♦ Getting some oomph back into your life
♦ Inhalation during vigorous exercise
♦ Controlling the speed and depth of the breath
♦ Using resistance tubes
Pulling against a resistance exercise
Pushing against a resistance exercise
Lifting against a resistance exercise
♦ A further challenging movement – bending forwards
♦ Tracking your progress
When starting this part of the Brice Method, you should by now have practised, if not mastered, simultaneously coordinating regular physical movements along with comfortable rhythmic breathing. In this chapter I will show you how you can build up to doing more vigorous types of exercise without getting really breathless. I can’t promise that you will be able to do lots of high intensity exercise; that will depend on your overall state of fitness, and any other physical limitations and co-morbidities you may have. You should, however, be able to use these techniques to gradually build up your ability. The benefits of a steady and gradual increase in intensity are that you should not only become physically stronger, but you should also develop a great deal more confidence in your own abilities.
Before you start on the exercises in this chapter, I must caution you not to go gung ho with them. The aim is not to ‘Get Fit Quick’ in the traditional sense. You will need to take a little time to build up to a reasonable level of activity and load. I reiterate time and time again to my own patients that you don’t have to work hard. I try to emphasise that the focus (especially at the early stages of strength development) is on technique rather than output. If they do not listen, I remind them of the song ‘It ain’t what you do, it’s the way that you do it!’ If they still don’t listen, I sing it to them, and whilst my sister is an opera singer, I can’t sing for toffee. My patients generally don’t want a repeat performance so all I need to do to remind them is to threaten them with a song.
Advice
Throughout the exercises in this chapter – REMEMBER – focus on technique over effort. If you don’t learn to do the exercises correctly from the start you will get into bad habits that will be hard to undo. If you do them correctly from the start, you should really move forwards and progress.
Getting some oomph back into your life
In life, you will frequently find you need some oomph to get things done properly. This may be the effort required to lift some shopping up a flight of stairs. It may be something less difficult, like opening a heavy shop door, or it could even be something as simple as standing up and pouring a cup of tea without spilling it everywhere. Some of the day-to-day challenges that you currently feel are beyond you might be manageable if you learn to harness breathing power. The power of the breath is what top sportsmen, dancers and even tradesmen use to maximise human performance to such extraordinary degrees.
Whilst you might think it rather odd to compare the training techniques of athletes to those of COPD patients, it is purely the fact that everyone else takes their breathing for granted that makes the two similar.
These groups of people are at polar ends of the fitness spectrum, but both have to work extra hard – the athletes to improve performance, the COPD patients to get what little air in that they can.
I have found that many of the breathing techniques that athletes use to maximise their performance also work very well for breathless patients. When you consider that the average Olympic heavyweight male rower could blow up 1000 party balloons in a race of just over five minutes, being able to take advantage of a small amount of that ability could provide extraordinary life-changing improvements in capacity for a person with COPD.
Earlier in this book, I explained how muscular action plays a key part in controlling the relative pressures in the chest and the abdominal cavities. If you remember, in Chapter 7 I detailed how the actions of the lower-body muscles needed to be equalised by the contraction of the muscles in the back and abdominals to maintain the alignment of the abdominal mass. By controlling the rate and force of exhalation (breathing out) you can help to ensure your body has a strong foundation to work from.
As a way of explaining this further, you just need to think about the effort a shot putter would put into throwing a 16 lb (7.25 kg) weight over 70 feet (21 metres). Think of how a shot putter seems to explode, with every muscle in their body from the tips of their toes to the tips of their fingers being essentially a single movement. If they are really putting every ounce of effort into the throw, they will inevitably yell as they throw. This yelling is not, as you might imagine, designed to attract attention, but is in fact sequenced to coincide with the expelling of the compressed air from the lungs as the body launches the shot away. Other sportsmen and women have their own way of coordinating their breath with a movement. You can’t watch a professional tennis match without hearing a screech or shout as they serve. A karate exponent demonstrating a block break uses their full effort including a shout of ‘Hoi’. Even with more gentle sports, breathing plays a key part in controlling human movement. Freestyle front crawl swimmers use a ‘3 stroke out and 1 stroke in’ breath as standard, and even pistol shooters control their exhalation as they fire to ensure consistent and accurate results.
For some of the patients I see, getting out of a low chair requires the equivalent effort to a weight-lifter lifting a 200 kg barbell. For others, opening a door takes the same relative effort as a karate expert punching through a block of wood. It therefore makes sense that COPD patients can use similar breathing techniques to re-educate their bodies to coordinate their breath and the effort, at least until they have become stronger and can manage to take a more appropriate breath.
Simply put, the amount of force you need to use to carry out an activity needs to be equalised by the amount of force you put into your breathing. This is all relative to your abilities, so you will need to teach yourself how to take the appropriate volume of air into your lungs to help ensure you do not run out of breath during an activity. Whilst it takes practice to fine tune your relative physical and breathing effort, this will be quite simple as you will find out. The hard part will be to remember to prepare yourself to breathe before you do an activity that requires significant effort. Most patients forget to breathe, so preparing yourself mentally in advance is the biggest problem you will have to overcome.
When you think about how hard you need to breathe compared with the weight-lifter above, it seems obvious that a high level of effort requires more oomph and more controlled breathing, even before you think about it more deeply. Rather than explain in depth how you should breathe relative to the effort you are anticipating, I have put it all into Figure 9.1.
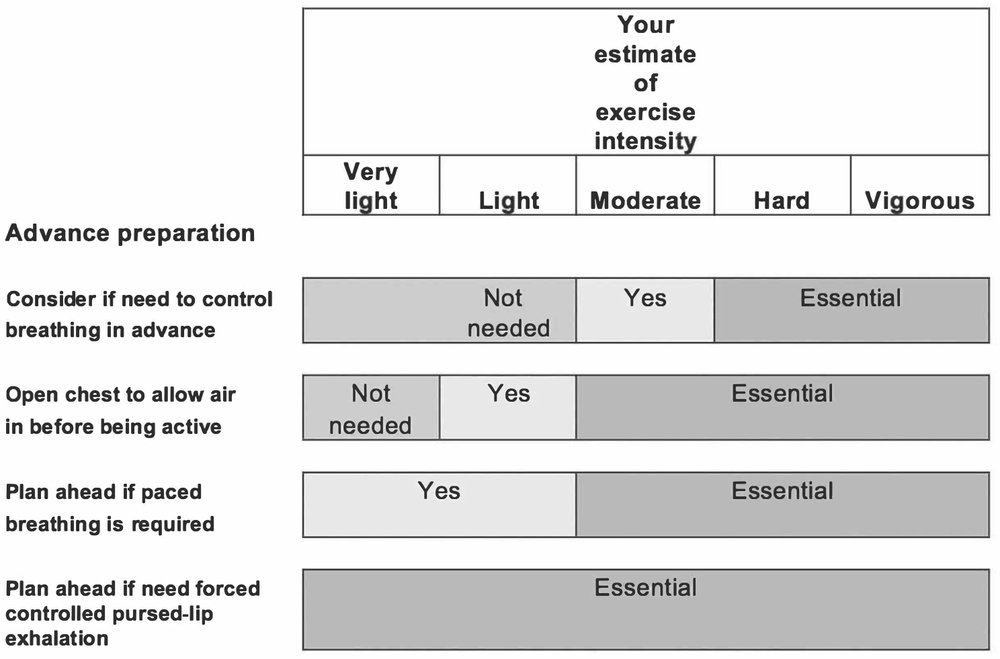
Figure 9.1: Thinking ahead to breathe
- Planning ahead if an exercise requires you to breathe in a certain way comes naturally to most of us when we are young and active. All you are doing is waking your mind up to do something that is completely natural to your body. Hopefully by this stage of the Brice Method, your brain is getting plenty of oxygen to make your thought processes clearer. A less fuzzy mind is one of the joys of natural relaxed breathing.
Inhalation during more vigorous exercise
Up to this stage I have trained you not to focus on inhalation. When you progress to this stage, you will need to start to consider if you have enough air in your lungs to execute an exercise, and if you are unable to prepare your posture to open your lungs fully, you may need to breathe in actively.
- Inhalation during high levels of effort: If the effort you are undertaking is very high relative to your strength or is quite complex relative to your physical abilities, you may need to take in extra air to give you enough air to keep some pressure in your lungs to work in tandem with the muscular effort of your limbs and torso. Doing so also enables you to maintain that effort for a significantly longer period of time.
- Inhalation during gentle levels of effort: At the other end of the spectrum, a very gentle degree of physical effort would mean that you would only have to take a small amount of air into your lungs, as they will not need to play any part in balancing the intra-thoracic/abdominal mass pressure.
Controlling the speed and depth of your breath
The speed at which you allow air to escape via pursed-lip exhalation will need to coincide with the length of activity you need to do. It is important that you do not try to hold your breath for any longer than 5 or 6 seconds without letting a little air out. If you do hold your breath, the pressure receptors in your lungs will start to signal a warning alarm to your brain, and make you feel particularly uncomfortable. If you hold for longer than 10 to 15 seconds under considerable effort, not only will your lungs be warning you of impending doom, but the level of oxygen in them and in your bloodstream will deplete enough to send even more emergency signals to your brain to drive you to breathe in an uncontrolled fashion similar to that of a severe bout of breathlessness (often known as an ‘exacerbation’).
The speed at which you release the air from your lungs plays an important part in retaining the air in your lungs long enough for oxygen to transfer into your bloodstream. As mentioned in the previous chapters, you should avoid letting all the air out too quickly. This is where you need to practise, slowly exhaling as you do the full range of motion. Sometimes the period of effort will exceed the time it takes you to count ‘one thousand, two thousand, three thousand’ (see page 62). Do not worry if this happens, simply let less air escape through your pursed lips to slow the flow and learn that you can also pace the exhalation in time with the exercise as easily as you can do it the other way around.
The use of your breath to aid performance plays a key part in almost every activity you can think of. The three main actions that this stage of the Brice Method will cover are pulling, pushing and lifting against a resistance. The means of resistance I will be recommending is to use a simple resistance tube.
Using resistance tubes
I find that resistance tubes are a great way to exercise without having to buy expensive equipment. An investment of approximately £10 on a resistance tube like the one shown in Figure 9.2, along with a simple door-jamb attachment that costs approximately £3, will give you the basic movements you might need, in a light and compact package.

Figure 9.2: Using resistance bands if needed
Using a resistance band is relatively simple, but you do need to take care where you attach the band before you start exercising; the last thing you want is a door handle working its way loose from the stress of the band, and knocking you out as the band twangs towards you. The band should be fixed to a strong, solid mounting, such as a stair banister, or a wall-mounted safety bar. If you do not have stairs, you can make sure the resistance tube has a door-jamb attachment, so that you can fix it at any height between a closed door and the door-frame. Do ensure you push or pull against the direction of the door opening, as it will prevent the chance of the door opening under the pressure of effort, and also stop another person from opening the door as you are exercising, both of which could result in the band pinging towards you.
All three of the exercises described below can be executed seated or standing, depending upon your personal preference. If you decide to stand, do make sure that with each exercise you do not lock your knees straight. If you do this, you can put too much pressure on your lower back, so you are advised to stand with your knees slightly bent. This is called having soft knees, and this will ensure that all the force of working against the resistance bands is safely compensated for by your body.
Pulling against a resistance exercise
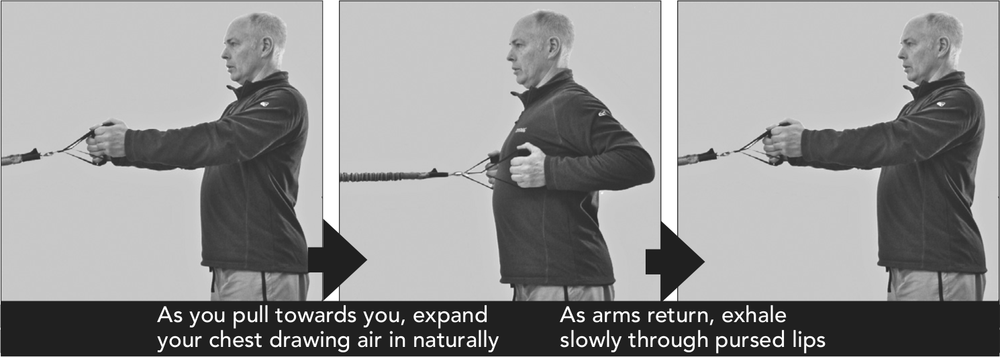
Figure 9.3: Pulling against a resistance
This first movement is a simple rowing movement, pulling a resistance towards you. This is almost exactly the same action as with the seated row exercise in Chapter 6 (page 73).
- Fix the exercise band to the door-jamb just below chest height.
- Stand or sit tall facing towards the door-jamb, with your hands straight out in front of you.
- Shuffle back away from the door until you have tension in the exercise band.
- Ensure your shoulders are drawn back and your head is looking straight ahead.
- Let air draw into your lungs naturally as you draw your elbows back.
- Remember, don’t suck the air in.
- Exhale gently as you lower your arms back to the starting position.
Repeat the above sequence 10 times, exhaling for a count of ‘one thousand, two thousand, three thousand’ and inhaling for a count of ‘one thousand’.
Fine-tuning the pulling resistance exercise
- Keep your knees slightly bent throughout the movement to protect your lower back.
- As you get slightly stronger and more confident with this you can move further away from the band fixing to increase the level of resistance.
- Initially, when there is only a small amount of resistance, you will not have to inhale or exhale actively, as your body does not need to over exert. You will soon notice that the resistance you have to pull against will need to be mirrored by the amount of effort you put into your breathing.
Note
The advice here goes somewhat against conventional practice for this exercise as it asks you to breathe in as you draw the elbows back. This is because it has been modified to suit COPD patients like you.
If you eventually start pulling significant weight in a gym setting, you may find that you need to adjust this technique, and exhale as you pull towards you. At this stage it is anticipated that you are not planning on entering any strongman or strongwomen contests; you are more likely to be simply wanting to do more mundane daily tasks around the home or in the garden.
Pushing against a resistance exercise
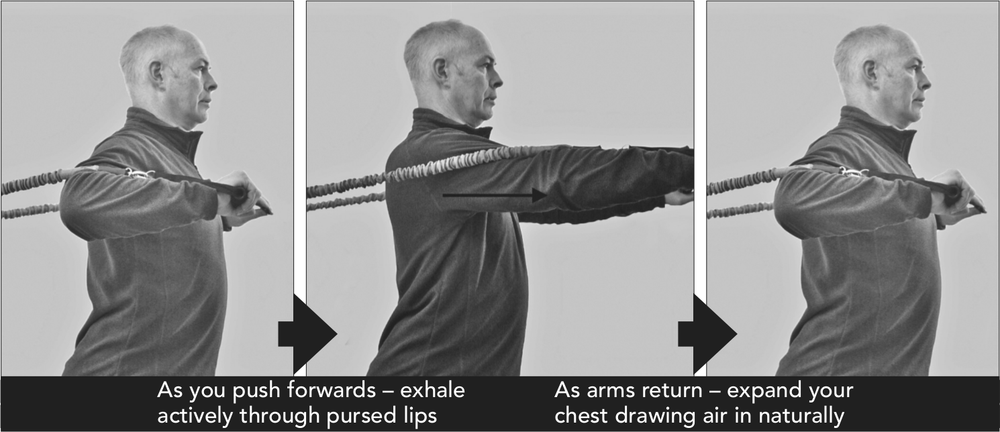
Figure 9.4: Pushing against a resistance
This exercise has many similarities to the wall press-up exercise completed in Chapter 6 (page 76).
- Hook the tube in the door fixing at about chest height and stand or sit tall facing away from the door.
- Take the slack out of the band by shuffling forwards away from the door.
- Keep your head up with your eyes looking parallel to the floor and hold your hands at shoulder height.
- Keep your knees slightly bent throughout the movement to protect your lower back.
- Exhale actively as you punch your hands forward away from you.
- Let air draw into your lungs naturally as you let your elbows draw back behind you towards the door.
- Remember, don’t suck the air in.
Repeat the above sequence 10 times, exhaling for a count of ‘one thousand, two thousand, three thousand’ and inhaling for a count of ‘one thousand’.
Fine-tuning the pushing against resistance exercise
- Stand with soft knees, especially if you have low back pain.
- Keep the door attachment, and your hands, at shoulder height. This will stop the band from twanging you around your ears.
- Remember that the further away from the door you move, the more resistance you will be expecting yourself to do as the resistance band stretches tighter.
- The amount of tension you have on the band will determine the degree of effort you will need to put into the exhaled breath. A low level of tension on the resistance band will need very little effort in exhalation, whereas a higher level of tension will mean you need to exhale more actively, through pursed lips.
Lifting against a resistance exercise
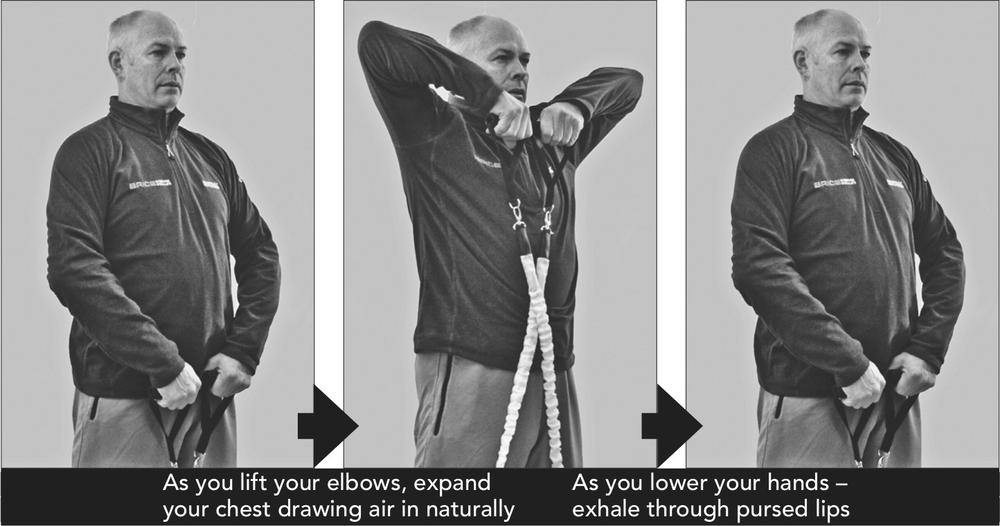
Figure 9.5: Lifting against a resistance
The upright row (page 74) is an ideal exercise to help you learn the breathing pattern you should adopt when lifting something upwards towards your chest.
- Stand or sit tall with your shoulders drawn back and your head looking straight ahead.
- Stand on the resistance band with your hands lowered down in front of your hips.
- Keep your head up with your eyes looking parallel to the floor and hold your hands at shoulder height.
- Keep your knees slightly bent throughout the movement to protect your lower back.
- Let air draw into your lungs naturally as you lift your elbows drawn up high, with the thumbs pulling under your chin.
- Remember, don’t suck the air in.
- Exhale gently as you lower your arms back to the starting position.
Repeat the above sequence 10 times, exhaling for a count of ‘one thousand, two thousand, three thousand’ and inhaling for a count of ‘one thousand’.
Once more, the pacing of your breathing should be to count for ‘one thousand, two thousand, three thousand’ on the out phase and ‘one thousand’ on the in phase. The only time this should be adjusted is if you are lifting a very heavy weight, something that should only be done if you are physically capable of doing so, and preferably under correct supervision.
So, in summary, the fundamental is to inhale as you pull and lift upwards, as your chest should be expanding as the effort is executed.
Fine-tuning the lifting against a resistance exercise
- Tension the band by stretching and standing on more or less of it, making sure each arm is doing the same level of exercise by balancing out the length of each end of the band.
- As with the previous two exercises in this chapter, the greater the level of tension you maintain in the resistance band, the harder your muscles will have to work, and the greater the amount of effort you will subsequently have to put into the exhaled breath.
Note
Similar to the pulling-towards-you exercise before this, the advice for lifting against a resistance goes somewhat against conventional practice as you are asked to inhale as you lift. This is because it has been modified to suit COPD patients.
If you eventually start pulling significant weight in a gym setting, you may find that you need to adjust this technique and exhale as you lift. Once more it is anticipated that you are not planning on entering any strength competitions; you are more likely to be wanting to do simple jobs around the home.
Case study – Brian
Brian was 83 years old when I first met him. His breathing was shallow, fast and he got out of breath walking the 20 yards to the reception desk to meet me. Being an ex-paratrooper, Brian pushed himself as hard as he could before he started the programme, but even then, he was unable to take his little dog for a walk too far without having to stop and get his breath back.
On his first visit, Brian sat hunched in his chair, but quickly found that the postural exercises helped him. The penny dropped, and he soon mastered how to breathe and move, and then progressed to do more active exercises. After his rehabilitation ended, he joined the gym and being the competitive sort, started lifting weights with the big boys. We now have to stop him deadlifting a 100 kg bar, nearly twice his body weight! Whilst it is inspirational to see him feel so capable, we really do not recommend you attempt lifting such a weight yourself.
A further challenging movement – bending forwards
Bending forwards when you have COPD can be quite a challenge. If you think of the postural problems we have discussed to this point, with the diaphragm being compromised by the gut, it is logical that forward bending would have a very limiting effect on your breathing. To make matters worse, you may have developed some additional abdominal fat, perhaps as a result of being on frequent courses of steroids. There is no quick fix to reduce the size of the abdominal mass. Weight loss takes time and whilst it will eventually be a considerable help to ease the issue, we need to find alternative ways round the problem of forward bending and breathlessness. In reality, you have to bend forwards to do many everyday tasks, from tying your shoelaces to drying your feet, or cutting your toenails. It is true that most of you will have found alternative ways to avoid a good many of these activities, and you will probably already have taken to not wearing lace-up shoes, and using a chiropodist to cut your toenails. Figure 9.6 shows a simple exercise that needs to be practised quite specifically to address this issue. Just leaning forwards without thinking about your technique will definitely make you short of breath. Follow the technique and persevere with it and you are highly likely to get a little further forward, bit by bit. I can’t, however, guarantee you will be cutting your own toenails again.
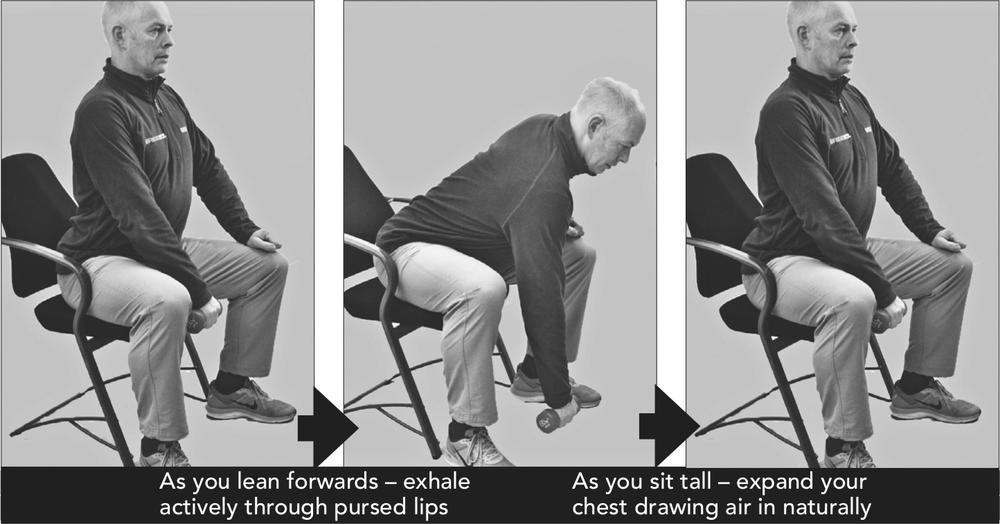
Figure 9.6: Bending forwards
Bending forwards seems like a simple exercise, until you can’t do it.
- First you will need to sit down and perch forwards on an upright chair, sitting tall, drawing your shoulders back and trying to elongate the distance between your pubic bone and the bottom of your sternum. This will open your chest up and expand your lungs, giving you air to exhale later to help control the movement.
- You will then sit with your knees over your heels with your heels and knees wide apart.
- Your knees should preferably be wider than your shoulders and your hips.
- Once you are comfortable with this position you can then lean forward, ensuring you bend forward from the hip and not rounding your back. As you bend, immediately exhale as you lean forward. This exhalation will have the effect of slackening your diaphragm and allowing your abdominal mass to move up into the normal lung space.
- You will find that you will initially not want to hold yourself in this position for longer than 2 to 3 seconds, as your body may need a little time to acclimatise to the movement.
- As you lift your body back to the upright position allow the air to draw back into your lungs, aiding the process by returning to the upright, seated position with your shoulders drawn apart.
It may be that other muscle groups, such as your hamstrings, your lower back, middle back or shoulder joints, limit your ability to bend. These will also take time to get accustomed to the movement, a movement enabled by the control of the volume of air in your lungs.
Tracking your progress
In this chapter you should have learned how to prepare yourself to breathe at the correct level for the exercise you need to undertake. You should be able to pace your breathing with the movements and know when to exhale and when to inhale according to the movement you are doing.