Chapter 8
Personalizing Slack
IN THIS CHAPTER
 Customizing your Slack workspace
 Administering your workspace options
 Tweaking your personal Slack preferences
 Customizing user profiles
 Organizing your channels into sections.
For two reasons, Slack’s management truly understands the need for customization. First, an organizations’ specific collaboration and communication needs vary and change over time. The needs of a hospital system don’t overlap that much with those of a Thai restaurant. Beyond that, what works today may not work tomorrow.
Second, the idea that everyone within a single organization works in an identical manner is patently absurd, but this isn’t news to you. In your careers, you’ve probably observed many different types of workers. At the extremes, stereotypical HR folks and IT folks approach tasks from very different mindsets. Employees in finance and accounting tend to be more meticulous and conservative than big-picture product and marketing people. Toss in age, cultural, and personality differences, and you can see how an overly rigid, one-size-fits-all productivity tool may appease some people and frustrate others.
Brass tacks: A one-size-fits-all approach simply wouldn’t work. Fortunately, Slack is a remarkably customizable tool.
This chapter begins by reviewing Slack’s global administrative settings — those that workspace members can’t override. It then moves to the individual settings and preferences that Slack users can change and concludes with a section on custom fields.
Getting to Know Your Slack Options
At a high level, Slack allows for two different levels of customizations:
- Group: Workspace Owners and Admins can change global settings, such as which members can post in which channels, file-retention policies, call settings, and much more.
- Individual: Regular members can tweak how they want Slack to look, act, and feel. (Chapter 5 describes how you can customize when and how Slack notifies you, but that’s just the tip of the iceberg.) No, you can’t change everything, but you can certainly make plenty of useful tweaks.
Although Workspace Owners and Admins can’t tweak every setting, they can personalize their organizations’ workspaces to a considerable degree. People in all roles, however, can modify some of their individual settings.
Configuring global workspace settings
Workspace Owners and Admins can configure certain settings for the entire workspace. For good reason, Slack prohibits regular members from overriding the settings in this section.
Changing the workspace name and URL
Sometimes companies change their names. (Slack itself is a case in point and, early in its history, Facebook famously dropped the “the.”) What once sounded good now feels a bit dated or less relevant. Also, companies merge and get acquired. To this end, you may decide to rename your workspace name and URL. Here’s how:
- Click on the main menu.
- From the drop-down menu, select Settings & administration and then Workspace settings.
- Scroll down to Workspace Name & URL and click on the button to its immediate right.
-
Type the new workspace name and URL.
 You can only change the first part of the domain; slack.com is locked.
 - Click on the green button.
Customizing the workspace icon
The workspace icon appears at the top of the Slack sidebar. To change the icon, follow the first two steps in the section “Changing the workspace name and URL” earlier in this chapter. Continue as follows:
- Click on the main menu.
-
From the drop-down menu, select Settings & administration and Customize [workspace name].
Slack launches a new tab in your default Web browser.
- Click on the Workspace Icon tab.
- Underneath the words Upload a New Icon, select the file from your computer and click on the green Upload Icon button.
- Crop the icon as needed and then click on the green Crop Icon button.
Setting workspace-app permissions
From the get-go, Slack allows any workspace member to install third-party apps and custom integrations. (Chapter 10 demonstrates how many companies and even independent developers have built cool and useful ways to extend Slack’s native functionality.)
It’s not hard to envision scenarios, though, in which an organization wants to restrict this feature or disable it altogether. Security and privacy (discussed in more detail in Chapter 9) certainly come to mind, although I can think of more prosaic reasons. For example, consider a company that uses Slack’s Free plan. As such, it cannot install more than ten apps in its workspace. If employees can install whatever apps they want whenever they want, the firm will quickly reach its limit.
By enabling app approval, Workspace Owners and Admins restrict the ability of regular members to install certain apps in the workspace. After following the first two steps in the section “Changing the workspace name and URL” earlier in this chapter, continue as follows:
-
Click on the Permissions tab. Scroll down to Apps & Custom Integrations and click on the URL immediately underneath it.
At the top is a section called Approve apps.
-
Toggle the Approve Apps switch to the right if you want to restrict members from installing apps on their own.
Slack offers a number of other granular user and notification options. For example you can prohibit users from downloading apps outside of the Slack App Directory.
Chapter 10 delves further into the topic of third-party apps.
Setting membership options
Slack offers two ways to allow members to join a given workspace. Workspace Owners can either
- Restrict the workspace to people who have formally received an email invitation.
- Allow anyone with a given email address domain to sign up for an account.
The second option is more common for organizations that have enrolled in the Enterprise Grid plan. Can you imagine having to manually invite 30,000 employees to a new channel?
To control who can join your workspace, follow the first two steps in the section “Changing the workspace name and URL” earlier in this chapter. Continue as follows:
-
Underneath the Settings tab, click under the Join This Workspace tab and click on the white Expand button.
Slack presents you with two options:
- Allow invitations
- Allow invitations, and approve invitations for any email address from these domains
The second option requires you to input an email address from one or more domains.
- Click on the green Save button.
Managing who can send workspace invitations
All Slack members can invite people to join a workspace. The only exception is a guest. Either for cost, privacy, or security reasons, though, perhaps you as a Workspace Owner or Admin want to approve new members. After following the first two steps in the section “Changing the workspace name and URL” earlier in this chapter, continue as follows:
- Underneath the Permissions tab, go to Invitations and click on the white Expand button.
- Check the Require admin approval box and then click on the green Save button.
Tailoring additional administrative settings and permissions
Slack offers the ability to perform a wide variety of administrative functions and set workspace permissions. At a high level, access them by following these steps:
- Click on the main menu.
- From the drop-down menu, select Settings & administration and then Workspace settings.
Slack launches a window or tab in your default browser. You see options including
- Workspace language: Offers an increasing number of different languages.
- Default channels: Govern which ones new members join here apart from
#general. - Display name guidelines: Create a custom message to guide new members in how to display their names.
- Name display: Set whether members' full or shorter names will appear.
- Email display: Show or hide whether this field appears in member profiles.
- Do Not Disturb: Set default DND hours. Note that employees can override them. (See Chapter 5 for more on this subject.)
- Hide your workspace URL from external sites’ logs: Hide information that companies use to track the source of their inbound web traffic. If you’d like to hide this field, then employees at those companies won’t know that your workspace members are visiting content on their sites.
- Calls: Enforce workspace-specific rules here. (Chapter 6 covers how to make calls in Slack.)
- Message retention and deletion: Specify how long your firm wants to retain employee messages. (See Chapter 9 for more on this topic.)
- File retention and deletion: Specify how long your organization wants to retain employee files uploaded to Slack. (See Chapter 9 for more on this topic.)
- Delete workspace: Use to obliterate your workspace and all of its content. (Note: Archiving a workspace is a less permanent solution.)
Managing channels
By default, Slack lets everyone but guests create their own public channels. For whatever reason, settings like these may not agree with you. Fortunately, Slack provides robust channel-management tools.
To effect these changes, follow the first two steps in the section “Changing the workspace name and URL” earlier in this chapter. Continue as follows:
- Click on the Permissions tab at the top of the page.
- Look for Channel Management and then click on the white Expand button.
- Make whatever changes you like, including determining which roles can do the following:
- Create public and private channels.
- Archive channels.
- Remove members from public channels.
- And much more.
- Click on the green Save button.
Personalizing your Slack options
You may not like your workspace’s logo or app-approval process. If that’s the case, then you’re welcome to make your case to the Workspace Owner or stew in silence. At least take solace in the fact that you can customize many of your Slack settings.
You set many of your preferences in this section following these steps:
- Click on the main menu.
- From the drop-down menu, select Preferences.
After doing this, Slack displays the member preference window in Figure 8-1.
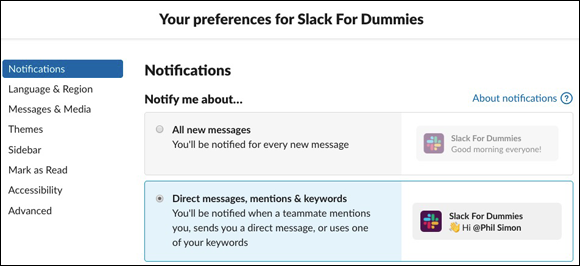
FIGURE 8-1: Slack member preference window.
From this window, Slack provides plenty of options.
Enabling dark mode
Like many apps of late, Slack has joined the dark-mode craze. To activate it for your computer’s Slack app, follow these steps:
- Click on the main menu.
- From the drop-down menu, click on Preferences.
- Click on Themes.
-
Check or uncheck Sync with OS setting.
If you leave Sync with OS setting checked, Slack inherits the setting from your smartphone app. (OS here stands for operating system.)
- Click on Dark.
Selecting a Slack theme
Perhaps you aren’t enamored with Slack’s default color scheme, and dark mode just doesn’t do it for you. You can pick a theme that works for you or, even better, create your own. Follow these steps:
- Click on the main menu.
- From the drop-down menu, click on Preferences.
- Click on Themes and scroll down.
-
Select the existing theme that you want to apply or customize your theme.
Unless you’ve selected dark mode (see the preceding section), the colors immediately change.
- If you’re satisfied with the preview, then click on the X in the top-right corner.
You can even share your theme with the Slack community. Click on the link under Feeling Adventurous and go nuts.
Tweaking Slack’s sidebar
The sidebar is where many Slack users immediately look after the application launches. After all, depending on your notification settings, the sidebar alerts you to items such as
- New channel activity
- DMs from others
- Optionally, members joining or leaving channels
Figure 8-2 shows the options that you can set in the sidebar.
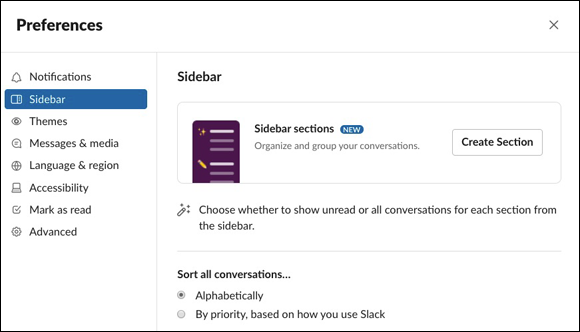
FIGURE 8-2: Slack sidebar options.
For example, you can elect for the sidebar to show you everything, unread messages and starred conversations, or unread messages only.
You can personalize Slack in plenty of other ways.
Creating custom emojis
If you want to express yourself with your own emoji, just follow these steps:
-
Click on the message icon.
Slack launches a new message window. (Chapter 4 covers messages in far more detail.)
-
Click on the smiley face.
Slack launches the emoji window.
- Click on the Add Emoji button.
- Click on the Upload Image button and select an image from your computer.
-
Give your emoji a name.
Slack places it in between colons and gives it a short code. For instance, I added one called :heisenberg: as a nod to my favorite show, Breaking Bad.
- Click on the green Save button.
From this point forward, you can select the emoji from the normal picker or you can just type the short code. Figure 8-3 shows my new custom emoji.
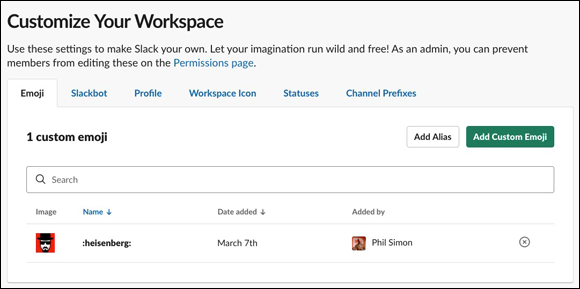
FIGURE 8-3: Slack custom emoji.
Customizing Slackbot
Slack lets users create automated responses based upon keywords or phrases in public and private channels. One potential application here is a frequently asked questions list. Alternatively, you can flag profanity or certain words. To set up custom, word-based responses, follow these steps:
- Click on the main menu.
-
From the drop-down menu, select Settings & administration and then Workspace settings.
Slack displays a sub-menu on the immediate right.
-
Select Customize “workspace name.”
This step launches a window or tab in your default web browser.
-
Click on the Slackbot tab.
It is the second tab from the left.
-
Underneath the words When someone says, enter the word that you want to flag.
Use your imagination. In Figure 8-4, I show one simple keyword.
For example, your company discourages people from talking about politics in the office. (I can’t think of a better way to polarize an employee base today.) As such, as Figure 8-4 displays, you configure the following rule in Slack.
I ignore the rule and post a message containing the dreaded p-word. Figure 8-5 demonstrates my custom automated Slackbot response in action.
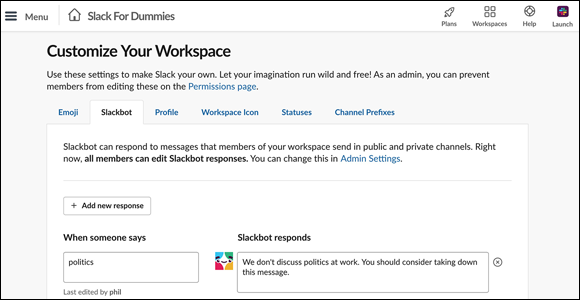
FIGURE 8-4: Slackbot setup for automated response.

FIGURE 8-5: Slackbot automated response in action.
- Underneath the words Slackbot responds, enter the automated response that workspace members will receive if they type the offending word or phrase.
- Click on the green Save response button.
I create one for my students every semester linked to the word “syllabus.” When students type it, Slackbot immediately displays its URL. Easy peasy.
Setting custom workspace statuses and times
Status is a key field in Slack because it indicates your availability to your colleagues. (Chapter 2 covers status in more detail.) This setting lets you create suggested statuses along with icons and default times for them to expire. To modify default status expiration times, just follow these steps:
- Click on the main menu.
-
From the drop-down menu, select Settings & administration and then Workspace settings.
Slack displays a sub-menu on the immediate right.
-
Select Customize “workspace name.”
This step launches a window or tab in your default web browser.
-
Click on the Status tab.
Slack provides a number of common statuses and default times.
For example, by default the “Out sick” status clears after today.
- From the drop-down next to the status you want to change, select the new default time.
- Click on the green Save button.
Customizing User Profiles
Slack is anything but boring. In fact, it’s downright fun to use. To this end, profiles that merely include employee name, rank, serial number, and email address doesn’t exactly scream fun. Why not let employees include a little personal information about themselves — or at least give them the option? Fun facts and interesting tidbits can grease the wheels for social interactions and build camaraderie in the workplace.
Once again, Slack makes this type of customization easy. Customers on premium plans can create custom profile fields. That is, members aren’t restricted to populating the standard fields included under Slack’s Free plan.
At a high level, Workspace Owners and Admins can add two types of custom fields. First, Slack presents commonly used fields such as:
- Address
- Birthday
- Start date
Second, you can also let employees enter links or handles for personal accounts for popular web services. The usual suspects include LinkedIn, Facebook, Twitter, and GitHub — a particularly popular site for coders.
Creating custom fields
What if you don’t like Slack’s list of suggestions? Simply create your own fields. Options here include text, a list of options, date picker, link, and person picker. The process is remarkably self-explanatory:
- Click on the main menu.
-
From the drop-down menu, select Settings & administration and then Workspace settings.
Slack displays a sub-menu on the immediate right.
-
Select Customize “workspace name.”
This step launches a window or tab in your default web browser.
- Go to the Profile tab and click on Edit your workspace’s profile fields.
-
Click on the white button that reads Create a custom field.
Slack takes you to the field-creation page.
-
Select the type of field that you’d like to create.
 The person picker option allows people to enter their manager from a list of existing Slack members. The field also allows you to list your direct reports. This field can be invaluable when trying to track someone down or resolve an issue.
 - Under the word Label, enter one for the new field and an optional hint.
- Click on the green Create button.
What does a Slack profile of a man with a brooding intensity look like? Figure 8-6 shows one with some custom fields.
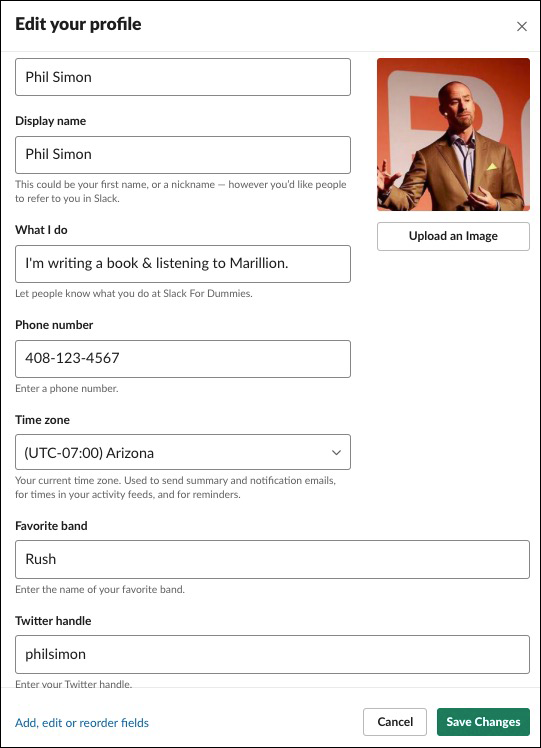
FIGURE 8-6: Slack profile of a man with a brooding intensity and custom fields.
Populating custom fields
Slack provides a great deal of flexibility in this area, but you should wield this sword carefully.
Second, what if you add a few new custom fields and want employees to populate them themselves? In this scenario, it’s best to post a message in a company-wide channel. (Chapter 11 mentions a more efficient but technically demanding way of doing this for many fields with large employee populations.)
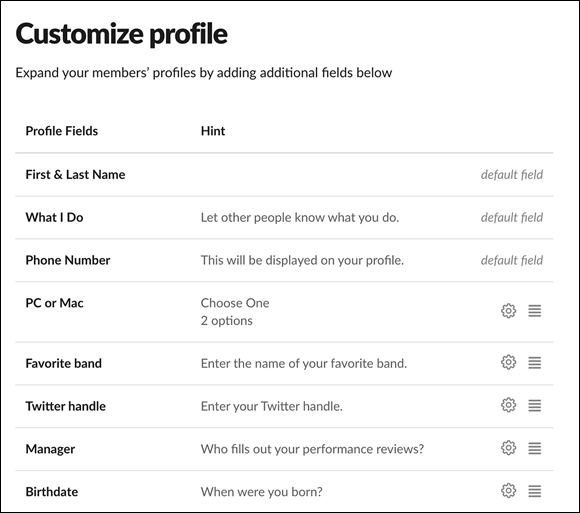
FIGURE 8-7: Slack custom fields in a user profile.
If you want to reorder a field, simply click on the line icon on the right of it and drag it up or down.
Just because you can add a custom field doesn’t mean that you should. Depending on where you live, a firm can expose itself to legal liability if it allows or requires employees to publicly display certain types of data. No, adding a voluntary field for Twitter handle or favorite band doesn’t violate any law — unless the latter happens to be Nickelback. (I’m kidding.) Double-check with your HR department or in-house attorney, though, about whether it’s wise to let employees enter personal information in Slack. Suspect fields include the following:
- Home address
- Social-security number or employee identification number
- Citizenship
- Any type of personal phone number
- Marital or disability status
- Ethnicity
- Full birthdate (including year born)
Organizing Your Sidebar
As you use Slack, you may find yourself routinely communicating in dozens of different public and private channels. Ditto for individual and group DMs. I’ll be the first to admit that, past a certain point, scrolling throughout all of this content can become time-consuming. The word cumbersome also comes to mind.
Fortunately, since its founding in 2013, Slack has constantly improved its product. One of the questions that its leadership has recently asked is: How can Slack let its users most efficiently find what they need without becoming overwhelmed?
The current version of Slack includes a new, optional, and very useful tool specifically designed to let users easily manage the content in their sidebars: the section.
Using sections
At a high level, sections allow you to easily place important channels and conversations into custom, collapsible buckets. In concept, they resemble the folder-management tools that people use on their computers every day. Think File Explorer for Windows and Finder for MacOS.
Creating a new sidebar section
To create a new section, follow these steps:
-
In the bottom half of the sidebar, mouse over either Starred or Channels.
Slack displays three vertical dots.
- From the sub-menu that appears, select Create New Section.
-
Enter a name for your section and, optionally, an emoji.
Slack provides a few canned suggestions for channel names. As Figure 8-8 shows, I have named my section “Important” and have added an exclamation mark as my emoji.
-
Click on the green Create button.
I’ve created the Important section, but there’s nothing in it yet.
- Drag and drop whatever channels and conversations into your new section.
I have added the #accounting, #development, and #laundromat channels into my section as well as a group DM with Gustavo and Lydia, as Figure 8-8 shows. Before you release the mouse, Slack wisely places a white box around the enter section into which you'll be adding your new channel or conversation. This nice touch minimizes the chance that you place something in the wrong section.

FIGURE 8-8: Slack custom section named Important.
By default, Slack sorts content in sections in alphabetical order by channels first and then by conversation.
Slack restricts custom sidebar sections to customers on premium plans only but not by role. That is, everyone from guests to Primary Owners can use sections — and everyone in between. Also, users create their own sections; sections are not global.
Say that you want to collapse the channels and conversations in your section to save space and minimize scrolling. Simply click on the triangle to the left of the section name. Click again to expand the section. And don’t think that you have to constantly expand and contract sections to stay informed of their notifications. Slack makes sure that you won’t miss notifications for content in your section. (Chapter 5 discusses notifications in more depth.)
Say that I have contracted my Important section and Lydia posts a message in the #development channel. (Note that I have not muted that channel.) Slack bolds the entire section in white as Figure 8-9 displays.

FIGURE 8-9: Slack notification of activity in channel collapses Important section.
Moving sidebar sections
Once you get the hang of sections, you’ll probably create a bunch. You may want to place certain sections in a specific order. Follow these steps to move sections:
- Click on the section that you want to move.
-
Drag and drop your section where you want it to go.
Slack displays a white line previewing where your section will reside when you’ve finished moving it.
-
Release your mouse.
Note that you can’t place sections in the top half of the sidebar.
Renaming a sidebar section
Say that I want to rename my Important section to something a bit more colorful. Follow these directions:
-
Right-click on the section name.
Slack displays a sub-menu.
-
Click on the first option: Rename Important.
Of course, your section name will depend upon what you initially named it.
- Enter the new name for your section and, optionally, a new emoji.
-
Click on the green Save button.
Slack provides some other neat sidebar features. Play around with them. Organizing your workspace content is a breeze.
Sorting channels
By default, Slack presents public channels in the sidebar in alphabetical order and then private channels in the same way. If you like, you can let Slack automatically arrange your channels by priority or what the company calls scientific sorting.
To change how Slack sorts your channels and conversations, follow these steps:
- Click on the main menu.
-
From the drop-down menu, select Preferences.
Slack displays a new pane.
- Click on Sidebar.
- On the right-hand side of the pane, click on Sort All Conversations.
- Select the desired option.
 If you don’t see one of the following options, then your Workspace Owner or Admin has disabled the options for full members.