Chapter 2
Getting Started with Slack
IN THIS CHAPTER
 Reviewing Slack’s different plans and prices
 Navigating Slack’s user interface
 Creating a Slack workspace
 Exploring the different Slack roles
 Inviting others to your Slack workspace
 Configuring your profile and account settings
Slack significantly improves how people collaborate with each other in many ways. Of course, that won’t happen unless you and your colleagues understand how to use it. This chapter discusses the mechanics behind Slack. It provides details on Slack’s cost, its versions and different user roles, installation, and other key attributes.
Note that this chapter covers many of Slack’s robust features but does not list all of them. There are just too many of them to provide a comprehensive list.
Reviewing Slack’s Different Versions
Slack offers a number of different plans to its customers. To state the obvious: the Free version is the least expensive one.
Free plan
This starter plan allows organizations and their employees to try Slack gratis. The Free version lets you take advantage of a decent amount of Slack’s functionality, but members under this plan can view only a workspace’s most recent 10,000 messages. (I cover workspaces later in this chapter.) Older messages are inaccessible, even in search results. What’s more, Slack restricts workspaces to ten third-party apps. If you attempt to add an eleventh, you’ll receive this message:
Workspaces on free subscriptions can only install 10 apps and your workspace has reached the limit. You can add [app name] if you upgrade your workspace or remove one of your existing apps.
Slack’s Free version doesn’t entitle you to use all third-party apps for free in perpetuity; no version does. As I cover in Chapter 10, apps don’t fall under Slack’s pricing model. They operate under different plans altogether.
When it comes to upgrade options, as of this writing these three exist:
- Standard plan
- Plus plan
- Enterprise Grid
Throughout the text, I collectively refer to these options as premium plans.
Standard plan
Slack markets its least expensive paid option, the Standard plan, to small and midsized businesses. To be fair, though, nothing prevents groups or departments at larger firms from going this route.
Features under this premium plan include guest accounts, single sign-on, multi-workspace channels, and unlimited search. (If there are 257,123 messages in your workspace, then you can search them all.) Slack also throws in group calls, screen-sharing, and unlimited apps.
For this plan, Slack charges $6.67 per person when billed yearly and slightly more per user on a monthly basis.
Plus plan
Ideal for larger firms or those with advanced administration tools, Slack’s Plus plan includes all features of the Standard plan. It also sports a guarantee of at least 99.99 percent uptime, enhanced security, data-export functionality, customized message retention, higher user storage limits, and 24/7 email support. For this plan, Slack charges $12.50 per person when billed yearly and slightly more on a monthly basis.
Enterprise Grid
Enterprise Grid represents Slack’s newest, most robust, and priciest offering. The industrial-strength, all-you-can-eat plan is ideal for massive organizations that have gone all-in on Slack. Prominent customers include IBM, Target, and The New York Times. Enterprise Grid appeals to firms that require more granular security features, unlimited licenses, phone support, an insane 1 terabyte of storage per member, and other powerful features.
Slack doesn’t list the price of Enterprise Grid plan on its website. Still, it’s fair to assume two things. First, the annual fee is considerable. Second, that cost varies based on the number of users in the firm. In reality, a 20,000-employee firm may ultimately save money by purchasing Enterprise Grid. Think about the total per-user monthly fees that it would incur by paying for the Slack Plus plan.
Changing your Slack plan
Slack allows its customers to easily upgrade and downgrade their plans.
Upgrading
To upgrade from one Slack plan to a more robust one, follow these steps:
- Click on the main menu.
-
From the drop-down menu, select Settings & administration and then Workspace settings.
Slack launches a window or tab in your default browser.
-
Click on the rocket icon on the top right-hand corner of the page.
Slack presents a pop-up menu with all options as well as a link to compare plans.
- Select your desired plan and follow the additional instructions.
Slack walks you through the upgrade process. Once you’re successful, you receive an email from Slack and a Slackbot message confirming your upgrade that resembles the one displayed in Figure 2-1.

FIGURE 2-1: Slackbot upgrade confirmation message.
Downgrading
Your firm can downgrade its Slack plan. Depending on your new plan, it will
- Lose access to certain Slack features.
- Use remaining Slack features to a more limited extent.
- Need to change channel access for existing guests.
To downgrade, follow the same instructions in the previous section but select a “lesser” plan.
Describing Slack’s cost structure
What if Slack magically solved every conceivable workplace and employee issue, but cost $1 million per employee per year? (It doesn’t, but bear with me here.) Even if Slack could wave its magic wand, few employers would even consider it because its price would be prohibitive. Maybe professional sports teams could justify this cost.
Luckily, Slack is remarkably affordable — something that appeals to cost-conscious organizations. Because of Slack’s robust functionality, the juice is more than worth the squeeze.
Starting quickly with Slack
Slack is one of many software vendors to embrace the freemium business model. As such, prospects can begin using Slack and many of its features within minutes and at no cost. Employees unlock additional goodies when their employers upgrade. (Parts 2 and 3 delve deeper into exactly what you can do with Slack.)
I’ve spent a good bit of my career seeing firsthand how executives actively resist new technologies. The reasons vary, but near the top of the list is a sometimes reasonable fear of being locked into long-term contracts and expensive consulting engagements. As I write these words, multiyear IT projects are alive and well.
Again, Slack operates under a different model. Firms can get going almost instantly. Even better, Slack does not require long-term commitments; management can opt to renew the tool every month. What if, for whatever reason, Slack doesn’t take at your organization? After all, no software vendor bats a thousand. (Chapter 13 emphasizes strategies for successful adoption.) The financial harm is minimal, especially compared to traditional software purchases and implementations.
Paying only for what you use
As the nearby sidebar illustrates, Slack has wisely adopted the SaaS model. Because of this decision, its clients can more efficiently allocate their capital. The rise of cloud computing means that organizations can run Slack without owning and maintaining any hardware themselves.
This dynamic represents a sea of change from 25 years ago. As a result, if only 50 employees at Speaker City need Slack’s premium features, then Slack bills the company for only 50 seats. Speaker City’s CIO wouldn’t need to purchase pricey servers and software, much less hire IT-support folks to keep the lights on.
Reviewing accounting considerations
Those with accounting backgrounds should be able to differentiate between the following:
- Purchasing and deploying a SaaS tool, such as Slack
- Purchasing and deploying software in the mode prevalent 25 years ago
Organizations generally treat Slack and its ilk as an operating expense (OPEX). That is, the business needs to spend this money to function now and on a daily basis. At the other end of the spectrum is a capital expense (CAPEX), one that businesses incur to realize a potential benefit in the future. I’m no accountant, but I do know that bean counters, company presidents, and chief financial officers (CFOs) generally prefer the flexibility and lower costs of OPEX to CAPEX.
Beginning Your Slack Journey with the Workspace
What if I go old school for a moment and forget about contemporary technology? Imagine a world without computers, smartphones, apps, and even the Internet.
Think about a massive brick-and-mortar town hall meeting. Everyone can gather around for a group announcement. Most of the real action, however, takes place in an informal, decentralized manner. Attendees break out into different groups based on their interests. They engage in wildly different, meaningful, and focused discussions on the issues that most resonate with them. Everyone shares ideas and opinions. They offer meaningful solutions to problems. They reach agreement on key town issues. They vote to break deadlocks. Even better, someone in each group takes copious notes and meticulously files them. As a result, anyone can look up who said what when and why. This context is critical.
This town hall meeting is a decidedly low-tech version of Slack’s starting point: the workspace. Formerly called a team, it is a cohesive amalgam of different technologies and communication tools, including:
- Channels (think chat rooms)
- Individual and group instant messaging
- Powerful search capability
- Screensharing (for customers on premium plans)
- Video calling
- And many others
What if you put all the ingredients above in a large pot and started cooking? You’d wind up with a scrumptious technological bouillabaisse called a workspace. I break down each of these individual components in subsequent chapters in this book.
Creating a new Slack workspace
To create a new Slack workspace, go to https://www.slack.com/create. You can create as many workspaces as you like but only one at a time. In my case, I belong to more than a dozen because I set one up for each of my classes every semester.
Depending on what you do and how your organization uses Slack, you may belong to a number of different workspaces as I do. When I talk to people about the best ways to use Slack, I recommend that they start with one and add new ones only as needed.
Follow these directions:
-
From
https://www.slack.com/create, enter your email address, and click on the Next button.Slack sends you a six-digit confirmation code. Don’t close this browser window or tab. You need that code in the next step.
- Retrieve that code from your email and enter it on the page from Step 1.
- Enter the name of your organization or team and press Enter or click on the Next button.
-
Enter the name or purpose of your workspace’s project and press Enter or click on the Next button.
Slack creates a workspace with this name as well as the
#randomand#generalchannels. (Chapter 3 covers channels in far more depth. For now, just think of them as buckets within your workspace in which users discuss specific topics.) -
(Optional) Enter the email addresses of people you want to invite to this workspace.
You can also copy an invite link to email to anyone you like. Of course, you can skip this step and always add workspace members at a later date. Slack has now created your workspace.
-
Click on the See Your Channel in Slack button.
Slack launches the workspace in a new browser tab or window. By default, Slack places your cursor in the new channel within the workspace.
- Click on the Finish Signing Up button.
- Enter your full name and a strong password. Then click on the Next button.
-
Name your workspace.
The value in this field defaults from Step 3, but you can rename it here. You can also change the first part of your workspace's URL as long as it’s available. Ultimately, your workspace URL will look like this:
https://[workspacename].slack.comURL stands for Uniform Resource Locator. Think of it as a web address.
- Press Enter or the click on the Next button.
-
(Optional) Add others’ email addresses or copy a link to share with them via text, email, or any other communication tool or app.
You can also let anyone whose email address shares your domain sign up for the app. If you invite others here, you see a confirmation page.
-
Click on the Start the Conversation button.
You see your new Slack workspace. You can start communicating and collaborating with others in Slack.
Signing in to an existing Slack workspace
Slack gives users two options when they want to log into an existing workspace:
- Requesting and receiving an email invitation
- DIY
REQUESTING AND RECEIVING AN EMAIL INVITATION
Contact the person or department responsible and ask for an email invitation. After a Workspace Owner or Admin adds you to the workspace, you will receive an invitation similar to the one shown in Figure 2-2.
Sign up by clicking on the Join Now button in the email.

FIGURE 2-2: Slack workspace email invitation.
DOING IT YOURSELF
The Workspace Owner or Admin at your organization may have enabled an open signup process. If this is the case, then you don’t need a person to invite you to the workspace.
For example, consider the following hypothetical example. Marillion permits anyone with a valid @marillion.com email to sign up. As a result, employees don’t need to receive formal workspace invitations. Rather, they can just visit https://marillion.slack.com and sign up.
What if I am a Marillion employee, though, but I don’t know the URL of my company’s workspace? Slack’s got me covered. I just go to https://slack.com/signin and click on the Find your workspace link. Slack then takes me to the page shown in Figure 2-3.
I choose the first option on Slack and enter phil@marillion.com as my email address. Slack attempts to verify three things:
- The email address
phil@marillion.comdoes in fact exist. phil@marillion.comcan indeed access an existing workspace.https://marillion.slack.comis the URL of that workspace. (In fact, you can use the same email address to join multiple workspaces, and Slack identifies them all.)
Slack indicates as much in the browser, as Figure 2-4 shows:
After Slack has verified all three of these facts, it then sends me an email that includes a unique link to the workspace. After clicking on it, I am able to do the following:
- Create a Slack account.
- Sign in to the existing Marillion workspace.
- Start communicating with my colleagues.
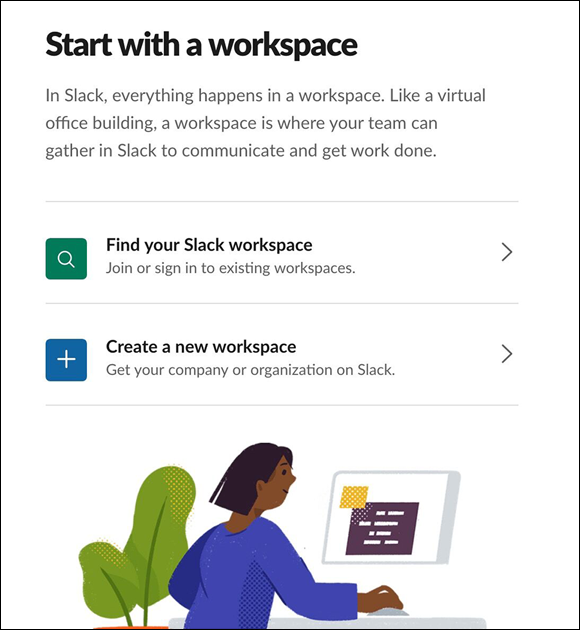
FIGURE 2-3: Slack Start with a workspace page.

FIGURE 2-4: Slack browser email-confirmation message.
I’ll return to the subject adding others to your workspace later in this chapter. (See “Expanding your existing workspace.”) It’s imperative, though, that I cover a few other things first.
Accessing your new workspace
After you create your new workspace, you can log in to it and use it. Brass tacks: Slack provides a slew of different ways to communicate and collaborate with your colleagues. After you set up a workspace, you can sign into it via the following methods:
- Any web browser
- Slack’s computer app
- A mobile app on your smartphone or tablet
Apropos of nothing, in February 2018 Slack decommissioned its Apple Watch app.
Signing in to Slack via a web browser
You can’t do anything in Slack until you log into a workspace. In this sense, it’s a walled garden similar to Facebook. Here’s how you access your workspace via a web browser:
-
Enter your workspace’s URL.
For example,
https://philsimon.slack.com/adminis the URL for my personal workspace. Yours will be different. - Enter the email address.
- Enter your password.
- Click on the Sign in button.
As you’d expect, you can reset your password if you forgot it by clicking on the related link. Also, say that you forget the URL of your workspace. On the same page, simply type your email address. Slack sends a message containing all of the URLs for all the workspaces associated with that email address.
Using the Slack desktop app
I prefer using the app, not a web browser. I suspect that many if not most current users find it easiest to use the Slack app that corresponds to their computer’s operating system. If your desktop or laptop runs MacOS, Windows, or even Ubuntu/Linux, Slack’s got you covered.
Download the Slack app and install it for your computer. In this way, Slack is just like any other contemporary computer program. Of course, the exact process will hinge on your computer’s specific operating system. Keep your workspace name, email address, and password handy, and you shouldn’t have any problems. Once you log in to your workspace, you can start using Slack in earnest.
Accessing Slack on mobile devices
Slack wouldn’t be a very useful tool today if you could only use it on proper computers. After all, it’s not 1998. Fortunately, you can any install the Slack mobile app on just about any device running a contemporary version of iOS and Android. Just follow these steps:
- Go to the app store on your phone or tablet.
- Install Slack as you would Spotify, Facebook, or any other phone or tablet app.
- Log in with your credentials.
Meeting Slackbot
After you join a workspace, expect to meet Slackbot. Its purpose is to send you automatic tips about how to use the application. Figure 2-5 displays one of these gentle reminders about how to get the most out of Slack.
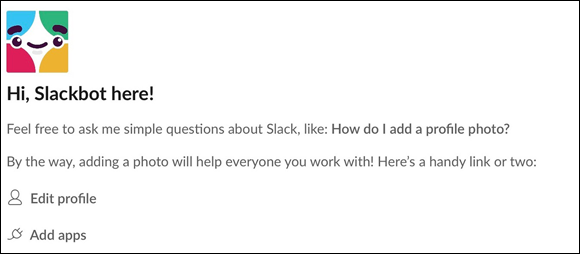
FIGURE 2-5: Slackbot introductory message with tips.
Introducing the Slack user interface
Slack has created an intuitive and user-friendly application that you’ll love using. On a conceptual level, its user interface (UI) contains seven main design elements:
- Sidebar: Easily navigate Slack’s views for Threads, Mentions & reactions, Drafts, Saved, Channels, People, Apps, and Files.
- Main workspace menu: Allows you to invoke valuable options and settings.
- Workspace switcher: Easily jump to different workspaces.
- Main navigation bar: Fixed bar for moving within a workspace, performing searches and viewing history.
- Page header: Fixed header that always lets you know exactly where you are in Slack.
- Page: The main “work area” for the selected view.
- Detail view: Presents more information and options for each view.
Regardless of your employer’s plan and how it uses Slack, these elements exist in all workspaces. Figure 2-6 presents a conceptual overview of the Slack UI:
Figure 2-6 may look great in the abstract, but how does it translate to an actual Slack workspace? To answer that question, I present Figure 2-7.
By way of overview, three useful Slack buttons always appear in its main navigation bar. As such, you can access them in all Slack views. Each of these buttons works like comparable features on your favorite web browser:
- Previous button (left arrow): Takes you to your previous screen.
- Next button (right arrow): If you clicked on Previous, then click here to go forward.
- History (clock): View your most recent locations.
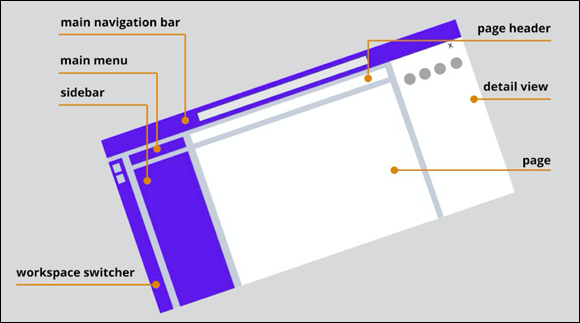
FIGURE 2-6: High-level diagram of the UI of a Slack workspace.
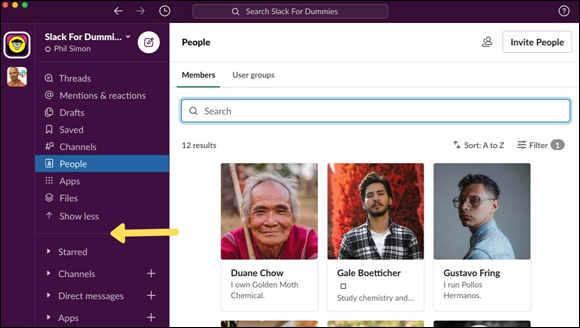
FIGURE 2-7: Sample Slack workspace with People view selected in sidebar.
These buttons help you easily navigate Slack. Get used to them.
To make things as easy as possible to understand, I inserted a yellow arrow in Figure 2-7 that highlights a narrow bar in the sidebar — one that you won’t find in Slack. In this text, I refer to the two halves of the sidebar separated by that horizontal bar. The top half of the sidebar lies above it; the bottom half lies below it.
Don’t let Figures 2-6 and 2-7 overwhelm you. I devote significant space in the forthcoming pages to Slack’s robust features. For example, Chapter 4 addresses direct messages or DMs. In Chapter 7, I discuss how to search for specific content, and I cover apps in Chapter 10.
For now, suffice it to say that the UI is contextual: Slack changes based upon your current view. That is, the view that Slack displays hinges upon what you selected in the sidebar. For example, if you click on People, then Slack shows you different features and elements than if you had selected Channels or Apps. Finally, if Slack has bolded one of these views, then you should eventually check it out because something new has taken place there.
Summarizing Slack’s Different Roles and Permissions
Slack resembles many different contemporary applications on a number of levels — some of which you most likely use today. Consider user roles for a moment. They represent how Slack governs who gets to do what within a given workspace.
For starters, roles are not binaries. Ditto for permissions. Different users can do different things based on their roles and the organization’s specific Slack plan. Also, Slack breaks roles into two buckets: administrative and non-administrative.
Administrative roles
This section describes Slack’s three different administrative roles for all plans save for Enterprise Grid. (See the section “Enterprise Grid roles and permissions” later in this chapter.)
Primary Workspace Owner
Slack initially designates the person who creates the workspace as the Primary Owner. This special type of Owner technically outranks any other Workspace Owner and sits atop the pecking order. Primary Owners can do everything that Workspace Owners can do as well as the following tasks:
- Demote Workspace Owners
- Transfer the role of Primary Owner to someone else
- Delete workspaces
Note that Slack bills an organization’s Primary Owner, not each of its employees. That is, individual members need not provide their credit card information to Slack.
An organization can assign only one Primary Owner per workspace at a time, although an existing Primary Owner can designate someone else. (The idea of designating multiple Primary Owners just doesn’t make sense.) To determine your organization’s Primary Owner, follow these steps:
- Click on the main menu.
-
From the drop-down menu, select Settings & administration and then Workspace settings.
Slack launches a new window or tab in your web browser.
- On the left side of the page, click on About this workspace.
- Click on the Admins & Owners tab.
Workspace Owners
Slack grants Workspace Owners the next highest workspace privileges. Permissions here include managing members, administering channels, setting security controls, exporting data, and handling other essential administrative tasks. Slack allows you to assign multiple individuals to the role of Workspace Owner although only one person can occupy the role of Primary Owner.
This begs the question: Which people at your employer should occupy the role of Workspace Owner? The answer depends on many factors, but typical examples include
- Company presidents and founders
- At large organizations, senior leaders and/or department heads — for example, a chief marketing office (CMO) may serve in this role for her company’s marketing workspace
- For a semester-long college class, the professor teaching the course
- For informal groups or families, the person or people who started the workspace
Workspace Admins
While they aren’t exactly slouches, Workspace Admins wield less power than Workspace Owners do. For example, they can’t view billing statements, but they can still do quite a bit. Specifically, they can manage members, perform additional actions on channels, and handle other key administrative tasks. Finally, a Workspace Admin may also restrict others’ rights to install third-party apps.
Non-administrative roles
Relatively few people in your firm will be Workspace Owners and Admins. The vast majority of Slack users at your employer will occupy the following non-administrative roles.
Members
Members belong to existing workspaces but lack the administrative rights of Workspace Owners and Admins. Their privileges generally include sending messages as well as joining, creating, and posting in channels. You may allow them to invite guests to your workspace. (Chapter 8 details more about locking down the tasks that they can perform.)
Let’s say that you’ve invited Steve to your workspace but he hasn’t accepted your invitation yet. Technically, Slack considers him an invited member, but that’s not an official role. Slack places a square icon to the left of the person’s name in the bottom half of the sidebar.
Guests
You hire Marie, an independent contractor. You want her to hold a single one-day training session at your company. Should you add her as a full Slack member? Is the juice worth the squeeze? Should your organization pay Slack’s monthly user fee for her to use it? Maybe, but Slack provides some options for this scenario.
Under Slack’s premium plans, Workspace Admins, Workspace Owners, and members can create and manage two types of guest accounts:
- Multichannel guests
- Single-channel guests
MULTI-CHANNEL GUESTS
Multi-Channel Guests (MCGs) can join the channels that the inviting workspace member has previously designated.
SINGLE-CHANNEL GUESTS
When Single-Channel Guests (SCGs) join a Slack workspace, they belong to one predetermined channel. That is, SCGs can’t join random ones. On the pricing front, only customers under premium plans can add SCGs. Slack caps this number at five per paid workspace member. For example, the Bluth Company pays for six user licenses. As such, a maximum of 30 total SCGs can join its workspace.
Managing member roles
Slack realizes that things change over time. As long as your role permits and someone with greater privileges hasn’t disabled the feature, you can elevate or downgrade members’ roles in Slack.
If you want to change someone’s current role, follow these steps:
- Click on the main menu.
- From the drop-down menu, select Settings & administration.
-
From the sub-menu that appears on the right, select Manage members.
Slack launches a new window or tab in your web browser.
- Click on the ellipsis on the right that corresponds to that member.
- Click on Change account type.
- Click on the radio button to the left of the new role.
- Click on the green Save button.
Changing guest access
Slack provides a few different options for handling guests. For example, Workspace Owners and Admins can do the following:
- Demote members to single- or multichannel guests
- Upgrade guests to members
For example, say that Steven owns Porcupine Tree Music (PTM), a quirky London-based music store that uses Slack. He frequently hires subcontractors for different reasons. Steven always invites them to the PTM workspace as SCGs. In the workspace, they coordinate details about events, payments, and other details.
One of Steven’s subcontractors is Gavin. He holds a few drum clinics at PTM, and they go well. Gavin’s got mad chops. Steven decides to hire Gavin as a full-time employee. Gavin gleefully accepts. To quote Homer Simpson, “Done and done.”
Slack wouldn’t be very flexible if Steven had to create a new account for guests such as Gavin. Fortunately, he doesn’t need to do so. Steven can merely upgrade Gavin’s account from SCG to member with all the accoutrements associated with his new status.
To upgrade a SCG to a member, simply follow the steps in the section “Managing member roles” earlier in this chapter.
Deactivating member accounts
Say that a Slack guest just isn’t working out. As the Slack admin, I want to remove the person as a guest and revoke access to my workspace. Follow these steps:
- Click on the main menu.
- From the drop-down menu, select Settings & administration and then Workspace settings.
-
From the sub-menu that appears on the right, select Manage members.
Slack launches a new window or tab in your web browser.
- Click on the ellipsis on the far right that corresponds to the member you want to remove.
-
Click on Deactivate account.
Slack warns you that this action deactivates Gale from the workspace, but active members are still able to view his contributions.
-
Click on the red Deactivate button.
The person is no longer an active member.
Note that Slack wisely grays out the names of deactivated members in the People view. You don’t see them appear in the sidebar. See Figure 2-8.
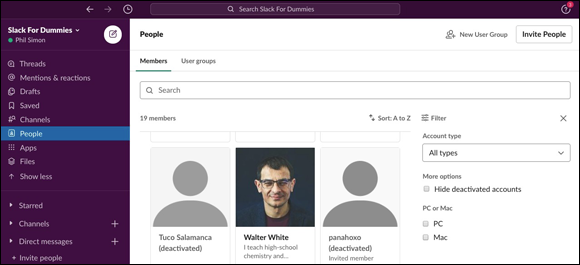
FIGURE 2-8: Deactivated accounts in the People view.
Slack disables the ability to send new messages to deactivated members. You can try, but you won’t succeed.
Deleting member accounts
Before deactivation and if their settings permit, individual members can delete direct messages (DMs) and files. However, Slack doesn’t let even workspace Owners and Admins delete entire members’ accounts and histories — and it’s not hard to understand why. After all, Slack stands for Searchable Log of All Conversation and Knowledge. The operative word here is All.
What if your firm fired an employee for engaging in inappropriate workplace behavior? For obvious reasons, HR would just as soon purge that employee from all records à la George Orwell’s classic book 1984. For legal reasons, though, Slack doesn’t let even Workspace Owners rewrite history. At some point, a court, lawyer, or regulatory body may compel an organization to turn over information. As a company, Slack doesn’t want to expose itself to liability. (For more details on this subject, see the nuanced discussion on exporting data in Chapter 11.)
Reactivating member accounts
Say that you want to reactivate a member’s account after deactivating it. Simply go to the same member dashboard and follow these steps:
- Click on the main menu.
-
From the drop-down menu, select Settings & administration and then Manage members.
Slack launches a new window or tab in your web browser.
- Click on the ellipsis on the far right that corresponds to the member whom you want to reactivate.
- Click on Activate account.
Find the latest information on guest accounts and permissions at bit.ly/sl-ch2x. For an exhaustive table of what each role can and cannot do in Slack, see bit.ly/table-sl.
Transferring primary workspace ownership
If you’re a Workspace Owner, then you can transfer primary ownership to a fellow Workspace Owner. Perhaps you’re taking on a new role in the company or you’re leaving for greener pastures.
Enterprise Grid roles and permissions
Slack’s robust Enterprise Grid offering provides for additional administrative roles that transcend individual workspaces. In other words, on Slack’s other plans, the Workspace Owner serves as its king or queen. With Enterprise Grid, however, two roles — Org Owner and Org Admins — effectively outrank the Workspace Owner.
Primary Org Owner
This individual retains the highest level of permissions. No one else can transfer ownership of the org. The person in this role can also do everything that Org Owners can do.
Org Owners
Think of Org Owners as seconds in command. As such, they can do the following:
- Determine an organization’s app-management policies for all workspaces.
- Choose which settings individual Workspace Owners can enable and disable. (If you can’t perform a “normal” task as a Workspace Owner under the Enterprise Grid plan, it’s probably because an Org Owner has disabled that functionality.)
- Configure single security and access settings such as single sign-on and two-factor authentication. (Chapter 9 offers much more detail.)
- Configure single sign-on (SSO).
Org Admins
Org Admins can do almost everything that Org Owners can do with a few exceptions. For example, they can’t override a workspace’s app-management policy. For a comprehensive table of what Org Admins and Owners can and can’t do, see bit.ly/eg-slack.
Starting Your New Workspace Off on the Right Foot
The Slack workspace is an unparalleled collaboration and communication tool. This chapter concludes by highlighting two critical things to do after you have created your workspace. First, you should invite others to join it. Second, you’ll want to let your future Slack-mates know a bit about you.
Expanding your existing workspace
A recurring theme in this book is that Slack is a team tool, not an individual one. In case you forgot, you can invite members to your workspace when you create it. (See the section “Creating a new Slack workspace” earlier in this chapter.)
Your Slack workspace(s) will likely morph in ways that you don’t expect. Mine certainly have. At some point, it will make sense to add new members. Invariably others will need to join in your reindeer games.
Fortunately, you don’t have to put on your swami hat. You need not try to predict who’ll benefit from your workspace in the future. Put differently, Slack makes it remarkably simple to add new members after your workspace is up and running.
Inviting others to your workspace
To invite others to your existing workspace, launch the Slack desktop app and follow these steps:
- Click on People in the sidebar.
-
Click on the white Invite People button.
Slack launches a new window.
-
Select the person’s role.
Note that the next steps will vary a bit based upon the specific role. In this example, I’ll add a member.
-
Enter the email addresses and, optionally, the names of the people you’d like to invite.
By default, Slack provides lines for two new members. You can Add Another or Add Many at Once. Just click on those links.
- (Optional) Set the specific channels to that new members will join if and when they accept your invitation.
- (Optional) Compose a personalized message.
- Click on the green Send Invitations button.
When adding either type of new guest, Slack prompts you with the dialog box shown in Figure 2-9.
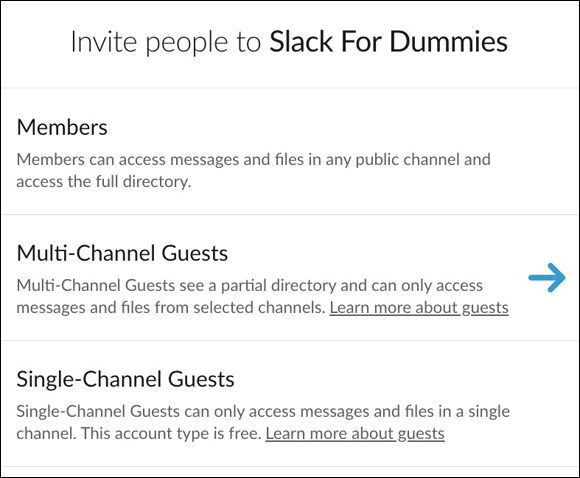
FIGURE 2-9: Slack guest-account options.
Select the desired guest account. (Guests can’t invite other guests to the workspace.)
Restricting who can invite others to your workspace
Out of the box, Slack allows all members to invite others to join individual workspaces. (Guests lack this capability.) In October 2019, Slack smartly added some nuance to this feature. That is, Workspace Owners and Admins can limit a members’ ability to invite other members to their companies’ workspaces.
The reasons for adding a little friction to the workspace-signup process are manifold. Here are four:
- An organization uses a number of different workspaces for different reasons. As such, it wants to ensure that its employees, partners, and vendors join the proper ones.
- A firm may operate in an industry and/or country whose government imposes strict privacy laws over which employees can view different types of information.
- A budget-conscious small business pays for Slack’s Standard or Plus plan. As a result, it wants to monitor how many members are in its workspace to limit its monthly costs.
- A human resources department relies heavily upon a workspace. As such, its discussions typically involve sensitive information. The conversations are certainly not fit for public consumption, even in public channels. (Chapter 3 covers channels in far more detail.)
Regardless of your motivation, if you want to prevent existing members from adding others to your workspace, then follow these steps:
- Click on the main menu.
-
From the drop-down menu, select Settings & administration and then Workspace settings.
Slack launches a window or tab in your default browser.
- Click on the Permissions tab at the top of the page.
- Look for the word Invitations and then click on the white Expand button.
-
Check the box to require admin approval for invitations.
Optionally, you can determine the channel to which Slack sends invitations requests.
- Click on the green Save button.
Configuring your member profile and key account settings
Slack answers the call here by allowing members to create detailed profiles. Fields include email address, profile picture, phone number, and other key work-related information. Figure 2-10 shows the top part of my public workspace profile:
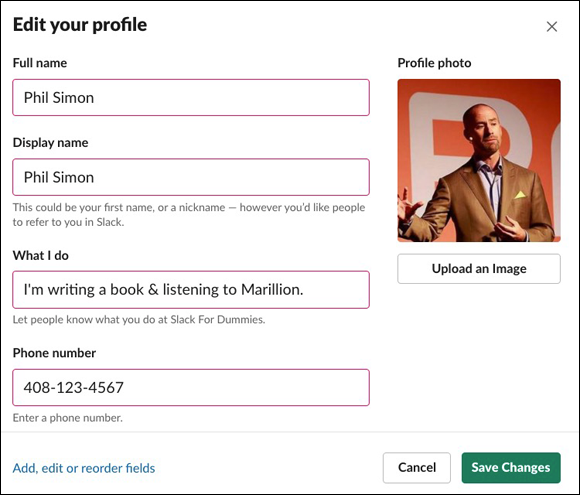
FIGURE 2-10: My Slack profile.
Note that more information exists under the buttons in Figure 2-10. To personalize your Slack profile, follow these steps:
- Click on the main menu.
- From the drop-down menu, select View profile.
- Click on the green Edit Profile button.
- Profile photo: This option is self-explanatory.
- Email address: This is the email address that you use to sign in to Slack. Based upon your role and permissions, you may not be able to change it.
- Time zone: Slack uses your time zone to send summary and notification emails (unless you have unsubscribed from them). With this information, Slack identifies times in your activity feeds and schedules reminders.
- Language: Choose language that you’d prefer to use when interacting with Slack.
- Click on the green Save Changes button.
To be sure, you can customize your profile in many other meaningful ways. For instance, customers of premium Slack plans can add a slew of different fields, such as manager name and Twitter and LinkedIn profiles. Chapter 8 delves much deeper into these options.
 Slack does not impose a time limit on Free plans; they do not expire.
 Throughout this book, I focus on the features that apply to all Slack plans. When necessary, I mention key Enterprise Grid features.
 If your organization has purchased Slack’s Enterprise Grid plan, then it may follow a different process. That is, only Workspace Owners and Admins may be allowed to follow the preceding steps.