In this chapter, you will learn how to
• Describe current printer and multifunction device technologies
• Explain the laser printing process
• Install and configure a printer or multifunction device
• Recognize and fix basic printer and multifunction device problems
Despite all of the talk about the “paperless office,” paper documents continue to be a vital part of the typical office. Some computers are even used exclusively for the purpose of producing paper documents. Many people simply still prefer dealing with a hard copy, even as portable devices have proliferated. Developers cater to this preference by using metaphors such as page, workbook, and binder in their applications.
In the past, your average office had an array of electronic and mechanical devices dedicated to performing a single task with paper documents. Think printers, copiers, scanners, and fax machines. Back in the 1990s, the multifunction device (MFD), also known as the multifunction printer (MFP), tried to consolidate multiple functions (often printing and scanning) into a single device. At first these devices weren’t terribly great at any of their functions, but today’s mature multifunction devices are more common than their single-function counterparts.
The CompTIA A+ certification strongly stresses the area of printing and expects a high degree of technical knowledge of the function, components, maintenance, and repair of all types of printers and multifunction devices.
This chapter examines the common varieties of printers and scanners, then looks at specifics of how a laser printer works. The chapter continues with the steps for installing a multifunction device in a typical personal computer, and concludes with troubleshooting issues.
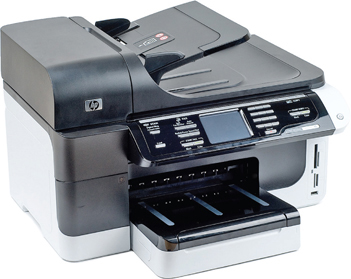
The multifunction devices your average person encounters in daily life probably sit on a desk, shelf, or countertop, and they tend to be fairly similar in appearance. Because of this, when most of us think about multifunction devices, we tend to picture small desktop all-in-one devices (which can usually be used as a printer, scanner, copier, and fax machine) connected to a nearby computer (see Figure 27-1 for an example).
Figure 27-1 All-in-one printer/scanner/fax machine/copier/iPod dock
The reality is that these desktop devices, descendants of the desktop printer and scanner, are just the low end of the market. As you head upmarket, multifunction printers look more like the descendants of copy machines and even small printing presses. Despite how different these high-end devices may look, they still share a core set of components—a printer and scanner of some sort—with the all-in-ones you’re probably familiar with. As you go upmarket, the greatest improvements tend to be in speed/capacity, durability, and document handling/finishing features such as sorting, stapling, binding, and so on.
Because multifunction devices are so varied, we’ll take a look at some of the individual components and technologies you may find inside them separately—be prepared to encounter these components as both standalone devices and included with other components in a multifunction device.
No other piece of your computer system is available in a wider range of styles, configurations, and feature sets than a printer, or at such a wide price variation. What a printer can and can’t do is largely determined by the type of printer technology it uses—that is, how it gets the image onto the paper. Modern printers can be categorized into several broad types: impact, inkjet, dye-sublimation, thermal, laser, and solid ink.
Printers that create an image on paper by physically striking an ink ribbon against the paper’s surface are known as impact printers. Although daisy-wheel printers (essentially an electric typewriter attached to the computer instead of directly to a keyboard) have largely disappeared, their cousins, dot-matrix printers, still soldier on in many offices. Although dot-matrix printers don’t deliver what most home users want—high quality and flexibility at a low cost—they’re still widely found in businesses for two reasons: dot-matrix printers have a large installed base in businesses, and they can be used for multipart forms because they actually strike the paper. Impact printers tend to be relatively slow and noisy, but when speed, flexibility, and print quality are not critical, they provide acceptable results. Computers that print multipart forms, such as point of sale (POS) machines, use special impact paper that can print receipts in duplicate, triplicate, or more. These POS machines represent the major market for new impact printers, although many older dot-matrix printers remain in use.
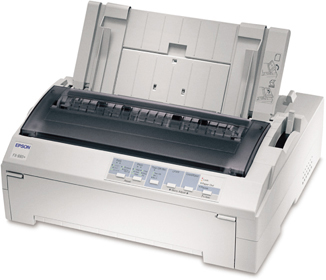
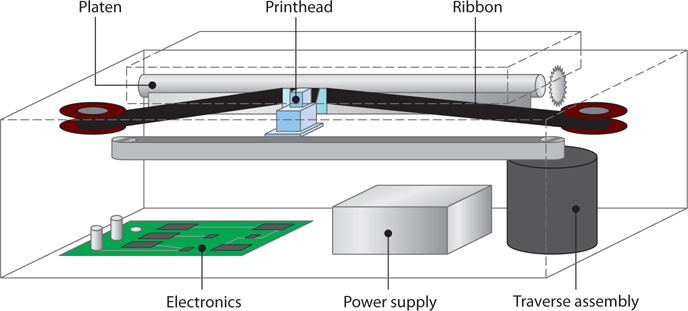
Dot-matrix printers use a grid, or matrix, of tiny pins, also known as printwires, to strike an inked printer ribbon and produce images on paper (see Figure 27-2). The case that holds the printwires is called a printhead. Using either 9 or 24 pins, dot-matrix printers treat each page as a picture broken up into a dot-based raster image. The 9-pin dot-matrix printers are generically called draft quality, while the 24-pin printers are known as letter quality or near-letter quality (NLQ). The BIOS for the printer (either built into the printer or a printer driver) interprets the raster image in the same way a monitor does, “painting” the image as individual dots. Naturally, the more pins, the higher the resolution. Figure 27-3 illustrates the components common to dot-matrix printers. Many dot-matrix printers use continuous-feed paper with holes on its sides that are engaged by metal sprockets to pull the paper through—this is known as tractor-feed paper because the sprockets are reminiscent of the wheels on a tractor.
Figure 27-2 An Epson FX-880+ dot-matrix printer (photo courtesy of Epson America, Inc.)
Figure 27-3 Inside a dot-matrix printer
Inkjet printers (also called ink-dispersion printers) like the one in Figure 27-4 are relatively simple devices. An inkjet printer uses a printhead connected to a carriage that contains the ink. A belt and motor move the carriage back and forth so the ink can cover the whole page. A roller grabs paper from a paper tray (usually under or inside the printer) or feeder (usually on the back of the printer) and advances it through the printer (see Figure 27-5).
Figure 27-4 Typical inkjet printer
Figure 27-5 Inside an inkjet printer

EXAM TIP Printers can also use duplex assemblies, which enable the printer to automatically print on both sides of the paper. Some printers include this feature built in, while others require a piece of additional hardware that flips the paper for the printer.
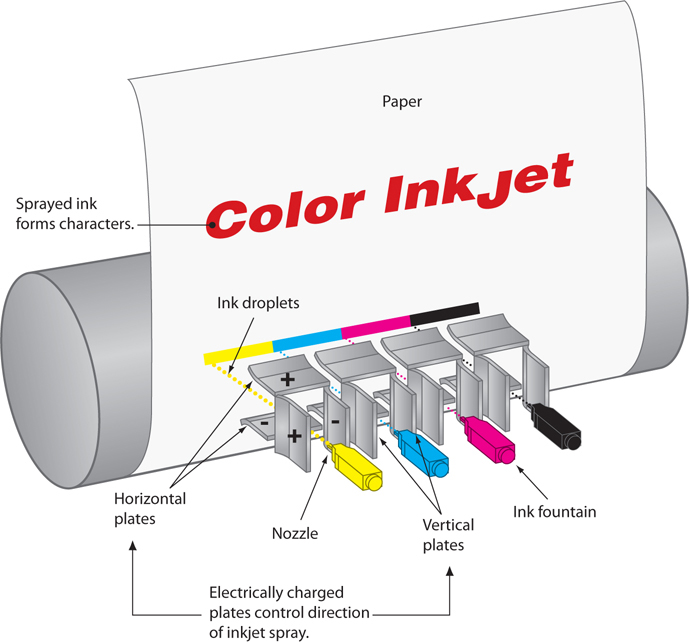
The ink is ejected through tiny tubes. Most inkjet printers use heat to move the ink, while a few use a mechanical method. The heat-method printers use tiny resistors or electroconductive plates at the end of each tube that literally boil the ink; this creates a tiny air bubble that ejects a droplet of ink onto the paper, thus creating a portion of the image (see Figure 27-6).
Figure 27-6 Detail of the inkjet printhead
The ink is stored in special small containers called ink cartridges. Older inkjet printers had two cartridges: one for black ink and another for colored ink. The color cartridge had separate compartments for cyan (blue), magenta (red), and yellow ink, to print colors by using a method known as CMYK (you’ll read more about CMYK later in this chapter). If your color cartridge ran out of one of the colors, you had to purchase a whole new color cartridge or deal with a messy refill kit.
Printer manufacturers began to separate the ink colors into three separate cartridges so that printers came with four cartridges: one for each color and a fourth for black (see Figure 27-7). This not only was more cost-effective for the user, but it also resulted in higher quality printouts. Today you can find color inkjet printers with six, eight, or more color cartridges. In addition to the basic CMYK inks, the additional cartridges provide for green, blue, gray, light cyan, dark cyan, and more. Typically, printers using more ink cartridges produce higher quality printed images—and cost more.
Figure 27-7 Inkjet ink cartridges
The two key features of an inkjet printer are the print resolution—how densely the printer lays down ink on the page—and the print speed. Resolution is measured in dots per inch (dpi); higher numbers mean that the ink dots on the page are closer together, so your printed documents will look better. Resolution is most important when you’re printing complex images such as full-color photos, or when you’re printing for duplication and you care that your printouts look good. Print speed is measured in pages per minute (ppm), and this specification is normally indicated right on the printer’s box. Most printers have one (faster) speed for monochrome printing—that is, using only black ink—and another for full-color printing.
EXAM TIP Print resolution is measured in dots per inch (dpi) and print speed is measured in pages per minute (ppm).
Another feature of inkjet printers is that they can support a staggering array of print media. Using an inkjet printer, you can print on a variety of matte or glossy photo papers, iron-on transfers, and other specialty media; some printers can print directly onto specially coated optical discs, or even fabric. Imagine running a T-shirt through your printer with your own custom slogan (how about “I’m CompTIA A+ Certified!”). The inks have improved over the years, too, now delivering better quality and longevity than ever. Where older inks would smudge if the paper got wet or start to fade after a short time, modern inks are smudge proof and of archival quality—for example, some inks by Epson are projected to last up to 200 years.
Try This!
Pages per Minute Versus Price
Printer speed is a key determinant of a printer’s price, and this is an easy assertion to prove, so Try This!
1. Fire up your browser and head over to the Web site for Hewlett-Packard (www.hp.com), Canon (www.canon.com), Epson (www.epson.com), Brother (www.brother.com), or Samsung (www.samsung.com). These five companies make most of the printers on the market today.
2. Pick a particular printer technology and check the price, from the cheapest to the most expensive. Then look for printers that have the same resolution but different ppm rates.
3. Check the prices and see how the ppm rate affects the price of two otherwise identical printers.
The term sublimation means to cause something to change from a solid form into a vapor and then back into a solid. This is exactly the process behind dye-sublimation printing, sometimes called thermal dye transfer printing. Dye-sublimation printers are used mainly for photo printing, high-end desktop publishing, medical and scientific imaging, and other applications for which fine detail and rich color are more important than cost and speed. Smaller, specialized printers called snapshot printers use dye-sublimation specifically for printing photos at a reduced cost compared to their full-sized counterparts.
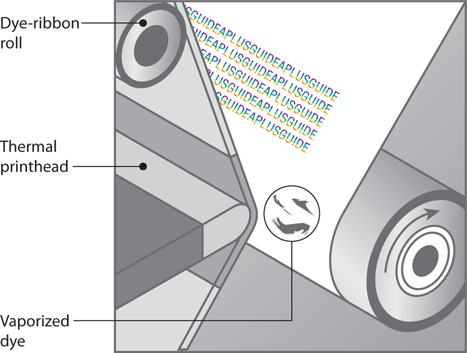
The dye-sublimation printing technique is an example of the so-called CMYK (cyan, magenta, yellow, black) method of color printing. It uses a roll of heat-sensitive plastic film embedded with page-sized sections of cyan (blue), magenta (red), and yellow dye; many also have a section of black dye. A printhead containing thousands of heating elements, capable of precise temperature control, moves across the film, vaporizing the dyes and causing them to soak into specially coated paper underneath before cooling and reverting to a solid form. This process requires one pass per page for each color. Some printers also use a final finishing pass that applies a protective laminate coating to the page. Figure 27-8 shows how a dye-sublimation printer works.
Figure 27-8 The dye-sublimation printing process
Documents printed through the dye-sublimation process display continuous-tone images, meaning that the printed image is not constructed of pixel dots but a continuous blend of overlaid differing dye colors. This is in contrast to other print technologies’ dithered images, which use closely packed, single-color dots to simulate blended colors. Dye-sublimation printers produce high-quality color output that rivals professional photo-lab processing.
Thermal printers use a heated printhead to create a high-quality image on special or plain paper. You’ll see two kinds of thermal printers in use. The first is the direct thermal printer, and the other is the thermal wax transfer printer. Direct thermal printers use a heating element to burn dots into the surface of special heat-sensitive paper. If you remember the first generation of fax machines, you’re already familiar with this type of printer. Many retail businesses still use it as a receipt printer, using large rolls of thermal paper housed in a feed assembly that automatically draws the paper past the heating element; some receipt printers can even cut the paper off the roll for you.
Thermal wax printers work similarly to dye-sublimation printers, except that instead of using rolls of dye-embedded film, the film is coated with colored wax. The thermal printhead passes over the ribbon and melts the wax onto the paper. Thermal wax printers don’t require special papers like dye-sublimation printers do, so they’re more flexible and somewhat cheaper to use, but their output isn’t quite as good because they use color dithering.
Using a process called electro-photographic imaging, laser printers produce high-quality and high-speed output of both text and graphics. Figure 27-9 shows a typical laser printer. Laser printers rely on the photoconductive properties of certain organic compounds. Photoconductive means that particles of these compounds, when exposed to light (that’s the “photo” part), will conduct electricity. Laser printers usually use lasers as a light source because of their precision. Some lower-cost printers use LED arrays instead.
Figure 27-9 Typical laser printer
The first laser printers created only monochrome images; you can also buy a color laser printer, but most laser printers produced today are still monochrome. Although a color laser printer can produce complex full-color images such as photographs, they really shine for printing what’s known as spot color—for example, eye-catching headings, lines, charts, or other graphical elements that dress up an otherwise plain printed presentation.
NOTE Some printers use consumables—such as ink—at a much faster rate than others, prompting the industry to rank printers in terms of their cost per page. Using an inexpensive printer (laser or inkjet) costs around 4 cents per page, while an expensive printer can cost more than 20 cents per page—a huge difference if you do any volume of printing. This hidden cost is particularly pernicious in the sub-$100 inkjet printers on the market. Their low prices often entice buyers, who then discover that the cost of consumables is outrageous—these days, a single set of color and black inkjet cartridges can cost as much as the printer itself, if not more!
The CompTIA A+ certification exams take a keen interest in the particulars of the laser printing process—or specifically, the imaging process—so it pays to know your way around a laser printer (see Figure 27-10). Let’s take a look at the many components of laser printers and their functions.
Figure 27-10 Components inside a laser printer
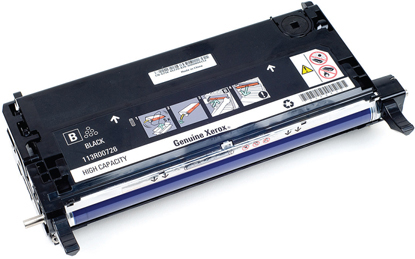
Toner Cartridge The toner cartridge in a laser printer is so named because of its most obvious activity: supplying the toner that creates the image on the page (see Figure 27-11). To reduce maintenance costs, however, many other laser printer parts, especially those that suffer the most wear and tear, have been incorporated into the toner cartridge. Although this makes replacement of individual parts nearly impossible, it greatly reduces the need for replacement; those parts that are most likely to break are replaced every time you replace the toner cartridge.
Figure 27-11 Laser printer’s toner cartridge

NOTE Color laser printers have four toner cartridges: black, cyan, magenta, and yellow.
Imaging Drum The imaging drum (also called the photosensitive drum) is an aluminum cylinder coated with particles of photosensitive compounds. The drum itself is grounded to the power supply, but the coating is not. When light hits these particles, whatever electrical charge they may have “drains” out through the grounded cylinder.
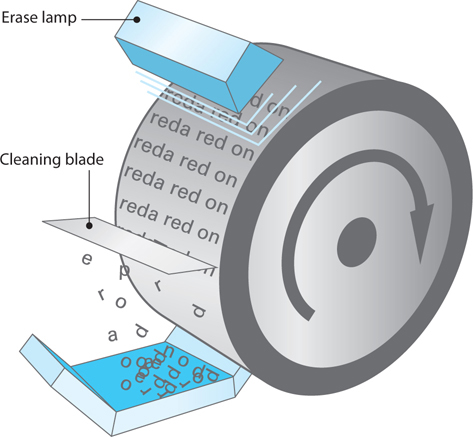
Erase Lamp The erase lamp exposes the entire surface of the photosensitive drum to light, making the photosensitive coating conductive. Any electrical charge present in the particles bleeds away into the grounded drum, leaving the surface particles electrically neutral.
Primary Corona/Charge Roller The primary corona wire (or primary charge roller, in newer laser printers), located close to the photosensitive drum, never touches the drum. When the primary corona or primary charge roller is charged with an extremely high voltage, an electric field (or corona) forms, enabling voltage to pass to the drum and charge the photosensitive particles on its surface. The primary grid regulates the transfer of voltage, ensuring that the surface of the drum receives a uniform negative voltage of between ~600 and ~1000 volts.
Laser The laser acts as the writing mechanism of the printer. Any particle on the drum struck by the laser becomes conductive and its charge is drained away into the grounded core of the drum. The entire surface of the drum has a uniform negative charge of between ~600 and ~1000 volts following its charging by the primary corona wire or charge roller. When particles are struck by the laser, they are discharged and left with a ~100-volt negative charge. Using the laser, we can “write” an image onto the drum. Note that the laser writes a positive image to the drum.
Toner The toner in a laser printer is a fine powder made up of plastic particles bonded to pigment particles. The toner cylinder charges the toner with a negative charge of between ~200 and ~500 volts. Because that charge falls between the original uniform negative charge of the photosensitive drum (~600 to ~1000 volts) and the charge of the particles on the drum’s surface hit by the laser (~100 volts), particles of toner are attracted to the areas of the photosensitive drum that have been hit by the laser (that is, areas that have a relatively more positive charge than the toner particles).
EXAM TIP The black toner used in laser printers is typically carbon melt mixed with a polyester resin, while color toner trades carbon for other pigments.
Transfer Corona/Transfer Roller To transfer the image from the photosensitive drum to the paper, the paper must be given a charge that will attract the toner particles off of the drum and onto the paper. In older printers, the transfer corona, a thin wire, applied a positive charge to the paper, drawing the negatively charged toner particles to the paper. Newer printers accomplish the same feat using a transfer roller that draws the toner onto the paper. The paper, with its positive charge, is also attracted to the negatively charged drum. To prevent the paper from wrapping around the drum, a static charge eliminator removes the charge from the paper.
In most laser printers, the transfer corona/roller is outside the toner cartridge, especially in large, commercial-grade machines. The transfer corona/roller is prone to a buildup of dirt, toner, and debris through electrostatic attraction, and it must be cleaned. It is also quite fragile—usually finer than a human hair. Most printers with an exposed transfer corona/roller provide a special tool to clean it, but you can also—very delicately—use a cotton swab soaked in 90 percent denatured alcohol (don’t use rubbing alcohol, because it contains emollients). As always, never service any printer without first turning it off and unplugging it from its power source.
Fuser Assembly The fuser assembly is almost always separate from the toner cartridge. It is usually quite easy to locate, as it is close to the bottom of the toner cartridge and usually has two rollers to fuse the toner. Sometimes the fuser is somewhat enclosed and difficult to recognize because the rollers are hidden from view. To help you determine the location of the fuser, think about the path of the paper and the fact that fusing is the final step of printing.
The toner is merely resting on top of the paper after the static charge eliminator has removed the paper’s static charge. The toner must be melted to the paper to make the image permanent. Two rollers, a pressure roller and a heated roller, are used to fuse the toner to the paper. The pressure roller presses against the bottom of the page, and the heated roller presses down on the top of the page, melting the toner into the paper. The heated roller has a nonstick coating such as Teflon to prevent the toner from sticking to it.
Power Supplies All of the devices described in this chapter have power supplies, but when dealing with laser printers, techs should take extra caution. The corona in a laser printer requires extremely high voltage from the power supply, making a laser printer power supply one of the most dangerous devices in computing! Turn off and unplug the printer as a safety precaution before performing any maintenance.
Turning Gears A laser printer has many mechanical functions. First, the paper must be grabbed by the pickup roller and passed over the separation pad, which uses friction to separate a single sheet from any others that were picked up. Next, the photosensitive roller must be turned and the laser, or a mirror, must be moved back and forth. The toner must be evenly distributed, and the fuser assembly must squish the toner into the paper. Finally, the paper must be kicked out of the printer and the assembly must be cleaned to prepare for the next page.
More sophisticated laser printers enable duplex printing, meaning they can print on both sides of the paper. This is another mechanical function with a dedicated duplexing assembly for reversing the paper.
EXAM TIP Be sure you are familiar with laser printer components, including the imaging drum, fuser assembly, transfer roller, pickup rollers, separation pads, and duplexing assembly. The CompTIA A+ 901 exam objectives refer to the separate pad; don’t get tripped up if you see it worded this way.
All of these functions are served by complex gear systems. In most laser printers, these gear systems are packed together in discrete units generically called gear packs or gearboxes. Most laser printers have two or three gearboxes that you can remove relatively easily in the rare case one of them fails. Most gearboxes also have their own motor or solenoid to move the gears.
All of these mechanical features can wear out or break and require service or replacement. See the “Troubleshooting Printers” section later in this chapter for more details.
System Board Every laser printer contains at least one electronic board. On this board is the main processor, the printer’s ROM, and the RAM used to store the image before it is printed. Many printers divide these functions among two or three boards dispersed around the printer (also known as sub-logic boards, as seen in Figure 27-10). An older printer may also have an extra ROM chip and/or a special slot where you can install an extra ROM chip, usually for special functions such as PostScript.
On some printer models, you can upgrade the contents of these ROM chips (the firmware) by performing a process called flashing the ROM. Flashing is a lot like upgrading the system BIOS, which you learned about in Chapter 6, “BIOS.” Upgrading the firmware can help fix bugs, add new features, or update the fonts in the printer.
Of particular importance is the printer’s RAM. When the printer doesn’t have enough RAM to store the image before it prints, you get a memory overflow problem. Also, some printers store other information in the RAM, including fonts or special commands. Adding RAM is usually a simple job—just snapping in a SIMM or DIMM stick or two—but getting the right RAM is important. Call or check the printer manufacturer’s Web site to see what type of RAM you need. Although most printer companies will happily sell you their expensive RAM, most printers can use generic DRAM like the kind you use in a computer.
Ozone Filter The coronas inside laser printers generate ozone (O3). Although not harmful to humans in small amounts, even tiny concentrations of ozone will cause damage to printer components. To counter this problem, most laser printers have a special ozone filter that needs to be vacuumed or replaced periodically.
Sensors and Switches Every laser printer has a large number of sensors and switches spread throughout the machine. The sensors are used to detect a broad range of conditions such as paper jams, empty paper trays, or low toner levels. Many of these sensors are really tiny switches that detect open doors and so on. Most of the time these sensors/switches work reliably, yet occasionally they become dirty or broken, sending a false signal to the printer. Simple inspection is usually sufficient to determine if a problem is real or just the result of a faulty sensor/switch.
Solid ink printers use just what you’d expect—solid inks. The technology was originally developed by Tektronix, whose printer division was acquired by Xerox. Solid ink printers use solid sticks of nontoxic “ink” that produce more vibrant color than other print methods. The solid ink is melted and absorbed into the paper fibers; it then solidifies, producing a continuous-tone output. Unlike dye-sublimation printers, all colors are applied to the media in a single pass, reducing the chances of misalignment. Solid ink sticks do not rely on containers (as does ink for inkjet printers) and can be “topped off” midway through a print job by inserting additional color sticks without taking the printer offline.
These printers are fast, too! A full-color print job outputs the first page in about six seconds. Of course, all that speed and quality comes at a price. Xerox’s base model starts at about twice the cost of a laser printer, with the expensive model selling for about six times the cost! Solid ink printers become a bit more affordable when you factor in the cost of consumables. A single stick of ink costs about as much as an inkjet cartridge, for example, but with a print capacity of 1000 pages, that completely beats the cost of inkjet cartridges over time.
The most quizzical printer of all, the virtual printer, doesn’t look like much, but it’s actually still pretty similar to physical or “real” printing. When you print to a virtual printer, your system goes through all the steps to prepare a document for printing, and sends it off to a virtual printer—a program which converts the output from your computer into a specific format and saves the result to a portable file that looks like the printed page would have. You can print this file later if you like, or maybe send it to someone else to print, but you can also just keep it in digital format. Virtual printers provide a nice way to save anything you can print, and they’re particularly good for saving reference copies of information found on the Web. CompTIA wants you to know specifically about a few of these options, so we’ll discuss them in a little more depth.
EXAM TIP The CompTIA A+ 901 exam objectives include Print to file, which produces a file that can be later printed without access to the program that created it, but you usually won’t want to use it as a virtual printer. Print to file is a legacy option you’ll often see as a checkbox on your print screen, but it may not work well with USB printers (and even if it works, the resulting file will be difficult to work with). Be aware that this option exists, but use one of the other options described here instead.
Print to PDF One of the most popular virtual printing options is the ability to print to PDF, a feature many operating systems support out of the box these days. Windows doesn’t join the party until Windows 10, however, so be aware that you’ll need to install a virtual PDF printer on older versions of Windows. You can get these through official Adobe software, but there are also some third-party options.
Print to XPS We’ll talk a little about what exactly XPS is in the next section, but Windows versions since Vista include the Microsoft XPS Document Writer as a printer, which you can use to create a .xps file that can be opened by the included XPS Viewer program. Support in other operating systems varies, but most of them have third-party software available for working with XPS files.
Print to Image This option lets you save a regular image file, such as BMP, GIF, JPG, PNG, TIFF, and more. Image formats tend to have some problems when being used for documents—text won’t scale as well and can’t be easily searched/selected/copied, for example—but they are very portable, and can often be viewed with software included in any operating system and on many types of devices. You will generally need to find and install third-party virtual printer software in order to print to the image format you desire on a given operating system.
Cloud and Remote Printing Blurring the line between traditional and virtual printing, a variety of applications, such as Google Cloud Print, will install a virtual printer on your system that wraps up your document and sends it out over the Internet or other network to a cloud server, which eventually ends up routing it to a real printer for printing—all without needing to have a driver installed for it.
Now that you’ve learned about the different types of print devices and techniques, it’s time to take a look at how they communicate with the computer. How do you tell a printer to make a letter A or to print a picture of your pet iguana? Printers are designed to accept predefined printer languages that handle both characters and graphics. Your software must use the proper language when communicating with your printer, in order to output paper documents. Following are the more common printer languages.
ASCII You might think of the American Standard Code for Information Interchange (ASCII) language as nothing more than a standard set of characters, the basic alphabet in upper- and lowercase with a few strange symbols thrown in. ASCII actually contains a variety of control codes for transferring data, some of which can be used to control printers. For example, ASCII code 10 (or 0A in hex) means “Line Feed,” and ASCII code 12 (0C) means “Form Feed.” These commands have been standard since before the creation of IBM computers, and all printers respond to them. If they did not, the PRT SCR (print screen) key would not work with every printer. Being highly standardized has advantages, but the control codes are extremely limited. Printing high-end graphics and a wide variety of fonts requires more advanced languages.
PostScript Adobe Systems developed the PostScript page description language in the early 1980s as a device-independent printer language capable of high-resolution graphics and scalable fonts. PostScript interpreters are embedded in the printing device. Because PostScript is understood by printers at a hardware level, the majority of the image processing is done by the printer and not the computer’s CPU, so PostScript printers print faster. PostScript defines the page as a single raster image; this makes PostScript files extremely portable—they can be created on one machine or platform and reliably printed out on another machine or platform (including, for example, high-end typesetters).
Hewlett-Packard Printer Control Language (PCL) Hewlett-Packard developed its printer control language (PCL) as a more advanced printer language to supersede simple ASCII codes. PCL features a set of printer commands greatly expanded from ASCII. Hewlett-Packard designed PCL with text-based output in mind; it does not support advanced graphical functions. The most recent version of PCL, PCL6, features scalable fonts and additional line drawing commands. Unlike PostScript, however, PCL is not a true page description language; it uses a series of commands to define the characters on the page. Those commands must be supported by each individual printer model, making PCL files less portable than PostScript files.
Windows GDI and XPS Windows uses the graphical device interface (GDI) component of the operating system to handle print functions. Although you can use an external printer language such as PostScript, most users simply install printer drivers and let Windows do all the work. The GDI uses the CPU rather than the printer to process a print job and then sends the completed job to the printer. When you print a letter with a TrueType font in Windows, for example, the GDI processes the print job and then sends bitmapped images of each page to the printer. The printer sees a page of TrueType text, therefore, as a picture, not as text. As long as the printer has a capable enough raster image processor (explained later in this chapter) and plenty of RAM, you don’t need to worry about the printer language in most situations. We’ll revisit printing in Windows in more detail later in this chapter.
Windows Vista also introduced a new printing subsystem called the XML Paper Specification (XPS) print path. XPS provides several improvements over GDI, including enhanced color management (which works with Windows Color System) and better print layout fidelity. The XPS print path requires a driver that supports XPS. Additionally, some printers natively support XPS, eliminating the requirement that the output be converted to a device-specific printer control language before printing.
You can use a scanner to make digital copies of existing paper photos, documents, drawings, and more. Better scanners give you the option of copying directly from a photographic negative or slide, providing images of stunning visual quality—assuming the original photo was halfway decent, of course! In this section, you’ll look at how scanners work and then turn to what you need to know to select the correct scanner for you or your clients.
All flatbed scanners, the most common variety of scanner, work the same way. You place a photo or other object face down on the glass (called the platen), close the lid, and then use software to initiate the scan. The scanner runs a bright light along the length of the platen once or more to capture the image. Figure 27-12 shows an open scanner.
Figure 27-12 Scanner open with photograph face down
NOTE Many serious scanners and multifunction devices will have an automatic document feeder (ADF), a tray which holds a multi-page document and feeds it into the scanner one page at a time, which can remove most of the manual labor from this process.
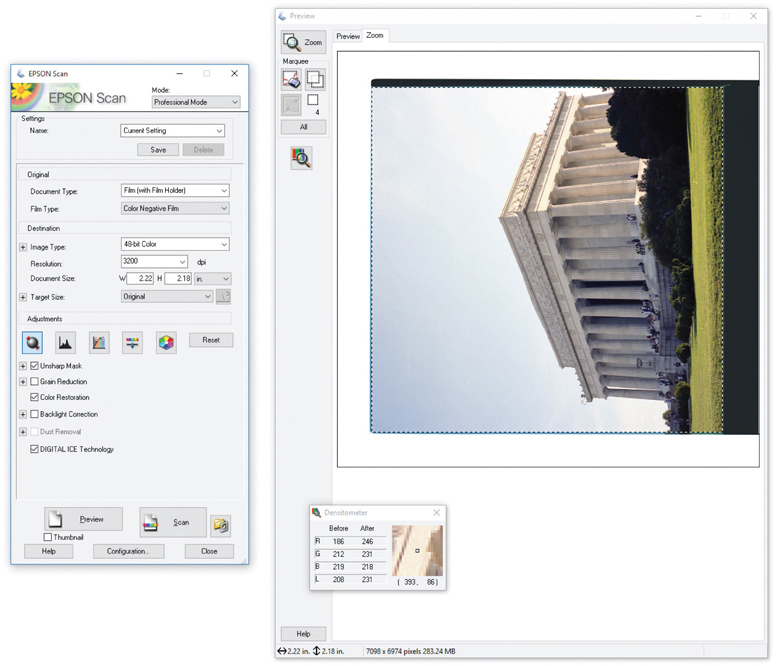
The scanning software that controls the hardware can manifest in a variety of ways. Nearly every manufacturer has some sort of drivers and other software to create an interface between your computer and the scanner. When you push the front button on the Epson Perfection scanner in Figure 27-13, for example, the Epson software opens ready to start scanning.
Figure 27-13 Epson software
You can also open your favorite image-editing software first and choose to acquire a file from a scanner. Figure 27-14 shows the process of acquiring an image from a scanner in the popular free image-editing software GNU Image Manipulation Program (otherwise known as GIMP). As in most such software, you choose File | Create and then select Scanner. In this case, the scanner uses the traditional TWAIN drivers. TWAIN stands for Technology Without an Interesting Name—I’m not making this up!—and has been the default driver type for scanners for a long time.
Figure 27-14 Acquiring an image in GNU Image Manipulation Program
At this point, the drivers and other software controlling the scanner pop up, providing an interface with the scanner (as shown in Figure 27-13). Here you can set the resolution of the image as well as many other options.
You must consider four primary variables when choosing a scanner: resolution, color depth, grayscale depth, and scan speed. You can and will adjust the first three during the scanning process, although probably only down from their maximum. The scan speed relates to all four of the other variables, and the maximum speed is hard-coded into the scanner.
Configurable Variables Scanners convert the scanned image into a grid of pixels (often referred to as dots). The maximum number of pixels determines how well you can capture an image and how the image will look when scaled up in size. Most folks use the term resolution to define the grid size. As you might imagine, the higher resolution images capture more fine detail.
Older scanners can create images of only 600 × 600 dots per inch (dpi), while newer models commonly achieve four times that density, and high-end machines do much more. Manufacturers cite two sets of numbers for a scanner’s resolution: the resolution it achieves mechanically—called the optical resolution—and the enhanced resolution it can achieve with assistance from some onboard software.
The enhanced resolution numbers are useless. I recommend at least 2400 × 2400 dpi optical resolution or better, although you can get by with a lower resolution for purely Web-destined images.
The color depth of a scan defines the number of bits of information the scanner can use to describe each individual pixel. This number determines color, shade, hue, and so forth, so color depth makes a dramatic difference in how easily you can adjust the color and tone in your photo editor. With binary numbers, each extra bit of information doubles the color detail in the scan. The most common color depth options you will run across in scanners today are 24-bit and 48-bit. A 24-bit scan, for example, can save up to 256 shades for each of the red, green, and blue subpixels that make up an individual pixel. This gives you a total of 16,777,216 color variations in the scanned image, which explains why some scanners refer to this as “millions of colors” in their settings. A 48-bit scan, in contrast, can save up to 65,536 shades per subpixel, giving you a scan that holds a massive 281,474,976,710,656 color variations. All this extra color does come with a downside: images scanned at 48 bits are twice the size of 24-bit scans and can easily be hundreds of megabytes per file!
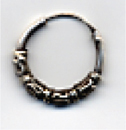
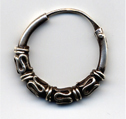
These days, 48-bit scanners are common enough that you shouldn’t have to settle for less, even on a budget. Figures 27-15, 27-16, and 27-17 show pretty clearly the difference resolution makes when scanning.
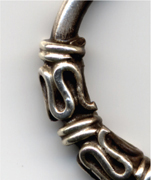
Figure 27-15 Earring scanned at 72 dpi and 24-bit color
Figure 27-16 Same earring, scanned at 300 dpi and 24-bit color
Figure 27-17 Same earring, scanned at 1200 dpi and 24-bit color
Scanners differ a lot in grayscale depth, a number that defines how many shades of gray the scanner can save per pixel. This matters if you work with black-and-white images in any significant way, because grayscale depth may be advertised with a much lower number than color depth. Current consumer-level scanners come in 8-bit, 12-bit, and 16-bit grayscale varieties. You might recognize these three numbers from the previous color depth discussion, because grayscale images only need a third the information it takes to represent the red, green, and blue values that make up a color image. I recommend 16-bit.
Scanning Speed Scanners have a maximum scanning speed defined by the manufacturer. The time required to complete a scan is also affected by the parameters you set; the time increases as you increase the amount of detail captured. A typical low-end scanner, for example, takes upward of 30 seconds to scan a 4 × 6 photo at 300 dpi. A faster scanner, in contrast, can crank out the same scan in 10 seconds.
Raise the resolution of the scan to 600 dpi at 48-bit resolution, and that faster scanner can take a full minute to complete the scan. Adjust your scanning settings to optimize for your project. Don’t always go for the highest possible scan if you don’t need the resolution and color depth.
As a general rule, you should obtain the highest quality scan you can manage, and then play with the size and image quality when it’s time to print it or share it over the Web. The amount of RAM in your system—and to a lesser extent, the processor speed—dictates how big a file you can handle.
If you travel a lot, you’ll want to make sure to use the locking mechanism for the scanner light assembly. Just be sure to unlock before you try to use it or you’ll get a light that’s stuck in one position. That won’t make for very good scans!
The scanning and printing capabilities of a multifunction device enable manufacturers to add copy-machine features easily. To copy a document or photo, you essentially scan a document or photo and then print it, but all with a single press of the Copy button.
Faxing generally requires separate functions in the machine, such as a document feed and a connection to a traditional, analog phone line. Assuming you have those and an account with the local telecom company, the process of faxing is pretty simple. You put a document in the feeder, plug in the fax number, and press the Send button (or whatever the manufacturer labels it).
EXAM TIP Although CompTIA added multifunction devices to the 901 objectives, you’re likely only to get questions on various printer technologies.
Most printers, scanners, and multifunction devices connect to a computer via a USB port, but Wi-Fi or Ethernet network connections are also very popular. You’ll need to know how to support networked connections as well as the plug-and-play USB ones.
New printers and multifunction devices use USB connections that you can plug into any USB port on your computer. USB printers may not come with a USB cable, so you need to purchase one when you purchase a printer. (It’s quite a disappointment to come home with your new printer only to find you can’t connect it because it didn’t come with a USB cable.) Most printers use the standard USB type A connector on one end and the smaller USB type B connector on the other end, although some use two type A connectors. Whichever configuration your USB printer has, just plug in the USB cable—it’s that easy!
Connecting a printer or multifunction device to a network isn’t just for offices anymore. More and more homes and home offices are enjoying the benefits of network printing. It used to be that you would physically connect the printer to a single computer and then share the printer on the network. The downside to this was that the computer connected to the printer had to be left on for others to use the printer.
Today, the typical network printer comes with its own built-in Wi-Fi adapter to enable wireless printing over infrastructure or ad hoc network connections, though you should avoid ad hoc (CompTIA uses adhoc, all one word) connection for security reasons when possible (see Chapter 22, “Wireless Networking,” for more on setting up an ad hoc wireless network).
Other printers include an onboard network adapter that uses a standard RJ-45 Ethernet cable to connect the printer directly to the network by way of a router. The printer can typically be assigned a static IP address, or it can acquire one dynamically from a DHCP server. (Don’t know what a router, IP address, or DHCP server is? Take a look back at Chapters 20 and 21.) Once connected to the network, the printer acts independently of any single computer. Alternatively, some printers offer a Bluetooth interface for networking.
NOTE Since printers tend to have longer lives than most other computing devices, be aware that printers with a built-in wireless print connection may be using older Wi-Fi or Bluetooth standards than you’re used to encountering.
Even if a printer does not come with built-in Ethernet, Wi-Fi, or Bluetooth, you can purchase a standalone network device known as a print server to connect your printer to the network—but beware that you may not be able to use all features of a multifunction device connected to a print server. These print servers, which can be Ethernet or Wi-Fi, enable one or several printers to attach via USB cable (or even parallel port, if you still have a printer that old). You may not need to go to the store to find a print server, though—check your router, first, to see if it has an integrated print server. If it does, you may be able to plug your printer into a USB port on the router. So take that ancient ImageWriter dot-matrix printer and network it—I dare you!
EXAM TIP You’ll find print servers outside network devices. In fact, your Windows system is capable of operating as a print server. Anytime you plug a printer into a computer and share the printer over the network, the sharing system can be referred to as a print server.
Plenty of other connection types are available for printers. We’ve focused mainly on USB and networked connections. Be aware that you may run into old printers using a parallel port, a serial port, or SCSI. Although this is unlikely, know that it’s a possibility. You might also see standalone scanners using Thunderbolt.
The imaging process with a laser printer breaks down into seven steps, and the CompTIA A+ 901 exam expects you to know them all. As a tech, you should be familiar with these phases, as this can help you troubleshoot printing problems. If an odd line is printed down the middle of every page, for example, you know there’s a problem with the photosensitive drum or cleaning mechanism and the toner cartridge needs to be replaced.
The seven steps to the laser printing process may be performed in a different order, depending on the printer, but it usually goes like this:
1. Processing
2. Charging
3. Exposing
4. Developing
5. Transferring
6. Fusing
7. Cleaning
When you click the Print button in an application, several things happen. First, the CPU processes your request and sends a print job to an area of memory called the print spooler. The print spooler enables you to queue up multiple print jobs that the printer will handle sequentially. Next, Windows sends the first print job to the printer. That’s your first potential bottleneck—if it’s a big job, the OS has to dole out a piece at a time and you’ll see the little printer icon in the notification area at the bottom right of your screen. Once the printer icon goes away, you know the print queue is empty—all jobs have gone to the printer.
Once the printer receives some or all of a print job, the hardware of the printer takes over and processes the image. That’s your second potential bottleneck, and it has multiple components.
Impact printers transfer data to the printer one character or one line at a time, whereas laser printers transfer entire pages at a time to the printer. A laser printer generates a raster image (a pattern of dots) of the page, representing what the final product should look like. It uses a device (the laser imaging unit) to “paint” a raster image on the photosensitive drum. Because a laser printer has to paint the entire surface of the photosensitive drum before it can begin to transfer the image to paper, it processes the image one page at a time.
A laser printer uses a chip called the raster image processor (RIP) to translate the raster image into commands to the laser. The RIP takes the digital information about fonts and graphics and converts it to a rasterized image made up of dots that can then be printed. An inkjet printer also has a RIP, but it’s part of the software driver instead of onboard hardware circuitry. The RIP needs memory (RAM) to store the data that it must process.
A laser printer must have enough memory to process an entire page. Some images that require high resolutions require more memory. Insufficient memory to process the image will usually be indicated by a memory overflow (“MEM OVERFLOW”) error. If you get a memory overflow error, try reducing the resolution, printing smaller graphics, or turning off RET (see the following section for the last option). Of course, the best solution to a memory overflow error is simply to add more RAM to the laser printer.
Do not assume that every error with the word memory in it can be fixed simply by adding more RAM to the printer. Just as adding more RAM chips will not solve every conventional computer memory problem, adding more RAM will not solve every laser printer memory problem. The message “21 ERROR” on an HP LaserJet, for example, indicates that “the printer is unable to process very complex data fast enough for the print engine.” This means that the data is simply too complex for the RIP to handle. Adding more memory would not solve this problem; it would only make your wallet lighter. The only answer in this case is to reduce the complexity of the page image (that is, fewer fonts, less formatting, reduced graphics resolution, and so on).
Laser printers can print at different resolutions, just as monitors can display different resolutions. The maximum resolution a laser printer can handle is determined by its physical characteristics. Laser printer resolution is expressed in dots per inch (dpi). Common resolutions are 600 × 600 dpi or 1200 × 1200 dpi. The first number, the horizontal resolution, is determined by how fine a focus can be achieved by the laser. The second number is determined by the smallest increment by which the drum can be turned. Higher resolutions produce higher-quality output, but keep in mind that higher resolutions also require more memory. In some instances, complex images can be printed only at lower resolutions because of their high memory demands. Even printing at 300 dpi, laser printers produce far better quality than dot-matrix printers because of resolution enhancement technology (RET).
RET enables the printer to insert smaller dots among the characters, smoothing out the jagged curves that are typical of printers that do not use RET (see Figure 27-18). Using RET enables laser printers to output high-quality print jobs, but it also requires a portion of the printer’s RAM. If you get a MEM OVERFLOW error, sometimes disabling RET will free up enough memory to complete the print job.
Figure 27-18 RET fills in gaps with smaller dots to smooth out jagged characters.
Now we turn to the physical side of the printing process. To make the drum receptive to new images, it must be charged (see Figure 27-19). Using the primary corona wire or primary charge roller, a uniform negative charge is applied to the entire surface of the drum (usually between ~600 and ~1000 volts).
Figure 27-19 Charging the drum with a uniform negative charge
A laser is used to create a positive image on the surface of the drum. Every particle on the drum hit by the laser releases most of its negative charge into the drum.
Those particles with a lesser negative charge are positively charged relative to the toner particles and attract them, creating a developed image (see Figure 27-20).
Figure 27-20 Writing the image and applying the toner
The printer must transfer the image from the drum onto the paper. The transfer corona or transfer roller gives the paper a positive charge; then the negatively charged toner particles leap from the drum to the paper. At this point, the particles are merely resting on the paper and must still be permanently fused to the paper.
The particles have been attracted to the paper because of the paper’s positive charge, but if the process stopped here, the toner particles would fall off the page as soon as you lift it. Because the toner particles are mostly composed of plastic, they can be melted to the page. Two rollers—a heated roller coated in a nonstick material and a pressure roller—melt the toner to the paper, permanently affixing it. Finally, a static charge eliminator removes the paper’s positive charge (see Figure 27-21). Once the page is complete, the printer ejects the printed copy and the process begins again with the physical and electrical cleaning of the printer.
Figure 27-21 Transferring the image to the paper and fusing the final image
The printing process ends with the physical and electrical cleaning of the photosensitive drum (see Figure 27-22). Before printing another new page, the drum must be returned to a clean, fresh condition. All residual toner left over from printing the previous page must be removed, usually by scraping the surface of the drum with a rubber cleaning blade. If residual particles remain on the drum, they will appear as random black spots and streaks on the next page. The physical cleaning mechanism either deposits the residual toner in a debris cavity or recycles it by returning it to the toner supply in the toner cartridge. The physical cleaning must be done carefully—a damaged drum will cause a mark to be printed on every page until it is replaced.
Figure 27-22 Cleaning and erasing the drum
The printer must also be electrically cleaned. One or more erase lamps bombard the surface of the drum with the appropriate wavelengths of light, causing the surface particles to discharge into the grounded drum. After the cleaning process, the drum should be completely free of toner and have a neutral charge.
NOTE Color laser printers use four different colors of toner (cyan, magenta, yellow, and black) to create their printouts. Most models send each page through four different passes, adding one color at each pass to create the needed results, while others place all the colors onto a special transfer belt and then transfer them to the page in one pass. In some cases, the printer uses four separate toner cartridges and four lasers for the four toner colors, and in others the printer simply lays down one color after the other on the same drum, cleaning after each of four passes per page.

CAUTION The heated roller produces enough heat to melt some types of plastic media, particularly overhead transparency materials. This could damage your laser printer (and void your warranty), so make sure you print on transparencies designed for laser printers!
Installing a multifunction device differs a lot from installing single-function devices. In the consumer space, the process is messy because of the complexity of the devices. Here’s the scoop.
First, most multifunction devices today connect via USB and wirelessly, so you need to consider connectivity. Second, you need to install drivers for each of the various functions of the multifunction device. Initially, that seems fine, because you can use the driver disc that came with the device and can install everything for the OS you choose.
That default process can rapidly turn into a mess, though, because of several factors. The drivers are often outdated. Updating specific drivers takes time and clicking. Worse, manufacturers often add absurdly bad applications to “support” specific functions of multifunction devices, such as special photo organization tools that bog down the system and function far worse than readily available tools like Picasa from Google (free) or Lightroom from Adobe (not free, but reasonably priced).
Third, you’re dealing with a very complex machine that can break in interesting ways. Maintenance and troubleshooting take on new dimensions by the sheer number of options to consider, from ink levels to scanner mechanics to dogged-out phone lines. Although none of these fall into the category of installation, you can minimize the problems by practicing a more compartmentalized installation.
Rather than focus on the multifunction aspect of multifunction machines, you will fare better for you and your customers if you think about each function as a separate action. Pull the machine apart in essence, for example, and install a printer, a scanner, a copy machine, and a fax machine. Share these individual parts as needed on a network. Update drivers for each component separately. Conceptualize each function as a separate device to simplify troubleshooting. This way, if your print output goes south, for example, think about the printer aspects of the multifunction device. You don’t have to worry about the scanner, copy, or fax aspects of the machine.
The next sections cover installation of single-function devices, though the bulk of information is on printers. That’s both what the CompTIA A+ exams cover and what you’ll have to deal with as a tech for the most part.
You need to take a moment to understand how Windows handles printing, and then you’ll see how to install, configure, and troubleshoot printers.
EXAM TIP The CompTIA A+ exams test you on installing and troubleshooting printers, so read these sections carefully!
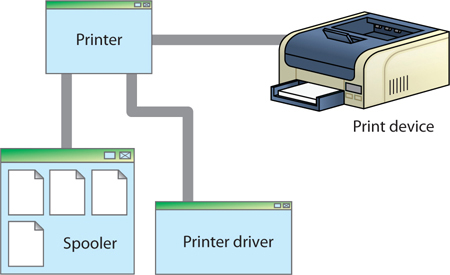
To Windows, a printer is not a physical device; it is a program that controls one or more physical printers. The physical printer is called a print device by Windows (although I continue to use the term “printer” for most purposes, just like almost every tech on the planet). Printer drivers and a spooler are still present, but in Windows, they are integrated into the printer itself (see Figure 27-23). This arrangement gives Windows amazing flexibility. For example, one printer can support multiple print devices, enabling a system to act as a print server. If one print device goes down, the printer automatically redirects the output to a working print device.
Figure 27-23 Printer driver and spooler in Windows
The general installation, configuration, and troubleshooting issues are basically identical in all modern versions of Windows. Here’s a review of a typical Windows printer installation. I’ll mention the trivial differences among Windows Vista, 7, and 8/8.1 as I go along. Setting up a printer is so easy it’s almost scary. Most printers are plug-and-play, so installing a printer is reduced to simply plugging it in and loading the driver if needed. With USB printers, Windows won’t even wait for you to do anything—Windows immediately detects and installs a printer once you connect it. If the system does not detect the printer in Vista, you need to open the Control Panel and find the Printer menu item—it is either by itself or, in the categorized view, under Hardware. With Windows 7 and newer, the applet has been renamed Devices and Printers. As you might guess, you install a new printer by clicking the Add a Printer icon/button (somehow Microsoft has managed to leave the name of this option unchanged through all Windows versions since 95!). This starts the Add Printer Wizard.
The Add Printer Wizard enables you to install a local printer or a network printer. This distinction is actually a little misleading. Windows divides printer installation into two scenarios: a printer connected directly to a computer (your local system or another one on a network), or a standalone printer directly connected to a switch or router. While you might expect the local and network installation options to divide these scenarios nicely, they don’t. Let’s take a quick look at both local and network installations so you know when to use each.
At first glance, you might think the local printer installation option is used to install your standard USB printer, but don’t forget that Windows will automatically detect and install USB printers (or any other plug-and-play printer). So what do you use it for? This option is most commonly used to install standalone network printers using an IP address. Using current versions of Windows and a modern printer, you shouldn’t need to use the IP address to install a standalone network printer, but it can be a helpful alternative if Windows refuses to detect it any other way.
If you need to install a standalone network printer, use its IP address or hostname. In Windows Vista and Windows 7, click Add a local printer. In the Create a new port drop-down box, select Standard TCP/IP Port. Click Next. Type the IP address here. Windows 8/8.1/10 is even simpler: If Windows doesn’t automatically detect your new printer, click The printer that I want isn’t listed and select Add a printer using TCP/IP address or hostname.
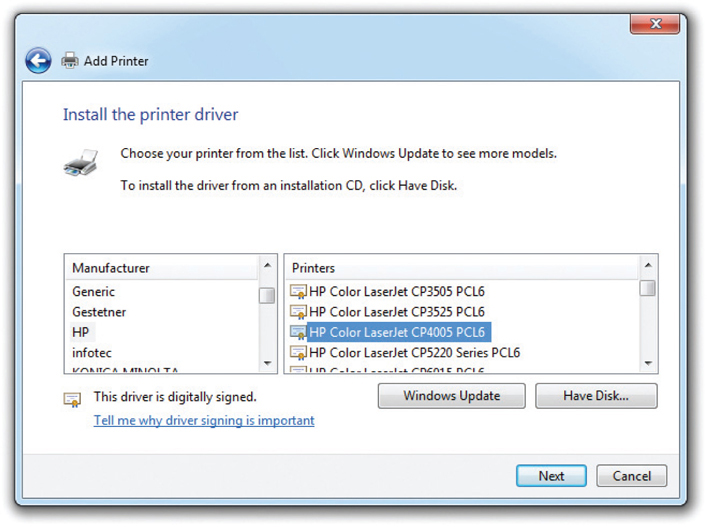
Whether you use a USB port or a TCP/IP port, you’ll need to manually select the proper driver (see Figure 27-24). Windows includes a lot of printer drivers, but you can also use the handy Have Disk option to use the disc that came with the printer. If you use the driver included on the disc, Windows will require administrator privileges to proceed; otherwise, you won’t be able to finish the installation. The Windows Update button enables you to grab the latest printer drivers via the Internet.
Figure 27-24 Selecting drivers
After clicking the Next button, you’ll be asked if the new local printer should be the default printer and whether you want to share it with other computers on the network. And before you ask, yes, you can share a standalone network printer connected to your computer via a TCP/IP port using File and Printer Sharing, though the printer would be disabled for other users any time you turned off your computer. You’ll be asked to print a test page to make sure everything works. Then you’re done!
EXAM TIP Windows-based printer sharing isn’t the only game in town. Apple’s AirPrint functionality can be used in conjunction with its Bonjour Print Service (installed separately, or along with iTunes) to share a printer connected to a Windows system with AirPrint-compatible Mac OS X and Apple iOS devices.
Surprisingly, setting up network printers doesn’t require much more effort than setting up local printers. When you try to install a network printer the Add Printer Wizard will scan for any available printers on your local network. More often than not, the printer you are looking for will pop up in a list (see Figure 27-25). When you select that printer and click Next, Windows will search for drivers. If you need to, you can pick from a list of available drivers or use the disc that came with the printer. Either way, you’re already done.
Figure 27-25 List of available shared printers on a network
NOTE Remember printer sharing from Chapter 21, “Local Area Networking”? Here’s the other side of the operation. Keep in mind that after you install a shared printer onto your computer, you can actually share it with others. Windows considers it your printer, so you can do what you want with it, including sharing it again.
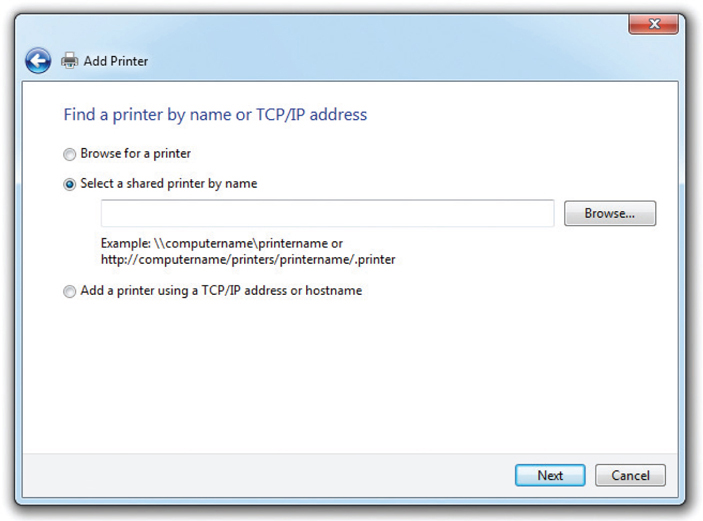
If Windows fails to find your printer, you’ll need to configure the network printer manually. Every version of Windows includes multiple methods of doing this. These methods change depending on whether you are connected to a domain or a workgroup.
If you are on a workgroup, you can browse for a printer on your network, connect to a specific printer (using its name or URL), or use a TCP/IP address or hostname, as you see in Figure 27-26. In a domain, most of these options remain the same, except that instead of browsing the workgroup, you can search and browse the domain using several search parameters, including printer features, printer location, and more. Once you’ve found your printer, you might be prompted for drivers. Provide them using the usual methods described earlier and then you are finished!
Figure 27-26 Options for finding network printers
NOTE If you are a member of a Windows homegroup and printer sharing is enabled, all printers connected to the homegroup are shared with you automatically.
Remember that Windows doesn’t always see your network’s printers exactly how they are physically arranged. Imagine you have a network with three computers. Andy’s computer has a printer connected via USB, whereas Beth’s computer and Carol’s computer have no printers. There is, however, a second printer connected directly to their router via Ethernet. Beth has configured her system to connect directly to the network printer using an IP address. As such, she can actually share that printer with the rest of her network, even though it’s not attached to her computer—Windows doesn’t care where it is. The process for sharing a local printer and a network printer is identical because Windows considers both printers to be installed on your computer and under your control. So now Andy and Beth both share printers. When Carol goes looking for shared printers to use, the network printer attached to the router will look like Beth’s printer, as if it were directly connected to Beth’s machine.
NOTE Depending upon how your network shares printers, you can end up seeing the same printer shared multiple ways. Everyone who has a shared printer installed can share the same printer again as their own printer. This can lead to some confusing printer usage, especially once people start turning off their computers and breaking the connections to the shared printer. Avoid this web of print sharing.
Figure 27-27 shows a typical Windows Devices and Printers screen on a system with one printer installed. Note the small checkmark on the icon; this shows that the device is the default printer. If you have multiple printers, you can change the default printer by right-clicking the printer’s icon and selecting Set as default printer.
Figure 27-27 Installed default printer in the Devices and Printers applet
In addition to the regular driver installation outlined previously, some installations use printer emulation. Printer emulation simply means using a substitute printer driver for a printer, as opposed to using one made exclusively for that printer. You’ll run into printer emulation in two circumstances. First, some new printers do not come with their own drivers. They instead emulate a well-known printer (such as an HP LaserJet 4) and run perfectly well on that printer driver. Second, you may see emulation in the “I don’t have the right driver!” scenario. I keep about three different HP LaserJet and Epson inkjet printers installed on my computer because I know that with these printer drivers I can print to almost any printer. Some printers may require you to set them into an emulation mode to handle a driver other than their native one.
EXAM TIP In addition to the Devices and Printers applet, Windows 7 and newer (excluding the Home Premium edition) also include the Print Management console. This tool enables you to view and modify all the printers and drivers on your system or connected to your network. You can also manage any Windows print servers connected to the network. Many of Print Management’s advanced features go beyond the scope of the CompTIA A+ exams, but know that it centralizes (and in a few cases, enhances) the standard printer controls in Windows. You can find Print Management in Control Panel | Administrative Tools | Print Management.
Once your printer is installed, a good first stop is the Printing preferences menu, accessible by right-clicking on the desired printer in the Devices and Printers applet in the Control Panel. This is where you’ll be able to control how your printer will print your documents. Be aware that these settings can vary depending on features available on your printer or multifunction device, but let’s take a look at some of the ones you’re most likely to find.
The settings you’re most likely to change from time to time are probably the layout settings, which control how the printer determines what to print where.
• The duplex setting lets you specify whether and how to use each side of a printed page. Simple duplexing will just use the front and back of each sheet sequentially, but you may find more advanced options for laying out booklets.
• The orientation setting lets you specify whether to print in landscape or portrait mode.
• The multiple page setting will let you print multiple document pages on each physical page.
• The scaling setting, not to be confused with the multiple page setting, is usually for fitting a large document to a single page, or scaling a small document up to the size of a full page.
• Reverse or invert options let you print the mirror image of your document, which is useful for printing on transfer paper and other special-use cases.
Many of the settings you’ll find are for telling your printer what kind of paper it will be using, and (especially if the printer has multiple paper trays) where to find it.
• Set the paper size to one of several common paper sizes, or define a custom one.
• Specify the paper type, which may involve setting thickness, coating, and special formats such as envelopes and labels.
• A paper source setting will let you select any available paper trays, and possibly manual feed, in which case the printer will wait for you to feed it each sheet individually. This is useful if you need to feed in one-off items or paper that won’t fit in the tray.
There are usually a number of different settings that have bearing on quality, but be aware that the name or description of some settings that affect quality may discuss ink or toner use (and may as such be located with other ink/toner-related settings).
• The most obvious of these, resolution, specifies what DPI the document should be printed at.
• Some printers may let you choose some mode or quality presets that optimize printing for graphics or text, or choose to manually configure your own advanced settings.
• Some printers may have settings that reduce ink or toner used, for economic and environmental reasons.
Some print devices offer options useful in specific, but limited, occasions.
• The apply a watermark setting will let you choose from presets or define your own. A watermark is a lightly printed mark across every page. Use a watermark to designate a draft copy of a document, for example, rather than a final copy.
• Header/footer settings can be used to add information about when a document was printed and who printed it.
• A collate option lets you specify the order in which multiple copies of a multi-page document are printed. If the option is unchecked and you print ten copies, each page will be printed ten times before the printer moves on. If the option is checked, the printer will print the full document before starting over.
Although a quality printer is the first step toward quality output, your output relies on factors other than the printer itself. What you see on the screen may not match what comes out of the printer, so calibration is important. Using the wrong type of paper can result in less-than-acceptable printed documents. Configuring the printer driver and spool settings can also affect your print jobs.
If you’ve ever tweaked a photograph so it looks perfect on your screen, only to discover the final printout was darker than you had hoped, consider calibrating your monitor. Calibration uses hardware to generate an International Color Consortium (ICC) color profile, a file that defines the color characteristics of a hardware device. The operating system then uses this profile to correct any color shifts in your monitor. With a calibrated monitor, you know any color shifts in your photograph are really in the photo, not an artifact of your monitor.
Where these ICC color profiles really start to get interesting is that they can be created for printers as well. Just like with a monitor, they let the computer know the unique color quirks of a specific printer. When your printer and monitor have been properly calibrated and the profiles installed, your prints and monitor display should match. Color profiles are sometimes included on the installation media with a printer, but you can create or purchase custom profiles as well. Windows includes Windows Color System (WCS) to help build color profiles for use across devices. WCS is based on a newer standard Microsoft calls color infrastructure and translation engine (CITE).
While we’ve looked at a few of the ways you can share a printer or multifunction device over a network, there’s more to know about sharing these devices than just how to set them up. A few big issues are network security and data privacy.
The ease of access that makes wired or wireless network printers and multifunction devices so useful is also a big risk; at best it means they’re vulnerable to attacks over the LAN, and at worst it means they may be open to attack from the entire Internet. While hardening a network printer or multifunction device is beyond the scope of this book, it’s important to be aware of the risks these devices present. There are the obvious immediate risks to the data and documents flowing through the device, but because security is often overlooked on these devices, they are also common starting points for an attack on the broader network.
If you think about it, a lot of sensitive information can pass through a printer or multifunction device in most organizations, especially in places like schools and hospitals where privacy is strictly regulated. When all of this information passes through the printer, it’s important to make sure it isn’t leaking out. Unfortunately, it’s common for modern devices to contain a hard drive or other storage media used to cache copies of documents the device prints, scans, copies, or faxes. Depending on the device, you may be able to disable this feature, schedule regular deletion of the cache, or manually clear the cache regularly to limit the amount of damage a compromise could cause. It’s also important to clear this information before disposing of the device.
EXAM TIP The CompTIA A+ 901 objectives refer to this as hard drive caching, so be prepared to see this phrasing on the exam.
Disabling features like this wouldn’t be much good if anyone who could use the device could also change the settings, so enterprise models often allow for user authentication on the device. This can address a number of the risks these devices present by limiting use to authenticated users, and restricting the features each user can access to only what they need.
Just because the data on your device is secure doesn’t mean documents rolling off of it are free from prying eyes. User authentication can also help out by letting users send documents to the printer, but waiting to print them until the user authenticates at the device. It can also minimize some of the risk to unsupervised documents by restricting the ability of less-trusted users to scan/copy/e-mail a document from the device, limiting the ease with which they could steal a copy of an unattended document and leave the original.
Once set up, printers tend to run with few issues, assuming that you install the proper drivers and keep the printer well maintained. But printer errors do occasionally develop. Take a look at the most common print problems, as well as problems that crop up with specific printer types.
NOTE Every printer is different. Read the documentation included with your printer to learn how you can perform the tasks listed in this section.
Printers of all stripes share some common problems, such as print jobs that don’t print, strangely sized prints, and misalignment. Other issues include disposing of consumables, sharing multiple printers, and crashing on power-up. Let’s take a look at these general troubleshooting issues, but start with a recap of the tools of the trade.
EXAM TIP Don’t forget to check the obvious. Many printers include tiny displays that can clue you in to what’s wrong. Most brands use a series of error codes that indicate the problem. Use the manual or the manufacturer’s Web site to translate the error code into meaningful information.
Before you jump in and start to work on a printer that’s giving you fits, you’ll need some tools. You can use the standard computer tech tools in your toolkit, plus a couple of printer-specific devices. Here are some that will come in handy:
• A multimeter for troubleshooting electrical problems such as faulty wall outlets
• Various cleaning solutions, such as denatured alcohol
• An extension magnet for grabbing loose screws in tight spaces and cleaning up iron-based toner
• An optical disc or USB thumb drive with test patterns for checking print quality
• Your trusty screwdriver—both a Phillips-head and flat-head, because if you bring just one kind, it’s a sure bet that you’ll need the other
If you click Print but nothing comes out of the printer, first check all the obvious things. Is the printer on? Is it connected? Is it online? Does it have paper? Is your computer online?
If you can’t connect to the printer, check all cables, ports, and power involved. If everything is plugged in and ready to go, check the appropriate printer applet for your version of Windows. If you don’t see the printer you are looking for, you’ll need to reinstall it using the Add Printer Wizard.
If you attempt to use a printer shared by another computer but Windows pops up with an “Access Denied” error, you might not have permission to use the printer. Go to the host system and check the Security tab of the Printer Properties dialog box. Make sure your user account is allowed to use the printer.
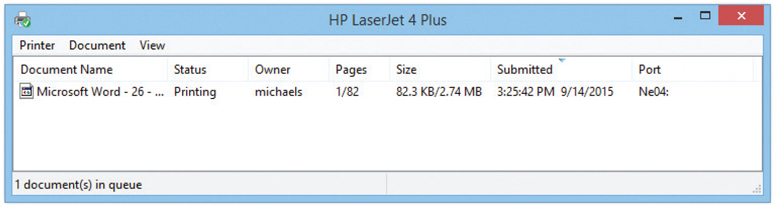
Assuming the printer is in good order, it’s time to look at the spooler. You can see the spooler status either by double-clicking the printer’s icon in the appropriate printer Control Panel applet or by double-clicking the tiny printer icon in the notification area if it’s present. If you’re having a problem, the printer icon will almost always be there. Figure 27-28 shows the print spooler open.
Figure 27-28 Print spooler
Print spoolers can easily overflow or become corrupt due to a lack of disk space, too many print jobs, or one of a thousand other factors. The status window shows all of the pending print jobs and enables you to delete, start, or pause jobs. I usually just delete the affected print job(s) and try again.
Print spoolers are handy. If the printer goes down, you can just leave the print jobs in the spooler until the printer comes back online. If you have a printer that isn’t coming on anytime soon, you can simply delete the print job in the spooler window and try another printer.
If you have problems with the print spooler, you can get around them by changing your print spool settings. Go into the Printers/Devices and Printers applet, right-click the icon of the printer in question, and choose Printer properties. In the resulting Properties dialog box (see Figure 27-29), choose the Print directly to the printer radio button on the Advanced tab and click OK; then try sending your print job again. Note that this window also offers you the choice of printing immediately—that is, starting to print pages as soon as the spooler has enough information to feed to the printer—or holding off on printing until the entire job is spooled.
Figure 27-29 Print spool settings
If that isn’t enough, try restarting the print spooler service. Open the Start menu and right-click on Computer. Select Manage—you’ll need administrator privileges to continue. In the column on the left, double-click on Services and Applications, and then click on Services. The Services console should appear in the center of the Computer Management window. Scroll down and find the service named Print Spooler. Right-click on the service and simply click Restart, if available; otherwise, select Stop, wait for it to stop, right-click on the service again, and select Start. You should be able to print using the print spooler again.
Another possible cause for a stalled print job is that the printer is simply waiting for the correct paper! Laser printers in particular have settings that tell them what size paper is in their standard paper tray or trays. If the application sending a print job specifies a different paper size—for example, it wants to print a standard No. 10 envelope, or perhaps a legal sheet, but the standard paper tray holds only 8.5 × 11 letter paper—the printer usually pauses and holds up the queue until someone switches out the tray or manually feeds the type of paper that this print job requires. You can usually override this pause, even without having the specified paper, by pressing the OK or GO button on the printer.
The printer’s default paper tray and paper size options will differ greatly depending on the printer type and model. To find these settings, go into the printer’s Properties dialog box from the Printers/Devices and Printers applet, and then select the Device Settings tab. This list of settings includes Form To Tray Assignment, where you can specify which tray (in the case of a printer with multiple paper trays) holds which size paper.
A print job that comes out an unexpected size usually points to a user mistake in setting up the print job. All applications have a Print command and a Page Setup interface. The Page Setup interface enables you to define a number of print options, which vary from application to application. Figure 27-30 shows the Page Setup options for Microsoft Word. Make sure the page is set up properly before you blame the printer for a problem.
Figure 27-30 Page Setup options for Microsoft Word
If you know the page is set up correctly, recheck the printer drivers. If necessary, uninstall and reinstall the printer drivers. If the problem persists, you may have a serious problem with the printer’s print engine, but that comes up as a likely answer only when you continually get the same strangely sized printouts using a variety of applications.
Misaligned or garbage printouts invariably point to a corrupted or incorrect driver. Make sure you’re using the right driver (it’s hard to mess this up, but not impossible) and then uninstall and reinstall the printer driver. If the problem persists, you may be asking the printer to do something it cannot do. For example, you may be printing to a PostScript printer with a PCL driver. Check the printer type to verify that you haven’t installed the wrong type of driver for that printer!
All printers tend to generate a lot of trash in the form of consumables. Impact printers use paper and ribbons, inkjet printers use paper and ink cartridges, and laser printers use paper and toner cartridges. In today’s environmentally sensitive world, many laws regulate the proper disposal of most printer components. Be sure to check with the local sanitation department or disposal services company before throwing away any component. Of course, you should never throw away toner cartridges—certain companies will pay for used cartridges!
EXAM TIP Material safety data sheets (MSDSs) contain important information regarding hazardous materials such as safe use procedures and emergency response instructions. An MSDS is typically posted anywhere a hazardous chemical is used.
Both laser printers and computers require more power during their initial power-up (the POST on a computer and the warm-up on a laser printer) than once they are running. Hewlett-Packard recommends a reverse power-up. Turn on the laser printer first and allow it to finish its warm-up before turning on the computer. This avoids having two devices drawing their peak loads simultaneously.
The small menu display screens included on many modern printers and multifunction devices can, like any other display screen, have a number of issues such as freezing, not coming on at all, displaying a single color, or artifacts such as lines showing on the display. Unfortunately, there’s not a lot you can do about these problems. Turning the device off and back on is a good start, and some manufacturers recommend completely unplugging it for a few minutes. If the screen is still misbehaving but the device is otherwise functional and the problem didn’t appear immediately after a firmware update, it’s time to take the device to a service center.
Impact printers require regular maintenance but will run forever as long as you’re diligent. Keep the platen (the roller or plate on which the pins impact) and the printhead clean with denatured alcohol. Be sure to lubricate gears and pulleys according to the manufacturer’s specifications. Never lubricate the printhead, however, because the lubricant will smear and stain the paper. Don’t forget to replace the ink ribbon every so often.
White bars going through the text point to a dirty or damaged printhead. Try cleaning the printhead with a little denatured alcohol. If the problem persists, replace the print-head. Printheads for most printers are readily available from the manufacturer or from companies that rebuild them. If the characters look chopped off at the top or bottom, the printhead probably needs to be adjusted. Refer to the manufacturer’s instructions for proper adjustment.
If the page is covered with dots and small smudges—the “pepper look”—the platen is dirty. Clean the platen with denatured alcohol. If the image is faded, and you know the ribbon is good, try adjusting the printhead closer to the platen. If the image is okay on one side of the paper but fades as you move to the other, the platen is out of adjustment. Platens are generally difficult to adjust, so your best plan is to take it to the manufacturer’s local warranty/repair center.
Compared to other printer styles, thermal printers are simple to troubleshoot and maintain. With direct thermal printers, you only need to worry about three things: the heating element, the rollers, and the paper. With thermal wax printers, you also need to care for the wax ribbon.
To clean the heating element, turn off the thermal printer and open it according to the manufacturer’s instructions. Use denatured alcohol and a lint-free cloth to wipe off the heating element. You might need to use a little pressure to get it completely clean. Clean the rollers with a cloth or compressed air. You want to keep them free of debris so they can properly grip the paper. Replacing the paper is as easy as sliding off the old roll and replacing it with a new one. Remember to feed the paper through the heating element, because otherwise you won’t print anything. Replacing the ribbon is similar to replacing the roll of paper; make sure to feed it past the heating element, or the printer won’t work properly. Your printer’s manufacturer should include any special instructions for installing a new ribbon.
Inkjet printers are reliable devices that require little maintenance as long as they are used within their design parameters (high-use machines will require more intensive maintenance). Because of the low price of these printers, manufacturers know that people don’t want to spend a lot of money keeping them running. If you perform even the most basic maintenance tasks, they will soldier on for years without a whimper. Inkjets generally have built-in maintenance programs that you should run from time to time to keep your inkjet in good operating order.
Inkjet printers don’t get nearly as dirty as laser printers, and most manufacturers do not recommend periodic cleaning. Unless your manufacturer explicitly tells you to do so, don’t vacuum an inkjet. Inkjets generally do not have maintenance kits, but most inkjet printers come with extensive maintenance software (see Figure 27-31). Usually, the hardest part of using this software is finding it in the first place. Look for an option in Printing Preferences, a selection on the Start menu, or an option on the printer’s management Web page. Don’t worry—it’s there!
Figure 27-31 Inkjet printer maintenance screen
When you first set up an inkjet printer, it normally instructs you to perform a routine (sometimes referred to as calibration) to align the printheads properly, wherein you print out a page and select from sets of numbered lines. If this isn’t done, the print quality will show it, but the good news is that you can perform this procedure at any time. If a printer is moved or dropped or it’s just been working away untended for a while, it’s often worth running the alignment routine.
Did I say that you never should clean an inkjet? Well, that may be true for the printer itself, but there is one part of your printer that will benefit from an occasional cleaning: the inkjet’s printer head nozzles. The nozzles are the tiny pipes that squirt the ink onto the paper. A common problem with inkjet printers is the tendency for the ink inside the nozzles to dry out when not used even for a relatively short time, blocking any ink from exiting. If your printer is telling Windows that it’s printing and feeding paper through, but either nothing is coming out (usually the case if you’re just printing black text) or only certain colors are printing, the culprit is almost certainly dried ink clogging the nozzles.
NOTE All inkjet inks are water-based, and water works better than denatured alcohol to clean them up.
Every inkjet printer has a different procedure for cleaning the printhead nozzles. On older inkjets, you usually have to press buttons on the printer to start a maintenance program. On more modern inkjets, you can access the head-cleaning maintenance program from Windows.
NOTE Cleaning the heads on an inkjet printer is sometimes necessary, but I don’t recommend that you do it on a regular basis as preventive maintenance. The head-cleaning process uses up a lot of that very expensive inkjet ink—so do this only when a printing problem seems to indicate clogged or dirty printheads!
Another problem that sometimes arises is the dreaded multi-sheet paper grab. This is often not actually your printer’s fault—humidity can cause sheets of paper to cling to each other—but sometimes the culprit is an overheated printer, so if you’ve been cranking out a lot of documents without stopping, try giving the printer a bit of a coffee break. Also, fan the sheets of the paper stack before inserting it into the paper tray.
Finally, check to see if excess ink overflow is a problem. In the area where the print-heads park, look for a small tank or tray that catches excess ink from the cleaning process. If the printer has one, check to see how full it is. If this tray overflows onto the main board or even the power supply, it will kill your printer. If you discover that the tray is about to overflow, you can remove excess ink by inserting a twisted paper towel into the tank to soak up some of the ink. It is advisable to wear latex or vinyl gloves while doing this. Clean up any spilled ink with a paper towel dampened with distilled water.
Quite a few problems can arise with laser printers, but before getting into those details, you need to review some recommended procedures for avoiding those problems.
CAUTION Before you service a laser printer, always, always turn it off and unplug it! Don’t expose yourself to the very dangerous high voltages found inside these machines.
Unlike computer maintenance, laser printer maintenance follows a fairly well-established procedure. Of course, you’ll need to replace the toner cartridge every so often, but keeping your laser printer healthy requires following these maintenance steps.
Keep It Clean Laser printers are quite robust as a rule. A good cleaning every time you replace the toner cartridge will help that printer last for many years. I know of many examples of original HP LaserJet I printers continuing to run perfectly after a dozen or more years of operation. The secret is that they were kept immaculately clean.
Your laser printer gets dirty in two ways: Excess toner, over time, will slowly coat the entire printer. Paper dust, sometimes called paper dander, tends to build up where the paper is bent around rollers or where pickup rollers grab paper. Unlike (black) toner, paper dust is easy to see and is usually a good indicator that a printer needs to be cleaned. Usually, a thorough cleaning using a can of compressed air to blow out the printer is the best cleaning you can do. It’s best to do this outdoors, or you may end up looking like one of those chimney sweeps from Mary Poppins! If you must clean a printer indoors, use a special low-static vacuum designed especially for electronic components (see Figure 27-32).
Figure 27-32 Low-static vacuum
EXAM TIP The CompTIA A+ 220-901 exam refers to a “toner vacuum,” which is the same as a low-static vacuum.
Every laser printer has its own unique cleaning method, but the cleaning instructions tend to skip one little area. Every laser printer has a number of rubber guide rollers through which the paper is run during the print process. These little rollers tend to pick up dirt and paper dust over time, making them slip and jam paper. They are easily cleaned with a small amount of 90 percent or better alcohol on a fibrous cleaning towel. The alcohol will remove the debris and any dead rubber. If the paper won’t feed, you can give the rollers and separator pads a textured surface that will restore their feeding properties by rubbing them with a little denatured alcohol on a nonmetallic scouring pad.
CAUTION The photosensitive drum, usually contained in the toner cartridge, can be wiped clean if it becomes dirty, but be very careful if you do so! If the drum becomes scratched, the scratch will appear on every page printed from that point on. The only repair in the event of a scratch is to replace the toner cartridge.
If you’re ready to get specific, get the printer’s service manual. They are a key source for information on how to keep a printer clean and running. Sadly, not all printer manufacturers provide these, but most do. While you’re at it, see if the manufacturer has a Quick Reference Guide; these can be very handy for most printer problems!
Periodic Maintenance Although keeping the printer clean is critical to its health and well being, every laser printer has certain components that you need to replace periodically. Your ultimate source for determining the parts that need to be replaced (and when to replace them) is the printer manufacturer. Following the manufacturer’s maintenance guidelines will help to ensure years of trouble-free, dependable printing from your laser printer.
Many manufacturers provide kits that contain components that you should replace on a regular schedule. These maintenance kits include sets of replacement parts, such as a fuser, as well as one or more rollers or pads. Typically, you need to reset the page counter after installing a maintenance kit so the printer can remind you to perform maintenance again after a certain number of pages have been printed.
Some ozone filters can be cleaned with a vacuum and some can only be replaced—follow the manufacturer’s recommendation. You can clean the fuser assembly with 90 percent or better denatured alcohol. Check the heat roller (the Teflon-coated one with the light bulb inside) for pits and scratches. If you see surface damage on the rollers, replace the fuser unit.
Most printers will give you an error code when the fuser is damaged or overheating and needs to be replaced; others will produce the error code at a preset copy count as a preventive maintenance measure. Again, follow the manufacturer’s recommendations.
NOTE Failure of the thermal fuse (used to keep the fuser from overheating) can necessitate replacing the fuser assembly. Some machines contain more than one thermal fuse. As always, follow the manufacturer’s recommendations. Many manufacturers have kits that alert you with an alarm code to replace the fuser unit and key rollers and guides at predetermined page counts.
The transfer corona can be cleaned with a 90 percent denatured alcohol solution on a cotton swab. If the wire is broken, you can replace it; many just snap in or are held in by a couple of screws. Paper guides can also be cleaned with alcohol on a fibrous towel.
CAUTION The fuser assembly operates at 200 to 300 degrees Fahrenheit, so always allow time for this component to cool down before you attempt to clean it.
Laser printer problems usually result in poor output. One of the most important tests you can do on any printer, not just a laser printer, is called a diagnostic print page or an engine test page. You do this either by holding down the On Line button as the printer is started or by using the printer’s maintenance software.
Blank Pages If a printer is spitting out blank pages, that usually means the printer is out of toner. If the printer does have toner and nothing prints, print a diagnostic print page. If that is also blank, remove the toner cartridge and look at the imaging drum inside. If the image is still there, you know the transfer corona or the high-voltage power supply has failed. Check the printer’s maintenance guide to see how to focus on the bad part and replace it.
Dirty or Smudged Printouts If the fusing mechanism in a laser printer gets dirty, it will leave a light dusting of toner all over the paper, particularly on the back of the page. When you see toner speckles on your printouts, you should get the printer cleaned.
If the printout looks smudged, the fuser isn’t properly fusing the toner to the paper. Depending on the paper used, the fuser needs to reach a certain temperature to fuse the toner. If the toner won’t fuse to the paper, try using a lighter-weight paper. You might also need to replace the fuser.
Ghosting Ghost images sometimes appear at regular intervals on the printed page. This happens when the imaging drum has not fully discharged and is picking up toner from a previous image or when a previous image has used up so much toner that either the supply of charged toner is insufficient or the toner has not been adequately charged. Sometimes it can also be caused by a worn-out cleaning blade that isn’t removing the toner from the drum.
Light Ghosting Versus Dark Ghosting A variety of problems can cause both light and dark ghosting, but the most common source of light ghosting is “developer starvation.” If you ask a laser printer to print an extremely dark or complex image, it can use up so much toner that the toner cartridge will not be able to charge enough toner to print the next image. The proper solution is to use less toner. You can fix ghosting problems in the following ways:
• Lower the resolution of the page (print at 300 dpi instead of 600 dpi).
• Use a different pattern.
• Avoid 50 percent grayscale and “dot-on/dot-off patterns.”
• Change the layout so that grayscale patterns do not follow black areas.
• Make dark patterns lighter and light patterns darker.
• Print in landscape orientation.
• Adjust print density and RET settings.
• Print a completely blank page immediately prior to the page with the ghosting image, as part of the same print job.
In addition to these possibilities, low temperature and low humidity can aggravate ghosting problems. Check your user’s manual for environmental recommendations. Dark ghosting can sometimes be caused by a damaged drum. It may be fixed by replacing the toner cartridge. Light ghosting would not be solved in this way. Switching other components will not usually affect ghosting problems because they are a side effect of the entire printing process.
Vertical White Lines Vertical white lines usually happen when the toner is clogged, preventing the proper dispersion of toner on the drum. Try shaking the toner cartridge to dislodge the clog. If that doesn’t work, replace the toner cartridge.
Blotchy Print Blotches are commonly a result of uneven dispersion of toner, especially if the toner is low. Shake the toner from side to side and then try to print. Also be sure that the printer is sitting level. Finally, make sure the paper is not wet in spots. If the blotches are in a regular order, check the fusing rollers and the photosensitive drum for any foreign objects.
Spotty Print If the spots appear at regular intervals, the drum may be damaged or some toner may be stuck to the fuser rollers. Try wiping off the fuser rollers. Check the drum for damage. If the drum is damaged, get a new toner cartridge.
Embossed Effect If your prints are getting an embossed effect (like putting a penny under a piece of paper and rubbing it with a lead pencil), there is almost certainly a foreign object on a roller. Use 90 percent denatured alcohol or regular water with a soft cloth to try to remove it. If the foreign object is on the photosensitive drum, you’re going to have to use a new toner cartridge. An embossed effect can also be caused by the contrast control being set too high. The contrast control is actually a knob on the inside of the unit (sometimes accessible from the outside, on older models). Check your manual for the specific location.
Incomplete Characters You can sometimes correct incompletely printed characters on laser-printed transparencies by adjusting the print density. Be extremely careful to use only materials approved for use in laser printers.
Creased Pages Laser printers have up to four rollers. In addition to the heat and pressure rollers of the fuser assembly, other rollers move the paper from the source tray to the output tray. These rollers crease the paper to avoid curling that would cause paper jams in the printer. If the creases are noticeable, try using a different paper type. Cotton bond paper is usually more susceptible to noticeable creasing than other bonds. You might also try sending the output to the face-up tray, which avoids one roller. There is no hardware solution to this problem; it is simply a side effect of the process.
Paper Jams Every printer jams now and then. If you get a jam, always refer first to the manufacturer’s jam removal procedure. It is simply too easy to damage a printer by pulling on the jammed paper! If the printer reports a jam but there’s no paper inside, you’ve almost certainly got a problem with one of the many jam sensors or paper feed sensors inside the printer, and you’ll need to take it to a repair center.
Pulling Multiple Sheets If the printer grabs multiple sheets at a time, first try opening a new ream of paper and loading that in the printer. If that works, you have a humidity problem. If the new paper doesn’t work, check the separation pad on the printer. The separation pad is a small piece of cork or rubber that separates the sheets as they are pulled from the paper feed tray. A worn separation pad looks shiny and, well, worn! Most separation pads are easy to replace. Check out www.printerworks.com to see if you can replace yours.
Warped, Overprinted, or Poorly Formed Characters Poorly formed characters can indicate either a problem with the paper (or other media) or a problem with the hardware.
Incorrect media cause a number of these types of problems. Avoid paper that is too rough or too smooth. Paper that is too rough interferes with the fusing of characters and their initial definition. If the paper is too smooth (like some coated papers, for example), it may feed improperly, causing distorted or overwritten characters. Even though you can purchase laser printer–specific paper, all laser printers print acceptably on standard photocopy paper. Try to keep the paper from becoming too wet. Don’t open a ream of paper until it is time to load it into the printer. Always fan the paper before loading it into the printer, especially if the paper has been left out of the package for more than just a few days.
The durability of a well-maintained laser printer makes hardware a much rarer source of character printing problems, but you should be aware of the possibility. Fortunately, it is fairly easy to check the hardware. Most laser printers have a self-test function—often combined with a diagnostic printout, but sometimes as a separate process. This self-test shows whether the laser printer can properly develop an image without actually having to send print commands from the computer. The self-test is quite handy to verify the question “Is it the printer or is it the computer?” Run the self-test to check for connectivity and configuration problems.
Possible solutions include replacing the toner cartridge, especially if you hear popping noises; checking the cabling; and replacing the data cable, especially if it has bends or crimps or if objects are resting on the cable. If you have a front menu panel, turn off advanced functions and high-speed settings to determine whether the advanced functions are either not working properly or not supported by your current software configuration (check your manuals for configuration information). If these solutions do not work, the problem may not be user serviceable. Contact an authorized service center.
1. What mechanism is used by most inkjet printers to push ink onto the paper?
A. Electrostatic discharge
B. Gravity
C. Air pressure
D. Electroconductive plates
2. With a laser printer, what creates the image on the photosensitive drum?
A. Primary corona
B. Laser imaging unit
C. Transfer corona
D. Toner
3. What is the proper order of the laser printing process?
A. Process, clean, charge, expose, develop, transfer, and fuse
B. Process, charge, expose, develop, transfer, fuse, and clean
C. Clean, expose, develop, transfer, process, fuse, and charge
D. Clean, charge, expose, process, develop, fuse, and transfer
4. On a dot-matrix printer, what physically strikes the ribbon to form an image?
A. Electromagnets
B. Printwires
C. Character wheel
D. Print hammers
5. Which of these items are considered to be dot-matrix printer consumables? (Select all that apply.)
A. Drive motor
B. Paper
C. Flywheel
D. Ribbon
6. What part must be vacuumed or replaced periodically to prevent damage caused by the action of the corona?
A. The rubber rollers
B. The ozone filter
C. The transfer filter
D. The cleaning blade
7. Which one of the following port types do most printers support?
A. PS/2
B. USB
C. Infrared
D. RS-232
8. A standalone printer prints a test page just fine, but it makes gobbledygook out of your term paper. What’s probably wrong?
A. Out of toner
B. Fuser error
C. Printer interface
D. Faulty software configuration
9. What printing process uses heat-sensitive plastic film embedded with various color dyes?
A. Dye-sublimation
B. Inkjet
C. Ink-dispersion
D. Dye-dispersion
10. Which tool would help you determine why a print job didn’t print?
A. Printer driver
B. Printer setup
C. Print spooler
D. System setup
1. D. Most inkjet printers use electroconductive plates to push the ink onto the paper.
2. B. The laser imaging unit creates an image on the photosensitive drum.
3. B. Process, charge, expose, develop, transfer, fuse, and clean is the proper process.
4. B. Printwires physically strike the ribbon in dot-matrix printers.
5. B, D. Both paper and ribbons are considered dot-matrix printer consumables.
6. B. The ozone filter should be periodically vacuumed or changed.
7. B. You’ll find almost all non-networked printers hooked up to USB ports.
8. D. The application (software) that is trying to print is probably configured incorrectly.
9. A. Dye-sublimation printers use heat-sensitive plastic film embedded with various color dyes.
10. C. The print spooler can help you determine why a print job didn’t print.