
Roasting pulls the water out of vegetables and concentrates their flavor. (Taste a roasted carrot next to a boiled carrot, and you’ll see how roasting emphasizes the vegetable’s natural sweetness.) Roasting works best for root vegetables, such as carrots, turnips, potatoes, and onions, and for vegetables that contain a great deal of moisture, such as tomatoes and mushrooms. I sometimes coat these softer vegetables with bread crumbs to add texture, as in a gratin.
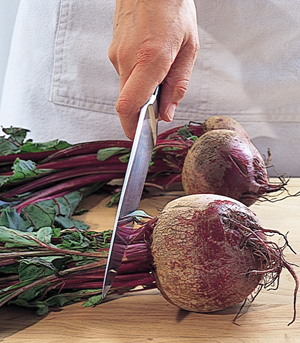
Sometimes you’ll want to roast root vegetables in their skins: russet potatoes because we like to eat the skins, beets because they bleed and dry out once they’re peeled, and baby vegetables because their thin skins are entirely edible. But usually we roast vegetables that have been peeled beforehand. Cut the peeled vegetables into sections or wedges, or turn them, and then lightly coat with olive oil or melted butter to prevent them from drying out in the oven.
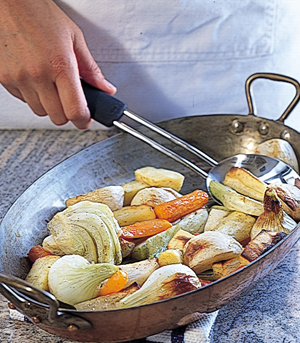
Vegetables can be roasted alone or in combination. Most of the time, all you need to do to roast vegetables is to slide them into the oven and turn them over from time to time so they brown evenly. A nice touch, however, is to pour a little good meat or chicken broth into the roasting pan about ten minutes before the vegetables are done. The broth quickly reduces in the heat of the oven and glazes the vegetables.
Vegetables being roasted alone are shown here, but they can also surround roasted meats or poultry—leg of lamb, roast beef, or roast chicken, for example. When you roast them this way, drippings from the roast mingle with and flavor the vegetables.
1. Same-size vegetables cook evenly: Here, carrots are peeled, sectioned, and cored (for an elegant presentation, they can even be turned). The spring onions are trimmed and left whole (or, if very large, quartered), the turnips are peeled and quartered, and the peeled parsnips are cut the same way as the carrots. Toss the vegetables in the roasting pan with a little extra virgin olive oil or melted butter.

2. Roast the vegetables at 400°F until they start to brown on top, about 20 minutes. Gently stir so they will brown evenly, and continue roasting for about 20 minutes more, until the vegetables are evenly browned and a knife penetrates easily. If desired, add broth and continue roasting until the broth has evaporated and the vegetables are coated with a shiny glaze.
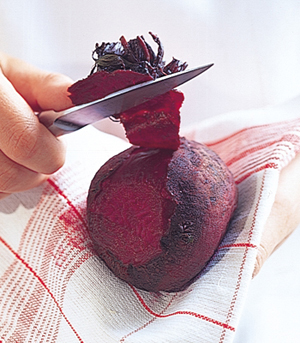
1. Cut off the greens, leaving a ½- to1-inch stem attached to the beet. If you cut into the flesh, the juices will leach out. (Save the greens and cook them.)
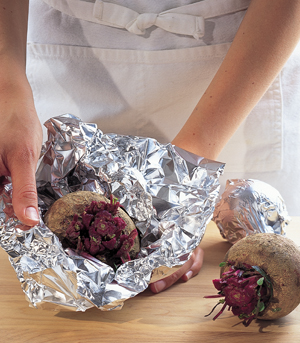
2. Wrap beets individually in aluminum foil to keep them from drying out. (Smaller beets can be grouped together.)
3. Because beets release juices while they roast, they should be roasted on a sheet pan, not directly on the oven rack like potatoes. Roast large beets at 400°F for about 1 hour and 15 minutes, until a skewer inserted into the center (just poke right through the foil) penetrates easily. Unwrap the beets.
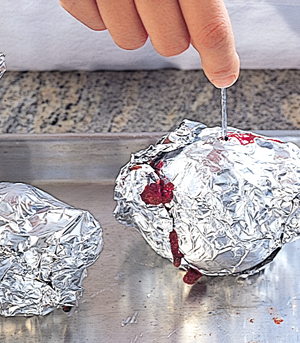
Beets are easiest to peel when still hot. Holding the beet in a kitchen towel, cut off the stems and pull away the peel in strips.
See Also
To turn vegetables, page 13
To make fresh bread crumbs, page 164
To steam beet greens, page 87
To roast meats, pages 184 and 191
To roast chicken, page 146
To make a chicken broth, page 30
To core carrots, page 21
To cut roasted beets in bâtonnets, page 18
To cut turnips into wedges, page 22
To seed tomatoes, page 36
Related Glossary Entries
Bake
Glaze
Roast
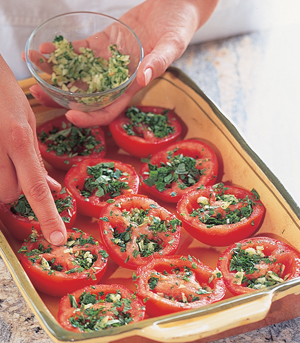
Many recipes for baked tomatoes recommend relatively high heat and a short baking time, but gentle heat and long baking will better concentrate their flavor. Serve with roasted or grilled meats and poultry.
1. Arrange unpeeled seeded tomato halves cut side up in an oiled baking dish just large enough to hold them in a single layer. Stuff with finely chopped garlic, basil, parsley, and fresh bread crumbs.
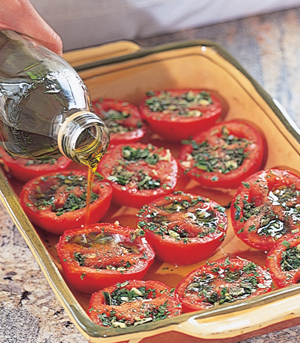
2. Dribble extra virgin olive oil into the openings in the tomatoes. Bake at 350°F for about an hour or longer, until the tomatoes shrivel and any liquid in the bottom of the pan has evaporated.
A gratin is a great way to bind ingredients together and cook them under what becomes a crisp, golden brown crust. I bake root vegetables in a mixture of grated cheese, cream, and milk that reduces over the vegetables to make a thick rich sauce. Potatoes are particularly marvelous in this style of gratin, because they’re such wonderful foils for cream and cheese, and their starchiness thickens the sauce. Turnips and celery root are good in combination with potatoes, because the potatoes add starch, which helps hold the gratin together, and softens the aggressive taste of the other vegetables. Parsnips can be used on their own, because they have a high starch content and their flavor is milder than turnip and celery root.
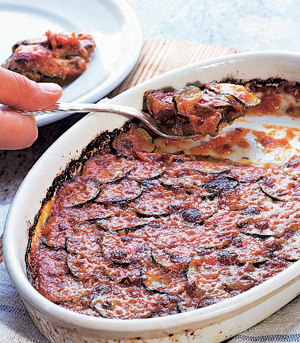
Because watery vegetables such as zucchini, summer squash, eggplant, and mushrooms contain so much liquid of their own, their moisture should be cooked out to concentrate their flavor. In the zucchini gratin, the zucchini are first sautéed and then layered with a fairly thick tomato sauce (coulis) and cheese.
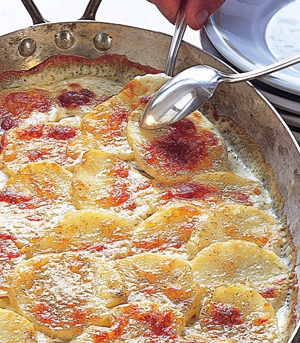
1. Pour a thin layer of the cream and milk mixture into a gratin dish. Season with salt, pepper, and nutmeg and arrange a single layer of potato slices on top. Heat on the stove—use a Flame Tamer if the dish is porcelain or ovenproof glass—until the liquid simmers.
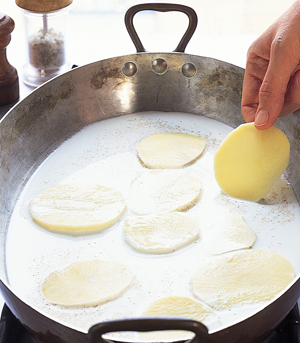
2. Make alternating layers of grated cheese and potatoes, sprinkling each layer with the cream mixture and finishing with a cheese layer. Season with salt, pepper, and nutmeg.

3. Bake at 375°F until the liquid is absorbed, the potatoes are soft, and the top is a crusty gold.
1. Coat the bottom of a gratin dish with a layer of cooked tomato coulis.
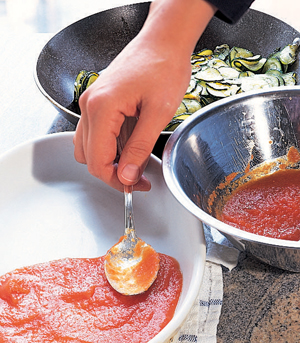
2. Arrange a layer of sautéed zucchini slices in overlapping rows on top. Sprinkle with grated cheese.

3. Continue adding layers of zucchini, coating each layer with tomato sauce and sprinkling with grated cheese.
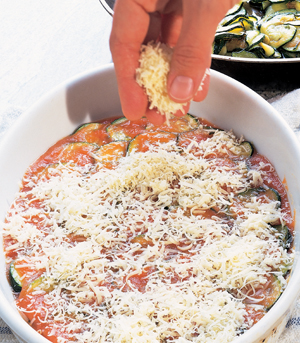
4. Bake at 375°F until golden brown on top.
See Also
To make a cooked tomato coulis, page 50
To sauté vegetables, page 89
Related Glossary Entries
Bake
Gratin
Reduction
Sauté
Though we are all fans of quickly cooked, bright green vegetables, some green vegetables, such as cabbage, green beans, and broccoli, and hardy greens, such as kale and chard, are actually more flavorful when cooked slowly in a covered pot (braised). They lose some of their bright green color, but the loss is more than compensated for by their deep and satisfying flavor, especially when they are cooked with ingredients such as garlic, hot chiles, and bacon.
See Also
To glaze root vegetables, page 76
To make a chicken stock, page 30
To fillet anchovies, page 236
To julienne bell peppers, page 13
Related Glossary Entries
Braise
Glaze
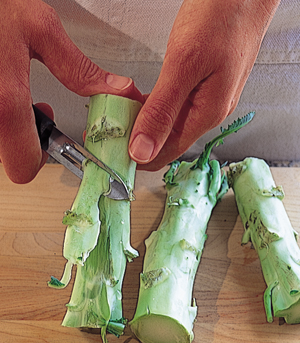
1. Cut the stalks off the florets and peel the stalks with a vegetable peeler.
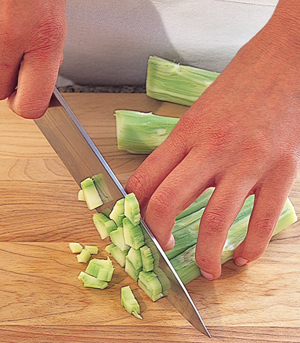
2. Cut the stalks lengthwise into quarters. Group the strips together and cut across into pieces.
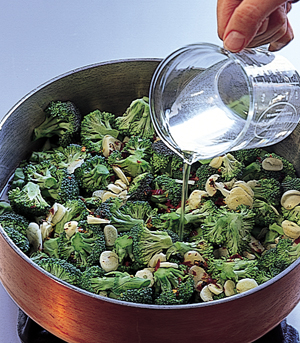
3. Gently cook sliced garlic in extra virgin olive oil. Stir in the chopped broccoli stems and the florets and add enough water or broth to come about one quarter of the way up the broccoli.
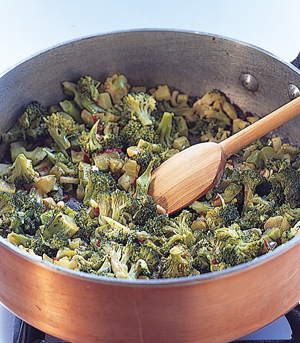
4. Cover and cook over low to medium heat for about 30 minutes, stirring every 5 minutes and checking to make sure the pan isn’t dry. (Add a little more liquid if necessary.) If there’s any liquid left in the pan after 30 minutes, cook, uncovered, for about 10 minutes more to eliminate moisture.
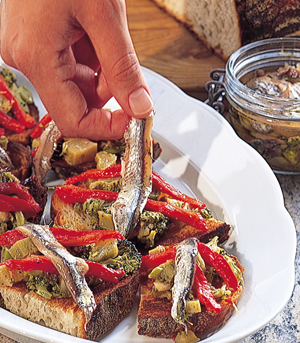
5. Braised broccoli served on toasts and garnished with anchovy fillets and strips of grilled bell pepper makes a savory bruschetta hors d’oeuvre.
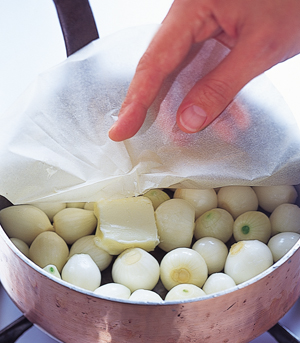
Root vegetables are often cooked using a special technique called glazing. Glazing means to cook vegetables in a small amount of liquid, usually with a tiny bit of butter and sugar, in a partially covered pan or with a round of parchment paper or aluminum foil placed directly over them. As the vegetables cook, they release their savory juices into the surrounding braising liquid (usually water or broth). The liquid reduces and thickens as the vegetables cook, so that when tender, they’re coated with a shiny, savory glaze that tastes of the vegetable.
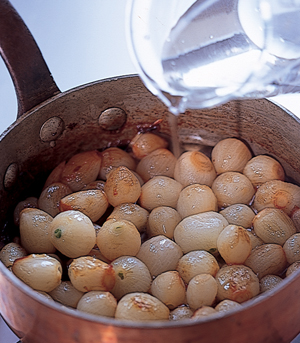
Root vegetables, here pearl onions, can be “white-glazed” or “brown-glazed.” (Traditionally only onions are brown-glazed, but in fact, you can brown-glaze any root vegetable.) White-glazed onions are cooked only long enough for the liquid to evaporate and lightly glaze the onions. Brown-glazed onions are cooked slightly longer, until the glaze on the bottom of the pan lightly caramelizes and browns. A small amount of water or broth is then added to dissolve the caramelized juices so they will coat the onions. Cream used for this stage results in creamed onions.
See Also
To peel pearl onions, page 5
To glaze roasted vegetables, page 70
Related Glossary Entries
Braise
Glaze
Parchment Paper or Aluminum Foil Round
1. Put peeled onions in a pan just large enough to hold them in one layer. Add a pat of butter and pour in water or broth to come halfway up their sides. Cover with a round of parchment paper or aluminum foil.
2. Simmer gently until the onions are easily penetrated with a knife and the liquid has evaporated and formed a brown glaze on the bottom of the pan. Add just enough water to dissolve the glaze.
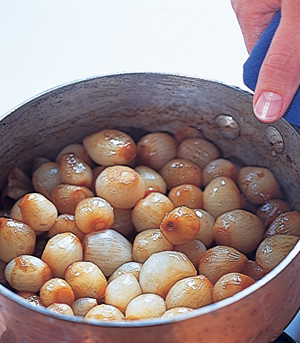
3. Simmer gently until the liquid cooks down to a glaze and coats the onions.
Deep-frying is a way to cook vegetables so that they are piping hot, crisp on the outside, and moist on the inside. Juicy vegetables such as zucchini, eggplant, and mushrooms should be coated with a light batter or bread crumb crust to keep them from absorbing too much oil. Potatoes can be fried without a batter or coating because they contain less water and brown well on their own.
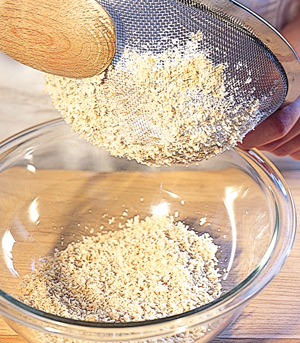
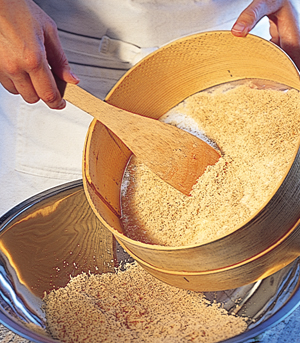
On the following pages are examples of two styles of coatings: a bread crumb coating and a lighter flour and club soda (or water) batter. A bread crumb coating makes a very substantial crust; because it absorbs juices, it works particularly well with very wet vegetables such as tomatoes. Liquid batters, like one of flour and club soda, coat vegetables with a crisp and delicate crust. Tempura batter (page 122) makes a delicate but crunchier crust than club soda batter and works particularly well for absorbent vegetables like mushrooms and tomatoes. Since tempura batter is substantial, it protects the vegetables from absorbing oil.
Use this method for thinly sliced vegetables such as eggplant, fennel, mushrooms, and okra.
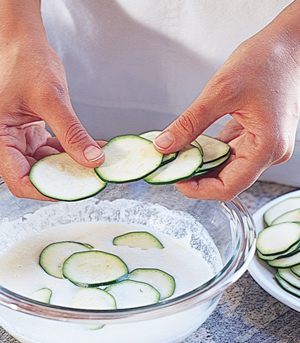
1. Cut the zucchini into thin slices and put them, several at a time, in club soda and flour or plain water and flour batter (page 78).
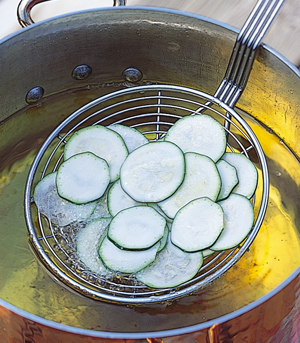
2. Arrange the slices on a spider or in a deep-fry basket (you can also use a slotted spoon, or drop them in with your fingers—but be careful) and lower them into 360°F oil.
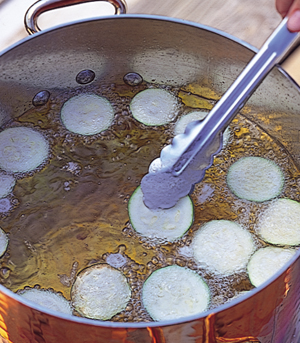
3. Break the slices up while they’re frying—here, I use tongs—to keep them from sticking to each other.
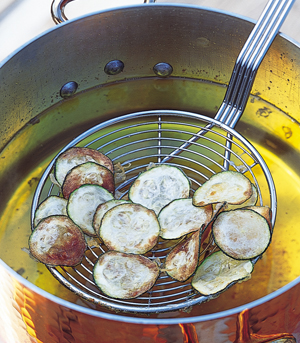
4. Take the slices out of the oil when they’ve barely begun to brown and have turned crispy, and drain on baking sheets lined with paper towels.
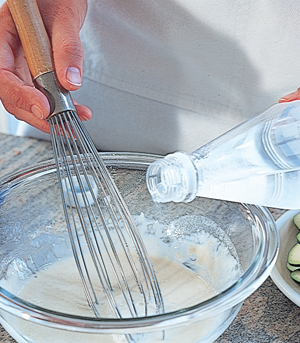
This batter can also be made with plain water instead of club soda, but the coating’s texture won’t be quite as light.
1. Use a whisk to work club soda or seltzer into flour in a small bowl. Use the least amount of liquid you need to make a smooth paste. Let this “starter” rest for 1 to 2 hours.

2. Just before frying, gently stir in club soda until the batter has the consistency of heavy cream.
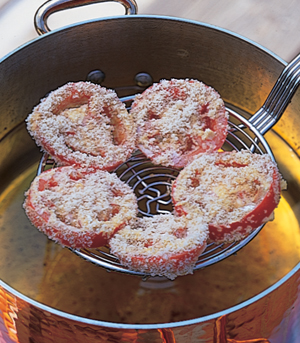
Select tomatoes that are relatively firm. Don’t peel them; slice them into ¼-inch-thick rounds. Squeeze the seeds out of each round.
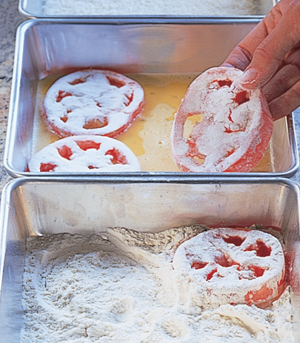
1. Coat the tomatoes on both sides with flour and pat off the excess.
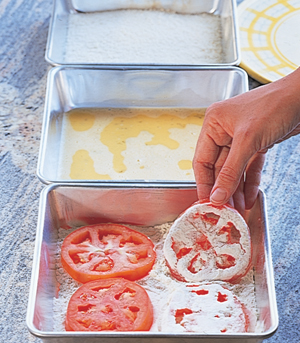
2. Dip the tomatoes into beaten egg seasoned with salt and pepper, coating both sides.
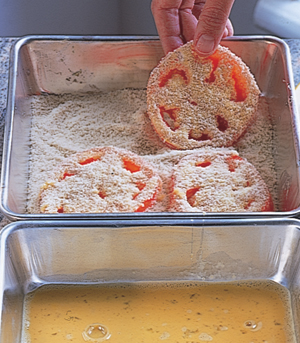
3. Coat the tomatoes on both sides with fresh bread crumbs.
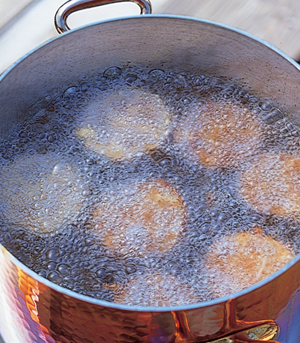
4. Arrange the tomatoes on a spider, shown here, or in a frying basket and gently lower into 360°F “pure” olive oil or vegetable oil.
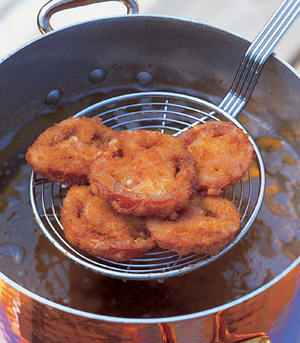
5. Fry the tomatoes until golden brown, about 3 minutes.
6. Take the tomatoes out with the spider or basket and drain on paper towels. Sprinkle with salt and serve immediately.
See Also
To make bread crumbs, page 164
To bread chicken breasts, page 162
To make a tempura batter, page 122
To make potato chips and French fries, page 80
Related Glossary Entries
Bread Deep-fry Gluten Spider
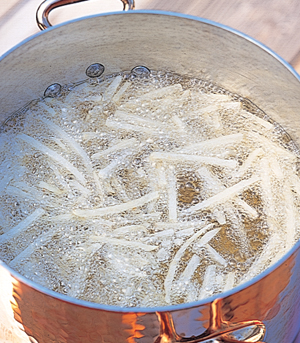
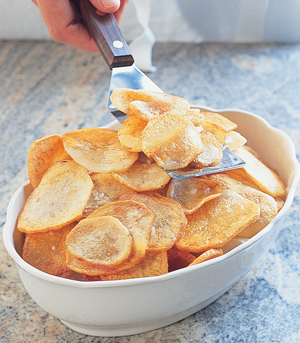
Potatoes are perfect for deep-frying. When cut thick, they turn crisp on the outside and soft, almost purée-like on the inside. When cut thin, they become fragile, delicate crisps. Potatoes are commonly fried in three shapes—French fries, the thinner straw potatoes, and potato chips. The technique for frying all of them is essentially the same except that straw potatoes and chips are simply fried in hot oil, while the thicker French fries must be fried twice—a preliminary frying in medium-hot oil to cook the potatoes through without browning, and then a second cooking in hotter oil to give them their crisp, golden crust. (Double frying is necessary because oil that is hot enough to brown the potatoes will overbrown raw potatoes before they’re cooked through.)
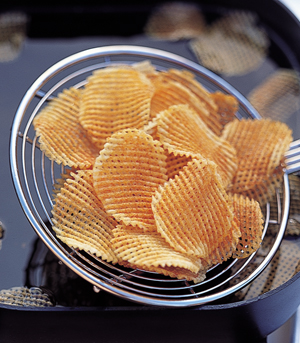
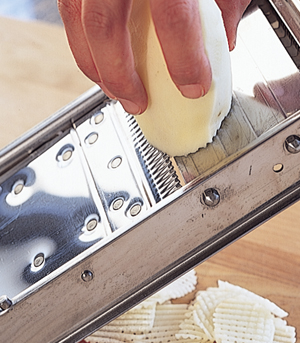
Potato chips are fried in a single stage in the same way as straw potatoes (page 81). Here, I am making waffled potato chips; plain rounds are cooked in the same way.
1. To make regular potato chips, just slice the potatoes into thin rounds with the regular blade on a mandoline or a vegetable slicer. To make the waffle potatoes shown here, use the wavy blade on the mandoline. After each slice, give the potato a 90-degree turn. Adjust the thickness so the tiny holes in the potato slices have the diameter of a pin.
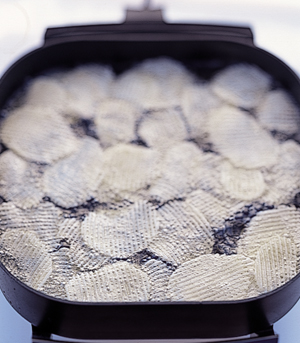
2. Arrange the potatoes on a spider or in a deep-fry basket.
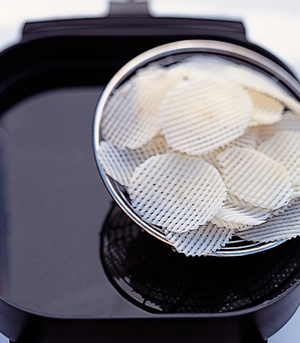
3. Plunge the potatoes into 350°F oil. Fry for about 4 minutes, until golden brown. Remove and drain on paper towels. Sprinkle with salt.
See Also
To cut vegetables into julienne, page 13
Related Glossary Entries
Deep-fry
Slicer
Spider
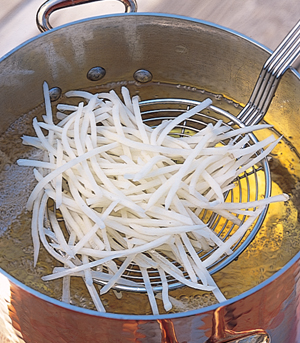
Straw potatoes are fried only once.
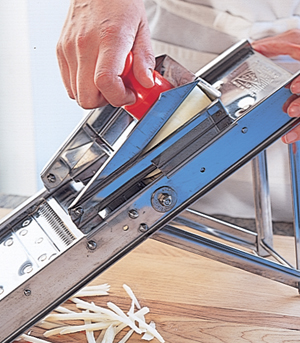
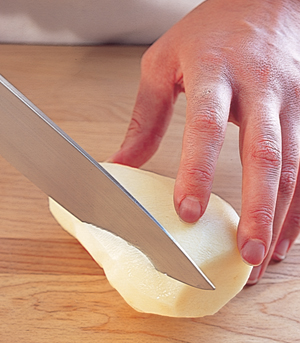
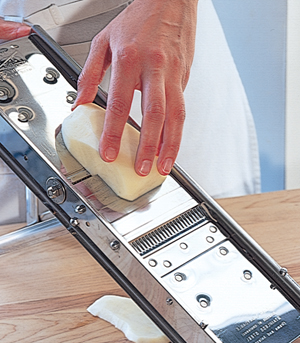
1. Use the julienne attachment on a mandoline to cut the potatoes into julienne strips about ⅛ inch thick or slice and julienne the potatoes by hand (see Box).
2. Plunge the potatoes into 350°F oil and stir while they fry to keep them from sticking to each other or to the sides of the pot.
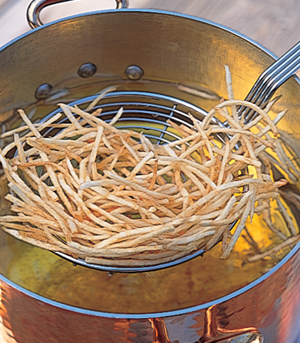
3. When the potatoes have browned, after 3 or 4 minutes, remove them from the oil and drain on a sheet pan covered with paper towels. Sprinkle with salt.
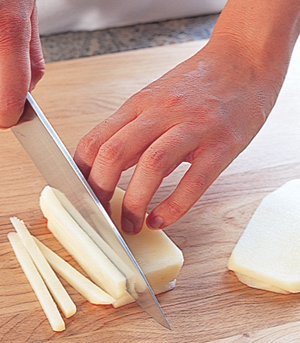
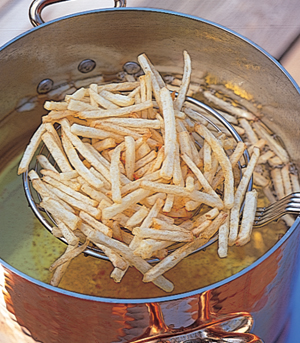
The French fries shown here are between ⅛ and ¼ inch thick (3/16 inch) and are cooked in two stages.
1. Cut the ends off the potatoes so the French fries will be of equal length and trim the sides so you don’t end up with little irregular pieces once you start slicing (this is optional).
2. Cut the potatoes into 3/16-inch-thick slices. Here, I use a mandoline. Be careful with your fingers; as you get near the blade, use the guard.
3. With a chef’s knife, cut the slices into 3/16-inch-thick French fries (so all four sides are the same).
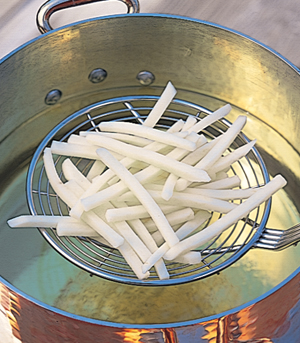
4. With a spider or deep-fry basket, plunge the French fries into 320°F oil.
5. Fry the potatoes, stirring once or twice at the beginning to prevent them from sticking, for about 5 minutes. If they start to brown sooner, turn down the heat.
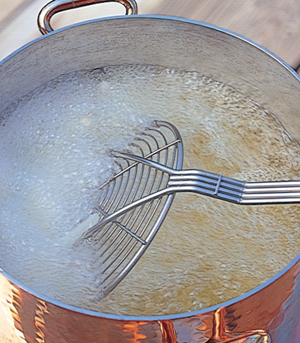
6. Scoop the potatoes out of the oil—they should show no sign of browning—and pinch one between your fingers. It should crush easily and be purée-tender inside. If not, return the potatoes briefly to the oil.
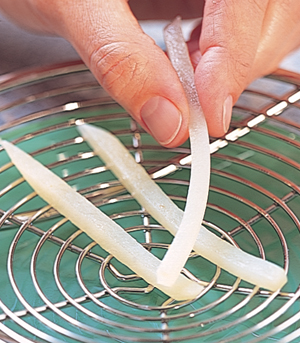
7. Heat the oil to 360°F (if you’re making a lot of fries, it’s easier to use two pots of oil, one hotter than the other) and plunge the French fries in for 3 to 4 minutes, or until golden brown.
8. Take the potatoes out of the oil and spread them on a sheet pan covered with paper towels. Sprinkle with salt.
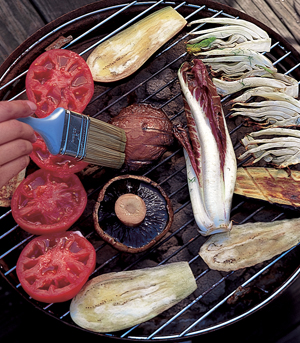
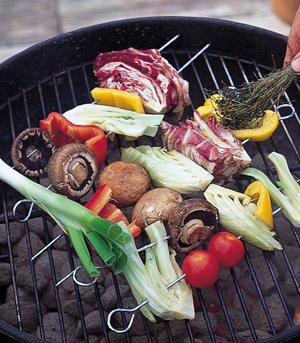
Grilling gives vegetables a lightly smoked flavor, it doesn’t take much preparation, and best of all, you can do it outdoors. Mushrooms and other small vegetables can be grilled whole. Larger vegetables just need to be sliced or cut into wedges. All vegetables are brushed lightly with olive oil before grilling to add flavor, promote browning, and keep them from drying out and sticking to the grill. Grilled vegetables are usually served as a side dish with other grilled foods, but they can also be served as a first course, drizzled with plain or flavored olive oil. When you can’t grill outside, use a grill pan on top of the stove to give vegetables a light grilled taste indoors.
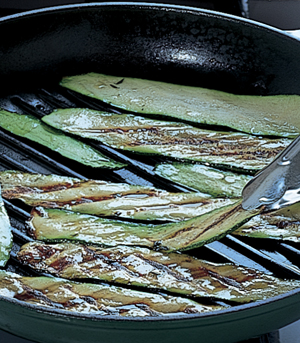
Slice zucchini and summer squash lengthwise—a plastic vegetable slicer is great for this—so the slices are easy to turn and don’t fall through the grill. Brush the slices with olive oil and sprinkle with herbs such as thyme or marjoram.
Grill the strips in a grill pan over high heat or on an outdoor barbecue. Turn the slices when they are well browned, cooking for about 5 minutes on each side.
1. Large vegetables are cut into slices and wedges; larger mushroom caps can be left whole.
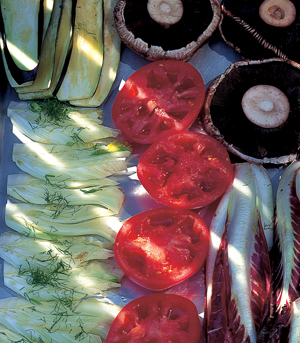
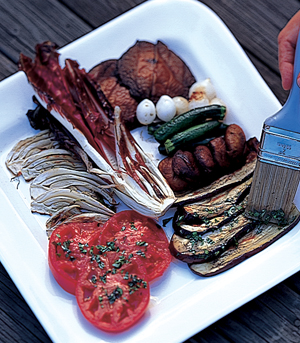
2. Brush vegetables with olive oil before and during grilling to prevent them from sticking to the grill and drying out, and grill until tender.
3. If you like, you can brush vegetables with an herb-flavored oil or olive oil containing chopped herbs just before serving.
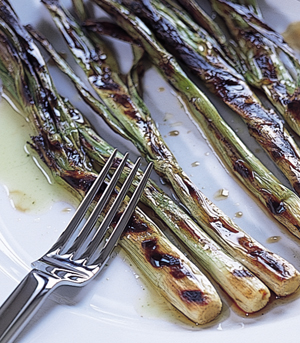
Scallions, baby leeks, and ramps are all delicious grilled.
1. Grill scallions until lightly charred on the outside and softened all the way through, 10 to 15 minutes.

2. Here, grilled scallions are drizzled with dried porcini and basil oils, but plain extra virgin olive oil is also delicious.
Serve each guest his or her own skewer, or slide the cooked vegetables off the skewers onto plates or a serving platter either alone or with other grilled foods.
1. Thread the vegetables onto 2 skewers to make them easy to turn. If you’re using wooden skewers, wrap the ends in aluminum foil to keep them from burning and make sure the vegetables are touching each other so none of the skewer is exposed to the flame.
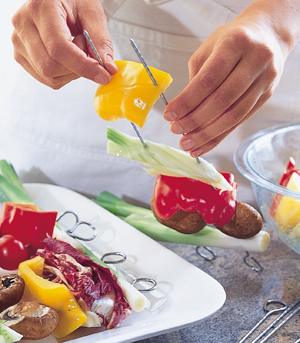
2. Arrange the skewers about 8 inches away from the coals. Lightly brush the vegetables with olive oil during grilling. Here, I use a bunch of dried thyme as a brush to add flavor.
See Also
To make dried basil and porcini oils, pages 39 and 40
Related Glossary Entries
Grill
Slicer
Steaming is a great method for cooking vegetables because the vegetables’ nutrients aren’t leached out into the surrounding liquid, something that may happen when vegetables are boiled or poached. Steaming is also very gentle, so that fragile vegetables, potatoes for instance, that might be damaged by the movement of simmering water, are left intact.
Steaming is simple. Liquid, usually water but occasionally wine or vegetable stock (court bouillon), is brought to a rapid boil, food to be steamed is suspended over the liquid, and the pot covered.
There are many steamers and related gadgets available.
• The least-expensive steamers are circular folding steamers with perforated metal leaves. You just unfold the steamer inside a pot with a little liquid in it so the ends of the leaves meet the sides of the pot. These folding steamers work perfectly well with leafy vegetables or small amounts of green or root vegetables.
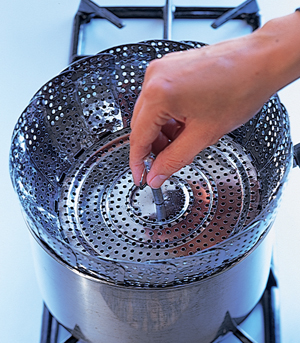
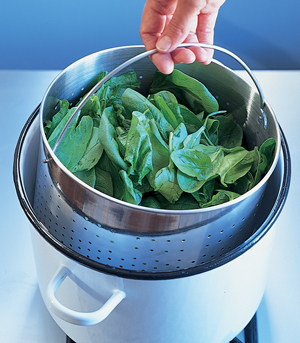
• A gadget that works well for larger quantities looks like a bucket with holes in it. The bucket has little feet that keep it about an inch above the bottom of a pot—just enough so the boiling liquid doesn’t get into the steamer through the holes in the bottom. Just bring ½ inch of water to a boil in a pot, arrange the food to be steamed in the bucket, put the bucket in the pot, and put the lid on (see page 87).
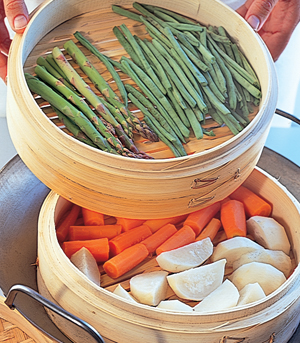
• Chinese bamboo steamers are inexpensive and easy to use. They look like drums with thin bamboo slats held in a thick wooden ring with a snug-fitting lid. An advantage of bamboo steamers is that you can stack them on top of each other so you can steam a larger amount of food or you can steam different foods with different cooking times. Start with a layer of slower-cooking foods and then add layers of quicker-cooking foods later. Originally, Chinese steamers were designed to use in a wok, but a pot will work just as well. Make sure that it has the same diameter as the steamer so the steam is forced upward.
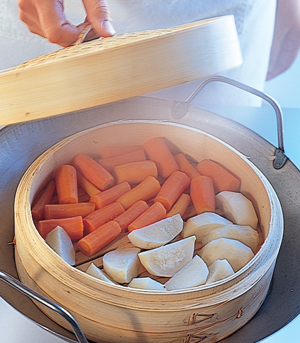
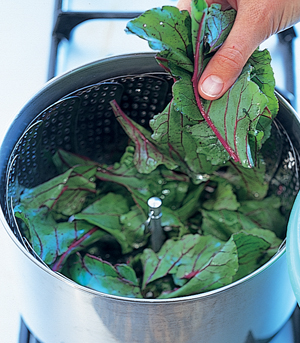
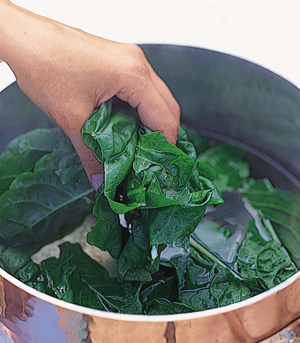
1. Bring about an inch of water to a rapid boil in a pot large enough to hold the steamer insert. Place the greens (here, spinach) in the steamer insert and lower it into the pot with the boiling water. Cover and steam for 1 minute.
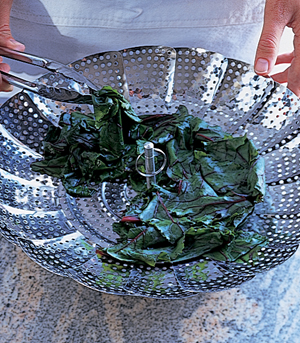
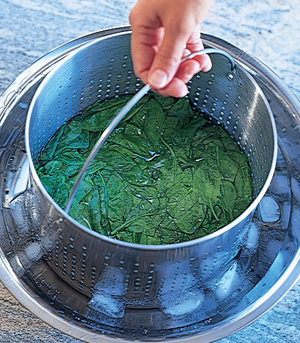
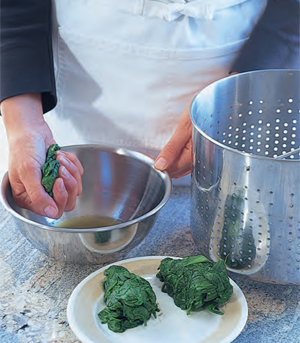
2. Turn off the heat, remove the lid, allow about 15 seconds for the steam to dissipate, and remove the steamer insert. Unless you’re using the spinach right away, refresh the spinach by rinsing under cold running water, or submerging in a bowl of ice water, as shown here.
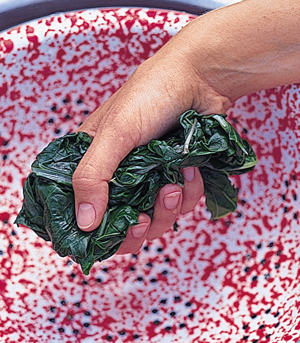
3. Squeeze excess water out of the refreshed spinach.
Green vegetables are excellent when steamed, but some cooks prefer to boil green vegetables because they cook faster and boiling better preserves their bright green color. When boiling green vegetables, use a lot of salted water and boil uncovered. If you’re not serving the vegetables right away, immediately rinse them under cold running water in a colander or plunge them in ice water.
1. Plunge the cleaned greens (here, spinach) into a large pot of boiling salted water and stir.
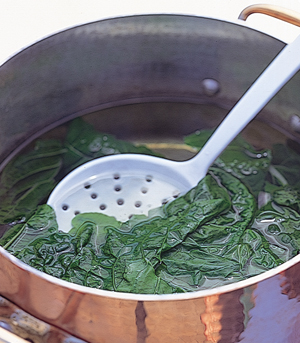
2. As soon as the spinach melts, about 30 seconds, drain in a colander and rinse under cold running water or plunge into a bowl of ice water.
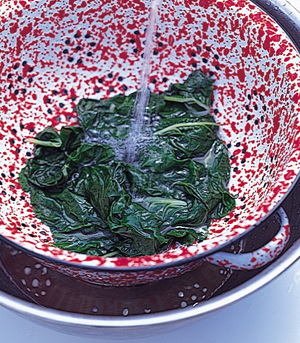
3. Gently squeeze the excess water out of the spinach. Boiled spinach can be reheated by lightly sautéing it in olive oil or butter, or it can be creamed.
See Also
To slow-cook hardy greens, page 75
To stem greens, page 8
Related Glossary Entries
Boil
Poach
Steam
Once cooked, greens can be served as is or perhaps sauced with lightly reduced cream. (Creamed spinach is delicious when made with a minimum of cream and lightly cooked spinach.) When you cream greens, they must be com pletely dry so that their moisture doesn’t dilute the cream and cause it to run out onto the plate. And the cream must be reduced until so thick that it almost breaks and turns oily. The moisture in the vegetables will reconstitute the cream.
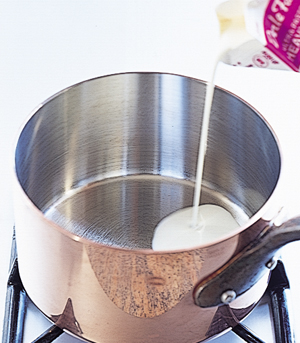
1. Simmer about 2 tablespoons heavy cream in a heavy saucepan until very thick. Season with salt and pepper.
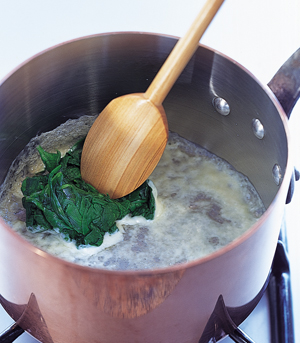
2. Add a well-squeezed bunch of steamed or boiled and refreshed spinach (or other greens) and heat through, stirring with a wooden spoon.
Sautéing is a high-heat cooking method that concentrates and enhances the flavor of vegetables by evaporating their water and caramelizing them so that they are savory and flavorful on the outside and meltingly tender on the inside. The fat you use—butter, oil, or rendered animal fat—adds additional flavor.
Small vegetables or vegetable slices and pieces are sautéed by tossing in a wide pan with sloping sides. Tossing is better than stirring because it’s gentler and even delicate stirring can crush some vegetables as they cook. Tossing can be intimidating at first, but with a little experience (tossing dried beans is good practice), it becomes second nature and is easier than stirring. Vegetable pieces that are too large to toss—such as potatoes, long slices of zucchini or eggplant—are sautéed in a single layer until browned, then turned with a pair of tongs or a spatula. Watery vegetables such as sliced tomatoes may also be coated with flour or a breading mixture before sautéing. The coating absorbs the moisture given off by the vegetable as it cooks and helps it brown; it also adds flavor and keeps the vegetable from absorbing fat.
1. Slice peeled russet potatoes into ⅛- to ¼-inch-thick rounds. Rinse thoroughly in cold water to eliminate some of the starch. Drain and pat dry on kitchen towels. (Paper towels will stick and tear.)
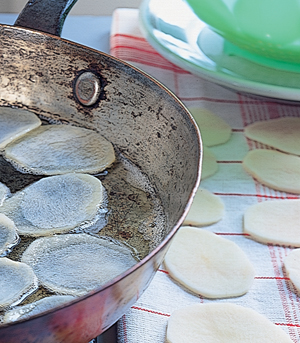
2. Cook the potatoes in a single layer in hot clarified butter or olive oil over medium heat. Turn them gently with a spatula as they brown.

3. Transfer the potatoes to a serving dish and sprinkle with salt.
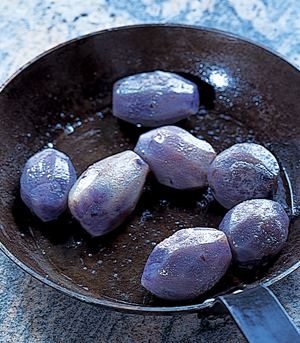
French château potatoes are traditionally made with large potatoes turned to small, perfect egg shapes, but it’s easier and less wasteful to use peeled, whole, small waxy potatoes (here, I use Peruvian purple potatoes).
1. Put the peeled potatoes in a pot with cold water to cover. Bring to a simmer over low to medium heat, adjusting the heat so that the water takes about 15 minutes to come to a simmer. Remove the potatoes with a slotted spoon or drain in a colander.
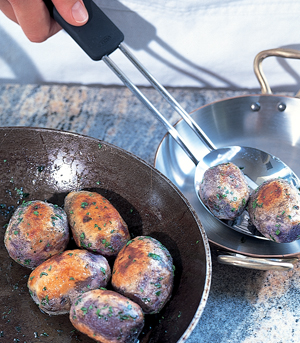
2. Sauté the potatoes in vegetable oil in an ovenproof skillet over medium-high heat until lightly browned. Add whole butter to the pan and roast the potatoes in a 375°F oven until well browned and easily penetrated with a knife, about 15 minutes.
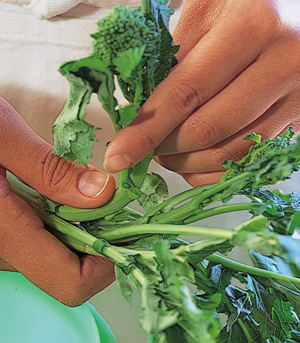
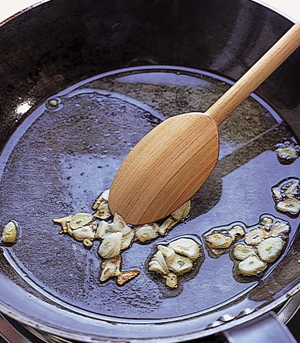
It’s pointless to sauté most greens, because they release so much water into the pan when they hit the hot oil or butter that they steam instead of sauté. I do, however, sauté broccoli rabe, which gives up less water than other greens. Even broccoli rabe releases enough moisture to steam, however, so it steams and is flavored with the hot olive oil in the same operation. Flavorful ingredients such as chopped or sliced garlic, ginger, chiles, or cubes of pancetta or bacon can be used to flavor the hot oil before the vegetables are added.
1. Pull the leaves and flowers away from the thick central stems. Leave small tender stems attached to the flowers and leaves.
2. Cook sliced garlic in olive oil over medium heat until the garlic barely begins to turn blond.
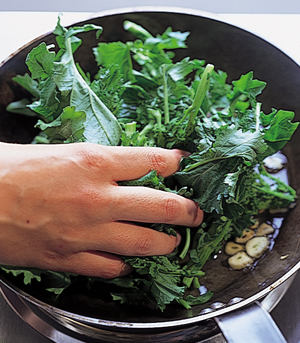
3. Add the trimmed broccoli rabe and stir it around with a wooden spoon until it becomes limp.
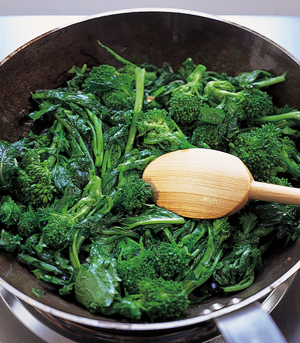
4. Continue cooking over medium heat until the broccoli rabe has the texture you like, about 5 to 10 minutes. (If you like it well cooked, add a little liquid—broth or water—cover, and cook 5 to 10 minutes more.)
Here, the eggplant is cut lengthwise, but it can also be cut across, into rounds.
1. Cut the stem ends off the eggplant and peel (optional). Slice the eggplant with a plastic vegetable slicer, as shown here, or by hand.
2. Coat the eggplant slices with flour, pat off the excess, and dip in beaten egg seasoned with salt, pepper, and fresh thyme leaves.
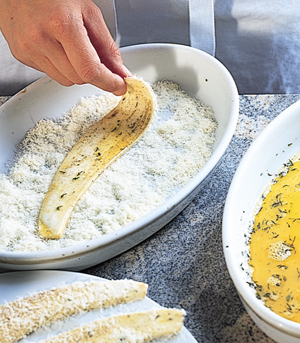
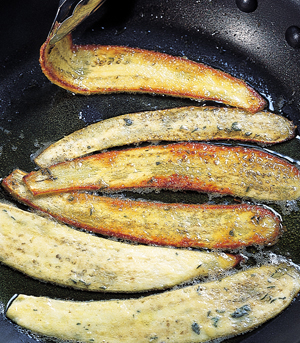
3. Sauté the eggplant slices in olive oil or whole butter over medium-high heat until golden brown on the first side. Turn gently with tongs and brown on the other side. Drain on paper towels.
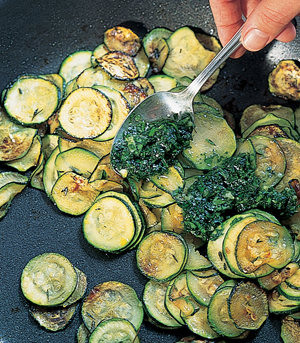
Flavor sautéed vegetables at the end of cooking with the mixture of parsley and garlic called a persillade.
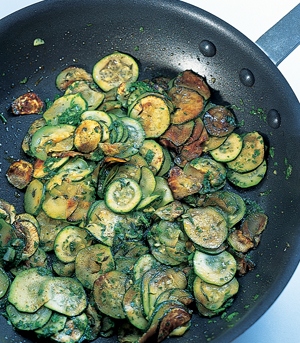
1. Toss the zucchini in olive oil over high heat until the zucchini turns golden brown and smells fragrant. Gently stir in a few spoonfuls of persillade.
2. Continue tossing for a minute or two, until the smell of garlic fills the room. Serve immediately.
See Also
To clarify butter, page 46
To turn vegetables, pages 13 and 21
To dice vegetables, pages 13 and 17
To coat with eggs and bread crumbs, page 162
To peel eggplant, page 3
Related Glossary Entries
Bread
Panfry
Persillade
Sauté
Slicer
Sweat (for the difference between sautéing and sweating)
Boil artichokes in water to cover by several inches with a tablespoon of olive oil until the bottom of the artichoke is easily penetrated with a paring knife. (Bring the water to a boil before adding the artichokes.) Artichokes will darken if cooked in aluminum or exposed to air during cooking, so use a nonaluminum pot and put a plate or kitchen towel on top of the artichokes to keep them submerged. Also, to keep them from darkening, raw artichokes are rubbed with lemon; the oil in the water helps protect them from exposure to oxygen, too. Serve cooked whole artichokes with homemade mayonnaise (homemade aïoli is fantastic with artichokes) or vinaigrette.
Artichokes are sometimes trimmed of their leaves and choke (a technique called “turning”) and the cooked bottoms served whole—as a container for small vegetables such as peas—or cut into wedges and served on their own as a vegetable. Baby artichokes have a slightly milder flavor than bigger artichokes and they’re easier to prepare, because the immature chokes are so small that you don’t need to remove them.
If you’re serving the artichokes as a garniture for a stew, cut off the stem flush with the bottom. If you’re serving as a vegetable side dish, you can peel the stem, removing the tough fibers, and leave it attached to the artichoke.
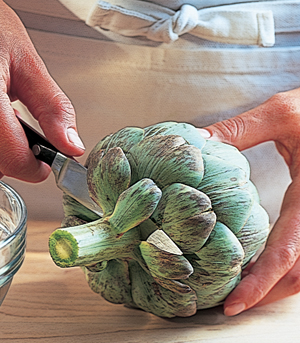
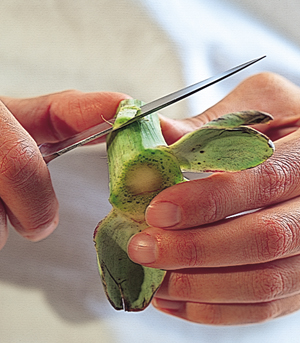
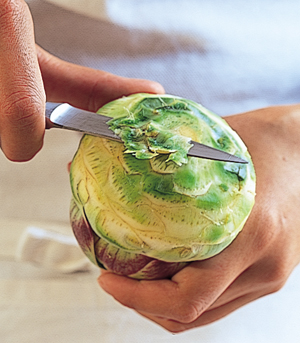
1. If the end of the stem is dark or dried out, trim it off. Cut off the top half of the leaves.
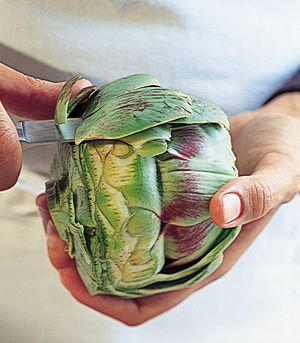
2. Rotate the artichoke bottom against the blade of a very sharp small knife to trim off the outermost dark green leaves.
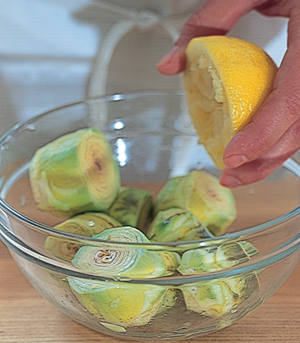
3. Trim off and discard the tiny leaves at the base. Toss the artichokes in a bowl with oil and lemon juice. Boil for about 30 minutes.
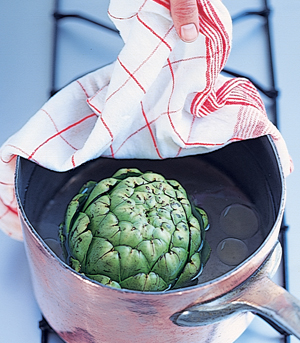
1. Cut the stem off the artichoke just above the small leaves at the top of the stem.
2. Whole artichokes are gently simmered in water containing a dribble of olive oil to keep the artichokes from turning dark. Cover the artichokes with a damp towel or a plate to keep them moist during cooking. Boil until a paring knife slides with only slight resistance into the base, 25 to 30 minutes.
The stems from large artichokes can be trimmed and boiled and served in a little dish on the side, sliced and layered into a zucchini gratin, or used in stuffings.
1. If you’re using the stems, peel off the tough outer layer and outer fibers with a paring knife. Rub the stem with lemon juice.
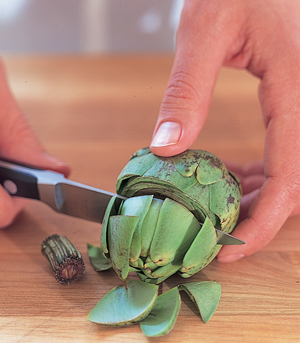
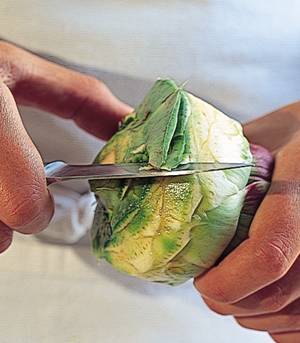
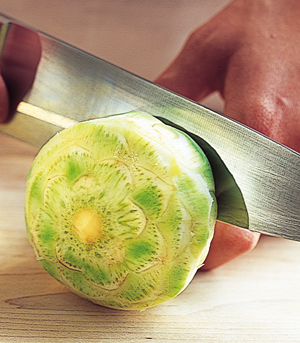
2. Rotate the artichoke against a very sharp paring knife, keeping the blade perpendicular to the base of the artichoke, until you see the pale green flesh on the sides of the base.
3. Hold the artichoke so the base is facing the knife at an angle and rotate the artichoke, trimming the leaves off the bottom.
4. Hold the artichoke upside down and trim off any last patches of green.
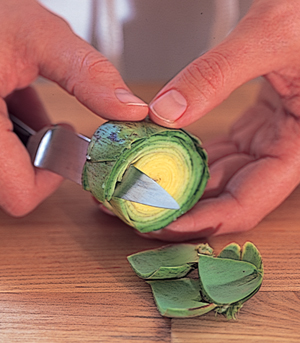
5. Cut the leaves away from the base. Be careful not to cut off any of the base—it’s better to err in the direction of leaving too many leaves attached to the base; they can be trimmed later.
6. Again, rotate the artichoke against the knife, trimming off any dark patches that are still attached to the top of the base. Rub with lemon juice to prevent darkening. Then cook the hearts as you would whole artichokes (but don’t bother with the towel or plate, because they don’t bob up as much as the whole vegetables).

See Also
To grill vegetables, page 83
To make a zucchini gratin, page 74
To make a mayonnaise, page 41
To make an aïoli, page 43
To make a vinaigrette, page 37
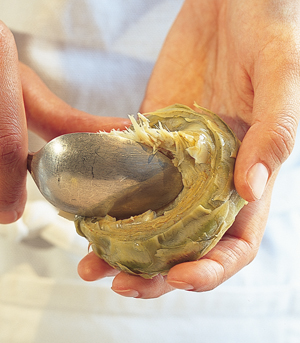
The choke can be cut out of raw artichoke bottoms, but it’s easier to cook the artichoke first, for about 20 minutes, and then scrape the choke out with a spoon.
1. Scrape along the inside of the artichoke with a spoon. Don’t dig or cut into the artichoke bottom—just scrape and pull the choke away from the flesh.
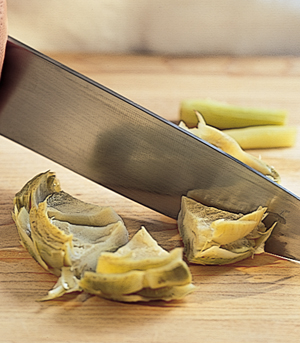
2. The chokeless bottom can be used whole—in formal presentations it can be used to hold buttered peas or fava beans—or cut into wedges and served as a vegetable.
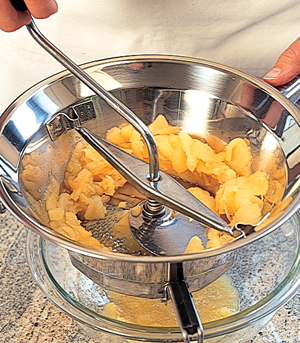
A purée is a food that has been mashed or sieved to make it smooth and soft, like mashed potatoes. The smoothest purées are made by working the cooked vegetables through a drum sieve, which makes very fine purées and gives the finished purées a silky-smooth consistency. But since most cooks (outside of restaurant professionals) don’t own drum sieves, most can get by using either a ricer—a gadget that presses cooked vegetables through small holes—or a potato masher. The ricer produces a purée that is only slightly less smooth than a drum sieve. A masher may leave some lumps, but it’s very easy to use. Never purée white-fleshed potatoes in a food processor or blender. These machines overwork the starch in the potatoes and you’ll end up with a gummy, gluey purée.
Unless they’re very stiff, many vegetables and fruits can be puréed in a food processor. A regular-mesh strainer or a food mill will purée most vegetables regardless of texture.
1. Place the peeled and cooked potatoes in the ricer. Set the ricer over a bowl.
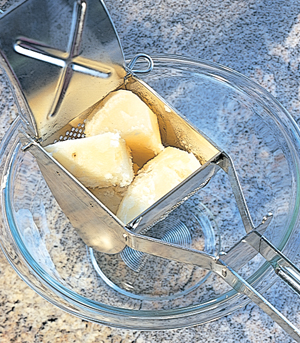
2. Squeeze the ricer handles together, forcing the pulp through the tiny holes.
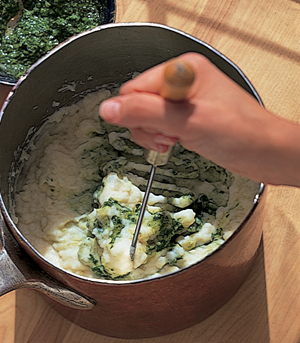
1. Mash boiled peeled potatoes with cream and butter, as shown here, or with lighter liquids such as milk, broth, or the potato cooking liquid.
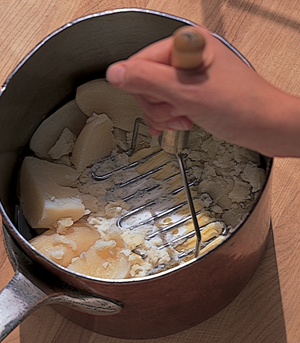
2. Mashed potatoes are sometimes flavored by adding vegetables such as celeriac, garlic, or fennel to the potatoes before they are pureed. Here, pesto is stirred into the mashed potatoes just before serving.
1. Toss sliced apples with a tablespoon of fresh lemon juice to keep them from turning dark and then put them in a heavy-bottomed pot with about ½ cup of water. The water generates steam, which helps cook the apples; it also helps keep them from burning.
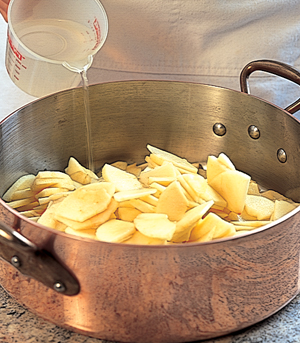
2. Cover the pot and cook over low to medium heat until the apples have softened, 15 to 30 minutes, depending on the apples. (Check every now and then to make sure that there’s liquid in the pot. Add a little more water as necessary.)
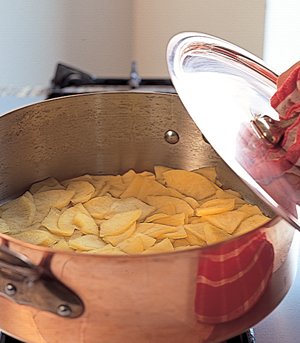
3. Uncover the pot and continue cooking, stirring, until all of the liquid evaporates.

4. Set the food mill over a bowl. Add the apple slices and crank the food mill, forcing the apple mixture through the grid.
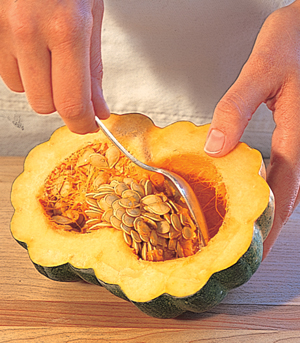
1. Cut the squash crosswise in half.
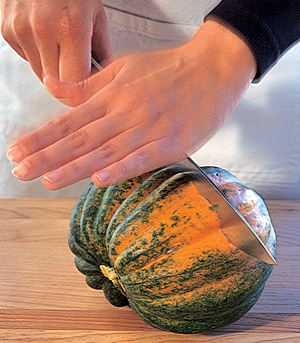
2. Scoop out and discard the seeds. Set the squash cut side up on a baking sheet and bake at 375°F until soft.
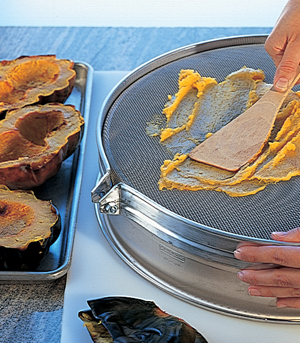
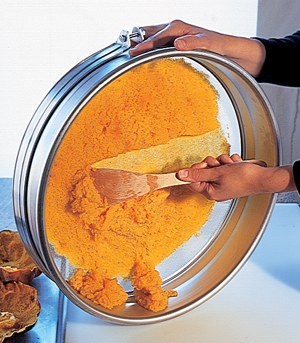
3. Set the drum sieve on a clean surface or a sheet pan and scoop the squash pulp onto the sieve. Work the pulp through the sieve with the back of a spoon or a plastic pastry scraper.
4. Scrape off any pulp clinging to the underside of the sieve, adding it to the rest of the purée.
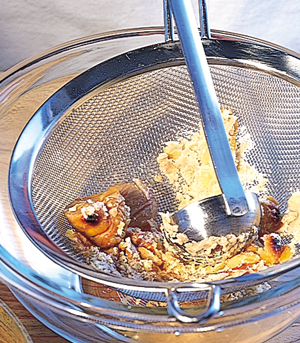
Instead of puréeing cooked chestnuts in a food processor, which incorporates pieces of the dark inner peel into the purée, work the chestnuts through a strainer or drum sieve, eliminating the pieces of the peel while puréeing. Here, the chestnuts are worked first through a coarse strainer and then through a fine-mesh drum sieve. Serve chestnut purée with game or meat with red wine sauce.
1. Braise the peeled chestnuts in a covered pan with a small amount of broth, port, or water. Use a slotted spoon to scoop the cooked chestnuts into a coarse-mesh strainer set over a bowl. (Reserve the braising liquid.)

2. Work the chestnuts through the strainer with the back of a ladle.
3. Scrape the purée clinging to the outside of the strainer into the rest of the purée.
4. For a very fine purée, work the strained mixture through a fine-mesh drum sieve with the back of a spoon or wooden spatula.

5. Scrape off the purée clinging to the underside of the drum sieve, adding it to the rest of the purée.
6. Thin the purée to the consistency of creamy mashed potatoes with the reserved braising liquid plus additional broth, and if you like, butter or cream.
7. Stir until smooth. Season to taste with salt and white pepper.
See Also
To thicken with vegetable purées, page 286
To cook potatoes, page 89
To make pesto, page 99
To make a chicken broth, page 30
To use vegetable purées for vegetable flans, page 97
To make a puréed vegetable soup, page 100
To peel chestnuts, page 4
Related Glossary Entries
Braise
Purée (also for information on equipment for puréeing)
A vegetable flan is a savory baked custard made by holding liquids together with eggs. A quiche is a flan with a crust. Flans are a great way to turn leftover cooked vegetables and soups into something different. Vegetable flans can be made with whole eggs, egg yolks, or egg whites (or sometimes a combination), depending on how rich you want the mixture to be, and usually contain cream or milk to give the flan a smooth, melting texture and to keep it from being rubbery. Flans are baked in a bain-marie (water bath) so they cook evenly, don’t overcook or curdle, and become creamy and smooth.
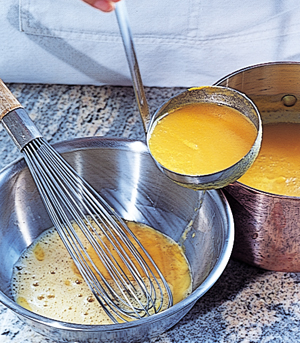
1. Whisk hot carrot purée, diluted with milk, cream, or a combination—essentially the carrot soup on page 100 but without the potatoes—into beaten eggs.
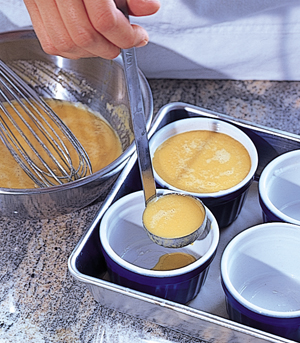
2. Line a baking pan with a triple layer of parchment paper to protect the ramekins from the direct heat of the stove. Fill buttered ramekins with the flan mixture and pour hot water into the pan to come halfway up the sides of the ramekins. Bring the water in the pan to a simmer over high heat. Transfer to the oven and bake at 350°F for about 45 minutes, until the mixture has set.
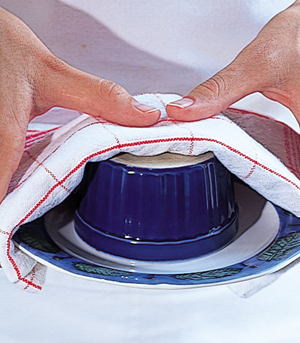
3. To unmold the flans, place a small plate upside down on each mold, turn the whole assembly over, and give it a quick shake up and down to release the flan.
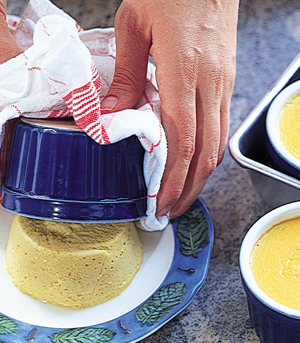
4. Remove the mold.
See Also
To purée vegetables, page 94
To determine doneness, page 66
To make Puréed Carrot Soup, page 100
Related Glossary Entries
Bain-marie
Purée
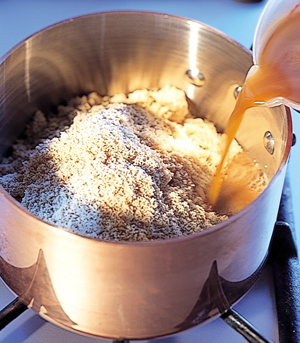
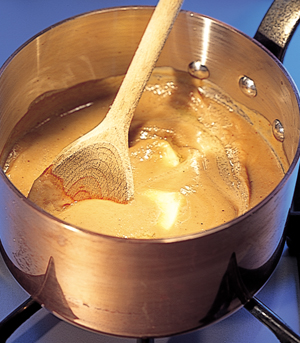
Most of the world’s best vegetable soups are made in the same way, by simmering chopped vegetables in water or broth. Different vegetables are used, depending on what’s available and what’s in season, but the basic method is almost always the same. Sometimes starchy ingredients such as rice or pasta are added to the soups to make them more substantial.
There are two tricks for elevating a simple vegetable soup into something sublime. One is to cook cubes of preserved pork, such as pancetta or prosciutto ends, in the pot before adding the vegetables. If you’re using prosciutto, you’ll need to add a little olive oil to the pan, since the prosciutto itself releases very little fat. A second trick is to stir a flavorful mixture into the soup just before serving or to pass it at the table for guests to help themselves. The mixture can be a simple as a little crushed garlic and chopped parsley or it can be more elaborate. Two of the most famous examples of this method are Ligurian minestrone col pesto and Provençal soupe au pistou—vegetable soups finished with pastes of crushed garlic, basil, Parmesan cheese (or pecorino), and pine nuts (in the Italian pesto) or tomatoes (in the French pistou).
Many of the same tricks used to enhance the flavor and color of creamy soups are also applicable to chunky soups. Sweat aromatic vegetables in a small amount of fat before adding liquid (along with prosciutto as mentioned above if you’re using it); add green vegetables and quick-cooking vegetables near the end of cooking; and precook hard-to-peel vegetables such as acorn squash before adding them to the soup.
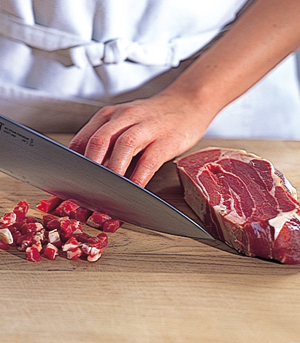
1. Cut prosciutto ends, shown here, or pancetta into ¼-inch dice.
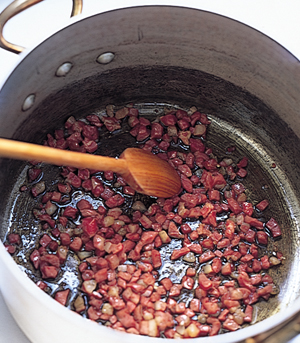
2. Stir the prosciutto in a small amount of olive oil in a heavy-bottomed pot over low to medium heat until fragrant, about 10 minutes. If you’re using pancetta, don’t bother with the olive oil—pancetta supplies its own fat as it cooks.
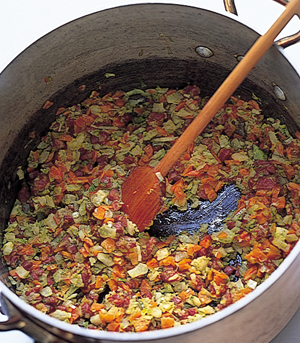
3. Add chopped vegetables such as leeks, onions, garlic, carrots, turnips, parsnips, and/or potatoes and cook gently for about 10 minutes, until the vegetables soften slightly and release their fragrance.
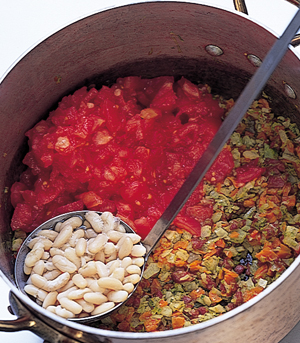
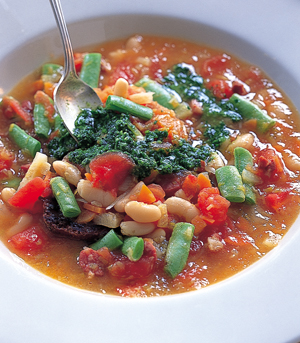
4. Add moist or quick-cooking ingredients, such as the tomatoes and precooked dried beans shown here. Add broth or water and simmer until all the vegetables are completely soft. Just before serving, add green vegetables, such as the string beans used here, and simmer for about 10 minutes.
5. Spoon the soup into warmed bowls. Here, I’ve placed a piece of toast rubbed with garlic in the bottom of each bowl to add substance and flavor to the soup—and so the vegetables form an attractive mound on top of the soup.
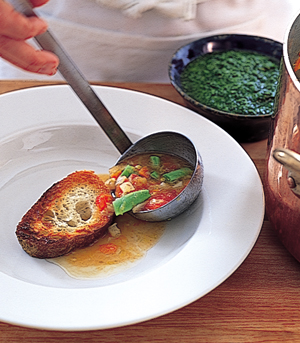
6. Pass pesto sauce at the table so guests can spoon it into their soups.
See Also
To make a chicken broth, page 30
To make a creamy vegetable soup, page 100
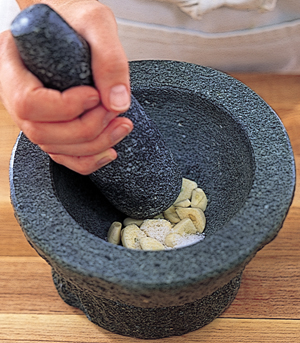
In this basic pesto sauce, garlic and basil are crushed to a paste in a mortar with a pestle and the mixture combined with grated Parmesan cheese and olive oil. It can also be made in a food processor, puréeing the ingredients as on page 39. Traditional Ligurian versions contain pine nuts, and the French pistou contains tomatoes.
1. Combine thinly sliced garlic with coarse salt—the salt helps grind the garlic—in a mortar and work to a smooth paste.
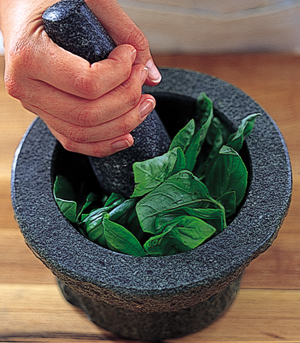
2. Work in basil leaves, a handful at a time, and continue grinding to a smooth paste. Combine with olive oil and freshly grated Parmesan cheese.
Traditionally, creamy vegetable soups were usually thickened with a roux and then enriched with cream or butter. You can make a simpler light, creamy vegetable soup by puréeing vegetables with broth, water, or milk. (Milk is a little tricky because it can curdle when boiled, but you can stabilize it by adding puréed vegetables.) Then, if you like, you can enrich the soup with butter or cream.
To make almost any creamy vegetable soup, start by sweating aromatic vegetables such as leeks or onions in a little butter, so they release their flavor, before adding liquid. If you’re using green vegetables such as spinach, broccoli, peas, or chard, add them near the end so they don’t lose their color. Some vegetables, such as asparagus, can be cooked in two stages—the stalks simmered in the soup for about ten minutes before the soup is puréed, and the tips quickly blanched and added to the soup just before serving. Purée soups with a food mill, blender, immersion blender, or strainer. Don’t use a food processor or the liquid will run out through the hole under the blade.
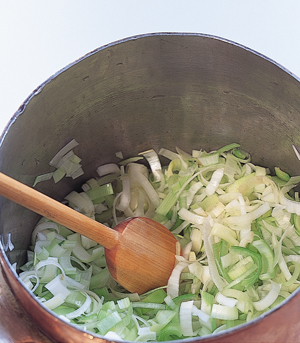
1. Gently sweat sliced leeks in butter over medium heat until they soften and turn translucent, about 20 minutes.
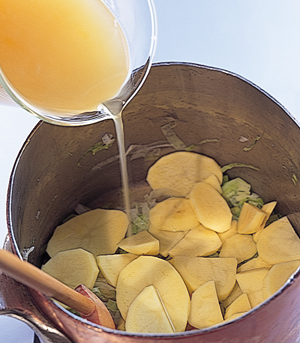
2. Add peeled and sliced potatoes. Pour in liquid such as broth, milk, or water and simmer until the potatoes have completely softened.
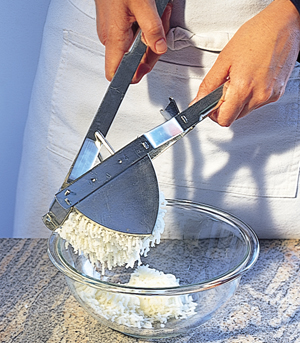
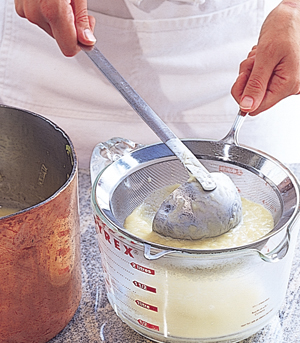
3. Purée the soup by working it through a coarse strainer, as shown here, or through a food mill. If you want it even smoother, strain it again through a fine-mesh strainer. Whisk heavy cream or butter into the soup (optional).
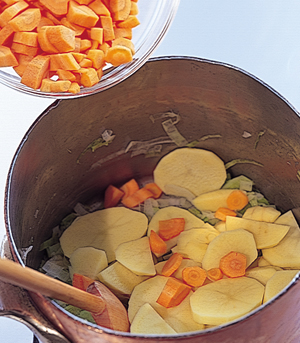
Practically any vegetable can be added to a leek and potato soup to give the soup that vegetable’s flavor and color.
1. Add carrots or other slow-cooking vegetable when you add the liquid and potatoes.
2. Carrot soup is better finished by whisking in butter instead of cream.
See Also
To make a chicken broth, page 30
To make miso soup, page 143
Related Glossary Entries
Purée
Sweat
Roasting intensifies the taste of fruit and is an excellent technique for most fruits, with the exception of berries or kiwis, which are so delicate that they turn to mush in the oven.
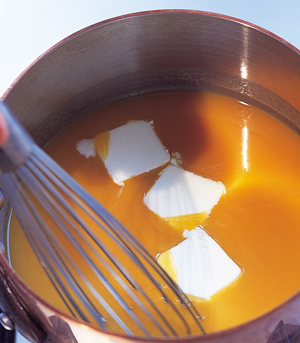
Very juicy fruits, such as pears and peaches, release a lot of liquid as they roast. The juices cook down and caramelize in the bottom of the pan along with added butter and sugar. I use this mixture to make a pan sauce—much like a meat “jus” or gravy made from pan drippings—by deglazing the pan with cream and simmering until smooth. (Unlike the method used for making a jus or gravy, however, in which fat in the pan is removed before deglazing, here the butter remains in the pan and is emulsified into the sauce.) For a perfectly smooth sauce, strain to remove any dark specks.
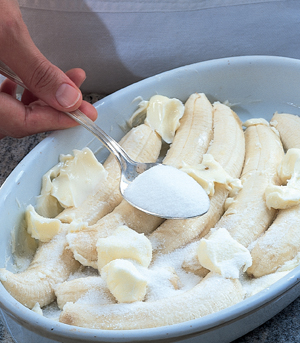
Bananas and apples don’t release much liquid, so I treat them more like a gratin. Sprinkle bananas or sliced or cut up apples with butter and sugar and roast them until they turn golden brown. Flambéed rum, poured over just before serving, combines with the caramelized butter-sugar mixture to make the sauce.
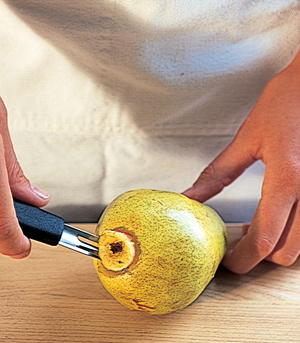
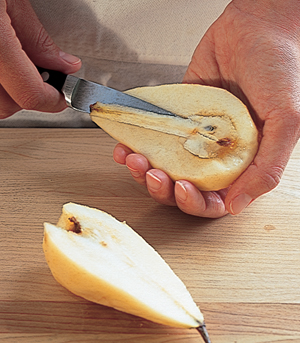
1. Cut out the dark blossom end of the core at the bottom of the pear by inserting a peeler deep into the pear and rotating it around the core.
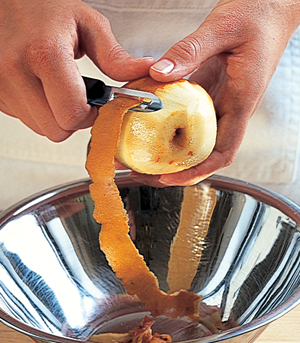
2. Peel by rotating the pear against the blade of the vegetable peeler.
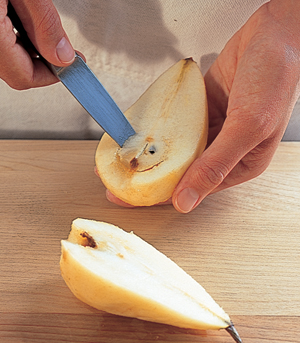
3. Cut the peeled pears vertically in half and then use a paring knife to cut out the stem.
4. Cut out the seeds from each half with the paring knife (or use a melon baller).
5. Spread the pear halves in a heavy pan just large enough to hold them in a single layer. Add chunks of butter and coat liberally with sugar.
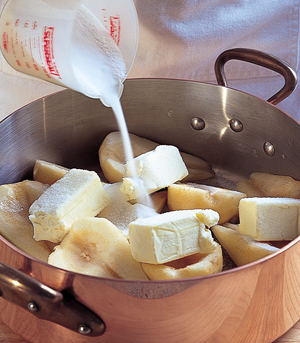
6. Roast at 375°F until the pears are soft, the juices have caramelized to a nutty brown glaze on the bottom of the pan, and the butter has separated and is floating on top, 30 to 45 minutes.
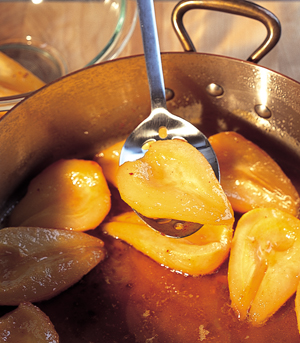
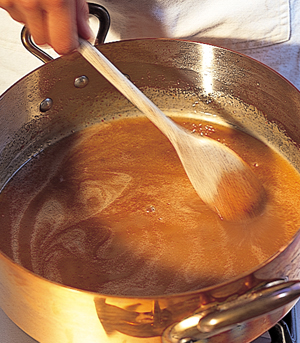
7. Transfer the pears to a serving dish or individual plates. Heat the roasting pan over medium to high heat and pour in heavy cream.
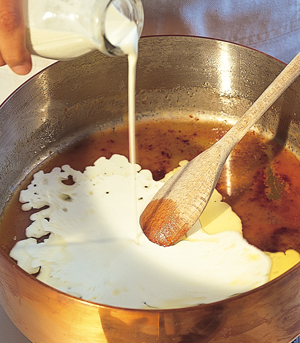
8. Simmer, stirring with a wooden spoon, until the caramel dissolves and the mixture forms a smooth sauce. Strain, if desired, and ladle the sauce over the hot pears as shown on page 101.
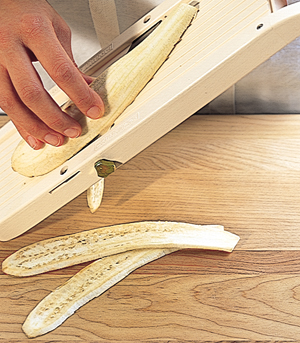
1. Sprinkle peeled and halved bananas with sugar and dot with butter. Bake at 350°F until the bananas have browned and the sugar has lightly caramelized, about 30 minutes.
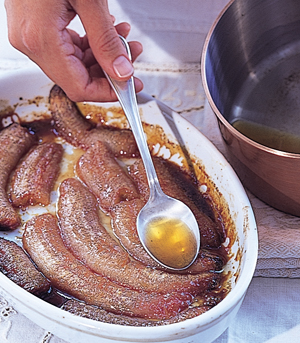
2. Flambé dark rum in the kitchen. When the flames die out, spoon the rum over the bananas and serve. You can also flambé in the dining room.
See Also
To flambé, page 267
To make a jus from roasted meats, page 187
Related Glossary Entries
Deglaze
Emulsion
Gratin
Jus
Roast
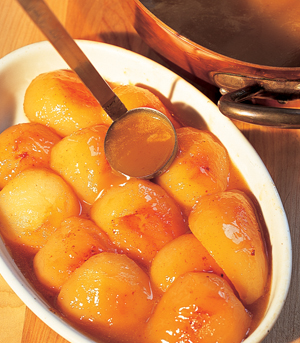
Poaching is a great way to deal with out-of-season or underripe fruits that are too hard or haven’t developed enough natural sugar to be tasty on their own. The fruit is poached in water, wine, fruit juice, spirits such as whiskey or rum, or some combination of these, almost always sweetened with sugar. (The sugar is necessary even when poaching ripe, sweet fruits, because without it, the poaching liquid will pull out the fruits’ natural sugars.) The liquid can also be flavored with spices such as cinnamon, cloves, or vanilla. After poaching, the cooking liquid is often reduced so that the flavor of the fruit is concentrated in it, and then it is served along with the fruit.
A delicious way to poach all kinds of fruit is to cook the fruit in water sweetened with sugar, reduce and cool the syrup, and then flavor it with an appropriate fruit brandy or other alcohol that underlines the taste of the fruit. Pears are often poached in sweetened red wine that is then reduced, cooled, and served as a sauce for the pears.
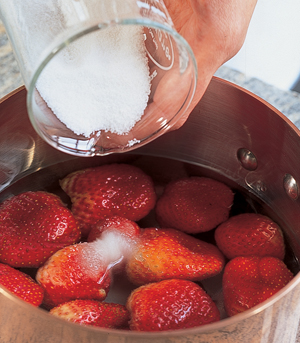
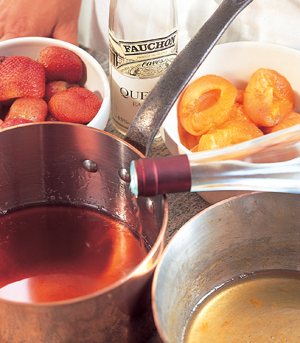
Here, strawberries and apricots are poached separately in a light sugar syrup. The syrup from each fruit is then reduced to concentrate its flavor, allowed to cool, and flavored with an appropriate fruit brandy.
1. Pour water over the fruit in each saucepan to cover, add sugar, and simmer until the fruit is soft.
2. Use a slotted spoon to transfer the fruit to a bowl. Boil the poaching liquid down to a thick syrup. Let cool, then flavor with a fruit brandy or other alcohol, such as rum, brandy, or whiskey.
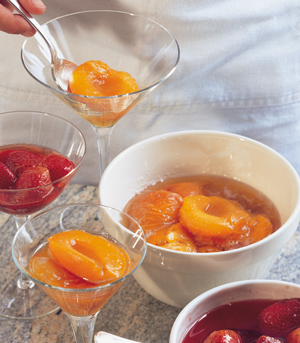
3. Let each fruit macerate in its own flavored syrup for at least an hour and as long as several days in the refrigerator. Serve in stemmed glasses or bowls, or spoon over ice cream.
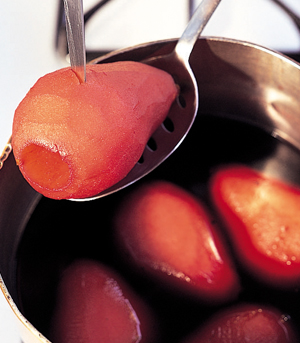
1. Remove the core from the bottom of the pear with a nonswivel peeler, a corer, or a paring knife.

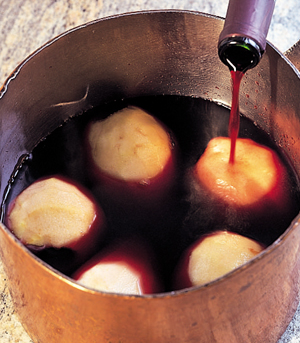
2. Pour red wine over to completely cover cored and peeled pears in a saucepan and sprinkle generously with sugar.
3. Poach at a bare simmer until the pears are easily penetrated with a paring knife.
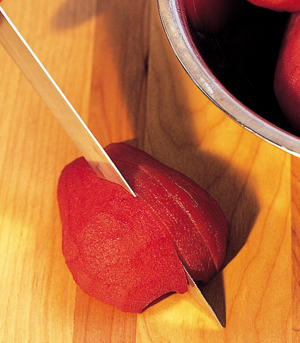
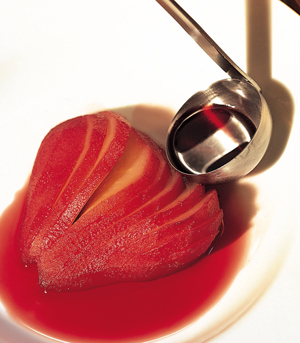
4. Drain the pears and reduce the poaching liquid until it is the consistency of thin syrup. Cut the pears in half and slice each half into a fan shape.
5. Serve hot or cold in shallow bowls, spooning the sauce around.
See Also
To hull strawberries, page 28
To peel pears, page 101
Related Glossary Entries
Fruit brandy
Poach