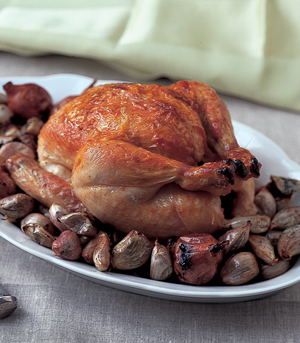
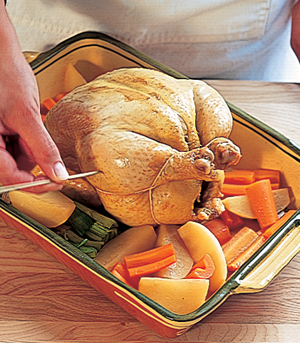
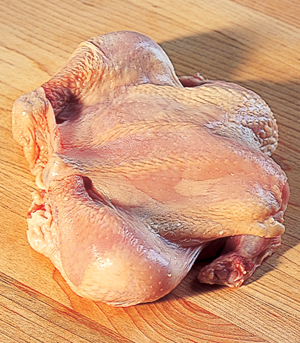
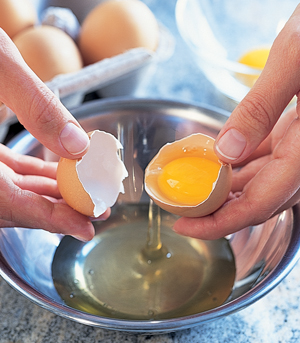
One of the quickest, easiest, and best-tasting ways to prepare a chicken is to roast it whole and serve it with the pan juices. You don’t need a roasting pan or a rack—in fact, I caution against using a rack because the juices will burn in the pan underneath and you’ll lose your sauce. A baking or gratin dish large enough to hold the bird works perfectly well. Nor do you need to baste the chicken, because the skin keeps the chicken moist by slowly releasing fat that bastes the meat throughout roasting. (The fat ends up on the bottom of the roasting pan and is skimmed off.) Breast meat cooks faster than thigh meat, so to equalize the cooking time, place a folded and buttered sheet of aluminum foil over the breasts during the first fifteen minutes in the oven to slow their cooking.
Cooks often ask whether it’s really necessary to truss a chicken. It’s not necessary, but I recommend it. Trussing doesn’t affect the way the bird cooks but a trussed chicken is easier to handle. Trussing also gives the bird an attractive shape, which is important if you’re carving it at the table. With practice, it takes less than a minute to truss a bird.
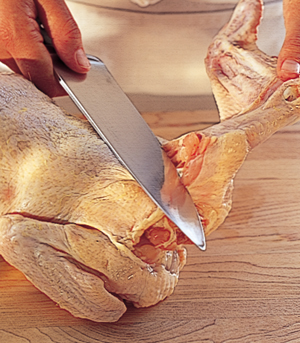
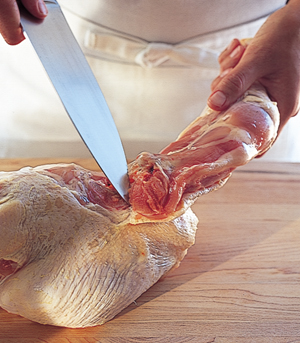
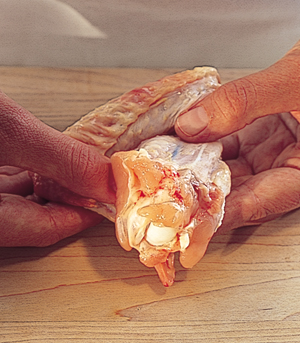
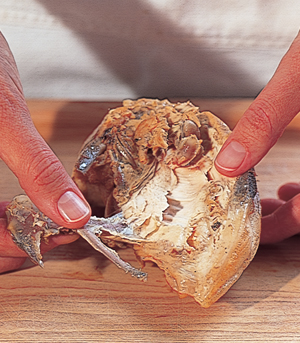
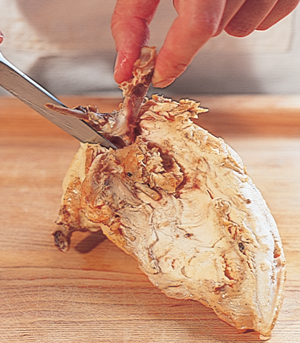
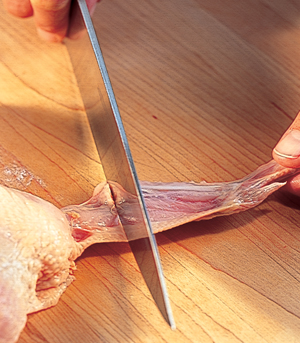
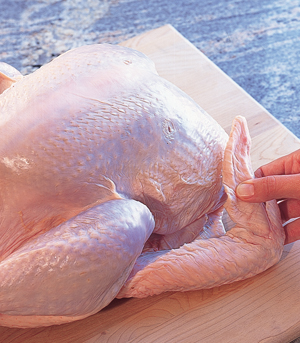
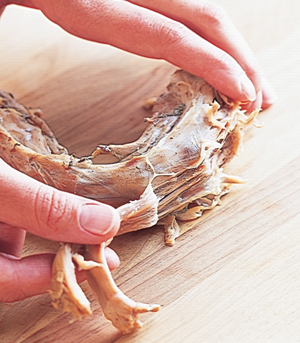
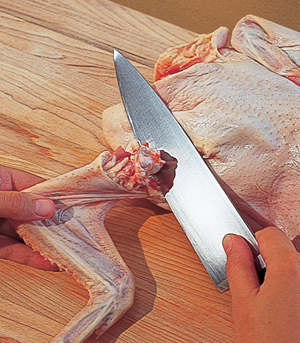
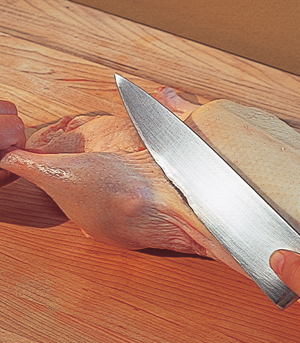
1. To make carving easier, remove the wishbone: Pull the skin up out of the way and slide the knife along the underside of the wishbone.
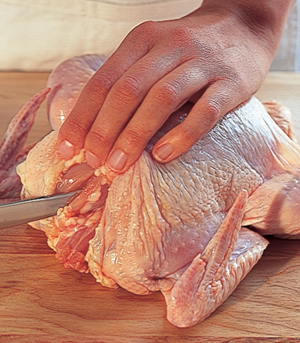
2. Continue cutting around and under the wishbone until it’s separated from the flesh.
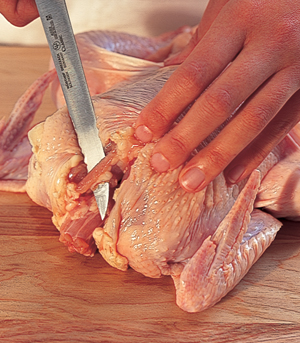
3. Pull the wishbone out with your fingers.
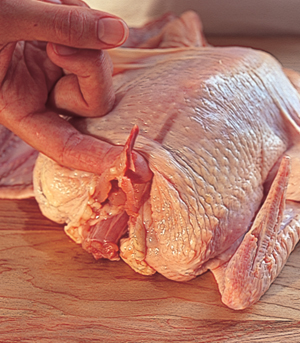
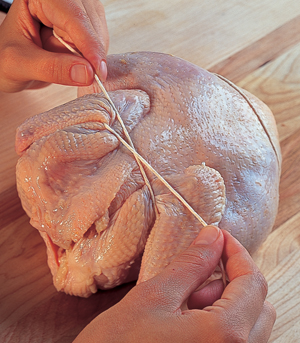
4. To truss the chicken (optional), slide the center of a 2½-foot length of string under the tail end of the chicken by about an inch.
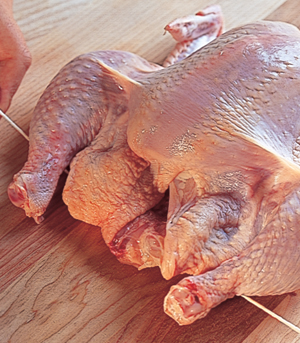
5. Cross the ends of the string over the drumsticks, making sure that each of the drumsticks is caught by the string.
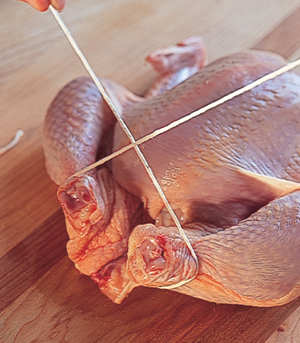
6. Tuck the left end of the string under the right drumstick and the right end under the left drumstick, making an X.
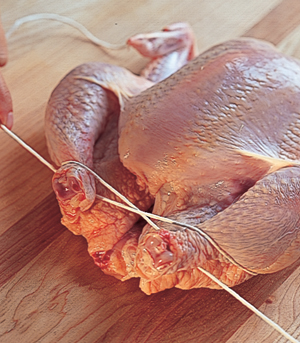
7. Pull tight so the drumsticks come together.
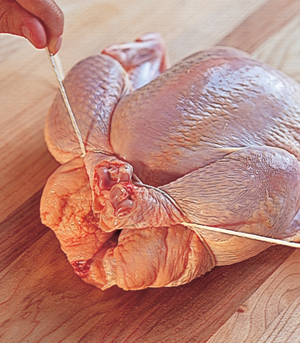
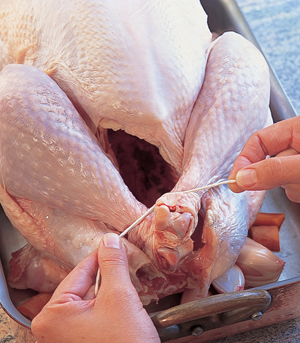
8. Pull the string back along the breast and over the wings.

9. Stand the chicken neck side up so the string hooks on top of the wings.
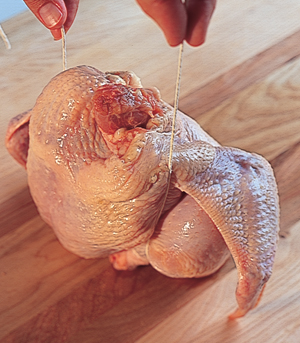
10. Turn the chicken over, pull the string tight over the wings, and tie into a knot. Fold under the end of each wing so that it hooks under the back of the chicken and stays in place.
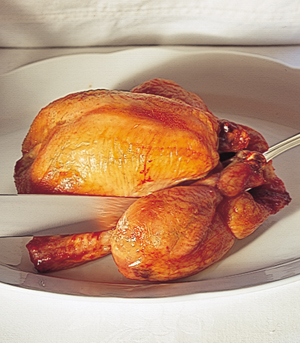
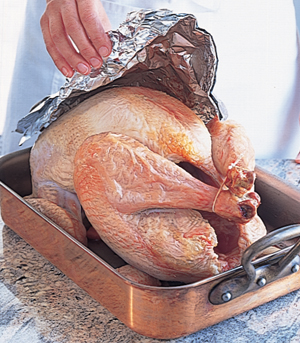
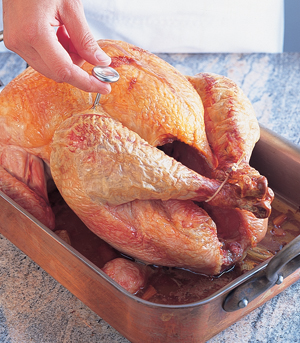
1. Preheat the oven to 425°F. Place the trussed chicken in a small roasting pan or oval baking dish. Loosely cover the breasts but not the thighs with a buttered triple sheet of aluminum foil, buttered side against the chicken, and roast for 15 minutes. (The foil slows the cooking of the breasts so they don’t dry out before the thighs are cooked.) Remove the foil and continue roasting until a thermometer inserted between the thigh and breast reads 140°F.
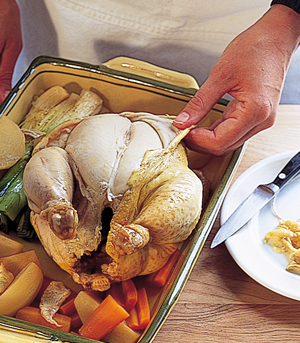
Remove the trussing string, cover the entire chicken loosely with aluminum foil, and let rest in a warm place such as the back of the stove or the oven on the lowest setting (however, if the oven has been used at a higher temperature, let it cool down with the door open before putting the chicken inside) for 20 minutes.
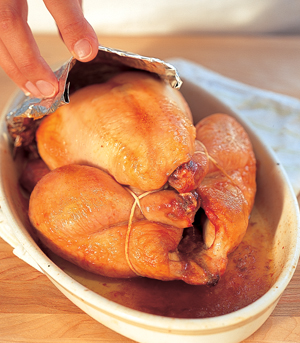
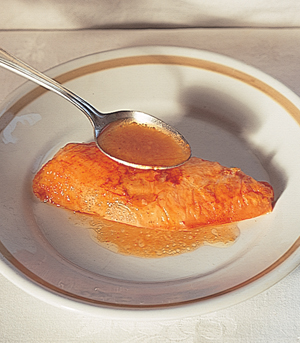
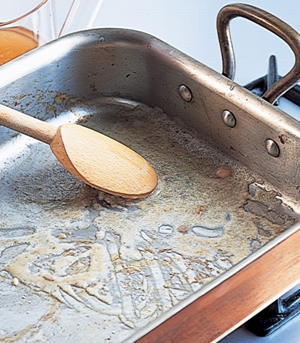
2. Use a wooden spoon stuck into the cavity of the chicken to transfer it to a platter (or a cutting board with a moat to catch the juices), tilting the chicken as you lift it so any juices in the cavity spill into the roasting dish.
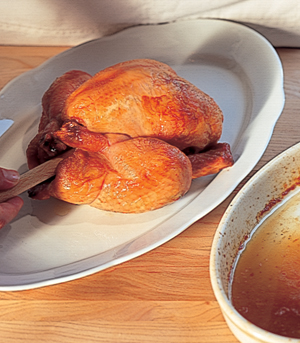
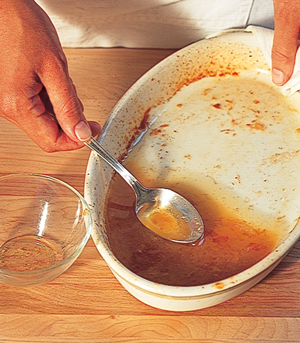
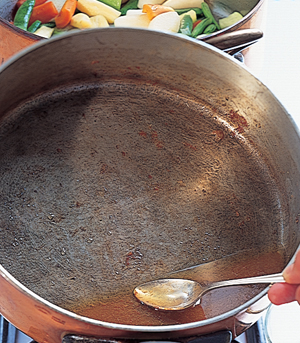
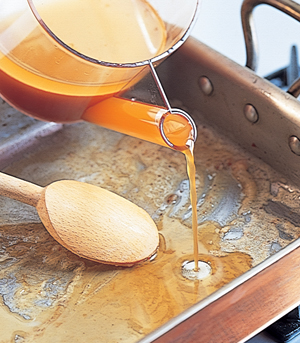
3. Pour any juices that accumulate on the platter into the roasting pan. Tilt the roasting pan and skim the fat off the top of the jus with a spoon.
4. Carve the chicken and serve the jus at the table in a sauceboat, or spoon it over each serving.
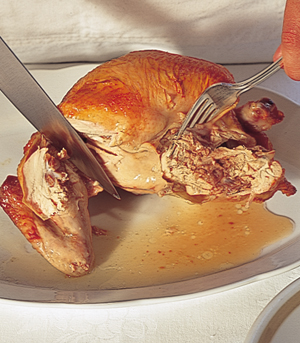
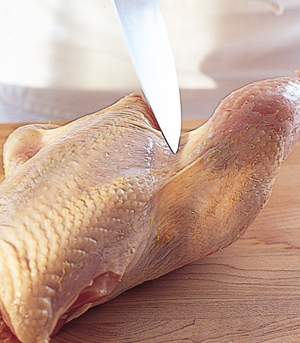
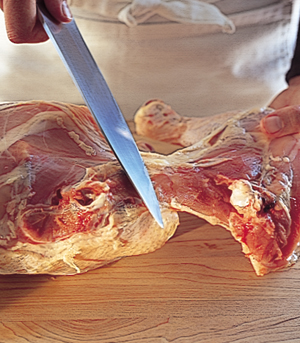
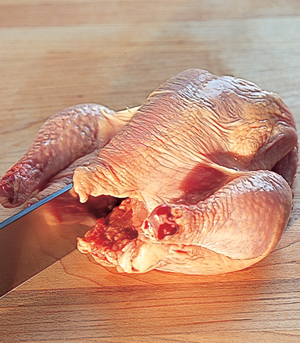
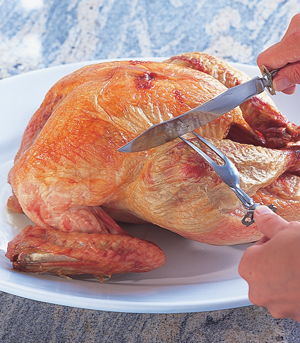
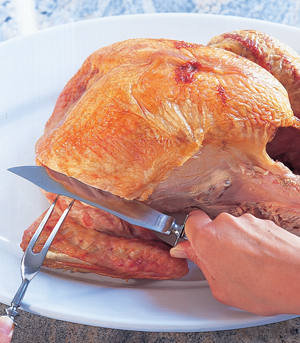
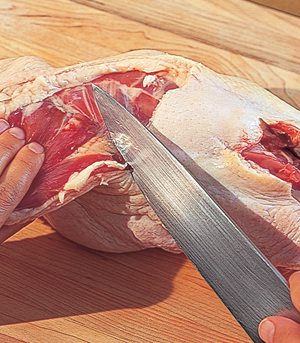
1. Hold the chicken steady with a fork inserted in the cavity. Cut through the skin separating the thigh and breast down to the bone at the base of the thigh that connects the thigh to the back.
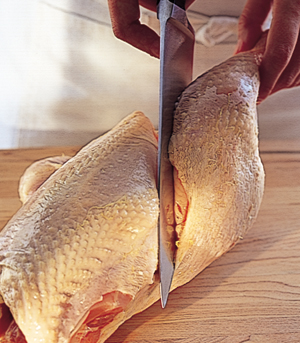
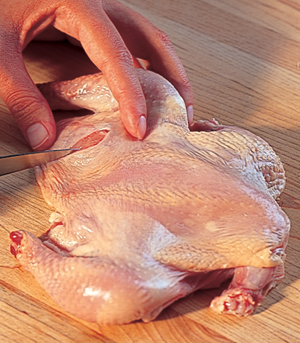
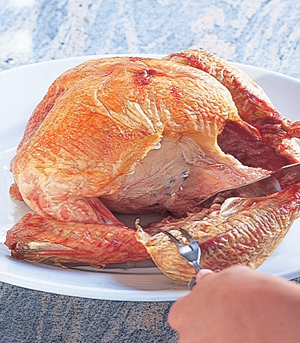
2. Push the thigh down and away from the chicken so the small bone at the base of the thigh snaps out.
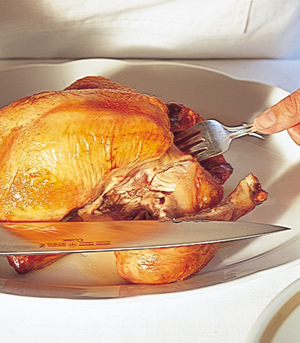
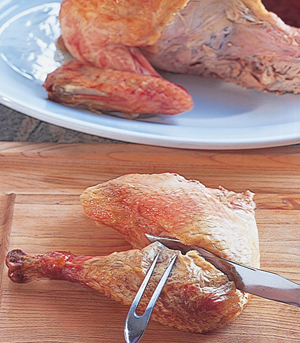
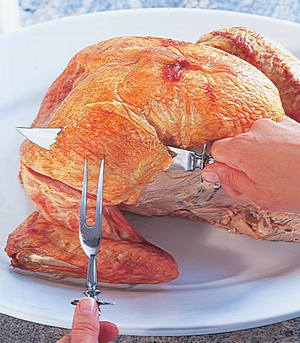
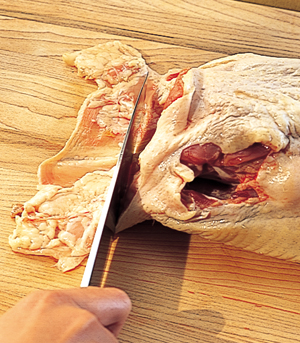
3. Slide the knife along the side of the chicken where the thigh connects to the back and separate the thigh completely from the chicken, leaving as little meat as possible attached to the back.
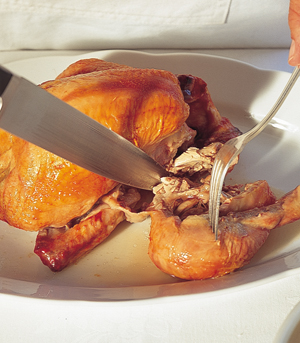
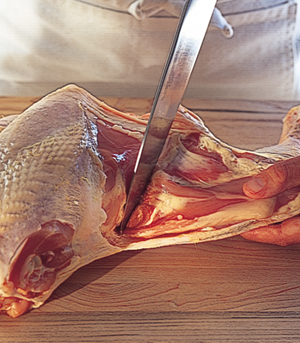
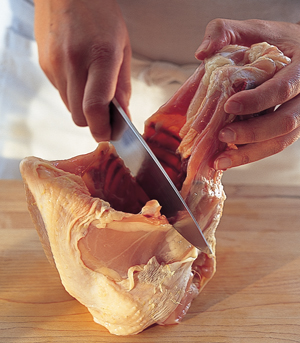
4. Cut into the breast just above the wing and locate the joint where the wing joins the rest of the chicken. (The joint is deeper inside the chicken than it appears from the outside.) Fold the wing out from the breast and cut through the joint, detaching the wing.
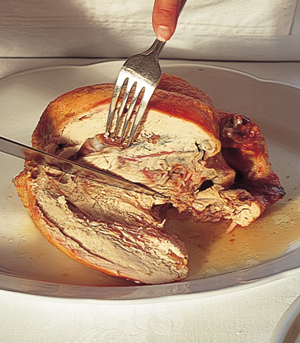
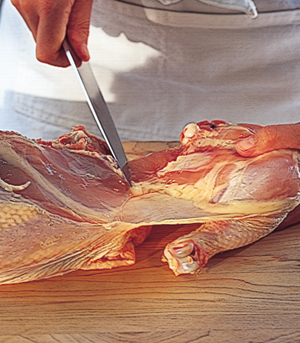
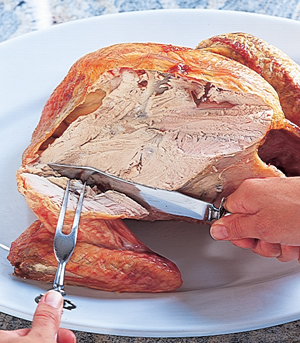
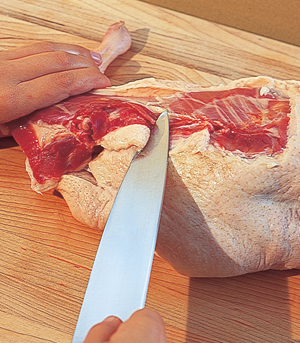
5. Slide the knife along one side of the breastbone, as close to the bone as possible, pushing the breast meat away from the bone with the back of the knife.
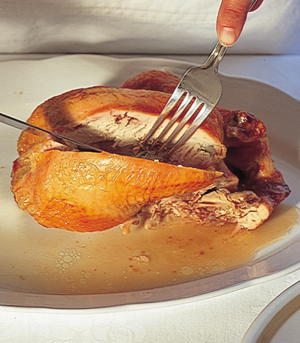
6. Continue sliding the knife along the breastbone, pushing the breast meat away from the bone with the back of the knife, and cut the breast off the carcass. Turn the chicken around and repeat on the other side.
See Also
To roast vegetables with the chicken, page 70
To test the internal temperature of poultry, page 167
Related Glossary Entries
Degrease
Gravy
Jus
Roast
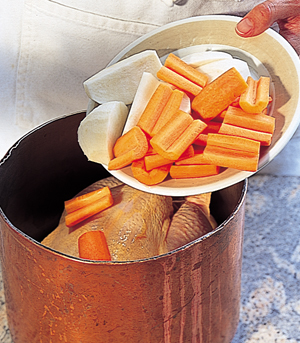
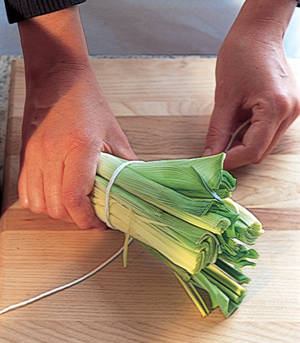
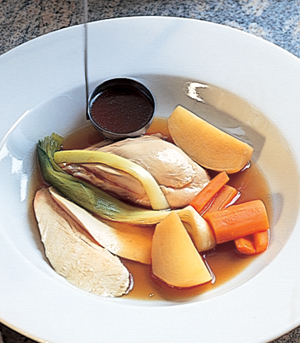
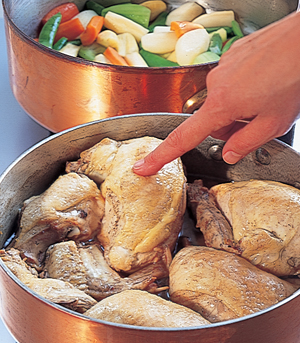
Poaching is a great method for cooking chicken and other poultry because it’s light—no fat is added—and it makes its own savory broth that can be served with the carved chicken as a delicate, fat-free, and pure-flavored sauce. Root vegetables such as carrots, leeks, and turnips poached along with the chicken make the dish a one-pot meal. Cut vegetables into relatively large pieces so they cook at the same rate as the chicken. Here, carrots are sectioned and cored and turnips cut into wedges. Remove the wishbone and truss the chicken before poaching, so that it cooks to an attractive shape and is easy to lift in and out of the poaching liquid.
1. Place the trussed chicken in a pot just large enough to hold it but deep enough to completely cover it with liquid. Add aromatic vegetables, such as the cored carrot sections and turnip wedges shown.
2. Cut rinsed leeks in half. Tie together with string so they don’t float up and interfere with skimming. Add them to the pot.
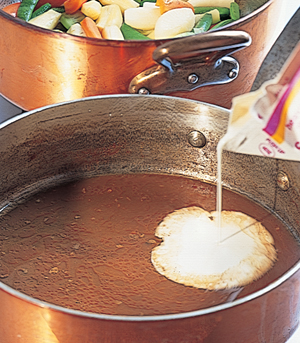
3. Put a bouquet garni in the pot and pour over enough broth or water to cover. Simmer gently, skimming off any fat or scum that floats to the top with a ladle, for 35 to 45 minutes.
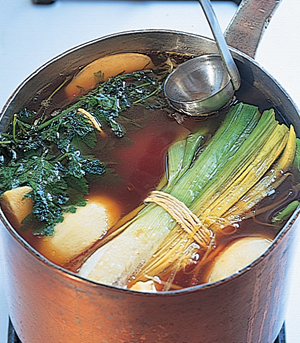
4. Transfer the chicken to a serving dish. See if it’s done by inserting a skewer into the thickest part of the thigh, right where it joins the drumstick. If the liquid runs clear, not pink, it is ready.
5. Pull off and discard the skin.
6. Carve the chicken and serve with the vegetables in wide soup plates, ladling over the broth.
See Also
To truss a chicken, page 146
To core and section carrots, page 21
To make a bouquet garni, page 31
To carve a roast chicken, page 149
Related Glossary Entry
Poach
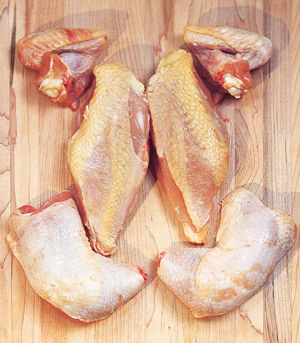
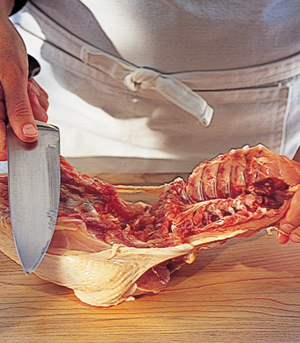
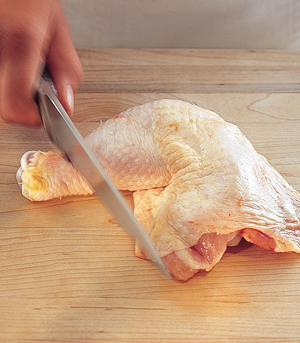
Use cut-up chicken in stews and sautés, and for frying and grilling. For family-style cooking, when you can pick up and eat chicken wings with your fingers, cut off the wings, cut the rest of the chicken into quarters (which actually yields two servable legs, two servable breasts, and the back in addition to the two wings), and cook the wings too. For a more elegant restaurant-style presentation, cut the chicken into six pieces: Trim off and discard the last two joints of the wings, leaving the first meaty joint attached to the breast (this not only makes use of the most edible part of the wing, but it also looks attractive) (see Box) and cut the legs in half into thighs and drumsticks. To cut the chicken into eight pieces, cut the breasts in two. Cutting the chicken into eight pieces allows you to serve four people a piece of white and dark meat each. Chicken backs and wing tips can be frozen and used for chicken broth.
1. Cut off the tail (optional).
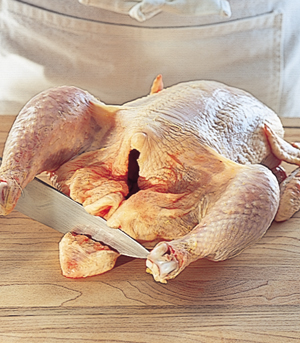
2. Pull out any large clumps of fat from the cavity opening.
3. Pull one wing out from the body and cut through the joint where the wing joins the body. Repeat with the other wing.
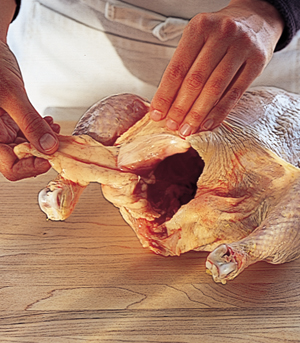
4. Pull one thigh forward so that when you cut off the thigh, the breast stays well covered with skin.
5. Cut through the skin between the thigh and breast all the way to the back. Follow the natural line of fat running along the edge of the thigh.
6. Hold your finger under the joint where the thigh connects to the rest of the chicken and snap open the thigh. You’ll feel the joint snap out.
7. Slide the knife along the back, keeping the knife against the bone and pulling on the thigh with the other hand as you go. Be sure to cut under the small morsel of meat (“the oyster”) imbedded in the back so that you leave it attached to the thigh.
8. Continue sliding the knife along the backbone while pulling on the thigh until the thigh comes away.
9. Turn the chicken onto its other side and repeat.

10. Remove the other thigh.
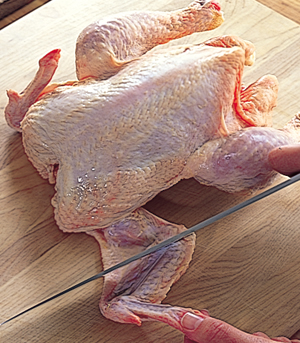
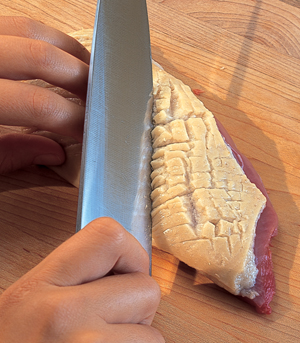
11. Hold the chicken on end on the cutting board with the tip of the breast pointing up. Make a series of rapid chops with a chef’s knife to cut through the rib cage. Continue until you’ve cut through all the ribs, keeping the knife toward the back so you don’t cut through any of the breast meat.
12. Snap the back away from the whole breast.
13. Cut through the joints that attach the breast to the back and separate the breast from the back.
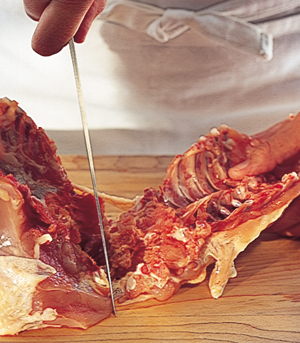
14. Split the breast by placing it skin side down on the cutting board and cutting straight down through the center of the breastbone. Pull the knife toward you to split the back part of the breast.
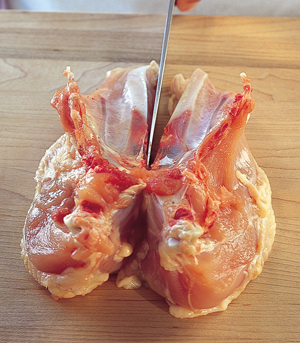
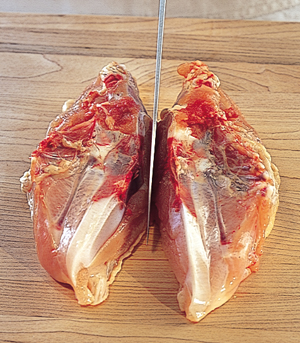
15. Turn the breast around and cut in the other direction, separating the 2 halves.
16. To cook wings for family-style eating, hook the tips of the wings under the rest of the wing to make a more compact shape.
17. If desired, cut off the ends of the thigh bones with a quick whack of the chef’s knife. Use the very back end of the blade so you don’t damage the edge.
See Also
To make a chicken stew, page 154
To make a chicken sauté, page 157
To grill chicken, page 161
To fry chicken, page 160
First cut the chicken into quarters as instructed on pages 151 and 152. Then place 1 leg skin side down on the cutting board. Locate the joint between the drumstick and thigh with your fingers and cut through with the chef’s knife. Repeat to split the other whole leg.

First cut the chicken into 6 pieces as instructed above. Then cut through the breast with the chef’s knife, pressing firmly on the back of the knife to cut through the bone.

In fine restaurants the first joint of the wing is sometimes left attached to the breast and the rest of the wing saved for making stocks. Pull the wing away from the chicken and cut it away by slicing through the second joint. Use a chef’s knife or a cleaver to hack off the unattractive little nub that’s left on the second joint.
Chicken stews (fricassées in French cuisine) are made by first cooking chicken pieces in a small amount of butter, olive oil, or other fat, then adding a liquid such as broth, wine, or vinegar and cooking, covered, until the chicken is tender. Once the chicken is done, the stewing liquid is usually thickened to make a sauce, but it is occasionally served, broth-like, around the chicken. A garniture may be cooked along with the chicken, or cooked separately and added at the end. Chicken stews differ from chicken sautés in that stewed chicken is cooked in liquid that is eventually bound to make the sauce, while sautéed chicken is cooked all the way through in fat alone (butter or oil). For a chicken sauté, liquid is added to the pan to make a sauce only after the chicken has been removed. Stewed chicken has a milder flavor than sautéed chicken and the skin is soft, not crispy. (Technically speaking, chicken stews are short-braises, because chicken is tender and lean enough that it need only be braised for a short time.)
Fricassées offer myriad possibilities for the creative cook. Liquids and garnitures can be varied almost endlessly to change the character of the basic stew. But beyond a change in ingredients, the way the chicken is cooked also substantially changes the flavor of the dish. So-called white fricassées are stews in which the chicken is cooked in the fat just long enough to cook the skin but not to brown it, producing a stew with a light-colored sauce and a delicate chicken flavor. In a brown fricassée, the chicken is thoroughly browned before liquid is added; this additional caramelization deepens the flavor of the chicken and results in a darker-colored, stronger-flavored sauce. Brown fricassées can accommodate more assertive ingredients, such as red wine or vinegar, that would overpower the taste of chicken that has not been browned.
When I want a delicate-flavored, light-colored chicken dish with a creamed or herbed sauce, I make a white fricassée. When I’m looking for a deeper, more concentrated chicken flavor, I make a chicken sauté or a brown fricassée.
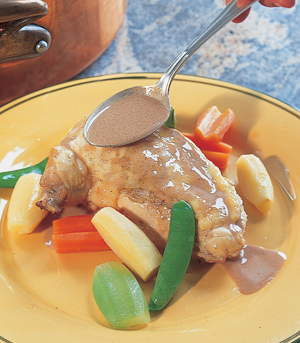
This stew is garnished with glazed assorted vegetables, added at the end.
1. Gently cook the chicken pieces in butter on both sides until the skin no longer looks raw. Pour over enough liquid to come a quarter of the way up the sides of the chicken; here, I use sherry vinegar.
2. Cover and simmer over low to medium heat until the chicken pieces feel firm to the touch, about 15 minutes. Transfer the chicken to plates or a platter and keep warm.
3. Tilt the pan so the liquid collects at one side. Spoon off any fat floating on top of the liquid. Discard the fat.
4. Reduce the liquid slightly to thicken it. Pour in heavy cream and continue to reduce until the liquid has a sauce-like consistency.
5. Pull the ribs and other small bones away from the inside of the chicken breasts.
6. Cut off the small bone attached to each breast near the wing.
7. Garnish with glazed vegetables. Season the sauce with salt and pepper and spoon over the chicken.
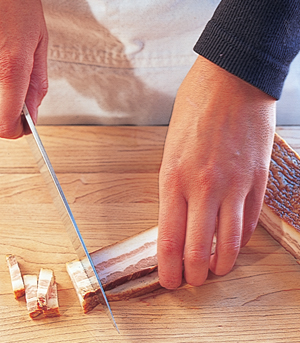
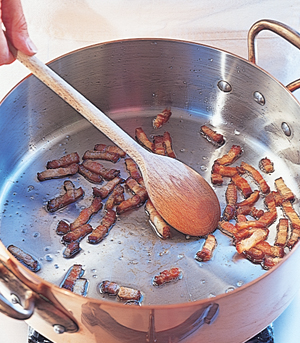
Many French dishes call for strips of unsmoked bacon cut into strips called lardons. Because American bacon is always smoked, our lardons must be blanched to get rid of some of their smokiness. Otherwise, the smokiness will take over the flavor of subtle dishes such as coq au vin and boeuf à la bourguignonne.
1. Cut thick slices of bacon crosswise into strips.
2. Put the strips in a pan, cover with cold water, and bring to the boil. Remove the lardons with a slotted spoon or drain in a colander.
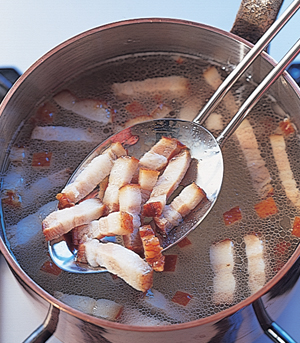
3. Cook the lardons gently, without additional fat, as you would bacon, until they barely begin to turn crispy.
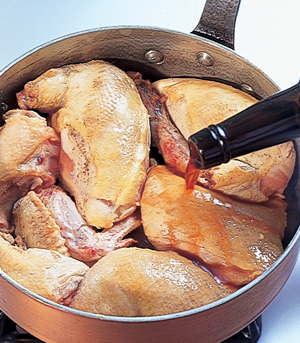
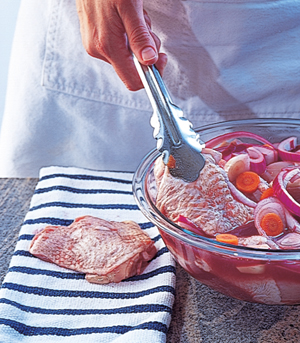
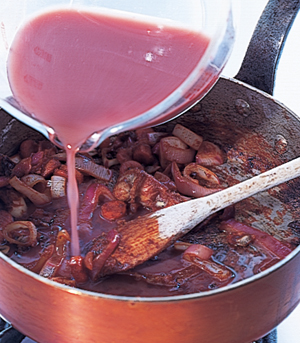
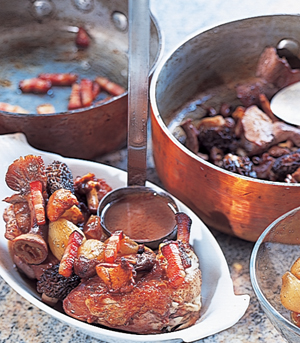
Chicken with red wine—coq au vin—is traditionally made by simmering a cut-up rooster in red wine for 3 hours and finishing the braising liquid with the rooster’s blood. Nowadays, because roosters are hard to find, chickens are often used instead. Because chickens are tender and cook quickly, the dish is prepared like a brown fricassée. The garnish of baby onions, lardons, and sautéed mushrooms is cooked separately and added to the stew at the end.
1. Cut the chicken into 8 pieces and marinate it with aromatic vegetables (here, carrots and onions) and enough red wine to cover for 4 hours or overnight in the refrigerator. Take the chicken out of the marinade and strain the marinade, reserving the vegetables and the liquid separately.
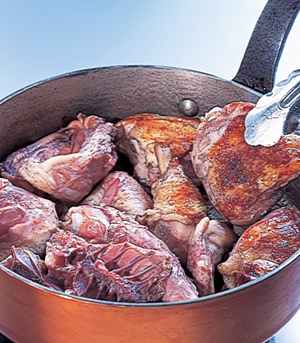
2. Blanch and gently cook lardons (see Box). Brown the blanched lardons in a sauté pan and remove with a slotted spoon; reserve for the garniture. Add the chicken to the pan and brown it in the fat rendered by the lardons, then remove from the pan.
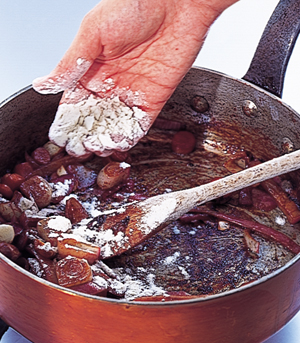
3. Discard all but a tablespoon of the fat left in the pan. Brown the reserved vegetables over medium heat for about 10 minutes. Stir in flour and continue stirring for about 2 minutes.
4. Stir in the strained marinade and bring to a gentle simmer.
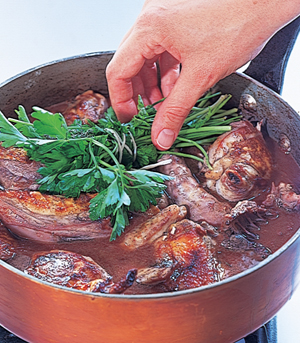
5. Add the chicken. Nestle a bouquet garni in the pot, cover, and cook very gently on top of the stove or in a 325°F oven for about 20 minutes, until the chicken is firm to the touch. Strain the braising liquid, then reduce and degrease it, with the pan moved to one side of the burner so it’s easier to skim off the foam and fat.
6. Serve the chicken with the lardons, glazed onions, and sautéed mushrooms—here, I use wild mushrooms—and ladle the sauce over it.
See Also
To cut up a chicken, page 151
To glaze root vegetables, page 76
To make a bouquet garni, page 31
To make a chicken broth, page 30
To make a chicken sauté, page 157
Related Glossary Entries
Blanch
Braise
Degreasing
Fricassée
Garniture
Thickener
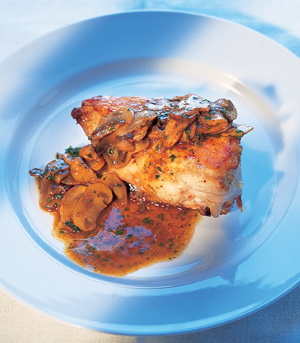
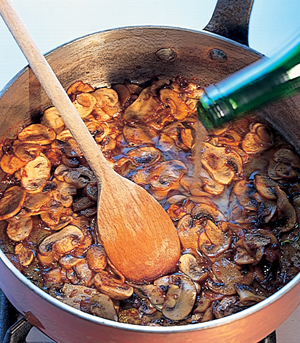
A chicken sauté is intensely flavorful because the chicken pieces are cooked entirely in a small amount of fat such as butter or olive oil on top of the stove. Sautéing the chicken pieces this way leaves them well caramelized, crispy, and very flavorful. When the chicken is done, serve it as is or make a sauce out of the caramelized juices that are left clinging to the bottom of the sauté pan. Classic and imaginative garnitures can be added for more complexity and to vary the flavor (see Box).
1. Heat butter in a heavy-bottomed pan just large enough to hold the chicken in a single layer. Season the chicken with salt and pepper and place it skin side down in the pan.

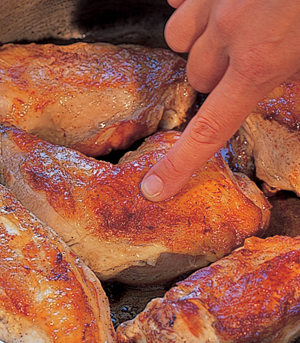
2. Cook for about 15 minutes, until the skin turns golden brown. Turn the chicken pieces over.
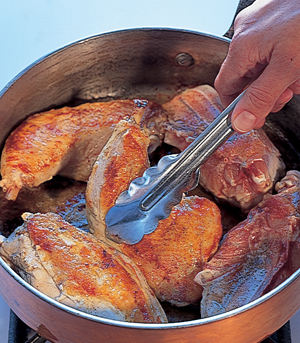
3. Cook on the flesh side for about 10 minutes, or until the flesh springs back when you press on it. Transfer the chicken to a plate or platter.
4. Pour out all but about a tablespoon of the fat left in the pan. Place over high heat, add shallots, and stir for about a minute, until they release their fragrance.
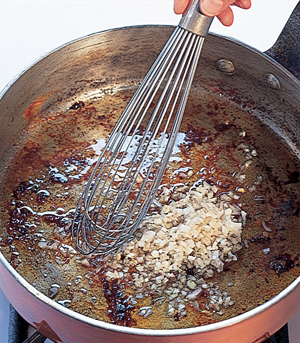
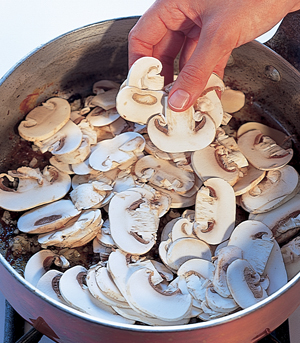
5. Add sliced mushrooms and continue to cook until the mushrooms brown and any liquid they release has completely evaporated.
6. Add white wine and simmer over high heat until it reduces to about 2 tablespoons.
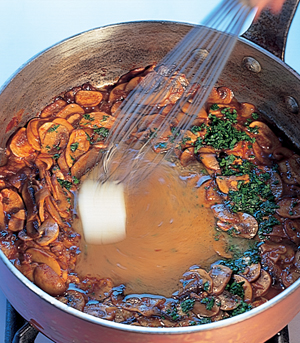
7. Add brown chicken broth and reduce to a lightly syrupy consistency.
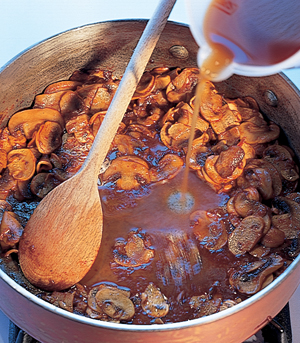
8. Whisk in butter and season with salt and pepper. Spoon the sauce over the sautéed chicken as shown on page 157.
See Also
To cut up a chicken, page 151
To make a brown chicken broth, page 30
To make a chicken stew (and for the difference between a stew and a sauté), page 154
To determine doneness, page 66
To turn vegetables, page 13
To thicken with vegetable purées, page 286
Related Glossary Entries
Deglaze
Garniture
Monter au Beurre
Sauté
Sweat
Thickener
Fried chicken, deservedly one of our most popular fried foods, is not technically deep-fried, because it isn’t completely submerged in the oil. Rather, it is cooked by the method called shallow-frying, in which food is fried in enough oil or other fat to come halfway up its sides. Frying gets the chicken piping hot and very crispy—when you want a really great crust, it’s the best method.
Cooks debate endlessly about how to coat chicken to get the best crust. I just dredge the chicken parts in flour. Since chicken skin browns perfectly well on its own, it needs only a little help to get really crisp. (I save more substantial batters made with flour, water, oil, and sometimes eggs, to deep-fry moist foods like vegetables that don’t have a skin and so need an additional something to produce a crispy outer layer.) Don’t use a bread-crumb coating for frying chicken—the breading just gets oily. (Breaded chicken breasts are better sautéed.) Two to four hours in a white wine marinade before frying will add enough flavor to the chicken so that it won’t need a sauce. But if you like, serve fried chicken with a salsa or a flavored mayonnaise such as aïoli or gribiche.
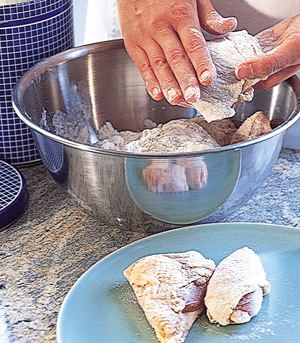
1. Cut the wings off a chicken and then cut it into 8 pieces. If desired, marinate the chicken for 2 to 4 hours in a mixture of chopped garlic, sliced onions, white wine, and a little olive oil.
2. Just before frying, toss the (drained) chicken pieces in flour and pat off the excess.
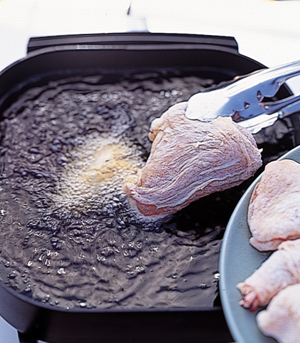
3. Heat the oil in an electric frying pan or large heavy pot to 360°F. Gently lower the chicken pieces into the oil with tongs. Start checking the chicken after 5 minutes.
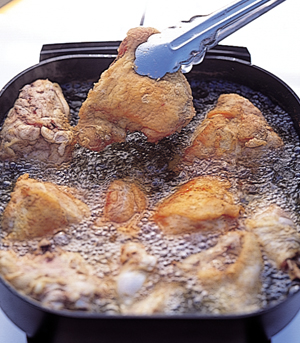
4. When the pieces have browned on one side, turn them over. The chicken is done when the pieces feel firm to the touch with no fleshiness, about 10 to 15 minutes in all. Drain on paper towels.
See Also
To make an aïoli or gribiche sauce, page 43
To cut a chicken into 8 pieces, page 153
To sauté breaded chicken breasts, page 162
Related Glossary Entries
Bread
Deep-fry
Marinate
Grilling is a great method for cooking chicken because the skin crisps on the grill and grilling adds a savory, gently smoky flavor. Unlike when sautéing, when it’s best to start with the skin side down first, start by grilling the chicken pieces skin side up over high heat. The flesh side is less likely to cause flames and the charcoal will have a chance to burn down somewhat before you turn the chicken skin side down. If the fire does flare up, move the chicken around on the grill.
A good way to prepare small poultry such as Cornish hens or squab for grilling is to cut out the backbone, spread the bird open, and insert the legs into small incisions made in the skin. This is a practical way to handle small whole birds, because it flattens them so that they grill evenly and quickly. Grill small birds just as you grill chicken. Cornish hens take about ten minutes on each side. Cook red-meated birds such as squab only until the meat is rare to medium-rare, about six minutes on each side.
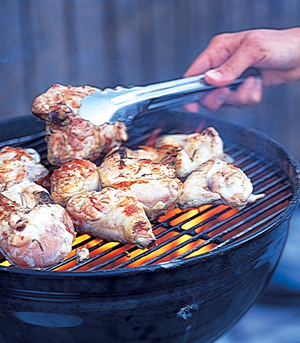
Quarter a whole chicken, or cut it into 6 or 8 pieces. If desired, marinate the chicken in white wine with sliced onions, garlic, and thyme.
Grill the chicken pieces skin side up until the flesh side is well browned, at least 10 minutes. Turn and grill until the skin is crisp and brown and the chicken feels firm to the touch, with no fleshiness.
See Also
To cut up a chicken, page 151
To marinate chicken, page 156
To roast a chicken, page 146
To determine doneness, page 66
Related Glossary Entries
Grilling
Marinate
1. Cut off the last 2 sections of the wings or leave them on and fold them under.
2. Slide a heavy chef’s knife into the cavity. Cut through just to the left of center.
3. Spread the bird open. Cut off the other side of the backbone. (You can also cut out some ribs for easier eating.)
4. Turn skin side up and make small slits on both sides.
5. Tuck the drumstick ends into the slits.
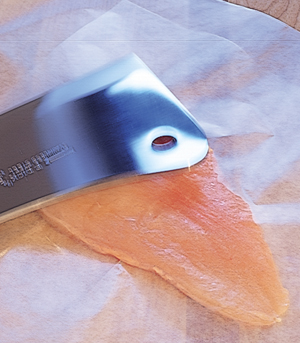
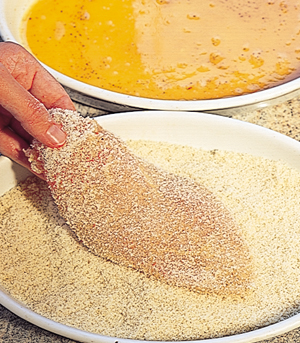
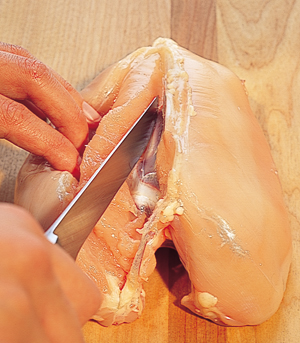
Breading and sautéing in butter is an excellent way to prepare boneless skinless chicken breasts. The breading traps the delicious lightly browned, hazelnut-flavored butter and flavors the mild-tasting white meat. Breading also allows you to brown over a relatively low heat (breading browns at a lower temperature than the flesh), which makes it easier to brown the breasts without overcooking and protects them from drying out. Boned chicken breasts can usually be found at the supermarket, but you’ll get more for your money if you start with a whole chicken or whole bone-in chicken breasts and bone the breasts yourself. In any event, breasts should be lightly pounded to an even thickness so that they cook evenly.
1. Place each chicken breast between 2 sheets of waxed paper or plastic wrap and gently flatten the thick end with the side of a cleaver so the whole breast is of the same thickness. Don’t overdo it; if the chicken is too thin, it will dry out.
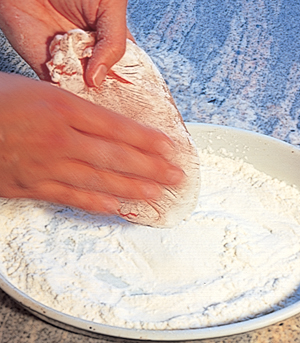
2. Coat each breast on both sides with flour and pat off the excess.
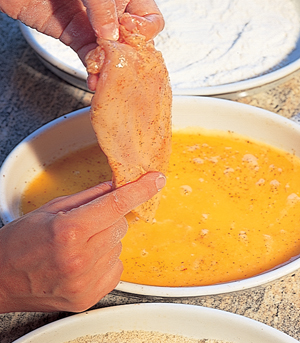
3. Dip the chicken in beaten egg that has been well seasoned with salt and pepper.
4. Coat the breasts on both sides with fresh bread crumbs.
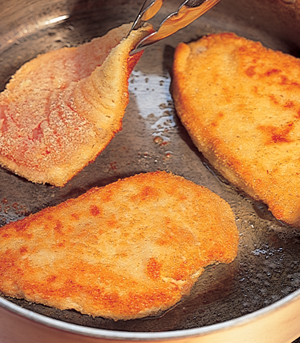
5. Sauté the breaded chicken breasts in clarified butter or extra virgin olive oil over medium heat, until golden brown and firm to the touch, 3 to 4 minutes on each side, turning once. Turn gently with tongs so you don’t tear the breading.
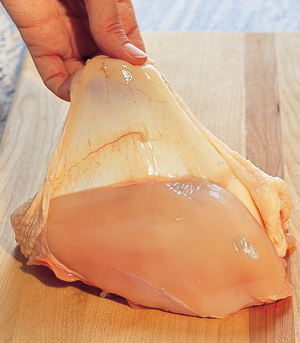
Whole double chicken breasts can be split in two and cooked with both skin and bone left attached or they can be skinned and boned, as shown here, and sautéed with or without a coating.
It’s less expensive to buy bone-in double chicken breasts and bone them yourself than to buy already boned breasts. The tenderloin, the small muscle that runs along one side of the boneless breast, is usually left attached. But for some dishes, such as the breaded boneless chicken breasts, it’s best to cook the tenderloins separately so they don’t fall off the rest of the breast during cooking. The small tendon that runs along the tenderloin is removed because it’s chewy and rather unattractive.
Skin-on chicken breasts can be sautéed almost in the same way as steaks, except over somewhat lower heat and almost entirely on the skin side to get the skin to release a maximum of fat.
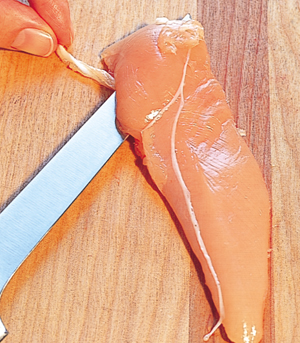
1. Peel off the skin.
2. Slide a small paring or boning knife under the wishbone on one side to free it from the meat.
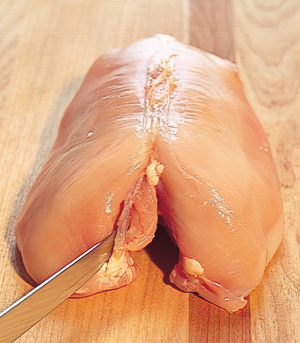
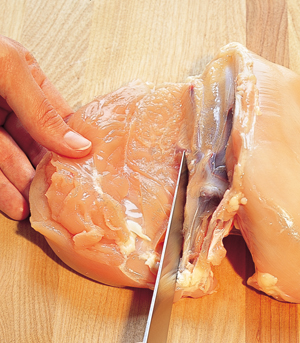
3. Working on the same side, slide the knife along the breastbone, keeping the knife against the bone and pulling the meat away from the bone.
4. Continue sliding the knife against the bone until you’ve completely detached the boneless breast. Repeat on the other side.
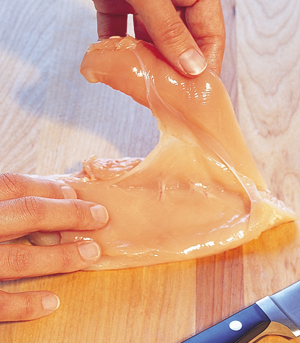
1. Pull the tenderloin away from each boneless breast.
2. Slide a boning or paring knife under the end of the small tendon at the thicker end of the tenderloin.
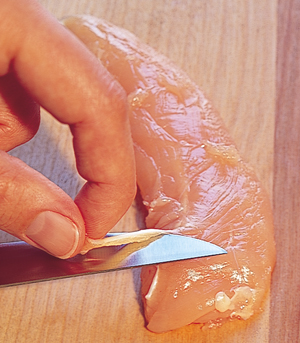
3. Place the tenderloin tendon down on the cutting board. With the knife against the tendon, pull on the tendon, moving it gently from side to side with your other hand, until it comes away.
See Also
To cut up a chicken, page 151
To cut up a duck, page 170
To sauté a steak, page 195
To make a beurre noisette, page 46
Related Glossary Entries
Confit
Sauté
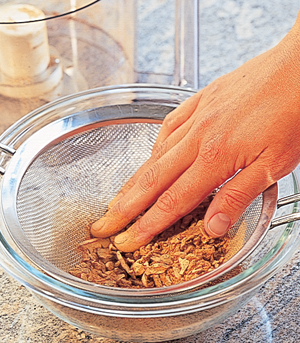
Porcini dust can replace flour and other coatings when sautéing poultry, seafood, veal, and sweetbreads. Before beginning, unless the dried porcini feel perfectly dry and hard to the touch, dry them thoroughly on a sheet pan in a 250°F oven for 15 to 45 minutes, depending on how moist they are.

1. Finely grind in a food processor.

2. Work the dust through a fine-mesh strainer with the tips of your fingers. Return any chunks that don’t go through the strainer to the food processor, grind again, and strain once more.
See Also
To cut up a chicken, page 151
To clarify butter, page 46
To make a flavored butter, page 47
To make a beurre noisette, page 46
To sauté sweetbreads, pages 216 and 217
Related Glossary Entries
Bread
Purée (for information on sieves and strainers)
Sauté
Because bread crumbs out of a box are usually stale and too dry for coating foods with a delicate coating, it’s well worth the effort to make fresh bread crumbs.
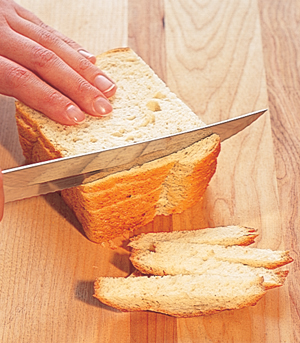
1. Cut the crusts off fresh white bread. Use a white bread with a dense crumb, such as Pepperidge Farm. Tear the bread into pieces.
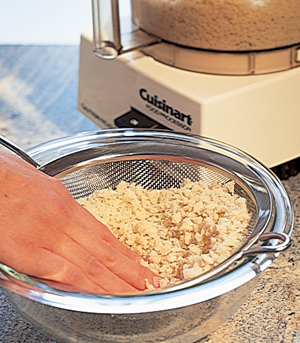
2. Work the bread in a food processor and then work the crumbs through a fine-mesh strainer or drum sieve with your fingertips.
Chicken livers are delicious just sautéed and served with a port-wine-and-shallot pan sauce. But if you’re game for a bit more work, one of the best ways to prepare the livers is in a mousse. Chicken livers have a full rich flavor and, once cooked and puréed, a smooth texture. There are several ways to make a chicken liver mousse. One basic technique is to purée the cooked livers with butter so that the resulting mixture has the texture of smooth pâté. In the recipe here, I go a step further and fold the butter/liver mixture with whipped cream to make it airy and light.
It’s important that the pan used to sauté the livers be preheated over very high heat. If the pan isn’t hot enough, the livers will steam instead of sauté; they’ll never brown, and the mousse will have an unpleasant gamy flavor. Cook the livers until they just spring back when pressed with your finger, or cut into them to check their color—they should be barely pink (medium) with no trace of rawness. (Overcooked livers will make the mousse grainy.) The mousse can be served in small ramekins or shaped into quenelles.
1. Pat the livers dry with a clean kitchen towel and season with salt and pepper. Sauté in clarified butter or olive oil in a preheated heavy-bottomed pan over very high heat, turning once, until the livers feel firm to the touch. Stand back—they spatter as they cook.
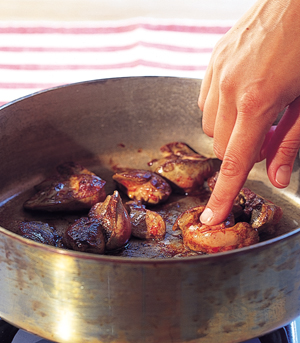
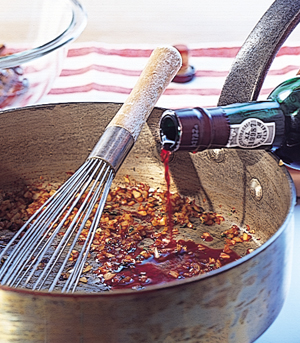
2. Transfer the livers to a bowl and pour the burned fat out of the pan. Add chopped shallots, garlic, and fresh thyme to the pan and whisk for about a minute, until they smell fragrant. Pour in port or Madeira and reduce to about 2 tablespoons.
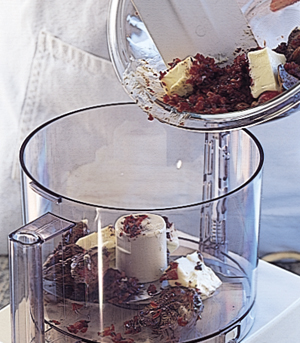
3. Add chunks of butter to the bowl with the warm livers, to soften the butter, and scrape in the port mixture. Purée the mixture in a food processor until smooth.
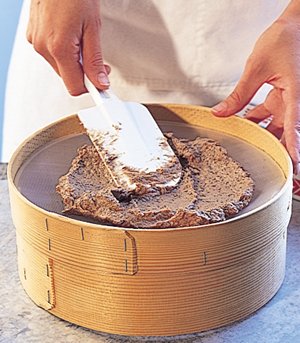
4. Work the purée through a drum sieve to make it perfectly smooth.
5. Fold the strained mousse with whipped cream to lighten it. Season to taste with salt and pepper. Serve in ramekins or shape into quenelles.
Related Glossary Entry
Quenelle
A turkey is roasted the same way as a chicken except that the cooking time is longer because turkeys are larger and need to be roasted at a lower temperature than chicken to prevent the skin from browning too much before they cook through. Exact cooking times and oven temperatures depend on the size of the turkey, but a very large turkey is usually roasted at a lower temperature than a small one. As when roasting a chicken, cover the turkey breast with a buttered tripled sheet of aluminum foil; remove the foil after an hour of roasting. The foil slows the cooking of the breast and prevents the breast meat from overcooking and drying out before the legs are done.
It isn’t necessary to remove the wishbone or truss the turkey; just tuck the wings under as for a chicken and tie the drumsticks together with string so they don’t flop open during roasting. I never stuff a turkey because getting the stuffing to cook through usually requires overcooking the turkey.
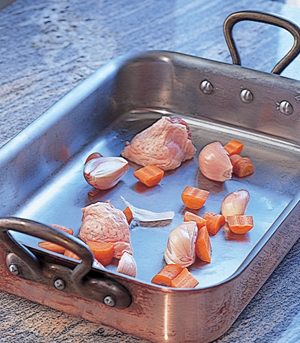
1. Fold the outer joints of the wings under the turkey.
2. Spread a few coarsely chopped vegetables and the turkey tail, cut in half, in a heavy-bottomed roasting pan. These prevent the turkey from sticking to the pan and also provide flavor. (The giblets could be added too, but here they’re used for the gravy.)
3. Place the turkey in the roasting pan and tie the ends of the drumsticks together with a piece of string.
4. Roast the turkey, breast covered with a buttered sheet of tripled foil, at 350°F for about 1 hour. Remove the foil.
5. Continue roasting until an instant-read thermometer inserted between the thigh and breast reads 145°F. Remove the turkey from the oven, cover loosely with foil, and let rest in a warm place, such as the turned-off oven, for 30 minutes.
Before carving, transfer the turkey to a platter. Set up a cutting board—preferably one with a trough to trap juices—in the dining room with the platter next to it.
1. Cut through the piece of crispy skin that joins the thigh and breast.
2. Continue cutting down, pulling the thigh away from the turkey with the fork, until you reach the joint where the thigh meets breast. Cut through the joint and remove leg.
3. Place the leg on the cutting board and cut apart the thigh and drumstick. (The joint is farther into the drumstick than you might think.)
4. Slice the “second joint” dark meat off the thigh and transfer it to the platter. This meat is juicier than the “first joint” meat on the drumstick.

5. Make a slight diagonal cut in the turkey just above the wing. This will allow the breast meat slices to come away as you carve the breast.
6. Slice the breast meat.
7. Use the carving fork to aid slicing.

8. Continue slicing until you reach the carcass. At this point, you will see the wing joint. Insert a knife into the joint and remove the wing. If the wing is large, the meat on the wing can be sliced.
See Also
To roast a chicken, page 146
To make a chicken broth, page 30
Related Glossary Entries
Deglaze
Degrease
Gravy
Thickener
Giblet gravy is an exception to the rule that liver should never be included in a stock or broth.
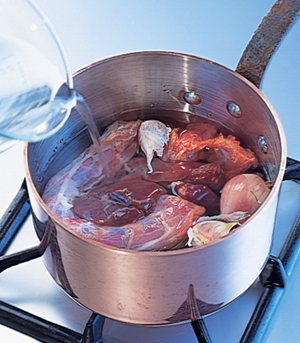
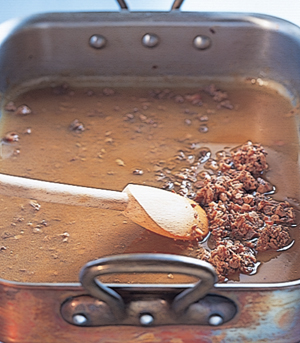
1. While the turkey is roasting, combine the giblets—the gizzard, neck, liver, and heart—in a small saucepan with a few cloves of garlic, a small peeled onion, and a small bouquet garni. Add water or chicken broth to cover and simmer gently, skim ming every now and then, for about 1½ hours.
2. Remove the giblets from the broth with a slotted spoon and reserve the broth. Peel the meat off the neck and combine it with the other cooked giblets. Discard the neck bone.
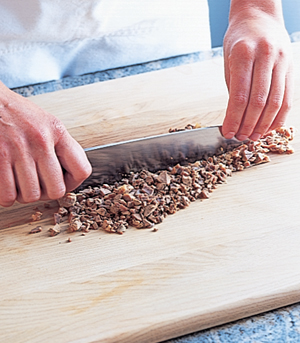
3. Chop the giblets medium-fine. Don’t chop them too fine, or they won’t contribute enough texture to the gravy.
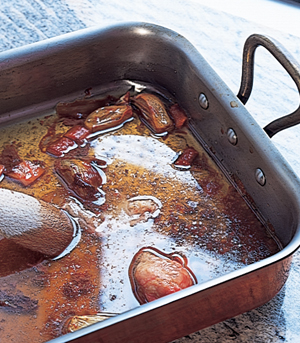
4. Pour 1 cup of the giblet broth into the roasting pan and scrape the bottom of the pan with a wooden spoon to dissolve any juices that may have caramelized.
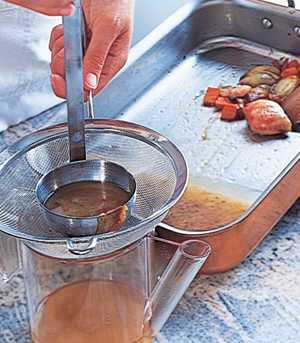
5. Strain the juices into a degreasing cup or glass pitcher and allow a few minutes for the fat to float to the top.
6. Pour about 1½ tablespoons of turkey fat into the roasting pan for every cup of gravy you want. Sprinkle in the same amount of flour. Stir this roux over medium heat for about 2 minutes.
7. Pour in the turkey juices, leaving the fat behind. Add additional chicken broth if you need to make more gravy, but be aware that this will weaken the gravy’s turkey flavor.
8. Stir in the chopped giblets and season to taste.
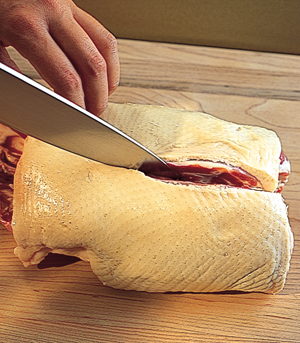
Because most ducks are covered with a rather thick and fatty skin, they are difficult to roast in the same way as other birds such as chicken. In order to get the skin to release most of its fat, and for the duck to turn “crispy,” the duck has to be roasted for such a long time that the meat is invariably overcooked. To solve this problem, separate the duck into thighs, breasts, and carcass bones. The thighs can be braised, cooked into confit, or grilled—they’re tougher than the breasts and require longer cooking—and the breasts can be sautéed so the skin turns crispy, but the meat remains pink (see page 157). The carcass bones can be used for making duck broth.
1. Turn the duck on its breast and cut off the wings where they join the body. Be careful not to cut into the breast meat.
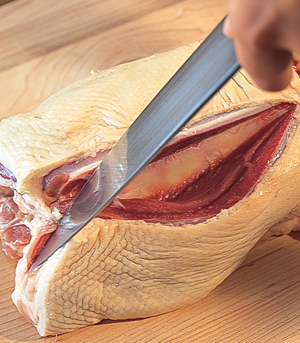
2. Turn the duck on its back and pull one thigh forward and out. Cut through the skin between the thigh and the breast, keeping the knife blade against the thigh. Follow the strip of fat that lies under the skin and leads along the side of the thigh down to the back.
3. Fold the thigh back and, with your thumb against the base of the thigh, snap the thigh out of the joint.
4. Slide the knife along the side of the duck where the thigh meat attaches to the back. Follow the contours of the backbone, leaving the meat attached to the thigh. Detach the thigh. Repeat to cut off the other leg.
5. Cut off the large flap of fat and skin at the neck end of the duck. This can be discarded or rendered for its fat. (Duck provides excellent and flavorful cooking fat.)
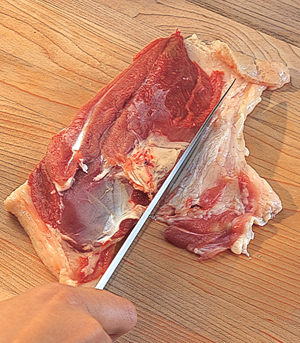
6. Turn the duck on its back. Cut along one side of the breast bone, keeping the knife flush against the bone, until you have detached the breast along the entire length of the backbone.
7. Peel the breast back, away from the bone, with your fingers and slide the knife under the wishbone, detaching it from the breast.
8. Continue sliding the knife against the breastbone, keeping the knife against the bone so you don’t cut into the breast meat until you completely detach the boneless breast.

9. Place the breast skin side down on the cutting board and cut away excess skin and fat. (This can also be rendered for duck fat.) Repeat with the other breast.
Because most duck breasts are covered with a thick layer of fatty skin, the skin is sometimes removed, an unfortunate solution, since the skin is very flavorful. A better method is to finely score the skin so that its fat quickly renders in the sauté pan and the skin turns crispy before the meat overcooks.
1. Use a sharp chef’s knife to make a series of about 20 fine parallel cuts in the fatty skin, without cutting into the meat. Keep the knife at an angle so that you cut sideways into the skin, exposing more fat.
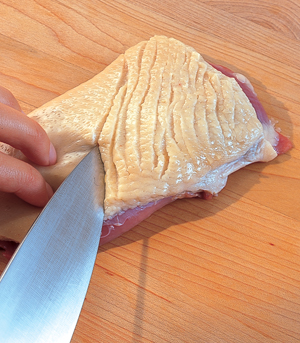
2. Give the breast a 90-degree turn and make a second series of cuts at right angles to the first.
See Also
To make brown chicken broth, page 30
To prepare chicken breasts, page 163
Related Glossary Entry
Confit
Sauté
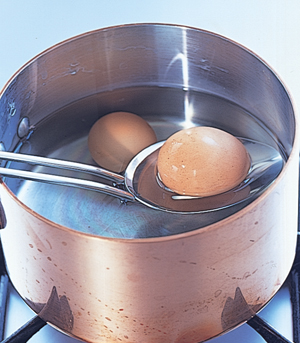
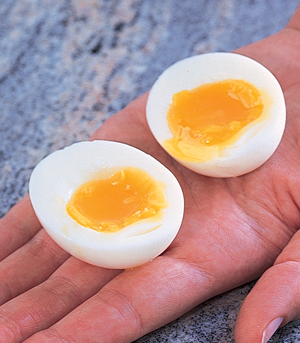
The best way to soft- and hard-boil eggs, both to get consistent results (so that a three-minute egg is always a three-minute egg) and to keep the shells from sticking to the eggs (making them hard to peel), is to start the eggs in boiling water and then turn the heat down to maintain a gentle simmer. Once the eggs are cooked, scoop them out into a bowl of ice water to stop the cooking if they are to be served cold. For soft-boiled eggs, skip the ice water and serve immediately.
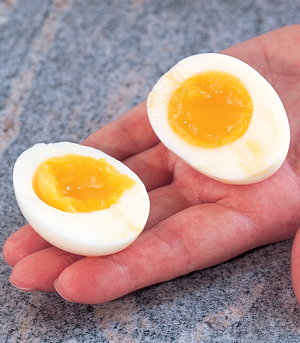
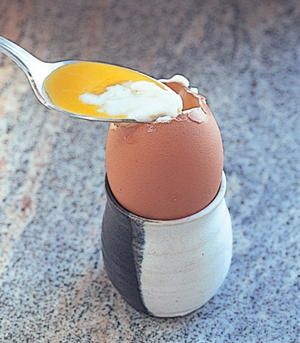
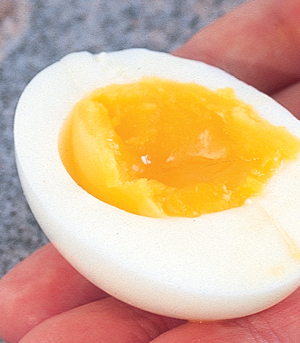
When hard-boiled eggs are overcooked, the outside of the yolks turn an ugly dark green and the sides are pale and dry. Because of this, most recipes calling for hard-boiled eggs are best made with “medium-boiled” eggs (what the French call oeufs mollets), cooked for between six and eight minutes, so that the yolks are still moist and a bright, shiny yellow.
Here, I boil cold eggs that have come straight out of the refrigerator. If your eggs are at room temperature, the cooking times will be slightly shorter.
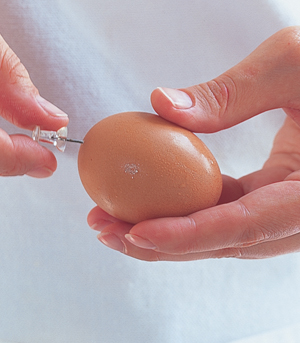
1. Use a pin to poke a tiny hole in the rounder end of each egg. This allows trapped air to escape during boiling and helps prevent the shell from cracking.
2. Gently lower the eggs into rapidly boiling water and start timing. When the water returns to the boil, turn the heat down to maintain a gentle simmer and cook to the desired doneness.
A 3-minute egg
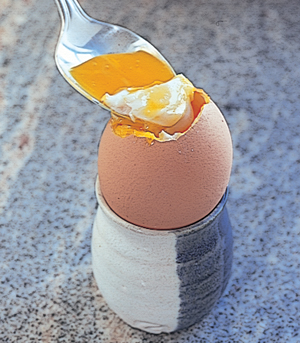
A 4-minute egg
A 6-minute egg is firm enough that the yolk will hold its shape when you cut into the egg.
An 8-minute egg still has a shiny yellow yolk and a moist center.
A 10-minute egg has a completely firm yolk but is still shiny.
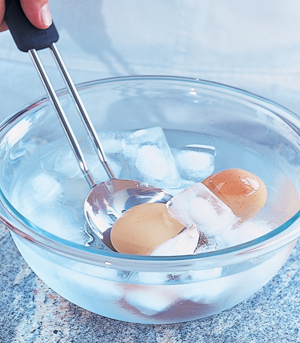
If you’re serving the eggs cold, immediately plunge them into ice water and let them sit for 5 minutes before peeling. The ice water helps prevent the shells from sticking to the eggs.
Poaching eggs is simple—just remember to keep the water at a very low simmer, so that it barely murmurs. If the water simmers too briskly, the egg whites will break apart rather than firming around the yolks. (You can trim the whites after cooking for a perfect oval shape.) A tiny bit of vinegar added to the water helps to coagulate the whites. The eggs should be cooked until the whites are set and opaque; if you’re unsure, carefully lift one of the eggs out of the water with a slotted spoon and touch the white—it should feel firm. If you’re poaching eggs for a crowd, cook them ahead of time and save them in a bowl of cold water in the refrigerator. When you’re ready to serve them, carefully drain off the cold water, pour boiling water over the eggs, and let stand about a minute, just long enough to reheat them.
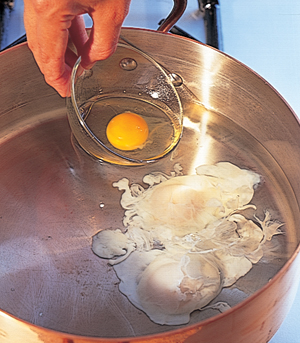
1. Crack the eggs and open the shells over a pan of simmering water containing a teaspoon of vinegar. Open the eggs as close to the surface of the water as possible so the eggs don’t break apart.
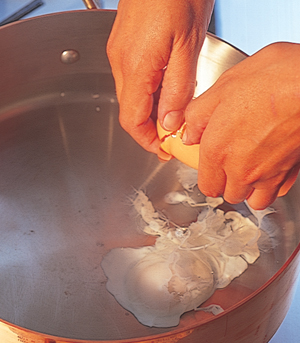
2. Or, break each egg into a little cup and then pour the egg from the cup into the water, so that you don’t burn your fingers.
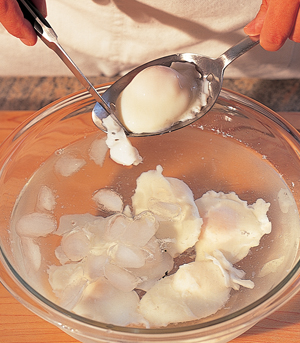
3. When the whites are set and opaque, remove the eggs from the water with a slotted spoon.
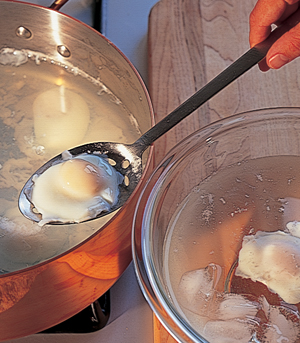
4. Cut off any irregular or foamy white with a knife. Serve the eggs right away, or put them in a bowl of ice water as described above and refrigerate until needed.
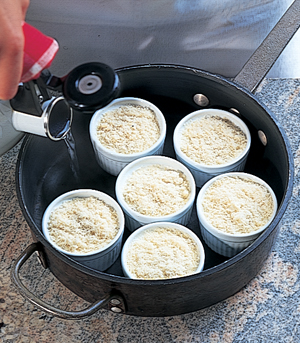
Oeufs en cocotte, eggs baked in individual porcelain ramekins with mixtures such as cooked tomato concassée, mushroom duxelles, or creamed spinach, under a drizzle of heavy cream and a grating of cheese, can be superb. The white of the egg firms and the barely cooked yolk mixes with the cream to make a rich, delicious sauce, flavored with the other ingredients. The whole thing is soft enough that you can eat it with a spoon and toast wedges dipped into the egg. Baked eggs are a practical way to use up leftover vegetable mixtures, ham or prosciutto, and cooked shellfish such as shrimp, crab, or lobster. Oeufs en cocotte are baked in a bain-marie to keep the whites tender and ensure that the eggs cook evenly.
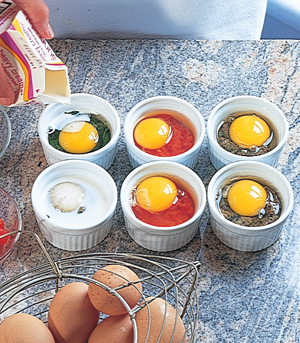
1. Place a tablespoon of a vegetable mixture or other ingredients in each buttered porcelain ramekin. (Here, I use cooked tomato concassée, duxelles, and creamed spinach.) Break an egg into each ramekin.

2. Pour a tablespoon or two of heavy cream on top of each egg. Season with salt and pepper and sprinkle with Parmesan cheese.
3. Place the ramekins in a pan or baking dish just large enough to hold them. Pour in enough boiling water to come halfway up their sides.
4. Bake in a 350°F oven just long enough to set the egg white but leave the yolk runny, about 10 minutes. Serve with toast wedges.

See Also
To make a cooked tomato concassée, page 50
To make duxelles, page 111
To make creamed spinach, page 88
Related Glossary Entry
Bain-marie
Omelet making has acquired a certain mystique, but a dozen eggs and a little practice are enough to master the technique. For a classic French omelet, the eggs should be completely cooked on the outside but creamy and custardlike on the inside.
How you stuff an omelet, if you stuff it at all, depends on the filling. Simple chopped ingredients such as herbs can be beaten into the raw eggs. Ingredients such as cheese, which can make the omelet stick to the pan, should be sprinkled over the cooked omelet just before it is rolled up. To stuff an omelet with a more elaborate filling—such as lobster or wild mushrooms—heat the filling separately, then make a shallow slit down the top of the finished omelet and gently spoon the hot filling over and into the slit.
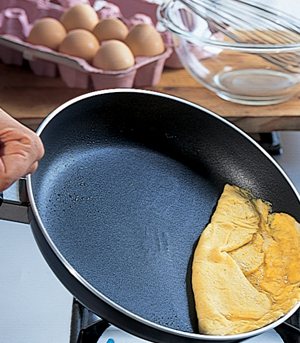
1. Heat a small amount of butter in a nonstick or well-seasoned omelet pan over high heat until the butter froths and the froth subsides. Add 3 beaten eggs, seasoned with salt and pepper, and beat vigorously with a fork.
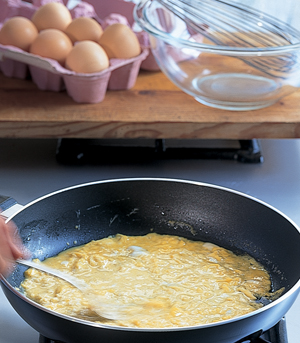
2. When the eggs are loosely scrambled and very little liquid remains, tilt the pan away from you and gently fold the omelet away from you, so the edge of the omelet forms a gentle downward arc.
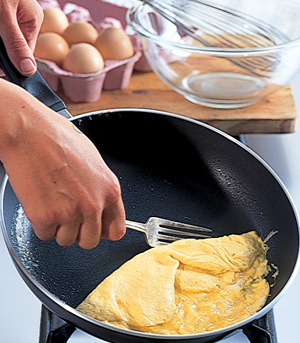
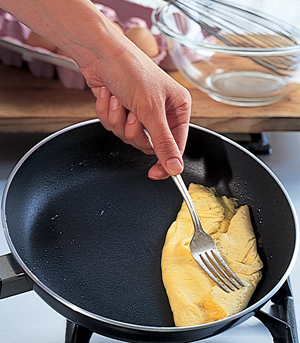
3. Give the pan handle a quick whack to jerk the omelet up slightly over the rim of the pan.
4. With a fork, fold the part of the omelet that comes up above the rim into the rest of the omelet.
5. Lift the pan (you’ll want to switch hands for this) and turn the omelet out onto a hot plate.

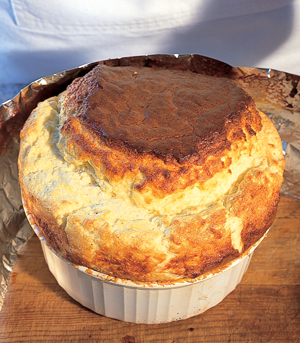
A soufflé is made by folding stiffly beaten egg whites into a savory or sweet mixture and baking the mixture in a metal or porcelain soufflé mold or dish. Most savory soufflés, such as the one below, are based on béchamel sauce, but dessert soufflés are usually based on pastry cream or a light sabayon made with beaten egg yolks and a flavoring. Because soufflés contain very little (sometimes no) flour, they are relatively unstable (unlike a cake, which will hold its shape) and fall quickly once out of the oven. For this reason, most soufflés are served the instant they’re done.
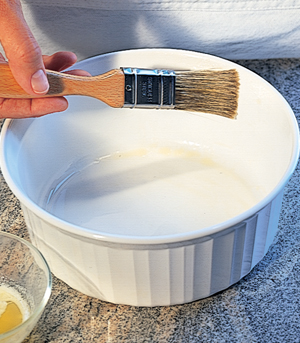
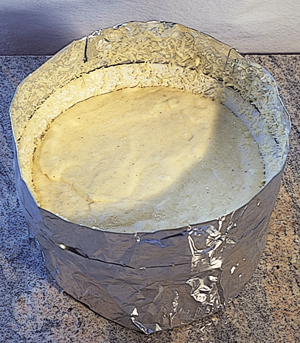
1. Brush the inside of the soufflé dish with softened or melted butter. If you use melted butter, chill the buttered dish in the refrigerator and brush a second time to ensure that there’s a thick enough layer of butter.
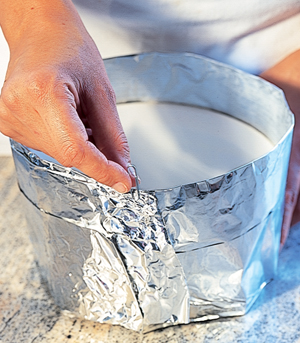
2. Fold a strip of aluminum foil long enough to wrap around the soufflé dish lengthwise into thirds. Brush the part of the collar that will rise above the rim of the soufflé dish with softened or melted butter. Wrap the collar around the soufflé dish. Attach it with a paper clip or by pinching it together.
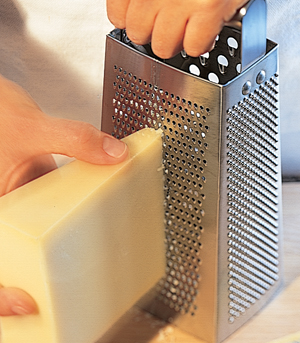
3. Finely grate hard cheese, such as Parmesan, for coating the soufflé dish. (Or use flour.)
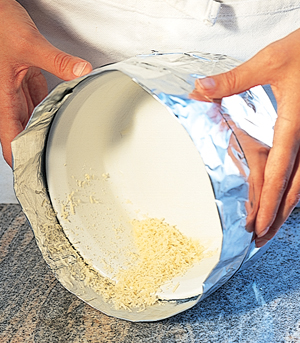
4. Put the grated cheese in the soufflé dish. Rotate the dish so the inside of both dish and collar is coated with a layer of cheese.
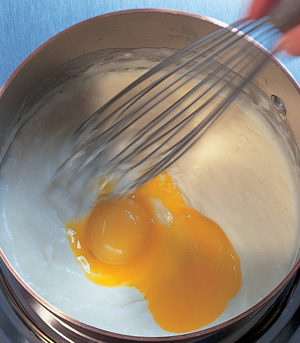
Crack open the egg. Hold your (well-washed) hand over a bowl and pour the egg out into your hand. Let the egg white drip through your fingers.
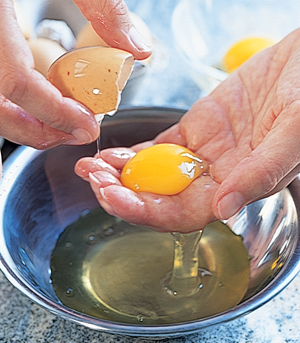
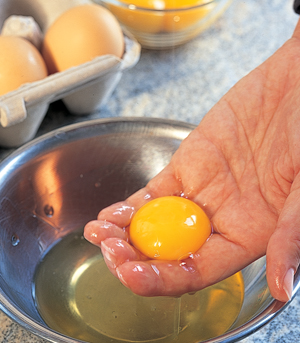
Crack open the egg and transfer the egg yolk back and forth over a bowl between the 2 halves of the shell until all of the egg white has dripped into the bowl. Work carefully so that you don’t break the yolk.
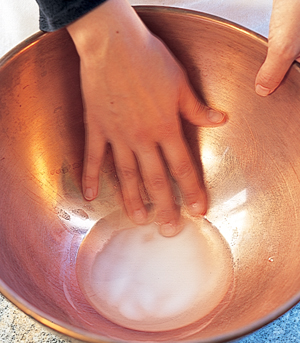
5. If using a copper bowl, swirl distilled vinegar and salt around in the bowl to eliminate tarnish. Rinse the bowl with hot water and dry thoroughly with a clean towel. Wrap a moist kitchen towel around the base of the bowl to hold it in place.
6. Separate the egg whites and yolks as directed on page 178. (If using an electric mixer, add a pinch of cream of tartar to the whites before you start beating.) Or, as shown here, break up the egg whites by twirling a balloon whisk between your hands in the whites for about 30 seconds.
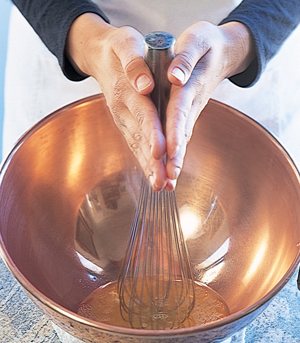
7. Start beating slowly and gently and gradually build up speed. (If you can, switch arms as you get tired of beating.)
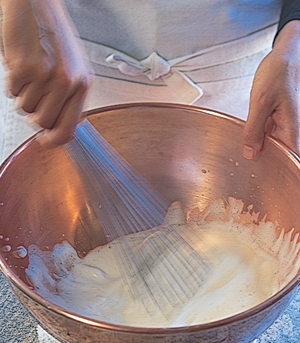
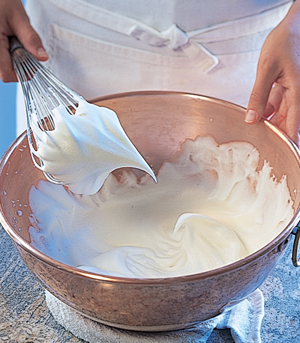
8. The egg whites have reached stiff peaks (the proper stage for a soufflé) when they stick straight out from the side of the whisk. Start on low speed and gradually increase the speed to high. Beat to stiff peaks, as above.
The base is flavored with Italian Parmigiano-Reggiano and Swiss Gruyère.
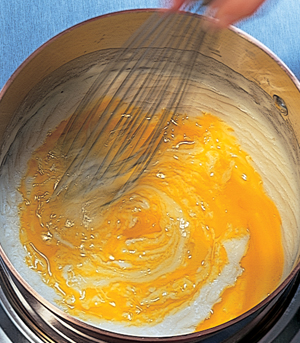
9. Prepare a béchamel sauce as directed on page 180. Then, off the heat, whisk egg yolks—usually about 2 fewer than the number of whites you’re using—into the béchamel sauce. Continue to whisk until smooth.
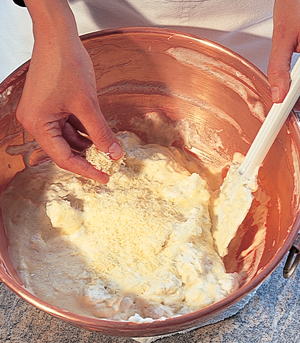
10. Whisk half of the grated cheese into the béchamel mixture.
11. Whisk in about one quarter of the beaten egg whites.
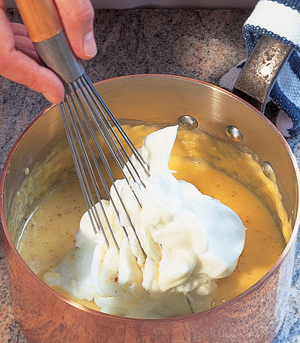
12. Use a large rubber spatula to fold the soufflé base into the rest of the egg whites. Slide the spatula around the sides and bottom of the bowl, lifting up the egg whites and folding them over as you go.
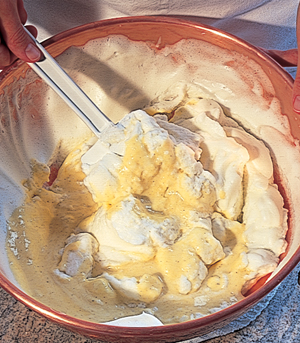
13. Continue folding, being careful not to deflate the egg whites but rather to cut through them, until the mixture is smooth and homogeneous but not overworked.
14. Scoop the mixture into the prepared soufflé dish.
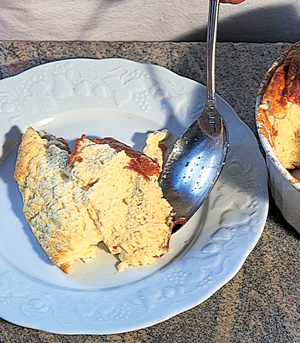
15. Place the soufflé on a sheet pan, slide it into a 375°F oven, and bake until it rises but still jiggles slightly (a soufflé should be slightly runny in the center) when you move it back and forth. A 4- to 6-serving soufflé will take from 35 to 50 minutes. Remove the collar in the kitchen, as shown on page 177, present the soufflé, and serve immediately.
16. Use a large spoon to spoon the soufflé onto hot plates.
Related Glossary Entries
Sabayon
White Sauce
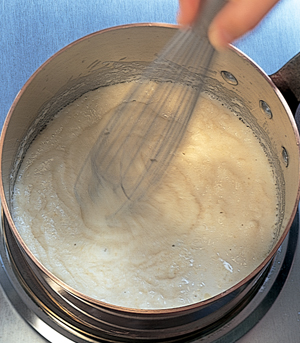
1. Combine equal parts flour and butter (see Box) in a heavy-bottomed saucepan.
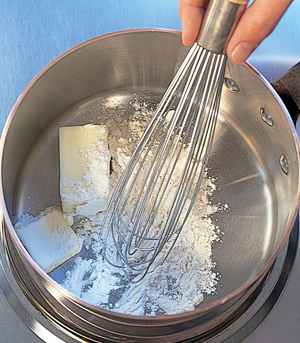
2. Stir with a small whisk over medium heat until the mixture—called a roux—is smooth and smells toasty, about 3 minutes. Don’t let it brown.
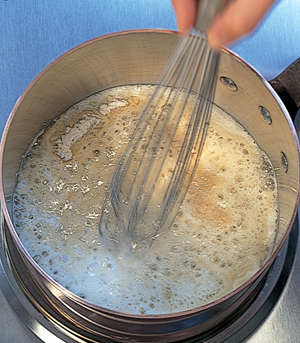
3. Whisk milk into the hot roux.
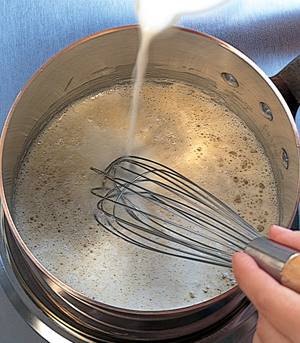
4. Continue whisking until smooth. The sauce will become thinner as you add more milk. Be sure to bring the sauce to the boil so it thickens as much as possible.