Poaching is a great way to cook a big whole fish, particularly one that you will be serving cold, because poaching cooks without fat, which would congeal on the fish when it cooled. Poaching makes the skin of the fish easy to remove, leaving the flesh underneath smooth and intact, even-colored, and pretty looking. Best of all, poaching doesn’t alter the delicate taste of the fish.
Fish is traditionally poached in a court bouillon, a vegetable broth flavored with white wine, but I often simplify things by just combining water, white wine, salt, and a bouquet garni in the pan with the fish.
You need a fish poacher or a large deep roasting pan to poach a big fish. A poacher is a long narrow lidded pot with handles at either end that is fitted with a two-handled rack. A fish poacher is easier to use than a roasting pan because the rack makes it easy to pull the fish out of the hot water without its falling apart. And the shape of the poacher allows you to use a minimum of liquid.
I most often poach salmon or its smaller relative, Arctic char, but occasionally I’ll poach a large striped bass.
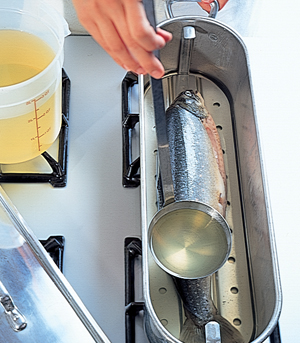
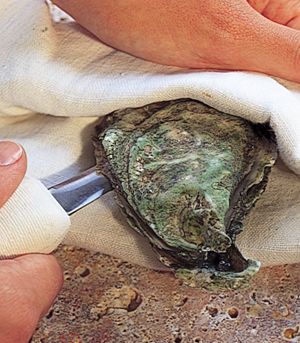
Here, an Arctic char, a fish closely related to trout and salmon, is poached in a court bouillon that has been strained and allowed to cool.
1. Place the char in the fish poacher and ladle over enough cooled court bouillon to completely cover the fish. Bring to a simmer over medium heat.
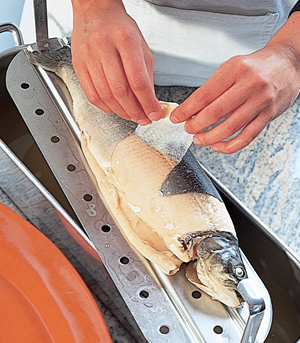
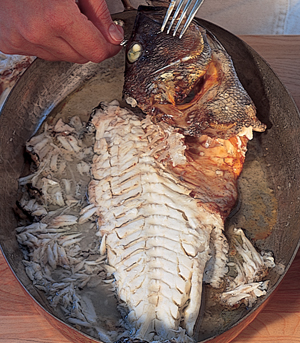
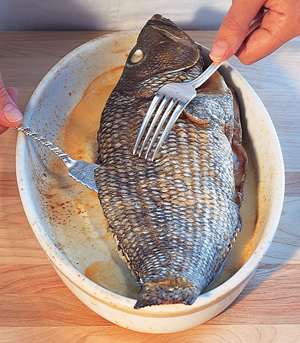
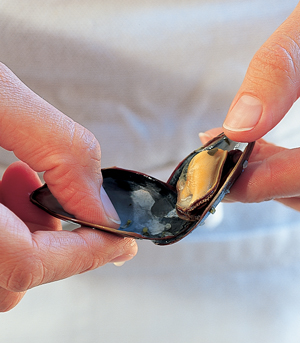
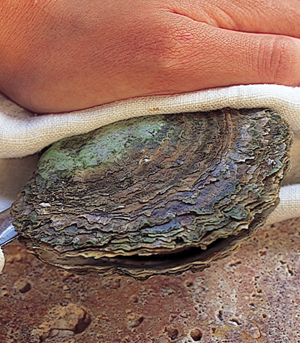
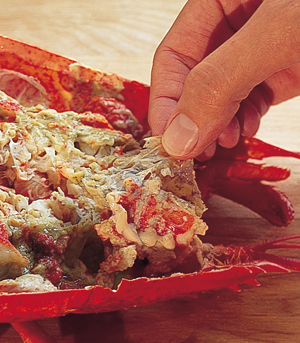
2. Simmer the fish gently until done. Lift the rack out of the poacher and set it on an angle on top of the poacher. To remove the skin, cut through it at the base of the head.
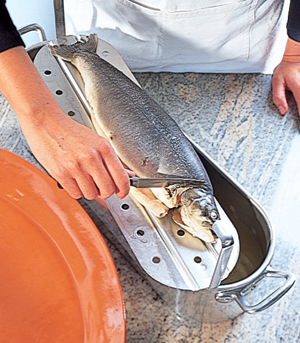
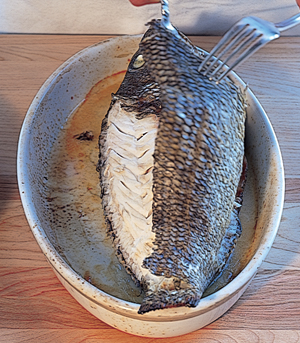
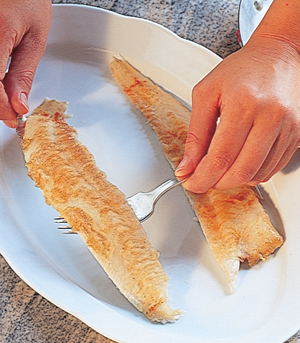
3. Peel off the skin with your fingers and discard. Gently turn the fish out onto a serving platter and peel the skin off the other side. If the fish is too large or awkward to handle, leave the skin on the bottom and discard when serving.
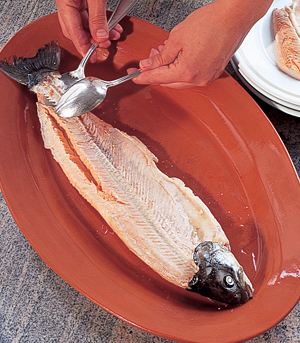
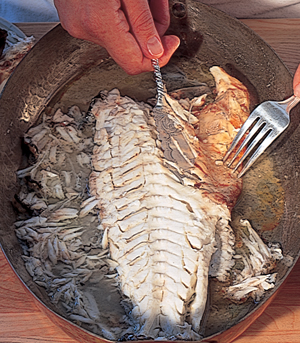
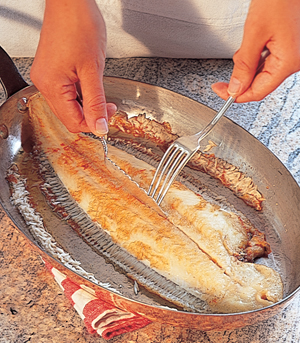
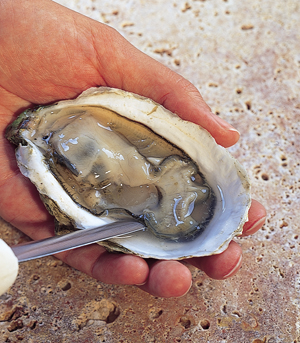
1. Insert 2 spoons (or a fish knife) in the dark line that runs along the center of the top of the fish. Gently separate the 2 halves of the top fillet.
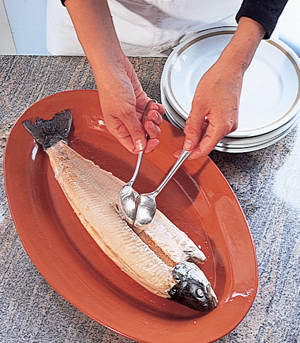
2. Cut the fillets into sections with one of the spoons—here, the top fillet is sectioned into sixths, but for larger fish, you’ll need to cut more pieces.
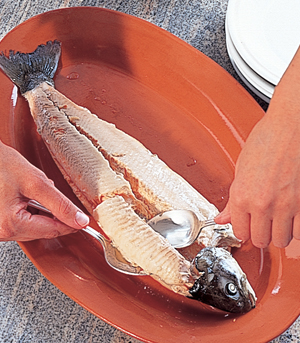
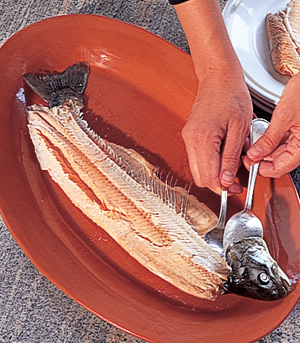
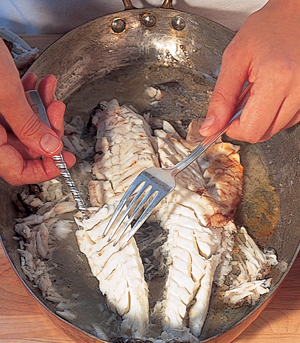
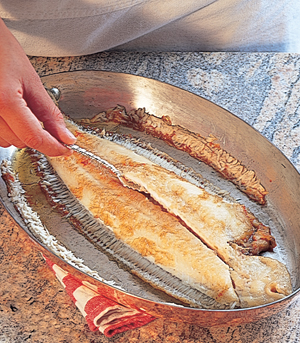
3. Continue sectioning the fillet and transfer the pieces to hot plates.
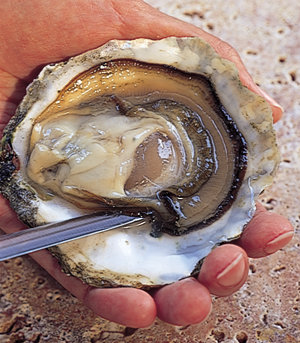
4. Lift the spinal column to detach it from the bottom fillet.
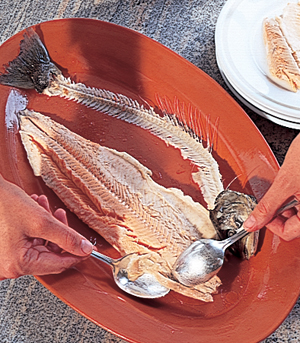
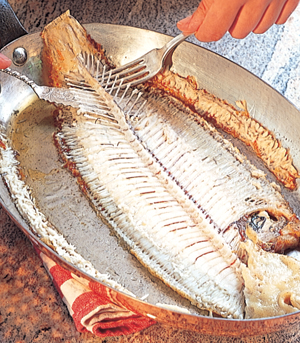
5. Break the spinal column where it joins the head and set it and the head aside on the platter.
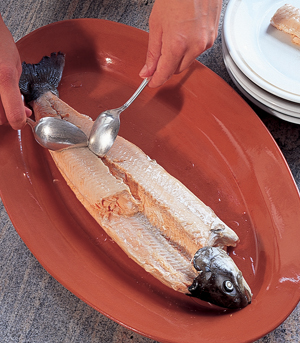
6. Pull away any bones that remain attached to the bottom fillet.
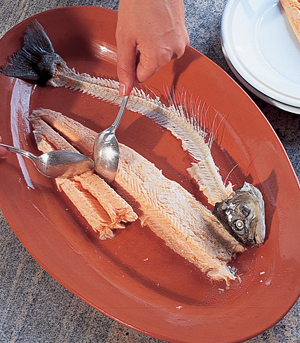
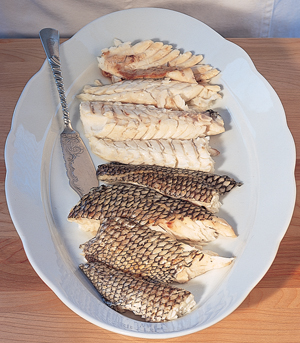
7. Separate the bottom fillet into sections, leaving the skin behind if you haven’t already removed it, and serve.
To make a court bouillon, page 113
To make a bouquet garni, page 31
To poach a small fish, page 110
Related Glossary Entries
À la Nage
Court Bouillon
Poach
I poach small fish for all the same reasons I poach a large fish—because poaching doesn’t interfere with the fish’s delicate flavor and requires no fat. You don’t need a fish poacher for small fish; you can use any sauté pan or baking dish that is deep enough to submerge the fish. A small fish can be poached on the bone, but I often bone the fish and stuff it. I also poach fish steaks and fillets.
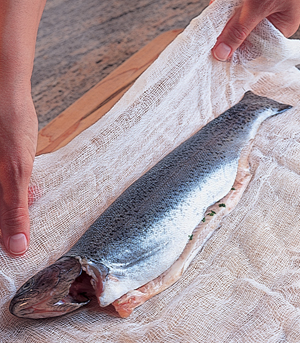
Wrapping a whole fish in cheesecloth makes it easy to pull it out of the hot poaching liquid. The cheesecloth wrapping also helps a boned whole fish hold its shape, keeps the sides of the fish from curling up, and holds a stuffing in.
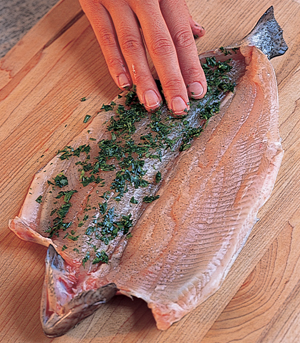
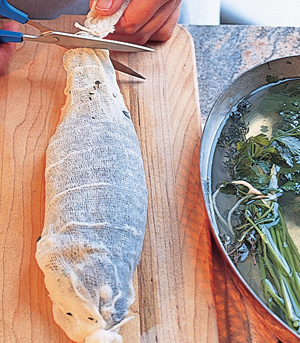
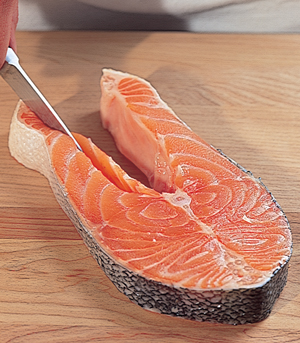
Trout is the fish I most like to stuff and poach, but this poaching technique can be used for any small whole or boned fish, such as black sea bass and small red snapper. (Fish is best boned through the back, but if the fish has been gutted already, bone it through the stomach.)
Here, a stuffed trout is poached in salted water and white wine that has simmered with a bouquet garni.
1. Rub the inside of the boned trout with chopped herbs or stuff with duxelles.
2. Wrap the trout in a double layer of cheesecloth.
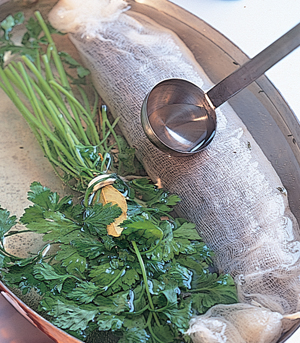
3. Tie the cheesecloth at both ends with string.

4. Slide the trout into an oval sauté pan with just enough simmering liquid to cover and poach until cooked through.
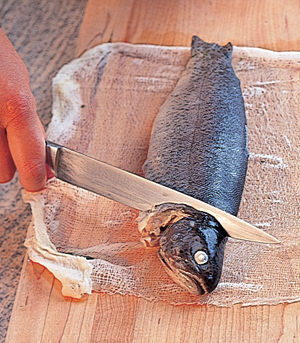
5. Transfer the cooked trout to a cutting board.
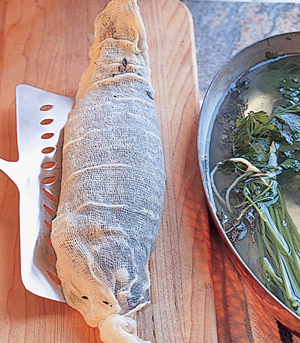
6. Cut away the ends of the cheesecloth and unwrap.
Serve the trout with a light sauce or in a wide bowl surrounded with a little of the trout’s poaching liquid.
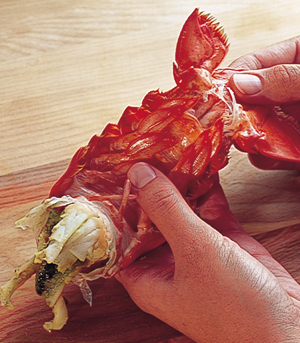
1. Cut the head off the trout.
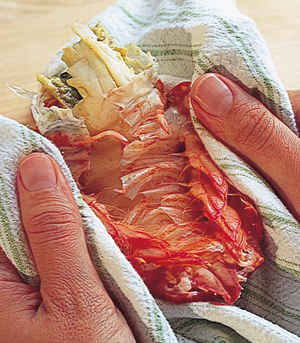
2. Peel off the skin with your fingers.
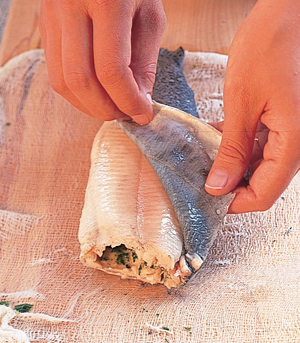
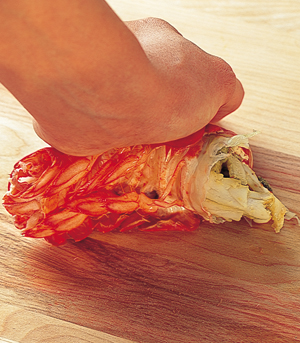
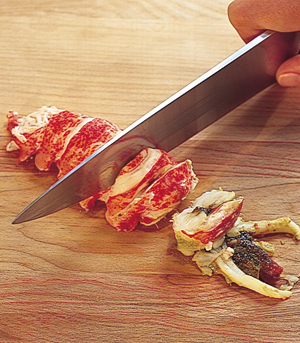
3. Cut off the tail. Use a small knife or spoon to pull out any small bones that you can feel running along the back of the trout. Then cut the trout in half at a slight angle.
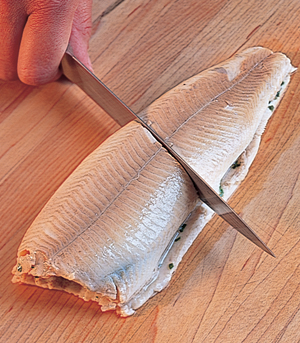
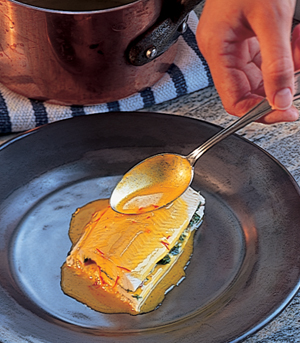
4. Poached trout is especially good with a butter sauce such as the saffron beurre blanc shown here.
See Also
To bone a whole trout through the stomach, page 226
To bone a whole fish through the back, page 228
To make a court bouillon, page 113
To chop mushrooms, page 14
To make a beurre blanc, page 48
To poach a big fish, page 108
To poach and serve a small fish à la nage, page 112
To determine doneness, page 66
Related Glossary Entries
Beurre Blanc
Poach
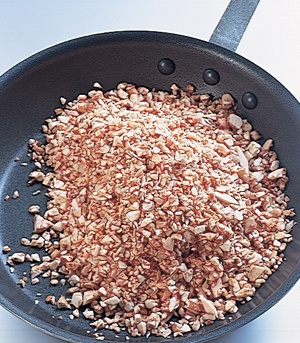
This is a great way to use mushroom stems, which can be stored in the freezer until needed.
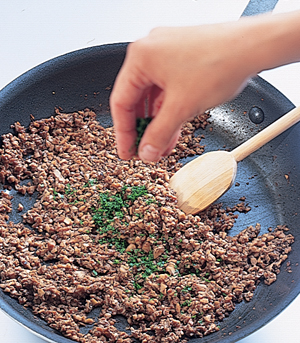
1. Melt about a tablespoon of butter in a wide skillet and stir in chopped mushrooms or mushroom stems. Cook over medium heat until the mushrooms release their liquid. Turn up the heat to high and continue cooking until the liquid in the pan evaporates.
2. Sprinkle with parsley or other chopped herbs.
3. Add heavy cream and reduce until the cream thickens slightly (optional).

Fish steaks and fillets, small whole fish, and shellfish such as scallops, shrimp, crayfish, and lobster all can be poached. One of the best ways to cook a fish steak or fillet, small whole fish, or shellfish is à la nage, which means that the fish is served surrounded with court bouillon and the vegetables used to make the court bouillon. The poaching liquid serves as a light, delicate, fat-free sauce that allows you to taste all of the subtle flavor of the fish. Because the poaching liquid is served with its vegetables, the vegetables are cut into pretty, presentable shapes, often julienne.
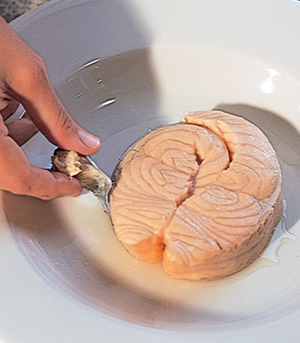
1. Pull any pin bones out of the salmon steaks with a small pair of pliers. Slide a paring knife along the inside of the bones lining the stomach flaps.
2. Cut along the small bones running up toward the back of the salmon steak. Cut all the way to the back of the steak up to, but not through, the skin.
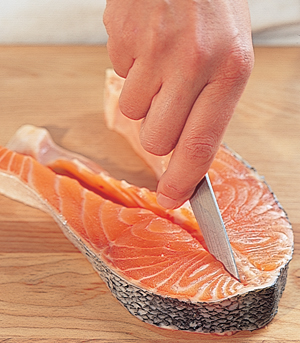
3. Repeat on the other side of the steak so that the central bone is completely separated from the two halves of the steak.
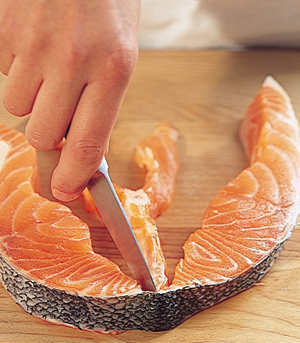
4. Carefully cut off 2 inches of the skin that wraps around one of the stomach flaps and fold the flap up in toward the center of the steak.
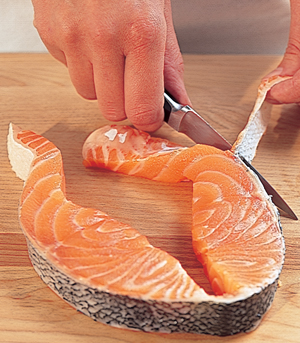
5. Wrap the remaining stomach flap around the outside of the steak and tie into a round, or medallion, with string.

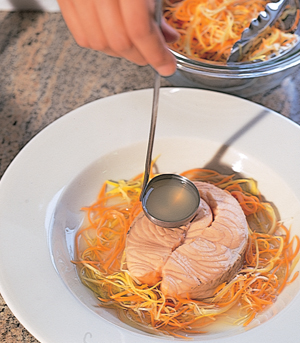
6. Place the medallions in a pan or pot just large enough to hold them in a single layer and pour over enough strained, simmering court bouillon to cover. If you’re serving the salmon à la nage as shown here, make the court bouillon with julienned vegetables and reserve the vegetables. If you’re not serving the salmon à la nage, make a regular court bouillon using chopped vegetables and discard the vegetables.
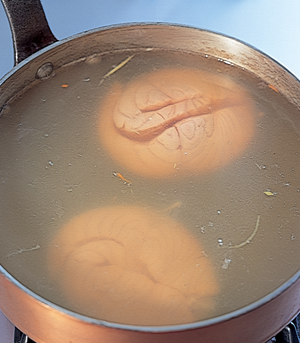
7. Use a spatula to transfer the cooked steaks to wide soup bowls. Pull the skin off the salmon steaks with your fingers.
8. If you’re serving the salmon à la nage, surround each steak with hot julienned vegetables and ladle over the vegetable broth. Serve immediately.
See Also
To julienne vegetables, page 13
To make a bouquet garni, page 31
To make a beurre blanc, page 48
To poach a small fish, page 110
To poach a big fish, page 108
To determine doneness, page 66
Related Glossary Entries
À la Nage
Poach
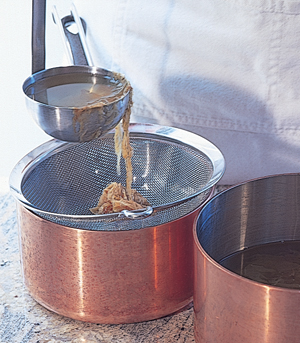
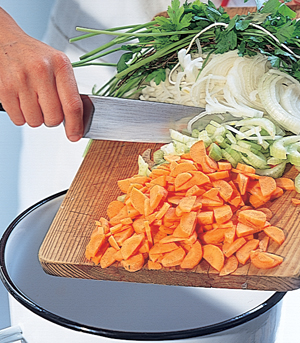
A court bouillon is a vegetable broth flavored with white wine. Simmer chopped or sliced aromatic vegetables (shown in the top photograph) and a bouquet garni in water in a covered pot for 20 minutes, add salt to taste and a cup of white wine per 2 quarts of water, and simmer for 20 minutes more. Strain the court bouillon and discard the vegetables and bouquet garni. There is no fixed rule about quantities of vegetables, but I use 2 large carrots and onions for every 2 quarts water. (You can use leeks in place of onions, and skip the carrot; the only vegetable that’s essential in the broth is onion or leek.) If you come up short on court bouillon, just add water.
If you are using the court bouillon to serve seafood à la nage, cut the vegetables into perfect slices or into julienne (shown in the bottom photograph.) Cook and strain the court bouillon as usual, but reserve the vegetables. Reheat the vegetables in the strained broth just before serving. (The vegetables could be left in the liquid while the seafood is poaching, but the seafood throws off scum that may cling to the vegetables and look unattractive.) I use leeks or onions and determine how many vegetables to use on the basis of the number I’m serving.

Cooking en papillote combines the techniques of baking, braising, and steaming. Fillets are sealed in a parchment paper or aluminum foil packet along with an herb butter, sometimes a vegetable, and usually a sprinkling of a liquid such as wine, and then baked. In the heat of the oven, the liquid turns to steam and, depending on the amount of liquid, braises or steams the fish. The butter melts and bathes the fish in the flavor of butter and the herbs. While cooking en papillote is a dramatic, professional cooking method, it’s also surprisingly practical, because it allows you to prepare everything ahead of time—and there are fewer dishes to clean because the meal cooks in a packet. Traditionally, the papillotes are opened in front of the diners (sometimes right under their noses) so they can savor the fragrance of the hot seafood.
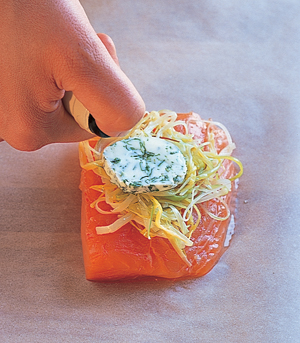
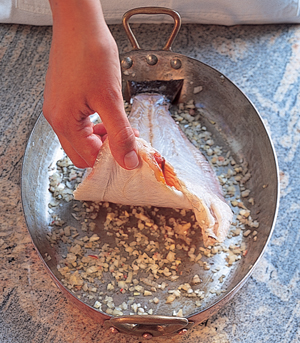
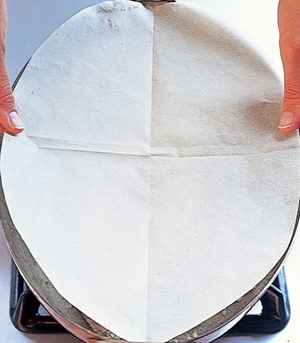
1. Cut a square of parchment paper, fold it in half to crease it, and unfold it. Center a piece of salmon fillet on the half to your right. Top the salmon with sweated julienned leeks.
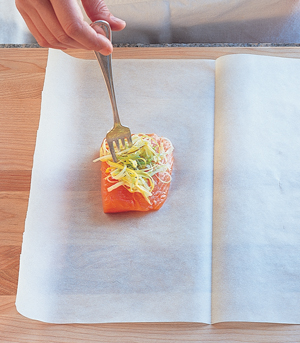
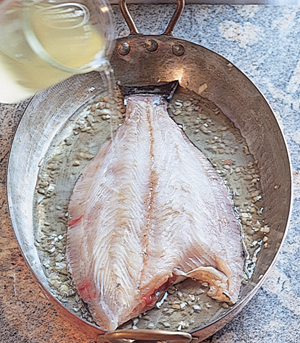
2. Place a slice of tarragon butter on top and sprinkle the salmon with white wine.
3. Brush the edge of the right half of the parchment paper with lightly beaten egg white. (If using aluminum foil, this isn’t necessary.)
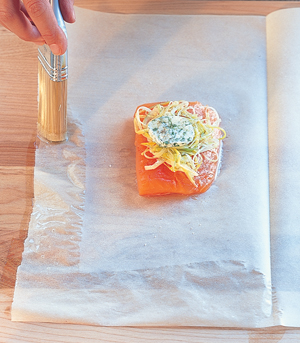
4. Fold the left half of the parchment paper over the salmon. Press along the edges to seal the paper and brush the edge again with egg white.
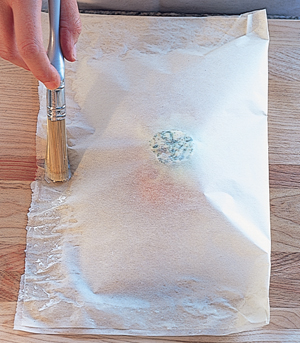
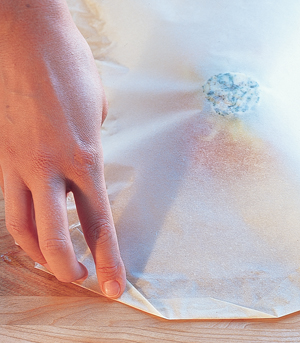
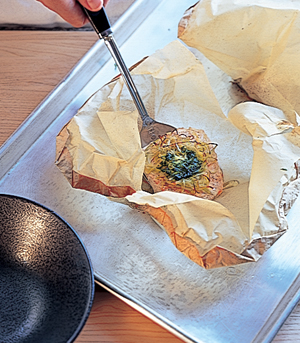
5. Make a series of straight folds along the outer edge of the papillote, pressing firmly on each fold to help seal the paper. Bake at 375°F for 7 to 10 minutes per inch of thickness of the fish, or until the bag is completely puffed up.
6. Cut the bag open with scissors in the kitchen or at the table.

7. Spoon the salmon and all of the juices into hot bowls and serve. (Or place unopened papillotes on plates in front of the diners and let them cut open their own papillotes.)
See Also
To make an herb butter, page 47
To julienne leeks, page 20
To fillet a salmon, page 224
Related Glossary Entries
Bake
Braise
Steam
Sweat
Baking in a small amount of aromatic liquid, called braising, is a simple and practical way to cook whole fish, fillets, or steaks. The fish flavors the surrounding liquid as it cooks, so that the liquid can be used to make quick, savory sauces.
The technique is simple: Butter a baking dish or pan just large enough to hold the fish in a single layer. Sprinkle the bottom of the dish with chopped aromatic ingredients—shallots, garlic, mirepoix of vegetables, or finely chopped raw mushrooms. Place the fish on top (in a single layer, if you’re cooking fillets or steaks) and season with salt and pepper. Add enough liquid—wine, fish broth, or concentrated red-wine fish broth—to come halfway up the side of the fish. Loosely cover the pan or dish with parchment paper or foil, bring to a simmer on top of the stove, transfer to the oven, and bake until done. (Or skip the aromatics and just pour enough simmering liquid over the fish to come halfway up the sides of the fish, cover with parchment, and bake.) Remove the fish and serve with the cooking juices as they are, or thickened (see Box).
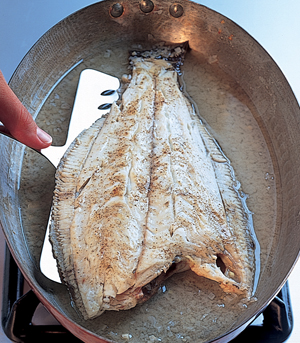
1. Sprinkle minced shallots generously over the bottom of an ovenproof oval pan and place the whole flatfish—top skin removed and the bottom skin scaled—on top.
2. Pour over wine and fish broth to come halfway up the sides of the fish.
3. Place the pan on the stove and bring the liquid to a simmer over high heat. Place an oval of parchment paper or aluminum foil over the fish and bake at 375°F until the fish is cooked through, 7 to 10 minutes per inch of thickness.
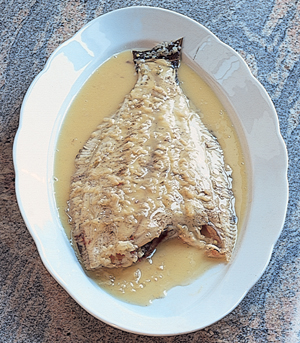
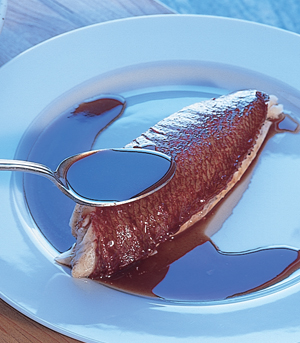
4. Place the pan on the stove over medium heat, remove the parchment paper, and use a wide spatula to transfer the fish to a plate or platter.
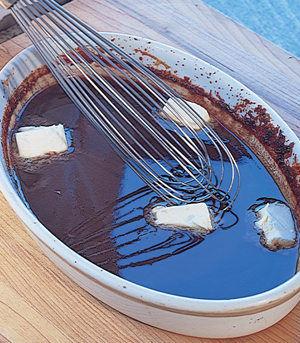
5. Whisk butter into the cooking liquid in the pan.

6. Season the sauce with salt and pepper and spoon over the fish. Serve whole, or fillet the fish at the table as shown on page 127.
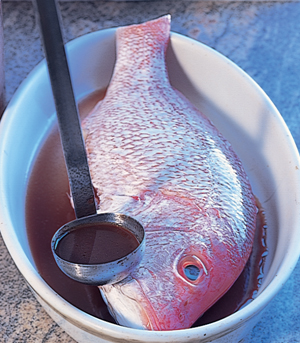
1. Place the scaled and cleaned fish in a baking dish, preferably oval, just large enough to hold it comfortably. Ladle over simmering concentrated red-wine fish broth and slide the fish into a 350°F oven.
2. Bake the fish, basting every few minutes, until done. Transfer the fish to a plate.
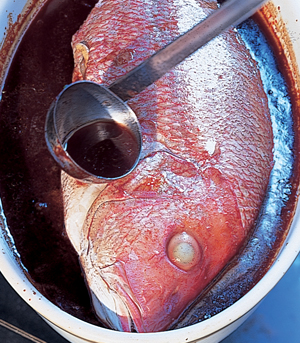
3. Whisk butter or another thickener into the hot braising liquid in the dish. (Or transfer the cooking liquid to a saucepan, heat, and whisk in the butter.) Season to taste with salt and pepper.
4. The fish can be served whole or filleted, as it is here. Spoon the sauce over the fish.
See Also
To clean and skin a flatfish, pages 230 and 234
To clean a round fish, page 220
To skin a fillet, page 233
To fillet a cooked sole or flounder, page 127
To make a concentrated red-wine fish broth, page 33
Related Glossary Entries
Braise
Garniture
Mirepoix
Monter au Beurre
Parchment Paper or Aluminum Foil Round
Thickener (for information on thickening the sauce)
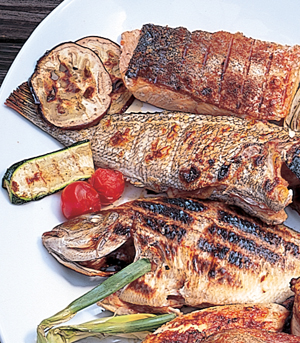
One of the most flavorful ways to cook fish is to roast it whole. Because the skin and bones are left intact, the flavor and juiciness of the fish are sealed in. Roasted fish, and whole fish in general, are neglected in the United States because many of us don’t know how to eat them—but the flavor and texture of whole fish is incomparable. My favorite fish to roast are red snapper, sea bass, striped bass, Arctic char, and small salmon.
Serve roasted whole fish sprinkled with extra virgin olive oil and a few drops of lemon juice or good wine vinegar—or just pass the oil and vinegar or lemon wedges at the table for guests to help themselves.
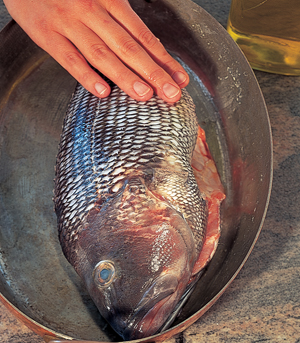
1. Rub the cleaned fish (here, scaled sea bass) with olive oil and season it with salt and pepper. Place the fish in a 425°F oven and roast for about 7 to10 minutes per inch of thickness.
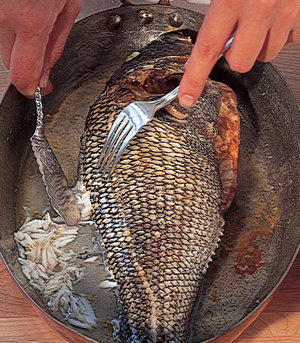
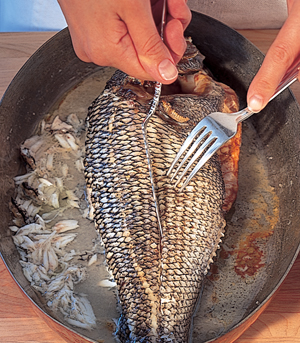
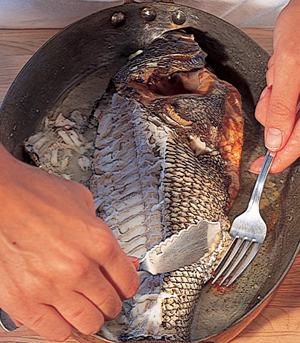
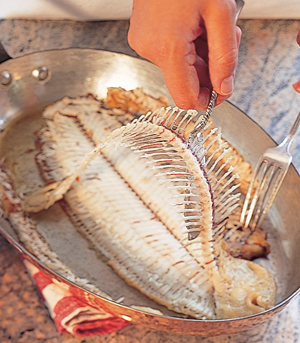
2. Using a fish knife and fork or 2 spoons, break through the skin down the back of the fish.

3. While holding the fish with the fork or one of the spoons, slide the knife or other spoon against the tiny bones that run along the ridge of the back, pushing the bones out into the roasting pan.
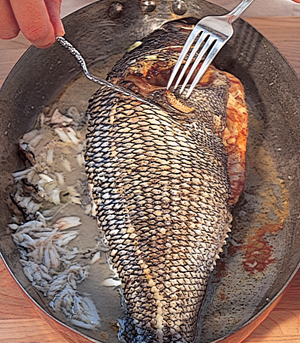
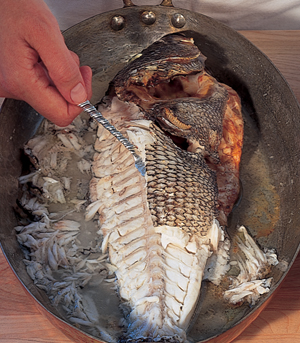
4. Break through the skin along the center and the top fillet with the knife or spoon until you run into bone. Continue along the whole length of the fish from the tail to the back of the head, dividing the top fillet in half.
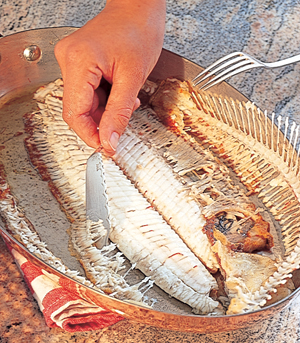
5. Break through the skin at the back of the head, separating the head from the top fillet.
6. If the fish is fairly large, cut the upper fillet half crosswise into 2 pieces.
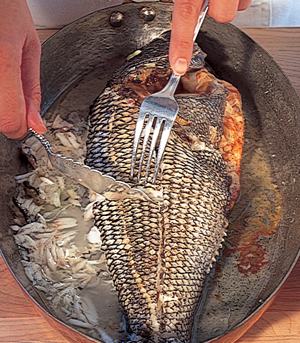
7. Lift out the 2 pieces of the fillet with the knife or spoon.
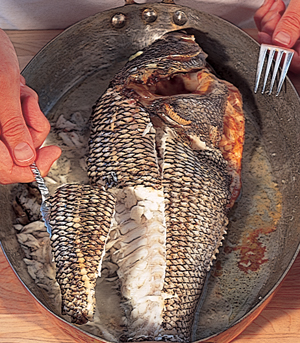
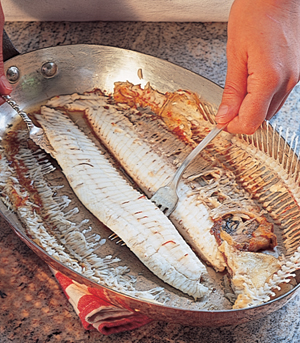
8. Use the knife and fork or the spoons to pull out any small bones along the edge of the fish’s back.
9. Cut the fillet half crosswise into 2 pieces and lift out with the knife or spoon.
10. Slide the knife under the backbone.
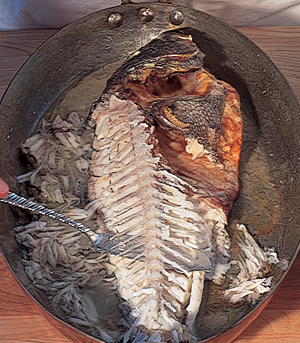
11. Gently lift the backbone away, and set it aside.
12. Pull off the head.
13. Gently pull away any ribs still attached to the bottom fillet.
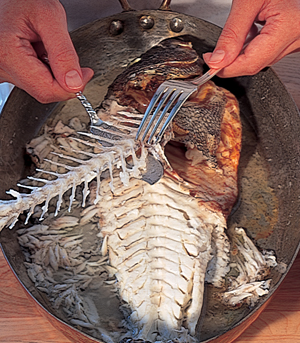
14. Divide the bottom fillet into 4 pieces in the same way as the top fillet.
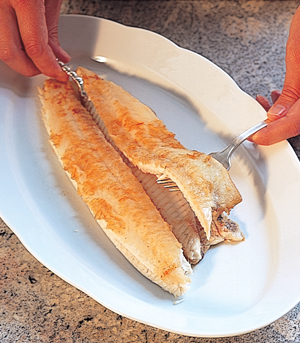
15. Serve on a hot platter or on individual plates.
Unless you want to eat the crispy skin, you can roast many whole fish with their scales attached.
1. Work a small knife (here, I use a fish knife) down the back of the fish, cutting through the skin.
2. Pull the skin away in one piece. Remove the backbone and carve the fish as shown on page 119.
See Also
To clean and scale whole round fish, page 220
To determine doneness, page 66
Related Glossary Entry
Roast
The advantage to deep-frying seafood is that it comes out of the oil intensely hot, crisp, and flavorful. No other cooking method creates such a satisfying and distinct contrast between the moist interior and the fragile, crunchy crust. Lean white-fleshed fish fillets are excellent deep-fried, as are shrimp, squid, and baby octopus.
Prepare seafood for frying by coating it with something that produces a crust: flour, a bread crumb coating, a light flour and water (or club soda) batter, or a tempura batter. Flour results in a subtle crust that is barely noticeable; you taste more of the fish. Breading and batters make a more apparent, crunchy outer coating. Tempura batter makes the crunchiest coating of all. If you want to emphasize the fish, use a flour coating. If you want to emphasize the crust, use a breading or batter. For lots of crunch, use a tempura batter.
Tempura batter is fundamentally different from other flour-based deep-fry batters. While other batters are mixed until perfectly smooth (and perhaps strained) and then given a rest period to allow the gluten to relax before frying, tempura batter is mixed together at the very last minute. The ingredients are just barely blended together (and therefore contain lumps) and so quickly that the gluten in the flour is never activated.
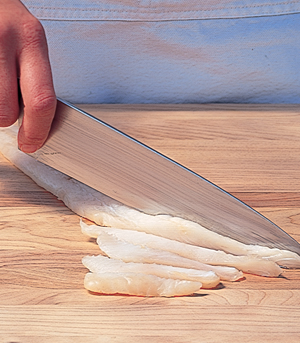
A goujonette is a thin strip of fish cut from a larger fillet, intended to look like a tiny fried fish. (Goujon is the French word for “minnow.”) Serve fried goujonettes with tartar or gribiche sauce or sprinkled with malt vinegar, fish-and-chips style, as a first course.
1. If the fillets are attached in the center, cut them apart along one side of the thin gristly strip that runs down the middle.
2. Cut the strip off and discard it.
3. Cut the fillets crosswise on the diagonal into strips about ½ inch thick and 3 inches long. (Those from the ends of the fillets will be shorter.)
4. Just before you’re ready to fry, toss the goujonettes in flour to coat.
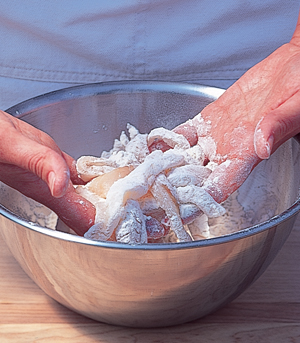
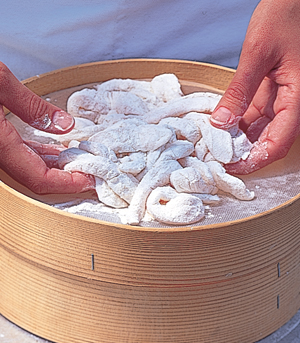
5. Then toss over a drum sieve set over a sheet pan or in a large strainer to get rid of the excess flour.
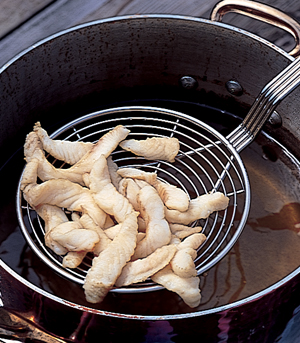
6. As soon as they are floured, fry the goujonettes in 370°F oil for about 5 seconds. Be careful not to overcook: Goujonettes cook very quickly. Drain on paper towels and serve immediately.
Japanese cooks usually serve shrimp tempura with a simple dipping sauce made by combining dashi, mirin (a sweet wine used for cooking), soy sauce, and ginger. Leave the small tail flippers attached when you peel the shrimp.
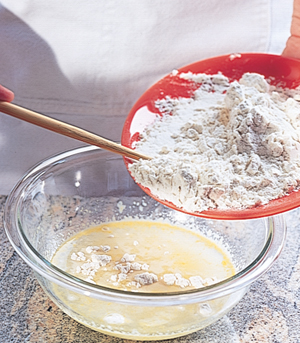
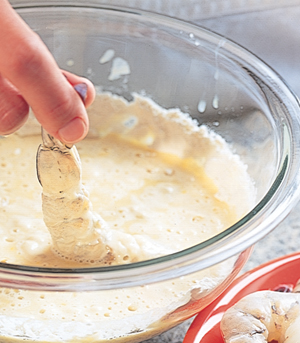
1. Lightly combine egg yolks and ice water with chopsticks. Don’t worry if the yolks aren’t fully blended. Pour in flour all at once and stir for a few seconds with the chopsticks until the batter barely comes together in a lumpy mass.
2. Just before frying, dip the shrimp into the batter.
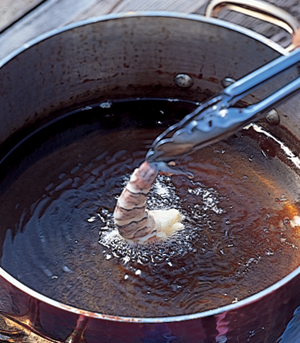
3. Gently lower the shrimp, holding the tail flipper with tongs, one at a time into 370°F oil. Fry for about 1 minute.
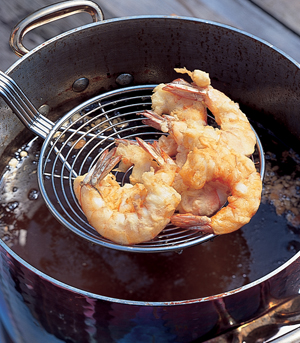
4. Take the shrimp out of the oil with a spider, as shown here, or slotted spoon. You can also use a wire frying basket. Drain on paper towels and serve immediately.
See Also
To coat with bread crumbs, page 162
To make a light frying batter, page 78
To peel and devein shrimp, page 131
To fillet a flounder, page 230
To make gribiche sauce, page 43
To make dashi, page 143
Related Glossary Entries
Bread
Deep-fry
Goujonette
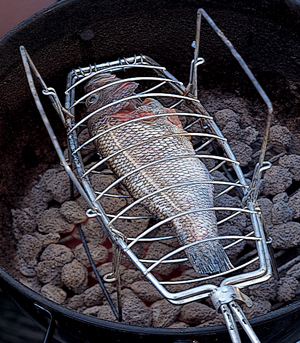
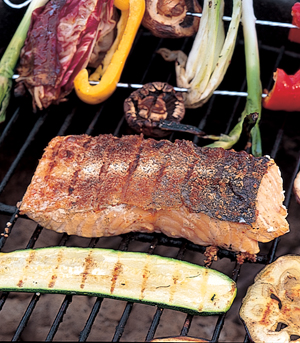
Grilling is the only cooking method we still use regularly that cooks with a live fire. It adds a light, smoky flavor to seafood and like sautéing, also sears food, giving it a crisp, savory outer crust. I like to grill whole fish, firm-fleshed steaks or fillets, shrimp, and scallops. During the winter, I sometimes use a grill pan so I can grill indoors on the stove. A grill pan resembles a heavy cast-iron skillet but it has a ridged surface that simulates the effect of cooking on an outdoor grill. Mollusks such as oysters and mussels are sometimes grilled in the shell, but I don’t recommend it. While the heat from the grill causes the mollusk to open, grilling does little to enhance the mollusk’s flavor.
The key to grilling seafood is keeping it from sticking to the grill rack. Whole fish such as snapper, pompano, and sea bass must be handled carefully so they don’t stick and fall apart. Firm fish steaks such as tuna, swordfish, and shark are particularly good on the grill because they hold together well and don’t stick, and they are especially flavorful when grilled.
To keep fish from sticking to the grill, make sure the grill rack is clean and very hot before you start to grill. Rub it quickly with a paper towel dipped in a little oil before you put the seafood.
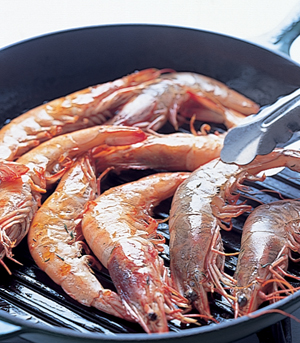
Grilled shrimp are tastiest when the shell is left on (of course, this means everyone must peel their own) and even tastier when the heads are left on, as shown here.
Lightly sprinkle the shrimp with salt and grill them, in their shells, until the shells turn pink, about 5 minutes. Serve piping hot.
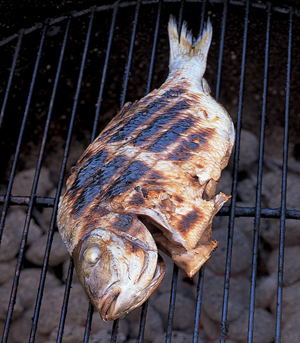
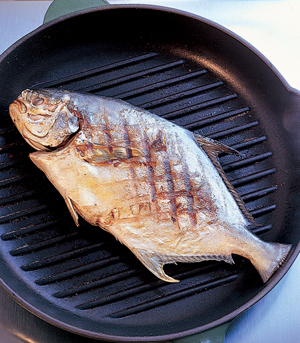
A grill pan gives seafood a light smoked flavor and cooks it with virtually no fat. Because pompano is a firm, rich fish, it takes especially well to grilling. Pompano should be cleaned before grilling, but it has no scales to worry about.
Cut the tail off the pompano so that it will fit into the grill pan, then rub with olive oil. Grill over high heat for about 5 minutes, then give the fish a 90-degree turn and grill for 5 minutes more to give the fish a crosshatch pattern on one side. Turn the pompano over and grill until cooked through, 8 minutes more, depending on its thickness.
See Also
To prepare a whole round fish, page 220
To carve a whole fish, page 118
To clean shrimp, page 131
To remove skin and scales together, page 120
Related Glossary Entries
Broil (also for information on quick-broiling)
Grill (also for information on grill pans)
• When grilling whole fish, leaving the scales attached will provide natural protection against sticking and help seal in savory juices. When you’re ready to serve, just peel off the skin, scales and all.
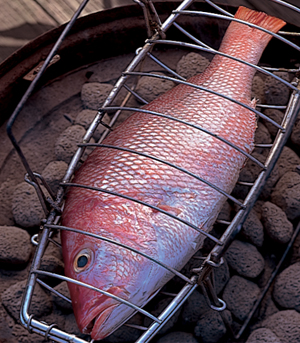
• If your whole fish has already been scaled, a grill basket makes the fish easy to handle: Instead of trying to turn over the fish on the hot grill, you just turn over the grill basket. A grill basket has legs on each side that enable you to set the basket directly over the coals, or you can fold the legs in and set the grill basket right on the grill.
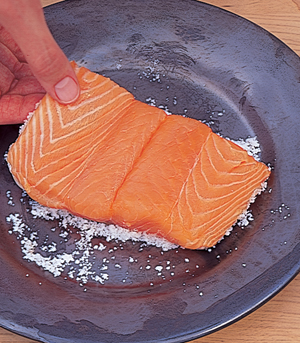
• One way to grill fish fillets is to dip skin-on fillets skin side down in coarse salt. The salt forms a barrier between the fish and the grill rack and keeps the skin from sticking. The excess salt can be brushed off or the skin removed entirely before serving, but I leave the skin on because the salty skin—especially salmon skin—is crispy and delicious.
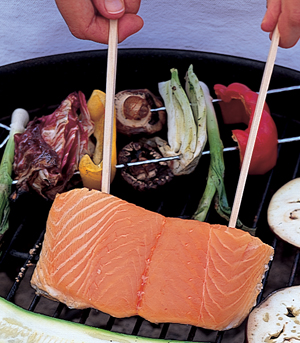
• When lifting fish steaks or fillets off the grill, don’t slide a spatula under the fish or you may tear the skin or flesh. Instead, slide 2 chopsticks or a 2-pronged sauté fork under the fish and gently lift the fish off the grill. Then, slide a spatula under the fish for turning or transferring to plates or a platter. Use tongs for shellfish such as shrimp.
The purpose of sautéing seafood is to give it a crisp, lightly browned crust. The seafood is cooked in butter (clarified is best because it doesn’t burn over high heat) or oil over intense heat, so that the outside of the food browns quickly before the inside overcooks. It’s easiest to cook small shellfish such as scallops or shrimp by tossing them in a pan with sloping sides; the sloping sides make the tossing motion easier. Whole fish, fish fillets, and steaks would fall apart if tossed that way, so they are browned on one side and then carefully turned with a spatula.
Fish steaks, thick fillets, and small thin whole fish such as sole or trout are the simplest to sauté because they cook through in about the same amount of time it takes the exterior to brown. Thin fillets, especially from fragile fish such as flounder, fall apart if overcooked by even a second, so watch them carefully.
I cook most fillets with the skin on, because the skin holds the fillet together, tastes deliciously crispy, and looks good. (Exceptions are fish with thick or leathery skin, such as grouper and blackfish.) But skin tends to stick, so use a nonstick pan or a well-seasoned skillet. Fish skin also contracts when hot, causing the fillet to curl. To prevent curling, start the fillet flesh side down, cooking it for a minute or two to allow the flesh to contract. Then turn the fillet skin side down and press down with the back of a spatula as it cooks to prevent it from curling and to keep the skin in contact with the bottom of the pan so its entire surface browns.
Sautéing à la meunière is an excellent way to prepare almost any small whole fish or fillet. The fish is coated with flour and then sautéed in butter (preferably clarified). Flouring—or breading—is particularly useful when cooking thin fish such as Dover sole, because the flour speeds up browning (flour and breading brown faster than the unadorned fish itself would) and so prevents the fish from overcooking. Once cooked, the fish is transferred to a platter or plates and sprinkled with lemon juice. The butter used for sautéing is discarded and fresh whole butter is cooked in the pan until it barely begins to brown—at which stage it is called “noisette”—and spooned over the hot fish.
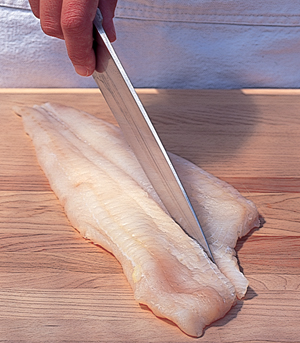
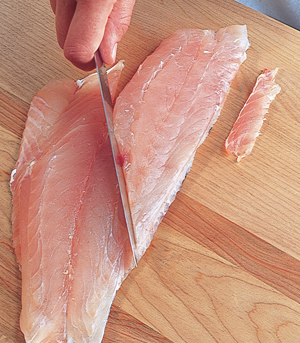
1. The small pinbones running down the head end of the fillet can be pulled out with pliers, but this is laborious and often tears the flesh. To avoid this, cut along each side of the strip of pinbones and remove the whole strip.
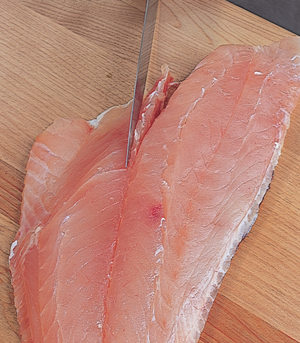
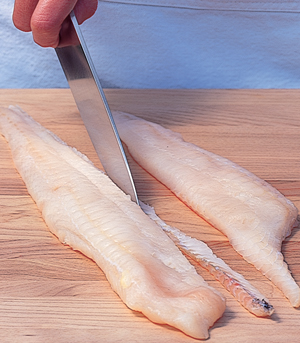
2. Cut the fillets into 2 equal pieces of similar shape.
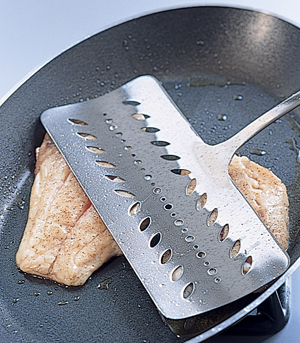
3. Season the fillets with salt and pepper. Cook the fillets flesh side down in hot oil or butter for 1 to 2 minutes.

4. Turn the fillets over and press down with the back of a spatula while sautéing the skin side. (This prevents the skin from contracting and causing the fillet to curl.) If necessary, turn over again and finish cooking on the flesh side. Transfer to serving plates.
After sautéing the fish, some cooks like to prepare a sauce by deglazing the sauté pan. One method is to make a hot vinaigrette by deglazing the pan with good-quality wine vinegar, olive oil, and herbs. Another method is to cook butter in the pan as in the Whole Dover Sole à la Meunière. The pan also can be deglazed with a little wine and/or fish broth and a small amount of cream or a chunk of butter added to the liquid to turn it into a sauce.
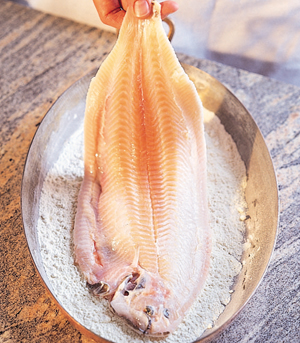
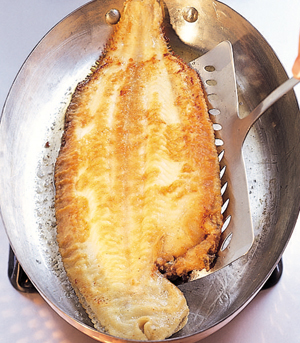
1. Season the cleaned and prepared sole with salt and pepper and coat it on both sides with flour. Pat off any excess flour. Sauté the fish in oil or clarified butter over medium heat, top side (the side that had the dark skin) down first.
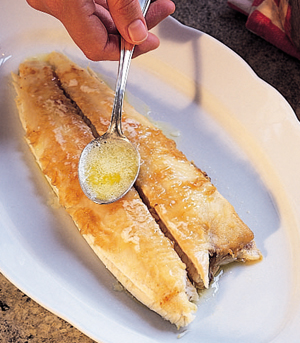
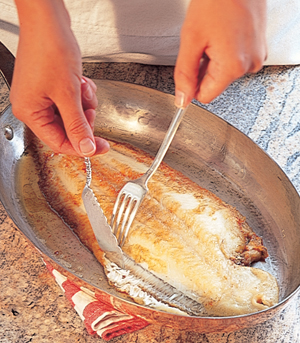
2. Turn the fish over when it is golden brown on the first side, after about 5 minutes, and cook for about 5 minutes longer. Serve the fish whole or fillet the fish and arrange it on plates (see page 127). Sprinkle the fish with lemon juice.
3. Pour off and discard the butter in the pan used to sauté the fish, wipe out the pan, and heat fresh whole butter in it (or heat the butter in a small saucepan). When it has barely begun to brown, spoon it over the fish. Serve immediately.
See Also
To clarify butter, page 46
To make a hot vinaigrette, page 38
To make a fish broth, page 32
To sauté soft-shell crabs, page 138
To prepare a whole flatfish, page 230
To fillet a snapper (same as for a striped bass), page 222
To make fresh bread crumbs, page 164
To remove the fringe bones before filleting, page 230
Related Glossary Entries
Bread
Monter au Beurre
Panfry
Sauté
1. Using a knife and fork or 2 spoons, push away the small bones—the fringe bones—that line the outside of the fish.
2. Slide a knife or spoon down the center of the fish, between the 2 top fillets, separating them slightly from the bone.
3. Slide a knife—here, a fish knife is used—or a spoon under each of the fillets, detaching them from the backbone.
4. Transfer the fillets to a platter, placing them toward the outer edge.
5. Slide knife or spoon under the backbone. Lift it away from the bottom fillets.
6. Detach head and backbone and push them gently to the side of the pan.
7. Push away the small bones surrounding the fillets with knife or spoon.
8. Lift the bottom fillets and place them in the center of the platter.
9. Place the top fillets over the bottom fillets.
Squid (along with other cephalopods, such as octopus and cuttlefish) is treated differently from most seafood because it toughens as it cooks. Squid can be either cooked very briefly—until just cooked through, or it will be tough—or long-cooked, stewed past the point of toughening until it becomes tender again.
Short-cooking methods are the same as for other seafood: Squid can be deep-fried, sautéed, or stir-fried. It also takes well to cooking as a quick stew: First sauté or stir-fry it in a little oil or butter, then add a small amount of flavorful liquid such as white wine. The liquid reduces into a light sauce during the minute or two it takes to cook the squid through. (This is technically called short-braising.) Be careful not to cook the squid more than one or two minutes, though, or it will toughen.
Octopus and cuttlefish take longer to cook than squid because they are thicker and tougher. Cuttlefish can be stewed in the same way as squid, but cook it covered for thirty minutes before uncovering, as shown here, and then cook for forty-five minutes to one hour more. Cook octopus as you would a beef daube.
Long-cooking, or stewing (technically called long-braising), squid takes forty-five minutes to an hour. The squid is cooked with aromatic vegetables and liquid to cover. Red wine is one of the best liquids to use for stewing squid, octopus, and cuttlefish because its full body and flavor match their flavor. Most stews are cooked covered, but squid, because it releases a lot of liquid and cooks relatively quickly, is cooked uncovered so that the stewing liquid reduces and concentrates while the squid is braising.
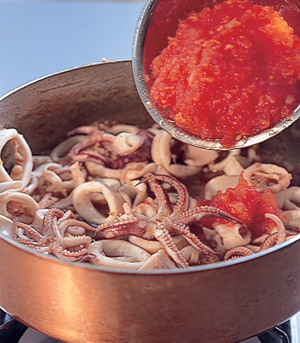
Squid is usually first separated into bodies, sometimes called hoods, and tentacles. The bodies are sliced into rings before cooking.
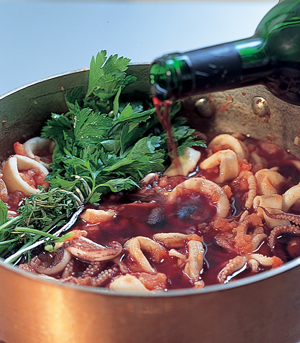
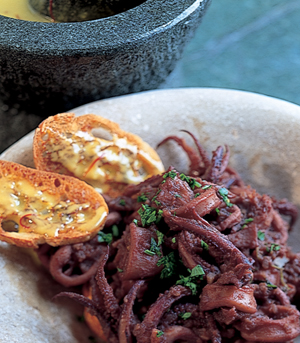
Any liquid can be used to stew squid, but here, I use red wine and chopped tomatoes. I serve the squid with aïoli and small slices of toasted French bread.
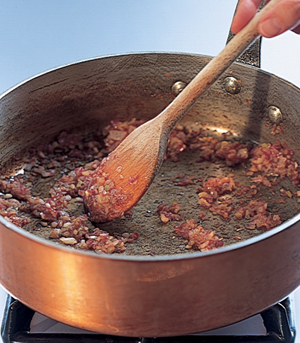
1. Prepare a flavor base by gently stirring chopped shallots and garlic or other aromatic vegetables in a small amount of olive oil over medium heat until the vegetables lightly caramelize, about 10 minutes.
2. Add the squid and enough liquid (here, the seeded and chopped tomatoes) to come halfway up the sides of the squid.
3. Add a bouquet garni and pour over enough red wine to cover the squid.
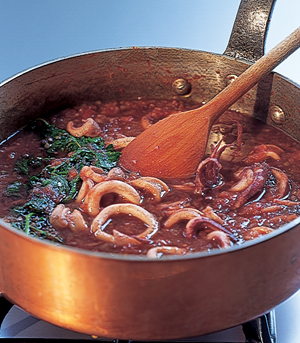
4. Bring to a simmer and cook, stirring from time to time, until the squid is tender and only a small amount of liquid remains in the bottom of the pan, 45 minutes to an hour.
5. Serve with toasts and aïoli (optional).
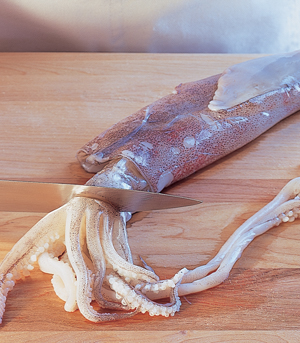
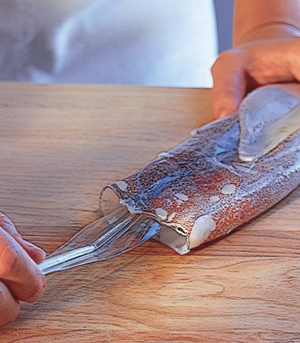
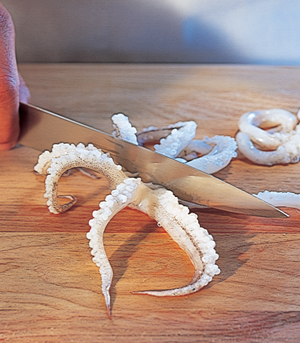
1. Cut the tentacles off just below the eye. Don’t cut them too far down, or they will come apart.
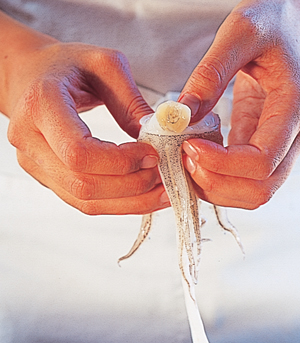
2. Fold back the tentacles slightly and push out the “beak” and any grit caught in the small center opening.
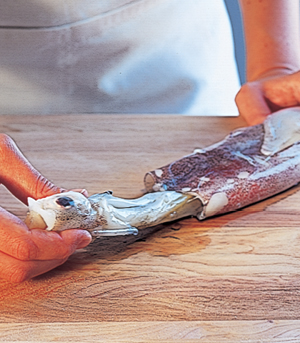
3. Pull the innards out from the hood. Reach into the hood and pull out any remaining innards. Rinse out the hood.
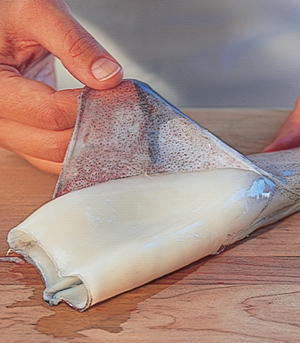
4. Pull out the small plastic-like “quill” that runs along the inside of the hood.
5. Cut off the small fin on one side of the hood and cut it into strips.

6. Removing the purple skin makes the squid more attractive but less flavorful. To remove it, start by scraping the covering off with a knife. Continue peeling the skin off with your fingers.
7. Unless you’re stuffing the hood, slice it into rings.
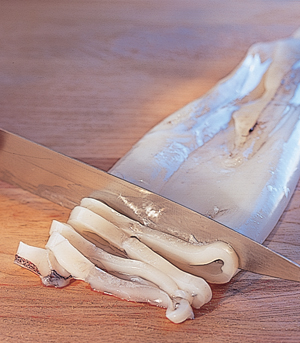
8. If the tentacle bunches are large, cut them into two or more pieces through the top.
See Also
To make a stew without browning, page 210
To seed and chop tomatoes, pages 36 and 50
To make aïoli, page 43
To deep-fry seafood, page 121
To sauté seafood, page 125
To stir-fry seafood, page 130
Related Glossary Entries
Braise
Mirepoix (also for information on sofrito and sofregit)
Stir-frying is like sautéing in that its purpose is to cook food quickly over high heat in a small amount of fat. The sloping sides of the wok make it easy to stir and toss the food with a spoon, wooden spatula, or a pair of chopsticks. To cook a stir-fry, heat a small amount of oil—just enough to lubricate the food—in the wok over high heat. Add aromatic ingredients, such as garlic, ginger, and/or chiles, and cook for a minute or two to infuse the oil with their flavor. (These ingredients can then be removed with a slotted spoon when they begin to brown, or left in the oil.) Add the seafood and other ingredients in stages—longer-cooking ingredients before quicker-cooking foods—and stir rapidly, still over high heat. Once the ingredients are cooked, you can add broth and/or other flavorful liquids to make a quick sauce that coats the foods. In Chinese cooking, a thickener, usually cornstarch moistened with water, may be stirred in to bind the sauce. Coconut milk also makes a lovely addition to Asian, especially Thai, stir-fries.
Stir-fry any firm-fleshed seafood, such as scallops, shrimp, squid, and crayfish tails. Don’t sauté delicate fillets—they’ll fall apart. A wok stand, a metal ring that sits on the stove burner and supports the bottom of the wok, will help to keep the wok stable.
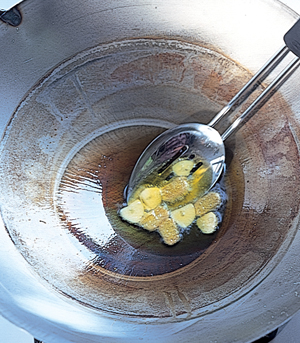
1. Heat peanut or vegetable oil in a wok. Add aromatic ingredients—here, slices of ginger and garlic—to flavor the hot oil and remove with a slotted spoon as soon as they begin to brown.
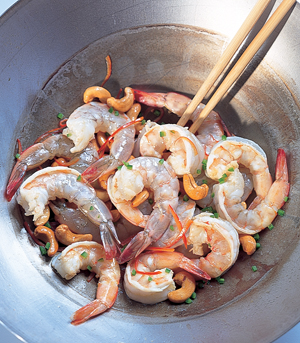
2. Add the remaining ingredients, stirring rapidly as you go. Here, shrimp, cashews, chopped jalapeño chiles, and julienned bell peppers are all added at the same time. Cook until just cooked through. Serve immediately.
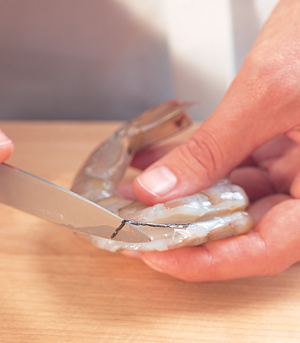
You need to devein shrimp only if the intestine is full of grit. To see if deveining is necessary, devein a couple of shrimp and inspect the intestines. If they are clean, don’t bother with the rest.
1. If the shrimp have heads, twist them off. The heads can be frozen and used later for making soups, sauces, and stocks.
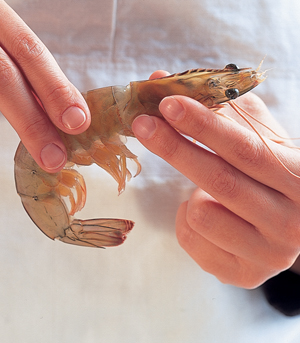
2. Peel off the shells (optional). If guests will be picking the shrimp up with their fingers, leave the tiny tail flaps attached.
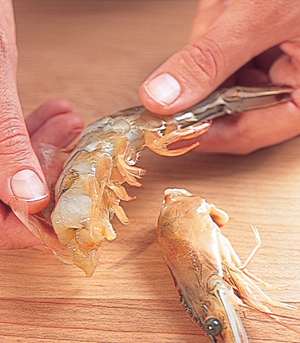
3. If you do need to devein, cut down the back of the shrimp with a small paring knife, exposing the “vein” (actually, the intestine).
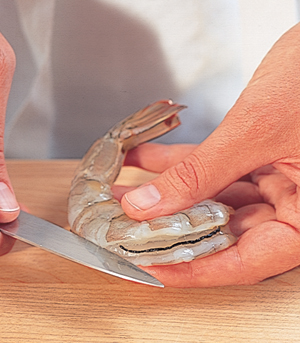
4. Pull the intestine out with the knife or your fingers.
See Also
To make a fish broth, page 32
To make a shrimp broth, page 34
To grate coconut for its milk, page 29
Related Glossary Entries
Sauté
Thickener
I steam lobsters and mollusks such as mussels, clams, and cockles by placing the shellfish directly in a pot with a small amount of liquid. I don’t bother to use a steamer insert or rack. Mussels, clams, and cockles are typically steamed in white wine flavored with aromatics such as shallots, garlic, and parsley. Once the shellfish is cooked, the steaming liquid is served as a broth along with the shellfish, to be mopped up with crusty French bread, or it is used as a base for a sauce for the seafood. The briny steaming liquid can also be combined with olive oil or butter and used, along with the shellfish, as a sauce for pasta.
Mussels usually open after about five minutes, cockles about seven minutes, and clams about ten minutes. Lobsters are done when they turn completely red, usually in about twelve minutes. Many recipes call for longer cooking times, but even slight overcooking leaves lobsters tough and dry.
Lobsters can be steamed in the same way as mollusks—in a large covered pot containing a small amount of boiling liquid, usually wine or water flavored with herbs and/or shallots. (If this seems inhumane, kill the lobsters before steaming.) If several lobsters are stacked in a large pot, use tongs to move those on top to the bottom and vice versa in the pot, being careful of the steam, after about six minutes.
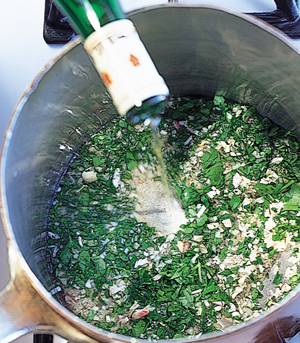
1. Add the liquid and aromatics to a pot large enough to hold the mussels after they’ve opened. Here, I use white wine, shallots, and parsley. Bring to a gentle simmer.
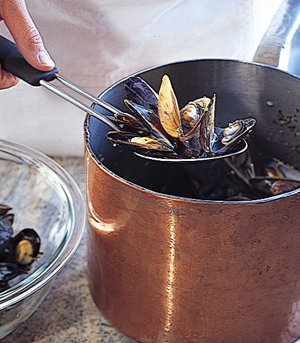
2. Add the mussels to the pot, cover, and turn the heat to high. Steam until all the mussels have opened, about 5 minutes. Remove the mussels with a slotted spoon.
3. To eat the mussels, pull apart the 2 shells and, using 1 shell as a spoon, scoop out the mussel and pop it into your mouth.
1. Rinse the mussels under cold running water while rubbing them vigorously between your fingers. If the mussels are very dirty, scrub with a stiff brush or scrape them with the back of a knife.
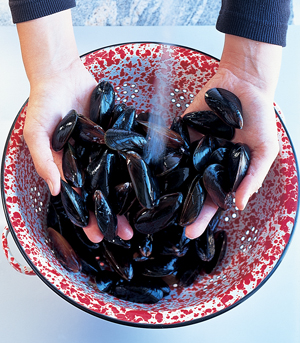
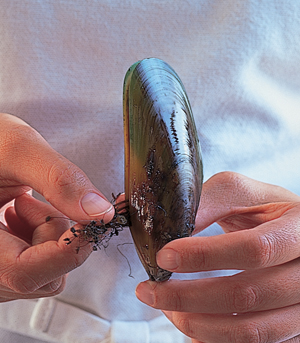
2. If you do want to remove the beard, pull it out with your fingers. If it’s especially stubborn, grab it with a kitchen towel and pull.
See Also
To kill a lobster humanely, page 135
Related Glossary Entry
Steam
You’re likely to encounter two kinds of oysters: elongated oysters such as blue points and Kumamoto oysters, which are the most common, and round, relatively flat oysters, such as Belons, a European variety that is growing in popularity. Elongated oysters are most easily shucked by working an oyster knife through the hinge, while round oysters are usually easier to open through the side. Place the oyster on the counter to help steady it while shucking.
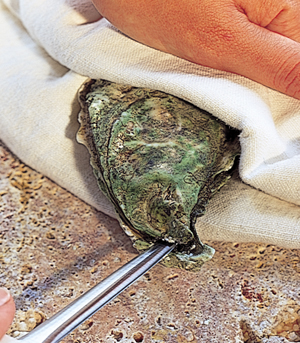
1. Hold the oyster in a kitchen towel, with a fold of the towel between the hand holding the oyster and the knife blade. Twist the blade in the hinge until the top shell loosens.
2. Slide the knife along the underside of the top shell. Press against the shell but don’t cut into the oyster. Cut the oyster away from the top shell.
3. Pull off the top shell. Holding the knife firmly against the inside of the bottom shell, slide the knife along the shell to cut through the muscle that attaches the oyster to the shell.
1. Slide an oyster knife into the side of the oyster. You may have to search for an opening between the 2 shells. Then, keeping the knife pressed against the underside of the lid, slide the knife along the top shell to detach the oyster. Be careful not to cut into the oyster.
2. Slide the knife along the bottom shell to cut through the muscle that attaches the oyster to the shell.
If lobster is simply going to be steamed and served whole, it needs only a quick rinse to ready it for the pot. For more elaborate recipes, however, you may need to pry the cooked meat from the shell or cut up the lobster while it is raw, by either splitting it lengthwise or cutting it into sections.
A number of lobster dishes call for lobster roe, found only found in females. To judge a lobster’s sex, turn the lobster upside down and look at the small flippers attached to the tail where it joins the head. Those on a female are flexible and soft; those on the male are hard.
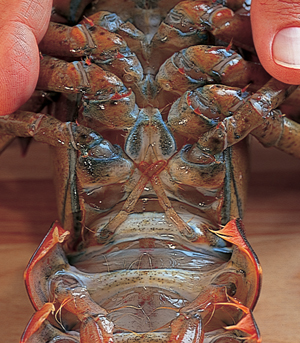
Female
Male
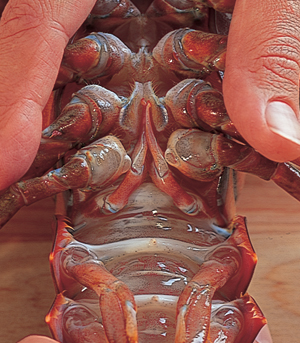
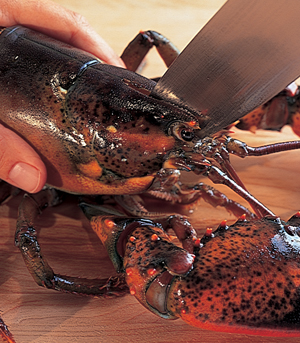
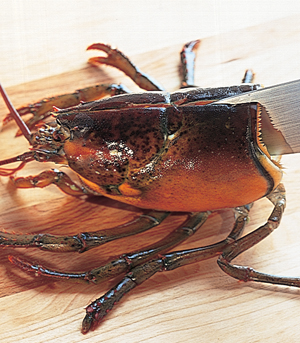
Sometimes you’ll need to cut up the lobster before cooking it to extract the maximum flavor from the shell, roe, and tomalley. Some recipes call for cutting the lobster in half, while others say to cut it into sections. Regardless of how you will cut the lobster up, you need first to kill it humanely. Hold a chef’s knife directly over the lobster’s head. Quickly push the knife all the way down to the cutting board and rapidly pull the knife forward, cutting the front part of the lobster’s head in half and killing it instantly.
After killing the lobster, turn it around and split it in half from the head to the tail. Remove the small grain sac from each side of the lobster’s head (it’ll feel rough when you run your fingers along the inside of the head) and discard. Occasionally the vein that runs down the top of the tail contains grit; if it does, pull it out.

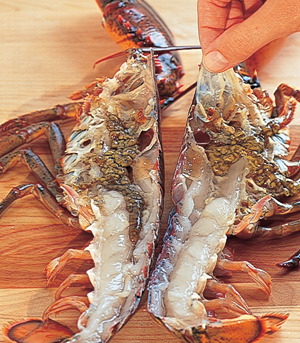
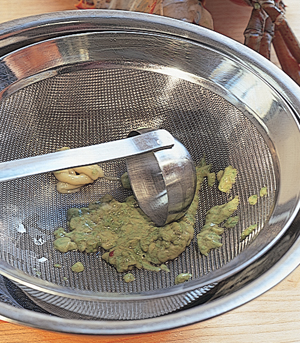
Often a lobster is cut up raw for soups and stews or to get at the tomalley (the liver) or roe. The tomalley (which is a light grayish-green) is found in both male and female lobsters; the roe (which is dark green, almost black) is only found in females. Both tomalley and roe can be pressed through a strainer and used to thicken, flavor, and color sauces.
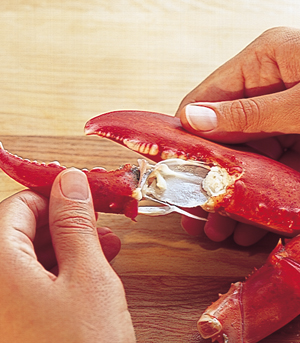
1. After killing the lobster, snap off the claws where they join the head (thorax).
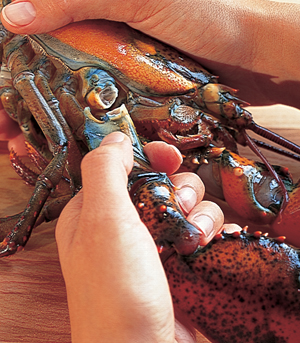
2. Hold the head firmly in one hand and twist off the tail with the other.
3. Reach into the head with your forefinger and scoop out any tomalley or roe into a strainer set over a bowl containing a teaspoon of wine vinegar or cognac.
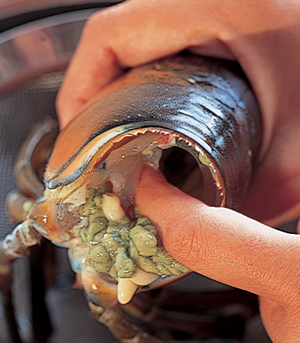
4. Work the tomalley or roe (tomalley is shown here) through the strainer with the back of a ladle. You can also work it through with the tips of your fingers.
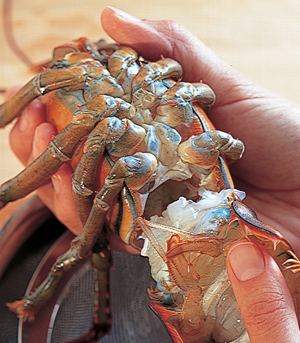
5. Finish cutting the head in half.
6. Pull the grain sac out of either side of the head and discard. Pull out any remaining coral or tomalley and work it through the strainer.
This method of shelling cooked lobster is designed for working quickly in the kitchen and can be used for any recipe calling for cooked lobster meat.
1. Snap off the lobster claws where they are attached to the head (thorax).
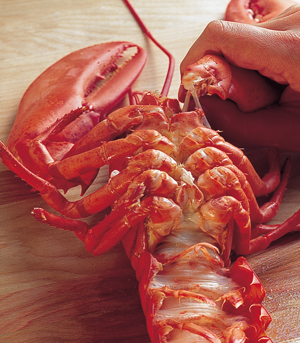
2. Grip the head and tail firmly in both hands and twist off the tail.
3. Snap off the flipper at the end of the tail.
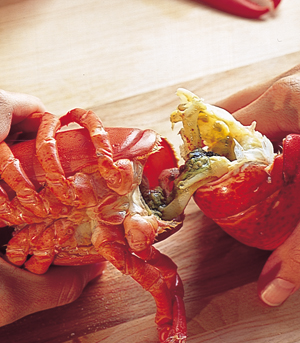
4. Place the tail on its side and press gently on it with the heel of your hand until you feel the shell crack and hear a gentle crunch. Don’t push too hard or you will mangle the meat.
5. Place the tail upside down in a kitchen towel and pull away the sides to release the tail meat.
6. The tail can be cut length-wise in half, cut into cubes, or, as shown here, sliced.
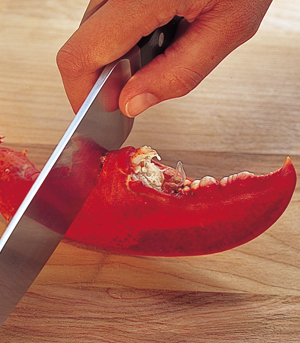
7. Gently move the claw pincers from side to side, then bend them away from the claw while pulling them out. The small feather-shaped piece of cartilage that’s imbedded in the claw should come away with the pincer.
8. Hold the claw “thorny” side up. Give a quick whack with a chef’s knife (preferably an old one, since the shell can damage the blade; you could also use a cleaver, if you handle it carefully) so the knife goes in about ½ inch, without cutting into the meat.
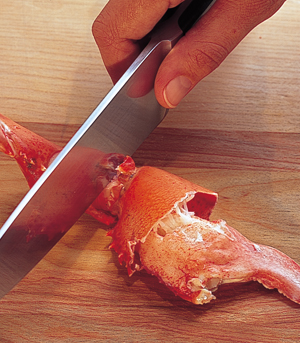
9. Rotate the knife to crack open the claw.
10. Use the chef’s knife to crack through the small hinge at the base of the claw.
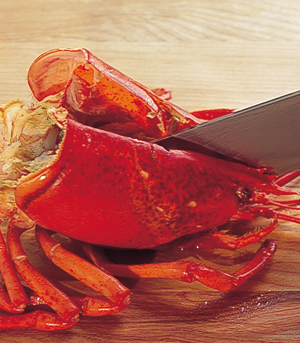
11. Use a pair of kitchen scissors to cut through the shells of the “knuckles” that connect the claws to the body. Pull the meat out of the claw and knuckles with your fingers.

12. Cut the head in half with the chef’s knife.
13. Remove the grain sac from each side of the head.
See Also
To steam lobster, page 132
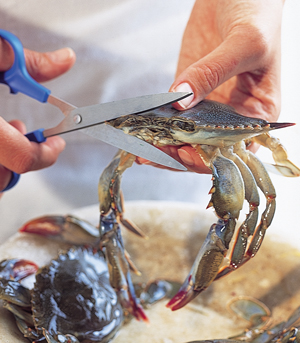
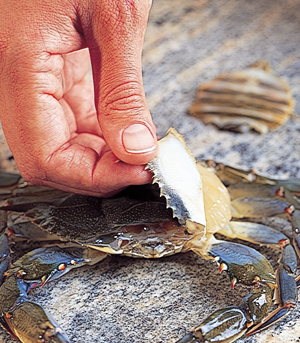
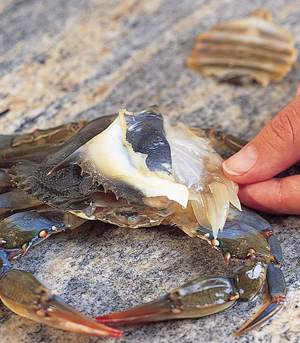
Most crabs are sold cleaned, cooked, and cracked, but soft-shell crabs are sold alive and are so perishable that it’s best to clean them no more than an hour or two before they are cooked.
1. Rinse the crabs. Cut off the very front part of each crab—the spiky part with the eyes—with scissors.
2. Turn the crab on its back and pull open the “apron” (the tail flap). Twist it, pull it off, and discard.

3. Turn the crab right side up and pull up the shell on each side.
4. Pull away the rough gills (sometimes called dead man’s fingers) on each side of the crab.
A coating of flour gives soft-shell crabs a crisp, brittle exterior.
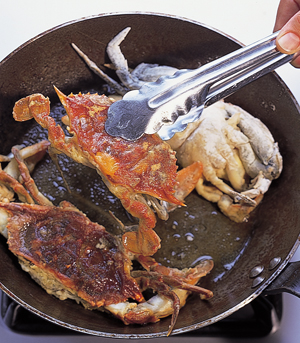
Clean the crabs. Just before cooking, pat the crabs with flour. Heat whole butter or olive oil in a nonstick or well-seasoned cast-iron sauté pan over medium-high heat. Sauté the crabs on both sides until crisp, about 3 minutes on each side.
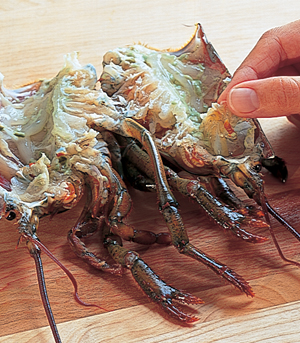
Like lobsters, crayfish should be alive when you buy them. Before cooking, sort through them and throw out any that are dead. When handling crayfish, pick them up from behind the head, holding them between thumb and forefinger, so they don’t pinch you.
One way to cook crayfish is just to toss them in a pot of boiling water for five minutes or so. (Southern cooks flavor the water with herbs and spices; French cooks use a court bouillon.) Here, I sauté them and use their shells to make a sauce.
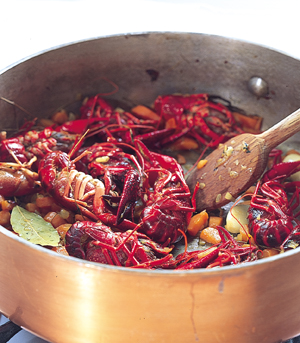
Here, the crayfish are sautéed with carrot and onion because the crayfish shell–vegetable mixture will be used to make a sauce. If you’re not making a sauce, omit the vegetables.
1. Rinse the crayfish in a colander. Gently sweat chopped carrots and onions in olive oil in a heavy-bottomed pan. Add live crayfish and stir over high heat.
2. Cook until all the crayfish turn red, about 7 minutes.
Most of the meat in crayfish is in the tails. If you like, you can crack the claws and remove the meat, but this is very labor-intensive and will yield only a small amount of meat.
1. Gently twist the tail of each cooked crayfish away from the head.
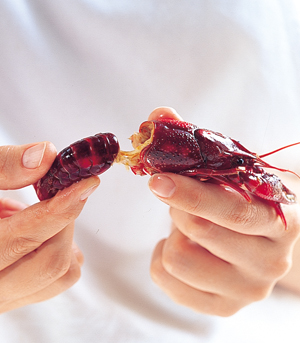
2. Firmly pinch the tail flipper where it joins the rest of the tail and pull it off. The intestine should come out with it. If it doesn’t, the tail meat can be deveined in a similar way as shrimp.
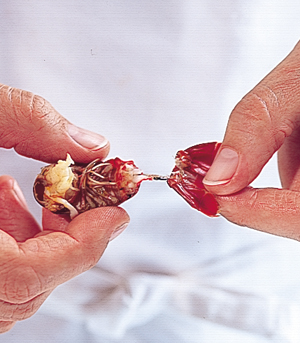
3. Pinch the tail between your thumb and forefinger until you feel the shell crack slightly.

4. Pull the shell away from the tail meat. If the intestine didn’t come out in Step 2, push the thin covering of meat that covers the vein sideways with your thumb so that it opens, revealing the vein. Pull the vein out with your fingers.

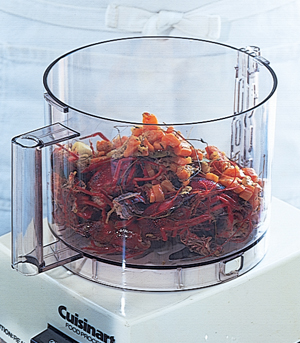
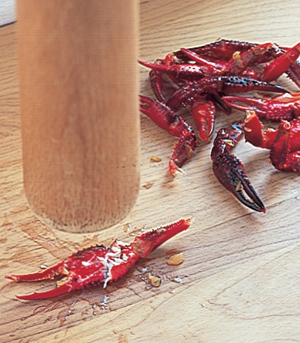
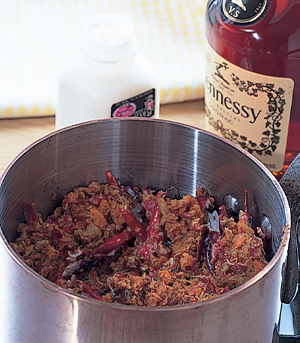
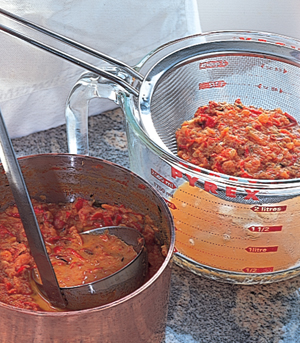
Here, the heads and shells from sautéed crayfish (page 139) are used to make a sauce.
1. Snap the claws off the sautéed crayfish (they’re very hard and would damage the food processor blade). Shell the tails (see page 140) and reserve the meat. Grind the heads and the tail shells for about 1 minute in the food processor.
2. Crush the claws with the end of a European-style rolling pin or mallet.
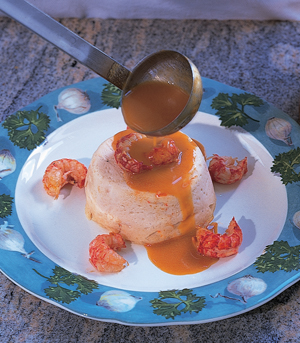
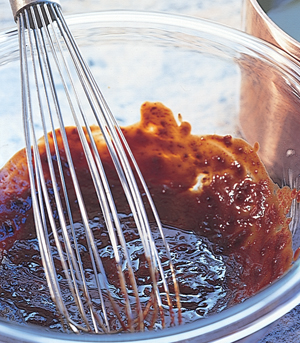
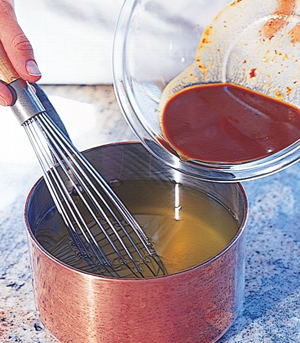
3. Combine all the shells, including the claws, in a heavy-bottomed saucepan and add chopped tomatoes, cognac, and heavy cream. Simmer, stirring occasionally, until the liquid turns orange, about 45 minutes.
4. Strain through a coarse strainer, pushing hard against the shells to extract the maximum amount of liquid, then strain again through a fine-mesh strainer or cheesecloth. If the sauce is thin, reduce it—cook it down—to thicken it slightly.
5. Here, the crustacean tails and sauce are served with a salmon mousseline.
See Also
To devein shrimp, page 131
To make a salmon mousseline, page 276
To make a crustacean broth, page 34
Related Glossary Entries
Mousseline
Reduction
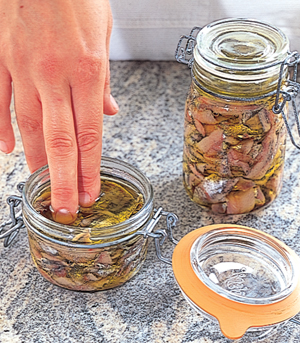
The best preserved anchovies come packed in salt. These anchovies are whole and must be partially desalted and filleted before they can be used. Because salted anchovies are sold in one-and-a-half pound or larger cans, it’s easiest to desalt them all at once and repack them in extra virgin olive oil, to be used as needed. Whole salted anchovies can also be bought in small amounts from specialty food shops, but these often come from cans that were opened too long ago and the anchovies are stale and fishy. Keep your own repacked anchovies in the refrigerator for up to a month.
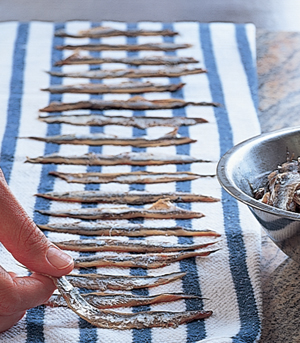
1. Dissolve the salt at the top of the can by soaking the can for a few minutes in cold water and then quickly rinsing off the salt under cold running water.
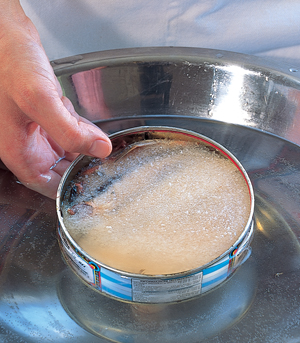
2. Turn the can over and shake out the anchovies in a clump into a bowl of cold water. Soak for about 10 minutes, then gently separate the anchovies one from another, a few at a time.
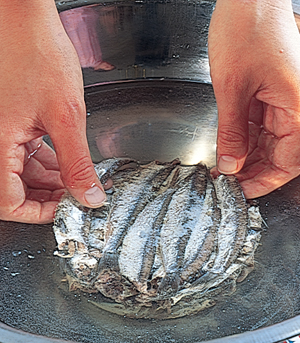
3. When all of the anchovies have been freed, soak them for 20 minutes in a fresh bowl of cold water.

4. Snap off the heads (the method is similar to taking the heads off fresh sardines) and gently push the fillets away from the backbone with your thumbs and forefingers.
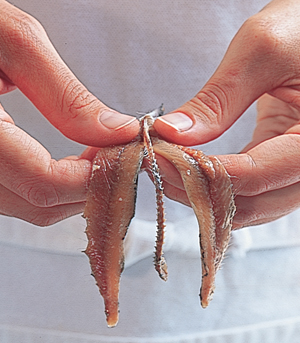
5. Soak the fillets in fresh cold water for 5 minutes, then transfer to cloth kitchen towels to drain. (Don’t use paper towels, which would stick and tear.)
6. Pack the fillets in jars and pour over enough extra virgin olive oil to cover. Press down on the fillets to push out any trapped air and add more olive oil as needed to cover completely.
See Also
To clean fresh sardines, page 236
Miso soup is made by flavoring Japanese-style fish and seaweed broth, called dashi, with a paste of fermented soybeans. It is completely different in style and technique from European soups, and is more akin to making tea.
Dashi is made by steeping a special variety of kelp, called konbu, and finely shaved flakes from dried bonito (a tuna-like fish) in hot water. The dashi is then strained and whisked with enough miso paste—a thick paste of fermented soybeans—to flavor the soup without making it too salty. The soup can be garnished with cubes of tofu, shellfish, vegetables, pieces of seaweed, lemon zest, or noodles. Simmer quick-cooking garnishes such as shellfish, tofu, lemon zest, leafy greens, or finely julienned vegetables directly in the soup. Cook noodles separately and place in each bowl.
Miso paste comes in many different varieties, from mild and very pale brown to strong and salty and such a dark red-brown that it looks almost black. It is available in Asian markets and even some supermarkets. For beginners, a medium-dark miso works perfectly well.
1. Whisk just enough dashi into a small amount of miso paste to make a smooth paste.
2. Whisk this paste back into the dashi and return to the simmer.
3. Ladle the miso soup into hot bowls containing whatever garniture you’ve chosen.
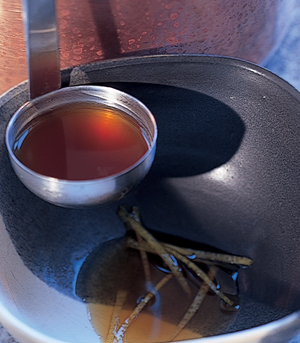
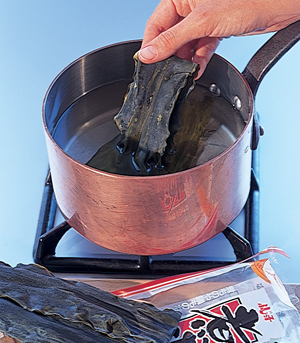
Dashi is the base for many Japanese soups and sauces.
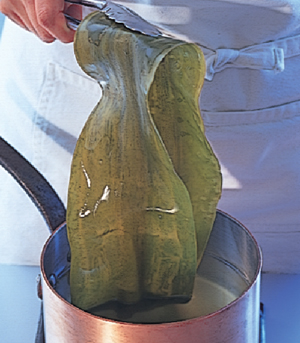
1. Add a strip of konbu to a pot of cold water. Bring the water to a simmer over low to medium heat. It should take about 15 minutes to simmer, to give the konbu time to infuse.
2. Remove the konbu from the water as soon as the water comes to the boil.
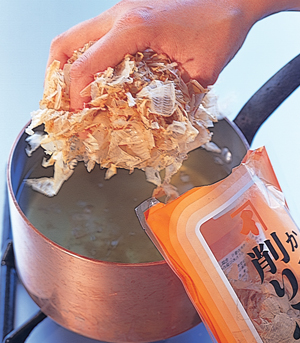
3. Bring the infused water (konbu dashi) back to the simmer, toss in a handful of shaved bonito flakes, and remove from the heat. Leave the flakes in the water for 1 minute.
4. Strain the bonito flakes out of the liquid.