CHAPTER 3
Itty Bitty Nitty Gritty
CREATING MAGICAL FAERIE HOUSE COMPONENTS
Why do we so love the faerie world? Is it because faerie houses speak to our love of miniature things—tiny worlds where our imaginations can soar and fly? Or do we long for a place to escape? Who knows—but perhaps rather than trying to analyze it, we should just dive in and experience the simple joy of making something magical, by hand, which comes from our hearts and the materials that nature so kindly provides.
As mentioned in Chapter 2, once we have a vision and plan for the house we want to build, we begin by constructing the smaller elements first. Let’s start then with an in-depth look at some of these components.
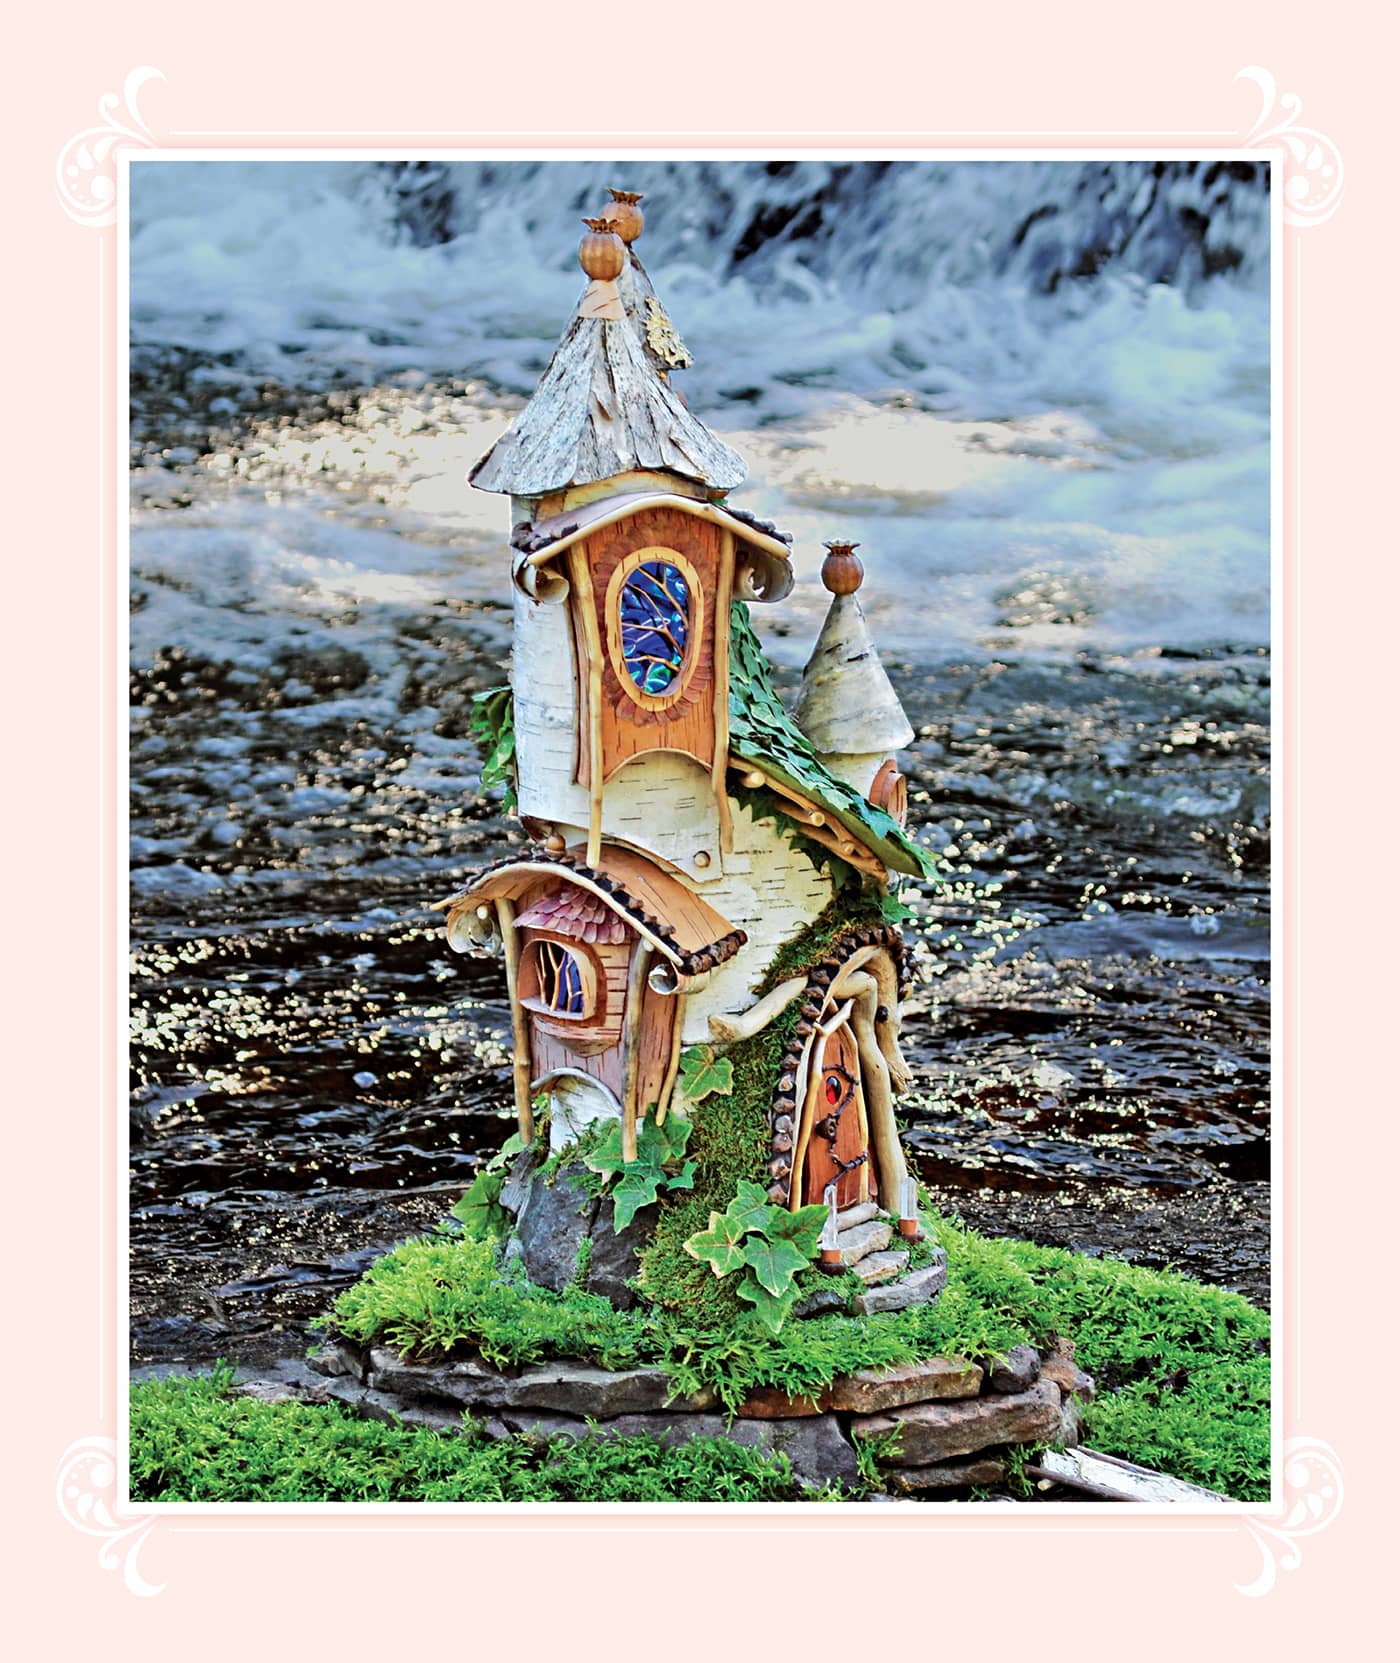
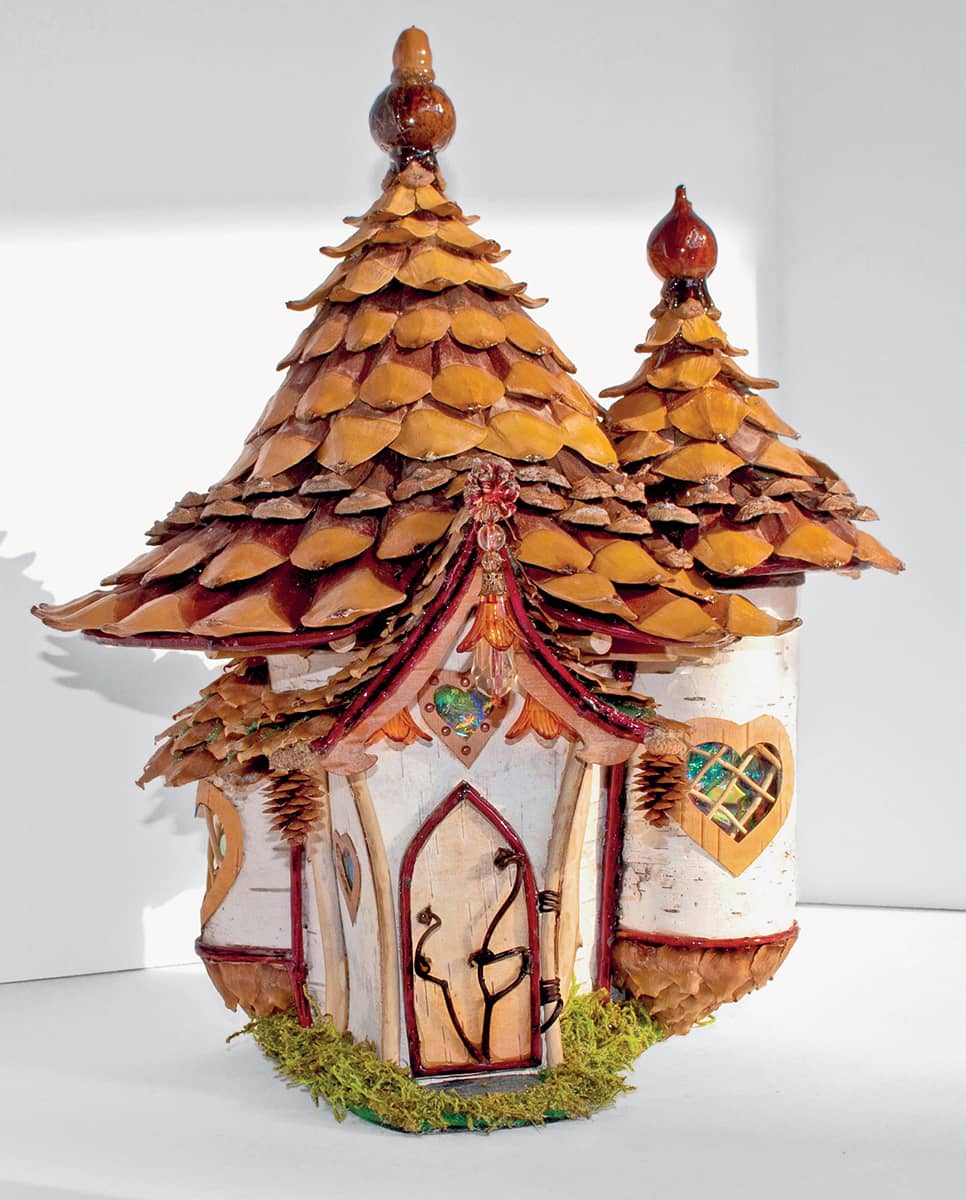
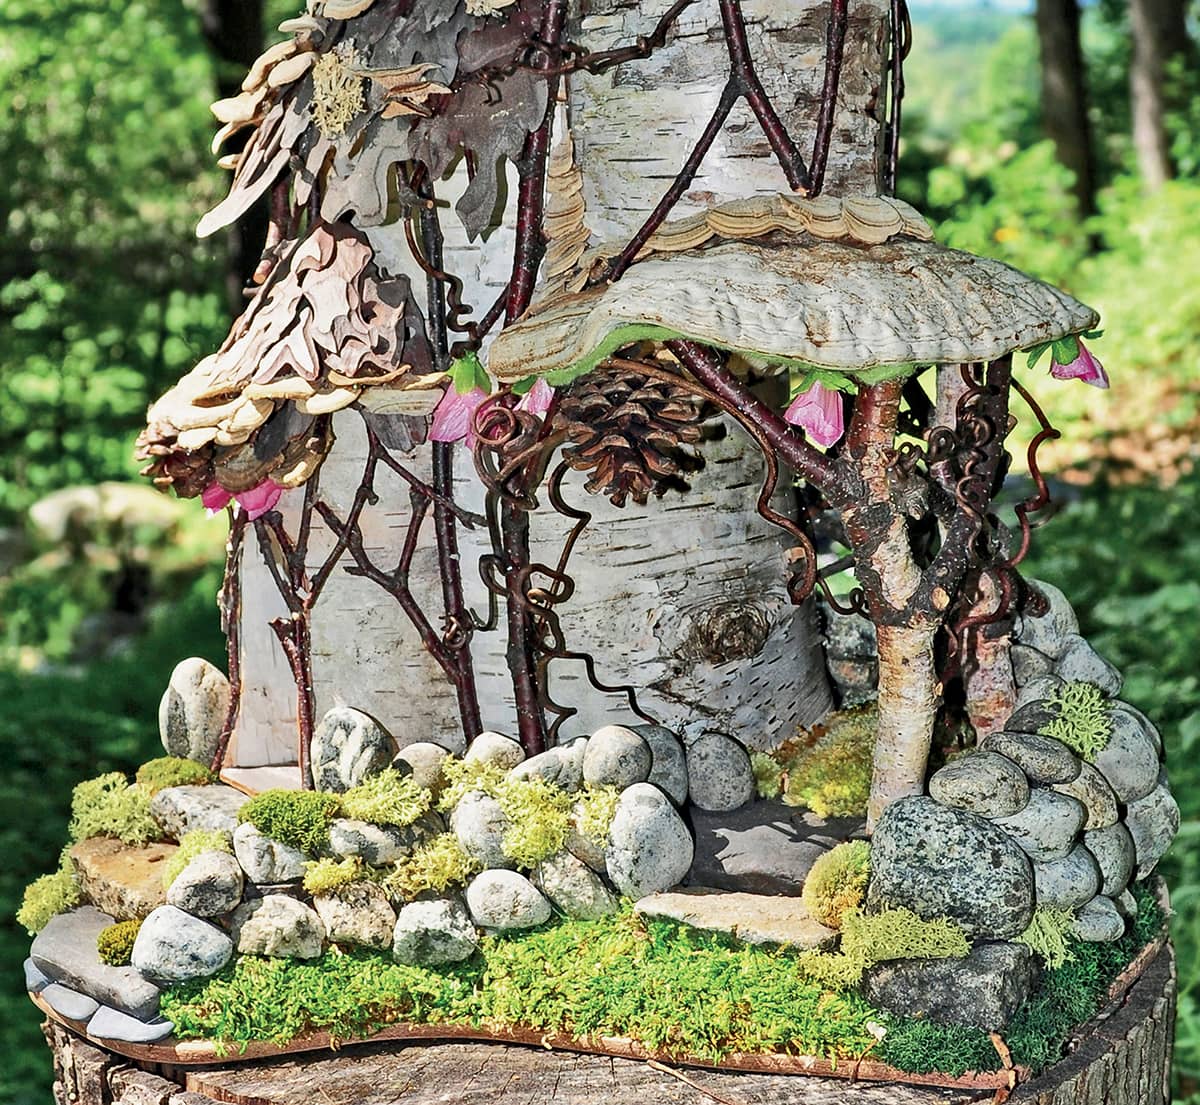
The magical Dragon Castle faerie house. Each roof is removable to allow viewing the exotic interior spaces. There is even a secret entrance to a crystal-lined cave under the castle for sleepy dragons to enter for a nap.
DOORS
Most doors on human-designed houses are basic rectangles, and the same goes for windows. One of the quickest ways to make your faerie house charming and magical is literally to go outside of the box and make windows and doors that are anything but linear squares or rectangles. This simple design choice makes a huge difference. Let the shape and form of the materials guide your construction design, and your faerie house will look more natural.
Doors that open and close add a lot of interest and magic to a tiny house, but doors that are fixed in place can also be quite alluring. Because doors and windows are made at such a small scale with many fine details such as hinges, doorknobs, latticework, etc., it’s much easier create these separately and then attach them to the main house.
The initial factor to consider when designing the door is whether the house has flat walls or curved walls. It is far easier to make a flat door than a curved one, but the challenge becomes how to attach a flat door to a curved wall and have a nice “fit” over the opening. You can solve that problem by creating a special vestibule entrance that has a flat front to support the flat door with curved edges on the back to accommodate the curved wall of the house. You will still make doors for flat-walled houses ahead of time, but the whole process is much easier with flat walls.
Don’t worry, this will all make sense as we go along!
If you’ve never made a faerie house before, you might want your first house to have a fixed-in-place door. If you have some crafting skills already and really like the idea of a door that opens and closes, then you may want to skip ahead and try your hand at crafting a hinged design.
Let me share some examples of what I’m talking about to make it easier to appreciate the different options.
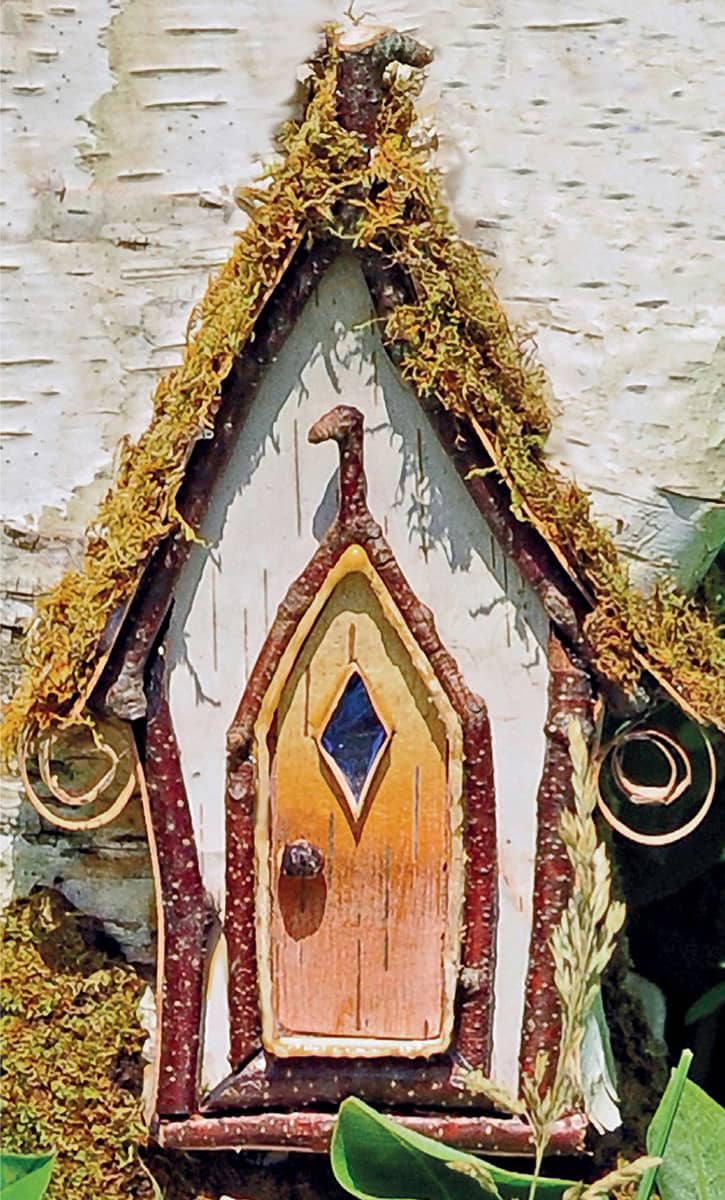
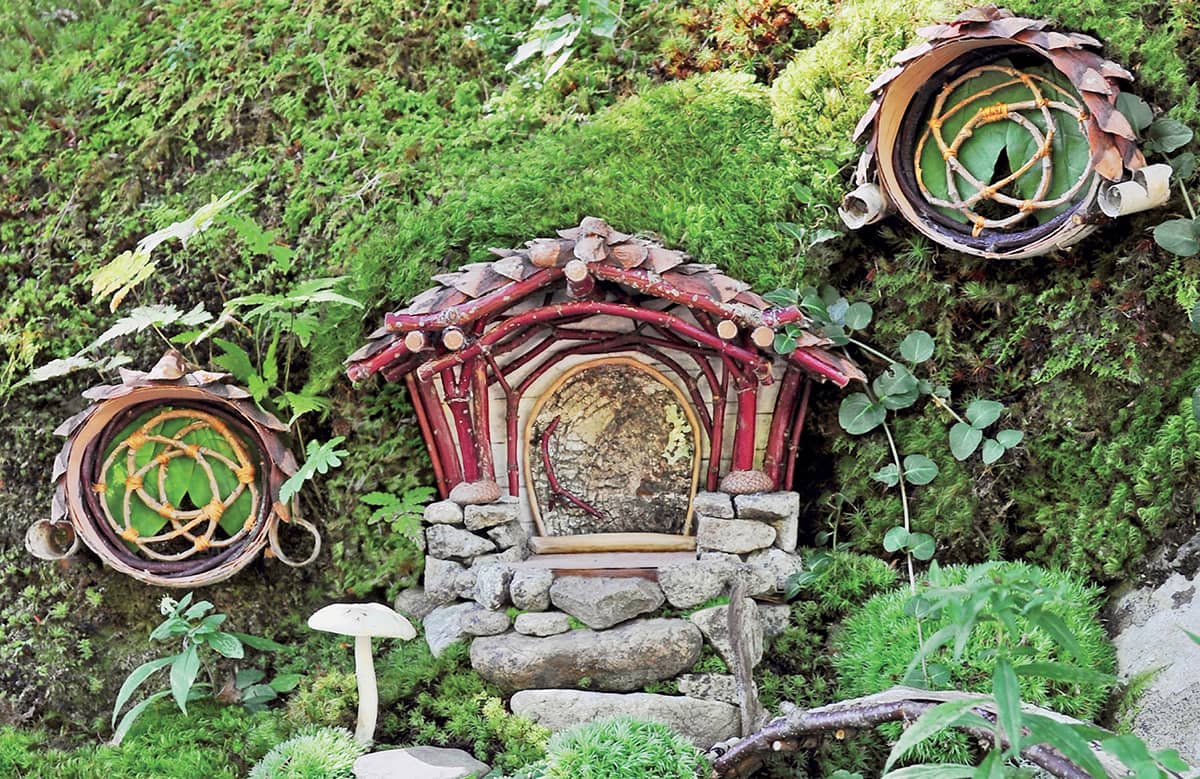
FIXED, CLOSED DOORS ON FLAT WALLS WITH VESTIBULES AND SURROUNDS
Opposite are four examples of fixed, closed doors installed on flat walls. These doors do not open but, as you can see, it is quite possible to create an elaborate entrance design even when the door itself is reasonably basic.
Each of these doors represents the same style of function and construction method. They are made in the “fixed” position (they do not open) and they have detailed surrounds to enhance their impact and appearance.
FIXED DOORS ON CURVED WALLS
Because many faerie houses are constructed with curved walls, it is helpful to know how to insert a flat door and have it look good. Usually, the trick is to float the door in a frame or vestibule within the curved wall. As shown here, this can work beautifully.
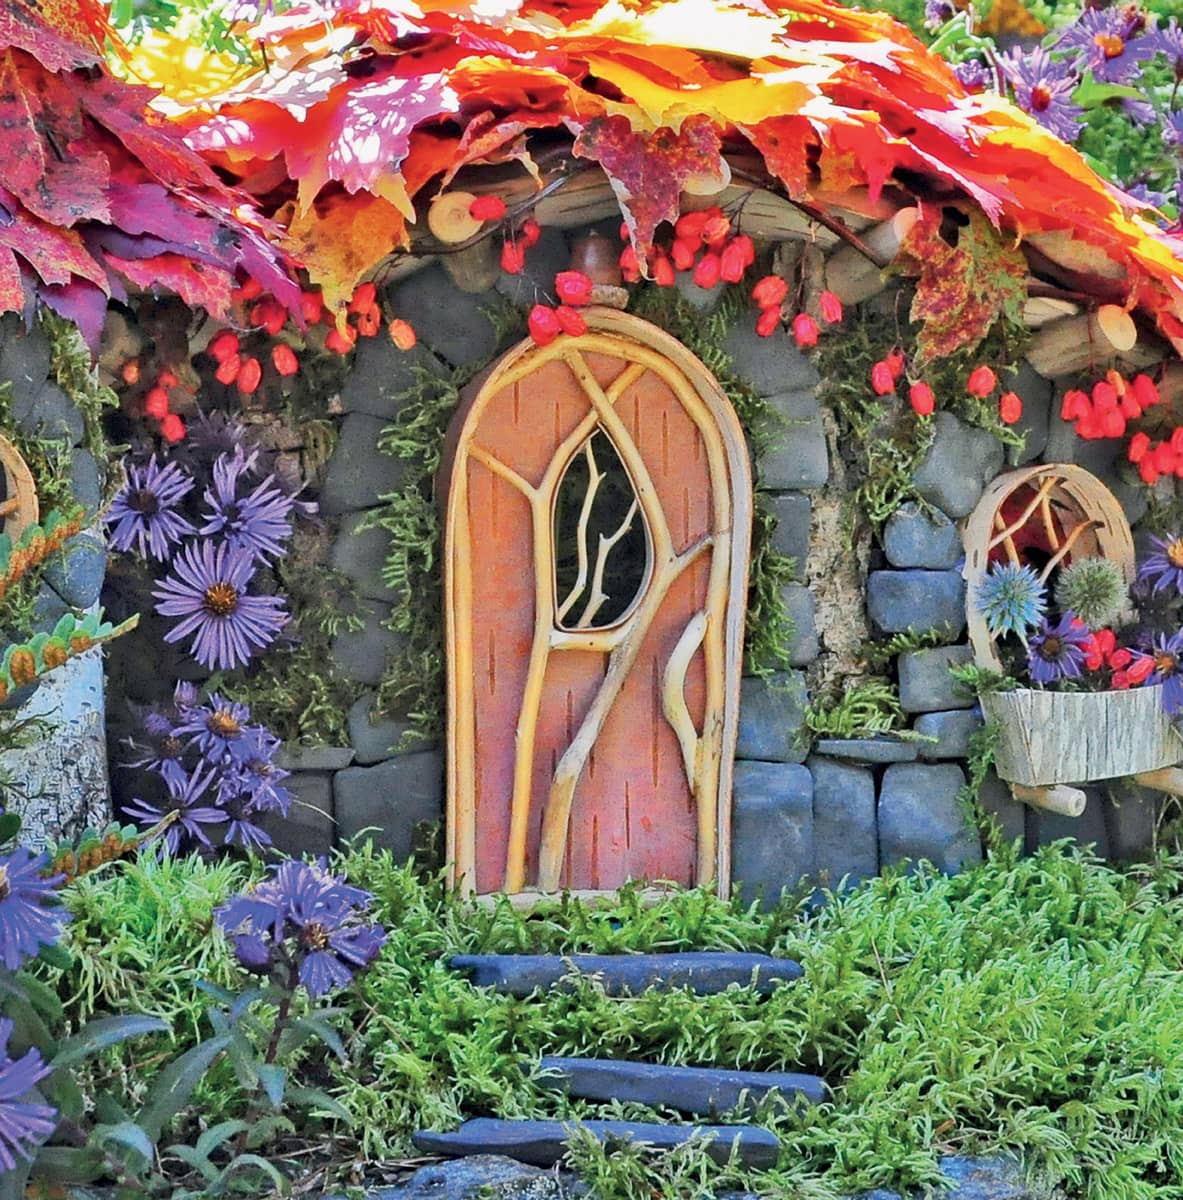
This door is flat and the wall has a gentle curve to it, but because the door is set into a deep frame, the flat door can rest in the curved surface of the wall without difficulty.
This door is attached to a curved wall but is fixed in the open position—a good solution to the flat door/curved wall problem.
HINGED DOORS
Here are some examples of simple hinged doors. If you don’t plan to handle the door a great deal, one nice way to make hinges is to use tiny silk leaves or simple ribbons, which allow the door to swing a bit. This is a good technique for especially tiny doors.
This tiny, 1"–wide door swings on tiny silk ribbons that you can see just on the right side of the door.
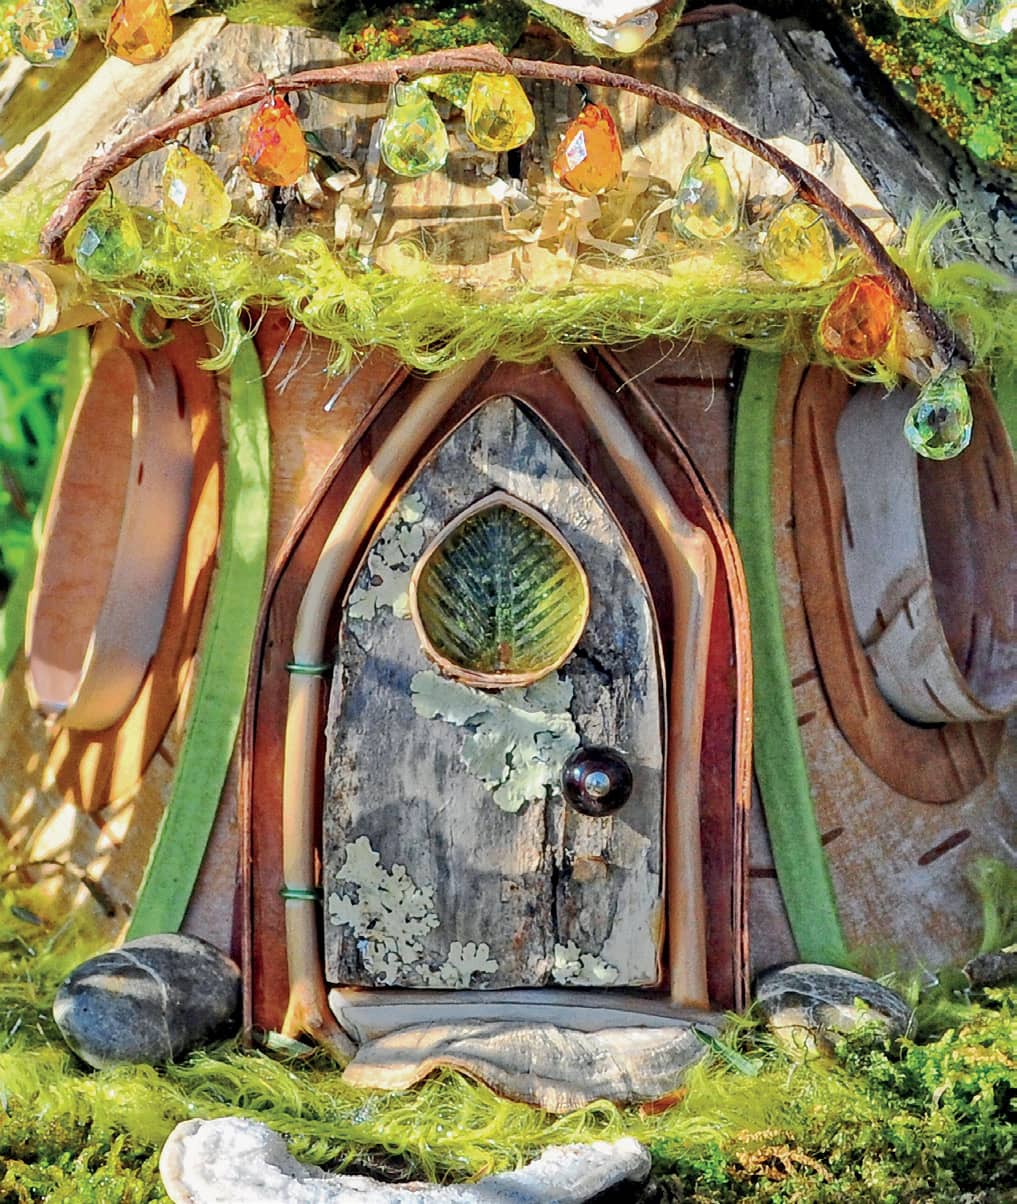
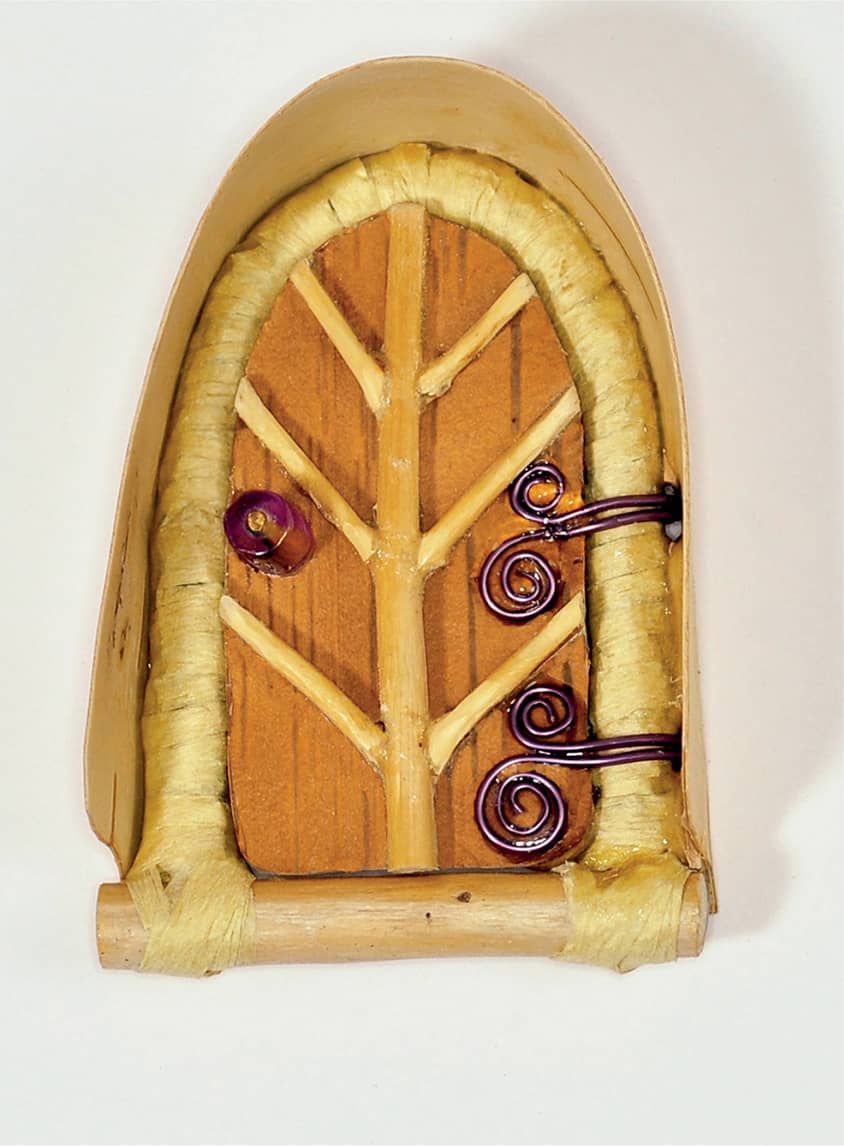
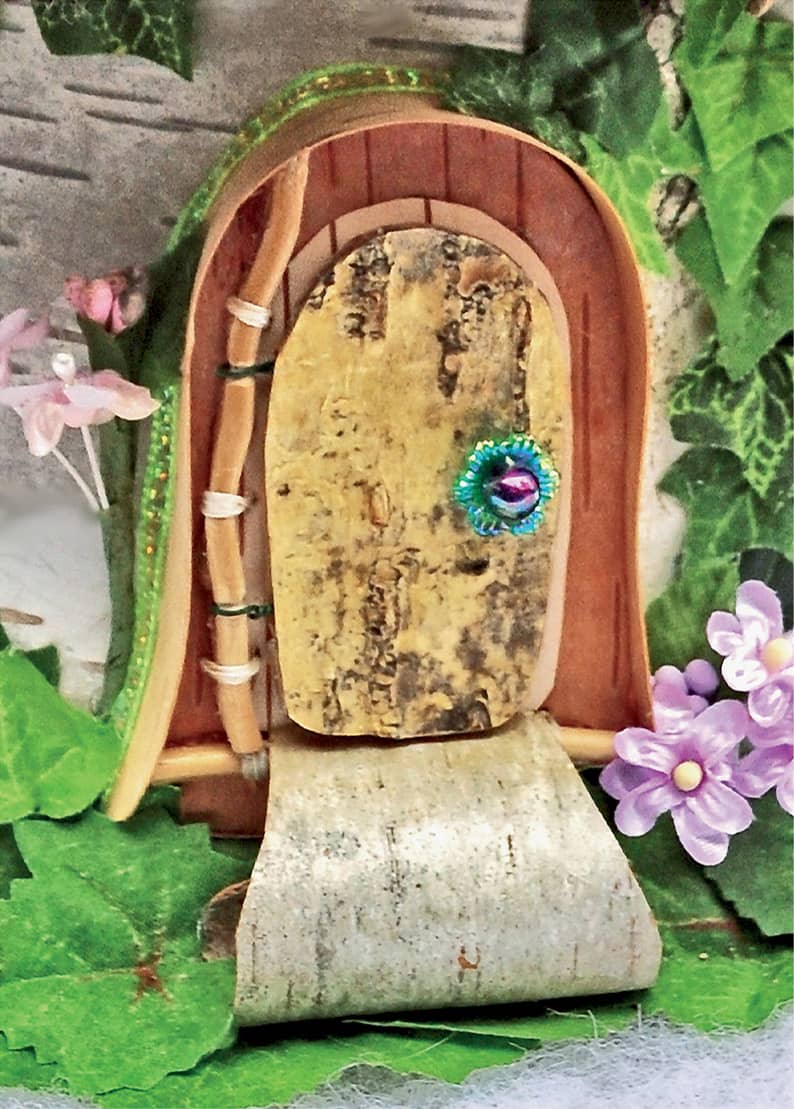
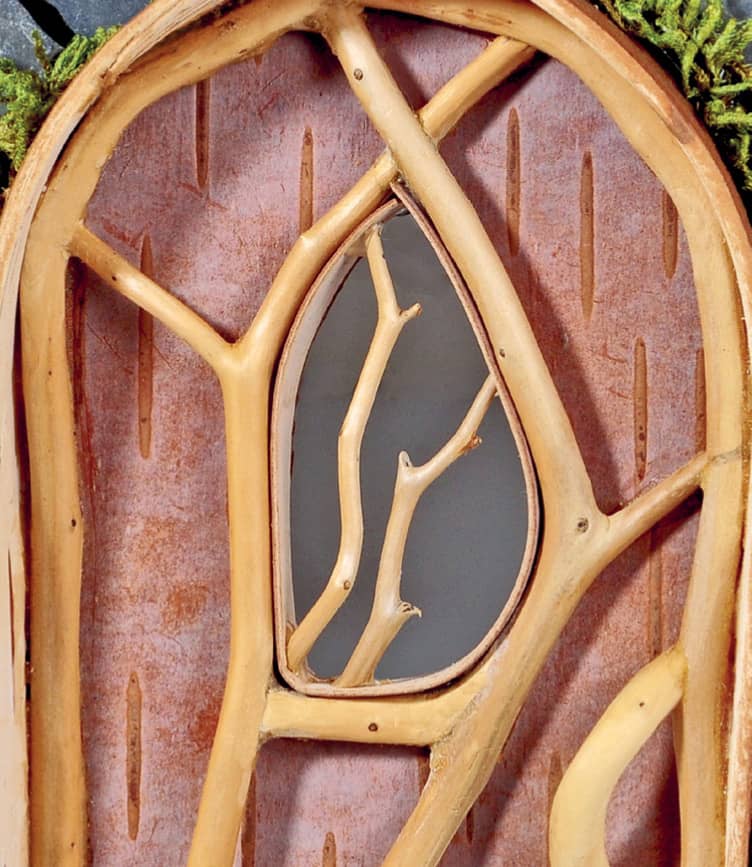
This rather simple door has wire hinges. One of the features that makes this door so inviting is the glass “leaf” bead, which forms a window in the door. Additionally, you can see that the twig that forms part of the frame is the same twig upon which the door is hung—another simple, elegant solution.
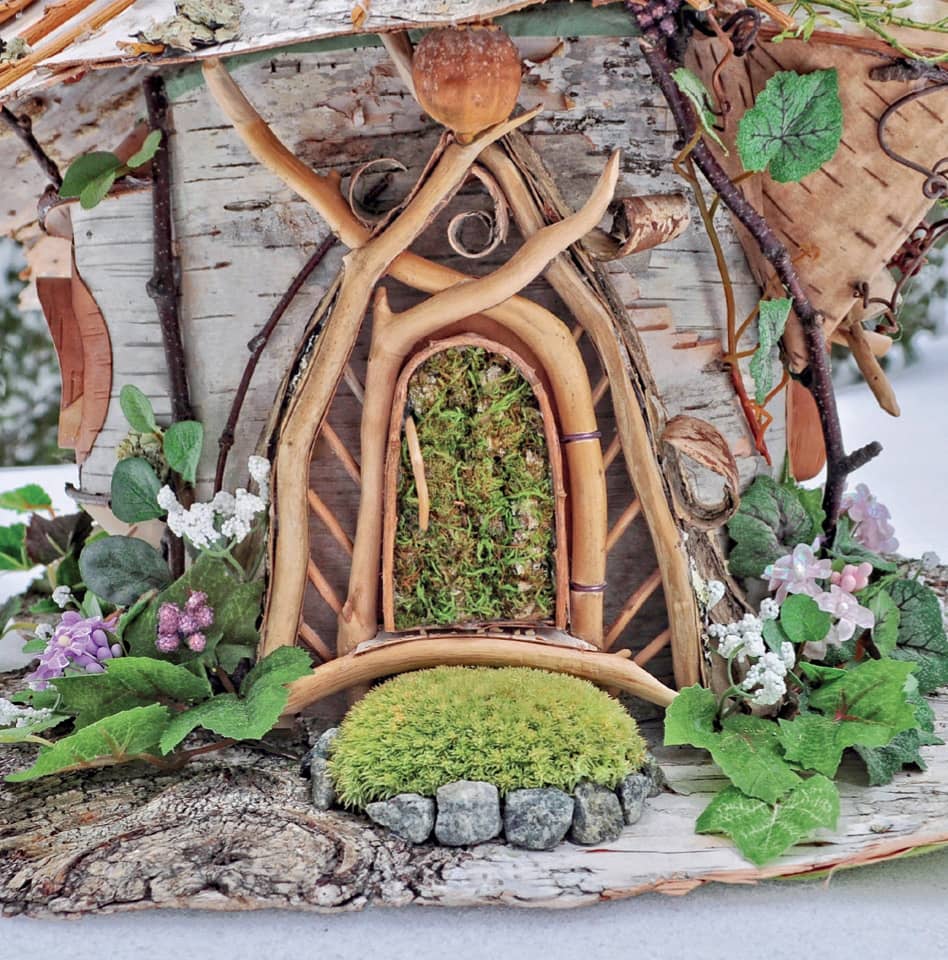
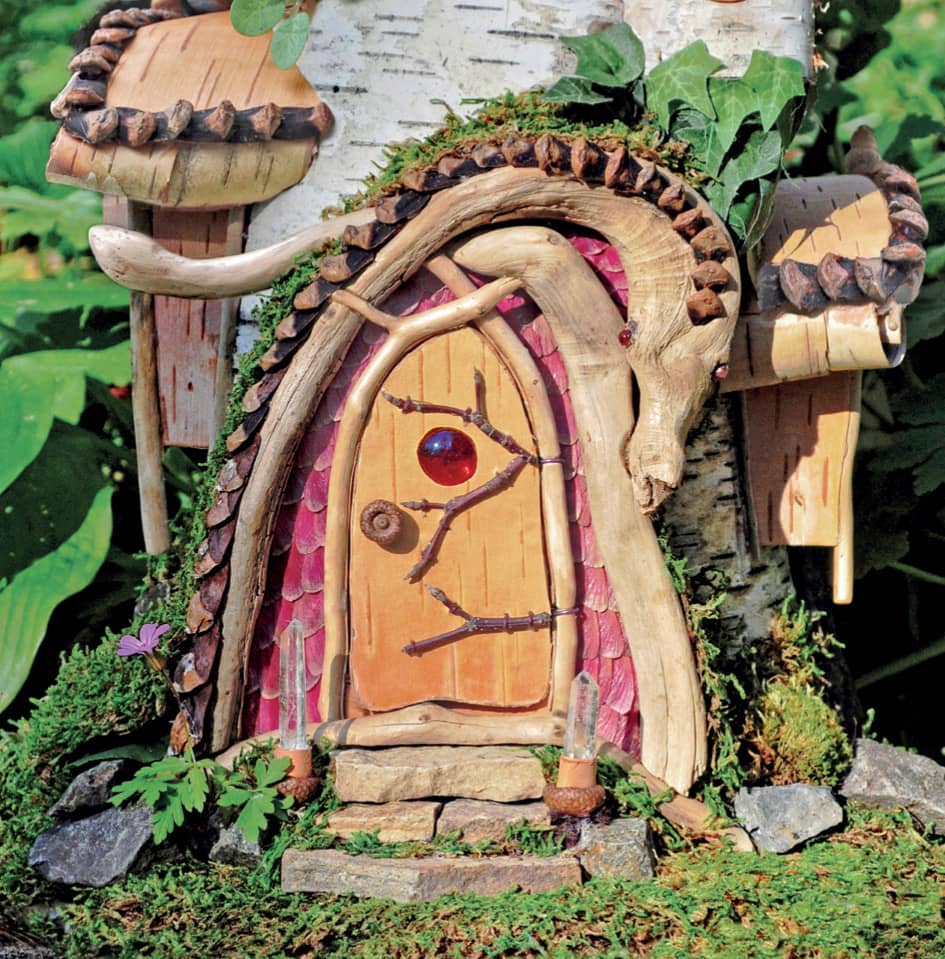
HINGED DOORS WITH ELABORATE SURROUNDS
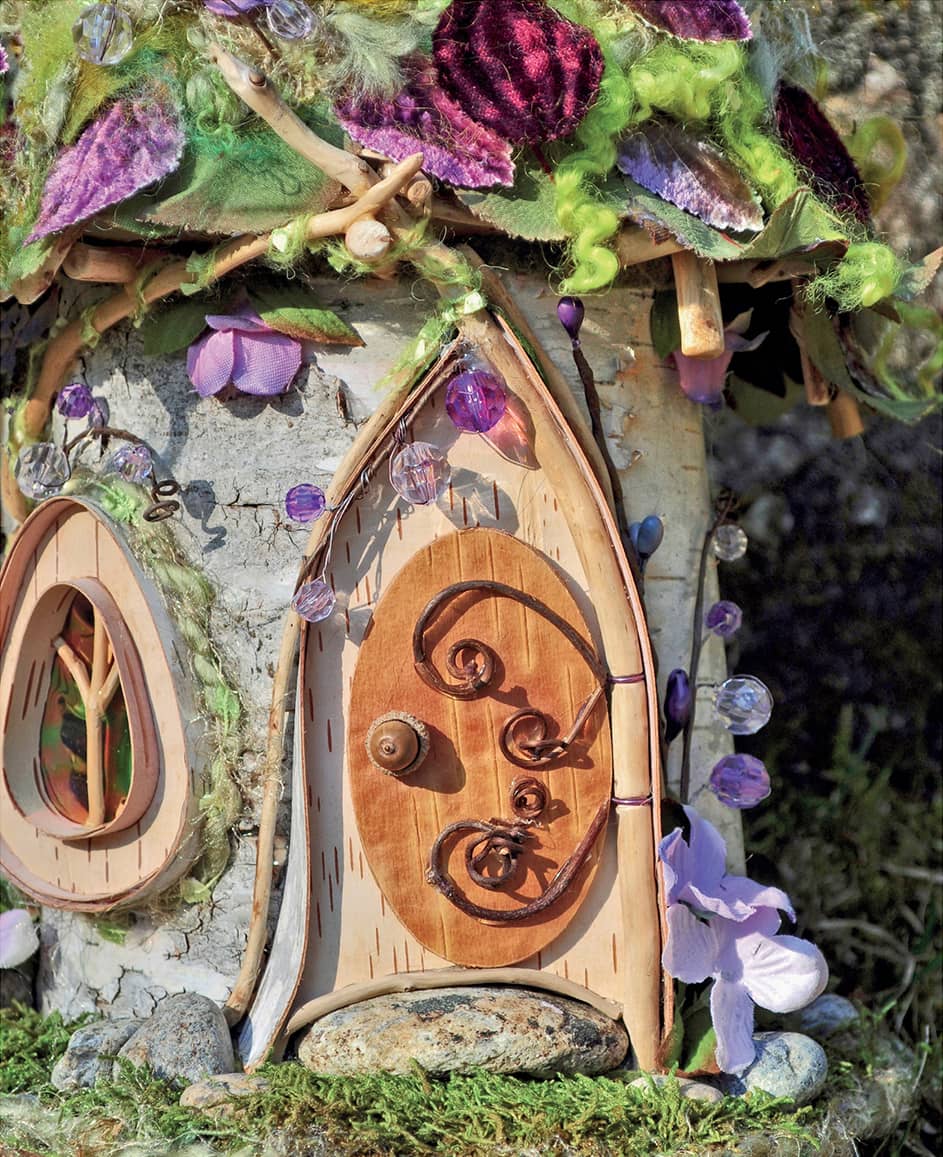
Once you feel confident in your building skills, you can get more creative with the details surrounding the door. Here are some examples of doors that move on wire hinges with embellishments in the framing surrounding the door.
“STAINED GLASS” DOORS
For the most exotic doors and entryways one can take things a step further and make doors that are transparent or translucent. They are difficult to make, so they are not covered in this book but are included for inspiration. They are made, in part, using photos of dragonfly wings printed on acetate, which creates the filigree pattern that you see.
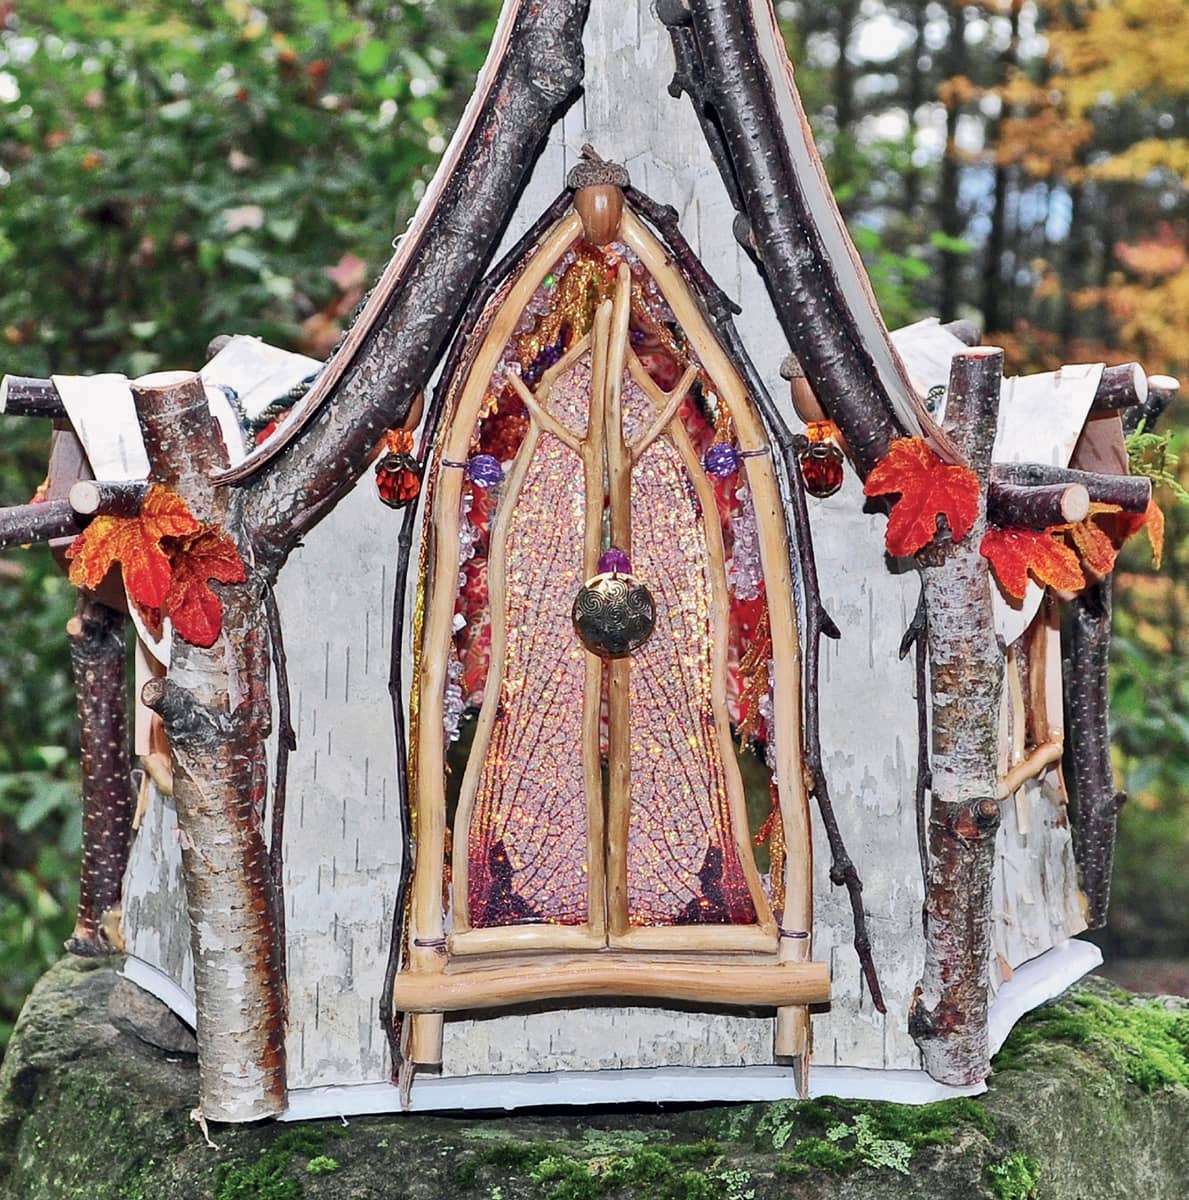
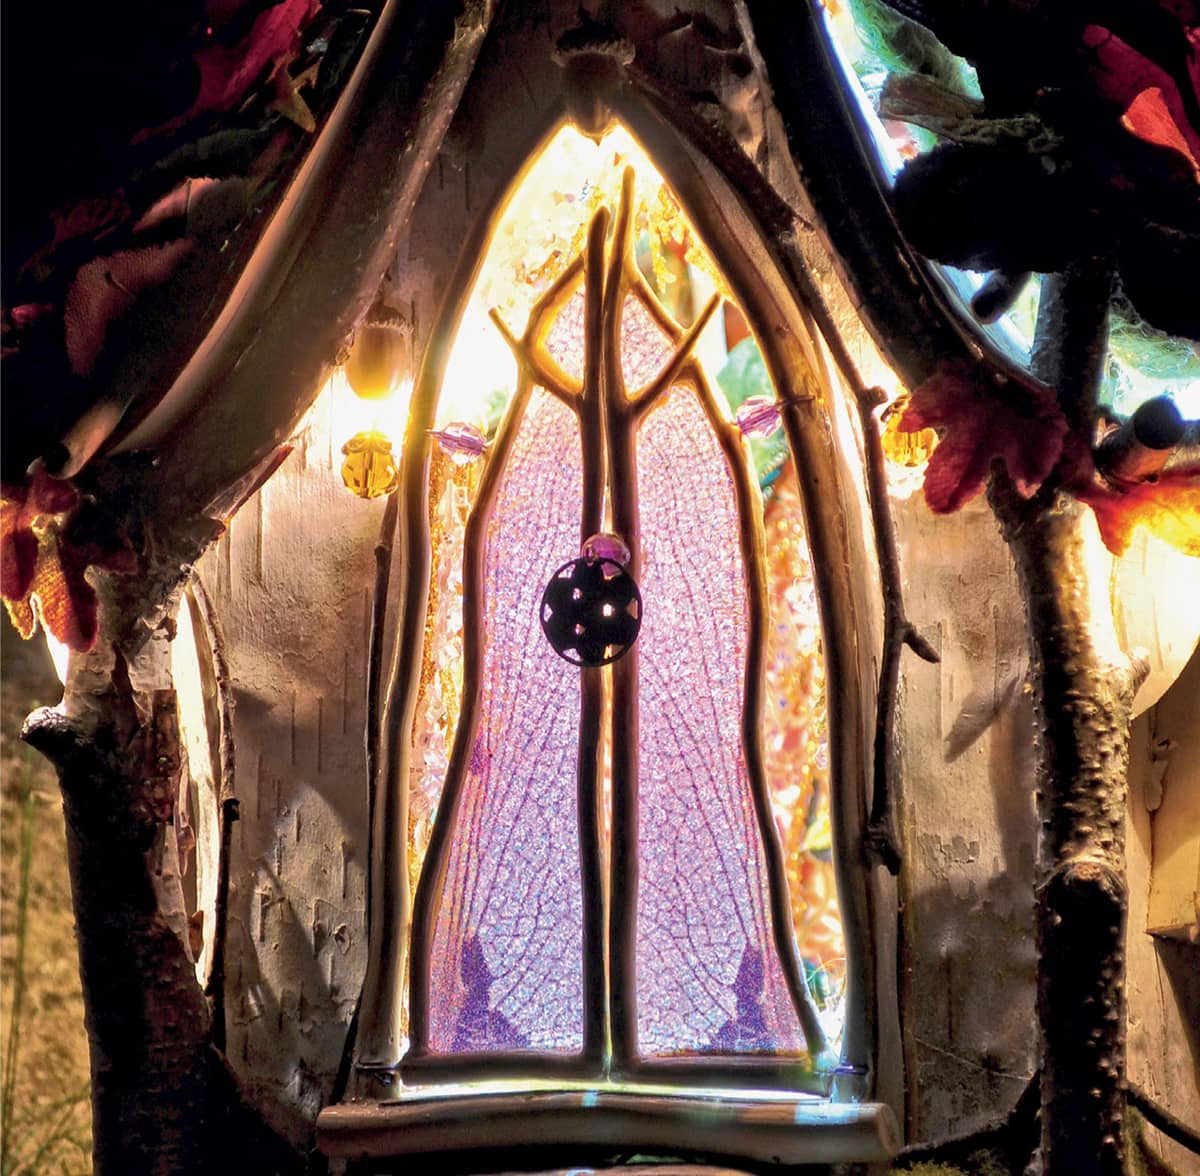
The enchanting quality of these “stained glass” doors is really seen at their best when twilight descends and the lights in the faerie house get switched on.
HOW TO BUILD A
TWIG-FRAMED FIXED DOOR WITH A SIMPLE SURROUND
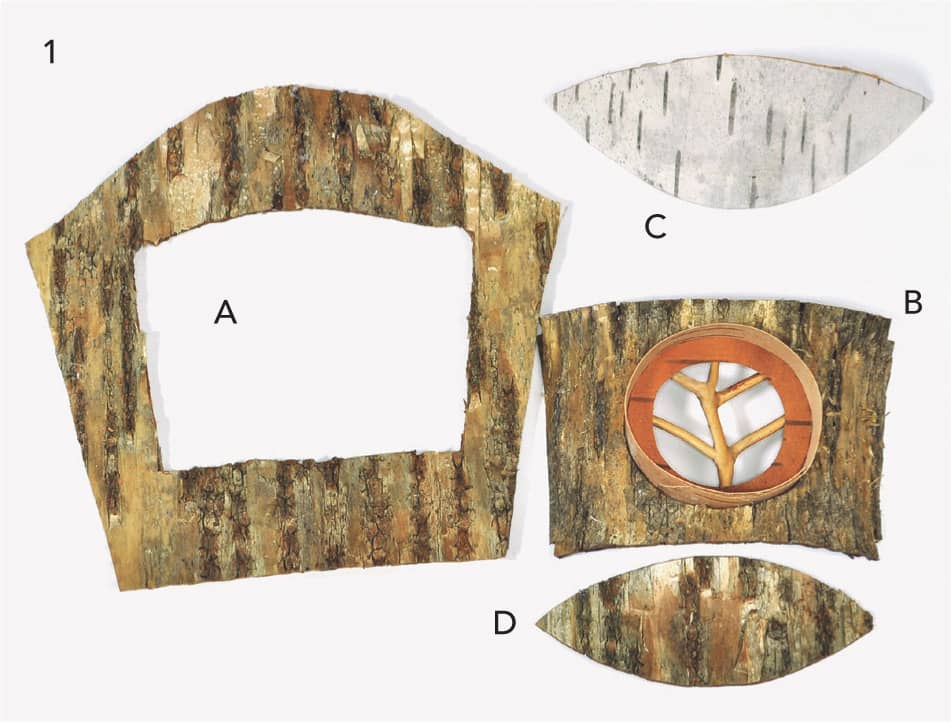
Whether your faerie house will have round walls or flat walls, it is easiest to make your door as part of a larger vestibule that you will then attach to the house. I like to let the materials guide the shape of the door, so to speak. We will eventually add this to our Green Dreams House (detailed in Chapter 6).
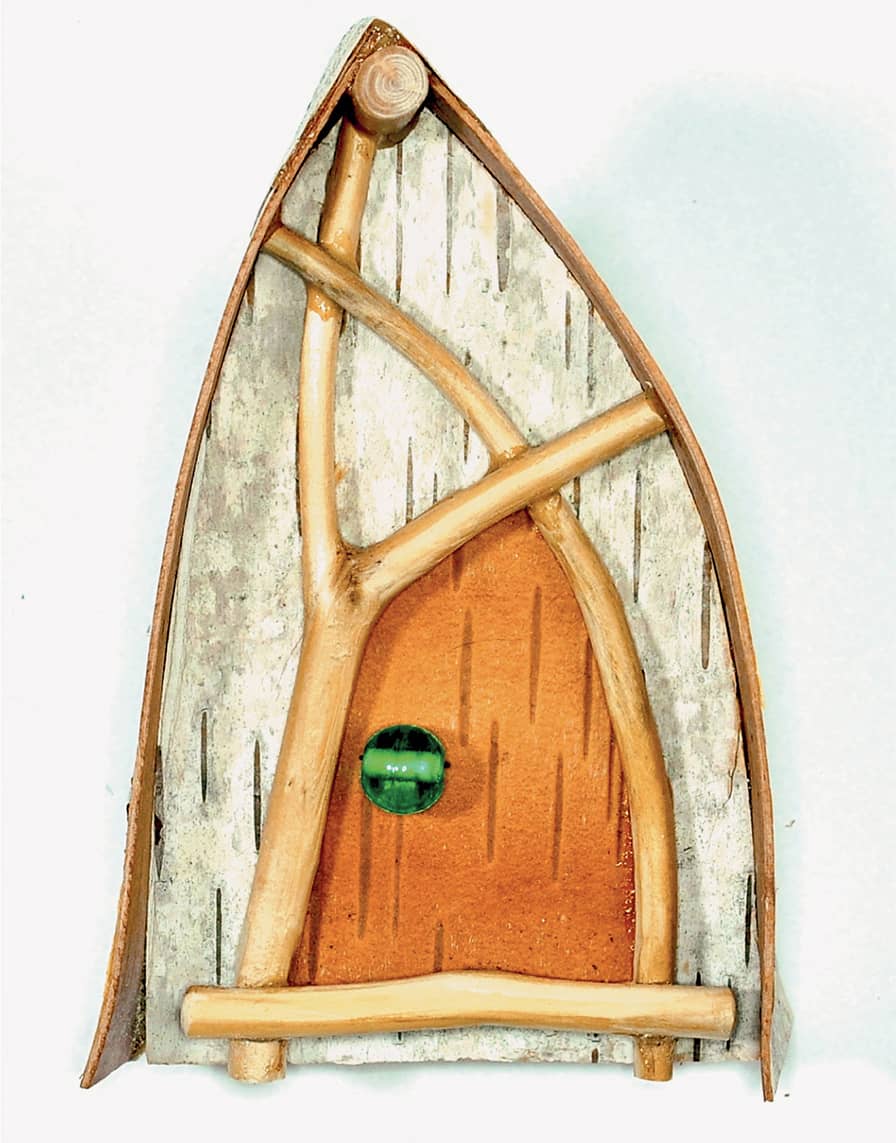
A fixed door in a vestibule.
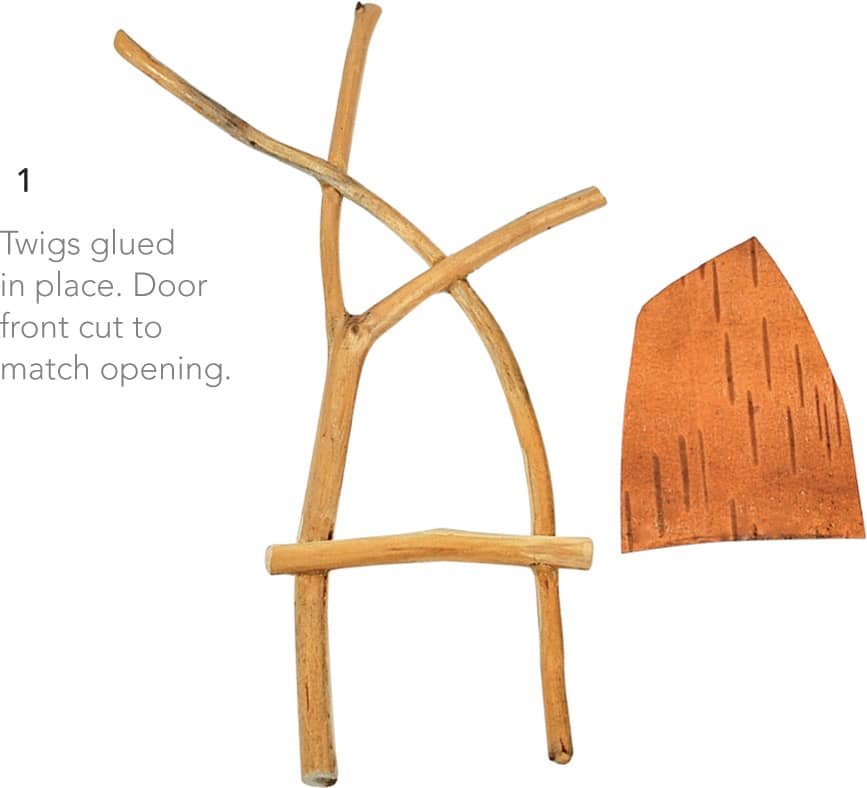
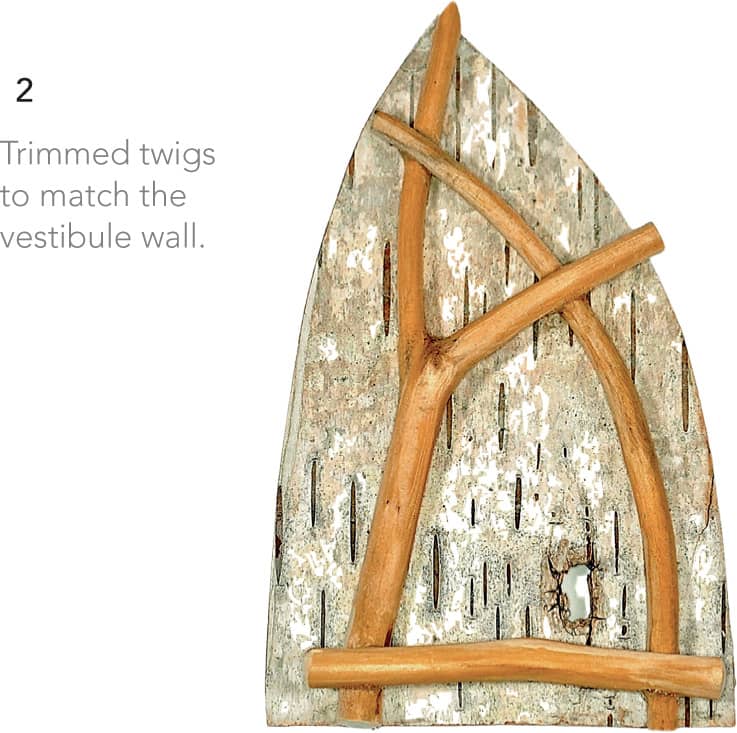
STEP 1
Lay out the twigs that will frame the door. Use overlapping and underlapping joints, if possible. Trim and carve the twigs Lincoln Log–style to get the twigs to lie as flat as possible. Use wood-colored epoxy to glue twigs together.
Cut a door from a contrasting piece of birch bark. Make the door a tiny bit larger than the opening in the frame. Do not attach yet.
STEP 2
Cut out the large flat piece of birch bark into an arched shape for the vestibule face wall. The arch can be symmetrical or asymmetrical, but it should extend a bit beyond all the glued joints of the twig frame. Using a fine-toothed flat saw, trim the ends of the twigs so that the frame now fits perfectly inside the vestibule wall panel.
STEP 3
Trim the piece of bark you’re using for the door front so that none of it shows beyond the frame edge and use epoxy glue to attach it to the twig frame. You can use tiny dots of hot glue to temporarily hold the door in the proper place within the frame while you apply the epoxy.

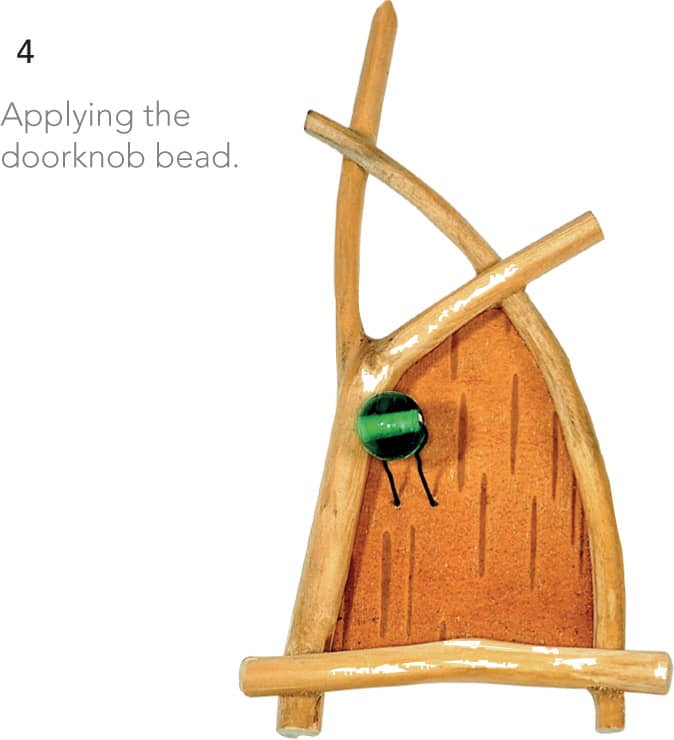
STEP 4
To attach the doorknob, run a thin wire through the bead and then bend it so the wire forms a horseshoe shape. Pierce a small hole in the door for each wire and insert the wires through the holes. Bend the wires flat on the back side of the door and epoxy-glue the wires down so the bead cannot be pulled out. You can use the same method for anchoring seeds, shells, jewelry findings, or any sort of item you want to use for a doorknob. Note: Be very careful doing this step because thin bark can tear easily.
STEP 5
Carefully center the frame on the wall and glue the door and frame assembly to the vestibule wall. Quickly remove any visible epoxy glue before it hardens.

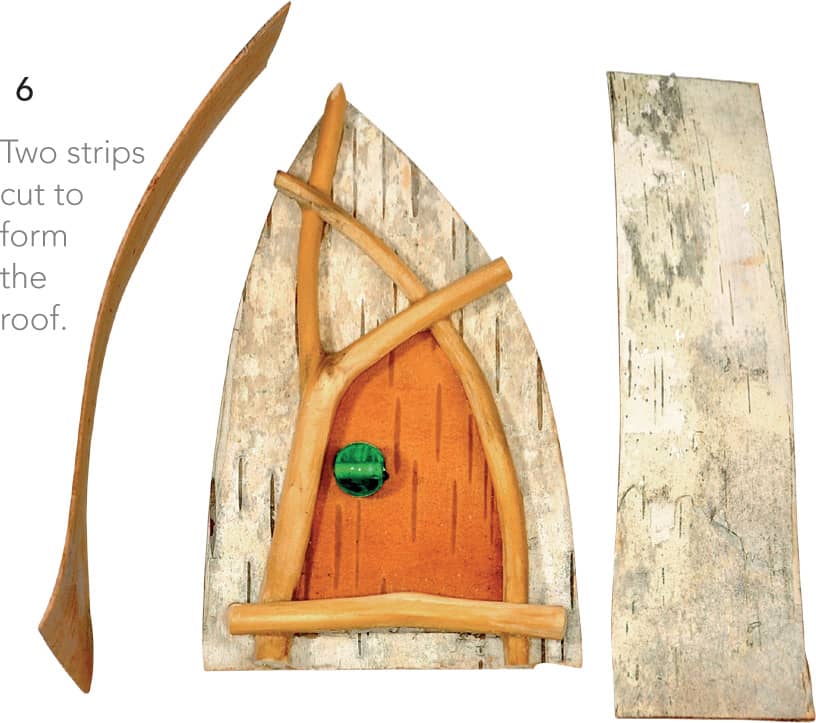
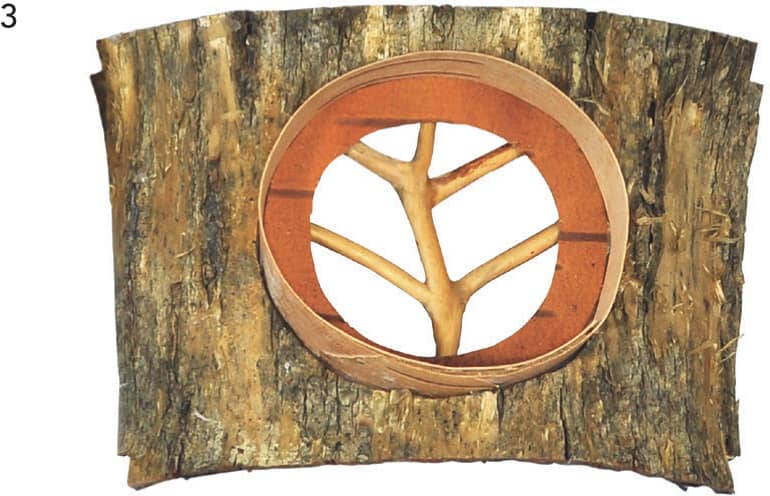
STEP 6
Cut two strips of birch bark that will form the arched roof of the vestibule. The strips should be the same width as each other and the lengths should match the length of the arched edge of the wall. You want bark that is fairly sturdy yet flexible enough to wrap smoothly along the side of the wall. If you have bark that is naturally curved already, this is ideal to use.
STEP 7
Glue the roof strips to the wall panel, positioning the wall panel along the center of the strip. Starting at the top of the arch, hold the strip of bark against the wall panel and apply three to five small drops of hot glue to hold the strip in place. Do not put the hot glue at the very beginning or at the very end of the strip. You want these joints to be filled only with the epoxy. Once the hot glue drops have set, fill in the entire back side of the joint with epoxy glue.
When the second strip is glued in place and is solid, fill in the apex of the arch on the back side with an extra bit of epoxy glue. Apply a thin bead of epoxy glue to the apex on the front side using a sharpened toothpick.
If you desire, cut a small section of extra twig and glue it on the inside of the front apex of the arch. This adds strength to that joint and hides the place where the two strips come together.
Congratulations, your door is finished!


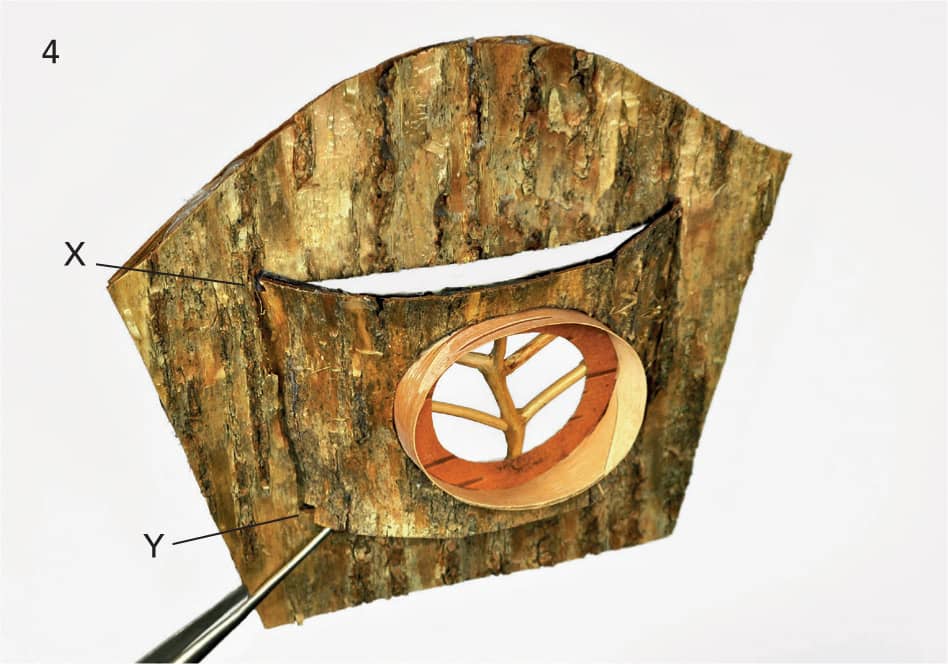
The finished door and vestibule with a peg at the apex of the arch.
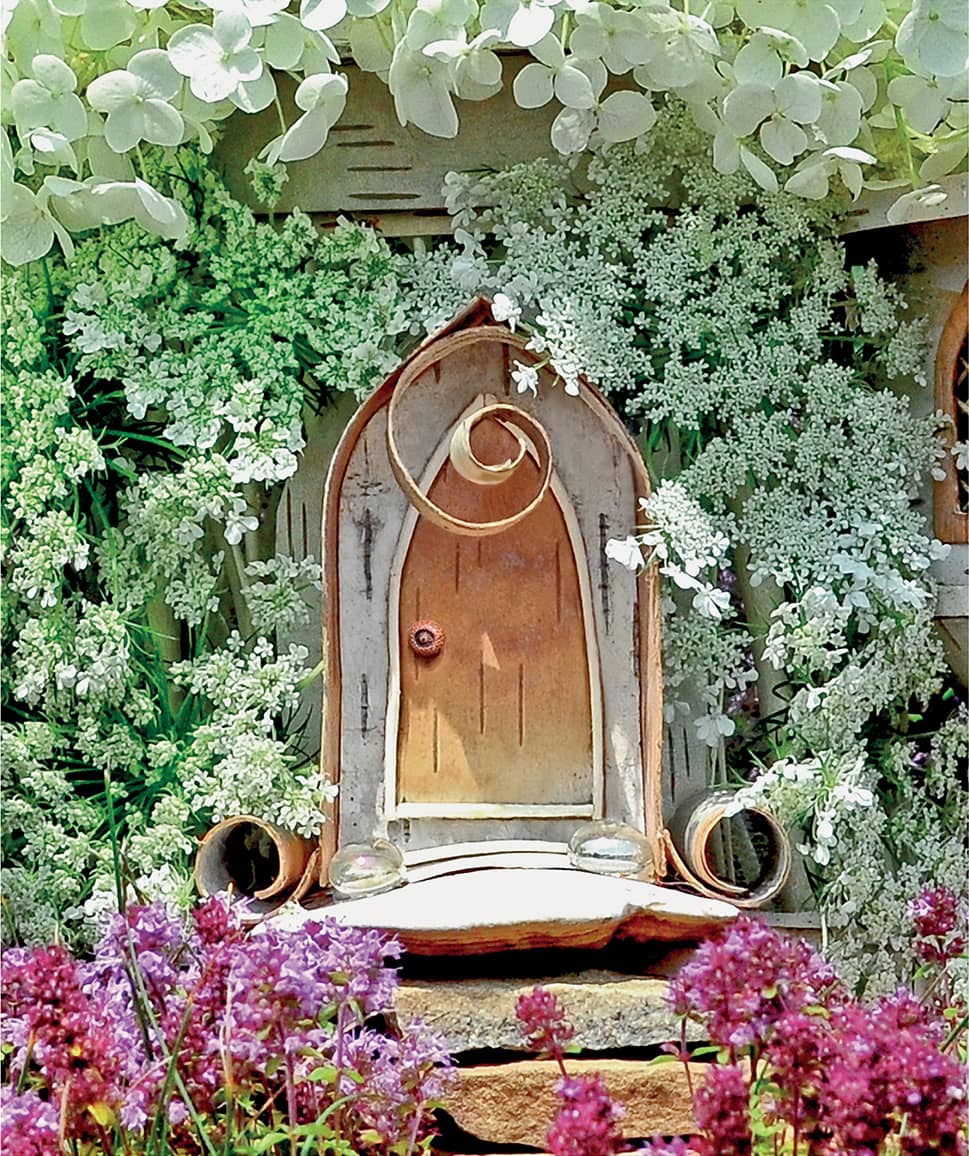
Here is an example of a door made using the same technique.
HOW TO BUILD A
HINGED DOOR IN AN ARCHED FRAME
The movement of hinged doors adds an extra bit of magic to faerie houses. This door will eventually find a home in our Golden Cottage house, built in Chapter 6. You can use the techniques presented in this tutorial to create other types of hinged doors.
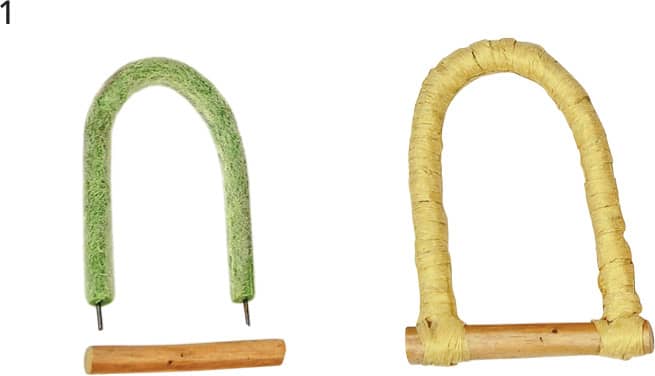
STEP 1
Make the door arch using the padded florist’s wire. Cut a small twig a little bit longer than the width of the bent arch. Glue the twig to the arch using epoxy glue. Wrap the entire arch structure with the raffia strands for a smooth, natural look. On the back side, secure the ends of the raffia carefully with epoxy glue.
STEP 2
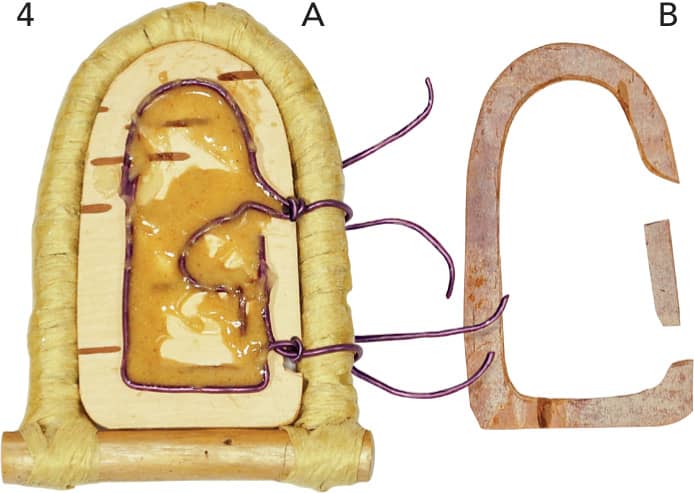
Trace the space within the arch frame on a piece of paper to make a template for cutting the birch bark. The door should rest within the frame but not be able to be pushed through the frame. Once you have the paper pattern for your door, cut out one piece of the dark brown bark (A) for the front of the door and a second piece of thin, light-colored birch bark for the back of the door (B). If your arch is not symmetrical, be careful to make sure that the back piece is the mirror of the door front. Cut a third piece out of slightly thicker bark for the inner middle layer (C). Once you have this middle layer piece cut out, trim a very tiny amount off all around the entire piece so that it is just barely smaller than the door front and back.

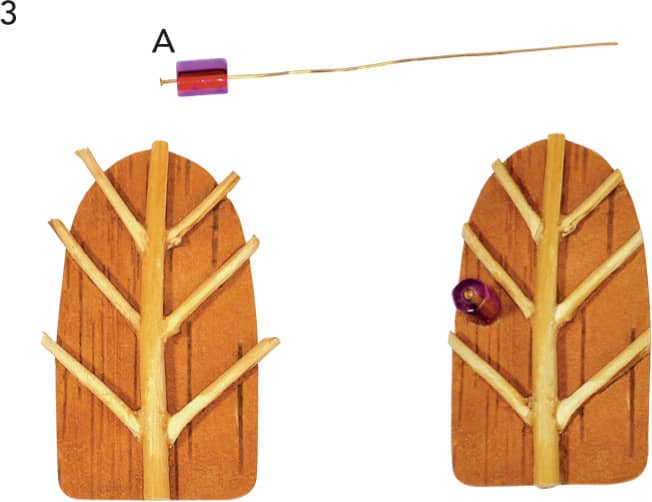
STEP 3
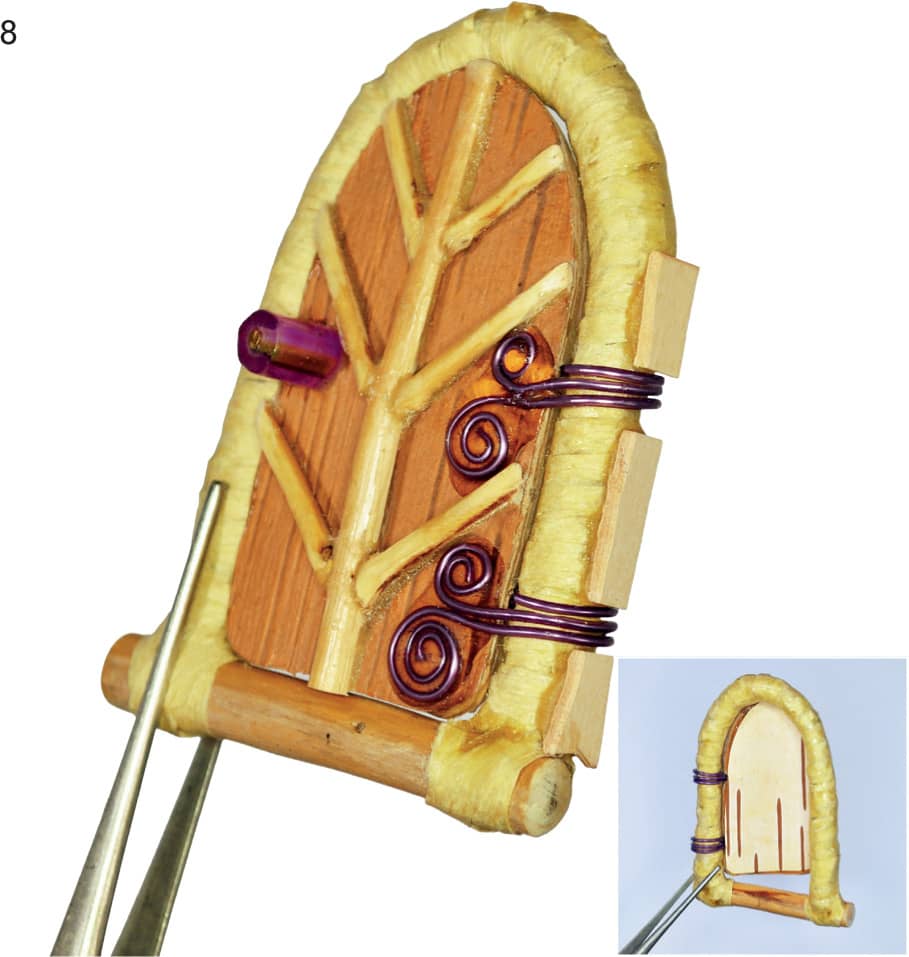
Carefully cut small twigs so that they fit together in a leaf vein pattern. The twig pattern, when laid out, should be larger than the door front. Using fine sandpaper, sand the twigs so they fit nicely on the vertical stem. Use tiny drops of wood-colored epoxy to attach the angled twigs onto the central stem.
Using small beads of wood-colored epoxy, attach the twig assembly to the front of the door making sure that the “stem” is flush with the bottom of the door front and that the small “branches” extend beyond the edge of the door. Let dry until the glue is firm. Prepare the doorknob bead (A) by inserting a jeweler’s head pin wire. Create a tiny hole in the door front and feed the wire through the hole, bend the wire over, and glue it down with epoxy.
STEP 4
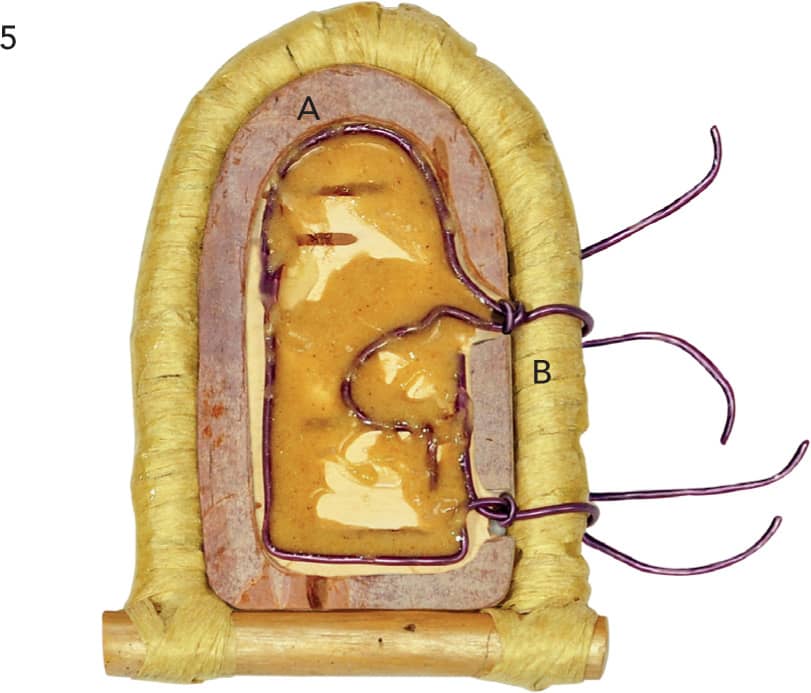
Place the thin birch bark door back (the part without the twigs) in the arch. Determine where the hinges should go and cut small notches for the wire. Cut small pieces of wire and bend as shown (A). Make sure that the wire is at least 3/16 inches away from all the edges of the door back. When you have the wires where you want them, use a thin amount of wood-colored epoxy to glue in place.
Cut out a narrow band of the trimmed middle layer, as shown (B). This will go around the outside of the wire that you just glued onto the door back. Cut an additional small vertical piece to go in the space between the hinges (Figure B).
STEP 5
Carefully glue the C-shaped piece of thick bark (A) onto the door back with epoxy glue. Also attach the small vertical piece that goes in between the hinges. (B) Be careful not to get any epoxy on the doorframe or in the hinges, as you can accidentally glue the door shut at this stage.
STEP 6
On the door front panel carefully cut and trim off the excess twigs so that the cut ends exactly match the edge of the brown door. Use fine sandpaper to finish these twig ends nicely.
Apply a generous amount of glue to the back of the brown door front and place that on top of the door back that is sitting within the door frame arch that was just completed in the previous step, again making sure no glue leaks out. The door will now move freely within the frame. Let the entire piece dry for at least 12 hours.
Once the door is completely hard and dry, carefully trim and sand the edge of the door so that it fits nicely within the arch frame.
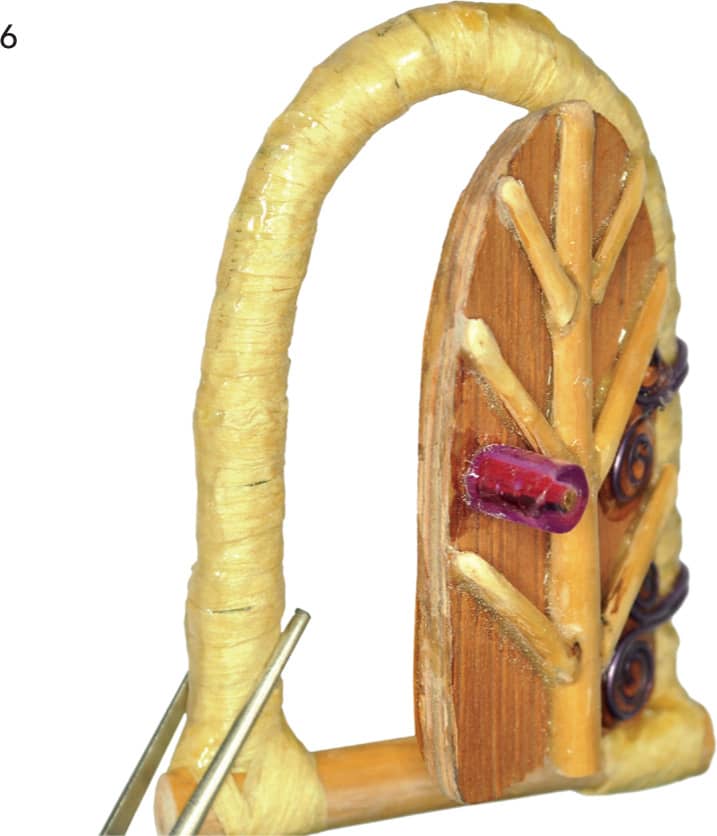
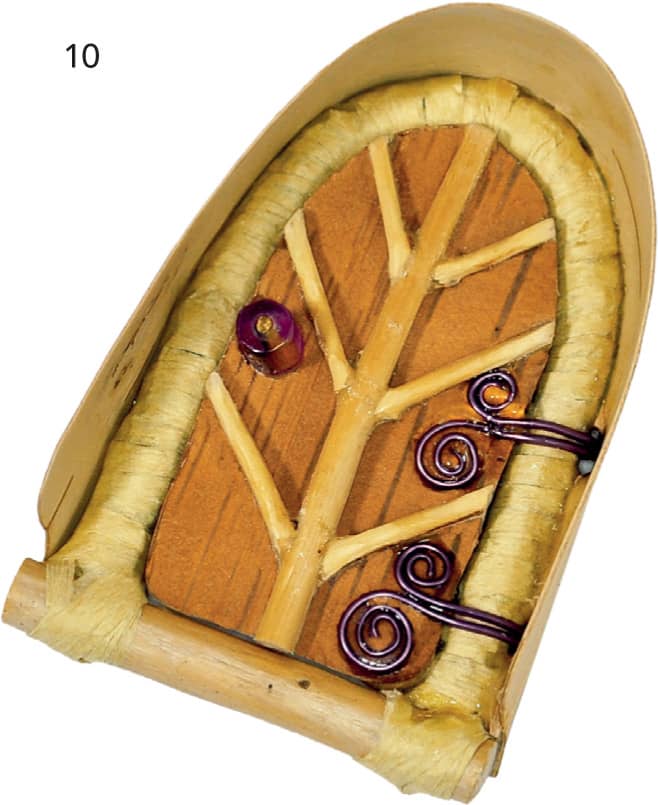
STEP 7
Push the door into the closed position and bring the two unused wires from each hinge forward around the door arch frame to the front of the door. With each wire, make a decorative spiral and lay flat on the door front. Mix up a small amount of clear epoxy glue and drop a couple of drops in the center of each spiral and work the glue outwards along the wires so that the whole spiral is now glued down. Lay the door flat until the glue is completely dry. Do not let any glue run into the hinge. Install spacers on the outside of the door arch. Make three tiny spacers (A) from the same thick bark that was used for the middle layer of the door.
STEP 8
Attach the spacers to the door arch in-between, above, and below the hinges. Use a thin application of wood-colored epoxy and make sure that all of the spacers lie flat in the same plane. The easiest way to do this is to press the arch against a flat surface briefly just before the glue starts to set up. Once again, be careful about not allowing any epoxy glue to get onto the hinges or they will no longer work properly.
STEP 9
Cut the strip of nice birch bark that you have left into an awning. Hold it up around the door to get the right shape.

STEP 10
Once the awning strip has been trimmed and shaped properly, use a thin amount of epoxy glue to attach the awning to the arch, again avoiding getting any glue on the hinges.
Congratulations! You have a finished hinged door.
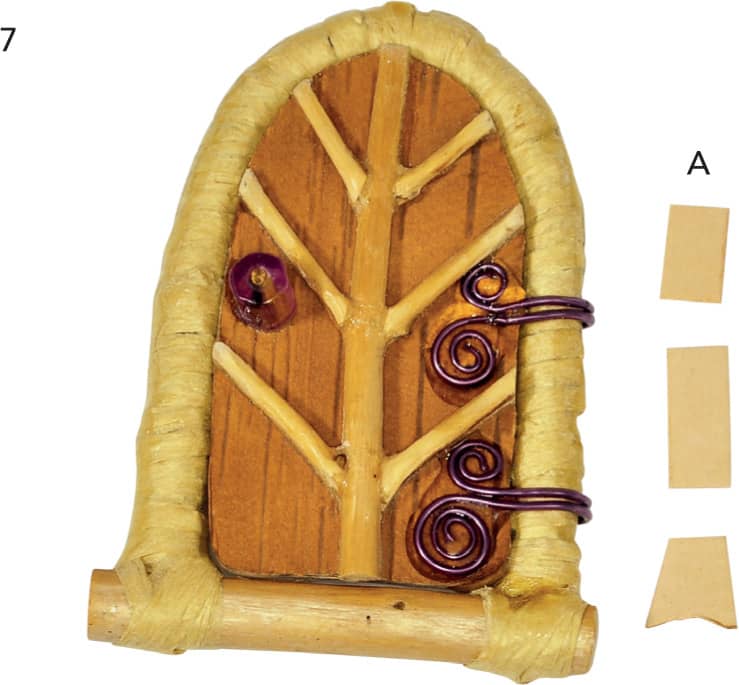
Here are some other examples of doors that were created using similar techniques. Note how there is an upright twig in each example to support the hinges. This works really well and is easy to make.
A simple hinged door.

This doorknob is an earring! Cut tiny channels in the upright supports for the hinge wires to ensure that the door does not slide down the twig over time and with use. Use a folded-over piece of fine sandpaper to make this groove if the twig is small and delicate.
A grapevine decoration is sewn to the door’s front panel before being glued onto the full door.
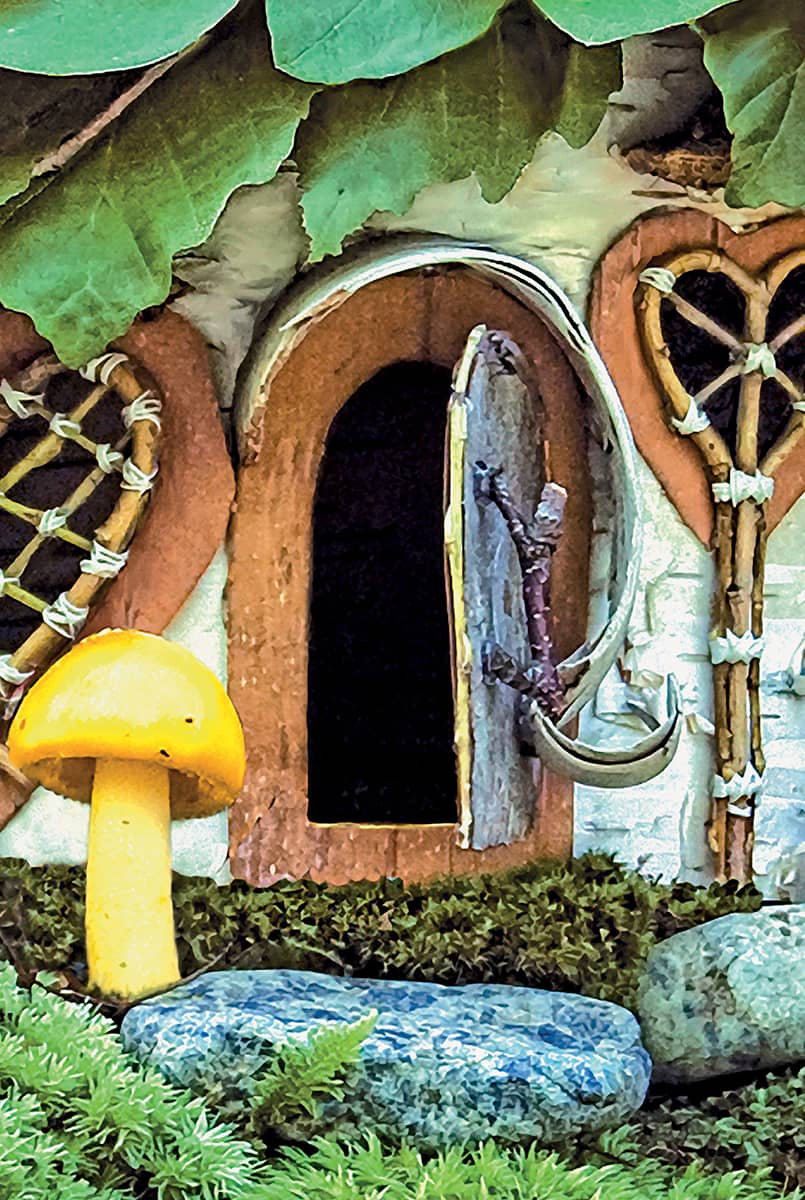
WINDOWS
In simplest terms, a window is an opening between the inner house and outer world. Other than the door, they are the most essential elements that add style and interest to the faerie house.
Once you know the basic configuration for your faerie house, it’s important to decide the best location for the windows. Make sure they’re in scale with the door and other basic aspects of the house. If you make your windows too small, they will be difficult to create. If the windows are too large, the walls of the house may become too flimsy.
Other things to think about include what you want for glazing material. (Cellophane films are available at craft stores.) Think about whether you want curtains and whether you’ll want to add lighting. Do you want to make simple yet charming windows, or do you want to make something extravagant with lots of detail?
If you’re going to have multiple windows, it’s best to use a similar design style for all of the windows so that the whole house has a pleasing and harmonious appearance.
GENERAL INSTRUCTIONS FOR BUILDING WINDOWS
1. Decide on the relative size and placement of windows for the house. I usually make paper patterns or templates for each separate window.
2. Cut the opening in the wall of the house to create the opening for the window.
3. Install the window either by applying a decorative frame with some sort of nice finish to the opening so that the raw cut edge is hidden from view or insert a complete window that has been fabricated ahead of time for the corresponding opening in the house.
4. Finish with a frame on the outside and/or inside to hide raw construction edges.
WINDOW STYLES
Because there are so many options for window designs and techniques, let’s break it down and examine different examples of the kinds of windows you might want to make for your house.
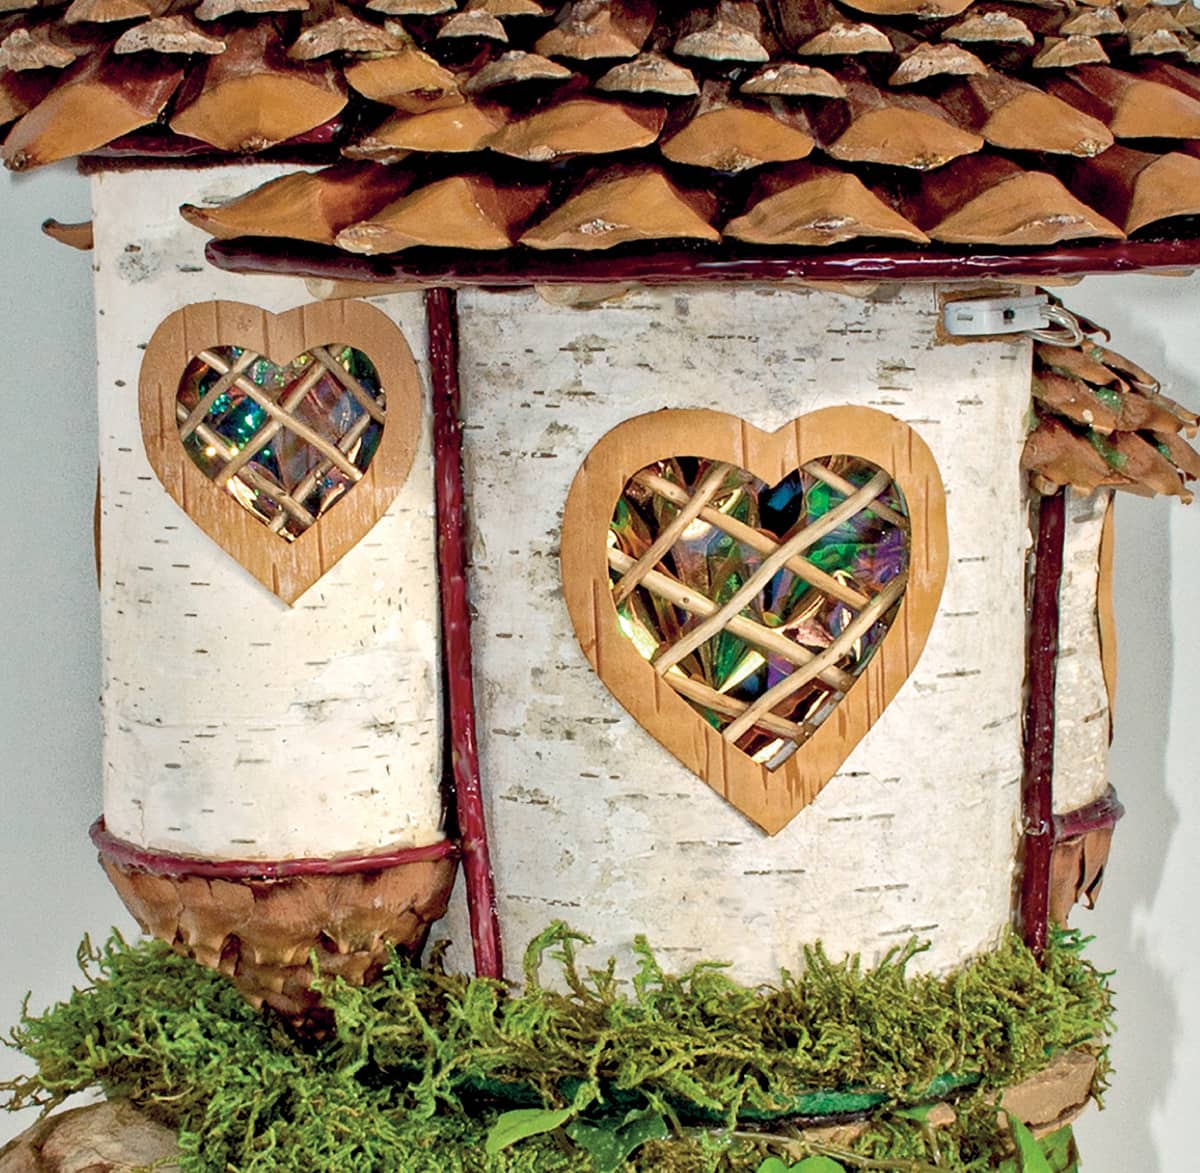
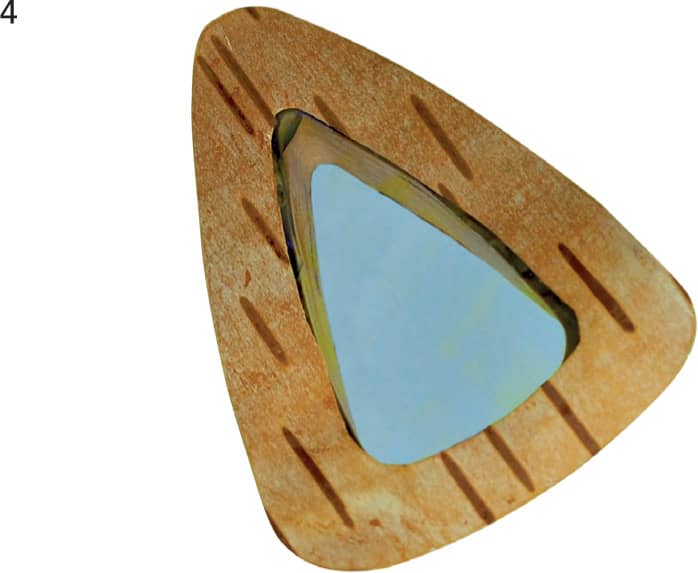
Flat-Frame Style Windows.
Flat-framed windows are the easiest to make and are a good place to begin. They can be round, oval, parabolic, arched, or any unusual shape you desire, as they’re usually just a simple opening cut in the wall with a simple frame to surround the opening. The trick to successfully making flat-framed windows is to ensure that the surrounding frame covers the edge of the cut window opening. Use twigs and other fine materials to add details to the windows and frames.
Here are some examples.
Flat-framed windows are great to make ahead of time in pairs or sets for adding to faerie houses you may want to make out in the wild. If you plan to leave your faerie house structure in the woods, then it is best to use non-toxic, non-plastic adhesives to construct your windows so that they will decompose as naturally as possible.

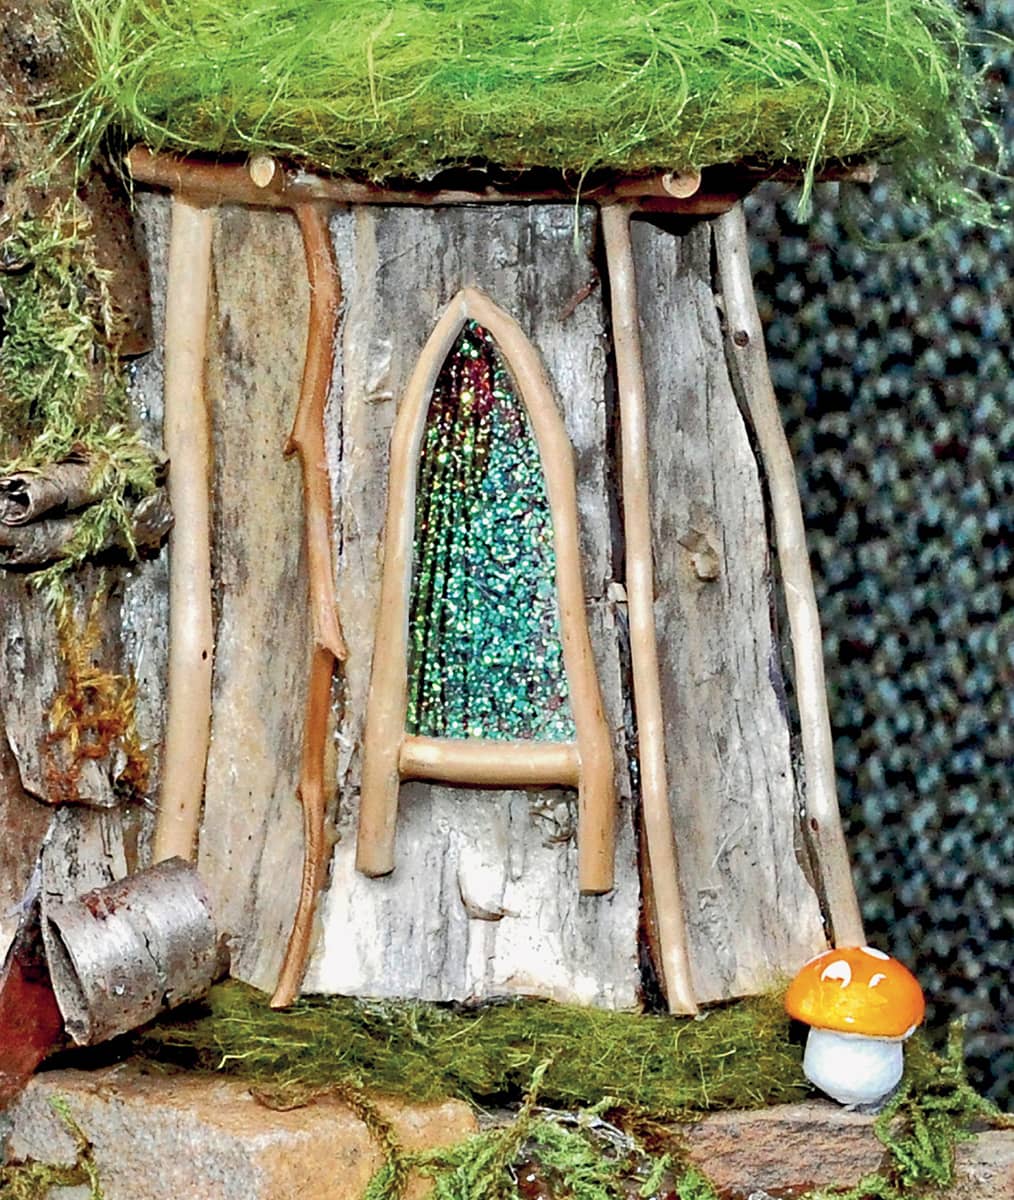
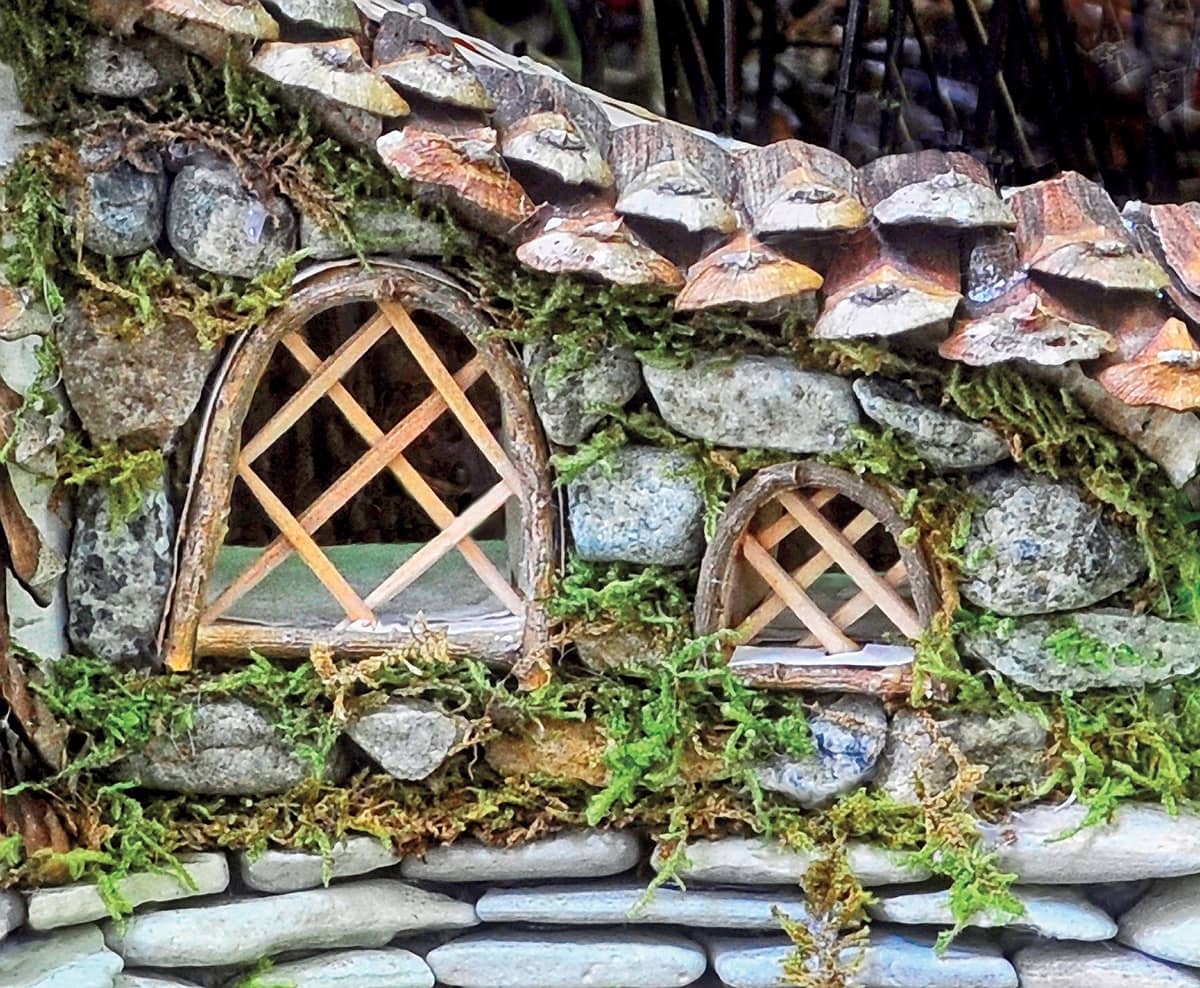
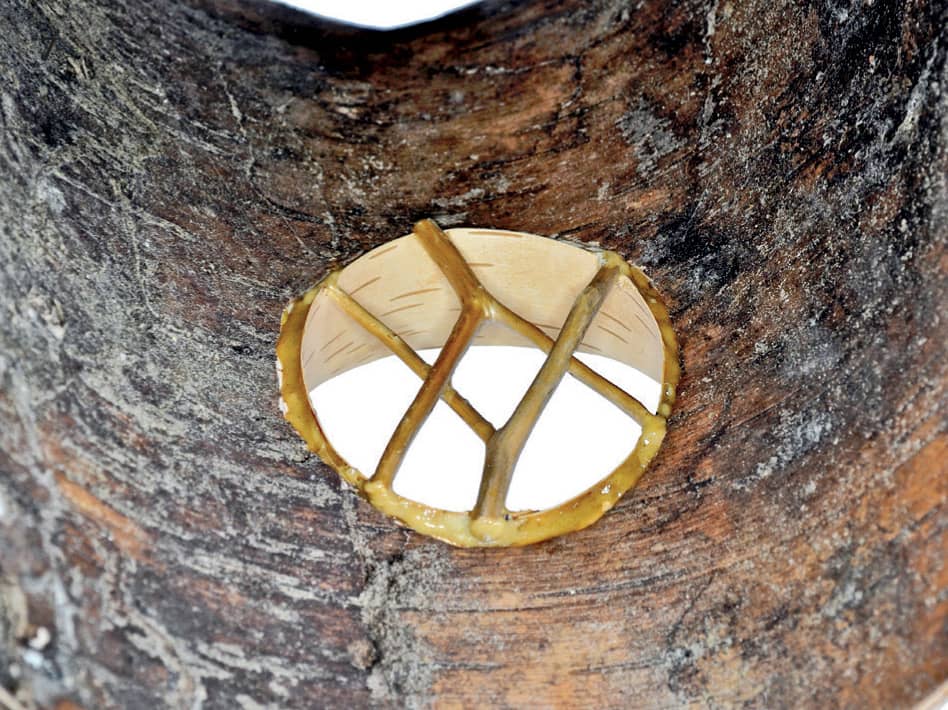
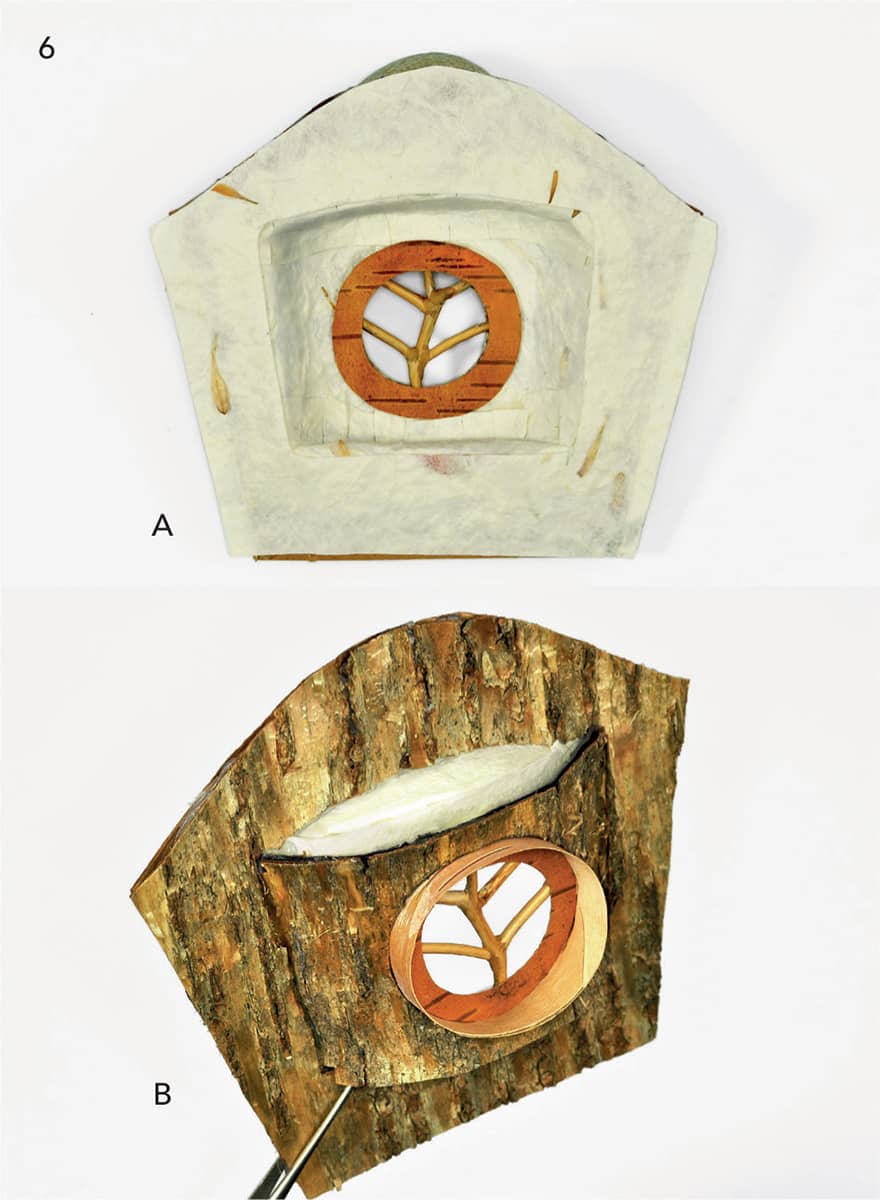
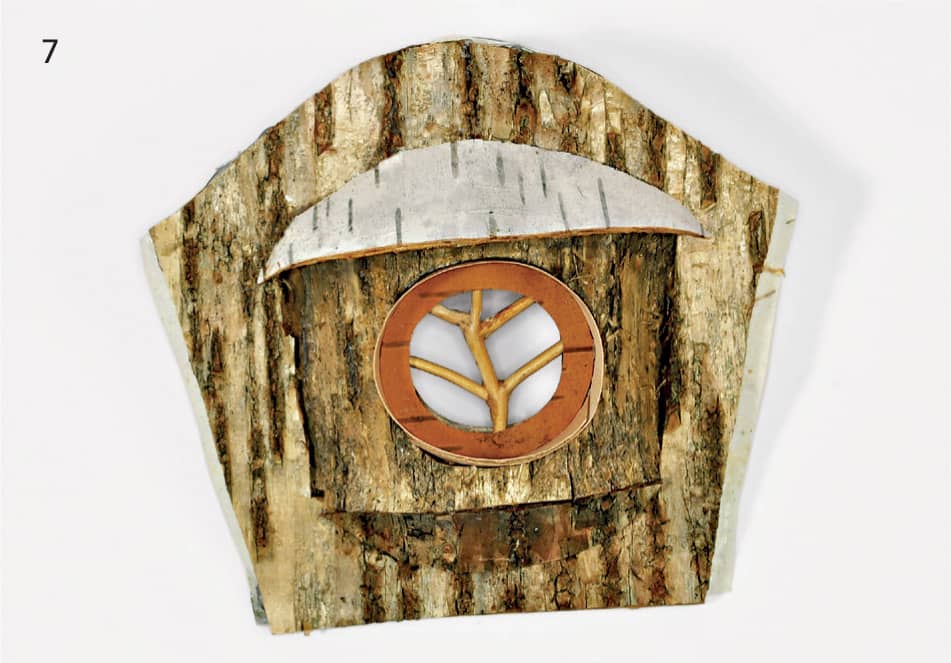
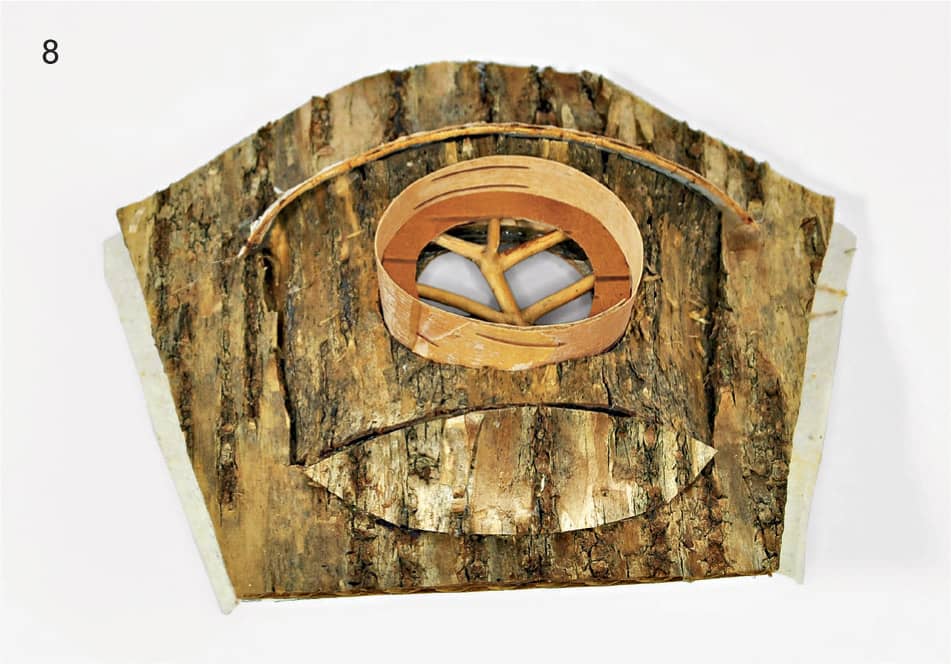
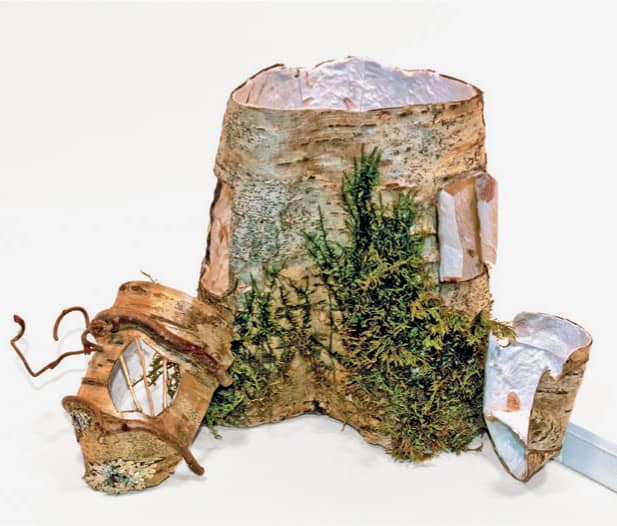
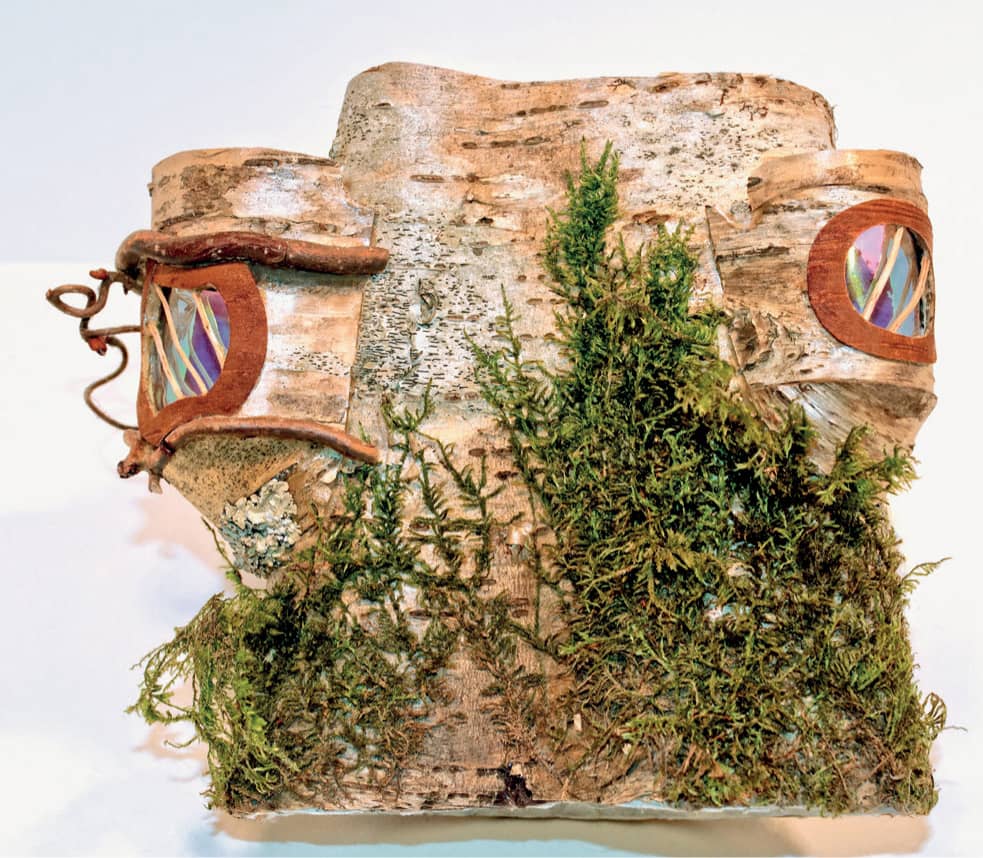
Twig-Framed Windows.
These windows are very similar to the flat-framed style except that rather than using flat bark to frame the window, you’ll use twigs, which determine the shape of the window. Always select your twigs first and make the window frame before cutting the window opening in the wall of the house. That way they will match.
Because twigs are generally straight or flat when laid on a surface, these windows are best suited for flat wall construction. Trying to make the twig frame go around a curved wall is difficult and not recommended unless you are skillful or have access to a lot of curved twigs.

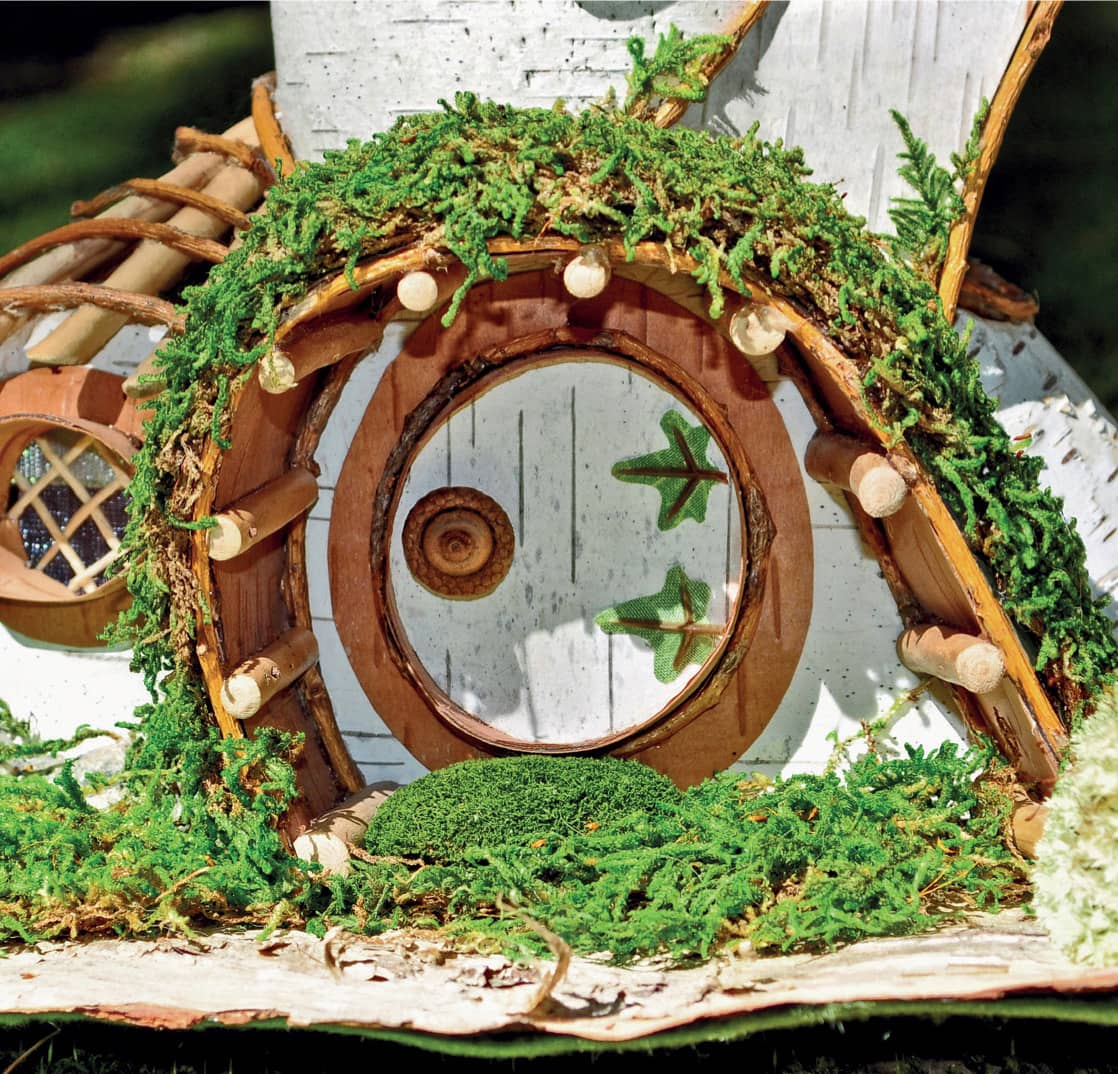
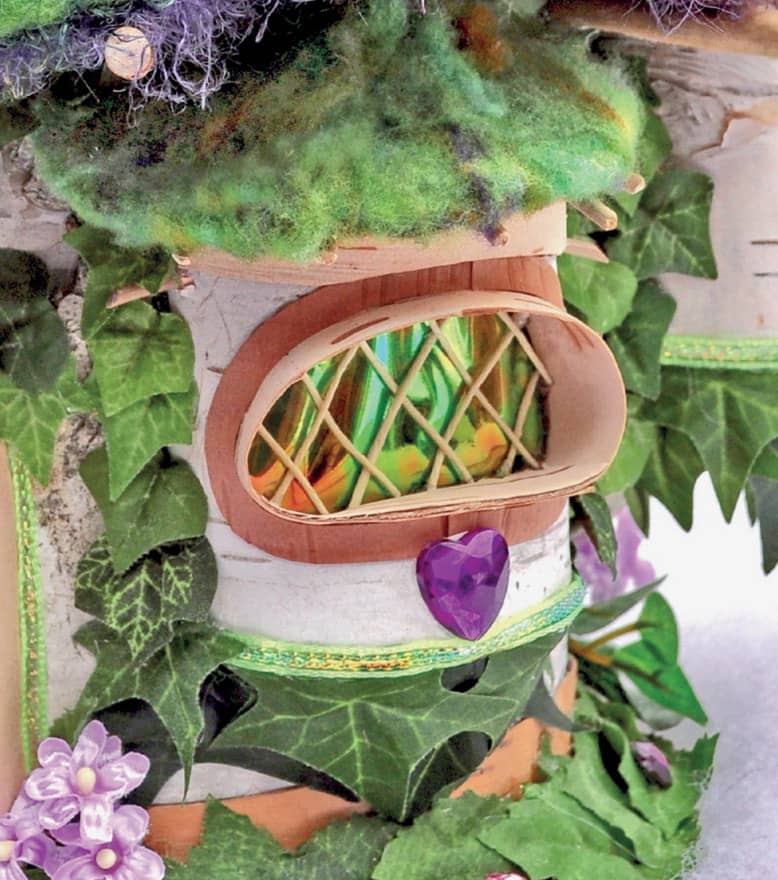
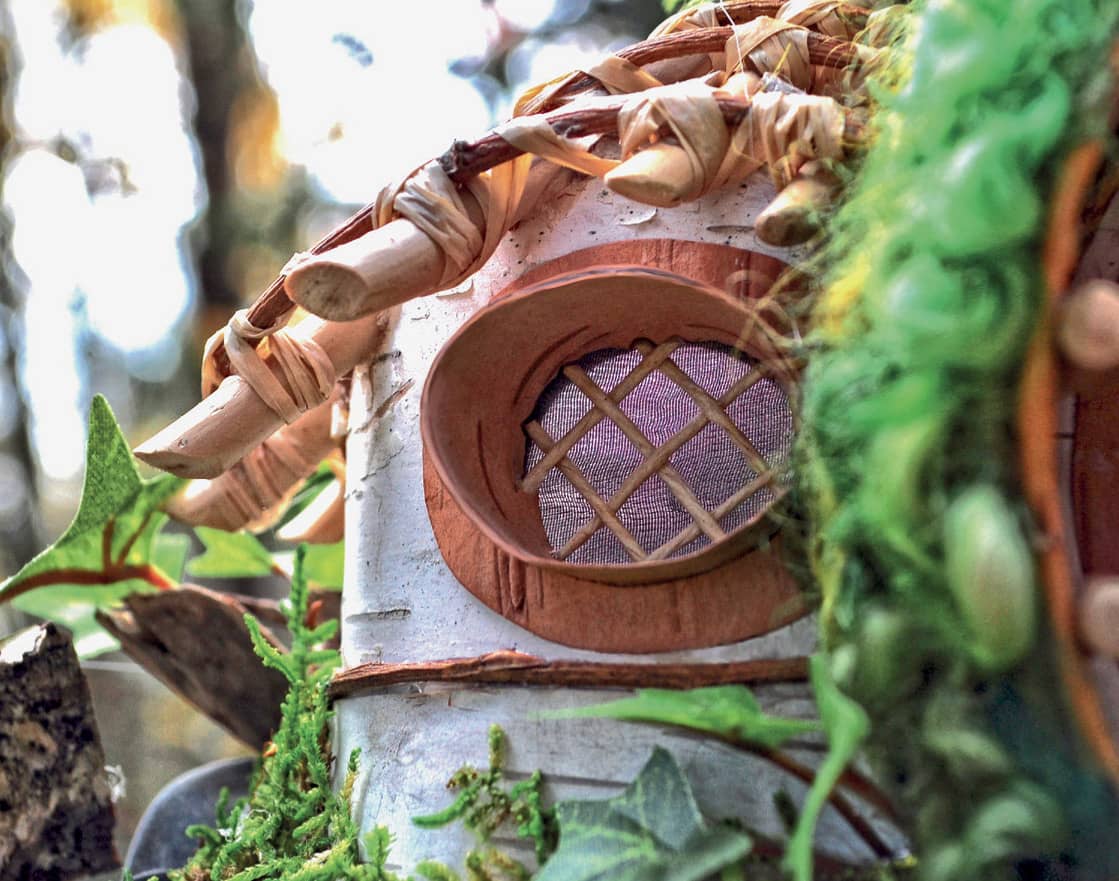
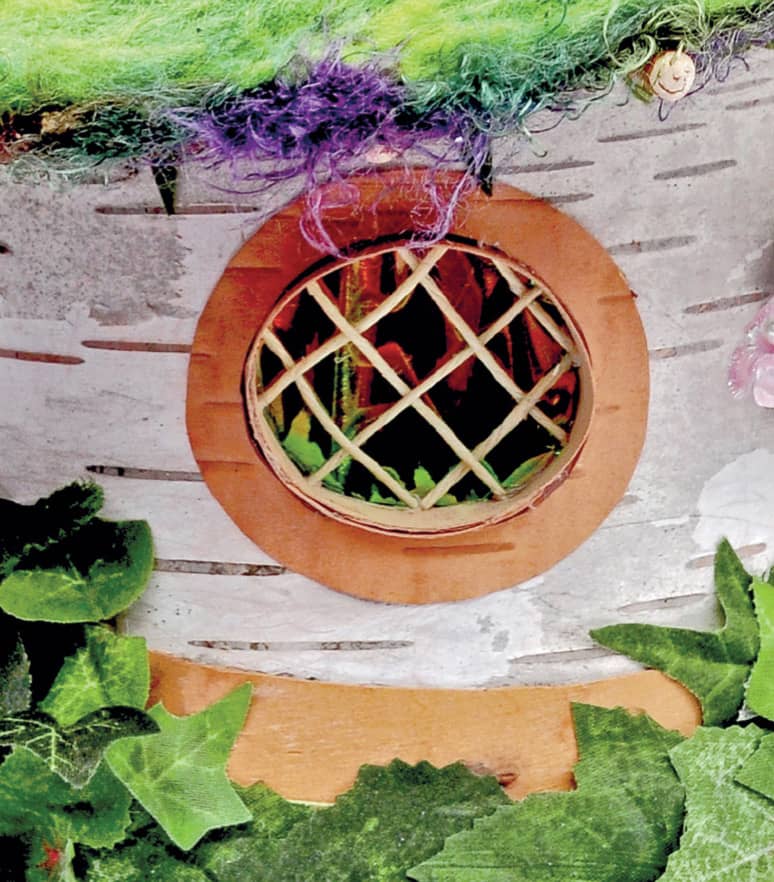
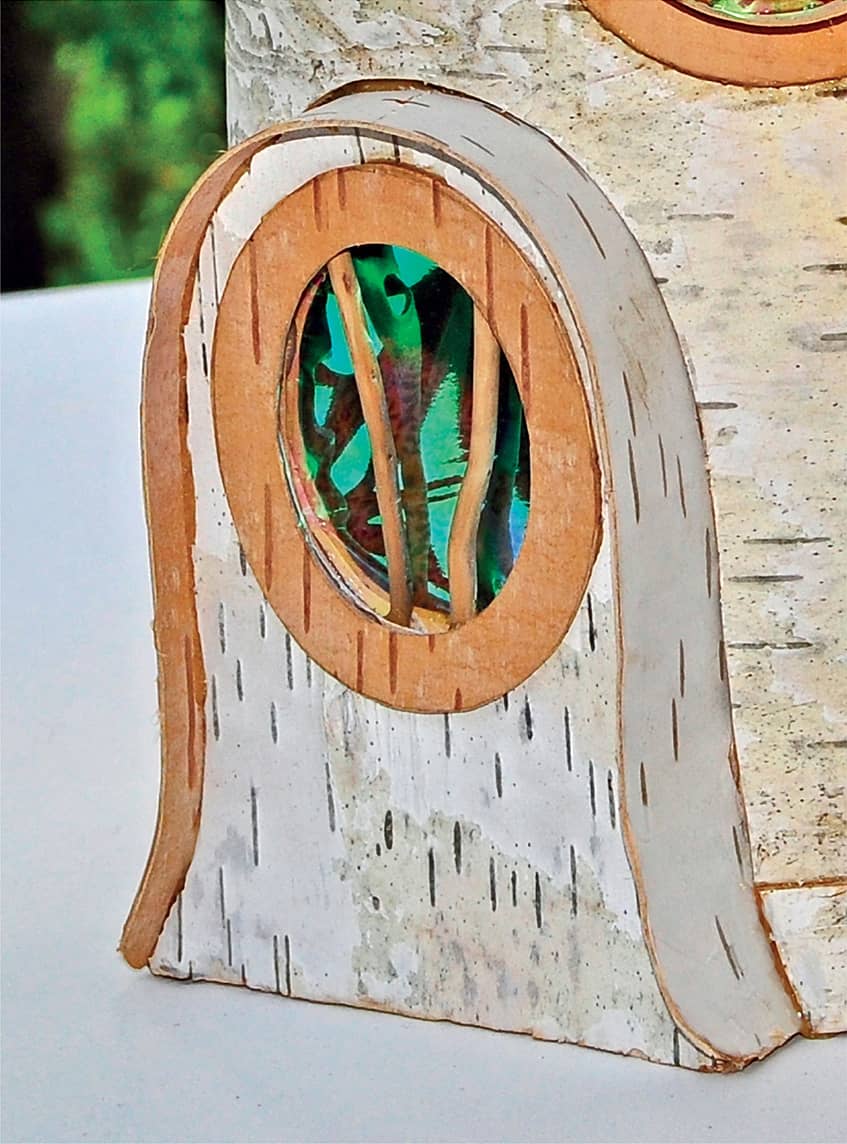
Porthole Windows.
Porthole windows are similar to flat-framed windows but have an additional strip of material that is used to line the opening of the window. This becomes an important element of the window construction and design. I use porthole window construction a lot because it is a great way to install a window in a curved surface. The porthole window usually sticks out a fair amount from the curved wall and offers a design element that looks a bit like an awning for the inserted window. This inner liner/awning then needs an outside frame, which is very similar to the first design style, the flat-framed window.
Porthole windows can have any sort of mullion or divider used to divide the interior space of the window just as with the flat-framed windows.
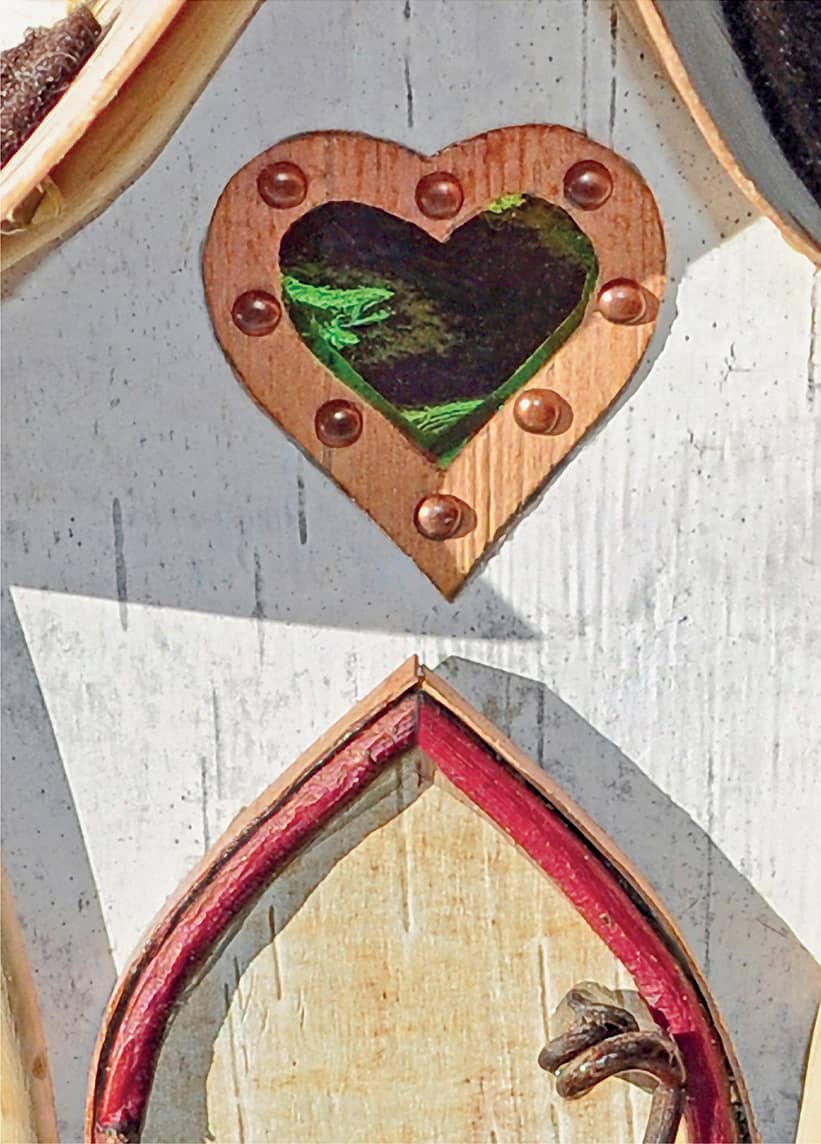
MULLION DETAILS
Mullions are the additional delicate elements within the frame of the windows that add style and interest. The important thing to keep in mind is to stay to scale and to make sure that whatever you use for mullions is firmly attached to the frame of the window on the inside. Here are some examples.

Latticework.
Latticework can be done with fine twigs, thin strips of birch bark, hemp, or linen twine. It is usually not necessary to actually weave the lattice together as this is too difficult for most of these small spaces.
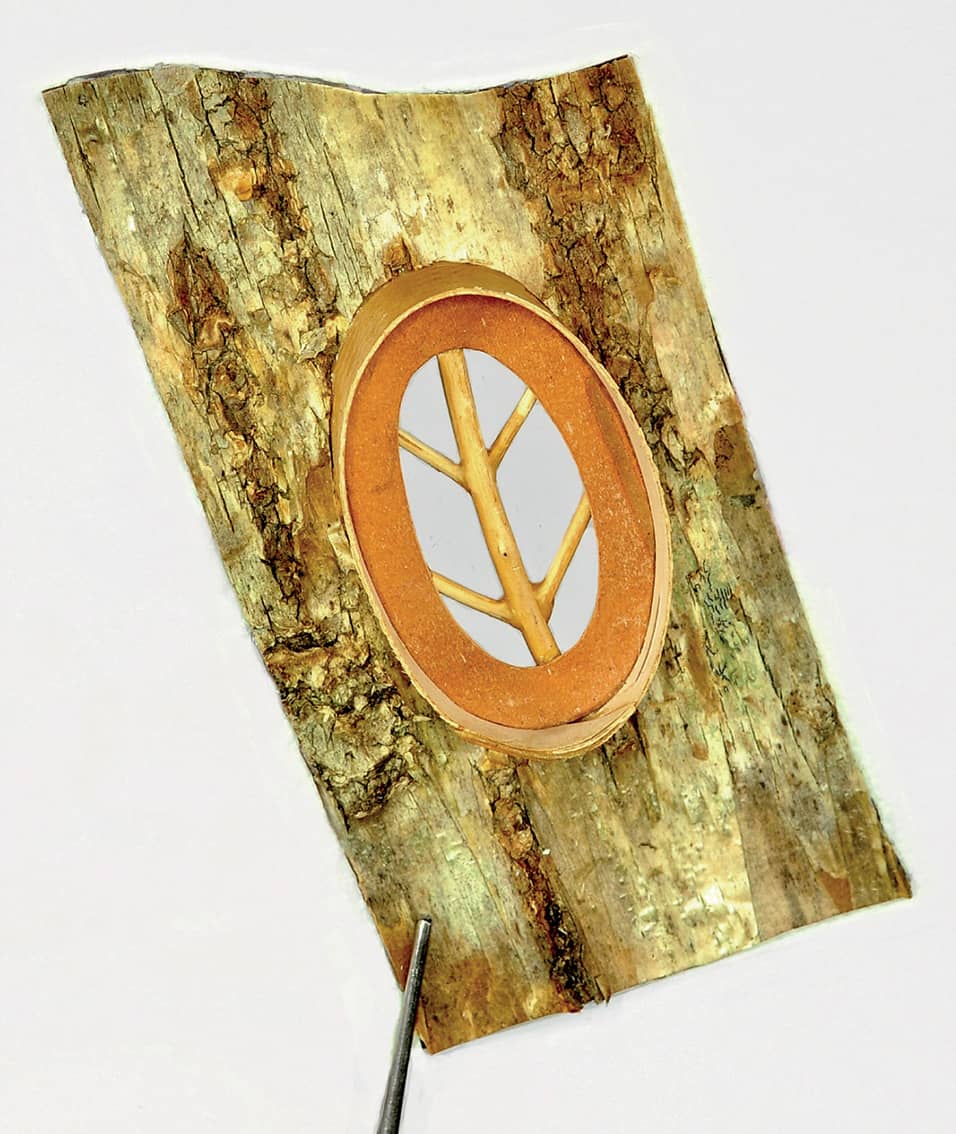
Unusual Mullion Examples.
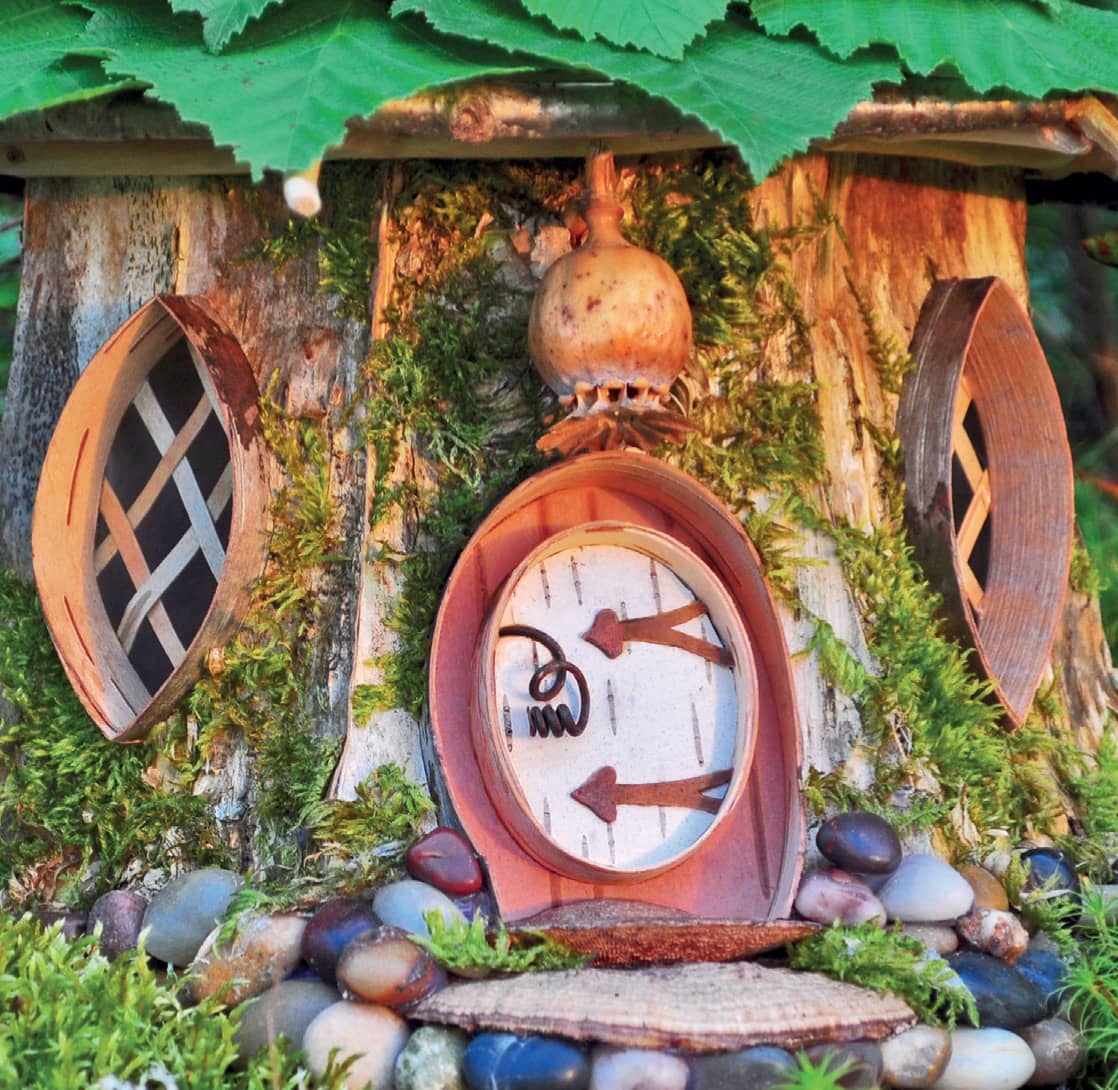
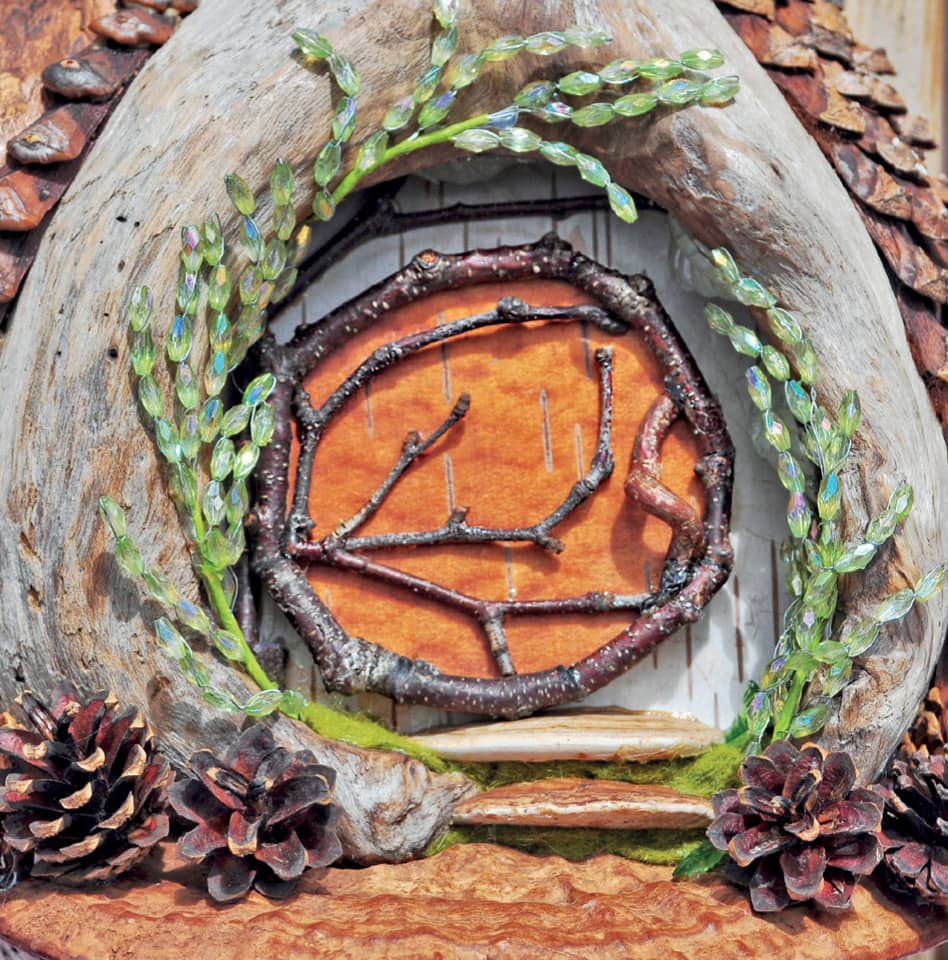
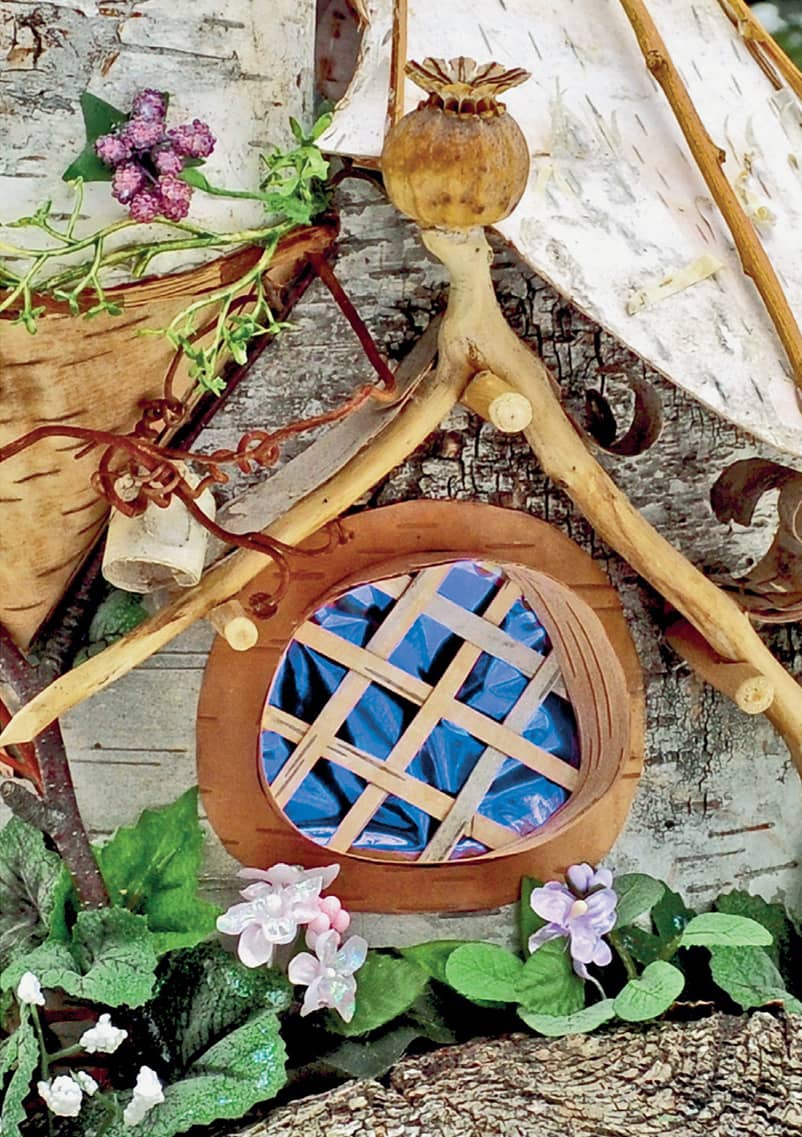
Unusual mullions can be made by creatively manipulating fine botanical materials. In this example, a single weeping willow branch was twisted upon itself several times to create the delicate mullion within the circular frame. Notice the freshly harvested hazel leaf draperies that I placed inside the window before setting the entire window assembly into the moss wall.
Twig mullions in a door window.
BAY WINDOWS
Add a bay window for extra interest. These are basically tiny half-rooms with a prominently featured window stuck onto the side wall of a house. Bay windows are generally curved and need a roof and some sort of support to attach the rounded space to the main house. Bay windows bulge out from a wall with brackets or corbel supports below the window to anchor it to the main house. Let’s look at some.

WINDOWS IN STONE HOUSES
Stone-walled faerie houses are always magical, but without windows and doors they look more like fortifications. Adding a door vestibule and windows to the stone portions of a tiny house make the whole structure more inviting and interesting. However, if you are building a dry-laid house outdoors, without mortar, then you must be very careful to make sure your wall will not become weak by opening it up for a window. In such cases, a single window (below) may be a better option.

Windows that will be incorporated into stone structures are made separately and added to the walls as they are raised.
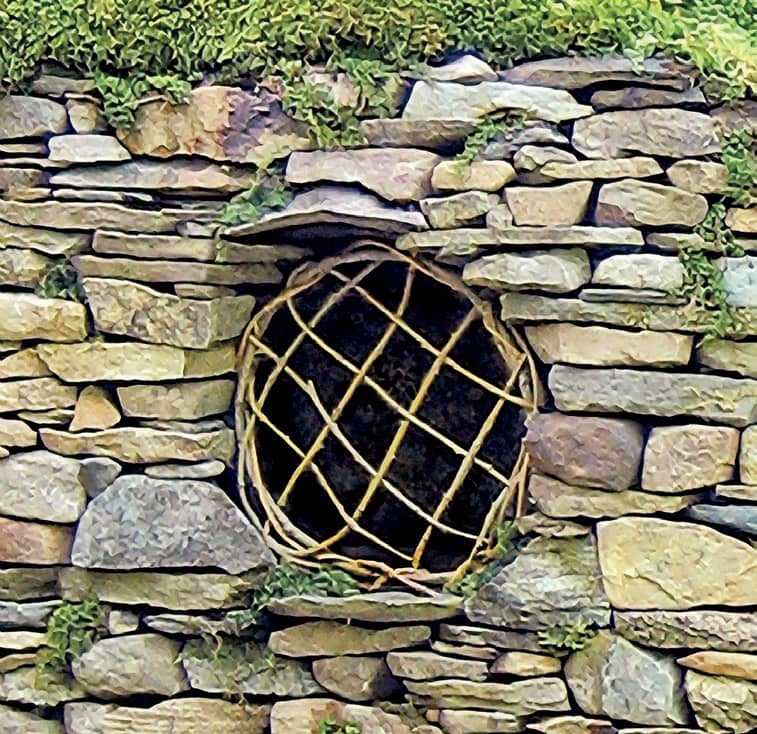
It is best to use minimal to no glue in windows for stone houses that will be left to weather the elements. This window is made from several green braches from a nearby weeping willow tree.

I made the door and windows for this house in the studio using eco-glue and then brought them to the site where the house was built.
These arch-shaped windows were made ahead of time and then placed in the wall as it was being built. Each window assembly consists of the curved twig (that was bent and dried months before), a matching straight sill twig that has been glued to the arch, a lattice of toothpicks, and sturdy birch bark liners that match the arch and project back into the full thickness of the walls. I used toothpicks so that the delicate open fronts would be strong and keep their shape under the weight of the stones above.
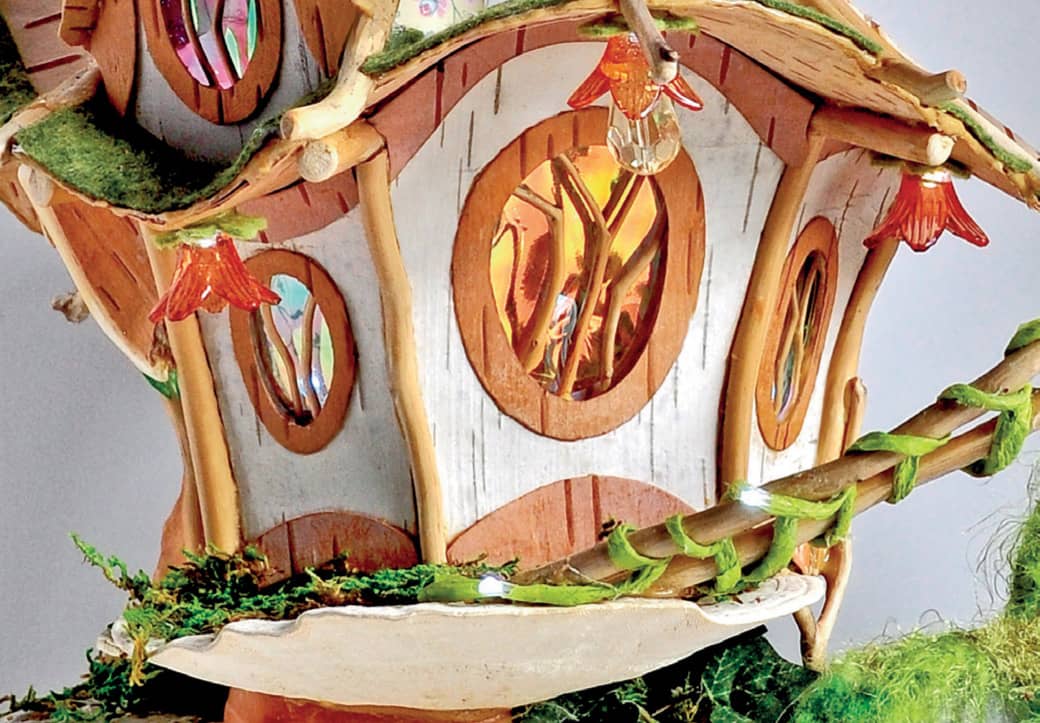
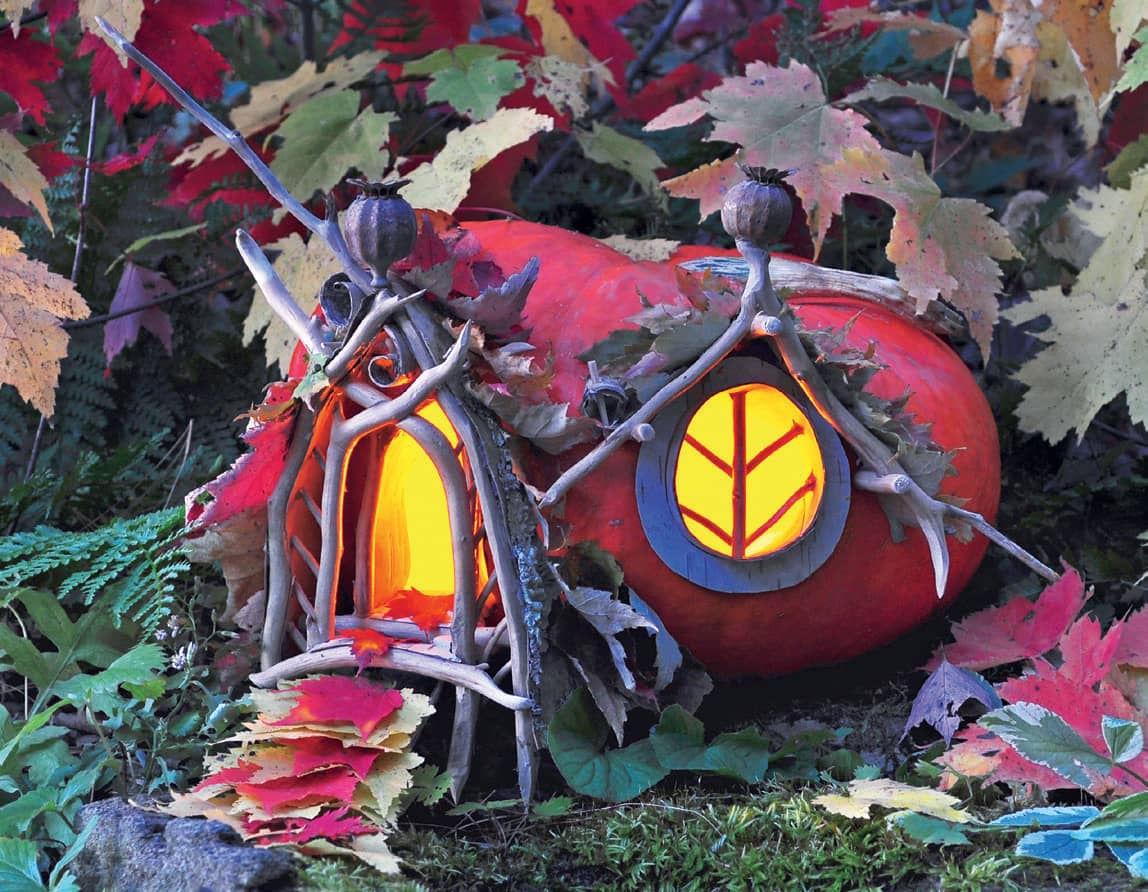
WINDOWS WITH LIGHTING
Windows are especially enchanting if your house has lighting built into the structure. You can light the faerie house by installing small, battery-powered lights.
A single battery-powered tea light makes this house glow.
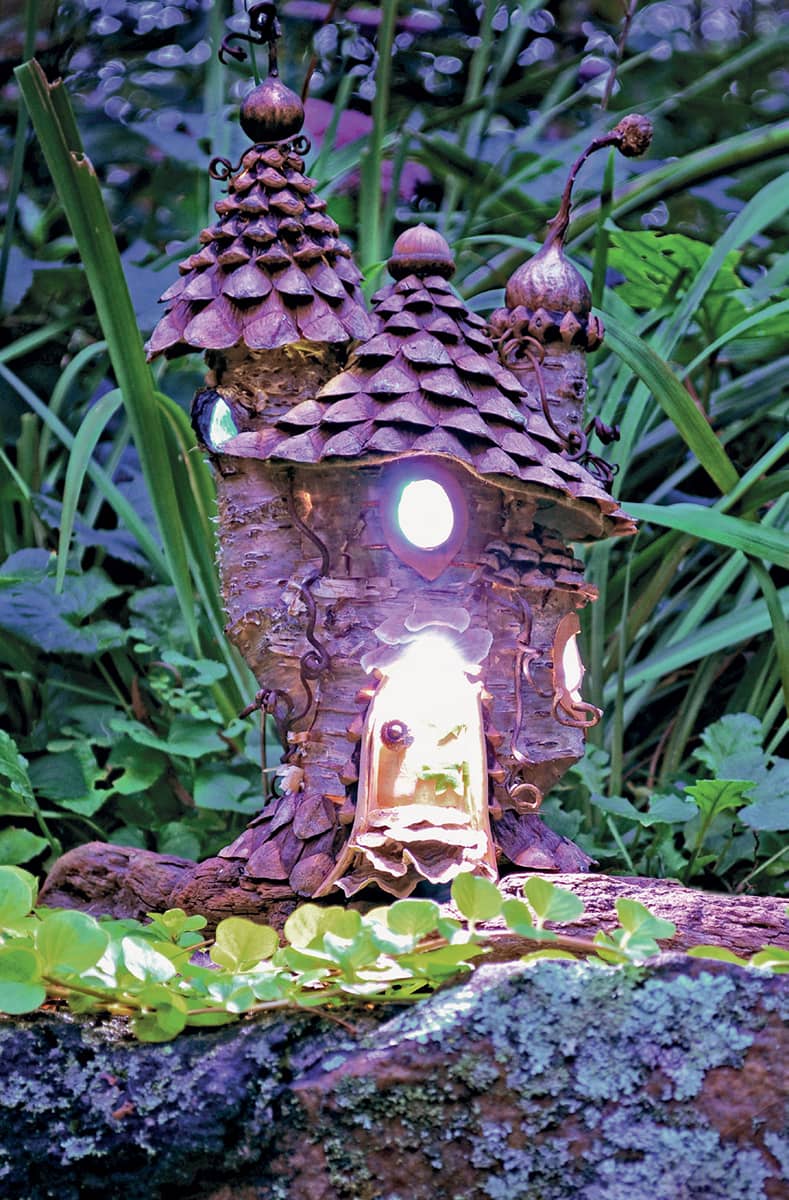
Micro LED lights illuminate this house.
Sometimes lighting is configured so both the inside and the outside of the house are illuminated using a single strand of lights.
Windows are one of the biggest design features on a faerie house. Start out with the simpler styles and get used to how they are made. Then let your skills grow along with your imagination as you tackle more elaborate and challenging designs.
In the tutorials that follow, I will show you some basic and simple techniques to give you a good start in seeing how these little elements are fabricated. Some of the windows demonstrated in these tutorials will be used later in Chapter 6.

HOW TO MAKE A
FLAT-FRAMED WINDOW
Flat-framed windows are some of the easiest window styles to make, and they can be made in almost any shape that you wish. For this tutorial, we will make a triangular window for a round-walled house that will eventually end up in our Green Dreams House, detailed in Chapter 6. However, you can use these techniques to make any framed window for a flat- or curved-wall house.
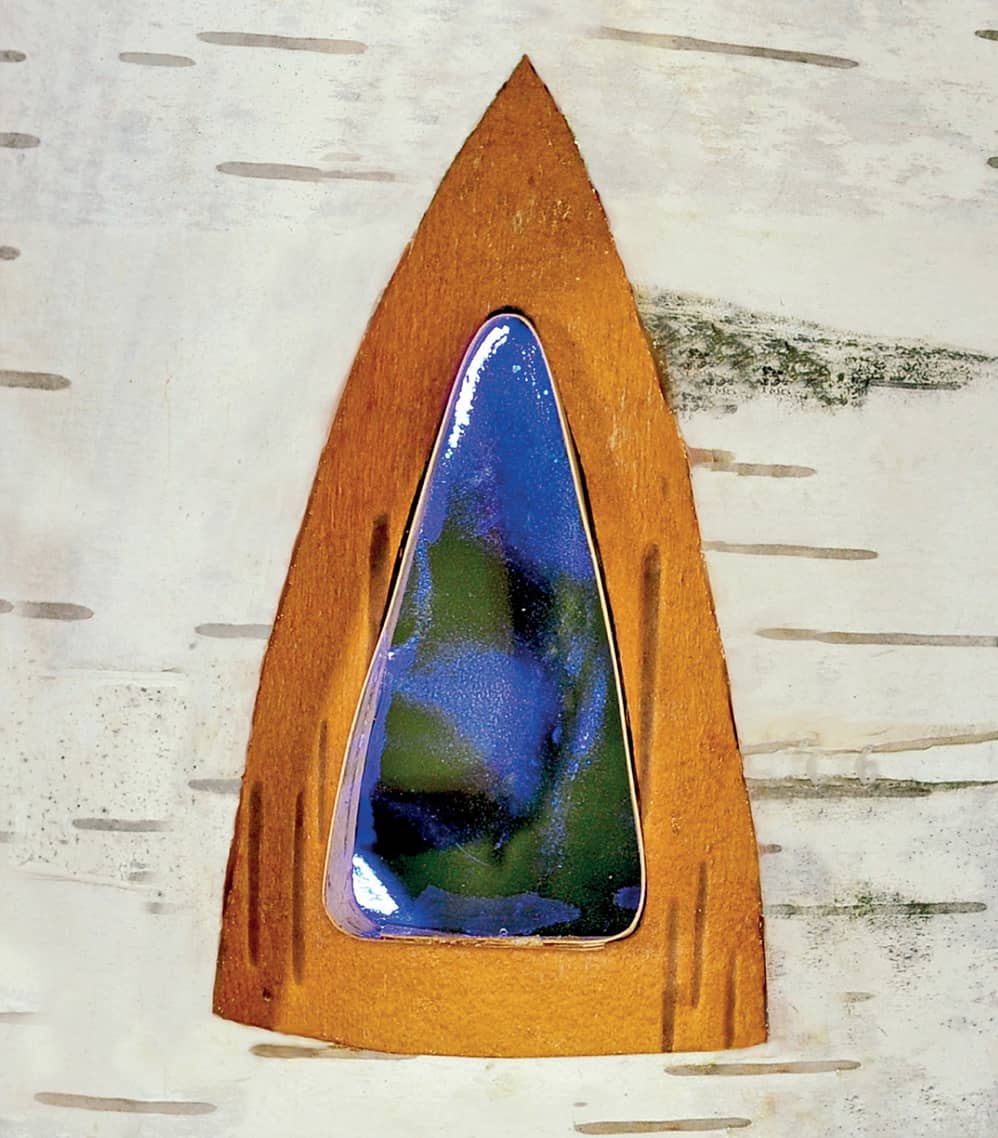
A finished flat-framed window.
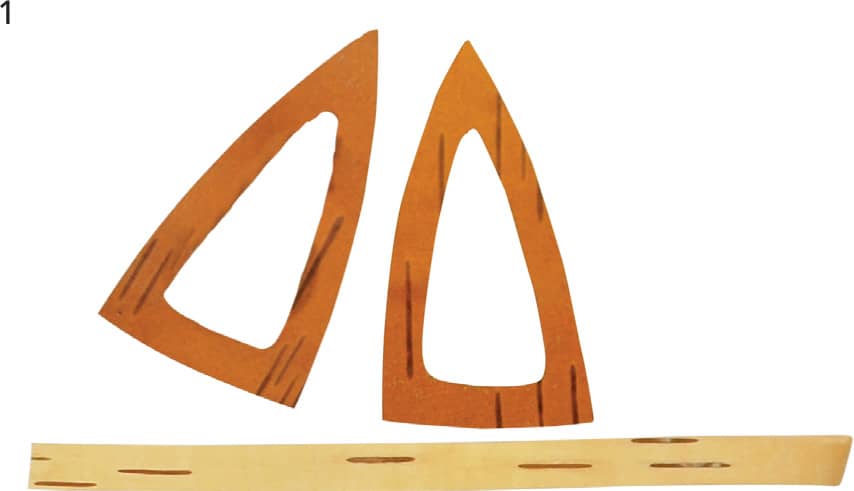
STEP 1
Using one of the window frames as a template, carefully trace an outline of the inner opening of the window onto the main body of the house. Make this line as faint as possible but still visible. Carefully using a very sharp X-Acto knife, cut out the window opening. Make your cut on the outside of the line you drew so that the actual window opening will be just slightly (about 1mm) larger than the opening in the frame that you used for a template. That way, once the frame is installed, you’ll see the inside edge of the frame rather than the raw edge of the opening cut into the wall. Use the side of the tip of the hot glue gun and sear the edge of the cut opening. This helps smooth the cut edge. No glue is applied.
STEP 2
Cut the transparent film so that it is slightly smaller than the outside edge of the window frame.
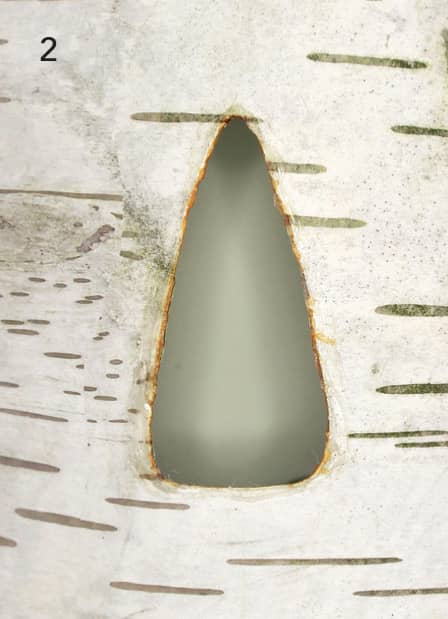
STEP 3
Use wood-colored epoxy glue to affix the window frame over the cut opening in the house. Take care to ensure no glue appears on the front side. Take the long thin strip of birch bark (A) and gently fold it so that it completely fills the window frame. You may need to use a small tweezers to hold and coax the liner strip all the way into all the corners. Carefully glue the strip in place from the inside of the house using wood-colored epoxy glue, keeping the liner edge flush with the inside of the wall. It usually helps to have the liner strip overlap itself along the bottom edge so that the windowsill is reinforced with the two layers of the liner.
STEP 4
From the inside, apply hot glue sparingly to the inside wall of the house and affix the transparent film centered over the window opening. Test the interior window frame in place and make sure no film edges stick out from behind the frame. Trim glazing material if needed, and then glue the frame in place over the film to create a finished interior look.
Here are some other examples of windows that are made using the same basic principles in this tutorial.
HOW TO MAKE A
WINDOW WITH A FRAME WITHIN A LINER
This kind of window can be made for either a curved or flat wall. I will demonstrate on a flat wall, but the same steps are done for installation in a curved wall, the main difference being that you’ll need to make sure that the tube/liner that the frame sits within is a little deeper so you’ll have enough depth to accommodate the curved wall. If that sounds confusing, check out the porthole window tutorial and you’ll see how it would work with a curved wall. This window will eventually end up in our Golden Cottage house.
A finished window.
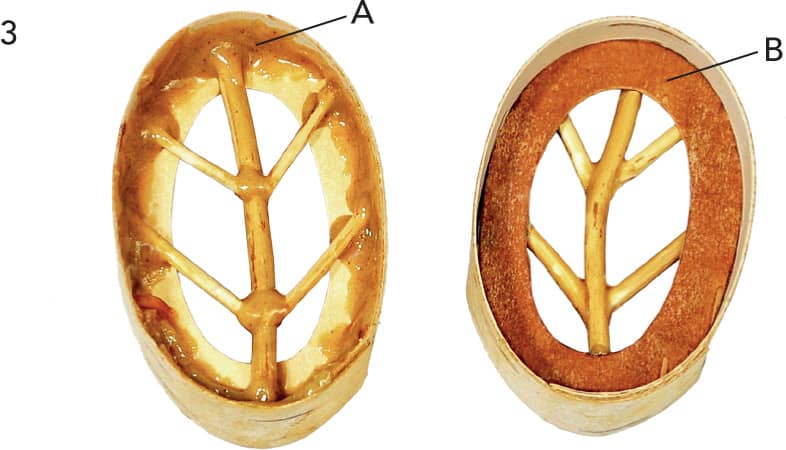
To make these windows, you will need an oval frame made from semi-stiff material such as birch bark (used here). Matboard or stiff decorative paper will also work (A). Be choosy about this piece. The bark should be the kind that does not delaminate (peel and come apart) easily. It should be thick enough to flex slightly, but rigid enough to stay flat as you build the window. I’ve used twig mullions (B) here but the windows can be open, glazed, or made using any sort of material you’d like for the interior of the window. A butterfly wing or silk flower petal covering half of the open window would make a lovely curtain-like effect.
You’ll also need a flexible strip of clean birch bark (C) or heavy paper for the lining. The strip should be long enough to go around the frame with a little overlap and should be as wide as you want the window to be deep with a little extra width for good measure. You will need a frame, twig mullion, and liner for one window. Multiply the materials for the number of windows desired.

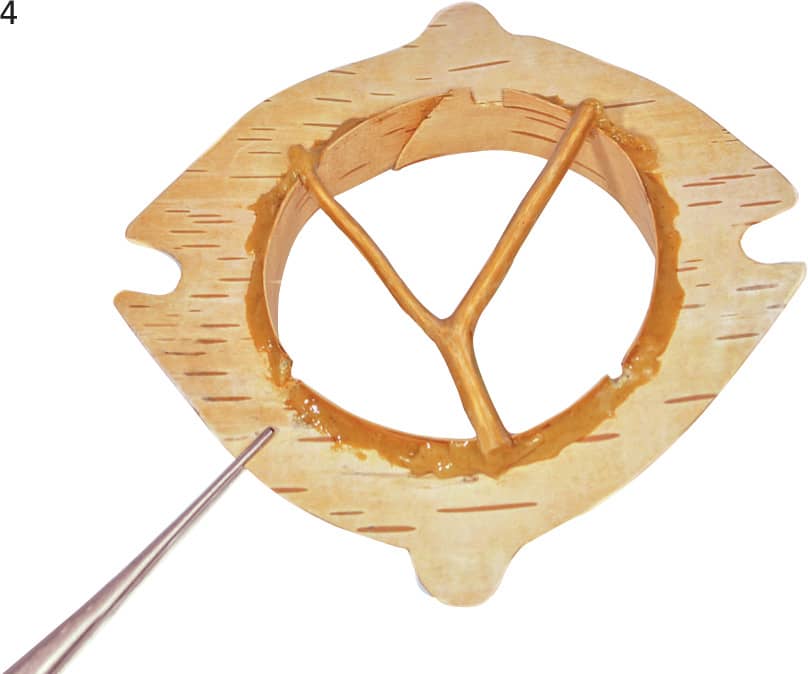
STEP 1
Build the mullions within the frame. Carefully trim twigs and glue them together to form a leaf-vein patterned mullion. Once the glue is lightly set, you can glue the mullions to the backs of the window frames. Then trim away excess glue visible from the front. Let dry completely before going to the next step.

STEP 2
Hold the window frame with tweezers. Begin gluing the liner strip to the edge of the frame. Anchor the strip to the frame with a tiny drop of hot glue on the inside of the window (the side that will face inside the house). Roll the frame a quarter turn while wrapping the strip tight against the frame edge. Apply another tiny drop of hot glue to hold the strip in place. Turn another quarter turn and repeat. Do this until the entire frame has been wrapped with the strip. Trim off the excess at the overlap. Glue the overlap with epoxy glue, not hot glue.
STEP 3
Carefully apply wood-colored epoxy all around the inside of the frame where it joins up with the liner strip (A). Make sure none of the epoxy shows from the front side. This will reinforce the small hot glue dots that anchored the liner strip in place. Install the liner strip (B).
STEP 4
Place the window on a piece of paper and trace around it. This will serve as your template to cut the opening for the window in the wall of the house. Cut an opening in the paper using the traced line. Test the paper template by gently pushing your window into the opening of the paper. Do not force it; it should just barely fit.

INSTALLING THE WINDOWS
Take the paper template and position it over the place where you want your window to be in your faerie house. Hold the paper and carefully trace a pencil line onto your wall material. Using a sharp X-Acto knife, cut along the pencil line or a little to the inside of the line to make the opening in your wall. It is best to cut it a little small and sand the opening with sandpaper to make the final fit adjustments. Place the window into the opening in the wall. Use sandpaper along the edges to adjust the opening until your window fits perfectly. From the back side (interior side), use wood-colored epoxy glue to attach the window to the wall opening.
Congratulations! You’ve made and installed a beautiful window!
Following are some other examples of windows made using the same technique.
HOW TO MAKE A
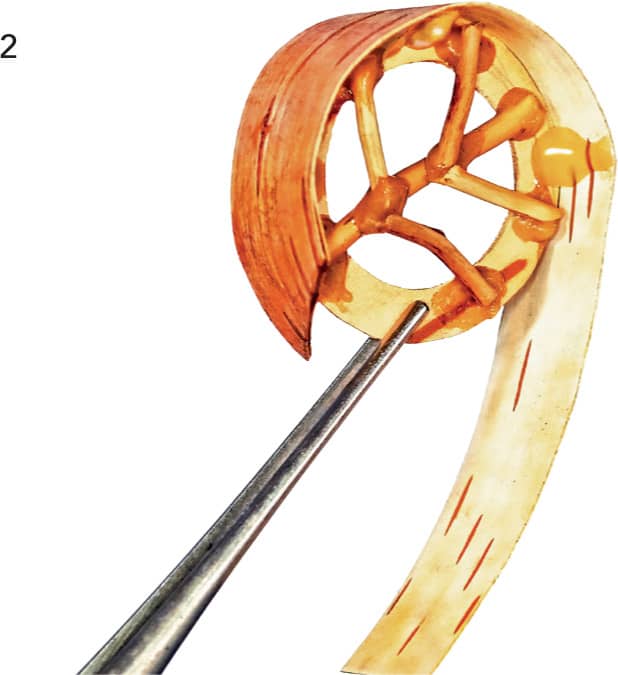
PORTHOLE WINDOW
Porthole windows are an excellent choice when working with curved- or round-walled structures. They provide an elegant solution to a difficult problem: how to make a window that curves. You’ll make these windows using a combination of techniques used for flat-framed windows and framed windows within a liner, so it is a good idea to practice with those first if you are new to window constructing.
Your finished windows will add a lot of charm to your faerie house, in addition to structural integrity from the epoxy glue. Experiment with different shapes once you have the skills. The frame itself can be shaped, decorated, or have contrasting and multiple layers. Silk flower petals, moss, beads, and so forth can be applied to the top of the porthole liner/awning for additional color and texture.

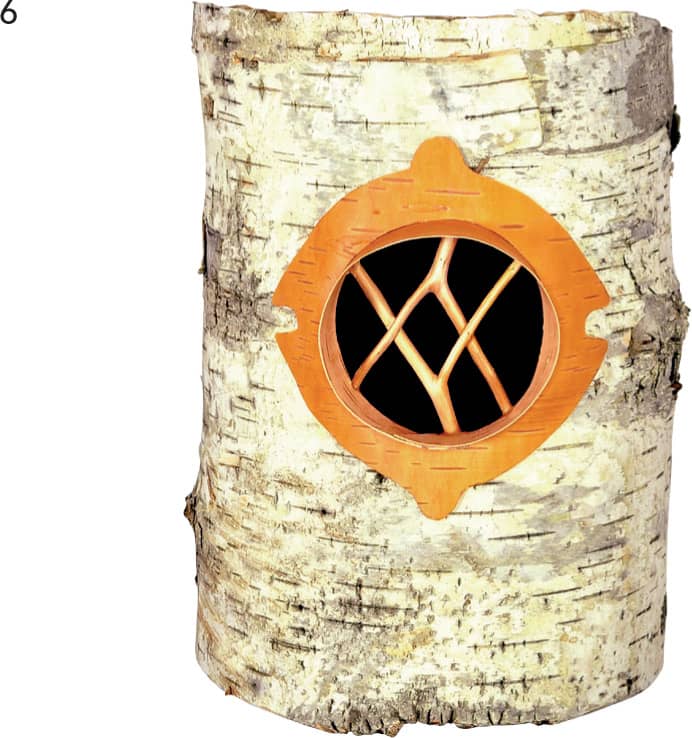
A porthole window installed in a birch bark wall.
STEP 1
Make a window template from a piece of paper that is the shape and size you want. Use this template to cut a hole in the wall of the faerie house that matches the template exactly. Save the template. Cut a window frame (A) using the template. This frame will hold the porthole liner and will be affixed to the outside wall of the house. The inner opening of the frame should be a tiny bit smaller than the template line, and the outside edge of the frame needs to be larger than the template line. This will ensure that the frame will correctly cover the opening in the wall.

STEP 2
Form the long strip of birch bark into a circle and insert it into the opening of the frame. You may need to apply a tiny dot of hot glue just to temporarily hold it in place. It should fit snugly but still allow for adjustment between the frame and the wall of the house. The joint of the strip should be positioned at the bottom of the window once it is assembled.
Insert the window assembly into the opening in the faerie house wall and gently re-position the frame so that it closely matches the curve of the house wall while the liner has full contact all around the window opening.
Carefully remove the window assembly from the house, making sure it does not move and apply four dots of hot glue to anchor the curved frame onto the liner. Re-test the alignment in the opening of the house wall.

STEP 3
If all is well, remove the assembly and glue the frame to the liner tube on the back side using wood-colored epoxy. Start by gluing the top half of the liner to the window frame first. Let dry. Next, glue the overlapping junction of the liner itself. You need to do this to give that part of the window extra strength. Finally, glue the lower half of the liner into the frame. It is best to work slowly.
If you’ve done it correctly, no glue will show from the outside of the window assembly. The window is now ready to install into the house if no mullions are desired. If you wish, add curtains (silk flower petals, leaves, ribbons, etc.) or glazing material (faerie film, sheet mica) to the back of the window after you install it into the house.


STEP 4 (optional)
Turn the window assembly so that the inside of the frame is facing upward and test your twig arrangement on the opening to get the design you want. Trim the twigs so they are just barely longer than the opening of the window. You may want to cut small notches in the liner to hold the ends of the twigs in the proper placement. Use wood-colored epoxy to glue the twigs in place, making sure to keep the inside of the window opening free from any glue drips.
STEP 5 (optional)
If you are creating a lattice-like mullion, apply one layer first, let dry and then apply the second layer of twigs. Don’t try to do it all at once because the twigs sometimes move when you clean up the excess glue.

STEP 6 (optional)
Install the window in the house. Insert the entire assembly into the opening of the wall and test the position. Be sure that the overlapping junction on the liner is positioned at the bottom of your window. Remove the window assembly. Apply epoxy to the back of the entire frame and reinsert the window assembly into the opening in the wall. Hold it in place until it is set.
The finished porthole window in a curved wall.
STEP 7 (optional)
You can add more glue to the inside of the window if you want a perfect seal. Just make sure that the extra glue goes in the space between the window liner and the original opening that was cut in the wall.
Here are some other examples of porthole-style windows.
HOW TO BUILD A
BAY WINDOW
Bay windows make wonderful additions to faerie houses. They can be added to just about any structure with a little planning and care. This tutorial will show you how to make a basic bay window on a flat-walled structure. Once you have mastered this technique, you can adapt the process in a variety of ways for your faerie house creations.
Two questions influence where I choose to place a bay window:
1. Is there enough space on the house itself so it can be sufficiently anchored to the wall of the house without looking clumsy or being structurally deficient?
2. Will this structure enhance or detract from the overall design?
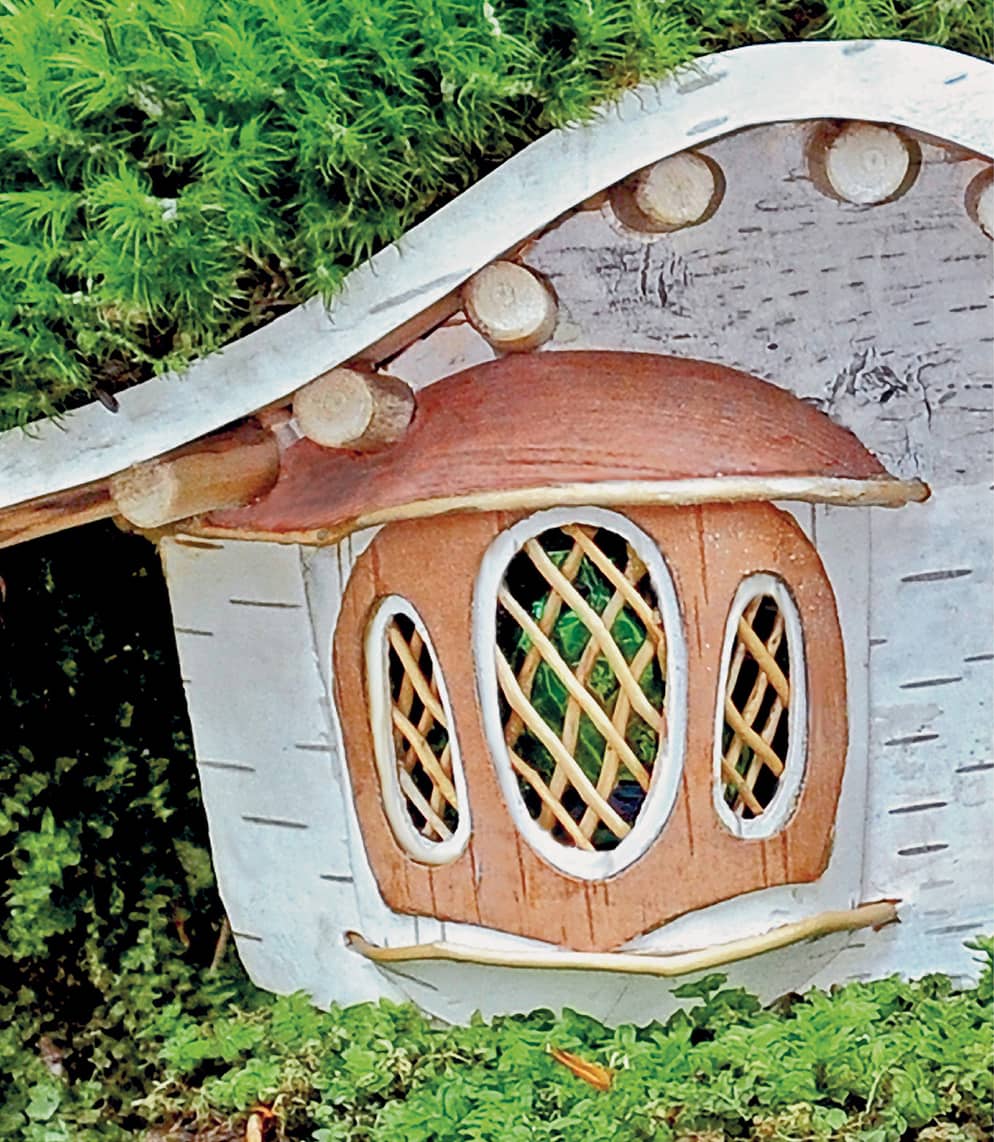
A three-pane bay window with twig lattice. Note that the single piece of brown bark with three oval holes gives the look of three separate windows.
If the window will be an enhancement and structurally supported, then I often make a little sketch of how I want the bay window to look. Keep in mind that the roof for the bay window will be below the eaves of the house and should match stylistically. This tutorial shows how to make the bay window for the Golden Cottage featured in Chapter 6. The space was tight, so the roof for the bay window is going to be simple and have a rather low pitch or slant so it will not take up too much room.
Because the house will be finished on the inside and lighted, I will include the steps needed to prepare the window for those additions. If your house is not going to have lighting or will be unfinished on the inside, you can skip those parts of the tutorial.
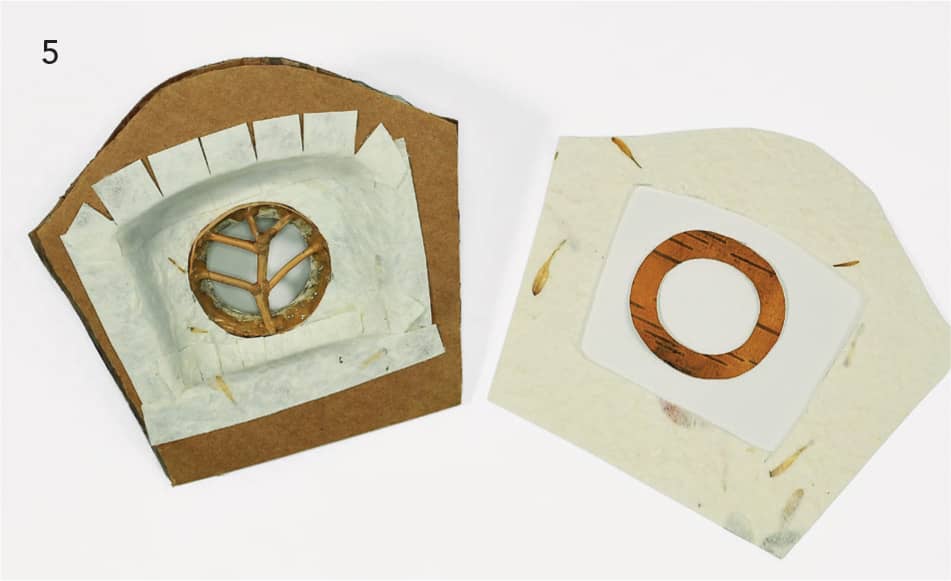
STEP 1
Cut the opening for the bay window into the house wall panel (A). The curved window panel that already has a round window installed in it (B) is the height of the opening in the house wall plus 1/4 inch. Cut tiny 1/8-inch notches at each corner of the bay window panel top and bottom.
The length of the window panel is longer than the width of the opening cut in the wall so that this piece will form a bowed-out shape when the ends are placed within the opening in the main wall. A roof will be made from the curved piece of white birch bark (C). The bottom of the bowed window will be made from a similarly shaped and matching piece of golden birch bark (D).
STEP 2
Cover the entire bowed window wall with brown felt to block out any possible light leaks around the round window. Curve the wall as you apply the felt. Cut out the notches at the corners.

STEP 3
If you plan to finish the interior of your house, this is the time to add the wallpaper to this piece. Make your wallpaper the same shape and size as this curved window panel (B) section but attach the wallpaper only at the edge of the circular window. Leave the rest unattached to the wall section for the moment.
In addition, use the main house wall panel (A) as a template and cut out a matching piece of wallpaper. Cut out the opening in the wallpaper just as the opening is in the wall panel (A). Set aside.
STEP 4
Insert the curved window panel into the house wall, making sure that the round window is right side up. The curved wall should fit snugly into place. Tack into position with four dots of hot glue from the inside. Do not put the hot glue at the exact corner as this needs to be glued well with the epoxy glue. On the inside, glue this joint well with wood-colored epoxy all along the entire X–Y length of both ends.
STEP 5
When the epoxy is solidly set, create a paper pattern for both the roof and the base. Make your adjustments to the paper pattern until you are satisfied, then cut out the good materials you will use for the roof and the bottom. Make wallpaper copies of the roof and base. Do not install these pieces yet. Turn the house wall panel over and work on the inside. Using hot glue, attach the wallpaper pieces to the inside of the bay window as shown. You may need to add extra strips of paper to cover all the joins. Each window is different, so work slowly and finesse each piece into place.
STEP 6
Once the bowed window well has been wallpapered, secure the round window frame in place with epoxy glue. Then apply the full wall piece of wallpaper to the wall of the house. This will cover over any of the raw edges of wallpaper and give a clean finish to the inside of the bay window.
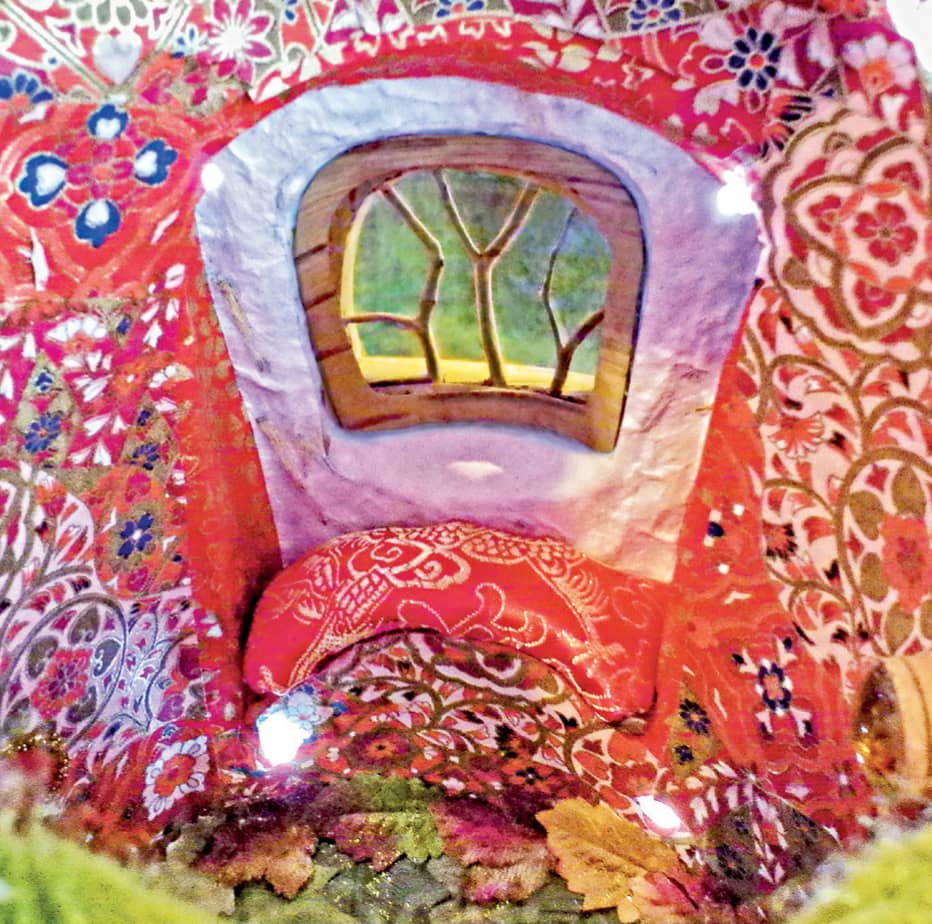
The wall with window should look like this from the inside (A); and from the outside (B).
If you plan on lighting the house, I recommend covering the back side of the exposed wallpaper with felt before attaching the roof and base of the bay window.
STEP 7
Attach the roof/awning. Apply the glue to the top edge of the roof and the top edge of the curved wall for cleanest results. Use epoxy glue and be careful not to leave any drips. Hold the roof in place while the glue sets. Be sure to have extra glue in the corners for a solid joint.
STEP 8
Now glue the bottom carefully in place using the same process.
If you plan on making an upholstered window seat inside the house, you can do that now. It is much easier to work in this tiny area while it is separate from the house. Once the main house is all put together, it is sometimes hard to reach these little nooks.
Here are two examples of window seats made in bay-type windows.
Here is a visual tutorial showing how I attached two bowed windows to a curved-wall faerie house. Now that you know how it is done, you should be able to see some extra tips in these images.
A curved-wall faerie house base with attachment cleats (A) for bay windows.
Bay windows positioned (see here for instructions on how to make bay windows).

Apply glue to the entire edge of the bay window bump-out and to the cleats and attach the bay window. Hold it in place until it is set.
The moss was gently pulled away from the main house to add the windows and was glued back in place when finished.

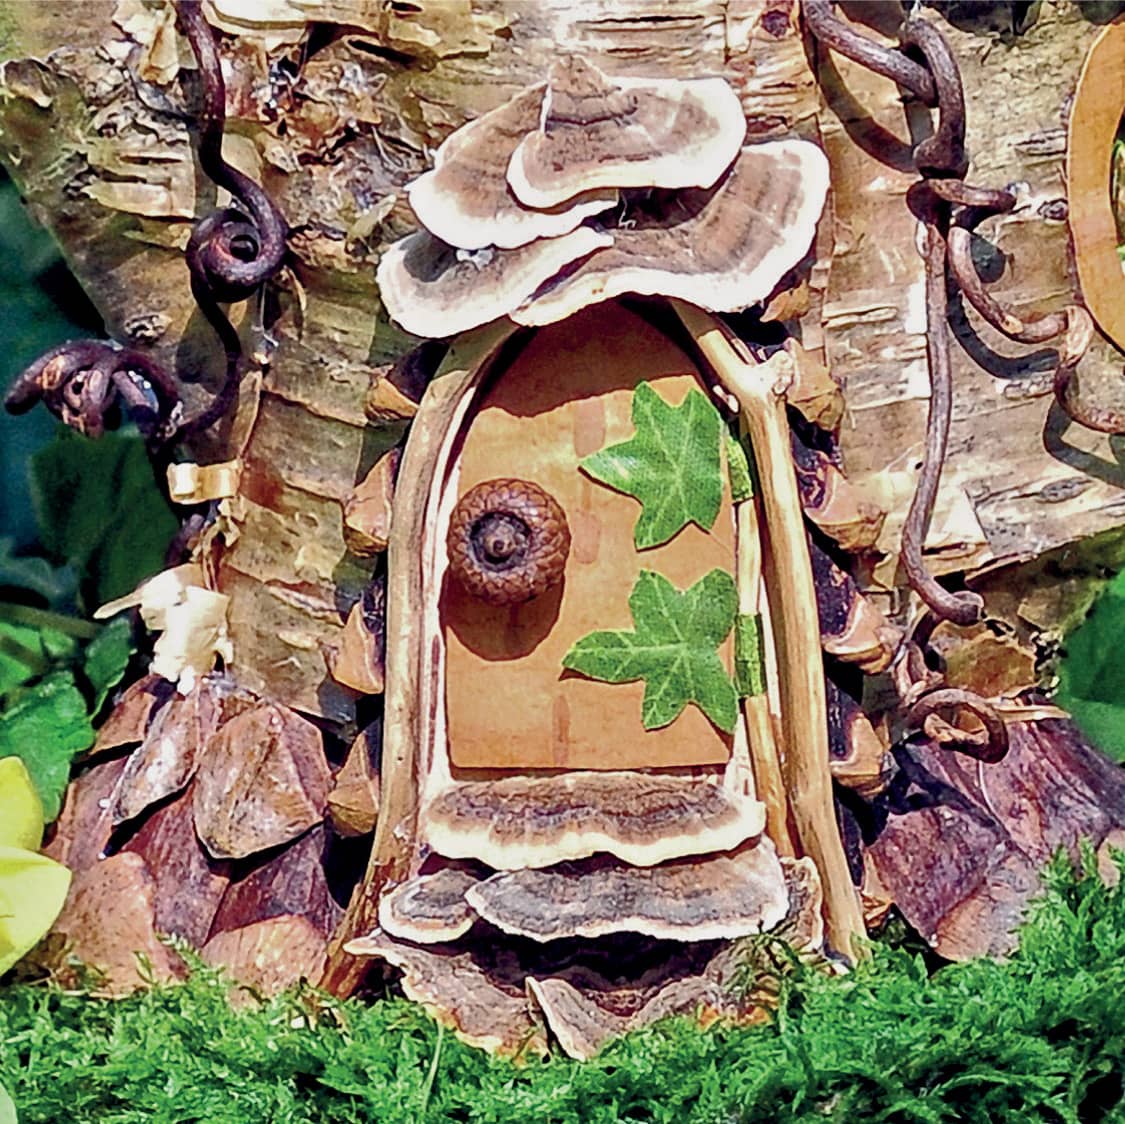
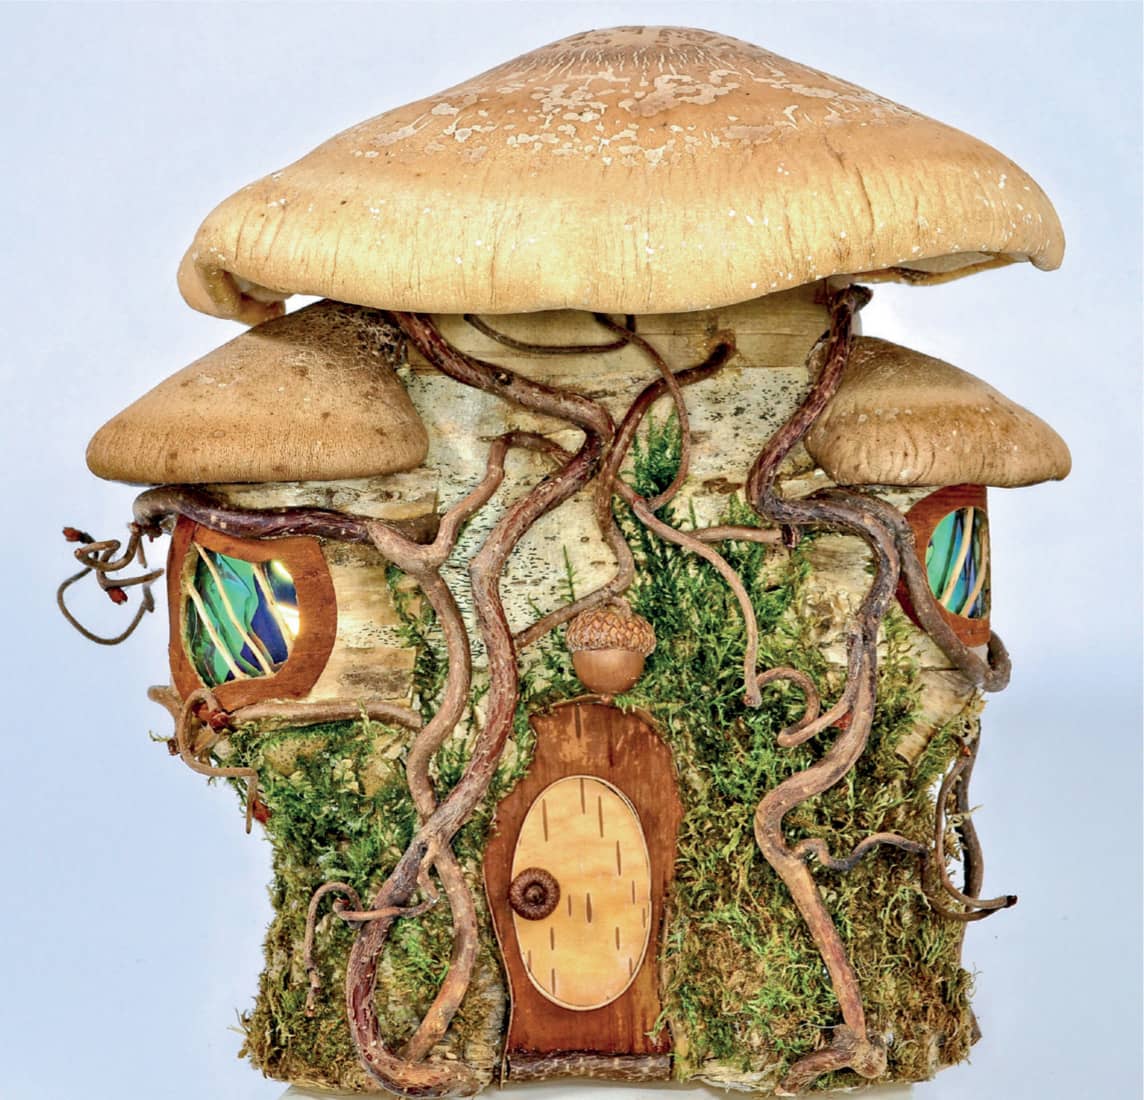
The finished house with the shelf-mushroom roofs applied to both bay windows, which match the main shelf-mushroom roof.
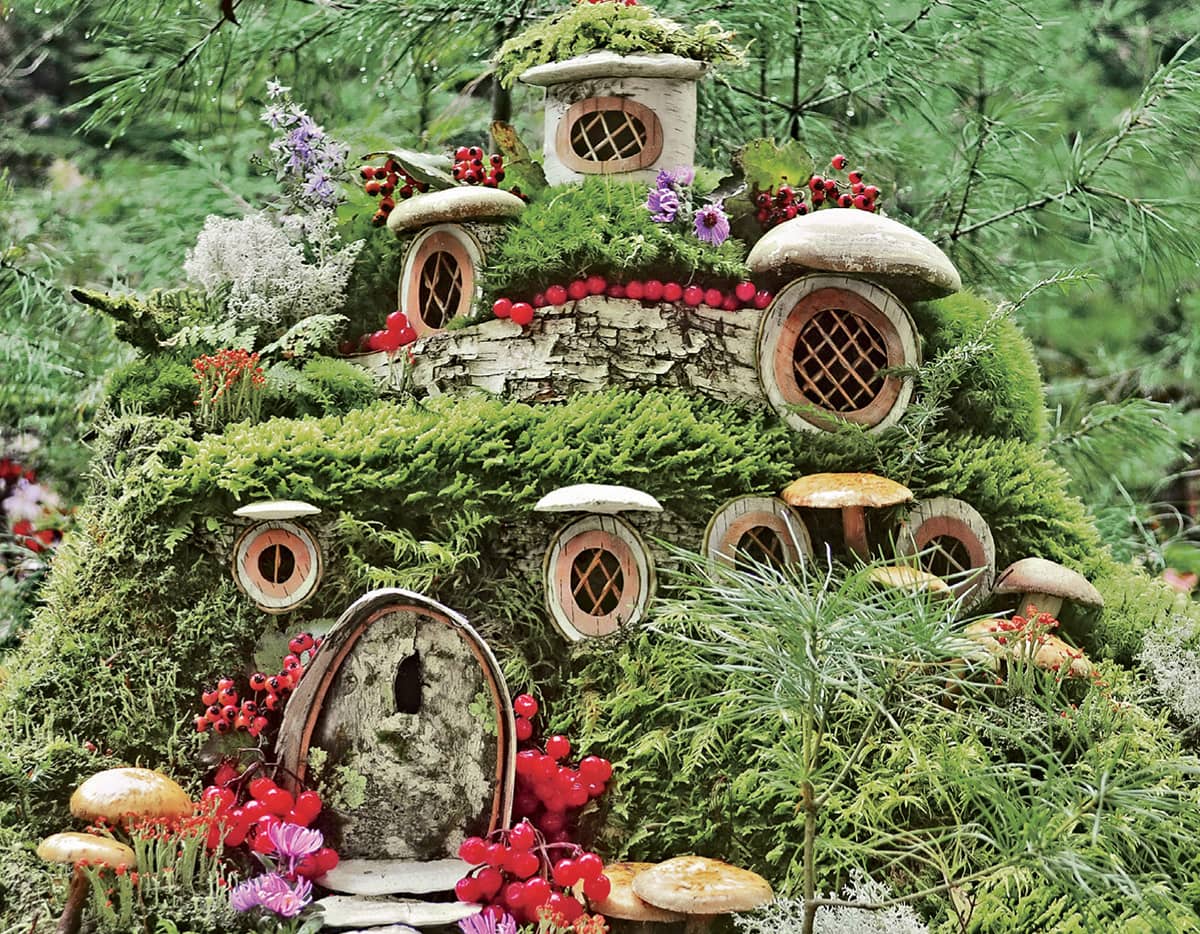
TOWERS AND PORCHES
As you become a more experienced builder, you may wish to add a tower or porch to your house. These pieces are best constructed separately and then added onto the main structure once you have the doors and windows installed. The construction techniques for towers are similar to bay windows, except that the curve of the tower is usually more extreme and the tower is usually finished with a full roof and complete support base. Install the windows in the tower first before adding it to the house. Afterward, finish the top and bottom. To install, cut a small, narrow opening, then glue the tower directly onto the house. This is similar to the way bay windows are installed.
Here are some examples of towers.
Bay window on left, tower on right.
The tower was added above the roofline using a conical support.
A free-standing tower (left) and bay window (right).
A tiny porch with delicate framing.
Porches are handled much the same way as bay windows, except they are usually more open structures that can be built out from the house using twig framing and don’t require doors or windows. Remember to plan for a roof that complements the main house.
Now that you know how to make the most important structural details, the next step will be to work on the inside and add lighting (if desired), which we will look at in the next chapter.
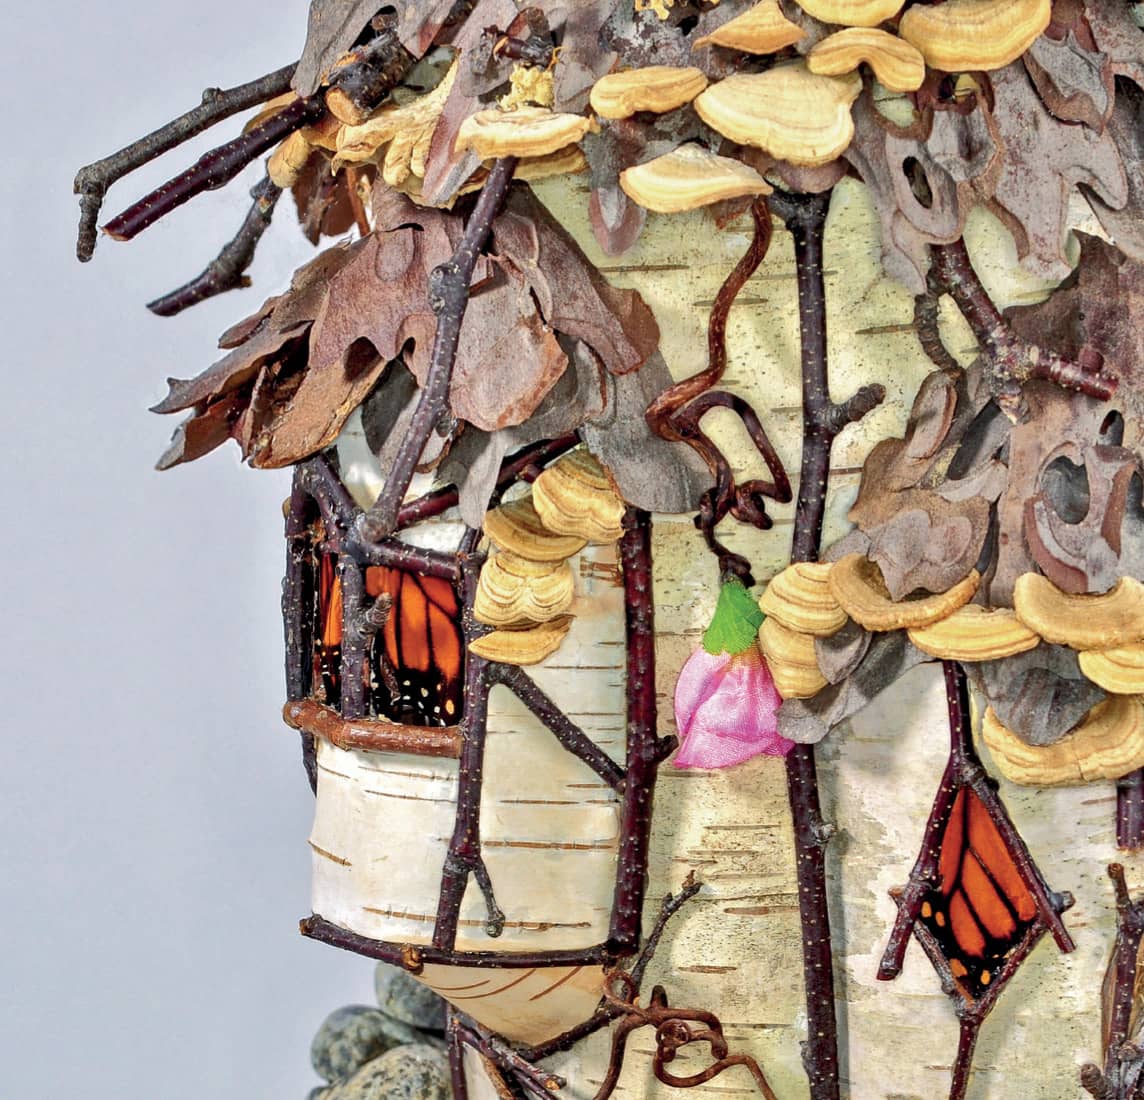
A porch with a shelf fungus roof.