Chapter 3
On Your Mark, Get Set, Whoa! The Road to Safe Canning and Preserving
IN THIS CHAPTER
 Putting your fears of home-canned food to rest
Determining your processing method by your food’s acidity
Making the acquaintance of food-spoiling microorganisms and enzymes
Recognizing the signs of food spoilage
The desire and determination to produce a delicious, safe-to-eat product without the risk of food poisoning is one thing longtime canners and people new to canning have in common. The canning and preserving techniques used today provide you with these results as long as you follow the proper steps and procedures for preparing, processing, and storing your food.
Before you begin your canning and preserving journey, take a stroll through this chapter, which introduces you to microorganisms, enzymes, and other potentially dangerous situations that cause food spoilage. You can also find information on how to prevent and identify food spoilage. The technical portion of this chapter shouldn’t deter you from canning. Rest assured, after reading this information, you’ll have no fear about preparing and serving your home-canned and home-preserved food.
Dispelling Your Fears of Home-Canned and Home-Preserved Food
Preventing food spoilage is the key to safe canning. Over the years, home-canning has become safer and better. Scientists have standardized processing methods, and home-canners know more about using these methods. When you follow up-to-date guidelines exactly, you’ll experience little concern about the quality and safety of your home-canned and home-preserved food.
The following sections offer some tips for safely handling, preparing, and processing your food.
Preparing your food properly
Prepping to start canning and preserving can sometimes feel daunting and keep you from starting. The truth is, getting your food ready is only a matter of basic science and common sense. None of these steps are difficult. For example, use fresh, firm (not overripe) food. Wash and prepare your food well to remove any dirt and bacteria: Wash it in a large bowl filled with room temperature water and a few drops of dish detergent, and then rinse it in a separate bowl of fresh water (see Figure 3-1). Can your fruit and vegetables as soon as possible after they’re picked. Wash only the type of food you are going to be preserving each time. To avoid cross contamination, do not mix different foods during this step.
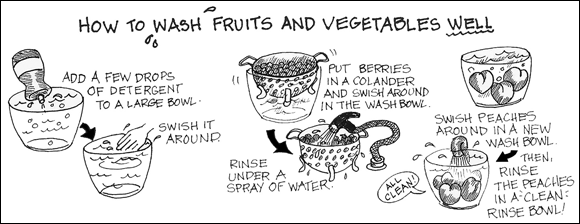
FIGURE 3-1: How to wash fruit and vegetables well.
 No, you don’t have to wash berries individually: Put them in a colander and submerge the colander, berries and all, in the wash bowl; then rinse them off with a running spray of water.
Packing your jars with care
You have picked your food and washed it carefully. Now, you are in the home stretch, and the way you fill the canning jars is super important:
- Don’t overpack foods. Trying to cram too much food into a jar may result in under-processing because the heat can’t evenly penetrate the food.
- Make sure your jars have the proper headspace. Headspace is the air space between the inside of the lid and the top of the food or liquid in your jar or container (see Figure 3-2). Proper headspace is important to the safety of your preserved food because of the expansion that occurs as your jars are processed or your food freezes.
- Make sure you release the air bubbles from the jar before sealing the lid. No matter how carefully you pack and fill your jars, you’ll always have some hidden bubbles.
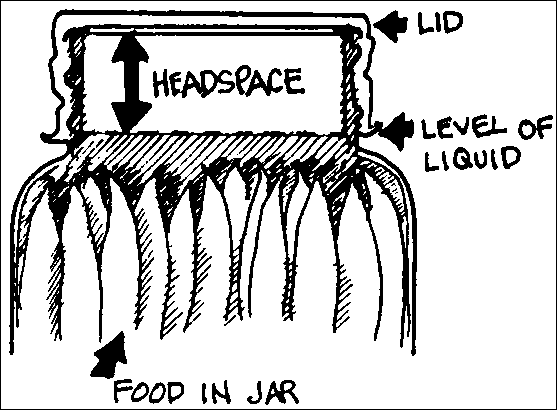
FIGURE 3-2: Headspace.
Taking a closer look at the all-important headspace
When you’re canning food, too little headspace in your canning jars restricts your food from expanding as it boils. Inadequate space for the expanding food may force some of it out of the jar and under the lid, leaving particles of food between the seal and the jar rim. If this occurs, your jar won’t produce a vacuum seal.
Leaving too much headspace may cause discoloration in the top portion of your food. Excess headspace can keep your jar from producing a vacuum seal if the processing time isn’t long enough to exhaust the excess air in the jar.
Always use the headspace stated in your recipe. If your recipe doesn’t give you a headspace allowance, use these guidelines:
- For juice, jam, jelly, pickles, relish, chutney, sauces, and condiments, leave a headspace of ¼ inch.
- For high-acid foods (fruits and tomatoes), leave a headspace of ½ inch.
- For low-acid foods (vegetables, meats, fish, and poultry), leave a headspace of 1 inch.
 Headspace is also important when you’re freezing food because frozen food expands during the freezing process. If you fail to leave the proper headspace in your freezer container, the lid may be forced off the container, or the container may crack or break. When your frozen food comes in direct contact with the air in your freezer, the quality of your food deteriorates, and the food develops freezer burn (go to Chapter 13 for more on freezing food). On the other hand, too much air space allows excess air in your container. Even though your food doesn’t come in direct contact with the air in the freezer, the excess space in the top of the container develops ice crystals. When your food thaws, the excess liquid reduces the food’s quality.
If you don’t trust yourself to eyeball the headspace, use a small plastic ruler (about 6 inches long) to measure the correct headspace in the jar.
Releasing air bubbles from your jars
The most important thing to do when you’re filling your jars is to release trapped air bubbles between the food pieces. This may seem unimportant, but air bubbles can play havoc with your final product.
- Jar seals: Too much air in the jar from trapped air bubbles produces excessive pressure in the jar during processing. The pressure in the jar is greater than the pressure outside the jar during cooling. This imbalance interferes with the sealing process.
- Liquid levels: Air bubbles take up space. When there’s trapped air between your food pieces before you seal the jar, the liquid level in the jar drops when the food is heated. (For releasing air bubbles, see Figure 3-3.) In addition, floating and discolored food results from packing your food without the proper amount of liquid in the jars. Snuggly packed food eliminates air and allows enough liquid to completely cover the food with a proper headspace (refer to Figure 3-2).
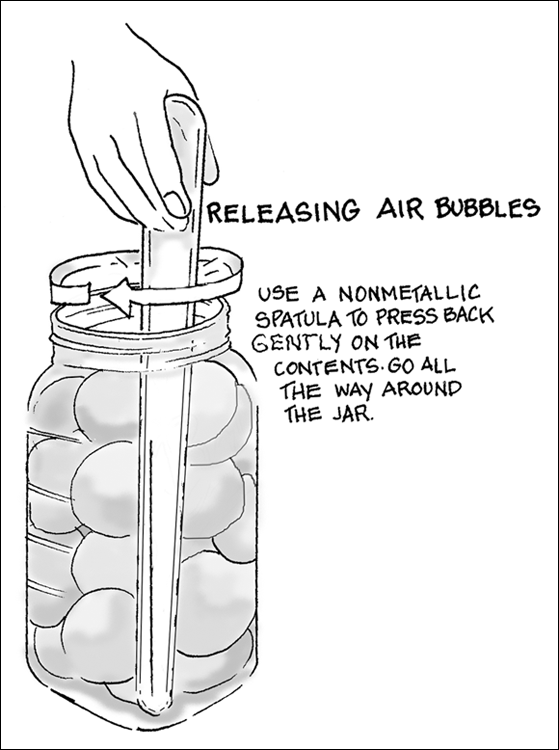
FIGURE 3-3: Releasing air bubbles from your filled jars.
Repeat after us: Never skip the step of releasing air bubbles.
Choosing the right canning method and following proper procedures
Always use the correct processing method for your food. Process all high-acid and pickled food in a water-bath canner. Process all low-acid food in a pressure canner. To find out how to determine whether a food has a low or high acidity level, head to the next section. (You can find out about the different canning methods in Chapters 4 and 9.)
In addition to choosing the right canning method, follow these guidelines to guard against food spoilage:
- Never use a pressure cooker as a presser canner. They are two different appliances.
- Don’t experiment or take shortcuts. Use only tested, approved methods.
- Never use an outdated recipe. Look for a newer version. Do not update the directions yourself. Check the publishing date at the beginning of the recipe book. If it is more than 5 years old, find a newer version.
- Safe recipes are based on science, not hearsay. If you truly want to use a recipe you find online with no science to back it up, look for an approved version elsewhere.
- If your elevation is higher than 1,000 feet above sea level, make the proper adjustments in processing time and pressure for your altitude. See the section, “Adjusting for Your Altitude,” for information on altitudes and processing times.
- If you’re pressure canning, allow your pressure canner to depressurize to 0 pounds pressure naturally; don’t take the lid off to accelerate the process.
- Allow your processed jars to cool undisturbed at room temperature.
- Process your filled jars for the correct amount of time and, if you’re pressure canning, at the correct pressure (both will be stated in your recipe). Make adjustments to your processing time and pressure for altitudes over 1,000 feet above sea level.
- Test each jar’s seal and remove the screw band before storing your food.
Checking your equipment
To prevent spoilage, your equipment must be in good shape and working properly:
- Have the pressure gauge and seal on your pressure canner tested every year for accuracy. (Weighted gauges don’t require testing.) This service is often offered for free at your local cooperative extension office.
- Use jars and two-piece caps that are made for home-canning. Discard any jars that are cracked or nicked.
- Never use single-use sealing lids a second time. Always use new lids. The sealant on the underside of the lid is good for only one processing. If your jars do not seal the first time, always replace the lid with a fresh one. There may be a problem with the sealant, despite starting with a new lid.
- Check the rubber gasket on reusable lids for signs of wear. With proper care, gaskets can be reused up to eight times before needing to be replaced, depending on whether you are pressure canning or water-bath canning.
Knowing the Acidity Level of Your Food
Knowing the acidity level of the food you’re processing is important because the pH, the measure of acidity, determines which canning method you use: water-bath or pressure canning.
For canning purposes, food is divided into two categories based on the amount of acid the food registers:
High-acid foods include fruits and pickled foods. (For detailed information on identifying and processing high-acid food, refer to Chapter 4.) Foods in this group have a pH of 4.6 or lower. Processing them in a water-bath canner destroys harmful microorganisms.
Tomatoes are considered a low-high acid food (or in the low range of high-acid foods). With all of the new varieties of tomatoes, it is now recommended that the home canner add an acid to the canning process, to ensure that the proper acidity is reached every time.
- Low-acid foods, primarily vegetables, meat, poultry, and fish, contain little natural acid. Their pH level is higher than 4.6. (Check out Chapter 9 for detailed information on identifying and processing low-acid food.) Process these foods in a pressure canner, which superheats your food and destroys the more heat-resistant bacteria, like botulism.
If you want to feel like you’re back in science class all over again, you can buy litmus paper at teacher- or scientific-supply stores, or online, and test the acidity level of your food yourself. Also referred to as pH paper, litmus paper is an acid-sensitive paper that measures the acid in food. When you insert a strip of pH paper into your prepared food, the paper changes color. You then compare the wet strip to the pH chart of colors that accompanies the litmus paper.
 The pH, or potential of hydrogen, is the measure of acidity or alkalinity in food. The values range from 1 to 14. Neutral is 7. Lower values are more acidic, while higher values are more alkaline. The lower the pH value in your food, the more acidic it is.
Adjusting for Your Altitude
Properly processing your home-canned foods destroys microorganisms. Knowing your altitude is important because the boiling point of water and pressure in a pressure canner changes at altitudes over 1,000 feet above sea level. This occurs because the air is thinner at higher elevations. With less air resistance, water boils at a temperature below 212 degrees.
To produce food free from microorganisms at higher elevations, adjust your processing time and pressure to compensate for your altitude. Use the altitude adjustment charts in Chapter 4 (for water-bath canning) and in Chapter 9 (for pressure canning). These adjustments ensure that your food is heated to the correct temperature for destroying microorganisms.
If you don’t know the elevation of your town or city, check with your municipal offices, your public library, or your state or county cooperative extension office. Or go to www.whatismyelevation.com and simply type in your Zip code.
Spoiler Alert: Identifying Food Spoilage
Food spoilage is the unwanted deterioration in canned or preserved food that makes your food unsafe for eating. Ingesting spoiled food causes a wide range of ailments, depending on the type of spoilage and the amount of food consumed. Symptoms vary from mild, flu-like aches and pains to more-serious illnesses or even death.
But having said that, the potential for spoiled food shouldn’t stop you from canning. When you understand the workings of these microscopic organisms and enzymes, you’ll know why using the correct processing method for the correct amount of time destroys these potentially dangerous food spoilers. And you’ll have nothing to worry about.
Meeting the spoilers
Mold, yeast, bacteria, and enzymes are the four spoilers. Microorganisms (mold, yeast, and bacteria) are independent organisms of microscopic size. Enzymes are proteins that exist in plants and animals. When one or more of these spoilers have a suitable environment, they grow rapidly and divide or reproduce every 10 to 30 minutes! With this high-speed development, it’s obvious how quickly food can spoil. Some of these create spoilage that can’t be seen with the naked eye (like botulism), while others (like mold) make their presence known visually.
Living microorganisms are all around — in your home, in the soil, and even in the air you breathe. Sometimes microorganisms are added to food to achieve a fermented product, like beer or bread (for leavening). They’re also important for making antibiotics. The point? Not all microorganisms are bad, just the ones that cause disease and food spoilage.
Mold
Mold is a fungus with dry spores. Poorly sealed jars of high-acid or pickled foods are perfect locations for these spores to set up housekeeping. After the spores float through the air and settle on one of their favorite foods, they start growing. At first you see what looks like silken threads, then streaks of color, and finally fuzz, which covers the food. Processing high-acid and pickled food in a water-bath canner destroys mold spores.
 Don’t eat food that’s had fuzz scraped off of it. This was thought safe at one time but not anymore. Mold contains carcinogens that filter into the remaining food. Although the food appears to be noninfected, ingesting this food can cause illness.
Yeast
Yeast spores are much less colorful, and grow in food in the same way as mold spores. They’re particularly fond of high-acid food that contains lots of sugar, like jam or jelly. They grow as a dry film on the surface of your food, more commonly inside the food, creating an off flavor and fermentation. Prevent yeast spores from fermenting in your food by destroying them in a water-bath canner.
Bacteria
Bacteria are a large group of single-celled microorganisms. Common bacteria are staphylococcus and salmonella. Botulism, the one to be most concerned with in canning, is the most dangerous form of bacteria and can be deadly. It’s almost undetectable because it’s odorless and colorless. Botulism spores are deadly but can be easily destroyed by heating the food to an internal temperature of 180 degrees Fahrenheit (85 degrees Celsius) for at least 5 minutes. Boiling occurs at 212 degrees Fahrenheit (100 degrees Celsius) and is the safest and easiest way to protect yourself from becoming ill.
Botulism spores hate high-acid and pickled foods, but they love low-acid foods. When you provide these spores with an airless environment containing low-acid food, like a jar of green beans, the spores produce a toxin in the food that can kill anyone who eats it. The only way to destroy them in low-acid food is by pressure canning.
For safety’s sake, before eating any home-canned, low-acid food, boil it for 15 minutes from the point of boiling, if you are at an altitude of 1,000 feet or lower. For altitudes above 1,000 feet, add 1 additional minute for each 1,000 feet of elevation.
Boiling kills the botulism bacteria, but only if boiled until the food reaches an internal temperature of 180 degrees Fahrenheit for at least 5 minutes. Symptoms from ingesting botulism-infected food occur within 12 to 36 hours after eating it. These symptoms include double vision and difficulty swallowing, breathing, and speaking. Seek medical attention immediately if you believe you’ve eaten infected food. Antitoxins are available to treat this poisoning, but the sooner, the better.
No matter how long you boil your jars, they will never reach a higher temperature than that of boiling water. This is why water-bath canning and pressure canning are not interchangeable.
Enzymes
Enzymes are proteins that occur naturally in plants and animals. They encourage growth and ripening in food, which affects the flavor, color, texture, and nutritional value. Enzymes are more active at temperatures of 85 to 120 degrees Fahrenheit than they are at colder temperatures. They’re not harmful, but they can make your food overripe and unattractive, while opening the door for other microorganisms.
An example of enzymes in action occurs when you cut or peel an apple. After a few minutes, the apple starts to brown. Stop this browning by treating the cut apple with an antioxidant solution (see Chapter 5). Other methods for halting the enzymatic action in your food are blanching (see Chapter 15) and hot packing (see Chapter 5).
Determining what you need to dispose of
No one can promise you that your home-canned foods will always be free from spoilage, but you can rest assured that your chances for spoiled food are greatly reduced when you follow the precise guidelines for each preserving method. However, if you suspect, for any reason, that your food is spoiled or just isn’t right, don’t taste it. Instead, take a time-out to better evaluate the contents. For starters, the best way to detect food spoilage is by visually examining your jars. Review the following checklist. If you can answer “true” for each of the following statements, then your food should be safe for eating:
- The food in the jar is covered with liquid, is fully packed, and has maintained the proper headspace.
- The food in the jar is free from moving air bubbles.
- The jars have good, tight seals.
- The food has maintained a uniform color.
- The food isn’t broken or mushy.
- The liquid in the jar is clear, not cloudy, and free of sediment.
After your food has passed this preliminary checklist, examine your jars more closely. Truth is, just because your food doesn’t look spoiled doesn’t mean that it’s not. If you discover any spoilage during any step of this process, don’t continue your search, but properly dispose of your product.
- Hold the jar at eye level.
- Turn and rotate the jar, looking for any seepage or oozing from under the lid that indicates a broken seal.
- Examine the food surface for any streaks of dried food originating at the top of the jar.
Check the contents for any rising air bubbles or unnatural color.
The food and liquid should be clear, not cloudy.
Open the jar.
There shouldn’t be any spurting liquid.
Smell the contents of the jar.
Take note of any unnatural or unusual odors.
- Look for any cottonlike growth, usually white, blue, black, or green, on the top of your food surface or on the underside of the lid.
Spoiled low-acid food may exhibit little or no visual evidence of spoilage. Treat any jars that are suspect as if they contain botulism toxins. Follow the detailed instructions for responsibly disposing of spoiled, low-acid food in Chapter 9. Never use or taste any canned food that exhibits signs of spoilage or that you suspect is spoiled. Boiling will not make spoiled food safe to eat.
Removing the screw bands from your cooled, sealed jars before storing them allows you to easily detect any broken seals or food oozing out from under the lid, which indicates spoilage. Screw bands can also create a “false seal.” Screw bands that are left on jars can easily corrode and adhere to the jars, making them impossible to open safely.