7
Next Batter Up
Scones, Doughnuts and Other Yeast-Free Standbys
Doughnuts and scones didn’t enter my at-home baking repertoire until I started baking gluten-free and allergen-free. There was no need to make my own. It was easy enough to run out to Dunkin’ Donuts or a local bakery if I needed some of these fancier baked goods. But that isn’t an option anymore, and sometimes a simple muffin or a quick bread just doesn’t cut it. Think about Sunday brunch, or bridal showers, or a long overdue reunion with your best friend from high school. That’s where thick batters come in. Using thick batters, you can create treats of every size and shape. You aren’t limited by the size of the pan—often you won’t need more than a cookie sheet and parchment paper. Better yet, working with thick batters can be a lot of fun. What you create is limited only by your imagination, and it’s a great opportunity to include the kids.
Are you ready? Let’s find out more.

About Thick Batters
The techniques you will use to make baked goods from thick batters are very similar to those used for muffins and cakes. What differs is the consistency of the batter. Instead of mixtures that can be poured into a pan, the batters you’ll be making in this chapter hold together in mushy balls. They aren’t quite as thick as the dough you will use for yeast breads, but they don’t contain as much liquid as did the baked goods in chapter 6. Here you will use a different proportion of wet to dry ingredients, with less of the liquids. The thicker consistency allows you to mold and sculpt the batter into shapes that will stay put while baking. This opens up a world of possibilities, including scones, doughnuts, and rolls of all shapes and sizes. Yes, you have permission to play with your food!
As with simple batters, the technique used most often to form thick batters is to mix the dry ingredients, mix the wet ingredients, then add the dry to the wet. You may find it necessary to scrape down the sides of your mixing bowl with a spatula during the mixing process to ensure that your batter is well blended. When you choose to use a formed pan (such as a doughnut or scone pan), be sure to transfer the baked goods from the pan to a cooling rack within ten to fifteen minutes of removing them from the oven. If you are using a baking sheet, while less critical, it’s still best to cool them on a rack, so air can circulate beneath them.
Keep in mind that when you work with thicker consistencies, it’s a little bit harder to adjust as you go. Baking too long may result in scones that you can skip across the lake. On the other hand, if you don’t bake them long enough, they will be heavy enough to sink straight to the bottom! For that reason, I recommend substituting ingredients and adjusting proportions in small increments.
Blueberry Scones
It is believed that scones originated in Scotland, and made their way to England and the rest of Europe from there. Surprisingly, the first scones were made from oats, without leavening ingredients. Yes, they were gluten-free and wheat-free! Because they were unleavened, they were quite flat. With the leavening options we have today, we can make our scones a little bit lighter and more cake-like.
Today, most of us think of scones as an alternative to muffins. In Europe they are a standard with afternoon tea, and I can’t think of a better low-sugar treat. Scones might best be described as biscuit-like quick breads, not as sweet as cakes or cookies. They are typically shaped into triangles, but can be made in almost any shape. If you’re pressed for time (or you just don’t want to get your hands dirty), try making them in your muffin pan and let them take on whatever organic form they choose.
Staying true to tradition, I have chosen to use oat flour in this recipe, combining it with a gluten-free flour blend.
{ Makes 8 scones }
1¼ cups gluten-free oat flour
1 cup gluten-free flour blend
½ teaspoon xanthan gum (reduce to ¼ teaspoon if your flour blend contains xanthan gum)
3 teaspoons baking powder
1 teaspoon baking soda
½ teaspoon salt
½ cup light brown sugar
½ cup flaxseed gel (equal to 2 eggs)
¼ cup sunflower oil
½ cup original (or original unsweetened) hemp milk
1 tablespoon fresh lemon juice
2 tablespoons water (as needed)
1 cup blueberries (see tip)
- Preheat the oven to 350°F. Line a baking sheet with parchment paper.
- Mix together the flours, xanthan gum, baking powder, baking soda, salt, and brown sugar in a medium bowl. Set it aside.
- Combine the flaxseed gel, oil, hemp milk, and lemon juice in a large bowl, with a mixer on medium speed, about 2 minutes.
- Gradually add the flour mixture to the wet ingredients. Blend completely on medium-low speed, about 5 minutes.
- Add water, ½ tablespoon at a time, if needed (up to 2 tablespoons), until a wet, pasty batter forms.
- Fold in the blueberries by hand.
- Form the scones and arrange them on the lined baking sheet with space in between.
- Bake at 350°F for 20 to 24 minutes, until lightly browned.

- These scones can be made with fresh, frozen, or dried blueberries. Thaw frozen blueberries and drain them before using. Dried wild Maine blueberries (available from kingarthurflour.com and other online sources) give these a truly special taste. If you choose to use dried blueberries, reduce the amount to ½ cup.
- If you don’t have blueberries on hand, try this recipe with raisins or other berries. If your raisins are dry, I recommend soaking them in water to plump them up and draining them before using.

How to Form Scones
Remember how much fun you used to have with Play-Doh, or Silly Putty, or that green slimy stuff that felt cold and gooey in your hands? Baking gives you a chance to have that same kind of fun in your own kitchen. While it’s possible to form scones with gloves on (go for it if you don’t want to get your hands dirty), using naked hands allows you to feel the consistency of the batter and helps you shape the scones properly. Be sure to take off any rings and bracelets, and wash your hands thoroughly before you start.
Sure, it’s possible to make scones using a scone pan, but they’re expensive and take up valuable space in your cabinet. If you don’t have a scone pan, all you need is a baking sheet lined with parchment paper, a smooth preparation surface, your own hands, a bench knife, and a little bit of warm water.
Once the batter is ready, it will be a loose ball. If you can pick it up with your hands, but it slowly slimes through your fingers, you have the right consistency. You will need a smooth surface to prepare the scones on. This could be a pastry board (these can be pricey and come in luxury surfaces like marble and granite), a nonstick pastry mat, a smooth cutting board (avoid wood), or wax paper. For simplicity, I will refer to this as the pastry board. Follow these steps to form your scones:
- Line a baking sheet or cookie sheet with parchment paper.
- Spread a few drops of warm water on the pastry board.
- Using a spatula or a spoon, loosen the batter from the sides of the mixing bowl.
- Wet your hands with a little bit of warm water. Lift the batter ball from your mixing bowl and place it in the center of the pastry board.
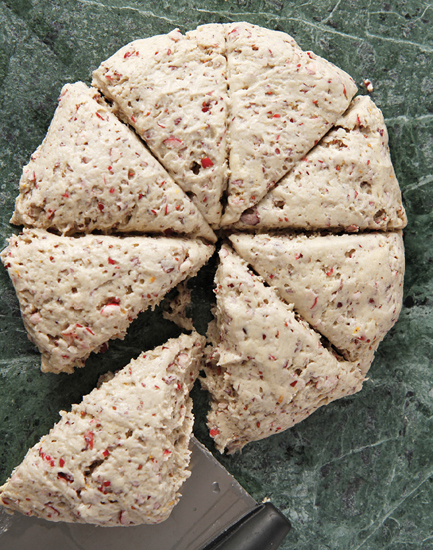
- Flatten the top of the ball using your wet fingers, keeping the round shape but letting it spread about 9 inches in diameter and about an inch thick.
- Run the bench knife under warm water and use it to slice the batter into eight pieces (as you would a pizza). If you don’t have a bench knife, a standard flat-edged knife will do.
- Use a bench knife or spatula to move the scones and place them on the lined cookie sheet, leaving space between the scones for baking.
Your scones are now ready to go into the oven. If the scones lose their shape when you move them, use wet fingers and your knife to reshape them. This technique can be used to form any shape you desire from a loose batter, including Baked Doughnuts and Sweet Potato Dinner Rolls.
Scones bake quickly because of their large surface area. The best way to test for doneness is to tap lightly on the top of a scone. The surface should be thin but hard. If the top of the scone doesn’t indent, they are ready to come out of the oven. Don’t worry; they will soften a bit as they cool.

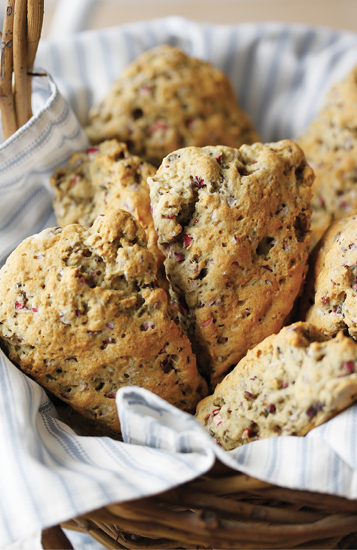
Cranberry Orange Scones
I can’t think of two fruit flavors that go together better than cranberry and orange. It’s the perfect blend of flavors from different corners of the United States. Whether it’s a punch made with cranberry and orange juices, a relish, or these scones, you just can’t miss when you mix these flavors.
Notice that in this recipe I have chosen honey as the sweetener. The gumminess of this sugar (in its prebaked state) helps hold the pastry together and allows you to shape it with your hands.
{ Makes 8 scones }
2 cups gluten-free flour blend
½ teaspoon xanthan gum (leave out if your flour blend contains xanthan gum)
1 teaspoon salt
2 teaspoons baking soda
2 teaspoons baking powder
¼ cup unsweetened applesauce (equal to 1 egg)
¼ cup grapeseed oil
¼ cup honey
½ cup fresh orange juice
1½ teaspoons orange zest
1 cup roughly chopped cranberries
- Preheat the oven to 350°F. Line a baking sheet with parchment paper.
- Mix together the flour, xanthan gum (if needed), salt, baking soda, and baking powder in a medium bowl. Set it aside.
- Combine the applesauce, oil, honey, orange juice, and orange zest in a large bowl, with a mixer on medium speed, about 2 minutes.
- Gradually add the flour mixture to the wet ingredients. Blend completely on medium-low speed, about 5 minutes.
- Add the cranberries and blend for 30 seconds longer.
- Form the scones and arrange them on the lined baking sheet with space in between.
- Bake at 350°F for 16 to 18 minutes, until lightly browned.

- These scones are easy to make. If you have time to make breakfast tomorrow morning, take the applesauce and orange juice that you will need out of the refrigerator before bedtime. Serve these warm for breakfast or pop them in a lunch box for a special treat. They take less than 30 minutes to make, including baking time.
Baked Doughnuts
I have a confession to make. There was a time when I would serve my family store-bought chocolate frosted doughnuts for breakfast—almost every day. I cringe when I think about it now. Nevertheless, when I eliminated wheat, milk, and eggs from my family’s diet, doughnuts were one of the treats I missed most. I needed to create an allergen-free doughnut, but I didn’t want it to be the high-calorie, high-sugar doughnut of my past. I also wanted my doughnut recipe to be quick and easy. That meant it had to be yeast-free and had to be baked rather than fried.
This basic baked doughnut recipe is most like an old-fashioned doughnut. It can be eaten plain, or topped with just about anything you want. Have fun with toppings; let the kids each decorate their own, or create a topping bar (as you would for ice-cream sundaes).
If you have time, these can be made in less than 30 minutes in the morning. Just remember to take the refrigerated ingredients out the night before.
{ Makes 8 to 10 doughnuts }
2½ cups gluten-free flour blend
½ teaspoon xanthan gum (leave out if your flour blend contains xanthan gum)
½ cup light brown sugar
4 teaspoons baking powder
½ teaspoon salt
½ cup original hemp milk
½ cup unsweetened applesauce (equal to 2 eggs)
1 tablespoon grapeseed oil
½ teaspoon vanilla extract
- Preheat the oven to 350°F. Line a baking sheet with parchment paper, or spray a doughnut pan with cooking oil.
- Mix together the flour, xanthan gum (if needed), brown sugar, baking powder, and salt in a medium bowl. Set it aside.
- Combine the hemp milk, applesauce, oil, and vanilla in a large bowl, with a mixer on medium speed, about 1 minute.
- Gradually add the flour mixture to the wet ingredients. Blend completely, about 5 minutes on medium speed, until a wet ball forms.
- Transfer the dough to a smooth prep surface and separate the dough into 8 to 10 balls.
- Wet your hands. Roll a ball back and forth between your hands to lengthen it into a cylindrical shape about 6 inches long.
- Form the cylinder into a doughnut on your prepared baking sheet or in your doughnut pan. Use a few drops of water to glue the ends of the doughnut together. Use wet fingers to smooth the sides and top of the doughnuts.
- Repeat this process for the remaining doughnuts.
- Bake at 350°F for 15 to 18 minutes, until lightly browned.

- These doughnuts will have a heartier taste when made with a multigrain flour blend.
- As an alternative to doughnuts, try forming crullers. After rolling the dough into a cylinder, twist it on your baking sheet to create the traditional cruller shape.
- A doughnut pan will help give the doughnuts a smooth shape. Whether you use a pan or a baking sheet you will get the same great taste.
- With the exception of Sugar-Crusted Doughnuts (see below), the toppings should be added when you are ready to serve. Undecorated doughnuts will keep for up to a week, and can easily be frozen.
* Variations:
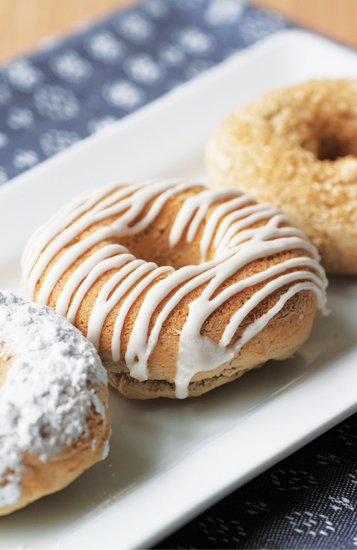
Glazed Doughnuts: Prepare Vanilla Glaze. Drizzle the glaze onto cooled doughnuts.
Chocolate-Frosted Doughnuts: Prepare Chocolate Glaze. Drizzle the glaze onto cooled doughnuts.
Sugar-Crusted Doughnuts: Before baking, sprinkle about ½ teaspoon of raw sugar over the top of each doughnut.
Powdered Doughnuts: Spread ¼ cup of confectioners’ sugar on a plate. Dip the tops of the baked doughnuts into the sugar, and then serve. This works best when the doughnuts are slightly cooled.
Sweet Potato Dinner Rolls
Every year as Thanksgiving approaches, my family begins the debate about whether I should prepare mashed potatoes or sweet potatoes. In the end, I usually just make both. When it comes to rolls, however, everyone agrees that these sweet potato rolls are the way to go. Although most of the roll and bread recipes are in chapter 9 because they require yeast, this one is simpler, yeast-free, and can be prepared using the same techniques as scones and other thick batters.
Notice that there is no standard egg replacer in this recipe. The sweet potato provides the same effect that a fruit puree would, acting as the replacement for eggs, providing both taste and texture, and the starch in the potato will help to keep the rolls together.
{ Makes 8 to 10 rolls }
1 cup mashed sweet potatoes (about 2 medium potatoes)
⅔ cup millet flour
1⅓ cups gluten-free flour blend
¼ teaspoon xanthan gum (leave out if your flour blend contains xanthan gum)
3 teaspoons baking powder
1 teaspoon salt
8 tablespoons (1 stick) Earth Balance Natural Shortening, softened
⅔ cup original hemp milk
Up to 3 tablespoons water (as needed)
Up to 2 tablespoons additional flour for dusting
- Bake the potatoes (either in a microwave or traditional oven), until a fork inserted goes in easily. After the potatoes cool, cut them open and scoop out the meat. Set it aside.
- Preheat the oven to 375°F. Line a baking sheet with parchment paper.
- Mix together the flours, xanthan gum (if needed), baking powder, and salt in a medium bowl. Set it aside.
- Combine the shortening and hemp milk in a large bowl, with a mixer on medium speed, about 3 minutes.
- Add the sweet potato meat. Mix for 2 to 3 minutes more on medium speed, until smooth.
- Gradually add the flour mixture to the wet ingredients. Blend completely, about 5 minutes on medium speed.
- Add water, ½ tablespoon at a time, until a wet ball forms.
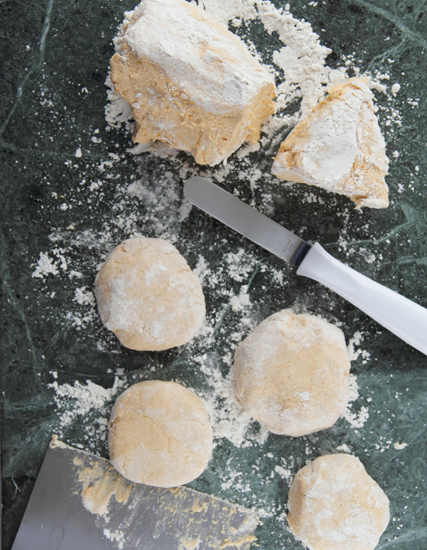
- Dust a smooth prep surface with a light coating of flour.
- Scoop the dough onto the prep surface. Use a bench knife to separate the dough into 8 to 10 balls.
- Roll each section of dough between your hands to form a smooth ball. Place the formed rolls on the prepared baking sheet and gently flatten the tops.
- Bake at 375°F for 20 to 24 minutes, until lightly browned. If you want both sides evenly browned, flip the rolls halfway through baking.

- These rolls can be made into a variety of shapes, including flat-topped rolls and rounded rolls. They can be made into English muffin shapes, or sliced in half and used as rolls for burgers or sandwiches.
- The process for forming these rolls is the same as I described for scones and doughnuts, with the added trick of using flour for dusting. You will use dry hands, rather than wet, to form the shapes here. When dusted, the rolls will have a traditional bakery look; however, dusting is not required to achieve a great taste. Feel free to form the rolls with wet hands for a smoother finish.
Oatmeal Raisin Cookies
This recipe is a classic—in an allergen-free version. While most of the cookies in this book can be found in the next chapter, I have included this recipe here because the techniques used to create these cookies more closely resemble those you use for a batter.
{ Makes approximately 24 cookies }
¾ cup gluten-free flour blend (see tip)
1½ cups gluten-free quick-cooking oats (see tip)
¼ teaspoon salt
1 teaspoon baking powder
½ teaspoon cinnamon
8 tablespoons (1 stick) Earth Balance Natural Shortening, softened
½ cup raw sugar (see tip)
½ cup flaxseed gel (equal to 2 eggs)
2 tablespoons water
¾ cup raisins (see tip)
- Preheat the oven to 350°F. Line a cookie sheet with parchment paper.
- Combine the flour, oats, salt, baking powder, and cinnamon in a medium bowl. Set it aside.
- Cream together the shortening and raw sugar in a large bowl, with a mixer on medium speed for about 5 minutes, until a textured paste forms. Scrape down the sides of the mixing bowl as needed. (learn about creaming.)
- Add the flaxseed gel and water. Blend with a mixer on medium-low speed, about 1 minute.
- Gradually add the flour mixture and blend on medium speed, about 2 minutes. The batter will be thick.
- Stir in the raisins by hand.
- Use a large spoon and damp hands to form cookies. Place them on the prepared baking sheet, leaving space in between.
- Bake at 350°F for 12 to 15 minutes, until the tops are lightly browned.

- While it’s okay to select a gluten-free flour blend that contains xanthan gum, notice that there is no xanthan gum used in this recipe.
- This recipe makes a soft cookie. For a crunchier cookie, substitute gluten-free old-fashioned rolled oats for the quick-cooking oats.
- You may substitute granulated cane sugar for raw sugar (see “Sweetening Options”).
- Try these with dried cranberries instead of raisins, or leave out the fruit entirely for a simple oatmeal cookie.
Poured Pizza Crust
I was inspired to create this pizza crust after attending a gluten-free baking class at the Culinary Institute of America. I had tried packaged gluten-free pizza mixes with allergen-free substitutions, and I wasn’t completely happy with any of them. Most of them used yeast and required a rise cycle. They took too long to prepare and were just a little too hard to sink your teeth into.
The pizza crust we made in Chef Coppedge’s class also used yeast and still required some rising time, but he did something I had never seen before: He taught us how to form individual pizza slices, using a pastry bag to spread the dough on a baking sheet. What a novel idea! There was no need for a rolling pin and no mess in transferring the crust to the pizza tin.
But I wanted an even simpler pizza crust—one that was shaped like a pizza, didn’t require yeast, and had no rising time—so I developed this one. After all, Friday night pizza should be quick and fuss-free!
{ Makes 1 large pizza crust, 8 servings }
1¾ cups gluten-free flour mix
¼ teaspoon xanthan gum (leave out if your flour blend contains xanthan gum)
1 teaspoon salt
1 teaspoon baking soda
4 tablespoons (½ stick) Earth Balance Natural Shortening, melted
1 cup original hemp milk
1 tablespoon rice vinegar
Your choice of toppings (see suggestions)
- Preheat the oven to 350°F. Coat a pizza tin with olive oil.
- Combine the flour, xanthan gum (if needed), salt, and baking soda in a medium bowl. Set it aside.
- Combine the shortening, hemp milk, and vinegar in a large bowl, with a mixer on medium-low speed, for 1 minute.
- Add the flour mixture to the wet ingredients and blend for 2 to 3 minutes on medium speed.
- Pour the batter into the pizza tin. Use a spatula (or the back of a soup spoon) to spread the batter evenly to the edges.
- Bake at 350°F for 15 minutes.
- Remove the partially baked crust from the oven. Use a spatula to gently flip the crust over so that the browned side is now the top. Add desired toppings.
- Bake for 12 to 18 minutes more until the toppings are done.

- Because this is a batter, this recipe works best if you use a pizza tin with a little bit of an edge— ½ inch will do. If you don’t have a pizza tin, a large cookie sheet or baking sheet with an edge will work.
- While not required, flipping the crust after it is partially baked will allow the crust to bake more evenly and leave it slightly crispy on both sides.
- Try making personal pizzas in round cake pans, and let the kids choose their own toppings.
* Topping suggestions:
Keep in mind that it’s not a requirement to have cheese on your pizza. Nor is there a requirement to use tomato sauce, or any of the other traditional ingredients. While there are some cheese substitutes available on the market, a pizza with tomato sauce, veggies, and meats can be very satisfying. You can customize toppings to suit your family’s particular food restrictions. Here are a few to try:
Pepperoni: This is the classic pizza, without the cheese. Layer tomato sauce, Italian spices, and pepperoni. If you feel the need for a cheese substitute, add Daiya Mozzarella Style Shreds.
Greek pizza: Layer sliced tomato, spinach, and olives. Drizzle olive oil mixed with basil over the top.
Veggie pizza: Layer chopped onions, green peppers, red peppers, and mushrooms over a thin layer of tomato sauce. Add a non-dairy cheese option, if desired.
Salad pizza: Prepare your favorite salad and serve it over the pizza crust. For this pizza, don’t bake the toppings. Add the toppings after the crust is fully baked.


