6
Open Fires
Home Cooking on the Firepit and the Grill
There’s almost nothing I like better than camping with my family. While we don’t necessarily rough it, we love to get out of the city and into the hills and forests far from the noise of traffic, leaf blowers, and the surprisingly loud chatter of the spandex-clad cycling groups that pedal constantly past our Austin home.
Stacy likes to note that our camping meals aren’t what you might expect on a typical camping trip. “It’s not like we just open a can of biscuits or throw hot dogs on the grill,” she says. However, cooking and eating a good meal in nature is one of the finest pleasures in life, so we eat well whether we’re camping in a mountain forest or grilling on the firepit in our backyard.
This chapter is devoted to re-creating the often-primitive style of camping-trip cooking at home. The recipes require neither bells and whistles nor advanced techniques, but I do have some ideas that will enrich your meals, improve flavors, and take your campfire cooking to a satisfying place.
This is a good time to make use of the whole fire. After all, if you were fully out in nature, the fire is the only heat source you would have, so it makes sense to capitalize on every aspect of it. And while I love to coax all the energy, flavor, and nuance out of a fire, I don’t always want to have the aggressive flavors of smoke or ash in every bite. Hence, some of the flavors I’m going for in this chapter are subtly smoky and some are not smoky at all. Good flavor and texture begin with prep, which is why many of these recipes include salting (dry brining) and drying out for a day or more before cooking.
I use different aspects of the fire to cook vegetables. You can char any tough green vegetables such as broccoli, brussels sprouts, or green beans over the hot flame of a chimney or in a roaring fire. I tend to like my vegetables rather undercooked, meaning I don’t mind if they have a bit of crunch. Cooking larger vegetables directly in the coals is a surprisingly wonderful and low-effort way to fill the table.
As for proteins, there are a few things that I like to cook over direct and indirect heat on a firepit (pork steaks and côte de boeuf), as well as some hybrid smoking-grilling dishes on the PK grill (chicken and fish), which offers the best of both worlds. Finally, see the recipe for Jordan’s Perfect Green Salad (this page) for a simple and delicious accompaniment to every meal.
Firepit Cooking
The elements of firepit cooking are primitive: wood, flames, grill. The unbridled nature of fire often leads to extremes. If you are timid about cooking over open fire, you won’t maximize the opportunities it presents. Don’t content yourself with only hot dogs and s’mores or go all in when the flames are at their peak and either undercook or burn your food—or do both at the same time.
Firepit cooking rewards patience and nuance. Once you learn these skills, you can cook just about anything well. For that reason, I love to cook larger cuts of meat on the firepit. They can take a while—up to a few hours of careful tending—but when done well, they give you the best of cooking over hot coals: grill action and a bit of smoke at the same time.
Getting Started
First, have plenty of wood on hand that is sized to fit your firepit. If you’ve got a big, open area, full-size fire logs work fine. But if it’s a smaller space, you’ll want to split those logs and maybe cut them shorter so you can feed the fire without making it stumble. As with all of the cooking in this book, avoid softwoods, like pine and cedar, just as you would in your smoker. Oak, fruit and nut woods, and hickory are all excellent. For more on selecting wood, see chapter 3.
Obviously, don’t build a fire—whether it’s in your backyard or in a park somewhere—when it’s dangerously hot, dry, or windy. Even in perfect weather, it’s wise to have water at the ready from a live hose with a spray nozzle or a couple of full buckets in case the fire starts to get away from you. I also keep fire blankets on hand—one in the camper and a small one in my cooking kit.
The best firepit cooking is anchored by a strong coal bed, so when you finally start cooking, the fire is on its second or third round of logs (the initial logs having burned down to establish that bed).
If you have charcoal and a chimney, it’s perfectly fine to start the fire that way, as the two generate quick and durable heat. I often place my prepped chimney in the center of the firepit and surround it with two or three stacked logs on three sides. I then light it and, after about twenty minutes, the heat and flame generated by the smoldering charcoal begin to escape the chimney and ignite the logs. This way, you get a jump on burning the wood while the charcoal provides an instant mini–coal bed to get you started.
After your first logs are going, dump and remove the chimney (place it somewhere safe) and use a long set of tongs to rearrange the logs in a log-cabin formation (see this page) to encourage airflow and combustion. As those first logs start giving up some hot coals, add another log or two and wait. When those burn down, you should have an ample coal bed for cooking. After this, maintain the firepit so it has one or two burning logs and a good coal bed. This is how you always want your firepit set up for cooking.
The trick to cooking over a firepit is tending and managing the fire along with whatever you’re cooking. It’s a little more difficult to control a fire versus adjusting the flame of your gas stove’s burner, but the general principle is the same. Only in this case, you adjust the logs and coals to produce the optimal heat and smoke you want.
To have precise control, use a pair of extra-long tongs to constantly move logs around and rustle up the coals. You can prepare a nice, flame-free coal bed to cook over while maintaining your gently burning logs on the side.
Prepping the Grate
For the recipes that follow, you need a good-size grate to cover the firepit. In the best of all worlds, it shouldn’t cover the entire surface of the firepit (mine covers half) because you need to have access to the logs and coals. Make sure your grill is clean and give it a quick wipe with grapeseed oil before putting food on it.
Be sure to have a comfortable distance between the grate and the coals. You want it close enough to get plenty of heat but not so close that you can’t escape the heat. It should also be high enough so the fat can drip down without creating flare-ups. A grate that is sixteen to eighteen inches above the coals should do the trick.
One of the beauties of firepit cooking is that you can achieve a hybrid of grilling and smoking. The fact that you’re cooking over a ton of wood coals is significant—they provide the delicious smoke that you can’t get from charcoal. But because the “smoke chamber” is simply the wide-open sky, foods can cook for a long time without taking on too much smoke.
In this chapter are a few things—both meat and vegetables—I love to cook on the grate and in the coals of the firepit. These are terrific ways to take full advantage of the whole fire.
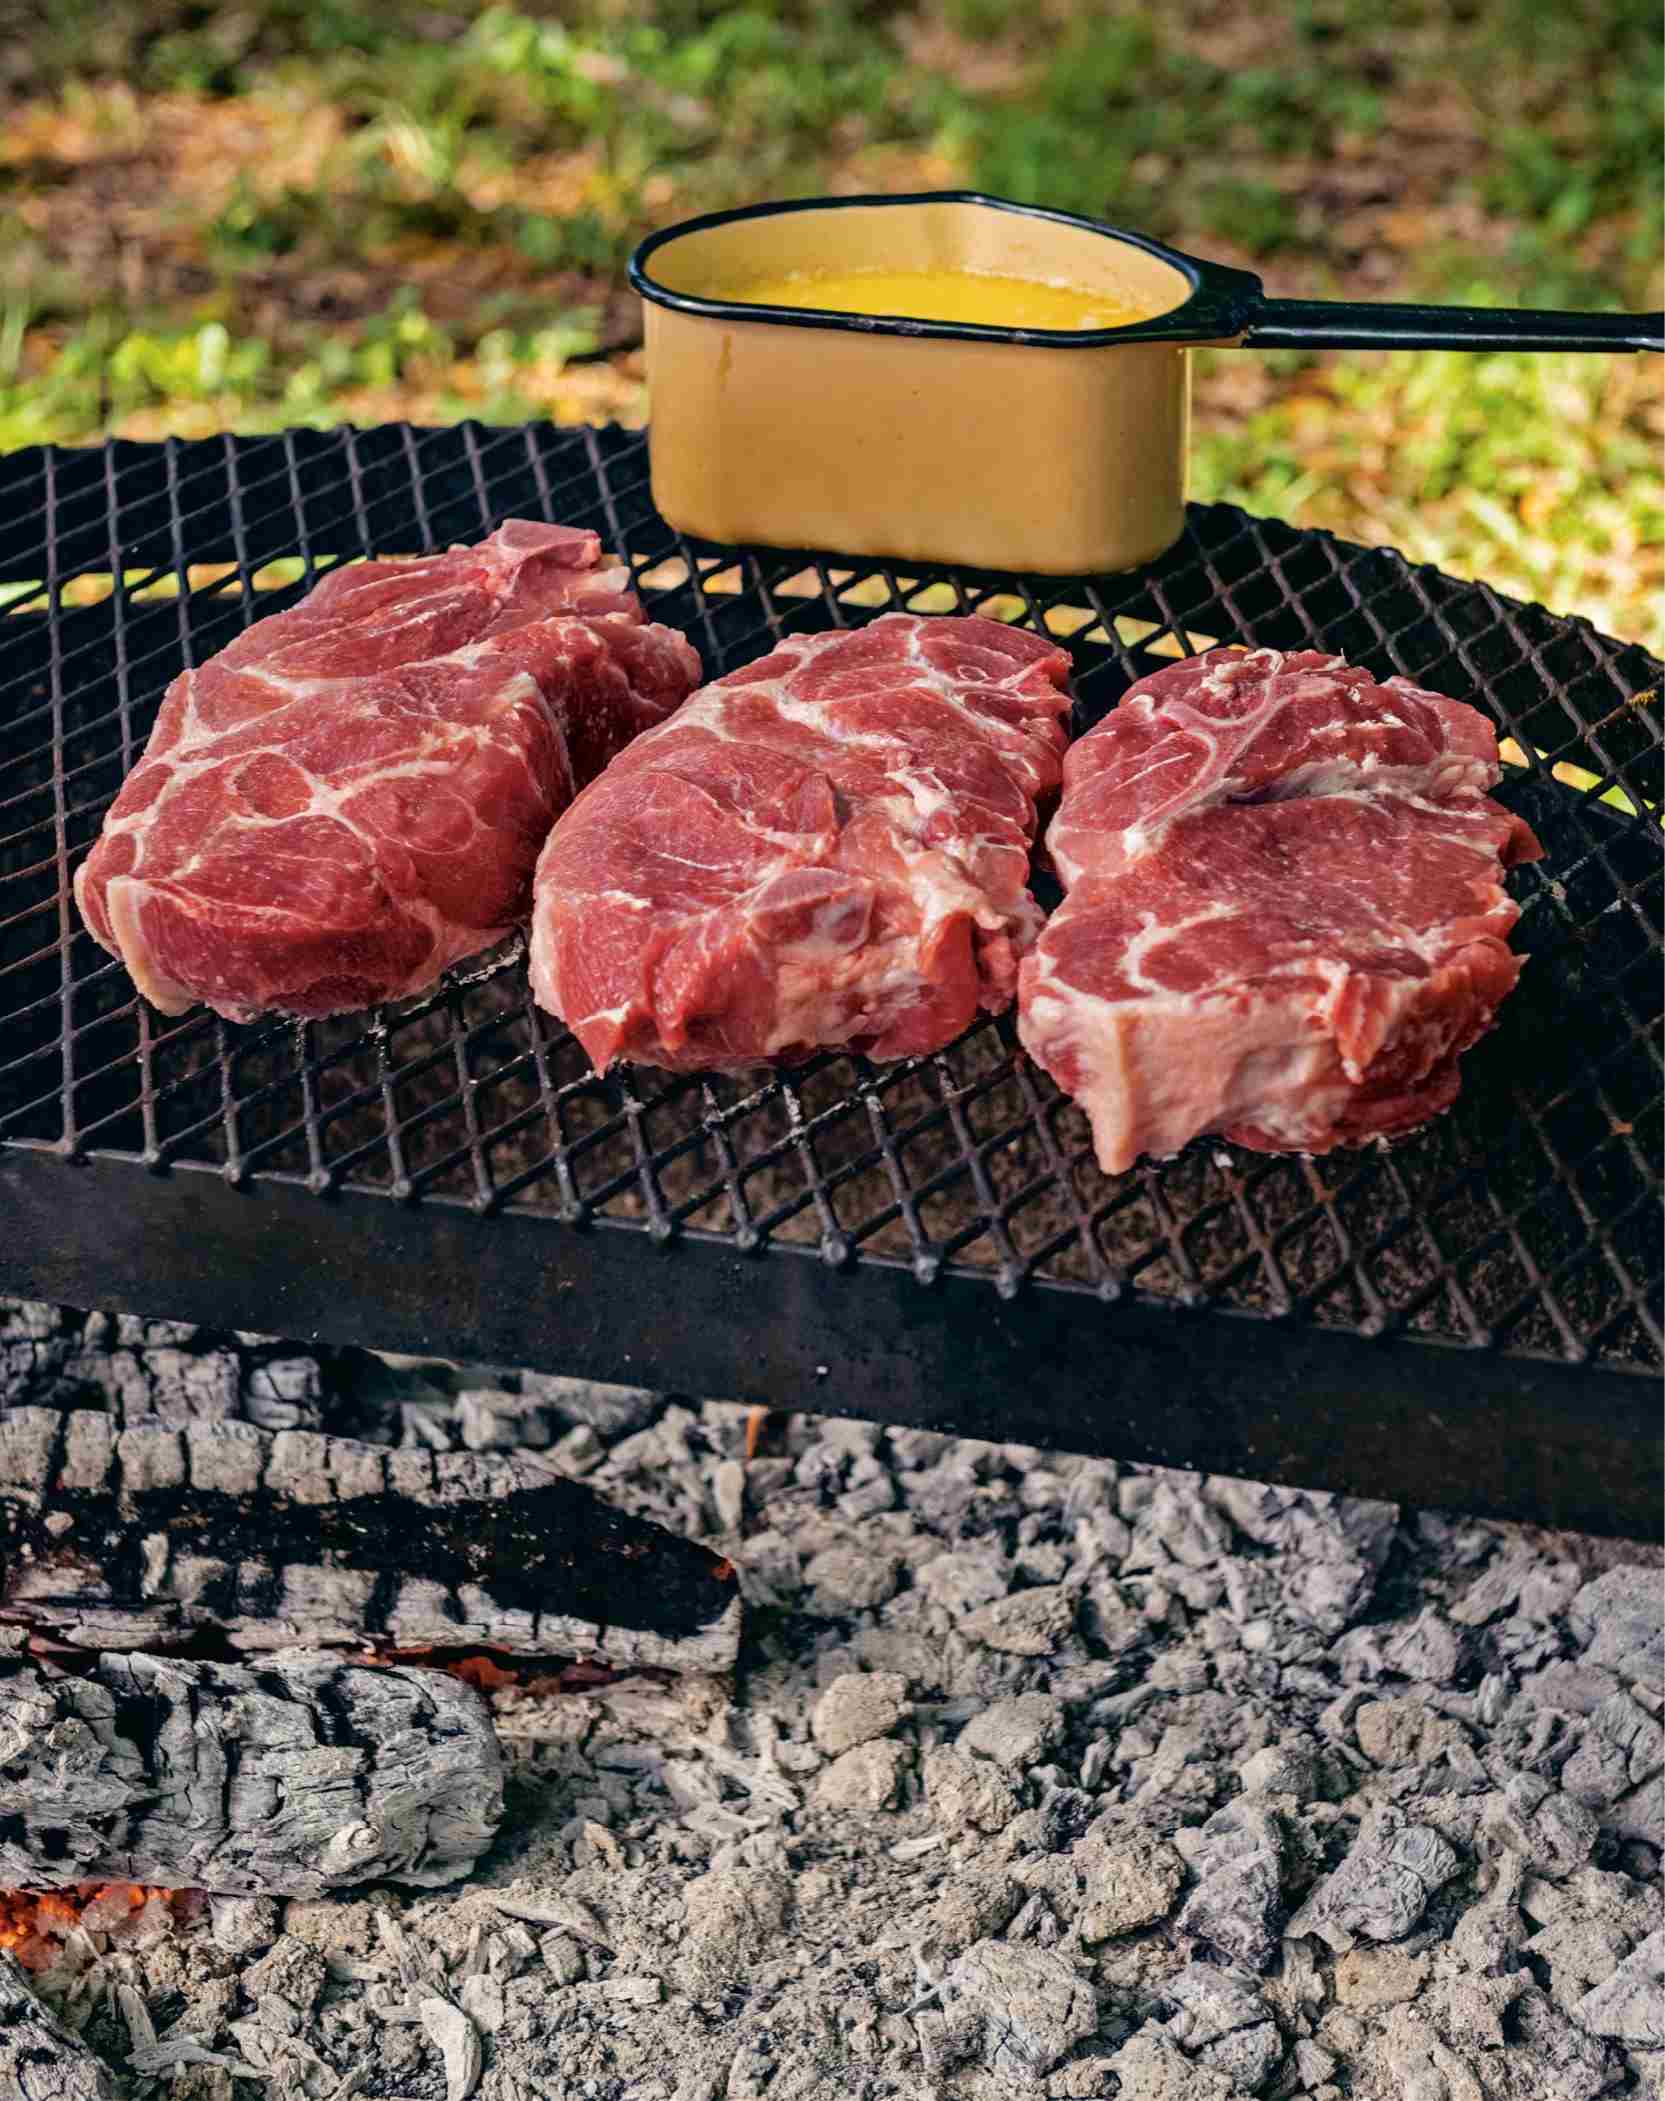
Firepit Pork Shoulder “Steaks”

This preparation of pork combines the dynamics of a slow cook with the fast grill, producing a flavor that hearkens to both. Pork steaks absorb the delicious effect of the grill as their drippings vaporize on the hot coals and subsequently rise up to perfume the meat. Yet they also pick up gentle smoke from the coals and burning wood.
While this pork is cooked like a steak or a chop, it is actually cut from the shoulder, aka the pork butt. As you know, the meat from the shoulder is much tougher than meat from the loin, where the chops are. Consequently, pork shoulder is usually cooked long and slow to break down the collagen and make the meat pull-apart tender. The goal for this approach to shoulder steaks is to cook them over direct heat, like a pork chop, but slowly and deliberately so they soften a bit over time. You’re not looking for exceedingly tender, pulled-pork consistency here. But you’re also going to cook well past medium-rare as you might do for a chop. The length of the cook allows the meat to pick up precious flavor from the fire.
Speaking of pork chops, they would be equally delicious cooked over the firepit and basted with the mop recipe listed here, but they are an entirely different muscle—from the loin, not the shoulder—which cooks quite fast, should be served at a lower internal temperature, and doesn’t need all that time to break down tough muscle fiber. Cook thick-cut pork chops as you would a steak (though not as rare), but feel free to baste them with this mop for added flavor.
The Meat
I recommend using rich, well-marbled pork, as the fat content helps the meat hold up over a long cook. Definitely try to avoid modern, conventional pork, which has been purposely bred to be lean. I look for heritage breeds such as Berkshire or Red Wattle. There’s even a ranch raising Ibérico pigs in Texas, the same breed that produces the world’s greatest jamón in Spain.
Use a bone-in pork butt and ask your butcher to cut it into steaks two to three inches thick. You could also buy a whole shoulder (more affordable but also more work) and then break out the old bone saw, which I sometimes do much to Stacy’s chagrin (not her favorite thing to find lying around the kitchen), and cut through the bone yourself. Most of the steaks from a pork butt will have a sliver of the blade bone in them. This is what you want. Boneless butts have to be butterflied to get the bone out and then are tied up in a round. This is fine for roasting a whole piece, but the steaks need to retain their structural integrity and thus must retain the bone.
The Mop
A mop is necessary here to add pork-friendly flavors and to keep the meat moistened so it doesn’t burn while it cooks for a good long while over the coals. The mop also provides additional fat that your pork might not have (even a well marbled heritage breed), augmenting the supply of vaporized juices as it drips onto the coals.
You can prepare the mop on the stovetop in advance and then warm it over the fire when it’s time to use. Doing this advance prep makes it easy to cook these steaks at home or at a campsite.
Cook time: 3 to 4 hours
Makes 4 to 6 servings
•Kosher salt
•One 6- to 8-pound / 2700 to 3600g bone-in pork shoulder butt, cut into 2- to 3-inch-thick steaks
The Mop
•1½ pounds / 350g unsalted butter
•⅓ pound / 150g thick-cut bacon, in one piece, cut into chunks
•3 cups / 690g apple cider vinegar
•Peel of 1 orange
•Peel and juice of 1 lemon
•15 to 20 garlic cloves, smashed (use the larger amount if you favor garlic)
•½ yellow onion, coarsely chopped
•Grapeseed oil for the grate
Liberally salt the steaks on both sides and set them on a baking sheet. Let the steaks air-dry, uncovered, in the refrigerator for at least 1 day or up to 2 days.
To make the mop: In a medium saucepan over low heat, combine the butter, bacon, vinegar, orange peel, lemon peel, lemon juice, garlic, and onion and warm until the butter melts, stirring occasionally. Keep the mop warm on the grate.
Build a firepit fire, burning down six to eight logs to create a nice coal bed, then maintain another couple of logs burning on the side to supply coals. When it’s time to start cooking, clear the burning logs off the coal bed so you have just coals to cook over. The logs can continue to burn on the side. Because of the length of time that these steaks cook, they are best done over a medium- to low-heat coal bed with the grate set eighteen to twenty-four inches above the coals. Oil the grate.
Remove the steaks from the fridge and lay them on the grate. Don’t temper the steaks, just put them on cold, as the first couple of hours are really about developing the exterior of the meat.
Since the steaks are going to cook in the open air for the next 1½ hours or so, set the fire to mellow and let ’em rip. Stand by with tongs and flip the steaks every now and then to develop a nice, rich crust. As the fire progresses, bring in fresh coals from the burning logs on the side and keep the meat moving so it never flames up. You want these steaks to be kissed by heat and the clouds of their own evaporations, not by flames.
After the first couple of flips, starting 15 to 20 minutes in or when you see the surface of the steaks beginning to dry out, start to mop to keep the surface moist. Gently drizzle the mop over the tops of the steaks. It will drip down and hiss in the coals, which is a good thing! Turn the steaks and mop the other side. Repeat this every 10 minutes or so as needed to keep the surface moist. Also, be careful with your mop—you need it to last the whole cook and then have some to put in the wrap, so go easy.
Now you’re about 2 hours in. Much as with brisket, you need your crust to get a little crustier than you ultimately want it because it will be softened after you wrap. When you’ve built a great crust, it’s time to wrap the steaks in aluminum foil. Have a foil sheet ready for each steak. Remove the steaks, place each one on a foil sheet, and pour a little bit of the mop over the top. Wrap each steak tightly in the foil and return the steaks to the fire for about 1 hour more.
Using a digital thermometer, test for doneness; the steaks are ready to remove from the heat when the thermometer inserted into the side of each at the middle reads about or just above 200°F. Allow the steaks to rest while you add some wood to replenish the coal bed. This could take 40 minutes to 1 hour.
Once your coals are back up and hot—or you’re simply ready to eat—unwrap the steaks and put them back on the grate to sizzle up the surface and regain your crust. Save the juices retained in the foil to pour over the sliced meat.
Remove the steaks from the fire and, when cool enough to hold, it’s time to slice and serve.


Firepit Côte de Boeuf

A staple of French cookery, côte de boeuf is immensely versatile. The term basically refers to a bone-in rib-eye steak, as we call it here in the US when it’s just one bone. It’s typically cut thick in France and meant to feed two people. It could also be known as a (very short) standing rib roast. But rib roasts are usually cooked in the oven, and here I use a two-bone rib steak to create a sort of hybrid steak–prime rib dish. You could also use a thick-cut, single bone rib eye, but it would cook faster. The pleasures of prime rib roast and grilled steak converge in one piece of meat: plenty of tender interior meat is matched with a thick, crunchy crust that supplies the ideal contrast of smoke, salt, and caramelization. Plus, one big rib steak is plenty to feed two to four people, making for a lovely presentation that can be shared family-style.
Cook time: 2 to 3 hours
Serves 4 to 8
The Meat
Any good butcher can prepare a two-bone rib steak for you, though it’s wise to order it a day or two in advance to make sure he or she can cut it to your preference. If the steak has an especially thick outer layer of fat, ask the butcher to trim some off to avoid flare-ups. You may also want to ask that the steak be tied with butcher’s twine so it maintains its form during a fairly lengthy cook, though I usually skip this step. Prep involves little more than dry brining with salt.
Côte de boeuf is a natural for the firepit, which allows you to cook directly, indirectly, and with a bit of smoke—all from fresh wood coals. The thickness of the cut demands a relatively long cook and gives you lots of flavor from the fire. This is basically a low-pressure two- to three-hour cook—the kind of thing you do while waiting for friends on a Saturday afternoon. Ideally, cook it slowly to get even cooking throughout. But because it is steak, you can also cook over higher heat if you need to speed things up.
•Kosher salt
•2 two-bone rib steaks, trimmed and tied
•Water, beef stock, or vinegar for spritzing
•Melted tallow or grapeseed oil for coating
•Horseradish Cream Sauce (recipe follows) for serving
•Grapeseed oil for the grate
Liberally salt the exterior of the steaks and set them on a baking sheet. Let the steaks air-dry, uncovered, in the refrigerator for 24 to 36 hours.
Build a firepit fire, burning down six to eight logs to create a nice coal bed, then maintain another couple of logs burning on the side to supply coals. When it’s time to start cooking, clear the burning logs off the coal bed so you have just coals to cook over. The logs can continue to burn on the side. Because of the length of time that these steaks cook, they are best done over a medium- to low-heat coal bed with the grate set eighteen to twenty-four inches above the coals. Oil the grate.
While the first logs are cooking down, remove the meat from the fridge to temper it a bit before putting it on the fire.
Stand the steaks vertically on the bone on the grate. This heats up the bone and begins the process of slowly cooking the adjacent meat. After the bone is browned, turn the steaks onto a side and let them go from there. Don’t turn the spinalis side (the rib-eye cap or muscle that runs along the outside of the steak, opposite the bone) to face the flames from the burning logs. The spinalis is the most tender and flavorful part of the rib eye. It will always cook past rare, but it’s good to protect it from too much heat so it retains its moisture.
Keep the steaks over low to medium heat on the cooler areas of the grate. Move them around fairly frequently, flipping them at the same time. While you’re flipping, also keep a spray bottle full of water handy to spritz the steaks, cool the sides, keep the crust from drying out too much, and prolong the cook. Slowly build a crust on the side facing the heat and then flip the steaks to let that side cool while the other side cooks. Do this repeatedly until a digital thermometer inserted into the side of each steak at the middle reads 110° to 112°F. At that moment, pull the steaks off the grate.
Allow the steaks to rest while you add some wood to replenish the coal bed until it is raging hot. After the steaks have rested no less than 30 minutes and for up to 1 hour—however long it takes to get the fire really hot again—gently coat the steaks in the tallow and throw them back on the grate for a couple of minutes on each side, until the crust gets nice and sizzling again. Remove the steaks from the heat.
When the steaks are cool enough to hold, it’s time to slice and serve. Slice between the bones so you have two rib-eye steaks. Slice the meat off the bone, leaving the bone in place, thus retaining the shape of the original steak. Then cut across the steaks, fanning from the bone to obtain nice long strips. Arrange the slices on a platter and include the bones. Serve horseradish sauce alongside.
Horseradish Cream Sauce
Makes 1½ cups
•1 cup / 240g sour cream
•⅔ cup / 140g prepared horseradish
•2 tablespoons / 28g champagne vinegar
•Grated zest of 1 lemon
•Fine sea salt
In a medium bowl, combine the sour cream, horseradish, vinegar, and lemon zest and mix well. Season with salt. Cover and chill for at least 1 hour before serving. The sauce will keep in the fridge for up to 2 weeks.

Adding a Hint of Smoke
To get a whiff of smoke flavor when grilling with charcoal, add a little wood to the mix to combine the radiative heat of coals with the gentle complexity of woodsmoke.
In my second book, Franklin Steak, a framework was described in which a whole log is inserted lengthwise into the back half of a grill, dividing the grill into two zones. Named the Franklin Formation by Jordan, the half over the log is a cool zone, while the front half, containing lit charcoal, is a hot zone. The front edge of the log catches fire, creating some smoke and flames. This produces a sort of hybrid grilling and smoking situation.
In the interim, I have made some improvements to the original framework (although, honestly, it still works well). By putting the log in the back of the grill, you had to reach over hot coals any time you wanted to put anything on the cool zone. Lately, I’ve been playing around with wood lengths and placements and tried putting the log in different orientations (which Jordan jokingly named the “Franklin Reformation” and the “Franklin Reformation Variation Orientation”). Terminology aside, the following ideas are just different configurations of a good technique.
First, you want to cut the log to ten inches or so, which gives you much more flexibility. You can then insert the wood perpendicularly into the grill relative to the grill’s length, set it at an angle, or position it parallel to the length in the middle, allowing hot coals to smolder it on two sides and creating a cooler zone in the center. Using a smaller log offers quite a bit more adaptability than the original formation—and provides the same benefits.
When choosing logs, I look for ones that are particularly dense and squarish in shape with no bark. I like these blocky logs because those with a wedge or a tip will catch fire on that end and burn too rapidly.
Whereas the cool zone of the original formation was rather long and narrow without much room to avoid the flaming edge of the log, this new version is both more comfortable and more adjustable. Like a slider on a mixing board, you can move the log in tighter to create a concentrated coal bed and large cool zone, or you can move it away from the charcoal to give the coal bed a wider birth, diminishing the intensity of its heat while maintaining a bit of smoke and a good-size cool zone. All in all, this is a much smarter configuration, and all that’s required to add a hint of smoke is sawing down your firewood to the right size for your grill.

Our Fishy Friends
I’m not very good at cooking fish on the grill, which may be the reason I don’t do it nearly as much as I could. Like everyone, I worry about all kinds of details particular to our fishy friends: the tiny bones that you have to remove from the raw fish, the cooked fish before you eat it, or your mouth after you’ve taken a bite; the scales that can slice and dice your fingers; and the skin that, no matter how hard you try, always seems to stick to the pan or the grill, mangling your fillet.
All that said, one thing is undeniable: fire-cooked fish done well is simply delicious. And certain fish love the kiss of the coals. Their flavors work almost as well as beef with a smooch of smoke. So, in recent times, I’ve set about to cooking fish and other sea delicacies on the grill, trying to replicate and even improve on the bites that I’ve had in the past.
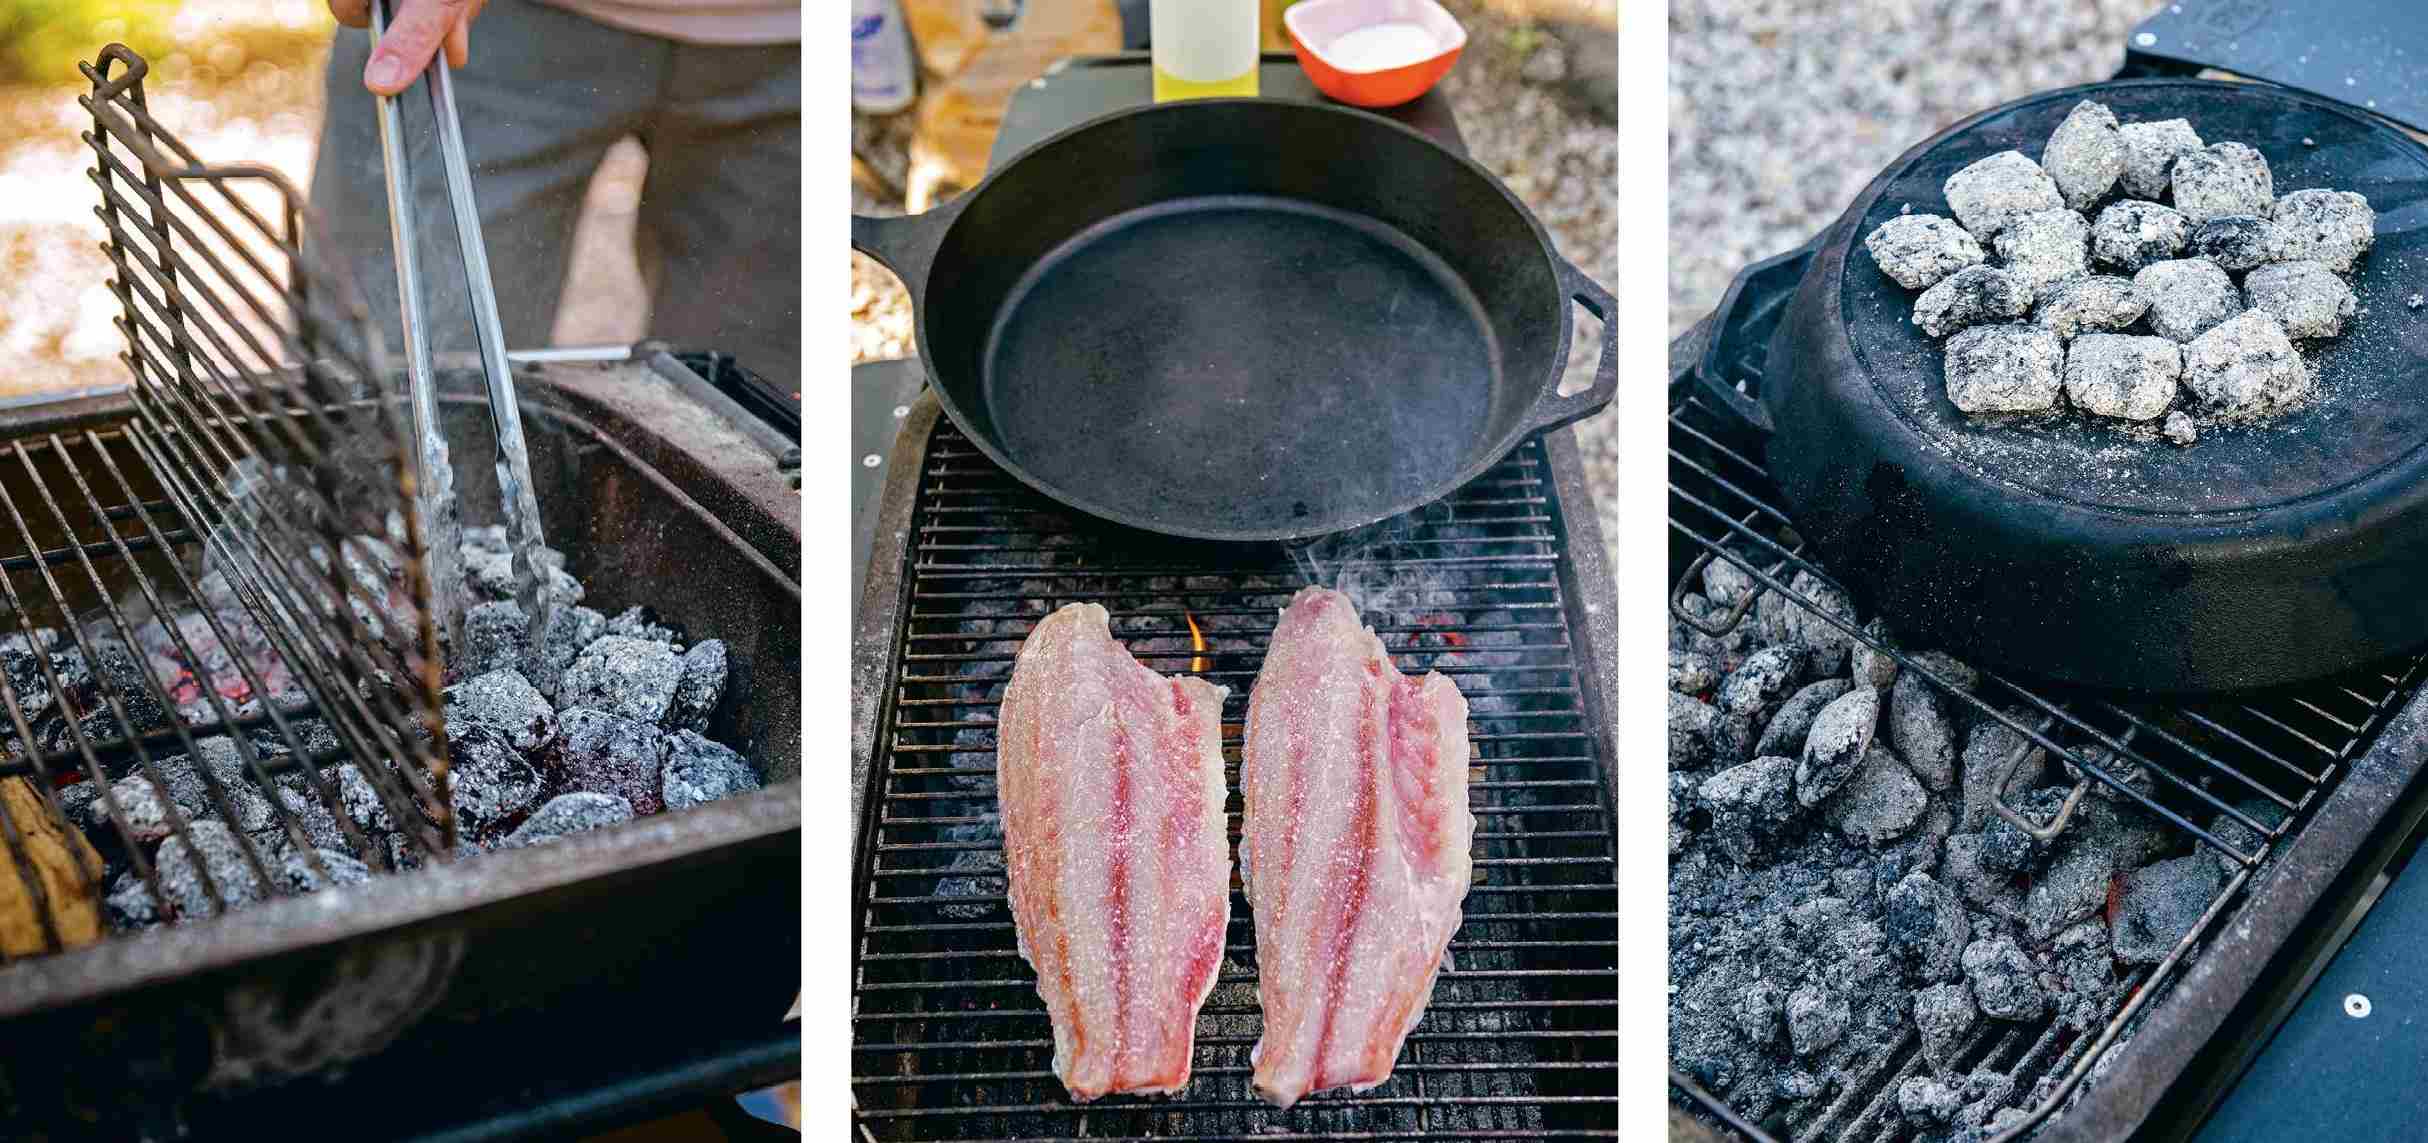
Redfish on the Half Shell

I’ve been trying to master the technique of cooking fish “on the half shell” since having redfish served this way at an event a few years ago. In coastal Texas and eastward through Louisiana and the Carolinas, half-shell cooking—leaving the fish scales on—is famously practiced on redfish, also known as red drum. Redfish is popular among sport fishers for being a very wily prey; it doesn’t stop fighting even once it’s been brought to shore and subdued. Also, its scales are famously sharp and numerous, making it a dangerous thing to handle.
The idea behind half-shell cooking is so full of common sense that it’s easy to underrate. When we buy fish at a store, the scales have almost always been already removed because they are difficult and messy to deal with at home. But scales also make the fish skin inedible. Of course, with this method, you can’t eat the skin (and for those of us who love Japanese delicacies such as crispy salmon skin, this is a loss), but the hard barrier formed by the scales accomplishes three things: (1) it prevents the skin from sticking when it’s cooked directly on a hot surface like a grill; (2) it prevents moisture loss to the base of the fillet, leaving a tender, flaky version of fish at its best; and (3) it prevents too much smoke from invading.
You can cook nearly any fish—cod, haddock, trout, salmon—this way with excellent results. In fact, I don’t see myself messing around with skin in the future and will instead ask my fishmonger to leave the scales intact. This is a perfect grill for the family or small gatherings.
I’ve worked with the technique some and have a method for doing it. It involves covering the fillets with a large, preheated cast-iron pan so the top of the fish cooks in tandem with the underside. This method would work just as well on a firepit.
Cook time: 12 to 15 minutes
Serves 4 to 6
•2-pound redfish fillet, with skin and scales intact
•Grapeseed oil for rubbing
•Kosher salt and freshly ground black pepper
•Red Chimichurri (this page) for serving
Set the fish on a baking sheet and let air-dry, uncovered, in the refrigerator for 1 to 2 hours. This helps the top to brown during cooking.
In the meantime, get your charcoal chimney going to create a medium-hot coal bed in your grill—not blistering but also not about to die. If you like, add a log using the perpendicular Franklin Formation (see this page) to generate a bit of smoke and subtly flavor the fish. (If you’re using a PK grill, make sure the hinged side of the grate is over the coals, as you’ll need to access them later.) You can also just use charcoal. Place a very large cast-iron skillet on the grate directly over the coal bed to preheat.
When your grill is ready, remove the fish from the fridge and rub the flesh side of the fillet with grapeseed oil, salt, and pepper. (Even though the scale side doesn’t necessarily need it, I rub oil and salt on this side, too, to make doubly sure the skin doesn’t stick to the grate.)
Oil the grate and lay your fillet, scale-side down, over the cool zone (not directly over the coals) so the thick end of the fillet lines up with the coal-facing side of the log.
Place the heated skillet over the fillet, making sure that one edge of the skillet also sits above some live coals. The idea is to funnel some of the heat and smoke from the coals and the log over the top of the fish. There’s enough heat coming from below to cook the underside of the fish. Using tongs, grab about ten lumps of hot charcoal and place them on top of the skillet.
After about 10 minutes, carefully peek under the skillet to see how the fish is progressing. Using a fish spatula, pull the fish off the grill when a digital thermometer inserted into the thickest part of the fillet reads 135° to 140°F. When you pick up the skillet, drop the coals back into the grill.
Transfer the fillet to a platter, top with the chimichurri, and serve immediately.

Grilled, Smoked Whole Branzino

Most good fishmongers have a nice supply of whole fish, but few people seem keen to buy and cook them. I was one of those people—until now.
There are great reasons to buy a whole, cleaned fish: you can see quite clearly that its integrity is intact; you get to enjoy all of its meat, from the cheeks to the belly; you don’t have to remove the bones; it’s very easy to cook; and it makes a nice shareable dinner for multiple people (depending on the size of the fish).
Leaving a fish intact helps it cook slowly and evenly on the grill. Of all the whole fish that I’ve grilled, I have consistently found that the well-known branzino, which is native to Mediterranean waters, is wonderful flavored with smoke from wood coals. You could also use trout, grouper, sea bream, or bass, but the buttery flavor of branzino combines deliciously with the sweet edge of the smoke.
When you purchase the fish, ask the fishmonger to leave the scales intact. Scaled fish tends to stick, even to the aluminum foil that I use for this method. The goal here is to get tender flesh, not crispy skin.
I love the classic preparation of fish stuffed with lemon slices, fennel, and parsley. While it may seem as though you need a special occasion to warrant cooking a whole fish, this is a no-fuss preparation that can be done quickly, inexpensively, and effortlessly on a summer weeknight. Deploying a piece of wood in the Franklin Formation (see this page) provides just a kiss of smoke.
Cook time: 13 to 20 minutes
Serves 4
•2 whole branzinos (about 12 ounces / 350g each), cleaned, with scales intact
•Grapeseed oil for rubbing
•Kosher salt
•Fronds from 1 fennel bulb (use the bulb to make pickled fennel)
•1 lemon, thinly sliced, plus lemon wedges for serving
•1 bunch flat-leaf parsley
•Pickled fennel (see this page) for serving
In a large bowl, combine water and ice cubes to prepare an ice bath. Rinse the fish under cold running water (work carefully to avoid cutting yourself on the scales), then place it in the ice bath until you’re ready to grill.
Ready a chimney half to three-fourths full of charcoal, then dump the charcoal into the grill bed. Using tongs, arrange a Franklin Formation with the log parallel to the length of the grill and in the middle so you can surround it on three sides with coals. You don’t want the grill to be roaring hot, so use just a few pieces of charcoal on each side.
Remove the fish from the ice bath and carefully dry each one with a clean kitchen towel. Rub the fish all over with the grapeseed oil and very gently salt the flesh. Dividing them evenly, stuff the fennel fronds, lemon slices, and parsley inside the fish cavities.
Cut two squares of aluminum foil; you will lay each fish in a foil boat, so be sure the squares are big enough to accommodate the size of your fish. Fold each foil square in half. Using a sharp spike or the tip of a knife, poke six small holes in the center of the foil—the area that will be the boat’s bottom. Place a fish in the middle of the foil, spine near the holes, and fold the sides of the foil up into a little open-topped boat shape, pinching the ends together to form the bow and stern. (Technically, you could do this without foil, but the foil makes the fish easier to handle.)


Lay the foil boats on the grate directly over the log (the cool zone), with the fish spines facing in toward each other. Cook until the meat starts to firm up to the touch a little, 8 to 10 minutes. Flip each fish within its boat and cook for 5 to 10 minutes more. The length of time depends on how hot your grill is and the size of the fish. Remove the fish from the grill when the flesh appears flaky but still moist when tested with the tip of a knife or prong.
Transfer the fish to a large platter and serve with lemon wedges and pickled fennel.

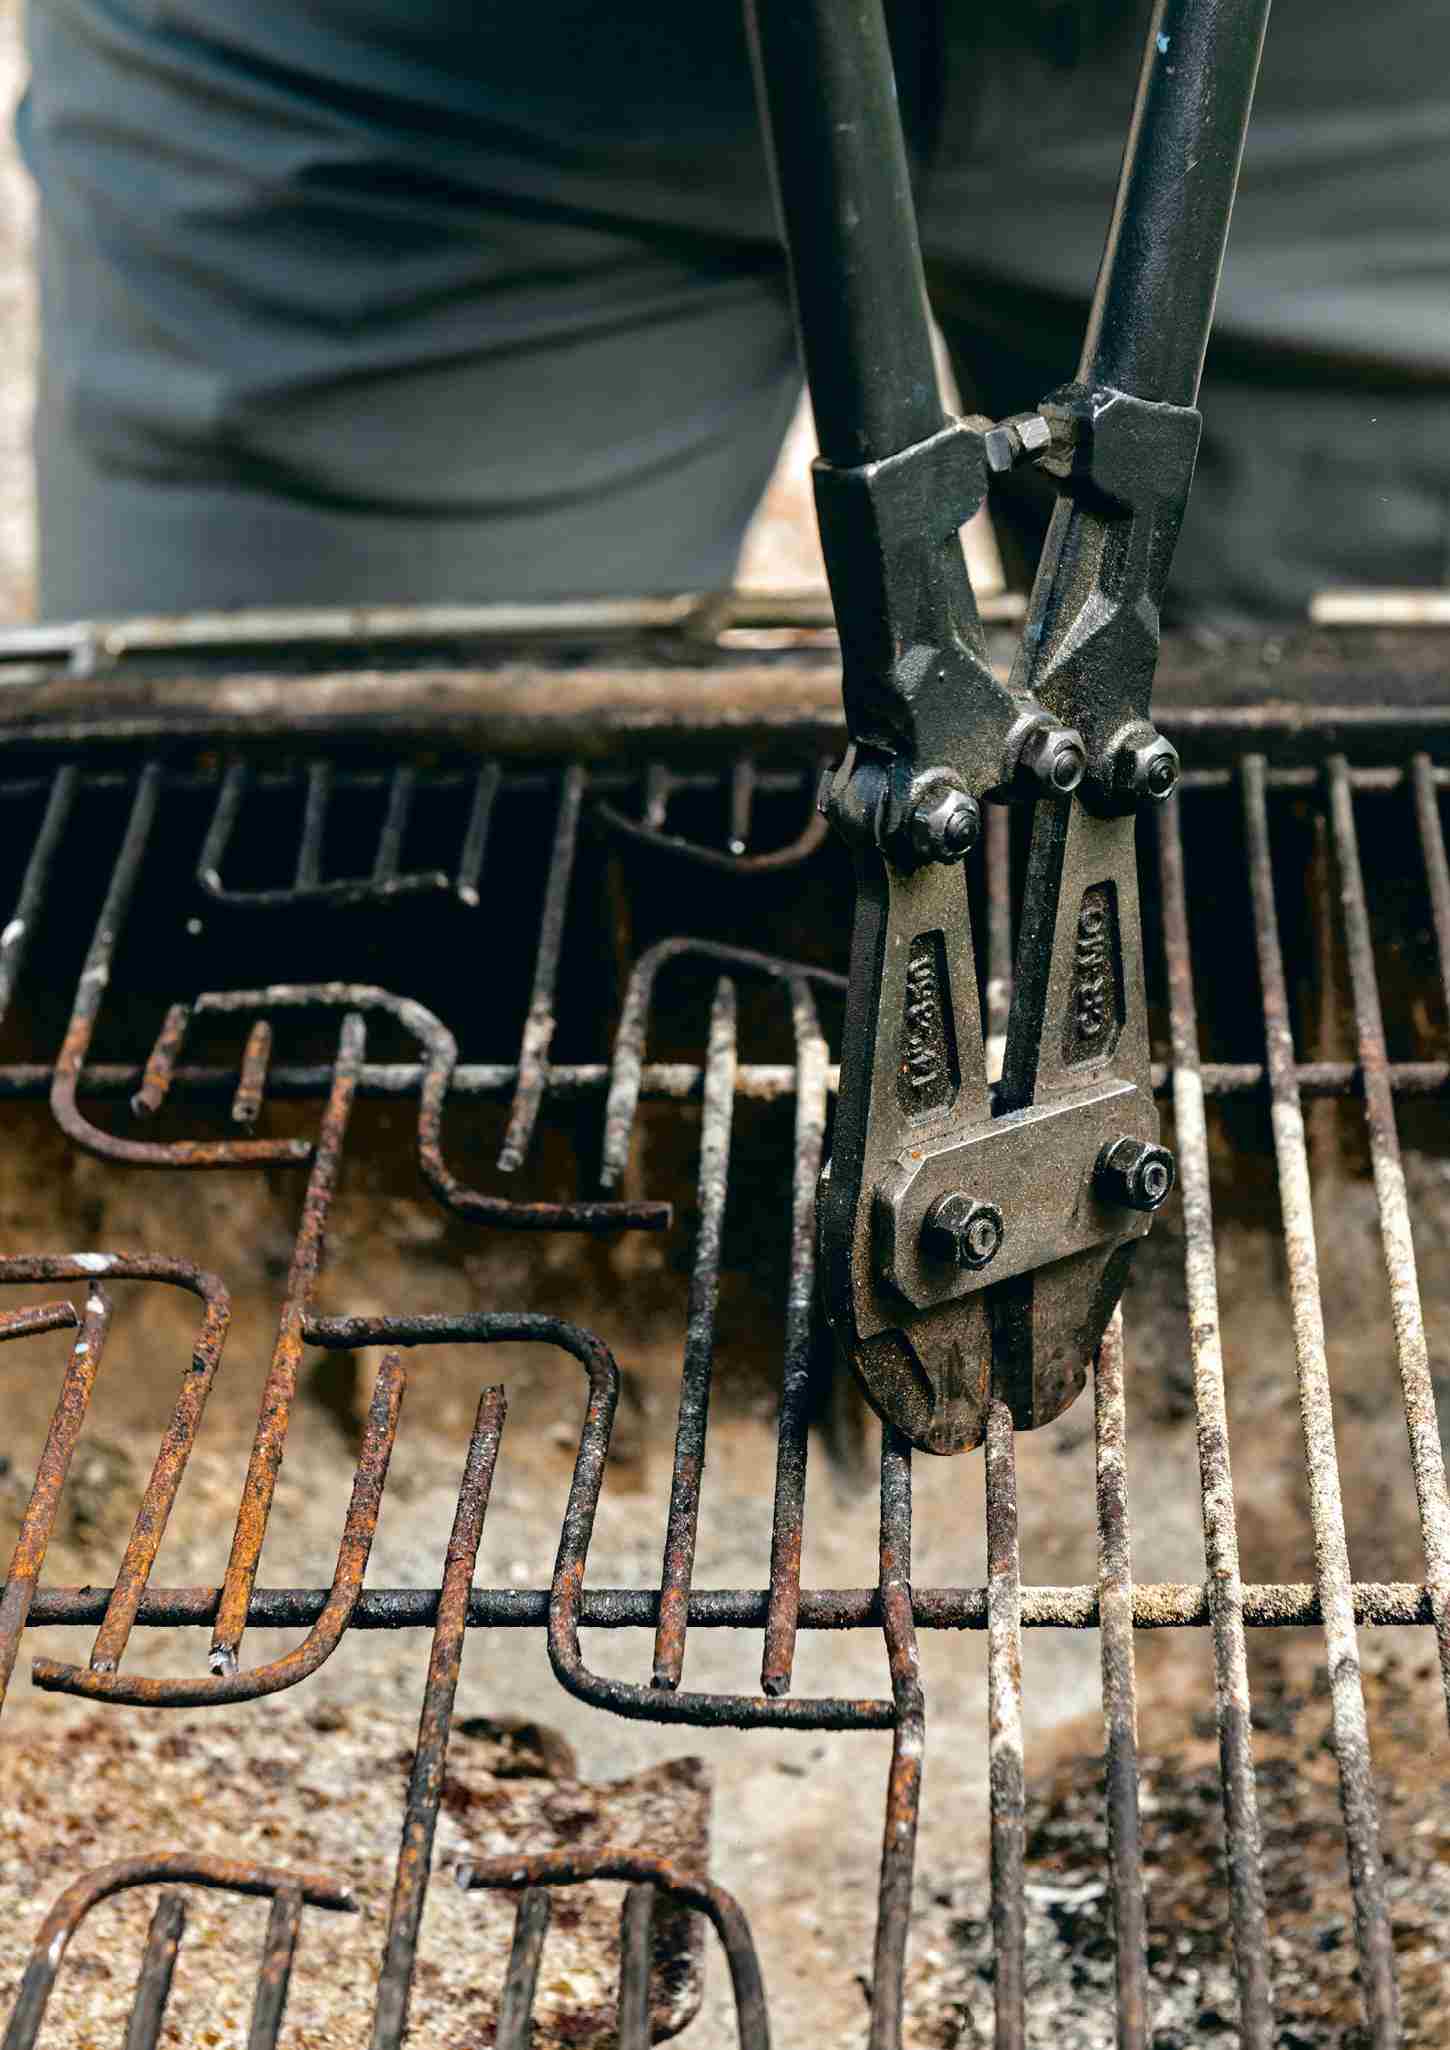
Devising an Oyster Grill Grate
When I couldn’t find a grate specifically built for grilling oysters, I decided to fashion one myself! The idea was to make medium-size gaps in a grill grate so the “cup” of an oyster would fit snugly and not tip over and spill its juice while I’m gently cooking the oyster over hot coals. In this case, I modified a PK grate using bolt cutters and pliers. I made only seven slots, because by the time the oysters have cooked and then cooled enough to handle, they should be sloshed down and you should be getting a fresh round started.
Oysters with Shallot-Chive Butter
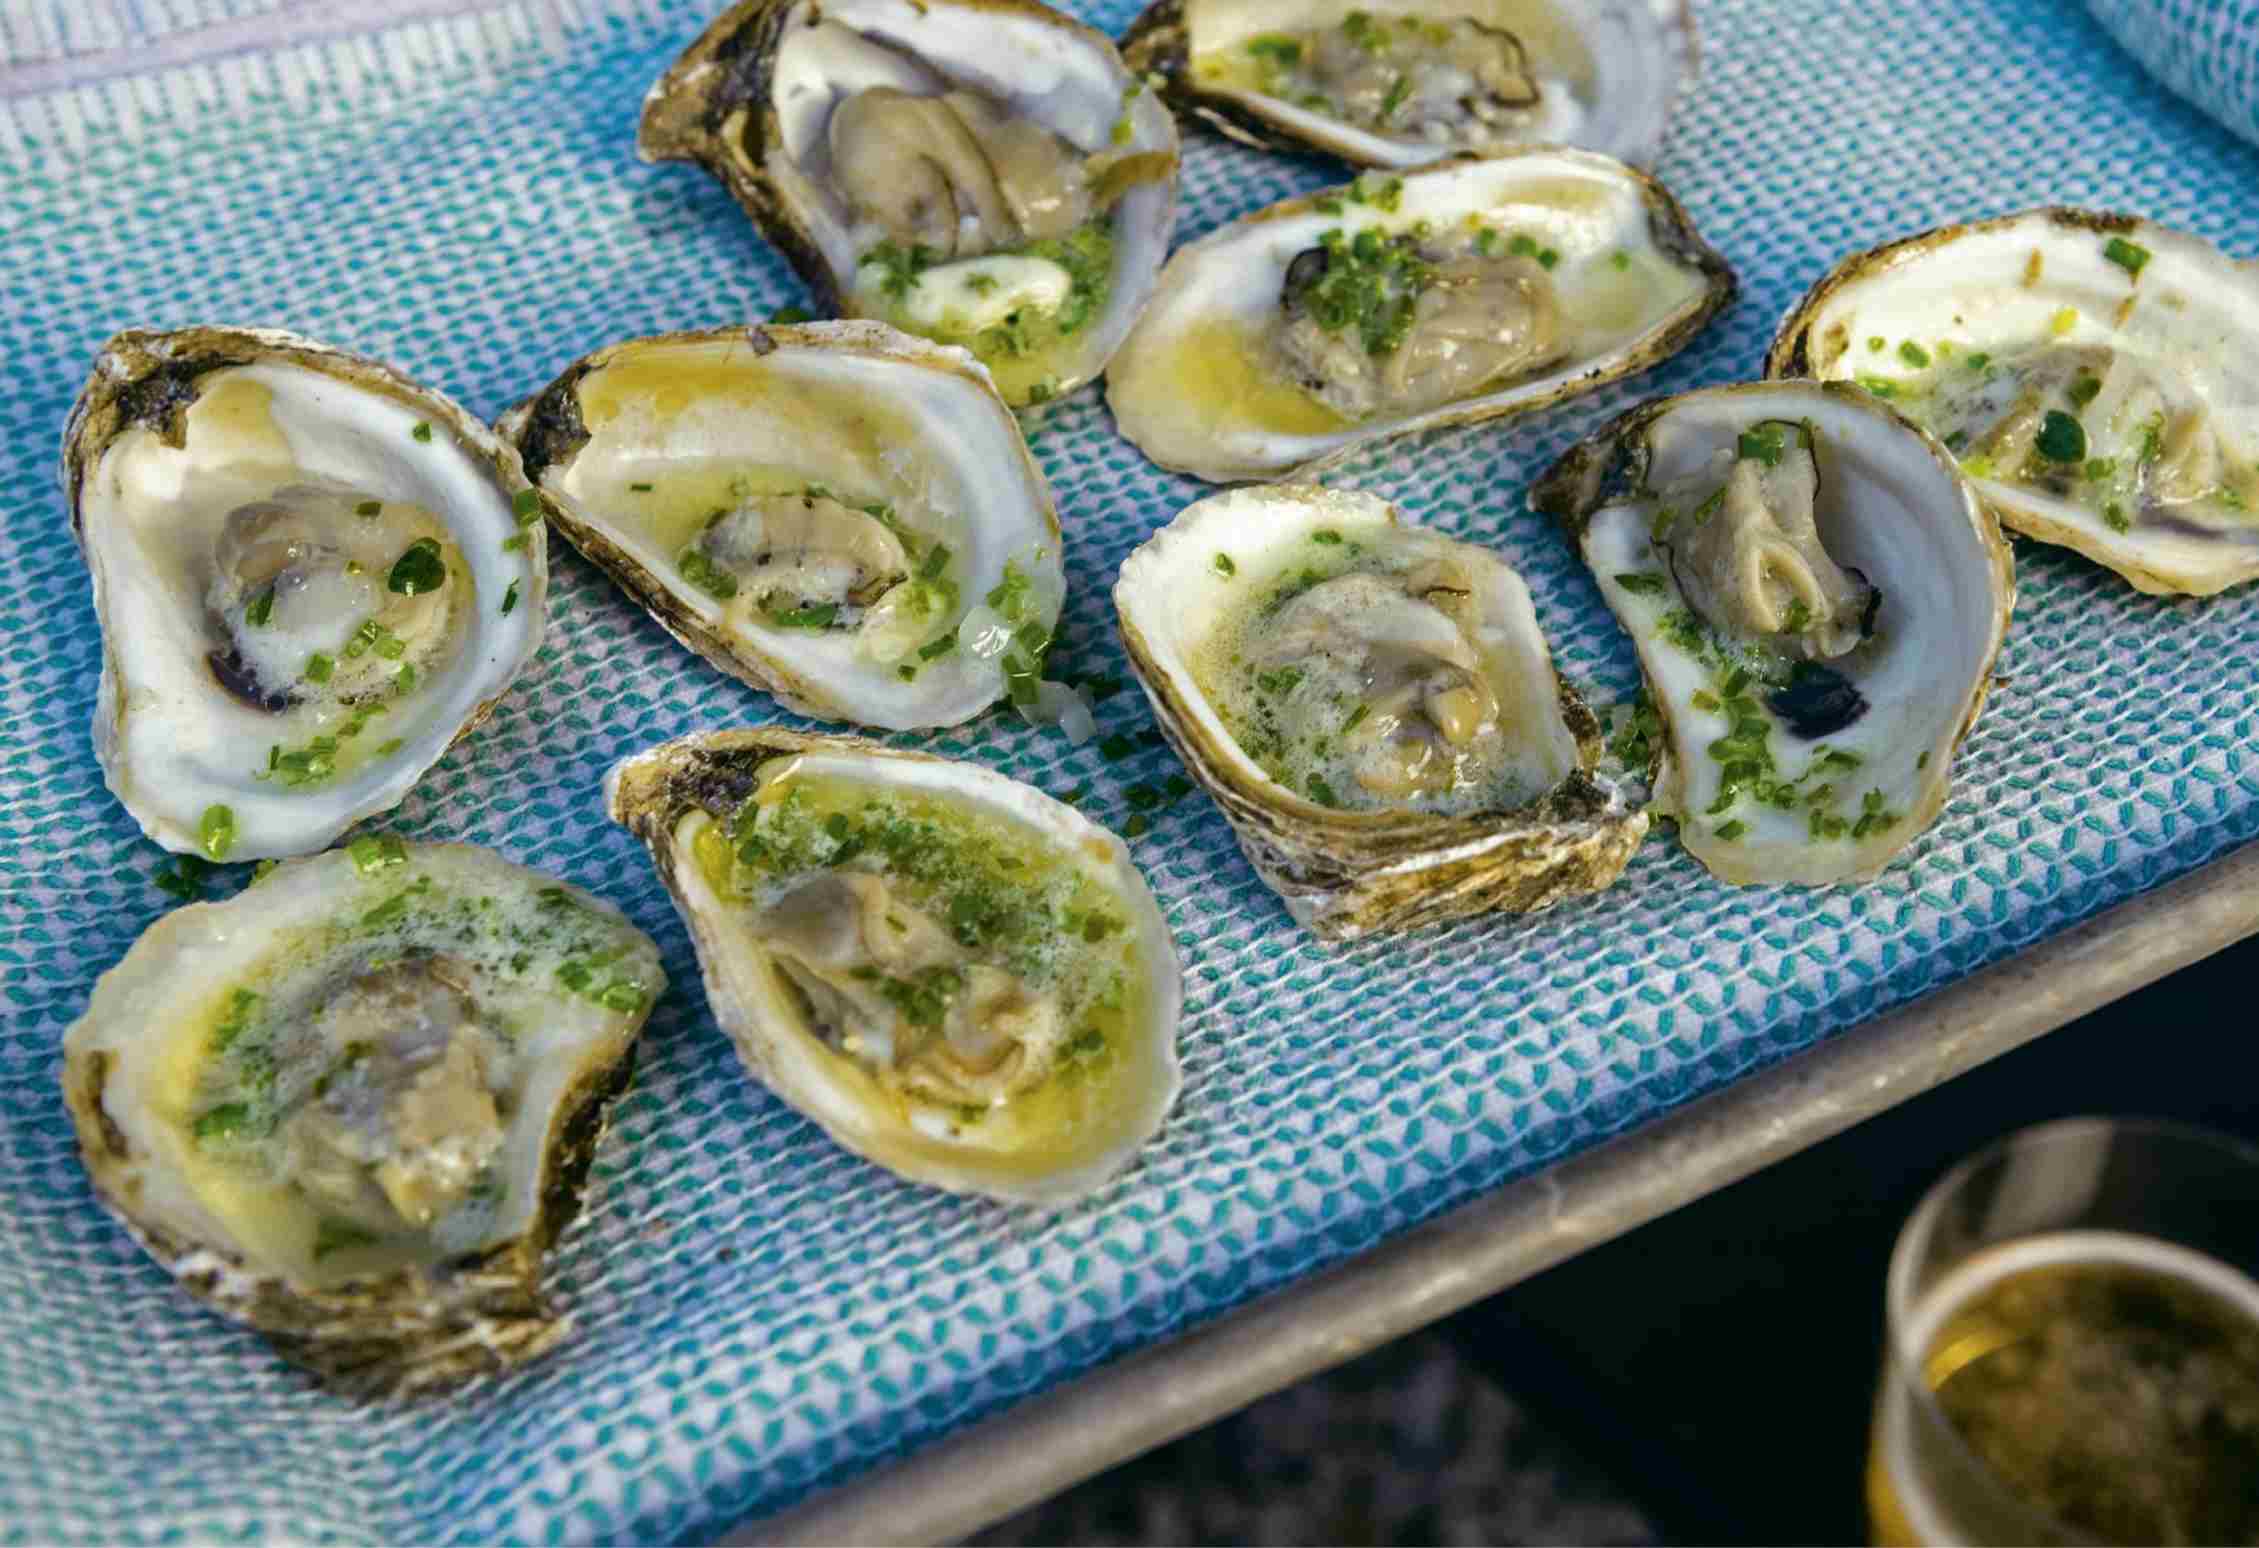
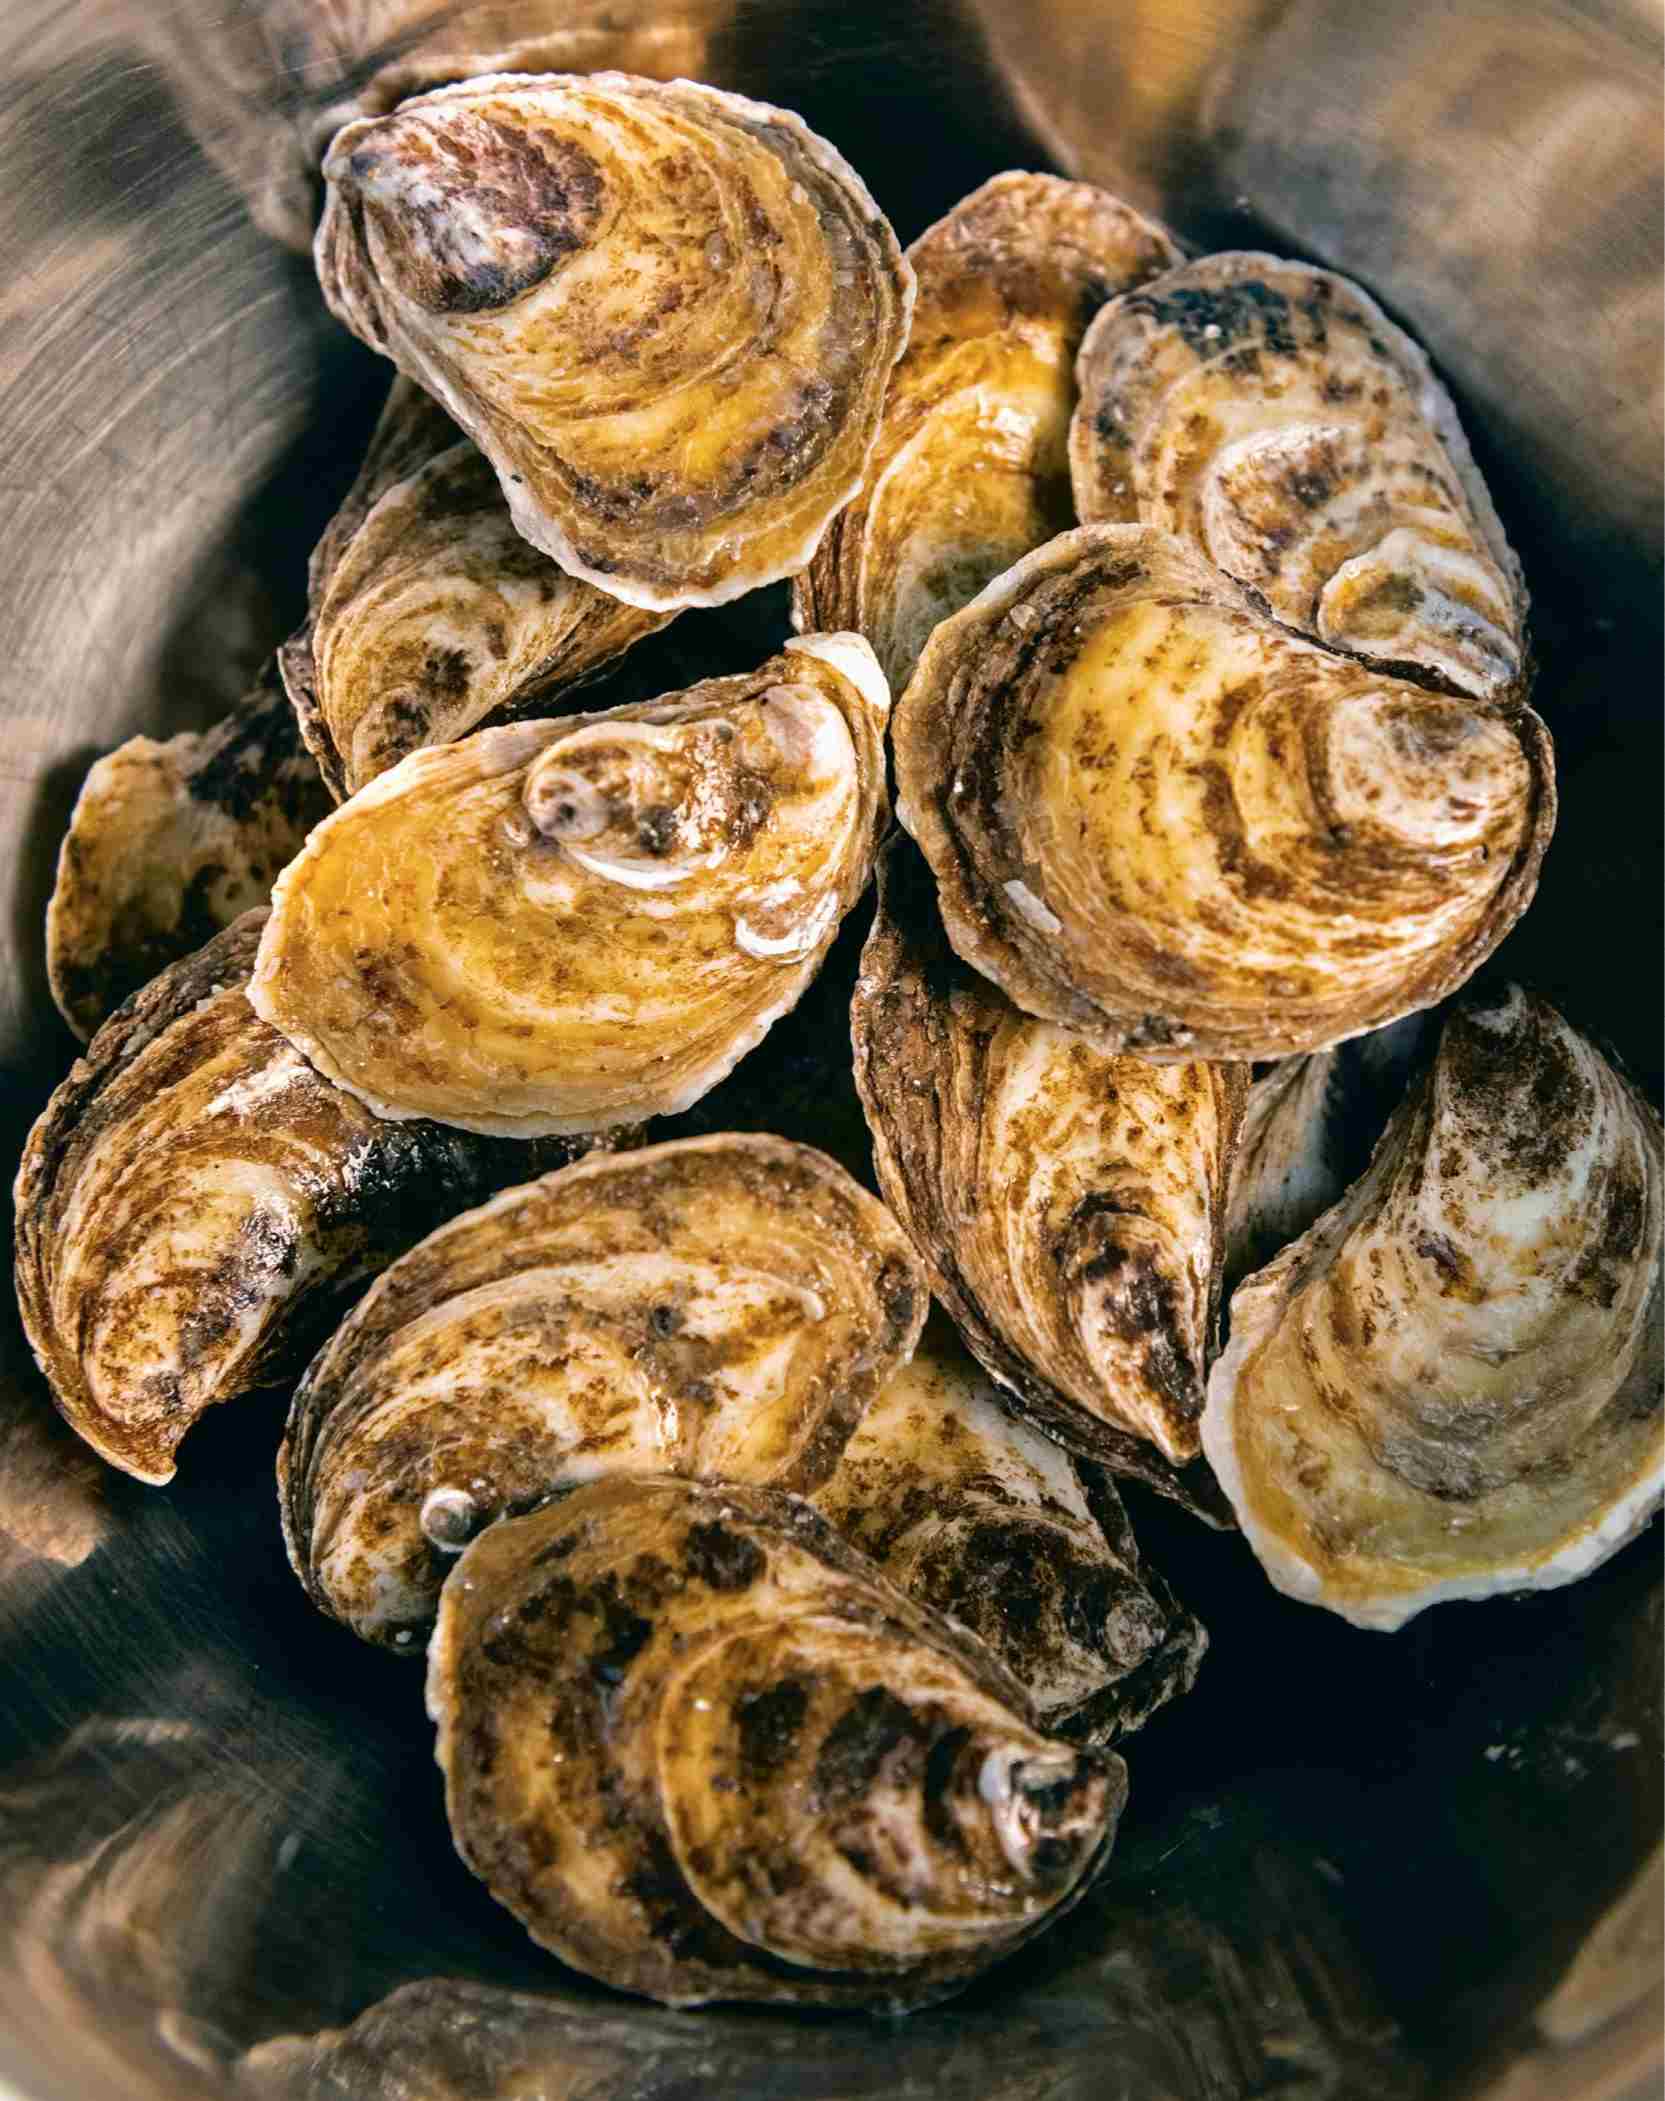
The act of buying and shucking oysters may seem like something that only happens at restaurants, but it turns out that shucking an oyster is only a minor challenge and becomes even less so the more often you do it. (I wouldn’t want to do hundreds a night, but a dozen at home is no problem.) On top of that, oysters are an incredibly wholesome, hearty, and nutritious food that travels well. Delicious when served with wine, beer, and cocktails, oysters are a good change up if your home dining habits need some fresh ideas.
While I love the clean, crisp bite and salty rush of raw oysters, grilling them with a compound butter is revelatory. A little pat of butter placed on an oyster on the half shell quickly melts into the brine as the oyster gently cooks to tender perfection. The magic is in that mixture of butter and brine, which, in the confines of the shell, creates a tiny bit of buttery oyster bisque. Nothing could be simpler and more appealing.
The only challenge is to shuck the oysters and get them on the grill without spilling too much of their liquor. I do recommend shucking them first. Some people let the fire open the oysters for them—putting an unshucked oyster over the coals will eventually boil the oyster and release the adductor muscle that holds the shell closed. But, often as not, the brine boils and blasts the shell open, shattering some of the calcium and spilling the brine. You want a clean shuck and a gentle cook. Don’t worry if you spill a little of the liquor when placing the oysters on the grill. As long as its shell is pretty level, the oyster will release more briny liquor as it cooks, providing plenty of liquid in the shell to mix with the butter.
Although you won’t go through a whole stick of butter with only a dozen oysters, it’s easier to make the compound butter in quantity, and it keeps well in the refrigerator for later use. Incidentally, feel free to riff on the compound butter mixture, as almost any herb or spice works. Even plain butter is delicious. Just be sure it’s unsalted butter because the oyster brine itself contains plenty of sea salt. A splash of hot sauce is a wonderful way to finish off each oyster.
Cook time: 20 minutes (including making the compound butter)
Serves 2 to 6 depending on number of oysters
•½ cup / 110g unsalted butter, at room temperature
•2½ tablespoons / 8g finely minced fresh chives
•1 tablespoon / 10g finely minced shallot
•12 to 36 raw oysters in their shells
•Hot sauce (see this page) for serving
In a small bowl, combine the butter, chives, and shallot and mix well. Spoon the butter in a uniform line down the center of a sheet of plastic wrap or aluminum foil. Fold one long side of the sheet over the butter and, using a straightedge (such as a ruler), press against the butter while pulling on the lower part of the sheet to force the butter into a uniform log about 1 inch in diameter. Wrap the butter in the plastic wrap or foil, twist the ends closed, and refrigerate to firm up. Leftover compound butter will keep in the fridge for up to 2 weeks.
Ready a chimney full of charcoal, then dump the charcoal into the grill bed and spread out the coals.
Shuck twelve of the oysters and gently set them on a platter. Remove the butter from the refrigerator and unwrap. Using a knife, cut off small slices of butter and place one atop each shucked oyster.
Gently place the oysters on the grate directly over hot coals. The liquor will start to simmer and melt the butter. When the butter has completely dissolved into the liquor, after 1 to 2 minutes, depending on the heat of your fire, use tongs or kitchen tweezers to remove the oysters from the heat and place them on a platter.
Allow the shells to cool enough to handle, then eat the oysters while still warm, topping each with a dash of hot sauce. Once you’ve slurped down a few, get started shucking the next dozen oysters for round two.

Smoked Chicken
While working on this book, I discovered that Aaron never cooks with the lid of his PK grill closed, which I do all the time. Practically, this means that Aaron doesn’t smoke foods on the PK, and I do. (All the other recipes for the grill in this chapter should be cooked without the lid.) This is probably because Aaron co-owns a restaurant that has a number of smokers and has at least one at home, while for the longest time I did not. And because of his preference for the perfect smoke that a fully burning fire creates, he’s never even thought of smoking anything on the PK, which offers a more rustic, less efficient smoking environment but still works quite well for smaller items such as this chicken.
Every time that I serve a smoked chicken to guests, they all say, “Wow, I never thought of smoking chicken.” Nothing seems more obvious to me, and, in fact, I can think of almost no more delicious way of cooking chicken. Smoking delivers not only beautiful golden brown skin with a ton of flavor but also incredibly tender, juicy meat. And the method could not be simpler. By the way, this method works equally well for quail, guinea fowl, Cornish game hens, or any other small- to medium-size bird with light-textured meat. It also produces wonderful boneless leg of lamb, pork roasts, and any other medium-size cut that will fit on the grill with the lid closed.
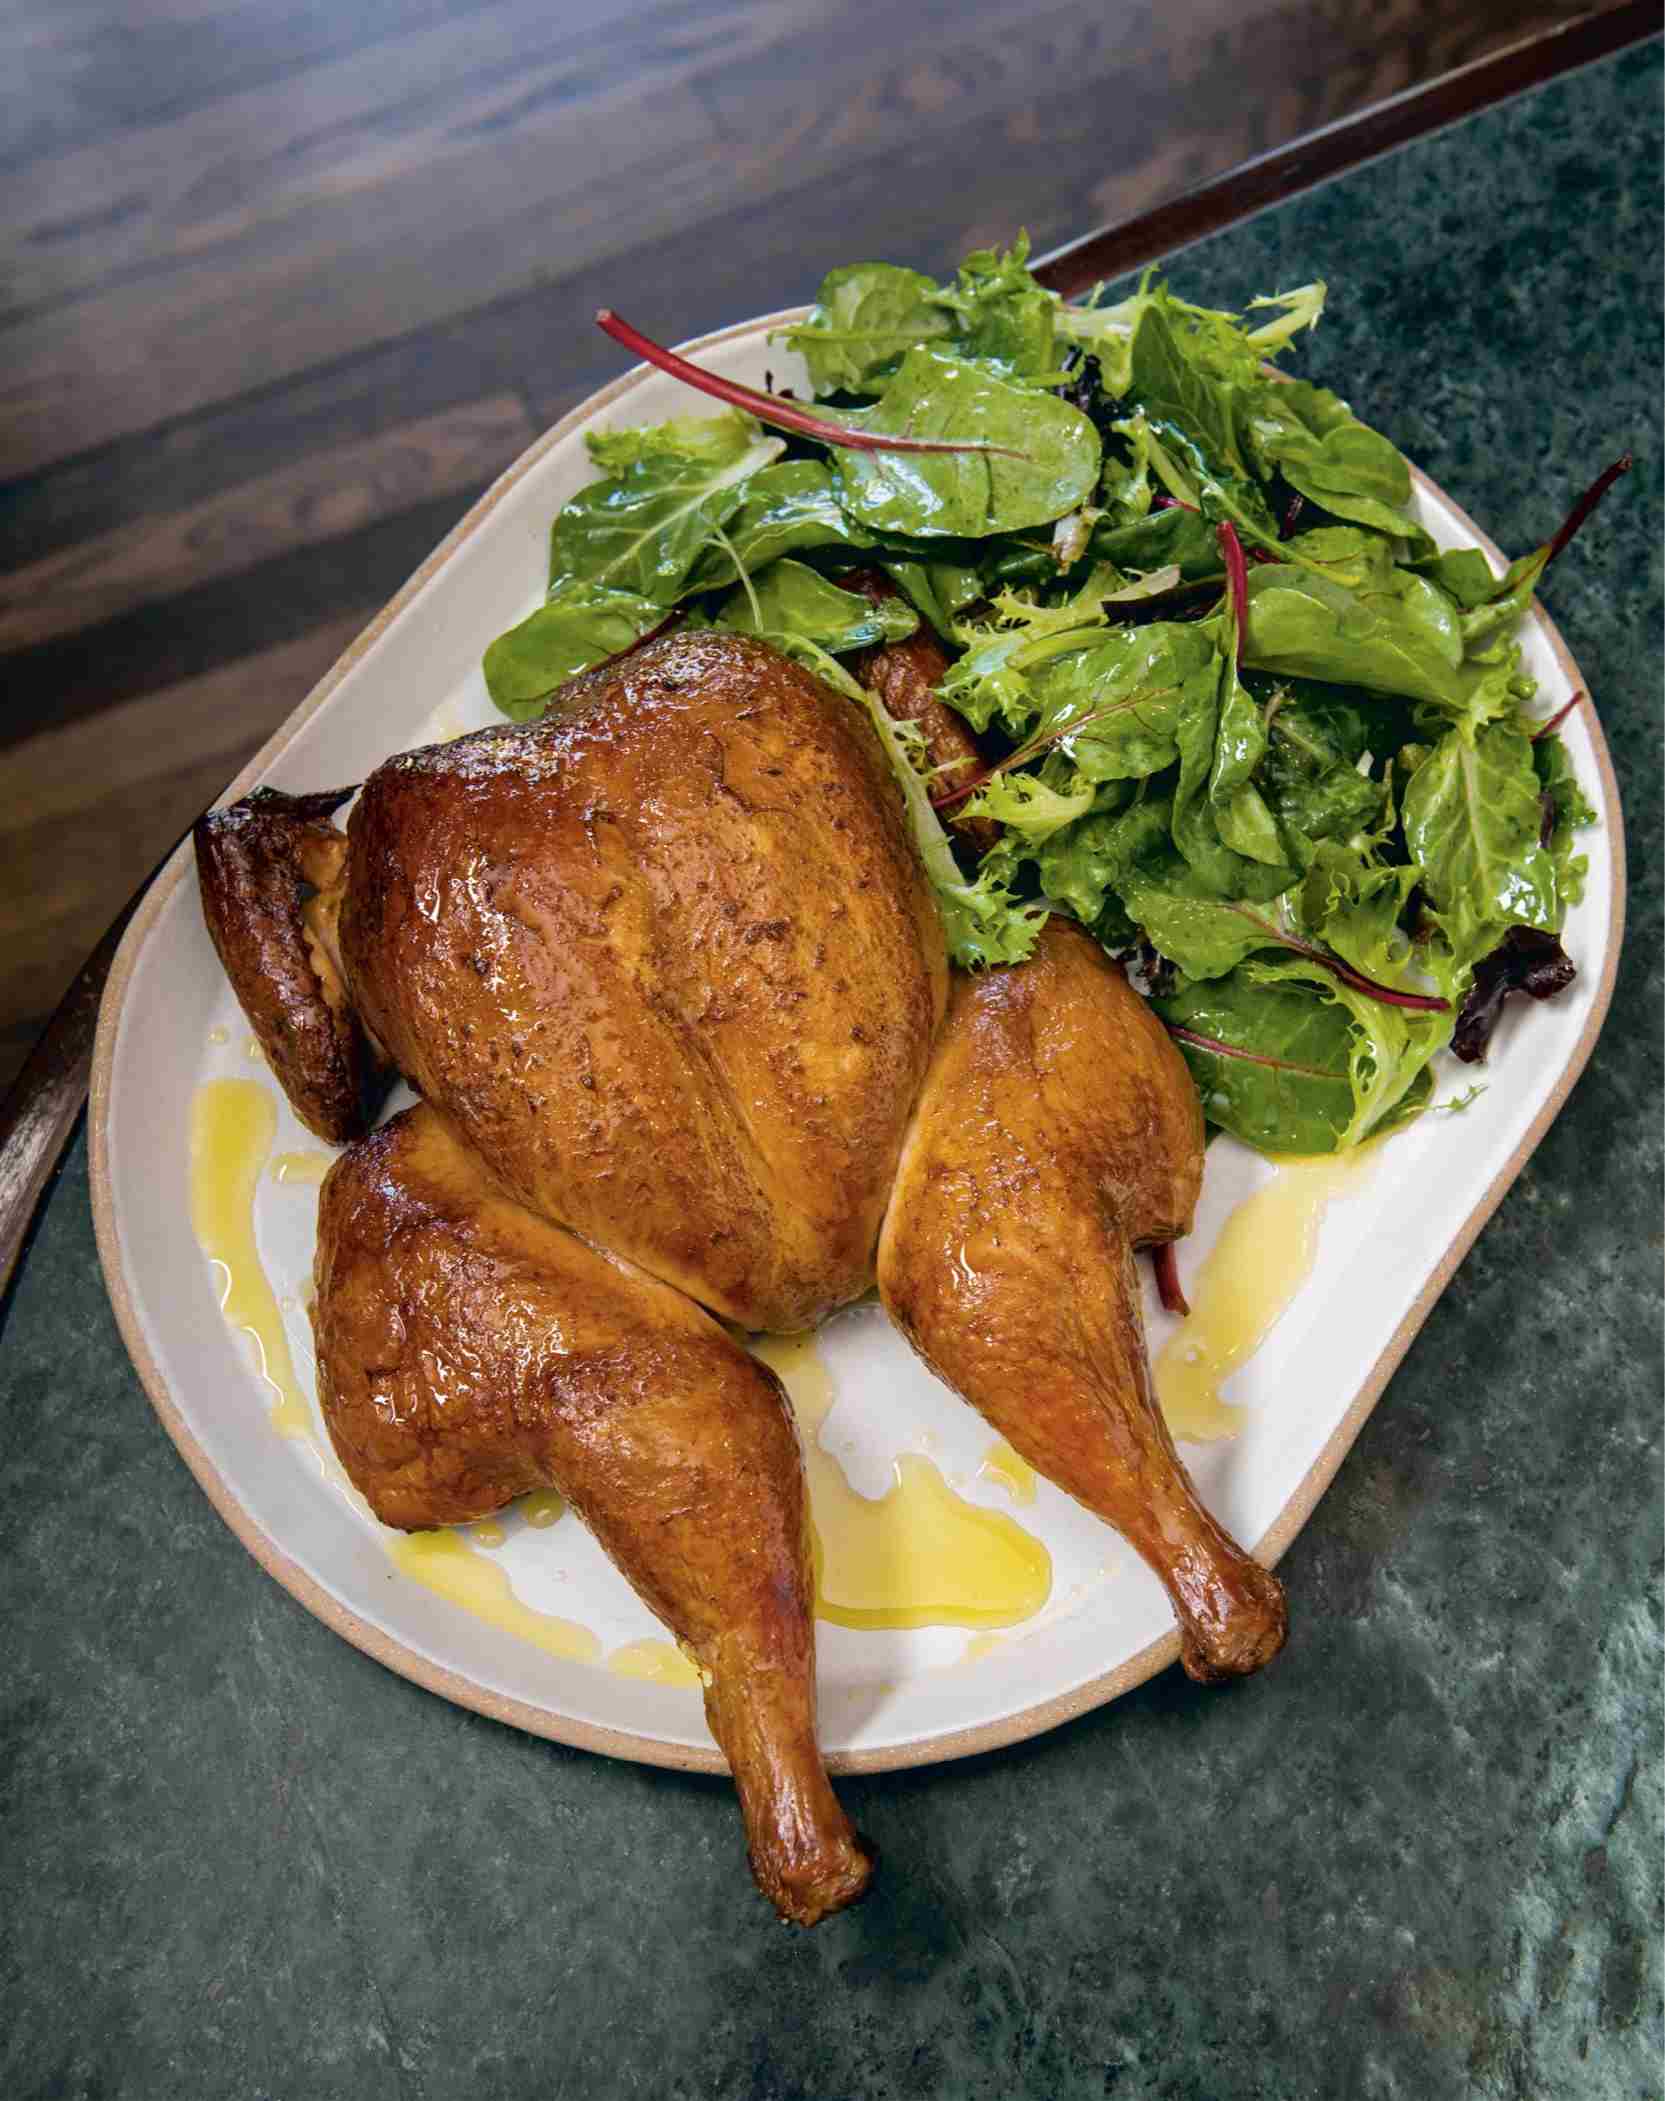
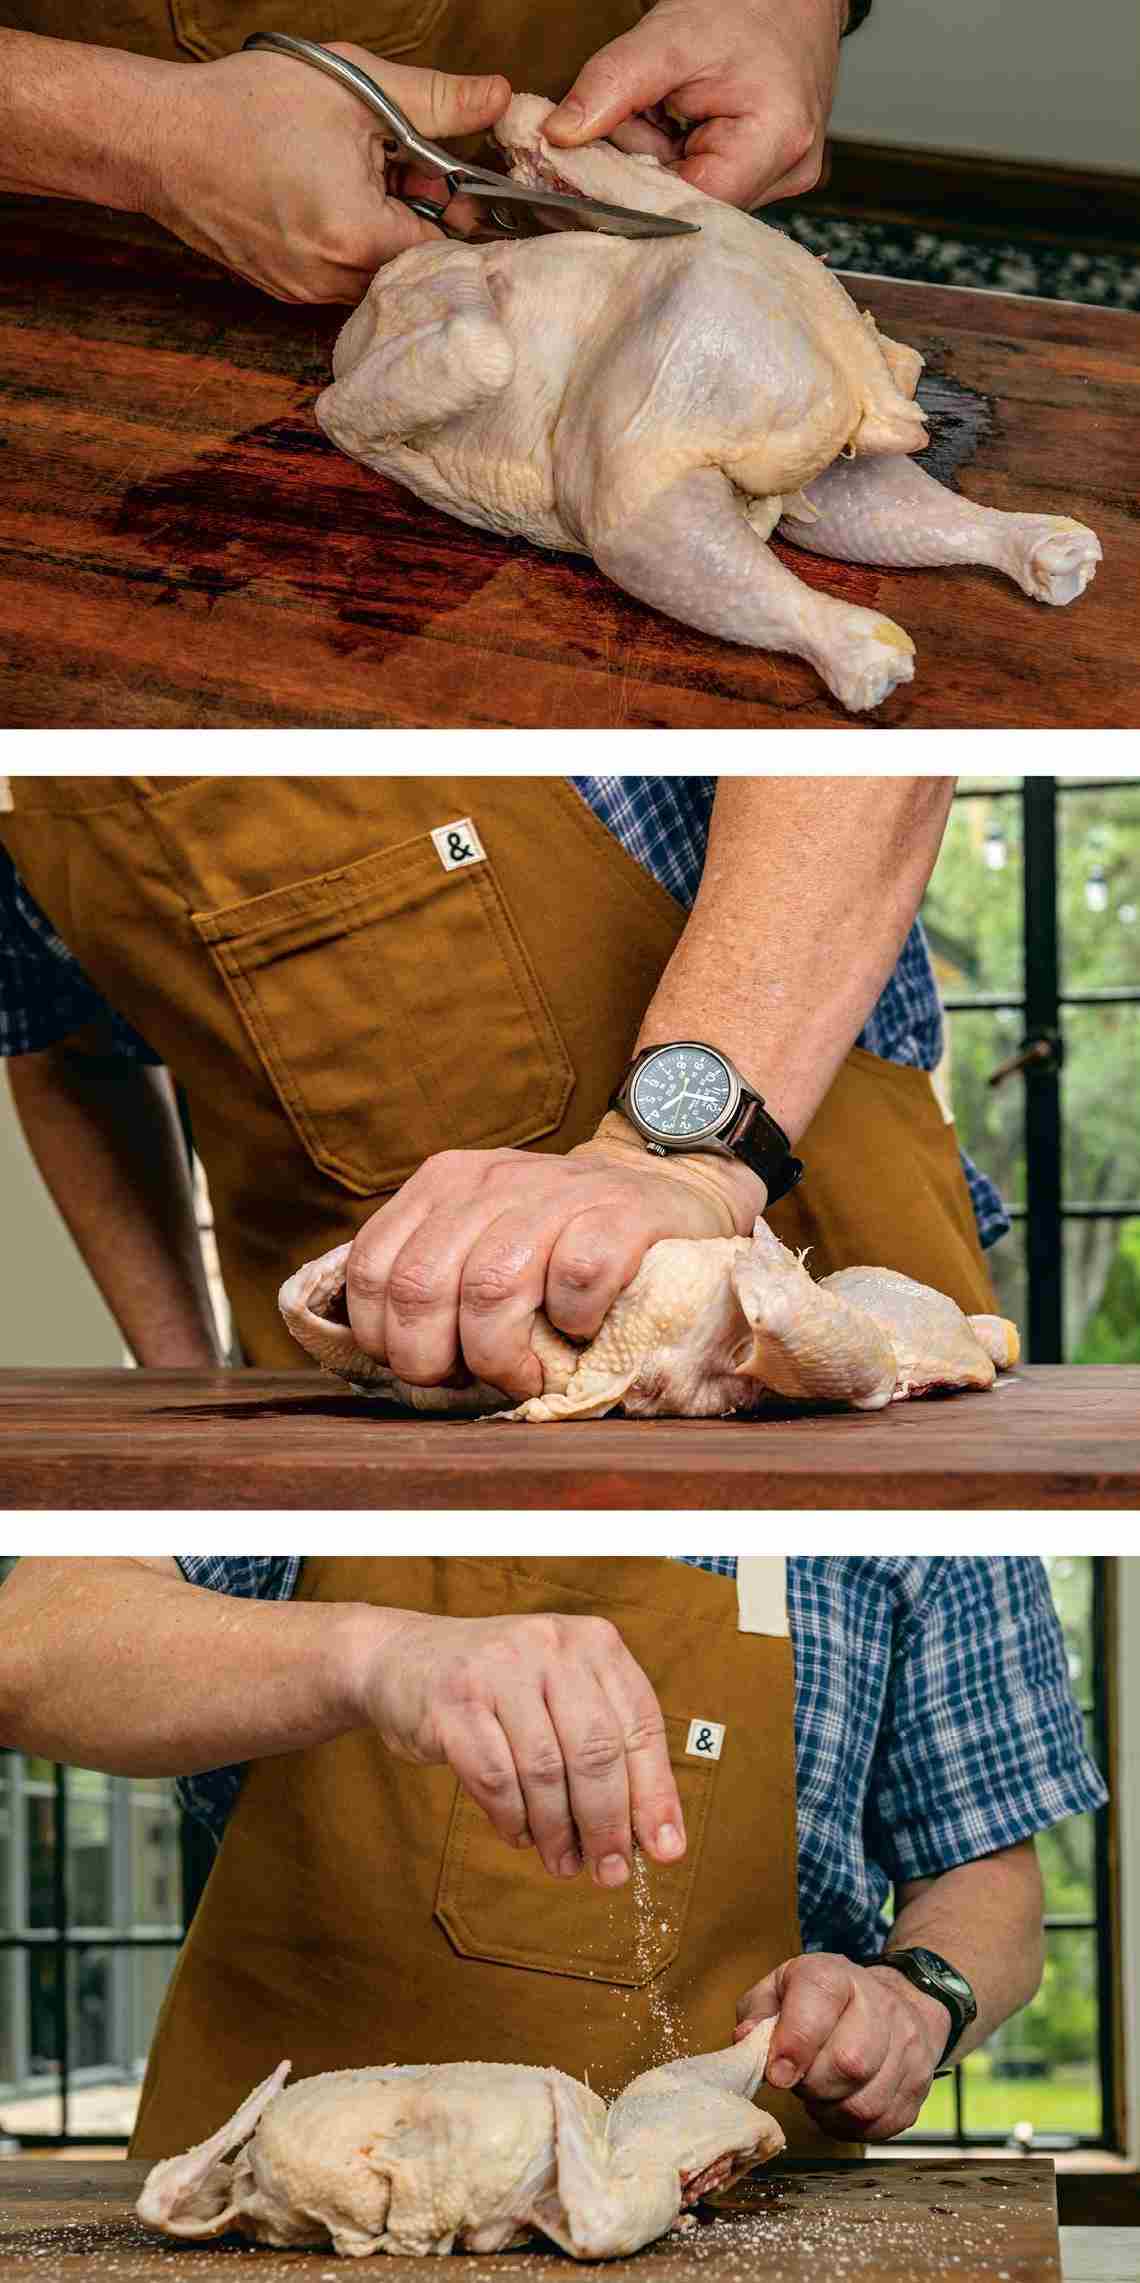
While you can easily do a whole intact chicken this way, I recommend spatchcocking (aka butterflying) it so it cooks more evenly and faster and thus doesn’t take on too much smoke. Basting it with a vinegary mustard solution adds zest and character.
Basic spatchcocking is quite easy. You can make it more complicated if you decide to remove the wishbone and ribs, which requires a smidge of deft knifework. But I like to leave the ribs on to protect the breasts during cooking. Plus, they’re much easier to remove when the bird is cooked. The wishbone is a little tricky to extract, so I usually just cut it out after the bird comes off the grill. As always, the chicken tastes and cooks better if it has been pre-salted and air-dried in the fridge for at least a day. —Jordan
Cook time: 50 to 80 minutes
Serves 4 to 6
•Kosher salt
•1 whole chicken, 3 to 5 pounds, spatchcocked
The Mop
•½ cup / 120g sherry vinegar
•¼ cup / 55g unsalted butter
•2 tablespoons / 30g Dijon mustard
•1 tablespoon / 20g honey
•1 tablespoon / 9g freshly ground black pepper
•½ teaspoon / 3.5g kosher salt
Liberally salt the chicken all over and set it on a baking sheet. Let the chicken air-dry, uncovered, in the refrigerator for at least 24 hours or up to 72.
To make the mop: At some point before cooking the chicken (this can be done a day ahead of time, then refrigerated and reheated), in a small saucepan over low heat, combine the vinegar, butter, mustard, honey, pepper, and salt and warm through, stirring occasionally, until the butter melts and the mixture has formed a sauce.
Remove the chicken from the fridge and allow it to temper on the counter.
Ready a chimney full of charcoal, then dump the chimney into one end of the grill bed. Using the Franklin Formation (see this page), lay a log next to the coals to form the boundary of a two-zone setup, or alternatively, place a good-size wood chunk on the coals. Close the lid and allow the wood to start smoking. The temperature should be hot—somewhere between 400° and 450°F.
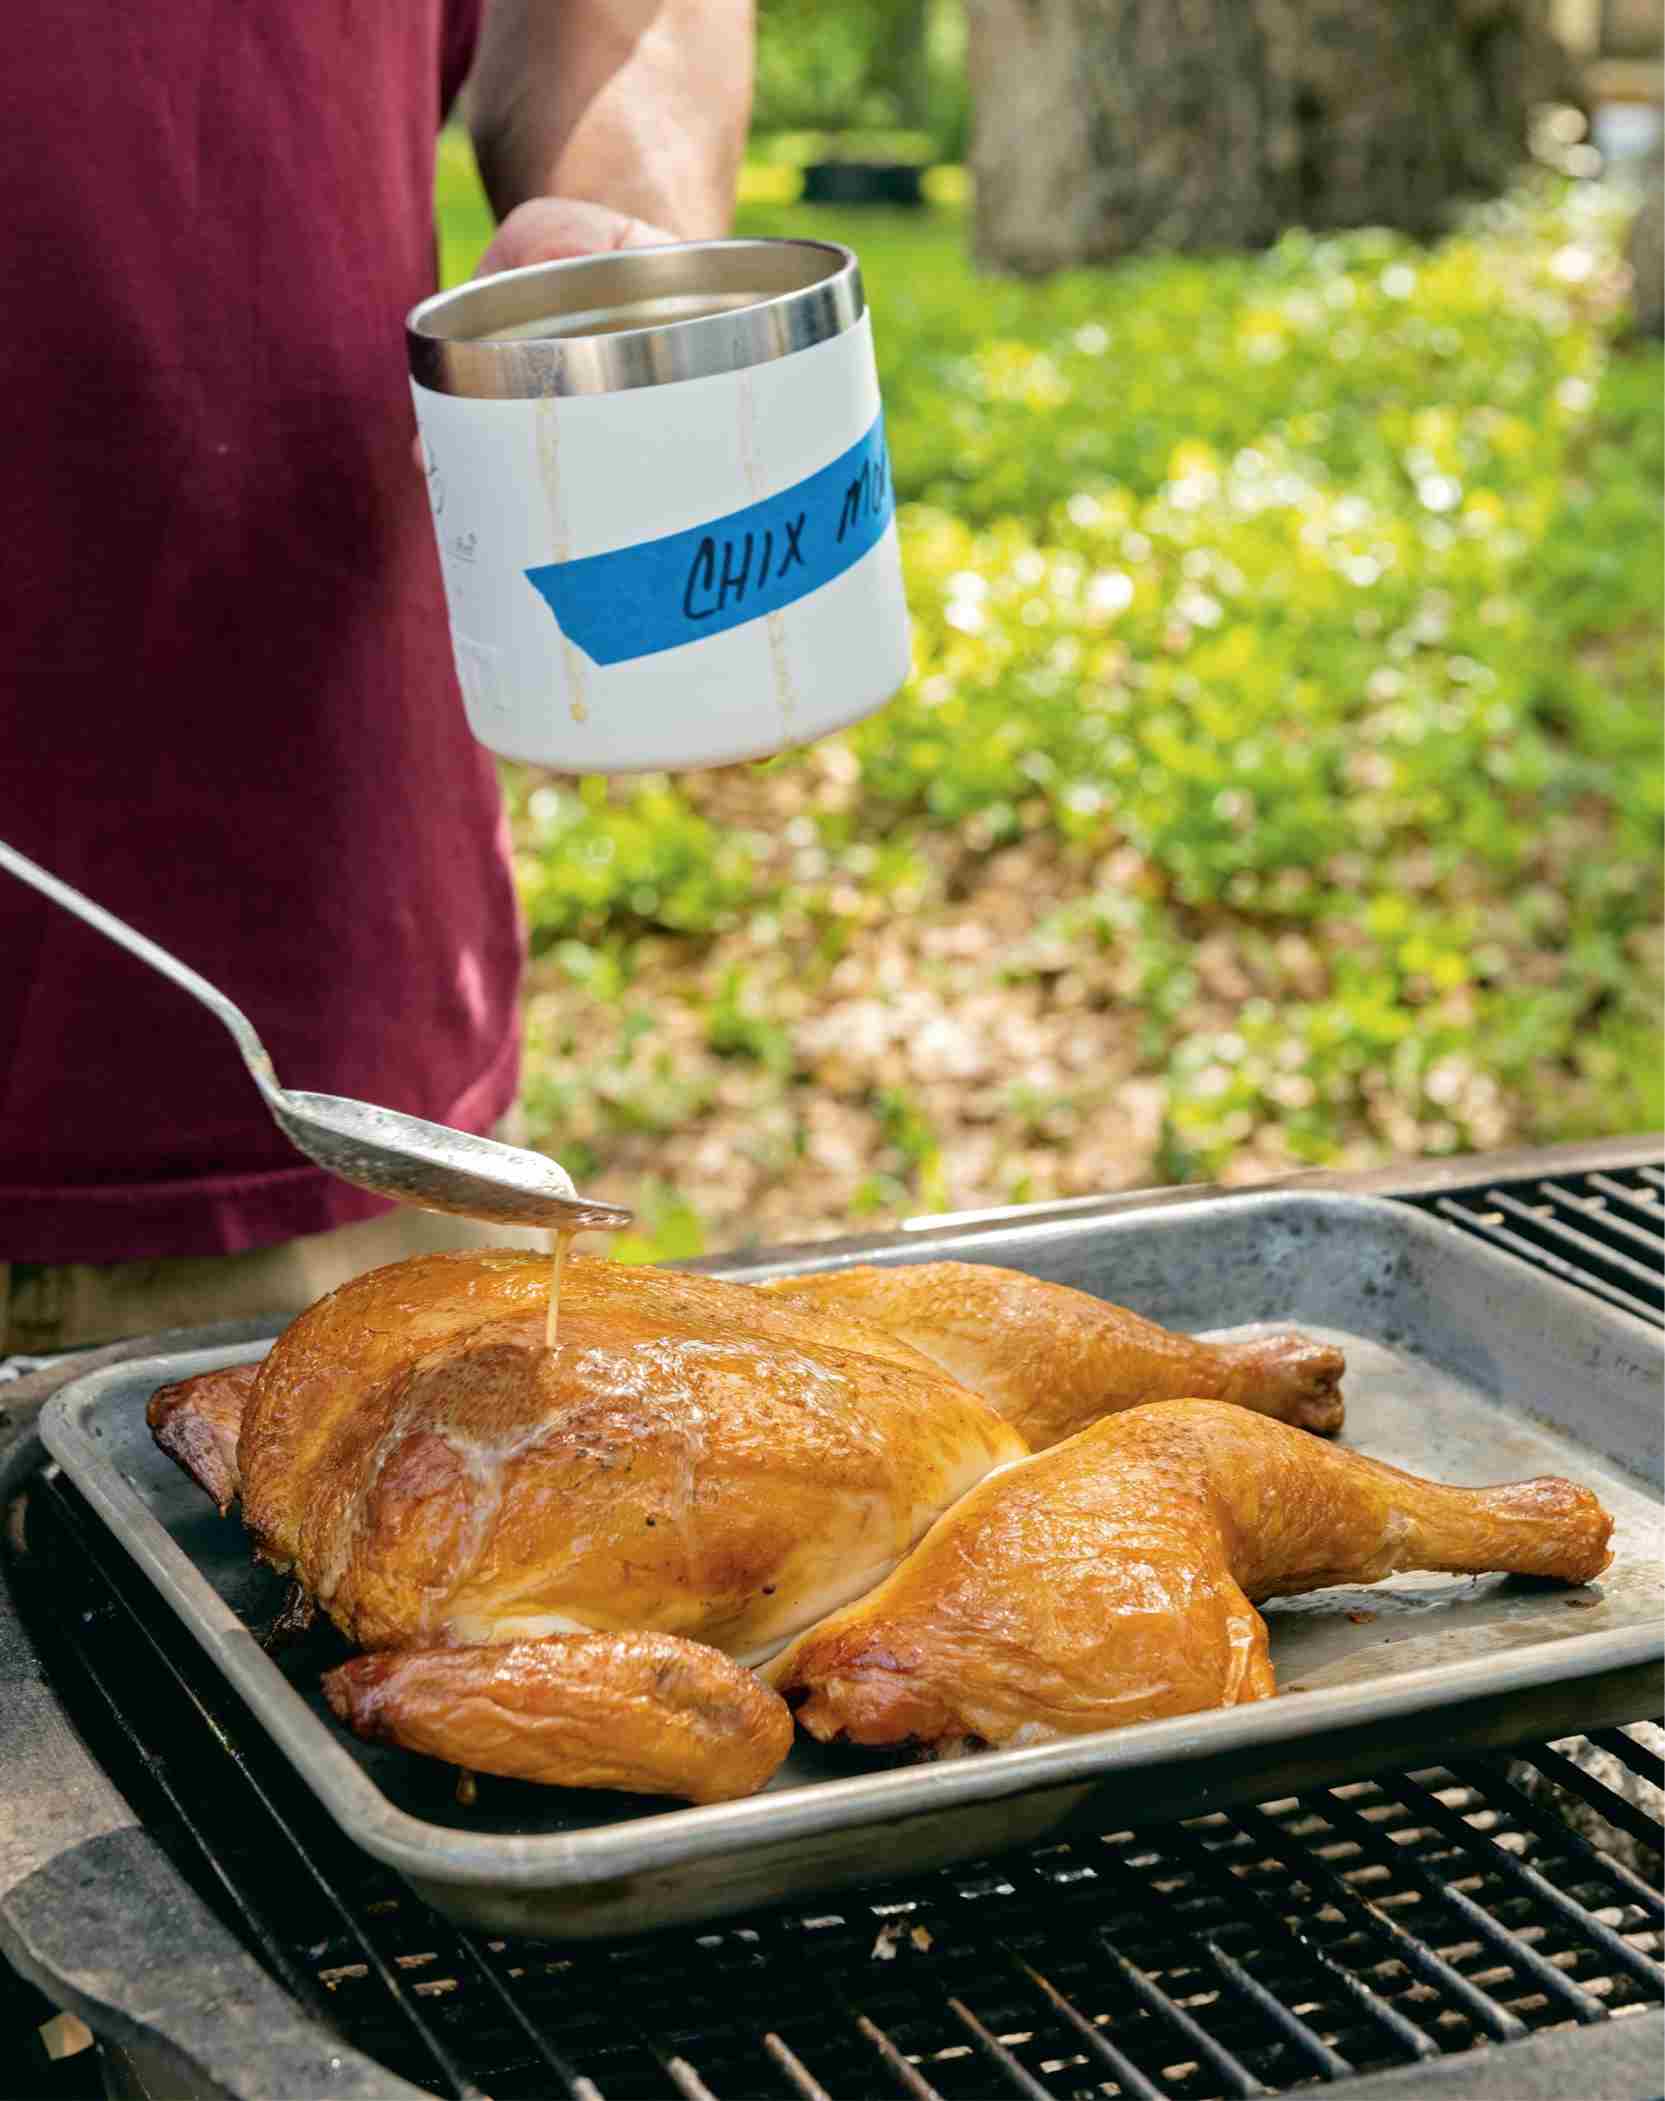
Lay the chicken, breast-side up, on the grate as far as possible from the heat, with the legs nearest to the heat. Close the lid and cook for 25 minutes.
Open the lid, lift the chicken (using tongs or pick it up with a kitchen towel in your hands), and place a quarter sheet pan under the chicken. The pan will capture your mop and let it combine with the chicken juices, evaporating them and steaming the underside of the bird. This is a good time for the first drizzle with the mop. Drizzle with the mop again after 15 minutes and a third time after another 15 minutes.
Now’s a good time to gauge the temperature. Insert a digital thermometer into the center of the breast (you’re looking for about 150°F) and then in the thickest part of the thigh, but not touching the bone (you want 175° to 180°F). It will probably require more cooking, so continue to baste every 10 to 15 minutes until it’s done.
When the chicken is done, transfer it to a platter and let rest until cool enough to carve and serve.
Veggie Sides and Mains
Vegetables are wonderful beings, and I love them a lot. As much as my career has been defined by the cooking of meat, my own eating life has always included a ton of veggies. And when I’m cooking out, it’s often handy to cook my vegetables over the fire.
Firepit cooking allows you to cook several ways at the same time. While your pork or beef steaks are slowly cooking on the grate above the fire, you can pull aside some coals or burning logs to quickly prepare some appetizers or side dishes. Or you can cook sturdy vegetables right down in the coals.
These same simple techniques can easily be adapted for use in a charcoal grill too. Although the firepit conveys the added benefit of real woodsmoke, I don’t want the vegetables to take on too much smoke, and most of the time they don’t. A hint of smoke is nice on your vegetable accompaniment, but if you’ve already got smoky meats, too much might be overkill. Also, I’m not at all against cooking up these vegetables in the fire and making a giant spread for a meal unto itself!
Grilled Mushrooms
Mushrooms are some of the easiest and most natural vegetables to cook on the fire, and they add an earthy, complex flavor to meals as a side dish, as a garnish to meat, or as a delicious meat substitute if you’re feeding vegetarians. While they are light and seemingly flimsy, mushrooms are actually quite resistant to high heat and fire, giving them the ability to take on gentle grill or smoke notes.
Cultivated mushrooms available in bulk at good grocery stores tend to be fairly well cleaned and manicured. If you detect any soil or leftover matter from their growing medium, simply wipe it off with a damp towel and trim off the bottom of the stems. Never wash mushrooms under water, as their spongelike bodies will soak up the moisture and become damp and slimy.
The ideal mushrooms to grill are whole portobellos, large trumpet mushrooms, and, especially, clumps of maitake mushrooms, also known as hen of the woods. In nature, maitakes grow at the base of trees and reach sizes up to twenty pounds. But they’re also easily cultivated, which is what you normally find at grocery stores. They grow in soft, feathery clumps that are more robust than they seem. You can pull apart the clusters into smaller bite-size strands or leave them attached in big clumps, as I do when roasting them over coals.
Cook time: 20 minutes
Serves 2 to 4
•1 pound / 450g maitake, portobello, or trumpet mushrooms, wiped clean and trimmed as needed
•Grapeseed oil for brushing
Using fresh, hot wood coals in a firepit or glowing-red charcoal in a grill bed, spread out the coals so you have a wide area for grilling. You want fairly high heat, as mushrooms can take a lot as they cook down. Also, they absorb a lot of smoke flavor—almost too much at times—so fast cooking helps them not take on too much.
Put the mushrooms on a baking sheet and gently brush them with grapeseed oil.
Place the mushrooms directly on the grate over high heat and grill until tender, 10 to 15 minutes, depending on the heat of your fire. Maitakes take a bit longer; you want the edges to get a little crisp and begin to dry out. You’ll be impressed with how much heat mushrooms can take.
Remove the mushrooms from the heat and serve immediately.
Fire-Kissed Brussels Sprouts

I could eat brussels sprouts just about every day of the week, and I love doing them on the fire. The intense heat from the flames and coals tempers the bitterness of the sprouts while adding a layer of charry complexity. To finish, I toss in something a little sweet, like thinly sliced apples, pomegranate seeds, or halved grapes.
Brussels sprouts are convenient to cook on a fire that you already have going for a larger protein, and they roast equally well over the wood coals of an open firepit or the glowing charcoal in a grill. You want the brussels sprouts as cold as possible before putting them on the fire, so keep them in the refrigerator or on ice until just before cooking.
To cook down sprouts in the fire, you can use a perforated grill pan or even a cast-iron skillet, but I have had the best luck using an inexpensive metal fry basket purchased from a restaurant-supply store. The metal on these baskets tends to be heavy-duty, so they can take the intense heat and wear and tear.
You can use this method in a firepit over wood coals or over charcoal in a standard grill or even quickly over a charcoal chimney. And it works well for green beans, parcooked fingerling potatoes, cauliflower, broccoli, and any other sturdy, fibrous vegetable you might want to try. Their water content and fibrous character allow them to resist the heat of the fire long enough to pick up just enough charry taste to be delicious.
Cook time: 10 to 15 minutes
Serves 2 to 4 as a side dish
•1 pound / 450g brussels sprouts, trimmed, halved, and well chilled
•Grapeseed oil for coating
•Kosher salt
•Juice and grated zest of 1 lemon
•1 cup / 140g pomegranate seeds
•Apple cider vinegar for drizzling
Create an open bed of exposed coals. Then take two fresh logs and place them on the coals as a stand for the fry basket. Push the logs together tight enough to compact the charcoal so there are no major air gaps that could generate flames.
In a medium bowl, toss the brussels sprouts with just enough grapeseed oil to coat evenly and lightly and then season with salt.
Dump the brussels sprouts into a fry basket and reserve the bowl. Place the basket directly on the coals. Grasp the handle of the basket almost immediately and begin flicking your wrist to toss the sprouts gently so they don’t become too charred. Continue tossing as the sprouts develop a lightly charred exterior. You want to prolong the cook as much as possible until it seems the sprouts are going to burn without ever getting to that point. You are cooking the exterior while keeping the interior crisp.
When the sprouts are ready, remove the basket from the fire and return the sprouts to the bowl. Add the lemon juice and mix well. Add the pomegranate seeds, lemon zest, and a drizzle of vinegar and mix.
Serve the sprouts immediately, as they get soggy quickly.
Coal-Roasted Veggies

As long as you use the appropriate vegetables and take them off the fire at the right time, there’s no easier way to cook vegetables than to put them directly on the coals. Instead of steaming them in a pot, they cook in their own juices, which concentrates their flavors.
Thin-skinned vegetables, like eggplants, definitely pick up some smoke, so be prepared for smoky baba ghanoush (the way it was meant to be). But thick-skinned vegetables, like gourds and squash, can take a lot of heat and will cook beautifully without getting particularly smoky. Onions and cabbages can be cooked without wrapping them in aluminum foil, and although their exterior will obviously blacken, you’ll find a beautifully cooked interior when you remove the charred outer skin or leaves. They can also easily be wrapped in foil and steamed with full protection from the flames.
However you do it, the ability to cook vegetables on a fire that you’ve already got going to cook a major protein not only is poetic but also saves time, heat, labor, and steps (our kitchen is a fair distance from the backyard firepit, so roasting veggies in the oven while cooking outside requires a lot of schlepping and diverts attention). If you have a wood fireplace, and it’s a cold winter night, you could even use that. You can also successfully cook eggplants on charcoal in a grill, but they’ll lack the sweet flavor of woodsmoke. Whichever method you choose, you want hot, active coals.
Smoky Eggplant Baba Ghanoush
Cook time: 20 minutes
Serves 4 as an appetizer or side dish
•2 medium globe eggplants
•1 small garlic clove, finely chopped
•Extra-virgin olive oil for serving
•1 lemon, halved
•Kosher salt
•Toasted bread slices or crackers for serving
Tuck the eggplants into the sides of the firepit, around the smoking coals. You can brush some coals on top of the eggplants too. Within 5 to 10 minutes, the eggplants will begin to shrivel and the skin will become crunchy. If you haven’t covered them with coals, use tongs to turn the eggplants so the upward facing side goes into the coals. Try not to manipulate the eggplants too much, as you don’t want to break the skin and release all the juice.
After about 20 minutes, the eggplants’ skins should be shriveling and crisped. They should have cracked a little and will be lightly leaking juices into the coals. Using tongs, gently transfer them from the fire to a big bowl or platter and let them cool. They’ll release a lot of liquid as they sit.
When the eggplants are cool enough to handle, cut them in half with a knife and use a spoon to scoop out all the flesh into a medium bowl. Remove any pieces of burned skin, as it will deliver an acrid taste. While the flesh is still warm, add the garlic. Then pour in a little olive oil, squeeze in the juice from a lemon half, season with salt, and mix until well combined. Taste and adjust with more olive oil, lemon juice, and salt as needed. Let sit for 5 to 10 minutes to allow the flavor of the garlic to mellow in the heat.
Serve the baba ghanoush warm, with toasted bread.
Coal-Fired Squashes and Onions
Cook time: 30 to 40 minutes
Makes as much as you want
•White, yellow, or red onions
•Acorn, butternut, or other winter squashes
•Extra-virgin olive oil for serving
•Unsalted butter for serving
•Flaky salt
•Fresh lemon juice for serving
Literally the easiest dish in the world to make, this involves nestling whole onions and squashes into the edge of the fire among the coals, then leaving them for 30 to 40 minutes. The onions will blacken and tenderize, which is how you know when to pull them out. The squashes will also carbonize on the outside, but a few pokes to gauge tenderness will tell you when they’re done.
Let the onions cool on the outside before peeling. Serve as you wish. For instance, they’re delicious as a side when cut in half and topped with a little butter and flaky salt. Likewise, allow the squash to cool enough to handle, then cut in half and scoop out and discard the seeds.
Serve the squash topped with a little olive oil, butter, salt, and lemon juice.
Fire-Steamed Cabbage
Cook time: About 30 minutes
Serves 4 to 6 as a side dish
•1 head red or purple cabbage
•Unsalted butter for topping
•Kosher salt and freshly ground black pepper
•2 or 3 slices bacon (optional)
Cut the cabbage in half but don’t core it. Lay the halves, flat-side down, on a cutting board and mold a piece of aluminum foil tightly around each piece, leaving a little extra foil for a lip (which makes for easy handling). Flip the halves so they are cut-side up. Top each half with a pat of butter and season with salt and pepper. Place the cabbage halves, foil-side down, in the hot, active coals.
If you have a grate that sits over the coals, roll the bacon slices, if using, together into a coil and place it on the grate directly over the cabbage so the delicious pork fat will drip down onto the slowly cooking cabbage.
The cabbage is ready when it appears soft and moist. This should take about 30 minutes, depending on the heat of your coals. Transfer the cabbage to a platter and serve immediately.
Jordan’s Perfect Green Salad
One thing that I have in common with all of the Franklins (Aaron, Stacy, and their daughter, Vivian) is that hardly a day goes by that I don’t eat a salad. Salads are everything that barbecue is not: fresh, raw, green, crunchy, acidic, and not too filling. When we’re test cooking, I am often tasked with making a simple green salad for dinner because we need something wholesome and satisfying—even though the dressing is just oil and vinegar and salt.
There’s not exactly a trick to my method, just a few things that I do always seem to provoke compliments. Here’s my basic theory of salad, along with a couple of variations that use what you might have on hand or be inclined to eat on any given day.
The Keys to a Perfect Green Salad
•A mix of fresh, tender lettuces, washed and fully dried
•Very good extra-virgin olive oil
•Vinegars and citrus
•Salt and pepper
•Restraint
Lettuces
I like to make a blend of two or more different varieties of lettuces, choosing from such types as butter lettuce, romaine, arugula, dandelion, and endive. Mostly, I love a little crunch. If you are starting with uncleaned lettuce, always wash and dry it fully using a salad spinner (something every kitchen should have). Wash and spin dry the leaves about 20 minutes ahead of dinner and let them chill in the fridge for the perfect condition. The leaves must be free of any dampness or the dressing will not adhere.
Very Good Extra-Virgin Olive Oil
Top-quality extra-virgin olive oil cannot be beat. It has a richness and complexity that you won’t get from any other type of oil. I recommend that you splurge on a bottle from Italy that might set you back thirty dollars or more. It will last a long time if you use it sparingly. I use mine pretty much exclusively to finish proteins and for salad dressing.
Vinegars and Citrus
I use all kinds of vinegars, but my standard is the trio of red wine, white wine, and sherry vinegars, which I use interchangeably, depending on my mood. Occasionally I use balsamic vinegar, but it’s somewhat sweet. You can also use fresh citrus juice in addition to or instead of vinegar. Sometimes I split this component of a dressing between the citric acid of a lemon and the acetic acid of vinegar, as each kind of acid imparts a slightly different tang, adding another dimension.
Salt and Pepper
It’s easiest to add salt by the pinch. Be careful not to use too much, as you can always add more. Just a little bit brings out the flavors of the greens, oil, and vinegar. Too much obscures them. A couple quick twists of the pepper grinder should be sufficient. As with salt, you don’t want too much.
Restraint
Even slightly overdressing it can make a salad vaguely off-putting. Too much vinegar and the acidity is too cutting. Too much oil and the salad is greasy. Too much dressing in general and the lettuces get soggy. Go as light as possible at the beginning and add a touch more dressing only if needed.
Technique
When you have great lettuces, just a little oil and vinegar applied directly to the leaves can be enough. Most vinaigrettes call for oil and vinegar in a three-to-one ratio, but I find that less vinegar is preferable when you’re using a great olive oil. I mix them together by feel, but you might start by trying a four-to-one or even five-to-one ratio.
Right before I serve the salad, I pour some olive oil on the lettuces. Use less than you think you need, then add just a light drizzle of vinegar and a pinch each of salt and pepper and gently toss together with freshly washed hands. Make sure every leaf gets coated with oil. If some didn’t, add more oil. Taste a leaf and let your palate decide if the dressing is just right or if you need a few drops more of either oil or vinegar.
Variations
Premade vinaigrette: To make a vinaigrette ahead of time, follow the preceding principles, but combine the ingredients in a small bowl or jar with a healthy dollop of Dijon mustard (more than you think you might want), which allows the dressing to emulsify. Add a pinch of salt, an even smaller pinch of sugar, and a few twists from a pepper grinder, then whisk everything until the mixture has a nice, thick texture that will coat the leaves. Some of my other favorite additions include finely minced garlic, minced shallot, and fresh dill or tarragon, finely chopped.
Salad additions: Add whole leaves of fresh flat-leaf parsley, mint, or basil to your lettuce mix. They always lift a salad. Also, very fine slivers of onion contribute a nice little background jolt. If you’re serving the salad in a wooden bowl, rub a clove of garlic onto the wood before adding the lettuces to give the perfect garlicky accent. A bit of crunch can also be nice: chopped radish, sliced cucumber, or chopped celery. Don’t add more than one or two of these additional ingredients to a salad. A green salad should be almost invisible compared to the rest of the food—that is, until everyone remarks on how perfectly it is dressed.

Herby Buttermilk Potato Salad

I’ve been making this rich, creamy potato salad for years, as it goes great with just about anything, especially intensely grilled meats such as the Firepit Côte de Boeuf (this page). The cool, slightly sour heaviness of the buttermilk and sour cream provide a soothing contrast to the smoky, crusty surface, and the herbs add some lift and zing. Best of all, it’s really easy to make and to customize to your own taste. This is a large portion, but the leftovers keep well in the fridge for a few days, during which it will almost certainly get eaten.
Makes 3 to 4 quarts
•6 pounds Yukon gold potatoes, diced into ½-inch cubes
•¼ cup / 12g fresh dill, finely chopped
•¼ cup / 12g fresh chives, finely sliced
•½ cup / 30g fresh parsley, finely chopped
•2 cups / 400g mayonnaise
•2 cups / 480g sour cream
•½ cup / 120g buttermilk
•1 tablespoon / 20g kosher salt
Line a sheet tray with paper towels. Bring a large pot of heavily salted water to boil. Add the potatoes, turn the heat to low, and simmer them until close to tender, 10 to 12 minutes. Drain and then lay out the potatoes on the towel-lined sheet tray to cool. Do not refrigerate. Add the dill, chives, and parsley to a mixing bowl followed by the room temperature potatoes. Gently mix the herbs and potatoes. Next add the mayonnaise, sour cream, buttermilk, and salt. Fold in the liquid ingredients until all is well combined, then use the flat of a spoon to smash some of the potatoes.
Prepare the potato salad a day in advance, as the flavors marry and improve overnight.
