Easy-Bake Baking
CHEESY FRITO BREAD WITH PIMIENTOS
SOCCANATA WITH LAMB, OLIVES & OREGANO
SWIRL BREAD WITH LEEKS, TAHINI & DILL
SPICED BUTTERNUT SQUASH BISCUITS
PINEAPPLE–PINE NUT BUTTERMILK CAKE
TOMATO PIE (WITH APOLOGIES TO HATTIE MAE)
FIG-ALMOND CLAFOUTI WITH SAFFRON SYRUP
BANANA-MATCHA BUTTER MOCHI CAKE
BERRY UPSIDE-DOWN CHOCOLATE CAKE
DOUBLE CHOCOLATE SCONES WITH CRYSTALLIZED GINGER
ROSEMARY–OLIVE OIL BROWNIES WITH SEA SALT
MOM’S CORNBREAD REVISITED
serves 8
Cornbread was an integral part of our family’s corned beef dinner, one of the big Saturday night meals my mother used to cook. In addition to the meat, which was glazed with pineapple, she served brown sugar–baked beans and coleslaw with currants, scallions, and dill. I liked the beef, but it was the sides I’d start dreaming about when she announced the menu during the week. I’d space out in front of my math homework, imagining dredging Mom’s cornbread through the gooey beans or the meat’s syrupy lacquer. Now, in my own kitchen, with my skillet, I wanted to try something different. I started with caramelized onions, because I love them, and I figured their sweetness would highlight the corn’s savory qualities, imparting that—for lack of a better word—umami that makes our mouths water.
When researching the best way to caramelize them, I found a Serious Eats post by J. Kenji López-Alt that breaks down a faster route. The result is a concentrated golden confit, nearly like a purée, that almost melts into the bread. Adding more butter to the oniony pan served as a way to deglaze the skillet and incorporate those browned bits into the cornbread batter. It was as though, instead of bacon grease, I was cooking with onion grease, and it was amazing. You could, of course, add bacon to this cornbread, in lieu of or along with the onions. But like my friend Amy Pennington, urban gardening expert, I’m of the opinion that bacon is “like cleavage.” It’s obvious. If that’s all you got, sure, put some in the pan.
8 tablespoons (1 stick) unsalted butter
3 cups finely diced yellow onions (about 3 medium onions)
Scant ¼ teaspoon baking soda
½ teaspoon salt
1 dried bay leaf
1 cup stone-ground cornmeal
1 cup unbleached all-purpose flour
2½ teaspoons baking powder
½ teaspoon freshly ground black pepper
1 cup buttermilk
1 large egg, slightly beaten
½ teaspoon lemon zest
1 Preheat a 10-inch cast-iron skillet on the stovetop, gradually raising the heat from low to medium-high. Place 1 tablespoon of the butter in the pan to melt and as soon as it’s sizzling, add the onions, baking soda, ¼ teaspoon of the salt, and the bay leaf. Cook, shaking the pan every couple of minutes, until the onions have released all their liquid and you begin to see brown debris on the bottom or sides of the pan. Add 2 tablespoons water to the pan to deglaze it, giving it a shake and using a wooden spatula or spoon to gently scrape the browned bits off the bottom.
2 Repeat this process up to three more times, until the onions have turned a deep golden brown and most of the residue has dissolved. (If you miss any, don’t worry—the butter you add to the pan for the batter will pick up any leftover debris.) All told, cooking the onions should take 25 to 30 minutes.
3 Transfer the onions, with the bay leaf, to a bowl and reduce the heat under the skillet to medium. Add 6 tablespoons of the butter to the pan to melt. Pour the melted butter and any leftover oniony bits into the bowl with the onions and bay leaf. Wipe out the skillet and place it in the oven.
4 Preheat the oven to 400°F. In a large bowl, combine the cornmeal, flour, baking powder, remaining ¼ teaspoon salt, and the pepper. Add the buttermilk, egg, and melted butter from the bowl with the onions and bay leaf and mix everything gently to incorporate. Add the lemon zest to the batter, discarding the bay leaf. Keep the stirring to a minimum; you don’t want to overmix the batter.
5 Take the heated skillet out of the oven—with your oven mitts on—and melt the remaining 1 tablespoon butter in it. Pour the batter into the pan, using a rubber spatula to smooth the top. Gently jiggle the skillet—remember those oven mitts—to get rid of any air bubbles and even out the batter.
6 Set the skillet on the middle rack in the oven and bake for 20 to 25 minutes. The cornbread is done when the edges are lightly browned and a cake tester inserted into the center comes out clean. Cut into wedges and serve. Leftover cornbread can be used to make stuffing.
CHEESY FRITO BREAD WITH PIMIENTOS
serves 8

This cornbread is not in any way traditional, although it is, somehow, an interpretation of a beloved Southern dish: pimiento cheese, the supremely creamy dip made with sharp cheddar, mayo, hot sauce, and the cherry peppers that give the spread its name. It also happens to be made with Fritos corn chips. I probably buried the lede there. The recipe was designed for the skillet, but a vintage corn stick pan is a sweet way to present the bread (just bake them a few minutes less).
3½ tablespoons unsalted butter
1 cup yellow cornmeal
½ cup corn flour
⅜ teaspoon salt
1 tablespoon baking powder
½ teaspoon baking soda
½ cup packed Frito crumbs (about 2 cups Frito corn chips pulsed in a food processor)
1 large egg
1½ cups buttermilk
20 shakes of Tabasco sauce (or your preferred hot sauce), or more to taste
1 cup grated extra-sharp cheddar cheese (preferably Tillamook Vintage Extra Sharp White Cheddar)
¼ cup coarsely chopped pimientos
2 tablespoons thinly sliced scallions (white and light green parts)
1 Preheat the oven to 350°F with a 10-inch cast-iron skillet in it. In a small saucepan, melt 2 tablespoons of the butter over medium-low heat. Once the butter has melted, remove the pan from the heat and set it aside.
2 Sift the cornmeal, corn flour, salt, baking powder, and baking soda into a large bowl. Using a whisk, stir in the Frito crumbs.
3 In a medium bowl, beat together the melted butter and the egg. Stir the buttermilk into the egg and butter mixture to combine. Add the hot sauce (as much as you can stand) and stir again to combine. Fold the wet ingredients into the dry to incorporate completely. Fold in the cheese, pimientos, and scallions.
4 Remove the skillet from the oven and place the remaining 1½ tablespoons butter in it to melt. Once the butter is sizzling, use your spatula to scrape the batter into the pan, smoothing the top and giving the skillet a gentle shake to even it out.
5 Bake the cornbread for 30 minutes, until the edges are brown, the top is golden, and the bread has pulled away from the sides of the pan a little. You can serve it straight from the skillet, or, if you wish, turn it out onto a plate; use a spatula to loosen the cornbread from the pan to avoid any sticking.
SESAME BROWN-BUTTER CORNBREAD
serves 8
Brown butter is what you get when you cook the fat until its water has evaporated and its milk solids have begun to toast, turning a lovely hazelnut hue that reminds me of the top of a crème brulée. Just as that custard, with its hard crust of crisp caramelized sugar, was big in the 1980s (thanks to Sirio Maccioni and his pastry chef Dieter Schorner at the legendary New York City restaurant Le Cirque), thirty years later, brown butter appears to be having a similar moment. People are throwing it into brownies, blondies, cakes, cookies, and, yes, even cornbread. Browning takes everything I love about butter and intensifies it, then tacks on a bonus: a deep, nutty note.
On the matter of sugar in savory cornbread, I side with whichever faction of the divided South is anti: I will have none of it in my batter. But this sweet cornbread isn’t like anything you’ve had before. I still can’t quite put my finger on it—its nuttiness is similar to, though less pronounced than, what peanut butter tends to give off when baked into batters. It’s a real surprise, this recipe—a pleasant one.
6 tablespoons (¾ stick) unsalted butter
1 cup stone-ground cornmeal
⅓ cup coconut flour
¼ cup sesame or benne seeds, toasted
⅓ cup coconut sugar
2½ teaspoons baking powder
¼ teaspoon baking soda
¾ teaspoon salt
½ cup buttermilk
½ cup vanilla ice cream, melted (see Note)
1 large egg, slightly beaten
1 tablespoon coconut oil
1 Preheat a 10-inch cast-iron skillet on the stovetop, gradually increasing the heat from low to medium. Once the pan is hot, add the butter, tilting to coat. As it melts, it will sizzle and foam. Continue to cook the butter until the foam dissolves and the liquid turns the color of hazelnuts, a rich brown. (Make sure it doesn’t burn.) If it’s spattering too much, reduce the heat a bit. Pour the brown butter into a small heatproof bowl and set aside to cool. Wipe out the skillet.
2 Preheat the oven to 400°F with the skillet in it. In a large bowl, using a whisk, stir together the cornmeal, coconut flour, sesame seeds, coconut sugar, baking powder, baking soda, and salt.
3 In a medium bowl, whisk together the buttermilk, melted ice cream, and egg to combine. Continue to whisk as you add the brown butter, drizzling it in to incorporate it gradually.
4 Add the wet ingredients to the dry ingredients, whisking to thoroughly incorporate. The batter will seem on the dry side. Don’t worry.
5 Take the hot skillet out of the oven and add the coconut oil, tilting to coat. Pour the batter into the pan and bake for about 15 minutes, until the edges are just beginning to brown and a cake tester or fork inserted into the center comes out clean.
6 You can serve it straight from the skillet, or, if you wish, turn it out onto a plate—just use a spatula to loosen the edges and bottom of the cornbread from the pan first, to avoid any sticking. Cut it into 8 wedges. Enjoy it for breakfast, or as an afternoon snack.
NOTE Whenever possible, I prefer to allow the natural sweetness of fats to shine through in my baked goods. It’s why you’ll notice vanilla ice cream in this recipe. Make sure you choose the best-quality ice cream you can find—one with a high butterfat content that isn’t cloying. It lends moisture and gives you a tender crumb.

ONE-PAN POPOVER
serves 4 to 6 as a snack
When is a Dutch baby pancake no longer a Dutch baby pancake? When it’s a popover. And when is it no longer a popover? When it’s a Yorkshire pudding. Though the latter is prepared with beef fat (usually the reserved drippings from a roast), its batter is frighteningly similar to that of a popover: both are made from flour, eggs, and milk—just use melted butter instead of the beef fat, and you’re there. Yorkies and popovers call for designated tins that look like muffin pans to produce multiple smaller portions. That’s not true of Dutch babies; they’re solitary, giant, puffed-up pancakes. After trying to understand what distinguishes each of these souffléed batters from the others, I’ve decided the differences are negligible enough to render them nearly interchangeable.
This one-pan popover packs as much flavor as possible with chives, lemon zest, Parmesan, and duck fat, which imparts a faintly sweet, subdued gaminess and makes for a more golden exterior and tender interior. As I watched the slow sigh of a rise through my oven window, I saw my creation go from fluffy, thin-skinned Dutch baby to high, crispy-domed popover—or maybe it’s a giant Yorkshire pudding because of its nonvegetarian fat. The ricotta topping turns it into something else altogether. (So don’t even think about leaving it out.)
¾ cup all-purpose flour
¾ cup kamut flour
1½ teaspoons kosher salt
1 teaspoon freshly ground black pepper
½ cup grated Parmesan cheese
2½ tablespoons packed minced fresh chives, or more to taste (see Note)
½ teaspoon lemon zest (see Note)
1½ cups milk
1½ tablespoons plus ½ teaspoon duck fat
3 large eggs
Ricotta Spread, for serving
1 In a medium bowl, sift the flours together. Add the salt, pepper, 3 tablespoons of the Parmesan, the chives, and the lemon zest and stir together to combine. Set the mixture aside.
2 In a small saucepan, heat the milk over medium-low heat just until it starts to bubble around the edges of the pan. Make sure it doesn’t boil and stir it occasionally to prevent a skin from forming. Remove the pan from the heat immediately, pour the milk into a small bowl, and set it aside.
3 Rinse and dry the saucepan and return it to the stove. Add 1½ tablespoons of the duck fat to melt over medium heat. Once the fat has melted, pour it into a separate small bowl and set it aside.
4 In the bowl of a stand mixer fitted with either the paddle or whisk (or in a bowl with a handheld electric mixer, or by hand with a whisk), beat the eggs on medium speed until they’re frothy. Gradually incorporate the warm milk into the eggs. Add the flour mixture, reduce the speed to low, and mix until the ingredients are well incorporated; scrape down the sides of the bowl if necessary. Mix in the melted duck fat. Cover the batter and refrigerate for at least 1 hour or up to 24 hours—the longer, the better.
5 Position the top rack in the middle or lower third of the oven and place a 10-inch cast-iron skillet on it. Preheat the oven to 450°F.
6 When the oven comes to temperature, remove the batter from the refrigerator and whisk it. Take the skillet out of the oven and melt the remaining ½ teaspoon duck fat in it, using a pastry brush to wipe the fat over the bottom and sides of the pan. Pour the batter into the pan and sprinkle the remaining Parmesan over the top.
7 Bake for 20 minutes, then, without opening the oven, reduce the oven temperature to 350°F and bake for 15 minutes more, until the popover is puffed and deeply browned. Serve the popover immediately, in the skillet, or carefully transfer it to a large plate, with the ricotta topping on the side.
NOTE If you’re keen on chives, increase the amount to 5 tablespoons. If you’re not a lemon lover, halve the zest or cut it altogether. Keep in mind, though, that those green and yellow flecks of freshness offset the duck fat.
Ricotta Spread
makes 1 cup
1 cup fresh ricotta cheese
1 tablespoon minced fresh chives
1 teaspoon flake salt
Freshly ground black pepper
In a small bowl, stir together all the ingredients to combine. You can prepare this a day or two in advance and refrigerate it, but it’s best served the same day it’s made.
SOCCANATA WITH LAMB, OLIVES & OREGANO
serves 4

On the Cöte d’Azur of France, they call it socca; across the border in Italy, it’s farinata. Both words refer to the same thing: a chickpea griddle cake that is often described as a crepe, but has a stronger presence. The foundation for an intensely flavorful meal, this one is so much more than a socca, or farinata, which is why I lovingly refer to it as a combination of the two words: it is my soccanata. Mark Bittman’s recipe for socca gave me the idea to pan-roast the zucchini I use to bolster the sumac-infused batter. I build on that with a topping of heavily—and heavenly—spiced ground lamb, prepared in the same cast-iron skillet as the rest. When the garbanzo base emerges from the oven, it is good enough to eat on its own, split into hot shards with your hands—or, even better, with the meat and a garnish of cooling, creamy Greek yogurt spooned on top.
SOCCANATA
1 cup chickpea (garbanzo) flour (see Notes)
1½ teaspoons salt
1 teaspoon freshly ground black pepper
1 teaspoon ground sumac
2 tablespoons extra-virgin olive oil
2 cups shredded zucchini (about 1 large zucchini; see Notes)
LAMB TOPPING (OPTIONAL)
1 teaspoon olive oil
½ large onion, minced
½ pound ground lamb (not too lean)
½ teaspoon salt
½ teaspoon ground sumac
½ teaspoon ground cumin
¼ teaspoon ground cinnamon
1½ teaspoons coarsely chopped fresh oregano leaves
2 heaping tablespoons coarsely chopped green olives (picholine, preferably)
1 teaspoon coarsely chopped fresh oregano leaves
1 tablespoon plus 1 teaspoon olive oil, plus more as needed
Greek yogurt, for serving
1 Prepare the soccanata: In a medium bowl, stir together the chickpea flour, 1 teaspoon of the salt, the pepper, and sumac to combine. Pour in 1 cup lukewarm water and whisk until the batter is smooth, without any lumps. (If you’re having a hard time getting a smooth consistency, use an immersion blender.) Stir in the extra-virgin olive oil, cover, and let the batter rest at room temperature for at least 30 minutes and up to 12 hours, or refrigerate overnight, so the flour can fully absorb the water. (The batter will keep in the refrigerator for up to 3 days.)
2 Preheat the oven to 450°F. (If you’re not making the lamb topping, then place the skillet in the oven to preheat.)
3 In a medium bowl, toss the zucchini with the remaining ½ teaspoon salt and let it sit for 5 minutes. Place the zucchini in a sieve set over a bowl and push it against the sieve to squeeze out the water. Alternatively, you can place the zucchini in a kitchen towel or cheesecloth and wring the liquid out. Put the zucchini in a dry bowl; set it aside.
4 Make the topping (if using): Preheat a 10-inch cast-iron skillet on the stovetop, gradually raising the heat from low to medium-high. When the pan is hot, add the olive oil and tilt to coat. Once the oil is hot, add the onion and sauté, stirring frequently with a wooden spoon, for about 5 minutes, until it begins to soften and turn translucent.
5 Add the lamb to the skillet, using the spoon or a spatula to break up the meat. Add the salt, sumac, cumin, and cinnamon and stir to combine. Stir in the oregano and olives. Cook, stirring continuously, for about 10 minutes, until the meat is cooked through. Transfer the mixture to a bowl and cover with aluminum foil to keep warm. Drain any remaining lamb fat from the pan, reserving 1 tablespoon. Do not clean the skillet.
6 Return the reserved 1 tablespoon fat to the hot skillet and tilt to coat. (If you don’t have enough fat, use olive oil to make up the difference. If your skillet is not hot enough—it should sizzle—put it in the oven for 5 minutes to heat up before adding the oil.) If you’re not making the lamb, take the skillet out of the oven and add 1 tablespoon of the olive oil. Add the drained zucchini to the skillet and put it in the oven. Roast the zucchini for 8 to 10 minutes, stirring it once or twice, until it’s just starting to brown.
7 Finish the soccanata: Take the skillet out of the oven and stir the oregano into the zucchini. Add the zucchini to the batter and whisk to combine. Quickly brush the surface of the hot skillet with 1 teaspoon of the olive oil. Immediately pour the batter into the pan and return the pan to the oven. Bake the soccanata for 10 to 12 minutes, until the center is firm and springy and the edges are set. Remove the skillet from the oven and turn on the broiler. Using a pastry brush or the back of a spoon, swipe the top of the soccanata with the remaining 1 tablespoon olive oil. Return it to the oven, a few inches beneath the broiler, and broil for 3 minutes, until the surface is lightly freckled with brown spots.
8 Serve the soccanata hot, straight from the skillet, or, if you want to remove it, wait a minute or two before gently loosening the edges with a spatula and flipping it out onto a serving plate. Top it with the lamb mixture, if using. Place a dollop of Greek yogurt in the center or serve it in a bowl on the side.
NOTES
• Chickpea flour makes this socca safe for anyone avoiding gluten.
• I like to shred zucchini in a food processor with the shredding blade because it yields a slightly coarser texture, but you can also use a box grater if you’d rather.
SWIRL BREAD WITH LEEKS, TAHINI & DILL
makes 1 loaf

Usually the label “whole wheat” or “vegan” is enough to deter me from flagging a recipe, but one for Whole Wheat Tahini Chocolate Bread that I found on a blog called Dreamy Leaf by a chef named Maya Sozer looked so pretty and delicious. I was swayed by the bread’s swirled shape and the inclusion of tahini. This savory riff on the sweet original upholds the wholesome end of the bargain. When you start to think about all those teasing Pillsbury commercials with families gathered around the table grabbing hot dinner rolls off a plate and melting pats of butter on them, you might feel a pang of pity for your vegan friends. They deserve a freshly baked, tempting bread of their own to tear into. And if it’s one that those of us who aren’t vegans can enjoy just as much, then all the better.
DOUGH
2 teaspoons active dry yeast
1 tablespoon maple syrup (or honey; see Note)
1 cup warm water (110° to 115°F)
3 cups whole-wheat flour, plus more for dusting
1 teaspoon salt
1 tablespoon olive oil
FILLING
1½ teaspoons olive oil
2½ cups thinly sliced leeks (about 2 large leeks), well rinsed in a colander under cold water and dried
2 tablespoons vermouth
¾ teaspoon salt
¼ teaspoon freshly ground black pepper
½ cup tahini
1 tablespoon maple syrup (or honey; see Note)
2 tablespoons sesame seeds, toasted
2 tablespoons chopped fresh dill
2 tablespoons plus 1 teaspoon olive oil
1½ tablespoons sesame seeds, for sprinkling
1 Start the dough: In a small bowl, dissolve the yeast and maple syrup in the warm water, gently stirring to incorporate. Set aside for about 5 minutes, until the yeast has dissolved and begun to foam.
2 In a large bowl, stir together the flour and salt with a wooden spoon. Add the yeast mixture and olive oil and stir just until the dough begins to come together. Start kneading the dough in the bowl, using your hand to incorporate any extra liquid or flour. If there’s not enough water, slowly add a bit more—a teaspoon or two at a time, up to ¼ cup—as needed. The dough should be soft and supple, not sticky or wet. After about 5 minutes of kneading, cover the bowl and let the dough rest for an hour, until it has doubled in size.
3 Meanwhile, make the filling: Preheat a 10-inch cast-iron skillet on the stovetop, gradually raising the heat from low to medium-high. Once the pan is hot, add the olive oil and tilt to coat. Add the leeks and sauté for about 8 minutes, until they are soft and just begin to brown. Deglaze the pan with the vermouth. When the liquid has cooked off, remove the pan from the heat and season the leeks with ¼ teaspoon of the salt and the pepper.
4 Transfer the leeks to a medium bowl. Preheat the oven to 350°F with a skillet in it. Add the tahini, maple syrup, and leeks and use a rubber spatula to combine. Incorporate the sesame seeds and the dill into the mixture. Taste and season with the remaining ½ teaspoon salt. Set the filling aside.
5 Finish the dough: Place the dough on a well-floured work surface and, using a floured rolling pin, flatten and spread the dough as thin and wide as you can (mine was approximately 17 by 14 inches). Using a rubber spatula, spread the leek filling over the surface of the dough and roll it into a tight log. Using a sharp knife, slice the log in half down the middle lengthwise so you have two snakelike ropes of dough. Twist each of the dough snakes a few times to elongate and thin them somewhat to allow you to fit them into the skillet properly.
6 Take the hot pan out of the oven and add 1 teaspoon of the olive oil to coat. Spiral the dough ropes into the skillet, starting with one in the center of the pan, and then wrapping the second around it to fill the pan (see photographs). Brush the top of the spiraled dough with the remaining 2 tablespoons olive oil and sprinkle the untoasted sesame seeds over the top. Bake for about 45 minutes, until the top is golden brown.
7 Like any freshly baked loaf, this bread is good straight out of the oven. Some might say that, when left covered at room temperature, it’s even better the next day. Serve it in the skillet or transfer it to a large plate; leave it intact so you don’t lose the dramatic presentation. Tear into it, or neatly slice a wedge.
NOTE I first made this bread with honey, not realizing it isn’t vegan. (You live, you learn.) It’s delicious with either sweetener, so if you’re not vegan and you don’t have maple syrup, honey is just as good.
BROCCOLI CAKE
serves 4 to 6
While flipping through Plenty More, Yotam Ottolenghi’s second tome on vegetable cookery, I spied a photo of a stunning cauliflower cake. Its top was golden, with purple onion rings set into it like pressed flowers, and its edges were coated in white sesame and black nigella seeds. It reminded me of a dish my mother used to make called Broccoli Mold. I know, that sounds positively dreadful. You’re thinking aspic, or maybe green, fuzzy, old-food mold. Stop it immediately! Instead, picture fresh, tender florets with scallions, sour cream, Swiss cheese, nutmeg, and almonds. Then try to imagine what would happen if you brought those items to Ottolenghi’s creation. That’s what I’ve done, with some adjustments.
To make it more of a cake and less of a frittata, I use the same amount of flour as Yotam does, but two fewer eggs. The result is something that, texturally, reminds me of a mildly bready Spanish tortilla, and like a tortilla, this broccoli thingamajig is great warm or at room temperature. I couldn’t resist tasting it when it came out of the oven, though. I had invited my mother over to test it out with me. As usual, she distracted me with her mom talk, thinking the cooking part was just an excuse to gossip. Fortunately, the recipe is so easy, you can’t really mess it up, even if Chatty Cathy invades your kitchen. Of course, had it not been for Mom, I wouldn’t have come up with this savory vegetable cake at all.
4 cups packed broccoli florets with 1 to 1½ inches of their stalks attached
4 teaspoons olive oil
¼ teaspoon coarse salt
1 cup finely diced onion (about 1 medium)
3 tablespoons thinly sliced scallions (white and light green parts)
¾ teaspoon fine salt
¼ teaspoon freshly ground black pepper
1 cup all-purpose flour
1½ teaspoons baking powder
¼ teaspoon ground turmeric
½ teaspoon smoked paprika
½ teaspoon sweet paprika
1 teaspoon toasted cumin seeds
5 large eggs
3 tablespoons sour cream
1½ packed cups grated aged Gouda
¼ cup pumpkin seeds, toasted
½ tablespoon unsalted butter
1 Preheat the oven to 425°F. Split the broccoli florets lengthwise so that each is about ⅛ inch thick, using your knife to slice through the stems, then pulling the florets apart. Place the split broccoli spears on a baking sheet big enough that you can spread them out in one layer. Sprinkle 2 teaspoons of the oil and the coarse salt over the florets and toss to evenly coat. Roast for about 15 minutes, until the florets are just beginning to brown. Transfer the roasted broccoli to a small bowl and set it aside to cool.
2 Meanwhile, preheat a 10-inch cast-iron skillet on the stovetop, gradually raising the heat from low to medium-high. When the pan is hot, add the remaining 2 teaspoons oil and tilt to coat. Give the oil a few seconds to heat up, then add the onion and scallions and sauté, stirring frequently with a wooden spoon or spatula, for 3 to 5 minutes, until they soften and begin to turn translucent. Transfer the onion and scallions to a large bowl, season with ¼ teaspoon of the fine salt and the pepper, and set aside to cool. Rinse and dry the skillet.
3 Preheat the oven to 400°F with the skillet in it.
4 Sift the flour, baking powder, the remaining ½ teaspoon fine salt, the turmeric, and smoked and sweet paprikas into a medium bowl. Add the toasted cumin seeds and toss to combine.
5 Add the eggs to the bowl with the onion-scallion mixture and whisk vigorously to combine. Add the dry ingredients, whisking to form a thick batter. Whisk in the sour cream. Switch to a wooden spoon and stir in the Gouda, followed by the pumpkin seeds and, finally, the roasted broccoli. Make sure the ingredients are thoroughly incorporated, being careful not to break the broccoli florets as you stir.
6 Remove the hot skillet from the oven and add the butter to melt, brushing it over the bottom and sides of the pan. Using a rubber spatula, scrape the batter into the skillet, spreading it to fill the pan and smoothing the top. Bake for about 20 minutes, until the top is golden brown, the center has set, and a cake tester inserted into the center comes out clean. Wait 5 minutes, then flip it out so it’s right-side up using the Upside-Down Plate Trick. Let it cool slightly, at least 10 to 15 minutes, before serving; it’s best eaten warm or at room temperature.
DATE, ONION & FONTINA SCONES
makes 8 scones
One of the things that separate West Coast pastry chef William Werner’s work from the rest of the pack is its aesthetic style. It’s sorta like rock ’n’ roll, with flowers. At his Craftsman and Wolves shops, there’s always something rebellious at play; visually arresting, traditional baked goods and breads showcase unusual seasonal ingredients and often blur the line between savory and sweet. In the fall, I love his apple-Gruyère scone, topped with a large crown of melted cheese from beneath which thin slices of baked apples poke out.
Fruit and cheese are a classic pairing. You get sweet and salty in one perfectly harmonized bite. To create my own combo, I took William’s recipe apart and put it back together, in a remarkably easy case of substitution. One day, when I’m feeling more The Melvins than Cat Power, I’m going to send him my recipe, so he can try it and tell me what he thinks. For now, I’m content to sit at my desk with a cup of tea, one of these scones, and a pitcher full of peonies.
1 tablespoon plus 1 teaspoon unsalted butter, per batch
3 cups finely diced yellow onions (about 3 medium onions)
¾ teaspoon plus ⅛ teaspoon baking soda
1¼ teaspoons salt
1 teaspoon packed orange zest
1¾ cups unbleached all-purpose flour, plus more for dusting
1¾ cups barley flour
1 tablespoon baking powder
9½ tablespoons unsalted butter, cut into cubes and chilled
1½ cups loosely packed coarsely grated Fontina cheese
½ cup packed finely grated Parmesan
2 tablespoons plus 1 teaspoon date syrup
1¼ cups heavy cream
1 cup chopped pitted Medjool dates
1 Preheat a 10-inch cast-iron skillet on the stovetop, gradually increasing the heat from low to medium-high. Once the pan is hot, add 1 tablespoon of the butter. As soon as it’s melted and sizzling, add the onions, ¼ teaspoon of the baking soda, and ¼ teaspoon of the salt. Cook the onions, shaking the pan every couple of minutes, until they’ve released all their liquid and you begin to see brown debris on the bottom or sides of the skillet.
2 Add 2 tablespoons of water to deglaze the pan, giving it a shake and using a wooden spatula or spoon to gently scrape the brown bits off the bottom. Repeat the deglazing process up to three more times, until the onions have turned a deep golden. All told, cooking the onions should take 25 to 30 minutes. Place them in a small bowl with the orange zest, stir to combine, and set aside. Rinse and wipe out the pan.
3 Sift the remaining ½ plus ⅛ teaspoon baking soda, remaining 1 teaspoon salt, the flours, and the baking powder together into the bowl of a stand mixer. Add the 9½ tablespoons cubed and chilled butter and toss to coat with the flour mixture. Cover and refrigerate for 25 minutes.
4 Preheat the oven to 375ºF with the skillet in it.
5 In a small bowl, toss ¾ cup of the Fontina and the Parmesan together and set aside. In a medium bowl, whisk together the caramelized onions, date syrup, and cream. Affix the stand mixer bowl with the butter and dry ingredients to the mixer and fit it with the paddle. Mix on low speed for about 2 minutes, until the butter breaks down into pea-size pieces. Add the onion-cream mixture and mix for a few seconds until just incorporated, then add the dates, followed by the remaining ¾ cup Fontina. It should take only a few seconds for everything to combine; don’t overmix the dough.
6 Turn the dough out onto a lightly floured work surface and pat it into a 1½-inch-thick block. Using a bench scraper, slice it into four 3½-inch squares and then cut each square on the diagonal, forming two triangles per square. Sprinkle the triangles with the Fontina-Parmesan mixture.
7 Remove the hot skillet from the oven, place 1 teaspoon butter in it to melt, and tilt (or brush) to coat. Place 3 or 4 dough triangles in the pan and bake for 25 to 30 minutes, until they’re golden brown and cooked through. While those are baking, place the remaining triangles on a plate lined with wax paper, cover them with plastic wrap, and place them in the refrigerator. Leave the finished scones in the skillet for 10 minutes before transferring them to a plate to finish cooling. When you are ready to bake the rest, remove them from the refrigerator and follow the above process, melting 1 teaspoon of butter in the skillet before adding the triangles and putting them in the oven. Serve the scones at room temperature.
8 If you prefer to bake the remaining dough triangles later, layer them between wax paper in an airtight container and store them in the refrigerator overnight or in the freezer for up to 1 month. You don’t need to defrost them before baking them, but you should keep them in the oven a couple of minutes longer. You can sprinkle them with the Fontina-Parmesan mixture before storing them, or sprinkle the triangles with the cheese right before you bake them. To bake, follow the directions above.
NOTE William makes his scones in a stand mixer, which is how I did it, to show proper respect. You could do it by hand, or in a food processor, if you prefer.
SPICED BUTTERNUT SQUASH BISCUITS
makes 18 biscuits

After possibly getting myself permanently banned from the South with my crème fraîche biscuits, I wanted to create one that followed protocol, technically speaking. In terms of the flaky, pillowy, tender outcome and method for achieving that, I went by the book; two, in fact. Virginia Willis’s sweet potato biscuits, from her cookbook, Basic to Brilliant, Y’all, are spot-on. Everyone loves them, my dad—the toughest critic—included. I did a variation with another fall regular, butternut squash, which may be less Southern than the tuber, but is a great vehicle for unexpected, sharper flavors. I roasted the squash, then combined it with honey and Thai Sriracha sauce.
Then I turned my attention to food writer Belinda Ellis’s “kneading” process. (With all the years she spent studying, teaching, and making biscuits, someone should give her an honorary doctorate!) Rather than a pushing and pulling motion, hers is a series of simple folds and pats—nothing complicated or time-consuming. My biscuits rose so high, I was almost convinced I had a special gift. A second burst of pride followed when I took a bite and experienced a surprising, unexpected wave of complex sweetness, followed by a sneaky hit of heat. The flavors had melded together to create something unique and irresistible. I believe these towering butternut-stained biscuits might just be good enough to get me back into the good graces of my Southern friends.
½ medium butternut squash, halved lengthwise and seeded (see Notes)
1½ teaspoons olive oil
¼ teaspoon kosher salt
2 teaspoons honey
2 teaspoons Sriracha
½ teaspoon ground ginger
1¼ plus ⅛ teaspoons fine salt
3¼ cups bleached all-purpose flour (preferably White Lily; see Notes), plus more for dusting
2½ teaspoons baking powder
8 tablespoons (1 stick) unsalted butter, cut into ½-inch cubes and chilled, plus ½ tablespoon
⅓ cup whole or low-fat milk
1 Preheat the oven to 400°F. Coat the flesh and skin of the squash with the olive oil and sprinkle with the kosher salt. Place the squash on a baking sheet, cut-side down, and roast until it’s very soft, about 1 hour. Remove the baking sheet from the oven and let the squash cool for at least 20 minutes. Once it’s cool, scoop out the flesh, discarding the skin. Place the flesh in a food processor and process until smooth. (The puréed squash will keep in an airtight container in the refrigerator for up to 3 days.)
2 When you’re ready to make the biscuits, preheat the oven to 400°F with a 10-inch cast-iron skillet in it.
3 Place 1 cup of the puréed squash in a medium bowl, reserving the rest for another use (like Roasted Vegetable Cobbler). Add the honey and Sriracha to the bowl and stir to combine. Add the ginger and ½ plus ⅛ teaspoon fine salt and stir again.
4 In the food processor, pulse the flour, baking powder, and the remaining ¾ teaspoon of the fine salt a few times to mix them together. Add all but 2 of the cubes of butter, a few at a time, and pulse to combine, until you have what looks like coarse meal.
5 Add the milk to the bowl with the squash purée and whisk until well combined and the mixture is smooth. Add the squash mixture to the food processor, pulsing just until a moist dough has formed. If it’s too dry, add more milk, a tablespoon or couple of teaspoons at a time, and pulse to incorporate.
6 Turn the dough out onto a lightly floured work surface, cradling it with lightly floured hands to gently form it into a block, then patting the top to flatten it into a rectangle about ¼ inch thick. Fold the dough in half, give it a pat, then fold it in half again. Lift the dough (use a bench scraper if there’s any sticking, and dust the work surface with flour as needed), put it back down, and pat it again. Repeat the folding and patting a few more times, just until the dough is smooth and no longer sticky.
7 Pat the dough and flatten it to a ¾-inch thickness. Press—without twisting—a 2-inch biscuit cutter straight down into the dough to cut out rounds, getting as many as you can out of the initial rectangle of dough, and place the rounds on a piece of wax paper as you go. Pile the scraps on top of one another in layers and pat them out to form another rectangle; cut as many more rounds from it as you can. Repeat until there is no dough left.
8 Take the hot skillet out of the oven and melt the 2 remaining ½-inch butter cubes in it, tilting the pan to coat. Place half of the cut biscuits in the pan and bake for 10 to 15 minutes, until a cake tester inserted into the center of a biscuit comes out clean. While those are baking, place the remaining half of the cut biscuits—still on the wax paper—on a large plate or tray so they can lie flat, cover them with plastic wrap, and place them in the refrigerator.
9 Remove the skillet from the oven and wait for 5 minutes before transferring the hot biscuits to a wire rack to cool for 10 minutes or so more. Repeat with the remaining cut biscuits, remembering first to place the additional ½ tablespoon of butter in the pan, which should still be hot. These are best enjoyed warm.
NOTES
• White Lily Flour is extremely light, which means that dough made with it requires less liquid. (If you’re using another brand of bleached all-purpose flour, you may end up with slightly drier dough.) If it’s too dry, you can add a bit more milk to the dough when it’s still in the food processor—1 tablespoon or even a couple of teaspoons at a time, to be safe. Alternatively, if the dough seems a little too wet when you turn it out, dust your work surface with extra flour, adding more, if needed, until you’re able to fold and pat the dough.
• To freeze the biscuits, place the unbaked rounds on a parchment paper–lined baking sheet, cover them with plastic wrap, and put them in the freezer. Once they're completely frozen, transfer them to a plastic bag. They’ll keep in the freezer for up to 2 months. Take them out while the oven is preheating and bake as directed (they may need an extra minute or two).
PINEAPPLE–PINE NUT BUTTERMILK CAKE
serves 8 to 10
When asked to cover some of the brightest new pastry stars—and their recipes—for a food magazine, I immediately thought of Kristen D. Murray of Portland, Oregon’s Måurice, where locals gather for fika, a Swedish coffee break. She suggested a pine nut and pineapple torte, engaging in the kind of culinary wordplay I love.
This simple, skillet-friendly buttermilk cake repurposes that ingredient matchup. The versatile base features spelt flour—it’s got a wholesome charm plus a pronounced nuttiness. I bring in a bit of sorghum flour, too, for its sweetness. The result is almost like a zucchini bread. I’d have it for fika. You might find it even better the next day for breakfast. To present it as more of a dessert, I’d serve it with unsweetened whipped cream. I hope Kristen would approve. This one’s for her.
4 tablespoons (½ stick) plus 1 teaspoon unsalted butter
2 cups spelt flour
½ cup sorghum flour
1 tablespoon baking powder
½ plus ⅛ teaspoon salt
1½ cups buttermilk
2 large eggs
6 tablespoons honey
Finely grated zest of 3 lemons
1 tablespoon packed chopped fresh basil
¼ cup pine nuts, toasted
1½ cups sliced pineapple (2-inch-long by ¼-inch-wide batons)
2 tablespoons plus 2 teaspoons raw sugar, such as turbinado
1 Preheat the oven to 375°F with a 10-inch cast-iron skillet placed on a rack in the top third of the oven. In a small saucepan, melt 4 tablespoons of the butter and set aside.
2 In a large bowl, whisk together the flours, baking powder, and salt. In a smaller bowl, whisk together the buttermilk, eggs, and honey. Whisk in the melted butter and zest. Add the wet ingredients to the dry, stirring just to combine. Mix in the basil and pine nuts.
3 Remove the hot skillet from the oven. Add the remaining 1 teaspoon butter to melt and brush it over the bottom and sides of the pan. Scrape the batter into the skillet, spreading it evenly and smoothing the top. Scatter the pineapple over the surface and sprinkle the raw sugar on top.
4 Bake for 30 to 35 minutes, until the top is golden and the center has just set—a cake tester inserted into the center should come out clean, but err on the softer side; it will firm up as it cools. Leave it in the skillet for about 10 minutes before using the Upside-Down Plate Trick to flip it out and serve it pineapple-side up.
CACIO E PEPE SHORTBREAD
serves 10 to 12
As I get older, I tend to prefer simpler things. This includes chef Mark Ladner’s bavette cacio e pepe at Lupa, which has few ingredients, but is all about that throat-tickling burn of pepper and the grainy Italian cheese texture against smooth, spaghettilike noodles. Something else I return to again and again is shortbread. The buttery, not-too-sweet, hint-of-salt block is a treat that’s served me well from childhood through adulthood.
This classic-pasta-turned-cookie functions much like a biscotti: it goes well with espresso, or even a dessert wine, although I might prefer a glass of Riesling or prosecco myself. It’s intended as homage to both Chef Ladner and my friend Caitlin Freeman, who has perfected the art of shortbread, and it might just be my favorite recipe in this cookbook (but you didn’t hear that from me).
½ cup plus 2 teaspoons finely grated Parmesan cheese
½ cup plus 2 teaspoons finely grated Pecorino Romano cheese
2 teaspoons coarsely ground black pepper
1 cup (2 sticks) unsalted butter, at room temperature
½ cup confectioners’ sugar
1¼ teaspoons kosher salt
1½ cups all-purpose flour
½ cup semolina flour
1 tablespoon plus 2 teaspoons extra-virgin olive oil
1 Preheat the oven to 350°F with a 10-inch cast-iron skillet in it.
2 In a small bowl, combine 2 teaspoons each of the Parmesan and pecorino and 1 teaspoon of the pepper. Set aside.
3 In the bowl of a stand mixer fitted with the paddle, beat the butter on low speed for 1 minute or so, until it’s smooth and fluffy, like cake frosting. Add the sugar, salt, and remaining 1 teaspoon pepper and mix until combined. Turn off the mixer and, using a rubber spatula, scrape down the sides of the bowl. Set the speed to medium and mix for 4 to 5 minutes more, until the mixture takes on a thick, creamy, almost shiny texture, like mayonnaise.
4 Turn off the mixer and scrape down the sides of the bowl again. Add the flours and mix on low speed to incorporate. Turn off the mixer, scrape down the sides of the bowl one more time, add the remaining ½ cup Parmesan and ½ cup pecorino and mix for 1 minute. Using the rubber spatula, push the dough together to form a ball.
5 Remove the hot skillet from the oven and brush it with 1 teaspoon of the olive oil. Turn the dough into the skillet and, working quickly, using your fingers (but being careful of the hot pan), press the dough into the skillet, pushing it out to fill the edges and flattening it to create an even surface. Brush the top with the remaining 1 tablespoon plus 1 teaspoon olive oil. Sprinkle the dough with the cheese-pepper mixture.
6 Bake the shortbread for 18 to 23 minutes, until the edges begin to brown. The middle should be cooked through, but slightly soft; it will harden as it cools. Let cool for 10 minutes. Use the Upside-Down Plate Trick to flip the shortbread out so it’s right-side up. Let cool completely.
7 To serve, divide the shortbread into 10 to 12 wedges. Enjoy it with your afternoon coffee, or, which I encourage, aperitifs, like prosecco, Bellinis, rosé, or whatever you like to drink at cocktail hour.
TOMATO PIE
(WITH APOLOGIES TO HATTIE MAE)
serves 6

I had never eaten tomato pie—not the one known throughout the American South—until I met chef Elizabeth “Heidi” Trull of Grits and Groceries in South Carolina. Her piping-hot, straight-out-of-the-oven pie was sealed with a thick, blistered cap of cheddar, and when you bit into it, it was creamy, with tomatoes that were burstingly juicy.
Before I left the restaurant, she shoved a collection of recipes into my hand. Inside, I found Hattie Mae’s tomato pie. Its namesake, Heidi notes, “was a wonderful lady who took care of us all growing up in Sumter [South Carolina] and this pie makes me think of her and home.”
I couldn’t wait to make such a nostalgic dish, one that would take me back to my childhood. If I wrote a family cookbook, the chapter on my mother, Nancy, would be titled Sun-Dried Tomatoes, Goat Cheese & Pine Nuts; she adds these ingredients to almost everything. I associate those things with the 1980s, and I chide my mom for her unwillingness to abandon this dated triumvirate, but the truth is, I kind of love their potency, especially when combined. I took Hattie Mae’s tomato pie, and I fused it with a taste of the ’80s. It’s a concentrated—and I think—dazzling mash-up.
DOUGH
1½ cups unbleached all-purpose flour
½ cup almond flour
1 heaping teaspoon fine sea salt
¼ cup plus 1 teaspoon olive oil (see Notes)
¼ cup plus 2 tablespoons cold water
¼ cup pine nuts, toasted
FILLING
½ cup dry sun-dried tomatoes
1 cup mayonnaise (preferably Duke’s)
½ cup fresh goat cheese, at room temperature
½ cup grated sharp cheddar cheese
½ cup mixed coarsely chopped fresh oregano leaves, basil, and/or flat-leaf parsley
3 medium beefsteak tomatoes, each cut crosswise into six ¼-inch-thick slices
1 teaspoon kosher salt
½ teaspoon olive oil
1 cup finely diced onions
¼ plus ⅛ teaspoon fine sea salt
¼ plus ⅛ teaspoon freshly ground black pepper
1 Make the dough: In a large bowl, whisk together the flours and sea salt. Add the olive oil and, using your hands (or a fork), rub the dry ingredients and oil together to combine, yielding a crumbly mixture. Make a well in the middle and add ¼ cup cold water. Continue to incorporate, using your hands or a fork, until dough clumps begin to form. Add more water, 1 teaspoon at a time, as needed, until the dough comes together. Using the heel of your hand, quickly and gently knead it into a ball, folding the pine nuts in as you go (poke any strays back in), then flatten the dough into a disc.
2 Place a 14-inch square of wax paper on your work surface and put the disc of dough on top of it. Place another piece of wax paper, the same size as the first, on top of the dough. Using a rolling pin, roll the dough into a circle about 10 inches wide and ¼ inch thick as follows: roll from the center, pushing the pin first out, then back, then rotate the dough 45 degrees before again rolling it out, then back. Once the dough is the desired size, transfer it to a plastic freezer bag (keeping it between the sheets of wax paper) and refrigerate for at least 2 hours or up to overnight.
3 Make the filling: Soak the sun-dried tomatoes in warm water for 1 hour, timing it so they’re done when you’re ready to start assembling the pie. Drain, then chop them into bite-size pieces.
4 Preheat the oven to 350°F. In a medium bowl, stir together the mayonnaise, goat cheese, cheddar, and one-third of the mixed herbs. Set the bowl aside.
5 Place the tomato slices on a baking sheet and sprinkle with the kosher salt. Let them sweat for 10 minutes. Meanwhile, take the pie dough out of the refrigerator and let it soften enough to make maneuvering it easier.
6 Preheat a 10-inch cast-iron skillet on the stovetop over low heat for 5 minutes. Rinse the tomato slices under cold water and pat them dry with paper towel.
7 Turn off the burner and brush the olive oil onto the warm pan. Fit the dough into the skillet to form the crust, carefully pushing the edges up against the sides of the pan to create a 1-inch rim. Lay one-third of the tomato slices in the pie shell, followed by one-third of the sun-dried tomatoes, half the onions, and one-third of the mixed herbs. Season with ¼ teaspoon each of the fine sea salt and pepper. Repeat with another layer of each ingredient. Finally, add the remaining tomatoes and sun-dried tomatoes and season with the remaining sea salt and pepper. Spread the mayo mixture over the top and bake for 45 minutes to 1 hour, until the crust is golden and the top is golden brown and bubbling.
8 Serve hot. It’s great at room temperature, too. Refrigerate leftovers and eat them cold the next day. Don’t even bother with reheating.
NOTES
• You can prepare the crust the day before and assemble and bake the pie in record time, for a quick weeknight dinner. And you can make it year-round, even when tomatoes aren’t in their prime.
• Thanks to olive oil, this pie dough is less flaky and more crackerlike to handle the weight and moisture of the tomatoes.
FIG-ALMOND CLAFOUTI WITH SAFFRON SYRUP
serves 8
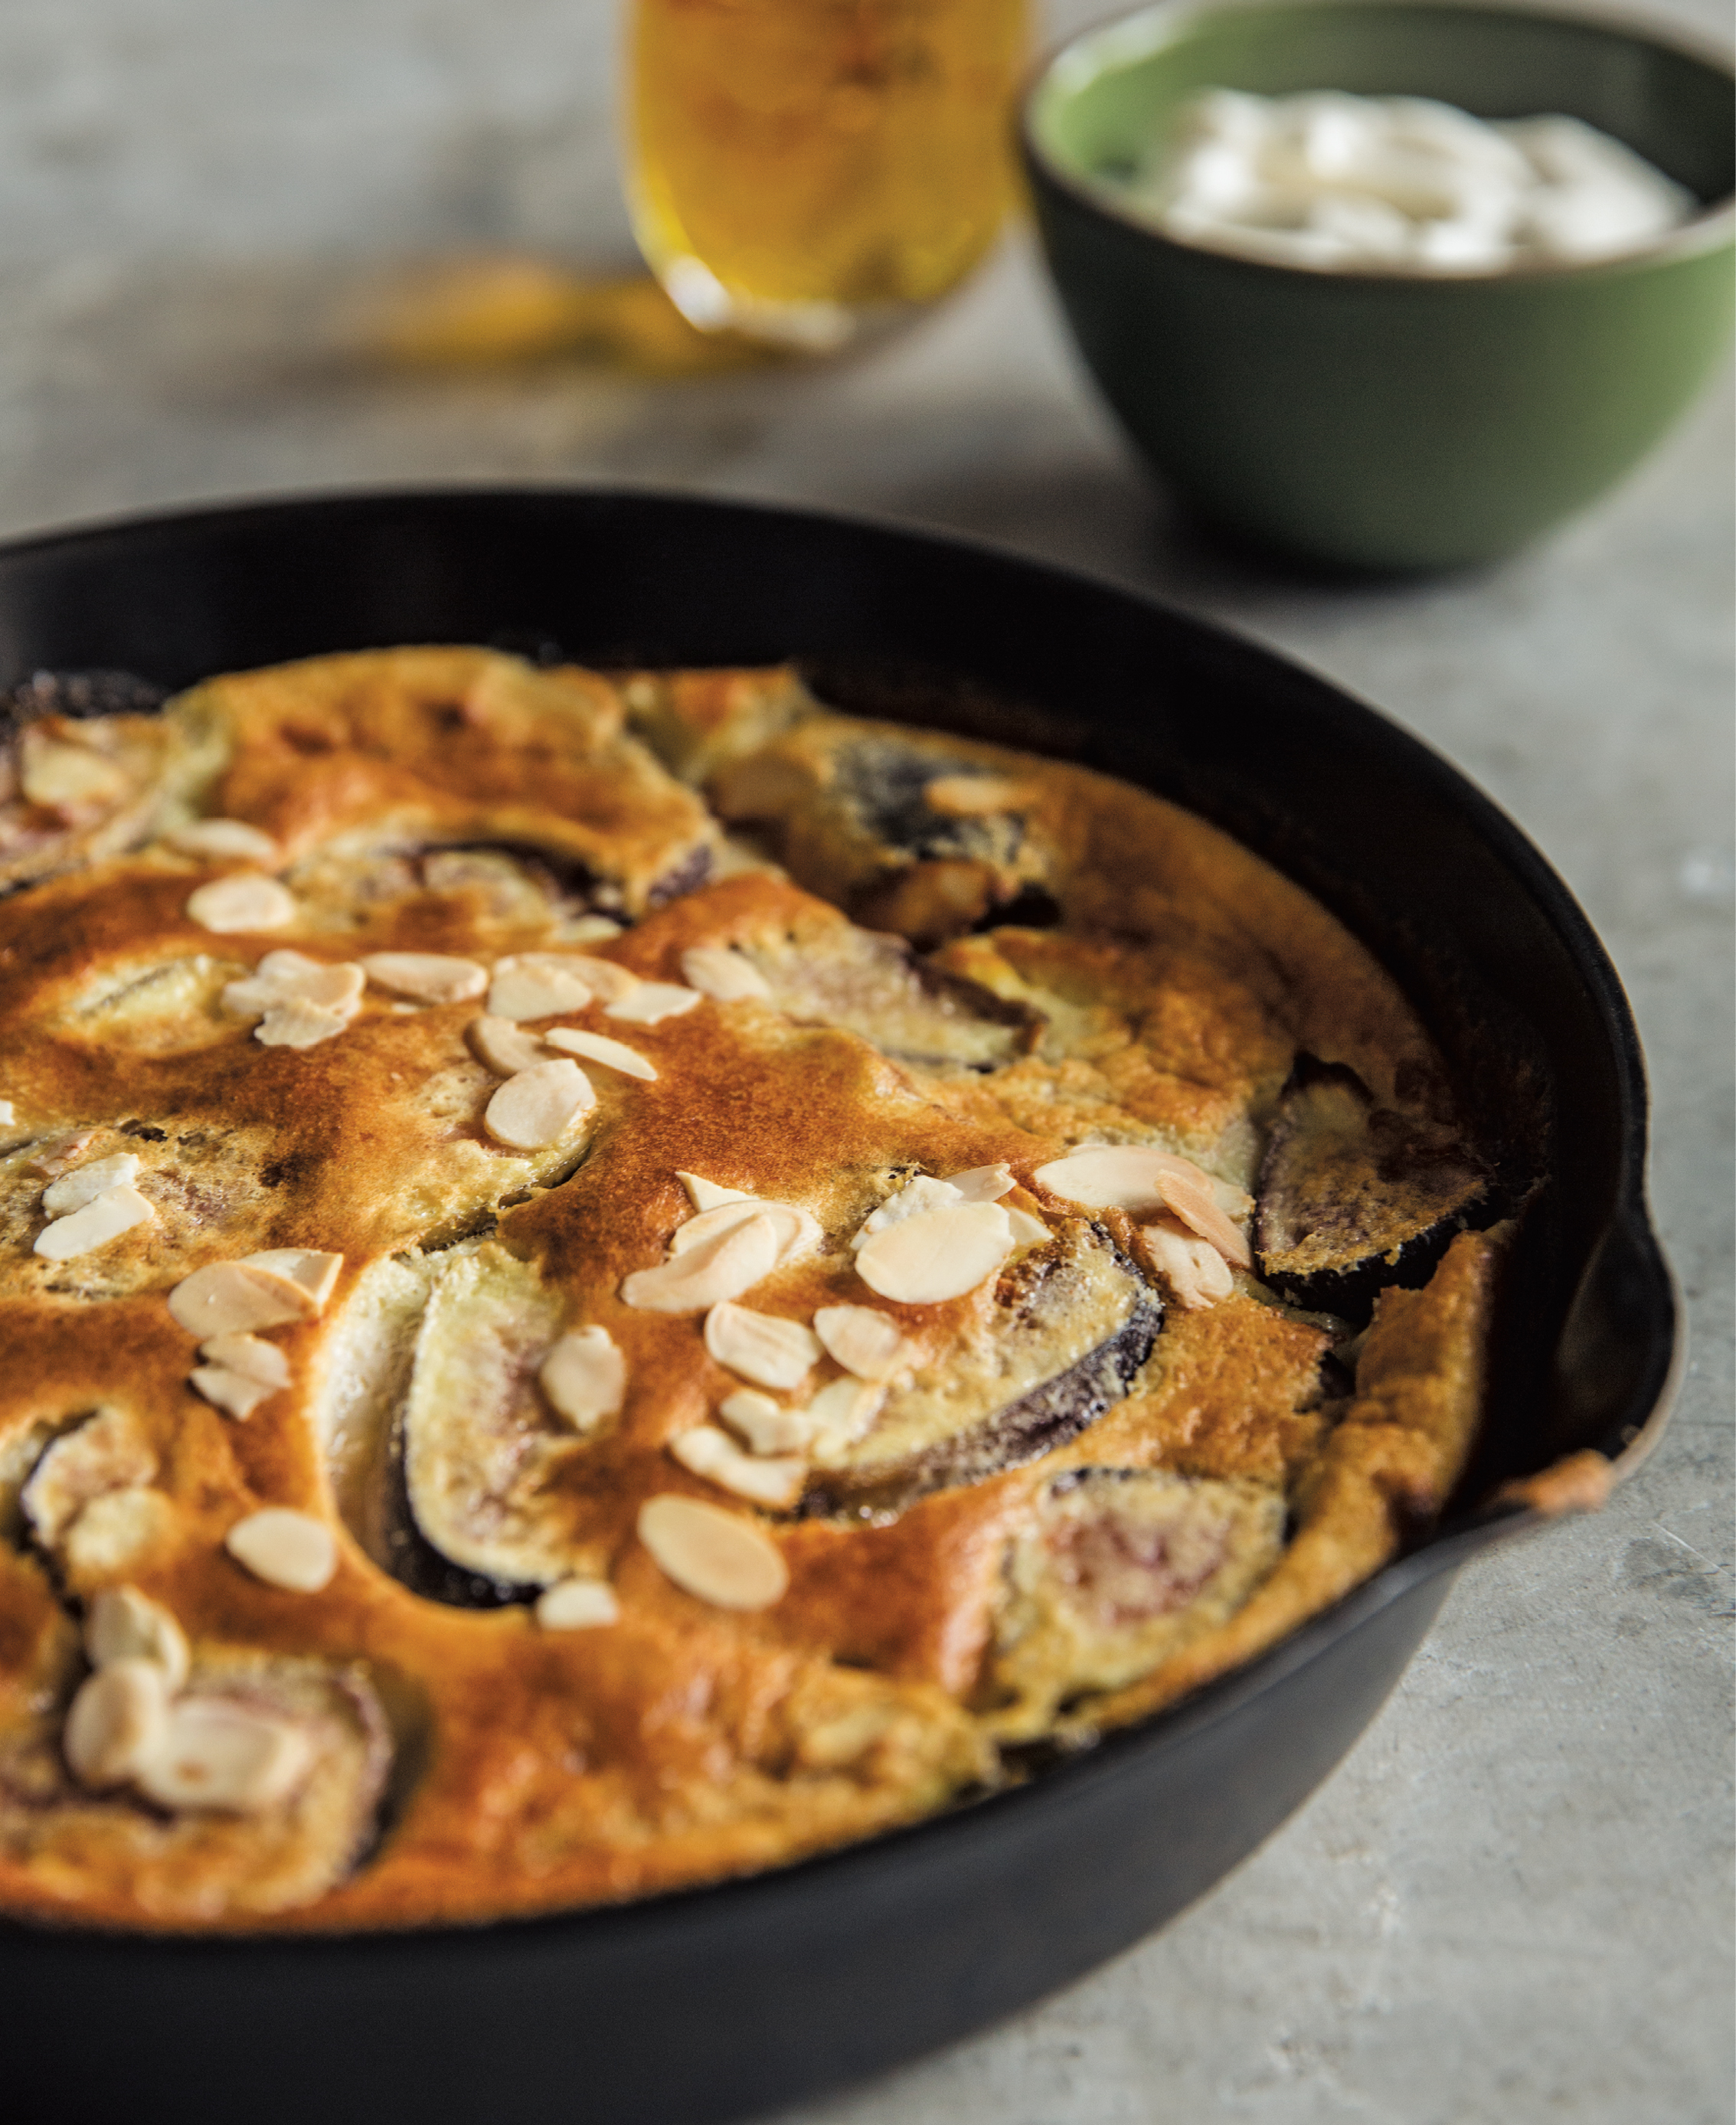
Clafouti (clah-foo-tee) is easier to make than it is to pronounce, and it’s a cast-iron regular. It allows you to whip up a quick-as-can-be batter, pour it over whatever seasonal fruit is at its peak, and bake the whole thing. But see, I’ve never liked the southern French confection much. I find it eggy, in the wrong way—it reminds me of overcooked scrambled eggs. So I created a clafouti that I could love, with more texture, thanks to granular semolina. I sexed it up with my favorite fruit, figs, and one of the world’s greatest luxuries, musky, warm, gold-staining saffron. Then I topped it with a sauce created by baking angel Elizabeth Quijada of Abraço in the East Village: a honey-flavored simple syrup infused with more of those extravagant crimson threads. Now, it seems, I love clafouti.
BATTER
3 large eggs
¼ cup sugar, plus 1 scant tablespoon for tossing
¼ cup unbleached all-purpose flour
1 tablespoon plus 1 teaspoon semolina (see Note)
¼ teaspoon salt
1⅓ cups half-and-half
½ teaspoon almond extract
½ teaspoon vanilla extract
Generous pinch of saffron (or ⅛ teaspoon)
2 cups sliced black figs (⅛ inch thin)
1 teaspoon butter
½ cup sliced almonds
Crème fraîche, for serving
1 Preheat the oven to 400ºF with a 10-inch cast-iron skillet in it.
2 In a large bowl, whisk together the eggs and ¼ cup of the sugar until well combined and frothy, then add the flour, semolina, salt, half-and-half, almond extract, and vanilla. Stir with the whisk to incorporate, trying to get as smooth a batter as possible. Add the saffron and whisk gently to combine, trying not to break the spice threads. In a medium bowl, gently toss the figs with the remaining scant tablespoon sugar.
3 Remove the hot skillet from the oven and add the butter. Once it melts, brush it over the surface of the pan to coat. Layer the figs over the surface of the pan, being careful not to burn your fingers on the hot metal, and scatter the almonds on top. Carefully pour the batter over the almonds and figs so they aren’t displaced. Bake until the surface of the clafouti has puffed up and is golden, its edges beginning to brown, about 30 minutes.
4 You can let the clafouti cool completely, but it tastes insanely good warm, too. Serve it out of the skillet, topping each slice with a dollop of crème fraîche and about a tablespoon of the saffron syrup drizzled over it. It will immediately begin to deflate once it’s out of the oven; that’s normal. Any leftover clafouti can be stored in an airtight container overnight and eaten at room temperature the next day.
NOTE Milled from hard durum wheat, semolina is not the same thing as semolina flour; the latter is more finely ground than the former. If you can’t find semolina, look for a coarsely ground semolina flour or, if necessary, use the standard variety. It’s okay! (It’s still relatively grittier than a soft flour like all-purpose or Italian “00”.) You might also try substituting a medium- or coarse-ground cornmeal.
SAFFRON SYRUP
makes about 1 cup
1 cup sugar
½ cup boiling water
¼ teaspoon saffron threads (or less, for subtler flavor)
¼ cup honey
1 Stir all the ingredients together until the sugar dissolves and the syrup takes on a brilliant yellow color. Set aside until ready to serve.
2 Leftovers can be used on yogurt and vanilla ice cream, or poured over pound cake, and can be stored in a sealed container in the refrigerator for up to 2 weeks. Alternatively, you can halve the ingredients and make just enough for the clafouti.
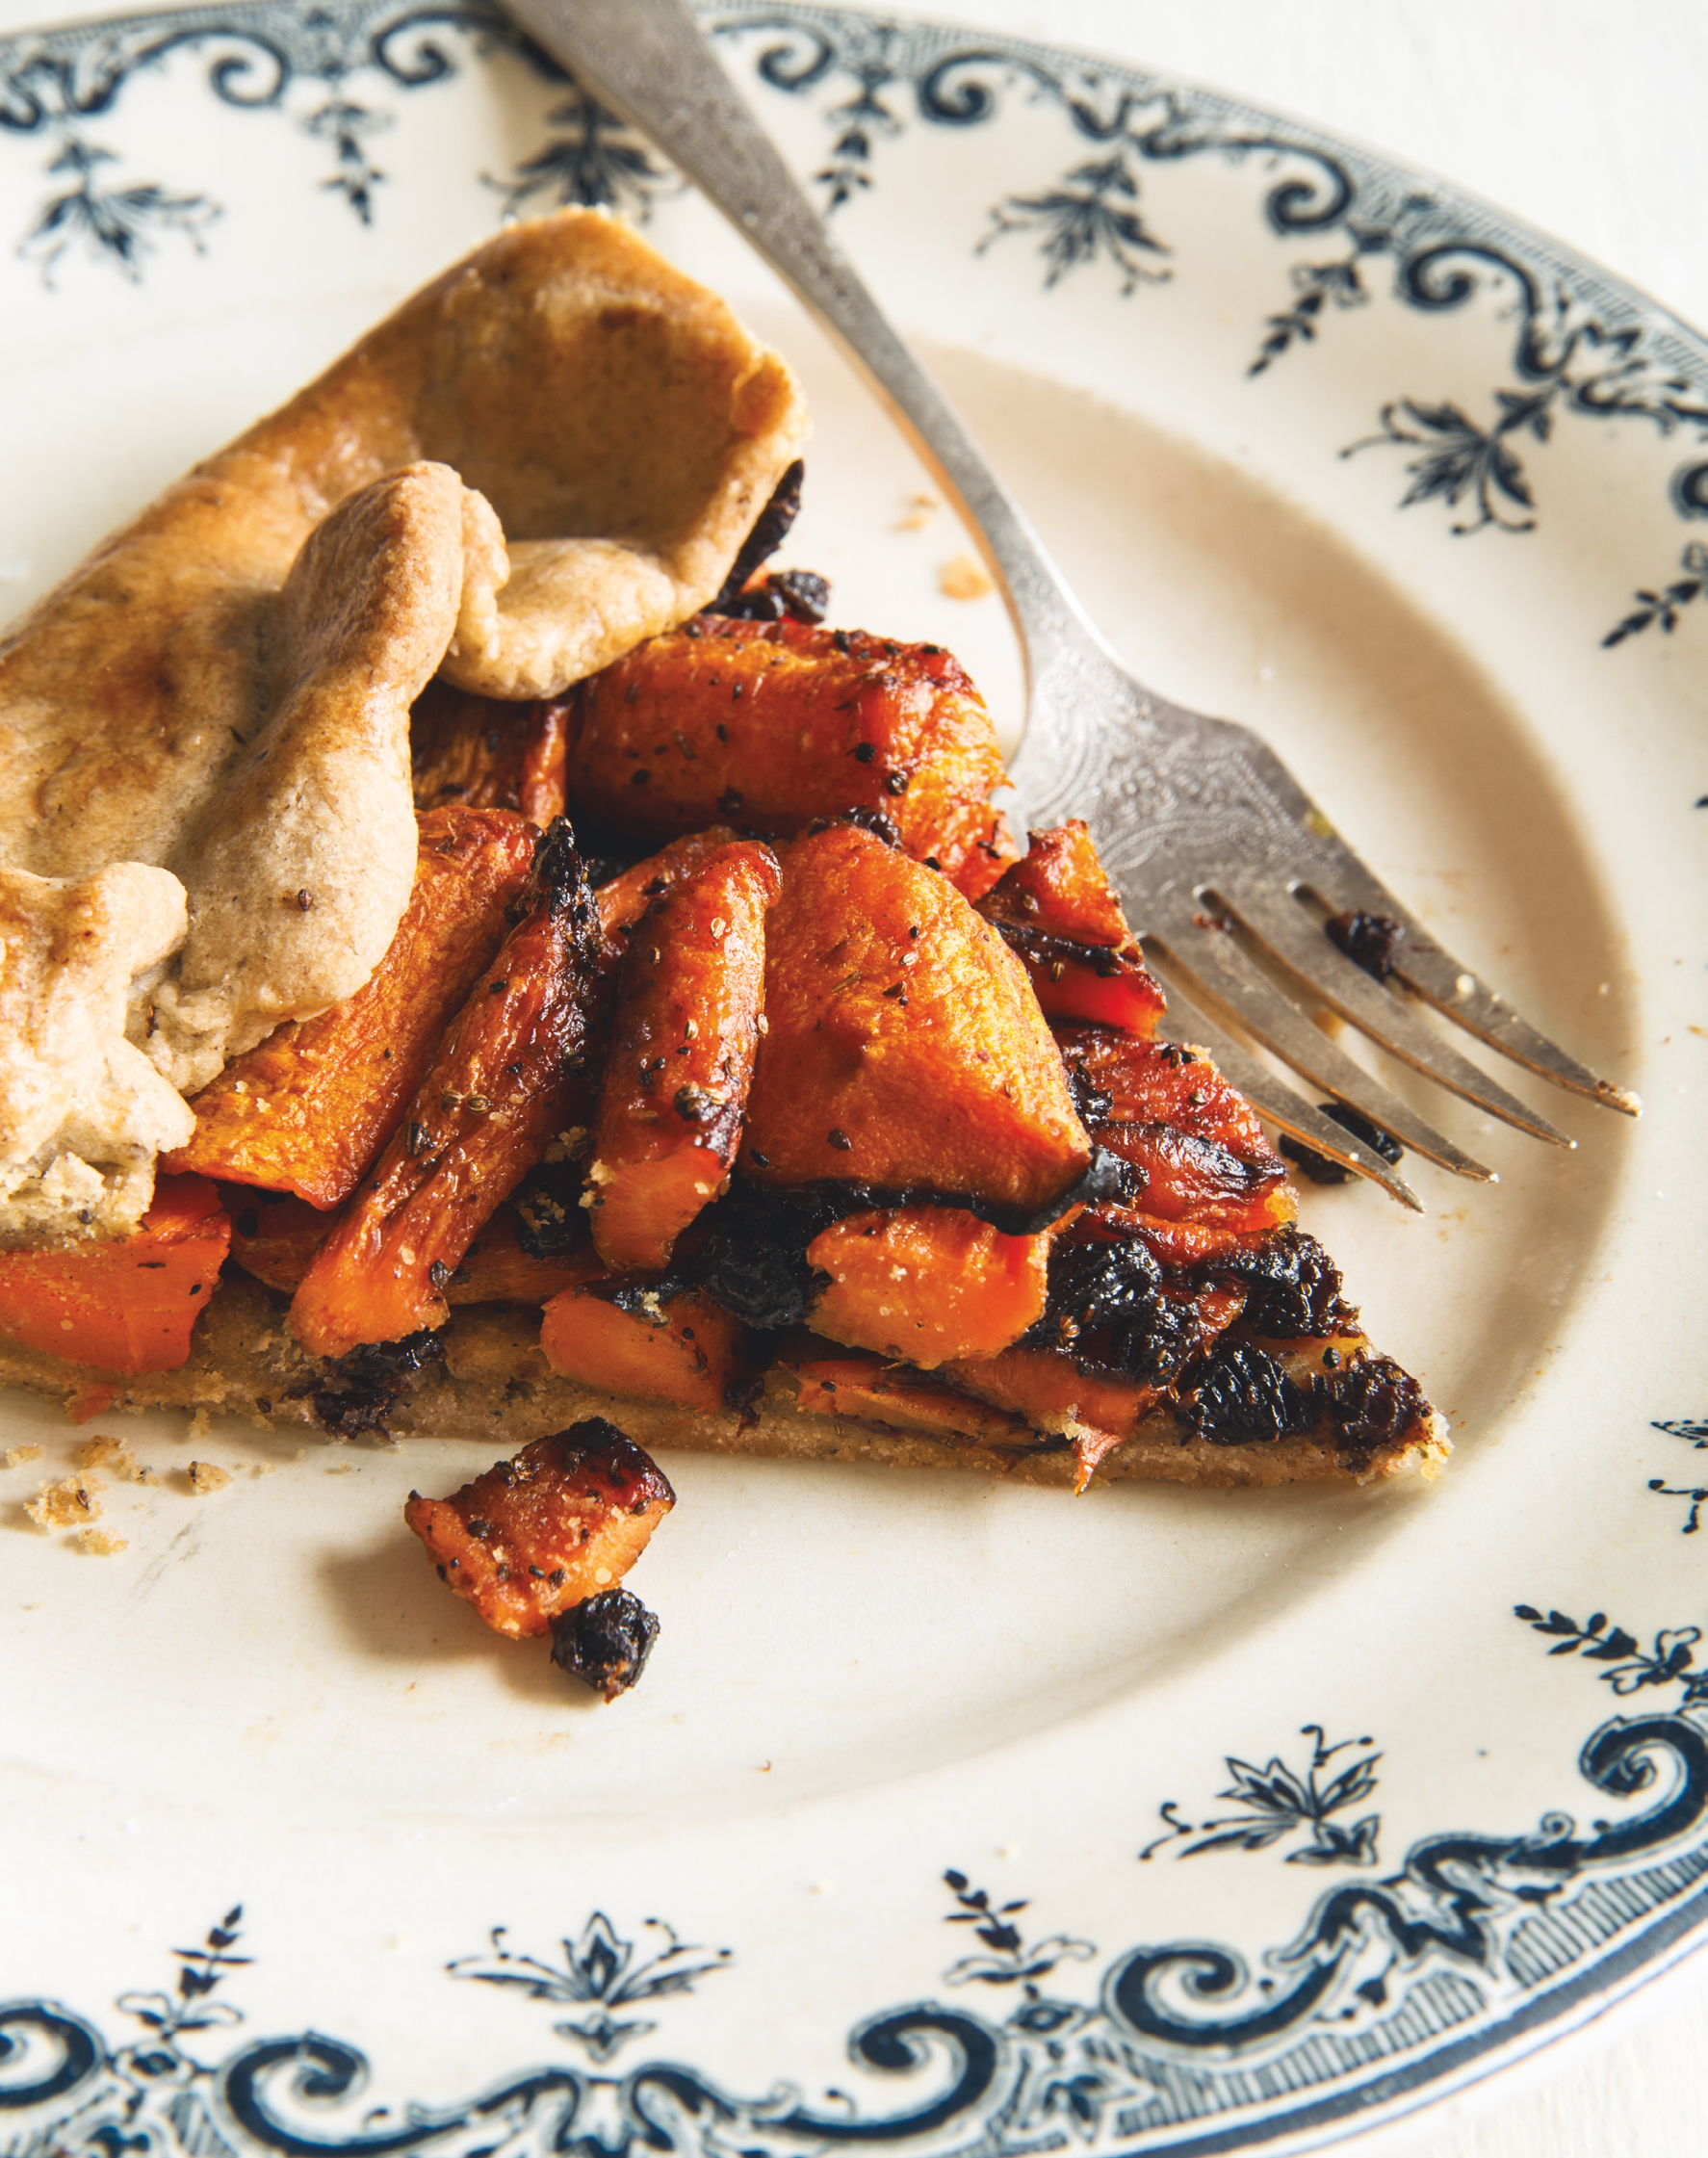
CARROT-CURRANT CROSTATA
serves 6
Some of the best culinary inventions have come out of using a few basic pantry items. I had three in mind when I started on this rustic-style tart—celery, raisins, and peanut butter. They form the children’s snack known as ants on a log, and sometimes carrot sticks stand in for the celery “logs.” I worked the seeds responsible for those fibrous green stalks into the crust, which is made with complementary, grassy buckwheat flour. I lined the pastry base with peanut butter and put the orange root veg in the filling with currants; they’re smaller and more tart than raisins, and I prefer them in savory dishes. I liked everything about this crostata, except for the peanut butter. It overpowered the rest. I could have stuck with it, stubbornly clinging to the cleverness of the original reference. But that’s another rule of cooking: flavor trumps. I removed the offending ingredient, and I had a real winner.
CRUST
1 cup unbleached all-purpose flour, plus more for dusting
½ cup buckwheat flour
½ teaspoon kosher salt
1½ teaspoons celery seeds
10 tablespoons unsalted butter, cut into ½-inch cubes and frozen (see Note)
¼ cup ice water, plus more as needed
FILLING
2 bunches of medium carrots, cut into 1-inch batons (thicker pieces should be split; about 3½ cups)
1 tablespoon olive oil
½ teaspoon celery seeds
½ teaspoon cumin seeds
1¼ teaspoons kosher salt, plus more to taste
1½ teaspoons pomegranate molasses
¼ cup currants
1 large egg
1 Start the crust: In a food processor, pulse together the flours, salt, and celery seeds a few times just to mix. Add the cubed butter and pulse again, until it breaks down into pea-size pieces and the mixture resembles a coarse meal. With the motor running, slowly trickle the ice water into the food processor, just until the dough comes together. Don’t add too much water or overmix the dough; it should take 30 seconds, tops. Test it by squeezing a bit between your thumb and index finger; if it’s too crumbly, add 1 to 2 teaspoons more ice water, pulsing the machine this time to quickly incorporate the water. Test the dough again, continuing until it’s the right consistency.
2 Turn the dough out onto a lightly floured surface, press it gently into a flat, round disc, and double wrap in plastic wrap. Refrigerate for 2 to 4 hours, or up to overnight.
3 Meanwhile, make the filling: Preheat the oven to 450°F. In a medium bowl, combine the carrots and the olive oil, tossing or stirring to coat evenly.
4 Preheat a 10-inch cast-iron skillet on the stove, gradually raising the heat from low to medium-high. When the pan is hot, add the celery seeds and cumin seeds. Toast them for about a minute, shaking the pan continuously, until they release their fragrance and just begin to color. Transfer the toasted seeds to a spice grinder and grind them. Add the ground spices and 1 teaspoon of the salt to the bowl with the carrots and toss or stir to mix together.
5 Spread the carrots out in one layer on a baking sheet. Roast for 15 to 20 minutes, until they begin to shrivel and caramelize.
6 Transfer the roasted carrots to a medium bowl. Add the pomegranate molasses and toss to coat evenly. Add the currants and mix together. Sprinkle the remaining ¼ teaspoon salt over the mixture and combine; taste and add more salt as needed. Set aside to cool.
7 Reduce the oven temperature to 400°F. Take the chilled dough out of the refrigerator and let it rest for about 10 minutes.
8 In the meantime, in a small bowl, whisk the egg, then whisk in 2 tablespoons water to make an egg wash.
9 Finish the crust: Place the dough on a lightly floured work surface and, using a lightly floured rolling pin, roll it out to a circle 10 to 11 inches in diameter, rotating it 45 degrees after every few rolls, and flipping it over once or twice to get an even thickness. Don’t worry if it’s not a perfect circle.
10 Have the skillet near your rolling station so you can easily transfer the rolled dough to the pan, laying it down so you have a relatively even amount of crust coming up on all sides. Spread the carrot-currant mixture over the crust, leaving a border about 1½ inches around the perimeter. Fold the excess dough edges up and around the filling, making pleats to hold the crust together and secure the filling. Brush the dough with the egg wash.
11 Bake for about 40 minutes, until the crust is golden brown. Let the crostata rest for 20 minutes before serving it straight from the skillet or, using a spatula, gently lifting it out of the pan onto a serving plate.
Working with Butter
Unless otherwise advised, if I’m making a butter crust, I cut my butter into ½-inch cubes. If I am going to use a machine like a food processor or stand mixer, I freeze my butter. Those appliances can cut through butter a lot faster than my hands can, but at the same time, their engines add heat to the dough. Just remember, your goal is to keep the butter cold, to distribute it evenly, and to quit while you’re ahead.
SORGHUM BISCUITS
makes 7 or 8 biscuits
Biscuit recipes strike me as extremely personal—proprietarily so. Even when people adhere to a family formula passed down from one generation to the next, their biscuits are always their own, a little different thanks to a more generous pinch of salt or a lighter touch with the dough. I wanted to re-create a biscuit that would showcase all the things I learned in a baking class taught by former Husk pastry chef Lisa Donovan, with just a few tiny ingredient changes that would put my imprint on it. A Southern crop, sorghum is known best for the thick, slightly sour, sugary syrup it produces. The sweet-smelling ancient cereal grain can also be ground into flour for baking. Even though it comprises a small one-fifth of the flour content in this recipe, I think it makes a flavorful difference.
My second alteration is more controversial. I put crème fraîche in my biscuits! Those living below the Mason-Dixon Line will probably take issue with this and categorize these as biscuit-flavored scones. I don’t care. I’m not Southern—my biscuit was born in New York City, where anything goes, as long as it tastes good. And that it does.
1¼ cups all-purpose flour, plus more for dusting
¼ cup sorghum flour
1½ teaspoons baking powder
Scant ½ teaspoon salt
⅛ teaspoon baking soda
8 tablespoons (1 stick) unsalted butter, cut into ½-inch cubes and chilled
¼ cup crème fraîche
¼ cup buttermilk, plus more as needed
1 In a large bowl, combine the flours, baking powder, salt, and baking soda and use your hands to mix it all together. Add all but 2 of the butter cubes to the dry ingredients. Working quickly, incorporate the butter by smearing it into the dry ingredients with your fingers, one small pile at a time, making sure all the dry ingredients have been introduced to the butter so that you end up with something resembling a coarse crumble.
2 Using a spoon or knife, drop the crème fraîche into the bowl in dollops, scattering them over the surface. Begin to swirl your hands through the mixture, using your fingers to incorporate the crème fraîche and form clumps. You will still have a relatively dry, loose, crumbly pile with doughlike pockets beginning to come together. Begin pouring the buttermilk over the surface of the mixture, continuing to use your fingers to integrate the wet and dry ingredients and form a sticky dough. You may not need all the buttermilk (you don’t want your dough to be too wet). Alternatively, if the mixture is still too dry, add a bit more buttermilk, as needed, 1 teaspoon at a time. Using your fingers more than your palms, bring the dough together so it’s thoroughly incorporated, working it without kneading it, being careful not to overwork the dough.
3 Dump the dough out onto a floured work surface and pat it into a ¾-inch-thick rectangle. Press—without twisting—a 2¼-inch biscuit cutter straight down into the dough to cut out rounds, getting as many as you can out of the initial rectangle of dough. Pile the scraps on top of one another in layers and pat them out to form another rectangle; cut as many more rounds from it as you can. Repeat until there is no dough left.
4 Lay the biscuits flat in groups of 3 or 4 between sheets of wax paper, and place in a plastic bag or sealable container. Refrigerate for at least 1 hour. You can also leave them overnight.
5 When you are ready to bake the biscuits, preheat the oven to 375°F with a 10-inch cast-iron skillet in it. Once the oven is hot enough, remove the pan and add the 2 remaining butter cubes to it. Let the butter melt and tilt to coat. Place the biscuits in the pan, filling it up. Bake the biscuits for about 20 minutes, until the tops have a light golden hue and a cake tester inserted into the center of a biscuit comes out clean. Grab ’em while they’re hot—or at the very least, warm.
BANANA-MATCHA BUTTER MOCHI CAKE
serves 10 to 12

My adaptation of butter mochi, a popular Hawaiian snack, epitomizes what I like to call a party trick. You can make it in a jiffy, with little paraphernalia, and it will surprise whomever you serve it to. For many, it’ll be a first taste of mochiko—the flour made from the same short-grain, glutinous sweet rice pounded into a paste and molded into mochi. If you’ve had the dumplinglike Japanese treats, you’re familiar with their distinct, bizarrely delightful, gummy texture. This cake carries it to an unobvious albeit semi-logical conclusion—it delivers that chewy, comforting experience in warm, just-baked form. Matcha’s bright, freshly-mown-lawn color and aroma transform the dessert into something remarkable. The powdered tea dyes the batter an unforgettable shade of KAPOW, while its astringency serves as a foil for the cake’s extreme sweetness. Rather than using overripe bananas (like you would in banana bread), ones in their younger state help temper the cake’s saccharinity instead of increasing it. Sliced into bite-size pieces, the fruit remains intact, a final surprise.
3 cups mochiko flour
2¼ teaspoons baking powder
2¼ cups sugar
1 tablespoon matcha powder
1½ teaspoons salt
3 large eggs
1⅛ cups coconut milk
1⅛ cups evaporated milk
1½ teaspoons vanilla extract
6 tablespoons (¾ stick) unsalted butter, melted and cooled (see Note)
2 not-too-ripe bananas, sliced crosswise into ¼-inch-thick coins, then quartered (about 1½ cups)
1 Preheat the oven to 350°F with a 10-inch cast-iron skillet in it.
2 In a large bowl, using a wooden spoon, stir together the mochiko flour, baking powder, sugar, matcha powder, and salt. In a medium bowl, whisk together the eggs, coconut milk, evaporated milk, vanilla, and melted butter. Pour the wet ingredients into the dry, stirring with a wooden spoon until you have a green batter. Make sure all the dry ingredients at the bottom of the bowl have been completely integrated. (Don’t worry about overmixing this batter.) Fold in the bananas.
3 Pour the batter into the pan and bake for 1 hour, until the top of the cake is golden and just browned around the edges. Enjoy warm, out of the pan, or at room temperature. The cake is best stored at room temperature, wrapped in plastic wrap or in a sealed container for up to 3 days. Zap it in the microwave for that warm, just-baked effect.
NOTE You can melt the butter in your skillet right before you put it in the oven to preheat. After you set the butter aside to cool for the batter, quickly wipe out the pan, no need to rinse it. Then place it in the oven.
BERRY UPSIDE-DOWN CHOCOLATE CAKE
serves 12

People presume upside-down cakes to have a vanilla or golden base. Why not chocolate? I asked the one person you can always count on for a perfect upside-down cake: Gina DePalma. The former pastry chef of Babbo and an Italian American, she had an encyclopedia’s worth of information on the desserts of Italy stored in her brain, and she wrote about or baked most of them. As you may have guessed, this cake is not Italian. It calls for blackberries, which are on hand year-round and, as Gina said, “are bold enough to stand up to chocolate.” They’re complex—sweet and juicy, but also tart and sour. Here they cook down into a wonderful syrupy quagmire flavored with Chambord to bring out their succulence. That black raspberry spirit is crucial as far as I’m concerned, but you can play around with other liqueurs or skip it altogether.
BERRY TOPPING
1 pint blackberries
½ cup granulated sugar
2 tablespoons light brown sugar
2 tablespoons Chambord
1 tablespoon unsalted butter
CAKE
1¼ cups unbleached all-purpose flour
¼ cup unsweetened cocoa powder (see Notes)
1 teaspoon baking powder
¼ teaspoon salt
⅔ cup (3 ounces) bittersweet (around 65%) chocolate, chopped
6 tablespoons (¾ stick) unsalted butter, cut into 12 pieces
2 tablespoons hot water, just off the boil (see Notes)
1¼ cups granulated sugar
2 large eggs, at room temperature
1½ teaspoons vanilla extract
½ cup buttermilk
1 pint raspberries
1 tablespoon fresh lemon juice
Vanilla ice cream, crème fraîche, or freshly whipped cream, for serving
1 Prepare the berry topping: Preheat a 10-inch cast-iron skillet on the stovetop, gradually raising the heat from low to medium. Place the blackberries in the pan with the granulated and brown sugars and the Chambord. Using a wooden spoon, crush the berries slightly to release some of their juices. Cook, stirring continuously and adjusting the heat as necessary to prevent scorching, for about 25 minutes, until the berries have taken on a jamlike texture; it should be glossy and not watery, but not tight. You’ll know it’s ready when you drag the wooden spoon through it and the mixture pulls away and leaves tracks that just begin to hold. Turn off the heat and add the butter, stirring it in as it melts to combine. Set aside to cool.
2 Make the cake: Preheat the oven to 325°F. Sift the flour, cocoa powder, baking powder, and salt together into a medium bowl. Using a whisk, stir to break up any clumps of cocoa powder.
3 In a medium heatproof bowl set over a wide pan of gently simmering water (or using a double boiler), melt the chocolate and butter together, whisking frequently. Whisk the hot water into the chocolate mixture and remove the bowl from the pan of simmering water. Whisk 1 cup of the granulated sugar into the chocolate mixture (it will get grainy). Whisk the eggs in, one at a time, followed by the vanilla.
4 Whisk half the dry ingredients into the chocolate mixture, followed by the buttermilk, then whisk in the remaining dry ingredients. Switch to a rubber spatula at the very end to make sure you’ve scraped the sides of the bowl and the ingredients are thoroughly combined.
5 In a medium bowl, gently toss together the raspberries, lemon juice, and remaining ¼ cup granulated sugar to coat the berries. Scatter the raspberries evenly over the surface of the cooled blackberry compote in the skillet.
6 Using an offset spatula, carefully spread the cake batter over the berries. Bake the cake for about 40 minutes, rotating the skillet 180 degrees halfway through baking, until just cooked through. A cake tester or fork inserted into the center should come out clean, and the berry juices should be bubbling up at the sides.
7 Let the cake cool in the skillet for 15 minutes before unmolding it, carefully, while it’s still warm. Use a butter knife to loosen the sides of the cake from the pan, then use the Upside-Down Plate Trick to flip it out. Slice it into 12 wedges and serve it with vanilla ice cream, crème fraîche, or freshly whipped cream (sweetened or not).
NOTES
• For this recipe, use the best-quality Dutch-process cocoa powder you can find—the darker, the better. An all-purpose variety like King Arthur’s Triple Cocoa Blend, which combines Dutch-process, natural, and black powders, will also work. (Good to know: If a chocolate recipe calls for baking powder, the general rule is to go Dutch. If it has baking soda, use natural cocoa powder.)
• “Off the boil” refers to liquid that has been brought to a boil, then left for just a couple of minutes to cool slightly. For this recipe, you can boil some water and let it sit for 2 to 3 minutes. You don’t need to take its temperature, but if you did, you’d see it was somewhere between 195° and 205°F.
DOUBLE CHOCOLATE SCONES WITH CRYSTALLIZED GINGER
makes 10 to 12 scones

The ideal scone should be moist enough that the clotted cream served with it is an option, not a necessity. It should be barely sweet, and that sweetness should derive, mostly, from its fat. What a scone is not, as a matter of course, is chocolate. It might have chocolate chips in it, but you don’t see a whole lot of scones made from chocolate dough. That’s what I wanted—a perfect chocolate scone. I wanted this thing to show the world that neither scones nor chocolate treats need be so sugary; that, when combined, the natural sweetness of butter and cream and luscious promise of the cocoa bean are enough.
When figuring out this recipe, I followed Dorie Greenspan’s method. I carefully studied how much flour, butter, sugar, and cream she uses for her scone dough, and tweaked it to accommodate cocoa powder, which accounts for part of the flour content. I also took out some more of the all-purpose flour, replacing it with sweet and nutty chestnut flour. Chestnut, chocolate, and ginger are a terrific trio, by the way.
8 tablespoons (1 stick) plus 1 teaspoon unsalted butter, per batch
1 large egg
¾ cup heavy cream
1 teaspoon vanilla extract
1¼ cups unbleached all-purpose flour, plus more for dusting
½ cup chestnut flour
¼ cup best-quality unsweetened Dutch-process cocoa powder
3 tablespoons sugar
1 tablespoon baking powder
¼ teaspoon salt
½ cup semisweet chocolate chunks or chocolate chips (see Note)
3 to 4 tablespoons finely chopped crystallized ginger, to taste
1 Cut 8 tablespoons of the butter into ½-inch cubes and chill them in the refrigerator for at least 1 hour.
2 Preheat the oven to 400°F with a 10-inch cast-iron skillet in it.
3 In a small bowl, stir together the egg, cream, and vanilla to combine. In a large bowl, using a whisk, mix together the flours, cocoa powder, sugar, baking powder, and salt.
4 Dump the chilled butter into the bowl with the flour mixture and, with your fingers, toss the cubes to coat. Using either your hands (fingertips, specifically) or a pastry cutter, break the butter up and rub it into the ingredients to incorporate until you get what resembles a coarse meal. Work quickly, while the butter is cold. Don’t worry if it doesn’t look uniform; you want the butter to be evenly distributed, but it should range in size from flat oatlike flakes to small pea-size pebbles.
5 Pour in the egg mixture and, using a fork, work it into the dry ingredients, just until the dough comes together. Add the chocolate chunks and the ginger, using more or less to taste, and, with your hands, gently knead the dough in the bowl to simultaneously integrate those mix-ins and smooth it out, making sure any remaining dry ingredients stuck to the bottom of the bowl have been worked in and the liquid is thoroughly incorporated. The dough should be wet and sticky. Don’t overwork it.
6 Turn the dough out onto a lightly floured work surface and, using a bench scraper, split it in two. Take one half, pat it into a disc about 5 inches wide, and cut it into 6 wedges, each about 2½ inches wide. Do the same with the second disc. Because it’s wet, the dough may be a little difficult to maneuver; just work quickly and deliberately and you’ll be fine. If you like a more generously portioned scone with a bit more heft and height, cut each of the discs into 5 wedges instead of 6.
7 Remove the hot skillet from the oven and melt the remaining 1 teaspoon butter in it, tilting the pan to coat. Place half the dough wedges in the pan and bake for about 20 minutes, until the tops are just firm, but not rock-solid.
8 You can refrigerate the remaining raw scones if you plan to bake them right after the first group for a full batch, back-to-back. Alternatively, you can freeze the unbaked scones. You don’t need to defrost them before baking them, but you should keep them in the oven a couple of minutes longer. Bake as directed above, melting a teaspoon of butter in the skillet before adding the wedges and putting them in the oven. If you want to bake them in advance, once they cool to room temperature, wrap them tightly in a layer of plastic wrap followed by aluminum foil and put them in the freezer right away. They’ll keep for up to 2 months and can be reheated in the oven at 350°F, uncovered, for up to 10 minutes.
Kneading by Machine
Whereas in the recipe for Date, Onion & Fontina Scones, I relied on a stand mixer, for these, Dorie-style, I use my hands. Both lead to success. You could also use a food processor; if you did, you would mix the dry ingredients in the machine, then pulse the butter in until it was broken down into pea-size crumbs. At that point, you’d transfer the mixture to a bowl, before folding in the chocolate chips and ginger. You would then stir in the wet ingredients to form a smooth dough.
NOTE I prefer chopping chocolate bars into chunks to using semisweet chocolate chips, because I like a less-sweet chocolate; for this recipe, I’d go with a 62 to 68% chocolate. If you’re less keen on dark chocolate, choose one with a lower cocoa percentage, or just use old-fashioned chocolate chips.
PB&C OATMEAL SKILLET COOKIE
makes 2 large cookies
Skillet cookies bring out the kid in all of us. I have memories of reaching my small hands into a pan full of hot, crispy-edged, mushy-middled, M&M’s-filled dough, its giant size making it seem naughty, like watching an R-rated movie without an adult chaperone. My inner child still loves those extra-large treats, only she’d prefer an oatmeal cookie. So that’s what I gave her. Levain Bakery on the Upper West Side of Manhattan produces my favorite example. It’s massive, extremely soft, and dense; it has the thickness of a plump scone and a craggy, crunchy top. Strangely enough, it isn’t chock-full of oats, but rather the grains are interspersed more the way nuts might be in a cookie. No one has ever been able to precisely replicate Levain’s dough, but one thing everyone agrees on is that cream cheese is involved. That secured it a place in my recipe. I also wanted some coconut and peanut butter in there. The lard, which I added for flavor and to dilute the grainy peanut butter, cuts any excess sugariness.
When I tasted my creation, it reminded me of the inside of a Reese’s Pieces candy, with a little pop of salt. It’s cakier than a typical oatmeal cookie, but it’s perfectly crispy on the outside. Once it cools, it becomes crumbly, almost like a sablé, and that makes it an excellent candidate for a fruit crisp topping. Make one to serve hot, and freeze the other half of the dough for another time, when you have the distinct longing for an oatmeal cookie, which, surely, from here on in, you will.
⅓ cup plus 1 tablespoon lard, plus 1 teaspoon per batch
1 cup unsweetened coconut flakes
⅓ cup natural smooth peanut butter
8 tablespoons (1 stick) unsalted butter, cut into ½-inch cubes and chilled
4 ounces cream cheese, at room temperature
⅓ cup granulated sugar
¾ cup packed dark brown sugar
2 large eggs
1 teaspoon vanilla extract
2 cups unbleached all-purpose flour
1 teaspoon baking powder
½ teaspoon baking soda
1½ teaspoons plus ½ teaspoon flake sea salt, per batch
2 cups old-fashioned rolled oats
1 Preheat a 10-inch cast-iron skillet on the stovetop, gradually raising the heat from low to medium-high. Add 1 tablespoon of the lard. Once the fat is melted and hot, add the coconut flakes and toast them, stirring continuously, for up to 4 minutes, until they’re golden brown. Transfer the coconut flakes to a plate and set aside. Wipe out the skillet.
2 Return the skillet to the stove over medium-high heat and add ⅓ cup of the lard. Once it’s melted, turn off the heat and let it cool slightly in the skillet, for about 10 minutes. Put the peanut butter in a small bowl and add the melted lard. Stir them together to completely combine, smoothing the peanut butter so there are no lumps. Wipe out the skillet.
3 Measure out ½ cup of the peanut butter mixture and set it aside. (You may have a tablespoon or two extra; it can be used in place of an equal amount of butter in another recipe.)
4 In the bowl of a stand mixer fitted with the paddle, beat the butter, cream cheese, and the ½ cup peanut butter mixture on low speed for about 1 minute, just until it becomes creamy. Add the sugars and continue to beat for 2 minutes more, until it takes on a butterscotch tone and is fairly aerated. You don’t want to overbeat it. Add the eggs and vanilla and beat for about 30 seconds to incorporate, being careful not to overbeat. Turn off the mixer and, using a rubber spatula, scrape down the sides of the bowl.
5 In a medium bowl, whisk together the flour, baking powder, baking soda, and 1½ teaspoons of the salt. Add the oats and whisk to incorporate. Add the dry ingredients to the batter in the stand mixer and mix on low speed to combine. You might need to pause and scrape down the sides of the bowl at some point during this process. When the batter is thoroughly mixed, use a wooden spoon to stir in the toasted coconut.
6 Cover the bowl with plastic wrap and stick it in the refrigerator for 30 minutes to 1 hour.
7 Meanwhile, preheat the oven to 375°F with the skillet in it. When the dough has chilled, remove the hot skillet from the oven, add the 1 teaspoon lard, and tilt to coat.
8 Using a spatula, scrape half the dough out into the skillet and press it in, using your fingers when necessary (but being careful of the hot pan), to fill the pan. Sprinkle the surface with the remaining ½ teaspoon salt and bake for 15 to 16 minutes, until the top is golden and the cookie appears just set. Let the cookie sit in the skillet for a minute or two when you take it out of the oven, then use the Upside-Down Plate Trick (see page 56) to turn it onto a plate and then transfer it to a wire rack to cool. If you can’t stand the wait, you can eat it straight out of the pan while it’s warm.
9 If you want to make the second cookie right away, keep the second half of the dough in the mixing bowl and put it in the refrigerator while the first half bakes. Otherwise, you can freeze the remaining dough until you’re ready to bake it. It will keep for a couple of months wrapped tightly in plastic wrap. Let it defrost in the refrigerator before baking, following the directions above, using 1 teaspoon of lard in the hot skillet and sprinkling ½ teaspoon flake sea salt over the top of the dough.
FAT THIN BARS
makes 16 small bars

Everyone has her weakness; her “betcha can’t eat just one” potato chip or “get your own box” cheese cracker. Pringles, Doritos, Triscuits, Cheetos, Cheez Doodles, Sun Chips, I’ve tried them all, and then some—who else here can say she ate Keebler Tato Skins and appreciated their baked potato appeal? With all that sampling, my salty-crunchy drug of choice has always been Wheat Thins. I vowed to put them in a piecrust one day. Then I tried Amy Scherber’s butterscotch-cashew bars at her bakery, Amy’s Breads, and had a slight change of plans. Those crackers, saltier than the original buttery base, or the obvious graham-cracker alternative, would offer a better contrast, in both flavor and consistency, to the tawny, gooey-sweet topping.
This new crust is thick, as it should be, and you get sharp shards of the caramelized wheat crackers snapping against your teeth, intermingling with the soft, molten butterscotch and the gentle crunch of the nuts. I gave the topping an upgrade to match, incorporating white miso paste and fleur de sel to balance its sugar with some saline complexity. The payoff is a grown-up candy bar for those of us who will never be too old for junk food. If you want to make it even more adult, you can try using a flavored salt—rosemary or chocolate, for example.
CRUST
5 cups original Wheat Thins (about one and a half 9.1-ounce boxes)
¼ cup plus 1 tablespoon packed dark brown sugar
10 tablespoons (1¼ sticks) plus 1 teaspoon unsalted butter
TOPPING
1⅓ cups best-quality butterscotch chips
⅓ cup white miso paste
½ cup plus 2 tablespoons light corn syrup
3½ tablespoons unsalted butter
¼ teaspoon salt
2 cups raw unsalted cashew pieces, toasted, or unsalted roasted cashews
1 teaspoon fleur de sel, plus more to taste
1 Make the crust: Preheat the oven to 350°F with a 10-inch cast-iron skillet placed on the middle rack.
2 Place the Wheat Thins and brown sugar in the bowl of a food processor. Pulse a few times to begin to break down the crackers, then process continuously for about 20 seconds until they’ve been mostly crushed into crumbs—you should have some jagged fragments amid the crumbs, which will yield a crunchier, rougher, more satisfying texture. Transfer the crumbs to a medium bowl and set aside.
3 In a small saucepan, melt 10 tablespoons of the butter and pour it over the crumbs. Using a rubber spatula, stir the mixture to combine, making sure all the crumbs are evenly coated. They should look wet and hold together when clumped in your fist.
4 Remove the hot skillet from the oven and place the remaining 1 teaspoon butter in it. Let the butter melt and brush it over the surface of the pan to coat. Pour the crumb mixture into the skillet and use your fingers to press the crust base evenly into the pan, being careful to avoid the hot edges. Bake for about 12 minutes, until the crust has caramelized and smells fragrantly toasted.
5 Meanwhile, make the topping: In a medium saucepan, combine the butterscotch chips, miso paste, corn syrup, butter, salt, and 2 tablespoons water. Cook over medium heat, stirring continuously, for about 5 minutes, until the chips have melted and the mixture has just begun to simmer and bubble around the edges of the saucepan. Turn off the heat and whisk the molten butterscotch mixture to smooth any remaining clumps of miso paste. Add the cashews, using a rubber spatula to stir them into the topping.
6 With the spatula, spread the mixture over the baked crust. Try to distribute the topping evenly over the crust, extending it to the edges, but don’t worry if you can’t; it’ll spread out during baking. Sprinkle the fleur de sel evenly over the surface. Return the skillet to the oven and bake for about 15 minutes, or until the topping is a rich brown and bubbling.
7 Let it cool completely in the skillet, at least an hour, before running a butter knife around the rim of the pan to detach the crust and/or butterscotch topping. Then, using the Upside-Down Plate Trick, flip it onto a plate, then onto another plate so it’s right-side up. Using a sharp knife, slice it into 16 small bars.
ALMOND BUTTER & RHUBARB TART
serves 10 to 12

I like how Gillian Shaw’s mind works. At Black Jet Baking Co. in San Francisco, she revamps old-fashioned American baked goods using seasonal produce. She turns out raspberry jam bars with a brown sugar crumble topping. They have the perfect amount of piquant, thick, sticky fruit and a toffeed, buttery oat crust. They would, I imagined, translate well to a tart and could be made in a cast-iron skillet. So I thought I’d ask her if they could be adapted, accordingly, and taken in a new direction with almond butter. Then she mentioned “strawberries and rhubarb,” and it was game over for jam. I saw no need for the berries, either.
I don’t know why we don’t let rhubarb perform solo more often. Gillian instructed me to roast the tangy, herbaceous vegetable first, with orange zest and sugar. This alone would have been enough. You could have it with a big old plop-down of whipped cream or a scoop of vanilla ice cream. Better to go for the tart, though. For me, it’s the creamy, thick almond butter that makes it truly indulgent, but at the same time, it’s the thing that cuts through the richness of the rest of this crunchy, sweet dessert.
ROASTED RHUBARB FILLING
5⅓ cups trimmed rhubarb, cut into 1-inch chunks
¾ cup plus 2 teaspoons granulated sugar
3½ tablespoons tapioca flour (see Notes)
Zest of 1 medium orange
OAT CRUST
6 tablespoons (¾ stick) plus 1 teaspoon unsalted butter
¾ cup packed dark brown sugar
¾ cup unbleached all-purpose flour
1½ cups old-fashioned rolled oats
⅓ teaspoon baking soda
1 teaspoon salt
ALMOND CRUMB TOPPING
⅔ cup packed dark brown sugar
⅔ cup unbleached all-purpose flour
3 tablespoons sliced raw almonds
3 tablespoons old-fashioned rolled oats
1 teaspoon salt
4 tablespoons (½ stick) unsalted butter, cut into cubes and chilled
6 tablespoons almond butter
1 Make the rhubarb filling: Preheat the oven to 350°F. In a large bowl, toss together the rhubarb, sugar, tapioca flour, and zest. Set aside for about 20 minutes.
2 Place the rhubarb mixture in a medium-large Pyrex or ceramic baking dish and bake for 20 minutes. Don’t worry if not all the sugar melts—it will finish cooking in the pie. Remove the dish from the oven and set it aside to cool; leave the oven on.
3 Make the oat crust: In a small saucepan, melt 6 tablespoons of the butter over medium-high heat. Set aside.
4 In a medium bowl, combine the brown sugar, flour, oats, baking soda, and salt and use your hands to mix them together, breaking up any clumps of brown sugar. Pour the melted butter over the dry ingredients and, using a spatula, thoroughly incorporate to get a mixture that resembles wet sand.
5 Preheat a 10-inch cast-iron skillet over low heat. Once it’s warm, add the remaining 1 teaspoon butter and, as it melts, brush it over the bottom and sides of the skillet. Press the oat mixture into the skillet, pushing some of it about halfway up the sides; the base should be about ½ inch thick. Bake the oat crust for about 15 minutes, until it turns a light golden brown. Remove from the oven and set aside; leave the oven on.
6 Make the almond crumb topping: In the bowl of a stand mixer fitted with the paddle, mix the brown sugar, flour, almonds, oats, and salt on low speed for about 20 seconds to combine. Add the cubed butter piece by piece and continue to mix for about 1 minute, until you have a crumbly topping. Watch it carefully; you don’t want the butter to cream, or to be left with a ball of dough. There will be chunks of butter left—this is okay.
7 Assemble the tart: Using an offset spatula, a small rubber spatula, or the back of a spoon, gently spread the almond butter over the oat crust to cover it evenly. Spoon the roasted rhubarb over the layer of almond butter, including some of the roasting juices in each spoonful, but being careful not to oversaturate the pie (use up to ⅔ cup of the liquid). Generously pile the almond crumb topping over the fruit, using your fingers to distribute it evenly over the surface of the pie.
8 Bake the tart for 20 minutes, then cover with aluminum foil and bake for 20 minutes more. Let cool for 30 minutes before serving.
NOTES
• Feel free to skip the rhubarb filling and use your favorite preserves (raspberry, strawberry, blueberry, apricot, peach, or even marmalade). Start with about the same amount of jam as almond butter and add more to taste. You could also try this with another ripe fruit, like apricots, depending on the season.
• Gillian prefers tapioca flour as a thickening agent, as opposed to cornstarch, because it doesn’t create the weird congealed texture that cornstarch can yield. She uses tapioca flour in all pie fillings except for apple, when she uses all-purpose flour.
HALVA FUDGE BARS
makes 16 bars

I originally called these blondies. They have the necessary brown sugar and butter associated with cocoa-free brownies. But they’re not blonde, they’re maroon, thanks to an Ethiopian staple, teff flour, and, indirectly, the Middle Eastern sesame confection, halva. Blondies are frequently dry. It becomes egregious when, to that dryness, you bring an even drier accoutrement like halva. I added a dark burgundy-colored date syrup to create an extra moist batter. By pulling out the pan while the center is still gooey and barely set and the top is crisp, you achieve the baking equivalent of searing a piece of steak on cast iron: a solid crust with a “rare” inside. Like the meat, the dough won’t stop cooking once it’s out of the oven. The results are so moist, “blondie” isn’t a good enough label. My halva miracle is more like fudge, and so I changed its name appropriately.
1 cup (2 sticks) plus 1 teaspoon butter
2 large eggs
1¼ teaspoons salt
1 cup packed dark brown sugar
⅔ cup date syrup
1½ teaspoons vanilla extract
2 cups teff flour
1 cup fried marcona almonds
1 cup packed halva
1 Preheat the oven to 350°F with a 10-inch cast-iron skillet placed on a rack in the lower third of the oven. In a small saucepan, melt 1 cup of the butter and set it aside.
2 In the bowl of a stand mixer fitted with the whisk (or in a large bowl using a whisk), beat the eggs until they’re frothy. Add the salt, brown sugar, date syrup, and vanilla and whisk until combined. Whisk in the melted butter. Using a spatula, fold in the teff flour until just combined. Fold in the almonds.
3 Remove the hot skillet from the oven and place the remaining 1 teaspoon butter in it. As it melts, brush the butter over the bottom and sides of the pan to coat. Pour half the batter into the pan. Scatter the halva over the surface of the poured batter, crumbling it with your fingers as you go. Pour the remaining batter over the halva, using a rubber spatula to smooth over the top.
4 Bake for 40 minutes, until the edges are darkening and beginning to crack and the middle is just set. You want the center to be barely cooked through, almost like warm cookie dough. Let it cool in the skillet for an hour. Then, using the Upside-Down Plate Trick, flip it so it’s right-side up. Cut it into 16 small wedges and serve.
CRISP TOFFEE BARS
makes 14 bars
Maida Heatter’s cookbooks have gotten a lot of mileage in my mom’s kitchen. Whether she’s covering soufflés or layer cakes, everything that meticulous doyenne of baking commands has a purpose. If she instructs you to line a cookie sheet with aluminum foil, it’s to keep things like her Dolly’s Crisp Toffee Bars—a frequent childhood request—from sticking. She promises “you will squeal with joy at the ease, fun, and satisfying excitement of peeling the foil from the smooth, shiny backs of the cookies.” Yes! I know this squeal! I emit one every time I flip a finished bread or galette out of the cast-iron skillet and marvel at the ease with which the entire thing lands on the serving plate, not a trace of stuck dough left behind. This squeal is what justifies my oiling the pan after every use, or preheating it and adding butter to it before pouring in a batter, to be safe.
That is just what I do when, all these years later, I bake those same “chocolate chip butter bars,” which are kind of like blondies in flavor and like crispy cookies in texture. If you make them in the skillet, as opposed to the shallower, wider jelly-roll pan Maida prescribed, they end up thicker, and you get a chewiness along with the crispy-crunchy.
The result is an improvement on something I thought couldn’t get better. I didn’t think I could like Maida Heatter any more than I already did, either, until I found out her “favorite pastime” was snacking in bed. Since then, I’ve decided it might be worth waking up with crumbs up my bum to bring one of Dolly’s bars into my bedroom, with a glass of milk—to help me sleep, of course.
1 cup (2 sticks) plus 1 teaspoon unsalted butter
½ teaspoon salt
1 teaspoon vanilla extract
1 cup packed dark brown sugar
2 cups sifted unbleached all-purpose flour
4 ounces (generous 1 cup) slivered almonds, toasted
1 cup chocolate chips (use your favorite brand/sweetness)
1 Preheat the oven to 350°F with a 10-inch cast-iron skillet placed on the middle rack.
2 In the bowl of a stand mixer fitted with a paddle, beat the 1 cup butter on low speed for about a minute, until it’s softened. Scrape down the sides and base of the bowl, plus the paddle, as needed. With the mixer on low speed, add the salt and vanilla. Crumble in the brown sugar, then turn the speed up to medium and beat the mixture for 1 to 2 minutes, until it’s the color of peanut butter and has aerated a bit. Stop the machine and scrape down the bowl again. Turn the mixer back on low speed and gradually add the flour, beating the mixture until it holds together. You may have to stop the machine to scrape the bowl again once or twice.
3 Add the almonds and chocolate chips and, using a wooden spoon, stir to combine them into the dough, which will be stiff.
4 Remove the hot skillet from the oven and place the remaining 1 teaspoon butter in it. As it melts, brush the butter over the bottom and sides of the pan to coat.
5 Using the wooden spoon, empty the dough into the skillet and, with your fingers, being careful to avoid touching the sides of the hot pan, press the dough to fill the skillet, evening it out as you go, until you have a solid, flat layer.
6 Bake for 30 to 35 minutes, until the top is a dark, golden brown. You may be tempted to take it out when the edges have begun to darken, but let it continue to cook so the entire surface can take on that color—you should start to see the dough bubble if you turn on the oven light and peer through the window.
7 Remove the skillet from the oven and let it sit for 1 minute before using a sharp knife to cut it into 14 bars. If necessary, run a butter knife around the sides of the pan to make sure the bars don’t stick to the skillet. Let the bars cool completely before removing them. Use a small spatula or butter knife to transfer them to paper towels to blot the buttery bottoms. If you want to give them as a gift or save them for later, seal them, individually, in plastic wrap or wax paper; you can also place them in an airtight container. They should keep for up to 1 week.
8 Baked in advance, the dough would make a killer crust for an ice cream pie, too, and you should be able to remove it all in one piece rather than slicing it into bars, so you can layer the ice cream on top of it and transfer it to the freezer to set. Or else you could serve it in the skillet, cooled, without cutting it. Just plop on a few scoops of ice cream and drizzle some hot fudge over the top.
EXTRA-DARK ESPRESSO BROWNIES
makes 16 brownies

Among many baking superpowers, Alice Medrich can claim seeing into the brownie’s soul. Her thorough, ongoing investigation has yielded numerous recipes, none so famous as her New Classic Chocolate Brownies. The trick to these is to take perfectly undercooked brownies out of the hot oven and place the aluminum pan in an ice bath to stop them from cooking a second longer. But cast-iron isn’t made for bathing. Plus, it holds more heat, and holds it longer than an aluminum pan; once you pull it out of the oven, your batter is going to continue to cook, and at a higher temperature. To avoid depressingly dry, stiff, sad blocks, you need to calibrate baking time and wetness accordingly.
I keep the skillet in the oven for the least possible amount of time required to yield actual brownies as opposed to hot, soupy batter. If you’re struggling with the question of whether or not it’s ready and wondering if just maybe you should put the skillet back in for a minute or two, you’ve nailed it. Stop, walk away from the pan, and leave your brownies to cool. When they do, they’ll be perfect.
10 tablespoons plus 1 teaspoon unsalted butter
1¼ cups packed dark brown sugar
¾ cup plus 2 tablespoons best-quality unsweetened cocoa powder (preferably natural)
¼ teaspoon salt
3 tablespoons espresso powder, dissolved in 2 tablespoons hot water
½ teaspoon pure vanilla extract
2 large eggs, cold
½ cup rye flour
⅓ to ⅔ cup cacao nibs, depending on your preference (see Note)
1 Preheat the oven to 325°F with a 10-inch cast-iron skillet placed on a rack in the lower third of the oven.
2 In a medium heatproof bowl set over a wide pan of gently simmering water (or using a double boiler), melt 10 tablespoons of the butter. Add the brown sugar, cocoa powder, and salt and cook, stirring from time to time, for about 7 minutes, until the mixture is smooth and almost hot enough to scald your finger. Remove the bowl from the heat. Let the mixture cool from hot to warm.
3 Add the espresso solution to the chocolate mixture and whisk to combine. Stir in the vanilla, then add the eggs one by one, whisking each one vigorously into the batter to aerate it before adding the next. Once the mixture is thoroughly blended, thick, and glossy, add the flour and stir until it completely disappears into the batter. Switch to a rubber spatula or wooden spoon and aggressively beat the batter for up to 60 strokes. Stir the cocoa nibs in, using more or less according to your preference and making sure they’re evenly distributed.
4 Remove the hot skillet from the oven and place the remaining 1 teaspoon butter in it. As it melts, brush the butter over the bottom and sides of the pan to coat. Pour the batter into the skillet and bake for about 20 minutes, until the edges of the brownie have begun to pull away from the pan and a cake tester inserted into the center comes out wet with the sludge of batter. The interior should be gooey and almost seem underdone, the surface dry and shiny.
5 Let the brownies cool completely in the skillet, then cut them into wedges and serve them out of the pan.
NOTE These fudgy brownies are dark, skating dangerously close to bitter. If you’re at all gun-shy about the bitter factor, you can use fewer nibs (⅓ cup, or less), but I like to push it to the maximum, and I appreciate the crunch.
ROSEMARY–OLIVE OIL BROWNIES WITH SEA SALT
makes 16 brownies
Fragrant with herbal, earthy, citrus, and nutty notes, this brownie is sweeter than the last and has a lighter consistency. Neither flourless nor cakey, its texture is like that of a flourless chocolate cake, with a soft, moist, pleasantly granular crumb. It also has a crackly, gleaming top, which its sibling does not. Three things account for that surface. The first is dark chocolate, which yields a shinier, shattering crust. The second is granulated sugar, which gives you the photogenic finish. The third is a good beating, which will also contribute to that luminous, crackled crown. You want to whip your eggs and sugar into a frenzy so they’re at peak volume and pour out in a thick, glossy ribbon of pale yellow liquid. You’ll need to get your stand mixer out for this. It makes a difference.
I combine the all-purpose with almond flour for added flavor and texture, and where others go infallibly classic with unsalted butter, I take a risk that pays off with a fruity extra-virgin olive oil. It imparts some moisture and a grassy-peppery aura. To complement that bouquet, I toss in rosemary. The element that prevents the herb and the olive oil from dominating the chocolate and delivering an unpleasantly savory brownie is the orange zest. The acid lifts those other ingredients. Sometimes, I find the combination of chocolate and citrus unsettling; in this recipe, I realize its potential. When these Mediterranean elements come together, they create a brownie different from any I’ve had before.
½ cup plus 1 tablespoon best-quality extra-virgin olive oil, plus 1 teaspoon
6 ounces bittersweet chocolate, coarsely chopped (see Note)
3 large eggs
¾ teaspoon flake sea salt
1 cup sugar
1 teaspoon vanilla extract
½ teaspoon almond extract
½ cup unbleached all-purpose flour
¼ cup almond flour
2 teaspoons orange zest
1 tablespoon finely chopped fresh rosemary
1 Preheat the oven to 350°F with a 10-inch cast-iron skillet placed on a rack in the lower third of the oven.
2 In a medium heatproof bowl set over a wide pan of gently simmering water (or using a double boiler), heat the ½ cup plus 1 tablespoon olive oil and the chocolate, stirring with a whisk, until the chocolate has melted and the mixture is smooth. Remove the bowl from the heat and set it aside.
3 Meanwhile, in the bowl of a stand mixer fitted with the whisk (or in a large bowl using a whisk), beat the eggs on high speed until they’re frothy. Add ½ teaspoon of the salt, the sugar, and the vanilla and almond extracts and continue to whisk until the mixture is a thick and glossy pale yellow. Add the chocolate mixture and beat some more to incorporate. Using a rubber spatula, fold in the flours just until combined. Fold in the orange zest and rosemary.
4 Remove the hot skillet from the oven and place the remaining 1 teaspoon olive oil in it. Brush the olive oil over the bottom and sides of the pan to coat. Pour the batter into the skillet and sprinkle with the remaining ¼ teaspoon salt. Bake for 25 to 30 minutes, until the top is glossy and beginning to crack. The center should be just barely cooked—moist but set. Let it cool completely in the skillet before cutting it into 16 small wedges and serving them straight from the pan. These brownies are especially good the next day. You can cut the entire batch into wedges, wrap them tightly, and store them overnight.
NOTE I’d go with a 62 to 68% chocolate, like Valrhona’s Grand Cru Caraïbe 66%.