ON-THE-RISE BAKING
SWEET POTATO RUSKS WITH GARAM MASALA
CHICKEN LIVER & CIPOLLINI ONION PIZZA
SWEET POTATO RUSKS WITH GARAM MASALA
makes about 30 rolls
So-called rusks made of mashed potatoes were immortalized in the New York Times on April 29, 1887, and featured in Amanda Hesser’s The Essential New York Times Cookbook. The rolls belonged to one “Aunt Addie,” as she signed her recipe. But, as Amanda points out in the headnote for her book’s version, “rusk” usually refers to stale country bread. These dried-out remnants served many purposes in the households of European peasants; they were used to give body to soups and stews, or offered as teething biscuits for babies, which is probably how we know them in this country. I repurposed Addie’s recipe when developing this sweet-potato roll. I don’t know what she would make of my adding an Indian spice blend, garam masala, to the dough. It’s a mélange of aromatics that varies regionally but usually contains cinnamon, clove, cardamom, nutmeg, peppercorn, coriander, and cumin. Some of those are the same seasonings baked into Thanksgiving sweet potato pies. These “rusks,” then, might not taste so exotic after all.
1 medium sweet potato
⅛ teaspoon plus 1 teaspoon coconut oil, per batch
1¼ cups sorghum flour
5¾ cups unbleached all-purpose flour, plus at least ½ cup more for dusting and kneading
2¼ cups whole milk
2¼ teaspoons active dry yeast (one ¼-ounce packet)
2 teaspoons kosher salt
3 tablespoons coconut sugar
4 tablespoons (½ stick) unsalted butter, at room temperature
1 large egg
2 tablespoons garam masala
1 Preheat the oven to 375°F with a 10-inch cast-iron skillet in it. Place the sweet potato on a square of aluminum foil large enough to enclose it. Drizzle ⅛ teaspoon of the coconut oil on the sweet potato—just enough to coat—and rub the oil over the entire surface. Using a fork, prick the potato a few times, then wrap it in the foil; it should be well sealed, but not too tight. Place the potato in the skillet and roast for about 1 hour, or until a sharp knife stuck into the center glides through with little resistance and its interior is soft. It may need more time; check on it every 10 minutes until it’s done.
2 Once the potato is cool enough to handle, peel it, discarding the skin, and, using a fork, mash the flesh in a small bowl. In a large bowl, whisk together the flours. In a separate large bowl, combine 1 cup of the potato, 2 cups of the milk, the yeast, and 3 cups of the flour blend and, using a wooden spoon, mix well. Cover the bowl and put it in a cool place for 2 to 3 hours, so the starter can double in size. Alternatively, you can leave it in the fridge overnight.
3 Add the salt, 2 tablespoons plus 2 teaspoons of the coconut sugar, the butter, egg, garam masala, and 2½ cups more of the flour blend to the starter and, using a wooden spoon or rubber spatula, stir together until the dough is too stiff to stir any further. Turn it out onto a well-floured work surface and, dusting your hands with flour, knead it for about 10 minutes, until it’s smooth and supple. It will start out quite sticky and you’ll need to add more flour as you go—up to 2 cups. Add it in small increments, starting with ½ cup and decreasing, as you continue, to ¼ cup, ⅛ cup, and finally 1 tablespoon at a time. If you run out of the flour blend, use unbleached all-purpose flour. Once the dough has reached the desired texture, put it in a clean bowl, covered, for 1 to 1½ hours, until it’s doubled in size.
4 Punch the dough down and turn it out onto a lightly floured work surface. Using a bench scraper or small sharp knife, slice pieces the size of large eggs and form them into balls, using your hand to form a dome over each as you gently press it in a circular motion against your work surface. Once you’ve shaped it into a loose bun, begin to speed up the circling, pressing motion until you’ve created a compact sphere. Place the rounds, smooth-side up, about ½ inch apart, on a flat surface lined with parchment paper, and cover them loosely. Let them proof for 30 minutes.
5 Meanwhile, preheat the oven to 400°F with a 10-inch cast-iron skillet in it. In a small bowl, dissolve the remaining 1 teaspoon coconut sugar in the remaining ¼ cup milk.
6 Remove the hot skillet from the oven and add 1 teaspoon coconut oil, tilting to coat. Fill the pan with 10 to 12 dough rounds, packing them close together. Choose the rounds in the order in which they were rolled. The remaining rounds can continue to proof while the first batch bakes.
7 Quickly brush the tops of the rounds in the hot skillet with the sweetened milk and bake for 20 minutes, until their tops have begun to brown, they’re cooked through, and, if you tap on their bases, they sound hollow. During the baking process, they will likely become attached, but can easily be pulled apart for eating. Using a large spatula, you should be able to transfer them out of the pan in one go, as a loaf. Place them on a wire rack to cool while you cook the remaining rolls.
8 You will have enough for a complete second batch, and a few extra for a third; act quickly, baking one after the other so your dough doesn’t overproof. For each, repeat the baking process, as above, adding 1 teaspoon of coconut oil to the hot skillet before placing the dough rounds in it and brushing them with the sweetened milk.
9 Leftover day-old or imperfect rusks can be used to make migas, or toasted and spread with coconut butter and honey, mango chutney, or tomato jam.
CURRIED PRETZEL KNOTS
makes 10 knots

Pretzel recipes aren’t hard to come by, but I knew chef Pichet Ong’s would be the benchmark, which it is, and that he would be open to my changing it, which he was.
I was in the market for something chubbier and tighter than the common cursive-shaped ballpark pretzels—something more like a knot that could be served with a meal, instead of biscuits or Parker House rolls, and that could be baked by the bunch. Their dough stained with curry powder, these stout, fragrant nuggets go in the oven in two shifts, five at a time. If you follow the directions and place the prepared dough in an alkaline bath of baking soda and water, you will get a true, golden pretzel crust. I encourage you to make my dipping sauce to accentuate the knots’ aromatic side. The combination of mango chutney, honey mustard, and that Indian spice blend might sound weird to some; I think of it as a loosely interpreted, cheat version of mostarda di frutta—the Italian condiment of fruit conserves flavored with mustard seeds. I won’t write you off if you don’t try it; you’ll be missing out, though.
1½ teaspoons active dry yeast
⅓ cup plus 2 teaspoons warm water (110° to 115°F)
3¼ cups bread flour, plus more for dusting
½ teaspoon salt
2 tablespoons curry powder
1½ tablespoons vegetable or canola oil, plus more for greasing
⅓ cup plus 2 teaspoons warm milk
¼ cup baking soda
1 large egg
1 teaspoon pretzel or other coarse salt, or as needed
Curry Dipping Sauce, for serving
1 In a small bowl, combine the yeast and warm water and let it rest for 10 minutes, until the yeast has dissolved and begun to foam.
2 Meanwhile, in a large bowl, stir together the flour, salt, and curry powder with a whisk. Add the oil, milk, and yeast mixture and, using a wooden spoon or rubber spatula, stir to combine. Pour ½ cup water over the mixture and use your hands to incorporate and form a tacky dough; it should be wet, but not sticky. If the dough is too dry, add more water, 1 to 2 tablespoons at a time, until you reach the desired consistency. Turn the dough out onto a lightly floured work surface and knead for up to 8 minutes, until it’s pliant and smooth. Put the kneaded dough back in the bowl and cover it with plastic wrap or a kitchen towel. Let the dough rest for about 1 hour, until it has doubled in size.
3 While the dough is resting, in a small saucepan, bring 2 cups water to a boil. Remove from the heat and stir in the baking soda until it has totally (or almost totally) dissolved. Set this alkaline solution aside to cool; it should be lukewarm, at most.
4 Meanwhile, preheat the oven to 450°F with a 10-inch cast-iron skillet placed on a rack in the top third of the oven.
5 Once the dough is ready, transfer it to a lightly greased Silpat baking mat or nonporous work surface. Using a bench scraper, divide the dough into 10 equal pieces. Shape them into logs, about 4 inches long, and let them rest, uncovered, for 5 minutes. Roll each log of dough into a thin rope 12 to 14 inches long and tie it into a chubby knot.
6 Pour the cooled alkaline solution into a 9-inch square pan. Place 5 of the pretzel knots in the pan, smooth-side down, and let them soak for 2 minutes. Flip them over and let their other sides soak for 2 minutes. Transfer the soaked knots to a large plate, allowing any excess solution to drain off of them as you lift them out of the pan, and let them sit, covered with a damp kitchen towel, for 10 minutes. Place the 5 unsoaked knots in the alkaline solution, giving each side a 2-minute soak. Transfer them to another large plate and cover them with a damp kitchen towel, too. (If you have a large enough kitchen towel, it can cover both plates.)
7 Empty the pan of the solution, give it a quick rinse, and fill it with fresh water. Place the pan on the bottom rack of the oven.
8 While the unbaked knots are proofing, in a small bowl, whisk the egg to incorporate the white and yolk, then whisk in 2 tablespoons of water to make an egg wash.
9 Once the first plate of knots has finished proofing, brush them liberally with the egg wash, then sprinkle them with ½ teaspoon of pretzel salt, adjusting to your preference.
10 Remove the hot skillet from the oven and place the 5 salted knots in it. Bake them for 10 minutes, until golden brown, rotating the pan halfway through. When the knots are almost done baking, quickly brush the 5 uncooked knots with the egg wash and sprinkle them with ½ teaspoon pretzel salt.
11 As soon as they come out of the oven, transfer the 5 baked pretzels to a large plate. Place the 5 unbaked knots in the hot skillet and bake for 10 minutes. Serve them, hot or warm, with the dipping sauce.
NOTE In Pichet’s original recipe, he calls for baking the pretzels “with steam until dark” to get a nice crust. I asked him what to do if, like me, you don’t have a steam oven. “I just spray the walls of the oven, and/or put a pan of water at the bottom,” he said. I tried the pan-of-water trick, and I’m sticking with it for this recipe. It’s terrific.
CURRY DIPPING SAUCE
makes approximately ½ cup
¼ cup mango chutney
¼ cup honey mustard
1 teaspoon curry powder
½ teaspoon salt, plus more to taste
½ teaspoon freshly ground black pepper, plus more to taste
In a small bowl, stir together all the ingredients. Taste for seasoning and adjust as needed.
WHOLE-WHEAT STICKY BUNS
makes 8 buns
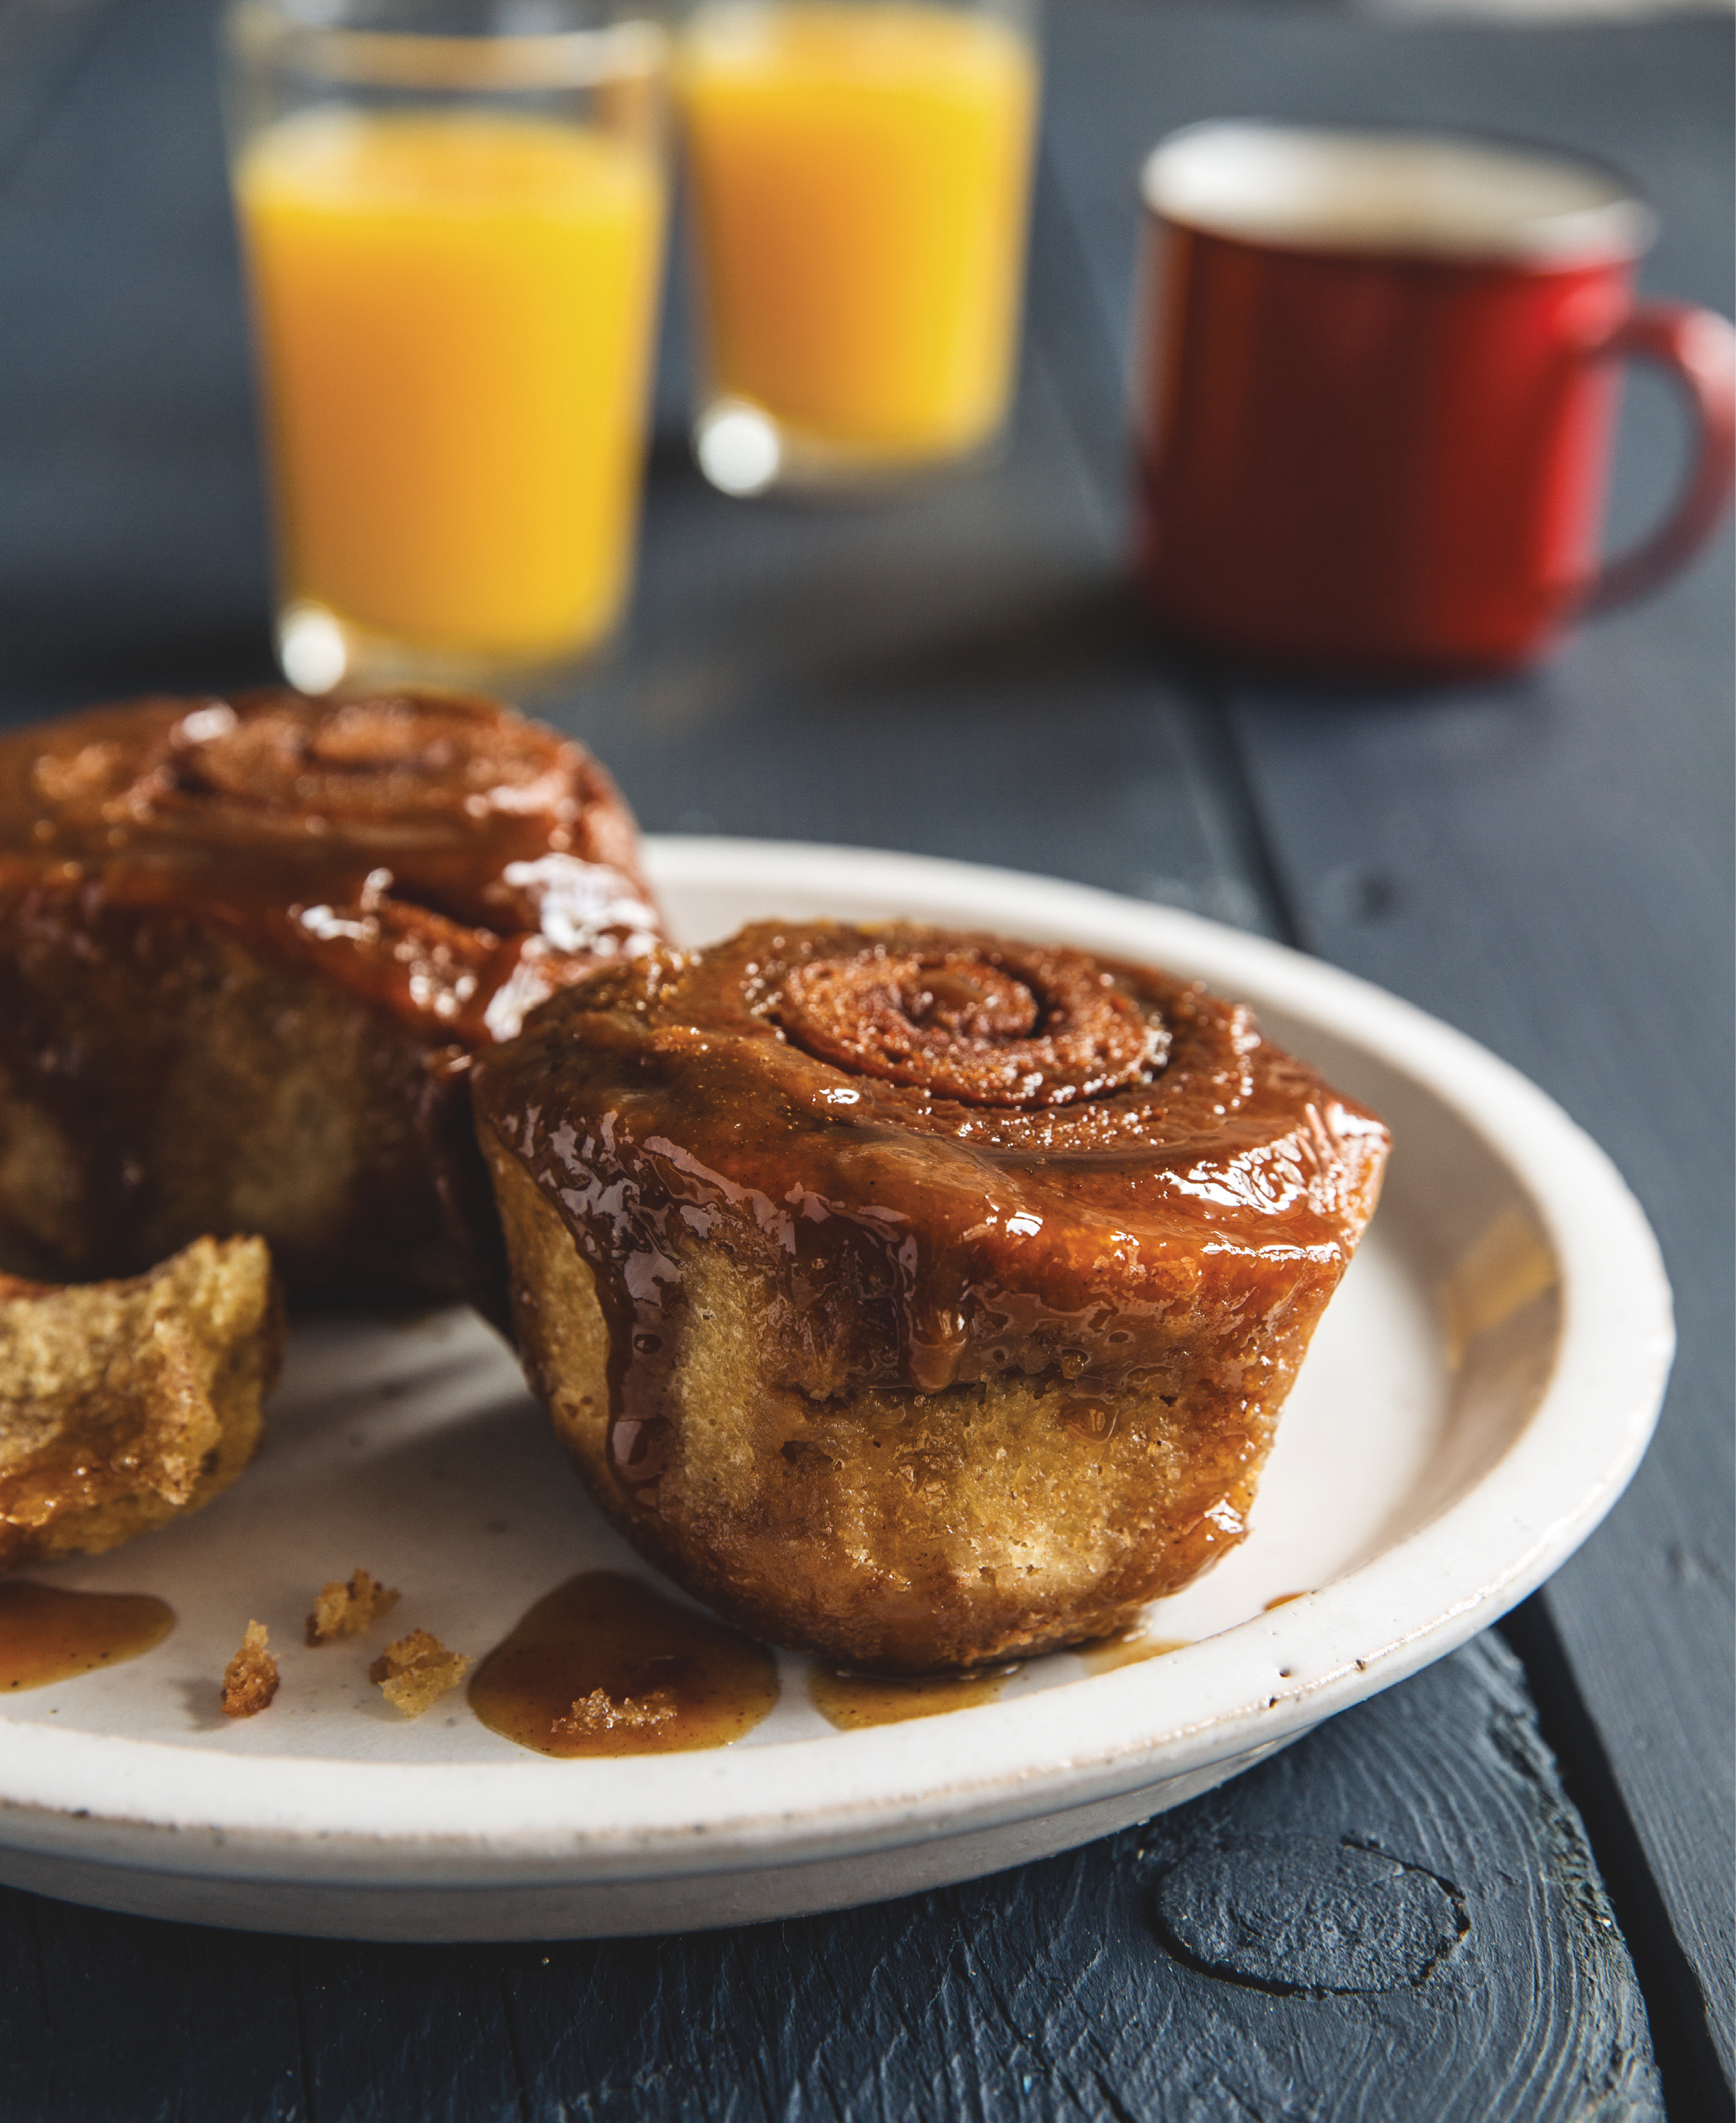
This thing looks as humble as any other old-fashioned homemade cinnamon roll, but when you sink your teeth into it, you become aware that Melissa Weller’s bun is heads and shoulders above whatever Cinnabon or—sorry to the grandmas—mediocre heirloom you’re used to. There are a couple of factors contributing to its superiority. One is whole-wheat flour. Somehow, when it’s incorporated into a brioche dough and paired with a cinnamon-and-sugar filling, it lends only depth and a very subtle nuttiness—not a healthful-seeming trace to be found. Opting for light brown sugar in the butter topping is another thoughtful and beneficial decision. It complements that whole-wheat flour without overpowering it, and gives you the sticky bun’s definitive caramelized goo without making the entirety taste like brown sugar. You can detect the sweet cream of the fat, and the earthiness of the spice, both of which dark brown sugar probably would have obscured.
DOUGH
¼ cup whole milk
4 large eggs
1¾ cups unbleached all-purpose flour, plus more for dusting
1⅓ cups whole-wheat flour
2 teaspoons active dry yeast
2 teaspoons fine sea salt
¼ cup plus 1 teaspoon granulated sugar
1 cup (2 sticks) plus 3 tablespoons unsalted butter, well softened
FILLING
2 teaspoons ground cinnamon
2 tablespoons granulated sugar
TOPPING
¾ cup (1½ sticks) unsalted butter, well softened
½ cup plus ⅓ cup packed light brown sugar
¼ cup heavy cream
1 Make the dough: In the bowl of a stand mixer fitted with the dough hook, combine the milk, eggs, flours, yeast, salt, and granulated sugar, in that order. Mix on low speed for 3 minutes, then raise the speed to medium and mix for 5 minutes more. Add the butter and mix on low for up to 8 minutes, until it is thoroughly incorporated into the dough, scraping down the sides and bottom of the bowl with a rubber spatula as needed. Remove the dough hook, cover the bowl with a kitchen towel, and let the dough rise at room temperature for 1 hour and 15 minutes.
2 Using a rubber spatula, scrape the dough out of the mixing bowl onto a parchment paper–lined baking sheet coated with nonstick cooking spray. Using your hands, gently coax the dough into a square shape, loosely cover it with plastic wrap, and refrigerate it until it’s cold, about 1 hour.
3 Meanwhile, make the filling: In a small bowl, combine the cinnamon and granulated sugar and mix with a spoon until well combined.
4 Remove the dough from the refrigerator and transfer it to a Silpat mat or other flat work surface dusted liberally with flour. Using a floured rolling pin, roll the dough out to a rectangle that is 18 inches long by 12 inches wide. Roll it out horizontally, so the longer side is facing you.
5 Using a pastry brush, coat the entire surface of the dough with water. Sprinkle the cinnamon-sugar filling over the surface. Starting with the side closest to you, roll the dough up, jelly-roll style, to form a long log. Transfer the log, seam-side down, to a parchment paper–lined baking sheet, loosely cover it with plastic wrap, and place it in the freezer for 30 minutes, to firm it up for slicing (see Notes). If your freezer can’t accommodate a tray large enough to hold the log, using your hands, adjust the shape of the log to fit a smaller tray or plate, making it shorter and thicker as needed.
6 Meanwhile, prepare the topping: In the bowl of a stand mixer fitted with the paddle, beat the butter and brown sugar together on low speed until just combined, scraping down the sides of the bowl as necessary. Add the cream and mix again to incorporate. (Do not overmix the topping; the less air you add, the better it bakes.) Spread the topping evenly across the bottom of a 10-inch cast-iron skillet.
7 Remove the log from the freezer and, using a bench scraper or sharp knife, slice it into 8 equal pieces and arrange them flat (i.e., cross-section style) in the skillet with one bun in the center and 7 circling it. (For the 2 end pieces, place the smooth, flat side in the topping, with the round sides sticking up.) Cover the skillet with a kitchen towel and leave the buns to proof for 2 hours.
8 Preheat the oven to 350°F, placing an aluminum foil–lined baking sheet on the lowest rack to catch any topping that bubbles up and out of the skillet during baking.
9 Transfer the skillet to the oven and bake the buns for 45 minutes, until light brown. Remove the skillet from the oven and let it rest for 5 minutes before carefully inverting the pan, using the Upside-Down Plate Trick, and turning the sticky buns out onto a serving plate.
NOTES
• Cutting the sticky buns when the dough is super cold—almost half frozen—helps it keep its shape. Depending on your freezer, 30 minutes may not be enough time for your dough. Keep it in a few minutes longer, as necessary.
• Once filled and rolled, the dough log will keep for up to a week in the freezer. Thaw the frozen dough log for about 1 hour before slicing it and preparing it for baking. Make the topping while the dough thaws.
ENGLISH MUFFINS, MY WAY
makes 3 muffins
I always preferred Thomas’ Cinnamon Raisin English Muffins to the Original variety—I only wished they’d removed the raisins. It’s not that I don’t like raisins, I do. A bowl of Raisin Bran hasn’t lost its appeal, but in those breadstuffs, the dried grapes were getting in the way of my enjoying that soft, slightly sweet, warmly spiced dough. My second-choice Thomas’ would be the Honey-Wheat. Whole-wheat flour is far from my favorite, yet somehow it works especially well in this instance. Must be the honey.
I kept all this in mind when dreaming up my ideal English muffin. I chose quinoa for my flour, but toasted it first. If you do that, you will get something wonderful out of it—a nuttiness that makes whole-wheat flour’s seem pathetic. Maple syrup matched the quinoa’s assertiveness, and I selected sour cream for a slightly more luxurious crumb. The volume on the spice needed to be raised to stand up to my other adjustments. Cinnamon alone wasn’t enough. Star anise is a more complex, intense form of regular anise that has an almost cinnamonlike note with a hint of black pepper. It gave my English muffins a depth that surpassed my ideal. Toast it, butter it, and anoint it with a swipe of apple or sweet potato butter.
1 teaspoon active dry yeast
2 tablespoons plus 2 teaspoons warm water (110° to 115°F)
2 tablespoons unsalted butter
¼ cup sour cream
¼ cup warm whole milk, steeped with 1 star anise (see Notes)
½ tablespoon maple syrup
½ teaspoon salt
6 tablespoons graham flour
6 tablespoons unbleached all-purpose flour
¼ cup quinoa flour, toasted (see Notes)
½ teaspoon ground cinnamon
¼ teaspoon baking soda
Semolina, as needed, for sprinkling the pan
1 In a small bowl, combine the yeast and the water and let it rest for about 5 minutes, until the yeast has dissolved and begun to foam.
2 In a 10-inch cast-iron skillet preheated over low heat or in a small saucepan, melt 1 tablespoon of the butter over low heat and pour it into a large bowl. Whisk in the sour cream, infused milk, maple syrup, salt, and the yeast mixture.
3 Add the flours, cinnamon, and baking soda and beat vigorously with a spoon or rubber spatula until thoroughly combined. Cover the bowl and let it rest in a warm spot for 1 to 1½ hours, or until the dough has doubled in size.
4 Preheat the oven to 350°F. Return the cast-iron skillet to the stove and preheat it, gradually increasing the heat from low to medium. When the pan is hot, add the remaining 1 tablespoon butter to melt, tilting to coat. When the butter is hot and sizzling, using a ½-cup measuring cup, drop one-third of the dough into the skillet to form a round muffin about 4 inches in diameter, mounding it slightly in the center. You may need to shape it a bit using your fingers; just be careful to avoid the hot edges of the pan. Repeat the process with the remaining two-thirds of the dough, until you have 3 muffins in the pan. Reduce the heat to low. Cover the skillet with a lid and cook the muffins for 3 to 5 minutes, until their bottoms are golden brown, making sure they don’t burn.
5 Uncover the skillet and, using a spatula, flip the muffins. Cover the pan again and cook the muffins for 2 to 4 minutes, until the other sides are golden brown.
6 Turn off the heat and transfer the muffins to a plate. Wipe out any remaining butter in the skillet so it’s dry and sprinkle its surface with a dusting of semolina. Put the muffins back in the pan, right-side up, and bake for 6 to 9 minutes, until they’ve finished puffing up and are cooked through. Split the muffins with a fork and toast before eating. You can also use them to make an NYC Rarebit Sandwich.
NOTES
• Quinoa flour has a sourish, grassy flavor and smell. In order to bring out its nuttier notes, you should toast it before adding it to any dough. To do so, heat a 10-inch cast-iron skillet over low heat. When the pan is hot, add the quinoa flour and, using a wooden spatula, stir continuously for about 5 minutes, until the flour has begun to take on a golden tone and has lost its grassy odor. Be careful not to burn it. Transfer the toasted flour to a small bowl and let it cool completely before using it.
• To steep the star anise, add it to a small saucepan with the milk and warm them together over low-medium heat to just below the boiling point. When you see little bubbles around the rim of the milk, remove the saucepan from the heat. To intensify the flavor, let the spice steep for 30 minutes (milder spices can go for up to 45 minutes or even 1 hour). This recipe calls for the spiced milk to be warm. If you’ve left it to sit and it has cooled, return the saucepan to the stovetop and warm the infusion gently over low heat. Discard the spice pod. You can try this technique with other whole spices. It applies to cream as well as milk; the higher the fat content of the liquid, the more intense the infusion.
DELHI BIALYS
makes 3 bialys
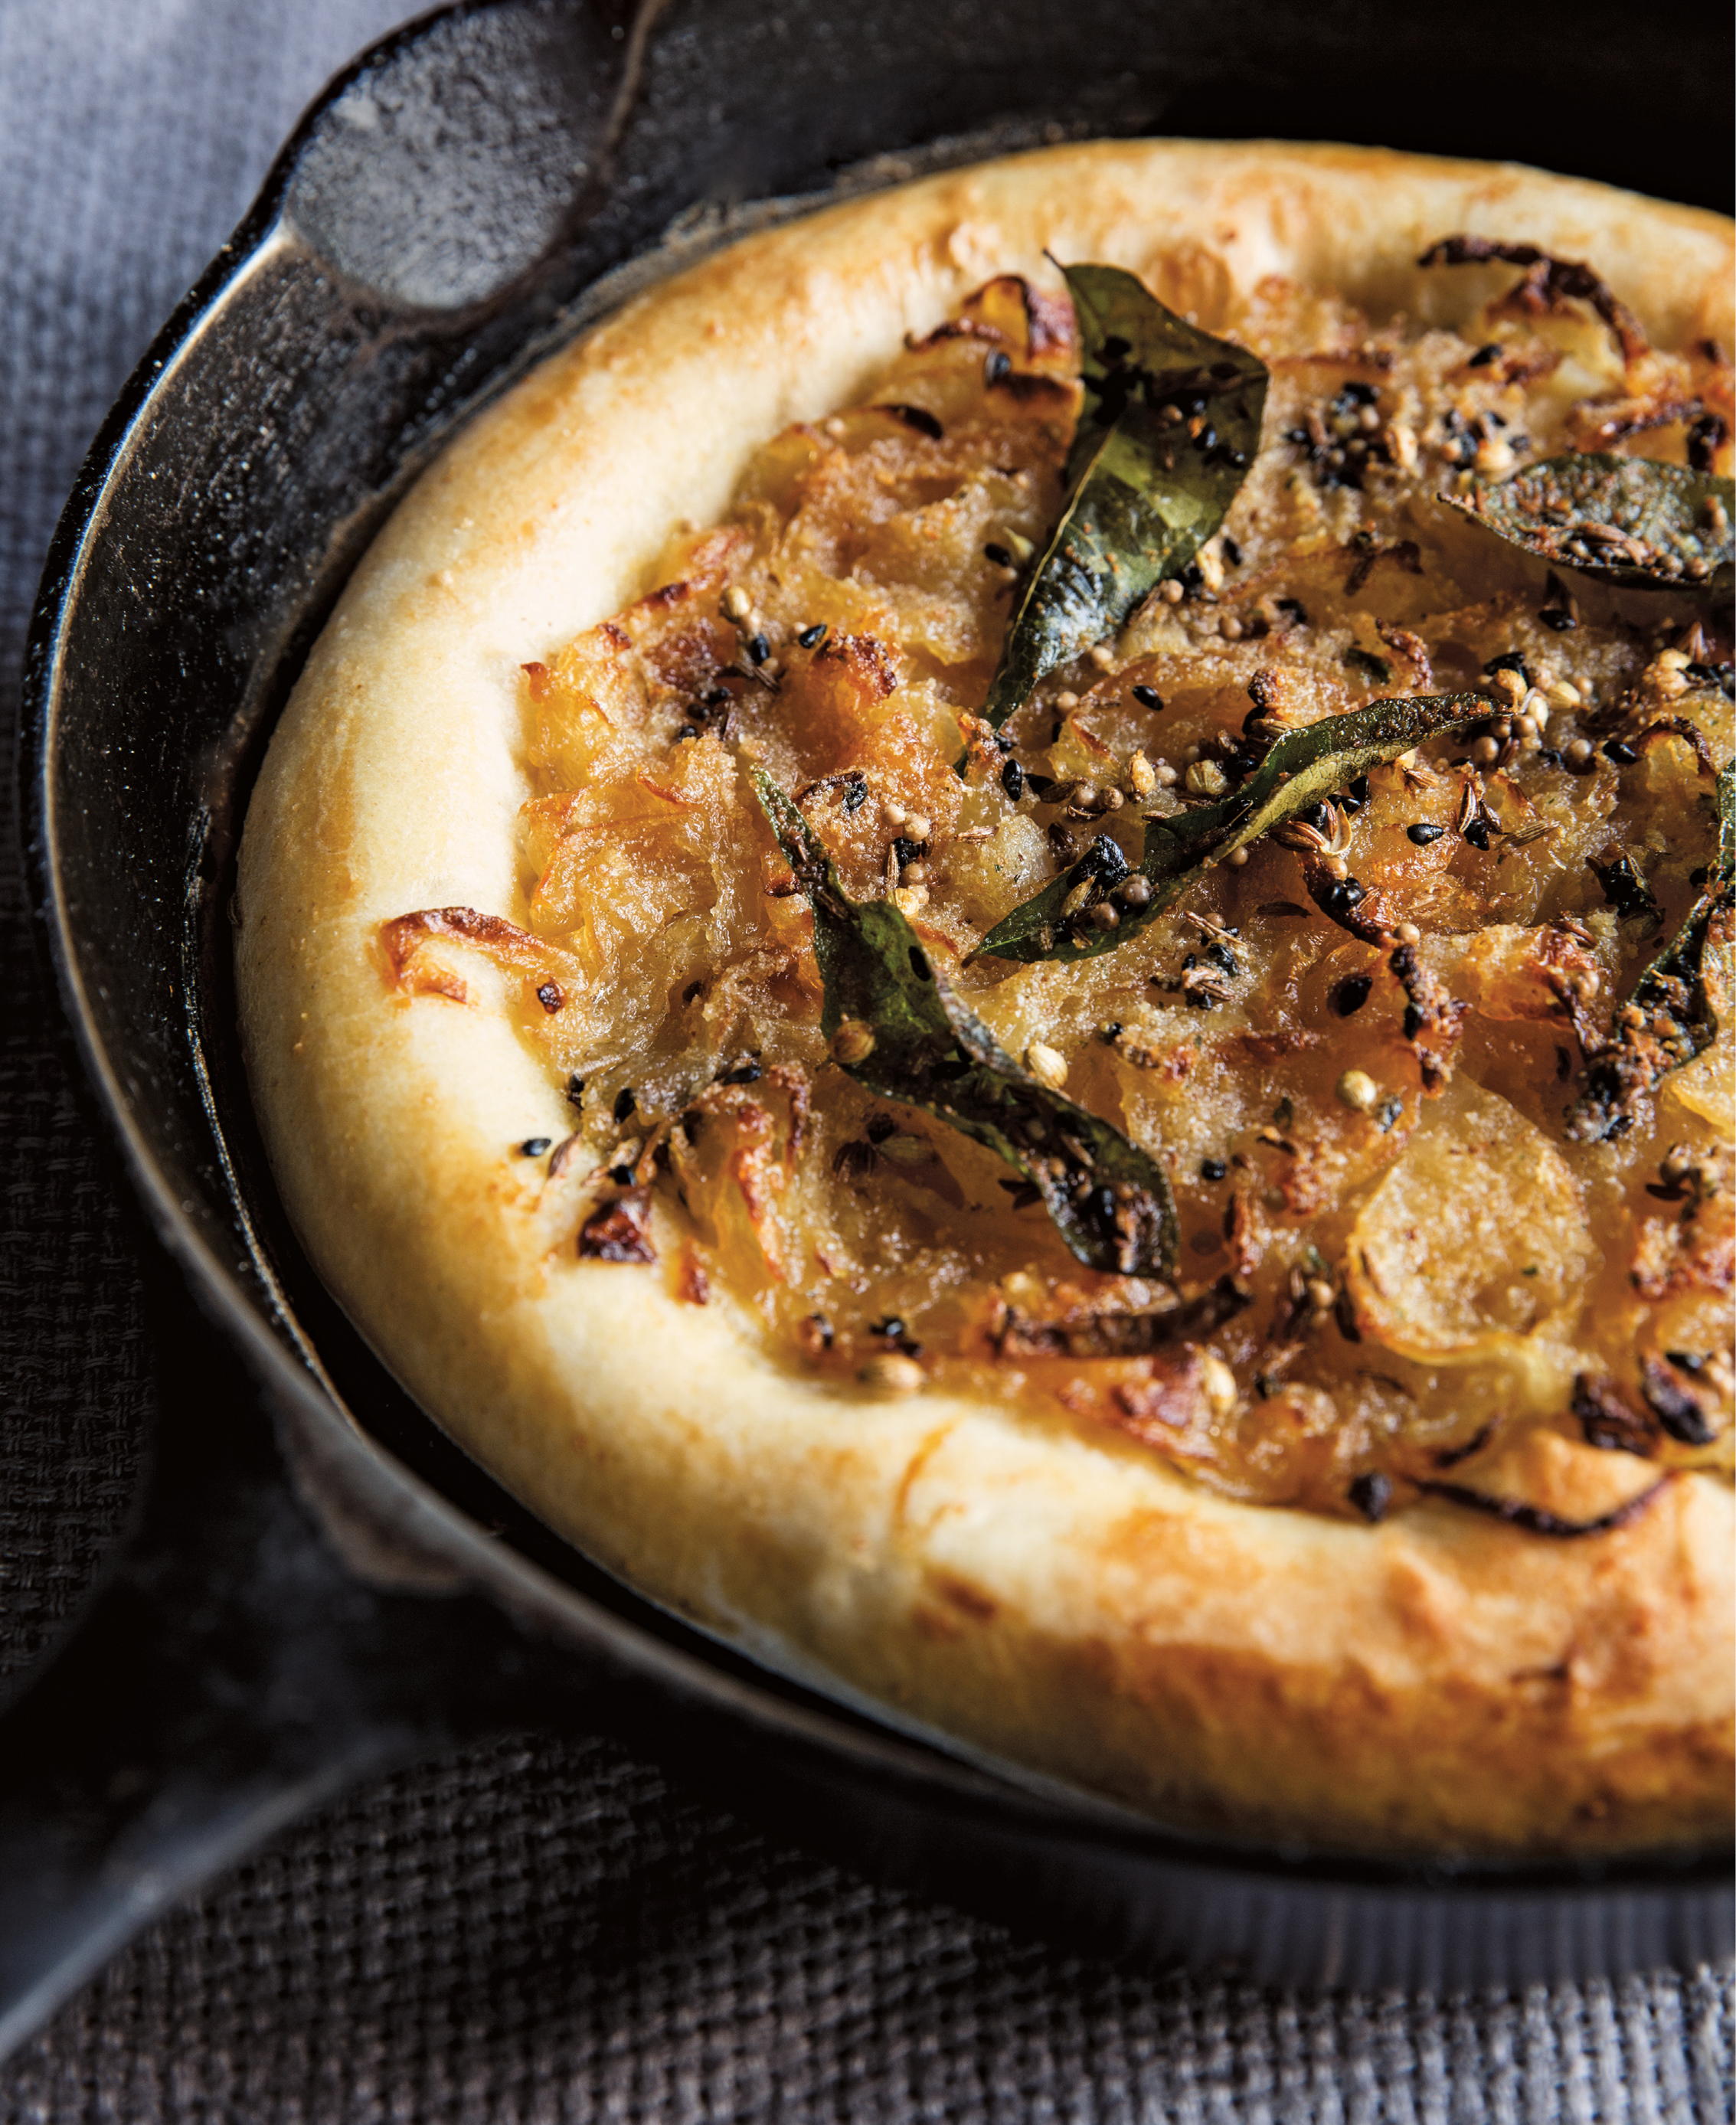
Once sold at eastern European bakeries or delicatessens in Jewish neighborhoods like Manhattan’s Lower East Side, bialys have become scarce. I grew up eating the round Polish bread whose dimpled center is topped with onions and, sometimes, poppy seeds, and was excited when New York City pastry chef and baker Melissa Weller told me she wanted to bring it back. She gave me her recipe for this book, but not before adapting it for a cast-iron skillet to yield a large, sharable bialy. Her instructions for kneading the dough were specific—she found that splitting it and putting each half in the food processor for a quick, intense spin, four times on and off, with one resting while the other whirls in the machine, results in the best-possible bialy a home kitchen can produce. She cooked down the onions—lots of them!—with great care, sweating them slowly on the stove at a low temperature before moving them to the oven and baking them, covered, for a half hour.
I did everything she instructed until, as my crispy, brown-crusted, chewy bialys cooled, I decided to leave off the poppy seeds. My brain had jumped from deli to Delhi, and I wanted to make a tempering—a fried blend of assorted spices used in Indian cuisine. I grabbed nigella, mustard, coriander, and cumin seeds from my spice cabinet and quickly toasted them in sizzling ghee until they popped and crackled. I threw in caraway seeds as well, to bring a hint of the Jewish bakery to my mix. At the last minute, I put some curry leaves in the pan. Then I spooned the hot aromatics and their golden cooking liquid over the bialys, letting the crunchy bits and unctuous fat settle into the onions.
DOUGH
5 cups unbleached all-purpose flour
¼ teaspoon active dry yeast
2 teaspoons fine sea salt
1½ cups plus 1 tablespoon cool water (about 65°F)
Coarse whole-wheat flour (e.g., graham flour) or rye flour, for dusting
6 teaspoons bread crumbs
¾ teaspoon flake sea salt, plus more for finishing
SPICE MIX
2 tablespoons ghee or vegetable oil
1 teaspoon mustard seeds
1 teaspoon coriander seeds
1 teaspoon nigella seeds
1 teaspoon cumin seeds
1 teaspoon caraway seeds
9 curry leaves (fresh, preferably, but dried is okay)
1 Make the dough: In a large bowl, whisk together the all-purpose flour, yeast, and fine sea salt. Add the cool water and, using your hands, mix everything together until you don’t see any flour.
2 Divide the dough in half. Transfer the first half to a food processor fitted with the dough blade and process for about 1 minute until the dough is warm—but not hot—to the touch. Set the first half aside and process the second half for about 1 minute. Repeat this procedure four times, waiting 1 to 2 minutes between kneadings to allow the food processor to cool down.
3 Transfer the kneaded dough halves back to the large bowl that you first used to mix the ingredients together. Cover it with plastic wrap or a kitchen towel and let the dough rest at room temperature for 1 hour and 15 minutes.
4 Give the dough a quick knead just to combine the halves, then, using a bench scraper, divide it into 3 equal pieces. Gently round each piece into a ball and set all 3 on a lightly oiled parchment paper–lined baking sheet. Cover the dough loosely with plastic wrap and refrigerate overnight or for at least 8 hours. (The dough will keep in the refrigerator for up to 3 days.)
5 Preheat the oven to 500°F with a 10-inch cast-iron skillet set on a rack in the middle of the oven. Heat the pan for a full 30 minutes.
6 Meanwhile, remove one of the pieces of dough from the refrigerator and let it warm up for 15 to 20 minutes. Dust your work surface with coarse whole-wheat flour and place the ball of dough on the dusted surface.
7 With your index and middle fingers, begin to punch down the dough, starting in the center of the ball and working out. Create a rim about 1 inch wide by dimpling the dough with your fingers. Stretch the dough by lifting it up from its center with your fist (just like you’d shape pizza dough). The stretched bialy should be 8 inches across. Spread ⅔ cup of the onion topping over the dimpled part of the bialy. Sprinkle 2 teaspoons of the bread crumbs and ¼ teaspoon of the flake sea salt on top.
8 Carefully pull the hot skillet out of the oven and place it on a heatproof surface. Using your hands or one hand and a large spatula, gently scoop underneath the bialy, trying not to disturb its topping. Quickly transfer it to the skillet and return the pan to the oven. Reduce the oven temperature to 450°F and bake for 15 to 20 minutes, until the crust is golden brown.
9 Remove the skillet from the oven and use a spatula to transfer the bialy to a wire rack. Repeat to make 2 additional bialys (see Note).
10 Make the spice mix: The 10-inch cast-iron skillet should still be hot from the oven. (If it isn’t, preheat it, gradually raising the heat from low to medium-high.) Place it on the stovetop over medium-high heat and add the ghee. Once the ghee is hot, add the mustard and coriander seeds and fry them for about 1 minute, until they start to pop. Add the nigella, cumin, and caraway seeds and cook for 30 seconds. Add the curry leaves and cook for 15 to 30 seconds to wilt them.
11 Garnish each bialy with 1 tablespoon of the hot tempering and finish with additional flake salt, if desired. Feel free to eat them as is, or serve them with Roasted Eggplant Spread with Honey & Nigella.
NOTE The second and third bialys can be made right away, or, as noted above, the dough can be kept in the refrigerator for up to 3 days.
ONION TOPPING
makes about 2⅓ cups
3 tablespoons unsalted butter
2 very large Spanish onions (about 2 pounds), thinly sliced
1 teaspoon fine sea salt
1 Preheat the oven to 300ºF. Preheat a 10-inch cast-iron skillet on the stovetop, gradually raising the heat from low to medium. Once the pan is hot, melt the butter, then add the sliced onions and reduce the heat to medium-low. Cook for about 5 minutes, without stirring, so the onions start to shrink and become easier to move around the pan.
2 Cook the onions, stirring frequently, for 15 to 20 minutes more, until they are very soft and translucent and have not taken on any color. Stir in the salt, cover the pan with an ovenproof lid (cast iron, preferably), and place the onions in the oven to bake for 30 minutes.
3 Remove the onions from the oven, but do not lift the lid. Let the onions cool for 30 minutes without disturbing them. Uncover and drain the liquid from the onions. If not using immediately, store them in the refrigerator for up to 5 days. I like to prepare them the day before I need them.
CHICKEN LIVER & CIPOLLINI ONION PIZZA
makes four 8-inch pies
A couple of years ago, I changed my mind about chicken liver. Once I tasted a silky mousse and a pâté smooth as ganache on toast, I saw that it was capable of so much more than the mound of chopped mush my grandfather used to shove in my face and force me to eat. This recipe features a no-brainer ragout as a topping; it’s gamy, earthy, savory, salty, and—because of those onions—a little bit sweet. I stuck with Jim Lahey’s famous formula for no-knead dough, but I played with the dry ingredients, combining a bit of semolina flour with Italian “00”. (The two zeros are used to indicate just how finely ground that flour is; it doesn’t get finer.) With syrupy, aged balsamic vinegar and just-pressed olive oil drizzled on top, the first pizza had barely been polished off when I knew I needed a second. The good news was that one batch of dough makes enough for four pies.
3 tablespoons unsalted butter
8 small cipollini onions, peeled and thinly sliced into rings (about 3 cups)
12 fresh sage leaves
½ teaspoon salt, plus more to taste
¼ teaspoon freshly ground black pepper, plus more to taste
½ pound chicken livers, sinew removed, minced
1 cup grated Parmesan cheese
Extra-virgin olive oil, for drizzling (optional)
Aged balsamic vinegar, for drizzling (optional)
1 Preheat the oven to 500°F. Preheat a 10-inch cast-iron skillet on the stovetop, gradually increasing the heat from low to medium-high. Once the pan is hot, melt the butter. Add the onions and sage and cook, stirring frequently with a wooden spatula, for 4 to 5 minutes, until lightly browned. Season the mixture with the salt and pepper, and stir again to combine. Add the chicken livers and cook for about 1 minute to sear them. Taste the mixture and adjust the seasoning accordingly. Transfer the mixture to a heatproof bowl and set it aside. It can be covered and kept in the refrigerator for up to 3 days, if you want to make it in advance or don’t wish to cook all the pies at once.
2 While the cast-iron skillet is still hot, wipe it out and place it in the oven for 30 minutes to get extra hot. Switch the oven to broil for the next 10 minutes while you shape the dough.
3 Place one ball of dough on a well-floured work surface and dust it—and your hands—with more flour. Press the dough on the floured surface and, using the palms of your hands and your fingers to massage it, stretch it out into an 8-inch disc. Try to handle it as little as possible. It’s more than okay if you see a few gas bubbles in the dough; don’t pop them. Alternatively, you can roll the dough out with a floured rolling pin. This will allow you to get a more perfect circle without any tears, though you will lose some of the desired blistering.
4 Remove the hot skillet from the oven and place the stretched dough in the pan. You should be able to pick up the dough with your hands and gently put it in the pan; you can also drape it over your rolling pin and then roll it into the pan. Working quickly, scatter one-quarter of the chopped liver topping over the dough, leaving a border of at least 1 inch. Sprinkle ¼ cup of the Parmesan over the topping. Put the skillet in the oven about 3 inches under the broiler and broil the pizza for 4½ minutes, or until the cheese is melted and golden and the crust has a nice char but isn’t burnt. Using a spatula, transfer the finished pizza to a serving plate. Season it with salt and pepper, as needed. If you wish, drizzle your best-quality extra-virgin olive oil and, if you have it, some aged balsamic vinegar over it, too.
5 Repeat the process with the remaining dough and topping, keeping the broiler on and putting the skillet back in the oven while you stretch out the dough.
PIZZA DOUGH
makes 4 balls of dough
1 cup plus 2 tablespoons semolina flour
3 cups plus 3 tablespoons “00” flour
¼ teaspoon active dry yeast
2 teaspoons fine sea salt
Unbleached all-purpose flour, for shaping
1 In a large bowl, stir together the semolina and “00” flours, the yeast, and the salt using a whisk. Add 1½ cups water and, using a wooden spoon or your hands, combine thoroughly to form a dough. Cover the bowl with plastic wrap or a kitchen towel and leave it to rise at room temperature for 18 hours, or until it has more than doubled in size.
2 Liberally sprinkle unbleached all-purpose flour over your work surface and turn the dough out onto it. Using a bench scraper, divide the dough into 4 equal portions. Take one portion and pull each of its 4 sides out and around toward the center, beginning to form a ball. Use your hands to round it out and place it seam-side down, molding it into a tight sphere. If your dough ball is sticky, dust it with additional flour. Repeat the process with the remaining 3 pieces of dough.
3 If you’re not planning to bake the dough right away, you can wrap each sphere separately in plastic wrap and store them in the refrigerator for up to 3 days. When you want to use the dough, bring it to room temperature 2 to 3 hours before you plan to bake it; just place it on your kitchen counter under a damp kitchen towel.
BIG SUR FOCACCIA
serves 8

This focaccia is one of the best I’ve ever had. I attribute its excellence to Michelle Rizzolo of Big Sur Bakery. I’ve tried it plain and marveled at how good it is bare, with nothing on it, and how it can be used for everything from sandwiches to, when stale, panzanella, or even soup. I’ve also done it Rizzolo-style, with a layer of tomato sauce and Giardiniera on top. Then, it’s almost more like a pizza, and could be made a meal of.
A little instant polenta in the dough yields a moister, tastier focaccia. It’s a small but brilliant improvement, and one I’d consider applying to other breads in the future.
1 cup warm water (110º to 115ºF)
1 teaspoon active dry yeast
3¼ cups all-purpose flour
1 tablespoon plus 1 teaspoon fine sea salt
2 tablespoons sugar
½ cup extra-virgin olive oil, plus more for brushing
1 recipe Poolish
½ cup cooked instant polenta, prepared according to the package instructions and cooled to warm or room temperature
Flake salt, for sprinkling
1 In the bowl of a stand mixer fitted with the dough hook, mix the warm water and yeast on low speed to combine. Add the flour, salt, sugar, ¼ cup of the olive oil, and the poolish and mix for 2 minutes; the mixture should adhere and become thick and taffylike. Turn the machine off and crumble the cooked polenta into the bowl, making sure to break up any clumps. Turn the mixer up to medium and mix for 4 minutes more. The finished dough should be smooth, shiny, and tacky. It will be relatively wet.
2 Pour the remaining ¼ cup olive oil directly into a 10-inch cast-iron skillet. Using a rubber spatula, turn the dough out of the bowl into the pan, gently rotating the dough in the oil until it’s completely coated. Use your hands to spread the dough to fit the pan. Place the skillet in a warm area of the kitchen, cover it with a kitchen towel, and allow it to rise for about 90 minutes, or until it doubles in size. Press the dough gently with your fingertips to deflate it, then let it rise for 30 minutes more.
3 While the dough is proofing, preheat the oven to 425°F. Using your fingertips, press the dough down again, brush the top with more olive oil, and sprinkle it with flake salt.
4 Bake the focaccia for 20 minutes, then reduce the oven temperature to 375°F and bake for 15 to 20 minutes more, until golden brown. Let the focaccia sit in the pan for a couple of minutes before using the Upside-Down Plate Trick to flip it out, then transfer it to a wire rack, placing it right-side up. Slice it into 8 wedges and serve.
5 Leftover (1- to 2-day-old) focaccia can be used for pancotto or panzanella. Store it in an airtight container at room temperature.
POOLISH
Any basic bread recipe can be adapted to contain a poolish, which deepens flavor. All it requires is pulling a tiny bit of yeast, water, and flour from the dough’s ingredients, combining them, and letting the mixture sit overnight at room temperature. You can omit it from a recipe that calls for it: add the ingredients from the poolish back into the dough proper, mixing it in one go.
½ cup warm water (100ºF)
¼ teaspoon active dry yeast
½ cup unbleached all-purpose flour
In a small bowl, using a wooden spoon or rubber spatula, mix the water, yeast, and flour to a thin paste. Cover the bowl with plastic wrap and leave it out overnight or for up to 15 hours at room temperature.
Focaccia Variations
Infuse the extra-virgin olive oil you use for brushing the dough with the chopped herb(s) of your choice by storing washed, dried, and gently bruised herbs with olive oil in a sealed bottle for 1 to 2 weeks away from sun and heat. Brush the mixture onto the surface of the dough before baking. The oil will prevent your herbs from burning in the oven.
Roast a head of garlic, squeeze out its cloves, and set them aside. When you press the focaccia dough down after the final 30-minute proofing, tuck the roasted garlic cloves into the resulting dimples. Brush the dough with extra-virgin olive oil, sprinkle with flake salt, and bake as directed.
Spread ½ cup tomato sauce over the top of the dough, followed by 2½ cups Giardiniera drained of its oil. (If the vegetables in your giardiniera seem too dry, drizzle a tablespoon of that oil over them on the focaccia so they don’t burn.) Sprinkle with a generous pinch of fine salt. Bake as directed, erring closer to 20 minutes for the second half of baking (at 375°F).
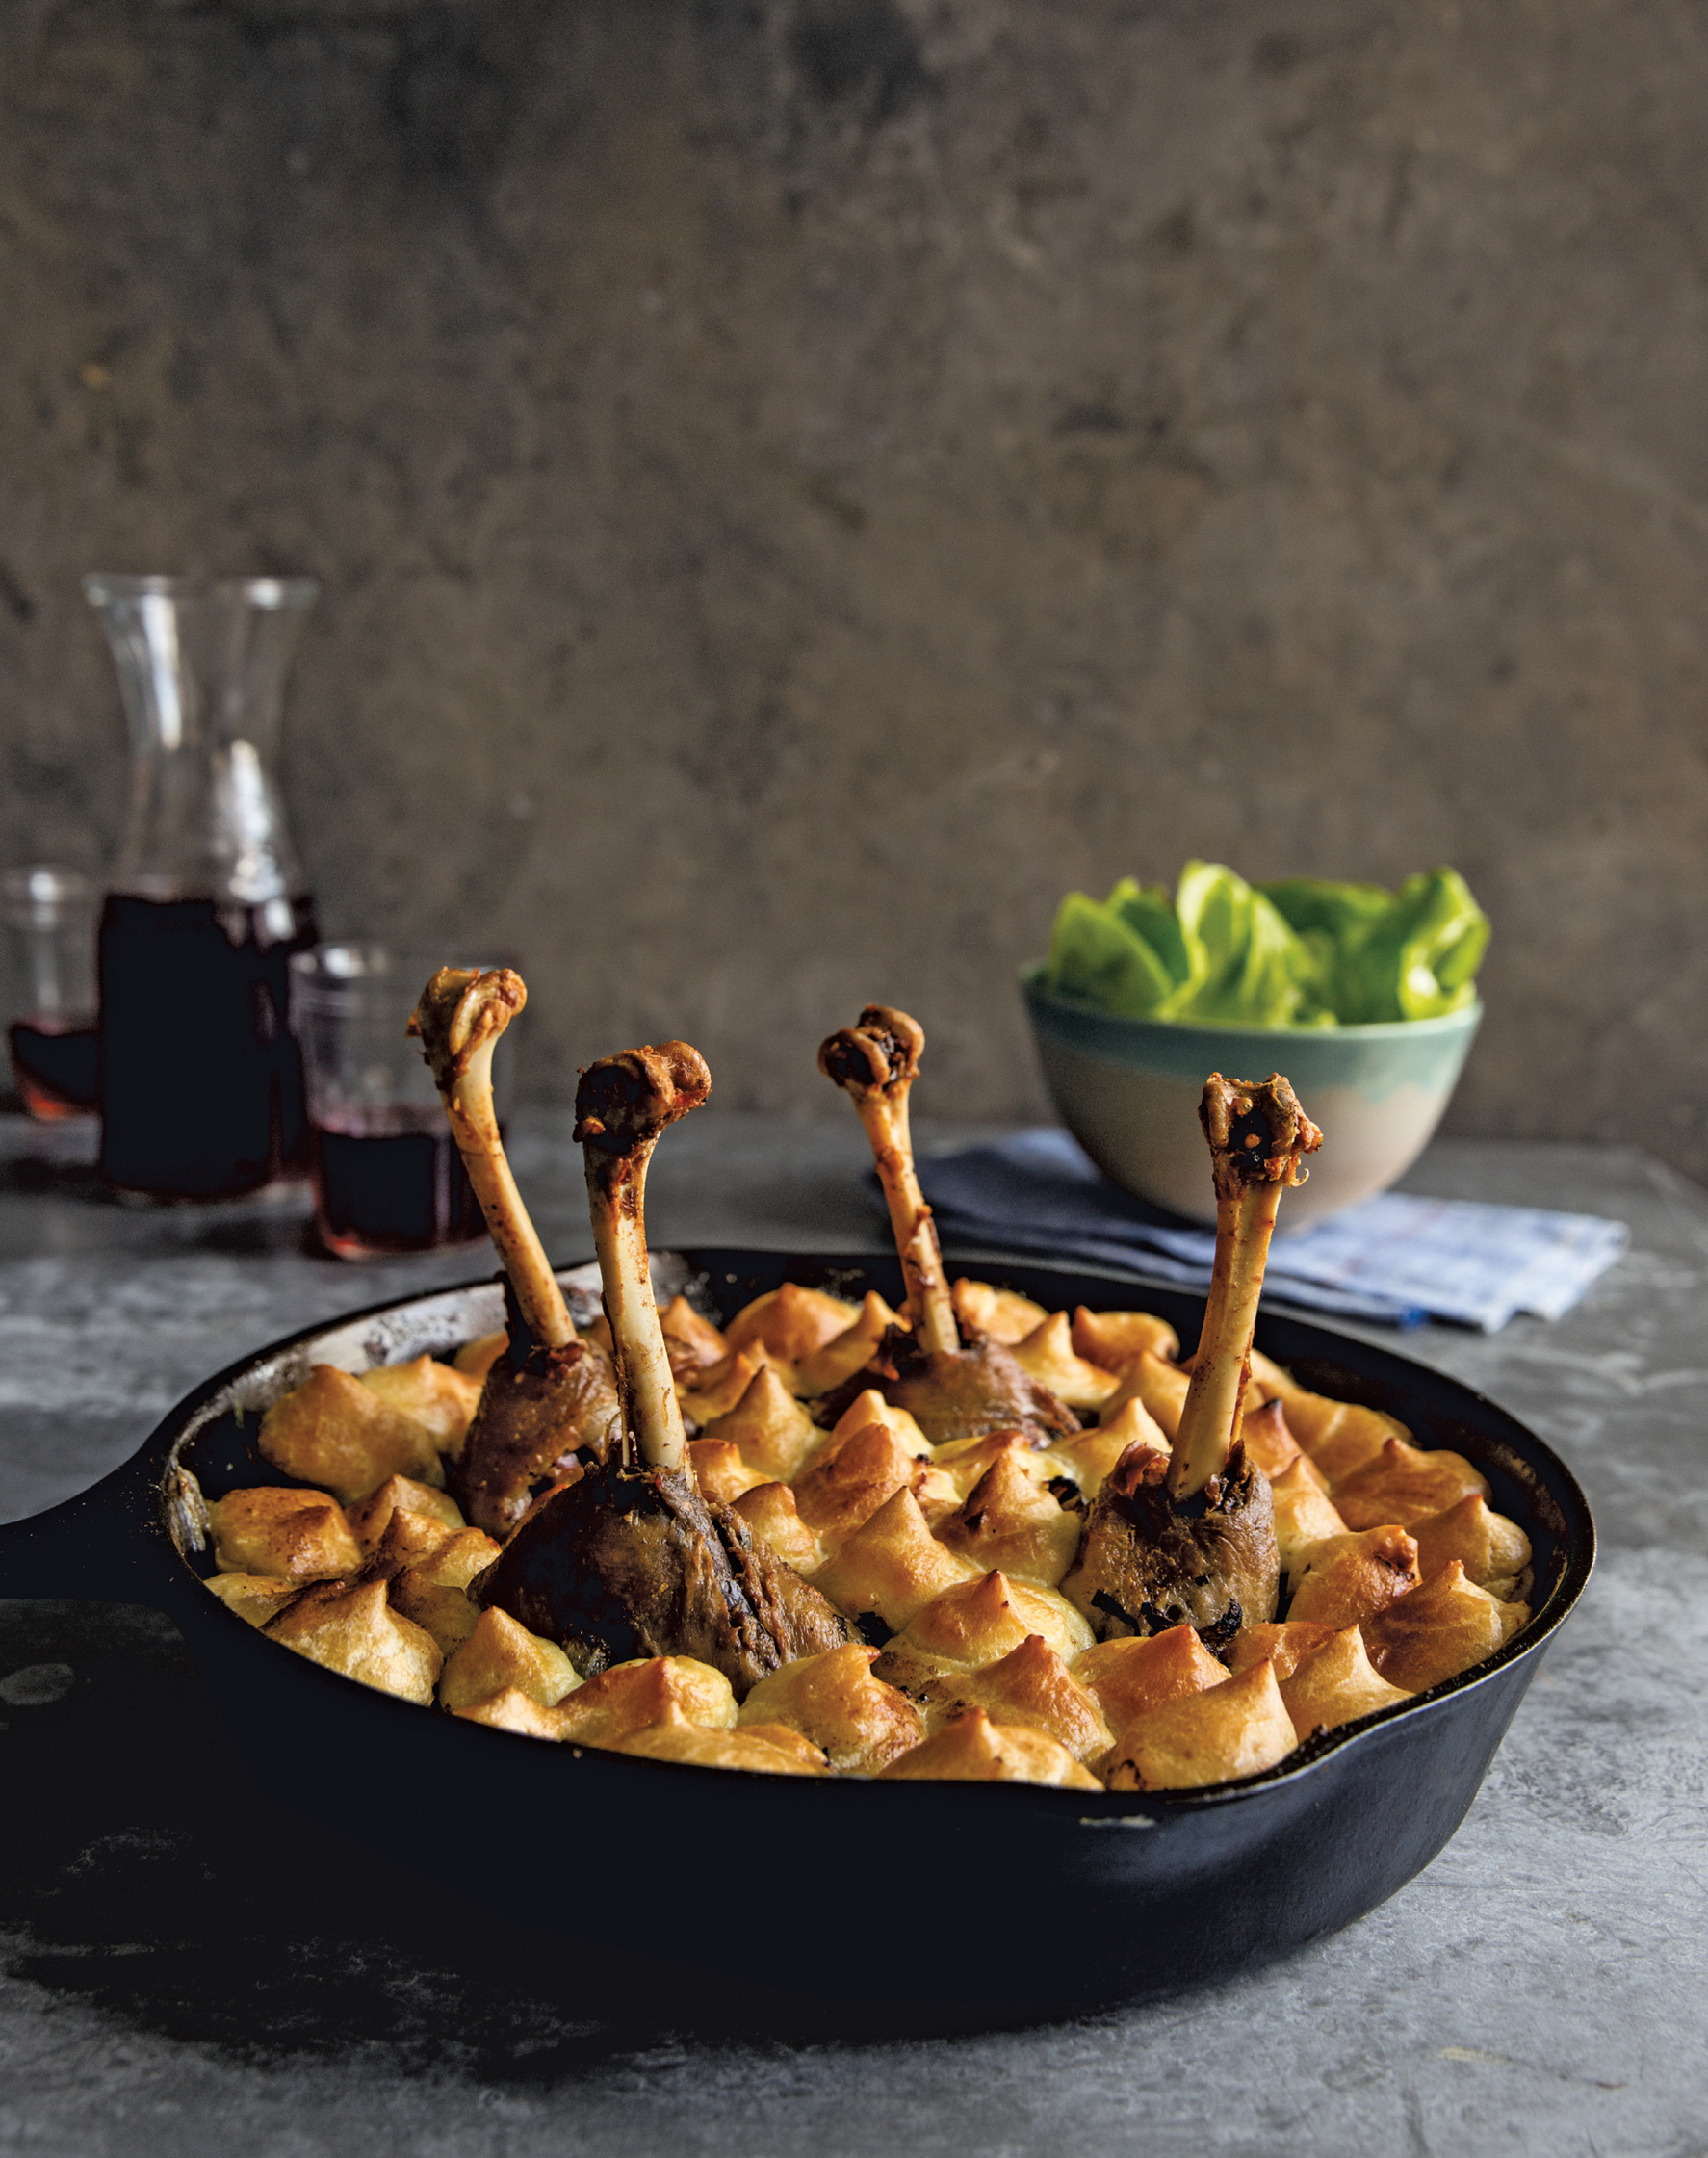
THE “FLYING DUCK” PIE
serves 4 to 6

If ever you’ve wanted to wow your friends, this is your golden opportunity. I started with a simple premise: an updated English meat pie that, first and foremost, could be baked in a cast-iron skillet. What I had in mind was duck—its flesh combined with East Asian flavors and its fat used in the crust. I asked a legit Brit, pastry chef Justin Gellatly of Bread Ahead bakery in London, what he would do. What he suggested went well beyond the limits of my imagination. Nestled into a base of cabbage, the filling is comprised of confitted duck legs and a garlicky potato-celery hash that incorporates some of that slow-cooked leg meat and is seasoned with Chinese five-spice, a powder of Sichuan peppercorns, fennel seeds, star anise, cloves, and cinnamon. A pâte à choux dough—the stuff of éclairs and gougères—gets piped around the whole thing, in little Hershey’s Kiss–shaped peaks. The completed masterpiece looks like a mountain of licking flames with the tips of four duck bones protruding—something straight out of a Game of Thrones banquet.
This “mountain” appears much harder to scale than it actually is. Each component, including the pastry, can be made in the skillet, on the stove. As the pie bakes, the choux blobs balloon and, eventually, brown to form a proper crust. What isn’t as easy is piping it neatly and uniformly. But no matter how rough or shoddy your creation seems before you put it in the oven, it will turn out better than you expected.
FILLING
1 tablespoon duck fat
1½ cups large-diced onions
6 garlic cloves
1 celery stalk, thinly sliced
¾ teaspoon Chinese five-spice powder
1 cup small-diced peeled potato (russet ideally)
CHOUX
1 cup duck fat (you can use the fat rendered when you make Confit Duck Legs with Garlic)
1¾ cups bread flour
Pinch of salt
6 large eggs
3 cups thinly sliced green or napa cabbage
1 Confit Duck Legs with Garlic; see Notes)
1¼ cups (10 ounces) chicken or duck stock
⅝ cup (5 ounces) English-style pale ale
2 teaspoons soy sauce
¼ teaspoon Chinese five-spice powder
Coarsely chopped fresh flat-leaf parsley, for garnish
1 Make the filling: Preheat a 10-inch cast-iron skillet on the stovetop, gradually increasing the heat from low to medium. When the pan is hot, add the duck fat and tilt to coat. When the fat is hot, add the onions, garlic, celery, and the five-spice powder. Sweat the vegetables for about 10 minutes, until they soften. Add the potato and sauté for 10 minutes or so more, until tender. Transfer the mixture to a medium bowl to cool.
2 Make the choux: In a 10-inch cast-iron skillet, combine 2 cups water and the duck fat and bring to a boil over medium-high heat. Remove from the heat and stir in the flour and salt to form a pastelike mixture. Put the pan back on the stove over medium heat and cook the paste for 2 to 3 minutes, stirring until it pulls away from the sides of the pan and starts to stick to the bottom. Remove from the heat and leave the paste to cool completely, at least 30 minutes.
3 Using a wooden spoon, beat in the eggs, one at a time, mixing each into the paste completely before adding the next one, until they’re all incorporated and the mixture is glossy and smooth. Place the mixture in a bowl, cover with plastic wrap, and pop in the fridge for 1 hour.
4 Assemble the pie: Preheat the oven to 350°F. Place the cabbage on the bottom of the skillet. On top of that, layer the picked meat from the confit duck legs and the confit garlic. Nestle the 4 drumsticks in the pile of duck meat and cabbage, upside-down, so the bones are sticking up straight. Sprinkle the vegetable mix on top of the meat, working around the drumstick bones. In a small bowl, combine the stock, ale, and soy sauce, then pour the mixture into the skillet. Sprinkle the five-spice powder over the contents of the pan.
5 Remove the choux paste from the refrigerator and fill a large piping bag with it. You can either fit the bag with a ½-inch nozzle or else cut the tip of the bag at a 45-degree angle. Pipe ¾-inch rounds, giving them little peaks (so they look like little flames or Hershey’s Kisses), all over the pie, going from the outside in, until the entire surface of the skillet is covered, with just the leg bones sticking out.
6 Bake the pie for about 90 minutes, until the pastry is golden brown and firm to the touch. Remove from the oven and garnish with the chopped parsley.
NOTES
• “Confit” is the word used to describe both the method for and outcome of preserving a food in fat. It involves salting the item, then slowly cooking it in fat until the meat browns and is fork-tender. Placed in a sealed container and covered with the strained, rendered fat, it will keep in the refrigerator for months.
• To prepare a confit duck leg that has been chilled, remove any excess fat that might have stuck to the meat. Place it skin-side down in a cast-iron skillet over medium-high heat and cook it for a few minutes, so the skin gets crispy and the rest warms through. You can order confitted duck legs and rendered duck fat. But you’d lose some of the flavor you get from following Justin’s brining process, and, in turn, the fat rendered from the duck legs that were seasoned that way.
CONFIT DUCK LEGS WITH GARLIC
makes 4 duck legs
4 duck legs (about ½ pound each)
6 tablespoons coarse sea salt
12 whole black peppercorns
2 fresh bay leaves
1 head garlic, sliced in half
1 pound plus 1 tablespoon duck fat, plus 2 teaspoons
1 In a deep tray or baking dish, place the duck legs in one layer. Sprinkle them with the salt, then rub them all over with it. Add the peppercorns, bay leaves, and garlic and rub those over the duck legs, too. Place the tray in the refrigerator and let the duck brine for 2 days.
2 When the duck legs are ready, take them out of the refrigerator. Remove the bay leaves and garlic and set them aside while you rinse the duck legs in cold water to remove all the salt. Place the duck legs in a bowl, cover them with fresh cold water, and soak them for 10 minutes. Rinse the duck legs again, place them back in the bowl with fresh cold water to cover, and soak them for another 10 minutes. Dry them with a kitchen towel or super-absorbent paper towel.
3 Set a 10-inch cast-iron skillet on the stovetop, place the duck legs, garlic, and bay leaves in it, and spread the duck fat over it. Cook over low heat for about 15 minutes, melting the fat so it covers the duck legs. Bring the fat to a gentle simmer, adjusting the heat as needed to maintain the simmer, and confit the legs for 3 to 4 hours, until the duck meat starts to give easily, almost falling off the bone.
4 Remove the skillet from the heat and let the duck begin to cool in the fat. Once the pan is no longer too hot to touch, strain the fat through a fine-mesh sieve, into a resealable container for later use. Leave the other contents in the skillet to continue cooling. Once the duck has reached room temperature, remove it from the pan and place it on a cutting board. Using a knife, separate the drumstick, bone intact, from the rest of each leg and, after removing its skin, set it aside. Remove all the meat from the rest of the duck legs and place it in a small bowl, discarding the skin and small bones. Squeeze the softened garlic cloves out of their skins and add the confitted garlic to the bowl. If any cloves have fallen out of the bulb during the cooking process, pick them out of the skillet and add them to the bowl, too. Discard the bay leaves and rinse and dry the skillet.
CHALLAH D’EPICES
makes 1 challah

One of the rituals for Rosh Hashanah, the Jewish New Year, is the eating of apples and honey to usher in a “sweet” year. Not long ago, I was hit with a sudden rush of filial devotion and thought I’d show up to my family’s celebration of that event with a homemade challah that featured those auspicious ingredients. It was my first challah, and it was not baked in a cast-iron skillet. It made me proud, and it made my father, who gets extra solemn around the high holidays, happy. This is my second challah; it is baked in a cast-iron skillet. It makes me even prouder, and, possibly, my father less happy. Redolent with the flavors of a traditional pain d’epices—a French spice cake—it is the sort of thing that someone like me, who grew up celebrating both Hanukkah and Christmas, would come up with—a challah with a gingerbread soul.
DOUGH
3¼ cups unbleached bread flour, plus more for dusting
¼ cup rye flour
1¼ teaspoons ground cinnamon
1¼ teaspoons ground ginger
¼ teaspoon ground cardamom
¼ teaspoon ground white pepper
2 star anise pods, ground (¼ teaspoon to ⅜ teaspoon)
⅛ teaspoon freshly grated nutmeg
⅛ teaspoon ground cloves
3 tablespoons plus 1 teaspoon butter, plus softened butter for greasing
¾ cup warm water (110° to 115°F)
⅓ cup buckwheat honey
2 large eggs
3 large egg yolks
1 tablespoon finely grated orange zest
2 teaspoons active dry yeast
2 teaspoons coarse salt
GLAZE
4 tablespoons (½ stick) unsalted butter
¼ cup buckwheat honey
2 tablespoons plus 2 teaspoons fresh orange juice
1 star anise pod
¼ teaspoon ground cinnamon
¼ teaspoon ground ginger
1 Make the dough: In a large bowl, stir together the flours, cinnamon, ginger, cardamom, white pepper, star anise, nutmeg, and cloves with a whisk until well combined.
2 Grease a separate large bowl with butter to prevent the dough from sticking. In a small saucepan, melt 2 tablespoons of the butter and let it cool for a few minutes. Pour the melted butter into the greased bowl; add the flour mixture, warm water, honey, eggs, egg yolks, orange zest, yeast, and salt. Using a rubber spatula or wooden spoon, mix the ingredients until they come together into a dough. (As it gets harder to stir, you may want to work with your hands.)
3 Turn the dough out onto a floured surface and knead for 10 minutes, until the dough looks smooth and feels pliant. It will be relatively wet and sticky when you start kneading it, and you will probably need to continue to dust more flour onto your work surface as you go. Once the dough stops sticking to the surface, you will know it’s ready.
4 In a small saucepan, melt 1 tablespoon of the butter over low heat and let it cool for a few minutes. Place the kneaded dough back in the greased bowl and brush the dough with the melted butter. Cover the bowl with a kitchen towel or plastic wrap, set it in a warm place, and let the dough rise for 90 minutes or until it doubles in volume.
5 Punch the down dough, cover it again, and let it rise and double in size again, giving it at least another 45 minutes. Meanwhile, in a 10-inch cast-iron skillet, melt the remaining 1 teaspoon butter over low heat. Remove from the heat and brush the melted butter over the bottom and sides of the pan to coat.
6 Turn the dough out onto a lightly floured surface and, using a bench scraper or sharp knife, split it evenly into halves. With both hands, roll one half out into a thick, foot-long rope. Do the same with the second half. Coil the first rope into a circle and put it in the center of the buttered skillet. Then wrap the second rope around the first, tucking the edges of the outer rope under those of the inner coil to connect the 2 ropes (see photographs).
7 Butter a piece of plastic wrap and cover the dough in the pan. Let it rise one more time for about 45 minutes. Meanwhile, preheat the oven to 375°F with a rack placed in the lower third of the oven.
8 Make the glaze: In a small saucepan, combine the butter, honey, orange juice, and star anise pod and bring to a simmer over medium-low heat. Remove from the heat and stir in the cinnamon and ginger. Let the glaze cool in the saucepan for a few minutes, leaving the star anise to steep. Brush the dough liberally with the glaze (about 2 tablespoons), reserving the rest.
9 Bake the bread until it is golden brown and sounds hollow when you knock on it (the true test of whether a challah is cooked or not), about 35 minutes. As soon as the challah comes out from the oven, brush it with another liberal coating of the glaze (about 2 tablespoons). Leave it in the skillet for a couple of minutes to set before transferring the challah to a wire rack to cool for about 30 minutes. You should be able to lift it out of the pan quite easily with a spatula.
10 Reserve any remaining glaze and leftover, stale challah to make Gingerbread Challah Bostock.
PISTACHIO-CHERRY DANISH
makes 1 large Danish

New Year’s Eve is a holiday I have little patience for and barely celebrate. I have two methods of coping: either leaving the country for someplace that isn’t teeming with tourists and Best Night Ever! cavorters, or staying home in my pajamas, drinking champagne, and eating something outrageously luxurious while watching old movies. A few years ago I was going with Option 2 and hadn’t figured out what my lavish culinary indulgence would be. Then I read something Amanda Hesser wrote about her mother’s Danish, and I became dead set on perfecting my own. There was no kneading required, and I just had to proof the dough overnight in the fridge. Filling and twisting it was just as painless. It was so good, I didn’t bother to let it cool and wait for the stupid ball to drop. I stood in my kitchen, ignoring everything else, as I stuck my fork in a slice, repeatedly, before cutting a second, larger piece. Later, when I got the idea of using pistachio paste in the filling, I knew I was going to see fireworks. Cherry and pistachio are a pastry power couple; theirs is a lusty, electric love for the ages. That first taste of Danish is like one of those Crash Davis–style “long, slow, deep, soft, wet kisses that last three days.” And now December 31 can’t come soon enough.
DOUGH
¾ cup whole milk
1 vanilla bean
¼ cup warm water (110° to 115°F)
2¼ teaspoons active dry yeast (one ¼-ounce packet)
½ cup sugar
1 teaspoon salt
2 large eggs
5 to 5½ cups sifted unbleached all-purpose flour
¼ teaspoon ground cardamom
8 tablespoons (1 stick) unsalted butter, at room temperature
FILLING
⅔ cup dried cherries
¼ cup dark rum or other dark liquor
2 egg whites
¾ cup packed pistachio paste
2 tablespoons sugar
4 tablespoons (½ stick) unsalted butter, at room temperature
Zest of 1 lemon
1 teaspoon unsalted butter
1 egg yolk, for the egg wash
¼ cup coarsely chopped pistachios, for sprinkling
1 teaspoon sugar, for sprinkling
⅛ teaspoon salt, for sprinkling
1 Make the dough: Place the milk in a small saucepan. Split the vanilla bean in half and scrape the seeds out into the saucepan. Add the scraped, split pod to the pan, too. Warm the milk over medium heat, bringing it just under a boil. When you see little bubbles around the rim and the milk is steaming, remove the pan from the heat and let the milk cool to lukewarm.
2 Pour the warm water into the bowl of a stand mixer fitted with the dough hook (or a large bowl); sprinkle in the yeast and stir to dissolve.
3 Add the lukewarm milk, sugar, salt, eggs, 1 cup of the flour, and the cardamom and mix together on low speed. Add the butter and mix to combine. Beat in 2 cups of the flour until the mixture is smooth. Add enough of the remaining flour to form a supersoft dough. Knead it in the mixer with the dough hook, or turn it out onto a work surface dusted with flour and knead it by hand for 3 to 4 minutes, until the dough is supple and silky smooth and small blisters develop just under its surface. Put the dough in a large well-greased bowl, turning the dough over so it’s greased-side up. Cover the bowl with plastic wrap and refrigerate overnight.
4 The next day, take the dough out of the refrigerator and punch it down. Transfer it from the bowl to your countertop and cover it with a kitchen towel. Let it rise a second time, at room temperature, for up to 90 minutes, or until almost doubled in size.
5 While the dough rises, make the filling: In a small saucepan, combine the cherries, rum, and ¼ cup water. Bring the mixture to a simmer, cook it for 2 minutes, then remove it from the heat and let it cool. Drain the liquid from the mixture and set the cherries aside in a small bowl.
6 In a food processor, pulse the egg whites until they’re foamy. Crumble in the pistachio paste and pulse again until it’s thoroughly combined and smooth. Add the sugar and butter and pulse again to incorporate. Using a rubber spatula, scoop the mixture into a medium bowl. Add the lemon zest and stir to combine.
7 Assemble the Danish: Preheat the oven to 350°F. Line a baking sheet with parchment paper. In a 10-inch cast-iron skillet, melt 1 teaspoon butter over low heat. Brush the melted butter over the bottom and sides of the pan to coat.
8 Turn the dough out onto a lightly floured work surface. Cut it into 4 equal pieces; you will be making 2 twists. Roll each piece out to a 5 by 12-inch rectangle. Using a rubber spatula or the back of a spoon, spread one-quarter of the pistachio paste mixture on each rectangle; dot each with one-quarter of the drained cherries. Roll each piece up from the long side, jelly-roll style. Pinch the edges and ends well to seal the seams and help keep the filling inside the dough. Place 2 of the filled rolls side-by-side, seams down. Twist one roll over the other, as tautly as possible, forming a thick rope. Pinch the ends of the twist to fuse the rolls together, and tuck or twist any less-than-pretty areas under, out of view. Repeat with the remaining rolls.
9 Coil the first twisted rope into a small, tight, snaillike spiral circle and place it in the center of the skillet. Wrap the second twisted rope around it, tucking the edges under the inner coil to connect the two ropes.
10 Beat the egg yolk with 2 tablespoons water to make an egg wash and brush the dough with it. Sprinkle the pistachios over the top, followed by the sugar and the salt. Cover the pan and let the dough rise once more until doubled in size, about 40 minutes.
11 Bake the Danish until it’s browned and cooked through, 30 to 35 minutes, rotating the pan 180 degrees halfway through. Remove it from the oven, leaving it in the skillet for a couple of minutes to set before transferring it to a wire rack to cool for about 30 minutes. You should be able to lift it out of the pan quite easily with a spatula. This is best eaten the same day it’s baked. I don’t even let mine cool; it’s a bit messier, but I can’t help myself.

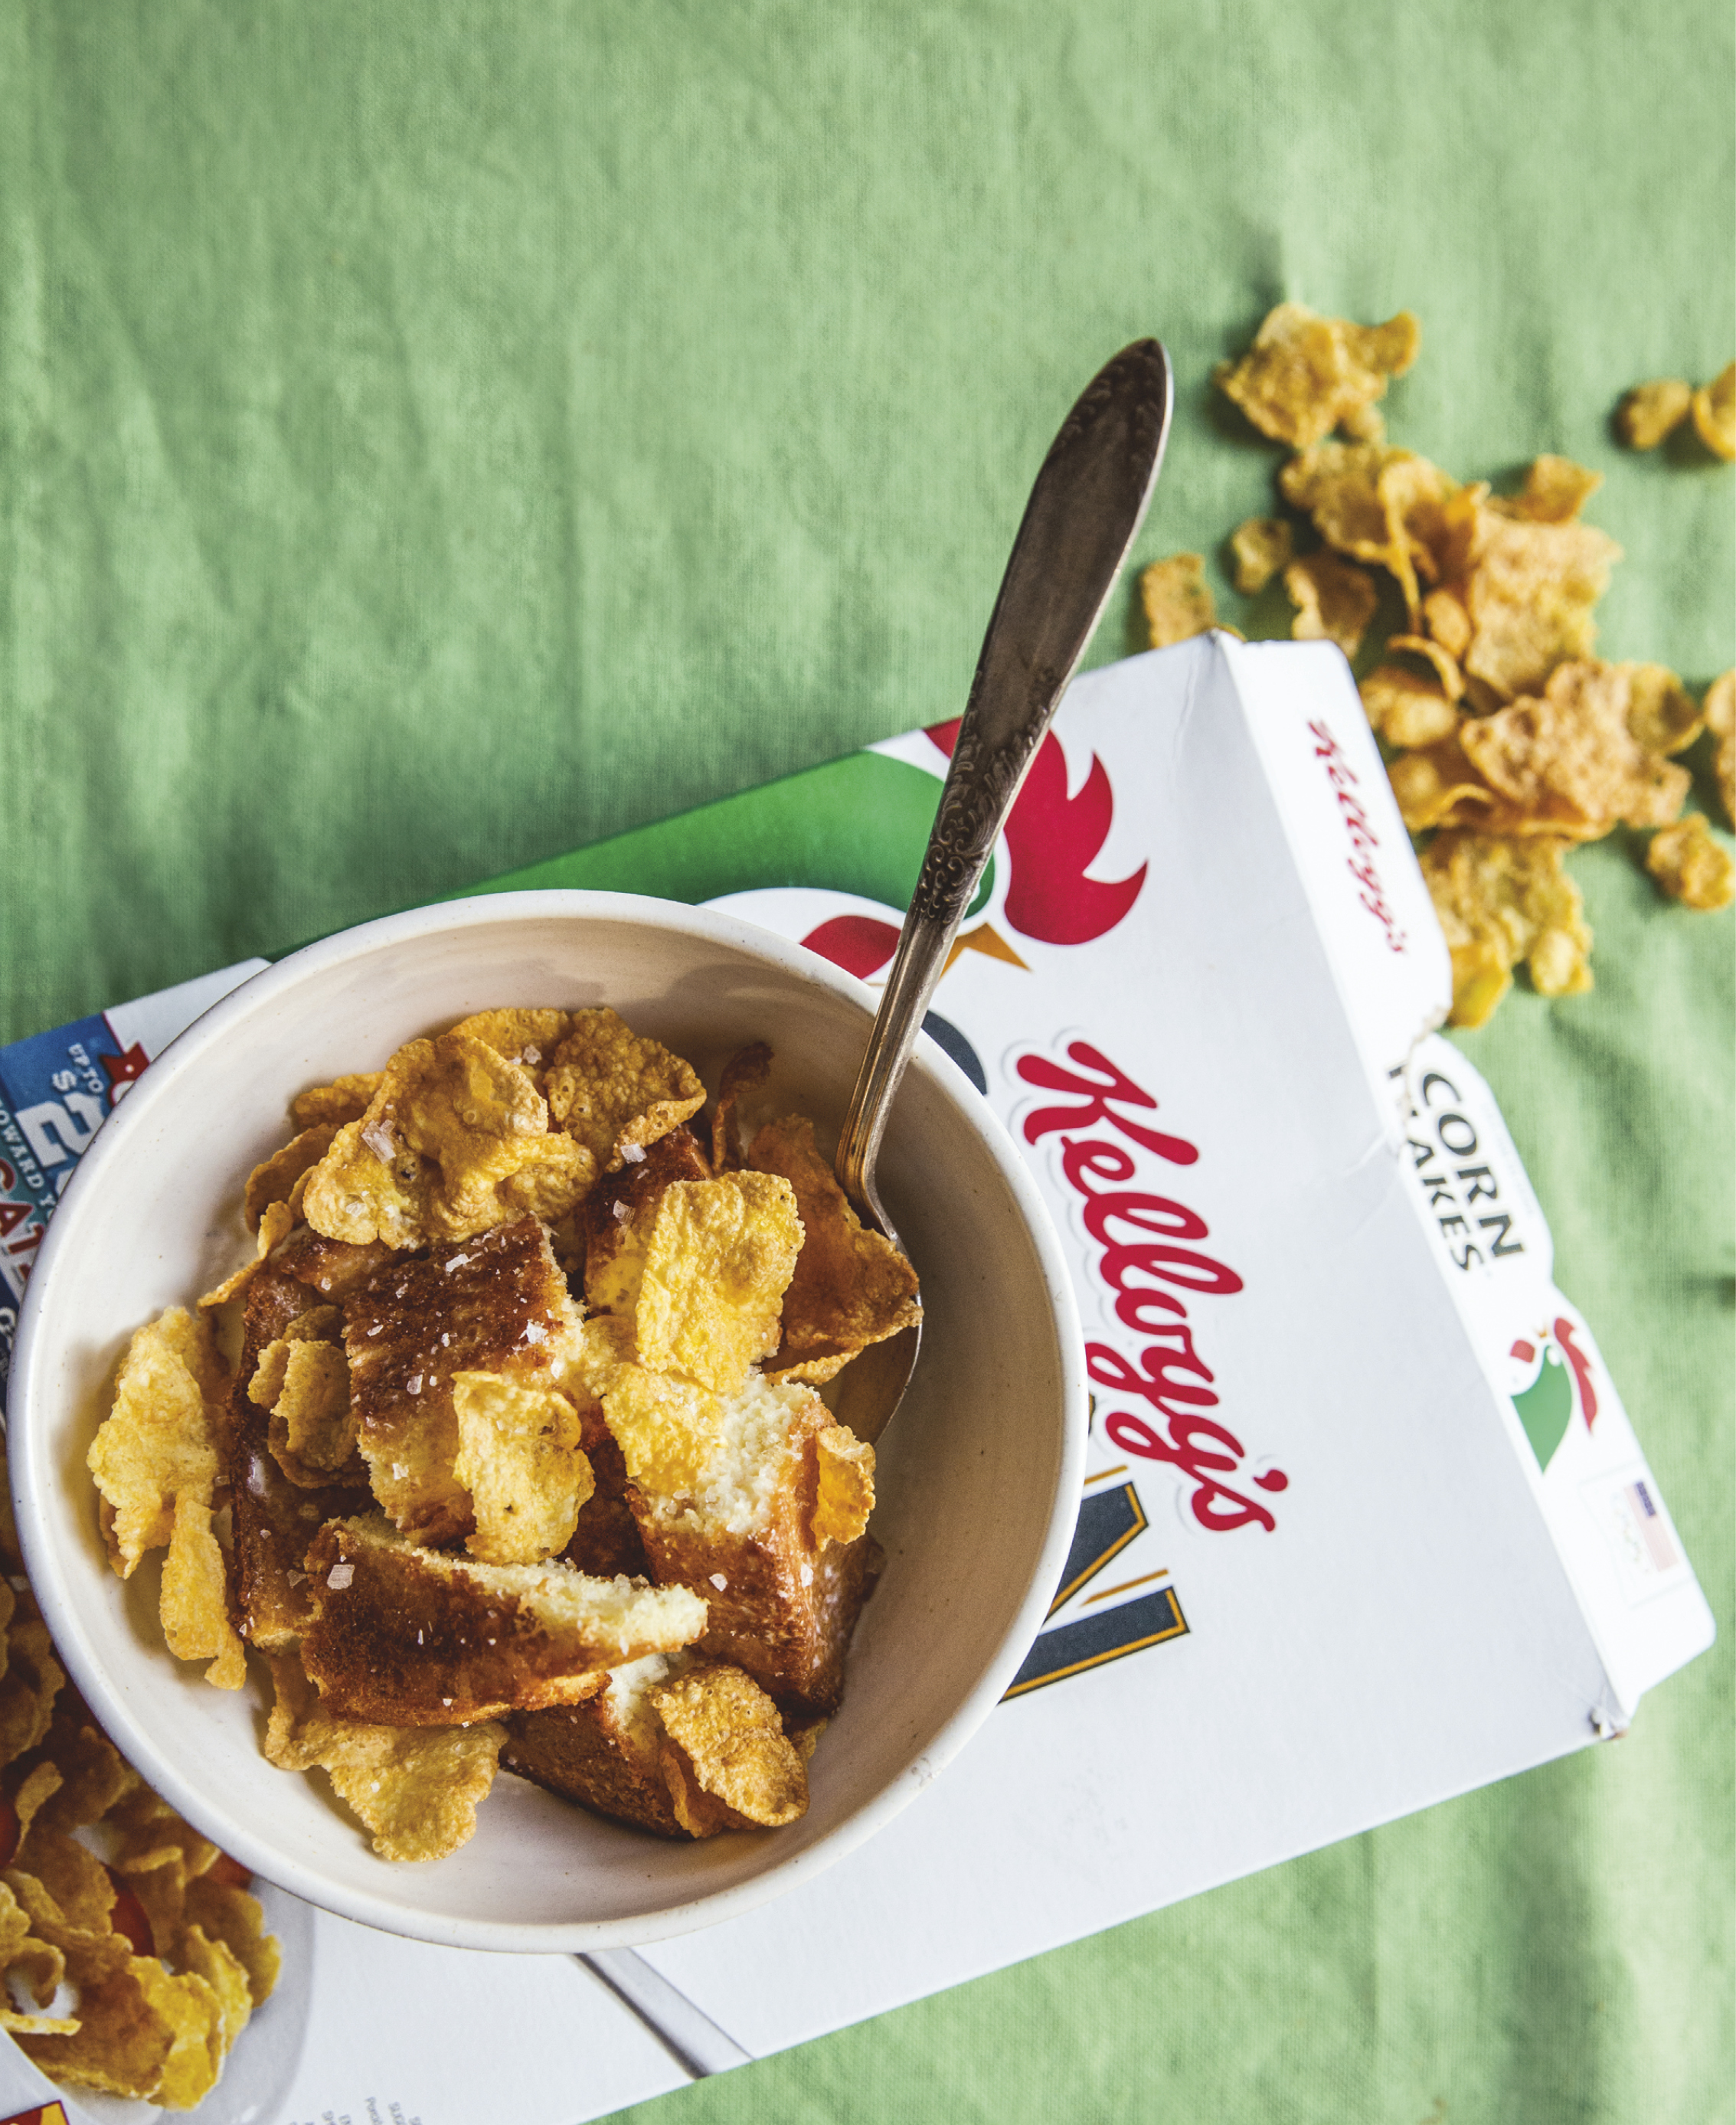
CORNFLAKES-N-MILK CAKE
serves 4 to 6

While you’d typically make a layer cake using “normal” circular aluminum baking pans, isn’t it nice to know you don’t need them? That you can do it with a single cast-iron skillet? A tribute to baker Liz Lorber in Atlanta, who introduced me to Hot Milk Cake and got my wheels turning, this recipe also reminds me of my father. He’s almost always on a diet, and whichever one it is, it usually forbids cereal. Sometimes he’ll say, with such longing, that all he wants is a simple bowl of cornflakes and milk—or even better, cornflakes and cream. Poor Dad! If only he wasn’t on a diet, again, I’d cut him a square of this crunchy-coated, fluffy cake.
BATTER
1½ cups cornflakes
1½ cups cold whole milk
3 large eggs
1½ cups sugar
6 tablespoons (¾ stick) plus 2 teaspoons unsalted butter
1½ cups unbleached all-purpose flour
½ teaspoon salt
1½ teaspoons baking powder
1 teaspoon vanilla extract
CORNFLAKE GANACHE
3⅔ cups cornflakes
1⅓ cups heavy cream
10 ounces Valrhona Dulcey Blond Chocolate, finely chopped
1½ tablespoons unsalted butter, cut into 3 pieces and softened
⅜ teaspoon salt
1 Make the batter: Preheat a 10-inch cast-iron skillet on the stovetop, gradually raising the heat from low to medium. When the pan is hot, add the cornflakes and toast for about 6 minutes, shaking the pan frequently and vigorously, and watching to make sure they don’t burn. Transfer the cereal to a 5½-inch strainer.
2 Place the strainer with the toasted cornflakes in a small saucepan. Pour the cold milk over the strainer into the saucepan, so that the cereal is immersed in the milk. Cover and warm the milk over medium-low heat. Bring the mixture just below its boiling point; when you see little bubbles around the rim of the milk, remove it from the heat (this should take up to 10 minutes, but you should check your milk at 7 or 8 minutes, to be safe). Let the mixture sit, covered, for 45 minutes.
3 While the cornflakes are steeping in the milk, preheat the oven to 350ºF with a 10-inch cast-iron skillet in it.
4 In the bowl of a stand mixer fitted with the whisk, beat the eggs until foamy, starting on medium-low and increasing the speed as you go. Whisk the sugar in gradually and continue beating until the mixture is thick and glossy.
5 Remove the strainer from the milk and discard the cornflakes. Measure out ¾ cup of the infused milk and discard the remainder. Return the reserved milk to the saucepan and add the 6 tablespoons butter. Cook over medium heat, stirring, until the butter melts.
6 In another bowl, sift together the flour, salt, and baking powder. Using a rubber spatula, fold the dry ingredients into the egg-sugar mixture. Add the buttery milk all at once and stir just to combine. Add the vanilla and stir again to incorporate.
7 Remove the heated skillet from the oven and add 1 teaspoon of the butter, letting it melt and brushing it to coat the bottom and sides. Pour half the batter (2 cups) into the prepared pan. Bake for 25 minutes, or until just done, when the top is golden brown and the edges are crispy. Insert a cake tester and it should come out clean. You’re looking for a moist crumb. Leave the cake in the skillet for 2 minutes before using a spatula to loosen it from the sides of the pan. Get under it with the spatula to make sure it isn’t sticking to the bottom of the skillet. Using the Upside-Down Plate Trick, flip the cake out, then transfer it to a wire rack, placing it down right-side up. Make sure the skillet is free of cake residue, then immediately melt the remaining 1 teaspoon butter in the hot pan, as before, brushing to coat. Pour the remaining batter into the skillet and bake as you did the first cake. Follow the same instructions as above, leaving the second cake on a wire rack so it can cool.
8 Meanwhile, make the cornflake ganache: Toast 1⅓ cups of the cornflakes as above. Place the toasted cornflakes in a 5½-inch strainer and set it in a small saucepan. Pour the cold cream over the strainer into the saucepan, and warm and steep, following instructions in step 2.
9 Remove the strainer from the cream and discard the cornflakes. Measure out ⅔ cup of the infused cream and discard the remainder. Return the reserved cream to the saucepan and bring it to a boil over medium-high heat.
10 Place the chocolate in a medium heatproof bowl. Pour the boiling cream over the chocolate and let it sit for 30 seconds. Using a rubber spatula or whisk, gently stir the cream and chocolate together, first making small circles in the center of the bowl, and then, as the ingredients begin to blend, widening the radius of the circles to incorporate the entire bowlful of cream and chocolate. Once you have a smooth ganache, stir in the butter, one piece at a time, just to combine. It should look like a shiny caramel glaze. Add the salt and stir to combine. Let the ganache rest at room temperature to thicken up so that it’s still pourable and easy to spread.
11 Meanwhile, toast the remaining 2⅓ cups cornflakes as above. Transfer the toasted cornflakes to a bowl and set aside.
12 When both cakes have cooled completely, slice off the round edges of each to yield two 6-inch square layers. (I cut them while they are resting on the wire racks.) Save the scraps for a snack (see Note).
13 On a cake stand or raised plate, place the first 6-inch square layer of cake. Pour ¼ cup of the ganache onto the center of the layer and, using an offset (cake) spatula, spread it over the surface. Add another ¼-cup scoop of ganache and continue to spread it, coating the entire layer so you can’t see the cake beneath it. If you prefer a thicker center seam of ganache, you can add another tablespoon or two, or even a third scoopful. Don’t worry if some spills over the edge.
14 Place the second cake layer on top of the first and frost as above. Spread the spillover around the sides of the layered cube using your offset spatula to dip into and pick up more ganache from the bowl, as needed, smoothing the frosting as you go. Catch any ganache puddles with the spatula and use them to finish coating the sides evenly.
15 Once the entire surface of the cube is coated in a smoothed layer of ganache, use your hands to cover the entire exterior of the cake with the remaining toasted cornflakes, gently patting them on; they should readily adhere to the ganache.
16 Use a damp kitchen towel or paper towel to clean up any drippings on the cake stand, carefully blotting around the perimeter of the cake. Present it, as is, bringing it to the table and slicing it to serve. It should be eaten the same day it’s made, and it’s a small cake, so you don’t have to worry about having leftovers.
NOTE Cake baked in a skillet is slightly sloping, so this recipe calls for trimming the edges of the rounds to turn them into squares, for a cube-shaped result. As I worked on this recipe, I wanted to do something special with those scraps. So, I cubed them and put them in a bowl with heavy cream, extra cornflakes, and a sprinkle of salt. Voilà—a baker’s snack.
SKILLET PANCAKE SOUFFLÉ
serves 4 to 6

Chef Pichet Ong was so excited about this cast-iron baking project that he offered me a prized recipe as a gift. This pancake-flavored soufflé—a billowing, golden-rimmed vision, rising out of a skillet—is unbelievable. Dutch baby pancakes never get so tall, and whatever height they have deflates before you can pull them out of the oven. Pichet managed to create something with a cloudlike interior that, even in a wide pan, could swell and hold its shape. It is barely sweet, so you can sauce or sprinkle it according to your mood. Coat the top with confectioners’ sugar, spoon it onto a plate with a few dollops of raspberry jam or orange marmalade, perhaps, and dig right in. If you want to play up the pancake factor and bring some old-fashioned fine dining to the experience, serve it in its skillet tableside, pouring a warm, Grand Marnier–spiked maple-syrup sauce and some fresh berries into the center of the soufflé. Or, for less drama and more practicality, I leave the sauce in a pitcher, so people can drizzle it over as generously as they like.
1 cup unbleached all-purpose flour
1 teaspoon baking powder
2¾ cups buttermilk
½ teaspoon salt
3 tablespoons unsalted butter
⅓ cup plus ½ teaspoon sour cream
½ teaspoon vanilla extract
1 tablespoon Grand Marnier
4 large egg yolks (see Notes)
5 large egg whites (see Notes)
⅛ teaspoon cream of tartar
¼ cup plus 1 tablespoon granulated sugar
Confectioners’ sugar, for dusting
Orange–Maple Syrup Sauce, for serving
1 Sift the flour and baking powder together into a medium bowl.
2 In a large, high-sided saucepan, stir together the buttermilk and salt. Add 2½ tablespoons of the butter and bring the mixture to the brink of boiling over medium-high heat (you should see smoke coming off the surface and lots of frothy bubbling action around the edges). Stir it occasionally to incorporate the melting butter. Using a whisk, add the flour mixture and cook for about 1 minute, until a smooth paste forms, whisking vigorously and continuously to avoid having too many lumps. Remove it from the heat.
3 Add the sour cream, vanilla, and Grand Marnier and whisk aggressively to combine. Vigorously whisk the egg yolks into the mixture, making sure to incorporate them thoroughly. Transfer the batter to a large bowl to cool down a bit; it should remain warm.
4 Preheat the oven to 350ºF with a 10-inch cast-iron skillet placed on a rack in the middle of the oven.
5 In the bowl of a stand mixer fitted with the whisk (or in a medium stainless steel or copper bowl using a whisk), beat the egg whites and the cream of tartar on medium speed for 2 minutes, until the whites are frothy. Gradually add ¼ cup of the granulated sugar and continue to whip for another 3 to 4 minutes, until the whites hold medium peaks.
6 Fold half the meringue into the batter to lighten it up. Once the first half of meringue is fully incorporated, fold in the remaining half.
7 Remove the hot skillet from the oven and add the remaining ½ tablespoon butter. Once the butter has melted, brush it over the bottom and sides of the skillet to coat. Sprinkle the base of the skillet with the remaining 1 tablespoon granulated sugar. Pour the batter into the prepared pan, using an offset spatula to smooth out and even off the top. Bake for about 25 minutes, until the top is dry, the edges are beginning to brown, and the pancake rises to about twice the height of the batter. Do not disturb your soufflé while it’s baking; leave the oven door shut!
8 Serve the hot soufflé in the skillet. Dust it with confectioners’ sugar (about 1 tablespoon) and serve it with the warm Orange–Maple Syrup Sauce on the side.
NOTES
• Eggs are best separated cold, but for maximum volume, egg whites are best beaten into meringue at room temperature. Get your yolks and whites sorted ahead of time, then let them come to room temperature before starting the rest of the recipe.
• This batter can be made ahead of time and refrigerated overnight.
ORANGE–MAPLE SYRUP SAUCE
makes about ¾ cup
¾ cup maple syrup
1 tablespoon Grand Marnier
Zest of ½ orange
1 tablespoon butter
¼ teaspoon salt
½ cup fresh raspberries and/or blueberries
1 In a small saucepan, cook the maple syrup over medium heat for 6 to 8 minutes, reducing it in volume, until the first sign of smoke.
2 Remove the pan from the heat, add the Grand Marnier, orange zest, butter, and salt and whisk together, just until the butter has melted and all the ingredients are incorporated. Add the berries, giving them a quick, gentle stir with a wooden spoon to combine.
WHOLESOME APPLE-QUINCE PIE
serves 10 to 12
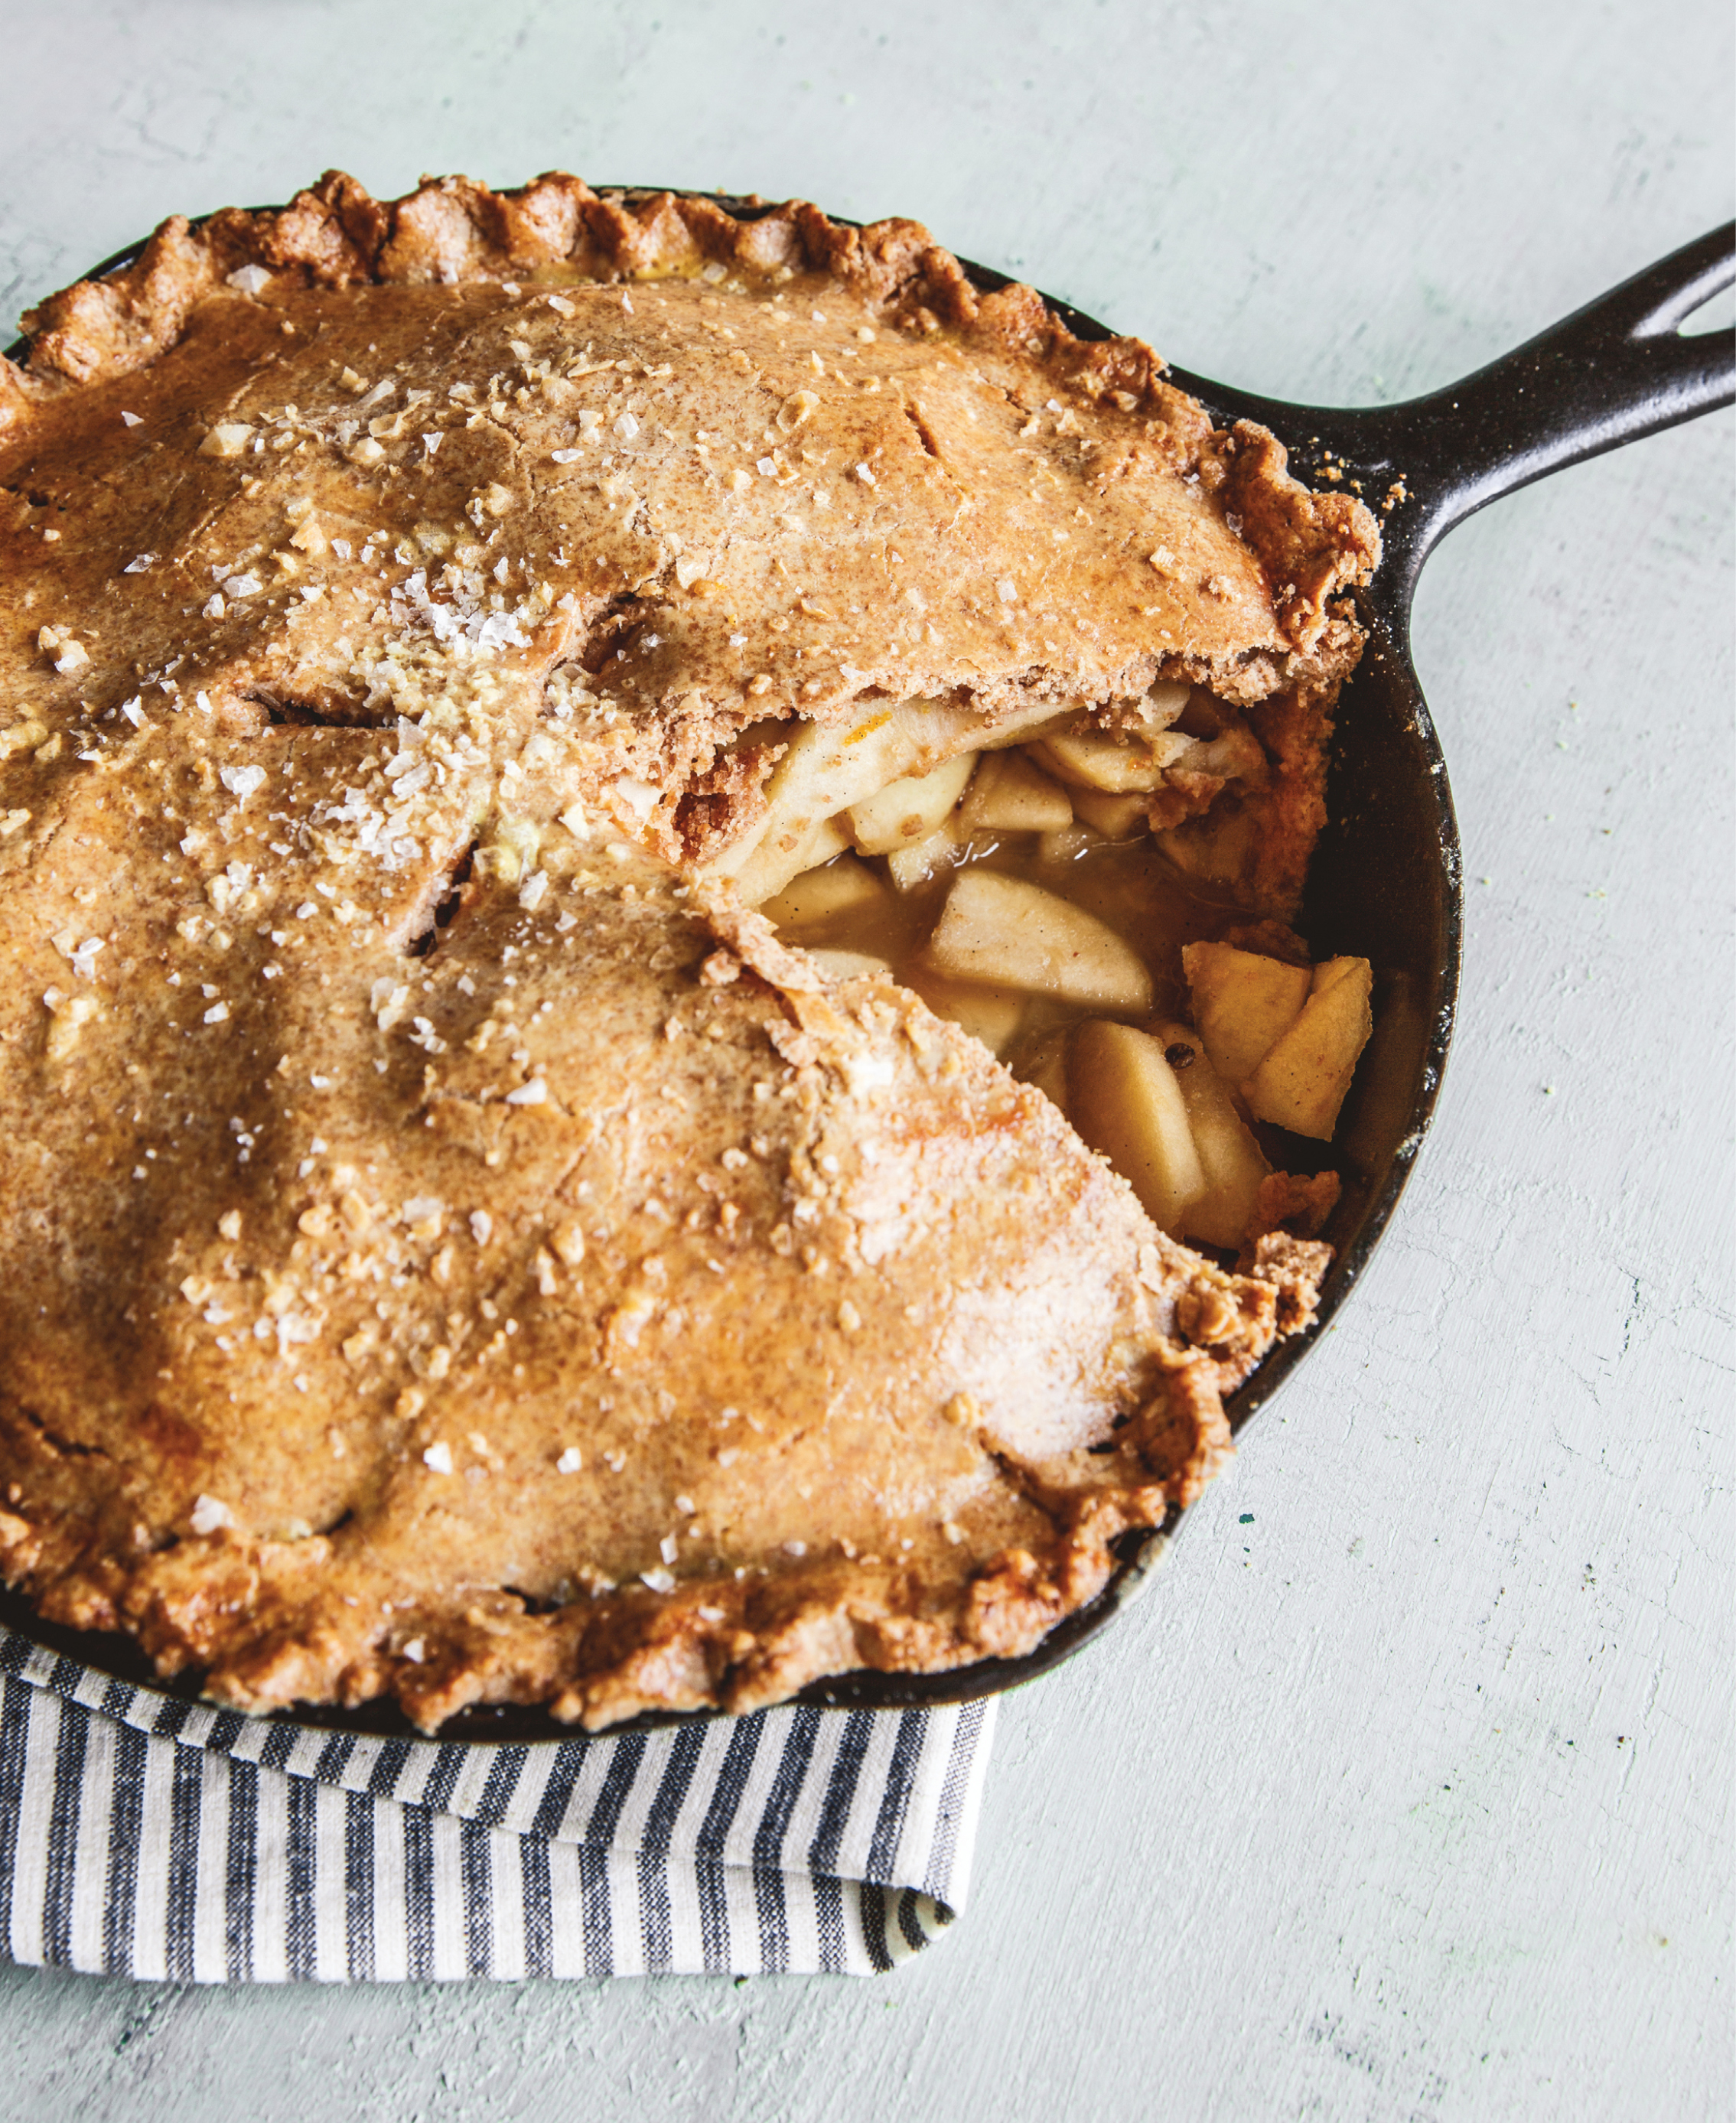
I love Heather Lanier’s approach to pie. As the owner of the farm, wellness retreat, and cooking school Hill of the Hawk in Big Sur, she makes pies that are stripped down so you can taste each ingredient, highlighting the fruit, which, lucky her, comes straight off the trees a few feet away from the counter where she rolls out her dough. Every note of Heather’s recipe—apple, quince, spelt, and butter—strikes clearer, louder.
The crust is as easy as you-know-what. It’s all done by hand, in a matter of moments, while the apples and quince are macerating in their spices and some sugar. Best of all, you don’t even need to stop to chill the dough. Straight into the oven it goes and an hour later, it’s ready. Pure pie, that’s what it tastes like.
FILLING
2 medium quince
Juice of 1 orange
1½ cups white wine
2⅔ pounds apples
1 vanilla bean, split lengthwise and seeds scraped
⅛ teaspoon flake sea salt
12 pink peppercorns, finely ground
½ teaspoon orange zest
⅔ cup sugar
CRUST
2 cups spelt flour
½ cup unbleached all-purpose flour, plus more for dusting
¾ cup (1½ sticks) unsalted butter, cut into ¼-inch cubes and chilled (see Notes)
6 tablespoons ice water, or as needed
1 large egg
2 tablespoons sugar
½ teaspoon sea salt
1 Make the filling: Quarter the quince. Core and peel them, then halve each quarter so you end up with 8 slices per quince. In a medium skillet or wide saucepan, cover the quince with the orange juice and wine. Cover and bring the liquid to a simmer over medium heat. Cook for about 35 minutes, until the liquid takes on a rose tint and the fruit’s flesh is soft enough to pierce with a knife.
2 While the quince simmer, peel and quarter the apples, then thinly slice them, about ⅛ inch thick. Set them aside in a large bowl. In a small bowl, stir together the vanilla seeds, salt, pink peppercorns, and orange zest.
3 Drain the quince and transfer the fruit to a cutting board to cool. Slice the quince a bit thicker than the apples (about ¼ inch thick) and add them to the bowl with the apples. Using your hands or a wooden spoon, toss the apples and quince together to combine. Sprinkle the sugar over the fruit and toss again to coat it evenly. Pour the spice mixture over the fruit and toss again to incorporate.
4 Make the crust: Preheat the oven to 350°F. In a large bowl, whisk together the flours. Add the butter and, using your fingers, rub it into the flour, breaking it down into pea-size pieces so you have what resembles a coarse meal. Dribble 3 tablespoons of the ice water over it and, using your hands, stir to incorporate the liquid so you begin to form a dough. Continue to add more water, 1 tablespoon at a time, just until the dough comes together; it shouldn’t be too crumbly or dry. You may need to add up to 3 tablespoons more, but be careful that the dough doesn’t become too wet or sticky.
5 Cut the dough into equal halves and shape each into a ball with your hands. Flatten both balls into discs and place them on a floured work surface.
6 Place a 10-inch cast-iron skillet and the bowl of apple-quince filling as close to your rolling station as possible. Roll the first disc of dough out into a circle 11 to 12 inches in diameter, rotating it 45 degrees after every few rolls, and flipping it over once or twice to get an even thickness. Use a bench scraper or a long spatula to gently peel the dough away from the work surface so you can lift it, carefully, into the skillet. Push the excess dough up around the edges of the pan. Repeat with the other disc of dough, setting it aside while you pile the fruit into the pan.
7 Pour off any extra juice that has pooled at the bottom of the bowl of fruit. Using a slotted spoon, place the filling in the dough-lined skillet, patting the fruit down to make sure it’s lying flat. Carefully lift the second dough circle and place it on top of the filling. Fold down the excess dough toward the outside of the skillet, then crimp it in a fun shape around the entire edge.
8 In a small bowl, beat the egg with ¼ teaspoon water to make an egg wash. Brush the entire surface of the top crust with the egg wash, giving it a thick coating.
9 In another small bowl, mix the sugar with the salt together to combine, and sprinkle the mixture over the top crust. Using a sharp knife, make two small, clean incisions to form a cross, so steam can escape. Bake for 1 hour, until the crust is golden and the edges are browned. Let the finished pie cool for at least 45 minutes before slicing into it and serving it straight out of the skillet.
NOTES
• Make sure to dice the butter into smaller cubes than you might for other crusts, because you will not be chilling the dough before baking it. Move quickly to incorporate the butter into the flour so it stays chilled and doesn’t begin to melt. The finer the dice, the faster you can work.
• Feel free to fancy or fatten this pie to your taste: cover the fruit in spiced, salted, or plain-old caramel sauce, or top each slice with a piece of good-quality sharp cheddar.