Chapter three
Planting and Tending
With the big job of building beds behind you, the fun part of gardening awaits. Planting, watching the young plants sprout and grow, watering and feeding them, and enjoying the harvest are to come! Along with planting and harvesting are a few tasks you may enjoy less: mulching, weeding, and dealing with pest problems. But the monotonous chores will be only a small part of the picture in a well-managed raised-bed garden.
Planting How-To
Planting a raised bed is similar to planting a regular garden, but easier, because the soil is always loose and easy to work with. You’ll be planting a combination of seeds and transplants. Some crops are easy to grow directly from seed, but for others it’s best to begin with transplants that have been grown indoors or in a greenhouse for the first 6 to 8 weeks of life (see facing page).
Some gardeners make a detailed plan on paper before they start planting. Others make decisions more spontaneously about what to plant where. Whichever approach you take, it’s wise to decide right from the start how intensively you want to plant your garden; that means thinking about how much space to leave between individual plants and groups or rows of plants.
The number of plants that will fit in a typical 4-foot × 6-foot or 4-foot × 8-foot raised bed varies depending on the crop and on your gardening strategy. Some crops naturally grow larger than others — a tomato plant grows much bigger than a lettuce plant, for example, so you’d plant a lot fewer tomato plants in a bed than you would lettuce. Strategy matters, too: If you plan to devote lots of time and energy to your garden all season long, you can squeeze more plants into a bed and succeed. But if you know you have limited time, it’s better to space plants farther apart. It’s logical: the soil is the reservoir of nutrients and water for crops. Plants that are widely spaced have more soil volume per plant from which to draw water and nutrients, so they will rely less on input from you.
Other factors affect spacing choices, too, but crop size and gardening strategy are the ones to consider first. So, how do you decide how many plants to put in each of your raised beds? In other words, how far apart should you space seeds or seedlings at planting time?
Seeds or Transplants?
Some raised-bed crops do best from seed because their roots don’t like to be disturbed. With other crops, there’s a big advantage to starting seeds indoors, either to protect the small seedlings from pests or to get a head start with crops that take a long time to reach maturity. Here are some lists of crops to start from seed, crops to plant as transplants, and crops that do well either way:
Best grown from seed
- Peas
- Beans
- Radishes and turnips
- Carrots
- Lettuce, spinach, arugula, and other leafy greens
Best grown from transplants
- Tomatoes
- Peppers
- Eggplant
- Broccoli
- Brussels sprouts
- Cabbage
Crops to start either way
- Beets
- Kale and mustard
- Chard
- Sweet corn
- Cucumbers
- Squash and melons
Figuring Out the Spacing
It’s easy to find recommendations about vegetable crop spacing on seed packets, in catalogs, in books, online, or from gardening friends. But you’ll soon discover that the recommendations vary! Some may call for standard row planting, some for intensive gardening, and others for spacing somewhere in between.
Standard Spacing
Standard row spacing allows for plenty of open space between one row of crop plants and the neighboring row. An example of standard spacing for carrots might be “Sow seeds 2 inches apart in rows 30 inches apart. Thin the seedlings to 4 inches apart.” That open space provides access for people to walk or tractor wheels to drive between the rows of plants (for tasks such as weeding and applying fertilizer). But when you garden in raised beds, you won’t be walking or driving a tractor between the rows! Instead, you can plan for crop rows to be closer together.
And what about the recommendation to sow carrot seeds 2 inches apart and then thin them to 4 inches apart? This type of recommendation applies most to seeds that are planted on a large scale, whether by machine or by hand. It is based on the assumption that a certain percentage of seeds won’t germinate, perhaps because they got buried too deeply, didn’t get covered up at all, or were eaten by birds. Spacing seeds closely gives the farmer some assurance that enough seedlings will germinate to produce a good yield. If too many seedlings germinate, thinning might be required: pulling out or cutting off excess seedlings to leave just one seedling every 4 inches along the row.
But when you’re sowing seeds on a limited scale in the ideal conditions of a raised bed, you can be confident that your germination percentage will be high. So you may want to sow seeds at the final desired spacing. Once the stand of seedlings has poked through the soil, you can skip the task of thinning; you may, however, need to resow to fill the occasional gap where a seed didn’t germinate.
Seed Quality
The fine print on a seed packet should include a germination rate (that is, an estimate of what percentage of the seeds will germinate). Seed companies continually test samples of the seeds they sell to ensure that the seeds are still viable and that the minimum germination percentage meets government standards. The minimum percentage varies by crop. For example, the minimum germination percentage required for pepper seeds is 55 percent, but for peas and lettuce, it’s 80 percent. Seed from reputable companies often has a higher germination rate than the minimum standard. But if you buy inexpensive seed, you may find that the germination rate is not as reliable. Also, if seed has aged or been kept in unfavorable conditions (hot and/or humid), the germination rate may be lower than the rate shown on the package.
Before you plant old seeds or seeds of questionable quality in your garden, run a germination test. Sprout 10 seeds between pieces of moist paper towels, or plant them in moist potting mix in a small cup. Multiply the number of healthy seedlings produced by 10 to figure out the germination rate. For example, if 8 of the 10 seeds sprout, the germination rate is 80 percent.
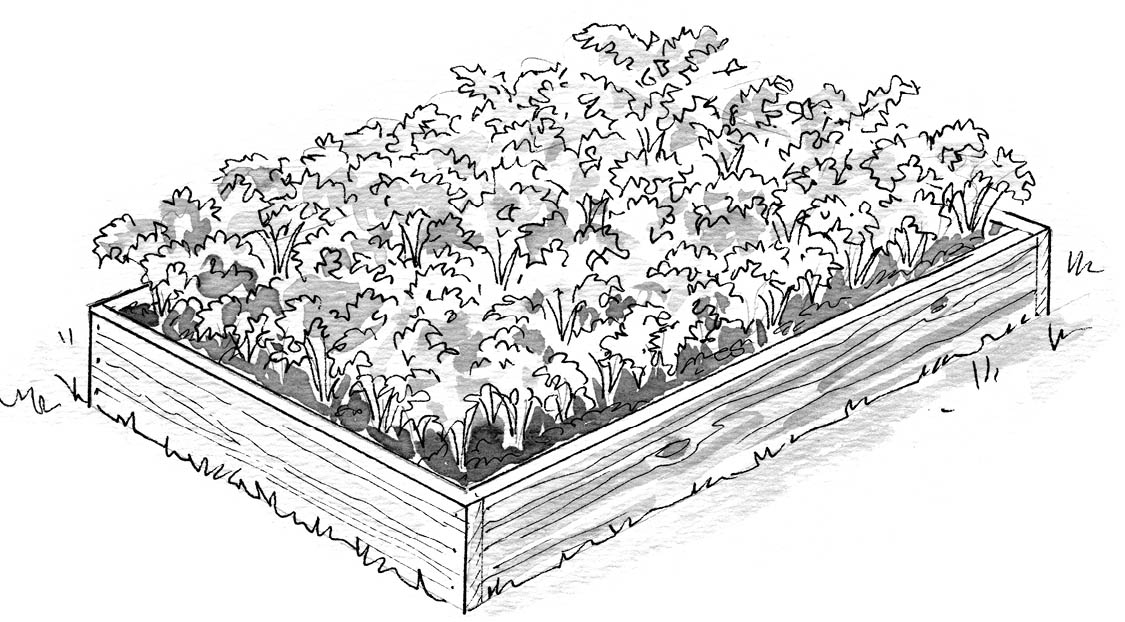
Intensive Spacing
In an intensive garden, plants are arranged to completely cover the bed surface. A gardener choosing intensive spacing might sow carrot seeds 3 inches apart in the row and sow several rows 3 inches apart. As the plants grow, they will eventually form a forestlike cover over the surface of the bed, with no soil showing through at all.
This method offers the advantage of higher yields, plus less need for weeding because the crops themselves shade out any weeds that sprout among them. The soil in the intensively planted plot will fill up completely with crop roots. Plants that are intensively managed need soil that is rich in nutrients and organic matter, and possibly supplemental fertilizer, throughout the season. The continuous covering of foliage does help keep the soil cooler and moister than if it were bare, but the intensive infiltration of roots pumps lots of moisture out of the soil. So watering will be important during any period without adequate rain — and adequate in this case may be more than the standard rule of thumb of 1 inch of rain per week.
Because of the wonderful soil and the gardener’s willingness to pamper the plants, it’s possible to pack a bed with plants and end up with excellent yield. For example, an intensively planted 4-foot × 8-foot raised bed of carrots might yield as much as 100 pounds of carrots!
In-Between Spacing
Are there choices other than standard row spacing and intensive spacing? Sure there are. In fact, there are almost infinite choices. You could space crop rows more tightly than standard spacing (for example, 18 or 12 inches apart) but not as tightly as an intensively managed bed. This intermediate approach offers the advantage of better air circulation around the plants, because some open space between rows will remain even as the plants mature. That’s helpful, especially in humid climates, because air circulation helps prevent disease problems.
Figuring out a planting plan for a raised bed is one of the most fun and creative opportunities in gardening. You may make some choices that don’t work out well, but you’ll learn from those (especially if you keep a raised-bed garden journal), and you’ll surely have some exciting successes, too. Remember to keep an optimistic and experimental attitude! Some gardeners are experimenting with spacing plants extra-far apart — spacing eggplants 5 feet apart, for example. They mulch the rest of the soil surface well, and they find that the eggplants grow much larger than they usually do (the plants do require some staking) and the yields are much higher than traditional expectations. This kind of experimentation is one of the fascinations of working with living organisms that respond to their environment. As you gain experience, you’ll learn to “read” your plants’ reactions by factors such as their leaf color, size, and appearance; how fast they’re growing; and how quickly they start developing flowers.
The Planting Puzzle
Figuring out a planting plan is like solving a puzzle. It involves some math, some reasoned consideration of the factors that affect plant growth, some knowledge of your soil, and some intuition.
As you make a planting plan, assign a rating of 1 to 5 to each of your answers to these questions:
- How fertile is my soil?
1 = poor, 5 = excellent
- How well does my soil hold water and/or how much am I willing to take time to water?
1 = very little, 5 = abundant
- What’s the weather like during my growing season?
1 = hot and dry, 5 = moderate and moist
- What about insect pests and diseases in my area?
1 = lots of potential problems, 5 = usually very few
If you end up with a score of 15 or greater, you may do very well with intensive planting. If the score is lower, you’ll be most likely to succeed if you take a less-than-intensive approach to planting. And you can always experiment with an intensive test planting of one small bed or a portion of a bed. You may discover that you rated your garden more severely than you needed to.
Sowing Seeds
Sowing seeds is a simple form of garden artistry, and with a little experimentation, you’ll discover the seed-sowing tricks you like best. The basic choices are sowing in furrows, sowing in wide bands (or broadcasting), and sowing in individual planting holes. Whichever method you choose, you can buy or improvise tools to aid in the task.
Here’s some sound general advice: sow early and often. Sow early because it’s impossible to predict the weather. Sow early, and you’ll be happily rewarded with an early crop if the weather is warmer than average. Sow often (in small quantities) for two reasons: first, making several small sowings of a crop is insurance against a spell of bad weather. For example, if you sow an entire packet of lettuce seed and a period of heavy rain follows, all that seed may be washed away. But if you split up the packet into four or more weekly seedings, you would lose only a quarter of the packet to that spell of heavy rain. Second, sowing small quantities weekly or every 2 weeks spreads out the harvest. Planting too much seed at once leads to a glut of produce you won’t be able to keep up with.
Before you sow, check the seed packet for the proper seed depth. Generally, the smaller the seed, the more shallowly it’s planted. Also remember to add some fungal inoculant to the soil (or rhizobacteria for peas and beans) as you plant, especially in new garden beds.
Sowing in Holes
Dibble planting works well for large seeds such as peas and beans. A dibble is a tool used to make holes in the soil. Your finger can be a dibble, or you can use a small stick or the end of a tool handle. If you use a long-handled tool, you can stand up straight while making the holes rather than bending over or kneeling. To use as a depth guide, mark lines on your dibble at 1/2 inch, 1 inch, and 2 inches. Simply poke a hole of the correct depth at each spot where you want to plant a seed. Drop a seed (or two for insurance) into each hole, then water the seeded row, and the soil will naturally fill in the holes.
Sowing in Furrows
Use the corner of a hoe or a trowel blade to “plow” open a furrow, or lay a long-handled tool along the row and press down gently to form a U-shaped furrow.
Sowing small seeds into a furrow takes patience. Measure out roughly the amount of seed you’ll need for the length of the furrow. You can then put the seeds into a small dish or box; add some sand or dry, sifted compost; and mix. You may find it easier to sow a mixture like this evenly along the furrow.
Some gardeners dribble out seeds between the thumb and forefinger. Others put seeds into a handheld seed dispenser, or just a piece of folded paper, and tap it lightly to make seeds drop out one by one.
Next, with your fingers, gently pinch the soil along the sides of the furrow back into place. Or use more sifted compost or commercial seed-starting mix to cover over the furrows. (Compost and seed-starting mix may be less likely to crust over than plain soil.) Water gently.
Broadcasting
Another approach to planting is to spread seeds across the entire surface of the planting area. This works well for crops such as lettuce, spinach, baby kale, and arugula, which you’ll harvest by cutting bunches of leaves with scissors.
To prepare for broadcasting, use your hand or the edge of a piece of scrap wood to smooth out the soil surface. Then calculate approximately how much seed you want to sow in that area, count or measure out the seeds, and sprinkle them over the soil surface. Use the flat of your hand to gently press the seeds into contact with the soil. Cover the seeds with sifted compost or a purchased seed-starting mix. Then spread a light mulch of grass clippings or straw, just enough to lightly shade the soil surface. Water very gently after sowing.
Following Up
Some seeds germinate within 24 hours, but others take several days. Carrot seedlings may take up to 2 weeks to emerge from the soil. Germinating seeds are vulnerable; if the soil dries out, seedlings may die or become stunted. Check newly seeded areas daily, and apply water as often as needed, which could be daily or even twice a day during hot summer weather. Use a watering can with a fine rose head, one with many tiny holes that delivers water gently and evenly. Or water with a handheld hose, using a nozzle set to a mist or shower setting. You don’t need to water new seedlings too deeply — your goal is not to soak the soil, but to keep the top inch or two consistently moist as the seeds send out their first roots and shoots.
Setting Out Transplants
When it comes to transplants, the more locally grown they are, the better. Most vegetable and flower bedding plants sold at home centers and even some garden centers have been grown in huge commercial greenhouses and shipped long distances. The plants are growing in soilless mix and entirely dependent on liquid chemical fertilizer for nutrition. They’re not the best prepared for life in an organic garden. If you can, seek out a local grower who uses a compost-based growing mix and has cared for the plants well, including hardening them off — a process of gradually exposing the tender young plants to outdoor conditions. Transplants that aren’t hardened off may suffer transplant shock when set out in the garden, and that can set back their growth by 2 weeks or more.
You can also try growing seedlings yourself in containers indoors. It’s a fun project, and a great way to have exactly the choice of varieties you want to grow.
Planting transplants is a cinch. Simply measure out where each plant should go, based on your planting plan or your on-the-spot spacing decisions. With a trowel, dig a hole deep enough for the rootball. If you wish, add some compost to the bottom of the planting hole. Then pour in a couple of cups of water. Set the plant in place and gently but firmly mold the soil over the rootball and up to the stem. Use your finger to make a shallow moat a few inches away from the plant stem. Then water again. The plant will transition best when the soil is very moist.
For any plant that has a bare central stem, such as peppers or broccoli, you can position the rootball an inch or so deeper than the soil surface to get the plants off to an even better start. This doesn’t work well for plants that sprout out from a central growing point, such as lettuce or squash.
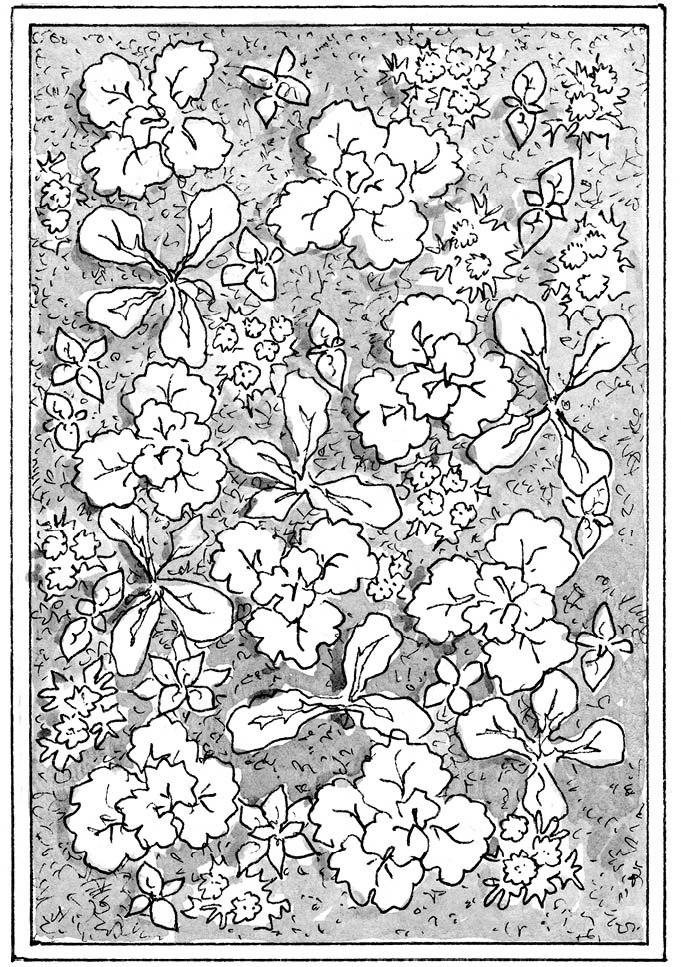
Interplanting
Interplanting is a serious-sounding term for a simple concept. It simply means planting a variety of kinds of plants in and among each other. Interplanting is a helpful technique because it makes optimal use of space. For example, once you set out broccoli plants in a bed, you can put lettuce transplants in the open gaps between the broccoli. Within a month, the lettuce will be ready to harvest, and after that the broccoli plants will fill all the gaps with their expanding foliage.
Interplanting with certain plants is reputed to help repel pests. For example, sowing radish seeds around young cucumber or squash plants may help repel cucumber beetles.
Flowering annuals are always a great choice for interplanting. They add color and variety that will increase your gardening pleasure, and many of them, such as alyssum and calendulas, attract beneficial insects that actually prey on caterpillars and other insect pests that eat vegetable crops.
Plant This with That
Choosing crops to interplant is a good exercise in creativity and logic. Consider both the type of top growth and the type of root growth of your plant companions. A deep-rooted crop is a good neighbor for a shallow-rooted crop, for example, because they’ll draw nutrients from different parts of the soil. And a tall bushy crop can be a good companion for a short crop that benefits from some afternoon shade in hot weather. Here are a few well-known interplanting schemes:
- Basil around tomatoes
- Onions and cabbage
- Spinach or arugula in the shade of tomatoes or trellised cucumbers
- Corn and winter squash
- Nasturtiums (pest repellents) with squash
- Marigolds (pest repellents) with beans
- Beans and potatoes
Watering
Have you ever had a potted plant unexpectedly die, and then discovered that the soil in the pot was bone-dry? It’s all too easy to let potted plants dry out. Raised beds aren’t as vulnerable to drying out as container gardens are, but they do lose moisture more quickly than an in-ground garden. Neglecting to water enough is a common mistake that raised-bed gardeners make.
Once you’ve begun planting, pay close attention to the water status of your garden. How can you tell when your raised-bed garden needs water? One strategy is to measure rainfall. Buy a rain gauge, which consists of a plastic reservoir calibrated in inches for easy reading (available from garden suppliers and home center), and set it up in or near your garden. Check the gauge every time it rains and keep records. A broad rule of thumb is that gardens need 1 inch of water per week. Light, sandy soils may need even more water than that because water drains through them more quickly. Hot conditions can increase the need for water, and the density of planting has an effect, too.
Another way is to touch the soil and see whether it feels moist. Soil dries out from the surface down, so you want to investigate the root zone, not just the soil surface. Dig a little hole and observe the top few inches of soil. If the entire top inch of the soil is dry, it’s time to water.
How much water should you apply? It’s best to water deeply to encourage roots to grow deeply. In general, apply at least 1 inch of water across the entire surface of the bed. That translates to 5 pints per square foot of garden area. Thus, a 100-square-foot bed needs 500 pints. There are 8 pints in a gallon, which means you’ll need to apply about 62 gallons to the bed. More than you expected? It’s a lot of water! But don’t set up a bucket brigade! It’s best to apply water slowly and steadily, not by pouring bucketfuls all at once. You can water by hand or with some type of irrigation system.
Figuring Flow Rate
Start by figuring out the rate at which your hose or irrigation setup delivers water. To see how fast water flows from an outdoor faucet, hook up a hose, attach a nozzle (the “gentle shower” setting is usually good for watering plants), and put the nozzle in a 5-gallon bucket. Turn on the hose to deliver water at the desired force — not too weak, not too strong. Time how long it takes to fill the bucket. If it takes 2 minutes, then the flow rate is 21/2 gallons per minute. Divide 62 gallons by 21/2, and you’ll find that it takes approximately 25 minutes of watering to deliver 1 inch of water to that 100-square-foot bed.
As you calculate how long you need to water, factor in natural rainfall. If 1/2 inch of rain fell during the week, then you need to supplement your garden with only 1/2 inch of water, or about 12 minutes of watering.
How and When to Water
Watering your garden by hand can be a lovely meditative exercise. Morning is an ideal time to water, when conditions are cool and less water will be lost to evaporation. Aim to water the ground surface rather than the foliage. Start out gently, because when the soil surface or surface mulch is dry, it may repel water at first, resulting in water running off in little streams rather than soaking in evenly. As the surface layer becomes wet, the soil will absorb water more quickly. Keep in mind that you don’t have to water your entire garden all at once, either. For example, you might choose to water a 20-square-foot area for 5 minutes one morning, the adjacent 20-square-foot section the following morning, and so on.
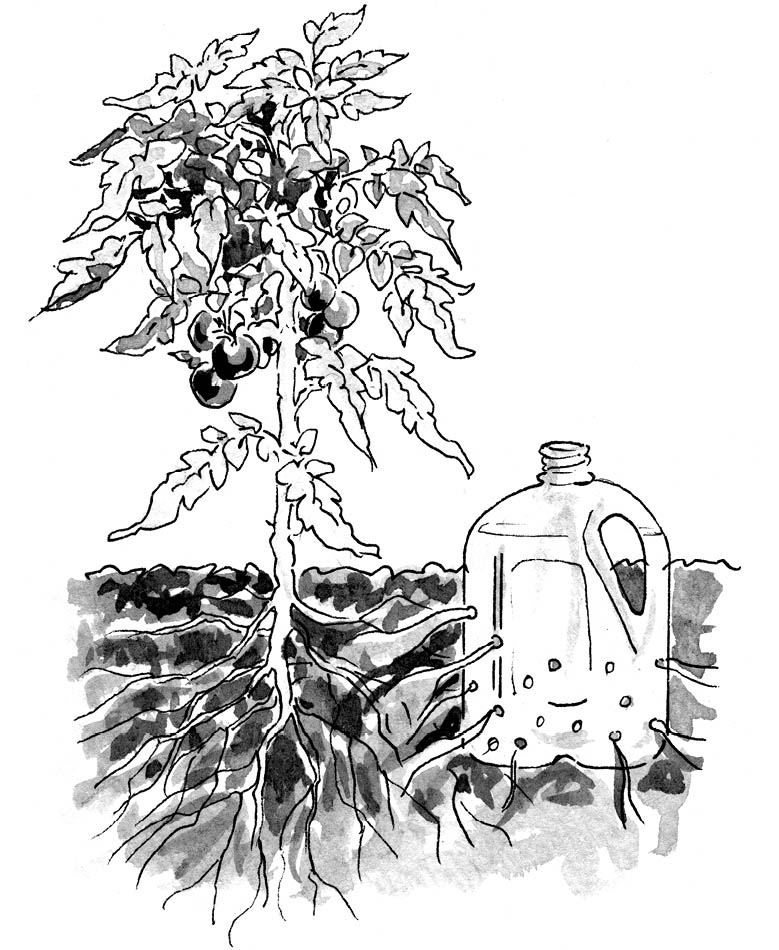
One of the most time- and water-efficient ways to care for your raised beds is to use soaker hoses or a drip irrigation system. Buying the equipment and setting it up requires an investment of dollars and time, but once in place a soaker hose or drip irrigation system is the ideal way to water. For more information, see Installing a Watering System.
Sprinkler Pros and Cons
If you don’t have the time or patience to water by hand, you can use a sprinkler instead, but there are drawbacks. The spray from a sprinkler will leave the foliage thoroughly wet, and wet foliage is more susceptible to infection by disease organisms. Also, most sprinklers deliver water in an uneven pattern, so some parts of a bed will be soaked while other parts are barely wetted. Also, because sprinklers shoot water out into the air, a portion of the water will evaporate before it ever reaches the soil.
A small sprinkler can work well for watering newly seeded areas, if it has a mist setting. Run the sprinkler for a short period (as little as 10 minutes) daily to ensure the seeded area never dries out, which will help to ensure quick, even germination.
If you plan to use a sprinkler to thoroughly water a bed of growing plants, first check the delivery rate and pattern of your sprinkler. Set it up in the raised bed and set our several shallow empty cans (cat food cans work well) across the bed. Turn on the sprinkler for a defined interval, such as 20 minutes. Then turn off the sprinkler and check each can. You may be surprised to find that some cans are full to overflowing while others are only half full. If the sprinkler pattern is too uneven, the sprinkler probably isn’t worth using. If only one or two cans are lacking in water, though, you can use the sprinkler, then follow up by hand-watering the spots that the sprinkler spray isn’t covering well.
Mulching and Feeding
Mulching your garden is another task you’ll need to tend to shortly after planting. It’s easy to do, and mulch offers many benefits:
- Smothers weed seedlings
- Blocks evaporation, which keeps the soil moist (and that’s good for soil microbes)
- Is an additional food source for the life in the soil
- Moderates soil temperature
- Protects the soil from erosion during heavy rain
- Prevents soil from spattering up onto foliage during rain or watering, which can help prevent diseases
Two of the most common mulches for vegetable beds are shredded leaves and grass clippings. Grass clippings are easily available during the growing season, from your own lawn or from nearby lawns (but be sure that those lawns haven’t been treated with pesticides or herbicides).
To have a supply of shredded leaves requires planning. In the fall, you can set up a leaf corral made of garden fencing or snow fencing attached to a few sturdy stakes. Dump leaves into the corral and tamp them down throughout the fall, then cover the corral with a tarp for the winter. Or you can simply load leaves into large plastic trash bags and store them in a pile or in a garden shed for the winter. If you don’t have a shredder, run a lawn mower over fallen leaves to chop them up roughly.
Other mulches that work well include straw, hay (although hay may contain lots of seeds that could become future weeds), and pine needles. Spread mulch about 1 inch thick, and leave a little open space between the mulch and the seeded rows or individual plant stems.
Mulch offers the greatest benefit early in the season. As your crops grow, their foliage takes over some of the duties of mulch, shading the soil surface and stifling weed competition.
Raised beds filled with rich soil mix may have enough of a storehouse of nutrients to feed crops all season long. Watch your crops for clues about whether fertilizer is needed. If the rate of growth begins to slow or foliage color changes, that could be a sign that your crops need a boost. Compost is always an option for feeding your crops, if you have enough of it. If you don’t have enough, you’ll need to buy a commercial product.
Choices of commercial fertilizers abound, but it can be hard to tell which products are suitable for organic gardens. The words “natural” and even “organic” on a fertilizer label aren’t necessarily a guarantee that a fertilizer is free of synthetic components. Instead, look for products with the logo of the Organic Materials Review Institute (OMRI) on the label or ask for recommendations from a knowledgeable staff person at a local garden center.
It’s easy to apply dry fertilizers by side-dressing — spreading the fertilizer on the soil surface alongside the plants. But in cool conditions, you may get better results from applying a liquid fertilizer such as liquid seaweed directly to the leaves.
Another way to build fertility is to plant cover crops. This is also one way to resolve a weed problem. (See below for more about cover crops.)
Dealing with Weeds, Pests, and Diseases
Problems will be few in a raised-bed garden as long as you keep up with watering regularly and feeding the soil. But any garden can suffer an outbreak of a pest or a disease, and weed competition can build up over the seasons. Here’s some basic advice on how to cope with weed, pest, and disease problems.
Outwitting Weeds
Weeds may not be much of a problem in a new raised-bed garden, especially if you use a purchased soil mix or bagged commercial compost. And intensive planting helps prevent weed problems because the crop plants quickly form a cover that prevents weed seed germination.
Over time, though, weeds have a way of infiltrating garden beds. Happily, pulling weeds in a raised bed is often almost effortless because the soil is so loose — the weeds slip right out, roots and all.
Germinating weed seeds. If one of your raised beds seems weedier than the other, try to outwit the weeds by tricking the weed seeds into germinating before you plant your crop. About a week before you plan to plant, water the bed well; then check it daily and keep the surface moist. This treatment will prompt most of the weed seeds near the surface of the soil to sprout. Just after the weed seedlings emerge, you can destroy them. Use a weeding tool such as a circle hoe or hula hoe designed for cutting just below the soil surface to slice through the weed seedling stems. Do this in the morning on a sunny day so that the weed seedlings will dry up and die before midafternoon. After that, disturb the soil as little as possible when you sow your seeds, and your crop will sprout and grow with little weed competition.
Planting cover crops. Another way to knock back a weed problem is to plant a cover crop either before or after your main crop. The main purpose of a cover crop, as you might guess, is to cover the soil surface. It’s a living version of mulch, and it serves many of the same purposes. Common cover crops for gardens include oats, rye, and buckwheat. These crops grow densely, and they’re good at shading out any weeds that try to compete with them.
Which cover crop to grow depends primarily on the time of year. Oats are a good choice for spring, and buckwheat is a fast-growing summer crop. Winter rye is perfect for sowing in late summer or early fall because it grows better in cold temperatures than other cover crops do, and it will survive over winter and continue growing the following spring.
Cover-crop seed is easy to sow, and the crops are trouble-free. It is important, however, to cut down a cover crop before it goes to seed. Otherwise, the cover crop plants will drop seeds all over your garden, and the seeds may germinate when you don’t want them to — and then you have a new weed problem! Cover crops offer another great benefit besides suppressing weeds: lots and lots of organic matter, which you can gently dig into the top few inches of the soil to enrich it. Or, after you’ve cut the cover crop, leave the “greens” to dry down on the soil surface as a mulch, and simply pull the mulch back out of the way when you’re ready to plant. (For detailed information on how to plant and manage cover crops, see Resources.)
Raised-Bed Recordkeeping
If you like to keep a journal or diary, you’ll probably enjoy keeping a garden journal, too. Write about everything and anything related to your garden, but especially note the “how I did it” details: describe your seed-sowing methods, transplanting techniques, weeding tricks, and watering routines. And be sure to keep track of what you planted when by making a planting map right in your journal.
For those who don’t want to keep a full-fledged journal, try one of these tricks:
- Make daily notes on a large wall calendar. Include sowing dates, germination dates, watering dates (and how much water applied), and date of first and last harvest for each crop.
- Use your computer or handheld device. You can download garden recordkeeping software, or you can make your own template.
- Keep notes on a set of 5 × 7 cards. Use one card for each crop you grow, and store the cards in a sturdy plastic box with a hinged lid. Take the box to the garden and jot notes about each crop as you work.
Keep your recordkeeping aspirations simple. The more requirements you set for yourself, the more likely you are to fall behind, and that’s discouraging. Even if you record only the planting date, the date first fruit appears, the date of the first harvest, and the date of the last harvest, that’s a good start!
Managing Pests and Diseases
Every garden will have some problems with pests and diseases, and raised-bed gardens are no exception. Some common signs of pest or disease problems are holes in the leaves or brown, wilted leaves at the base of a plant. These signs are distressing, but chances are that most of what you plant will produce and grow well.
If you do discover a pest problem in your garden, the first step is to sleuth out the specific cause. You can do that by comparing damage symptoms or insects (if you spot them, usually on the underside of leaves) to the photos in a pest and disease identification guide; by asking a knowledgeable gardening friend what’s causing the problem; or by taking a sample of the damaged plant parts and/or any bugs, beetles, caterpillars, and the like you find on or near the suffering plants to your local Cooperative Extension Service for expert identification.
Keep in mind that one of the best ways to minimize plant problems is to build healthy soil. Plants that are growing vigorously are less susceptible to attack by many pests and disease organisms, and microbes in a healthy soil actually produce substances to help protect plants against disease.
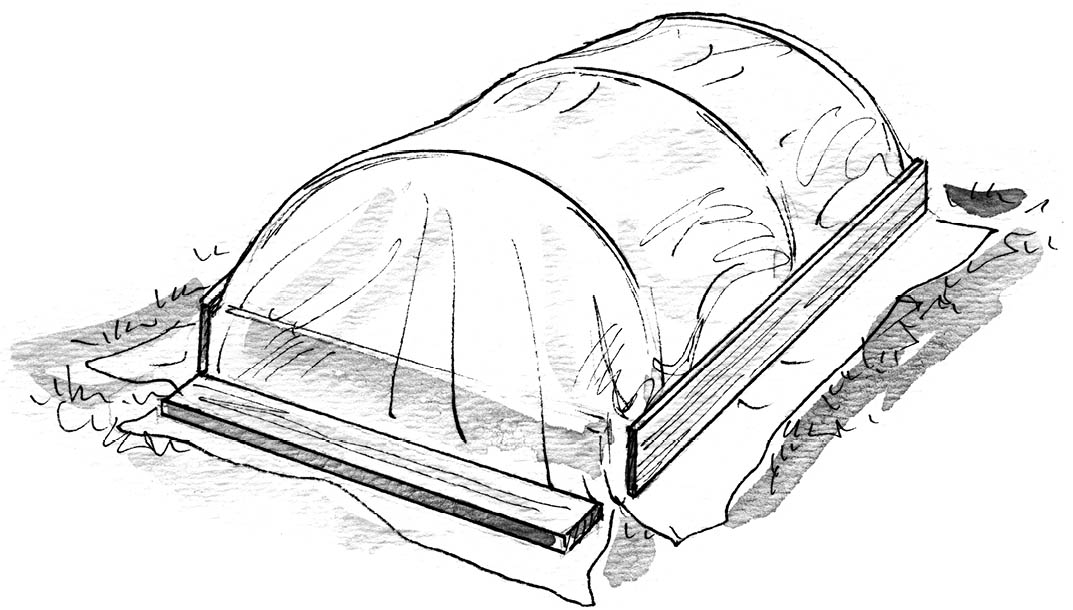
Preventing problems with row covers. Another strategy for preventing many potential pest problems is to cover beds with row covers. Row covers are pieces of lightweight synthetic fabric that allow air and water to pass through, but not insect pests. You can drape row covers directly over plants or rest them on wire or plastic hoops (as shown below). It’s important to seal the edges of the covers at the soil surface by weighing them down with rocks, boards, or soil so that pests can’t crawl underneath.
Fighting slugs. Slugs are a common pest that can’t be excluded with row covers. These soft-bodied creatures (which are mollusks, as are shellfish) can burrow through the surface soil and come up on the inside of a row cover tunnel. And slugs love the protected environment under a tunnel. They also do well in beds that are mulched, because the mulch helps keep the soil moist.
Slugs are susceptible to commercial slug baits, but choose carefully. Some baits are made from synthetic materials. A good choice is an iron phosphate bait, such as Sluggo, which is not harmful to people or pets but is toxic to slugs.
You can also handpick slugs off plants (they’re active in the early morning or at night) and drop them into a can of soapy water. Or fasten a strip of copper all around the frame of your raised bed. Slugs can’t cross a copper barrier, so it will permanently stop them.
Slugs have plenty of natural predators, so as your garden matures and develops a native population of predators such as ground beetles, any slug problem you have may decrease all on its own.
Preventing animal damage. The most troublesome pests for many vegetable gardeners are those with four feet, such as deer, woodchucks, and rabbits. Covering beds with row covers may be enough to prevent damage from some animals, but woodchucks and deer have been known to push or tear right through row covers to reach the treats underneath. You can cage a bed by stretching chicken wire over plastic or wire hoops. Or make a barrier with netting, such as the one shown above.
You can use smelly repellents, such as strong-smelling deodorant soap or a garlic spray around the perimeter of your raised beds. These may stop pests for a while, but animals sometimes learn to ignore a repellent. To increase effectiveness, try switching the type of repellent every few weeks.
There are also commercial repellent devices that use motion sensors to activate a bright light or a spray of water when pests approach the garden. You can find these at garden centers or through online garden suppliers.