BASIC FISHING RIGS
Several years back I went fishing below a dam on a local river for saugers and white bass, and while I was there I learned a lesson that’s stuck with me ever since.
Fish were feeding in the swift current where water was being released through the dam. I anchored in a slack area and proceeded to cast a diving crankbait across the current, retrieving it back in a looping track downstream. Every couple of dozen casts I’d get a bite and reel in another fish. I thought I was doing pretty well.
Then I started watching another angler in a boat anchored several yards up from me. He was obviously using a different technique, casting directly toward the face of the dam. He reeled in slowly, holding his rod up as his bait worked back with the current. And he was getting a fish at almost every cast! It seemed as if his rod was constantly bowed over from fighting another large sauger or white bass.
After a couple of hours, he began stowing his gear to leave. I pulled up my anchor, idled over beside his boat and commented, “I couldn’t help but notice how many fish you’ve been catching. Would you mind sharing your secret?”
He was willing to help. “It’s no secret,” he said. “I’m using small shad minnows, the type the fish are feeding on. I use a bottom-bumping rig to work the minnows down the current, the way the bait naturally moves. This rig keeps my bait close to the bottom without hanging up, and I’m casting into breaks between the seams of fast water. This is where most of the feeding is going on. The fish don’t have to work so hard to hang there, and the currents wash the minnows to them.”

Using the right rig is crucial in fishing. A rig is whatever you tie onto your line to hold and present your bait or lure to the fish. Anglers who know how to match and adjust rigs to particular fishing situations will see more action than those who don’t.
So, he did have secrets, three of them! One was his bait. The second was his rig and the third was his method of using it. His presentation was much more natural and effective than mine and he caught his limit of fish. Even if you’re in the right spot, you can still fare poorly if you’re not using the right bait, rig, and technique.
COMPONENTS OF A FISHING RIG
A fishing rig is whatever you tie on the end of your line to hold and present your bait. It’s a combination of hooks, sinkers, floats, snaps, swivels, leaders, and the knots that tie everything together.
Fishermen use many different rigs for special fishing situations. There are rigs for live bait and artificial lures. There are rigs for fishing on bottom, on the surface, and in between. There are rigs for trolling, drifting, or staying in one spot. There are rigs for fishing in current and still water. There are rigs for using more than one bait at a time. This list could go on and on. Beginners don’t need to learn a lot of complicated rigs; for now, a few basic rigs will provide the means for catching most popular species in a wide variety of settings.
FISHING KNOTS: HOLDING THE RIG TOGETHER
One thing all fishing rigs have in common is knots, and learning to tie knots is the logical starting point in a discussion of rigs. You will have to tie knots several times on each fishing trip, so learn this lesson well!
Tying a knot in a fishing line weakens it. An improperly tied knot can reduce line strength by more than 50 percent. But a knot that’s properly tied will retain up to 95 percent of the full strength of the line. Strong knots that won’t slip or break will produce more fish.
Following are instructions for tying six fundamental knots. The first three are my picks for tying line to hooks, sinkers, swivels, etc. The fourth knot is used to tie a loop in the line. The fifth knot is the one I use to tie two lines together when I’m adding line to my reel. And the sixth is a good knot for adding line to an empty reel spool.
When tying any of these knots, I always follow two rules: Before snugging a knot tight, I always spit on it to lubricate it. This saliva reduces line-weakening friction and heat build-up as the knot draws tight. And I always leave ⅛-inch of line when I clip the tag end. This allows for some slippage in the knot without it coming undone.
Using the right style and size hook is an important part of fishing success. Match size of the hook to the size fish you’re after. For instance, with little fish like smaller trout, sunfish, and yellow perch, smaller hooks are better.
TRILENE KNOT
This is the knot I use for 90 percent of my fishing. I tie it almost every time I need a line-to-hook or line-to-lure connection. It’s a very strong knot, and it takes only a small amount of practice to master. I highly recommend it.
To tie the Trilene knot, run approximately four inches of line through the hook eye, loop it around and pass it through the hook eye again. Pull the line to draw the loop down to a small diameter (¼ to ½ inch). Now catch and hold this loop between your thumb and forefinger to keep it open. Wrap the end of the line around the standing line five times. Last, pass the end back through the loop, and snug the knot tight by pulling the standing line and the hook in opposite directions. Trim the tag end.
Trilene Knot
PALOMAR KNOT
This is another general-purpose knot that also offers maximum strength and versatility. The palomar knot is dependable and easy to tie, and it’s a good alternative to the Trilene knot. You’ll find that most professional fishermen use the palomar knot almost exclusively.
To tie the palomar knot, bend the line back on itself to form a double strand six inches long. Pass this double strand through the hook eye, and tie a loose overhand knot, leaving a loop deep enough so the hook (or lure) can pass through it. Pass the hook through the loop, then tighten the knot by pulling the hook with one hand and the double strand of line with the other. Trim the tag end.

Palomar Knot
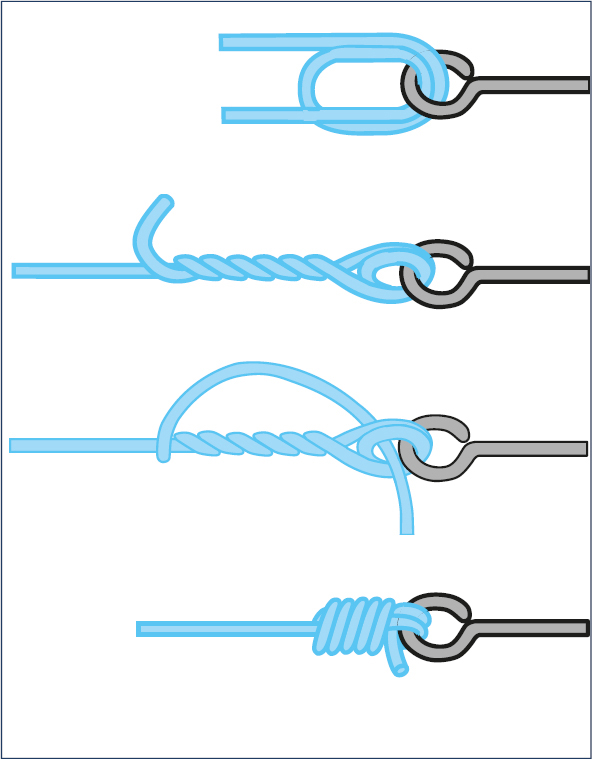
IMPROVED CLINCH KNOT
This is a third general-purpose knot that is an old standby in fishing. It’s slightly weaker than the Trilene or palomar knot, but it’s still strong and easy enough to tie to be the choice of many expert anglers.
To tie the improved clinch knot, thread the line through the hook eye three or four inches. Wrap the end of the line around the standing line six times. Then run the end back through the opening between the hook and the first wrap. Last, turn the end up and thread it through the long loop between the wraps and the downturned line. Hold onto the end and snug the line by pulling the standing line and hook in opposite directions. Clip the tag end. (Note: some experts double their line and tie this knot as if their doubled line was a single strand.)

Improved Clinch Knot
SURGEON’S LOOP
When you want to tie a loop in your line, this is the knot to use. The surgeon’s loop knot is easy to tie, and it won’t slip.
To tie the surgeon’s loop knot, bend the line back to double it. Then tie a simple overhand knot. Instead of snugging this knot up tight, make another wrap in the overhand knot. Now snug the knot tight and clip the tag end.

Surgeon’s Loop
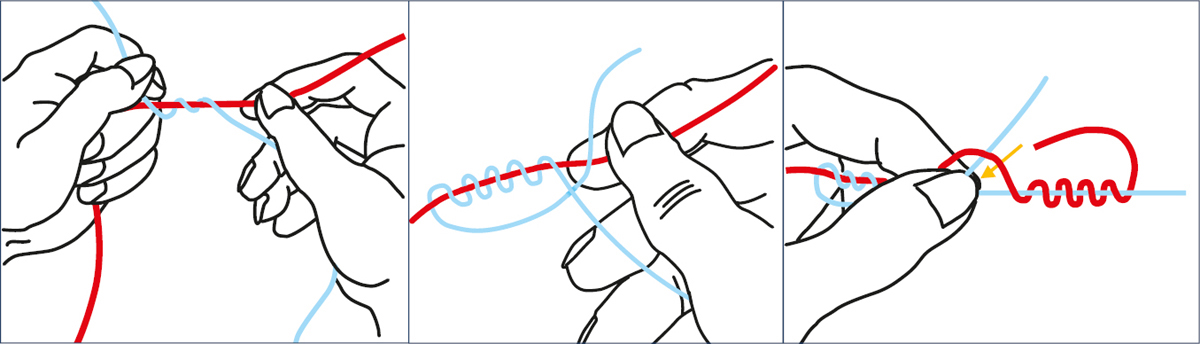
BLOOD KNOT
The blood knot is good for adding new line to old line on your reel. This knot requires a fair amount of practice to learn, because it’s easy to get the twists and ends confused. However, once you master it, you can splice two lines together quickly and securely.
To tie the blood knot, overlap the two lines four or five inches end to end. Wrap one around the other five times. Next, wrap the second line around the first line five times in the opposite direction. Finally, pass both ends back through the center opening in opposite directions. While holding these tag ends, snug the line tight. Then trim the ends.
Blood Knot
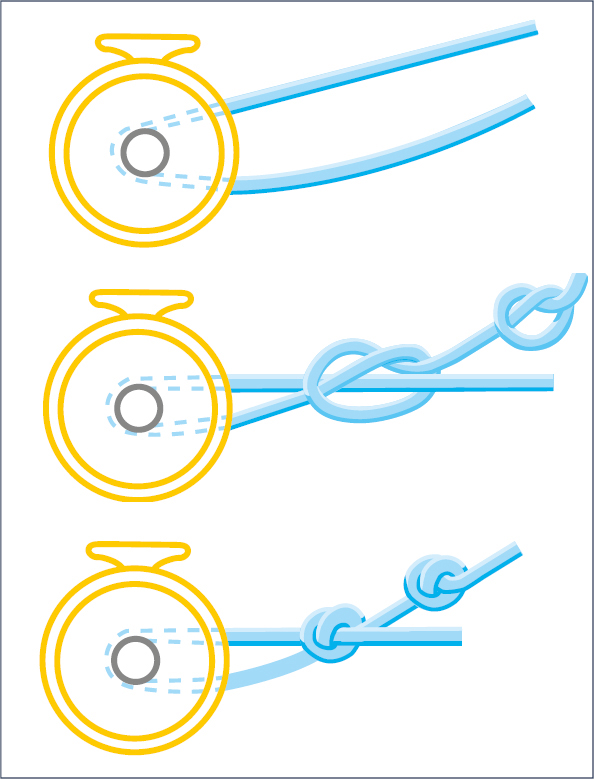
This knot is used for tying line to an empty reel spool. It’s simple and allows the line to slide down snug against the spool so it won’t slip.
Begin by looping the line around the reel spool. Then tie a simple overhand knot in the standing line. Last, tie another overhand knot in the end of the line to anchor the first knot when the line is drawn tight. Snug the line tightly around the reel spool and trim the tag end.
Line End Knot
HOOKS, SINKERS, FLOATS
Hooks, sinkers, and floats are basic components in many fishing rigs. Different combinations of hooks, sinkers, and floats can be used on everything from small panfish to large gamefish. These items of “terminal tackle” come in many different sizes and designs. Beginning anglers must understand these differences and must learn to select and assemble the right tackle for the species they’re targeting.
HOOKS: GETTING TO THE POINT
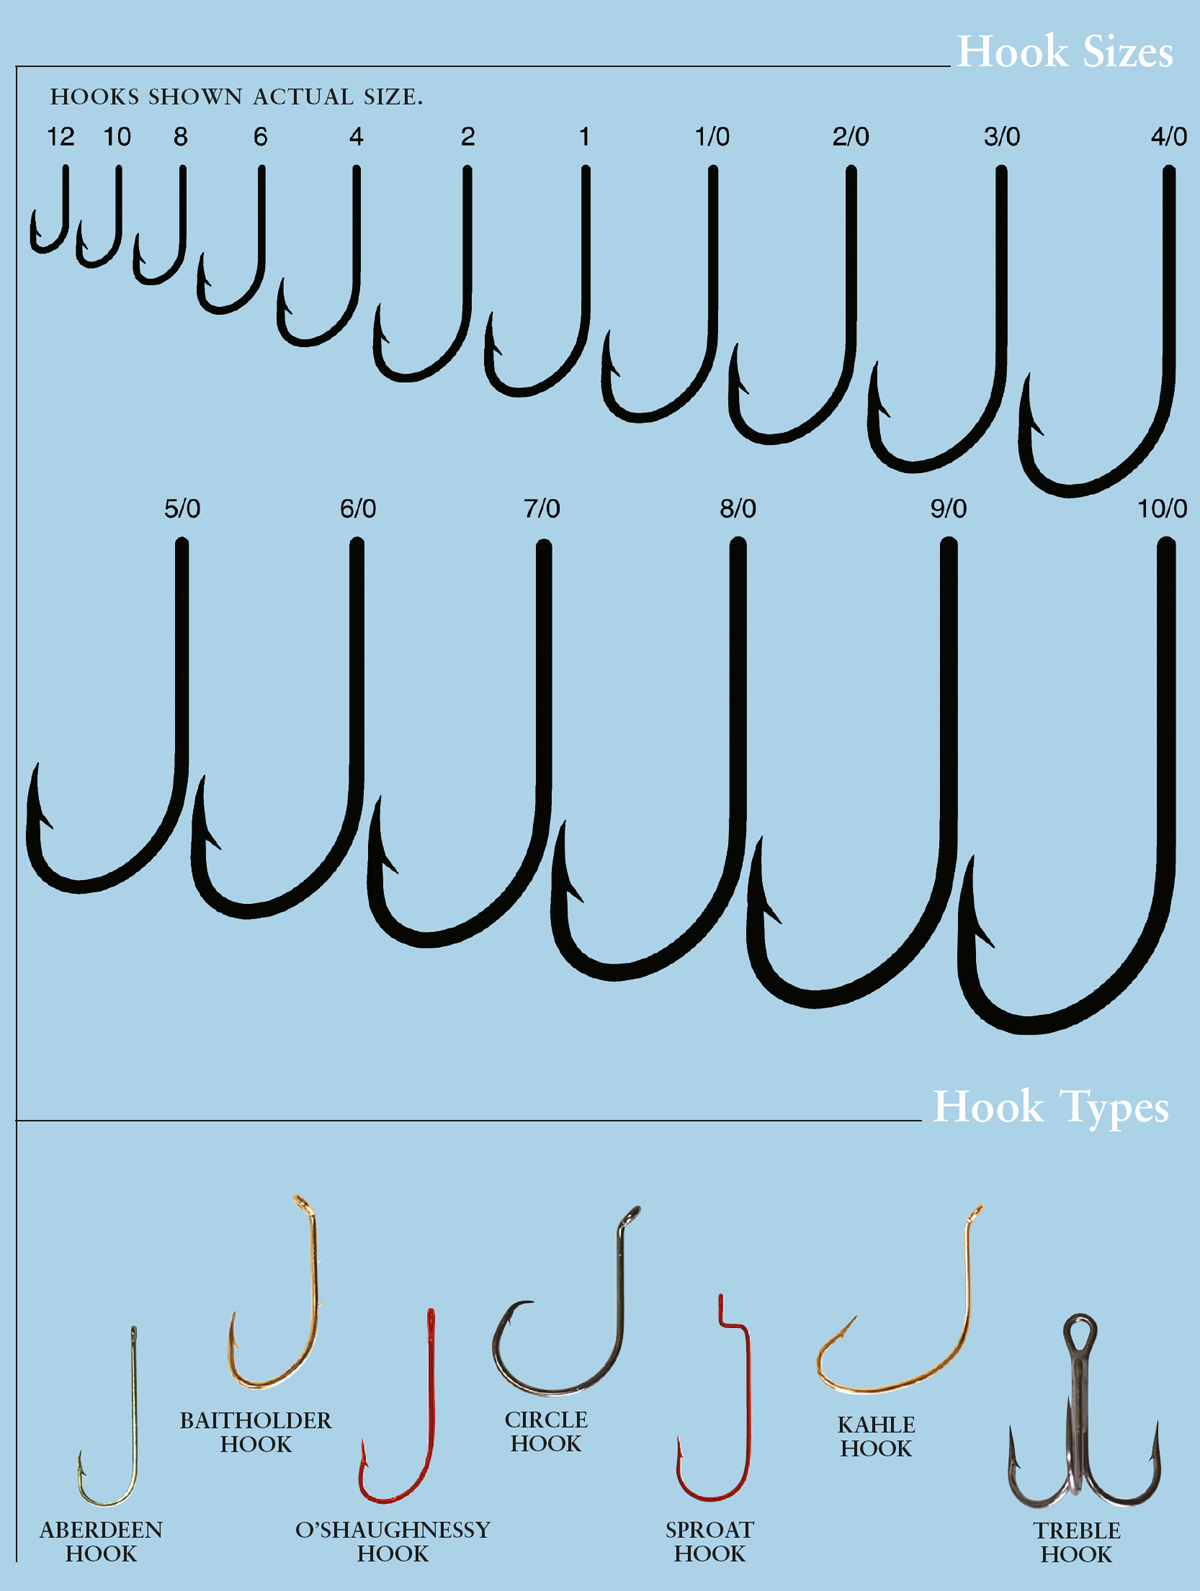
Hooks can be confusing to expert anglers, much less beginners. One major manufacturer makes hooks in more than 40,000 designs, sizes, and finishes. They run the gamut from tiny wire hooks for trout to giant forged hooks for such saltwater brutes as sharks and marlin. Hooks also come in different thicknesses, temper (“springiness”), barb configurations, and other features. Different styles of hooks bear different names: Aberdeen, O’Shaughnessy, Sproat, Carlisle, Limerick, etc. (Modern hook designs originated in the British Isles, where these hooks were named and used for different fishing purposes.) With so many variables it’s easy to understand how a beginning angler can feel intimidated when faced with choosing just the right hook. Don’t worry! You do not have to become a hook expert to be a successful angler. Making good hook selections is easy if you follow a few basic guidelines.
Hook Selection
Following are recommendations for hook sizes and styles for popular fish species. In each case, the range of sizes provided will work for the fish in question. For general-purpose use, the best selection for each species would be the medium-sized hook in the category. However, if you know the fish are likely to be on the small size, or if you’re fishing strictly for trophy fish, adjust your hook choice down or up accordingly.
One special note should be made about so-called “cam-action” hooks. These hooks have offset bends in the shaft. When a fish bites down on the offset, the hook’s point rotates to a better penetrating angle, making it easier to get a solid hookset. These hooks really work! I recommend them when fishing with live bait or plastic worms, and in other single-hook situations.
Overall, don’t worry about different names and styles of hooks. Again, many different hooks will serve the same purpose. Just find one design and size for the type fishing you’ll be doing. If it works, stick with it. Later on you might want to learn more about hook styles and the subtle differences in each. But for now, stick with the basics, and you’ll be okay.
BASS
Sizes #2-4/0
When using live bait in open water, choose smaller wire hooks. When using plastic worms or other artificial lures—especially in or over heavy aquatic vegetation—use 1/0-4/0 forged steel hooks.
SUNFISH
Sizes #10-#6 light wire hooks
Hooks with a long shank are better, since they are easier to remove when a sunfish swallows the live bait.
CRAPPIES/WHITE BASS
Sizes #4-2/0 light wire hooks
WALLEYES/SAUGERS
Sizes #6-#1 light wire hooks
Some experts prefer “baitholder” hooks when using minnows, nightcrawlers, or leeches.
YELLOW PERCH
#8-#4 light wire hooks
MUSKELLUNGE/PIKE
Sizes 1/0-6/0 forged steel hooks
STREAM TROUT
Sizes #10-#1 Aberdeen or “baitholder” hooks
STRIPED BASS/HYBRIDS
Sizes 1/0-6/0 forged steel hooks
LARGE CATFISH
Sizes 1/0-7/0 forged steel hooks. Sizes #8-#1 light wire hooks
First, buy quality hooks and not the bargain-basement variety. Stick with popular brand names that are most widely advertised and distributed. Quality hooks cost only slightly more than inferior ones, but they’re more than worth the price in terms of strength and reliability.
Second, pay special attention to hook size. The simple rule is to use small hooks for small fish and big hooks for big fish. As logical as this seems, this is a common mistake made by beginning anglers. They use bass-size hooks when fishing for small panfish, and the little fish can’t get the hook in their mouths.
It’s important to understand the system manufacturers use to label hook sizes. Smaller hooks are “number-sized,” the larger its number, the smaller the hook. For instance, a #32 hook is tiny and used in small flies. A #10 hook is much larger and might be suitable for big bluegills or perch. A #1 hook is larger still and a good size for crappies, walleyes, small bass, and catfish.
At this point, numbering switches over to the “aught” system and heads in the other direction. After a #1 hook, the next largest size is a 1/0 (pronounced “one-aught”), followed by 2/0, 3/0, and so on. These larger hooks are used for bigger bass and catfish, pike, muskies, stripers, lake trout, etc.
The chart on the opposite page will guide you in selecting hooks for specific fish.
SINKERS: A “WEIGHTY” MATTER
Sinkers are weights that pull the bait down to the level the angler desires. Sinkers are molded—typically from lead or tungsten—in many different designs and sizes. The type sinker you use and how you use it depends on which rig and technique you select for the species you’re after. In terms of size, use a sinker heavy enough to do the job, but no heavier than it has to be. In most cases, the lighter the sinker, the less noticeable it will be to the fish.
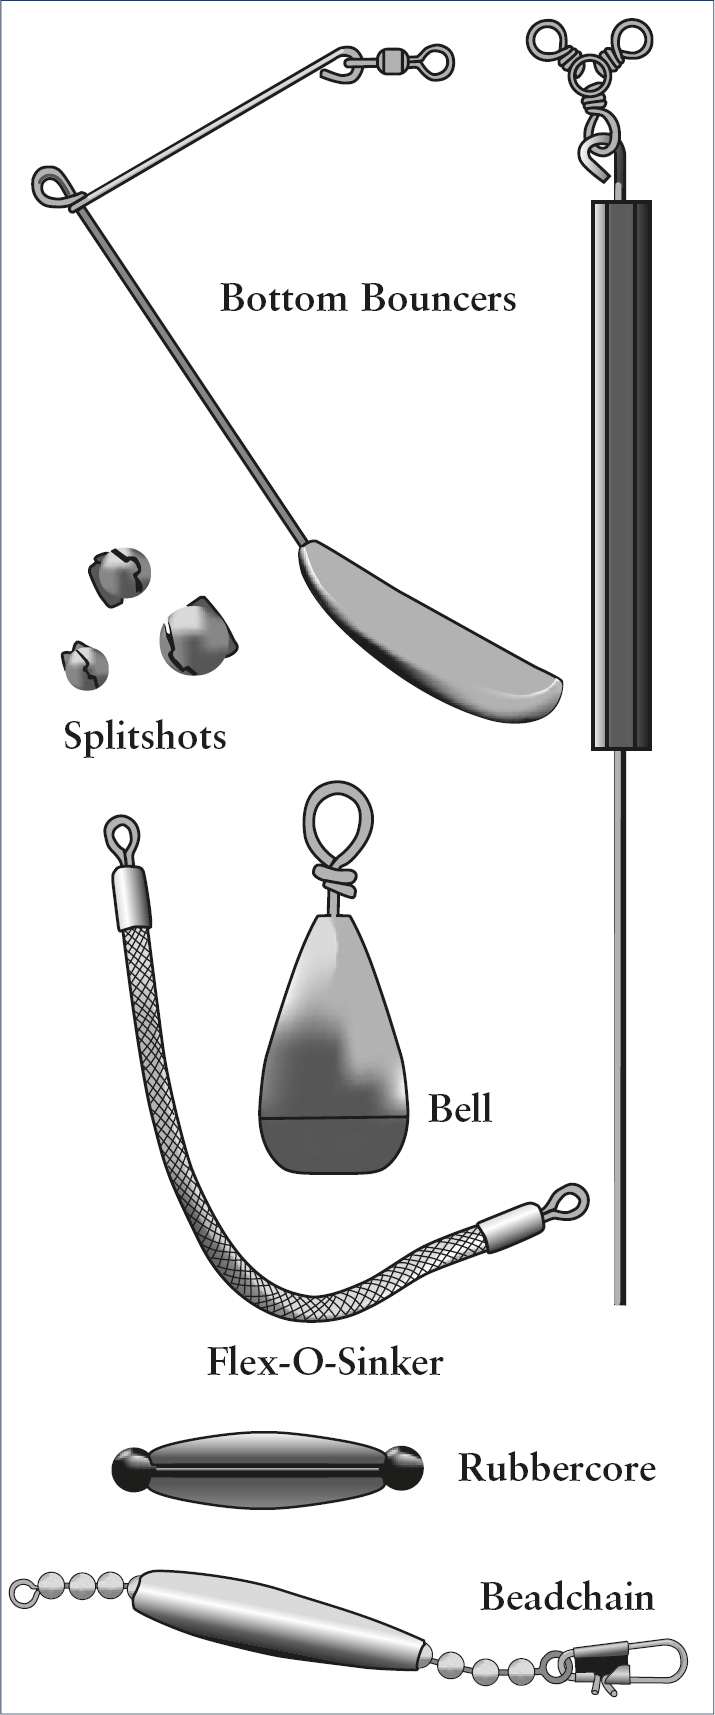
The most common sinkers are those that clamp directly onto the line. Split shot are small round balls that are pinched onto the line along a slit through the middle of the sinker. Clincher sinkers are elongated weights that wrap onto the line. Rubber-core sinkers resemble clinchers, but they have a rubber strip through the center. Line is looped behind this rubber to hold the sinker in place.
Sliding sinkers have holes through the middle so the line can slide freely through them. Three common examples are the egg sinker and the bullet sinker—so named for their shape—and the walking slip sinker, whose name refers to the special way it’s employed. Egg sinkers are used with stationary live bait rigs. The most common use for bullet sinkers is with Texas-rigged plastic worms. And walking slip sinkers are used with slip-sinker rigs to crawl live bait across the bottom.
Various other sinkers are used with bottom-bumping or stationary rigs. Bell swivel sinkers are bell-shaped and each has a brass swivel that’s molded in. The line is tied to the swivel, which prevents line twist when you’re drift-fishing or bottom-bouncing. Bank sinkers are general-purpose bottom sinkers that cast well, slide easily along smooth bottoms, and hold well in current. Pyramid and inverted pyramid sinkers have sharp edges and flat sides for gripping in soft, smooth bottoms.
There are many other sinkers for special techniques such as trolling, drifting, or dragging. But the sinkers listed above are the ones used in the rigs outlined later in this chapter and also in the fishing techniques described in Chapter 8.
FLOATS: VISUAL STRIKE INDICATORS
Most fishermen start out as bobber watchers. They watch a float with a bait suspended beneath it, and they wait for a fish to pull the float under or take off with it. This is a very simple yet effective and exciting way to fish.
Floats actually serve two purposes. The first is to suspend the bait at the depth the angler wishes, and the second is to signal when a bite is occurring. A float keeps the bait as shallow or deep as you desire. It allows you to dangle the bait just above bottom or suspend it over the top of brush, submerged weeds, or other underwater cover.
Also, if you want to fish close to the bottom, but you don’t know how deep it is, the float can tell you. If your sinker is resting on bottom, there’s no weight pulling against the float, so it will lie on its side on a slack line. But when you shorten the length of line between your float and sinker so the sinker is no longer touching bottom, the weight will cause the float to ride upright. Then, knowing that your bait is a set distance below your sinker (i.e., six inches), you know how deep your bait is and its position relative to the bottom.
Floats come in many materials, shapes, and sizes. Most floats are made from hard plastic, foam plastic, buoyant wood, cork, or porcupine quills. Float designs include round, tubular, barrel-shaped, pear-shaped, quill-shaped, and combinations of these designs.
Long, slender floats are more sensitive to light bites than round ones. Slender floats cast better since there’s less wind resistance. I recommend them over round floats for most small-bait, light-tackle situations. If you’re fishing for larger fish with larger baits, sensitivity isn’t so critical and round floats will work fine. Also, a good compromise for general use is the combination of a round or barrel float with a quill-like stem running through the middle. The thick part provides plenty of buoyancy for the sinker/hook/bait, while the quill adds sensitivity to indicate that you’re getting a bite.
Most floats attach onto the line with a small, spring-loaded wire clip. Others are pegged onto the line. A third family of floats slides up and down the line freely.
Many beginning anglers make the mistake of fishing with a float that’s too large. Select a float that’s the smallest possible size considering the weight of your sinker, hook, and bait. You want the float to ride high on the surface, but the slightest tug should pull it under. If a float is too large, smaller fish will have trouble swimming down with the bait. This unnatural resistance from the float could alert them to danger. So keep several different-sized floats in your tackle box to match different fishing conditions and rigs.
SNAPS, SWIVELS, SNAP SWIVELS, SPLIT RIGS, AND LEADERS
Snaps, swivels, snap swivels, split rings, and leaders are additional types of terminal tackle for use with various rigs and lures.
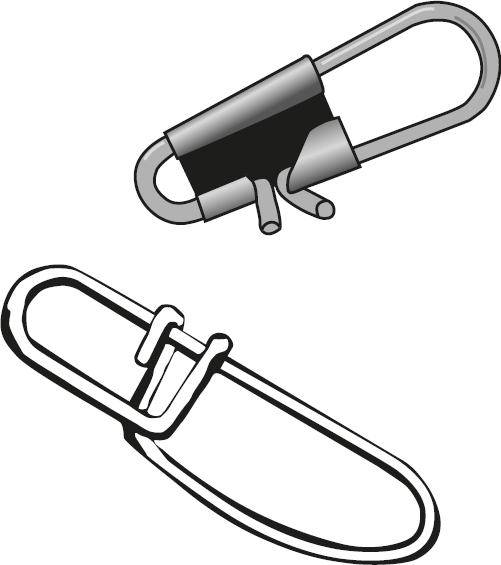
SNAPS
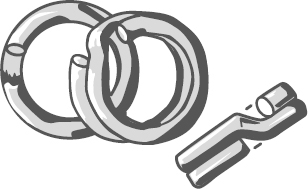
SPLIT RING

THREE-WAY SWIVELS
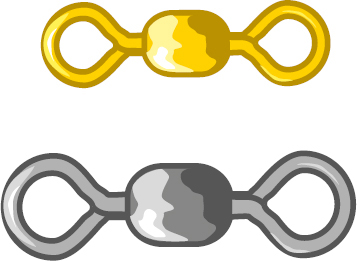
SWIVELS
A snap is a small wire bracket with a safety-pin catch. It’s simply a device for changing lures or hooks faster and easier. Tie the line to one end and snap the lure on the other end. To change lures simply unsnap the catch, take off the lure, put on a different one, and fasten the catch back. With a snap, you don’t have to cut and retie line each time you change lures.
There are trade-offs for this convenience, however. A snap adds more weight, drag, and hardware that the fish might see. Also, snaps occasionally bend or break under pressure from hard-fighting fish. For these reasons, I rarely use a snap. Instead, I prefer to tie my line directly to the eye of the hook or lure. The only time I use a snap is when I know I’ll need to change lures frequently. When I do use a snap, I choose the smallest, lightest one possible, considering the size and strength of the fish I’m after.
A swivel is a small revolving metal link that’s often tied between the main line and other components of terminal rig. A swivel prevents line twist caused by rotating lures or natural baits. Like snaps, swivels also have drawbacks. One main drawback is poor design or material that keeps the swivel from rotating freely. The best swivels have ball bearings that allow them to revolve under far less pressure than swivels without ball bearings. I strongly recommend them.
The three-way swivel is an important specialty swivel. As its name describes, it has three tie-on rings instead of two. This swivel is used in the bottom-fishing rig described in the next section of this chapter.
A snap swivel is a combination of a snap and a swivel. Many fishermen use snap swivels with all types of rigs and lures. In most cases, however, they’re unnecessary and even ill-advised. Snap swivels add weight, which can deaden the action of a lure. They also can create a weak link between line and hook and increase the chance of fouling on brush or weeds. I only use a snap swivel for casting in-line (revolving) spinners with spinning tackle.
The split ring or “O” ring is a small overlapping wire ring threaded into the eye of a lure—the line is tied to the ring. This is to allow more freedom of movement in the lure, which gives it a more lifelike action. Many lures come from the factory with a split ring pre-attached. If a lure doesn’t have a split ring, I don’t add one. Some lures perform better with the line tied directly to the eye. Also, I never clip a snap swivel into a split ring. Such a connection hampers lure action.
A leader is a length of fishing line or thin wire tied or fastened between the main line and the hook/lure. Leaders serve either of two main purposes: (1) increase line strength next to the hook; (2) provide a low-visibility connection between a highly visible main line and the bait. This keeps the visible line from scaring fish, and it also makes the bait look more natural.
The term “leader” also means an additional length of line tied into a terminal rig for adding extra hooks. This is the most common use of leaders for beginning fishermen.
Most leaders are monofilament or fluorocarbon line. Thin wire leaders, however, are used by anglers trying for toothy fish such as pike and muskies that can bite monofilament or fluorocarbon in two.
RIGS FOR EVERYDAY FISHING
Now we get to the heart of the matter. You know enough about hooks, sinkers, floats, knots, and other terminal tackle to start assembling different rigs for specific fishing situations. Following are explanations and diagrams of ten basic rigs, including how to tie them and where and how to use them. Sizes of hooks, sinkers, floats, and lines in these rigs will vary from one fishing situation to the next, depending on size and strength of target fish, water depth, bottom type, amount of current, and other variables.
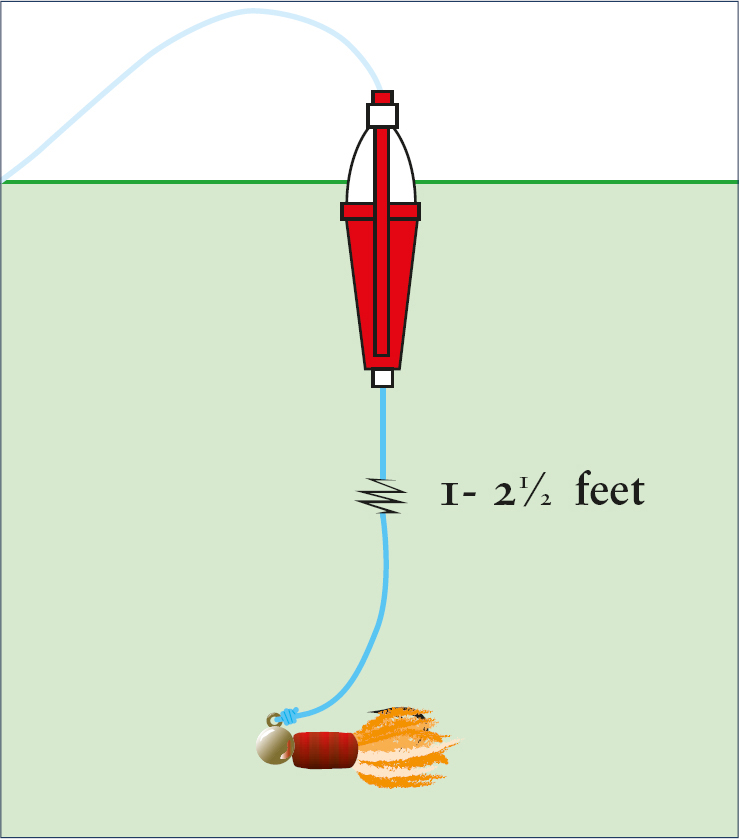
Fixed-Bobber Rig
This is the old standby float/sinker/hook rig that catches almost anything that swims. It’s used mainly in calm water (ponds, lakes, rivers, pools, or streams). It works with both poles and casting tackle, although it’s awkward to cast with more than three feet of line between the bobber and hook.
To assemble this rig, first tie the hook to the end of the line. Next, fasten a split shot, clincher or rubber-core sinker six inches up the line. Clamp or wrap the sinker tightly onto the line so it won’t slip down. Last, attach a bobber onto the line at the desired distance above the sinker. The bobber can be adjusted up or down the line to float the bait at whatever depth you desire.
The fixed-bobber rig is extremely easy to use. When a fish is nibbling, the bobber will twitch on the surface. When the fish takes the bait, the bobber will move away or be yanked underwater. That’s the time to set the hook!
Fixed-Bobber Rig
Always balance the size of the sinker and float. Use just enough sinker to take the bait down. Match it with a float barely large enough to hang on the surface, and hold up the weight of the sinker and bait. This way, even the slightest tug from a fish will pull the float under.
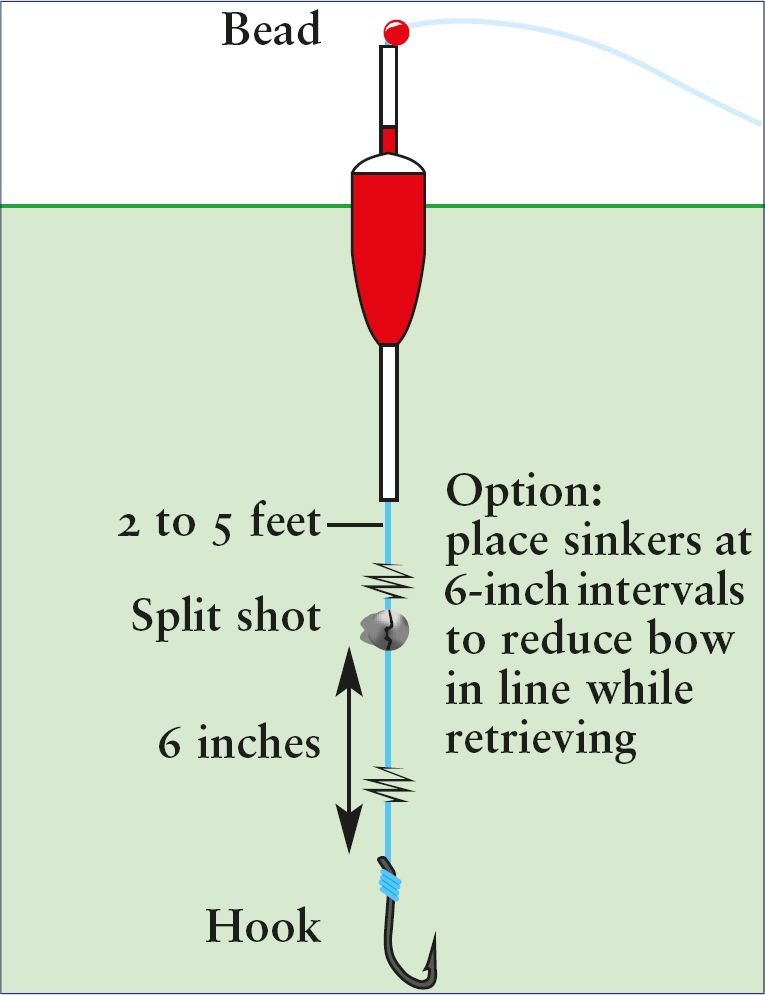
Slip-Bobber Rig
The slip-bobber rig is so named because the bobber slides freely up and down the line. It allows you to cast from shore or boat and present the bait at any desired length.
The slip-bobber rig is similar to the fixed-bobber rig, with the exception of the free-sliding bobber. To assemble, the bobber is run up the line first. (The line runs through the middle of the bobber.) Next, pinch on a sinker six inches up the line. The bobber will slide down and rest atop the sinker. Then tie the hook on the end of the line. Last, a bead and then a “bobber stop” is attached to the line above the bobber at the depth where you want to fish. For instance, to fish five feet deep, put the bobber stop five feet up the line from the hook. When the rig is cast out, the sinker will pull the line down until the bead meets the bobber stop and the bobber is held there.
Slip-Bobber Rig
Some float rigs are sold with a bobber stop in the package. The stop is typically a short piece of plastic tube with thread tied loosely around the tube. To use this stop, run it up the line, carefully remove the tube, and then cinch up the threading on the line. Then follow with the float, bead, sinker, and hook as described above. Another form of bobber stop can be a piece of rubber band tied tightly around the line. Whatever you use, make sure the bobber stop can be reeled through the rod guides onto the reel spool without catching. When casting, the bobber stop should likewise pass through the reel’s line guide and rod guides without snagging.
When casting with a slip-bobber rig, the bead, bobber, sinker, hook, and bait are near the end of the line, which makes casting easy. When the rig hits the water, the weight of the sinker and hook sink pull line through the bobber until it hits the bead at the bobber stop. Again, fishing depth can be altered by raising or lowering the bobber stop on the line.
Bottom Rig
This is the basic rig for fishing on bottom without a float. Bottom rigs are mainly used for catfish and bullheads, but they also work on bottom-feeding bass, walleyes, bluegills, trout, and other species. A bottom rig works in both quiet water and current.
This rig is built around a three-way swivel. Tie the main line into one ring of the swivel. Tie a 12-inch leader on the second ring of the swivel, and tie a bank or bell swivel sinker on the other end of this leader. Last, tie an 18-inch leader into the third ring of the swivel. The hook and bait go on the end of this leader.
The bottom rig is highly versatile. It can be used from shore or boat, with light or heavy tackle. Length of the leaders for the sinker and hook/bait can be altered as desired. Typically, though, the hook leader should be longer than the sinker leader.
Since you don’t use a float with this rig, how can you tell when you’re getting a bite? With the sinker resting on bottom, reel up slack until the line is taut to the rod tip. Then, if you’re holding the rod, you’ll feel the bite. If the rod is propped up, you’ll see the tip twitch or jerk. Some fishermen attach small bells to their rod tips to alert them to bites. Also, your line might start moving one way or the other as a fish swims off with the bait. The key to using a bottom rig is to keep slack out of the line so you’ll notice these things.
Live-Bait Rig
This is a stationary rig that allows natural action from live bait. It can be used in any type water and for a wide variety of fish.
To tie this rig, run a sliding egg sinker up the line. Now clamp on a BB-size split shot sinker below the egg sinker and 18 inches up from the end of the line. This split shot serves as a stop to keep the egg sinker from riding down on the bait. Last, tie the hook on the end of the line and bait it with a minnow, crawfish, or nightcrawler. Now the bait can swim freely off bottom and pull line through the sinker. Also, when a fish takes the bait, it can swim off without feeling the unnatural weight of the sinker.
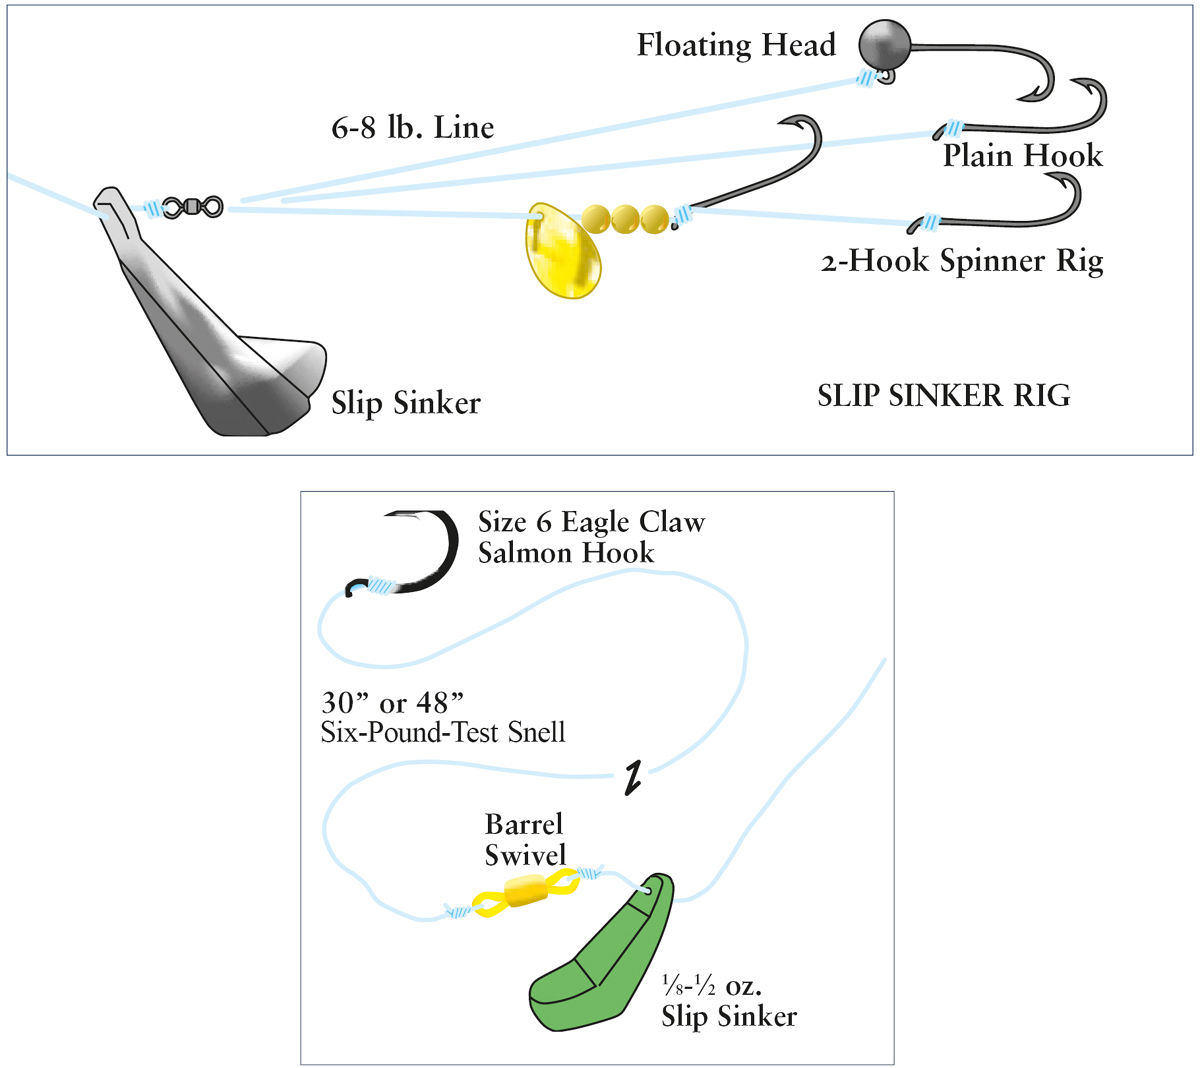
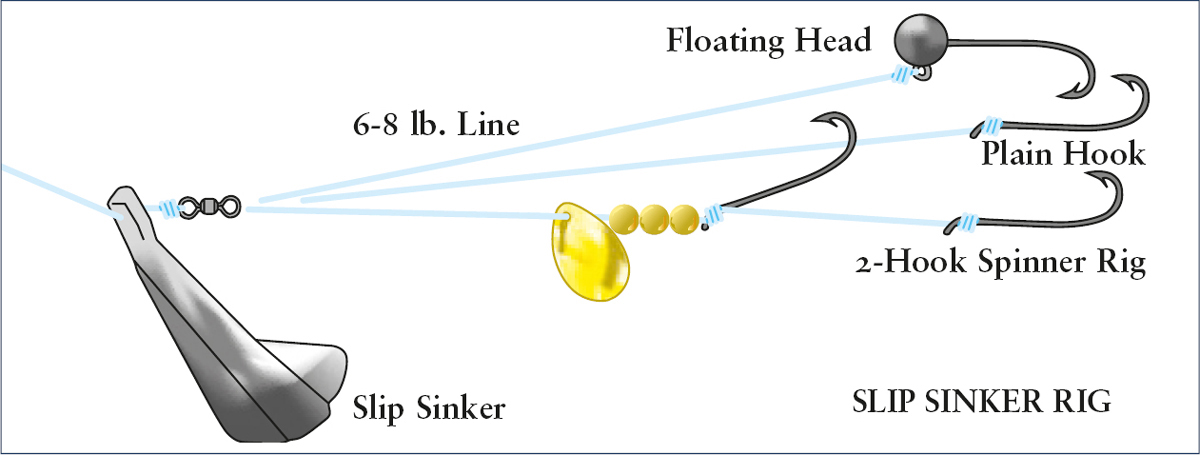
Slip-Sinker Rig
Also called the “walking-sinker rig,” this rig is used to fish live bait across the bottom—either by trolling or casting—and slowly cranking in line. This rig is highly effective for walleyes or saugers, but it can also be used for many other species.
Most slip-sinker rigs are sold in packages, but they can also be assembled from individual components. First, slide a walking-type sinker up the line, then tie on a small barrel swivel. Tie a three-foot monofilament leader onto the other end of the barrel swivel, and add the hook at the end of this leader. (Note: many pre-tied slip-sinker rigs have a spinner blade in front of the hook.) Bait with a nightcrawler, leech, crawfish, or minnow.
Slip-Sinker Rigs
Most experts troll or drag slip-sinker rigs with spinning tackle. When a fish takes the bait, they trip the bail and give line freely so the fish can run. When the run stops, they reel in slack line until they feel pressure on the line, then set the hook.
Bottom-Bouncing Rig
Bottom bouncers are weighted wire devices used to troll baits along snaggy bottoms. Thin steel wire is bent into an “L” shape. A lead weight is molded around the center of the long arm. The short arm has a ring for tying on a three-foot leader and hook, or floating or suspending lure. The main line is tied into the 90-degree bend of the “L,” between the bottom bouncer’s two arms.
The bottom bouncer is mainly used when fishing from a boat. It is lowered to the bottom and then pulled slowly along likely structure. Enough line should be let out so the bottom bouncer is trailing well behind the boat. The wire holds the weight up off bottom where it won’t hang up, and the leader and baited hook or lure float behind, just above the bottom.
The bottom bouncer is used mainly for walleyes, but it’s also extremely effective for bass, crappies, catfish, and other structure- or cover-oriented species.
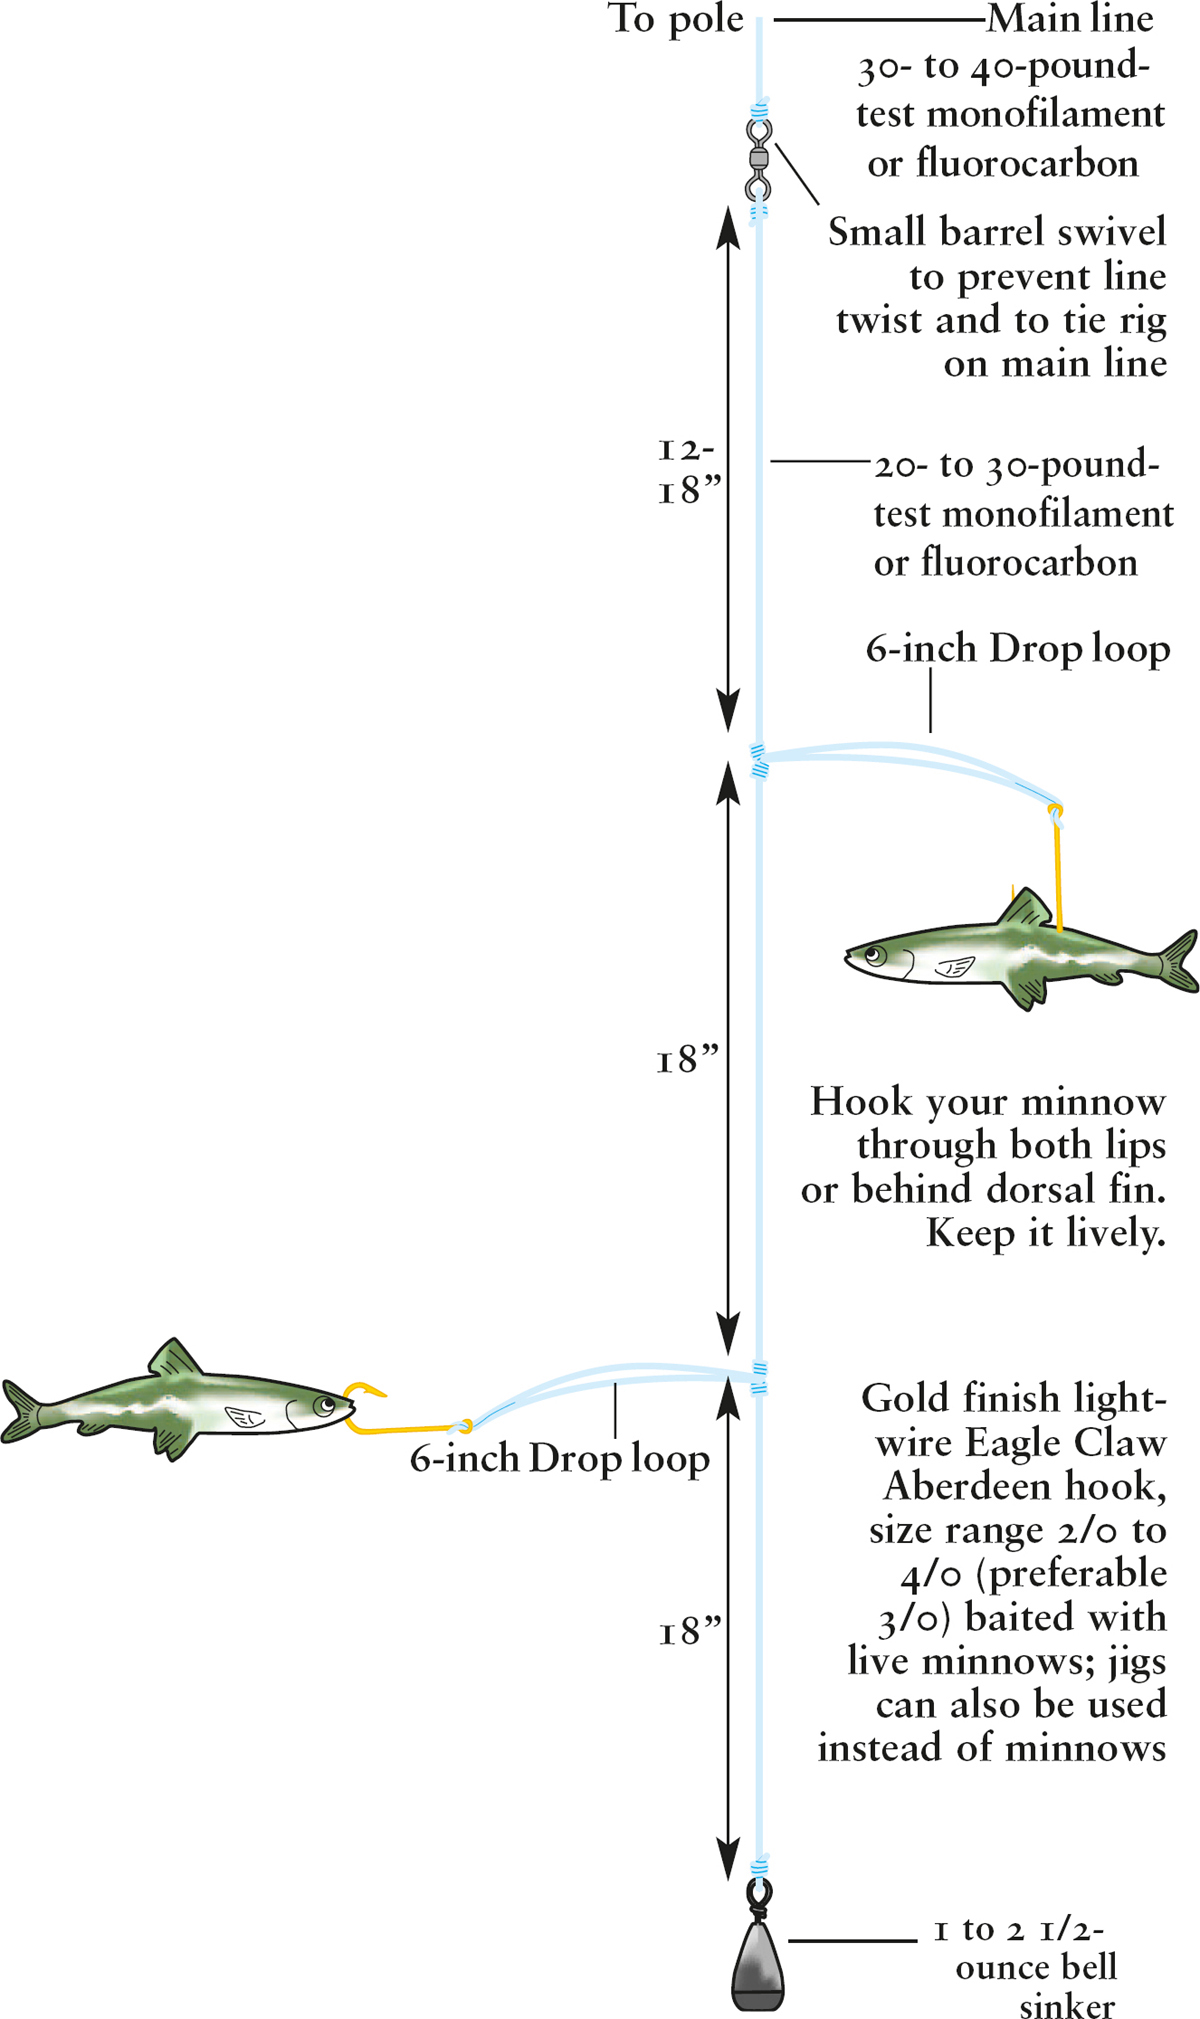
Two-Hook Panfish Rig
This is a deep-water rig used primarily for crappies and catfish. It’s fished “tightline” fashion (no float) from a boat. The sinker is on the bottom of this rig, and it’s jigged slowly off bottom while two baited hooks dangle above it. Minnows are the usual bait for this rig, though small crappie jigs might also be used.
First, tie a bell swivel sinker to the end of the line. Next, tie a surgeon’s knot 18 inches above the swivel to form a loop that is big enough to stretch three inches. Now tie an identical loop 18 inches up from the first loop. Finally, add hooks to the loops in the following manner: Pinch the loop closely together so the line is doubled, then run it through the eye of a thin wire hook (#2-1/0). Then open the loop and pull the hook back through it. Slide the hook tight at the end of the loop, and add bait.
Texas-Rigged Plastic Worm
Plastic worms are popular among bass fishermen, and the so-called “Texas rig” is the favorite way to use soft plastics. A Texas-rigged worm is weedless and can be crawled through thick cover where bass like to hide.
Start by running a sliding bullet sinker up the line (a ⅛- to ⅜-ounce sinker for depths up to 10 feet), then tie on a plastic worm hook. Insert the point of the hook ½ inch into the head of the worm. Now pull the point out the side of the worm, and slide the worm up the shank of the hook until the eye is pulled into the head of the worm. Last, rotate the hook and reinsert the point into the side of the worm, completely covering the barb. Done correctly, the worm will hang straight with the hook in place.
Rigged in this manner, the sinker will slide freely along the line. Many anglers prefer to peg the sinker at the head of the worm, especially when they’re fishing heavy cover or matted aquatic weeds and they want the sinker and hooked worm to stay together. Otherwise, the sinker might sink to the bottom, and the hooked worm stay near the top where there aren’t any fish. Pegging a sinker can be accomplished by pushing the small point of a flat toothpick through the hole of a regular bullet sinker, from the small end toward the back. When the toothpick can be pushed no further, it’s broken off even with the hole of the sinker. Then the sinker is slid down the line to the head of the worm, where it will stay in place. Another option is to use a “screw-in” sinker (molded-in screw anchors the sinker to the head of the worm).
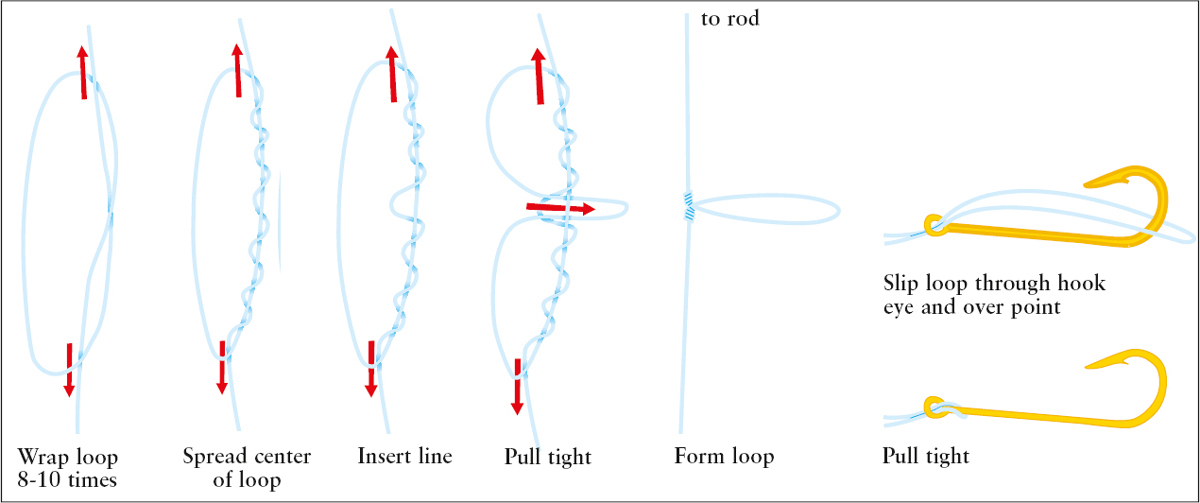
Tying a Spreader Rig
A special section on how to fish Texas-rigged plastic worms is included in the next chapter.
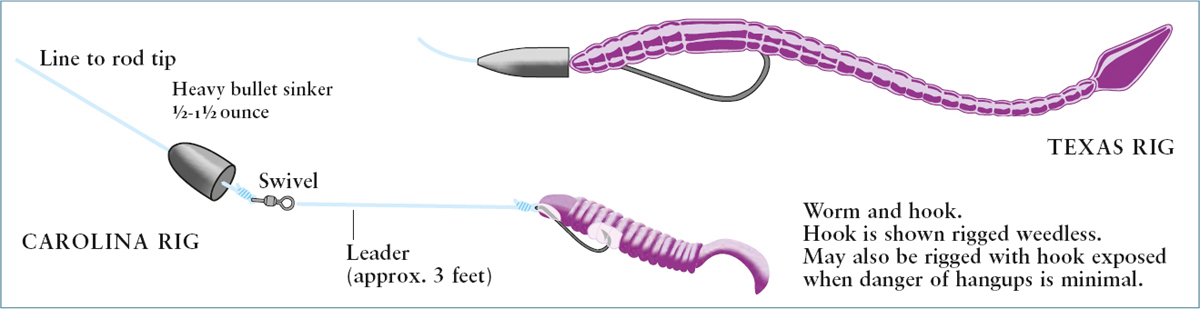
Carolina-Rigged Plastic Worm
Where the Texas-rigged worm is meant for fishing in heavy cover, the Carolina-rigged worm is designed for open structure fishing and covering long distances of submerged channel drop-offs, sunken points, banks, humps, etc. It’s very similar to the live-bait rig, except it employs a soft-plastic bait. It’s also a very easy rig to use. You simply make a long cast, allow the rig to sink to bottom, then crank it back in very slowly. There are two basic presentations: dragging or pulling sideways with the rod tip, and small hops by making vertical lifts with the rod tip.
To make a Carolina rig, run a heavy bullet slip sinker (½- to 1-ounce sinker) up the line, then tie a barrel swivel on the end of the line. Next, tie a three-foot leader with a hook and plastic worm, minnow swimbait, or lizard on the end. With this rig, the bait is often fished with the point exposed. Do this by inserting the point of the hook into the head of the worm/lizard/swimbait and then threading the worm around the bend of the hook and up the shaft. Last, pull the point out the top of the bait, and pull the bait up to straighten it. Properly done, the worm/lizard/swimbait should hang straight on the hook. (Some anglers rig the hook weedless like a Texas rig when fishing in snaggy cover.)
Drop-Shot Rig
The drop-shot presentation can be adapted to a variety of fishing scenarios: spawning bluegills, bass feeding near the bottom or just off the bottom, suspending bass, and even walleyes at any depth. It can be fished straight up and down from a boat, or fished with a horizontal retrieve from the bank or a boat. In shallow settings, a drop-shot rig can be baited with a worm or cricket, cast out, and slowly dragged back along the bottom to attract bluegills or other panfish. Bass fishermen or walleye fishermen use the same strategy to catch fish at various depths, depending on where they’re holding and what they’re feeding on. Walleye anglers might bait their drop-shot rig with a nightcrawler or leech.
Basically, the rig consists of a round or cylindrical sinker (1/8 to 1/2 ounce) pinched or tied to the bottom of a fluorocarbon leader, followed by a wide-gap, short-shank hook tied to the leader with a palomar knot. A short soft-plastic worm or minnow swimbait is nose-hooked so that it sticks out from the leader. Depending on where you’re fishing, you might be able to get by with a couple of hooks separated several inches apart. The leader might be as short as a foot or so, and up to about three feet long. The best length is determined by how clear the water is, light penetration, how skittish the fish seem to be, and how well you can handle a long leader with the fishing tackle you have.
Double-Hook Rig
Entire books have been written about fishing rigs, so it’s difficult to cover this subject in a single chapter. However, you can use these rigs in probably 90 percent of freshwater fishing in North America. These rigs are versatile and productive! Pick the ones that apply to the type fishing you do, then practice tying and using them until they become second nature.
In the next chapter you’ll learn about baits, and in Chapter 8 we’ll cover easy fishing techniques for different spots. These three chapters—6, 7, and 8—are the heart and soul of Basic Fishing. Study them carefully, and follow their tips. If you use the right rig, bait and methods in a location where fish exist, you’ll catch some almost every time. You’ll also have learned the basics, and you’ll be ready to progress to a higher level of fishing knowledge and skills.
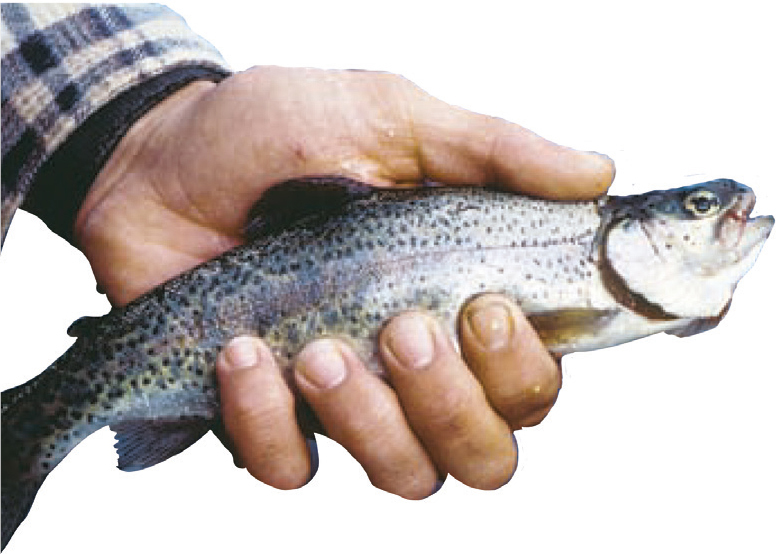
Success! A young angler displays a trout she took by using the right type of fishing rig for the situation at hand.