Listening
The other projects in this book focus on building or modifying an object—a synth, a uke, a garage-sale toy megaphone. This project focuses a bit more on building up your skills—tuning your ear and limbering up your limbs—so that you can coax tasty licks and rhythms from the plain old, unimproved junk cluttering up your basement, your garage, or the cheapest aisles of your local resale shop.
There are three fundamental habits that contribute to building a good junkshop percussion kit and developing solid junkshop percussion chops:1
Listening
Exploring surfaces
Exploring techniques
This chapter has no significant building instructions. Instead, it’s a collection of tips, tricks, and techniques for finding the good sounds that lie dormant around you.
Meet Vince: Professional Washboardist
For this project, I’ve enlisted the aid of percussionist Vince Russo, a man uniquely qualified to speak on the topic of coaxing fun sounds out of cast-off objects. Vince tours with the Appleseed Collective, an Americana roots band that’s often described as a post-folk Dixie-Gypsy blend of ragtime, bluegrass, and Django Reinhardt–Stéphane Grappelli–style “hot club” jazz.
Vince has played percussion for most of his life, working in a variety of styles on a traditional drum kit. In Vince’s words, the drum kit is an inherently “rigid, biased form”: different limbs have different jobs in order to produce a set of prescribed rudimentary patterns. These patterns are the building blocks for wonderfully complex rhythms, and they can be liberating once you acquire them—but the form itself can be constraining. Vince had never touched a washboard before he joined the Appleseed Collective, and the washboard was a revelation: “There’s no orthodoxy in washboard,” he says. As he traveled, he saw washboard players from vastly different backgrounds—traditionally trained drummers, accomplished percussionists, folks who inherited the tradition from their communities, the completely selftaught—using “wildly different playing styles.”
“There are rhythmic things that carry over from the drums, but a lot of it, in terms of muscle motion, is different,” Vince says. “Because there’s little structure here, your mission is really to impose structures so that you can later move out of them.” For example, Vince discovered that he could fall back on his old drumming rudiments, and by moving them across the many surfaces of the washboard, he could “create the same sound five different ways.” It was a wild, improvisational effect that was still solid and controlled.
“This is about exploration,” he explains, “about being able to explore on the washboard rather than being taught how to play a drum kit. I’m so much more of a fluid communicator on the washboard.”
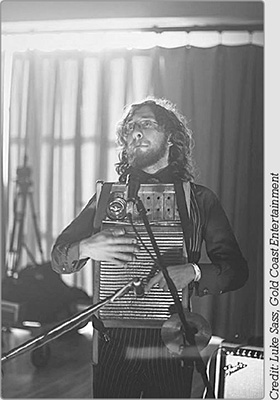
Vince Russo, fluid percussionist
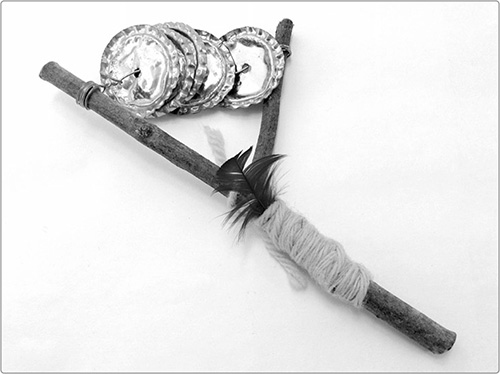
See Vince Russo demo a little junkshop percussion at http://www.nostarch.com/jamband/. Figure 8-1 shows a few examples of junkshop percussion instruments.

FIGURE 8-1: A variety of junkshop percussion instruments
Vince would be the first person to point out that he’s far from the world’s most accomplished percussionist. Many drummers have more inborn talent, begin formal lessons earlier in life, and dedicate more hours to molding their natural talent into formidable technique. Nonetheless, he’s able to make a living as a gigging musician because of something he learned early on: “There’s not a lot of percussionists who listen.” Listening will trump technical talent and years of study every time.
There’s a broad assumption that the beat is the core of a song—that the percussionist’s job is just to hold down the beat and keep everyone in step. But if you just want perfect time, you can build the basic 555 timer metronome in Appendix B (see “555 Timer Oscillator and Metronome Circuits” on page 362) or buy a great metronome for under $15. Any percussionist worth their chops knows that the drummer’s job—every musician’s job—is to serve the song itself. Sometimes this means leaning back into the groove and keeping the percussion tight to allow other musicians to dance over the beat. Other times, the percussionist needs to expand with the song, contributing to its energy and sense of forward momentum, which is, more or less, the musical definition of finding the groove.
Finding the groove—or, as drummers often say, “finding the pocket” or “staying in the pocket”—is a quasi-spiritual, you’ll-know-it-when-you-feel-it sorta thing. But there are several listening practices that’ll bring you closer to the groove. Top among these are catching the song’s stops and dynamics.
Stops are the breaks in the forward energy of the song. Either a rest is formally added, or the players emphasize particular beats (i.e., shift the accent).2 Shifting the accent so that the music seems to “tread water” for a few bars is often called stop-time, a name that carries over from ragtime music. Listen for breaks, drops, or anything else that gives a feel of moving the music into a holding pattern and then popping back out of that hold.
Dynamics are often thought of as just being about how loud notes are relative to each other and how sections of a song contrast in terms of volume. But dynamics aren’t just about volume, even though that’s an important aspect. The dynamics are better thought of in terms of how full or sparse the song is in various sections and how much of that sound-space is being filled by each instrument.
As a quick exercise, play your favorite song and focus your attention on the rhythmic elements, which are often carried primarily by the percussionist and bassist. Listen for stops, rests, and shifts in dynamic, the ways the song swells and recedes, and your emotional response to these shifts.
Then, listen to my favorite song: the original commercial recording of “I Want You Back” by the Jackson 5. This is the most common version of the song, the one that’s in hundreds of movie soundtracks and has regular radio play anytime I’m on a summer road trip with my kids. Most of the songs that came from Motown Records in this period are wonders of graceful composition, flawless performance, and inspired audio engineering. In this particular song, listen to the bass and percussion: it begins with simple hand claps, adds tambourine and subdued congas, and then progresses to a simple drum kit. At the B section (roughly two-thirds into the song), all of the rhythmic elements drop away and are then reconstructed, this time focusing on the congas. Each part is remarkably sparse (the hand claps are only once per measure, and the drum beat is a straightforward beginner’s lesson pattern), but taken together, these simple elements, gracefully timed, entirely direct your heart’s response to the song. This is a real-world example of what we mean when we talk about a song’s groove.
But listening is just listening unless you have an instrument in hand. Go find something to beat on. There’s nothing special or magical about the washboard in general or about Vince’s washboard in particular. Rather, it’s a tool that provides a wide variety of percussive surfaces in an easy-to-carry package. You could get just as far playing a mixing bowl, or plastic bucket, or elementary school desk.
Percussion, at its simplest, can be thought of in terms of heavy and light sounds: stomping on the bleachers versus clapping hands, snapping the snare versus tapping the closed high hat, beating the kick drum versus hitting a rim. As you explore surfaces to percuss upon, look for heavy and light sounds that you want to use as your building blocks. Here are some ideas.
These are your kick-drummy sounds. Try boxes—cardboard and otherwise—plastic 1- and 5-gallon buckets, large plastic water-cooler bottles, the middle of the kitchen table, a clean trash can, an old filing cabinet, an empty dumpster, a closed garage door, and so on.
You can get ringing sounds from cymbals, bells, wind chimes, wine glasses, dog dishes, mixing bowls, and so on. Bowls offer a world of options for exploring all on their own; I’m especially fond of metal dog dishes. Try metal, ceramic, or glass bowls. Use them right side up, upside down, and with or without water. Play them with your hands, drumsticks, chopsticks, pencils, metal or wooden spoons, thimbles, your wedding ring, pieces of PVC, old whisk brooms, or even BBQ skewers.
You can improvise wonderful chimes by hanging the metal platters from inside a discarded hard drive on lengths of string (see Figure 8-2). You may have recently torn apart a hard drive to get magnets for the Playing-Card Pickup (Project 9) or just because you were angry with it.
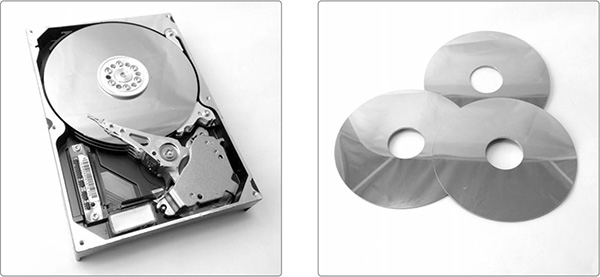
FIGURE 8-2: A dead desktop computer hard drive with cover torn off (left) and the three platters ready for their new life as chimes (right)
Think of a metronome or the sound you get by striking the rim of a snare drum, a stroke percussionists call a cross stick3 or rimshot.4 You can often find good clicks on mixing bowls and dog dishes. Flip one over and set it on a towel to muffle the reverb. Or you can lay a stick across the top of the bowl and strike the rim by lifting one end of the stick while the other end mutes the bowl, as shown in Figure 8-3; this technique is actually very similar to playing a cross stick on a snare drum.
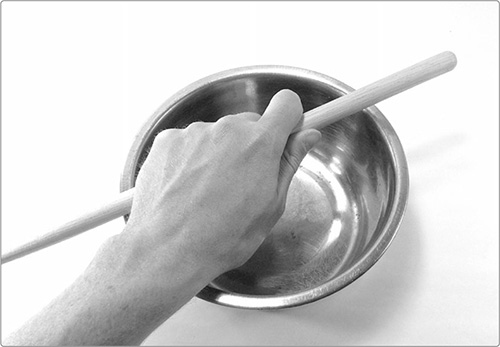
FIGURE 8-3: Playing a cross stick on a dog dish
You can also find nice clonks and clicks in glass soda, juice, and milk bottles. Try tapping on a bottle right side up or upside down. Play it on its side on top of a towel, in your lap, or gripped between your knees. Leave the cap on, take it off, or intermittently mute the open mouth with your free hand while playing.
Bones and spoons, as shown in Figure 8-4, are a traditional source of clicks and clacks in American folk music. Bones were once made from sections of beef rib and are now mostly made from wood. They’re a bit tricky to find these days and have a steep learning curve. But spoons are readily available and are very much a “minutes to learn, lifetime to master” sort of instrument. Figure 8-4 shows a classic spoon grip, and a quick YouTube search will bring you more spoon-playing instructional videos than you ever thought necessary.
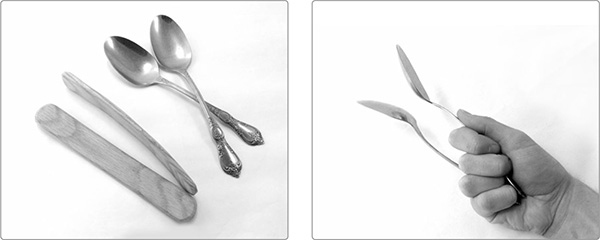
FIGURE 8-4: Bones and spoons (left) and a classic spoon grip (right)
Another traditional click—one that’s very important to Latin, and especially Cuban, music—comes from the claves (pronounced CLAH-veys).5 These are a set of 1-inch-thick, 9-inch-long hardwood dowels that can, for example, be cut from an old shovel handle (see Figure 8-5).
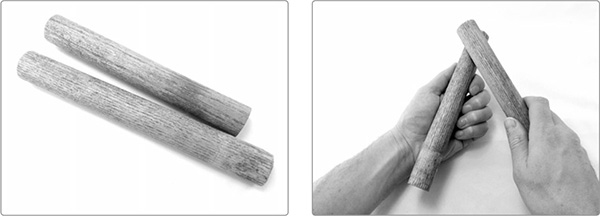
FIGURE 8-5: A set of claves (left) and a basic clave grip for a right-handed person (right). Note that my left-hand fingertips are below the surface of the clave, which prevents me from inadvertently hammering my fingers between the two heavy dowels.
The claves are traditionally played by letting one dowel, called the hembra, rest lightly in the nondominant hand while striking it with the other dowel, called the macho.6 This should permit the resting hembra to resonate freely, a bit like the wooden bar of a marimba. Experiment with where to strike your hembra to get the best tone. My best tone is either at the far tip of the hembra or between the base of my thumb and tip of my middle finger.
The sound of a shaker depends on both the body of the shaker and its contents. Try plastic Easter eggs, pill bottles, soda cans, soup cans, coffee cans, cardboard mailing tubes, cigar boxes, plastic or glass bottles, and jars of all sorts, and fill them with ball bearings, BBs, gravel, plastic beads, dried beans, rice, sand, wire scraps, snips of aluminum pie pans, metal bottle caps, screws, washers, or bolts. I recommend a glass jar with a metal lid, charged with a handful of dried beans. This configuration gives several tonal options: shake side to side for an all-glass shakersound, shake end to end for a hard metal smack countered by a softer glass pitterpat, mute the metal lid occasionally with your fingertips, and so on.
Flattened bottle caps sound really neat inside mailing tubes, and also make excellent zils (finger-cymbalesque jingles) for improvised rattles and easy tambourines, like the one shown in Figure 8-6.
FIGURE 8-6: A bottle-cap rattle tambourine
When you start playing percussion instruments with sticks instead of hands, consider using either chopsticks, which are light and easy to finesse, or something heavy, like claves or sections of a broom handle. For many newcomers, these thicker sticks will be easier to grip and play steadily than traditional drumsticks.
You can also fashion excellent mallets by drilling a small hole about halfway through a high-bounce ball, squirting in some silicone-based glue, and sticking in a piece of dowel or chopstick (see Figure 8-7). You can get a solid bass drum sound playing an overturned 5-gallon bucket using a pair of these.
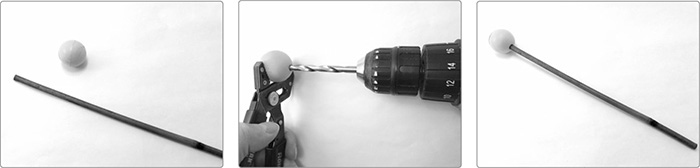
FIGURE 8-7: Making a bouncy ball mallet
Traditional drumsticks are amazingly versatile, but using them to good effect requires quite a bit of practice—it ain’t hammering a nail. If you want to explore traditional drumsticks, pick up any old pair of all-wood sticks and invest some quality time on YouTube watching the videos that come up when you search traditional grip, matched grip, and traditional vs. matched grip. You can learn to play a great drumroll with nothing more than a pair of decent sticks and a hardwood coffee table or hardcover book.
For many beginning junkshop percussionists, the hands are a more serviceable playing tool than sticks or mallets, especially when those hands have been slightly enhanced. Take your lead from the washboard players of the world and explore the sounds you find in surfaces by augmenting your fingertips with these gaffs, gimmicks, and gizmos:
Thimbles (metal or plastic)
Rings
Fingerpicks (the kind used by banjo players and bluegrass guitarists, which are available in a variety of styles in metal and plastic)
Frosting-bag tips (for example, those made by Wilton and sold as decorating bag tips)
Used shotgun shells
Test tubes
Cigar tubes
Work gloves modified with bottle caps or other metal scraps
If these don’t strike your fancy, dive into the junk drawer, stick some stuff on your fingers, and see what you hear.
You might have noticed some repeat appearances in this chapter, and that’s because different surfaces in the same object can make different sounds. Mixing bowls can serve in different modes for tings, rings, and clicks; claves can also be drumsticks; glass bottles might serve as shakers or as cowbells. But the most famous multisurface junkshop percussion instrument is the washboard (see Figure 8-8).
FIGURE 8-8: Vince’s antique washboard (left) and a homemade mini-washboard crafted from wood and an accordion-folded “tall #3” soup can—the sort of can that stands about 7 inches tall (right). Craig W. Van Otteren and Jim Jett developed these mini-washboards as a kid’s project for the 2014 Wheatland Music Festival in Remus, Michigan.
Despite the name, Vince finds that many folks don’t immediately make the connection that the washboard is an early 20th-century tool for scrubbing clothes. Brand-new washboards are increasingly common in music shops, but Vince doesn’t necessarily suggest getting one of these—they are cheap-o novelties that, in his experience, are poorly constructed and tinny sounding. He finds it much easier to work with finesse on an old board. While a new made-for-music washboard runs about $30, an antique washboard is only about $50 and will survive much longer. Some folks prefer to play washboards free of any additional add-ons, while others completely encrust their boards in service bells, cowbells, wood blocks, cymbals, cans, lids, chimes, and so on. Vince has added two accoutrements to his board: a service bell bolted to the soap saver and a small splash cymbal mounted to the left-hand rail.
Another great improvised, multisurface instrument is the humble hardcover book. Badly out-of-date encyclopedias—which tend to have thick, glossy pages, ripe for riffling—are an excellent example. A hardcover can be drummed like bongos with hands, fingers, knuckles, or any combination thereof. You can play a drumroll on it using standard drumsticks. The pages can be riffled with the book open or shut, and you can slam the book itself for an accent. And don’t forget about your nails, which can drum and rasp the fabric of the cover or skritch-skratch up and down the edges of the pages.
There’s a deep temptation among first-time washboardists to run a metal spoon up and down the corrugated metal scrubbing surface with abandon. This is really, really annoying. Focus primarily on building your rhythm by tapping on the metal scrubbing surface and wooden frame. Only rake the corrugated metal occasionally as an accent or transition.
Lots of washboard players play symmetrically—that is, with a spoon in each hand or all the fingers wearing thimbles. Vince prefers an asymmetrical style, with different tools for each hand. Although many play as Vince does, with the board strapped to their chest, some folks play the board flat on their laps barehanded like bongos or use traditional drumsticks. Just remember the golden rule of the washboard: “There is no orthodoxy in washboard.” Wildly different playing styles coexist and are really a matter of what appeals to you, both for the comfort in playing and the sounds you get.
For an example of an improvised multisurface instrument that’s made the transition from ad hoc make-do to “real” instrument, check out the cajón, as shown in Figure 8-9. What started out as a drum improvised out of packing crates by Peruvian slaves in the 1600s is now a commercially mass-produced instrument, an all-in-one tunable drum with bass and snare in a single package. You can buy cajóns in stores, take cajón lessons, and even hear the cajón in songs on Top 40 radio.
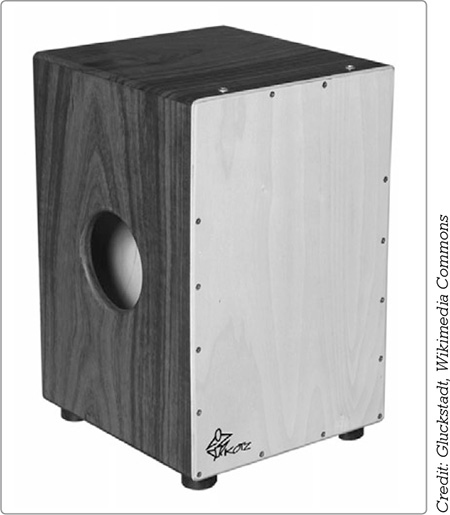
FIGURE 8-9: A commercial cajón
The trick to drumming is in breaking up the rhythmic movement of your limbs in new and counterintuitive ways. When I’m walking down the street, I’m moving rhythmically and largely symmetrically: my legs take equal strides at a steady pace, and my arms swing back and forth. But when I sit down at a drum kit, I assign my limbs jobs that aren’t at all symmetrical. For example, to play a simple 4/4 rock beat, my right hand taps the closed hi-hat eight times, while my right foot stomps only on the 1st and 5th beats; my left hand hits the snare twice but only on the 3rd and 7th beats; my left foot holds down the hi-hat pedal, but I might lift it on 1 and 5 so that those beats are accented.
This is confusing to read and can feel absolutely mind bending to do at first, but anyone can learn to do it. Remember, you learned to walk, skip, and hop—all of which are insanely complicated rhythmic activities that you now do all the time, completely on autopilot.
Drummers start retraining their limbs by practicing rudiments. These are simple patterns originally developed in Northern Europe so that drummers could be used to coordinate complex battlefield maneuvers during the early Renaissance. These patterns were later refined to serve as the codified building blocks of really complex marching band drumline patterns. Today, rudiments are still used to form the basis of the formal drumming vocabulary.
The best rudiment for breaking up your limbs is the paradiddle. This is a steady pattern of RIGHT-LEFT-RIGHT-RIGHT-LEFT-RIGHT-LEFT-LEFT, repeated ad nauseam. Get a metronome ticking and pat the pattern out on your lap using your open palms. If you don’t want to buy or build a metronome, just search metronome click track on YouTube for a virtual alternative. Make a point of practicing this with a metronome; maintaining an even beat is just as challenging as using the right hand at the right time, so you might as well work both those mental muscles at once.
You’ll note that this pattern forces your hands to take turns leading; you very much feel this in your body as a sense of passing the beat from left to right. Work on playing this pattern evenly and slowly at first, and then bump up the speed. Finally, try steadily speeding up and slowing down as you play.
Once the paradiddle gets comfortable, you can further blow your mind by doing flam paradiddles. A flam is when you precede your drum stroke with a little tap7 from the alternate hand; think of the “pa-rump” you hear in The Little Drummer Boy’s “pa-rumpa-pum-pum.” That “pa” tagged to the front of the “rump” is a flam. A flam paradiddle might be written out like this, where the lowercase words are the tapped grace notes: leftRIGHT-LEFT-RIGHT-RIGHT-rightLEFT-RIGHT-LEFT-LEFT. An even more mind-bendingly limb-liberating hand alternator with flams is the pataflafla, which goes like so (where, again, lowercase words indicate flams): leftRIGHT-LEFT-RIGHT-rightLEFT-leftRIGHT-LEFT-RIGHT-rightLEFT.
Once you’ve gotten the hang of these, the paradiddle-diddle will be no sweat. It’s a paradiddle with an extra diddle—that is, an extra double stroke: RIGHT-LEFT-RIGHT-RIGHT-LEFT-LEFT, repeat. Because the paradiddle-diddle has that extra diddle, it doesn’t alternate hands. You can address this by dropping half of a normal paradiddle in between two paradiddle-diddles. This will force the paradiddle-diddle into the other hand. If this sounds confusing, start tapping it out on the table, and you should hear it immediately.8
Try playing these patterns on different bits of your improvised percussion kit or using different objects in your hands. Vince, for example, plays washboard with thimbles, fingerpicks, and pastry-bag tips on his right hand and a heavy beer-bottle opener in his left. In this way, he can make a lot of music with very little. “You don’t need to have a multitude of surfaces to have a multitude of sounds,” he says. “I’ll play a countertop or my knees.” He laughs, “One time I jammed with a dulcimer player, and I didn’t have my washboard, but I had my washboard picks and a glass juice bottle. The bottle had a little bit of that waffle pattern, so I clinked on it with my picks.”
But wait, there’s more! Once you’ve freed your hands from working in lockstep synchronization, the next logical step is to liberate your fingers. Vince notes that “using your fingers—and not just thinking, I have right and left—really opens it up and expands the possibilities.” This is the place where junkshop percussion really pushes beyond the drum kit: your hands don’t have to be wrapped around sticks, nor your feet dedicated to pedals controlling the hi-hat or thumping the big bass drum. Try practicing paradiddles by tapping your toes,9 alternating between the index and ring finger on your right hand, or alternating between your left heel and left hand.
The more you practice automating these movements and breaking up your limbs, the more free mind-space you’ll have for listening to the song as it forms around you and feeling for the groove. And, as you do all this practicing, don’t stop listening. Pay attention to what’s fluid and comfortable as you play, but also listen for sounds and patterns you like—little tasty licks that you can keep handy and that might fit a gap you hear in the next song you play.