The Playing-Card Pickup is a true magnetic pickup, based on the same basic design principles as the pickups built into professionally made electric guitars. Although this pickup was developed for the next two projects (the Robo-Tiki Steel-Stringed Ukulele and the Twang & Roar Kalimba), it’s well suited to amplify any number of homemade stringed instruments, such as cigar-box guitars and “canjos,” as well as smaller store-bought steel-stringed instruments. Much like the Plasti-Pickup (Project 2), the Playing-Card Pickup is a fun, experimental noise toy in its own right, useful for quickly electrifying ad hoc percussion kits composed of cookware, scrap metal, playground equipment, and so on.
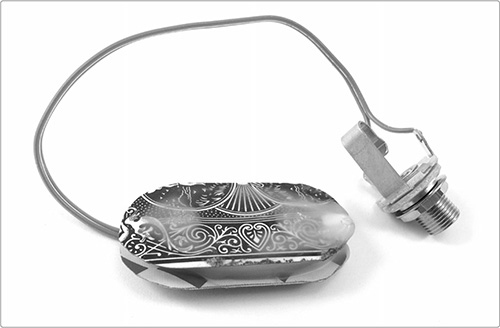
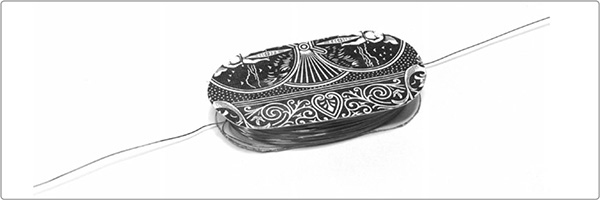
The finished Playing-Card Pickup is shown in Figure 9-1. Hear samples at http://www.nostarch.com/jamband/.
FIGURE 9-1: The finished Playing-Card Pickup
Build Time
 Under an hour
Tools
A standard soldering kit (See page 340.)
A ruler or straight edge
A hobby knife, utility knife, or pocketknife
Scissors
A quarter
An amp and instrument cable for testing the pickup
(Optional) A multimeter (See “Using a Multimeter” on page 349.)
Supplies
A playing card
Four small neodymium disk magnets (Available in most hardware stores, these are often called supermagnets or rare earth magnets. I used disk magnets that are 8 mm in diameter and 3 mm tall, but others should work fine.)
A few hundred feet of 43-, 42-, or 30-gauge enameled winding wire (30-gauge wire—also called magnet wire—is by far the easiest to find on the spur of the moment. 42- and 43-gauge wire can be ordered online; see “Resources” on page 141 for details.)
A chunk of beeswax roughly 1 1/2 inches by 3 inches, or about 2 ounces by weight
24-gauge insulated hook-up wire (Stranded wire is best.)
A 1/4-inch mono phone jack, also called a guitar jack
Control-gel cyanoacrylate glue (Any brand of control-gel formula superglue will do. I especially like Loctite Ultra Gel.)
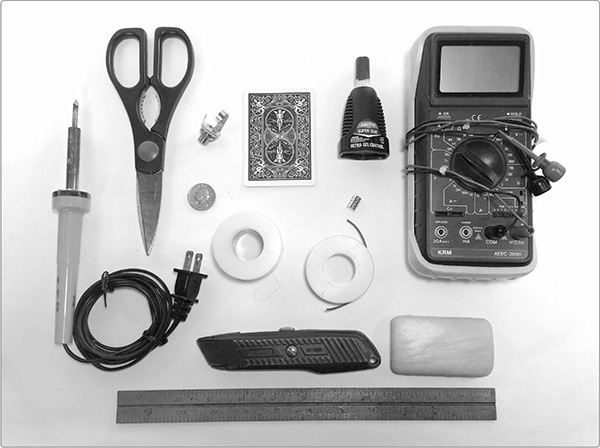
FIGURE 9-2: Tools and supplies (not shown: amp and instrument cable)
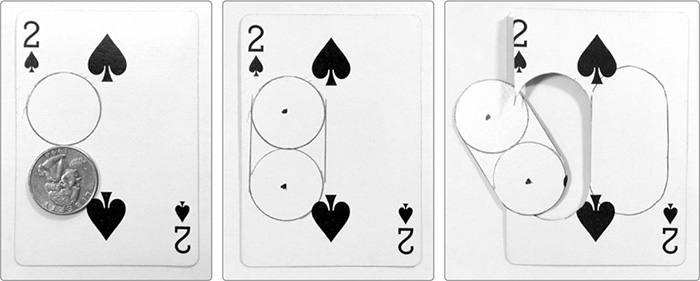
Step 1 We’ll start by cutting a pair of identical body plates from an old playing card or a similar thin, rigid cardboard. Place a quarter on the card, trace a circle around it, and then move it down so that it’s tangent to (barely touching) the circle you just drew (see the left image of Figure 9-3).
FIGURE 9-3: Cutting the matching front and back body plates
Trace a second circle, mark the centers of both circles, and draw a pair of tangent lines joining their outer edges, as shown in the middle of Figure 9-3. Cut this oblong shape out and use it as a template to create a matching plate (as in the rightmost image in Figure 9-3). With a little care, you should be able to make both plates from a single card.
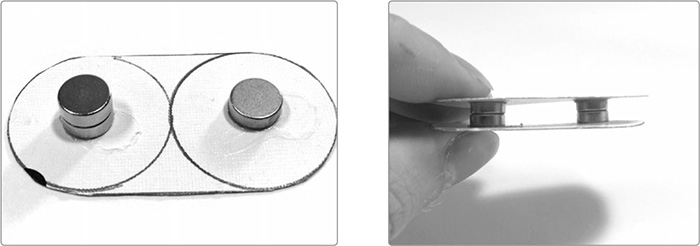
Step 2 Now we’ll mount the magnets. Because they’ll want to stick to each other, you can make this step a bit easier by having a nice, flat hunk of magnetic metal handy (an old toolbox or metal filing cabinet is great). Start by putting a dab of control-gel superglue at one of the center points you marked in Step 1. Place one of your neodymium magnets in the puddle of glue and squeeze for 5 or 10 seconds to let the glue begin setting. Repeat with a second magnet at the other center point, taking care not to let magnet #2 attach itself to magnet #1. Now snap your partially finished pickup body, magnets up, on your metal work surface. Control-gel superglue takes a few minutes to firm up, but you can speed that up by blowing on it.
Once your magnets are glued down, stack another small neodymium magnet atop each of the ones you just glued (see the leftmost image in Figure 9-4). Put a bead of glue atop each magnet stack and then glue the other body plate in place (see the rightmost image in Figure 9-4).

* SUPERGLUE FIRE WARNING: Cyanoacrylate (CA) glues have an exothermic reaction with cotton and some wool blends. In other words, CA tends to get hot when it makes contact with many fabrics. CA may even react with cotton balls or swabs (some brands are all or mostly natural fiber), and the reaction can be rapid enough to cause burns or catch fire. This risk is minimal but real. Be prepared. If you squirt some glue on your clothing, just strip down in a hurry and risk embarrassment rather than ending up with a smoldering T-shirt glued to you.
* PROTIP: If you glue your fingers together, remember: superglue binds fast and hard, but it has relatively poor shearing strength. In other words, it holds tight if you’re pulling straight up, but it often releases if you work from the edge and peel the glued surfaces apart. Dip glued-together fingers in olive oil and then rock them back and forth; don’t try to pull them straight apart.
FIGURE 9-4: Completing the pickup body
Step 3 Next, we’ll wind the coil. Leave a 6-inch tail of enameled magnet winding wire dangling and begin wrapping your pickup as you’d wind up the string on a yo-yo. Even though 30-gauge enameled wire is thin, it’s pretty durable, so you should be able to wrap quickly without snapping the wire. Wind until the body is filled with wire along its long edges, and then leave another 6-inch tail and snip the wire. Many pickup builders speed this up by sticking their pickup body to the exposed flywheel on an electric sewing machine and then running the machine at a slow-ish setting, carefully feeding the wire to the pickup as it spins. Using this method, you can have the coil wound in just a few minutes. Finish this step by using sandpaper to scrape the enamel off the last half-inch of each free end of the coiled magnet wire.
However you arrive at it, the final result should look like Figure 9-5 and, if you’ve used 30-gauge wire, will probably consist of a few hundred windings, totaling less than 200 feet. If you’ve used a thinner-gauge wire, you’ll have used a greater length of wire, resulting in more windings. That’s great, and it will work just as well—if not better!
Step 4 If you have a multimeter, now is a great time to check that your pickup is in good shape. The coil should have continuity (that is, electricity should be able to flow through the coil from one end to the other), and it should offer around 14 ohms1 of resistance. Resistance as low as 8 ohms is fine, and higher is also okay.
The pickup we’re building is a passive, single-coil magnetic pickup with a relatively flat winding. It’s modeled on the original soapbar pickups used in ’40s and ’50s Gibsons and Fenders, and it retains something of their bright, crisp twang. A single-coil design like this is a bit more susceptible to interference than a dual-coil pickup, but given our junkyard-punk hillbilly aesthetic, that wash of warm background hum is a feature, not a bug.
That paragraph you just read is a dandy little spiel to rattle off if a gearhead asks you about the electrified cigar-box instrument you’re showing off, but probably sounds like a bunch of in-group jargon to you. Don’t fret: guitar pickups are pretty mysterious to most folks, including many a road-weary musician. What the heck are pickups? How do they do their voodoo?
From an electrical engineering standpoint, the pickups on an electric guitar are simple magnetic transducers: they transform the vibration of the metal guitar strings into a matching electrical signal suitable for electronic amplification.
A magnetic guitar pickup is made of one or more magnets surrounded by many coils of fine wire. When you pluck a guitar string, that steel string vibrates near the pickup, disturbing the standing field created by the magnet. This moving magnetic field induces a moving electrical current in the coil, and your amp amplifies this fluctuating current. The fluctuations in this electrical current are identical to the fluctuations in the magnetic field, which are themselves identical to the fluctuations of the vibrating guitar string. This is why the note coming out of the amp matches the note the string is playing: same frequency = same note.
When you think about it, your guitar amplifier isn’t really amplifying your guitar, per se: it’s amplifying an electrical current that matches a magnetic ripple that matches the vibrations of the guitar strings themselves. That’s why an electric guitar sounds distinctly different from its acoustic cousins. With an acoustic instrument, the design and composition of the body has a profound impact on the instrument’s voice because you hear the entire body of the instrument vibrating. With an electric instrument, the body has almost no impact on the sound because the pickup only detects the vibrations in the metal string itself. Body composition has almost no impact on how those metal strings vibrate. It could be fine Adirondack spruce or an old wood toolbox; it’s gonna sound about the same. If you really think about it, when you’re listening to Jack White or Joan Jett tear it up, you aren’t even hearing the strings, not really; you’re hearing the electricity.
Most electrified ukes and cigar-box guitars floating around the Internet don’t have a true magnetic pickup. Instead they rely on an acoustic piezo pickup, like the ones we built for the Slinkiphone and the Plasti-Pickup (Projects 1 and 2). That’s why they don’t sound like electric guitars: strictly acoustic pickups amplify the entire instrument—including every bump and scrape on the fingerboard—just as much as the notes you’re playing. You don’t get the same tone as an electric guitar because that true electric-guitar tone arises from directly amplifying the string itself, rather than the wood it’s strapped to.
If you don’t have continuity, then the coil is broken; unwind it and try to find that break. You can probably repair this break by scraping off the enamel on the two broken ends and resoldering the wire, although that might prove a pain. (Unwinding the broken coil and entirely rewrapping with brand-new wire is also an option.) If the pickup’s resistance is less than 8 ohms, you probably have a short in the coil. This will definitely make the pickup sound quieter and could lead to it not working at all. Proceed with caution, or play it safe by rewinding the pickup and testing again.
Step 5 Let’s add the insulated leads and 1/4-inch jack. Cut two 6-inch lengths of 24-gauge insulated wire. Strip the ends, tin them, and solder one to each end of the pickup coil, as shown in Figure 9-6. Wrap at least one of these connections in a snip of electrical tape or shrink tubing in order to prevent annoying shorts in the pickup.
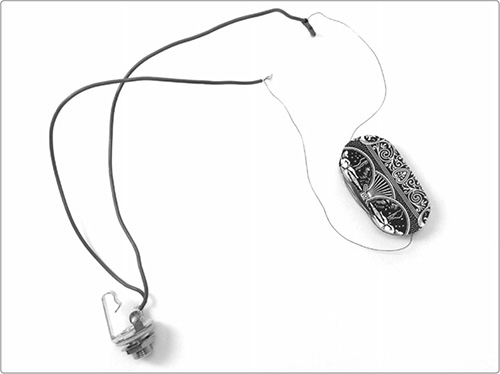
FIGURE 9-6: Leads and jack connected
Finally, tin the lugs of the jack and solder one lead to each lug so you can test the pickup easily in the next step. It doesn’t matter which lead goes to which lug. (Need a refresher on soldering? Flip to “Soldering” on page 346). Keep in mind that this is just a temporary connection; you’ll need to remove the jack when you install the pickup later. Going light on the solder now will make desoldering later a breeze. If you’re not planning to install this pickup in an instrument, then feel free to go a bit heavier on the solder now.
Step 6 It’s time for a sound test! You could skip this step if your pickup had continuity in Step 4, but if this is your first pickup, I strongly advise testing now so you’ll know how much the sound improves after potting the pickup in Step 7. Carefully plug a guitar cable into the jack, connect it to an amp, power up, and crank the volume. Tap the pickup with your finger, and you should hear some scraping and thumping. You should also hear a nice loud thump when you drop a small magnetic screw or nail on the pickup. If you don’t hear anything but your tests in Step 4 confirmed that the coil has 8 or more ohms of resistance, then you have a short in your leads or jack. Check for crossed wires or solder bridges, fix them, and test again.
Once your pickup checks out, wrap the remainder of the enameled wire around the body of the pickup and glue the two leads to the center of the back of your pickup (see Figure 9-7).
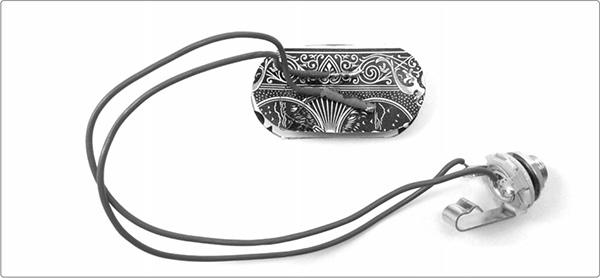
FIGURE 9-7: Fully functional pickup, ready for potting
Step 7 Let’s pot the pickup, which means soaking it in molten wax. Remember how the pickup thumped when you poked it with your nonmagnetic finger? That’s because the enamel coils moved, and even tiny shifts of the wire in the fixed magnetic field will generate enough current for the amp to pick up. Potting the pickup fixes the coil in place and eliminates this unwanted nonmusical noise.
To begin, place your beeswax in a clean glass jar, place the jar in a pot with a few inches of water, and place this over medium heat until the wax has just melted.2 Then, remove it from the heat. Dunk the pickup in the molten beeswax for one minute. Tiny bubbles should drift to the surface as the wax soaks into the little crevices between the windings. Pull out the pickup, and let it drain and cool for 30 seconds. Repeat a few more times. After the third or fourth dip, you shouldn’t see any more bubbles when you soak it. Hang it over the edge of a jar to cool, as in Figure 9-8, so you don’t get wax all over your table. Then, carefully check the outside of the coil for loose loops of wire that can still wiggle. If you see any, try a couple of quick candle dips: five seconds submerged, five seconds to drip, five more seconds submerged. Candle dips will build up a thick outer layer of wax pretty quickly.
When no wires move, set aside your pickup. You’re ready to install it in your instrument or to start exploring the electromagnetic soundscape around you.
* HOT WAX FIRE WARNING: Never leave beeswax unattended on the stove! If the beeswax smokes, it’s too hot; cut the heat immediately. A beeswax fire is a lot like a grease fire: never throw water on it! Flaming wax will splash and spread the fire when doused with water. To put out such fires, cover the pot with its lid (if possible) or smother the fire in baking soda, salt, or sand. Do not smother a fire with flour! Flour burns very well and can be explosive when thrown at a grease fire. According to US Army improvised munitions manuals, a 5-pound sack of flour—if properly initiated—can easily level a small building.
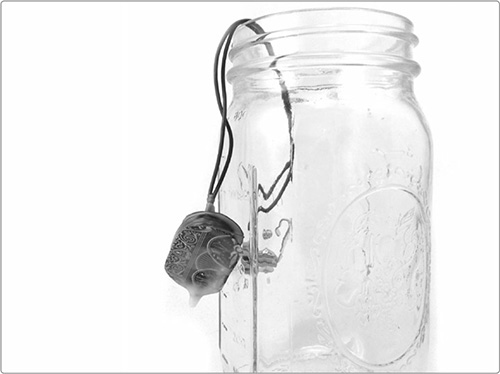
FIGURE 9-8: Drip-drying the potted pickup
Beeswax is available at most health/organic food stores and farmers’ markets, as well as many craft, hardware, and art supply stores. Although beeswax (or a 20/80 blend of beeswax/paraffin) is traditionally preferred by many luthiers, straight paraffin wax has gained traction in professional circles over the last several years. I’ve talked with makers who’ve used paraffin candle wax instead of beeswax to pot their playing-card pickups and gotten good results, although I haven’t tried it myself.
Paraffin wax is an industrially produced petroleum product with very consistent composition; you can be sure that pretty much any hunk of paraffin wax is basically about the same as any other. Beeswax is made by bees with low standards for quality control. I’ve had batches of beeswax that contained minute magnetic particles in suspension—you could see this magnetic dust gather like iron filings over the magnets on the potted pickups. How does this metal end up in the beeswax? It’s what’s left of shooting stars. Meteorites burn up as they enter our atmosphere, in most cases leaving nothing behind but a dusting of iron powder. Tons of this stardust rains down on Earth each year, and some gets inadvertently collected by bees as they gather their sweet, sweet nectar. I’ve personally never noticed any audible difference between my “high iron” beeswax pickups and those with less obvious accumulations of meteorite dust, but my pickups are not precision devices to begin with. Nonetheless, this variable iron content may contribute to the “dark” tone that veteran luthiers sometimes attribute to 100 percent beeswax-dipped pickups.
As for real and verifiable differences between paraffin wax and beeswax: paraffin wax has a lower melting point, which some folks find easier to work with in general. That makes paraffin wax preferable for some applications, and it should pot your pickup just fine. Beeswax, however, is more pliant at room temperature. This makes the pickup more durable over time. Because durability trumps all for me (I regularly hand these homebrew instruments to excitable children), I stick with beeswax. It doesn’t hurt that I’ve already got a big hunk of beeswax on hand, and I love the faintly honey-dipped smell of the finished beeswax pickup.
Finally, note: paraffin wax is just as flammable as beeswax. Please take the same precautions when handling it as you would for beeswax.
The primary use for this pickup is to amplify the next two projects: the Robo-Tiki Steel-Stringed Ukulele (Project 10) and the Twang & Roar Kalimba (Project 11). It’s likewise a great design for amplifying a homemade cigar-box guitar, diddley bow, or any number of smaller steel-stringed instruments, such as lutes, mandolins, strum-sticks, mountain dulcimers, and so on.
You can also use this magnetic pickup to amplify and record many harmonicas. The wooden or plastic comb you blow into and the brass reeds that vibrate to make the harp sing aren’t magnetic, but most harmonicas have a chrome body, which is. You can stick the Playing-Card Pickup right to the side of your Marine Band Special 20 and blow with abandon—no worries about picking up pops and ’plosives.
Like the Plasti-Pickup (Project 2), this homespun magnetic pickup is a great tool for sonic exploration. For example, stick this guy to the side of anything magnetic that you might want to percuss and amplify—such as a flagpole, handrail, garbage can, swing set, tire rim, and so on. If you have metallic bowls or dog dishes that aren’t magnetic enough to hold the pickup tight, just set the bowl on top of the pickup and drop in a couple of magnetic ball bearings, washers, or screws to keep the pickup in solid contact with the bowl. This is a great way to capture the sound of Tibetan singing bowls for recording, amplification, or effects processing, and it even works with totally nonmagnetic vessels like “singing” wine glasses or large glass mixing bowls. Check out Junkshop Percussion (Project 8) for more ideas.
You can even use the Playing-Card Pickup to safely listen to the 120-volt AC lines in your walls. That’s not terribly useful musically, but it can come in handy if you’re hanging a picture and worried about hitting a live wire, or just curious about what path your wires take behind the plaster.
More windings mean a hotter pickup—one that’s more powerful, sensitive, and louder. By using a thinner-gauge wire (one with a higher number; see “Wire” on page 336 for a quick explanation of wire gauges), you’ll be able to fit more windings into the same size pickup.
Commercial pickups use 42- or 43-gauge wire. If you’ve successfully made a pickup with 30-gauge wire, making another with 42- or 43-gauge wire is well within your skill set and definitely worthwhile. This thinner wire is more delicate, so wind slowly and consider doing it entirely by hand. Everything else with the design is otherwise the same. Just use the thinner-gauge wire and add windings until the coil is within 1/8 to 1/16 inch of the long edge of the body plate. The resulting pickup should have a DC resistance around 2.5k ohms—that’s 2,500 ohms, 170 times more resistance than what you measured on your 30-gauge pickup in Step 4.
With magnetic pickups, higher resistance corresponds to greater amplification; 2.5k ohms is at the lower end for fairly cool (i.e., low-powered) commercial pickups. Such a pickup will still work with a lot of different homebrew and commercial effects.
Sourcing 30-gauge wire is pretty easy: it’s readily available at some hardware stores and most electronics shops, hobby shops, and science supply stores. It can also be salvaged from discarded motors and transformers. The thinner 42- and 43-gauge wires are easier to find online than locally, though a very well-appointed guitar repair shop might have a spool to sell.
Stewart MacDonald (http://www.stewmac.com/), a popular online luthiery supplier, sells large half-pound spools of pro-grade 42- and 43-gauge pickup winding wire, both new and vintage. Either gauge and style is fine for this project. A half-pound spool is enough winding wire to make at least a dozen pickups like this one. Antique Electric Supply (http://www.tubesandmore.com/) sells smaller, and thus cheaper, spools of 42-gauge wire that also work well for this project. Both stores are good sources for other musical instrument and effect hardware, such as switches, jacks, tuning pegs, and so on.
As for appropriate magnets, many hardware stores stock the small neodymium magnets I call for here, but they can be a tad pricey, up to a buck each. If you order online, you can get magnets significantly cheaper. K&J Magnetics (http://www.kjmagnetics.com/) is a popular, well-stocked source for rare-earth magnets. The 8 mm × 3 mm discs I favor are the same as K&J’s 5/16 × 3/32 disc magnets. As of this writing, K&J Magnetics sells them for $0.38 each.
You can also salvage neodymium magnets from old computer hard drives (as shown in Figure 9-9). Each drive contains two arc-shaped bar magnets. You might need to modify the size and shape of your playing-card body plates in Step 1, but it’s a neat opportunity to upcycle. I’d suggest a chunky 2-inch by 2 1/2-inch pickup, which is a bit more like a bulky soapbar pickup. If you’re already taking apart a hard drive, hold on to the platters; they make really great chimes for your Junkshop Percussion setup (Project 8).
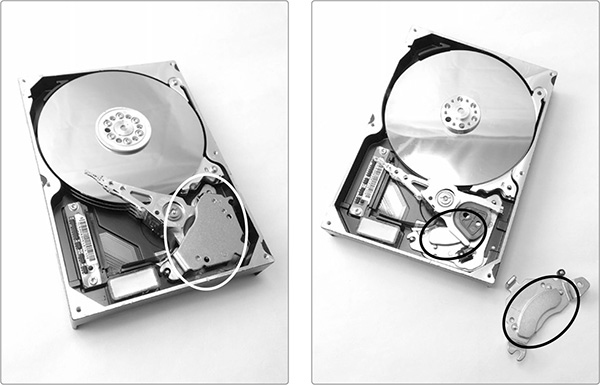
FIGURE 9-9: A broken hard drive with the cover removed (left) and the same drive partially dismantled to reveal the pair of curved neodymium magnets (right). The circles indicate the location of these wonderfully powerful magnets.