
The kalimba, or thumb piano, has a sweet, harmonically complex music-box voice—when you think “generic African music” you are likely imagining lots of hand drums and a kalimba. Despite being so immediately recognizable, this instrument is really distinguished by its diversity: it has a dozen names throughout sub-Saharan Africa, and it has been crafted from every material imaginable—from scrapyard remnants to now extinct hardwoods, with countless idiosyncratic tunings. The Twang & Roar Kalimba is made from common materials and has a Westernized tuning that’s easy to improvise on, and with the addition of just two extra tines, it’s ready to play lots of familiar folk tunes—a mod discussed in detail in “Expand Your Scale” on page 193.
While our kalimba is a perfectly usable acoustic instrument that’s great for hikers and campers, it’s also kitted out with a pair of pickups—one magnetic, the other piezo—so that you can plug in and crank up the twang and roar. The two pickups connect through a simple pan-pot mixer, which allows you to smoothly transition between them, with lots of tonal options in the middle.
The piezo pickup amplifies any contact made with the instrument, bringing out the aggressive twang of the tines as well as the thump, rasp, and rumble of the player’s hands on the body of the instrument. The piezo is also loud and distorts wonderfully.
In contrast, the magnetic pickup amplifies only the vibration of the metal tines themselves, for a more natural tone. Because those tines are fairly massive pieces of vibrating metal (by guitar-pickup standards), they can really rattle that magnetic field. Play hard, and you’ll get a great Rhodes electric piano–style fuzzy bark tone.1
FIGURE 11-1: The finished Twang & Roar Kalimba
There’s a ton of room to improvise and expand on this kalimba design: you could build an all-acoustic or all-electric kalimba, or use a big booming oil drum or a tiny candy tin for the body. The first kalimbas, built 3,000 years ago on the west coast of Africa, had bamboo tines instead of metal ones. Today, folks make neat kalimbas with all sorts of upcycled tines: bike spokes, popsicle sticks, plastic sporks, and so on.
The following instructions assume that you’re building a six-note kalimba using a box less than 5 inches wide, with metal tines tuned to the C pentatonic scale (see “Scales and Chords” on page 373 for more on the pentatonic scale). If you want to build something larger or with an alternative tuning, check “Playing the Twang & Roar Kalimba” on page 190 and “Tips, Tricks, and Mods” on page 191 before proceeding.
Hear the Twang & Roar Kalimba in action in the samples at http://www.nostarch.com/jamband.
Build Time
 About 2 hours for a full electric-acoustic model, plus 4 to 24 hours of drying time for the glue (An all-acoustic kalimba can be built in about half that time.)
Tools
A standard soldering kit (See page 340.)
An electric drill with bits (You’ll need 3/16-inch, 1/4-inch, and 3/8-inch bits. Depending on the exact dimensions of your potentiometers, a 5/16-inch bit might be handier than a 1/4-inch bit.)
A 1-inch spade drill bit, also called a paddle bit (See Figure 10-11 on page 154.)
A ruler marked in both inches and millimeters
Any wood saw
8 1/2-inch bolt cutters (Larger bolt cutters are fine, too; a hacksaw will do in a pinch, but it’s a pretty miserable alternative.)
A screwdriver that matches your #8 machine screws (You’ll almost certainly want a Phillips screwdriver.)
Medium-grit sandpaper
Pliers
(Optional) A hacksaw (This tool is mandatory if you’ve skipped the bolt cutters.)
(Optional) A tapered half-round file or other metal file with a flat face
(Optional) A multimeter (See “Using a Multimeter” on page 349.)
(Optional) An amp and instrument cable for testing the pickups and mixer
Supplies for the Body and Tines
A cigar box (A narrow, deep box will be easiest to work with and play. For best results, get a box with a wooden bottom.)
A 7/16-inch dowel, at least 4 inches long (Anything thinner will prove hard to drill.)
A 1/4-inch carriage bolt, roughly as long as the width of your cigar box (The one shown in Figure 11-2 is 5 inches long. You could also get a 1/4-inch threaded rod and cut it to your desired length.)
Two 1-inch-long #8 machine screws
Two 1/2-inch-long #8 machine screws
Two #8 wing nuts
Two #8 nuts
Six #8 washers
3 feet of 1.4 mm, or .055, music wire (See “Buying Music Wire” on page 174 for details.)
A few rubber bands (The thick ones used to secure lobster claws or bunches of broccoli are great.)
Supplies for the Pickup and Mixer
Control-gel cyanoacrylate glue (Any brand of control-gel formula superglue will do. I especially like Loctite Ultra Gel.)
A playing card
Four small neodymium disk magnets (Available in most hardware stores, these are often called supermagnets or rare earth magnets. I used disk magnets that are 8 mm in diameter and 3 mm tall, but others should work fine.)
A few hundred feet of 30-gauge enameled winding wire (Also called magnet wire, this is regularly stocked by any hobby or science supply shop that carries electronic supplies, and it can also be found at many hardware and craft stores.)
A chunk of beeswax roughly 1 1/2 inches by 3 inches, or about 2 ounces by weight
24-gauge insulated hook-up wire (Stranded wire is best.)
A 1/4-inch mono phone jack, also called a guitar jack
A piezo element, such as Digi-Key part #102-1126-ND (Any piezo element will do, but getting one with pre-soldered leads will save your sanity.)
A 10k ohm audio potentiometer (This is a variable resistor with an audio taper; see “The Gory Details: Audio Taper vs. Linear Taper” on page 327.)
A 100k ohm variable resistor with a linear taper
Two control knobs that fit your variable resistors
Silicone-based household glue, sometimes called room-temperature vulcanizing rubber or RTV-1
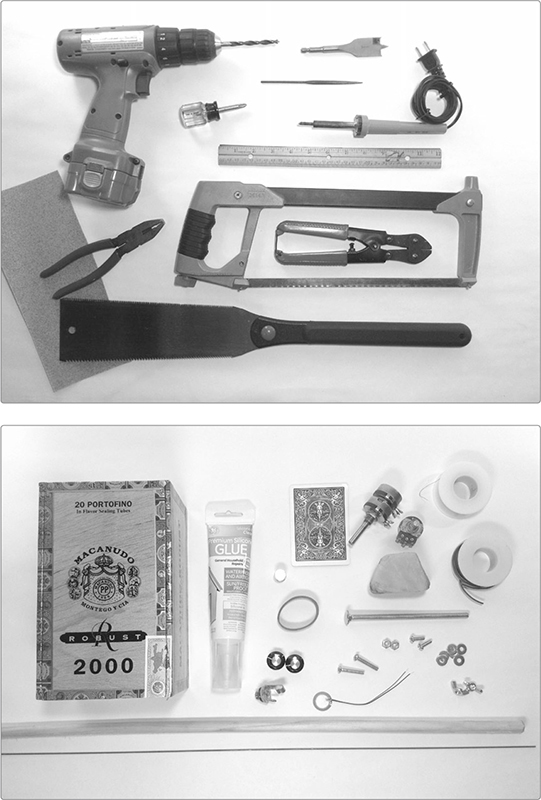
FIGURE 11-2: Tools and supplies (not shown: multimeter, amp, instrument cable, and control-gel cyanoacrylate glue)
.055 music wire is thin-gauge spring steel sold at craft and hobby shops and many hardware stores (it might also be referred to as control wire or piano wire, especially in hobby shops). You can even find it on Amazon.com; just search for .055 music wire. In the United States, almost every store that stocks this material has the same wire, produced by K&S Precision Metals of Chicago, Illinois. It’s sold both as straight 36-inch lengths and as coils. Local stores usually carry the straight lengths, which K&S identifies as stock #503. The coils are sold by weight and are a better deal if you need a lot of control wire (used to control certain styles of old-school model airplanes).
For this project, you’re better off with the straight lengths because getting all of the curve out of the coiled wire can be really challenging with common hand tools. These straight lengths of .055 music wire are generally sold in three-packs for a few dollars. A three-pack gives you enough music wire for several thumb pianos—or for lots of mistakes and experiments!
Similar to the Robo-Tiki Steel-Stringed Ukulele (Project 10), this project is a matter of building several subunits—an acoustic kalimba with a few extra holes for wires and hardware, a pickup, and a very simple mixer—and then bringing them together. We’ll start by doing all the acoustic bits—that is, everything shown in Figure 11-3—so that those uninterested in going electric can be on their merry way after the final step on page 181.
Step 1 Cut the music wire into six pieces, each 6 inches long. These will be the tines shown in Figure 11-3. Music wire is durable, precision-drawn, high-carbon, tempered spring steel, but you can snip right through it with a little muscle and a decent pair of bolt cutters. The cut ends will be pointed but not terribly sharp. You can easily smooth them with a metal file if they prove too prickly for your fingers.
You can use a hacksaw to cut the tines, but it’s incredibly frustrating. Steel this thin is hard to secure while cutting; it springs around a lot, and you’ll definitely need to file the playing ends down afterward. Sawing is not recommended, but it is possible. However you cut your tines, finish them by using pliers to bend over the last 1/4-inch of each tine (see Figure 11-4).
FIGURE 11-3: Anatomy of a kalimba
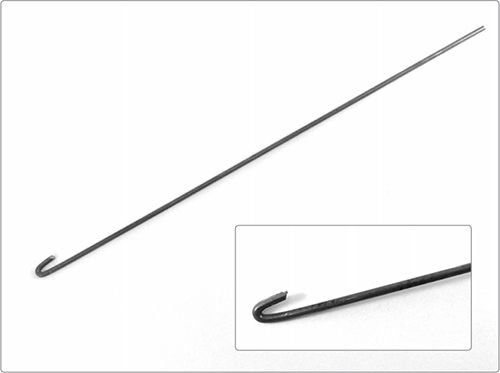
FIGURE 11-4: A completed tine; note the hooked end (detail inset)
Step 2 Prepare the bridge. This is a 4-inch length of 7/16-inch dowel with two 3/16-inch holes, 1 inch from either end of the dowel. (If that string of numbers makes you dizzy, then a quick look at the far-right image in Figure 11-5 will likely clear your head). Take your 4-inch dowel and draw a centered guideline down its length, as in the far-left image of Figure 11-5. Measure 1 inch in from each end and mark your drill holes, as in the middle image of Figure 11-5. Finally, drill those holes.
* WARNING: Drilling holes in the side of a cylinder can be tricky. Before pulling the trigger, ask yourself where that drill bit is going to end up if you slip. If you want to be extra safe, you can use a hammer and nail to pop little guide divots into the dowel before drilling.
Finish the bridge off by sanding down any rough edges. Don’t worry if the drill holes look bad; they’ll be hidden behind washers when you’re done.
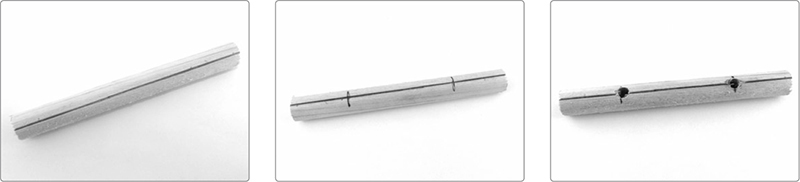
FIGURE 11-5: Preparing the bridge
Step 3 Prepare to drill the body of your kalimba. The bottom of the box will be your piano’s soundboard. Flip the box over so that its lid is down and bottom up. Peel off any unwanted price tags or pesky surgeon general’s warnings. Pencil in horizontal guidelines 2 1/2 inches from the top (for the saddle line) and 1 1/2 inches from the top (that’s the bridge line). Next, add two Xs along the saddle line, each 1 inch from either edge of the box (see Figure 11-6).
* NOTE: The bottom is a cigar box’s sturdiest construction. Using it for the top of your instrument makes for a better resonator overall. Lids, on the other hand, are often made of inferior wood and are almost always poorly attached. Using such lids as soundboards results in a muffled tone, poor amplification, and annoying buzzes.
Step 4 Drill the body of your kalimba. This will take several steps, starting with the acoustically mandatory sound hole. Using the 1-inch spade bit, drill a hole in either of the lower corners of the soundboard; in Figure 11-7, I chose the lower left. Be sure to leave a 3/8-inch to 1/2-inch margin around the hole so you don’t bore into the sidewalls of the cigar box. If the hole looks rough, take some time to sand it smooth now.
FIGURE 11-6: Guidelines for drilling the kalimba’s soundboard. The saddle line is the lower of the two lines, and it has a pair of Xs on it.

FIGURE 11-7: Placement of the sound hole
Step 5 Add the saddle-block holes. Using a 3/16-inch bit, drill holes at the two Xs you marked on the saddle line. Then, center the bridge you prepared on top of the bridge line and use it as a guide to drill two more 3/16-inch holes (see Figure 11-8). If using the bridge as a guide in this fashion is too tricky—as it might be for those with small hands or heavy drills—you can use it as a guide to mark the placement of the holes and then remove the dowel and drill the holes on your marks.
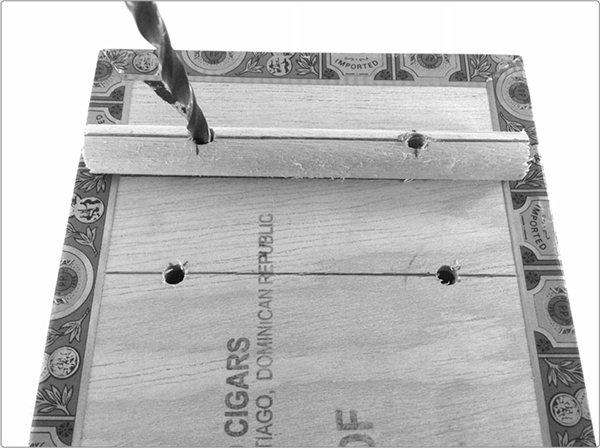
FIGURE 11-8: Using the bridge as a guide for drilling the bridge anchor holes
Step 6 Now drill holes for the jack, pan pot, and volume control pot. If you’re not going to electrify your kalimba, then you can skip this step. Otherwise, drill two 1/4-inch or 5/16-inch holes for the volume and pan pot, respectively (if you’re using only one pickup, then omit the pan pot).
Next, drill one 3/8-inch hole for the jack. I placed all three holes on the tailpiece, as shown in Figure 11-9, but you could drill them almost anywhere. Just don’t mount them on the soundboard, as that will take a real bite out of the kalimba’s sweetness.
* NOTE: The hole sizes you need for this step depend on your potentiometers’ dimensions. If you’re unsure of the exact size, use the smaller bit and ream out the hole until your hardware fits.
FIGURE 11-9: Location of the holes for the volume, pan pot, and jack
Step 7 Erase any guidelines you drew, unless you dig the “sketchy construction lines” aesthetic. Once the kalimba body looks presentable, install the saddle blocks, which are screws that keep the saddle from sliding around. Start by placing a washer on a 1/2-inch #8 machine screw. Thread that screw out through either of the saddle-block holes so that the screw head is inside the kalimba body. Then snug a #8 nut onto the machine screw from the outside. Repeat with the other 1/2-inch screw, #8 washer, and #8 nut.
Step 8 Add the mounting hardware for the bridge. Place a washer on each of the 1-inch #8 machine screws and thread each through the soundboard from the inside. Next, slide the bridge onto the two machine screws, put a final washer on each, and spin on the wing nuts. Leave them fairly loose for now. You just want to keep everything from falling apart when you set the kalimba down. Your kalimba should look like Figure 11-10 at this stage.
FIGURE 11-10: The installed mounting hardware, bridge, and saddle blocks (for an interior view of the mounting hardware, see the right image in Figure 11-17)
Step 9 Complete the acoustic construction of the kalimba by adding the six steel tines. As shown in Figure 11-11, the carriage bolt—which serves as the instrument’s saddle—will rest against the tops of the two hexagonal saddle-block nuts. Because we want the saddle to rest evenly against these and run parallel to the top edge of the kalimba, we’ll want to make sure these nuts are twisted around so they are identically oriented, with flat sides parallel to the top and bottom edges of the soundboard (see Figure 11-11a). Next, lay the 5-inch-long, 1/4-inch-diameter carriage bolt snug against the aligned nuts (see Figure 11-11b). You want the saddle to rest flat on the soundboard, so either saw off its head or let it hang off the edge of the box.
Step 10 Add the first tine. Working from the top, slide the straight end of the tine under the center of the bridge and over the center of the saddle. Levering the end of the tine up with a screwdriver helps (see Figure 11-11c). You’ll want about 3 inches of tine to extend below the saddle. Add the remaining five tines, distributing them evenly across the middle 1 1/2 inches of the saddle (as in Figure 11-11d).
FIGURE 11-11: Installing the saddle and tines
Step 11 Once all of the tines are in place, use pliers to adjust their lengths according to the chart in Figure 11-21 on page 190. Make sure none of the hooked tails are touching (these are the ends that stick out past the top edge of the box, above the bridge), and then tighten the wing nuts. You may need to use a screwdriver to hold the machine screws in place from the inside of the body in order to keep them from impotently spinning while you’re trying to tighten.
Step 12 If you’re building a nonelectric kalimba, you’re finished. Flip to “Tuning the Twang & Roar Kalimba” on page 189 and “Playing the Twang & Roar Kalimba” on page 190, and get plucking! Even if you’re going electric, now is a good time to tune up, as doing so will make the next few steps significantly less annoying for anyone who shares living arrangements with you.
We’ll be building and testing the dual-pickup mixer shown in Figure 11-12, with the caveat that you’ll at least partially unbuild this after testing in order to install the magnetic pickup.2 Get out both pots, your jack, your piezo element, the supplies you need to build the magnetic pickup, your insulated 24-gauge hook-up wire, and your soldering kit.

FIGURE 11-12: The circuit diagram for the Twang & Roar Kalimba’s pan-pot mixer
Step 13 First, you need to build the magnetic Playing-Card Pickup (Project 9). Please do so now.
Step 14 Prepare to wire the pan pot. Look at your 100k ohm pot. I like to talk about pots as they appear when viewed from the front with their lugs up like a crown (see Figure 11-13). You’ll need to add two leads to the pan pot: one will run from pan pot lug 2 to the volume pot, and the other will go from pan pot lug 1 to the piezo pickup (which you’ll mount on the inside of the soundboard, likely below the tines). A 6-inch wire will almost certainly be able to make either of these connections, but take a second to eyeball the layout of your specific kalimba and be sure. Maybe you need a slightly longer wire to make that run from pan pot to piezo? If your pan pot and volume pot are very close, you might prefer a shorter lead between them. Keeping these wires on the shorter side is a good policy (anything over 8 inches in an audio application like this starts to run the risk of picking up strong AM radio signals). Once you’ve settled on appropriate lengths, cut your wires, strip the ends of each, and tin them (this handy skill is discussed further in “Tinning Wires” on page 348).
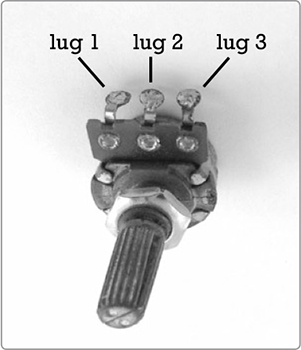
FIGURE 11-13: A pot viewed from the front. Doesn’t it look like a little metal-nosed Pinocchio wearing a crown?
Step 15 Let’s solder the pan pot! Grab the magnetic pickup you built in Step 13 and solder either of its insulated leads to lug 3. Now solder one of the freshly trimmed and tinned wires from Step 14 to lug 1. As indicated in Figure 11-14, this will be the input from the piezo pickup. Take the other length of insulated wire from Step 14 and solder it to lug 2. This lead is the pan pot’s output (it will go to the volume control). Finally, solder the red lead from your piezo element to the free end of the lead running to lug 1. You can use either piezo lead, but it’s good practice to always respect the convention of running black wires to ground.

FIGURE 11-14: The wired pan pot
Step 16 Prepare the 10k ohm pot, which we’ll use for volume control. Cut two 4-inch lengths of insulated wire and strip and tin both ends of each. Solder one wire to lug 2 of the 10k ohm pot and the other to lug 3, as shown in Figure 11-15.

FIGURE 11-15: The prepared volume control
Step 17 Complete the electronics. Start by routing your pan pot to your volume control. You should have one free lead on the pan pot; it’s connected to the middle lug. Solder the free end of this lead to the first lug on the volume pot.
Now solder the jack, which has two lugs. One lug connects to the hooked metal tongue that will make contact with the tip of the 1/4-inch guitar cable; this lug carries the signal from the instrument. The other lug connects to the cable’s sleeve, thus completing the ground connection.3 Solder the lead connected to the middle lug on the volume pot to the tip lug of the jack. Then, take all three ground connections—the black lead on the piezo, the free lead on the magnetic pickup, and the remaining lead on the volume pot—and solder them to the ground lug on the 1/4-inch jack. Confused? Check Figure 11-16.
FIGURE 11-16: The wired electronics. I’ve extended the piezo’s ground lead and added shrink tube to both the piezo leads’ solder joints.
Step 18 Twist both the pan pot and the volume pot counterclockwise until you can’t twist anymore. If you’ve followed the instructions correctly so far, this should correspond to the lowest volume setting, with only the signal of the magnetic pickup—which is quieter than the piezo—running to the jack. Connect the jack to your amplifier, turn the amp on, and set its volume control to a comfortable level.
Step 19 Test the piezo element. Run the pan pot fully clockwise and bring the volume control up halfway. Poke the piezo; you should get all manner of scrapping and thunking. If it isn’t feeding back, raise the volume until it does or until the volume pot is fully clockwise. If you start getting feedback, then bring down the volume on your amp and go back to nudging the volume up on the kalimba’s electronics until the volume pot is fully clockwise.
Step 20 Once the volume control is sorted out and you know the piezo works, twist the pan pot fully counterclockwise. You should now hear nothing when you tap the piezo element, and you should also hear nothing when you tap the magnetic pickup with your nonferrous finger.4 Tap the magnetic pickup with an iron nail or steel screw, and you should hear clunking. Success!
Step 21 Set the volume pot back to full counterclockwise, shut down your amp, unplug everything, and move on to final construction. Problems? Check your work against Figure 11-16 and the schematic in Figure 11-12. If you see no obvious mismatch between your build so far and those images, flip to “General Troubleshooting” on page 355.
Step 22 Find and mark the best locations for each pickup. This is trickiest with the magnetic pickup, which has a very limited range. Start by placing the magnetic pickup on top of the soundboard beneath the tines. Face up or down makes no difference, but I prefer facedown, as shown in Figure 11-17, because it’s important that the magnetic pickup lie flat to get an accurate sense of what the tone will sound like on the finished project. Slide the pickup around while plucking each of the kalimba’s tines until you find the position where it gets the cleanest, most even tone. This will generally be centered beneath the tines, with the pickup’s top edge about 3/4 inch below the saddle line you drew in Step 3. (If the two end tines are within about 1/4 inch of the rounded ends of the pickup, they’ll be much quieter than the others. Tighten the spacing between tines a thread or two if you need to.) Once you’ve found your sweet spot, mark this location and then mark where you’ll want to drill the hole for the magnetic pickup’s wires.
Next, flip open the body of your kalimba and press the piezo pickup to different locations on the underside of the soundboard while plucking various tines. Find the spot with the sound you like best and mark it. I like my piezo pickup tone to be as aggressive as possible, so my sweet spot tends to be centered about 1 inch below the saddle block screws on the inside of the body (see the right image in Figure 11-17).
Step 23 Prepare to mount the pickups. While your soldering iron heats up, drill a 3/16-inch hole for the magnetic pickup’s leads, as shown in Figure 11-18. Depending on how you’ve finished your magnetic pickup, this hole may or may not be visible when the project is finished. If it’s going to be visible, take a second now to sand and file it into a presentable state. Then desolder the leads on your magnetic pickup from the jack and pan pot.
FIGURE 11-17: Finding the sweet spot for the magnetic pickup (left) and piezo pickup (right)

FIGURE 11-18: The location of this kalimba’s pickup-wire hole. (Different handmade pickups will have their leads in different locations, so adjust accordingly.)
Step 24 Mount the pickups, starting with the piezo pickup. Flip the kalimba over, open up the box, and squirt a pea-sized dab of silicone-based household glue on the piezo pickup sweet spot you marked earlier. Press the piezo into place brass side down and hold it firmly for a good 30 seconds. It should stay in place, but avoid bumping or jostling it for the remainder of this step. Turn the kalimba back over and carefully feed the leads of the magnetic pickup through the 3/16-inch hole you drilled in the previous step (see the left image in Figure 11-19). Smear a generous dollop of glue on the soundboard where you want to mount the magnetic pickup. Press the magnetic pickup into the adhesive, adjust it so that it’s centered beneath the tines, lash it in place with a thick rubber band, and double-check the alignment and centering of the pickup (see the right image in Figure 11-19). Leave everything to dry for 30 minutes or so.

FIGURE 11-19: Mounting the magnetic pickup
Step 25 When your 30-minute wait is up, carefully remove the rubber band that’s holding the magnetic pickup in place, as it’s also holding the box shut. Now, mount one pot in each of the smaller holes shown in Figure 11-9 and then mount the jack in the larger hole. The washers go on the outside of the box, between the wood and the nut. If a little post protrudes from the face of either pot’s casing and that post starts getting in the way, just snap it off with a pair of needle-nose pliers, as discussed in “Resistors: Fixed and Variable” on page 325.
Step 26 Solder the leads from the magnetic pickup back to the pan pot and jack; it doesn’t matter which wire goes to the pan pot and which goes to the jack. Install the knob covers on the two potentiometers and then retest the electronics, following the process from “Test the Electronics” on page 185. If all is swell, then finish off the kalimba by smearing an insulating layer of silicone-based glue over the piezo (see Figure 11-20). This will drastically reduce—and perhaps even eliminate—feedback. When that’s finished, close the kalimba up, check to confirm that the magnetic pickup is still situated to your liking, replace the rubber band, and leave the whole thing to dry overnight.
FIGURE 11-20: The guts of the finished Twang & Roar Kalimba. Note the silicone insulating the piezo element.
First, make sure your tines correspond to the initial lengths shown in Figure 11-21. Your kalimba might sound okay after adjusting the lengths according to the chart, but it’s unlikely to actually be in tune at this point.
You’ll need two tools to fine-tune your kalimba: pliers and a chromatic tuner. If you don’t own a tuner, you can download one. Several free smartphone/tablet apps have chromatic tuners, or, if your computer has a mic and an Internet connection, you could just go to Tunerr.com.
Part of the aural charm of the kalimba comes from the sympathetic vibration of adjacent tines: when you pluck one, its neighbors vibrate too. This characteristic is musically rich, but annoying while tuning, so you’ll want to mute all the tines you aren’t tuning in order to focus on the one you are. Do this by pressing down on the other tines with your free fingers or by lightly securing the other tines with a rubber band.
Let’s tune the longest tine first. That’s the middle one, which will provide the lowest note. Mute the other tines, pluck the middle tine, and watch the tuner’s readout. You want this tine to be middle C. (See Appendix C for details about musical terms.) It’ll almost certainly be a touch sharp or flat at this point. In fact, don’t be shocked if it’s pretty far off, as sharp as C♯/D♭ or D, or as flat as B. If the tine is sharp, then it’s too short; use pliers to pull it out a millimeter or two. If it’s flat, then it’s too long. Use the side of your pliers like a little hammer to tap the tine in a millimeter or so. Check the pitch again; if you are dead on centered at middle C, then rejoice and move on to the D tine, which is one to the left. If not, keep fiddling until you get as close as you can to a perfect middle C; you need to do this only once in a blue moon, so get it right and lock it down.
Repeat these tuning steps for each tine. It’s easiest to tune them in order from lowest to highest pitch—that is, longest to shortest tine. This means working out from the middle and alternating left and right. Periodically recheck the tines you’ve already tuned because it’s easy to accidentally knock something out of whack. Once your kalimba is all tuned up, tighten the wing nuts, double-check the tuning, and make any final adjustments.
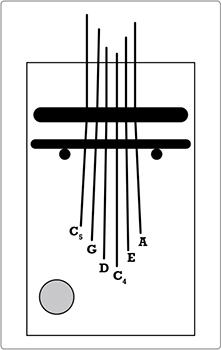
Note |
Length (measured from front edge of saddle) |
C4* |
81 mm |
D |
76 mm |
E |
71 mm |
G |
64 mm |
A |
60 mm |
C5 |
55 mm |
* The subscript 4 denotes middle C, which is the C more or less smack in the middle of a standard 88-key piano keyboard. It’s around 261.6 Hz—an ugly number, but a pretty universally recognized note in Western music. C5 is thus the next C up, pitched one octave higher than middle C.
FIGURE 11-21: A diagram showing which tine corresponds to which note, followed by a chart giving the initial lengths for the six tines on your pentatonic kalimba
This kalimba is now tuned to the C-major pentatonic scale. This is a great place to start because there are no “wrong notes” in a major pentatonic scale: you can noodle around in basically any sequence, and you won’t hit a sour note. For example, the signature riff in The Temptations’ “My Girl” is basically just the major pentatonic played from lowest to highest. Try it! On the kalimba, playing the scale lowest to highest just means starting with the middle tine and working your way out, alternating between left and right. To construct your own riff, pick a few notes, and build them into a repeating pattern. Divert from that pattern by just a note, creating tension, and return to your original pattern. Congratulations: you’re a composer!
While many tunes use the pentatonic scale as their basis, there are relatively few still-common tunes that confine themselves entirely to a single octave of it. One exception is good ole “Camptown Races”:5
The Camp- town la- dies sing this song,
G G E G A G E
Doo- da, Doo- da
E D E D
The Camp- town race- track’s five miles long
G G E G A G E
Oh, the doo- da day
D D E D C4
Goin’ to run all night, Goin’ to run all day
C4 C4 E G C5 A A C5 A G
Bet my money on a bob- tailed nag
G G E E G G A G E
Some- body bet on the bay
D D D E D C4
Yes, it’s a hokey tune, but you can still make it swing. Hit YouTube to search for Dave Brubeck’s 1959 recording of this minstrel show classic to see what I mean.
There are tons of ways you can mod your kalimba to fit your own style: adding tines, changing the tuning, building around a much bigger or smaller body, or using very different materials. But first, you’ll want to sort out any little annoyances that could be keeping your kalimba from operating at its full potential.
Acoustically speaking, there isn’t a ton that can go wrong with this project. One common issue is slight buzzing on some or all of the notes, especially when plucked hard. There are a couple of possible sources of buzzing.
Most commonly, the tails of two or more tines turn out to be touching—sometimes just barely. They may buzz only when the body of the instrument is really vibrating, as with an especially loud riff. Check to be sure that all of the tails are well clear of each other.
A more subtle problem is that the tines may occasionally rattle against the soundboard. A quick solution is to run a rubber band or strip of felt beneath the tails of the tines, as shown in Figure 11-22.
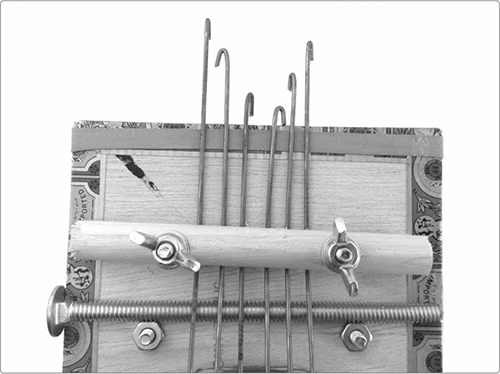
FIGURE 11-22: Padding the tines to eliminate buzz
Or, it could be the lid of the box itself that’s buzzing; this is especially common if you’ve used the top of the box as your soundboard. Sometimes this can be addressed by running a thick rubber band, like the one shown in Figure 11-22, snugly around the box.
A more permanent and aesthetically pleasing solution is to add blocking to the interior corners to secure the lid. Cut a couple lengths of wood long enough to run from the bottom of the cigar box to the underside of the closed lid, and glue these into the two corners opposite the hinge. Once the glue dries, screw the lid down by driving screws through the lid and into these blocks. You’ll probably want to use relatively thin screws and to predrill these holes so you don’t split the lid or blocks.
As far as electronic troubleshooting goes, provided you haven’t used a metal box as the body of your kalimba, there are no special pitfalls here. The most common problem is going to be a wrong connection or short circuit. Flip to “General Troubleshooting” on page 355 for a list of things to check.
Sound hole placement is a much-debated art and science unto itself. Because of the small soundboard and resonator, a centered guitar-style sound hole isn’t a great idea here; it consumes your sweet spot, making for a much duller instrument. But you could certainly try violin-style f-holes or replacing the single large corner hole with a spray of small holes in various sizes, as in the style of Ovation guitars. (Google ovation sound holes for inspiration.)
If you have a good ear and chromatic tuner, you could consider a different material for the tines themselves. I’ve specified music wire because it’s a precision material that’s easy to source. If you live in a town that uses street sweepers, the lost bristles—which are flat-rolled spring steel—make excellent kalimba tines. They have a rich, mellow tone and are easy on the fingers. These bristles are about a foot long, twice as wide as the music wire I specified, and half as thick. At the lengths on the charts in Figures 11-21 and 11-23, bristles are about an octave lower in pitch, so start with lengths half that in the chart and tune from there. I’ve never seen bristles for sale, but street sweepers seem to lose one or two on every block. Take a walk within a day or two of the sweeper’s passing, keeping an eye on the gutter, and you should come up with the four bristles you need in no time.
As for electronic mods, you might choose to use only one of the pickups and thus eliminate the need for the pan pot. Or, instead of panning between and mixing the magnetic and piezo pickups, you might want to switch between them, as one does with a guitar. You can accomplish this by replacing the dual-ganged pot with an SPDT switch. (For an explanation of various switch types, flip to “Switches” on page 338.) To do this, take the output lead—that is, the one that would normally run from the middle lug of the pan pot to the volume pot—and connect it to the central lug on the SPDT switch. Then, wire one lead from each pickup to each of the outer lugs of the switch, similar to what’s shown in Figure 10-23. If you want finer control when mixing the signals from the two pickups, you could give each its own 100k ohm audio-taper potentiometer.
You might also choose to add more pickups. There’s no real benefit to adding another magnetic pickup because the instrument has only one spot where a magnetic pickup works—directly under the metal tines—and your first pickup is already there. But there are vast aural possibilities that can be explored by placing piezo pickups elsewhere on the instrument. The one caveat here is that piezo pickups can be really loud and aggressive. The volume control, as wired in this design, does a great job of taming this single piezo so that it doesn’t overwhelm the magnetic pickup. If you start tossing in more piezos, you may need to experiment with adding a single resistor to the red lead of each of the additional piezos in order to tame the tone further.
We’ve already discussed going solely acoustic (just skip the “Time to Go Electric!” section), but you can also go all electric. Just as an electric guitar is pretty darn unobtrusive if you feed it into headphones—but still aggressive when amplified—you can build a resonator-less kalimba, replacing the hollow box with a plain old board. Use something a bit on the heavy side—like a stray hunk of scrap wood from a 2×4 or 1×6—and the piezo pickup on your all-electric model will be less prone to feedback.
Probably the most tempting mod is to add more tines, thus expanding the scale of your instrument and increasing the number of tunes you can play. It’s relatively easy to add two tines to the pentatonic Twang & Roar Kalimba for a full eight diatonic notes, which is perfect for a full major or minor scale. If you use the lengths described in Figure 11-23, your eight tines will be tuned to match all of the white keys on the piano between middle C and the next highest C, giving you the eightnote C major scale. (See Appendix C for a bit more explanation of musical terms.) I strongly suggest starting with C major, as so many American folk tunes can be adapted to this scale. You’ll add only two tines to get that diatonic scale, but that’ll rearrange how the notes are placed on the kalimba, making it much easier to play chords and, thus, to accompany other musicians.6

Note |
Length (measured from front edge of saddle) |
C4 |
81 mm |
D |
76 mm |
E |
71 mm |
F |
70 mm |
G |
64 mm |
A |
60 mm |
B |
57 mm |
C5 |
55 mm |
FIGURE 11-23: A diagram showing which tine corresponds to which note, followed by a chart giving the initial lengths for the eight tines on your diatonic kalimba
To add extra tines, just scooch the existing tines in one or two threads toward the center. Slide your additional tines in at either edge, adjust all the lengths, and retune. On the C major diatonic kalimba, you’ll ultimately have the eight tines spaced between 1/8 inch and 1/4 inch apart, taking up a total of roughly 1 1/2 inches, centered over the pickup. Figure 11-24 gives a side-by-side comparison of pentatonic and diatonic kalimbas built on this design.
The straight pentatonic and diatonic versions I’ve discussed are probably the best options for beginners, because you’re going to have trouble cramming more than eight or nine tines into the 1 1/2-inch zone where the magnetic pickup works. If you forgo the magnetic pickup and just rely on the piezo pickup, then you’ll have a bit more room to work within this design. You may even be able to bump this up to a full 13-note C4–C5 chromatic scale.7 That would let you play even more scales, including major, harmonic minor, natural minor, blues, and so forth. But having that many tines creates a more cramped playing space and a much more challenging layout (you’ll no longer have the chords conveniently grouped as you do on the diatonic kalimba).

FIGURE 11-24: A pentatonic Twang & Roar Kalimba (left) and a diatonic one (right). Note the tighter tine spacing on the diatonic kalimba.
If you’re going fully chromatic, consider busting completely out of the Twang & Roar mold. The 5-inch-wide cigar box is pretty constrained, and the 1.44 mm music wire has a relatively limited acoustically usable range. For an optimal, fully chromatic, electro-acoustic kalimba, you’ll need a wider cigar box, a longer saddle and bridge (anchored at either end and in the middle), and a whole new magnetic pickup design. The pickup should be longer, with several magnets evenly spaced along its length, more like a modern multi-magnet guitar pickup. A chunky “hard drive salvage” pickup, like the one described at the end of the Playing-Card Pickup chapter (Project 9), might work here. You’ll also want to go with beefier tine material, such as those street-sweeper bristles or sections cut from an electrician’s flatsteel fish tape (a tool sold at most hardware stores and used to pull wires through walls and conduit).
Tons of super familiar tunes can be played with a single octave of the diatonic major scale. “Jingle Bells,” “Twinkle, Twinkle Little Star” (which is also the “Alphabet Song”), and “Home on the Range” jump to mind—all of which are great fun to improvise on! (For more on improvisation, see Appendix C, especially “Applied Theory: The 12-Bar Blues” on page 377.)
Here’s a C major arrangement of “When the Saints Go Marching In” (another classic base for improvisational jamming). This arrangement gives the lyrics, melody, and accompanying chords. The chords are played by plucking all three indicated notes simultaneously. You can just let them ring out until the next chord, or you can rhythmically repeat them. Experiment and see how that minor rhythmic change can switch up the song, taking it from a somber dirge to a jazzy little ditty.
Oh when the saints go mar- ching in
C4 E F G C4 E F G
Cmaj(C4EG) Cmaj(C4EG)
Oh when those saints go mar- ching in
C4 E F G E C4 E D
Cmaj(C4EG) G,(FGB)
How I want to be in that num- ber
E D C4 C4 E G G F
Cmaj(C4EG) Fmaj(FAC5)
When the saints go march-ing in.
I was first introduced to the notion of electrifying a thumb piano by the work of Konono Nº1, a band from Kinshasa that performs traditional Congolese music on traditional instruments that they’ve augmented with their own homebrew electrical amplification systems. Their debut album, Congotronics, was very popular with fans of electronic music and inspired a series of albums. I especially enjoy their original album and the second release in the series, Congotronics 2: Buzz ‘n’ Rumble from the Urb’n’Jungle (an anthology album featuring eight bands in addition to Konono Nº1). If these tracks fit your ear especially well, you might also dig the Éthiopiques series of anthology albums (there are now almost 30), which showcase electrified traditional and jazz/pop-influenced Ethiopian and Eritrean music.


