Chapter 6. Dynamic PDF
Introduction: Hacks #74-92
PDF doesn’t have to be stuck in a file, created once and then published. PDF can be dynamic in multiple ways, ranging from interactivity through forms to custom generation of PDFs that meet particular user needs. While PDF seems static to a lot of people, that’s more a matter of the way it’s typically been used rather than an aspect of the technology itself. If you want to do more with PDF than distribute documents, you can.
Collect Data with Online PDF Forms
Turn your electronic document into a user interface and collect information from readers.
Traditional paper forms use page layout to show how information is structured. Sometimes, as on tax forms, these relationships get pretty complicated. PDF preserves page layout, so it is a natural way to publish forms on the Web. The next decision is, how many PDF form features should you add?
If you add no features, your users must print the form and fill it out as they would any other paper form. Then they must mail it back to you for processing. Sometimes this is all you need, but PDF is capable of more.
If you add fillable form fields to the PDF, your users can fill in the form using Acrobat or Reader. When they are done, they still must print it out and mail it to you. Acrobat users can save filled-in PDFs, but Reader users can’t, which can be frustrating.
If you add fillable form fields and a Submit button that posts field data to your web server, you have joined the information revolution. Your web server can interactively validate the user’s data, provide helpful feedback, record the completed data in your database, and supply the user with a savable PDF copy. Olé!
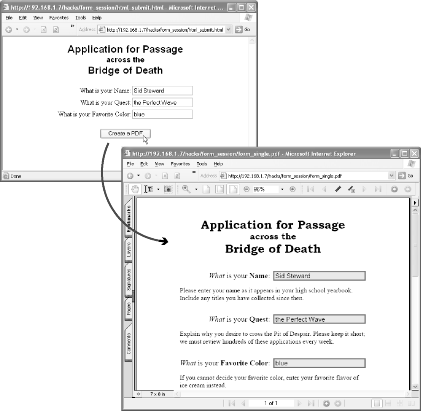
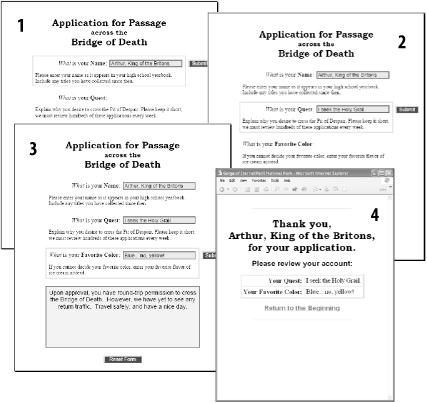
We have gotten ahead of ourselves, though. First, let’s create a form that submits data to your web server, such as the one in Figure 6-1. Subsequent hacks will build on this. To see online examples of interactive PDF forms, visit http://www.pdfhacks.com/form_session/. You can download our example PDF forms and PHP code from this site, too.
Create the Form
Open the form’s source document and print to PDF [Hack #39] or scan a paper copy and create a PDF using OCR. Open the PDF in Acrobat to add form fields.
Tip
PDF forms can be powerful JavaScript programs, but we won’t be using any PDF JavaScript. Instead, we will create PDF forms that let the web server do all the work. This gives you the freedom to program the form’s logic with any language or database interface you desire.
PDF form fields correspond closely to HTML form fields, as shown in Table 6-1. Add them to your PDF using one or more Acrobat tools.
|
HTML form field |
PDF form field |
|
|
Text |
|
|
Text with Password Option |
|
|
Checkbox |
|
|
Radio Button |
|
|
Button with Submit Form Action |
|
|
Button with Reset Form Action |
|
|
Text with Hidden Appearance |
|
|
Button with Icon Option |
|
|
Button |
|
|
Text with Multiline Option |
|
|
Combo Box or List Box |
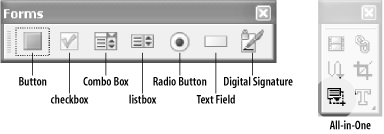
In Acrobat 6, as shown in Figure 6-2, you have one tool for each form field type. Open this toolbar by selecting Tools → Advanced Editing → Forms → Show Forms Toolbar. Select a tool (e.g., Text Field tool), click, and drag out a rectangle where the field goes. Release the rectangle and a Field Properties dialog opens. Select the General tab and enter the field Name. This name will identify the field’s data when it is submitted to your web server. Set the field’s appearance and behavior using the other tabs. Click Close and the field is done.
In Acrobat 5, use the Form tool shown in Figure 6-2 to create any form field. Click, and drag out a rectangle where the field goes. Release the rectangle and a Field Properties dialog opens. Select the desired field Type (e.g., Text) and enter the field Name. This name will identify the field’s data when it is submitted to your web server. Set the field’s appearance and behavior using the other tabs. Click OK and the field is done. Using the Form tool, double-click a field at any time to change its properties.
Tip
Take care to maximize your PDF form’s compatibility with older versions of Acrobat and Reader [Hack #41] .
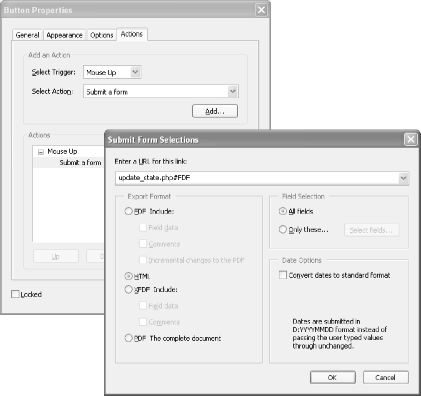
To upload form data to your web server, the PDF must have a Submit Form button. Create a PDF button, open the Actions tab, and then add the Submit a Form (Acrobat 6) or Submit Form (Acrobat 5) action to the Mouse Up event, as shown in Figure 6-3.
Edit the action’s properties to include your
script’s URL; this would be an
HTML form’s
action attribute. Append #FDF
to the end of this URL, like this:
http://localhost/pdf_hacks/echo.php#FDFSet the Field Selection to include the fields you want this button to
submit; All Fields is safest, to start. Set the Export Format to HTML
and the PDF form will submit the form data using
HTTP’s post method.
Install the Apache Web Server on Windows
To test your interactive PDF form, you must have access to a web server. Many of these hacks use server-side PHP scripts, so your web server should also run PHP (http://www.php.net). Windows users can download an Apache (http://www.apache.org) web server installer called IndigoPerl from IndigoSTAR (http://www.indigostar.com). This installer includes PHP (and Perl) modules, so you can run our hacks right out of the box. Apache and PHP are free software.
Visit http://www.indigostar.com/indigoperl.htm and download indigoperl-2004.02.zip. Unzip this file into a temporary directory and then double-click setup.bat to run the installer. When the installer asks for an installation directory, press Enter to choose the default: C:\indigoperl\. In our discussions, we’ll assume IndigoPerl is installed in this location.
After installing IndigoPerl, open a web browser and point it at http://localhost/. This is the URL of your local web server, and your browser should display a Web Server Test Page with links to documentation. When you request http://localhost/, Apache serves you index.html from C:\indigoperl\apache\htdocs\. Create a pdf_hacks directory in the htdocs directory, and use this location for our PHP scripts. Access this location from your browser with the URL: http://localhost/pdf_hacks/.
Test Your PDF Form
Create a text file named echo.php and program it with the following script. IndigoPerl users can save it to C:\indigoperl\apache\htdocs\pdf_hacks\echo.php. This PHP script simply reports submitted form data back to your browser. Create a PDF Submit button that posts data to this script’s URL (e.g., http://localhost/pdf_hacks/echo.php#FDF) as we described earlier.
<?php // echo.php, report the data we received
echo '<h2>GET Data</h2>';
foreach( $_GET as $key => $value ) {
  echo '<p>Key: '.$key.', Value: '.$value.'</p>';
}
echo '<h2>POST Data</h2>';
foreach( $_POST as $key => $value ) {
  echo '<p>Key: '.$key.', Value: '.$value.'</p>';
}
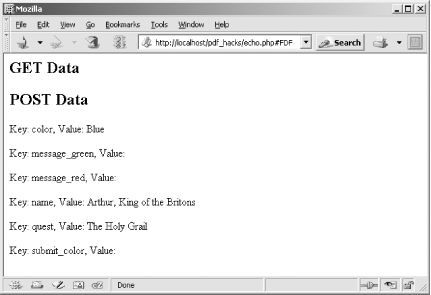
A PDF form interacts properly with a web server only when viewed inside a web browser. So, drag and drop your form into a browser, fill some fields, and then click the Submit button. The PDF should be replaced with an echoed data report, like the one shown in Figure 6-4.
Serve Filled-Out PDF Forms
Populate online PDF forms with known data.
To maintain form data, you must display the current state of the data to the user. This enables the user to review the data, update a single field, and submit this change back to the server. With HTML forms, you can set field values as the form is served to the user. With PDF forms, you can use the Forms Data Format (FDF) to populate a form’s fields with data, as shown in Figure 6-5.
FDF, the Forms Data Format
The PDF Reference [Hack #98] describes the FDF file format. Its syntax uses PDF objects Section 6.8[Hack #80] to organize data. To see an example, open your PDF form in Acrobat and fill in some fields. Export this data as FDF by selecting Advanced → Forms → Export Forms Data . . . (Acrobat 6) or File → Export → Form Data . . . (Acrobat 5). Our basic PDF form [Hack #74] yields an FDF file that lists fields in name/value pairs and then references the PDF form by filename:
%FDF-1.2
1 0 obj
<< /FDF
  << /Fields
    [ << /T (text_field_1) /V (Here is some text) >>
      << /T (text_field_2) /V (More nice text) >> ]
     /F (http://localhost/fine_form.pdf)
  >>
>>
endobj
trailer
<< /Root 1 0 R >>
%%EOF
[Hack #77] offers a PHP script for easily creating FDF from your data.
Tip
For XML fans, XFDF is an XML-based subset of FDF features. Acrobat Versions 5 and 6 support XFDF. Its MIME type is application/vnd.adobe.xfdf.
Users can store and manage PDF form data using FDF files. Visit http://segraves.tripod.com/index3.htm for some examples. For our purpose of serving filled-out PDF forms, the user never sees or handles the FDF file directly.
You have two options for automatically filling an online PDF form with data. You can serve FDF data that references the PDF form, or you can create a URL that references both the PDF form and the FDF data together.
Serve FDF to Fill Forms
One way to automatically fill an online PDF form is to serve a
data-packed FDF file (with MIME type
application/vnd.fdf). The
user’s browser will open Acrobat/Reader and pass it
the FDF data. Acrobat/Reader will read the FDF data to locate the PDF
form. It will load and display this PDF and then populate its fields
from the FDF. The PDF form in question should be available from your
web server and the FDF data should reference it by URL using the
/F key, as we do in our preceding example.
Warning
Check your web server to make sure it sends the appropriate Content-type: application/vnd.fdf header when serving FDF files. Or, send the header directly from your script.
This technique is simple, but it has limitations. First, not all browsers know how to handle FDF data. Second, this technique does not always work inside of HTML frames. The next technique overcomes both of these problems.
Combine PDF and FDF URLs to Fill Forms
Another way to automatically fill an online PDF form is to
append an FDF
file reference to the PDF form’s URL. In this case
the FDF file must omit the PDF form reference
(the /F key). When the user follows the link,
Acrobat/Reader opens the PDF and fills the form fields using the FDF
data. The FDF file reference must be a full URL:
http://localhost/fine_form.pdf#FDF=http://localhost/fine_data.fdf
Or, it must reference an FDF-generating script instead of a file. For example:
http://localhost/fine_form.pdf#FDF=http://localhost/fdf_data.php?t=42
You should use this technique of referencing both the form PDF and the FDF data in a single URL when displaying filled-in forms inside of HTML frames.
Warning
You really must use a web server to test these techniques. Windows users can download IndigoPerl [Hack #74] from http://www.indigostar.com. IndigoPerl is an Apache installer for Windows that includes PHP and Perl support.
Hacking the Hack
FDF can also contain PDF annotation (e.g., sticky note) information. Use the preceding techniques to dynamically add annotations to online PDF. Create example FDF or XFDF files by opening a PDF in Acrobat and adding some annotations. Then, select Document → Export Comments . . . (Acrobat 6) or File → Export → Comments . . . (Acrobat 5).
Drive PDF Forms with Your Data
Convert your data into FDF so that Acrobat or Reader can merge it with a PDF form.
As discussed in [Hack #75] , you can deliver filled-out PDF forms on the Web by serving FDF data. FDF data contains the URL for your PDF form and the data with which to fill the form. Upon receiving FDF data, Acrobat (or Reader) will open the referenced PDF form and then populate it with the given information. The next problem is how to easily create FDF data on your web server.
The PDF Reference [Hack #98] describes FDF in dizzying detail, and Adobe offers a free-of-charge FDF Toolkit with a dizzying license (http://partners.adobe.com/asn/acrobat/forms.jsp). But what you need is usually easy to create from the comfort of your favorite web programming language. We provide such a script written in PHP. It converts form data into an FDF file suitable for filling our basic PDF form [Hack #74] .
Tip
In Java, try the FdfWriter and FdfReader classes in iText (http://www.lowagie.com/iText/) for creating or parsing FDF data.
Elaborate forms might require the high-caliber Adobe FDF Toolkit to create suitable FDF. Most forms merely require their field data cast into the FDF syntax. We offer the forge_fdf script for this purpose. The FDF example from [Hack #75] shows the pattern evident in simple FDF files.
Instead of using a general-purpose FDF function or library, you can also consider exporting an FDF file from your form and then converting it into a template. Replace the form values with variables or other placeholders. Serve this template back to your form after filling the variables with user data. forge_fdf includes functions for encoding PDF strings and names [Hack #80] , which you might find useful when filling in your template.
Create FDF with forge_fdf
Pass form data and a PDF’s URL into forge_fdf, and it returns the corresponding FDF as a string. Create an FDF file with this string or serve it directly to the client browser with Content-type: application/vnd.fdf. We offer an example a little later.
You must remember some FDF peculiarities when passing arguments to forge_fdf.
-
$pdf_form_url Provide the PDF form’s URL (or filename) unless you plan to pass this FDF data as part of a larger URL that already references the PDF form. For example, if the FDF data will be served to the user like so:
http://localhost/fine_form.pdf#FDF=http://localhost/fine_data.fdf
pass an empty string as
$pdf_form_url.To exit a PDF form and replace it with an HTML page in the user’s browser, serve the PDF an FDF with
$pdf_form_urlset to your HTML page’s URL.-
$fdf_data_strings Load text, combo box, and listbox data into this array. It should be an array of string field names mapped to string field values. If you want a form field to be hidden or read-only, you must also add its name to
$fields_hiddenor$fields_readonly.-
$fdf_data_names Load checkbox and radio button data into this array. It should be an array of string field names mapped to string field values. Often,
trueandfalsecorrespond to the case-sensitive stringsYesandOff. If you want a form field to be hidden or read-only, you must also add its name to$fields_hiddenor$fields_readonly.-
$fields_hidden If you want a field to disappear from view, add its name to this array. Any field listed here also must be in
$fdf_data_stringsor$fdf_data_names.-
$fields_readonly If you don’t want the user tinkering with a field’s data, add its name to this array. Any field listed here also must be in
$fdf_data_stringsor$fdf_data_names.
For example, the following script uses forge_fdf to serve FDF data that should cause the user’s browser to open http://localhost/form.pdf and set its fields to match our values:
<?php
require_once('forge_fdf.php');

$pdf_form_url= "http://localhost/form.pdf";

$fdf_data_strings= array( 'text1' => $_GET['t'], 'text2' => 'Egads!' );
$fdf_data_names= array( 'check1' => 'Off', 'check2' => 'Yes' );

$fields_hidden= array( 'text2', 'check1' );
$fields_readonly= array( 'text1' );

header( 'content-type: application/vnd.fdf' );

echo forge_fdf( $pdf_form_url,
                $fdf_data_strings,
                $fdf_data_names,
                $fields_hidden,
                $fields_readonly );
?>
To see a more elaborate example of forge_fdf in action, visit http://www.pdfhacks.com/form_session/. Tinker with the online example or download PHP source code from this web page.
The Code
Copy this code into a file named forge_fdf.php and include it in your PHP scripts. Or, adapt this algorithm to your favorite language. Visit http://www.pdfhacks.com/forge_fdf/ to download the latest version.
<?php
/* forge_fdf, by Sid Steward
   version 1.0
   visit: http://www.pdfhacks.com/forge_fdf/

  For text fields, combo boxes, and list boxes, add
  field values as a name => value pair to $fdf_data_strings.

  For checkboxes and radio buttons, add field values
  as a name => value pair to $fdf_data_names.  Typically,
  true and false correspond to the (case-sensitive)
  names "Yes" and "Off".

  Any field added to the $fields_hidden or $fields_readonly
  array also must be a key in $fdf_data_strings or
  $fdf_data_names; this might be changed in the future

  Any field listed in $fdf_data_strings or $fdf_data_names
  that you want hidden or read-only must have its field
  name added to $fields_hidden or $fields_readonly; do this
  even if your form has these bits set already

  PDF can be particular about CR and LF characters, so I
  spelled them out in hex: CR == \x0d : LF == \x0a
*/

function escape_pdf_string( $ss )
{
  $ss_esc= '';
  $ss_len= strlen( $ss );
  for( $ii= 0; $ii< $ss_len; ++$ii ) {
    if( ord($ss{$ii})== 0x28 ||  // open paren
        ord($ss{$ii})== 0x29 ||  // close paren
        ord($ss{$ii})== 0x5c )   // backslash
      {
        $ss_esc.= chr(0x5c).$ss{$ii}; // escape the character w/ backslash
      }
    else if( ord($ss{$ii}) < 32 || 126 < ord($ss{$ii}) ) {
      $ss_esc.= sprintf( "\\%03o", ord($ss{$ii}) ); // use an octal code
    }
    else {
      $ss_esc.= $ss{$ii};
    }
  }
  return $ss_esc;
}

function escape_pdf_name( $ss )
{
  $ss_esc= '';
  $ss_len= strlen( $ss );
  for( $ii= 0; $ii< $ss_len; ++$ii ) {
    if( ord($ss{$ii}) < 33 || 126 < ord($ss{$ii}) ||
        ord($ss{$ii})== 0x23 ) // hash mark
      {
        $ss_esc.= sprintf( "#%02x", ord($ss{$ii}) ); // use a hex code
      }
    else {
      $ss_esc.= $ss{$ii};
    }
  }
  return $ss_esc;
}

function forge_fdf( $pdf_form_url,
                    $fdf_data_strings,
                    $fdf_data_names,
                    $fields_hidden,
                    $fields_readonly )
{
  $fdf = "%FDF-1.2\x0d%\xe2\xe3\xcf\xd3\x0d\x0a"; // header
  $fdf.= "1 0 obj\x0d<< "; // open the Root dictionary
  $fdf.= "\x0d/FDF << "; // open the FDF dictionary
  $fdf.= "/Fields [ "; // open the form Fields array

  // string data, used for text fields, combo boxes, and list boxes
  foreach( $fdf_data_strings as $key => $value ) {
    $fdf.= "<< /V (".escape_pdf_string($value).")".
      "/T (".escape_pdf_string($key).") ";
    if( in_array( $key, $fields_hidden ) )
      $fdf.= "/SetF 2 ";
    else
      $fdf.= "/ClrF 2 ";

    if( in_array( $key, $fields_readonly ) )
      $fdf.= "/SetFf 1 ";
    else
      $fdf.= "/ClrFf 1 ";

    $fdf.= ">> \x0d";
  }

  // name data, used for checkboxes and radio buttons
  // (e.g., /Yes and /Off for true and false)
  foreach( $fdf_data_names as $key => $value ) {
    $fdf.= "<< /V /".escape_pdf_name($value).
      " /T (".escape_pdf_string($key).") ";
    if( in_array( $key, $fields_hidden ) )
      $fdf.= "/SetF 2 ";
    else
      $fdf.= "/ClrF 2 ";

    if( in_array( $key, $fields_readonly ) )
      $fdf.= "/SetFf 1 ";
    else
      $fdf.= "/ClrFf 1 ";
    $fdf.= ">> \x0d";
  }

  $fdf.= "] \x0d"; // close the Fields array

  // the PDF form filename or URL, if given
  if( $pdf_form_url ) {
    $fdf.= "/F (".escape_pdf_string($pdf_form_url).") \x0d";
  }

  $fdf.= ">> \x0d"; // close the FDF dictionary
  $fdf.= ">> \x0dendobj\x0d"; // close the Root dictionary

  // trailer; note the "1 0 R" reference to "1 0 obj" above
  $fdf.= "trailer\x0d<<\x0d/Root 1 0 R \x0d\x0d>>\x0d";
  $fdf.= "%%EOF\x0d\x0a";

  return $fdf;
}
?>
PDF Form-Filling Sessions
Walk your users through the form-filling process.
Collecting information with online forms is an interactive process. We have discussed how to collect form data [Hack #2] and how to drive forms [Hack #75] . Now, let’s use what we know to program an interactive, online form-filling session, such as the one in Figure 6-6 (visit http://www.pdfhacks.com/form_session/ to see this example and download PHP source code).
Set the Stage
To submit data to your server, the PDF form must be displayed inside a web browser. I recommend displaying it inside an HTML frameset. This enables you to bracket the form with (HTML) instructions and a hyperlinked escape route, so the user won’t feel abandoned or trapped. It also adjusts the user to the idea that this isn’t any old PDF. Most people experience PDF as something to download and print out. Not only will this look different, but also the frameset conceals the PDF’s URL and prevents reflexive downloading.
Here is the HTML frameset code used in our example at http://www.pdfhacks.com/form_session/. Note that it uses a PDF+FDF URL to reference the form in order to prevent the PDF from breaking out of the frameset [Hack #75] .
<?php
// This is part of form_session
// visit www.pdfhacks.com/form_session/
//

$our_dir= 'http://'.$_SERVER['HTTP_HOST'].dirname($_SERVER['PHP_SELF']);

// The PDF+FDF URL notation respects frames
// and triggers the browser's 'PDF' association
// instead of its 'FDF' association (some browsers
// don't have an FDF association).
//
$form_frame_url= '"'.
$our_dir.'/form_session.pdf#FDF='.
$our_dir.'/update_state.php?reset=1"';

?>
<!DOCTYPE HTML PUBLIC "-//W3C//DTD HTML 4.01 Frameset//EN"
   "http://www.w3.org/TR/html4/frameset.dtd">
<html>
  <head>
    <title>PDF Form Filling Session Demo</title>
  </head>
  <frameset cols="*,200">
    <frame src=<?php echo $form_frame_url ?> name="form" scrolling="no"
marginwidth=0 marginheight=0 frameborder=1>
    <frame src="sidebar_session.html" name="sidebar" scrolling="auto"
marginwidth=5 marginheight=5 frameborder=1>
  </frameset>
</html>
Create Your Interactive PDF Form
Here are some ideas for your interactive PDF form design. Keep in
mind that a form can have any number of PDF fields, and you can hide
fields from the user or set them as read-only at any time. Our
forge_fdf script
[Hack #77]
enables you to set these flags as needed. Just add the
field’s name to the
$fields_hidden or
$fields_readonly arrays.
Use hidden text fields to store the form’s session and state information.
If your form has multiple sections that require separate, server-side computation, add a Submit Form button for each section. Show only one button at a time by hiding all the others.
Don’t forget to append an
#FDFto form submission actions—e.g.,update_state.php#FDF.Highlight specific sections of your form with borders. Create a border using an empty, read-only text field that shows a colored border and a transparent background.
You must draw these decorative form fields first, so they won’t interfere with other, interactive fields. Or, move a decorative field behind the others by giving it a lower tab order.
Tip
Alter form field tab order in Acrobat 6.0.1 by activating the Select Object Tool (Tools → Advanced Editing → Select Object Tool), selecting Advanced → Forms → Fields → Set Tab Order, and then clicking each field in order. Alter form field tab order in Acrobat 5 by activating the Form Tool, selecting Tools → Forms → Fields → Set Tab Order, and then clicking each field in order.
After the user completes a section, set that section’s fields as read-only to lock the data in. Fields that hold the results of server-side calculations also should be read-only.
If a form’s page gets cluttered with PDF fields, consider dividing fields across two or three copies of the same PDF page.
Consider splitting multiple-page forms into single-page PDFs.
Create text fields to serve as read-only messages to the user. If the user submits invalid field data, serve the form again and show a suitable message. When creating these message fields in Acrobat, color them so that they stand out from the data. You can change a message’s text using FDF.
We employ some of these techniques in our online example at http://www.pdfhacks.com/form_session/.
Beginning, Middle, End
A form-filling session has a beginning, a middle, and an end. The middle is the hard part because that is where your form logic is. The tricky parts are the beginning and the end. Here they are, in order:
- Dive into the form
Begin the session by using a PDF+FDF URL [Hack #75] to open the form. For example:
http://localhost/form_session.pdf#FDF=http://localhost/update_state.php?reset=1
The FDF portion is a script that initializes the session state. It must also serve FDF that sets the form’s initial appearance.
Store the session’s ID and state information in hidden PDF text fields, if necessary.
- Respond to data submissions
With each form submission, update the session state and then respond by serving FDF. Use FDF to update the form’s appearance. Use it to activate some fields and hide others, as needed. Also use FDF to update read-only field text with calculated data or messages to the user.
Omit the
/Fkey ($pdf_form_urlin forge_fdf) from the FDF you serve until you are ready to exit this session.- Bail out of the form
When the form session is done, break out by serving an FDF Forward. This is an FDF with no form data except the
/Fkey ($pdf_form_urlin forge_fdf). Set the/Fkey to the URL of an HTML page or script. This new address will replace the PDF form in the user’s browser.
Running the Hack
Visit http://www.pdfhacks.com/form_session/ to see a live example of this model. Download form_session-1.1.zip from this page to examine the PHP scripts and PDF forms. IndigoPerl [Hack #74] users can unpack form_session-1.1.zip into C:\indigoperl\apache\htdocs\pdf_hacks\form_session-1.1\ and then run the example locally by pointing their browsers at http://localhost/pdf_hacks/form_session-1.1/start.html.
Permanently Merge a PDF Form and its Data
Provide online users with a copy of their completed form to save.
Adobe Reader enables a user to add, change, view, and print form data, but it does not enable a user to save the filled-in PDF form to disk. Saving the file produces a lovely copy of an empty form. How annoying!
Correct this problem server-side by merging the PDF form and its data. Then, offer this filled-in form as a download for the user’s records. After merging, the form fields remain interactive, even though they display the user’s data. Go a step further and flatten this form so that field data becomes a permanent part of the PDF pages. After flattening, filled-in fields are no longer interactive. You can merge and flatten forms using the iText library or our command-line pdftk. Both are free software.
Merge or Flatten a Form and Its Data in Java
The iText library (http://www.lowagie.com/iText/ or http://itextpdf.sf.net) is a remarkable tool for manipulating PDF documents. The following Java program, merge_pdf_fdf, demonstrates how to merge or flatten a PDF and its form data FDF [Hack #77] using iText. Run this code from your command line, or integrate it into your web application.
/*
  merge_pdf_fdf, version 1.0
  merge an input PDF file with an input FDF file
  to create a filled-in PDF; optionally flatten the
  FDF data so that it becomes part of the page
  http://www.pdfhacks.com/merge_pdf_fdf/

  invoke from the command line like this:

    java -classpath ./itext-paulo.jar:. \
    merge_pdf_fdf input.pdf input.fdf output.pdf

  or:

    java -classpath ./itext-paulo.jar:. \
    merge_pdf_fdf input.pdf input.fdf output.pdf flatten

  adjust the classpath to the location of your iText jar
 */

import java.io.*;
import com.lowagie.text.pdf.*;

public class merge_pdf_fdf extends java.lang.Object {

  public static void main(String args[]) {
    if ( args.length == 3 || args.length == 4 ) {
      try {
        // the input PDF
        PdfReader reader =
          new PdfReader( args[0] );
        reader.consolidateNamedDestinations( );
        reader.removeUnusedObjects( );

        // the input FDF
        FdfReader fdf_reader=
          new FdfReader( args[1] );

        // PdfStamper acts like a PdfWriter
        PdfStamper pdf_stamper=
          new PdfStamper( reader,
                          new FileOutputStream( args[2] ) );

        if( args.length == 4 ) { // "flatten"
          // filled-in data becomes a permanent part of the page
          pdf_stamper.setFormFlattening( true );
        }
        else {
          // filled-in data will 'stick' to the form fields,
          // but it will remain interactive
          pdf_stamper.setFormFlattening( false );
        }

        // sets the form fields from the input FDF
        AcroFields fields=
          pdf_stamper.getAcroFields( );
        fields.setFields( fdf_reader );

        // closing the stamper closes the underlying
        // PdfWriter; the PDF document is written
        pdf_stamper.close( );
      }
      catch( Exception ee ) {
        ee.printStackTrace( );
      }
    }
    else { // input error
      System.err.println("arguments: file1.pdf file2.fdf destfile [flatten]");
    }
  }
}
To create a command-line Java program, copy the preceding code into a file named merge_pdf_fdf.java. Then, compile merge_pdf_fdf.java using javac, setting the classpath to the name and location of your iText jar:
javac -classpathmerge_pdf_fdf.java
Finally, invoke merge_pdf_fdf like so:
java -classpath:. \merge_pdf_fdfinput.pdf input.fdf output.pdf
Merge or Flatten a Form and Its Data with pdftk
Use
pdftk
[Hack #79]
to merge a
form with an FDF datafile
[Hack #77]
and create a new PDF. The
fields will display the given data, but they also remain interactive.
pdftk’s fill_form operation takes
the filename of an FDF file as its argument. For example:
pdftkfill_formoutput
You can’t combine the fill_form
operation with any other operation (e.g., cat),
but you can supply additional output options for encryption
[Hack #52]
.
Flatten form data permanently into the page by adding the
flatten_form output option. The resulting PDF data
will no longer be interactive.
pdftkfill_formoutputflatten_form
Or, if your PDF form already has field data, just flatten it:
pdftkoutputflatten_form
Merge or Flatten with pdftk in PHP
After installing pdftk on your web server, you can invoke it from your PHP scripts to merge PDF forms with FDF data. Use our PHP script forge_fdf [Hack #77] to cast your data into FDF. Then, save this FDF data into a temporary file. Finally, call pdftk to create a new PDF from your PDF form and FDF data.
The following PHP code could be used for this purpose:
<?php
// session_fdf is your function for converting
// the user's session state into an FDF string
$fdf_ss= session_fdf( $_GET['id'] );

$temp_fn= tempnam( '/tmp', 'tempfdf' );
$temp_fp= fopen( $temp_fn, 'wb' );
if( $temp_fp ) {
  fwrite( $temp_fp, $fdf_ss );
  fclose( $temp_fp );

  header( 'Content-type: application/pdf' );
  passthru( '/usr/local/bin/pdftk form.pdf fill_form '.$temp_fn.
            ' output - flatten' ); // output to stdout (-)

  unlink( $temp_fn );
}
?>
Tool Up with pdftk
Take control of your PDF with pdftk.
If PDF is electronic paper, pdftk is an electronic staple-remover, hole punch, binder, secret-decoder ring, and X-ray glasses. pdftk is a simple, free tool for doing everyday things with PDF documents. It can:
Split and merge PDF pages [Hack #51]
Decrypt and encrypt PDF documents [Hack #52]
Burst a PDF document into single pages [Hack #71]
Uncompress and recompress page streams [Hack #80]
The pdftk web site (http://www.AccessPDF.com/pdftk/) has links to software downloads and instructions for installation and usage. pdftk currently runs on Windows, Linux, Solaris, FreeBSD, and Mac OS X. Some users can download precompiled binaries, while others must download the source code and build pdftk using gcc, gcj, and libgcj (as described on the web site). pdftk is free software.
On Windows, download pdftk_1.0.exe.zip to a
convenient directory. Unzip with your favorite archiving tool, and
move the resulting pdftk.exe program to a
directory in your PATH, such as
C:\windows\system32\ or
C:\winnt\system32\. Test it by opening a
command-line DOS prompt and typing pdftk --help.
It should respond with pdftk version information and usage
instructions.
Tip
Additional free PDF tools include mbtPDFasm (http://thierry.schmit.free.fr/dev/mbtPdfAsm/enMbtPdfAsm2.html) and the Multivalent Tools (http://multivalent.sourceforge.net/Tools/index.html). Related commercial tools include pdfmeld (http://www.fytek.com/).
Handy Command Line for Windows
Command prompts aren’t well suited for quickly navigating large, complex filesystems. Let’s configure the Windows File Explorer to open a command prompt in the working directory we select. This will make it easier to use pdftk in a specific directory.
Windows XP and Windows 2000:
In the Windows File Explorer menu, select Tools → Folder Options . . . and click the File Types tab. Select the Folder file type and click the Advanced button.
Click the New . . . button and a New Action dialog appears. Give the new action the name
Command.Give the action an application to open by clicking the Browse . . . button and selecting cmd.exe, which lives somewhere such as C:\windows\system32\, or C:\winnt\system32\.
Add these arguments after
cmd.exelike so:C:\windows\system32\cmd.exe
/K cd "%1"Click OK, OK, OK and you are done.
Windows 98:
In the Windows File Explorer menu, select Tools → Folder Options . . . and click the File Types tab. Select the Folder file type and click the Edit . . . button.
Click the New . . . button and a New Action dialog appears. Give the new action the name
Command.Give the action an application to open by clicking the Browse . . . button and selecting command.com, which lives somewhere such as C:\windows\.
Add these arguments after
command.comlike so:C:\windows\command.com
/K cd "%1"Click OK, OK, OK and you are done.
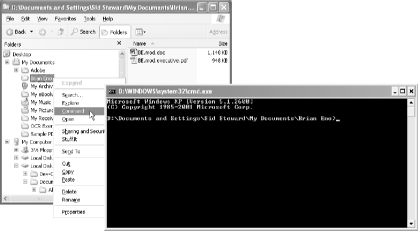
Test your configuration by right-clicking a folder in the File Explorer. The context menu should list your new Command action, as shown in Figure 6-7. Choose this action and a command prompt will appear with its working directory set to the folder you selected. Olé!
Decipher and Navigate PDF at the Text Level
Turn obfuscated PDF code into transparent data so you can work with it directly.
PDF uses an element framework for organizing data. When editing PDFs at the text level, it helps to know how to navigate these nodes. The data itself usually is compressed and unreadable. pdftk [Hack #79] can uncompress these streams, making the PDF more interesting to read and much more hackable.
First, uncompress your PDF document using pdftk:
pdftkoutputuncompress
Next, fire up your text editor. A good text editor enables you to inspect any document at its lowest level by reading its bytes right off of the disk. Not all text editors can handle the mix of human-readable text and machine-readable binary data that PDF contains. Other editors can read and display this data, but they can’t write it properly. I recommend using gVim [Hack #82] .
Tip
Get the full story on PDF by reading the specification at http://partners.adobe.com/asn/acrobat/sdk/public/docs/PDFReference15_v5.pdf.
Open a PDF in your text editor and you will find some plain-text data and some unreadable binary data. All of this data is organized using a few basic objects. The PDF Reference 1.5 section 3.2 describes these in detail. Here is a quick key to get you started.
- Names:
/... A slash indicates the beginning of a name. Examples include
/Typeand/Page. Most names have very specific meanings prescribed by the PDF Reference. They are never compressed or encrypted.- Strings:
(...) Strings are enclosed by parentheses. An example is
(Nowisthetime). You use them for holding plain-text data in annotations and bookmarks. You can encrypt them but you can’t compress them. Mind escaped characters—e.g.,\),\(, or\\.- Dictionaries:
<<key1 value1 key2 value2 ...>> Dictionaries map keys to values. Keys must be names and values can be anything, even dictionaries or arrays.
- Arrays:
[object1 object2 ...] Arrays represent a list of objects. All PDF objects are part of one big tree, interconnected by arrays and dictionaries.
- Streams:
<<...>> stream...endstream Most PDF data is stored in streams. Dictionary data precedes the stream data and holds information about the stream, such as its length and encoding.
streamandendstreambracket the actual stream data. Streams are used to hold bitmap images and page-drawing instructions, among other things. Use pdftk to make compressed page streams readable. Some streams use PDF objects (dictionaries, strings, arrays, etc.) to represent information.- Indirect object references:
m
n
R Indirect object references allow an object to be referenced in one place (or many places) and described in another. The reference is a pair of numbers followed by the letter
R, such as:35280R. You find them in dictionaries and arrays. To locate the object referenced bym nR, search form nobj.- Indirect object identifiers:
m nobj ... endobj An indirect object is any object that is preceded by the identifying
m nobj, wheremandnare numbers that uniquely identify the object. Another object can then reference the indirect object by simply invokingm nR, described earlier.
Dictionaries tend to be the most interesting objects. They represent
things such as pages and annotations. You can tell what a dictionary
describes by checking its /Type and
/Subtype keys. Conversely, you can find something
in a PDF by searching on its type. For example, you can find each
page in a PDF by searching for the text /Page. For
annotations, search for /Annot, and for images,
/Image.
At the end of the PDF file is the XREF lookup table. It gives the byte offset for every indirect object in the PDF file. This allows rapid random access to PDF pages and other data. Text-level PDF editing can corrupt the XREF table, which breaks the PDF. [Hack #81] solves this problem.
Edit PDF Code Freely
Take control of PDF code by mastering its XREF table.
[Hack #80] revealed the hackable plain text behind PDF. Here we edit this PDF text and then use pdftk [Hack #79] to cover our tracks. pdftk can also compress the page streams when we’re done.
Warning
An unsuitable text editor can quietly damage your PDF. Test your text editor by simply opening a PDF, saving it into a new file, and then trying to open this new file in Acrobat or Reader. If your editor corrupted the PDF’s data, Acrobat or Reader should display a brief warning before displaying the PDF. Sometimes, however, this warning flashes by too quickly to notice. After the PDF is repaired, Acrobat and Reader will display the PDF as if nothing happened.
Since Acrobat and Reader aren’t the most reliable tools for testing PDFs, you should consider some alternatives. The free command-line pdfinfo program from the Xpdf project (http://www.foolabs.com/xpdf/) can tell you whether a PDF is damaged. The Multivalent Tools (http://multivalent.sourceforge.net/Tools/index.html) also provide a free PDF validator.
If you need a good text editor, try gVim [Hack #82] .
First, uncompress your PDF’s page streams [Hack #80] :
pdftkoutputuncompress
Then, open this new PDF in your text editor. Locate your page of
interest by searching for the text /pdftk_pageNum
N, where N is
the number of your page (the first page is 1, not 0). This text was
added to the page dictionaries by pdftk.
Find the /Contents key in your
page’s dictionary. It is probably mapped to an
indirect object reference: m n
R. Locate this indirect object by searching for
the text m n
obj. This
will take you to a stream or to an array of streams. If it is an
array, look up any of its referenced streams the same way.
Now you should be looking at a stream of PDF drawing operations that
describe your page. These operations and their interactions are best
understood by studying the PDF Reference
[Hack #98]
. However, if your page has a
lot of text on it, you can probably make it out. An example of a
legal change in page text is changing
[(gr)17.7(oup)] to [(grip)], or
(storey) to (story). Anything
inside parentheses this way is fair game. So, change something and
save your work.
Editing PDF at the text level typically corrupts the XREF lookup table at the end of the file. Repair your edited PDF using pdftk like so:
pdftkoutput
Or, if you want to compress the output and remove the /pdftk_pageNum entries, add compress to the end like so:
pdftkoutputcompress
Open your new PDF in Reader and view your page. Do you see the change you made? If it was in the middle of a paragraph, you might be surprised to find that the paragraph hasn’t rewrapped to fit your altered word. Most PDFs have no concept of a paragraph, so how could it?
This procedure is an unlikely way to fix typos. We put it to better use in [Hack #82] .
Integrate pdftk with gVim for Seamless PDF Editing
Turn gVim into a PDF editor.
gVim is an excellent text editor that can also be handy for viewing and editing PDF code. It handles binary data nicely, it is mature, and it is free. Also, you can extend it with plug-ins, which is what we’ll do. First, let’s download and install gVim.
Visit http://www.vim.org. The download page offers links and instructions for numerous platforms. Windows users can download the installer from http://www.vim.org/download.php. As of this writing, it is called gvim63.exe. During installation, the default settings should suit most needs. Click through to the end and it will create a Programs menu from which you can launch gVim.
The first-time gVim user should run
gVim in Easy mode,
which will make it behave like most other text editors. On Windows,
do this by running gVim Easy from the Programs menu. Or, you can
activate Easy mode from inside gVim by typing (the initial colon is
essential) :source
$VIMRUNTIME/evim.vim into your gVim session.
gVim comes with an interactive tutorial and a good online help
system. Learn about it by invoking :help.
Tip
If gVim frequently complains about “Illegal Back
Reference” errors, check your
HOME environment variable (Start →
Settings → Control Panel → System →
Advanced → Environment Variables). Some backslash character
combinations in HOME, such as
\1 or \2, will trigger these
errors. Try replacing all the backslashes with forward slashes in
HOME.
Plug pdftk into gVim
The pdftk plug-in turns gVim into a PDF editor. When opening a PDF it automatically uncompresses page streams so that you can read and modify them [Hack #80] . When closing a PDF, it automatically compresses page streams. If any changes were made to the PDF, it also fixes internal PDF byte offsets [Hack #81] .
Visit http://www.AccessPDF.com/pdftk/ and download pdftk.vim.zip. Unzip and then move the resulting file, pdftk.vim, to the gVim plug-ins directory. This usually is located someplace such as C:\Vim\vim63\plugin\. To help find this directory, try searching for the file gzip.vim, which should be there already. The pdftk plug-in will be sourced the next time you run gVim, so restart gVim if necessary.
Use care when testing the plug-in for the first time. Copy a PDF to create a test file named test1.pdf. Launch gVim and use it to open test1.pdf. There will be a delay while pdftk uncompresses it. Data should then appear in the editor as readable text, as shown in Figure 6-8. Any graphic bitmaps still will appear as unreadable gibberish.
Without making any changes to the file, save it as test2.pdf and close it. gVim will pause again while it compresses test2.pdf. Now, open test2.pdf in Acrobat or Reader. If everything is in place, it should open just fine. If Acrobat or Reader complains about the file being damaged, double-check the installation.
Warning
Acrobat and Reader display a warning as they repair a corrupted PDF file, but sometimes this warning flashes by too quickly to notice. After the PDF is repaired, they will display the PDF as if nothing happened. So, Acrobat and Reader aren’t the most reliable tools for testing PDFs. Consider these alternatives.
The free, command-line pdfinfo program from the Xpdf project (http://www.foolabs.com/xpdf/) can tell you whether a PDF is damaged. The Multivalent Tools (http://multivalent.sourceforge.net/Tools/index.html) also provide a free PDF validator.
Hacking the Hack
With our PDF extensions, gVim enables you to conveniently edit PDF code. You can bring power and beauty together by configuring Acrobat’s TouchUp tool to use gVim for editing PDF objects.
In Acrobat, select Edit → Preferences → General → TouchUp. Click Choose Page/Object Editor . . . and a file selector will open. Select gvim.exe, which usually lives somewhere such as C:\Vim\vim63\. Click OK and you are done.
Test out your new configuration on a disposable document. Open the PDF in Acrobat and select the TouchUp Object tool (it might be hidden by the TouchUp Text tool), as shown in Figure 6-9.
Click a paragraph and a box appears, outlining the selection. Right-click inside this box and choose Edit Object . . . . gVim will open, displaying the PDF code used to describe this selection, as shown in Figure 6-10. It will be a full PDF document, with fonts and an XREF table.
Find some paragraph text and make some small changes [Hack #80] . When you save the gVim file, Acrobat should promptly update the visible page to reflect your change. Sometimes this update looks imperfect, temporarily. You can make many successive PDF edits this way.
You might notice occasional warnings from gVim about the data having been modified on the disk by another program. You can safely ignore these.
Modify PDF Hyperlinks at Serve-Time
Add live session data to your PDF on its way down the chute.
After publishing your PDF online, it can be hard to gauge what impact it had on readers. Get a clearer picture of reader response by modifying the PDF’s hyperlinks so that they pass document information to your web server.
For example, if your July newsletter’s PDF edition has hyperlinks to:
http://www.pdfhacks.com/index.html
you can append the newsletter’s edition to the PDF hyperlinks using a question mark:
http://www.pdfhacks.com/index.html?edition=0407
When somebody reading your PDF newsletter follows this link into your site, your web logs record exactly which newsletter they were reading.
Take this reader response idea a step further by adding data to PDF hyperlinks that identifies the user who originally downloaded the PDF. With a little preparation, this is easy to do as the PDF is being served.
Add Hyperlinks to Your PDF Using Links or Buttons
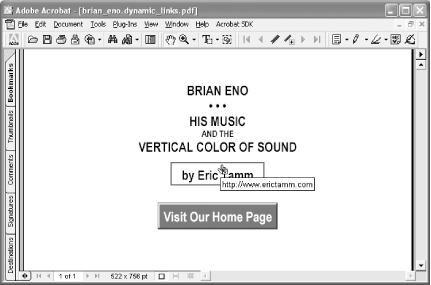
A PDF page can include hyperlinks to web content. You can create them using the Link tool, the Button tool (Acrobat 6), or the Form tool (Acrobat 5). Use the Link tool shown in Figure 6-11 if you want to add a hyperlink to existing text or graphics. Use the Button/Form tool if you want to add a hyperlink and add text/graphics to the page, as shown in Figure 6-12. For example, you would use the Button/Form tool to create a web-style navigation bar [Hack #65] .
To create a hyperlink button in Acrobat 6, select the Button tool (Tools → Advanced Editing → Forms → Button Tool). Click the PDF page and drag out a rectangle. Release the rectangle and a Field Properties dialog opens. Set the button’s appearance using the General, Appearance, and Options tabs.
Open the Actions tab. Set the Trigger to Mouse Up, set the Action to Open a Web Link, and then click Add . . . . A dialog will open where you can enter the hyperlink URL.
Tip
When creating hyperlink buttons, the button’s Name is not important. However, it can’t be left blank, either. Set it to any unique identifier. Acrobat 6 does this for you automatically.
To create a hyperlink button in Acrobat 5, select the Form tool. Click the PDF page and drag out a rectangle. Release the rectangle and a Field Properties dialog opens. Set the field type to Button and enter a unique Name. Set the button’s appearance using the Appearance and Options tabs.
Open the Actions tab. Select Mouse Up and click Add . . . . Set the Action Type to World Wide Web Link. Click Edit URL . . . and enter the hyperlink URL.
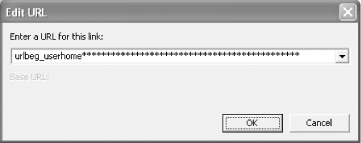
Use Placeholders for Hyperlink URLs
When
entering your link or button URL,
use an identifying name, such as urlbeg_userhome,
instead of the actual URL. Pad this placeholder with asterisks
(*) so that it is at least as long as your longest
possible URL, as shown in Figure 6-13. Use a
constant prefix across all these names (e.g.,
urlbeg) so that they are easy to find later using
grep.
Format the PDF Code with pdftk
When your PDF is ready to distribute online, run it through pdftk [Hack #79] . This formats the PDF code to ensure that each URL is on its own line. Add the extension pdfsrc to the output filename instead of pdf:
pdftk.pdf output.pdfsrc
From this point on, you should not treat the file like a PDF, and this pdfsrc extension will remind you.
Add Placeholder Offsets to the PDF
Find the byte offsets to your URL placeholders with grep (Windows users visit http://gnuwin32.sf.net/packages/grep.htm or install MSYS [Hack #97] to get grep). grep will tell you the byte offset and display the specific placeholder located on that line in the PDF. For example:
ssteward@armand:~$grep -aburlbeg mydocument.pdfsrc9202:<</URI (urlbeg_userhome*******************) 11793:<</URI (urlbeg_userhome*******************) 17046:<</URI (urlbeg_newsletters*******************)
In your text editor [Hack #82] , open your pdfsrc file and add one line for each offset to the beginning. Each line should look like this:
#--
For example, this is how the previous grep output would appear at the start of mydocument.pdfsrc:
#-userhome-9202
#-userhome-11793
#-newsletters-17046
%PDF-1.3...
After adding these lines, do not modify the PDF with pdftk, gVim, or Acrobat. The pdfsrc extension should remind you to not treat this file like a PDF. Altering the PDF could break these byte offsets.
The Code
This
example PHP script,
serve_newsletter.php, opens a
pdfsrc file, reads the offset data we added,
then serves the PDF. As it serves the PDF, it replaces the
placeholders with hyperlinks. It uses the input
GET query string’s
edition and user values to
tailor the PDF hyperlinks.
For example, when invoked like this:
http://www.pdfhacks.com/serve_newsletter.php?edition=0307&user=84
it opens the PDF file newsletter.0307.pdfsrc and
serves it, replacing all userhome hyperlink
placeholders with:
http://www.pdfhacks.com/user_home.php?user=84
and replacing all newsletters
placeholders with:
http://www.pdfhacks.com/newsletter_home.php?user=84&edition=0307
Tailor serve_newsletter.php to your purpose:
<?php
// serve_newsletter.php, version 1.0
// http://www.pdfhacks.com/dynamic_links/

$fp= @fopen( "./newsletter.{$_GET['edition']}.pdfsrc", 'r' );
if( $fp ) {

  if( $_GET['debug'] ) {
    header("Content-Type: text/plain"); // debug
  }
  else {
    header('Content-Type: application/pdf');
  }

  $pdf_offset= 0;
  $url_offsets= array( );

  // iterate over first lines of pdfsrc file to load $url_offsets
  while( $cc= fgets($fp, 1024) ) {
    if( $cc{0}== '#' ) { // one of our comments
      list($comment, $name, $offset)= explode( '-', $cc );

      if( $name== 'userhome' ) {
        $url_offsets[(int)$offset]=
          'http://www.pdfhacks.com/user_home.php?user=' . $_GET['user'];
      }
      else if( $name== 'newsletters' ) {
        $url_offsets[(int)$offset]=
          'http://www.pdfhacks.com/newsletter_home.php?user=' .
          $_GET['user'] . '&edition=' . $_GET['edition'];
      }
      else { // default
        $url_offsets[(int)$offset]= 'http://www.pdfhacks.com';
      }
    }
    else { // finished with our comments
      echo $cc;
      $pdf_offset= strlen($cc)+ 1;

      break;
    }
  }

  // sort by increasing offsets
  ksort( $url_offsets, SORT_NUMERIC );
  reset( $url_offsets );

  $output_url_line_b= false;
  $output_url_b= false;
  $closed_string_b= false;

  list( $offset, $url )= each( $url_offsets );
  $url_ii= 0;
  $url_len= strlen($url);

  // iterate over rest of file
  while( ($cc= fgetc($fp))!= "" ) {

    if( $output_url_line_b && $cc== '(' ) {
      // we have reached the beginning of our URL
      $output_url_line_b= false;
      $output_url_b= true;

      echo '(';
    }
    else if( $output_url_b ) {
      if( $cc== ')' ) { // finished with this URL
        if( $closed_string_b ) {
          // string has already been capped; pad
          echo ' ';
        }
        else {
          echo ')';
        }

        // get next offset/URL pair
        list( $offset, $url )= each( $url_offsets );
        $url_ii= 0;
        $url_len= strlen($url);

        // reset
        $output_url_b= false;
        $closed_string_b= false;
      }
      else if( $url_ii< $url_len ) {
        // output one character of $url
        echo $url{$url_ii++};
      }
      else if( $url_ii== $url_len ) {
        // done with $url, so cap this string
        echo ')';
        $closed_string_b= true;
        $url_ii++;
      }
      else {
        echo ' '; // replace padding with space
      }
    }
    else {
      // output this character
      echo $cc;

      if( $offset== $pdf_offset ) {
        // we have reached a line in pdfsrc where
        // our URL should be; begin a lookout for '('
        $output_url_line_b= true;
      }
    }

    ++$pdf_offset;
  }

  fclose( $fp );
}
else { // file open failure
  echo 'Error: failed to open: '."./newsletter.{$_GET['edition']}.pdfsrc";
}
?>Tailor PDF Text at Serve-Time
Create a PDF template that you can populate as it is served.
Sometimes a PDF needs to include dynamic information. For example, you could fashion the cover of your personalized PDF sales brochure [Hack #89] to include the customer’s name: “Created for Mary Jane Doe on March 15, 2004.” To do this, let’s use what we know about modifying PDF text in a plain-text editor [Hack #80] to create a PDF template. Then we’ll fill in this template using a web server script.
The overall process resembles [Hack #83] . Instead of PDF links, you will add placeholders to the PDF’s page streams. As it is served, these placeholders can be replaced with your data.
Create the PDF
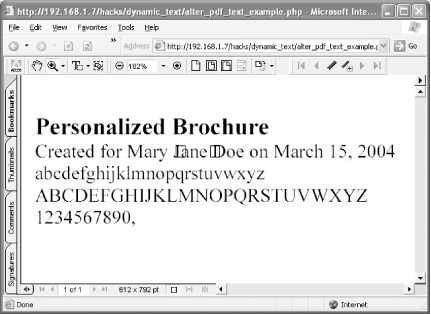
Design the document using your favorite authoring application. Add placeholder text where you want the dynamic data to appear. Placeholders should have a common prefix, such as textbeg_customer. Style this text to taste, but align it to the left (not the center). Before creating a PDF, be careful with the placeholder fonts to avoid results such as the one in Figure 6-14.
Whichever font you choose for your placeholder, you must make sure the font gets adequately embedded into the PDF [Hack #43] . An embedded font is often subset, which means it includes only the characters that are used in your document. If your placeholder text uses a Type 1 font, you can configure Distiller to not subset this font [Hack #43] . If your placeholder text uses a TrueType or OpenType font, you must be sure that every character you might need occurs in your document. To be safe, create a separate page that includes every letter in the alphabet, every number, and every punctuation mark you’ll need. Set this alphabet soup to the font of your placeholder.
Print to PDF and delete this alphabet page.
Convert the PDF into a Template
Prepare the PDF for text editing with pdftk [Hack #79] like this (if you use gVim and our plug-in [Hack #82] to edit PDF, this step isn’t necessary):
pdftk.pdf output.pdf uncompress
Open the results in your editor and search for your placeholder text.
If you can’t find it, search on its page
number—e.g., pageNum
5
— and then dig down
[Hack #81]
to find the page stream that has your placeholder. Distiller probably
split it into pieces—e.g., textbeg_customer
might end up as
[(text)5(b)-1.7(eg_cust)5(o)-1.7(mer)].
Tip
When creating PDF with Ghostscript, text that uses TrueType fonts ends up getting a strange, custom encoding. This means your PDF code will be incomprehensible. The solution is to use Type 1 fonts in your document instead of TrueType.
Make a few changes to this page stream. First, repair your placeholder text so that grep can find it. So:
[(text)5(b)-1.7(eg_cust)5(o)-1.7(mer)]TJ
becomes:
[(textbeg_customer)]TJ
Or, if your string ends in Tj, such as this:
(Created for textbeg_customer on textbeg_date)Tj
rewrite it like this, adding square brackets and changing the
Tj at the end to TJ:
[(Created for textbeg_customer on textbeg_date)]TJ
Next, isolate each placeholder on its own line, if necessary. So, the previous example becomes:
[(Created for )
(textbeg_customer)
( on )
(textbeg_date)]JT
Finally, pad the placeholders with asterisks (*).
Add enough asterisks so that the placeholder is longer than any
possible data you might write there. Padding the previous example
would look like this:
[(Created for )
(textbeg_customer***********************************)
( on )
(textbeg_date**********************)]JT
Save and close your altered PDF.
Tip
What happens to excess padding when the file is served? Our script replaces it with whitespace outside of the PDF string, so it won’t be rendered on the page. The preceding example might look like this, after it is served by our script:
[(Created for )
(Mary Jane Doe)
( on )
(March 15, 2004)                    ]JT
where (Mary
Jane
Doe) and (March
15, 2004) are followed by
numerous space characters.
Add Placeholder Offsets to the PDF
If you used gVim and our plug-in to edit the PDF, now you must uncompress the PDF. If you did not use gVim, now you must repair the PDF’s XREF table and stream lengths. One command accomplishes both tasks:
pdftk.pdf output.pdfsrc uncompress
From this point on, you should not treat the file like a PDF, and this pdfsrc extension will remind you.
Find the byte offsets to your placeholders with grep (Windows users visit http://gnuwin32.sf.net/packages/grep.htm or install MSYS [Hack #97] to get grep):
ssteward@armand:~$grep -ab.pdfsrc9202:(textbeg_customer***************************) 9247:(textbeg_date***************************)]TJ 11793:(textbeg_customer***************************)
In your text editor, add one line for each offset to the beginning of your pdfsrc file. Each line should look like this:
#--
The dataname is used in the following
script code to identify the data to be written into the PDF. In this
example, customer will be replaced with the
customer’s name. For example, here is how the
preceding grep output would appear at the beginning of a
pdfsrc file:
#-customer-9202
#-date-9247
#-customer-11793
%PDF-1.3...
After adding these lines, do not modify the PDF with pdftk, gVim, or Acrobat. The pdfsrc extension should remind you to not treat this file like a PDF. Altering the PDF could invalidate these byte offsets.
The Code
This
example PHP script,
alter_pdf_text_example.php, opens a
pdfsrc file, reads the offset data we added, and
then serves the PDF. As it serves the PDF, it replaces the
placeholders with the given text. Note how the replacement text is
escaped using escape_pdf_string.
<?php
// alter_pdf_text_example.php, version 1.0
// http://www.pdfhacks.com/dynamic_text/

// the filename of the source PDF file, which
// contains placeholders for our dynamic text
$pdfsrc_fn= './cover.pdfsrc';

// the data we will place into the PDF text;
$customer_text= "Mary Jane Doe";
$date_text= "March 15, 2004";

function escape_pdf_string( $ss )
{
  $ss_esc= '';
  $ss_len= strlen( $ss );
  for( $ii= 0; $ii< $ss_len; ++$ii ) {
    if( ord($ss{$ii})== 0x28 ||  // open paren
        ord($ss{$ii})== 0x29 ||  // close paren
        ord($ss{$ii})== 0x5c )   // backslash
      {
        $ss_esc.= chr(0x5c).$ss{$ii}; // escape the character w/ backslash
      }
    else if( ord($ss{$ii}) < 32 || 126 < ord($ss{$ii}) ) {
      $ss_esc.= sprintf( "\\%03o", ord($ss{$ii}) ); // use an octal code
    }
    else {
      $ss_esc.= $ss{$ii};
    }
  }
  return $ss_esc;
}

// open the source PDF file, which contains placeholders
$fp= @fopen( $pdfsrc_fn, 'r' );
if( $fp ) {

  if( $_GET['debug'] ) {
    header("Content-Type: text/plain"); // debug
  }
  else {
    header('Content-Type: application/pdf');
  }

  $pdf_offset= 0;
  $text_offsets= array( );

  // iterate over first lines of pdfsrc file to load $text_offsets;
  while( $cc= fgets($fp, 1024) ) {
    if( $cc{0}== '#' ) { // one of our comments
      list($comment, $name, $offset)= explode( '-', $cc );

      if( $name== 'customer' ) {
        $text_offsets[(int)$offset]=
          escape_pdf_string( $customer_text );
      }
      else if( $name== 'date' ) {
        $text_offsets[(int)$offset]=
          escape_pdf_string( $date_text );
      }
      else { // default
        $text_offsets[(int)$offset]=
          escape_pdf_string( '[ERROR]' );
      }
    }
    else { // finished with our comments
      echo $cc;
      $pdf_offset= strlen($cc)+ 1;

      break;
    }
  }

  // sort by increasing offsets
  ksort( $text_offsets, SORT_NUMERIC );
  reset( $text_offsets );

  $output_text_line_b= false;
  $output_text_b= false;
  $closed_string_b= false;

  list( $offset, $text )= each( $text_offsets );
  $text_ii= 0;
  $text_len= strlen($text);

  // iterate over rest of file
  while( ($cc= fgetc($fp))!= "" ) {

    if( $output_text_line_b && $cc== '(' ) {
      // we have reached the beginning of our TEXT
      $output_text_line_b= false;
      $output_text_b= true;

      echo '(';
    }
    else if( $output_text_b ) {
      if( $cc== ')' ) { // finished with this TEXT
        if( $closed_string_b ) {
          // string has already been capped; pad
          echo ' ';
        }
        else {
          echo ')';
        }

        // get next offset/TEXT pair
        list( $offset, $text )= each( $text_offsets );
        $text_ii= 0;
        $text_len= strlen($text);

        // reset
        $output_text_b= false;
        $closed_string_b= false;
      }
      else if( $text_ii< $text_len ) {
        // output one character of $text
        echo $text{$text_ii++};
      }
      else if( $text_ii== $text_len ) {
        // done with $text, so cap this string
        echo ')';
        $closed_string_b= true;
        $text_ii++;
      }
      else {
        echo ' '; // replace padding with space
      }
    }
    else {
      // output this character
      echo $cc;

      if( $offset== $pdf_offset ) {
        // we have reached a line in pdfsrc where
        // our TEXT should be; begin a lookout for '('
        $output_text_line_b= true;
      }
    }

    ++$pdf_offset;
  }

  fclose( $fp );
}
else { // file open failure
  echo 'Error: failed to open: '.$pdfsrc_fn;
}
?>
Running the Hack
IndigoPerl users (see Section 6.2.2
in
[Hack #74]
) can copy
alter_pdf_text_example.php into
C:\indigoperl\apache\htdocsdf_hacks along with a
PDF template named cover.pdfsrc. Point your
browser to http://localhost/pdf_hacks/alter_pdf_text_example.php,
and a PDF should appear. All instances of
textbeg_customer should be replaced with
“Mary Jane Doe,” and all instances
of textbeg_date should be replaced with
“March 15, 2004.” Naturally, you
will need to adapt this script to your own purposes.
Use HTML to Create PDF
Format your content in HTML and then transform it into PDF.
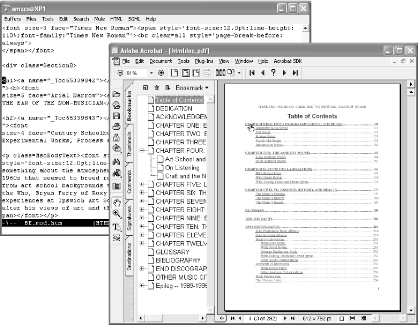
HTML pages are easy to create on the fly. PDF pages are hard. One simple way to create dynamic PDF is to first create the document in HTML and then use HTMLDOC to transform it into PDF, as shown in Figure 6-15. This works for single pages and long documents.
HTMLDOC creates PDF documents from HTML 3.2 data. It provides document layout options, such as running headers and footers. It can add PDF features, such as bookmarks, links, metadata, and encryption. Invoke HTMLDOC from the command line or use its GUI. Visit http://www.easysw.com/htmldoc/software.php to download Windows binaries or source that can be compiled on Linux, Mac OS X, or a variety of other operating systems.
The detailed documentation that comes with HTMLDOC also is available online at http://www.easysw.com/htmldoc/documentation.php.
In Perl, you can automate PDF generation with HTMLDOC by using the HTML::HTMLDoc module to interface with HTMLDOC.
Use Perl to Create PDF
Create or modify PDF with a Perl script.
Many web sites use Perl for creating dynamic content. You can also use Perl to script Acrobat on your local machine [Hack #95] . Given the great number of packages that extend Perl, it is no surprise that packages exist for creating and manipulating PDF. Let’s take a look.
Install Perl and the PDF::API2 Package on Windows
[Hack #95] explains how to install Perl on Windows. After installing Perl, use the Perl Package Manager to easily install the PDF::API2 package.
Launch the Programmer’s Package Manager (PPM,
formerly called Perl Package Manager) by selecting Start →
Programs → ActiveState ActivePerl 5.8 → Perl
Package Manager. A command prompt will open with its
ppm> prompt awaiting your command. Type
help to see a list of commands. Type
search pdf to see a list of available packages. To
install PDF::API2, enter install
pdf-api2. The Package Manager will fetch the
package from the Internet and install it on your machine. The entire
session looks something like this:
PPM - Programmer's Package Manager version 3.1. Copyright (c) 2001 ActiveState SRL. All Rights Reserved. Entering interactive shell. Using Term::ReadLine::Stub as readline library. Type 'help' to get started. ppm>install pdf-api2==================== Install 'pdf-api2' version 0.3r77 in ActivePerl 5.8.3.809. ==================== Transferring data: 74162/1028845 bytes. ... Installing C:\Perl\site\lib\PDF\API2\CoreFont\verdanaitalic.pm Installing C:\Perl\site\lib\PDF\API2\CoreFont\webdings.pm Installing C:\Perl\site\lib\PDF\API2\CoreFont\wingdings.pm Installing C:\Perl\site\lib\PDF\API2\CoreFont\zapfdingbats.pm Installing C:\Perl\site\lib\PDF\API2\Chart\Pie.pm Successfully installed pdf-api2 version 0.3r77 in ActivePerl 5.8.3.809. ppm>quit
The PDF::API2 package is used widely to create and manipulate PDF. You can download documentation and examples from http://pdfapi2.sourceforge.net/dl/.
Hello World in Perl
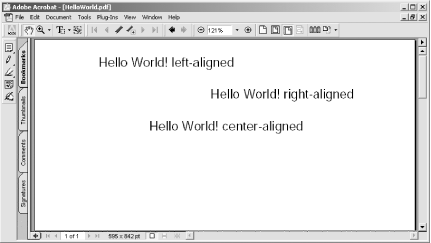
This Perl script creates a PDF named HelloWorld.pdf , adds a page, and then adds text to that page. It gives you an idea of how easily you can create PDF. Figure 6-16 shows the PDF document created by this script.
#!/usr/bin/perl
# HelloWorld.pl; adapted from 0x_test-pl

use PDF::API2;

my $pdf  = PDF::API2->new(-file => "HelloWorld.pdf");
$pdf->mediabox(595,842);
my $page = $pdf->page;
my $fnt = $pdf->corefont('Arial',-encoding => 'latin1');
my $txt = $page->hybrid;
$txt->textstart;
$txt->font($fnt, 20);
$txt->translate(100,800);
$txt->text("Hello World! left-aligned");
$txt->translate(500,750);
$txt->text_right("Hello World! right-aligned");
$txt->translate(300,700);
$txt->text_center("Hello World! center-aligned");
$txt->textend;
$pdf->save;
$pdf->end( );
Discover Perl Packages with CPAN
CPAN (http://www.cpan.org) is the Comprehensive Perl Archive Network, where you will find “All Things Perl.” Visit http://search.cpan.org to discover several other PDF packages. Drill down to find details, documentation, and downloads. For example, PDF::Extract (http://search.cpan.org/~nsharrock/) creates a new PDF from the pages of a larger, input PDF.
Use PHP to Create PDF
Generate PDF from within your PHP script.
A number of libraries enable you to create PDF using PHP. The standard PHP documentation includes a PDF Functions section that describes the popular PDFlib module (http://www.pdflib.com). However, this PDF extension is not free software. Typically, you must purchase a license and then recompile PHP to take advantage of these functions.
Consider some of these free alternatives. They are native PHP, so they are easy to install; just include one in your script.
R&OS PDF-PHP
With the R&OS PDF-PHP library (http://www.ros.co.nz/pdf/), you can add text, bitmaps, and drawings to new PDF pages. Formatting includes running headers and footers, multicolumn layout, and tables. PDF features include page labels, links, and encryption. Programming features include callbacks and transactions.
<?php // hello world with R&OS, from readme.pdf
include ('class.ezpdf.php');

$pdf =& new Cezpdf( );
$pdf->selectFont('./fonts/Helvetica.afm');
$pdf->ezText('Hello World!', 50);
$pdf->ezStream( );
?>
FPDF
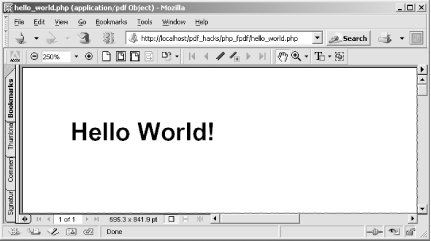
FPDF (http://www.fpdf.org) enables you to add text, bitmaps, lines, and rectangles to new PDF pages. Formatting includes running headers and footers, multicolumn layout, and tables. PDF features include metadata and links. The home page provides an active user forum and user-contributed scripts. The following PHP script produces the PDF document shown in Figure 6-17.
<?php // hello world with FPDF, adapted from the tutorial for IndigoPerl users
define('FPDF_FONTPATH','C:\\indigoperl\\apache\\htdocs\\pdf_hacks\\fpdf\\font\\');
require('C:\\indigoperl\\apache\\htdocs\\pdf_hacks\\fpdf\\fpdf.php');

$pdf=new FPDF( );
$pdf->AddPage( );
$pdf->SetFont('Arial','B',16);
$pdf->Cell(40,10,'Hello World!');
$pdf->Output( );
?>
pdf4php
pdf4php (http://www.gnuvox.com/pdf4php/) provides basic operations for creating PDFs. Add text, JPEG bitmaps, lines, and rectangles to new PDF pages. PDF features include compression. The PHP library file size is smaller, so runtime parsing goes faster.
<?php // hello world with pdf4php, adapted from the home page
include('pdf4php.php');

$pdf=new PDFClass( );
$pdf->startPage(8.5 * 72, 11 * 72);
$pdf->SetFont(48, 'Helvetica');
$pdf->SetStrokeColor(1,0,0);
$pdf->DrawTextAt(4.25*72, 45, "Hello World!", ALIGN_CENTER);
$pdf->endPage( );
$pdf->end( );
?>
phppdflib
phppdflib (http://www.potentialtech.com/ppl.php) provides basic operations for creating PDFs. You can add text, bitmaps, lines, rectangles, and circles to new PDF pages. Special features include templates.
<?php // hello world with phppdflib, adapted from example.php
require('phppdflib.class.php');

$pdf=new pdffile;
$pdf->set_default('margin', 0);
$firstpage=$pdf->new_page("letter");
$pdf->draw_text(10, 100, "Hello World!", $firstpage);
$temp=$pdf->generate( );
header("Content-type: application/pdf");
header("Content-length: '.strlen($temp));
echo $temp;
?>
Use Java to Create PDF
Generate PDF from within your Java program.
When you’re programming in Java, the free iText library should serve most of your dynamic PDF needs. Not only can you create PDF, but you can also read existing PDFs and incorporate their pages into your new document. Visit http://www.lowagie.com/iText/ for documentation and downloads. You can download an alternative, development branch from http://itextpdf.sourceforge.net.
Tip
Another free PDF library written in Java is Etymon’s PJX (http://etymon.com/epub.html). It supports reading, combining, manipulating, and writing PDF documents.
When creating a new PDF, iText can add text, bitmaps, and drawings. Formatting includes running headers and footers, lists, and tables. PDF features include page labels, links, encryption, metadata, bookmarks, and annotations. Programming features include callbacks and templates.
You can also use iText to manipulate existing PDF pages. For example, you can combine pages to create a new document [Hack #89] or use a PDF page as the background for your new PDF [Hack #90] .
Here is Hello World! using iText:
// Hello World in Java using iText, adapted from the iText tutorial
import java.io.FileOutputStream;
import java.io.IOException;

// the iText imports
import com.lowagie.txt.*;
import com.lowagie.text.pdf.PdfWriter;

public class HelloWorld {
  public static void main(String[] args) {
    Document pdf= new Document( );
    PdfWriter.getInstance(pdf, new FileOutputStream("HelloWorld.pdf"));
    pdf.open( );
    pdf.add(new Paragraph("Hello World!"));
    pdf.close( );
  }
}
Assemble Pages and Serve PDF
Collate an online document at serve-time.
Imagine that you have a travel web site. A user visits to learn what packages you offer. She enters her preferences and tastes into an online form and your site returns several suggestions. Now, take this scenario to the next level. Create a custom PDF report based on these suggestions by assembling your literature into a single document. She can download and print this report, and the full impact of your literature is preserved. She can share it with her friends, read it in a comfortable chair, and leave it on her desk as a reminder to follow up—a personal touch with professional execution.
Assembling PDFs into a single document should be easy, and it is. In Java use iText. Elsewhere, use our command-line pdftk [Hack #79] .
Assemble Pages in Java with iText
If your web site runs Java, consider using the iText library (http://www.lowagie.com/iText/) to assemble PDF documents. The following code demonstrates how to use iText to combine PDF pages. Compile and run this Java program from the command-line, or use its code in your Java application:
/*
  concat_pdf, version 1.0, adapted from the iText tools
  concatenate input PDF files and write the results into a new PDF
  http://www.pdfhacks.com/concat/

  This code is free software. It may only be copied or modified
  if you include the following copyright notice:

  This class by Mark Thompson. Copyright (c) 2002 Mark Thompson.

  This code is distributed in the hope that it will be useful,
  but WITHOUT ANY WARRANTY; without even the implied warranty of
  MERCHANTABILITY or FITNESS FOR A PARTICULAR PURPOSE.
 */

import java.io.*;

import com.lowagie.text.*;
import com.lowagie.text.pdf.*;

public class concat_pdf extends java.lang.Object {

  public static void main( String args[] ) {
    if( 2<= args.length ) {
      try {
        int input_pdf_ii= 0;
        String outFile= args[ args.length-1 ];
        Document document= null;
        PdfCopy writer= null;

        while( input_pdf_ii < args.length- 1 ) {
          // we create a reader for a certain document
          PdfReader reader= new PdfReader( args[input_pdf_ii] );
          reader.consolidateNamedDestinations( );

          // we retrieve the total number of pages
          int num_pages= reader.getNumberOfPages( );
          System.out.println( "There are "+ num_pages+
                              " pages in "+ args[input_pdf_ii] );

          if( input_pdf_ii== 0 ) {
            // step 1: creation of a document-object
            document= new Document( reader.getPageSizeWithRotation(1) );

            // step 2: we create a writer that listens to the document
            writer= new PdfCopy( document, new FileOutputStream(outFile) );

            // step 3: we open the document
            document.open( );
          }

          // step 4: we add content
          PdfImportedPage page;
          for( int ii= 0; ii< num_pages; ) {
            ++ii;
            page= writer.getImportedPage( reader, ii );
            writer.addPage( page );
            System.out.println( "Processed page "+ ii );
          }

          PRAcroForm form= reader.getAcroForm( );
          if( form!= null ) {
            writer.copyAcroForm( reader );
          }

          ++input_pdf_ii;
        }

        // step 5: we close the document
        document.close( );
      }
      catch( Exception ee ) {
        ee.printStackTrace( );
      }
    }
    else { // input error
      System.err.println("arguments: file1 [file2 ...] destfile");
    }
  }
}
To create a command-line Java program, copy the preceding code into a file named concat_pdf.java. Then, compile concat_pdf.java using javac, setting the classpath to the name and location of your iText jar:
javac -classpathconcat_pdf.java
Finally, invoke concat_pdf to combine PDF documents, like so:
java -classpath:. \concat_pdf
Assemble Pages in PHP with pdftk
This example of using pdftk with PHP demonstrates how easily it assembles server-side PDF. Pass pdftk a hyphen instead of an output filename, and it will deliver its work on stdout.
<?php
// the input PDF filenames
$brochure_dir= '/var/www/brochures/';
$report_pieces=
   array( 'our_cover.pdf', 'boston.pdf', 'yorktown.pdf', 'our_info.pdf' );

// the command and its arguments
$cmd= '/usr/local/bin/pdftk ';
foreach( $report_pieces as $ii => $piece ) {
   $full_fn= $brochure_dir.$piece;
   if( is_readable( $full_fn ) ) {
      $cmd.= ' '.$full_fn;
   }
}
$cmd.= ' cat output -'; // hyphen means output to stdout

// serve it up
header( 'Content-type: application/pdf' );
passthru( $cmd ); // command output gets passed to client
?>
See Also
Consider some of these other free tools for assembling PDF:
Multivalent Document Tools (http://multivalent.sourceforge.net/Tools/index.html) are Java tools for manipulating PDF documents.
PDFBox (http://www.pdfbox.org) is a Java library that can combine PDF documents.
PDF::Extract (http://search.cpan.org/~nsharrock/) is a Perl module for extracting pages from a PDF document.
PDF::Reuse (http://search.cpan.org/~larslund/) is a Perl module designed for mass-producing PDF documents from templates.
Superimpose PDF Pages
Merge your PDF pages with a background letterhead, form, or watermark.
Sometimes it makes sense to divide document creation into layers. For example, you need to create an invoice’s background form, with its logo and rules, only once. You can create the invoice data dynamically as needed and then superimpose it on this form to yield the final invoice.
Perform this final merge in Java with iText, or elsewhere with our command-line pdftk [Hack #79] , producing the results in Figure 6-18.
Superimpose Pages in Java with iText
iText (http://www.lowagie.com/iText/) is a powerful library for creating and manipulating PDF. The following Java program uses iText to apply one watermark PDF page to every page in a document. This watermark page can be any PDF page, such as a company letterhead design or an invoice form. The watermark will appear as though it is behind each page’s content. Compile and run this program, or use its code in your Java application.
/*
  watermark_pdf, version 1.0
  http://www.pdfhacks.com/watermark/

  place a single "watermark" PDF page "underneath" all
  pages of the input document

  after compiling, invoke from the command line like this:

    java -classpath ./itext-paulo.jar:. \
    watermark_pdf doc.pdf watermark.pdf output.pdf

  only the first page of watermark.pdf is used
*/

import java.io.*;
import com.lowagie.text.*;
import com.lowagie.text.pdf.*;

public class watermark_pdf {

  public static void main( String[] args ) {
    if( args.length== 3 ) {
      try {
        // the document we're watermarking
        PdfReader document= new PdfReader( args[0] );
        int num_pages= document.getNumberOfPages( );

        // the watermark (or letterhead, etc.)
        PdfReader mark= new PdfReader( args[1] );
        Rectangle mark_page_size= mark.getPageSize( 1 );

        // the output document
        PdfStamper writer=
          new PdfStamper( document,
                          new FileOutputStream( args[2] ) );

        // create a PdfTemplate from the first page of mark
        // (PdfImportedPage is derived from PdfTemplate)
        PdfImportedPage mark_page=
          writer.getImportedPage( mark, 1 );

        for( int ii= 0; ii< num_pages; ) {
          // iterate over document's pages, adding mark_page as
          // a layer 'underneath' the page content; scale mark_page
          // and move it so that it fits within the document's page;
          // if document's page is cropped, this scale might
          // not be small enough

          ++ii;
          Rectangle doc_page_size= document.getPageSize( ii );
          float h_scale= doc_page_size.width( )/mark_page_size.width( );
          float v_scale= doc_page_size.height( )/mark_page_size.height( );
          float mark_scale= (h_scale< v_scale) ? h_scale :  v_scale;

          float h_trans= (float)((doc_page_size.width( )-
                                  mark_page_size.width( )* mark_scale)/2.0);
          float v_trans= (float)((doc_page_size.height( )-
                                  mark_page_size.height( )* mark_scale)/2.0);

          PdfContentByte contentByte= writer.getUnderContent( ii );
          contentByte.addTemplate( mark_page,
                                   mark_scale, 0,
                                   0, mark_scale,
                                   h_trans, v_trans );
        }

        writer.close( );
      }
      catch( Exception ee ) {
        ee.printStackTrace( );
      }
    }
    else { // input error
      System.err.println("arguments: in_document in_watermark out_pdf_fn");
    }
  }
}
To create a command-line Java program, copy the preceding code into a file named watermark_pdf.java. Then, compile watermark_pdf.java using javac, setting the classpath to the name and location of your iText jar:
javac -classpathwatermark_pdf.java
Finally, invoke watermark_pdf to apply the first page of form.pdf to every page of invoice.pdf to create watermarked.pdf, like so:
java -classpath:. \watermark_pdf
Superimpose Pages with pdftk
pdftk packs iText’s power into a standalone program. Apply a single PDF page to the background of an entire document like so:
pdftkoutputbackground
pdftk will use the first page of watermark.pdf, if it has more than one page. You can combine this background option with additional input operations (such as assembling PDFs [Hack #51] ) and other output options (such as encryption [Hack #52] ).
Generate PDF Documents from XML and CSS
Produce PDF documents for XML documents styled with CSS using YesLogic Prince.
YesLogic (http://www.yeslogic.com) of Melbourne, Australia, offers an extremely simple little tool for converting XML documents styled with CSS into PDF or PostScript. It’s called Prince and it’s currently at Version 3.0. It runs on Windows or Red Hat Linux (Versions 7.3 and 8.0). Prince comes with a set of examples, default stylesheets, and DTDs.
You can download a free demo version from http://yeslogic.com/prince/demo/. This demo is fully featured but outputs the word Demo in an outline font across every page it creates. If you like it, you can purchase a copy from http://yeslogic.com/prince/purchasing/.
This simple XML document represents a time:
<?xml version="1.0" encoding="UTF-8"?> <!-- a time instant --> <time timezone="PST"> <hour>11</hour> <minute>59</minute> <second>59</second> <meridiem>p.m.</meridiem> <atomic signal="true" symbol="◑"/> </time>
The CSS stylesheet provides detailed formatting information for it:
time {font-size:40pt; text-align: center }
time:before {content: "The time is now: "}
hour {font-family: sans-serif; color: gray}
hour:after {content: ":"; color: black}
minute {font-family: sans-serif; color: gray}
minute:after {content: ":"; color: black}
second {font-family: sans-serif; color: gray}
second:after {content: " "; color: black}
meridiem {font-variant: small-caps}
After downloading and installing Prince, open the application and follow these steps:
Select Documents → Add and then select the document time.xml from the directory of working examples.
Select Stylesheets → Add and select time.css from the same location.
Select the Output menu and select PDF if it isn’t already selected.
Click Go and Prince produces a PDF based on time.xml combined with time.css. The application should look like Figure 6-19.
Select time.pdf in the lower-left pane and right-click it. If Adobe Reader is installed on your computer, you should be able to open time.pdf with it. If it is not installed, get a free copy from http://www.adobe.com/products/acrobat/readstep2.html.
Figure 6-20 shows you time.pdf in Adobe Reader Version 6.0.
—Michael Fitzgerald
Create PDF with XSL-FO and FOP
Use Apache’s FOP engine together with XSL-FO to generate PDF output.
Apache’s Formatting Objects Processor (FOP, available at http://xml.apache.org/fop/) is an open source Java application that reads an XSL-FO (http://www.w3.org/TR/xsl/) tree and renders the result primarily as PDF, although other formats are possible, such as Printer Control Language (PCL), PostScript (PS), Scalable Vector Graphics (SVG), an area tree representation of XML, Java Abstract Windows Toolkit (AWT), FrameMaker’s Maker Interchange Format (MIF), and text.
XSL-FO defines formatting objects that help describe blocks, paragraphs, pages, tables, and such. These formatting objects are aided by a large set of formatting properties that control things such as fonts, text alignment, spacing, and the like, many of which match the properties used in CSS (http://www.w3.org/Style/CSS/). XSL-FO’s formatting objects and properties provide a framework for creating attractive, printable pages.
XSL-FO is a huge, richly detailed XML vocabulary for formatting documents for presentation. XSL-FO is the common name for the XSL specification produced by the W3C. The spec is nearly 400 pages long. At one time, XSL-FO and XSLT (finished spec is less than 100 pages) were part of the same specification, but they split into two specs in April 1999. XSLT became a recommendation in November 1999, but XSL-FO did not achieve recommendation status until October 2001.
To get you started, we’ll go over a few simple examples. The first example, time.fo, is a XSL-FO document that formats the contents of the elements in time.xml:
<fo:root xmlns:fo="http://www.w3.org/1999/XSL/Format">
 <fo:layout-master-set>
  <fo:simple-page-master master-reference="Time" page-height="11in"
      page-width="8.5in" margin-top="1in" margin-bottom="1in"
      margin-left="1in" margin-right="1in">
   <fo:region-body margin-top=".5in"/>
   <fo:region-before extent="1.5in"/>
   <fo:region-after extent="1.5in"/>
  </fo:simple-page-master>
 </fo:layout-master-set>
 <fo:page-sequence master-name="Time">
  <fo:flow flow-name="xsl-region-body">

 <!-- Heading -->
 <fo:block font-size="24px" font-family="sans-serif" line-height="26px"
   space-after.optimum="20px" text-align="center" font-weight="bold"
  color="#0050B2">Time</fo:block>

 <!-- Blocks for hour/minute/second/atomic status -->
 <fo:block font-size="12px" font-family="sans-serif" line-height="16px"
   space-after.optimum="10px" text-align="start">Hour: 11 </fo:block>
 <fo:block font-size="12px" font-family="sans-serif" line-height="16px"
   space-after.optimum="10px" text-align="start">Minute: 59</fo:block>
 <fo:block font-size="12px" font-family="sans-serif" line-height="16px"
   space-after.optimum="10px" text-align="start">Second: 59</fo:block>
 <fo:block font-size="12px" font-family="sans-serif" line-height="16px"
   space-after.optimum="10px" text-align="start">Meridiem: p. m.</fo:block>
 <fo:block font-size="12px" font-family="sans-serif" line-height="16px"
   space-after.optimum="10px" text-align="start">Atomic? true</fo:block>

  </fo:flow>
 </fo:page-sequence>
</fo:root>
XSL-FO Basics
The root element of an
XSL-FO
document is (surprise) root. The namespace name is
http://www.w3.org/1999/XSL/Format, and the
conventional prefix is fo. Following
root is the layout-master-set
element where basic page layout is defined.
simple-page-master holds a few formatting
properties such as page-width and
page-height, and some margin settings (you could
use page-sequence-master for more complex page
layout, in place of simple-page-master). The
region-related elements such as region-body are
used to lay out underlying regions of a simple page master. The
master-reference attribute links with the
master-name attribute on the
page-sequence element.
The page-sequence element contains a
flow element that essentially contains the flow of
text that will appear on the page. Following that are a series of
block elements, each of which has properties for
the text they contain (blocks are used for formatting things such as
headings, paragraphs, and figure captions). Properties specify
formatting such as the font size, font family, text alignment, and so
forth.
Generating a PDF
FOP is pretty easy to use. To generate a PDF from this XSL-FO file, download and install FOP from http://xml.apache.org/fop/download.html. At the time of this writing, FOP is at Version 20.5. In the main directory, you’ll find a fop.bat file for Windows or a fop.sh file for Unix. You can run FOP using these scripts.
To create a PDF from time.fo, enter this command:
fop time.fo time-fo.pdftime.fo is the input file, and time-fo.pdf is the output file. FOP will let you know of its progress with a report such as this:
[INFO] Using org.apache.xerces.parsers.SAXParser as SAX2 Parser
[INFO] FOP 0.20.5
[INFO] Using org.apache.xerces.parsers.SAXParser as SAX2 Parser
[INFO] building formatting object tree
[INFO] setting up fonts
[INFO] [1]
[INFO] Parsing of document complete, stopping renderer
Figure 6-21 shows the result of formatting time.fo with FOP in Adobe Acrobat.
You also can incorporate XSL-FO markup into an XSLT stylesheet, then transform and format a document with just one FOP command. Here is a stylesheet (time-fo.xsl) that incorporates XSL-FO:
<xsl:stylesheet version="1.0" xmlns:xsl="http://www.w3.org/1999/XSL/Transform"
xmlns:fo="http://www.w3.org/1999/XSL/Format">
<xsl:output method="xml" encoding="utf-8" indent="yes"/>

<xsl:template match="/">
<fo:root>
 <fo:layout-master-set>
  <fo:simple-page-master master-reference="Time" page-height="11in"
      page-width="8.5in" margin-top="1in" margin-bottom="1in"
      margin-left="1in" margin-right="1in">
   <fo:region-body margin-top=".5in"/>
   <fo:region-before extent="1.5in"/>
   <fo:region-after extent="1.5in"/>
  </fo:simple-page-master>
 </fo:layout-master-set>
 <fo:page-sequence master-name="Time">
  <fo:flow flow-name="xsl-region-body">
   <xsl:apply-templates select="time"/>
  </fo:flow>
 </fo:page-sequence>
</fo:root>
</xsl:template>

<xsl:template match="time">
 <!-- Heading -->
 <fo:block font-size="24px" font-family="sans-serif" line-height="26px"
     space-after.optimum="20px" text-align="center" font-weight="bold"
     color="#0050B2">
     Time
 </fo:block>

 <!-- Blocks for hour/minute/second/atomic status -->
 <fo:block font-size="12px" font-family="sans-serif" line-height="16px"
     space-after.optimum="10px" text-align="start">
     Hour: <xsl:value-of select="hour"/>
 </fo:block>
 <fo:block font-size="12px" font-family="sans-serif" line-height="16px"
     space-after.optimum="10px" text-align="start">
     Minute: <xsl:value-of select="minute"/>
 </fo:block>
 <fo:block font-size="12px" font-family="sans-serif" line-height="16px"
     space-after.optimum="10px" text-align="start">
     Second: <xsl:value-of select="second"/>
 </fo:block>
 <fo:block font-size="12px" font-family="sans-serif" line-height="16px"
     space-after.optimum="10px" text-align="start">
     Meridiem: <xsl:value-of select="meridiem"/>
 </fo:block>
 <fo:block font-size="12px" font-family="sans-serif" line-height="16px"
     space-after.optimum="10px" text-align="start">
     Atomic? <xsl:value-of select="atomic/@signal"/>
 </fo:block>
</xsl:template>

</xsl:stylesheet>
The same XSL-FO markup you saw in time.fo is interspersed with templates and instructions that transform time.xml. Now with this command, you can generate a PDF like the one you generated with time.fo:
Fop -xsl time-fo.xsl -xml time.xml -pdf time-fo.pdfFor more information on these technologies, see Michael Fitzgerald’s Learning XSLT (O’Reilly) or Dave Pawson’s XSL-FO (O’Reilly).
—Michael Fitzgerald

