Chapter 7. Scripting and Programming Acrobat
Introduction: Hacks #93-100
users think of Although most users think of Acrobat as a GUI interface to PDF documents, you can also automate and extend it. Some automation features are built into Acrobat, especially Acrobat 6 Professional, and you can create your own automated processing sequences using a variety of other tools.
Modify or Convert Batches of Documents
Automate repetitive tasks using Acrobat, such as converting folders of Word documents to PDF.
If you have a folder of PDFs that you must alter or convert, consider using Acrobat’s built-in batch processing feature. After you create a batch sequence, you can use it to process large quantities of PDFs hands-free. You can also apply a batch sequence to a single PDF, which means you can create batch sequences for use as macros.
Acrobat batch processing isn’t just for manipulating PDF. You can use it to convert Microsoft Office documents, PostScript files, or graphic bitmaps into PDF documents. Or, use batch processing to convert PDF documents to HTML, PostScript, RTF, text, or graphic bitmaps. Many of these options are not available in Acrobat 5. In Acrobat 6, you can also apply OCR to bitmaps or refry PDFs to prepare them for online distribution [Hack #60] .
You can automate many of the basic things you do in Acrobat with batch processing. We’ll describe a couple of examples.
Refry a Folder Full of PDFs (Acrobat 6 Pro)
Before publishing a PDF online for wide distribution, you should try reducing its file size by refrying it [Hack #60] . With Acrobat 6, you can refry a PDF using its Optimizer feature (Advanced → PDF Optimizer . . . ). Let’s create an Acrobat 6 batch sequence that applies the Optimizer to an entire folder of PDF documents. While we’re at it, we can also add metadata or other finishing touches [Hack #62] .
Create a batch sequence in Acrobat 6 Professional by selecting Advanced → Batch Processing . . . and clicking New Sequence . . . . Name the new sequence Refry and click OK. The Batch Edit Sequence dialog will open.
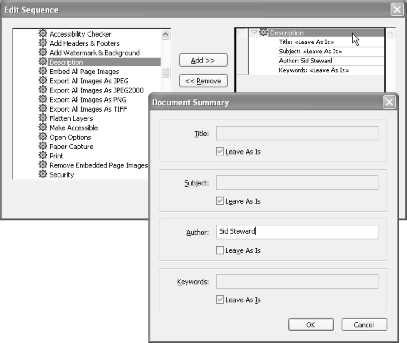
If you want to also add metadata (title, subject, author, or keywords) to the PDFs, click Select Commands . . . and the Edit Sequence dialog will open. Select the Description command from the list on the left and click Add. In the right column, double-click this command and a dialog opens where you can set the metadata values, shown in Figure 7-1. Click OK to close the Edit Sequence dialog and to return to the Batch Edit Sequence dialog.
Tip
Fine-tune a batch sequence using the Execute JavaScript batch command. If JavaScript is not powerful enough, you can develop your own batch processing commands using an Acrobat plug-in. See the BatchCommand and BatchMetadata plug-in samples that come with the Acrobat SDK [Hack #98] .
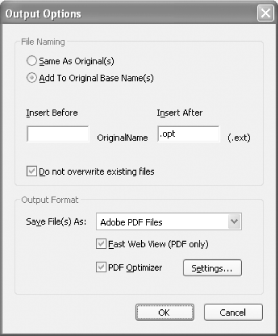
Set Run Commands On to Ask When Sequence is Run. Set Select Output Location to Same Folder as Original(s). Click Output Options . . . .
On the Output Options dialog, shown in Figure 7-2,
select Add to Original Base Name(s) and then set Insert After to
.opt. Under Output Format, set Save File As to
Adobe PDF Files. Place checkmarks next to Fast Web View and PDF
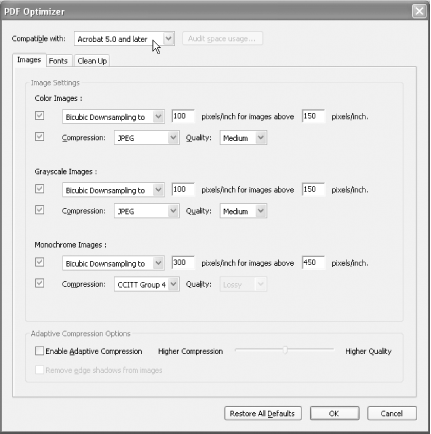
Optimizer. Click Settings . . . to configure the Optimizer, as shown
in Figure 7-3.
Configure the Optimizer to suit your requirements. Set its compatibility to Acrobat 5.0 and Later or Acrobat 4.0 and Later for maximum PDF portability [Hack #41] . Click OK when you’re done.
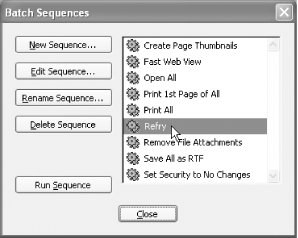
Click OK to close the Output Options dialog. Click OK to close the Batch Edit Sequence dialog. Your new Refry batch sequence now should be visible in the Batch Sequences dialog, as shown in Figure 7-4.
Tip
To make a batch sequence recurse into subfolders, set Run Commands On to Selected Folder. Then click Browse . . . to select the folder you want to process. Whenever you run the sequence, it will process that same folder (and its subfolders).
Test your batch sequence on a temporary folder of disposable PDFs. In the Batch Sequences dialog, select Refry and click Run Sequence. Click OK on the Confirmation dialog. A file selector will open. Select one or more PDFs and click Select to continue. Acrobat will create new PDFs based on your Optimizer settings. The new PDFs will have the same filenames as the original PDFs, except they will have .opt.pdf instead of .pdf at the end. When Acrobat is done, check the new PDFs to make sure the results are satisfactory.
Convert Microsoft Office Documents to PDF
If you have Acrobat 6 and Microsoft Word, you can use Acrobat’s preconfigured Open All batch sequence to convert Word documents into PDFs hands-free. As the name suggests, you actually can use the Open All batch sequence on any kind of file that Acrobat knows how to handle, including bitmap and PostScript files. Acrobat 5 also has an Open All batch sequence, but it does not handle as many file types as Acrobat 6 does.
Tip
To merge a number of Word documents into a single PDF with Acrobat 6, use the File → Create PDF → From Multiple Files . . . feature instead.
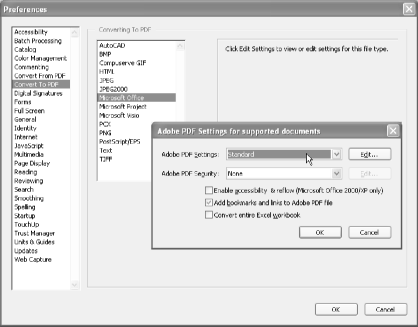
First, you must configure Acrobat 6 to create the kind of PDF you desire. Do this using the Acrobat preferences, located at Edit → Preferences → General . . . → Convert to PDF. Select Microsoft Office and click Settings . . . , and a dialog opens, shown in Figure 7-5 [Hack #34] .
In Acrobat 6, start the Open All batch sequence by selecting Advanced → Batch Processing . . . → Open All and clicking Run Sequence. In Acrobat 5, start the Open All batch sequence by selecting File → Batch Processing → Open All. Click OK to close the confirmation dialog (if necessary), and a file selector will open. Change Files of Type to All Files, select one or more input files, and then click Select. Acrobat will create one PDF for each input document. Acrobat 5 can’t process Word documents this way, but it can handle bitmap images.
Exploring Batch Sequences
The previous examples are pretty simple. You can also create fancier sequences to perform specific tasks. The Acrobat 5 CD-ROM includes batch sequence examples and documentation in its Batch folder. Also, visit http://www.planetpdf.com/mainpage.asp?webpageid=1511 for more examples and commentary.
Tip
The Acrobat 5 CD-ROM batch sequence examples are set as read-only. After you copy them to a local folder, change this file attribute to view their JavaScripts in Acrobat.
Batch sequences are stored as text files, so they are easy to maintain. System-level sequences are located somewhere such as C:\Program Files\Adobe\Acrobat 6.0\Acrobat\Sequences\ENU\. With Acrobat 6, user-level sequences are located somewhere such as C:\Documents and Settings\Sid Steward\Application Data\Adobe\Acrobat\6.0\Sequences\. With Acrobat 5, user-level sequences are located somewhere such as C:\Documents and Settings\Sid Steward\My Documents\Adobe\Acrobat\Sequences\.
Script Acrobat Using Visual Basic on Windows
Drive Acrobat using VB or Microsoft Word’s Visual Basic for Applications (VBA).
Adobe Acrobat’s OLE interface enables you to access or manipulate PDFs from a freestanding Visual Basic script or from another application, such as Word. You can also use Acrobat’s OLE interface to render a PDF inside your own program’s window. The Acrobat SDK [Hack #98] comes with a number of Visual Basic examples under the InterAppCommunicationSupport directory. The SDK also includes OLE interface documentation. Look for IACOverview.pdf and IACReference.pdf. These OLE features do not work with the free Reader; you must own Acrobat.
Tip
Acrobat Distiller also has an OLE interface. It is documented in DistillerAPIReference.pdf , which comes with the full Acrobat SDK.
The following example shows how easily you can work with PDFs using Acrobat OLE. It is a Word macro that scans the currently open PDF document for readers’ annotations (e.g., sticky notes). It creates a new Word document and then builds a summary of these annotation comments.
The Code
To add this macro to Word, select Tools → Macro →
Macros . . . , type in the macro name
SummarizeComments, and click Create. Word will
open a text editor where you can enter the code shown in Example 7-1. Save, and then test. You can download this
code from http://www.pdfhacks.com/summarize.
Sub SummarizeComments( )
Dim app As Object
Set app = CreateObject("AcroExch.App")
If (0 < app.GetNumAVDocs) Then
  ' a PDF is open in Acrobat
  ' create a new Word doc to hold the summary
  Dim NewDoc As Document
  Dim NewDocRange As Range
  Set NewDoc = Documents.Add(DocumentType:=wdNewBlankDocument)
  Set NewDocRange = NewDoc.Range

  Dim found_notes_b As Boolean
  found_notes_b = False

  ' get the active doc and drill down to its PDDoc
  Dim avdoc, pddoc As Object
  Set avdoc = app.GetActiveDoc
  Set pddoc = avdoc.GetPDDoc

  ' iterate over pages
  Dim num_pages As Long
  num_pages = pddoc.GetNumPages
  For ii = 0 To num_pages - 1

    Dim pdpage As Object
    Set pdpage = pddoc.AcquirePage(ii)
    If (Not pdpage Is Nothing) Then

      ' iterate over annotations (e.g., sticky notes)
      Dim page_head_b As Boolean
      page_head_b = False
      Dim num_annots As Long
      num_annots = pdpage.GetNumAnnots
      For jj = 0 To num_annots - 1

        Dim annot As Object
        Set annot = pdpage.GetAnnot(jj)
        ' Popup annots give us duplicate contents
        If (annot.GetContents <> "" And _
            annot.GetSubtype <> "Popup") Then

          If (page_head_b = False) Then ' output the page number
            NewDocRange.Collapse wdCollapseEnd
            NewDocRange.Text = "Page: " & (ii + 1) & vbCr
            NewDocRange.Bold = True
            NewDocRange.ParagraphFormat.LineUnitBefore = 1
            page_head_b = True
          End If

          ' output the annotation title and format it a little
          NewDocRange.Collapse wdCollapseEnd
          NewDocRange.Text = annot.GetTitle & vbCr
          NewDocRange.Italic = True
          NewDocRange.Font.Size = NewDocRange.Font.Size - 1
          NewDocRange.ParagraphFormat.LineUnitBefore = 0.6

          ' output the note text and format it a little
          NewDocRange.Collapse wdCollapseEnd
          NewDocRange.Text = annot.GetContents & vbCr
          NewDocRange.Font.Size = NewDocRange.Font.Size - 2

          found_notes_b = True
        End If
      Next jj
    End If
  Next ii

  If (Not found_notes_b) Then
    NewDocRange.Collapse wdCollapseEnd
    NewDocRange.Text = "No Notes Found in PDF" & vbCr
    NewDocRange.Bold = True
  End If
End If
End Sub
Running the Code
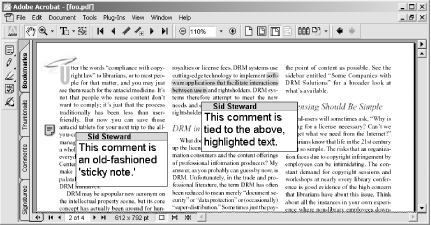
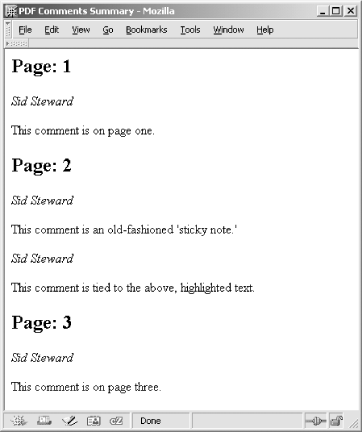
Open a PDF in Acrobat, as shown in Figure 7-6. In Word, run the macro by selecting Tools → Macro → Macros . . . → SummarizeComments and then clicking Run. After a few seconds, a new Word document will appear, as shown in Figure 7-7. It will list all the comments that readers have added to each page of the currently visible PDF.
Hacking the Hack
This script demonstrates the typical process of drilling down through layers of PDF objects to find desired information. Here is a simplified sketch of the layers:
-
app The currently running Acrobat program. Use the
appto alter the user interface or Acrobat’s preferences.-
avdoc The PDF currently displayed in Acrobat. Use the
avdocto change how the PDF appears in the viewer or to print pages.-
pddoc Represents the underlying PDF document. Use the
pddocto access or manipulate the PDF’s pages or metadata.-
pdpage Represents the underlying PDF page. Use the
pdpageto access or manipulate a page’s annotations, its rotation, or its cropping.
These OLE objects closely resemble the objects exposed by the Acrobat API [Hack #97] . The API gives you much more power, however.
Script Acrobat Using Perl on Windows
Install Perl and use it instead of Visual Basic to drive Acrobat.
Depending on your tastes or requirements, you might want to use the Perl scripting language instead of Visual Basic [Hack #94] to program Acrobat. Perl can access the same Acrobat OLE interface used by Visual Basic to manipulate PDFs. Perl is well documented, is widely supported, and has been extended with an impressive collection of modules. A Perl installer for Windows is freely available from ActiveState.
We’ll describe how to install the ActivePerl package from ActiveState, and then we’ll use an example to show how to access Acrobat’s OLE interface using Perl.
Tip
Acrobat OLE documentation comes with the Acrobat SDK [Hack #98] . Look for IACOverview.pdf and IACReference.pdf. Acrobat Distiller also has an OLE interface. It is documented in DistillerAPIReference.pdf.
Install Perl on Windows
The ActivePerl installer for Windows is freely available from http://www.ActiveState.com/Products/ActivePerl/. Download and install. It comes with excellent documentation, which you can access by selecting Start → Programs → ActiveState ActivePerl 5.8 → Documentation.
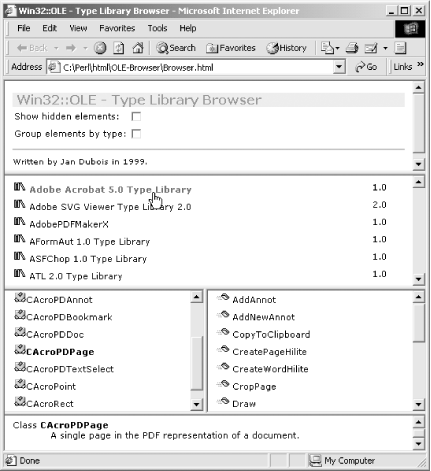
ActivePerl also includes the OLE Browser, shown in Figure 7-8, which enables you to browse the OLE servers available on your machine (Start → Programs → ActiveState ActivePerl 5.8 → OLE-Browser). The OLE Browser is an HTML file that must be opened in Internet Explorer to work properly.
The Code
In this example, the Perl script will use Acrobat to read annotation (e.g., sticky notes) data from the currently open PDF. The script will format this data using HTML and then output it to stdout.
Copy the script in Example 7-2 into a file named SummarizeComments.pl. You can download this code from http://www.pdfhacks.com/summarize/.
# SummarizeComments.pl ver. 1.0
use strict;
use Win32::OLE;

my $app = Win32::OLE->new("AcroExch.App");
if( 0< $app->GetNumAVDocs ) { # a PDF is open in Acrobat
  # open the HTML document
  print "<html>\n<head>\n<title>PDF Comments Summary</title>\n</head>\n<body>\n";
  my $found_notes_b= 0;

  # get the active PDF and drill down to its PDDoc
  my $avdoc= $app->GetActiveDoc;
  my $pddoc= $avdoc->GetPDDoc;

  # iterate over pages
  my $num_pages= $pddoc->GetNumPages;
  for( my $ii= 0; $ii< $num_pages; ++$ii ) {

    my $pdpage= $pddoc->AcquirePage( $ii );
    if( $pdpage ) {

      # interate over annotations (e.g., sticky notes)
      my $page_head_b= 0;
      my $num_annots= $pdpage->GetNumAnnots;
      for( my $jj= 0; $jj< $num_annots; ++$jj ) {

        my $annot= $pdpage->GetAnnot( $jj );
        # Pop-up annots give us duplicate contents
        if( $annot->GetContents ne '' and
          $annot->GetSubtype ne 'Popup' ) {

          if( !$page_head_b ) { # output the page number
            print "<h2>Page: " . ($ii+ 1) . "</h2>\n";
            $page_head_b= 1;
          }

          # output the annotation title and format it a little
          print "<p><i>" . $annot->GetTitle . "</i></p>\n";

          # output the note text; replace carriage returns
          # with paragraph breaks
          my $comment= $annot->GetContents;
          $comment =~ s/\r/<\/p>\n<p>/g;
          print "<p>" . $comment . "</p>\n";

          $found_notes_b= 1;
        }
      }
    }
  }
  if( !$found_notes_b ) {
    print "<h3>No Notes Found in PDF</h3>\n";
  }

  # close the HTML document
  print "</body>\n</html>\n";
}
Running the Hack
Open a PDF in Acrobat, as shown in Figure 7-6, and then run this script from the command line by typing:
C:\> perl SummarizeComments.pl > comments.htmlIt will take a few seconds to complete. When it is done, you can open comments.html in your browser to see a summary of the PDF’s comments, as shown in Figure 7-9.
As noted in [Hack #94] , this example demonstrates the relationships between several fundamental PDF objects.
Customize Acrobat Using JavaScript
Create custom Acrobat menu items and batch processing scripts.
Acrobat can do most of the things that you need. Yet, there’s always something you wish it did a little differently. Acrobat enables you to add custom features using plain-text JavaScripts. These scripts can add menu items to Acrobat’s menus or add tailored sequences to Acrobat’s batch processing.
Acrobat JavaScript builds on the language core familiar to web developers, but its document object model is completely different from the DOM used by web browsers. Acrobat’s JavaScript objects are documented in Technical Note 5186: Acrobat JavaScript Object Specification. Access it online from http://partners.adobe.com/asn/developer/pdfs/tn/5186AcroJS.pdf. Another useful document is the Acrobat JavaScript Scripting Guide from http://partners.adobe.com/asn/acrobat/sdk/public/docs/AcroJSGuide.pdf.
Test Scripts Using the Debugger
The JavaScript Debugger (Acrobat 6 Pro) or Console (Acrobat 5) is the place to test new ideas. Open it by selecting Advanced → JavaScript → Debugger . . . (Acrobat 6 Pro) or Tools → JavaScript → Console . . . (Acrobat 5).
Add New Acrobat Features with Startup JavaScripts
When Acrobat starts up, it runs any JavaScripts it finds in either the system-level JavaScripts folder or the user-level JavaScripts folder. The locations of these folders are given shortly. You might need to create some of these folders if you can’t find them.
Use startup JavaScripts to add menu items to Acrobat or to set global JavaScript variables. [Hack #15] demonstrates how to add a menu item and how to set/query a persistent global variable. Acrobat stores these persistent global variables in a file named glob.js. [Hack #10] shows one use of making Acrobat execute a JavaScript periodically.
These JavaScripts even enable you to add features to the free Reader, although Reader won’t perform the more powerful commands. Our various JavaScript hacks all work with Reader. JavaScripts are also platform-independent, so our JavaScript hacks all run on Windows, Mac, and Linux.
Windows startup JavaScripts
For Versions 5 or 6 of Acrobat or Reader, the system-level JavaScripts folder is located somewhere such as C:\Program Files\Adobe\Acrobat 6.0\Acrobat\Javascripts\ or C:\Program Files\Adobe\Acrobat 6.0\Reader\Javascripts\.
For Acrobat or Reader 6, the user-level folder is located somewhere such as C:\Documents and Settings\Sid Steward\Application Data\Adobe\Acrobat\6.0\JavaScripts\. Both Acrobat and Reader use this one folder.
For Acrobat 5, the user-level folder is located somewhere such as C:\Documents and Settings\Sid Steward\My Documents\Adobe\Acrobat\JavaScripts\. Both Acrobat and Reader use this one folder.
Sometimes you must create a JavaScripts folder, if one does not already exist.
Mac startup JavaScripts
For Acrobat 6, the system-level JavaScripts folder is located inside the Acrobat 6 package. Right-click or control-click the Acrobat application icon, and choose Show Package Contents. The system-level JavaScripts folder is located at Contents : MacOS : JavaScripts.
The Acrobat 6 user-level JavaScripts folder is in the user’s home folder: ~ : Library : Acrobat User Data : JavaScripts.
The Acrobat 5 system-level JavaScripts folder is located at : Adobe Acrobat 5.0 : JavaScripts. The user-level folder is located in the user’s home folder: ~ : Documents : Acrobat User Data : JavaScripts.
Linux startup JavaScripts
For Reader 5, the system-level JavaScripts directory is located somewhere such as /usr/local/Acrobat5/Reader/intellinux/plug_ins/JavaScripts. The user-level directory is located in the user’s home directory: ~/.acrobat/JavaScripts. Create these directories if they don’t already exist.
Create Custom Batch Sequence Commands
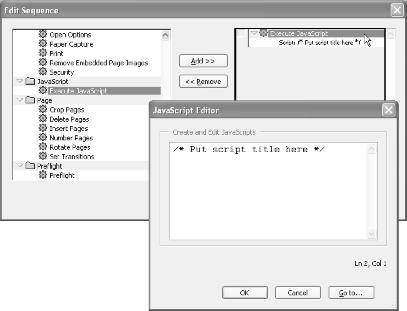
Acrobat 6 Professional’s batch processing [Hack #93] uses batch sequences to modify or process collections of PDF documents. Acrobat provides basic commands for creating sequences, such as Insert Pages. Among these commands you will also find Execute JavaScript. Use this command to apply a JavaScript to each PDF in the batch, as shown in Figure 7-10. You can use the global object to store the accumulated state of your running batch process, if necessary. Visit http://www.planetpdf.com/mainpage.asp?webpageid=1511 for some interesting examples and commentary.
Tool Up for Acrobat Plug-In Development
Compile Acrobat plug-ins on Windows using GCC.
The Acrobat API gives you the most powerful tools for accessing and modifying PDF data. The typical way to access the API is with an Acrobat plug-in.
A plug-in is a DLL (on Windows), and it is created from C or C++ source code using a compiler such as Microsoft’s Visual C++ or the GNU Compiler Collection (GCC). In this hack, we’ll explain how to install the free (and fabulous) GCC compiler on Windows. Then, we’ll install the Acrobat SDK. Finally, we’ll build a sample plug-in using GCC.
Tip
You can also compile Acrobat plug-ins for Macintosh and Unix. Adobe provides separate SDKs for each platform. Typically, you compile Macintosh Acrobat plug-ins using Metrowerks CodeWarrior.
Install GCC on Windows with MinGW and MSYS
You can get GCC on your Windows machine using a couple of different methods. I prefer using the packages provided by the MinGW (http://www.mingw.org) folks. They provide a set of installers that you can choose from according to your needs. They also provide software updates that you can unpack and copy on top of the original installation.
Visit http://www.mingw.org/download.shtml and download the following packages. Each file is named according to its version. If newer versions are available under the Current section of the web page, use those instead. For example, download MSYS-1.0.10.exe instead of MSYS-1.0.9.exe.
| MSYS-1.0.10.exe |
| MinGW-3.1.0-1.exe |
| gcc-core-3.3.1-20030804-1.tar.gz |
| gcc-g++-3.3.1-20030804-1.tar.gz |
First, install MinGW. Throughout this discussion, I’ll assume you installed MinGW on the C: drive so that you ended up with C:\MinGW\.
Next, install MSYS. Throughout this discussion, I’ll
assume you installed MSYS on the C: drive so
that you ended up with C:\msys\1.0\. The MSYS
post-install script will configure MSYS to your environment. When it
asks where MinGW is installed, tell it C:/MinGW
(note the forward slash).
MSYS gives you many of
the GNU (http://www.gnu.org)
tools that are common on Linux systems, such as grep, less, and diff.
MSYS also gives you a Bourne shell (a.k.a. command
prompt) environment that makes a Linux user feel more at
home. In fact, it creates a home directory for you; in my case it is
C:\msys\1.0\home\Sid Steward\. When you run MSYS
(Start → Programs → MinGW → MSYS
→ msys), a colorful command prompt opens, and it opens in
your home directory by default. It is like a little slice of Linux,
right there on your Windows machine. Run dir and
it doesn’t understand. Use ls
instead. Run pwd and you’ll see
that even the filesystem looks different. Your current directory is
/home/Sid Steward/, not
C:\msys\1.0\home\Sid Steward\. You can access
the traditional DOS drive names like so:
cd "/c/Program Files"Test whether MSYS can find MinGW by running:
$ gcc --versionIf it replies command
not
found, MSYS can’t see MinGW. In
that case, you will need to edit the text file
C:\msys\1.0\etc\fstab so that it includes the
line:
c:/MinGW /mingwNote the forward slashes, and replace
c:/MinGW with the location of MinGW on
your machine.
Tip
To access the MSYS and MinGW tools from the Windows command prompt,
you will need to add C:\msys\1.0\bin and
C:\MinGW\bin to your Windows
Path environment variable. Access environment
variables by selecting Start → Settings → Control
Panel → System → Advanced → Environment
Variables.
Finally, we’ll apply the 3.3.1 updates to the
installation. Copy the *.tar.gz files to your
MinGW directory (e.g., C:\MinGW\). Open the MSYS
shell (Start
→
Programs
→
MinGW
→
MSYS
→
msys) and then change into the
/mingw directory (cd /mingw).
Unpack the *.tar.gz archives like so:
Sid Steward@GIZMO /mingw $tar -xzf gcc-core-3.3.1-20030804-1.tar.gzSid Steward@GIZMO /mingw $tar -xzf gcc-g++-3.3.1-20030804-1.tar.gz
Now, test to make sure the upgrades worked by checking the versions. For example:
Sid Steward@GIZMO /mingw
$ gcc --version
gcc.exe (GCC) 3.3.1 (mingw special 20030804-1)Download and Install the Acrobat SDK
The full Acrobat SDK from Adobe includes documentation, samples, and API header files. Presently, only (fee-paying) ASN Developer members can download the full Acrobat 6 SDK. So, we’ll download the freely available Acrobat 5 SDK instead. This free download does require that you sign up for a (free) ASN Web Account.
Visit http://partners.adobe.com/asn/acrobat/download.jsp, and download the Acrobat 5.0 Full SDK Installation. For Windows, it is a zipped-up installer named acro5sdkr4.zip.
Tip
In addition to the Acrobat SDK documentation, you should also download the latest PDF Reference from http://partners.adobe.com/asn/tech/pdf/specifications.jsp.
Unzip, and then run the installer. Throughout this discussion, I’ll assume you installed the SDK in a directory named C:\acro5sdkr4\.
Open C:\msys\1.0\etc\fstab in a text editor and add this line (note the forward slashes):
C:/acro5sdkr4 /acro5sdkr4Mapping Windows directories to MSYS directories like this makes life easier in MSYS. Regardless of where you installed the SDK, its location in MSYS is always /acro5sdkr4. We’ll take advantage of this fact in our plug-in sample project. It expects to find the Acrobat API headers at /acro5sdkr4/PluginSupport/Headers/Headers/.
Download and Install Our Sample Plug-In
The Acrobat SDK Windows installer comes with many sample plug-in projects, but they all use Visual C++ project files. Visit http://www.pdfhacks.com/jumpsection/ and download jumpsection-1.0.tar.gz, which is the source code for our jumpsection Acrobat plug-in [Hack #13] . It demonstrates the basic elements of an Acrobat plug-in project built using MinGW.
Move jumpsection-1.0.tar.gz to your MSYS home directory and unpack it in MSYS like so:
Sid Steward@GIZMO ~
$ tar -xzf jumpsection-1.0.tar.gz
This creates a directory named jumpsection-1.0.
Change into this directory and compile jumpsection using
make:
Sid Steward@GIZMO ~ $cd jumpsection-1.0Sid Steward@GIZMO ~/jumpsection-1.0 $make
make will use the instructions in
Makefile to create the Acrobat plug-in
jumpsection.api. When it is done, copy
jumpsection.api to the Acrobat plug_ins
directory
[Hack #4]
and restart Acrobat to test it. It works in both Acrobat 5 and
Acrobat 6. It won’t load in Reader.
This toolset is the bare minimum you will need to build Acrobat plug-ins. To develop plug-ins, you will also need a good text editor such as vim [Hack #82] or Emacs (http://www.gnu.org/software/emacs/windows/ntemacs.html). Or, you might prefer a GUI environment such as Dev-C++ (http://www.bloodshed.net/devcpp.html).
Explore the Acrobat SDK Documentation and Examples
Look under Acrobat’s hood, and explore the possibilities.
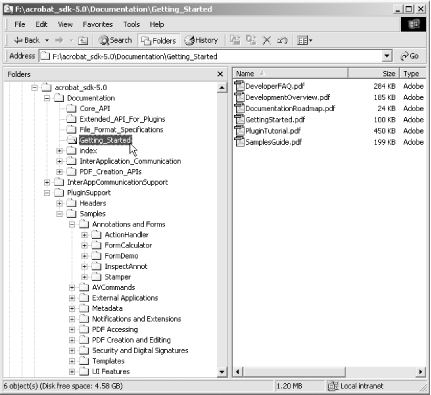
The Acrobat 5 SDK for Windows includes more than 26 documents, 15 interapplication (e.g., OLE, DDE) examples, and 52 Acrobat plug-in examples, as shown in Figure 7-11. Acrobat SDKs are also available for Macintosh and Unix. This material is the foundation for all PDF, Acrobat, and Distiller programming. And, it is freely available from http://partners.adobe.com/asn/acrobat/download.jsp. For a fee, you can also access the Acrobat 6 SDK.
Here is a list of the most notable documents included with the Acrobat SDK.
PDF Reference
The most important document is the PDF Reference (PDFReference.pdf). The one that comes with the Acrobat 5 SDK is old, so visit http://partners.adobe.com/asn/tech/pdf/specifications.jsp and download the latest version.
[Hack #41] discusses how each new version of Acrobat is coupled with a new release of the PDF Reference. Check the “what’s new” section of the reference to get a glimpse of what was added to the corresponding version of Acrobat. In the PDF Reference Version 1.5 (that was released with Acrobat 6), new PDF features are described in section 1.2.
The PDF Reference sometimes refers to the PostScript Reference. Download this venerable document from http://partners.adobe.com/asn/tech/ps/specifications.jsp.
Acrobat Core API Reference
The API Reference (CoreAPIReference.pdf) lists all the objects, methods, and callbacks available to your Acrobat plug-in [Hack #97] . It is a reference, so it doesn’t offer deep explanations. For explanations of the concepts behind the API, consult the Acrobat Core API Overview (CoreAPIOverview.pdf).
Acrobat Interapplication Communication (IAC) Reference
The Acrobat Interapplication Communication (IAC) Reference (IACReference.pdf) lists all the different interfaces you can use to access Acrobat from external programs or scripting languages. It includes Acrobat’s OLE objects and their methods, Acrobat’s Apple Event objects and their properties, and the DDE messages that Acrobat supports. For an introduction to IAC programming, read the Acrobat Interapplication Communication Overview (IACOverview.pdf).
Guide to SDK Samples
Read the SDK Samples Guide (SamplesGuide.pdf) to get a sense of what you can do with the Acrobat SDK. Consult the included sample code to see exactly how Adobe made their samples work. One of the samples might provide a good foundation for creating exactly what you need.
Acrobat Distiller Parameters
Acrobat Distiller uses different settings [Hack #38] to create different kinds of PDFs. A PDF created for online distribution should be lightweight, while a PDF created for a service bureau should have the highest fidelity. The Distiller Parameters document (DistillerParameters.pdf or distparm.pdf) explains all the available settings. As discussed in [Hack #42] , the Distiller GUI interface does not give you access to all these parameters.
pdfmark Reference Manual
The pdfmark Reference Manual (pdfmarkReference.pdf) provides information on pdfmark operators. Acrobat Distiller and Ghostscript both convert PostScript pages to PDF pages. By adding pdfmark operators to the input PostScript, you can also make Distiller or Ghostscript add features to the output PDF, such as annotations, links, bookmarks, and metadata. Various word processor macros [Hack #32] use pdfmark operators for this purpose.
Use Acrobat Plug-Ins to Extend PDF
The Acrobat API gives you the power to adapt PDF to your needs.
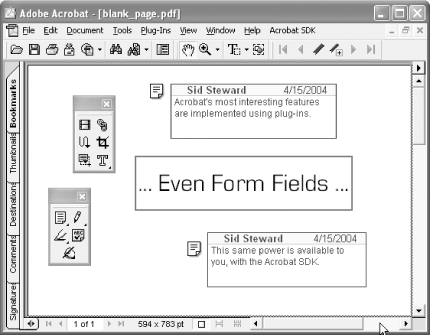
Some of our Acrobat hacks add features to Adobe Acrobat using plug-ins. But plug-ins also have the power to extend Acrobat with custom tools, or to extend PDF with custom PDF annotations. The best illustration of this power is the fact that Adobe uses plug-ins [Hack #4] to implement Acrobat’s most interesting features, as shown in Figure 7-12. PDF form fields, for example, are implemented as PDF annotations. A specific plug-in (AcroForm.api ) handles them in Acrobat. This plug-in adds tools to Acrobat for creating and editing form field annotations, and then this plug-in handles user interaction with the form fields.
Likewise, you can extend PDF by adding custom annotations to PDF pages. Your Acrobat plug-in would need a way to add annotations to the page; you can do this with a custom tool. Then, your plug-in must register an annotation handler with Acrobat. An annotation handler is responsible for drawing the annotation’s appearance on the PDF page and for responding to user interaction with the annotation.
When would you want to use custom PDF annotations? Annotations are ideal for adding things to PDF pages. You control how these things appear, print, and behave.
Learn about PDF annotations by reading the PDF Reference Version 1.5, section 8.4, and consulting the Acrobat SDK [Hack #98] . The SDK includes the Stamper sample plug-in that demonstrates how to create a custom tool and a custom annotation handler. Take a look at the other plug-in samples included in this Annotations and Forms section to get a sense of what else is possible.
PostScript and PDF Games
Have some fun, thanks to PostScript and PDF programming.
PostScript is a full-fledged programming language, and you can animate PDF using JavaScript. Folks have hacked PDFs to do all sorts of things.
Naval Battle and Tic-Tac-Toe in PDF
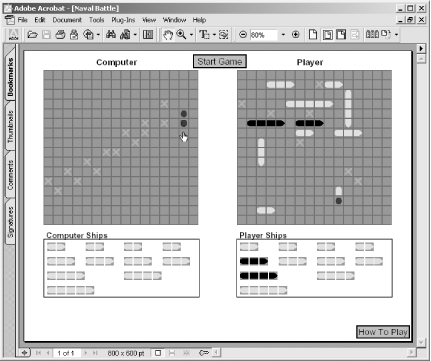
Naval Battle, shown in Figure 7-13, is a PDF game in which you try to sink the computer’s ships before it sinks yours. Craig Connor of Adobe Systems, Inc. created it, and you can download it from http://www.math.uakron.edu/~dpstory/acrotex.html. This site offers many other interactive PDF games, including Tic-Tac-Toe by D. P. Story.
Programming PostScript
PostScript is more than marks on a page; it is a full-fledged programming language. This means it can compute the drawing as it creates the drawing. For example, Michel Charpentier has a PostScript program that computes prime numbers (http://www.cs.unh.edu/~charpov/Programming/PostScript-primes/). Naturally, it reports its results as a printed page. If you send such a program to your PostScript printer, its interpreter actually performs the computation. If you don’t have a PostScript printer or Acrobat Distiller, you can use Ghostscript to run these PostScript programs and see their results on-screen [Hack #3] .
PostScript and Fractals
Because PostScript is a programming language, it is possible to describe large, intricate patterns using lightweight PostScript procedures. In particular, PostScript is a clever way to generate fractals (see Figure 7-11). Michel Charpentier provides good examples and a good discussion for generating (L-system) fractals at http://www.cs.unh.edu/~charpov/Programming/L-systems/. Stijn van Dongen provides another source of interesting examples at http://www.micans.org/stijn/ps/. Finally, if you are serious about mathematical PostScript, visit http://www.math.ubc.ca/~cass/graphics/text/www/ to read Bill Casselman’s Mathematical Illustrations.
PostScript Web Server
The PostScript web server, PS-HTTPD, is a lark on par with the RFC 1149 implementation for Linux (http://www.blug.linux.no/rfc1149/). Visit http://www.pugo.org or http://public.planetmirror.com/pub/pshttpd/ to learn more about PS-HTTPD and to download source code.
