Chapter 2. Managing a Collection
Introduction: Hacks #15-23
While you’ll often work with individual PDF files, documents have a way of accumulating. As your collection of PDF files grows, finding things in that collection often becomes more difficult. These hacks will show you ways to work with groups of documents, adding features and creating supporting frameworks for managing multiple documents.
Bookmark PDF Pages in Reader
Create and maintain a list of PDF pages for rapid access.
Web browsers enable you to bookmark HTML pages, so why doesn’t Adobe Reader enable you to bookmark PDF pages? Here is a JavaScript that extends Reader so that it can create bookmarks to specific PDF pages. It works on Windows, Mac, and Linux.
Tip
The bookmarks created by this JavaScript aren’t PDF bookmarks that get saved with the document. They behave more like web browser bookmarks in that they enable you to quickly return to a specific PDF page.
Bookmark JavaScript for Acrobat and Reader
Visit http://www.pdfhacks.com/bookmark_page/ to download the JavaScript in Example 2-1. Unzip it, and then copy it into your Acrobat or Reader JavaScripts directory. [Hack #96] explains where to find this directory on your platform. Restart Acrobat/Reader, and bookmark_page.js will add new items to your View menu.
// bookmark_page.js, ver. 1.0
// visit: http://www.pdfhacks.com/bookmark_page/

// use this delimiter for serializing our array
var bp_delim= '%#%#';

function SaveData( data ) {
  // data is an array of arrays that needs
  // to be serialized and stored into a persistent
  // global string
  var ds= '';
  for( ii= 0; ii< data.length; ++ii ) {
    for( jj= 0; jj< 3; ++jj ) {
      if( ii!= 0 || jj!= 0 )
        ds+= bp_delim;
      ds+= data[ii][jj];
    }
  }
  global.pdf_hacks_js_bookmarks= ds;
  global.setPersistent( "pdf_hacks_js_bookmarks", true );
}

function GetData( ) {
  // reverse of SaveData; return an array of arrays
  if( global.pdf_hacks_js_bookmarks== null ) {
    return new Array(0);
  }

  var flat= global.pdf_hacks_js_bookmarks.split( bp_delim );
  var data= new Array( );
  for( ii= 0; ii< flat.length; ) {
    var record= new Array( );
    for( jj= 0; jj< 3 && ii< flat.length; ++ii, ++jj ) {
      record.push( flat[ii] );
    }
    if( record.length== 3 ) {
      data.push( record );
    }
  }
  return data;
}

function AddBookmark( ) {
  // query the user for a name, and then combine it with
  // the current PDF page to create a record; store this record
  var label=
    app.response( "Bookmark Name:",
                  "Bookmark Name",
                  "",
                  false );
  if( label!= null ) {
    var record= new Array(3);
    record[0]= label;
    record[1]= this.path;
    record[2]= this.pageNum;

    data= GetData( );
    data.push( record );
    SaveData( data );
  }
}

function ShowBookmarks( ) {
  // show a pop-up menu; this seems to work only when
  // a PDF is already in the viewer;
  var data= GetData( );
  var items= '';
  for( ii= 0; ii< data.length; ++ii ) {
    if( ii!= 0 )
      items+= ', ';
    items+= '"'+ ii+ ': '+ data[ii][0]+ '"';
  }
  // assemble the command and then execute it with eval( )
  var command= 'app.popUpMenu( '+ items+ ' );';
  var selection= eval( command );
  if( selection== null ) {
    return; // exit
  }

  // the user made a selection; parse out its index and use it
  // to access the bookmark record
  var index= 0;
  // toString( ) converts the String object to a string literal
  // eval( ) converts the string literal to a number
  index= eval( selection.substring( 0, selection.indexOf(':') ).toString( ) );
  if( index< data.length ) {
    try {
      // the document must be 'disclosed' for us to have any access
      // to its properties, so we use these FirstPage NextPage calls
      //
      app.openDoc( data[index][1] );
      app.execMenuItem( "FirstPage" );
      for( ii= 0; ii< data[index][2]; ++ii ) {
        app.execMenuItem( "NextPage" );
      }
    }
    catch( ee ) {
      var response=
        app.alert("Error trying to open the requested document.\nShould
I remove this bookmark?", 2, 2);
      if( response== 4 && index< data.length ) {
        data.splice( index, 1 );
        SaveData( data );
      }
    }
  }
}

function DropBookmark( ) {
  // modeled after ShowBookmarks( )
  var data= GetData( );
  var items= '';
  for( ii= 0; ii< data.length; ++ii ) {
    if( ii!= 0 )
      items+= ', ';
    items+= '"'+ ii+ ': '+ data[ii][0]+ '"';
  }
  var command= 'app.popUpMenu( '+ items+ ' );';
  var selection= eval( command );
  if( selection== null ) {
    return; // exit
  }

  var index= 0;
  index= eval( selection.substring( 0, selection.indexOf(':') ).toString( ) );
  if( index< data.length ) {
    data.splice( index, 1 );
    SaveData( data );
  }
}

function ClearBookmarks( ) {
  if( app.alert("Are you sure you want to erase all bookmarks?", 2, 2 )== 4 ) {
    SaveData( new Array(0) );
  }
}

app.addMenuItem( {
cName: "-",              // menu divider
cParent: "View",         // append to the View menu
cExec: "void(0);" } );

app.addMenuItem( {
cName: "Bookmark This Page &5",
cParent: "View",
cExec: "AddBookmark( );",
cEnable: "event.rc= (event.target != null);" } );

app.addMenuItem( {
cName: "Go To Bookmark &6",
cParent: "View",
cExec: "ShowBookmarks( );",
cEnable: "event.rc= (event.target != null);" } );

app.addMenuItem( {
cName: "Remove a Bookmark",
cParent: "View",
cExec: "DropBookmark( );",
cEnable: "event.rc= (event.target != null);" } );

app.addMenuItem( {
cName: "Clear Bookmarks",
cParent: "View",
cExec: "ClearBookmarks( );",
cEnable: "event.rc= true;" } );
Running the Hack
When you find a PDF page you want to bookmark, select View → Bookmark This Page, or use the Windows key combination Alt-V, 5. A dialog will ask you for the bookmark’s name. Enter a title and click OK.
Tip
The bookmarks you create persist across Acrobat/Reader sessions because the data is stored in a persistent, global JavaScript variable. Acrobat/Reader stores persistent data in a text file named glob.js in the JavaScripts directory.
To activate a bookmark, some PDF document (any PDF document) must already be open in the viewer. This is due to a quirk in Acrobat’s JavaScript pop-up menu. Select View → Go To Bookmark, or use the Windows key combination Alt-V, 6. A pop-up menu appears, showing your bookmark titles. Select a title, and that PDF will open in the viewer and then advance to the bookmarked page.
Remove a bookmark by selecting View → Remove a Bookmark. A pop-up menu will show all of your current bookmarks. Select a bookmark, and it will be removed permanently.
Create Windows Shortcuts to Online PDF Pages with Acrobat
Quickly return to the particular page of an online PDF, and manage these shortcuts with your other Favorites.
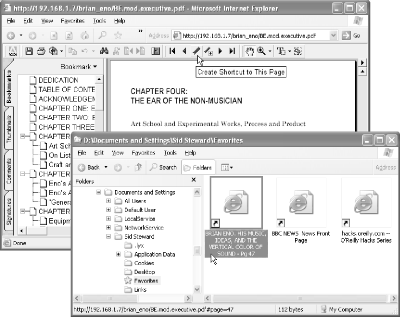
Web browsers don’t enable you to bookmark online PDF pages as precisely as you can bookmark HTML web pages. Sure, you can bookmark the PDF document, but if that document is 300 pages long, your bookmark isn’t helping you very much. The problem is that the browser doesn’t know which PDF page you are viewing; it leaves those details to Acrobat or Reader. The solution is to have Acrobat/Reader create the shortcut for you. This little plug-in for Acrobat does the trick by creating page-specific Internet shortcuts in your Favorites folder, as shown in Figure 2-1.
Warning
Our Shortcuts plug-in does not work with Reader. Visit http://www.pdfhacks.com/shortcuts/ to see the status of Reader support.
Visit http://www.pdfhacks.com/shortcuts/ and download shortcuts-1.0.zip. Unzip, and then copy shortcuts.api to your Acrobat plug_ins folder. This folder is usually located somewhere such as C:\Program Files\Adobe\Acrobat 5.0\Acrobat\plug_ins\.
Restart Acrobat. Our Shortcuts plug-in adds a PDF Hacks → Shortcuts submenu to the Acrobat Plug-Ins menu. It also adds this Create Shortcut to This Page button to the navigation toolbar:
When viewing an online PDF, click this button and an Internet shortcut will appear in your personal Favorites folder. This shortcut is visible immediately from the Favorites menu in Internet Explorer. You can organize shortcuts into subfolders, rename them, or move them. When you activate one of these shortcuts, your default browser opens to the given URL, in this case to the PDF page you were viewing.
Tip
You can convert the shortcuts in your Favorites folder into Mozilla bookmarks by using the Internet Explorer Import/Export Wizard. Start the wizard from Internet Explorer by selecting File → Import and Export . . . .
Examine one of these shortcut URLs and you will see our trick for opening an online PDF to a specific page. It is simply a matter of appending information to the PDF’s URL. For example, http://www.pdfhacks.com/eno/BE.pdf#page=44 takes the reader to page 44. [Hack #69] explains this technique in detail.
Tip
If your browser fails to refresh its display after you activate one of our PDF shortcuts, try one of these tips.
Note
On Internet Explorer, configure your browser to open shortcuts in new windows by opening Tools → Internet Options . . . → Advanced and then removing the checkmark next to the “Reuse windows for launching shortcuts” option.
On Mozilla, click the Reload button or select View → Reload after you activate a shortcut.
Our Shortcuts plug-in also works on local PDF files, but this requires some additional configuration. So read on, friend!
Create Windows Shortcuts to Local PDF Pages
Pinpoint and organize the essential data in your local PDF collection.
PDF files can hold so much information, yet Acrobat provides no convenient way to reference an individual PDF page outside of Acrobat. This makes it harder to organize a collection. To solve this problem, I developed an Acrobat plug-in that can create Windows shortcuts that open specific PDF pages. However, it works only after you add some special Dynamic Data Exchange (DDE) messages to the PDF Open action. Use this plug-in to create Windows shortcuts to the PDF pages, sections, or chapters most useful to you. Name these shortcuts and organize them in folders just like Internet shortcuts.
Adobe Reader users should use [Hack #15] instead of this hack.
Configure the Shell to Open PDF to a Given Page
First, we must have Acrobat open PDF files to a particular page, when a page number is given. The Windows shell is responsible for opening Acrobat when you double-click a PDF file or shortcut. You can view and edit this association from the Windows Explorer File Manager.
In the Windows File Explorer menu, select Tools → Folder Options . . . and click the File Types tab. Select the Adobe Acrobat Document (PDF) file type and click the Advanced button (Windows XP and 2000) or the Edit . . . button (Windows 98). Double-click the Open action to change its configuration.
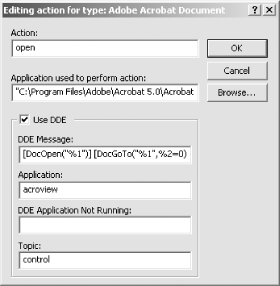
Now you should be looking at the Edit Action dialog for the Adobe Acrobat Document file type. Check the Use DDE checkbox and then add/change the DDE fields like so:
|
Field name |
Field value |
|
DDE Message |
[DocOpen("%1")] [DocGoTo("%1",%2=0)]
|
|
Application |
acroview |
|
DDE Application Not Running | |
|
Topic |
control |
This DDE message tells Acrobat to open the PDF file given in the
first argument (%1) and then to go to the page
given in the second argument (%2). If
%2 is not given, Acrobat opens the PDF to the
first page (page zero).
Tip
Sometimes the Application field is filled with a different name. It
must be acroview for our DDE message to work
properly.
When you are done, the PDF Open action should look like Figure 2-2.
Click OK, OK, and Close, and you are done.
Acrobat Shortcuts Plug-In
Follow the directions in [Hack #16] to install and use our Shortcuts Acrobat plug-in. Internet shortcuts are a little different from shortcuts to local files, but for our purposes they behave the same way.
Hacking the Hack
Acrobat and Reader recognize more than 30 DDE messages. They are documented in the Acrobat Interapplication Communication Reference, which comes with the Acrobat SDK [Hack #98] . Its filename is IACReference.pdf . Use DDE messages to program your own Acrobat context menu actions.
Also, look into the PDF Open Parameters document from Adobe, which you can find at http://partners.adobe.com/asn/acrobat/sdk/public/docs/PDFOpenParams.pdf.
Turn PDF Bookmarks into Windows Shortcuts
Turn your PDF inside out.
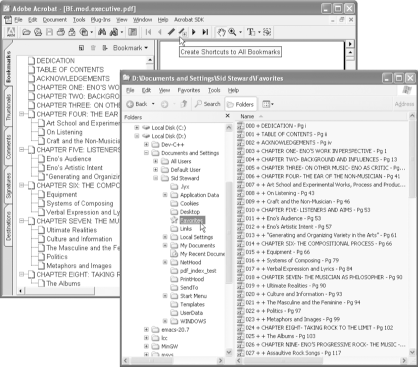
We’ve talked about creating a shortcut to a single PDF page [Hack #17] . Now let’s create a complete tree of shortcuts, each representing a PDF bookmark, such as those in Figure 2-3. Organize them in folders and use the Windows File Explorer to navigate your PDF collection. It works with local and online PDF files.
Install the Shortcuts plug-in [Hack #16] and then configure your computer for local shortcuts [Hack #17] . Open a bookmarked PDF and press the
button. Or, select Plug-Ins → PDF Hacks → Shortcuts → Create Shortcuts to All Document Bookmarks. A set of shortcuts will appear in your Favorites folder. Create a new folder and move the new shortcuts to a convenient location.
Generate Document Keywords
Complement your search strategy with document keywords.
Lost information is no use to anybody, and the difference between lost and found is a good collection search strategy. Keywords can play a valuable role in your strategy by giving you insight into a document’s topics. Of course, a document’s headings, listed in its Table of Contents, provide an outline of its topics. Keywords are different. Derived from the document’s full text, they fill in the gaps between the formal, outlined topics and their actual treatments. This hack explains how to find a PDF’s keywords using our kw_catcher program.
How the kw_catcher Keyword Generator Works
Finding keywords automatically is a hard problem. To simplify the problem, we are going to make a couple of assumptions. First, the document in question is large—50 pages or longer. Second, the document title is known—i.e., we aren’t trying to discover the document’s global topic, represented by its title. Rather, we are trying to discover subtopics that emerge throughout the document.
Stopwords, noise, and signal
Stopwords are the words that appear most frequently in almost any document, such as the, of, and, to, and so on. Stopwords do not help us identify topics because they are used in all topics. Words that are used with uniform frequency throughout a document are called noise. Stopwords are the best example of noise. For any given document, dozens of other words add to the noise.
We are trying to find a document’s signal, which is the set of words that communicate a topic. Automatically separating signal from noise is tricky.
Recall our assumption that the document title, or global topic, is known. This is because a book’s global topic tends to come up consistently throughout the document. For example, the word PDF occurs so regularly throughout this book, it looks like noise.
Identifying local topics
Document word frequency is the number of times a word occurs in a document. By itself, it does not help us because noise words and signal words can occur with any frequency.
Instead, we will look at the word frequency in a given window of pages and compare it to the document’s global word frequency. For example, frequency occurs ten times in this book, and nine of those occurrences are clustered within these few pages. That certainly distinguishes it from the document’s constant noise, so it must be a keyword.
This is the central idea of kw_catcher. The program uses a few other tricks to ensure good keyword selection. kw_catcher is free software.
Installing and Using pdftotext
We must convert a PDF into a plain-text file before we can analyze its text for keywords. The Xpdf project (http://www.foolabs.com/xpdf/) includes the command-line utility pdftotext, which does a good job of converting a PDF document into a plain-text file. Xpdf is free software.
Windows users can download xpdf-3.00-win32.zip from http://www.foolabs.com/xpdf/download.html. Unzip, and copy pdftotext.exe to a folder in your PATH, such as C:\Windows\system32\. Macintosh OS X users can download a pdftotext installer from http://www.carsten-bluem.de/downloads/pdftotext_en/.
Run pdftotext from the command line, like so:
pdftotext In general, kw_catcher can take any plain-text file that uses the
formfeed character (0x0C) to mark the end of each
page.
Installing and Using kw_catcher
Visit http://www.pdfhacks.com/kw_index/ and download kw_index-1.0.zip. This archive contains Windows executables and C++ source code. Unzip, and move kw_catcher.exe and page_refs.exe to a folder in your PATH, such as C:\Windows\system32\. Or, compile the source to suit your platform.
Run kw_catcher from the command line, like so:
kw_catcherwhere the arguments are given as follows:
-
<window size> This is the number of sequential pages used to identify peaks in word frequency. If most of a word’s occurrences occupy a window of this size, it is a keyword. A large window admits more noise, whereas a small window misses signal. Try starting with a size of 12 and then adjust.
-
<report style> How do you want the data presented?
-
keywords_only Yields a basic list of keywords.
-
frequency Organizes keywords according to the number of times they occur in the document.
-
reading_order Outputs every keyword only once, in the order they first appear in the original text.
-
reading_order_repeat Outputs keywords as they appear in the original text. These last two preserve a sense of the keywords’ contexts.
-
-
<text input filename> This is the filename for the plain-text input. Typically, this input is created with pdftotext.
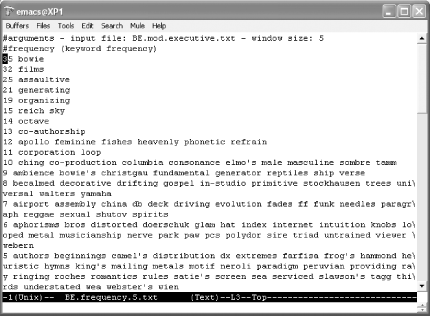
If all goes well, you’ll get results such as those shown in Figure 2-4.
For example, creating a keyword list named mydoc.kw.txt from mydoc.pdf would look something like this:
pdftotext mydoc.pdf mydoc.txt
kw_catcher 12 keywords_only mydoc.txt > mydoc.kw.txt
See [Hack #57] for an example of how you can put these keywords to use.
Index and Search Local PDF Collections on Windows
Teach Windows XP or 2000 how to search the full text of your PDF along with your other documents. Or, use Adobe Reader to search PDF only.
Search is essential for utilizing document archives. Search can also find things where you might not have thought to look. The problem is that Windows search doesn’t know how to read PDF files, by default. We present a couple of solutions.
Search PDF with Adobe Reader
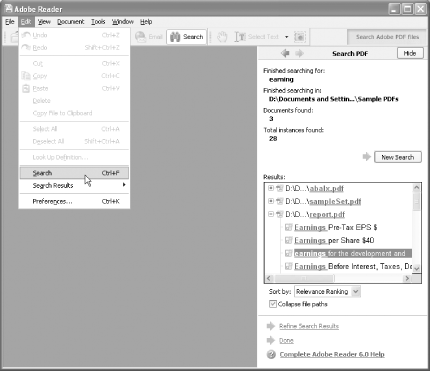
The free Adobe Reader 6.0 provides the easiest solution. It enables you to perform searches across your entire PDF collection (Edit → Search). Its detailed query results include links to individual PDF pages and snippets of the text surrounding your query, as shown in Figure 2-5. Its Fast Find setting, enabled by default, caches the results of your searches, so subsequent searches go much faster. View or change the Reader search preferences by selecting Edit → Preferences → Search.
The downside to Adobe Reader search is that it searches PDF documents only.
Index and Search PDF with Windows XP and 2000
It makes sense to search across all file types from a single interface. Newer versions of Windows enable you to extend its built-in search feature to include PDF documents. With Windows 2000, all you need to do is install the freely available PDF IFilter from Adobe. With Windows XP, you must also apply a couple of workarounds. In both cases, you can use the Windows Indexing Service to speed up searches.
The Windows Indexing Service is powerful but needs to be configured for best performance. The next section introduces you to the Indexing Service. We then discuss installing and troubleshooting Adobe’s PDF IFilter.
Windows Indexing Service: Installation, Configuration, and Documentation
You don’t need
Indexing Service to search your
computer, but it can be handy. Queries run much faster, and you can
use advanced search features such as Boolean operators (e.g.,
AND, OR, and
NOT), metadata searches (e.g.,
@DocTitle Contains "pdf“), and pattern matching.
The downside is that the Indexing Service always runs in the
background, using resources to index new or updated documents. A
little configuration ensures that you get the best performance.
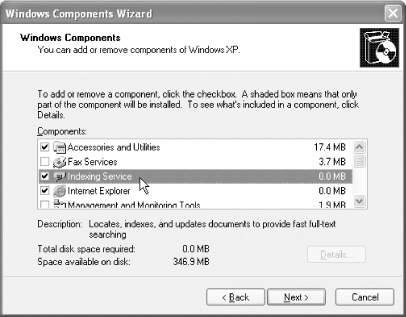
First off, do you have Indexing Service? If not, how do you install it? Both questions are answered in the Windows Components Wizard window. In Windows XP or 2000, open this wizard by selecting Start → Settings → Control Panel → Add or Remove Programs and clicking the Add/Remove Windows Components button on the left. Find the Indexing Service component and place a check in its box, if it is empty, as shown in Figure 2-6. Click Next and proceed through the wizard.
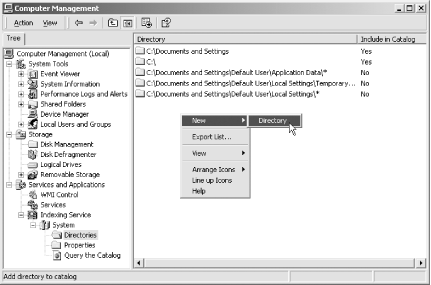
Access Indexing Service configuration and documentation from the Computer Management window, shown in Figure 2-7. Right-click My Computer and select Manage. In the left pane, unroll Services and Applications and then Indexing Service.
Sometimes you must stop or start the Indexing Service. Right-click the Indexing Service node and select Stop or Start from the context menu.
Under the Indexing Service node you’ll find index catalogs, such as System. Add, delete, and configure these catalogs so that they index only the directories you need. For details on how to do this, I highly recommend the documentation under Help → Help Topics → Indexing Service. This document also details the advanced query language.
Tip
You can fine-tune your Indexing Service with the registry entries located at HKEY_LOCAL_MACHINE\SYSTEM\CurrentControlSet\Control\ContentIndex. These are documented at http://msdn.microsoft.com/library/default.asp?url=/library/en-us/indexsrv/html/ixrefreg_192r.asp.
You still can search the directories you do not index by selecting Start → Search → For Files or Folders, so don’t feel compelled to index your entire computer.
Before installing the PDF IFilter, create a special catalog for testing purposes. Put a few PDFs in its directory. Disable indexing on all other catalog directories by double-clicking these directories and selecting “Include in Index? No.” This will simplify testing because indexing many documents can take a long time.
Tip
Download our indexing test PDF from http://www.pdfhacks.com/ifilter/. During testing, search this PDF for guidelines.
Prepare to Install PDF IFilter 5.0
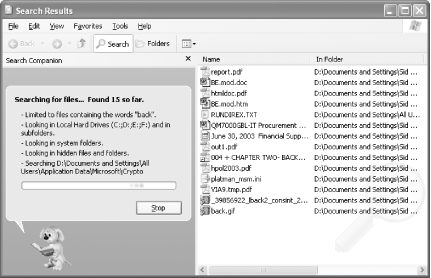
On Windows XP and 2000, you have two kinds of searches: indexed and unindexed. An indexed search relies on the Indexing Service, as we have discussed. An unindexed search takes a brute-force approach, scanning all files for your queried text, as shown in Figure 2-8. In both cases, the system uses filters to handle the numerous file types. These filters use the IFilter API to interface with the system.
A PDF IFilter is freely available from Adobe. Visit http://www.adobe.com/support/salesdocs/1043a.htm and download ifilter50.exe. Adobe’s web page states that this PDF IFilter works only on servers. In fact, it works on XP Home Edition, too.
If you run Windows 2000, you can install the PDF IFilter and it will work for both indexed and unindexed PDF searching.
If you run Windows XP Home Edition and install the PDF IFilter (Version 5.0), you might need to disable the PDF IFilter for unindexed PDF searches. Unindexed searching of PDFs on XP Home Edition with the PDF IFilter can leave open file handles lying around, which will cause all sorts of problems. Visit http://www.pdfhacks.com/ifilter/ and download PDFFilt_FileHandleLeakFix.reg. We will use it in our installation instructions, later in this hack. This registry hack ensures that only the Indexing Service uses the PDF IFilter. After you apply this hack, PDFs will be treated like plain-text files during unindexed searches. You can undo this registry hack with PDFFilt_FileHandleLeakFix.uninstall.reg.
Warning
Unindexed searching of PDFs on XP with the PDF IFilter can leave open file handles lying around.
If you perform an unindexed search in a folder of PDFs and then find you can’t move or delete these PDFs, you have open file handles. Reboot Windows to close them.
Download Process Explorer from http://www.sysinternals.com and follow the explorer.exe process to see these open file handles. Use our PDFFilt_FileHandleLeakFix.reg registry hack as a workaround, as we describe next.
Install and Troubleshoot Adobe PDF IFilter 5.0
On XP, installing the PDF IFilter might require a couple of registry hacks. First we’ll install it, then we’ll troubleshoot.
In the Computer Management window (right-click My Computer and select Manage), right-click Services and Applications → Indexing Service and select Stop.
Run the Adobe PDF IFilter installer through to completion.
Windows XP Home users: install PDFFilt_FileHandleLeakFix.reg by double-clicking it and selecting Yes to confirm installation. (If you need to undo this registry hack, run PDFFilt_FileHandleLeakFix.uninstall.reg.)
Start Indexing Service back up again (right-click Services and Applications → Indexing Service and select Start).
Rescan your test catalog. Do this by selecting the catalog’s Directories node, right-clicking your test directory, and selecting All Tasks → Rescan (Full).
Wait for the rescan to complete.
Tip
Follow the Indexing Service’s progress by selecting Services and Applications → Indexing Service in the Computer Management window. Watch the pane on the right. It is done indexing a catalog when Docs to Index goes to zero.
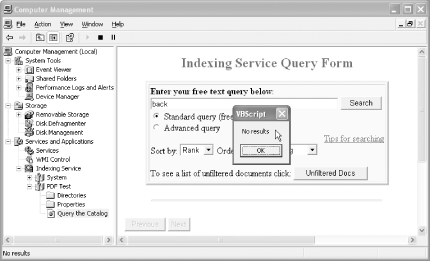
To test your index, don’t select Start → Search. Instead, in the Computer Management window, select the Query Catalog node listed under your test catalog. Submit a few queries that would work only on the full text of your PDFs. Avoid using document headings or titles. Did it work? If so, you’re done! If you get no results, as shown in Figure 2-9, work through the next section, which explains a common workaround for Windows XP.
PDF IFilter doesn’t work with XP Indexing Service—workaround
PDF IFilter and Indexing Service don’t see eye to eye on Windows XP. If querying indexed PDF yields empty sets, give this a try:
In the Computer Management window (right-click My Computer and select Manage), right-click Services and Applications → Indexing Service and select Stop.
Open the Registry Editor (Start → Run . . . → Open:
regedit→ OK).Select HKEY_CLASSES_ROOT and then search for pdffilt.dll in the registry data (Edit → Find . . . → Find what:
pdffilt.dll→ Look at: Data → Find Next).You should hit upon an InprocServer32 key that references pdffilt.dll and specifies its ThreadingModel. Double-click the ThreadingModel and change it from Apartment to Both.
Select HKEY_LOCAL_MACHINE\SYSTEM\CurrentControlSet\Control\ContentIndex and double-click the DLLsToRegister key to edit it.
In the list of DLLs, delete the following line:
C:\Program Files\Adobe\PDF IFilter 5.0\PDFFilt.dll
Click OK, and then close the Registry Editor.
Start the Indexing Service back up (right-click Services and Applications → Indexing Service and select Start).
Rescan your test catalog. Do this by opening the catalog’s Directories node, right-clicking your test directory, and selecting All Tasks → Rescan (Full).
Wait for rescan to complete.
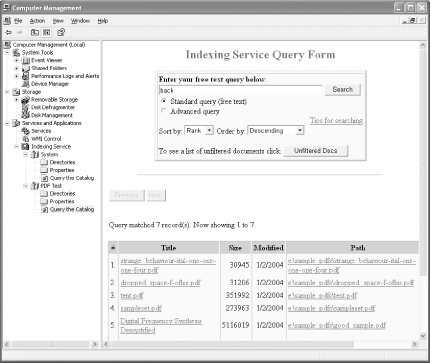
Your test query should now work, as shown in Figure 2-10.
Tip
Adobe documents this workaround on its web site at http://www.adobe.com/support/techdocs/333ae.htm.
Using Start → Search → For Files and Folders
When searching PDFs by selecting Start → Search → For Files and Folders, don’t search for Documents. Search All Files and Folders instead. The Documents search overlooks PDFs.
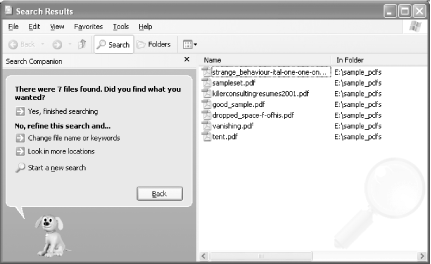
If you indexed a specific folder instead of an entire drive, that folder (or one of its subfolders) must be given in the Look In: field when using Start → Search → For Files and Folders. Otherwise, the index won’t be consulted; an unindexed search will be performed instead, even within the indexed folder. Set the Look In: field to a specific folder by clicking the drop-down box and selecting Browse . . . , as demonstrated in Figure 2-11.
When searching within an indexed
folder, you can use advanced search terms (e.g., @DocTitle
Contains "earnings“). Consult the Indexing Service online
documentation, described earlier, for details.
Searching PDF Using Windows 98 and NT System Tools
Using the older Windows search tool on PDF still can be useful, even if it doesn’t access the full text of your document. If the PDF documents are not encrypted, their metadata (Title, Author, etc.) and bookmarks are visible to the search tool as plain text. PDF shortcut titles [Hack #17] also are searched.
Spinning Document Portals
Help readers navigate your PDF documents with an HTML front-end. Let them search your PDF’s full text, and then link search hits directly to PDF pages.
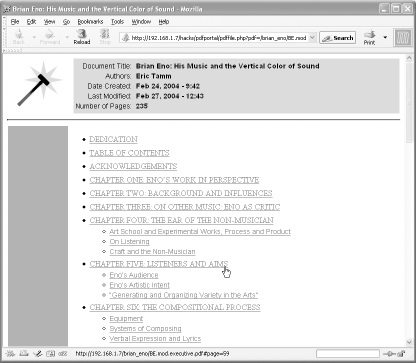
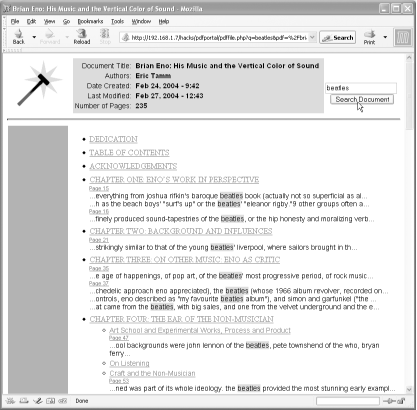
An HTML portal into a PDF document should describe the document, and it should link readers directly to the sections they might need. This hack uses the information locked in a PDF to create its portal page, as shown in Figure 2-12. We automate the process with PHP, so portals are created on demand. An optional search feature enables readers to drill down into the PDF’s full text. Visit http://www.pdfhacks.com/eno/ to see an online example.
In [Hack #70] , we discussed how to extract document information from a PDF using pdftk [Hack #79] . Here, we automate the process with PHP, casting the PDF information into a friendly, dynamic web page. Pass a PDF’s path into the script and it yields an HTML portal. If the PDF has no bookmarks or metadata (Title, Author, etc.), this portal will look pretty lean. Even so, the search feature will help readers find what they want.
Tool Up
We’ll need pdftk [Hack #79] and pdfportal (http://www.pdfhacks.com/pdfportal/). pdftk can extract information from PDF documents, like metadata and bookmarks. pdfportal is a set of PHP scripts that use this document data to create hyperlinked HTML pages.
To install pdfportal, visit http://www.pdfhacks.com/pdfportal/ and download pdfportal-1.0.zip. Unpack the archive and copy its files to a location on your PHP-enabled web server where it can read and execute them. Edit pdfportal.config.php to reflect the location of pdftk on your web server.
If you want to use the pdfportal search feature, you must also have pdftotext [Hack #19] . Pdftotext converts PDF documents into plain text. Edit pdfportal.config.php to reflect the location of pdftotext on your web server.
Tip
If you can’t install pdftk or pdftotext on your web server, use pdftk and pdftotext on your local machine to create the necessary data files and then upload these data files to your web server. Read pdfportal.config.php for details.
Windows users without access to a PHP-enabled web server can download and install IndigoPerl from http://www.indigostar.com. IndigoPerl is an Apache installer for Windows that includes PHP and Perl support.
Open the Portal
Let’s say you copied the pdfportal files to http://localhost/pdfportal/ and you have a PDF named http://localhost/collection/mydoc.pdf. To view this PDF using the portal, pass its path to pdffile.php like so:
http://localhost/pdfportal/pdffile.php?pdf=/collection/mydoc.pdf
pdffile.php calls pdftk to create
http://localhost/collection/mydoc.pdf.info,
if it doesn’t already exist.
pdffile.php then uses this plain-text
info file to create an HTML page. An info file
is simply the output from pdftk’s
dump_data operation
[Hack #64]
.
Search the PDF’s Full Text
Open your PDF’s document portal. If pdffile.php can find pdftotext on your computer (see pdfportal.config.php), it does two things. It uses pdftotext to convert your PDF into a plain-text file, and it activates its search interface. It stores the plain-text file in the same directory as the PDF file.
When you submit a search, pdffile.php scans this text file to discover which PDF pages contain your search terms. It reports search hits in reading order, as shown in Figure 2-13. If the PDF has bookmarks, these are used to organize the results. Click a link and the PDF opens to that page.
Spinning Collection Portals
Convert directories full of secretive PDFs into inviting HTML portals, automatically.
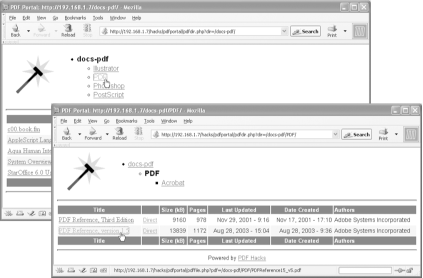
You can create portals that enable readers to comfortably navigate entire directories of PDF documents. These directory portals list document titles, authors, and modification dates, a layer up from the document portals created in [Hack #21] . They offer hyperlinks to each PDF’s document portal and to neighboring directories. Written in PHP, these portals, shown in Figure 2-14, are easy to adapt to your requirements.
Tool Up
You’ll need pdftk [Hack #79] and pdfportal. To install pdfportal, visit http://www.pdfhacks.com/pdfportal/ and download pdfportal-1.0.zip. Unpack the archive and copy its files to a location on your PHP-enabled web server where it can read and execute them. Edit pdfportal.config.php to reflect the location of pdftk on your system.
Windows users without access to a PHP-enabled web server can download and install IndigoPerl from http://www.indigostar.com. IndigoPerl is an Apache installer for Windows that includes PHP and Perl support.
Running pdfdir.php
Let’s say you copied the pdfportal files to http://localhost/pdfportal/ and you have a directory named http://localhost/collection/. To view this directory using the portal, pass it to pdfdir.php like so:
http://localhost/pdfportal/pdfdir.php?dir=/collection/
pdfdir.php calls pdftk’s
dump_data operation to create
info files for every PDF in this directory, as
needed. It then uses these plain-text info files to create an
informative HTML summary page. As noted earlier, an info file is
simply the output from pdftk’s
dump_data operation
[Hack #64]
.
Click a document’s title, and its document portal [Hack #21] opens. Navigate from directory to directory using the hyperlinked tree at the top of the page.
Identify Related PDFs
Analyze word frequency to find relationships between PDFs.
Organizing a large collection into categories requires a firsthand familiarity with every document. This level of care generally is not possible. In any case, some documents inevitably get filed into the wrong categories.
Here is a pair of Bourne shell scripts that measure the similarity between two PDF documents. You can use them to help categorize PDFs, to help identify misfiled documents, or to suggest related material to your readers. Their logic is easy to reproduce using any scripting language. To install the Bourne shell on Windows, see [Hack #97] .
They use the following command-line tools: pdftotext [Hack #19] , sed (Windows users visit http://gnuwin32.sf.net/packages/sed.htm ), sort, uniq, cat, and wc (Windows users visit http://gnuwin32.sf.net/packages/textutils.htm ). These tools are available on most platforms. Here are some brief descriptions of what the tools do:
- pdftotext
Converts PDF to plain text
- sed
Filters text and makes substitutions
- sort
Sorts lines of text files
- uniq
Removes duplicate lines from a sorted file
- cat
Concatenates files
- wc
Prints the number of bytes, words, and lines in a file
The first script, wordlist.sh, takes the
filename of a PDF and creates a text file that contains a sorted list
of each word that occurs at least twice in the document. Save this
script to your disk as wordlist.sh and then
apply chmod
700 to it, if
necessary:
#!/bin/sh
pdftotext $1 - | \
sed 's/ /\n/g' | \
sed 's/[^A-Za-z]//g' | \
sed '/^$/d' | \
sed 'y/ABCDEFGHIJKLMNOPQRSTUVWXYZ/abcdefghijklmnopqrstuvwxyz/' | \
sort | \
uniq -d > $1.words.txt
First, it converts the PDF to text. Next, it puts each word on its own line. Then, it removes any nonalphabetic characters, so you’ll becomes youll. It removes all blank lines and then converts all characters to lowercase. It sorts the words and then creates a list of individual words that appear at least twice. The output filename is the same as the input filename, except the extension .words.txt is added.
If you call wordlist.sh like this:
wordlist.sh it creates a text file named mydoc1.pdf.words.txt. For example, the word list for Brian Eno: His Music and the Vertical Color of Sound (http://www.pdfhacks.com/eno/) includes:
anything
anyway
anywhere
apart
aperiodic
aphorisms
apollo
apparatus
apparent
apparently
appeal
appear
The second script, percent_overlap.sh, compares two word lists and reports what percentage of words they share. If you compare a document to itself, its overlap is 100%. The percentage is calculated using the length of the shorter word list, so if you were to take a chapter from a long document and compare it to the entire, long document, it would report a 100% overlap as well.
Given any two, totally unrelated documents, their overlap still might be 35%. This also makes sense, because all documents of the same language use many of the same words. Two unrelated fiction novels might have considerable overlap. Two unrelated technical documents would not.
Warning
In this next Bourne shell script, note that we use backtick characters (`), not apostrophes ('). The backtick character usually shares its key with the tilde (~) on your keyboard.
Save this script to your disk as
percent_overlap.sh and then apply chmod
700 to it, if necessary:
#!/bin/sh
num_words_1=`cat $1 | wc -l`
num_words_2=`cat $2 | wc -l`
num_common_words=`sort $1 $2 | uniq -d | wc -l`

if [ $num_words_1 -lt $num_words_2 ]
then echo $(( 100 * $num_common_words/$num_words_1 ))
else echo $(( 100 * $num_common_words/$num_words_2 ))
fi
Run percent_overlap.sh like this, and it returns the overlap between the two documents as a single number (in this example, the overlap is 38%):
$ percent_overlap.sh
38
If you do this on multiple documents, you can see a variety of relationships emerge. For example, Table 2-1 shows the overall overlaps between various documents on my computer.
|
A |
B |
C |
D |
E |
F |
G | |
|
A=PDF Reference, 1.4 |
100 |
98 |
65 |
36 |
48 |
50 |
35 |
|
B=PDF Reference, 1.5 |
98 |
100 |
67 |
37 |
51 |
52 |
34 |
|
C=PostScript Reference, Third Edition |
65 |
67 |
100 |
38 |
47 |
49 |
36 |
|
D=The ANSI C++ Specification |
36 |
37 |
38 |
100 |
38 |
40 |
25 |
|
E=Corporate Annual Report #1 |
48 |
51 |
47 |
38 |
100 |
62 |
49 |
|
F=Corporate Annual Report #2 |
50 |
52 |
49 |
40 |
62 |
100 |
52 |
|
G=Brian Eno Book by Eric Tamm |
35 |
34 |
36 |
25 |
49 |
52 |
100 |
