
For those who, for whatever reason, do not want to use the cluster cage system here are three other methods. Over the years I have used all three with good results—Take your pick!
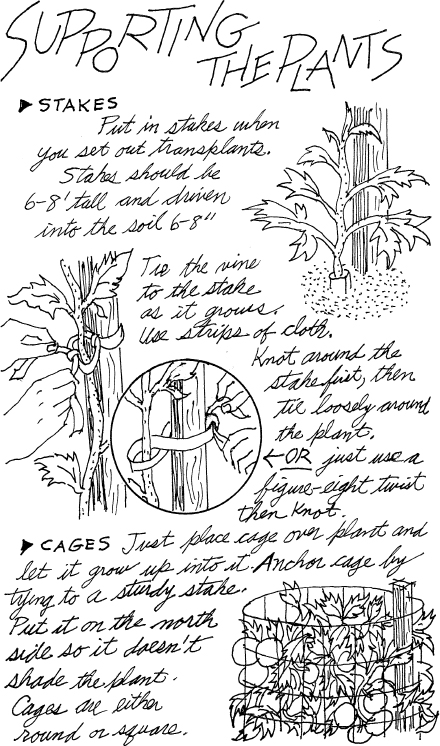
This is the old tried and true method and still used by many home gardeners. A single 6 or 8 foot stake is driven into the ground next to each transplant and the vine is tied to it as it grows. Stakes need to be very sturdy as the plants when loaded with fruits will be quite heavy, 2- x 2-inch poles are best but 1x2s will do.
To make tying up easier some gardeners limit growth by letting only one or two main stems develop and prune suckers. Suckers are shoots that grow out from the stem right above a leaf branch as shown on page 194.
Cages keep tomatoes off the ground without the tying. They are made of heavy duty wire and have large openings so that the tomatoes can be picked easily. They are just put over the plants and left to grow up into it—a great method! Do not prune.
They should be anchored by driving a stake as tall as the cage into the ground at one side and the cage tied to it.
Those sold are either round or square. You can make your own using about 5 feet of 4-foot-tall heavy wire fencing. Bend it into a circle and loop the ends into hooks to link together.
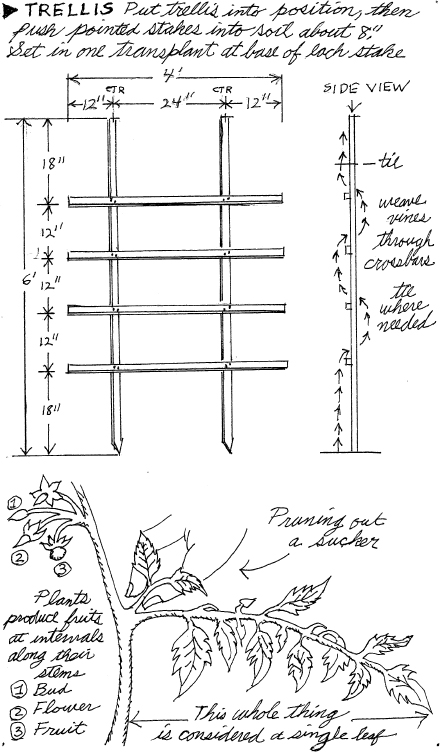
This is similar to staking but has many places on which you can tie the vines. Trellises can be made in any size, 4 feet wide by 6 feet tall is the best size for the modules. Positioned across the width of the bed it will support two plants.
It is made using 1x2 lumber. Two 6-foot lengths with points cut at their bottom are needed as stakes. Four 4-foot lengths are used for crossbars. The illustration on page 194 shows the construction. Use 1¼-inch x #6 deck screws to fasten crossbars to stakes, 2 at each stake. The transplants are set in at the stake’s base. As the vines grow they are weaved between the crossbars. Tying is done only where it is needed. Do not prune.
There are two main types of tomato plants: determinate and indeterminate. The two classifications refer to the growth habit.
Determinate varieties are mostly small early tomatoes which used to be called bush or dwarf. They do not grow indefinitely at the tip. They develop flower buds between each leaf or between every other leaf. When they reach a certain height flowers form at the vine tips, they stop growing and no more fruit forms. They usually produce their fruit during a short span of time. They do not need to be supported.
Indeterminate varieties are mostly the large main-crop tomatoes; they keep growing indefinitely at the tip and do not stop setting fruits until stopped by frost. Flower clusters are always produced on the sides of the stems, usually after every two leafs or after every three leafs. Also side branches, called suckers, will sprout at some of the junctions where the leaf joins the main stem. These develop into additional stems and will produce fruits just like the main stem. Whether to prune or not to prune these suckers is the subject of hot debates.
Most gardeners favor indeterminates because of the larger fruit and greater yield. Because of their extensive growth they are usually staked or supported by other means.
But they don’t have to be! If left unsupported they will require less work and yield more fruits. Drawbacks are that they are more susceptible to diseases, rot, insect and slug damage. Space required is the biggest disadvantage. One plant can spread for 15 square feet. They have to be spaced 4-5 feet apart and in rows 4-5 feet apart. In the usual backyard this is not practical.
In addition semi-determinates have been developed that have some characteristics of each. Most have the growth habit of determinates but like the indeterminates produces fruits over a longer period. There is a wide diversity in this classification depending on what genes were used in the cross.
There are hundreds of varieties available today. But you can narrow the list down a bit if you just visit your local nursery. They carry only the varieties that are suited to your region.
Any variety that has the label “All-America Selections Winner” denotes that that strain has been tested in field trials all over the country and is suitable for growing in any part of the United States. They are usually a good choice.
Then you must take into consideration what you are going to use them for, fresh eating, in salads, making sauce, or canning?
Generally you should plant at least two different varieties. If a condition arises that ravages one you will still have a crop from the other. Besides, by choosing strains that mature at different times, the harvest can be stretched.
When looking through seed catalogs or reading the backs of seed packets it is helpful to understand some of the basic terminology.
Variety names followed by the initials V,F,N,T and A mean that that variety is resistant or tolerant to the most common tomato problems: verticillium wilt (V), fusarium wilt, race 1 (F), races 1 & 2 (FF), nematods (N), tobacco mosaic virus (T), and alteraria (A) which is early blight.
Other initials or abbreviations will indicate various aspects of the plant: I-indeterminate, D-determinate, OP-open pollinate, H or HY-hybrid, E-early (up to 65 days), M-midseason (up to 66-79 days) L-late (80+days). There are many more but most catalogs will have a key to explain what each means.
Basically, pruning is the pinching off of the shoots (called suckers) that grow out from the stem right above a leaf branch. (See page 194). If left to grow this shoot simply becomes another big stem which will produce fruits the same as all of the others.
Determinate plants should never be pruned. Some semi-determinates grow fairly tall and can be pruned very lightly. Indeterminate varieties are the ones that many choose to prune.
But since pruning takes away stems that will produce fruits and in the long run reduces your yield why do people prune? The following are some of the reasons and methods used.
Reasons for pruning
Most commonly gardeners prune the large indeterminate vines simply to make them easier to manage. Also done to increase the air flow through the plants lessening the chances of diseases.
Some say they prune to get earlier and slightly larger fruits. This is common among those who have a short growing season.
They assert that the stress caused by pruning makes a plant fear it’s going to die so hurries to ripen its fruit. Reason given for bigger fruits is that since pruning reduces the number of flowers there is less competition for the nutrition, so each one gets more. Sounds logical, but I have doubts about the claim of bigger fruits.
Before deciding whether to prune or not just remember that at the end of the season a comparable un-pruned plant will have yielded a much bigger overall harvest.
Single-stem pruning
Remove all side branches or suckers leaving only the main stem. Check plants weekly and remove them right away. Be careful not to harm any fruit buds or flowers. Also snap off flush with the main stem any lower leaves that have yellowed.
Multiple-stem pruning
Two or more main stems are allowed to develop. This method will produce more fruits than single stem and give more sunscald protection. The only difference between this and the single stem technique is that one or more suckers near the bottom of the main stem are left to grow into additional main stems, usually two.
Caged and unsupported plants usually are not pruned
But some gardeners even prune those, randomly pinching out suckers to control growth—don’t ask me why!
To prune or not to prune, that is the question
I am not a fan of pruning. If you decide to prune be aware that once started it must be continued every week for the entire growing season. If you stop the plant will become unbalanced.
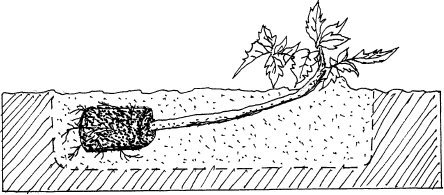
I have always set in my tomato transplants vertically straight up and down. But there are those who put them in horizontally.
This method requires digging a shallow trench about 2 to 3 inches deep and a little longer that the length of the transplant. All leaves are pinched off except the very top cluster.
The plant is then placed in the trench and the entire stem is covered leaving just the top leaf cluster sticking out. A little mound of dirt is made under this cluster so that it has a slight upward tilt. Once growth starts it will grow upright.
Proponents say that roots being closer to the surface get extra warmth early in the season causing faster growth and since more roots form on the buried stem a stronger plant is the result.
In theory that sounds good, but I conducted a few comparison tests and found those claims to be very questionable. The plants that I set in straight up consistently outperformed the ones put in horizontally. I’ll stick with putting them in straight up! But if you have some extremely leggy plants setting only those in using the trench method is a valid option. In short season areas it might make a difference because of the extra warmth on the roots.
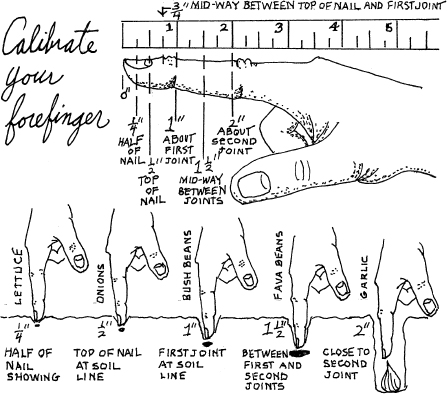
Place a standard ruler alongside your forefinger and take notice of where the fingernail, first joint and second joint match up with the ¼, ½, ¾, 1, 1½ and 2-inch marks.
The illustration above shows the calibration of my forefinger and some typical plantings.
Depths do not have to be ultra precise. Notice in the above drawing that the 2-inch mark does not fall exactly on the second joint but slightly below. I gauge that spot by eye. Anything fairly near the joint is considered to be 2 inches.
When small seed sowings are made in flats, push seeds in with tip of finger to ¼ or ½ inch depth. When garden furrows for small seed are made, measure the furrows using your fingertip.
Large seed sowings need to be pushed in deeper. Bush beans call for a planting depth of 1 inch; I simply push seeds in until the first joint of my finger is at the soil line.
For garlic use your calibrated forefinger to make sure that the clove tip is 2 inches below the surface.
All new gardeners should start out small. As experience is gained they can then slowly work up to a full three-module garden.
That said, for new or even for experienced gardeners, it sometimes makes sense to start out small and stay small! A well tended small garden is better than a neglected large one.
Nearly everything that is involved in the establishing and working of the three-module garden also applies to the one-module.
To start: Pick a site that receives at least 6 to 8 hours of sun a day, double-dig a 4- x 8-foot plot and frame it (Chapter 2, pages 20-25). Then mark off that completed module into three 32-inch sections (two 16” planting units each third) by putting a dab of paint on the frame at those spots to mark the areas. From the top third down: Area 1 corresponds to Module 1, Area 2 corresponds to Module 2, Area 3 corresponds to Module 3.
• Now make a modular planting stick and buy any necessary tools or watering devices (pages 26-28).
• The crops to be grown are clustered in three groups: A, B, and C. Each group goes into one third of the module. Crop rotation from initial planting to succession planting is exactly the same as in the three-module garden as it follows the same pattern. For the yearly rotation sequence go to page 136, just substitute the word Area for the word Module and follow instructions.
• When ready to do the initial planting read Chapter 3, pages 29-62 which describes all gardening procedures. Apply what is appropriate to the working of your one module garden.
• As the initial crops become fully harvested start making the changeover to the succession planting. As different crops mature at different times this changeover will happen over an extended period. Once it has been completed most of the crops will produce steadily up to the earliest fall frost date, and some even beyond that. (Chapter 7, pages 91-94 and Chapter 8, pages 95-97).
Lastly: After the final harvesting of all plants prepare the full module for winter as explained in Chapter 9, pages 126-133 applying what is relevant to your situation.
This little plot is in essence a “one-size-fits-all” garden—equally appropriate for an urban, suburban, or rural lot.
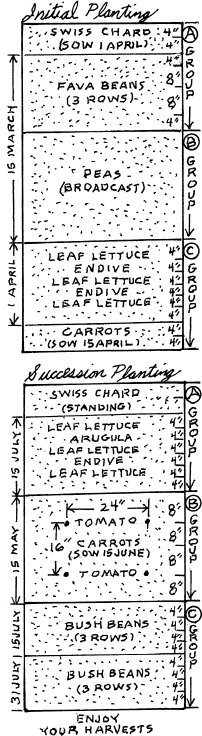
Initial planting
First sowing (about March 15)
A group Fava Beans
B group Peas
Second sowing (about April 1)
A group Swiss Chard
B group Tomatoes (sow indoors)
C group Lettuce
C group Endive
Third sowing (about April 15)
C group Carrots
Succession planting
Transplanting (about May 15)
B group Tomato transplants
First sowing (about June 15)
B group Carrots
Second sowing (about July 15)
A group Lettuce
A group Arugula
A group Endive
C group Bush Beans
Third sowing (about July 31)
C group Bush Beans
How to plant:
Fava Beans are sown 6” apart in three staggered rows 8” apart.
Swiss Chard & Carrots are sown in a conventional single row.
Peas are broadcast.
Lettuce, Endive & Arugula are sown in conventional single rows spaced 4” apart and harvested by the cut-and-come-again method.
Tomatoes, four transplants are set in spaced as shown on the illustration.
Bush Beans are sown 4” apart in three staggered rows 4” apart.
For full growing instructions on each crop go to that specific vegetable’s page (or pages) in Chapters 6 and 8 for whatever details you need.