Google SketchUp is far from being a one-trick pony. As you saw in earlier chapters, SketchUp lets you quickly design models from scratch and determine the dimensions as you work. But say you already took a photograph of what you're trying to model. Wouldn't it be great if you could just show the picture to SketchUp and say, "I want this. Same shape. Same size. Just do it." It may not be quite that easy, but you can use a photograph as a reference when you create a 3-D SketchUp model. Using a little magic called Photo Match, SketchUp identifies the perspective and focal length of the photograph. Then it recreates that view in the modeling window. Using the drawing tools, you trace over parts of the image to create edges and faces of a three-dimensional model. You can use the original photo to create textured surfaces in your model, or you can use the standard SketchUp methods to add details.
This chapter shows you how to do it all. It begins with a detailed explanation of Photo Match and some tips to consider when you're shooting photos for Photo Match. Then, in the exercises, you get to see Photo Match in action as you create a model of the famous Villa Savoye, located in Poissy, outside of Paris, which was designed by the noted architect Le Corbusier.
When you work in SketchUp, you create three-dimensional models using a two-dimensional tool—your computer's monitor. SketchUp provides visual clues that simulate the perspective you see in the real world and vanishing points that artists have used for centuries. The blue, red, and green axes also give you reference points, so you can identify three-dimensional directions even though you're looking at a two-dimensional computer screen. Your view of the SketchUp model is called the camera view because it's similar to looking at a scene through a camera lens.
Now consider a photograph of a building. A photo is a view of a scene through a camera lens. It's very similar to a single view within SketchUp's modeling window. Within that scene, you can probably identify a vertical line that's the same as SketchUp's blue axis line. With some photos, you may also be able to trace lines that represent the red and green axis lines. If it's easy to find axis lines in a photo, it's probably a good candidate for Photo Match.
Tip
If you can't find horizontal lines at a right angle to each other in the photograph, you may have a problem using it in Photo Match. See the next page for tips on photos that work well with Photo Match.
In a nutshell, here's how Photo Match works:
You take a photo of a building or other object that you want to model. The photo in Figure 10-1 is a nearly perfect candidate for Photo Match.
You import that photo into the SketchUp modeling window by using a special matching mode. The steps on Importing a Photo for Photo Match explain how to import a photo for Photo Match.
Using calibration tools in matching mode, you help SketchUp identify the blue, green, and red axes in the photo. In the process, you're also helping to identify a point that's similar to the Origin point in SketchUp's modeling window. The calibration process gives SketchUp the information it needs to set up a SketchUp camera view (perspective and focal length) that matches that of the photo. On Calibrating the Photo Match Image, you see the steps for calibrating an image for Photo Match.
Once the calibration is complete, you can trace over some of the lines in the photo to create edges and faces for the three-dimensional model. The exercise on Creating 3-D Details from a Texture Image shows an example of tracing over an imported Photo Match image to create three-dimensional objects.
Since you already have a photo of the structure, why not use that image as a texture for the faces in the model? The quality of the results depends on the photo. For details on the process, see Applying an Image to a Model.
As an alternative to using a photo texture, you may want to use the image to help you create three-dimensional features attached to your structure. The steps on Creating 3-D Details from a Texture Image give you an opportunity to do that.
Once you've created the front of your model, you'll often repeat this process to create the back faces and sometimes the top of your model.
For Photo Match to figure out the focal length for a particular camera view, it needs to identify parallel lines on both the red and green axes, and it needs to identify the vanishing point for those parallel lines. The classic vanishing point example is a set of train tracks. When you stand on the tracks and look down the line, it appears that the tracks meet at some point in the distance—that's the vanishing point. (Now get off the tracks before a train comes.) SketchUp analyzes the distance between the parallel lines at different points along the axes. From these details, Photo Match can create the proper perspective and focal length for the camera view in the SketchUp modeling window.
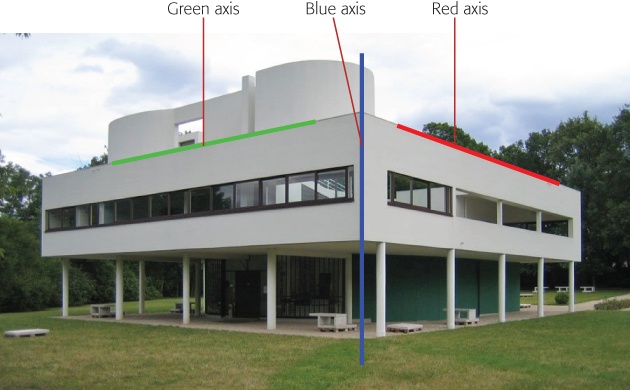
Figure 10-1. This photo of the Villa Savoye designed by Le Corbusier makes an ideal photo for use with Photo Match. It's easy to identify the blue axis in the center of the image. You can view two faces of the building at right angles to each other, making it easy to determine the red and green axes. Also, the building's faces have strong parallel lines.