Use OS X Automation Technologies
In this chapter, I want to talk about a particular subset of technologies that go considerably deeper than things like keyboard shortcuts or text expansion. The four topics I cover here—Automator, AppleScript, services, and shell scripts—aren’t so much tools as platforms built into OS X you can use to create your own tools. As such, they’re more complex, but also far more powerful.
I’ve arranged the topics in this chapter in order of what I consider least to most intimidating. Services are plug-ins that add features for working with text, graphics, and more to almost any app. Automator lets you construct multi-step operations called workflows using graphical building blocks rather than code. AppleScript is a language you can use to write programs that do all sorts of useful tasks on your Mac—but it’s a step or two up from Automator in difficulty. And shell scripts run in the Terminal command-line utility, performing tasks using OS X’s Unix underpinnings.
Worried that this all sounds too complicated? Don’t be. I want to make sure you understand this crucial concept up front:
You can use a service, Automator workflow, AppleScript, or shell script without knowing how to create one.
In fact, that’s precisely what I recommend. For each of the technologies in this chapter, I suggest the following process:
- Learn how to locate, install, and use scripts/tools written by other people.
- Once you’re comfortable using them, try modifying them slightly. That’s one of the easiest ways to learn how they work while also customizing them to better meet your needs.
- When you have time to tinker, start to create your own scripts/tools, using the resources I recommend (and with other people’s work as a guide).
Use Services for System-wide Shortcuts
In OS X, a service is a special, context-sensitive program that can operate almost anywhere. You can find services on the Services submenu of the application menu (that is, the menu with the current application’s name). Or, right-click (or Control-click) something and choose a service from the very bottom of the contextual menu. (Services appear on a Services submenu of the contextual menu if more than four of them are active and applicable to whatever you selected.)
If you look at this menu in different apps, and with different things selected, you’ll notice that your choices change. For example, you’ll see one set of commands when you select a file in the Finder, a different set when you select text in Mail, and yet another set when you have a graphic open in Preview. That’s because each service is designed to operate only on certain kinds of data, or in certain contexts. The idea is to show you only the commands that are relevant to what you’re currently doing.
Services, like Automator workflows and AppleScripts (discussed later in this chapter), can perform complex tasks for you with only one click. So they’re fantastic automation tools that every Mac user should be aware of. As we’ll see in a moment, you can use a combination of built-in services, third-party services, and services you create yourself to automate a wide variety of activities.
Before you do anything else, you should configure the services on your Mac to your taste. Not all the services installed on your Mac are necessarily active (only active services appear in the Services submenu); you can enable or disable services as you wish. In addition, you can assign a keyboard shortcut to any service to avoid hunting for it in a hard-to-reach submenu.
To set up Services on your Mac:
- Go to System Preferences > Keyboard > Shortcuts > Services (Figure 32).
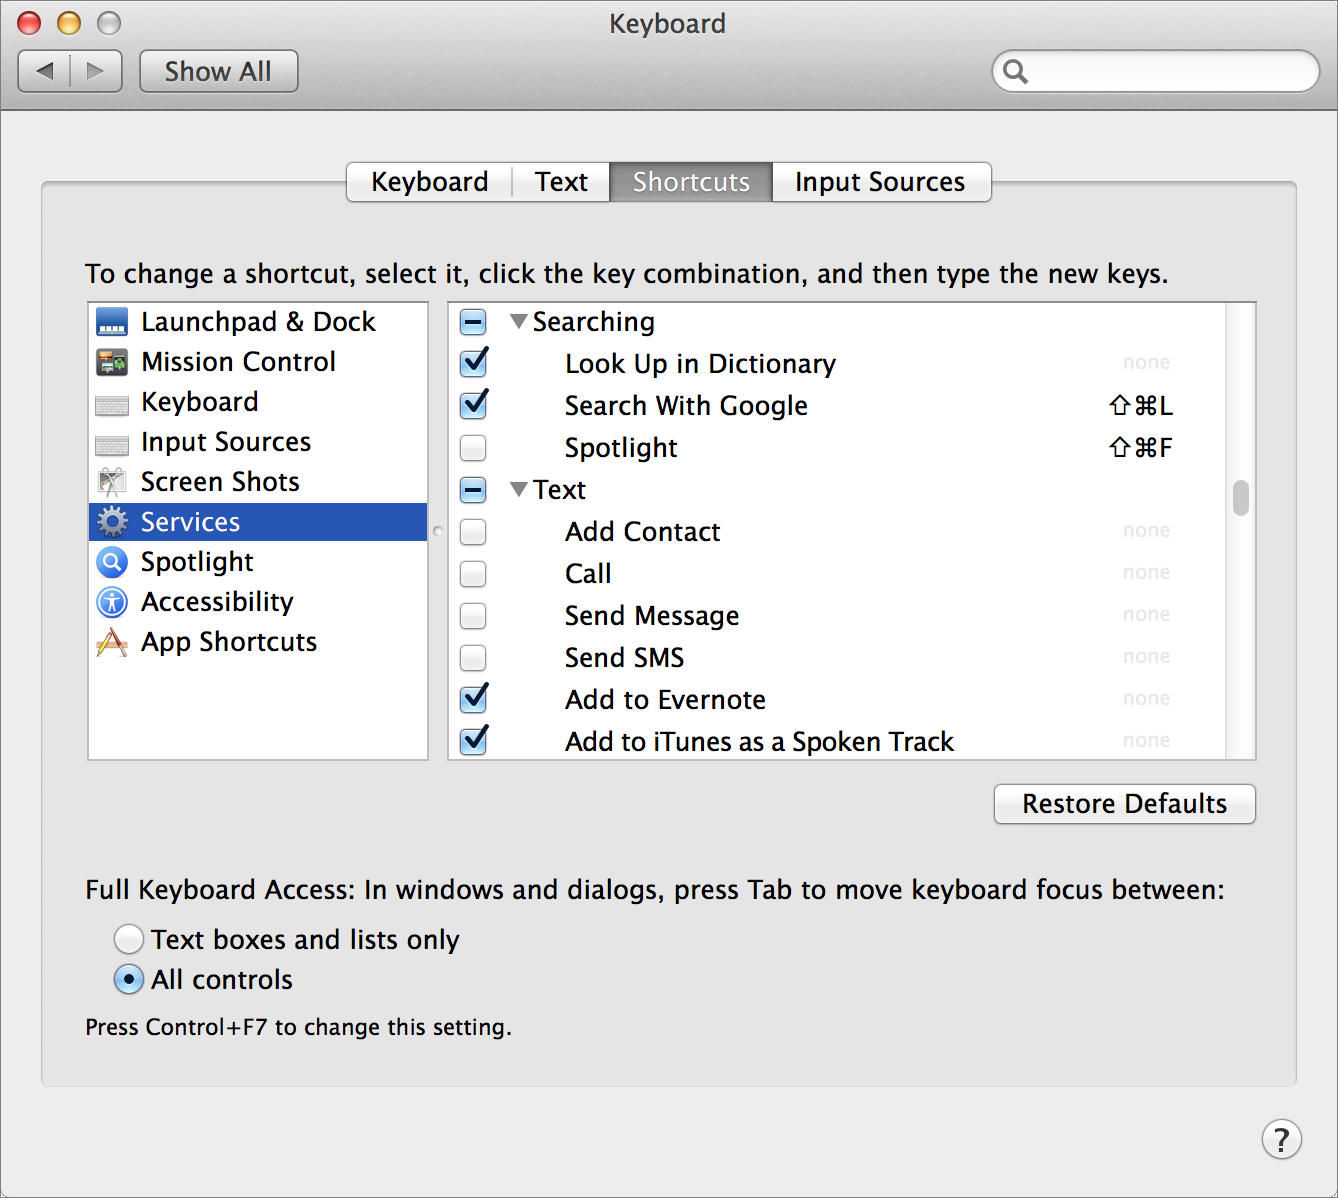
Figure 32: Enable, disable, or add keyboard shortcuts to services here.
- Select the checkbox next to any service you want to enable; deselect those you want to disable. (Remember, selected services appear in the Services submenu only when the context—the app and data type—are appropriate.)
- To add a keyboard shortcut to a service that doesn’t have one, click the light gray word None to the right of the service name and click Add Shortcut. Or, to change an existing shortcut, double-click it.
- Press the new key combination you want to use for the service. (To remove a shortcut, select it and press Delete.)
Ordinarily, changes to the Services menu happen immediately, so you can try out your newly activated service or shortcut right away.
Find and Use Services
OS X includes lots of built-in services, which you can explore simply by selecting various kinds of things (text, files, images, URLs) and then looking at the Application > Services submenu. For example, you can select a word and choose Look Up in Dictionary from the Services submenu to open the Dictionary app with that word’s definition showing, or select a graphic in the Finder and choose Set Desktop Picture to make it your Desktop picture without having to open System Preferences > Desktop & Screen Saver > Desktop and adding it there manually. In addition, some apps install their own services.
Beyond what comes with OS X and the apps you already have, there are a great many free services you can download that are extremely useful. For instance:
- The Download Services page at Mac OS X Automation has dozens of services for images, email, movies, PDFs, Web browsing, and other contexts.
- DEVONtechnologies’ Needful Things page includes three services: BlueService (for sending text to a Bluetooth device), CalcService (for performing calculations on text selections), and my favorite, WordService (which includes numerous commands for reformatting and manipulating text).
- Markdown Service Tools from Brett Terpstra help you format text using the popular Markdown syntax.
- Matt Sephton’s Services page has a variety of useful services.
- Waffle Software makes a tool called ThisService that helps developers create their own services. A number of developers who use that tool have submitted their own services to Waffle’s site, where you can freely download them. Note, however, that not all of these work under Mavericks.
Once you’ve downloaded a service, move or copy it into /Library/Services (to make it available to all users) or ~/Library/Services (to make it available only to you). Then go back to System Preferences > Keyboard > Shortcuts > Preferences to enable the specific commands you want to use and assign or change keyboard shortcuts.
But wait, there’s more! You can create your very own service, without any programming at all, using Automator, which I discuss next. (For instructions, see the sidebar Create Your Own Service).
Understand Automator
Automator is an easy-to-use technology, included as part of OS X, for bundling actions into sequences known as workflows. If programming (even the simplified version in AppleScript) gives you the willies, Automator is nothing to fear. You don’t have to learn a new language or write in code—just drag things into a list, fill in some blanks, and check some boxes.
For example, a workflow can:
- Convert text files and graphics into an ebook in EPUB format
- Create a graphic from a word or phrase
- Import all the images from a Web page into iPhoto
- Create and mount a new disk image
- Convert a movie file to a size and format suitable for your iPhone or iPad
- Create an audio file with a synthesized voice reading the contents of a text file
- Add a 1-pixel gray border around any graphic (that’s how we put the borders on most of the graphics in Take Control books!)
Workflows are made from building blocks called actions. Automator itself includes many actions, as do a number of the apps bundled with OS X (such as Calendar, Contacts, Mail, iTunes, and Preview). Just as a third-party app may or may not include AppleScript support, some apps come with their own Automator actions and some don’t. A few third-party apps with good Automator support are BBEdit, DEVONagent Pro, DEVONthink Pro Office, LaunchBar, Microsoft Office 2011, Pixelmator, and Transmit. In addition, actions can optionally contain instructions written in numerous programming and scripting languages, including AppleScript, Perl, Python, and Ruby, and shell scripts.
I’ll show you how to make a simple Automator workflow. Then I’ll tell you about some of your other options, where to find existing workflows that you can use as-is or modify to meet your needs, and how to learn more about Automator.
Create a Simple Automator Workflow
For an easy (yet somewhat fancy) introduction, we’ll create a workflow that asks you to type some text, and then speaks it back to you.
Follow these steps:
- Open Automator (in
/Applications). - Click New Document.
- In the dialog that appears, select Workflow (the default) as the document type and click Choose. Your window should now look something like Figure 33.
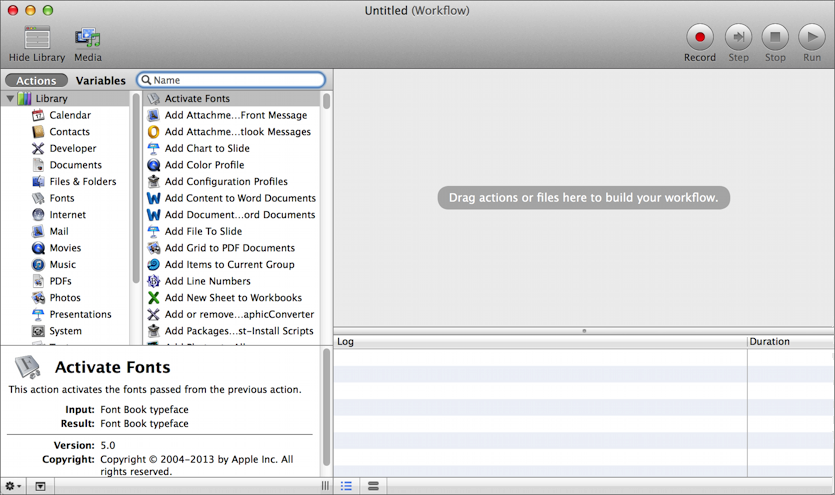
Figure 33: An empty Automator workflow window.
- If you don’t see a Library list in a sidebar on the left, click Show Library on the toolbar.
The Library is the list of available actions. You can click a category or app name to see its available actions, or type a search term into the Search field to find matching actions.
- Type
textinto the Search field to show only text-related actions in the second column. - Locate the Ask for Text action in the second column, and drag it into the workflow area on the right (Figure 34).
As the name suggests, this action will display a dialog that asks you to enter text.
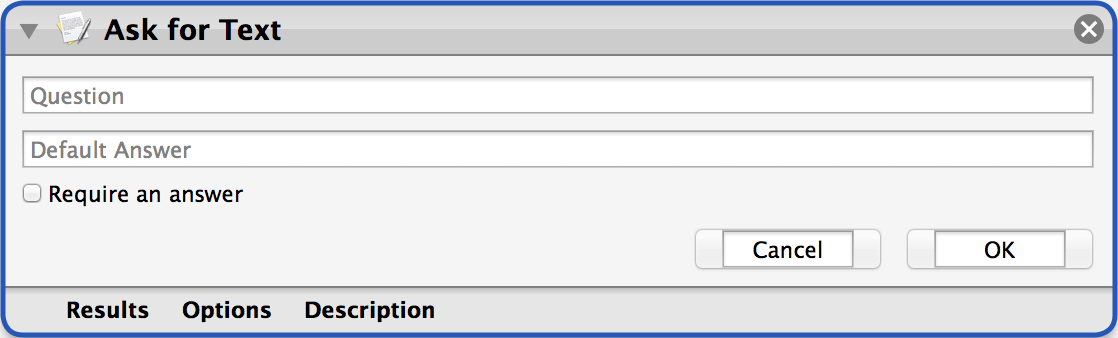
Figure 34: The Ask for Text action, ready to be filled in.
- Fill in the question you want the dialog to ask, such as
What would you like me to say?and, if you like, fill in a default answer, such asBeep. Select the Require an Answer checkbox to ensure that some text must be entered (so that the workflow always does something). - Return to the second column, find the Speak Text action, and drag it below the Ask for Text action (Figure 35).
You’ll notice that the two actions join together to show that the output of the first one (whatever you type into the dialog) is fed as input into the second one.

Figure 35: Two actions joined into a workflow.
- If you like, choose a different voice from the Voice pop-up menu.
Your workflow is now ready. To run it, click the Run  button on the toolbar. You should see a dialog asking you what you want it to say. Accept the default answer or supply a new one, click OK, and your Mac will speak that text.
That’s the general idea of workflows. Usually, one action produces some sort of output (a file, a URL, text, or whatever) and feeds that to the next action, which does something with it and passes it along to another action—and so on. The final action provides the result in the form you’re looking for (a modified file, information in a dialog, an open Web page, or what-have-you).
To reuse a workflow, save it (choose File > Save, choose a name and location, and click Save); you can then double-click it to reopen it in Automator. Or you can save it as an app (same procedure, but choose Application from the File Format menu in the Save dialog), and you get a stand-alone, double-clickable Automator app. (For other ways to package a workflow, see the sidebar Automator Workflow Types.)
Find and Run Sample Workflows
Automator workflows you find online usually work unmodified on your Mac—you double-click them and, depending on how they were saved, you either run them in Automator or they run as apps. (If you want to edit an Automator app, drop it onto the Automator icon.)
Try some of the sample workflows at these sites:
- Linked: A Collection of 70+ Automator Actions, Workflows and Tutorials at MacStories
- 15 Automator and AppleScripts You Can’t Live Without at MacLife
- 10 Awesome Uses for Automator Explained at Tuts+
You may find workflows that almost do what you want them to do. Feel free to experiment by changing options within actions, or by swapping out one action for another. Unlike AppleScript, Automator makes it simple to tinker without worrying that you’ll make a syntax error or have no idea what command to use—your only building blocks are the actions you see in the list.
Learn More about Automator
If you want to learn much more about working with Automator:
- For a quick and interesting tutorial, start with Apple’s Mac Basics: Automator page.
- See the Automator portion of the Mac OS X Automation site.
- Read Neil North’s Automator for Mac OS X: Tutorial and Examples.
Get to Know AppleScript
Whereas Automator lets you construct a workflow visually by dragging and dropping actions into a list, AppleScript is a scripting language—a type of simplified programming language that runs only in a specific environment (in this case, OS X). That means AppleScripts can run only on a Mac, and because your Mac must interpret the commands in the script as it runs, an AppleScript won’t have the high performance of a conventional Mac app. Even so, AppleScripts can look and act like ordinary Mac apps. You may already be using some apps that were written in AppleScript without even realizing it!
AppleScript has been around since way back in 1992, and it’s become popular among people who like to tinker but wouldn’t consider themselves programmers, because it’s built into OS X and is a lot easier to work with than a big, complicated language like Objective-C. AppleScript is often referred to as “English-like,” which is a generous description at best, but if you don’t know much about programming, you can probably make more sense of AppleScript code than, say, Java.
Write a Simple AppleScript
In a moment, I’ll give you some examples of what you can do with AppleScript (see Learn What AppleScript Can Do). But first—before I lose the attention of people who think programming is Just Too Scary—I’m going to show you how to write a complete AppleScript program with exactly one English word. Here we go:
- Open AppleScript Editor (in
/Applications/Utilities). - In the window that appears, click New Document. A blank window opens.
- Type the word
beep(Figure 36). Your script is now complete!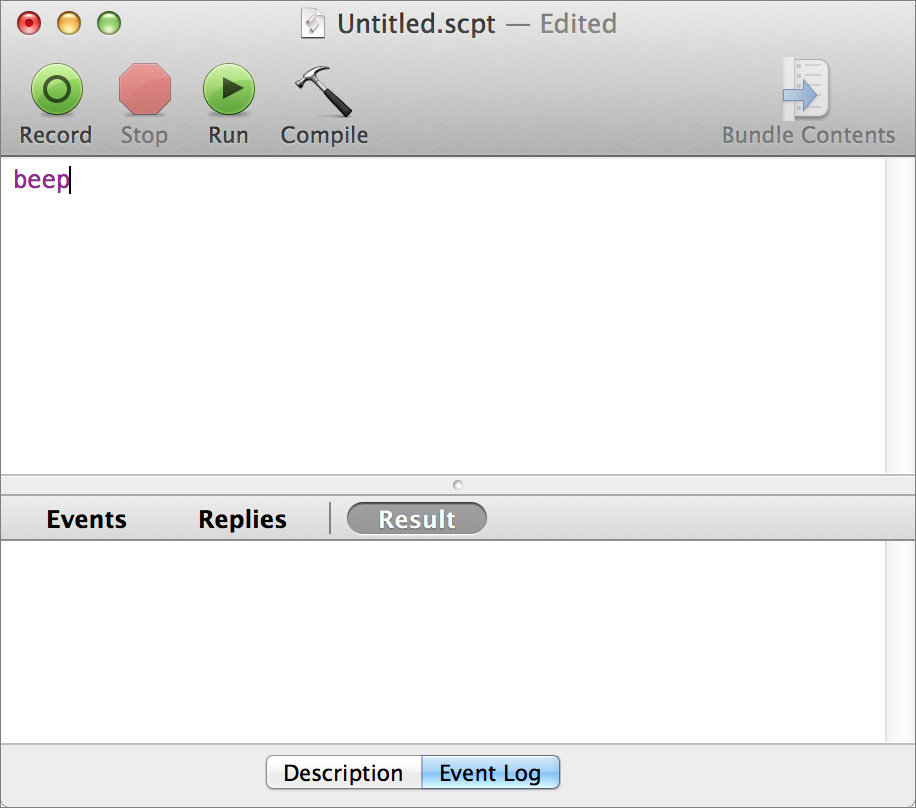
Figure 36: Here’s your first complete AppleScript!
- Click the green Run
 button.
Two things should happen. First, you’ll hear your system alert sound. That was your program running—congratulations! Second, you’ll notice that the word beep changed its appearance from a purple, monospaced font to a bold, blue, proportional font. That’s because when you try to run an AppleScript, the script editor first compiles it, a process that checks to make sure it’s properly written. If it is, it formats the entire script in an easier-to-read fashion (which will be more apparent with a longer script).
Now that you’ve written and run an AppleScript, you can follow the same steps to run scripts other people have written—simply type (or copy and paste) the scripts into AppleScript Editor and click the Run  button. We’ll come back to this idea in a bit, but for now, I merely want to point out that using AppleScript can be as simple as that.
Learn What AppleScript Can Do
The simplest way to think about what AppleScript can do is that it provides an alternative means of performing common actions in OS X and in many apps. For example, you can open or quit an app using menu commands or the keyboard; AppleScript can also open or quit apps as part of a script. You can rename a file in the Finder; an AppleScript can do that too. You can open a word processor, do a search for a certain word, highlight the entire paragraph it appears in, make it bold, copy it, switch to another app, and paste it—or let AppleScript do all that for you with one click.
It’s that last type of activity—combining strings of actions that involve multiple apps—where AppleScript especially shines. AppleScript is also good at repetitive tasks (say, renaming dozens of files or fetching a long list of items from one place and copying them to another place) that would otherwise be tedious. And it gives you access to features on your Mac that aren’t normally exposed. For example, you just wrote a script that plays a beep, and although that happens when there’s an error, there’s no button or menu command that lets you manually trigger a beep. (AppleScript can trigger lots of actions that are far more interesting and useful than a beep!)
More importantly, an AppleScript can include logic that enables it to make decisions as it runs—either on its own, or with your input. It can use programming constructs such as variables, if-then conditions, and loops, and it can also tie into numerous other automation tools (such as TextExpander, LaunchBar, and Keyboard Maestro, all discussed elsewhere in this book).
Fine, you may say, but what exactly can AppleScript do?
Well, if you want to know every built-in command and option, with detailed background and examples, check out Apple’s massive Introduction to AppleScript Language Guide. It’s written mainly for developers, but it’s reasonably clear, and well worth consulting.
But that tells you only about AppleScript itself. To find out what you can do with AppleScript in a particular app, you’ll need to look elsewhere.
Every app that supports AppleScript, including the Finder, contains a dictionary of all the nouns and verbs AppleScript can use to control it. For example, the Calendar app’s dictionary contains verbs like create calendar and switch view; and nouns like calendar, sound alarm, attendee, and event. To see what’s in any app’s dictionary, drag that app onto the AppleScript Editor icon. You’ll see something like Figure 37. Look through the terms and read some of the definitions to see what sorts of things AppleScript can do in that app.
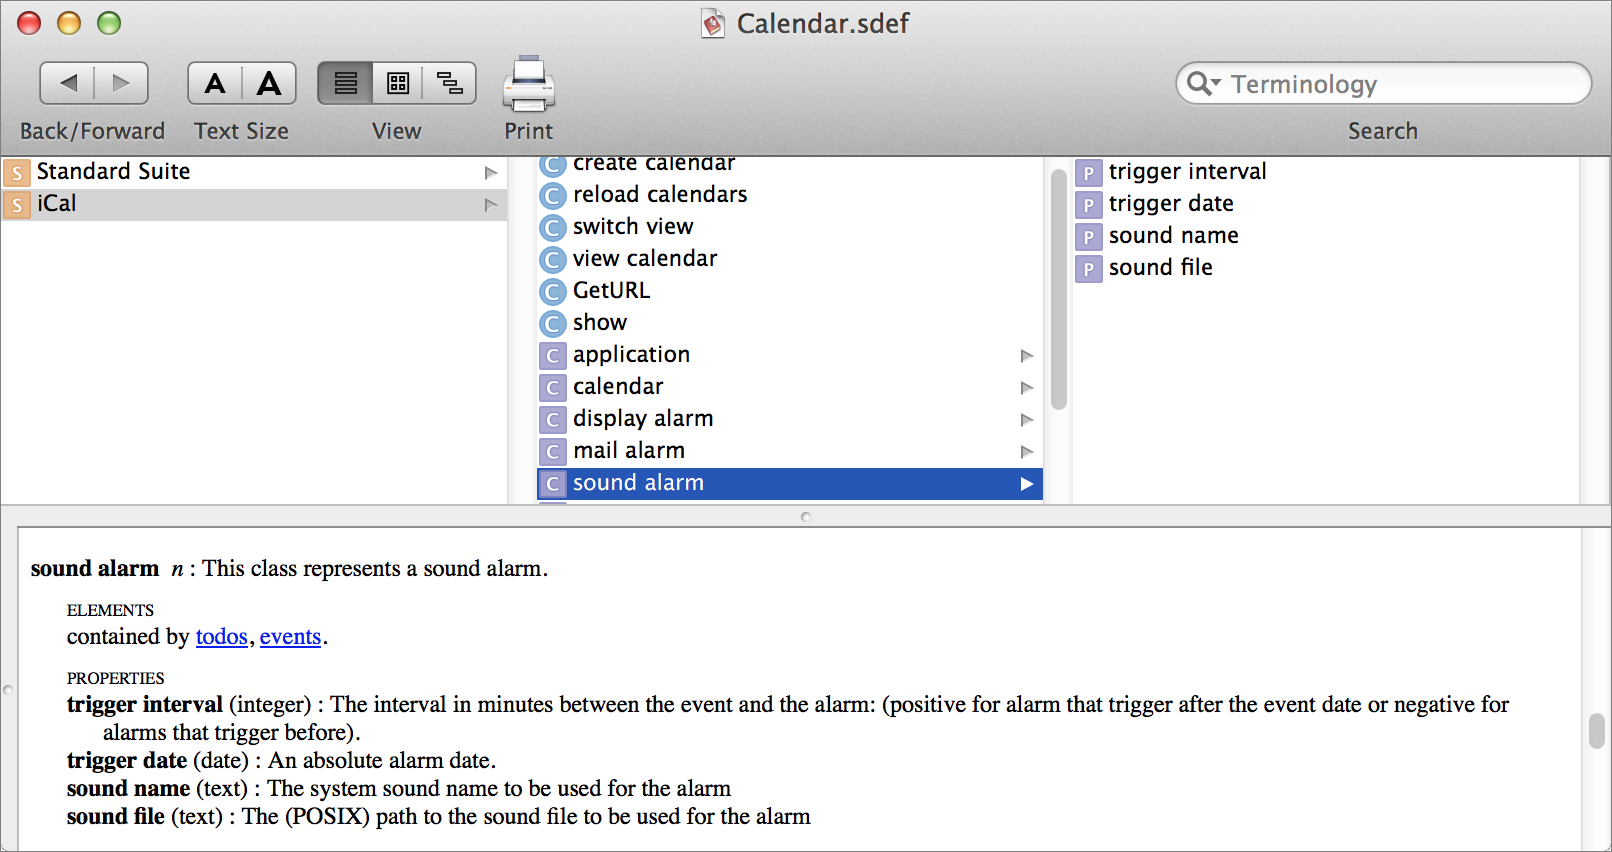
Figure 37: A portion of the AppleScript dictionary for Calendar.
Unfortunately, not all apps support AppleScript, and of those that do, some of them have rather meager dictionaries (meaning you can’t do very much with them). But there are enough deeply scriptable apps out there to enable you to accomplish a great deal with AppleScript.
I could fill many pages with examples of tasks an AppleScript could perform, but here are just a few:
- Find and remove duplicate messages in Mail, events in Calendar, or records in Contacts
- Combine multiple PDFs into a single file
- Apply proper title case to the names of all your tracks in iTunes
- Rotate, resize, or change the format of images
- Download all the MP3 files linked from a Web page
- Rename all the files in a folder with a different extension
- Count the number of email messages in a certain mailbox
I’ll give even more examples as the chapter goes on.
Find and Run Example AppleScripts
Here are three simple scripts to try. To use one, copy and paste (or retype) it into AppleScript Editor and click the Run  button.
Tell me how many files and folders are on my Desktop:
tell application "Finder"
    set theFolder to (path to desktop) as string
    set theCount to number of items in folder theFolder
    display dialog (theCount)
end tell
Speak the current date:
set theDate to current date
set theYear to year of theDate
set theMonth to month of theDate
set theDay to day of theDate
set niceDate to theMonth & " " & theDay & ", " & theYear as text
say niceDate
Resize the frontmost Safari window:
tell application "Safari"
    activate
    if front window exists then
        set bounds of front window to {0, 0, 1000, 600}
    else
        display dialog ("Safari has no open windows.")
    end if
end tell
A quick Web search should turn up thousands of additional AppleScripts you can use—and I refer you to some additional sources ahead, in Learn More about AppleScript.
You can also find a bunch of sample scripts already on your Mac, in the /Library/Scripts folder. You’ll notice that those scripts—and perhaps many of those you find online—aren’t just text; they’re AppleScript files. One way to use them is to double-click the file (which opens them in AppleScript Editor) and then click the Run  button. But that’s not the only way!
Another way to access an AppleScript saved as a file is to choose its name from the AppleScript  menu (Figure 38). Don’t see it? Open AppleScript Editor, go to AppleScript Editor > Preferences > General, and select the Show Script Menu in Menu Bar checkbox. By default, that shows all the scripts in
 /Library/Scripts as well as ~/Library/Scripts, so you can add to the menu by placing your scripts in one of those folders (or a subfolder).
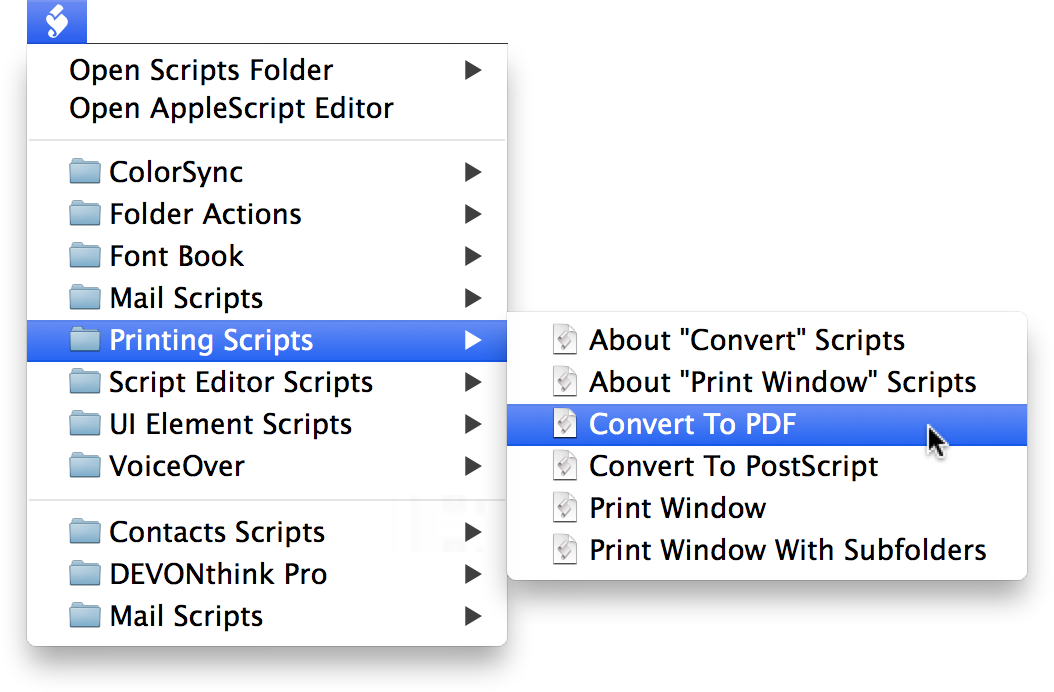
Figure 38: The optional AppleScript menu displays both built-in and user-supplied scripts, letting you run them with one click (and without opening AppleScript Editor).
To save any of your own scripts (including those you created using the sample code just previously) as files, choose File > Save, choose a name and location, and leave the File Format pop-up menu set to its default choice of Script. Then click Save.
Tip: Besides running an AppleScript in AppleScript Editor, from the AppleScript  menu, or as a stand-alone app, you can also trigger AppleScripts using many of the other utilities discussed in this book, such as Keyboard Maestro, LaunchBar, and TextExpander.
Edit an Existing AppleScript
One of the easiest ways to learn AppleScript is to start with a script someone else has written, make a modification or two, and see what happens. If you like the results, make further changes, add a few new lines, or combine portions of multiple scripts. Once you have some experience fiddling with other people’s code, you’ll feel more comfortable creating scripts of your own from scratch.
You might start, for example, with the Resize the frontmost Safari window script from a few pages back. Try replacing Safari with the name of another app. Or, try changing this line:
set bounds of front window to {0, 0, 1000, 600}
Those numbers refer, respectively, to the window’s distance (in pixels) from the left edge of the screen; distance from the menu bar; width; and height. By changing those values, you can both resize and reposition the window.
Then try playing with the front window term. What if Safari has two windows open? Can you guess how to resize the back window? (It’s exactly what you think.) Then try changing the text of the dialog that appears if Safari has no windows open. And so on.
By the way, although I don’t have space to get into details about AppleScript, I do want to mention one oddity. You may have noticed that a couple of my example scripts started with tell application "App Name" on a line by itself, and concluded with an end tell line, with everything else indented in between. These are examples of tell blocks, a ubiquitous construction in AppleScript. With a handful of exceptions (that is, commands interpreted by AppleScript itself rather than sent to an app), nearly everything you do in AppleScript involves telling some object (an app, a window, a paragraph) to do something.
Tell blocks can be nested explicitly:
tell application "MyApp"
    tell front window
        do something
    end tell
end tell
Or they can be combined like so:
tell front window of application "MyApp" to do something
Either way, if something isn’t working the way you expect, the first thing you should ask yourself is whether you’re telling the right entity to do something.
Use AppleScript Folder Actions
A folder action is an AppleScript that runs automatically when something happens to a specified folder—for example, you open or close it, or add files to it. In my book Take Control of Your Paperless Office, I described a situation in which your scanner saves PDF files to a certain folder—but what you want is for your OCR software to open the PDFs, recognize the text in them, save them as searchable PDFs, and then close them. No problem: attach one of my spiffy folder action scripts to the folder where your scans are saved, and all that can happen automatically.
Not just any old AppleScript can be a folder action; it must be written specially for that purpose. (For details, see the Folder Actions Reference page on Apple’s Developer site.)
In addition, before you can use folder action scripts, you must enable the system-wide Folder Actions capability if you haven’t previously done so, and attach a particular script to the folder where your incoming scans are stored:
- Make sure whatever script you want to use is stored in the
/Library/Scripts/Folder Action Scriptsfolder or in~/Library/Scripts/Folder Action Scripts. - Right-click (Control-click) the folder you want to attach the script to, and from the contextual menu that appears, choose Folder Actions Setup (if you don’t see it at the top level of the contextual menu, look on the Services submenu). Folder Actions Setup opens.
- In the dialog that appears, select the script you want to use. (Although you can attach multiple AppleScripts to a single folder, I don’t recommend it. Pick a single script, and if need be, you can return to this dialog and change it later.)
- Make sure Enable Folder Actions is checked at the top of the Folder Actions Setup window. Your window should look something like Figure 39.
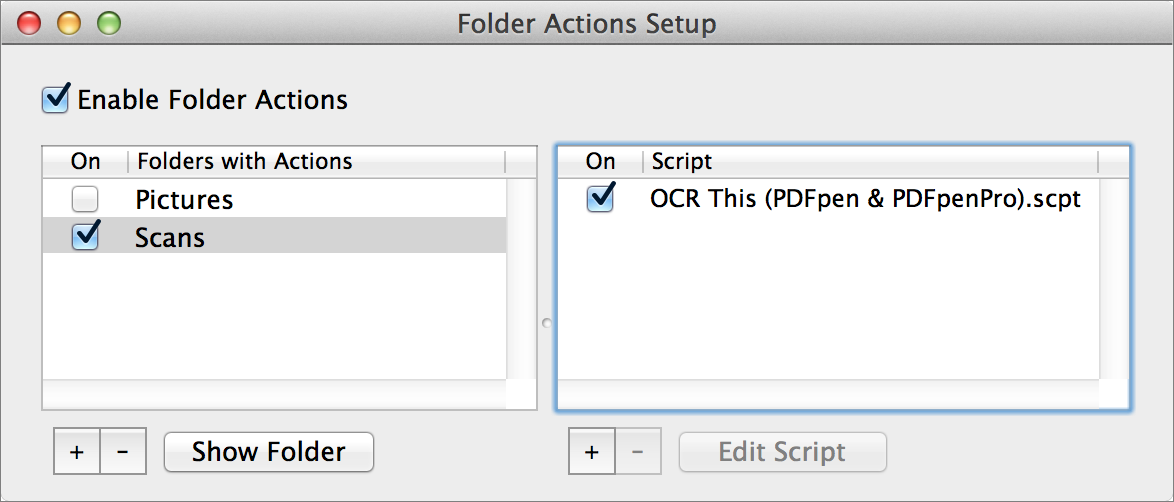
Figure 39: You’re looking for approximately this end result (folder and script names may differ) after configuring Folder Actions.
- Quit Folder Actions Setup.
Now, to use your folder action, drop a new file in the folder (or take whatever other action(s) the script supports, such as changing or removing files). The script should run automatically.
Here are a few further examples of things you could do with an AppleScript folder action:
- Get an alert when someone puts a new file in a shared folder. (I do this to learn when I have a new monthly royalty statement, which my publisher puts in a shared Dropbox folder.)
- Rename all the files to follow a particular format or convention.
- Upload the files to a Web server.
- Move files to other folders on your Mac depending on file type, name, or other characteristics.
Learn More about AppleScript
I’ve barely scratched the surface of what you can do with AppleScript. If you want to learn more, allow me to recommend a few useful references:
- Apple’s official Introduction to AppleScript Language Guide
- The AppleScript portion of the excellent Mac OS X Automation site
- MacScripter.net, an extensive discussion forum where anyone (regardless of skill level) can offer or receive help with AppleScript
- Matt Neuburg’s book AppleScript: The Definitive Guide
- AppleScript 1-2-3, by Sal Soghoian and Bill Cheeseman
- A Wave of Automation at Mac OS X Automation, which covers automation features added in Mavericks (including AppleScript libraries)
Script the Command Line with Shell Scripts
As you may know, OS X is based on Unix, and as such, there’s a whole layer of functionality most users never see. But you can access a long list of hidden files and useful tools in the text-based world of the command line.
A command-line interface is a way of giving instructions to a computer and getting results back. You type a command (a word or other sequence of characters) and press Return or Enter. The computer then processes that command and displays the result (often in a list or other chunk of text). In most cases, all your input and output remains on the screen, scrolling up as more appears. But only one line—usually the last line of text in the window, and usually designated by a blinking cursor—is the actual command line, the one where commands appear when you type them.
You access the command line on a Mac using the Terminal utility (found in /Applications/Utilities). When you open Terminal, it runs a special program called a shell, which interprets the commands you type and delivers the text-based output. OS X comes with several different shells, but that detail is unimportant for our purposes.
What is important is that shells are programmable. You can put a series of shell commands in a text file and, without any special fuss, run it as a program. Shell scripts can automate nearly any activity you can perform on the command line. Although some scripts are fabulously complex, running many thousands of lines, we’re concerned here with simpler tasks you can automate.
If you happen to be the sort of person who genuinely likes working in a command-line interface, you’ll probably want to have lots of scripts that simplify the process for you. But even if you’re entirely happy remaining in OS X’s graphical interface, shell scripts can be your friends. They can modify files and folders, perform system functions, and do other sorts of tricks that are difficult or impossible to perform in other ways (such as using AppleScript or Automator). In fact, some of my favorite AppleScripts, Automator actions, and Keyboard Maestro macros rely heavily on embedded shell scripts.
Here are a few things shell scripts can do for you:
- Rename large numbers of files at once
- Modify hidden preferences for OS X and its apps
- Unhide the
~/Libraryfolder in Mountain Lion and later - Securely delete specific files or folders without first moving them to the Trash
- Force background processes to quit without requiring the use of the Activity Monitor utility
- Load or unload daemons and agents (see Schedule Any Activity on Your Mac)
Ordinarily, you create and run shell scripts in the Terminal utility (as I show you next). However, as I mentioned, many of the other utilities I cover in this book can run shell scripts too.
Create Your Own Shell Script
I want to give you a tiny taste of creating your own shell scripts. As with the other topics in this chapter, I’m not going to teach you anything about programming as such, just the mechanics of creating and using a simple shell script. I want you to have enough familiarity with the process that you can successfully reproduce and run shell scripts you may run across in magazines, in books, or on Web sites.
You can create and run a shell script in six easy steps.
Step 1: Open Terminal
Open the Terminal utility (in /Applications/Utilities). You’ll be presented with a mostly blank window. That’s where all the magic happens.
Step 2: Start with an Empty Text File
Scripts are plain text files, so you should begin by creating one in a text editor. You can make a shell script in TextEdit, BBEdit, or even Word, but that requires extra steps. So I suggest using a simple command-line text editor called nano.
For the purpose of demonstration, we’ll name the script test.sh. (The .sh extension isn’t mandatory, but it can help you keep track of which files are scripts.) Before you create this file, I suggest typing cd (change directory) followed by Return to ensure that you’re in your home directory. (You can put scripts anywhere you want, but for now, this is a convenient location.)
That done, type nano test.sh and press Return.
The nano text editor opens with a blank file.
Step 3: Type In the Script
A script can be anything from a single one-word command to thousands of lines of complex logic. Let’s start with a very simple, five-line script. Type this:
#!/bin/bash
echo "Hello! The current date and time is:"
date
echo "And the current directory is:"
pwd
The first line tells the script which shell program to use (in this case, bash). The two echo commands simply put text on the screen. The date command displays the date (surprise!), and the pwd (print working directory) command displays your current directory. So, this script displays four lines of text, two of which are static (the echo lines) and two of which are variable.
Step 4: Close and Save the File
To save the file, press Control-O and press Return to confirm the file name. Then press Control-X to exit nano.
Step 5: Enable Execute Permission
The only slightly tricky thing about running scripts—and the step people forget most often—is adding execute (run) permission to the file. To do this, enter chmod u+x test.sh.
Step 6: Run the Script
That’s it! To run the script, type ./test.sh and press Return. The window should display something like this:
Hello! The current date and time is:
Wed Jun 1 19:58:21 PDT 2014
And the current directory is:
/Users/jk
For fun, try switching to a different folder. For example, type
cd /Library/Preferences
and press Return to move to the /Library/Preferences folder. Now run the script again by typing ~/test.sh and pressing Return. You’ll see that it shows your new location.
Try Another Script
Here’s another script you may find useful. It changes the extension on all files in a folder (for example, from .JPG to .jpeg)—something that’s not easy to do in the Finder or on the command line.
Repeat the preceding set of directions, with two differences. First, in Step 2, use a different file name when you open nano:
nano br.sh
(That is, br for batch rename.) Then, in Step 3, type the following code instead:
#!/bin/bash
for f in $3/*.$1; do
    base=`basename $f .$1`
    mv "$f" "$3/$base.$2"
done
To run this script, enter ./br.sh followed by the old extension, the new extension, and the folder in which to make the change—in that order. For example, to change all the files in ~/Documents with the extension .JPG to end in .jpeg, enter this:
./br.sh JPG jpeg ~/Documents
Shell Scripts Outside the Shell
But wait! Isn’t renaming documents the sort of thing you might want to do frequently, without having to mess around in Terminal? Absolutely. So that’s the sort of script that you might want to put in a launcher (like LaunchBar), a text-expansion tool (like TextExpander), or a macro utility (like Keyboard Maestro), so that you can execute it with just a keystroke or click.
The problem with this particular example script is that it doesn’t run on its own; it asks for three arguments (or parameters)—namely, the “before” extension, the “after” extension, and the folder in which to change the files. So, without modifications, it wouldn’t work embedded in another tool.
There are many ways to work around this problem, and I’ll show you one example later, in Control Your Mac with Keyboard Maestro.