Figure 648: Overview Screen, from Android 2.3.3
One of the most confusing aspects of Android to deal with is the concept of tasks. Fortunately, the automatic management of tasks is almost enough to get by, without you having to do much customization. However, some developers will need to tailor how their app interacts with the task system. Understanding what is possible and how to do it is not easy. It is made even more complicated by changes to Android, from both engineering and design perspectives, over the years.
This chapter will attempt to untie the knot of knowledge surrounding Android’s task system, explaining why things are the way they are. However, there will be a few places where the knot turns a bit Gordian, and we will have to settle for more about “how” and less about “why” the task system works as it does.
Understanding this chapter requires that you have read the core chapters of this book.
One sample app makes heavy use of
the PackageManager system service and refers in a few
places to the Launchalot sample app profiled in that chapter.
It will be useful to establish some common definitions of terms that you will encounter, both in this chapter and in other materials that describe the task system.
So, what exactly is a “task”?
The Android developer documentation describes it as:
A task is a collection of activities that users interact with when performing a certain job. The activities are arranged in a stack (the back stack), in the order in which each activity is opened.
In that sense, a task is reminiscent of a tab in a tabbed browser. As the user navigates, clicking links and submitting forms, the user advances into other Web pages. Those pages could be on the same site as they started or could be on different sites. The browser BACK button is supposed to reverse the navigation, allowing the user to return from whence they came.
The user perceives tasks mostly in the form of pressing the BACK button, using this to return to previous “screens” that they had been on previously.
Sometimes, BACK button processing is handled within a single activity,
such as when you put a dynamic fragment onto the “back stack” via
addToBackStack() on a FragmentTransaction. Or, the activity could
override onBackPressed() and do special stuff in certain scenarios.
Those are part of the user experience of pressing BACK. From the standpoint
of the task system, though, internal consumption of the BACK button presses
do not affect the task.
At the task level, the “back stack” refers to a chain of activities.
This matches the behavior of Web sites, where while pressing the browser
BACK button might trigger in-page behavior, usually it returns you to
the previous page. Similarly, while pressing BACK on an Android device
might trigger in-activity behavior, usually it triggers a call to
finish() on the foreground activity and returns control to whatever
had preceded it on the back stack.
In a tabbed Web browser, if we have several tabs open, we think of all of them as being “running”. Frequently, we do not really even think about the concept, any more than we might think about the state of tabs in an IDE other than the one that we are working in right now. However, if you have ever had some browser tab all of a sudden start playing audio, such as from a reloaded page pulling in an audio-enabled ad banner, you are well aware that tabs are “running”, while you are also “running” to try to figure out what tab is playing the audio so you can get rid of it.
However, that is the behavior on a desktop Web browser. A desktop Web browser is not subject to heap size limitations the way Android apps are. And, historically, mobile devices had less system RAM than did their desktop and notebook counterparts, though that is rapidly changing.
In Android, therefore, developers are used to the notion that their processes may be terminated, while in the background, to free up memory for other processes. This is being done to allow for more apps to deliver more value in less system RAM.
However, from a multitasking standpoint, having apps just up and vanish
is awkward. Hence, Android has the notion of “recent tasks”. These are tasks,
with their corresponding back stacks, that the user has been in “recently”.
How far back “recently” goes depends a bit on the version of Android
– there could be as few as eight items. These “recent tasks” may or may
not have a currently-running process associated with them. However,
if the user chooses to return to one of those recent tasks, and there
is no process for it, Android will seamlessly fork a fresh process, to be
able to not only start up those apps, but return the user to where they
were, in terms of UI contents (e.g., saved instance state Bundle)
and in terms of back stack contents (e.g., where the user goes if the
user now presses BACK).
In a tabbed Web browser, you can navigate between different tabs in some browser-specific way. Some tabs may have the actual “tab” visible around the address bar. Some tabs might only be reachable via some sort of scrolling operation, or via a drop-down list, for people who have lots and lots of tabs open. Regardless, there is some UI means to pick the tab that you want to be viewing in the main browser area.
In Android, the “overview screen” is where the user can view the recent tasks and choose to return to one of them. Many people, including this author, refer to this as the “recent tasks list”, but apparently the official term is “overview screen”.
The way the overview screen has looked and worked has changed over the years.
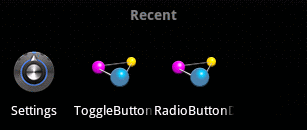
In the early days of Android, long-pressing the HOME button would bring up the overview screen, with up to eight recent tasks:
Figure 648: Overview Screen, from Android 2.3.3
And… that was pretty much it.
The overall move to the holographic theme for Android brought with us a new icon, for a dedicated way to get to the overview screen:

Figure 649: Overview Screen/Recent Tasks Navigation Bar Icon, from Android 4.3
Devices that offered a navigation bar at the bottom would have this button. Devices that chose to have off-screen affordances for BACK and HOME might have a similar button for the overview screen. For those that neither had a navigation bar nor a dedicated off-screen button for the overview screen, long-pressing HOME would bring up the overview screen.
The overview screen could have more apps (15 or so) before old tasks would be dropped:
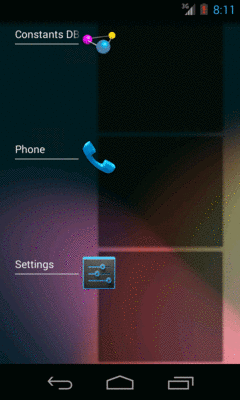
Figure 650: Overview Screen, from Android 4.3
The overview screen also added more improvements:
FLAG_SECURE
to block this, and except
on some emulator imagesFunctionally, the Android 5.x overview screen functions much like its 4.x counterpart, with the ability to see previews of tasks and remove tasks from the screen.
However, there are some differences, starting with the navigation bar icon used to bring up the overview screen:

Figure 651: Overview Screen/Recent Tasks Navigation Bar Icon, from Android 5.0
Also, the previews are larger and stacked like cards, more so than being a classically vertically-scrolling list:
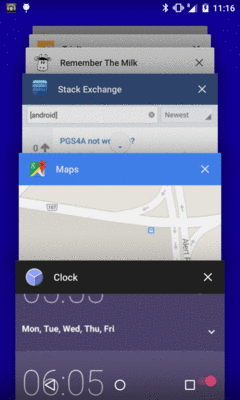
Figure 652: Overview Screen, from Android 5.0
More importantly:
A running task is a task that has running process(es) associated with it. Recent tasks may or may not be running.
In October 2008, the first Android device was publicly released (the T-Mobile G1, a.k.a., HTC Dream).
Around December of 2008, the first task killers appeared on the Android Market (now the Play Store).
While the techniques used in 2008 to kill tasks were removed in later releases, some amount of task management behavior still exists in Android. Having a task killer is useful for understanding how tasks (and their killers) behave on Android. In particular, it is useful to have a way to emulate an app’s process being terminated due to low memory conditions… which is exactly what modern task killers do.
So, in this section, we will explore the concept of task killers, including how to implement one, before using this tool to help us explore the overall Android task system.
Despite the name, task killers do not kill tasks.
Rather, task killers terminate background processes. This does not impact the task, insofar as it will still be in the recent tasks roster and will still show up on the overview screen. However, the process for the app associated with the task will shut down.
Task killers can only request to terminate background processes. If your app is in the foreground (i.e., has the foreground activity), it cannot be terminated by a task killer.
To terminate background processes, task killers need to hold the
KILL_BACKGROUND_PROCESSES permission, via a <uses-permission>
element in their manifests. That enables them to be able to call
the killBackgroundProcesses() method on ActivityManager. Supplied
an application ID, killBackgroundProcesses() will terminate any
background process(es) associated with that application. Normally, there
will only be one such process, but if the app in question is using
the android:process attribute in the manifest to have multiple
processes, then all the app’s processes will be terminated.
This termination is done using the same internal mechanism that is used by the “out-of-memory killer”, which is responsible for freeing up system RAM due to low memory conditions.
For ordinary users, there are a few options for terminating background
processes. Using a task killer, or swiping the task off the overview
screen on Android 4.0+, will terminate background processes. Both use
killBackgroundProcesses() (or internal equivalents).
However, users can also go into the Settings app, find the app in the
list of installed apps, and click a “Force Stop” button associated with
that app. On the surface, this has a similar effect to the above
techniques, as the background process is terminated. However, force-stopping
the app also unschedules any AlarmManager or JobScheduler events
for that app, plus moves the app back into the “stopped state”, blocking
manifest-registered broadcast receivers. Hence, force-stopping an app
has a much larger impact than does merely using a task killer.
A few devices have manufacturer-supplied task managers (a.k.a., task killers),
where stopping an app from those apps actually does a force stop behind
the scenes, rather than killBackgroundProcesses(). This is not a good
idea, as force-stopping an app has the aforementioned side effects.
Fortunately, third-party task killers cannot force-stop apps, barring
any security flaws in Android that might make this possible.
Nowadays, normally, users do not need task killers. Occasionally one can be useful, to stop a background process for a poorly-written app (e.g., one that powers on GPS but fails to let go of GPS when the app moves to the background). On most modern Android devices, swiping the app off the overview screen usually suffices, and so task killers are not nearly as crucial as they were in Android 1.x/2.x, where there was no such built-in background process management solution.
For developers, the problem with swiping an app off the overview screen is that it not only terminates background processes, but it also removes the task entirely. This makes it difficult to see what the behavior is when apps’ processes terminate for more conventional reasons (e.g., out-of-memory killer) and how tasks tie into that. While developers have the ability to stop processes through development tools (e.g., the process list in DDMS), that just terminates the process, and it may do so slightly differently than does the out-of-memory killer. Hence, having a task killer around can be useful for experimentation purposes.
And, since getting a task killer on an emulator can be challenging (since emulators do not have access to the Play Store), having the source code for a simple task killer is useful for developers. So, let’s look at how to implement a task killer.
In order to see some of the effects of fussing with our tasks, we need
an app where we can see when our saved instance state comes and goes.
To that end, we have the
Tasks/TaskCanary
sample application. It consists of a single activity, with a UI that
is merely a full-screen EditText. In addition to the automatic
saving of the EditText contents in the saved instance state Bundle,
we also keep track of the time we first worked with that Bundle,
in a data member named creationTime, backed by a STATE_CREATION_TIME
entry in the Bundle itself:
package com.commonsware.android.task.canary;

import android.app.Activity;
import android.content.Intent;
import android.os.Bundle;
import android.provider.Settings;
import android.util.Log;
import android.view.Menu;
import android.view.MenuItem;

public class MainActivity extends Activity {
  private static final String STATE_CREATION_TIME="creationTime";
  private long creationTime=-1L;

  @Override
  public void onCreate(Bundle state) {
    super.onCreate(state);
    setContentView(R.layout.activity_main);
  }

  @Override
  protected void onRestoreInstanceState(Bundle savedInstanceState) {
    super.onRestoreInstanceState(savedInstanceState);

    dumpBundleToLog("restore", savedInstanceState);
    creationTime=savedInstanceState.getLong(STATE_CREATION_TIME, -1L);
  }

  @Override
  protected void onSaveInstanceState(Bundle outState) {
    super.onSaveInstanceState(outState);

    outState.putLong(STATE_CREATION_TIME, getCreationTime());
    dumpBundleToLog("save", outState);
  }

  @Override
  public boolean onCreateOptionsMenu(Menu menu) {
    getMenuInflater().inflate(R.menu.actions, menu);

    return(super.onCreateOptionsMenu(menu));
  }

  @Override
  public boolean onOptionsItemSelected(MenuItem item) {
    if (item.getItemId()==R.id.settings) {
      startActivity(new Intent(Settings.ACTION_DATE_SETTINGS));
    }
    else if (item.getItemId()==R.id.other) {
      startActivity(new Intent(this, OtherActivity.class));
    }

    return(super.onOptionsItemSelected(item));
  }

  private long getCreationTime() {
    if (creationTime==-1L) {
      creationTime=System.currentTimeMillis();
    }

    return(creationTime);
  }

  // inspired by http://stackoverflow.com/a/14948713/115145

  private void dumpBundleToLog(String msg, Bundle b) {
    Log.d(getClass().getSimpleName(),
        String.format("Task ID #%d", getTaskId()));

    for (String key: b.keySet()) {
      Log.d(getClass().getSimpleName(),
          String.format("(%s) %s: %s", msg, key, b.get(key)));
    }
  }
}
Each time we save and restore the instance state, we dump the Bundle
to Logcat, so we can see what is in that Bundle. We wind up with lines
like:
D/MainActivity: (save) android:viewHierarchyState: Bundle[...]
D/MainActivity: (save) creationTime: 1427032894794
D/MainActivity: (restore) android:viewHierarchyState: Bundle[...]
D/MainActivity: (restore) creationTime: 1427032894794
(where the ... is a bit long to reproduce in the book and is not
essential for the sample)
This way, both in the UI and in the logs, we can confirm that our state is being saved and restored as expected… or perhaps not as expected, in some cases.
You will notice that we have a pair of action bar items. One will bring up a screen from the Settings app, which we will use to see how this affects our task. The other one will bring up another activity from our app, which we will use to explore how to start a clean task.
With all that behind us, let’s start talking about tasks, focusing first on what behavior the developer gets “out of the box”, with no task-specific logic in the app. In other words, what is the default user experience for an ordinary Android app?
NOTE: if you wish to reproduce the results described here, you will want to have the Task Canary installed on your device or emulator.
Assume that we are “starting from scratch”. For example, the user has installed your app (or bought a device with your app pre-installed) but has never run your app before. Or, perhaps the overview screen is cleared of all tasks.
If the user taps your home screen launcher icon, not only is a process forked to run your app, but a new task is created, and your app’s task will appear in the overview screen.
(see! that wasn’t so hard!)
To reproduce this behavior:
Eventually, the user wanders away from your app. Then, later on, the user returns to your app, by finding the task associated with your app in the overview screen and tapping upon it.
In the end, you wind up in the same state as before: you have a process for your app, and your task is still in the overview screen. How we get there depends a bit on what happened with your process, in between when you had been in the foreground and when the user taps on your task in the overview screen.
If your app’s process was still running, nothing much happens of note,
other than you return to the foreground. From a state standpoint, your
app would be called with onSaveInstanceState() when the user left
your app, but you will not be called with onRestoreInstanceState(),
because your activity was not destroyed yet. Note that this assumes that
you did not undergo a configuration change (e.g., user originally was in
your app in portrait, then returned to you from the overview screen while
the device was in landscape). In the case of a configuration change, your
activity would be destroyed and recreated by default, and you would
be called with onRestoreInstanceState(), but that would be due to the
configuration change more so than the use of the task and the overview
screen.
To reproduce the above behavior, given that your device was in the state after the “Starting from the Home Screen” section above:
However, it is entirely possible that while your task is around that your
process is terminated to free up memory for other processes. If the
user returns to your app via the overview screen, a fresh process will
be forked for your app. This would trigger a call to onRestoreInstanceState(),
because your old activity no longer exists, because its process no longer
exists.
Note that if you leave a task for an extended period of time — say, 30 minutes or so — the task may be “cleared” when you return to it. This means that you are taken back to whatever the “root” activity of the task is, where by “root” we mean the original activity put into the task.
Some apps only start up other activities within the same app. However,
many apps start up activities from other apps, either directly via
startActivity() or indirectly (e.g., clicking on links in a WebView).
For example, the Task Canary app has an item in the action bar
overflow that, when clicked, brings up the Settings screen for adjusting
date and time settings.
You might think that when the user taps on this overflow item, and
Task Canary calls startActivity(), that a new task is created. After
all, the Settings app is a completely separate app from the Task Canary
app.
However, try this:
You will see one entry in the overview screen, for Task Canary, rather than two. Furthermore, particularly on Android 5.x devices, you will see the Settings screen as the top-most activity within the Task Canary task:

Figure 653: The Task Canary Task, on Android 5.1
However, suppose that instead of using ACTION_DATE_SETTINGS for the
Intent, we used ACTION_APN_SETTINGS instead, to allow the user to
view mobile access point names and such. You might think, given the
above flow, that we would wind up with just one task, as we did with
ACTION_DATE_SETTINGS. In reality, you will see two tasks, instead of
just one:
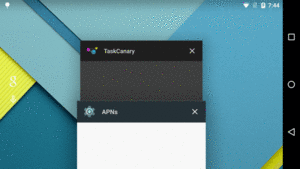
Figure 654: Two Tasks on Android 5.1
This is where things start to get a bit confusing.
With the user experience as background, let’s now dive into what is really going on with these operations.
A task is not created just because an activity is started. Otherwise, even individual apps would have lots of tasks, one per activity.
A task is not created just because a task from a different app is started. Otherwise, the two Settings scenarios above would have both resulted in a new task.
Instead, tasks are created when somebody asks for a task to be created.
That “somebody” could be the author of the app calling startActivity()
or the author of the activity being started.
There are three major approaches for indicating that a new task should
be started: flags on the Intent used with startActivity(), task affinity
values, and launch modes. We will get into launch modes
later in this chapter, as the normally-used
launch modes have no impact on tasks. Instead, we will focus on the other
two approaches here.
If you want to start an activity, and ensure that the activity starts
in a new task, add Intent.FLAG_ACTIVITY_NEW_TASK to the flags on the
Intent being used with startActivity():
startActivity(new Intent(SOME_ACTION_STRING)
                .addFlags(Intent.FLAG_ACTIVITY_NEW_TASK))
What will happen, when you call startActivity() with FLAG_ACTIVITY_NEW_TASK,
is that Android will see if there is a task that already has this
activity in it. If there is, that task will be brought to the foreground,
and the user will see whatever is on the top of that task’s stack.
Otherwise, if there
is no task with this activity in it, Android will create a new task and
associate a new instance of the activity with this task.
This is what home screen launchers do. When you tap on a home screen launcher icon, if there is a task that has a copy of your home screen activity in it, that task is brought back to the foreground. Otherwise, a new task is started.
If you also add Intent.FLAG_ACTIVITY_MULTIPLE_TASK, then Android skips
the search for existing tasks and unconditionally launches the activity into
a new task. This is generally not a good idea, as the user can wind up
with many copies of this activity, not know which one is which, and perhaps
have difficulty getting back to the right one.
By default, if Android needs to create a new task as a result of
FLAG_ACTIVITY_NEW_TASK, it just creates a task. And, if there is no
such flag on the Intent, Android will put the activity into the
task of whoever called startActivity().
If, however, the activity has an android:taskAffinity attribute in
its <activity> element in the manifest, then Android will specifically
start this activity in a certain task, identified by the string value
of the attribute. Other activities with the same task affinity will also
go into this task.
The reason why the two Settings screens behave differently is that
the ACTION_APN_SETTINGS activity has a certain task affinity value,
while ACTION_DATE_SETTINGS does not. The task affinity of
the ACTION_APN_SETTINGS activity is shared by many, though not all,
activities within the Settings app. Those activities, when started, will
always go into the task identified by the affinity. Hence, when we start
ACTION_DATE_SETTINGS, it goes in our task (because that activity
has no affinity and we did not include FLAG_ACTIVITY_NEW_TASK), but
when we start the ACTION_APN_SETTINGS activity, it goes into a Settings-specific
task.
Note that you can also have the android:taskAffinity value defined
on the <application> element, to provide a default task affinity for
all activities. The overall default is "", or no affinity.
On Android 3.0 and higher, the user can get rid of a task by swiping the task off of the overview screen.
Otherwise, prior to Android 5.0, a task would automatically go away after some amount of user activity, as there were only so many “slots” available for tasks.
On Android 5.0+, though, it is unclear if there is an upper bound to how many tasks can exist. Beyond that, tasks survive a reboot, as information about those tasks is persisted. We will get more into the ramifications of this, and how you can take advantage of it, later in this chapter.
A task will be resumed and brought back to the foreground in several situations, including:
FLAG_ACTIVITY_NEW_TASK is added (without FLAG_ACTIVITY_MULTIPLE_TASK)
to the Intent used to start an activity, and there is a task containing
the activity in questiontaskAffinity for the activity being started ties it to another
taskHowever, just because the task exists does not mean that the process(es)
exist for the activities in the task. As needed, Android will fork fresh
processes, to be able to load in the app’s code and start the necessary
activities. Android will deliver to the newly-created activities the
same Intent that was used to create the original incarnation of the
activity (via getIntent()) and the saved instance state Bundle.
In theory, services are immune to task behavior. Tasks can come and go, and services are usually oblivious to this.
A service should be called with onTaskStopped() if a task associated
with one or more of the app’s activities is removed. The service might
use that as a signal that it too should shut itself down.
There appears to be
a quasi-documented android:stopWithTask attribute
on the
<service> element in the manifest. The default is false, but if you
override it to be true on your <service>, then onTaskStopped()
will not be called, and Android will simply destroy your service when
the task is removed.
However, as of Android 4.4, there are many reports that services may
be destroyed when a task is removed, even without android:stopWithTask="true",
though on a slight delay. Developers concerned about this should keep an
eye on this issue
and this issue,
both for various hacky workarounds and for any signs that this is being
permanently addressed.
If the user swipes away the task using the overview screen, onDestroy()
will be called on all outstanding activities. If a “task killer” terminates
your background process, your onDestroy() methods will not be called when your process
is terminated by those apps.
So, removing a task is a graceful exit, and Android calls onDestroy(),
but an explicit termination of your process by another is a not-so-graceful
exit, and Android skips onDestroy().
As a result, as previously advised in this book and elsewhere, you cannot
count on your onDestroy() methods being called, and you need to take this
into account in terms of what sorts of code you put in them.
In many cases, the default behavior of tasks is just fine. However, there are many scenarios in which we may want to override the default behavior, routing activities to specific tasks, to have a better flow for the user.
By default, each time you call startActivity(), a new
instance of the activity is created. Depending upon the user flow, that
may not be a bad approach. For example, it may be that the only logical
path out of the started activity will be to press BACK and destroy it.
However, there will be plenty of cases where we will not want to keep creating new activity instances. For example, if you elect to have several activities reachable via a nav drawer, you do not want to create fresh instances of activities that the user has already visited via that drawer. Otherwise, they will keep piling up, continuing to consume heap space. Instead, it would be better to try to reuse an existing activity instance, if one is available, creating a fresh one only if needed.
The most flexible approach for accomplishing this involves using
a flag on the Intent used to start the activity:
Intent.FLAG_ACTIVITY_REORDER_TO_FRONT. This tells Android to bring
an existing activity matching our Intent to the foreground, if one
already exists in our task. If there is no such activity, then go ahead
and create a new instance.
The
Tasks/RoundRobin
sample application demonstrates this. It consists of two activities
(FirstActivity and SecondActivity), each of whose UI consists of one
really big button. Clicking the button should start the other activity,
so clicking the button in FirstActivity should start an instance
of SecondActivity. But, we want to reuse activity instances where
available, and confirm that indeed we are reusing those instances.
FirstActivity accomplishes that by adding FLAG_ACTIVITY_REORDER_TO_FRONT
to the Intent used to start SecondActivity when the button is clicked:
package com.commonsware.android.tasks.roundrobin;

import android.app.Activity;
import android.content.Intent;
import android.os.Bundle;
import android.util.Log;
import android.view.View;

public class FirstActivity extends Activity implements View.OnClickListener {
  @Override
  protected void onCreate(Bundle savedInstanceState) {
    super.onCreate(savedInstanceState);

    setContentView(R.layout.first);
    findViewById(R.id.button).setOnClickListener(this);

    Log.d(getClass().getSimpleName(),
        String.format("onCreate for %x", hashCode()));
  }

  @Override
  protected void onResume() {
    super.onResume();

    Log.d(getClass().getSimpleName(),
          String.format("onResume for %x", hashCode()));
  }

  @Override
  protected void onDestroy() {
    Log.d(getClass().getSimpleName(),
        String.format("onDestroy for %x", hashCode()));

    super.onDestroy();
  }

  @Override
  public void onClick(View view) {
    startActivity(new Intent(this, SecondActivity.class)
                    .addFlags(Intent.FLAG_ACTIVITY_REORDER_TO_FRONT));
  }
}
SecondActivity has a nearly identical implementation, just routing back
to FirstActivity.
If you run the app, the user’s perspective is that clicking the button
“ping-pongs” the user between the two activities. Looking at Logcat, you
will see new instances created the first time the user visits an activity,
courtesy of the Log.d() call in onCreate(). But, if the user returns
to an existing instance via the button click, you will see that onCreate()
is not called, and that the hashCode() reported in onResume() matches
the hashCode() of the previously-created instance of this activity:
D/FirstActivity: onCreate for b31b9430
D/FirstActivity: onResume for b31b9430
D/SecondActivity: onCreate for b31eb8a8
D/SecondActivity: onResume for b31eb8a8
D/FirstActivity: onResume for b31b9430
D/SecondActivity: onResume for b31eb8a8
Note that launch modes offer another way to control this behavior, having the activity being started indicate that its instance should always be reused. However, this is a specialty case, one that most apps will not require.
Let’s suppose that you have an app that requires in-app authentication, via some form of login screen. For example, your app’s data is held in SQLCipher for Android, and so you need the user to supply a passphrase for the database.
In the beginning, when your app is launched from the home screen, your
LAUNCHER activity appears. If that is your login screen, all is good.
You collect the passphrase, create your singleton instance of the
SQLCipher-enabled SQLiteOpenHelper, and you can access the database.
Eventually, the user presses HOME, and time passes. Android terminates
your process to free up system RAM. The user then tries returning to
your existing task, such as via the overview screen. Android creates a
fresh process for you and takes you to the activity on the top of that
task’s back stack. But at this point, your singleton SQLiteOpenHelper
is gone, and you need to collect a passphrase again.
You might think that this is purely a UI issue. Rather than collecting
the passphrase in an activity, you collect it in a fragment, one that
your LAUNCHER activity uses directly, and one that other activities
can use via a DialogFragment. This way, you can arrange for every
activity to be able to complete the re-initialization of your process and
give you access to the encrypted database again.
Another approach would be to say that you want to wipe out this task
and start over, routing the user back to the LAUNCHER activity for
authentication.
There are two main approaches for implementing this: setting Intent
flags or using android:clearTaskOnLaunch in the manifest.
One way to do that is to have each activity check to see if a new
task is needed (e.g., “is the SQLiteOpenHelper singleton null?”).
When that situation is detected, you call startActivity() for
your LAUNCHER activity, with two flags: FLAG_ACTIVITY_NEW_TASK
and FLAG_ACTIVITY_CLEAR_TASK.
For example, the
Tasks/Tasksalot
sample application is a straight-up clone of Launchalot with only one
change of substance: using FLAG_ACTIVITY_CLEAR_TASK instead
of FLAG_ACTIVITY_RESET_TASK_IF_NEEDED:
  @Override
  protected void onListItemClick(ListView l, View v,
                                 int position, long id) {
    ResolveInfo launchable=adapter.getItem(position);
    ActivityInfo activity=launchable.activityInfo;
    ComponentName name=new ComponentName(activity.applicationInfo.packageName,
                                         activity.name);
    Intent i=new Intent(Intent.ACTION_MAIN);

    i.addCategory(Intent.CATEGORY_LAUNCHER);
    i.setFlags(Intent.FLAG_ACTIVITY_NEW_TASK |
                Intent.FLAG_ACTIVITY_CLEAR_TASK);
    i.setComponent(name);

    startActivity(i);
  }
To see this in action:
TaskCanary sample app and use the overflow to bring
up OtherActivity
At this point, you will see the TaskCanary sample app return to the screen.
From the logs in Logcat, you will see it is the same task ID as before.
Yet, you are seeing the FirstActivity. OtherActivity was removed from
the task as part of FLAG_ACTIVITY_CLEAR_TASK processing.
This differs from what you see in a home screen, with FLAG_ACTIVITY_RESET_TASK_IF_NEEDED.
If you run the same test, but rather than use Tasksalot, you tap on
the “Task Canary” icon in the home screen launcher, the task will return
to the foreground, but you will be taken to OtherActivity.
FLAG_ACTIVITY_CLEAR_TASK always clears the task and makes the activity
that you are starting up be the root of the newly-cleared task.
Perhaps you always want to start with a cleared task, whenever the user returns to the task after having left it previously. In other words, you always want to start back at whatever your task’s root activity is, which is typically your launcher activity.
To do this, simply have android:clearTaskOnLaunch="true" on that
launcher activity. Then, for any task where that activity is the root,
when the user returns to the task, any other activities in the task
are reparented (if applicable) or dropped.
Note, though, that this does not mean that you get a new process. Hence, any singletons you had before may or may not still be there.
So, in the authentication scenario described above, using
android:clearTaskOnLaunch="true" would take the user back to your
initial activity, where you can perform the authentication. However,
if you detect that the SQLiteOpenHelper still exists, and therefore
you do not need the user to log in again, you could switch over to
showing your initial content (e.g., run a FragmentTransaction).
This is far simpler than having the detect-the-null-singleton-on-each-activity
approach. However, the downside is that the user loses context. If they
were six activities deep into your app, and they get interrupted by a phone
call, when they come back to your app, they are back at the beginning.
A home screen launcher app, when it invokes the user’s selected
activity, will use code something like this from the Launchalot
sample:
  @Override
  protected void onListItemClick(ListView l, View v,
                                 int position, long id) {
    ResolveInfo launchable=adapter.getItem(position);
    ActivityInfo activity=launchable.activityInfo;
    ComponentName name=new ComponentName(activity.applicationInfo.packageName,
                                         activity.name);
    Intent i=new Intent(Intent.ACTION_MAIN);

    i.addCategory(Intent.CATEGORY_LAUNCHER);
    i.setFlags(Intent.FLAG_ACTIVITY_NEW_TASK |
                Intent.FLAG_ACTIVITY_RESET_TASK_IF_NEEDED);
    i.setComponent(name);

    startActivity(i);
  }
Here, we:
ComponentName identifying the specific activity in the specific
app to be started (in this case, based on the ResolveInfo that
the user chose)Intent for the MAIN action and the LAUNCHER categoryFLAG_ACTIVITY_NEW_TASK and the FLAG_ACTIVITY_RESET_TASK_IF_NEEDED
flags in the Intent
ComponentName to the Intent, to convert it from an implicit
Intent into an explicit Intent
Intent
FLAG_ACTIVITY_NEW_TASK indicates that we want the activity being started
to be the root of a new task. If there is no outstanding task for this app,
a new task will be created, a new activity instance will be created,
and that activity will be the root of the task. Here, “root” means that
if the user presses BACK and destroys the activity, the task itself is
removed and the user returns to the home screen.
However, despite its name, FLAG_ACTIVITY_NEW_TASK does not necessarily
create a new task. If there is an existing task for this app containing
this activity, that task is brought back to the foreground and is left
intact. The activity we request is not created, let alone brought to the
foreground.
That is where FLAG_ACTIVITY_RESET_TASK_IF_NEEDED comes in. It ensures
that the task that is brought to the foreground is showing the requested
activity. This may involve reparenting activities
as well.
Another possibility, instead of FLAG_ACTIVITY_RESET_TASK_IF_NEEDED,
is FLAG_ACTIVITY_MULTIPLE_TASK. This always starts a fresh task,
with a fresh instance of the requested activity in the root of that task.
However, this now may mean that the user has multiple tasks for the same
app, which may be confusing in some circumstances. However, this also
lies at the core of Android 5.0’s documents-as-tasks support
and therefore may become more familiar to users over time.
Several sample apps in this book use an “invisible activity”, one with
the theme set to Theme.Translucent.NoTitleBar. These are useful in cases where
something outside your app needs an activity, but you do not really
have a UI that you want to display. In the case of the book samples, having
a LAUNCHER activity makes it much easier for readers like you to
simply run the samples from the IDE.
However, those sample apps usually do not have any other activities.
The invisible activity is just there to kick-start something else, such
as AlarmManager events.
However, if you have a mix of invisible and regular activities in an app, your invisible activities still wind up potentially having a visible impact.
For example, suppose that we have an ordinary Android app, with regular
activities. However, we want a home screen shortcut icon to allow the
user to start something in the background, such as playing music. While
an app widget would allow us to control what happens when the user
taps on an icon in that app widget, a home screen shortcut icon always
launches an activity. So, we make the start-the-music activity invisible
via Theme.Translucent.NoTitleBar.
If the user taps on that shortcut, and none of our other activities are
part of a task, things proceed as expected: the music starts and the
user sees nothing (other than perhaps a Toast that we show to let
the user know that we are responding to their request).
But, if one or more of our activities are in some task, launching the invisible activity brings the task back to the foreground. While our invisible activity is still invisible, the user now sees whatever other activity of ours they had last been in. It is possible that this is a feature, and not a bug, for some apps. But, in other cases, we might want the invisible activity to not have this effect.
The solution: task affinity.
Your ordinary activities can use the default task affinity, or have
other task affinities as needs dictate. Your invisible activity, though,
would have an android:taskAffinity value that is distinct from all
others, to force it into its own task. That way, when the user taps on the
shortcut, the invisible activity routes to its own task. That task will
not yet exist, so the invisible activity causes the task to be created.
When the invisible activity calls finish() to destroy itself after kicking
off the background work, the task is now empty and is removed. Since
this was a new task, no existing UI would be brought back to the foreground,
and since the task is removed in the end, we are “reset” for the next
time the user taps on the shortcut.
One of the more unusual features of Android’s task system is the ability for activities to be “reparented”, or moved from one task to another. On the surface, this feels a bit odd, as if a Web page on one browser tab might magically show up in a separate browser tab, just via navigation. And, in truth, it is a specialized use case, but one that could conceivably apply to your app.
Suppose that you were writing an SMS client. You have an activity
that is your message composer, where the user can type in a text message
to send to somebody. You export that activity, with Intent actions
like ACTION_SEND and ACTION_SENDTO. A third-party app, using one
of those Intent actions, starts up your message composer activity.
In the absence of a taskAffinity to stipulate otherwise, by default,
your message composer activity will be in the task of the third-party app.
Now, suppose that the user fails to actually send a message, such as by pressing HOME from the third-party app’s task. Some time later, the user taps on your app’s home screen launcher icon. At this point, there are two possibilities as to what happens:
The default is option #2. If, instead, you want to offer option #1, that is where task reparenting comes into play.
On your <activity> (or on <application> to set an app-wide default),
you can have android:allowTaskReparenting="true". This indicates
to Android that the message composing activity, that is on some other
app’s task, can move to your app’s task when that task is created.
The trigger for this “reparenting” is the task affinity. If you do not specify a task affinity for an activity, the default affinity is for a task rooted in one of your app’s activities, typically the launcher activity. In some circumstances, when a task for your app is created, Android will search through other tasks to see if there is any activity, in another task, that has an affinity for your task and allows reparenting. If there is a match, that activity is brought into your task.
The “some circumstances” mentioned in the preceding paragraph is something
using two Intent flags when calling startActivity():
FLAG_ACTIVITY_NEW_TASK, to create a new task if one is needed, andFLAG_ACTIVITY_RESET_TASK_IF_NEEDED, to clear out the task if it already
has contents and reparent any activities in other tasks to this one
if appropriateAs it turns out, home screen launchers are supposed to use this pair of flags when they respond to the user tapping on a home screen launcher icon.
The
Tasks/ReparentDemo
sample Android Studio project contains a pair of applications as modules
that demonstrate this effect, based on David Wasser’s
epic Stack Overflow answer.
One module, app/, contains an application with two activities, where
the second activity (ReparentableActivity) has android:allowTaskReparenting="true":
<manifest
  xmlns:android="http://schemas.android.com/apk/res/android"
  package="com.commonsware.android.tasks.reparent">

  <application
    android:allowBackup="true"
    android:label="@string/app_name"
    android:icon="@drawable/ic_launcher">
    <activity android:name=".MainActivity">
      <intent-filter>
        <action android:name="android.intent.action.MAIN"/>
        <category android:name="android.intent.category.LAUNCHER"/>
      </intent-filter>
    </activity>
    <activity
      android:name=".ReparentableActivity"
      android:allowTaskReparenting="true">
      <intent-filter>
        <action android:name="com.commonsware.android.tasks.reparent.WHEEEEE"/>
        <category android:name="android.intent.category.DEFAULT"/>
      </intent-filter>
    </activity>
  </application>
</manifest>
The two activities just display static messages, indicating which of those
two activities you are seeing in the foreground. They also log process
and task IDs to Logcat. MainActivity does that in onCreate():
package com.commonsware.android.tasks.reparent;

import android.app.Activity;
import android.os.Bundle;
import android.util.Log;

public class MainActivity extends Activity {
  @Override
  public void onCreate(Bundle state) {
    super.onCreate(state);
    setContentView(R.layout.main);

    Log.d(getApplicationInfo().loadLabel(getPackageManager()).toString(),
          String.format("Process ID %d, Task ID %d",
              android.os.Process.myPid(), getTaskId()));
  }
}
ReparentableActivity logs the same information in onResume():
package com.commonsware.android.tasks.reparent;

import android.app.Activity;
import android.os.Bundle;
import android.util.Log;

public class ReparentableActivity extends Activity {
  @Override
  public void onCreate(Bundle state) {
    super.onCreate(state);
    setContentView(R.layout.reparent);
  }

  @Override
  public void onResume() {
    super.onResume();

    Log.d(getClass().getSimpleName(),
        String.format("Process ID %d, Task ID %d",
            android.os.Process.myPid(), getTaskId()));
  }
}
The other module, app2/, contains an application with one activity, whose
UI consists of one really big button. Clicking that button triggers a
launch() method that calls startActivity() on an Intent
identifying the ReparentableActivity from the first app:
package com.commonsware.android.tasks.reparent.app2;

import android.app.Activity;
import android.content.Intent;
import android.os.Bundle;
import android.util.Log;
import android.view.View;

public class MainActivity extends Activity {
  @Override
  public void onCreate(Bundle state) {
    super.onCreate(state);
    setContentView(R.layout.main);

    Log.d(getApplicationInfo().loadLabel(getPackageManager()).toString(),
        String.format("Process ID %d, Task ID %d",
            android.os.Process.myPid(), getTaskId()));
  }

  public void launch(View v) {
    startActivity(new Intent("com.commonsware.android.tasks.reparent.WHEEEEE"));
  }
}
To see this behavior in action, install both apps. If you run them straight from your IDE, you will want to clear out all relevant tasks, either by swiping them off the recent-tasks list (or by rebooting the device or emulator, if it runs Android 4.4 or lower).
Then, start up the “Reparent Demo Aux” app (from the app2/ module). Click
the button, and you will see the ReparentableActivity appear. If you
press HOME, bring up the recent-tasks list, and go back to this
task, you will see the same ReparentableActivity. The task, however,
is for “Reparent Demo Aux”.
Now, press HOME, then start up the “Reparent Demo” app (from the app/ module).
Rather than seeing the MainActivity from that app, you see
the ReparentableActivity instance from before. The logs will illustrate
that your process ID has not changed, but that the task ID for this
activity has changed, from the task ID used by the app2/ app to the
task ID created for app/. The activity has been reparented.
The use of FLAG_ACTIVITY_RESET_TASK_IF_NEEDED may sound a lot like
FLAG_ACTIVITY_CLEAR_TASK. The “if needed” part comes into play in
two cases:
Here, by “resettable activities”, we mean:
FLAG_ACTIVITY_CLEAR_WHEN_TASK_RESET
flagSo, if our back stack consists of activities A-B-C-D, and C was started
with FLAG_ACTIVITY_CLEAR_WHEN_TASK_RESET, and we start up one of
these activities (say, A) with FLAG_ACTIVITY_RESET_TASK_IF_NEEDED,
and this existing task is coming back to the foreground, C and D
will be cleared from the task. The user ordinarily would be taken to
activity D, but instead will be taken to activity B, because C is
explicitly resettable and D is higher on the back stack.
Sometimes, you only want an activity around while it is in the foreground
and the user can see it. Once the user leaves the app, you no
longer want that activity to exist. For example, a bank app showing
bank account details might want this behavior, so that highly-sensitive
information like this does not hang around. Or, you might want this for
certain activities that are memory-intensive, so they release their
heap space and reduce the odds of an OutOfMemoryError.
You could attempt to manage this yourself, via timely calls to finish(), but
catching all the cases when finish() is needed could get troublesome.
Instead, Android has a pair of options to have no-history activities: activities that automatically finish when the user leaves them:
android:noHistory attribute on the <activity>
in the manifestIntent.FLAG_ACTIVITY_NO_HISTORY on the Intent used
to start those activitiesYou can see these in action in the
Tasks/NoHistory
sample application. This is a near-clone of a simple two-activity
app that we saw back when we first learned about
how to have multiple activities.
There are only two real differences in this version of the sample app.
First, the launcher activity (MainActivity) has android:noHistory="true"
on its <activity> element:
    <activity
      android:name=".MainActivity"
      android:label="@string/app_name"
      android:noHistory="true">
      <intent-filter>
        <action android:name="android.intent.action.MAIN"/>

        <category android:name="android.intent.category.LAUNCHER"/>
      </intent-filter>
    </activity>
Second, when that activity goes to start OtherActivity, it adds
FLAG_ACTIVITY_NO_HISTORY to the Intent used with startActivity():
  public void showOther(View v) {
    Intent other=new Intent(this, OtherActivity.class);

    other.putExtra(OtherActivity.EXTRA_MESSAGE,
                   getString(R.string.other));
    other.addFlags(Intent.FLAG_ACTIVITY_NO_HISTORY);

    startActivity(other);
  }
Both of these inherit from the original sample’s LifecycleLoggingActivity,
which just logs messages to Logcat on the major lifecycle methods. If you
run the app, click the big button to go from MainActivity to
OtherActivity, then switch to some other app (via the overview screen,
via the home screen launcher, etc.), you will see that both activities
are destroyed, even though we do not press BACK, call finish(), or do
anything else ourselves to destroy them.
This has a key side-effect: you cannot combine no-history with
startActivityForResult() especially well. If the activity that
calls startActivityForResult() has no-history enabled (via the
manifest attribute or the Intent flag), it will simply not be called
with onActivityResult().
A related attribute is android:finishOnTaskLaunch. If set to true,
and if the user leaves the task and returns to it, the activity
is destroyed. Whereas android:noHistory removes the activity when
the user leaves the activity, android:finishOnTaskLaunch only
removes the activity when the user leaves the task and returns to it.
Perhaps you have a use case where you want your entire task to be hidden from the overview screen.
To do that, you can indicate that the activity that is the root of the task (e.g., your launcher activity) is to be “excluded from recents”. To do that, you can:
android:excludeFromRecents="true" to the appropriate
<activity> element in your manifest, orIntent.FLAG_ACTIVITY_EXCLUDE_FROM_RECENTS to the Intent
used to start up the activity and its taskNote that this only matters if the activity in question is the task root (i.e., the one that started the task). Having this setting on other activities higher in the back stack will have no effect on the visibility of the task.
Also, please note that this does not eliminate the task itself. It merely hides it from the overview screen. So, for example, suppose you were to:
android:excludeFromRecents="true" to MainActivity in the TaskCanary
sampleTaskCanary in the launcher, and
tap on the launcher iconYou will see that those task IDs are the same. So, the task is there, and we can return to that task, but the task is merely suppressed from the listing shown in the overview screen.
As noted previously in this chapter, on Android 5.0+, tasks live forever, insofar as they survive a reboot. That, coupled with a seemingly-infinite roster of recent tasks — compared with rather finite lists in earlier versions of Android — means that your app usually will be brought back from an existing task on Android 5.0+.
However, there are a few key differences.
For normal process termination, in between device reboots, the
Bundle that we get in onSaveInstanceState() is held onto in RAM by
some core OS process. Of course, on a reboot, that process is terminated
along with everything else. And a Bundle can hold onto objects
that, while perhaps Parcelable, are not designed to be persisted.
The default behavior is that when your task is brought back to the foreground after a reboot, only the task’s root activity is created, and that is the only activity in the task. This effectively mimics the behavior of pre-Android 5.0 versions of Android.
However, if you want to, you can control a bit more how your task behaves on a reboot.
Your <activity> element in the manifest can have
a largely-undocumented android:persistableMode attribute.
If you set this to persistAcrossReboots on the activity that serves
as the root of your task (e.g., your launcher activity), then you will
be able to override three additional methods on your Activity:
onCreate()onSaveInstanceState()onRestoreInstanceState()Right now, you may think that the author of this book is drunk, as we covered those methods already, far earlier in the book.
However, what API Level 21 adds, for persistAcrossReboots activities,
are flavors of those methods that take two parameters: a Bundle (as
normal) and a PersistableBundle. Values that you store in the latter
parameter will be delivered to you when your activity is re-created
as part of your task coming back to the foreground, even after a reboot.
Note that all of the above requires that you set your compileSdkVersion
to 21 or higher.
PersistableBundle allows you to save int, long, double, and String
values, along with arrays of each. On Android 5.1+, you can also save
boolean and arrays of boolean values. Notably, you cannot put a
Parcelable (or, strangely, a Serializable) in a PersistableBundle.
If your activity has persistAcrossReboots set — as does MainActivity
in the
Tasks/PersistentCanary
sample application — you will be called both with the single-parameter
and dual-parameter versions of those methods, in that order. Unless
your app has a minSdkVersion of 21 or higher, you will probably wind
up overriding both versions of each method, where you put stuff in
the Bundle in the single-parameter method and you put stuff in the
PersistableBundle in the dual-parameter method. Since versions of
Android prior to 5.0 do not know about PersistableBundle or methods
that take one, only the single-parameter versions of those methods will
be called on those devices. If your minSdkVersion is 21 or higher,
though, you could just override the dual-parameter versions of the
methods and work with both Bundle and PersistableBundle as needed.
Normally, if your task is in the overview screen, and the user returns to it, the user will be taken to whatever activity was at the top of the back stack.
However, if the device reboots, and the user returns to your task, what
happens depends on that semi-documented persistableMode value:
persistNever,
the task is not persisted across rebootspersistRootOnly,
the task will be persisted, but only for that root activity; other
activities higher on the back stack are discardedpersistAcrossReboots,
then not only is the task persisted for the root activity, but other
activities on the back stack are also persisted if they too
have persistAcrossReboots (and were not launched with
the FLAG_CLEAR_TASK_WHEN_RESET flag)So, in the case of PersistentCanary, even if you use the overflow
to bring up the date-and-time Settings screen, since that activity
has the default persistRootOnly value for persistableMode, only
the MainActivity will be in the task after a reboot.
Tasks used to be relatively app-centric. By and large, each app had its own task, and just one task.
Android 5.0 extended the task system to support the notion of “documents” as tasks. Now, an app may be in several tasks, with different tasks focused on different “documents” or other specific contexts.
The vision is that this would be used by:
The benefit to the user is a standard way to switch between these different contexts, by means of the overview screen. The risk is that the overview screen becomes unwieldy, choked with too many entries to sift through.
An app should open a new “document” based on some specific explicit “open” operation by the user. So, for example:
Conversely, an app should not open a new document based on pure navigation operations:
ViewPager should not open a new
documentYou have a few options for launching an activity as a new document, indicating that it should have a separate entry on the Android 5.0+ overview screen.
If you always want this activity to form the basis of a new document,
add android:documentLaunchMode="always" to the <activity> element
of your manifest, and you are done. Every time you start up an instance,
you will get a new document.
This can be seen in the
Tasks/Docs
sample application, which has an EditorActivity with the aforementioned
attribute:
    <activity
      android:name=".EditorActivity"
      android:documentLaunchMode="always"
      android:maxRecents="3"
      android:autoRemoveFromRecents="true"/>
(we will cover those other new attributes shortly)
There are four possible values for android:documentLaunchMode:
always, as noted, always starts a new documentintoExisting, which looks for an existing document, where the
root activity is the same class and the Intent is for the same Uri, and
brings it back to the foreground, or starts a new document if a match
cannot be foundnever prevents this activity from ever being launched as a new
documentnone, which is the default, indicates that the activity will only
be launched as a new document if Intent flags indicate that it
should, as will be explained shortlySince intoExisting depends upon Uri matches, you only want to use
intoExisting if you are passing Uri values into the activity when
starting it. Otherwise, use always.
To conditionally launch an activity as a new document, have its
android:documentLaunchMode set to none (or missing, since that is
the default), and add Intent.FLAG_ACTIVITY_NEW_DOCUMENT to the Intent
that is used to start up the activity that would represent a new
document. This will have the behavior akin to intoExisting for
android:documentLaunchMode, meaning that Android will search for a
matching document and bring it back to the foreground if the match
is available.
To replicate always functionality, add both
Intent.FLAG_ACTIVITY_NEW_DOCUMENT and Intent.FLAG_ACTIVITY_MULTIPLE_TASK
to the Intent.
By default, you can launch as many documents as you want. However, unless you get rid of the document (as will be described below), or the user gets rid of the document (by swiping it off the overview screen), your roster of documents can keep piling up. Users may get frustrated if their overview screen is flooded by entries for your app.
You can employ an automatic least-recently-used (LRU) algorithm here
by adding android:maxRecents to the <activity> that is the root
of the task for the document. This indicates the maximum number of
entries there should be in the overview screen for that activity, where
Android will remove older tasks to make way for new ones if needed.
So, in the Docs sample, android:maxRecents="3" limits the number
of EditorActivity tasks to 3; if the user tries opening more than this,
older ones are quietly removed.
Note that the default value for android:maxRecents is 16. Also, there
is a cap, ranging from 25 to 50, depending on device RAM — you will be
unable to set it higher than this.
Android’s default behavior is that the document will exist forever, or until the user swipes it off the overview screen.
It is rather unlikely that this is really the behavior that you or your users will want. Hence, you are going to want to take some steps to ensure that your documents will go away from the overview screen when they are no longer needed.
The simplest solution is to add android:autoRemoveFromRecents="true".
This indicates that once the root activity is finished (e.g., the user
presses BACK), the document is removed. By default, pressing BACK does
not remove the document, so you need to opt into this behavior.
However, that approach assumes that it is fairly easy for the user to get back to the task’s root activity and press BACK. If you have a complex navigation of activities within the “document”, it may not be easy for the user to trigger document removal this way.
You can also forcibly get rid of the document by calling
finishAndRemoveTask() yourself on an activity in the task.
For example, in a tabbed Web browser,
if you have a “close tab” UI element (e.g., action bar item), that could
call finishAndRemoveTask() to get rid of the “document”.
There are other attributes that you can place on your <activity>
element in the manifest that have impacts on how that activity
participates with the task system.
Occasionally, particular techniques become much too popular in Android
development, courtesy of some blog posts or other resources touting them
as “quick hacks” to address certain issues. The android:launchMode
attribute is one of those. Most Android apps should have no need to
change launchMode off of its default value of standard, or
occasionally singleTop. Yet, because
the Android task system is rather confusing, some developers latch onto
other launch modes and use them in places where there are better,
more fine-grained solutions.
That being said, let’s explore the launch modes, with the help from the fine people at Novoda. The Novoda developers released an app on the Play Store, and an accompanying GitHub repo that helps to illustrate the launch modes.
That app has four activities, one for each of the four launch modes:
standardsingleTopsingleTasksingleInstanceThe launcher activity is the standard activity. Each activity has four
buttons, to start up that activity via startActivity(), by default
with no particular Intent flags (though there’s a legacy options menu
that allows you to play with those as well). The color-coded
UI for each activity
also shows a unique identifier of the activity, the task ID of the task
that the activity is in, the lifecycle methods that were invoked on that
instance, and a set of stacked bars designed to illustrate what should
be on the back stack for that task (using some techniques of dubious
reliability, but the sort of thing that should be OK for a demo app
like this).
So, when we launch the app, we get a green UI for a standard activity:
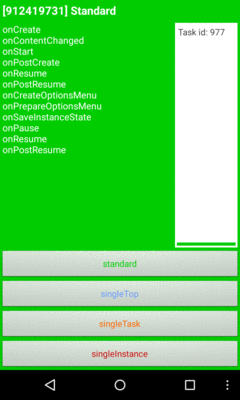
Figure 655: Novoda Demo App, As Initially Launched
singleTopUsing singleTop for the launchMode has one effect: controlling whether
a new instance of the activity is created. Normally, calling startActivity()
will create a new instance of the activity, unless Intent flags
dictate otherwise. With singleTop, if the activity being started is
already at the top of its stack, that existing instance is simply called
with onNewIntent(). Otherwise, singleTop behaves as does standard.
So, if we tap the button to launch a singleTop method in the Novoda
demo app, from our earlier state, we get a blue singleTop activity:

Figure 656: Novoda Demo App, After Starting singleTop Activity
That worked just like standard. But, if we tap the same button again,
we do not get a new instance of the activity. However, the transcript
of lifecycle methods shows that onNewIntent() was called:
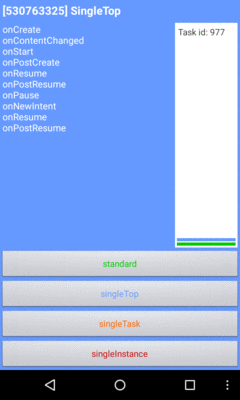
Figure 657: Novoda Demo App, After Starting singleTop Activity Again
Note that you can get a similar result by including
Intent.FLAG_ACTIVITY_SINGLE_TOP on a startActivity() call. Using
launchMode says you always want single-top behavior; using
FLAG_ACTIVITY_SINGLE_TOP says that this time you want single-top behavior.
Pressing BACK returns you to the original green standard activity,
with the blue singleTop activity having been destroyed.
A launchMode of singleTask says that this activity must always
be the root activity of a task.
If the task does not have that activity, a new task is created. So,
if we tap the button to launch the singleTask activity in the Novoda
demo app, we get a new task (ID 978, compared to the previous 977), with an
instance of the yellow singleTask activity as its root:
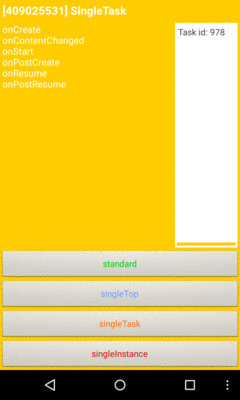
Figure 658: Novoda Demo App, After Starting singleTask Activity
However, if the activity in question is already there as the root of the
task, all other activities on the back stack are cleared, and we are
taken to the singleTask activity again.
So, in the Novoda demo app, if after we start the singleTask activity,
we tap the button to launch a standard activity or two:
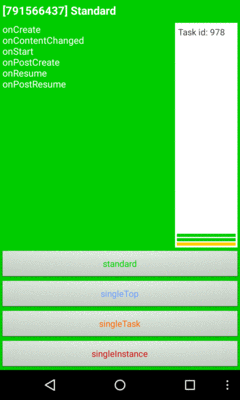
Figure 659: Novoda Demo App, Two standard Activities After singleTask Activity
…then
tap the button to launch the singleTask activity, we get largely the
same screen as before, just with a few more lifecycle methods logged:
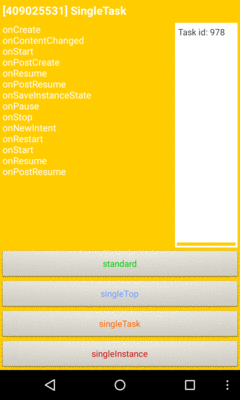
Figure 660: Novoda Demo App, After Starting singleTask Activity Again
It is the same task and the same instance, but with the other activities removed.
singleInstance works much like singleTask, except that the task
will only ever hold this one activity. No other activities will be placed
into the task.
So, tapping the button to start a singleInstance activity in the Novoda
demo app brings up the red singleInstance UI:
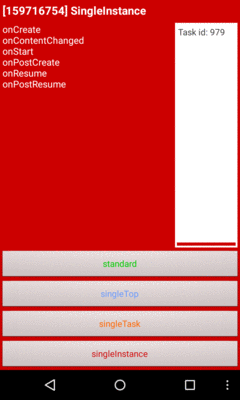
Figure 661: Novoda Demo App, After Starting singleInstance Activity
Tapping the same button again just triggers onNewIntent() and other
lifecycle methods on the same activity in the same task. If, however, you
try tapping on the button for the standard activity, your activity
will go to another task. Depending on when and how you try the Novoda
demo app, this could be a prior task associated with our app (e.g., one
you used for earlier standard tests), or it could be a new task (if you
do not have any other ones). This is based on the taskAffinity
of the activity being started.
In general, singleTask and singleInstance are for unusual use cases,
and ordinary Android apps should have little reason to use them. Google
specifically urges you not to use them:
…standard is the default mode and is appropriate for most types of activities. SingleTop is also a common and useful launch mode for many types of activities. The other modes — singleTask and singleInstance — are not appropriate for most applications, since they result in an interaction model that is likely to be unfamiliar to users and is very different from most other applications.
As noted earlier in the chapter, tasks may be cleared by Android if the user has not been in the task for some time (e.g., 30+ minutes). In these cases, the user is taken back to the root activity.
If, however, the root activity has android:alwaysRetainTaskState="true"
in its manifest entry, then Android will not apply this timeout rule. So
long as the task exists, its entire state will be retained and used when
the user returns to the task. This is useful for tasks where there is
a lot of state that the user might regret losing.
There are a handful of other task-related methods and such floating
around the Activity class:
This calls finish() not only on the current activity, but on all
activities immediately behind it on the back stack for this task
that have the same
taskAffinity as does the current activity. Much of the time, the
activities on the stack will all share an affinity, and therefore this
will frequently finish all activities in the task. If the task
has a mixed set of affinities (e.g., a mix of explicitly-named affinities
and other activities using the default affinity), this method would only
wipe out those behind the current with a specific match.
This method is not commonly used.
This calls finish() on all activities in the task and removes the
task outright.
For example, a “logout” operation might call finishAndRemoveTask()
to flush the current task, then call startActivity() to launch the
login activity. That login activity will wind up in a fresh task (since
the current one will be removed), and the old activity instances will
go away, so the user cannot somehow stumble into them when they are not
yet logged in.
Returns a unique integer that identifies the task the activity resides in.
This method is not commonly used.
isTaskRoot() is a method on Activity. It will return true if this
activity instance is at the root of a task, meaning that pressing BACK
should remove the task and return the user to the home screen.
This method moves the current task to the background. What comes to the foreground is undocumented but generally seems to be the task for the home screen. Some apps use this to offer a “minimize” or “go to background” option within the app, though this is superfluous, as the task will move to the background naturally as the user navigates their device.
For Android 5.0+, setTaskDescription() allows you to associate an
ActivityManager.TaskDescription instance with your task. Here you can
provide values that help drive what the task looks like on the overview
screen. Specifically, you can provide the icon, title, and background color
to use for the title bar over your thumbnail on the overview screen.