Figure 864: Warning when unmounting the SD card
If you have been diligent about reading this book (versus having
randomly jumped to this chapter), you will already have done a fair
number of things with
your project’s AndroidManifest.xml file:
In this chapter, we continue looking at things the manifest offers you, starting with a discussion of controlling where your application gets installed on a device, and wrapping up with a bit of information about activity aliases.
Understanding this chapter requires that you have read the core chapters of this book.
On October 22, 2008, the HTC Dream was released, under the moniker of “T-Mobile G1”, as the first production Android device.
Complaints about the lack of available storage space for applications probably started on October 23rd.
The Dream, while a solid first Android device, offered only 70MB of on-board flash for application storage. This storage had to include:
It would not take long for a user to fill up 70MB of space, then have to start removing some applications to be able to try others.
Users and developers alike could not quite understand why the Dream had so little space compared to the available iPhone models, and they begged to at least allow applications to install to the SD card, where there would be more room. This, however, was not easy to implement in a secure fashion, and it took until Android 2.2 for the feature to become officially available.
If your app’s android:minSdkVersion is 11 or higher, you can
probably ignore all of this. At that time, what the Android SDK
refers to as “internal storage” and “external storage” were moved to
be part of one filesystem partition, and so there is no artificial
division of space between the two.
But, if you are still supporting Android 2.2 and 2.3, you may wish to consider supporting having your app be installed to, or moved to, external storage.
Indicating to Android that your application can reside on the SD card is easy… and necessary, if you want the feature. If you do not tell Android this is allowed, Android will not install your application to the SD card, nor allow the user to move the application to the SD card.
All you need to do is add an android:installLocation attribute to
the root <manifest> element of your AndroidManifest.xml file.
There are three possible values for this attribute:
internalOnly, the default, meaning that the application cannot be
installed to the SD cardpreferExternal, meaning the application would like to be
installed on the SD cardauto, meaning the application can be installed in either locationIf you use preferExternal, then your application will be initially
installed on the SD card in most cases. Android reserves the right to
still install your application on internal storage in cases where
that makes too much sense, such as there not being an SD card
installed at the time.
If you use auto, then Android will make the decision as to the
installation location, based on a variety of factors. In effect, this
means that auto and preferExternal are functionally very similar
– all you are doing with preferExternal is giving Android a
hint as to your desired installation destination.
Because Android decides where your application is initially
installed, and because the user has the option to move your
application between the SD card and on-board flash, you cannot assume
any given installation spot. The exception is if you choose
internalOnly, in which case Android will honor your request, at the
potential cost of not allowing the installation at all if there is no
more room in on-board flash.
For example, here is the manifest from the
SMS/Sender
sample project,
profiled in another chapter, showing the use of
preferExternal:
<?xml version="1.0" encoding="utf-8"?>
<manifest xmlns:android="http://schemas.android.com/apk/res/android"
  package="com.commonsware.android.sms.sender"
  android:installLocation="preferExternal"
  android:versionCode="1"
  android:versionName="1.0">

  <uses-permission android:name="android.permission.READ_CONTACTS"/>
  <uses-permission android:name="android.permission.SEND_SMS"/>

  <uses-sdk
    android:minSdkVersion="7"
    android:targetSdkVersion="11"/>

  <supports-screens
    android:largeScreens="true"
    android:normalScreens="true"
    android:smallScreens="false"/>

  <application
    android:icon="@drawable/ic_launcher"
    android:label="@string/app_name">
    <activity
      android:name="Sender"
      android:label="@string/app_name">
      <intent-filter>
        <action android:name="android.intent.action.MAIN"/>

        <category android:name="android.intent.category.LAUNCHER"/>
      </intent-filter>
    </activity>
  </application>

</manifest>Since this feature only became available in Android 2.2, to support
older versions of Android, just have your build tools target API
level 8 (e.g., compileSdkVersion of 8 or higher in build.gradle for
Android Studio users) while having your minSdkVersion attribute
in the manifest state the lowest Android version your application
supports overall. Older versions of Android will ignore the
android:installLocation attribute. So, for example, in the above
manifest, the Sender application supports API level 4 and above
(Android 1.6 and newer), but still can use
android:installLocation="preferExternal", because the build tools
are targeting API level 8.
On newer devices, such as those running Android 4.2, the user will see nothing different. That is because internal and external storage share a common pool of space, and therefore there is no advantage in having your application installed to external storage.
However, on, say, Android 2.3, you will see a difference in behavior.
For an application that wound up on external storage, courtesy of your
choice of preferExternal or auto, the user will have an option to
move it to the phone’s internal storage. This can be done by choosing
the application in the Manage Applications list in the Settings
application, then clicking the “Move to phone” button.
Conversely, if your application is installed in on-board flash, and it is movable to external storage, they will be given that option with a “Move to SD card” button.
Ideally, the pirate sees nothing at all.
One of the major concerns with installing applications to the SD card
is that the SD card is usually formatted FAT32 (vfat), offering no
protection from prying eyes. The concern was that pirates could then
just pluck the APK file off external storage and distribute it, even for
paid apps from the Play Store.
Apparently, they solved this problem.
To quote the Android developer documentation:
The unique container in which your application is stored is encrypted with a randomly generated key that can be decrypted only by the device that originally installed it. Thus, an application installed on an SD card works for only one device.
Moreover, this “unique container” is not normally mounted when the
user mounts external storage on their host machine. The user mounts
/mnt/sdcard; the “unique container” is /mnt/asec.
So far, this has all seemed great for users and developers. Developers need to add a single attribute to the manifest, and Android 2.2+ users gain the flexibility of where the app gets stored.
Alas, there is a problem, and it is a big one: on Android 1.x and 2.x,
either the host PC or
the device can have access to the SD card, but not both. As a result,
if the user makes the SD card available to the host PC, by plugging
in the USB cable and mounting the SD card as a drive via a
Notification or other means, that SD card becomes unavailable for
running applications.
So, what happens?
onDestroy(), and instance state
saved via onSaveInstanceState() is lost.AlarmManager alarms
will be canceled, and so on.The upshot: if your application is simply a collection of activities, otherwise not terribly connected to Android, the impact on your application is no different than if the user reboots the phone, kills your process via a so-called “task killer” application, etc. If, however, you are doing more than that, the impacts may be more dramatic.
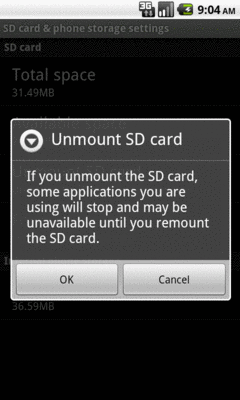
Perhaps the most dramatic impact, from a user’s standpoint, will be if your application implements app widgets. If the user has your app widget on her home screen, that app widget will be removed when the SD card becomes unavailable to the phone. Worse, your app widget cannot be re-added to the home screen until the phone is rebooted (a limitation that hopefully will be lifted sometime after Android 2.2).
The user is warned about this happening, at least in general:
Figure 864: Warning when unmounting the SD card
Two broadcast Intents are sent out related to this:
ACTION_EXTERNAL_APPLICATIONS_UNAVAILABLE, when the SD card (and
applications installed upon it) become unavailableACTION_EXTERNAL_APPLICATIONS_AVAILABLE, when the SD card and its
applications return to normalNote that the documentation is unclear as to whether your own
application, that had been on the SD card, can receive
ACTION_EXTERNAL_APPLICATIONS_AVAILABLE once the SD card is back in
action.
Also note that all of these problems hold true for longer if the user physically removes the SD card from the device. If, for example, they replace the card with a different one — such as one with more space — your application will be largely lost. They will see a note in their applications list for your application, but the icon will indicate it is on external storage, and the only thing they can do is uninstall it:
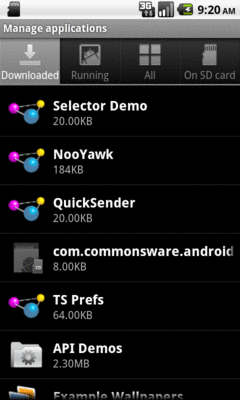
Figure 865: The Manage Applications list, with an application shown from a removed SD card
Given the huge problem from the previous section, the question of whether or not your application should support external storage is far from clear.
As the Android developer documentation states:
Large games are more commonly the types of applications that should allow installation on external storage, because games don’t typically provide additional services when inactive. When external storage becomes unavailable and a game process is killed, there should be no visible effect when the storage becomes available again and the user restarts the game (assuming that the game properly saved its state during the normal Activity lifecycle).
Conversely, if your application implements any of the following features, it may be best to not support external storage:
But, as noted earlier, this is not even usually necessary on API Level 11+ devices. Hence, even if your app would otherwise qualify for being installed to external storage, you may not wish to bother. If few devices (Android 2.2 and Android 2.3) might need the capability, it may not be worth the extra testing burden.
When Android 3.0 did away with the required separate partitions for
internal storage and external storage, the android:installLocation
option fell out of use, as there was no particular value in having
the apps on external storage. For single-partition devices — meaning,
for most devices — users did not even have the option for moving their
apps to external storage.
However, android:installLocation is returning to relevance, once again
courtesy of removable media.
On Android 6.0+, users with removable storage options, such as micro SD card slots,
have the option of “adopting” those as an extension of
the device’s internal storage. Once done, apps set with
auto or preferExternal for android:installLocation can be
moved to the removable media. However, there appears to be one
key difference: not only is the APK on the removable media, but so
is all of that app’s portion of internal storage. The removable
media is encrypted, so the material copied to the removable media
should remain fairly inaccessible.
From the user’s standpoint, for low-end devices with minimal on-board flash, they have additional storage space that they can use for apps.
However:
Notification telling them to put it back:
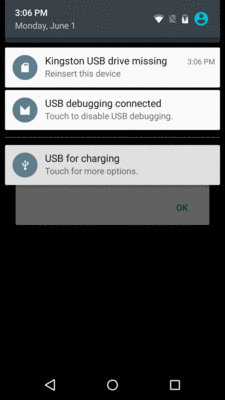
Figure 866: Android 6.0, Ejected Adopted Removable Media Notification
The user does have an “Erase & Format” option that will reformat the removable media and allow it to be permanently removed from the device. It does not appear that this will automatically move any apps back to internal storage. The users would need to move those apps back to internal storage by means of the Apps list in Settings.
Normally, it appears this system will be limited to internal card
slots for things like micro SD cards. While USB On-The-Go (OTG) allows
Android devices to access thumb drives, those are likely to be accidentally
removed by the user (not to mention they usually tie up the charging
port). However, for development testing purposes, you can run the
adb shell sm set-force-adoptable true command to allow the
device to adopt USB OTG drives. Note though that once you do this, the
drive is more or less owned by that Android device until you “Erase & Format”
it, and you will lose everything on the drive as part of this whole
process.
As was mentioned in the chapter on integration, you
can use the PackageManager class to enable and disable components
in your application. This works at the component level, meaning you
can enable and disable activities, services, content providers, and
broadcast receivers. It does not support enabling or disabling
individual <intent-filter> stanzas from a given component, though.
Why might you want to do this?
While you cannot control individual <intent-filter> stanzas
directly, you can have a similar effect via an activity alias.
An activity alias is another manifest element — <activity-alias>
– that provides an alternative set of filters or other
component settings for an already-defined activity. For example, here
is the AndroidManifest.xml file from the
Manifest/Alias
sample project:
<?xml version="1.0" encoding="utf-8"?>
<manifest xmlns:android="http://schemas.android.com/apk/res/android" android:versionCode="1" android:versionName="1.0" package="com.commonsware.android.alias">

  <supports-screens android:largeScreens="true" android:normalScreens="true" android:smallScreens="false"/>
  <application android:icon="@drawable/ic_launcher" android:label="@string/app_name">
    <activity android:label="@string/app_name" android:name="AliasActivity">
      <intent-filter>
        <action android:name="android.intent.action.MAIN"/>
        <category android:name="android.intent.category.LAUNCHER"/>
      </intent-filter>
    </activity>
    <activity-alias android:label="@string/app_name2" android:name="ThisIsTheAlias" android:targetActivity="AliasActivity">
      <intent-filter>
        <action android:name="android.intent.action.MAIN"/>
        <category android:name="android.intent.category.LAUNCHER"/>
      </intent-filter>
    </activity-alias>
  </application>
</manifest>
Here, we have one <activity> element, with an <intent-filter] to
put the activity in the launcher. We also have an <activity-alias>
element… which puts a second icon in the launcher for the same
activity implementation.
An activity alias can be enabled and disabled independently of its underlying activity. Hence, you can have one activity class have several independent sets of intent filters and can choose which of those sets are enabled at any point in time.
For testing purposes, you can also enable and disable these from the
command line. Use the adb shell pm disable command to disable a
component:
adb shell pm disable
com.commonsware.android.alias/com.commonsware.android.alias.ThisIsTheAlias
… and the corresponding adb shell pm enable command to enable
a component:
adb shell pm enable
com.commonsware.android.alias/com.commonsware.android.alias.ThisIsTheAlias
In each case, you supply the package of the application
(com.commonsware.android.alias) and the class of the component to
enable or disable (com.commonsware.android.alias.ThisIsTheAlias),
separated by a slash.
Sometimes, you may want to put more data in the manifest, associated with your components. You will frequently see this for use with libraries or plugin distribution models, where sharing some configuration data between parties could eliminate a bunch of API code that a reuser might need to implement.
To support this, Android offers a <meta-data> element as a child of <activity>,
<activity-alias>, <receiver>, or <service>. Each <meta-data] element has
an android:name attribute plus an associated value, supplied by either an
android:value attribute (typically for literals) or an android:resource attribute
(for references to resources).
Other parties can then get at this information via PackageManager. So, for example,
the implementer of a plugin could have <meta-data> elements indicating details
of how the plugin should be used (e.g., desired polling frequency), and the host
of the plugin could then get that configuration data without the plugin author
having to mess around with implementing some Java API for it.
For example, Roman Nurik’s DashClock is a lockscreen app widget designed to serve as a replacement for the clock app widget that ships with many Android 4.2+ devices. Not only does it display the time, but it is a plugin host, allowing third party developers to supply “extensions” that can also display data in the app widget. This way, users can set up a single lockscreen app widget and get at a bunch of useful information.
DashClock’s extension API makes use of <meta-data> to pass configuration data
from the extension to DashClock itself. The implementation of a DashClock extension
is a service, and so the extension’s <service> element will have a batch of
<meta-data> elements with this configuration data:
<service android:name=".ExampleExtension"
     android:icon="@drawable/ic_extension_example"
     android:label="@string/extension_title"
     android:permission="com.google.android.apps.dashclock.permission.READ_EXTENSION_DATA">
     <intent-filter>
         <action android:name="com.google.android.apps.dashclock.Extension" />
     </intent-filter>
     <meta-data android:name="protocolVersion" android:value="1" />
     <meta-data android:name="description"
         android:value="@string/extension_description" />
     <!-- A settings activity is optional -->
     <meta-data android:name="settingsActivity"
         android:value=".ExampleSettingsActivity" />
 </service>
(sample from the DashClock documentation)
Here, the developer can specify:
protocolVersion entrydescription entrysettingsActivity entryIn all three cases, DashClock uses android:value. Note that android:value
does support the use of resources — the value of description is a reference
to the extension_description string resource, for example.
To retrieve that metdata, an app can ask for PackageManager.GET_META_DATA as
a flag on PackageManager
methods for introspection, like queryIntentActivities().
In the case of DashClock, it retrieves all implementations of its plugin by asking
Android what services have an <intent-filter> with an <action> of
com.google.android.apps.dashclock.Extension, via queryIntentServices(), asking
for PackageManager to also supply each service’s metadata:
List<ResolveInfo> resolveInfos = pm.queryIntentServices(
                new Intent(DashClockExtension.ACTION_EXTENSION), PackageManager.GET_META_DATA);
(from the ExtensionManager.java file
in the DashClock source code)
Each ResolveInfo object that comes back in the list will have a serviceInfo
field containing details of the service. Because GET_META_DATA was passed in as
a flag, the serviceInfo will have a Bundle named metaData which will contain
the key/value pairs specified by the <meta-data> elements. DashClock can then
grab that data and use it to populate its own object model:
for (ResolveInfo resolveInfo : resolveInfos) {
    ExtensionListing listing = new ExtensionListing();
    listing.componentName = new ComponentName(resolveInfo.serviceInfo.packageName,
            resolveInfo.serviceInfo.name);
    listing.title = resolveInfo.loadLabel(pm).toString();
    Bundle metaData = resolveInfo.serviceInfo.metaData;
    if (metaData != null) {
        listing.protocolVersion = metaData.getInt("protocolVersion");
        listing.description = metaData.getString("description");
        String settingsActivity = metaData.getString("settingsActivity");
        if (!TextUtils.isEmpty(settingsActivity)) {
            listing.settingsActivity = ComponentName.unflattenFromString(
                    resolveInfo.serviceInfo.packageName + "/" + settingsActivity);
        }
    }
(from the ExtensionManager.java file
in the DashClock source code)
The <meta-data> element supports five data types for android:value:
true or false in the android:value attribute)It also supports colors, specified in #AARRGGBB and similar formats, which, according to the documentation, is returned as a string.
In this fashion, extension developers can supply enough information for DashClock
to allow the user to see the list of installed extensions, choose which one(s)
they want, and configure those (where applicable). Actually getting the content
to display will need to be done at runtime, in this case via making requests
of the service to supply a ExtensionData structure with the messages, icon, and
so forth to be displayed.