> Shooting Specifically for a Photo Book
> Scanning Images and Other Printed Materials
> Optimizing Your Image Settings
The creation of every great photo book begins with a photo shoot. The basic criteria that qualify photos for use in a photo book are no different from those that apply elsewhere—e.g., they need to have sufficient contrast, a strong composition, an interesting subject, and they need to be in focus. However, when you are shooting specifically for a photo book, you need to take extra care with your choice of subject.
When we are out taking photos in everyday situations, we generally aim to create images that stand out individually. In contrast, a photo book often tells a story using a sequence of images that embody separate, individual details of an overall narrative. If you are taking snapshots on vacation, you probably won’t photograph the menu in a restaurant or a great-tasting local delicacy, whereas such minutiae make great illustrations in a photo book. Photos of entry tickets, street signs, and flyers enhance the look of a book page and can make effective backgrounds. If you collect menus and the like while you are away, you can always scan or photograph them later, but you have to take pictures of local color while you are out and about. [Fig. 3.1]
Figure 3.1: The images in a photo book should tell a story. Photos of details like entry tickets, street signs, or other local color round out the overall picture.
Try to get into the habit of photographing extra details when you are taking photos of family events. If you are documenting a wedding, for instance, try to get shots of all the separate stages of the event. Things like the wedding dress on its hanger or the bride’s shoes in their romantic-looking box make great decorative elements alongside the main image on a page. In addition to illustrative details, you can also use abstract details to create backgrounds for your book’s pages—for example, the material of the wedding dress or the bridesmaids’ bouquets.

Figure 3.2: Tiny details, like these wedding rings in their box, make great decorative illustrations alongside the main images in a photo book.

Figure 3.3: Graphic landscapes or architectural details make great background images, even if they appear dull when viewed on their own. Images without distracting details make the best backgrounds.
During the wedding itself, make sure you get pictures of the person conducting the ceremony, to use either as a main image or as a detail. And be sure to capture pictures of all the guests. Missing faces are much more obvious in a photo book than in a slide show. Experience has shown that photographers subconsciously tend to shoot more pictures of a few selected individuals at large events, especially if they know the people involved. Keep an eye on your own behavior at your next family event.
TIPS & TRICKS GUEST LISTS
Try to get a written list of the guests at large events, and cross each person off once you have photographed them. You can also simply go from table to table to make sure that you get pictures of everyone. Photographing the signatures in a guestbook for inclusion in the finished photo book is a nice touch. 
In a travel photo book, you could use a detail of a landscape or part of a building as a decorative background. In order to prevent the page background from spoiling the effect of the main image, it should be uniformly colored and free of distracting details. The types of images that make effective backgrounds would make boring photographs if displayed on their own.
Even if you are not documenting a specific event, pictures of objects related to a book’s theme make great additions to the overall look of the book. For instance, in a book of baby photos, you might include photos of the baby’s favorite toy or first spoon and fork. Depending on their nature, such details can be photographed or scanned (see section 3.2, “Scanning Images,” for more details).
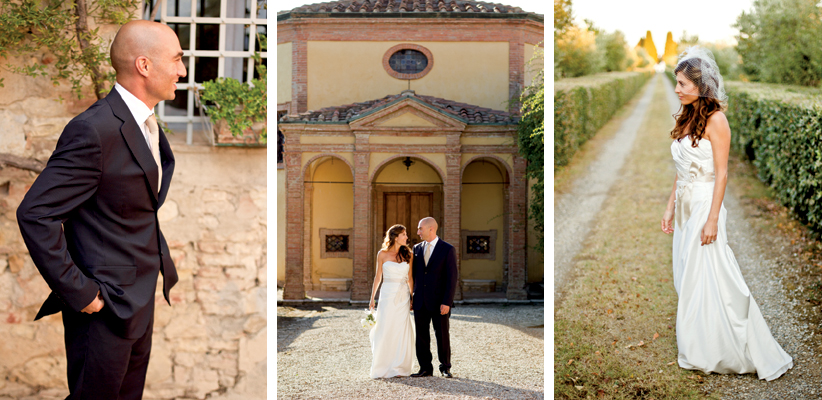
Composition is the other aspect of shooting images for photo books that differs from a conventional photographic approach. Experienced photo book makers will have an idea of what the final layout of their book will look like before they start a shoot, and will compose their images accordingly. The most important thing to do when shooting for a photo book is to think beyond the individual photos and develop a graphic narrative. For example, the triptych form often used in classical painting makes a very effective framework for photos of a wedding couple. [Fig. 3.4]

Figure 3.4: The classical three-part triptych is a well-loved artistic device for enhancing the look of a scene
EXPERT ADVICE FROM MIKE LARSON: CREATING A TRIPTYCH

Arranging your images in a triptych adds a professional look to a photo book and creates a dynamic feel that a single image does not always have. Triptychs can be used effectively for photos of couples (as shown below) or for portraits of individuals. You have to think ahead while shooting in order to produce striking left-hand, center, and right-hand images that complement each other and tell a complete story. Consider the effects you want the individual images to have before starting your shoot, and take enough shots to give yourself a choice later on. It is usually best to shoot all the images for a triptych in one session. 
Pay attention to the differences between landscape- and portrait-format images while you are shooting. The pages of most photo books are either square or portrait-format rectangular (i.e., wider horizontally than vertically). For a rectangular book, if you want to turn a particular image into a page-filler, be sure to shoot it in landscape format. If you are planning a square-format book, be sure to compose your images in such a way that there will be sufficient space at the edges for subsequent cropping.

Figure 3.5: These photos demonstrate how you can photograph a single subject for different uses in a photo book—for a double-page spread; for a single, portrait-format page; and as an isolated detail against a hazy background
If you want to isolate a specific detail, you should photograph it against a homogenous background, with as much free space as possible surrounding it. Changing your viewpoint is often the best way to alter your perspective of a subject. Shooting from below against a blue sky is an effective way to isolate a particular detail.
If you are not sure how you want your finished book to look, give yourself a variety of options by shooting multiple versions of each image, using different framing and compositional concepts. It is easy to later crop digital images to the right size and shape (see section 7.1, “Scaling and Cropping and Photos”).
If you want to include printed materials, such as an entry ticket or a brochure, you can either photograph or scan them. If you decide to scan your material, make sure that you set a resolution that equates to 300dpi for the size at which the image will be printed. For example, if you want a scan of an 8″ × 10″ image to fill a 12″ × 12″ page, you will need to scan it at a higher resolution to allow for the increase in image size. Accordingly, if you are scanning negatives or slides, the scan resolution will have to be even greater. For more details, see section 3.5, “Optimizing Your Image Settings.”
Using a commercial scan service is a practical alternative if you have a lot of material to be scanned. High-quality scans can cost as little as 30 cents per scan (plus postage). If you use a local service, you won’t have to pay postage, and there is less of a risk of your valuable images getting lost along the way. Another way to reduce the cost of scanning is to rent a high-end scanner and do the work yourself.
Figure 3.6: Scans of old prints make a great addition to a family album
(Photos: Heinz Pluta)
TIPS & TRICKS
SELECTING THE CORRECT SCAN RESOLUTION The resolution of negative and slide scans varies from service to service, and is usually between 2500 and 4000 dpi. Greater resolution usually costs more, and you will have to decide whether this is actually necessary depending on the project at hand. A 2500 dpi scan can be printed at a size of up to 8 × 12 inches at 300 dpi, and a 4000 dpi scan is sufficient for reproduction at up to 12 × 18 inches. If you are not sure how large you want to print a detail, it is always preferable to scan material at a higher resolution.
EXPERT ADVICE FROM SASCHA STEINHOFF: HOME SCANNING VS. SCAN SERVICES

Scanning at home really only makes sense if you have access to high-end hardware, and you are prepared to spend time getting to know the ins and outs of scanning software. Professional-grade scan services save time and—for small quantities—money. For subsequent processing, the TIFF file format is the best output format, but you will generally have to convert images to JPEG format for printing.
You should always carefully check negatives and slides for dust and scratches before scanning. Even the smallest imperfections can become quite visible once they have been enlarged to full-page size. Use an anti-static cloth or compressed air to clean your material. If your images still show dust and dirt after cleaning, it is probably inseparable from the film’s emulsion. There are special fluids available for advanced film cleaning, but you must be extremely careful when hanging out the treated material to dry, as fresh dust can easily attach itself to the moist film. High-end scanning hardware usually has built-in dust and scratch removal functionality.
Any remaining dust marks or scratches can also be retouched using specialized software tools, such as Polaroid’s Dust and Scratch Removal. Photoshop, too, has built-in dust and scratch removal filters. Using these tools requires some practice and can be quite time-consuming, but they usually produce very good results.
Scanning and the special challenges it presents are a study in their own right. If you want to delve deeper into the subject, or if you simply want to improve your results, I recommend reading Sascha Steinhoff’s Scanning Negatives and Slides, 2nd Edition and/or The VueScan Bible, also published by Rocky Nook. The amount of time you spend on scanning will depend on the quality of your raw material and the type of results you wish to achieve.
Whether you just happened to be sick one day or the weather didn’t cooperate, you will often find that you are missing an image that plays an important role in the story you want your photo book to tell. Or perhaps you only have low-quality mobile phone photos of an event that you would like to use in a photo book. These are situations in which you can use third-party images to improve your book. This is easy to do if you are looking for photos from a group trip or a family event, as you can ask other people who were part of the trip or event to contribute their photos to your project. The Internet is another great source for travel photos. Some photographers turn their noses up at the idea of using other people’s photos, but a photo book is often not just about demonstrating your own photographic prowess, but also about telling a story; and a third-party image is often the element that completes the picture.
TIPS & TRICKS If an image isn’t available in an appropriate size at a printable resolution, you can always reproduce it at a reduced size to make its origins less obvious.
At first glance, the Internet appears to be an inexhaustible source of all sorts of images. However, on closer inspection, you will often find that the images turned up by a search are only available at low resolution for fast loading and viewing on a monitor. See section 3.5, “Optimizing Your Image Settings,” for more information on the types of images required for effective print reproduction.

Figure 3.7: Google’s Advanced Image Search is a great tool for finding print-quality images on the Internet
While photo platforms like Flickr or fotocommunity.com often provide only low-resolution photos, Google’s Advanced Image Search allows you to filter your search according to image size (e.g., larger than 2MP, larger than 4MP, etc.). You can use a dpi calculator (see section 3.5) to figure out how large an image has to be to suit your planned print output size.
Please Note: Image Rights Make sure that you have permission to use each image that you download from the web. You are not automatically allowed to reproduce an image just because you found it online. Specialist search engines like Google’s Advanced Image Search can be used to search for images with specific usage rights.
If you search for “royalty-free images” on the Internet, you will find a number of databases that specialize in listing public domain images in all sizes, including images that can be used for print.
The Stock.XCHNG (www.sxc.hu) specializes in stock photos shot specifically with print usage in mind. The Abstract > Textures category contains a collection of images that are perfectly suited for use as page backgrounds. The database also offers a range of images that you can enhance using custom text, such as an empty parchment roll or a hand holding a blank calling card.
Wikimedia Commons offers a broad range of more than 10 million images from various sources, including private individuals and public archives. These images are generally available for reuse and many are available in printable sizes.
There are also specialized historical image archives that contain a wealth of images for enhancing photo histories. A good place to start a search is at Flickr Commons, which draws images from sources as diverse as the Library of Congress and the Reykjavík Museum of Photography. The bulk of the images available come from American and English institutions. Please note that the Flickr interface often contains only highlights of the individual collections. For example, the famous Farm Security Administration photo archive is represented by just 25 favorites at Flickr, whereas the original archive on the Library of Congress website contains more than 175,000 images. If you find a useful image at Flickr, it is always worth taking a closer look at the source website.

Figure 3.8: Royalty-free image databases like aboutpixel.com offer a wide range of images that can be used for print applications
Figure 3.9: The Flickr Commons project gives you access to images from a broad range of mostly Anglo-Saxon historical archives

Figure 3.10: The Library of Congress website contains a wealth of archived images, including Dorothea Lange’s famous Farm Security Administration photos

Figure 3.11: Fotolia is one of today’s largest online image sources
If you want to use professionally produced images, there are many commercial databases around, including iStockphoto, ClipDealer, and Fotolia. Images suitable for print are more expensive than their low-resolution counterparts, so it is worth calculating the lowest possible resolution that you can get away with. See section 3.5, “Optimizing Your Image Settings,” for more details on how to figure out what image size you need.
Specialized themed websites are another great place to look for unusual images. For example, NASA’s Visible Earth website (visibleearth.nasa. gov) offers images of the Earth shot from space that make perfect backgrounds for a whole range of subjects, and its Earth Observatory website (earthobservatory.nasa.gov) contains fascinating aerial images of many cities. There are more great space images available at hubblesite.org. Printable images can be found at the site’s Astronomy Printshop, which offers images for free. Make sure that your chosen image has sufficient resolution for your purposes—many of the older images are not sharp enough to fill an 8″ × 10″ page.
Figure 3.12: Earth Observatory offers aerial photos of selected cities
Figure 3.13: You can download free high-resolution images of Earth from space at visibleearth.nasa.gov
Maps make a great addition to any travel photo book. Google Maps is perhaps the best-known Internet map source, but doesn’t offer images with sufficient resolution for most print applications. Screenshots of Google Maps taken from a 1280 × 800-pixel monitor have a maximum usable length of about four inches when printed at 300 dpi. If you require greater resolution, you will have to use image-processing tricks to produce a magnified version of the screenshot.
The OpenStreetMap free maps project (www.openstreetmap.org) uses a more effective approach, and includes a dedicated Export function that allows you to save maps as PDFs. These PDFs can then be opened and saved at 300 dpi using Photoshop or the GIMP open-source image-processing package. The website also offers raw map data for download. Another great map source is mapsof.net, which offers a wide range of different map files.
If you are a Mac user, the Photo Book function built into the iPhoto application allows you to create maps that relate to the photos in your book. See section 5.1, “Using Wizards to Create a Book,” for more information.

Figure 3.14: OpenStreetMap (OSM) includes a dedicated Export function that allows you to save maps as PDFs

Figure 3.15: mapsof.net offers all sorts of world, country, and city maps
TIPS & TRICKS INCREASING RESOLUTION USING MULTIPLE SCREENSHOTS
Combining multiple screenshots is an effective way to produce maps with increased resolution. First, calculate how far you need to zoom into each map to achieve the required combined resolution. You can then stitch your screenshots together using your favorite image-processing software.
Most photo book providers offer clip art illustrations that cover general themes (vacation, wedding, baby, etc.) as part of their proprietary software. Mixbook calls its clip art offering “stickers,” and also allows you to download other clip art from the web, as does SmileBooks.

Figure 3.16: Mixbook offers a wide range of clip art, called “stickers,” for use in your photo book layout

Figure 3.17: SmileBooks lets you download additional clip art from their servers
One of the major pitfalls of digital photography is the sheer number of photos that people tend to generate. In the good old analog days, 10 rolls of film (up to 360 images) were considered a big haul. Nowadays, it’s common for people to come home from a two-week trip with 3,000 images.
TIPS & TRICKS
HOW MANY IMAGES DOES A BOOK REQUIRE? The number of photos you end up using in a photo book will depend heavily on the layout and the number of pages involved. Narrative photo books, such as travel books, average between two and four images per double-page spread, although some spreads contain as many as ten photos. Give yourself some options when preselecting your images—one rule of thumb states that you should select twice as many images as you think you will actually need, although the final number you choose will depend on the type of project and your level of experience. Once you have made a few photo books, you will develop a feel for the types of photos that work best in a layout. [Fig. 3.17]

Figure 3.18: The number of images you’ll need depends on the type of book you want to produce. A narrative travel book, like the one about Iceland illustrated here, often contains as many as five, or even ten, images per double-page spread.
Photo book software doesn’t always make it easy to browse through your images and select which ones you want to use. This becomes especially difficult when creating large, narrative books that contain a large number of photos. Most providers offer only a small preview window at the edge of the monitor, which makes effective judgment virtually impossible.
TIPS & TRICKS The greater the number of images you have, the more important effective pre-selection will be.
It makes much more sense to select your images before you begin to create your layout, rather than try to select them as you go. Experience has shown that pre-selecting your images accelerates the entire book creation process, even if it appears more arduous at the time. It is always a good idea to sort and apply keywords to your images immediately after shooting. This will help you find the right photos for all sorts of purposes later on.
Rating and keywording your photos provides additional metadata that will help you select images when preparing to create a photo book. See the box titled “Photo Metadata” for more information.
For example, let’s say you want to create a photo book for your sister’s 50th birthday. If your photos are stored in folders called things like “Christmas 2009” or “Grandma’s Birthday,” you will have to go through every single folder to find suitable photos of your sister. If, however, you have tagged all photos of your sister with keywords in advance, it’s a snap to use a software search to pick them out, regardless of where they are actually stored. And, if you decided to rate your photos while keywording them, you can even select the best photos of your sister in a single step. You can also narrow your search by selecting multiple keywords.
Many people consider keywording and rating photos to be laborious and time-consuming, but if you work systematically using appropriate software it can be quite quick and easy to do. With practice, you can apply single keywords to multiple images—I usually spend about ten minutes performing basic rating and keywording for several hundred photos.
Taking the time to apply keywords to your photos is an investment in the future. Photo books often cover large collections of images that span various periods of time; so in the long run, careful data management saves much more time and effort than it costs. Ten minutes of tagging time saves hours of searching.
GOING DEEPER PHOTO METADATA
Subsidiary information that relates to a digital image, such as the name of the photographer or the camera used to take the photo, is known as metadata. There are various metadata standards that allow people to search collections of image data using different machines in multiple locations. This is a great aid to finding photos from a number of sources for use in a book project. The Exchangeable Image File Format (EXIF) standard is the most common for recording technical image data, and the International Press Telecommunications Council (IPTC) standard is the most widely used for recording information about the content of images.
EXIF was developed by the Japan Electronic and Information Technology Industries Association (JEITA). The EXIF data fields include camera model, focal length, exposure time, aperture, and the ISO value used to take the photo.

Figure 3.19: EXIF data contains a wealth of technical data, including the camera model and the focal length of the lens used to take the photo
Figure 3.20: Adobe Lightroom can be used to display and edit IPTC metadata

Figure 3.21: Metadata is saved in the form of an additional “sidecar” file for RAW formats
Most cameras automatically record nearly all EXIF data along with an image, and some newer cameras allow you to enter your name separately and have it automatically appended to the image metadata.
IPTC metadata, which includes things like location names and genres, is an essential component of images that are stored in databases and used in publishing, as it is impossible to effectively search through large numbers of images using just folders and filenames. IPTC metadata is also widely used by non-professional photographers who simply need to keep track of large amounts of image data. [Fig. 3.19]
Because the camera doesn’t know what you have photographed or which genre your subject belongs to, you have to enter IPTC metadata manually, ideally immediately after you have downloaded your images to your computer. Most IPTC data fields are self-explanatory. They go beyond the requirements of most private users, so you should leave any fields you don’t need blank [Fig. 3.20]. The individual fields are explained on the Photo Metadata page at www.iptc.org.
Some image management programs don’t follow the IPTC standard, and often have their own independent keyword hierarchies. Sticking to the IPTC standard for your own metadata makes sense if you want your image data to remain consistent and program-independent. This also makes it simpler for others to read the metadata stored with your images—for example, if you contribute images to someone else’s photo book.
Metadata can be written directly into JPEG image files without altering the original image data. With RAW formats, metadata is saved in the form of an additional “sidecar” file, usually in the widely used XMP format. [Fig. 3.21] 
Figure 3.22: Windows 7 allows you to directly enter star ratings at the operating system level and sort your image files accordingly

Figure 3.23: The iPhoto photo management application is an integral part of the Apple OS X operating system
If I have managed to convince you that adding metadata to your images is a good idea, you are now probably asking yourself how to go about it. The Windows operating system has built-in functionality for adding star ratings and keywords to image files, either using the Properties > Details dialog or, since the release of Windows 7, using the Details Explorer view. You can also sort JPEG images in Windows according to their ratings, and you can add ratings to multiple images. [Fig. 3.22]
Keywording and rating is even simpler if you use a dedicated image- or asset-management program. This type of specialized software can be used to quickly and easily add keywords and other tags (such as the photographer’s name) to entire folders of images. [Fig. 3.22, 3.23]
Figure 3.24: High-end image management software like Adobe Lightroom can combine multiple criteria in a single search—for example, all images of New York rated with three stars
Image management software displays thumbnails of the images stored in a folder, which saves you time because you don’t have to wait for each image to load for viewing. It is also possible to view a collection of thumbnail images independently of the original image files—for instance, if your images are stored on your home network but you want to view and sort your images on your notebook while you are out and about.
The number of image management programs on the market, and the competition among them, has increased in recent years. The current crop of software ranges from free programs for private use, such as Picasa, iPhoto (for Mac), and digiKam, to pro-grade packages like Adobe Photoshop Lightroom and Apple’s Aperture. Nikon supplies its proprietary ViewNX software with its DSLRs, and Canon includes its own ZoomBrowser (for Windows) and ImageBrowser (for Mac) with its cameras. Adobe Bridge (which is part of the Adobe Creative Suite) performs similar tasks. These are some of the better-known programs among the huge range currently available.
It is important that the program you select writes metadata to your images files and not just to its own internal database. Otherwise, if you switch to a different program in the future, or if the program’s manufacturer goes out of business, you will have to re-enter all of your metadata. Some programs, such as earlier versions of iPhoto, provide plug-ins specially designed for exporting metadata.
TIPS & TRICKS
DON’T FORGET TO SAVE YOUR METADATA Even if your image management software can write metadata to image files, it won’t necessarily do so automatically. In Lightroom, for example, you have to select “Automatically Write Changes into XMP” in the program’s Catalog preferences before you start your work. But be warned: This setting uses additional computing power and can slow the program down. Alternatively, you can use the Metadata > Save Meta-data To File command in the Library view to save your metadata with the image data and make it available to other programs and users.
The other major differences among the various programs relate to the range of functionality they offer in addition to image management. Pro-grade Lightroom includes a comprehensive set of image editing tools, whereas the Picasa freeware offers only basic image-processing functionality in addition to its simple keywording and one-star rating tools. The Lightroom rating tools include a five-star rating system, a color-coded sorting system, and flags. Light-room can be used to add metadata to images using IPTC data fields, whereas Picasa has no such functionality.
Lightroom can also be used to combine multiple search criteria, such as a keyword and a rating, whereas with iPhoto, you have to filter your images according to a keyword first, and then sort them again according to rating. Another plus for Lightroom: Blurb now offers a plug-in for Lightroom that makes selecting and uploading images to your layout even quicker and easier. Adobe’s plug-in architecture is open to third-party developers, so it can only be a matter of time before other photo book service providers follow suit and offer their own plug-ins.
In spite of Lightroom’s obvious advantages, free software like Picasa or iPhoto is still a great aid to image selection, and is a lot better than working with just folders or unsorted images. Some photo book software packages even automatically detect iPhoto as the main image source.
TIPS & TRICKS Take care when deleting image files, and be sure to pick the correct option when the program asks if you want to remove an image from the catalog only or from the hard drive, too. Make sure that you don’t select multiple images when you only want to delete one—it is very easy to delete an entire folder by mistake.
TIPS & TRICKS
IMAGE EDITING IN LIGHTROOM
Lightroom (and other photo workflow tools) doesn’t write adjustments you make to your images directly to the image data, which can be confusing for users who aren’t used to working this way. This approach is called non-destructive image editing. Changes you make to an image are recorded to the file’s metadata, and are applied to the image file itself only when the image is exported. This leaves the original image data untouched, making it simple to undo changes later. This approach also saves disk space, as you don’t have to save a copy of the image every time you make a change.
However, most photo book software cannot interpret image changes stored in metadata, so you will have to export your edited images before you can upload them to your layout. Some workflow tools can be configured to write changes directly to the image data, but experience has shown that it is better to keep a separate original version in addition to any edited versions you create.
The following sections illustrate a complete photo book image-management workflow using Adobe Lightroom, but the basic principles can be applied to just about any image management software. Using Picasa to perform the same tasks requires a fair degree of creativity but, with a little effort, the program’s tag system can be used to create a modified, star-based rating system.
I always import my images to Lightroom and perform basic keywording before viewing them. Adding keywords, such as “vacation” and perhaps the location, saves a lot of effort when searching for images later. Lightroom lets you add keywords directly in the import dialog. If you want to stick to the IPTC standard metadata fields, you should create a metadata preset with appropriate fields and enter your keywords there. [Fig. 3.25]
Once I have imported my images, I double-click the first one and begin to apply star ratings using the context menu. [Fig. 3.26]
People use star ratings very differently. I tend to apply between two and four stars, with three stars representing images that are generally good enough for inclusion in a photo book. Light-room allows you to add ratings directly using the number keys, so I simply work with my left hand resting over the 2, 3, and 4 keys, and my right hand over the arrow keys. This way, I can rate large numbers of images very quickly. Additionally, I apply Lightroom color labels (also using keystrokes) while viewing my images to mark the ones I want to edit later. [Fig. 3.27]
Figure 3.25: The first step is to import your images and perform basic keywording

Figure 3.26: Stars allow you to give an image a graded rating
Figure 3.27: You can use color labels to mark images that you wish to edit
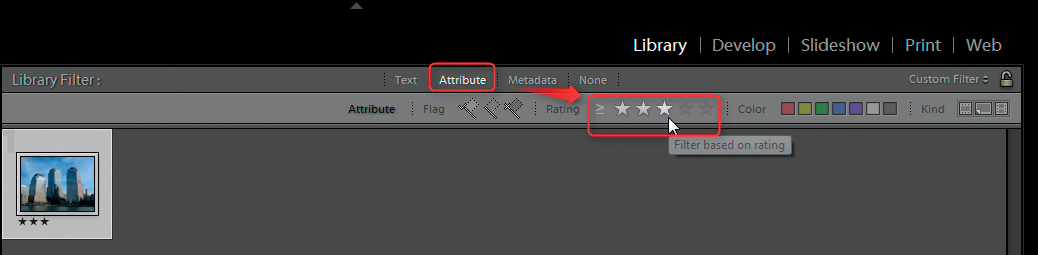
Figure 3.28: You can filter your images according to ratings in the Lightroom Library view
TIPS & TRICKS ADD KEYWORDS IMMEDIATELY AFTER IMAGE IMPORT
If you have time, it is a good idea to apply additional keywords, such as people’s names or places, to your images while you are viewing them. You can add keywords later, too, but remember: The more precise your keywording system, the more quickly you will be able to find a particular image later on. Most hobby photographers apply just a single keyword during import and add more later when they have time.
TIPS & TRICKS You can use Filters to search for images with specific characteristics, such as those shot in portrait format or on a particular date.
Try to rate and keyword your images immediately after shooting, even if you are not planning a photo book at the time. If you do decide to use them for a subsequent book project, it will be much easier to find the appropriate images using filters. I usually start a search by filtering for images that I have rated with three stars or more. [Fig. 3.28]
Figure 3.29: You can use metadata filters to quickly find images that were shot in landscape format or on a particular date

Figure 3.30: Here, all images that are suitable for inclusion in the book project have been marked using flags
TIPS & TRICKS
SORTING IMAGES PRIOR TO EXPORT
If you are creating a large book, it is often useful to sort your images before exporting them—for example, using color labels to mark images that belong to a specific chapter or that might make suitable cover images. See section 4.6, “Developing a Storyboard,” for more details.
It is also a good idea to take a look at your filtered photos and mark the ones you think may be suitable for a photo book. In this case, I use the Pick flag (activated by pressing the P key), but a color label serves exactly the same purpose if you prefer. I can now begin to select the images that I want to include in my book. [Fig. 3.30]
Before continuing, I edit any images that I have marked for processing. Then I export my images to a separate folder.
There are various settings you need to define when exporting your images to ensure that they are saved at a quality suitable for printing. [Fig. 3.31]
It is often a good idea to rename your images during export so that your photo book provider’s software can handle them effectively. Some provider software simply sorts images alphabetically or numerically, and offers no options for using your own criteria. If you shoot all of your images chronologically using a single camera, creating a chronological photo book presents no major problems. However, things start to get more complicated as soon as you begin to use more than one camera, or if you want to rearrange the order of your images. In these cases, it can be useful to sort your images into the order you want them to appear in your book before you export them. Again, Lightroom includes functionality that allows you to sort your images according to various criteria, and preserves the resulting order during the export process.
Please Note: To change the order of stored images in Lightroom, you have to create a collection first. Only then can you move individual images.
It is simplest to rename your images using sequential numbers at the start of your file names, although you can apply other conventions too. [Fig. 3.32]
TIPS & TRICKS Don’t use spaces or special characters in your image filenames, as photo book software often has problems dealing with them.
Picasa users can use the additional Picasa Independent Album Explorer (PIAE) tool to sort their images into the desired order for export. [Fig. 3.34] I have found that using the original filename plus a sequential number is a practical file-naming solution. This way, you can find the original images easily using the new filenames as a reference. Make sure you export your images at a printable resolution.

Figure 3.31: Make sure you save your images at their original size when you are exporting them

Figure 3.32: The Lightroom export dialog allows you to rename batches of images sequentially
Figure 3.33: XnView (on the right) is a good alternative renaming tool
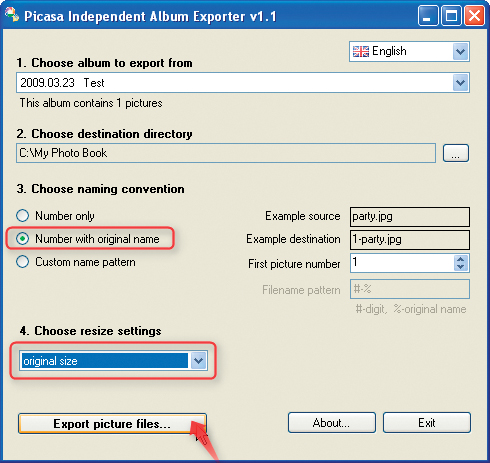
Figure 3.34: The Picasa PIAE tool (shown above) can be used to export images in any order
There are also a number of free batch file renaming solutions available, such as XnView (for Windows) or the Automator tool built into the Mac operating system. [Fig. 3.33, 3.35]
Ideally, you should perform general keywording and image rating independent of the use you are planning for your images. After all, these tags aren’t the only criteria you will use to select images for inclusion in a book project. The actual content of an image plays a much more important role in the selection process, especially when you are selecting from a large collection. As already mentioned, book projects usually include a large number of detail and background photos that would never be included in a gallery exhibit.
The most important content-based selection criterion is whether a photo fits into the overall theme of the book. If you are constructing a portfolio, you will need to select a mixture of persuasive images to convince (potential) customers to use your services, in addition to others taken from reference projects. However, if you are working on a personal project, detail photos that capture the mood of the event or the journey will play a more central role, regardless of their photographic quality.

Figure 3.35: Using the Automator tool built into the Mac OS X operating system is a quick and easy way to rename large numbers of image files
Before you actually receive your printed photo book, you will have viewed most of your images only on your camera monitor or your computer. However, ideal monitor settings are not always the best for producing perfect quality prints.
Let’s start by considering image resolution. This value states how many pixels or dots per inch (ppi or dpi) an image has. Images on a computer monitor are usually displayed at a resolution of 72 dpi, which is the highest resolution most conventional monitors can produce. However, print applications use much higher resolutions. A typical print resolution is 300 dpi, although the actual value can vary depending on the print process the provider uses. If you use a 5MP APS-C camera, your images will have a shooting resolution of perhaps 2592 × 1944 pixels. At a print resolution of 300 dpi, such an image will measure a maximum of 8.64 × 6.48 inches, which is smaller than an 8.5″ × 11″ book page.
PRINT SIZES AND IMAGE RESOLUTION
For a letter-sized page (8.5″ × 11″): The long side of a frame-filling single-page image must measure at least 3,300 pixels. A single-image double-page print has to be at least 5,100 pixels wide.
For a tabloid-sized page (11″ × 17″): The long side of a frame-filling single-page image must measure at least 3,300 pixels. A single-image double-page print has to be at least 10,200 pixels wide.
This means that images that look good on a monitor won’t necessarily be of sufficient quality for print. Most provider software checks image resolution automatically and issues a warning if the resolution is not high enough for the image to be printed effectively. Picaboo issues a simple warning, while SmileBooks has a three-level “traffic light” warning system. Blurb enhances its warnings with tips on optimizing your image settings. [Fig. 3.36]

Figure 3.36: Most photo book software (in this case, Blurb) warns you if your images don’t have sufficient resolution for printing
The simplest way to get rid of resolution warnings is to reduce the size of the image, and thereby increase the number of pixels per unit area. Try it and see!
Not every image with a resolution below 300 dpi has to be reduced in size or rejected. Some providers allow a minimum print resolution of 150 dpi, but it’s up to you to decide if the quality of your images is sufficient for your specific project. Details like the rigging of a sailboat will suffer much more obviously from too little resolution than a sunset landscape. If your provider uses a “traffic light” warning system, an amber warning might require only a slight reduction in image size, or perhaps no adjustment at all. Other programs issue warnings for the slightest discrepancies, so if you are not sure what to do, you can calculate the resolution of your image yourself. Online print size calculators can help you work out the minimum pixel resolution necessary for your desired print size, or the maximum size at which you can print an image based on a print resolution (i.e., dpi value) that you enter manually. [Fig. 3.37]

Figure 3.37: Online dpi calculators help you work out whether an image is printable
Some programs and operating systems display generalized dpi values when you view an image file’s properties. Don’t let these values confuse you, as they are meaningless if they do not have corresponding image size values (centimeters or inches). [Fig. 3.38]

Figure 3.38: Resolution stated in dpi without an additional size value (centimeters or inches) is not conclusive and should be ignored
Photoshop, Photoshop Elements, GIMP, and Microsoft’s Paint.NET all have built-in functionality for calculating image sizes. In Photoshop, this functionality can be found under Image Size in the Image menu. Be sure to deactivate the default Resample Image option; otherwise, the program will not make adjustments in real time. You can then calculate the maximum possible image size for your chosen resolution or the minimum possible resolution for a particular image size, depending on which variable you adjust.

Figure 3.39: This illustration shows the Photoshop Image Size dialog. The Microsoft Paint.NET dialog looks almost identical, but is (confusingly) located under the Resize command in the Image menu. The command works in units of pixels/inch (equivalent to dpi) and pixels/cm.
TIPS & TRICKS
REDUCING IMAGE SIZE
Your images are more likely to be too small than too large for use in a photo book, although the latest panorama and stitching techniques can produce images that are much too large for conventional use. Some providers cannot handle extra-large image files—for example, at the time of writing, SmileBooks has a 25-megapixel maximum image size limit, and Blurb can’t handle files larger than 15 MB (with a maximum side length of 4,000 pixels). Files larger than the given limits simply don’t display, or produce an incompatibility warning. If you receive such a warning, the first thing to do is check for updates to your software to make sure you are using the latest version. The next step is to ask your provider how large files can be. If your image files are within your provider’s size limits but are still larger than they need to be for printing, it is a good idea to reduce their size to avoid additional incompatibility issues.
Figure 3.40: XnView is free and allows you to reduce the size of all the images in a folder at once

Figure 3.41: The Mac Automator utility can be used to batch-reduce image size
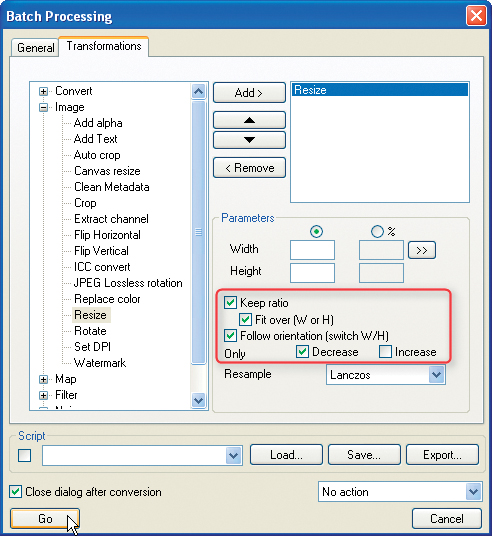
Photoshop and the Lightroom Export dialog both have built-in batch processing functionality, as does the free Windows-based XnView. XnView’s Batch Convert command can be found in the Tools menu. You can select images either individually in the General tab or in the program’s image browser window, where you can select multiple images using the Ctrl key. Once you have selected your images, click on the Transformations tab and select the Decrease option under Parameters. [Fig. 3.40]
Alternative freeware batch-processing programs include IrfanView or David’s Batch Processor (DBP) for GIMP.
Apple’s Automator tool can batch-reduce image size, too. Open the program and select Image Capture Plugin in the opening dialog. Enter the word “scale” in the search box, and select Scale Images to scale your images according to their longest side, or Crop Images to enter absolute width and height values. Once you have defined your settings, click the Run button to start the process. [Fig. 3.41]
Lightroom and Photoshop can also be used to reduce the size of images in batches. Always make sure you scale images according to the longest side, and that you activate the option for retaining the aspect ratio. Activate the Reduce Only option, too, if your software has one.
A color space defines the number of colors that are producible for the medium in question. A major difference between monitor and print output is the color spaces used by the two media. The color space used by most monitors is significantly larger than a color space for printing on paper. [Fig. 3.42] This means that a monitor can produce more subtle color differences (i.e., more color variations) than can be printed on paper. The size of a color space is referred to as the “gamut.”
Monitors use additive color synthesis to “paint” colors onto the screen, whereas print processes use subtractive color synthesis to place the colors on paper. Printing is based on four colors of ink: cyan, magenta, yellow, and black (CMYK). On a substrate such as paper, mixing all available colors results in black. On a light-emitting device such as a monitor, the colors available are red, green, and blue (RGB), and mixing all available additive colors gives us white. Therefore, digital images that are being prepared for printing must be converted to the CMYK system at the pre-press stage.
Converting image data to CMYK is too complex for most everyday users, so most service providers do it for you automatically. Convert your images yourself only if you are using a specialist service provider who specifically asks you to do so.
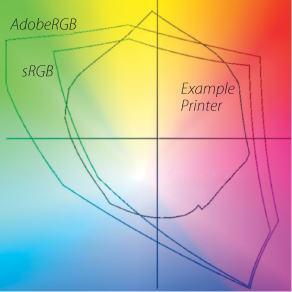
Figure 3.42: A color space defines the number of colors that are reproducible for the medium in question. Here we see the gamuts for human vision (the outermost edge of the colored area), Adobe RGB, sRGB, and a typical inkjet printer. The print color space (represented here by the inner of the three lines) is significantly smaller than the color spaces that most monitors use.
(Graphic created by Stephen Laskevitch.)
High-end DSLRs usually allow you to choose whether to use the sRGB or AdobeRGB color space while shooting. Experienced users can improve print quality through selected use of the extended AdobeRGB color space. (For more details, see Chapter 11, “Quality Control”.) With the exception of a few specialist labs, most photo book providers either accept only sRGB data, or they automatically convert any other color space to their specifications. The sRGB color space is the default color space for most digital cameras, and is generally accepted as the standard for most commercial digital imaging print processes.
Another thing to keep in mind is that it’s best to use 8-bit color depth for your images. Most providers cannot handle the 16-bit color depth that some photographers prefer to use for image processing. In fact, uploading 16-bit images for use in a photo book often produces worse results than using conventional 8-bit files.
TIPS & TRICKS If you shoot using a color space or color depth setting that differs from those required by your service provider, you should convert your image data manually to the appropriate format using your own image-processing software. This way, you retain control of the conversion process.
While most professional-grade print processes use TIFF as their standard image file format, most photo book providers use the more common JPEG format. The JPEG image compression algorithm tends to produce lower image quality, but the format is supported by more cameras than any other format, and has therefore become an industry standard. Most digital cameras are set to shoot in JPEG format by default, so you won’t have to make any adjustments to your camera if you don’t want to.
Figure 3.43: In the Photos section of the SmileBooks Options dialog, you can activate automatic image correction for your entire book while ignoring images you have edited yourself
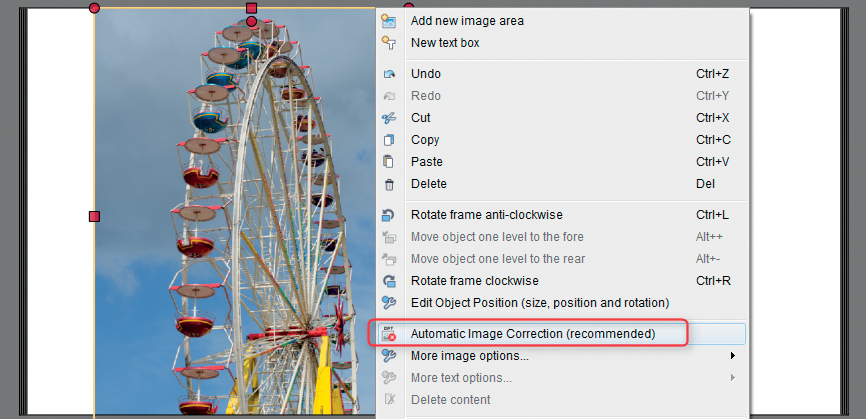
Figure 3.44: You can deactivate the automatic image correction functionality at SmileBooks using the context menu
Blurb and SmileBooks now also support the popular PNG image file format, which is capable of supporting transparent image areas (see also section 7.4, “Isolating Image Details”).
SmileBooks and AdoramaPix support TIFF, and SmileBooks also supports BMP in addition to the formats already mentioned. Some specialists support Photoshop file formats, too.
If you use high-end layout software like InDesign, you can process your images using lossless TIFF or PSD formats. Photoshop and InDesign are both Adobe products, so compatibility between them is assured—and you can even edit images that are part of an InDesign layout in Photoshop without having to re-embed them afterward (see the section on our Namibia travel book in chapter 13).
Image optimization is a wide-ranging subject that could fill several volumes. For our purposes, I will stick to discussing a few specific aspects that are relevant to photo book printing.
Images have to be appropriately prepared for printing just as they do for any other form of output. In our case, we are talking about corrections to tonal range, color, and overall sharpness. Generally, if an image doesn’t look good on a monitor, it will not be improved by the print process. Rather, its weaknesses will be underscored.
Some photo book providers perform automatic image optimization during printing, so if you have edited your images before uploading them, you should deactivate any provider’s automatic correction functionality before proceeding. Quality service providers enable you to switch off automatic correction for individual images as well as for entire books. Blurb is one of a few providers who don’t perform any general corrections. If it isn’t clear from the available options, ask your provider what exactly you should expect. In general, custom corrections applied to individual images produce better results than a provider’s automatic correction functions. [Fig. 3.43, 3.44]
EXPERT ADVICE UWE STEINMÜLLER ON IMAGE SHARPENING AND OPTIMIZING TONAL VALUES

The basic aim of optimization for print is to retain as much detail as possible in the darkest and lightest areas of an image. If you don’t optimize, you run the risk of producing images with ill-defined black and white patches. The Levels functions built into Photoshop, Photoshop Elements, and GIMP are perfect for making appropriate adjustments to the tonal values in your images. Minimum values of around 5 for shadows and maximum values between 242 and 245 in the highlights are good starting points for retaining detail in printed RGB images. It is only really possible to recommend precise values if the print medium and its specific characteristics are known. The general rule is: The more absorbent the paper, the less ink you will need to apply to produce accurate colors.
I recommend that you decide whether to sharpen your images for printing on an individual basis rather than sharpening the whole batch at once. Check image areas that might require sharpening at 100 % magnification before making a final decision. If possible, sharpen your images using the Photoshop Unsharp Mask filter or the Lightroom Sharpening tool. These can be applied more selectively than general sharpening filters like the one built into the Lightroom Export tool. Artificially oversharpened images simply don’t look right.