The process involved in ordering a finished book varies from provider to provider and from book type to book type. Your provider’s software is sure to have an Order button of some sort that will initiate the process. At Blurb (and others) the order button is only visible in Preview mode.
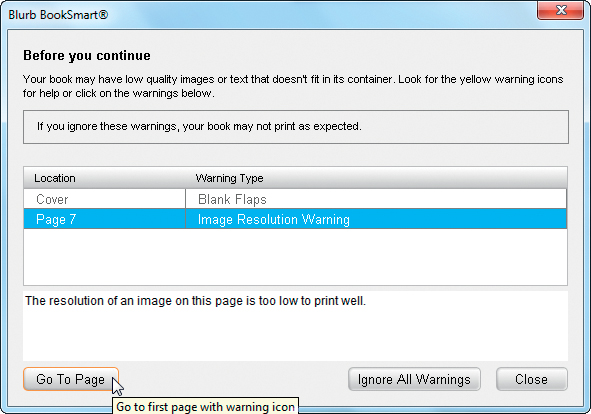
Figure 12.1: The order process checks for problems such as images with insufficient resolution or empty pages
WARNING! Ordering a book doesn’t necessarily save the finished layout. If you are working with standalone software, always save a local copy of your layout on your hard disk or a USB stick before uploading it for printing. If you are using online software, make sure you click the Save button. Some software, like Blurb, automatically saves every change you make to your layout. 
Once the order process begins, it will automatically check for potential problems, such as images with insufficient resolution or empty pages. [Fig. 12.1]
If you receive a warning for an issue that you already know about—for example, if you are happy with an image resolution that is not as high as your provider recommends—you can simply ignore it and carry on. You should nevertheless take care not to just click through the warnings, in case there are any that you haven’t already accounted for.
You can now log in to your customer account or set up a new one if necessary. Some providers, like Blurb, provide a registration link on their home page, while others, like SmileBooks, let you register during the order process. [Fig. 12.2]
Figure 12.2: You must log in to your account to upload a layout or create a new account if necessary. The illustration here shows the Blurb login page.
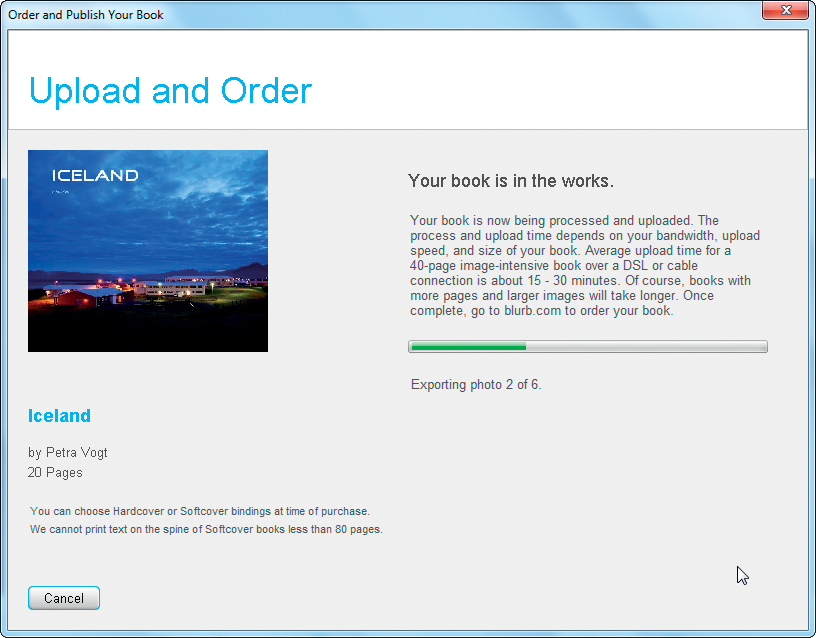
Figure 12.3: Your images will now be uploaded
At this stage, MyPublisher and others let you order extras, such as deluxe paper or a deluxe hardcover. If you use standalone software, you will probably have to order any extras after you have uploaded your layout. The time an upload takes depends on the number, size, and resolution of your images as well the speed of your Internet connection. If you have a medium or low-speed connection and the upload process is over within a few minutes, your layout may not have uploaded properly. Most providers confirm a successful upload within the software interface and send you a separate confirmation e-mail, too. If you don’t receive confirmation, repeat the order process.
TIPS & TRICKS If the upload process freezes or crashes, try uploading at a different time of day. Early evening is upload “rush hour,” and most providers’ servers are less likely to be overloaded later at night. Remember to take your provider’s time zone into account when choosing an upload time. 
Some providers have problems with upload freezes or crashes at busy times such as Christmas. If this is the case, you will either have to contact your provider’s customer support for advice or simply retry your upload.
At SmileBooks, uploading your layout completes the order process, while other providers require you to complete additional steps (see below). Even if you have created your book offline using your own software, there will usually be some kind of online preview available, and you will have to order your book via your provider’s website. The upload process for self-made layouts varies from site to site, so we won’t go into detail here. However, once you have uploaded your layout, the rest of the order process is identical to that for books created using the provider’s software.
TIPS & TRICKS Providers that support the use of PDF layouts usually provide a detailed downloadable checklist of pitfalls to look out for when ordering. Go through the list step by step to ensure that nothing goes wrong.
Once you are logged in, you will see an overview page that lists your current books. [Fig. 12.4]

Figure 12.4: Blurb provides an online list of your current books that are ready to print

Figure 12.5: The Blurb order process includes various output options, from eBook to hardcover with dust jacket
Regardless of whether you use online or standalone software, this is where you can see whether your upload was successful. This is also where you can order a book. Blurb offers a choice between output as a printed book with a soft or hard cover, or as an eBook. [Fig. 12.5]
Once you have made your choice, the rest of the process follows standard online shopping procedures. You enter shipping and billing addresses and any express delivery or gift wrapping options that you require. You will rarely find options for express printing.
If you are unhappy with the book you receive, the following checklist will help you decide whether your issue is provider-based and whether it is worth making a complaint:
 The cover is bent or torn. The binding is inaccurate or shows signs of weakness or shoddy gluing.
These types of issues are nearly always due to manufacturing problems. In rare cases, they occur during delivery. Whichever is the case, you should ask for a refund or a reprint.
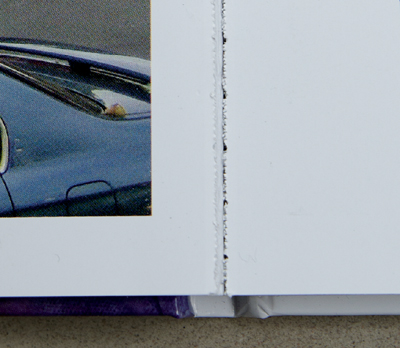
Figure 12.6: The book was delivered with a damaged binding
Some pages show blots or ink spots, or pages stick together. Glossy pages are unevenly or incompletely coated.
Blots often occur during printing, especially on glossy pages. These should raise an alarm during the provider’s own quality control checks, but errors do sometimes slip through. Before you make a claim, check carefully at high magnification to make sure that any unexpected spots aren’t present in the original images. Scans especially are prone to dust spots.
Figure 12.7: Some of the pages in this book were spoiled by random ink spots
(Photo: Martin Groth)
Some images (or parts of images) are blurry.
Blurred images are not usually due to manufacturing errors. Check your original images for errors at 100 % magnification on your monitor. Most preview images are quite small and often appear sharper than they really are. Printed images are larger and have higher resolution than most monitors, making any errors much more obvious.
The printed images are too bright or too dark.
The important thing to find out is whether all or just some of your images are too bright or too dark. If all of your images show errors, the problem is probably due to incorrect color management, or sometimes a printing error. For instance, images that appear too dark throughout the printed book are often caused by a monitor that had been set too bright during the book’s creation and image editing processes. The default settings for many monitors are designed to make them appear artificially vivid. Ideally, you should work with a calibrated monitor. You can read more about color management in Chapter 11, “Quality Control.”
Figure 12.8: Most RAW converters and professional image processing software like Adobe Lightroom (shown here) include warnings for under- or overexposed image areas
If just a few images are too dark, or have dark or bright patches, this might be caused by your provider’s automatic image correction functionality. See section 3.5, “Optimizing Your Image Settings,” for more details.

Figure 12.9: Yellow casts are often caused by artificial light or incorrect white balance settings
Printed images generally have a lower range of contrast than monitor images. The brightest and darkest parts of black-and-white images often lack detail when they are printed. Check the highlight and shadow clipping warnings in your image processing program for signs that your image is under-or overexposed. [Fig. 12.8]
Some images display color casts.
Here, too, it is important to establish whether all or just some images are affected. As described above, if all your images are faulty, the problem could be due to a manufacturing error or incorrect monitor settings. You can do a rough check by printing one or two images on your home printer or at a local copy shop. Avoid using an instant printer at a drugstore, as they often have faulty color settings. If the color cast persists in your test prints, the problem probably lies with the original photo or your monitor rather than with your provider.
Figure 12.10: If an image is saved in the wrong color space or with the wrong bit depth, its colors won’t print correctly. The upper images shown here were saved as 16-bit color depth Adobe RGB files, while the lower images were saved as 8-bit color depth sRGB files, which is what you want for a photo book.
(Photos: Christian Popkes)
If only a few images are affected, and if they show blue and/or yellow casts, this is probably due to incorrect white balance settings at the shooting stage. These types of errors are usually obvious during image selection, but they can slip through if you are working with a large number of photos. Print processes always produce colors that appear different than monitor colors (see chapter 11, “Quality Control,” for more details). Simply put, the correct white balance settings can help give various types of lighting a more neutral feel. Candlelight, for example, tends to look yellow in photos, whereas neon tubes often appear blue. But even a sunset can end up with a marked yellow cast. White balance errors are easy to rectify later if you shoot in RAW format, and some image processing programs, such as Adobe Lightroom, are even capable of correcting a small degree of color shift in JPEG images. [Fig. 12.9]
Pages fall out or the cover is loose.
This is rare, but it can occur shortly after manufacture. Ask yourself how you have treated the book. Thick books place more stress on the binding every time they are opened, so avoid lifting a book by a single page. If you have treated your book normally but it still shows weaknesses, you should make a complaint. Some providers guarantee their bindings, so find out whether this is the case if you do experience problems.
The colors are dull, and your images look as if they are covered with a light gray film.
This is likely to be a color management problem, especially if you created your layout using pro software and high-bit color depth image files. It is possible that your images were saved to the wrong color space or at the wrong bit depth. Always use the sRGB color space and 8-bit color depth for images that you want to print in a book. See section 3.5, “Optimizing Your Image Settings,” for more details on how to select the right settings. Pro photographers who are used to working with traditional offset book printing techniques have to adapt their workflow, as it is all too easy to unintentionally save a PDF using CMYK print parameters or 16-bit color depth. [Fig. 12.10]
Always ask for a reprint if your book suffers from obvious manufacturing defects. Printing is a mechanical process that is prone to errors—most providers know this and are willing to help. Nevertheless, make sure that any errors are not due to your own oversight before you make a claim.
If you are producing a book for your family or a group of friends, you may want to share your layout with them, either before the book is printed or afterwards as an electronic version. If not everyone involved lives or works at the same location, you will have to share your layout electronically.
You can, of course, simply copy the entire book file (see section 12.5, “Saving a Project”), but this involves transferring large amounts of data and requires each recipient to have the same photo book software installed on their computer. It is much simpler for everyone if your provider offers online previews or a PDF version of layout files. Blurb is extremely user-friendly in this respect and offers not only an elegant preview with animated pages, but also direct, one-click links to a number of social networks and an iPad-compatible preview. MyPublisher and AdoramaPix also offer preview files that can be emailed or embedded in your own web-site. iPhoto and Aperture offer preview PDFs that are simple to share.

Figure 12.11: Blurb’s elegant preview page includes animated page turns
Figure 12.12: Blurb provides direct one-click links for sharing your book on various social networks
PRO-GRADE SOFTWARE Adobe InDesign includes comprehensive tools for outputting your layout file as a Flash or HTML file that you can upload to your website. Simply save your file using the File > Export command and select the Flash Player (SWF) or HTML file type option in the Export dialog. The dialog that follows includes options for fine-tuning your file. It is often a good idea to adjust the size to fit conventional monitor resolution. Large book pages can be only partially displayed at conventional monitor resolutions, so reducing the preview resolution not only makes viewing them easier, but also reduces the size of the resulting file. The Page Transitions options determine the effects that are used when you click through the pages. Page Turn is an effective simulation of a real book. Try out some of the other effects in the menu and see which you like best. [Fig. 12.13]

Figure 12.13: The InDesign Export dialog, where you can save your file as a Flash Player (SWF) or HTML file
Click OK to save your preview file with the selected settings. You can now distribute the resulting SWF or HTML files by email or embed them in your website for others to view. 
You can sell your book in a small way—for example, selling a book of your sailing photos to other members of your yacht club—or you can offer your work for national or even international sale.
TIPS & TRICKS If you plan to sell your book, you should make sure that all the material it contains adheres to the appropriate copyright and reproduction laws in the region where you plan to sell it. Disregarding the law can be an expensive mistake!
Whichever route you take, you will have to find ways to market, print, and sell your book. Nowadays, you can perform all of these tasks yourself if you want, or you can use the services of an online publisher for any or all of the steps along the way. Some online publishers offer sales channels via their own websites (for example, Blurb) or via established retailers like amazon. com (for example, Viovio). Others, like Lulu, offer both.
EXPERT ADVICE FROM DIETMAR BÜHRER: SELF-PUBLISHING

There is little chance of most amateurs getting a publishing contract from a major commercial publisher. I prefer to design my own books, decide on the size of the print run myself, and keep as much of the proceeds as possible. I then offer my books for sale at local bookstores. Local stores often like to sell the work of lesser-known authors who aren’t found on this week’s bestseller lists. My experience is that individual booksellers are friendly and respectful, and often strike deals that provide a small profit for both of us.
The self-publishing approach involves a lot of work and significant advance printing and advertising costs before you begin to sell anything. Once you have made a sale, you have to look after the entire accounting process yourself, too. The most practical, but also most difficult, way to get published is to use a traditional, commercial book publisher. The best solution is often to self-publish your first book using an online service, and hope that a commercial publisher will take note and offer you a contract.
Blurb is the best known of the online photo book services with a built-in sales platform. You can use the bookstore on the Blurb website to sell your books; popular titles are shown on the bookstore’s home page. You can also use the Blurb links and preview options described in the previous section to market your book via your own website or a social network. At Blurb, the provider does all the hard work for you, taking over printing and selling your book as well as billing the customer. [Fig. 12.14]

Figure 12.14: Blurb has its own bookstore built into its website
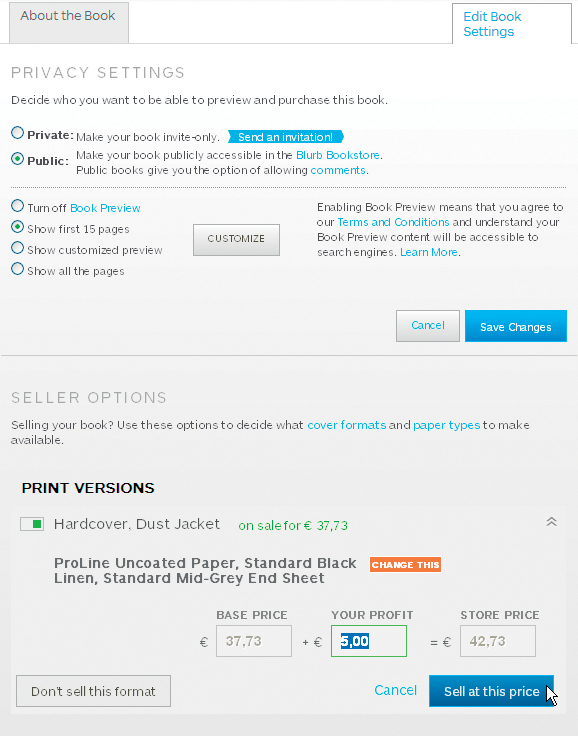
Figure 12.15: If you sell your book via the Blurb Bookstore, you can set your own profit margin. You can also decide how many pages to display as a preview and which ones to display.
You can choose which of your book projects you want to sell publicly from your Blurb account. You can also make projects available to selected groups of individuals, such as friends or family, who can then order the book online.
TIPS & TRICKS Like Blurb, MyPublisher and AdoramaPix also provide ways to share your work and sell it to others, either publicly or via links that are distributed to selected people. Generally, you set your own profit margin over and above the price charged by the provider for printing, distributing, and selling a book, and there are online previews for prospective customers, too.
EXPERT ADVICE FROM JUDITH STENNEKEN: SELF-PUBLISHING VIA BLURB

My book Last Call documents the slow death of Berlin’s Tempelhof Airport, and it won me Blurb’s prestigious Photography Book Now competition in 2010. I used this opportunity to make my book public and was surprised at the huge response I received, although I’m sure a lot of the attention was due to the prize itself.
The major pluses of self-publishing platforms like Blurb are the simple process and the ability to produce high-quality small print runs. This combination provides enormous practical and financial advantages over traditional publishing methods and lets you determine the size of your print run according to your available budget. It also gives you the opportunity to produce low-cost dummies at various stages during the book creation process.
I want to use Blurb or a similar service for my next project, too, and try out different approaches during the initial creative phase. I would, however, prefer to use a commercial publisher specializing in small runs for the printing phase to give me more control over the manufacturing process and the colors that end up on the printed page.
At Blurb, you have to register to sell your books and enter your bank account number. Direct deposit is used to pay your share of any sales your books generate.
You can use the Privacy Settings in the Share tab to set any of your book projects to Public. This can be reached by clicking on the Details menu located next to the book’s cover in the Your Books view. This is also where you can set the sale price for your book. The minimum price for a book is its usual list price, but you can add a markup if you want. [Fig. 12.15]
You can also select which pages get shown as a preview—all, one, or a selection. At the time of writing, it was not possible to obtain an ISBN number directly from Blurb. However, if you already have an ISBN number for your book (see “Selling Your Book Through a Retailer” below), you can use it for a Blurb book. If you want to include a bar code, you must convert the file to a JPEG, and then insert it in your layout.
In addition to direct online marketing through a photo book provider, you can also sell your books indirectly through a retailer. If you take this approach, you will need a unique 13-digit ISBN (International Standard Book Number) for each book you publish. Such a number is a mandatory requirement if your book is to be included in the Books in Print catalog, which is the central database for all booksellers, libraries, and publishers. Only books listed in the catalog can be easily ordered for resale by booksellers. You may also need a barcode to sell your book in a bookstore, unless you place the book on consignment.
WARNING! If your book has an ISBN, you have to print certain mandatory information in it, including the author’s name, the name of the publisher, and the ISBN itself. A copyright page is a good place to group all of this information together.
ISBNs are usually assigned by a book’s publisher, who purchases blocks of ISBN numbers from the agency in its home country. You can register yourself as a publisher and purchase one or more ISBNs. The U.S. agency is run by R. R. Bowker (www.isbn.org), and registering as a publisher online there is free. At the time of writing, a single ISBN costs $125 and a block of 10 costs $250. Bar codes cost $25 apiece. The British ISBN Agency is run by Nielsen (www.isbn.nielsenbook.co.uk), where packs of 10 ISBNs cost £118. ISBNs are free in Canada. Registration and purchase of ISBNs generally has to take place in the publisher’s home country.
Some online print services provide ISBNs if you need one, like Lulu and CreateSpace (formerly Booksurge), which is owned by Amazon. CreateSpace offers a limited range of formats that are suitable for photo books, the largest of which is 8.5″ × 11″. Lulu has a larger range of formats that goes up to 12″ × 12″, and provides its own online book creation tool. Lulu and CreateSpace assign company internal ISBNs for free but charge money if you want to have your book listed in the Books in Print catalog. At Lulu, you can order an ISBN independently and assign it to a particular project later. Lulu also provides services for registering your books at major retailers like Barnes & Noble and amazon.com.
TIPS & TRICKS Amazon Advantage is a self-service consignment program that allows you to market and sell your books on Amazon.com. With Advantage, you ship a supply of books to the Amazon warehouse, and they fulfill orders and send you your share of profits via direct deposit. Your books must have an ISBN and scan-nable barcode. At the time of writing, the program costs $29.95 to join.
The Amazon Associates Program is Amazon. com’s affiliate marketing program. By including links to Amazon products and services on your blog or website you can earn up to ten percent of net revenue for sales that you generate for any product, including your own book. All you have to do is register (for free) and set an affiliate link to your website, blog, or social network profile. It’s also possible to embed an Amazon micro-bookstore in your own website.
Whatever type of venue you use to sell your book—amazon.com, Blurb, Lulu, etc.—you will be asked to provide a brief description of its contents. Make sure that this book description is accurate and future-proof. Making changes to it later can be very difficult.
EXPERT ADVICE FROM DIETMAR BÜHRER: MARKETING

By now, I have written or coauthored 40 books available via print-on-demand. If I particularly like a book, I have multiple copies printed. However, I don’t make too many copies of a book for a first print run. I recommend ordering a single copy first and checking it for errors and overall quality—this way, you can be sure that all copies of your book conform to your own expectations.
Whether you really need an ISBN depends on your intended audience and how you intend to sell your book. Booksellers won’t necessarily display your book just because it has an ISBN and you walk through the door. It’s your job to publicize the book so well that people ask for it and order it locally.
For an Internet-savvy audience, it’s not important whether a sales link takes them to an online platform like Blurb or straight to a retailer like Amazon. If you feel your book will generate more interest in real-world bookstores, an ISBN is a good thing to have. Try to establish relationships with local booksellers and art book resellers, like Rizzoli in New York.
EXPERT ADVICE FROM DIETMAR BÜHRER: ADVERTISING

Every book needs to be advertised. Make postcards or flyers at a copy shop and distribute them to libraries, cultural centers, educational institutions, cafés, bars, fitness centers, and anywhere else where people meet. Try to organize readings at a local library or bookstore and get your friends (and their friends) to attend.
TIPS & TRICKS Some providers, such as Blurb and Lulu, offer bulk discounts for as few as five copies of a book.
Most low-volume books are, unfortunately, more expensive to print than high-volume books of the same size. If you intend to produce a large print run, it might be worth using a traditional offset printer to get a cheaper per-copy price. For example, 250 copies of a large, landscape-format photo book ordered from a self-publishing platform can cost almost twice as much as the same run from an offset printer. That’s why the main advantage of an online provider like Blurb is that you can order small quantities of books as you need them and avoid a large upfront printing bill.
That said, some online service providers offer offset printing options for larger print runs, so it’s always worthwhile to get a quote and to shop around for deals at traditional print shops.
TIPS & TRICKS Getting in touch with commercial publishers can’t do any harm and might even lead to a book contract if your book is sufficiently interesting. One way to do this is to speak to publishers at trade shows. You never know where an inquiry might lead.
Having a book printed online doesn’t always mean that it has been adequately saved, especially if you are using a provider’s standalone software. If you think you might want to reprint your book at a later date, it’s essential to make your own archive copy of the layout. If your hard disk is large enough, you can simply keep the files there until you need them. As with any electronic data, it is always a good idea to keep a backup copy. Keeping copies of your book files on separate memory media saves disk space and makes it easier to share them with others or edit them on another computer.
TIPS & TRICKS If you are working on a large book project, you should make backup copies of your work at regular intervals during the creation process.
Saving projects is simplest if you use a provider like Blurb or MyPublisher where each finished project consists of a single file. At Blurb, all you have to do to save a project is navigate to File > Export > Export Book Project and pick a location for the resulting .bookexport file. These files are system-independent when saving, but can only be opened using the provider’s software and the File > Import > Import Book Project command. Saving MyPublisher projects works the same way. At Picaboo, you can’t choose your own location, and the resulting .boox files are saved by default in the My Documents folder.
Some providers, like SmileBooks, store layout and image files separately. You can usually select the location of the layout file using the Save As command. The most practical solution is to save the layout file and all image files to the same folder, making it easy to back up the whole project.

Figure 12.16: Some providers (SmileBooks, for instance) store layout and image files separately, making it essential to back up the entire project folder
Other providers that only work with online book creation software (AdoramaPix and Mixbook, for example) don’t offer local storage options. Ask your chosen provider how long files are saved before you embark on a project. In principle, AdoramaPix saves online book files forever, although the company reserves the right to delete files belonging to users who haven’t logged in to the service for 12 months or more.
Pure online services generally allow you to reorder a book at any time, while providers who accept offline software keep uploaded files for a set period of time, making it simple to reorder a book from your account interface. SmileBooks, for example, guarantees to keep your work available for six weeks, so you will have to upload your files again if you want to reprint a book once the grace period has expired. Others, like Blurb, keep your work available for one year from the most recent order.
Figure 12.17: Some providers, such as Blurb, keep copies of your finished projects online. This way, you can have them reprinted without having to upload them again first.
TIPS & TRICKS Among others, MyPublisher and AdoramaPix let you create direct order links that you can distribute among your friends and acquaintances.