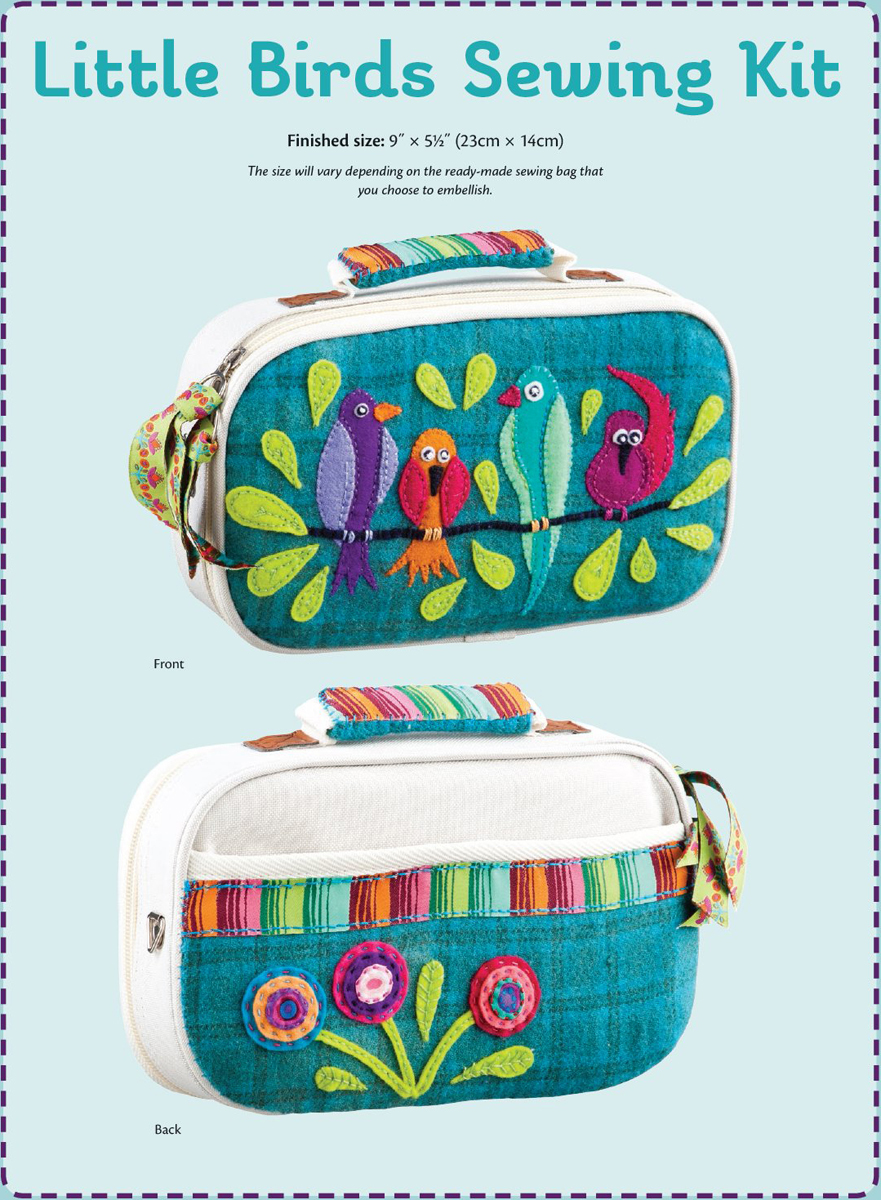
This little flock of birds resting on a branch is a great way to personalize any small project, like a sewing kit. Stitch some simple flowers and a branch of funky birds onto a piece of wool and simply attach it to your bag. You can adapt this project to suit your bag.
MATERIALS
Purchased sewing bag: Mine was 9˝ × 5½˝ × 2˝ (23cm × 14cm × 5cm).
Wool: 1 square 12˝ × 12˝ (30cm × 30cm) for background (Note: Adjust this size as needed to fit your purchased sewing bag.)
Wool felt: 12 squares 5˝ × 5˝ (13cm × 13cm) in a variety of colors for birds, flowers, and leaves
Black wool felt: 1 piece 2˝ × 8˝ (5cm × 20cm) for branch, eyes, and beaks
White wool felt: 1 piece 2˝ × 2˝ (5cm × 5cm) for eyes
Dotted print: 3 circle motifs for flower centers
Perle cotton thread: size 8 or 10 in a variety of colors, including green and white
Ribbon, 1˝ (2.5cm) wide: ½ yard (50cm) (Note: Adjust this size as needed to fit your purchased sewing bag.)
Ribbon, ½˝ (12mm) wide: ½ yard (50cm)
CUTTING
Note: Adjust sizes as needed to fit your purchased sewing bag.
Background wool
Cut 1 piece 7˝ × 10˝ or to fit the front of your bag.
Cut 1 piece 5˝ × 10˝ or to fit the back of your bag.
Cut 1 piece 2½˝ × 4½˝ or to fit your handle length and wrap around handle.
½˝-wide ribbon
Cut into 2 pieces 9˝ long.
Appliqué pieces
Copy the Little Birds Sewing Kit appliqué patterns (page 110) at 100%.
Note: For cotton or linen fabrics, trace around the freezer paper and cut out with a ¼˝ seam allowance. For wool felt, there is no need to trace around the pattern or leave a seam allowance.
1.Trace the appliqué patterns onto the dull (paper) side of freezer paper and cut on the drawn lines.
2.Press the freezer-paper templates onto the right side of the appropriate felt or fabric.
3.Cut out all the appliqué pieces. Refer as needed to the following suggestions for fabric for the appliqué pieces:
Colored felt: Cut out all the birds.
Green felt: Use a rotary cutter to cut strips 1¼˝ × 2˝; then cut the leaves.
Black felt: Cut 6 small circles for the birds’ eyes, 2 beaks, and a ¼˝-wide strip for the branch.
Dotted print: Cut 3 small circles, allowing a ¼˝ seam allowance.
Appliqué
Note: I like to stitch as much of the appliqué as I can before I apply it to the background. Refer to Appliqué Basics (page 5) and Embroidery Stitches (page 9) as needed.
Front
1.Stitch all of the birds together, stitching on the wings with a running stitch.
2.Attach the beaks and eyes with tiny whipstitches.
3.Use white perle cotton thread to add a colonial knot to the centers of the birds’ eyes.
4.Pin the wool background 7˝ × 10˝ piece (or the size piece you cut for the front) onto the front of the bag and mark the shape of the bag on the wool felt with a chalk pencil. Remove this piece before stitching the appliqué.
5.Pin the birds along the center of the background fabric. Use the project photo (page 66) as a guide for placement.
6.Stitch the birds in place using whipstitch and backstitch.
7.Place the branch across the lower parts of the birds. Pin and stitch down the branch using a whipstitch in black perle cotton thread.
8.Scatter the leaves to fill the background space and pin them in position. Stitch them in place with backstitch.
9.Stitch the birds’ feet over the branch with long straight stitches.
Back
1.To make the circle flowers, refer to Flowers for the Tree (page 37).
2.Pin the wool background 5˝ × 10˝ piece (or the piece you cut for the back) onto the bag back and mark the shape of the bag with a chalk pencil. Remove this piece before stitching the appliqué to the back.
3.Stitch the 1˝-wide ribbon to the top edge of the back piece, overlapping the ribbon ½˝ over the edge of the wool fabric so the seam is flat.
4.Pin the stems, flowers, and leaves to the wool background and stitch them in place, stitching the stems with a backstitch, the leaves with a fly stitch, and the flowers with a running stitch.
Finish
1.Trim the front appliquéd piece that you marked, allowing a ½˝ seam allowance all around.
2.Use flat-head pins to pin the front piece onto the front of the bag, turning under the seam as you go.
3.Stitch the front piece to the bag with a slip stitch and matching perle cotton thread. (It is helpful to do this with an upholstery needle and a thimble.)
4.Repeat Steps 1–3 for the back. The ribbon edge goes right up to the piping (of my premade bag). Slipstitch the ribbon to the piping.
5.Fold under ½˝ on the 2 short ends of the 2¼˝ × 4½˝ wool piece. Wrap the piece around the handle and whipstitch the long edges closed along the top of the handle. Place a 1˝-wide ribbon of braid over the seam, turning the raw edges under ½˝. Pin to the wool. Whipstitch all around the ribbon.
6.Tie the ½˝-wide ribbon pieces through the rings on the zipper pull.