The first tab of the Document Properties dialog, called Page (see Figure 3-2), contains some general settings that you will be changing quite often, so we’ll look at them now. (All other tabs control grids, guides, and snapping modes; we will discuss them in detail in Chapter 7.)
First of all, you can set the default unit for your document—for example, px (SVG pixel; see A.6 Coordinates and Units) or mm (millimeters). This setting will affect all places where you see or can specify lengths or coordinates. For example, the X, Y, W, and H controls of the Selector tool display their values measured with the default unit of the document, although to the right of them there is a drop-down menu where you can choose any other unit (see Figure 6-10). Similarly, status bar hints (for example, when drawing a path with the Pen tool, 14.1 The Pen Tool) indicate distances in the default unit.
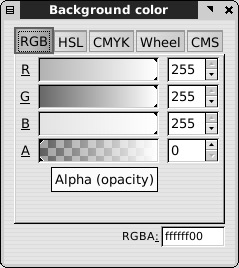
You can also change the background color and opacity of the document (the default is fully transparent white). Just click the color swatch and use the pop-up color selector menu:
Changing the opacity of a white background has no visible effect on your screen, but it will affect the exported PNG files: They will only have transparent background if you have transparent background in your SVG document.
Note
The background color and opacity will not work in other SVG viewers, which will always show a transparent background. The Inkscape background color setting is limited to editing display and bitmap export in Inkscape itself. If you want a colored background that works everywhere, create a background rectangle underlying the entire drawing.
Next, you can change the page size—either by choosing from a list of standard sizes or by specifying a custom size—and the orientation (portrait or landscape). Inkscape’s canvas is virtually limitless (1.1 What Vector Graphics Is and Why It Matters), and you can draw anywhere on it, be it inside or outside the page. However, most standard SVG viewers will only display what is on the page, ignoring anything outside the page boundaries.
So, if you’re preparing your artwork to be published or shared in SVG format, you can use outside-the-page canvas as clipboard or work area, but then place the finalized artwork onto the page. Printing or exporting to most vector formats also ignores everything outside the page. Bitmap export, however, can take either the page, or the actual drawing (all objects), or just the selected objects no matter where they are located (2.9 Saving and Exporting).
If you’ve been drawing without much regard to page borders but now want your drawing to fit precisely within the page boundaries, a convenient way to do this is to select the Fit page to selection button in the Document Properties dialog. Just select all objects that you want to have in the final drawing ( or rubber band selection, see 5.7 Selecting with the Rubber Band) and click this button to make the page border frame the selected objects exactly.
As you resize the page, the objects in your drawing remain fixed relative to the top and left sides, whereas the right and bottom sides move.
At other times, however, you may not care about the size of the page at all. For example, you may be working on a collection of icons or logos, all in the same SVG file, not intending to share the SVG but exporting each icon to a separate bitmap file. In that case, the rectangle of the page is just a distraction. The page border controls at the bottom of the Document Properties dialog allow you to change the color and shadow of this rectangle or just hide it altogether. You can also place the border on top of the drawing so it remains visible over any objects that might otherwise obscure the edges of the page.
