A more powerful tool for transforming objects numerically is the Transform dialog ( ). It has separate tabs for each of the four transform types we’ve been discussing (moving, scaling, rotating, and skewing) as well as a tab for the complete transformation matrix. Generally, you choose one of the tabs, type the values you want, and click Apply.
Let’s look at these tabs in order.
Unlike the X and Y values in the Selector controls bar, which always show you the absolute coordinates of the selection, in the Move tab (shown in Figure 6-11) you can view and specify both absolute coordinates and relative displacements. By default, the Relative move checkbox is selected, so the Horizontal and Vertical fields initially display zeroes, and any numbers you type there will move the selection by that much (for example, the values of 3 and 0 move the selection by 3 units horizontally to the right).

Now, uncheck the Relative move checkbox; you will see that the values in the fields have changed. They now display the current coordinates of the selection, which are the same as the X and Y fields in the Selector controls bar. The units drop-down menu also works similarly.
If several objects are selected and both the Apply to each object separately and Relative move checkboxes are checked, each object will be shifted, not relative to its own previous position, but relative to its neighbor—the nearest selected object to the left (for X) or below (for Y). This makes it easy to “space out” or “tighten up” collections of objects.
For example, if you need to space out a horizontal row of objects, select them and move them horizontally by 5 px with both checkboxes checked. The leftmost object will shift by 5 px to the right, the next one by 10 px, and so on until the rightmost selected object is displaced by 5n px, where n is the number of selected objects. As a result, each interval between adjacent objects will increase by 5 px and the whole row will be spaced out, much like a letterspacing adjustment spaces out a text string (15.3.4 Letter Spacing and Line Spacing). Moving these objects by –5 px will, conversely, squeeze them tighter together: The leftmost will move by 5 px to the left, the next one by 10 px, and so on. For vertical moves, the effect is the same except that it starts from the object closest to the bottom (i.e., with the smallest Y coordinate).
Note
The order in which objects are shifted may not be obvious if they overlap. The rule is, either left edges (for horizontal moves) or bottoms (for vertical moves) of the objects’ bounding boxes are sorted to determine which object to move relative to which. The order of selecting the objects or their z-order makes no difference.
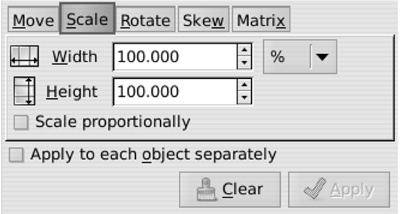
Here, the default unit is always %, which allows you to quickly scale selection by a given ratio (such as 200% to scale it up twice or 50% to scale it down to half the size). The units drop-down menu contains all the absolute units you may need (switching to them changes the displayed values from 100% to the width and height of the selection in the chosen unit), and the Scale proportionally checkbox is analogous to the lock button on the Selector’s controls bar.
So far, everything this tab is able to do can also be carried out via the Selector tool’s W and H controls. However, the important Apply to each object separately checkbox is unique to this dialog: It applies the same scaling to each selected object, scaling it around its own rotation center (6.4 Center of Rotation) instead of scaling the selection as a whole around its center. For the % unit, this means scaling each selected object by the same ratio; for all other units, this results in all selected objects getting the same specified width and height.
Unlike the Move tab (and the Selector controls), values on the Scale tab (shown in Figure 6-12) do not update automatically when you transform a selection by other means (such as by dragging handles), nor when you just select a different object; the values you typed stay put. This is convenient when you want to apply the same size to many different objects, but sometimes this may be a problem: You may assume that the displayed value in absolute units is that of the currently selected object, while that’s not actually the case. To quickly reset the values back to 100% of the current selection, click the Clear button.
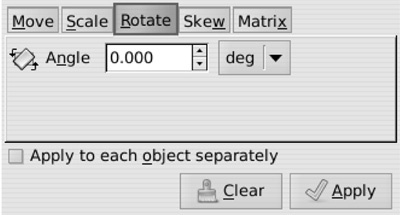
This tab (shown in Figure 6-13) contains a single editable field for the rotation angle. Positive values rotate counterclockwise, and negative values rotate clockwise. The default unit is degree (360 degrees to the full circle), but you can switch it to radians (2 × π = 6.283 radians to the full circle). The Apply to each object separately checkbox works as expected: Instead of rotating the entire selection around the selection’s rotation center (6.4 Center of Rotation), it rotates each object separately around its own rotation center.
This tab (shown in Figure 6-14) contains two editable fields for horizontal and vertical skewing, which basically means displacing one of the four sides of the bounding box along itself, correspondingly slanting the adjacent perpendicular sides. The Apply to each object separately checkbox works the same as for scaling and rotating, skewing each object around its own rotation center.
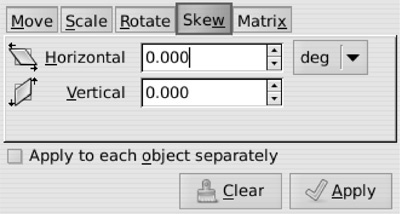
The units drop-down menu contains absolute length units, percent, and angular units (degree and radian). Here’s how they work:
Absolute units
With an absolute unit, the Horizontal value specifies the absolute displacement of the top edge of selection to the right (positive) or to the left (negative); the Vertical value specifies the displacement of the left edge down (positive) or up (negative).
Percent
With the % unit, values are specified in the same way as with absolute units, except that the amount of displacement is calculated as the given percentage of the adjacent perpendicular side of the bounding box. In other words, this percentage is equal to the tangent of the skew angle. For example, skewing an upright rectangle vertically by 100% results in its formerly horizontal sides becoming slanted at 45 degrees.
Angular units
This allows you to directly set the slant angle—that is, the angle of the sides adjacent to the side being moved. For example, vertically skewing an object by 45 degrees is the same as skewing it by 100% or by the absolute value of the object’s width.
This tab (shown in Figure 6-15) allows you to directly edit the object’s transformation matrix stored in its transform attribute (A.7 Transformations). A detailed explanation of the algebra of transformation matrices is outside the scope of this book; for practical purposes, it’s enough to know that the two rightmost values (labeled E and F) represent the displacement of the object (how far it has been moved), and the four other values collectively encode its scaling, rotation, and skew.
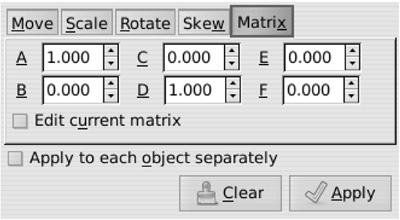
By default, the Edit current matrix checkbox is unchecked and the tab presents an identity matrix where A and D are 1 and all other values are 0. If you change any values and click Apply, this matrix will be post-multiplied with the current matrix of the object, that is, applied to the selected object on top of its current transformation. If you check the Edit current matrix checkbox, the tab will show and let you directly edit the current matrix of the selected object. (If multiple objects are selected, the matrix of the first or bottommost selected one will be displayed.)
The Matrix tab thus provides a way to reset the transform attribute of an object without going to the XML Editor: Check Edit current matrix, then click Clear (this resets the values to the identity matrix), and click Apply.