The Dropper tool allows you to pick a color (and, optionally, opacity) directly from any point or area of the drawing and assign it to the selected objects (or to selected gradient handles, 10.4.2 Painting). With this tool, you can use your own drawing as a palette, easily reusing colors you have once created for something else. It is also indispensable when you need to combine and blend vector objects with an imported bitmap.
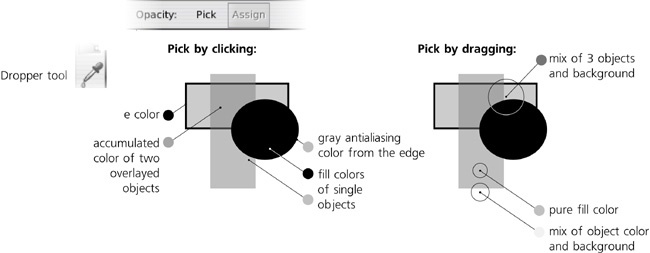
The important thing about this tool is that when picking colors, it pays no attention to what object you click; instead, it simply takes the color of the clicked pixel in the rendered screen image. This means you can easily pick colors from bitmaps, stacks of semitransparent objects, blur fringes (17.1 Blur), or from the middle of a gradient. This also means that if an object is too small to be rendered at the current zoom, you can’t pick its color, and that if you click the edge of a black object on white background, chances are you’ll pick a midrange gray color of the antialiasing pixel in that point (see Figure 1-1).
When you switch to the Dropper tool ( or
or  ), the status bar starts to report the color located directly under the cursor. So, if you want to know the color of some area, you don’t even need to click: Just hover your mouse over that area and read the status bar. Also, at any time you can press
  to copy the color under the cursor to the clipboard (in the form of a
 RRGGBBAA hex string); from there you can paste it to any text object in Inkscape or to an external program.
Assigning colors to selected objects or gradient handles can be done either by clicking or by dragging. With a click, you just take the color of the screen pixel which happens to be under your mouse cursor. With a drag, you create a circular area whose center is in the point where you started dragging, and when you release the mouse, the tool averages the colors of all pixels inside this circle.
Picking with averaging is especially useful for sampling colors from bitmaps. For example, if you need to create a vector object that is the same color as the cheek of a face on a photo, picking single pixels from the cheek is unlikely to get you what you need; the picked colors will be too light or too dark due to the nonuniformity of the photo. If, however, you average the colors from a circular area covering most of the cheek, the result will be much more persuasive.
By default, Dropper assigns its colors to the fill of the selected objects. When you  -click or
  -drag, it will instead change their stroke.
Using the two toggle buttons on the controls bar of the Dropper tool, you can change the way it treats transparency. The Opacity: Pick button controls whether the opacity at the point under the cursor is picked, and the Assign button controls whether that picked opacity value is assigned to selected objects. (When Pick is off, the Assign button is disabled.)
Note
The opacity that the tool picks is the accumulated opacity of all objects at the click point. For example, if you click a single object with 50 percent opacity, the picked value is 50 percent. If two such objects overlay, the picked value is 75 percent. The opacity of the page background (as set in Document Properties, 3.4.2 Background) is ignored by the Dropper tool.
Let’s look at a simple example. Suppose you have a bright red (FF0000) object with 50 percent opacity which makes it appear pale red. Now, you select some other object and try to pick the color from the red one. What will happen?
The tool will pick the pale red color (
FF8080) and no opacity. In other words, the opacity will already be “multiplied into” the color. The status bar will report FF8080 under cursor and that is the color the selected object will get—whereas the opacity of the selected object, if any, will not change. Only in this case the visible color of the page background will be mixed in.
Opacity: Pick button is on
The tool will pick the actual bright red color (
FF0000) and the 50 percent opacity separately. The status bar will display FF0000 alpha 0.5 under cursor. Now, what happens when you click depends on the other button, Assign:If Assign is on, both color (
FF0000) and opacity (50 percent) will be assigned to the selected objects’ fill or (with ) stroke. Note that the opacity will become the fill or stroke opacity of the selected objects, not their master opacity (8.1.2 Opacity).
If Assign is off, the bright red color (
FF0000) is assigned to the selected objects’ fill or stroke, whereas the picked opacity is simply discarded and 100 percent opacity is assigned. For example, if you select a semi-transparent object and click that object itself with Pick on and Assign off, the object will lose its opacity but keep its color.
