Handles are the on-canvas controls that correspond to the gradient stops. In the Gradient tool, they can be not only freely dragged around, but also selected and painted, much the same as selected objects are painted.
Selected handles are blue, unlike the unselected ones which are white. The simplest way to select a handle is by clicking it; you can also  -click to add a handle to selection or remove it from selection, or
  -drag around multiple nodes to select them with a rubber band (compare 5.7 Selecting with the Rubber Band). After you have created a new gradient by dragging, the handle you’ve been dragging remains selected.
Similar to the Selector tool, in the Gradient tool you can also select handles with the keyboard:  and
and  select the next and previous handle (or first and last, if none were selected before),
  selects all handles in selected objects, and
  deselects any handles (but leaves the objects selected; a second
  deselects objects).
Note
Watch the status bar (2.6 Selecting): It always displays useful information on the selected gradient handle(s) as well as the object(s) and gradient types they belong to.
You can assign any color or level of transparency to the selected gradient handle or handles, using all the same methods you would use to change the style of an object (8.1 Style Fundamentals). When a handle is selected, the palette, the Fill and Stroke dialog, the color gestures and commands in the selected style indicator (8.1.1 Paint), the Paste Style command, and even the Dropper tool all work on the selected handle, not on selected object. Figure 10-7 shows an example.
Unlike an object, a gradient stop does not have fill or stroke (even though the gradient itself can apply to fill or stroke). Therefore, when you have one or more stops selected, the style indicator in the status bar shows the color of the stop in both fill and stroke swatches; this may not be perfectly logical, but it is handy. The opacity of a gradient stop is reflected by the master opacity control (labeled O: in the status bar). The displayed stroke width, however, is always that of the object (if it has stroke), not a stop, since stops cannot have any strokes.
It is especially convenient to use the Dropper tool if you want one end of the gradient to blend smoothly into other objects; make sure the corresponding handle is selected, switch to Dropper, and click the area into which you want it to blend. (Note that by switching to the Dropper tool, you leave the Gradient tool, but this is not a problem; like many other tools, Dropper displays gradient handles and even preserves handle selection. You cannot select objects in Dropper, but you can switch gradient handle selection.)
When multiple gradient handles are selected, the selected style indicator displays the averaged color and opacity of the selected stops (this is the same behavior as for multiple selected objects, 8.2.1 RGB).
When at least one handle is selected, the Copy command ( ) copies to the clipboard the style (both color and opacity) of the single selected handle, or the averaged style of several selected handles. This means you can copy and paste style between gradient stops—select a handle, copy, select some other handle(s), and paste style (
 ). If you select several handles, this allows you to quickly average their actual colors and opacities by copying and pasting their style back onto them.
You can move the selected gradient handles by directly dragging them with the mouse, or by the arrow keys with all the regular modifiers ( for ten times the standard 2 px displacement,
  for pixel-size displacement,
  for 10 pixels displacement; see 6.5.1 Moving). Naturally, the end stop handles (gradient ends in a linear, center and radii in an elliptic) can be moved arbitrarily, whereas the middle handles can only be moved along the gradient line. (Don’t confuse middle handles with the center handle of an elliptic gradient; the latter, despite being in the center of an ellipse, represents an end stop of the gradient definition.)
If you selected multiple objects, all those that have gradients will display their handles (regardless of whether they are linear or elliptic, on fill or on stroke) and allow you to edit any of them simultaneously. This opens up interesting possibilities. For example, you can select ends of all linear gradients and move them all in parallel. Or, you can press  to select all stops in all gradients and use arrow keys to move the entire ensemble of gradients as a whole.
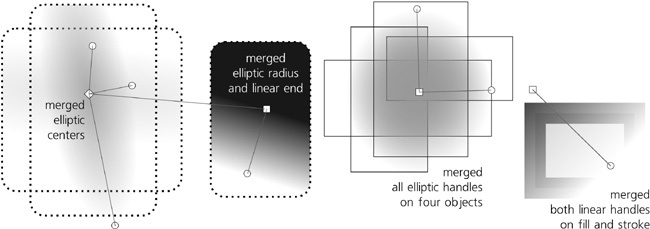
What’s more, any number of end stop handles (but not middle stops) can be merged. Just move one handle close enough to another, and it will snap to it and merge. (The status bar will report the merged status of such a handle, for example handle merging 2 stops.) Now, when you drag such a merged handle, it will affect all gradients it belongs to at once. To separate merged handles, drag away from a merged handle with  .
.
For example, you can merge the centers of two objects’ elliptic gradients, merge an elliptic handle with another object’s linear handle, merge all three elliptic handles of multiple objects, or merge the gradients on fill and stroke of the same object:
When you drag to create a new gradient with several objects selected, you get what looks and acts like a single gradient applied to multiple objects but is in fact many gradients with their handles merged together.
If two handles have different colors or opacities, they will remain different after you merge them. However, if you assign a color or opacity to a merged handle, it will apply to all gradient stops sharing this merged handle, equalizing their styles. If you want to change the style of one of the merged handles without unmerging it, this is possible if the merged handles belong to different objects: Simply deselect everything (both handles and objects) and select only the object whose handle you want to repaint.
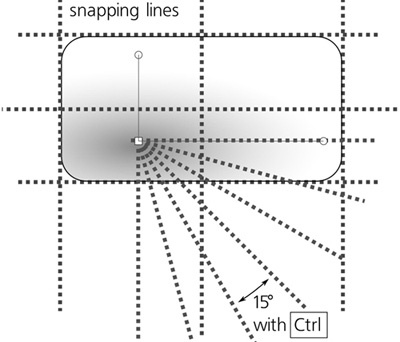
When being dragged by the mouse, all handles of an object’s gradient snap to the edges of the object’s bounding box, its central axes, and their continuations (apart from snapping to the regular snap destinations such as guidelines or grid, 7.3 Snapping). This makes it easy, for example, to place a gradient handle exactly in the center of the object. Also, when dragging a handle or when creating a gradient, holding  snaps the gradient angle to horizontal, vertical, and 15-degree increments in between:


