Now that you know everything about guides and grids, it’s time to look at what guides and grids are most often created for: snapping.
The idea of snapping is simple: Inkscape can try to place things where you want them to be instead of where you actually move them with your inevitably imprecise mouse or tablet pen movements. As soon as you move a snappable (something that can be snapped) close enough to an active snap target, it jumps all the way into place. Snapping is a fundamentally interactive operation; it may only happen when you drag something with your mouse (but not, for example, when you move things by arrow keys on your keyboard or use the Align and Distribute dialog).
Snappables can be entire objects as well as different kinds of nodes or points (path nodes, gradient handles, center points, etc.) inside objects. Snap destinations, apart from guides and grids, can include other objects and their parts (i.e., objects can snap to objects, if you allow them).
Snapping is a big topic, but it’s not deep; once you get the basic idea, the rest is just remembering the numerous modes and toggles. If you don’t need snapping and do not use guides or grids, you will likely never be bothered by it. In any case, remember that there’s a master snap toggle—the  key—that enables or disables all kinds of snapping in the entire program. (A mnemonic for remembering this shortcut is to view the
 % sign as two objects that are about to snap to a slanted guideline.) Unlike the  (guides toggle) and
  (grid toggle), this key only turns snapping behavior on or off but does not hide or show anything.
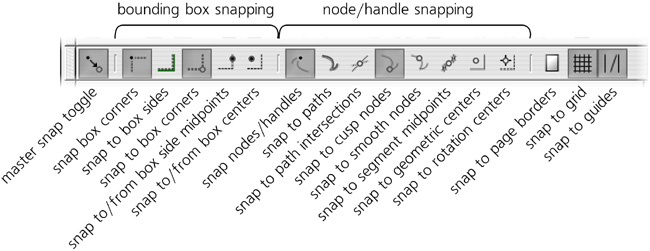
Most of the snapping controls are collected in the snap controls bar, by default displayed between the commands bar and the tool controls bar above the canvas. Use View ▸ Show/Hide ▸ Snap Controls Bar to turn this toolbar on or off.
The leftmost button on the bar is the master snap toggle; if it’s off, all other buttons on the bar are disabled.
Apart from grids and guides, the things that snap and are snapped to can be classified into two large groups, corresponding to the two largest sections of the snap controls bar: bounding boxes in the Selector tool (4.2 The Bounding Box) and nodes and handles in the rest of the tools. While in certain cases, things from one group can snap to things from the other, in general they tend to snap only within their own family. In particular, as of Inkscape 0.47, nodes and handles never snap to bounding boxes (though this may change in later versions). These two groups of options are detailed in the following sections.
Finally, the three last buttons on the bar control the major snap destinations that work for both groups: the edges of the page (2.3 Interface Overview), grid (7.2 Grids), and guides (7.1 Guidelines). All of them only affect snapping but, unlike the  and
and  keys, do not hide the snapping aids.
In all icons on the snapping bar buttons, blue dots depict the snappables (i.e., what snaps), while green lines and circles correspond to snap targets (i.e., what you snap to). Some buttons enable/disable one kind of element in both these roles.
If all you need is to align the whole objects and you’re not interested in nodes or other special points, use bounding box snapping.
In the bounding box group of buttons, the first button enables bounding box corners as a snappable. (Unlike a snap target which can be either a point or a line, a snappable can only be a point.) Now, when you drag or transform anything with the Selector tool, the bounding box of the selection will snap to whatever snap targets you enable. Unless this button is on, all other buttons in this group are grayed out.
The next two buttons enable the sides of the bounding box and its corners as snap targets. This includes the boxes of all visible objects in your drawing, whether they are selected or not. (For example, if you want to snap corners to corners only, turn on the first and the third buttons in this group.) In situations like this, when you have both a line and a point on that line as a snap target, the point (i.e., the bounding box corner) takes over when you are close enough to it, but if you are close to the snapping line but far from the corner, you will snap to the nearest point on the line and easily slide along it.
The last two buttons in this group enable centers of bounding box sides and centers of the entire boxes as both snappables and snap destinations.
This group controls snapping of not only path nodes (12.1 The Anatomy of a Path) but gradient/pattern handles (10.1 The Gradient Tool, 10.8 Patterns), rotation centers (6.4 Center of Rotation), text baseline origins (15.3.3 Kerning), and some other special points.
Again, the first button in this group serves as a local master switch for the group; it activates nodes and handles as snappables, and without it, all other buttons in this group are grayed out.
The next button enables snapping to paths: You can snap and slide nodes along any path in your drawing (it need not be selected), but intersections, nodes, and midpoints on these paths do not hold any special attraction for the node you’re dragging. These snap targets are turned on by the next four buttons: path intersections (12.1.2 Filling Paths), cusp nodes, smooth nodes (12.5.5 Node Types), and midpoints of straight line segments in paths (Figure 7-10).
The last two buttons add two more snap targets for nodes: geometric object centers and rotation centers (which are initially the same as geometric centers but can be moved anywhere).
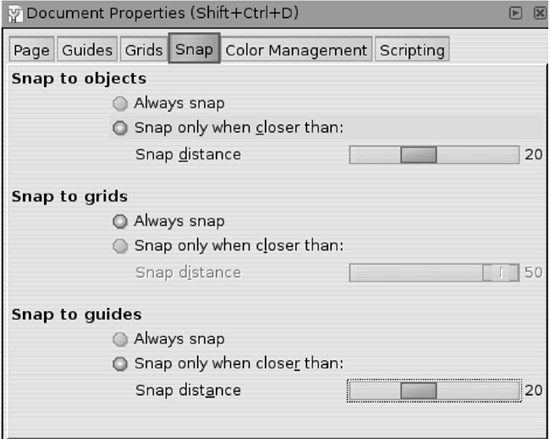
On the Snap tab of the Document Properties dialog, you can adjust the snapping distance—how close you must get to the snap target for snap to happen. This parameter is per-document and can be set separately for snapping to objects (i.e., to bounding boxes, path, nodes, etc.), grids, and guides.
For grids, the default setting is Always snap, which means snapping happens at any distance (which for a grid cannot be more than grid spacing anyway). If you zoomed out and some of the grid lines are hidden (7.2 Grids), snapping will happen to visible grid lines only.
For objects and guides, snapping is triggered, by default, at a distance of 20 screen pixels or closer. Using the screen pixel unit ensures that the snapping force is independent of zoom; if you want to move a snappable close enough to a snap destination but avoid snapping, work at a closer zoom level.
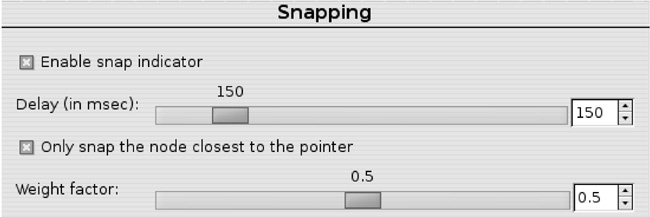
The global Inkscape Preferences dialog (3.1.1 Inkscape Preferences) also has a Snapping tab (Figure 7-12).
Snap indicator (by default turned on) is the X-shaped mark in the snap point and the textual label, displayed right on canvas, telling you what has just snapped to what. Both the mark and the text pop up when snapping happens and disappear after one second. Snap indication greatly improves usability, but you can turn it off if you like.
Snap delay is the time, in milliseconds, that Inkscape waits after your mouse pointer stopped before doing the snap. Increasing this value makes snapping more “reluctant,” but this may actually be a good thing if your document is complex and you have many snapping modes enabled, so that everything wants to snap to everything. In this case, increasing the delay and decreasing the snap distance will make your work much easier.
Only snap the node closest to the pointer tells Inkscape to ignore all other nodes you may be dragging except the one to which your mouse cursor is the closest. For example, if you plan to snap a corner of a rectangle, simply grab the rectangle near this corner for dragging, and all the other corners will not get in your way. This is another way to reduce “parasite” snapping and speed up work in complex documents. If this option is on, Inkscape will display a black round mark over the snap-enabled node while you drag.
Weight factor is another parameter that controls Inkscape’s decision about which of the dragged points to snap if more than one get within snapping distance of a target. When set to 0, Inkscape snaps whichever point is the closest to its target, ignoring the position of the mouse cursor. Setting it to 1 is similar to turning the Only snap the node closest to the pointer option on; now, among all nodes that want to snap, snapping will happen for the node which is closest to the cursor (which may or may not be the same as the closest node which can snap). Using a value in between 0 and 1 allows you to balance these two snapping strategies.


