The easiest way to snap objects to alignment is by creating a guide, or guideline. Guides are visible, infinitely long straight lines on the canvas, but they are not objects. They cannot be selected, they don’t print, and they don’t show up on bitmap exports. Although they are saved with the document, they are not part of the SVG standard and are therefore invisible in SVG viewers other than Inkscape. They are just Inkscape-specific helpers for organizing your artwork.
For example, guides may separate parts of your layout, helping you visualize the edges of the various areas or cells. A guide can be a centerline helping you draw symmetrically around it. Or you can use a guide to quickly check if several objects are really aligned or just look like they are.
To create a guide, you must have rulers visible. (If you’ve hidden the rulers, display them with  .) Click anywhere on a ruler and, without releasing the mouse, drag your cursor onto the canvas. You will see a new ruler appear which you can now drop (by releasing the mouse) where you want it. Naturally, dragging off the horizontal ruler creates horizontal guides, and dragging off the vertical ruler creates vertical guides; what’s more interesting, dragging from the very ends of the rulers creates diagonal guides, slanted (by default) at 45 degrees.
Moving a guideline is easy: With the Selector or Node tool, just grab the guideline and drag it to where you want it to be. (When you are hovering the mouse over a guideline, it turns from blue to red, which indicates that it can now be grabbed.) To delete a guideline, simply drag it back onto a ruler and drop it there, or  -click it.
To hide all guidelines in the document, press the  key (this is the vertical line character, usually on the same key as the
  but requiring
  to be pressed as well). This does not delete anything, however; if you press
  again (or try to create a new guideline), all hidden guidelines will be displayed again. This key controls both guide visibility and snapping to guides (you won’t snap to invisible guides); if you want to disable only snapping without hiding the guides, use the
  key (the global snapping toggle, 7.3 Snapping).
As often is the case in Inkscape, while you can move guidelines manually by dragging, there’s also a way to specify the position and angle of a guideline precisely via numbers. This is done in the Guideline dialog (Figure 7-2), which is called up by double-clicking any guideline.
For horizontal guides, the Angle is 0, while Y determines the height of the guideline.
For vertical guides, the Angle is 90, while X determines the horizontal position of the guideline.
Finally, for diagonal guides, the X and Y values together determine the anchor point through which the guideline goes (which, initially, is the point where you released the mouse when creating the guide). On canvas, the anchor is shown as a small circle. The Angle sets the slant (default is 45 degrees).
The Relative change checkbox zeroes all editable fields in the dialog; now any value you type into them will add to the current values, not replace them. When done, click OK for your changes to take action; the Delete button deletes the guideline. Both buttons close the dialog.
This dialog is modal, which means it locks the rest of Inkscape while it is displayed.
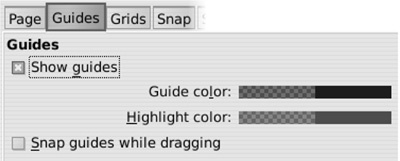
A few general options that affect all guidelines can be found in the Guides tab of the Document Properties dialog ( ), as shown in Figure 7-3. Why not the global Inkscape Preferences dialog? Because these options are considered to be local to the document and are saved with it. This means different documents can have different guide setups.
Here you can see the global guide visibility checkbox. On by default, it allows you to quickly hide (but not delete!) all guides in the document. You can toggle guide visibility even without opening the dialog, by pressing the  key. Toggling guide visibility also toggles snapping to the guides.
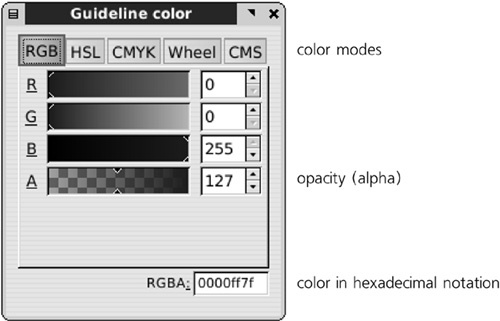
Next, you can change the color and opacity of the guides in their normal state (default is half-transparent blue) and when the mouse is hovered over them (default is half-transparent red). Clicking the color swatches opens a small color chooser dialog:
The A slider sets alpha (transparency). You will see this dialog in many other situations as well (such as when choosing the page background color).
Finally, you can let guides snap when you drag them. Normally, guides are added so you can snap objects to them, but snapping guides themselves when you move them around is also useful. Guides will only snap to objects’ bounding boxes, not to other guides or grids.
Converting an object to guidelines is a way to quickly create multiple guidelines at once. This is done by choosing the Objects to Guides command in the Object menu.
Note
By default, this operation destroys the selected objects and replaces them with a bunch of guidelines. However, you can toggle on the Keep objects after conversion to guides checkbox in the Tools tab of the Inkscape Preferences dialog to prevent this, or simply press  before calling conversion.
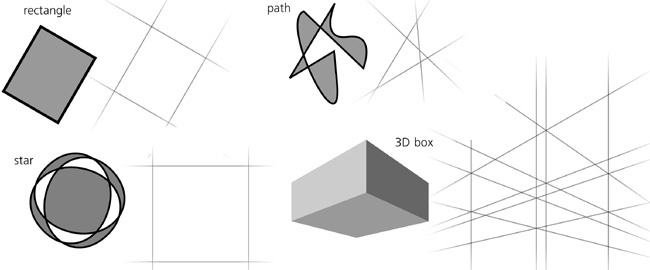
Figure 7-5 shows how this command works for different types of objects:
For paths or rectangles, it replaces each straight path segment or rectangle side with a coincident guide. For example, if you just draw a rectangle and convert it to guides, you will have a rectangular area delineated by two vertical and two horizontal guides. Or, to quickly create a slanted guideline going through two given points, switch to the Pen tool (14.1 The Pen Tool), click one point, double-click the other (to finalize the straight line path), and convert this path to a guide.
For 3D boxes (11.3 3D Boxes), all 12 edges of a box are converted to guidelines.
For anything else, the four sides of the object’s bounding box are converted to two vertical and two horizontal guides.


