A 3D box is an object which represents a projection of a three-dimensional box (rectangular prism) onto the plane of the drawing. As such, it consists of six sides, and from the pure SVG viewpoint it is simply a group of six paths, each with four nodes. Inkscape, however, treats these objects in a special way, allowing you to resize and move them in their own 3D space, reposition their vanishing points, and so on.
Apart from the 3D Box tool, most other tools and commands treat a 3D box as a group. In particular, you can  -click and
  -click using the Selector tool to select any side within the box (most often for changing its style), just as you select objects inside a group. Selecting inside does not destroy the box; however, you can also easily “unbox” it with the Ungroup (
 ) or Object to Path (
 ) commands. This removes any 3D-specific capabilities and leaves you with a regular group with paths inside.
What makes such an apparently limited construct as a 3D box useful?
Inkscape is not planning to become a full-featured 3D application—it does not model a “true” three-dimensional space in which you would place your 3D objects. Inkscape is and always will be a two-dimensional drawing tool. However, it is often used to draw three-dimensional objects. So, to assist in such tasks, Inkscape implements a simple, 2D-oriented system of perspective drawing, which has remained basically unchanged since being perfected by the Renaissance artists six hundred years ago.
In Inkscape, you don’t “build a 3D world”; you just create a flat drawing that represents a three-dimensional scene in a certain perspective. Inkscape’s 3D Box tool is mostly a helper that makes creating such perspective drawings easier. In perspective drawing, a box is almost as important as a rectangle is for two-dimensional drawing and layout; drawing anything in correct perspective usually starts with drawing its enclosing box. So, Inkscape’s 3D boxes are most often used not for their own sake, but as quick and 3D-accurate guides to lay out your perspective drawing—something to align your objects against and to inscribe them into (see Chapter 21 for an example).
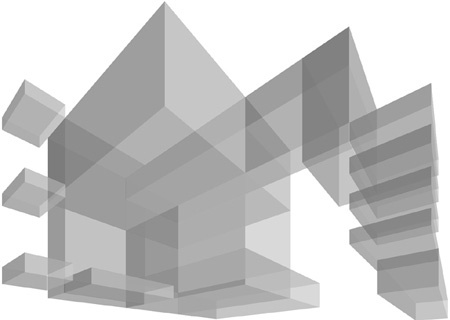
On the other hand, the ease of creating and reshaping 3D boxes in Inkscape is an inspiration in itself. A style of art dominated by 3D boxes is exemplified by the About box (Help ▸ About) of Inkscape 0.46 in which this tool made its debut:

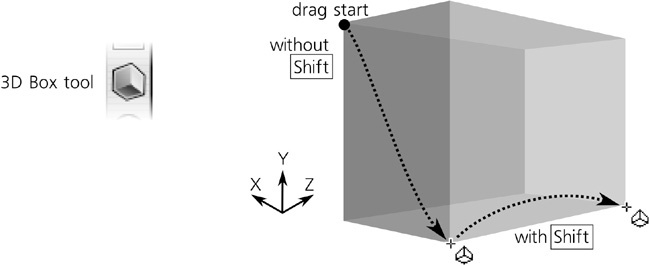
To draw a 3D box, switch to the 3D Box tool ( or
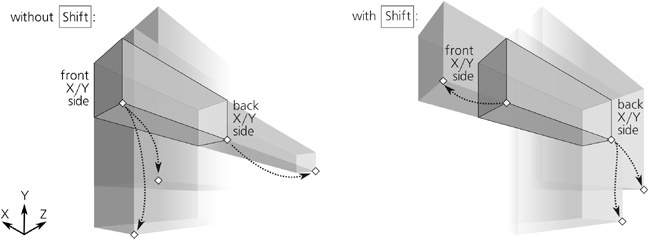
or  ) and drag on the canvas. This draws the front side of the box in the X/Y plane; the depth of the box along the Z axis remains fixed. To switch to the Z axis, drag with
  ; this leaves the X/Y side fixed but lets you adjust the depth:
Once a box is created, it displays a handle in each of the eight corners as well as in the center. Also, colored lines go from the edges of the box to the vanishing points. Let’s look at these controls in detail.
Each 3D box exists in a certain perspective which is defined by three vanishing points, corresponding to the three spatial dimensions: X (red guides), Y (blue guides), and Z (yellow guides). Each vanishing point may be either finite (in which case it is an actual handle that you can drag around) or infinite (in which case it is just a direction toward the point which is at infinity; you can change the angle of this direction).
By default, the X and Z vanishing points are finite, located in the middle of the left and right edges of your document’s page. The Y vanishing point is infinite, its direction being vertical:
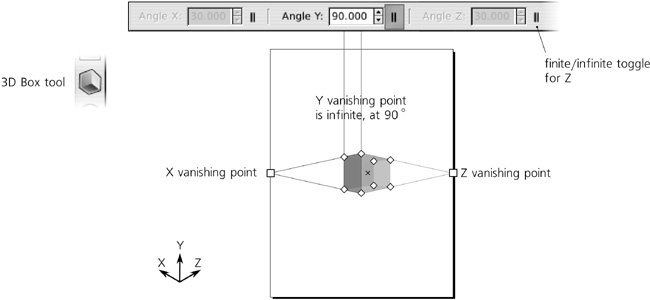
The finite/infinite status of the vanishing points in any dimension can be toggled by the three buttons in the controls bar of the tool. The finite vanishing points can be simply dragged freely on the canvas. The angles of the infinite ones can be adjusted numerically in the controls bar or by the shortcuts:


Without modifiers, these keys rotate by the angle step (the default is 15 degrees, 6.3 The Selector: Rotating and Skewing). With  , they rotate so that the perspective lines are displaced by at most 1 screen pixel at the current zoom.
For example, you can make all three vanishing points infinite and rotate them at the angles of 150 (X), 90 (Y), and 30 (Z) degrees for drawing isometric boxes without any perspective foreshortening. Also, while boxes look most natural when they are located somewhere in between the three vanishing points, they are not obliged to be there; moving a box away from the sweet spot of a “natural” perspective makes it look curiously distorted which, sometimes, may be exactly what you want.
For a newly created 3D box, Inkscape will reuse the perspective of the last selected 3D box. As a result, usually multiple boxes will share the same perspective. The important thing to be aware of is that when you change a perspective, all boxes using this perspective—whether selected or not—will respond to the change:
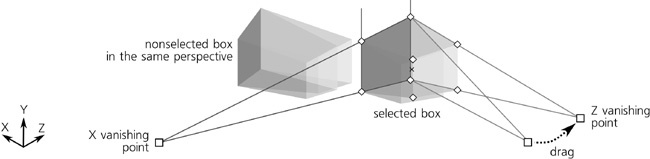
Figure 11-12. Changing a perspective by dragging a vanishing point affects all the boxes in this perspective.
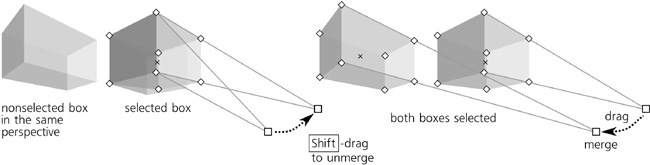
If several boxes share a perspective, you can unmerge any one of them by dragging its finite vanishing point (with only that box selected) while holding . Unlike dragging without , this will affect only the selected box. Another way to unmerge a box’s perspective is by moving the box object in Selector; this will drag its own set of vanishing points along with the box, without affecting any other boxes. After unmerging a box, changing the perspective of the box will only affect that box.
On the other hand, it is just as easy to merge two different perspectives together so they become one. To do this, select two boxes with different perspectives and move the finite vanishing points of one perspective to those of the other— they will snap and join (similar to how the gradient handles join when dragged close enough, 10.4.3 Moving, Merging, and Snapping), and the boxes will now have the same perspective. (If the perspectives had any infinite vanishing points, their direction angles must be the same for perspective merging to work.)
Each 3D box, when selected in any of the shape tools or the Node tool, displays eight diamond-shaped corner handles and an X-shaped center handle. Without modifiers, the four handles on the front X/Y side reshape that side, while the four others change the Z depth of the box. With , however, their roles are exchanged, as shown in Figure 11-14.
With , the side-resizing handles snap to the continuations of that side’s edges and its diagonal. (For depth-changing handles, has no effect.)
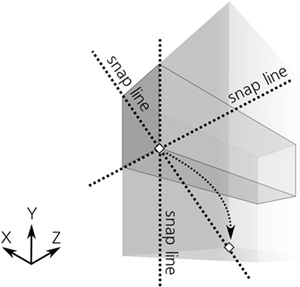
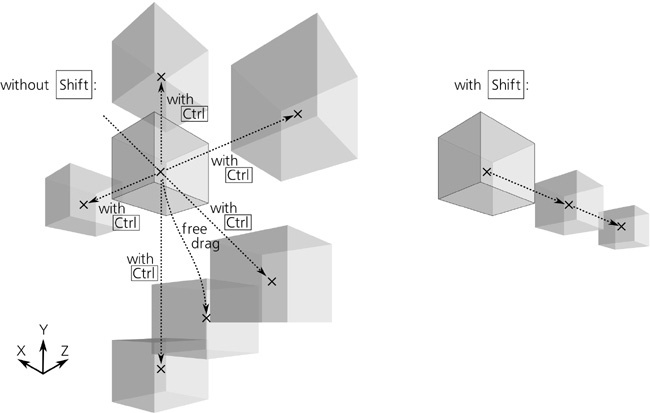
Similarly, dragging the central handle without modifiers moves the box in the X/Y plane, and with it snaps it to the directions of its X and Y vanishing points as well as the bisector between them. With (with or without ), the central handle moves the box along the direction toward its Z vanishing point:
As with rectangles, if you enable snapping of nodes to paths, nodes, and intersections (7.3.3 Node and Handle Snapping), your 3D scene will feel very snappy—everything you draw or resize will eagerly join and line up, making it a pleasure to build solid gapless constructions out of many boxes. As a simple example, to build a multi-story building, draw a single-story box, then duplicate it by  and -drag the central handle of the copy upward to raise it to the next level until it snaps into place:
From the viewpoint of styling, a 3D box is no different from a group of paths. By default, all six sides of a new box have different shades of blue; you can paint the entire box with some color (thereby removing any difference between the sides), or you can -click and -click to select any single side in it to paint it separately.
Moreover, you can even enter the box just as you would enter a group (5.10 Selecting in Groups) by selecting it and pressing  ; after that, you will be able to select single sides by simple clicking or by
  and
and  . After any of these operations, the box remains a box—to remove its 3D box functionality, you would need to ungroup it () or convert it to paths (, which in this case actually converts it to a group of paths).
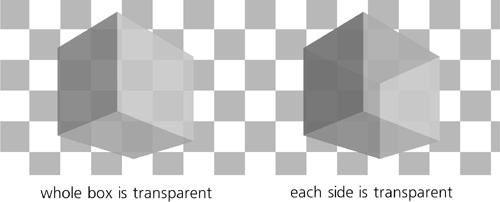
Apart from color, you can apply blur (17.1 Blur), clips, and masks (18.4 Clipping and Masking) to an entire box or to any of its sides individually. If you lower the opacity of a 3D box, it behaves exactly as a semitransparent group (4.5.1 Uses of Grouping): You can see what’s beneath the box, but you cannot see the hidden sides of the box itself. To be able to see the hidden sides, you need to lower the opacity of individual sides by selecting them separately, as shown in Figure 11-18.
The z-order of sides within a box is always automatically correct from the 3D viewpoint—that is, the sides that are supposed to be farther away from you are at the bottom, and the front sides are at the top of the z-order. However, the z-order of different boxes is not enforced by Inkscape in any way; as all other shape tools do, the 3D Box tool creates new boxes on top of the current layer’s z-order (4.3 Z-Order). This means that after drawing a box, you may need to move it in the z-order stack relative to other boxes for the composition to look correct.
For the newly created boxes, the choice between the last set style and the tool’s own style (11.1.2 The Style of New Shapes) applies as well, but with a twist. By default, the 3D Box tool uses the last set style, but its definition of the last set is different: Unlike all other tools, it remembers the style last set on the same side of a 3D box, not on any object. For example, if you paint the top side of any box red, all new boxes you create after that will have their top sides (but not other sides) red.
Since a 3D scene typically assumes a single light source, this behavior makes sense: draw a single box and paint its sides as they would look when lit from, for example, the top-left corner. After that, all new boxes you create will be “lit” in a similar way.
Note
The last set style is only remembered by this tool when you assign it to individual sides, not the entire box. For example, if you just select a box and paint it all red, new boxes will not honor this. So, supposing you want all new boxes to have stroke but no fill (“wireframe”), the easiest way to achieve this is to enter a box as a group (), select all its sides ( ), and assign the stroke and remove fill on all of them at once.
The Tweak tool works on 3D boxes exactly as you would expect it to work on a bunch of paths (grouped or not). With path tweaking modes (12.6 Path Tweaking), once you distort the sides of a box, it ceases to be a 3D box and becomes a simple group. The Color Paint and Color Jitter modes, however, paint over boxes without destroying their 3D capability. It often makes sense to only enable the hue and possibly saturation channels but not lightness (8.7.3 Channels), so that you can change the colors of boxes but preserve the relative lightness and darkness of their sides for the 3D effect, as shown in Figure 9 on the color insert.