We’ve already seen in 8.7 Color Tweaking how the Tweak tool ( ,
,  ) can be used to paint and jitter colors in objects, and in 6.9 Transforming with the Tweak Tool, how it can be used to move and transform objects. Several other modes of this versatile tool—Push, Shrink/Grow, Attract/Repel, and Roughen—are for editing the shape of paths.
AI
The Tweak tool’s path editing modes are somewhat similar to the Pucker and Bloat tools in the latest versions of Adobe Illustrator.
The Tweak tool’s approach to editing paths is fundamentally different from that of the Node tool. The Node tool, true to its name, allows you to edit nodes, and you need to have a good working knowledge of how nodes define the shape of the path. With the Tweak tool, you can forget everything you ever knew about nodes; just interact with your path as a pliable body, like a lump of modeling clay, bending and sculpting it at any point and in any direction. While hardly useful for technical drawing, tweaking paths is extremely handy for creating artistic images such as cartoons.
The Tweak tool will work on any number of selected objects. For example, you can select all ( ) and “smear” your entire drawing in Push mode. You can also apply tweaking to groups of objects; the tool will go into groups and act on individual paths inside groups. If you’re trying to use it without selecting something, it will remind you to select some objects first with a status bar message.
Note
As of version 0.47, the Tweak tool won’t correctly work on open paths—an open path becomes closed if you tweak it.
In any of the Tweak tool’s modes, what you have at your disposal is a circular brush (the orange-edged circle centered on the cursor) with which you “paint” over the selected objects to change them. The size of the brush is controlled by the Width parameter, and the amount of action it applies depends on the Force parameter (as well as pen pressure if you have a pressure-sensitive tablet). See 6.9 Transforming with the Tweak Tool for more details on these parameters.
It takes practice to learn to apply the right amount of drag at the right place, with the proper force (including pen pressure), and with the correct brush size to get the result you need. However, this skill is very rewarding—with the Tweak tool, you are fully in control of the paths in your drawing; what used to be awkward and time consuming with the Node tool is now quick and natural.
Any tweaking of a path slightly distorts—more precisely, simplifies, just like the Simplify command—the entire path, including even those parts that you didn’t touch with the brush.
The Fidelity value allows you to control the amount of this parasite simplification. The tradeoff here is the number of nodes in the resulting path; with low fidelity, the resulting path will be node-poor but probably distorted more than you would find acceptable, whereas high fidelity minimizes distortions but the path may end up having a lot of nodes, which inflates the SVG size and slows down Inkscape.
The best value for fidelity depends on the nature of your artwork. If you’re sculpting an amorphous blob, you can work with a low fidelity of about 20. If, however, you are pushing or growing a text string converted to path and want the letters outside the distorted area to remain as clean and legible as possible, you will need to raise fidelity to 80 or more.
Note
The Tweak tool works by recasting the path into an “approximating polygon” with thousands of tiny straight line sides, tweaks the vertices of that polygon, and then recasts it back into an approximating path with Bézier segments. The fidelity controls the precision of this transformation and thus the number of the nodes in the result, but no fidelity setting will give you the exact nodes of the original—they will always move somewhat, just like they do after a Simplify.
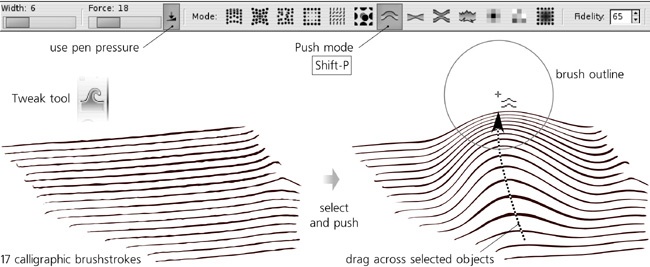
Push is the default mode of the Tweak tool. To switch to Push mode from any other mode, press  , or click its button on the controls bar.
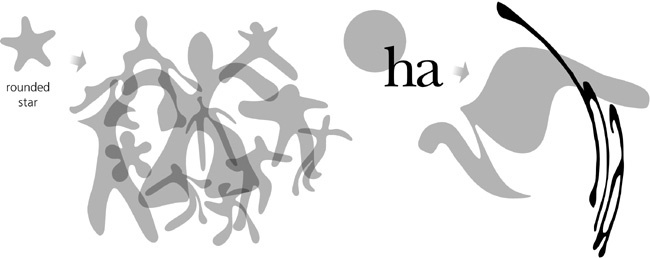
Push is a general-purpose sculpting mode. When you drag in this mode, the parts of the selected paths covered by the brush get shifted in the direction of your drag, for as long as the mouse button or pen is held down:
Varying brush width as necessary, you can push any path into almost any other—but you can also use it for small tweaks, such as flattening a bump, bending an appendix, or curving an engraving grid. Thanks to the bell-like profile of the brush, the paths you’re pushing respond by curving softly and smoothly:
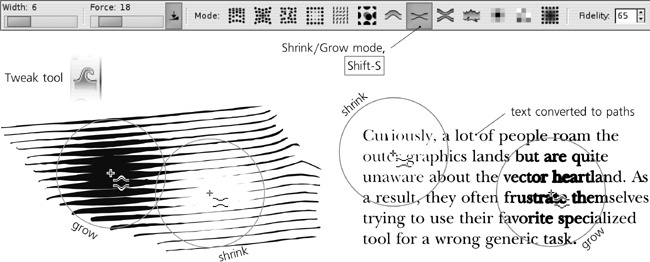
The Shrink/Grow mode ( ) moves each point of a path in a direction perpendicular to the path’s edge in that point, either inward (shrink, plain drag) or outward (grow, drag with
  ). To quickly access this mode from any other mode of the tool,
  -drag to shrink and
  -drag to grow.
The Shrink/Grow mode is very similar to the Inset and Outset commands (12.4 Offsetting), except that the Tweak tool, as always, acts softly on a part of a path instead of the whole path. Most often, this mode is used to lighten or darken parts of drawings composed of many details, such as engravings, freehand scribbles, or even text (converted to paths):
Unlike Push, the Shrink/Grow mode does not require you to actually drag; you can just click and hold while the path keeps bulging or retracting under your brush. However, you can just as well drag to chase the moving edge of the path; this way, using a small-sized brush, you can grow appendages and branches of any length out of a path. (Such growing can also be done in Push mode, but Grow is somewhat easier for this task.) Also, the Shrink mode can act as a quick eraser. Cutting through paths, evaporating small crumbs and bits, and trimming long brush strokes is very easy in this mode:
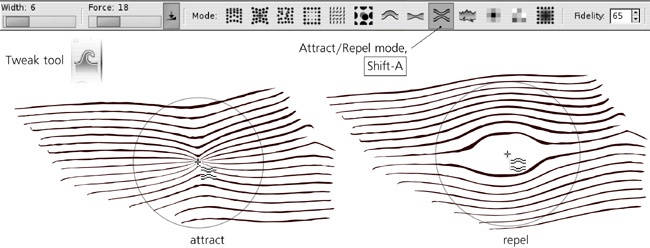
The Attract/Repel mode ( ) works by moving each affected point on a path toward (attract, plain drag) or from (repel, drag with
  ) the cursor point, pinching and exploding whatever paths fall under the brush. In some cases, this may look similar to Shrink/Grow, but the difference is that Attract/Repel doesn’t care about the direction of the path being tweaked. This mode moves everything symmetrically, relative to the center of the brush:
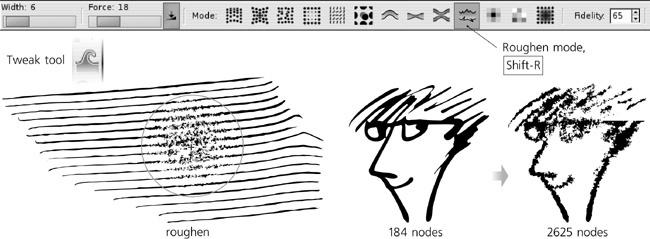
The Roughen mode ( ) randomly distorts the edge of the path where you apply your brush, without changing the overall shape of the path, as shown in Figure 12-39. Slight roughening simply makes the edge crooked and uneven, while strong roughening tears and explodes the edge into random blobs and splotches.
Note
This operation, especially with high fidelity, adds a lot of nodes. Such a roughened path is always hard to edit—it’s awkward to handle with the Node tool and may be painfully slow with the Tweak tool. For this reason, you should finalize the overall shape of a path with pushing, growing, and shrinking first, and only roughen it, if necessary, as the final step.
