The Tweak tool ( or
or  ) is a versatile instrument which applies the same “soft brush” metaphor not only to transforming objects but also to styling them (8.7 Color Tweaking) and editing paths (12.6 Path Tweaking). This tool has a number of modes; in this chapter, we will cover those modes that deal with transforming, duplicating, and deleting objects. Using these modes, it is easy to sweep, sculpt, and scatter collections of objects, such as clone tilings, into complex and naturalistic images—to draw with scattering.
All modes of the Tweak tool share a number of common features. No matter which mode you’re in, you use a circular soft-edged brush (the orange circle you see under the cursor) controlled by the Width and Force parameters on the controls bar and affected by the pen pressure (if you have a pressure-sensitive tablet). You “paint” with this brush over the selected objects to change them.
The width of the brush varies from 1 to 100, but these aren’t absolute units; regardless of zoom, 1 gives you a very small brush and 100 gives you a brush approximately the size of your screen. In this tool, you will always see the circular brush outline centered on your mouse cursor and demonstrating the current width of the brush. You can change this value by using the Width control on the toolbar or the  (narrower) and
  (wider) keys. The brush is soft; its action is maximum in the center and smoothly decreases towards the edge following a bell-like profile.
Similarly, force ranges from 1 (very weak; you need to stroke an object several times to achieve a visible effect) to 100 (very strong; the first stroke of the brush applies the maximum effect under the brush). To change the force, use the toolbar control or press the  (weaker) and
  (stronger) keys.
To get a feeling of how the Tweak tool works, create a number of small objects in a test drawing. The easiest way to do this is to set up a small clone tiling (16.6 Tiling Clones) of about 10-by-10 clones, but you can also start with a single ellipse or path and manually duplicate ( ) or clone (
 ) it several times, dragging away the copies. Now, select all the objects you created, switch to the Tweak tool, adjust Width so the circle covers several objects at once, set Force to a moderate value of 20, enable one of the modes by its toggle button, and start dragging over the objects. Figure 6-16 shows what will happen.
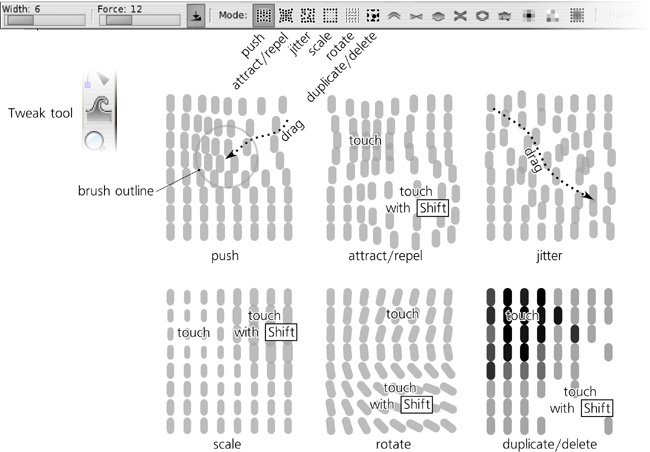
Moves those selected objects that are under the brush in the direction in which you drag the brush. This mode is similar to simply dragging objects around, except that instead of dragging each object individually, you drag a brush that softly and naturally “sweeps” all objects that it happens to run across. Note that non-selected objects are never affected; the easiest way to achieve this is to group all tweakable objects and simply select the group.
Attract/Repel Objects mode
Move Jitter mode
Moves those selected objects that are under the brush in random directions and by random distances. The harder you press and the higher the Force is, the heavier the jitter is. This is a way to “shake up” your composition if it’s becoming too solid.
Scale mode
Rotate mode
Rotates those selected objects that are under the brush clockwise (by default) or counterclockwise (with
 pressed). This allows you to introduce rotation non-uniformities to your scattering, for example to “bend” your scattering texture to adapt it to the dominant directions in different parts of the image.
Randomly duplicates some of the selected objects under the brush (by default) or deletes some of them (with
pressed). The chance of an object to be duplicated or deleted, as always, depends on force and pen pressure. This completes the “scatter drawing” toolset by providing a way to thicken and thin your scattering wherever necessary.As with the regular Duplicate command (4.4 Copying, Cutting, Pasting, and Duplicating), duplicating with the Tweak tool places the copies right over the originals, so it is a good idea to use the Jitter mode after duplicating to ruffle them apart. The duplicates created by the tool are automatically added to selection if the original objects were selected (e.g., if you’re tweaking a group of objects, they are duplicated within that group and are not by themselves selected).