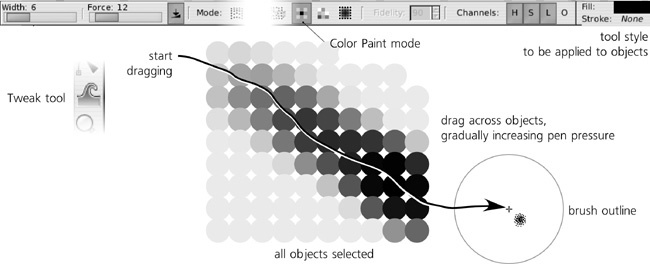
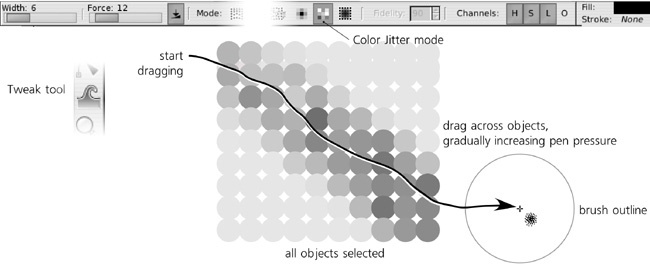
We’ve already seen some of the capabilities of the Tweak tool in the chapter on transformations (6.9 Transforming with the Tweak Tool). Let’s look at its two modes for changing colors of objects, Color Paint and Color Jitter. Both of these modes work on flat color paint as well as on gradients (10.7 Gradient Tips and Examples). Refer to 6.9 Transforming with the Tweak Tool to review how the tool’s Width and Force parameters work.
The Color Paint mode is used to apply color to the selected objects under the brush. The color being used—more precisely, the style because it includes both fill and stroke—can be seen in the style swatch at the right end of the tool’s controls bar (above the canvas). To change this applied style, simply click the color palette or use any other style editing command (such as the Fill and Stroke dialog) while you are in this mode of the Tweak tool.
Note
Unlike all other tools, in the Tweak tool in Color Paint mode you cannot assign style directly to selected objects; any style-setting commands are “intercepted” to change the tool’s style instead.
The fill from the tool’s style applies to the fills of the painted objects, and the stroke applies to the strokes. If the tool’s style has no fill or no stroke, it won’t affect fills or strokes, correspondingly. For example, if you want to color the fills of objects blue but leave their strokes untouched, assign blue fill to the tool’s style (just click blue on the palette) but set its stroke to none (middle-click the Stroke swatch in the status bar).
This mode literally paints on objects, gradually shifting their colors toward the target color. For example, if you keep painting with yellow fill over a blue-filled object, the object will first become greenish blue, then green, then yellowish green, and sooner or later end up being exactly the yellow color you’re painting with.
Painting with  pressed inverts the color you’re applying (e.g., when painting with yellow,
  will gradually apply blue).
The speed of this gradual transition depends both on the Force value and, if you have a pressure-sensitive tablet, the pen pressure. Also, since the brush is “soft,” objects touched by the periphery of the brush are less affected than those hit by the brush center.
The Color Jitter mode does not apply any color, but instead jitters (randomizes) the colors of the objects it touches. The force of the action determines how strong the randomization is—that is, how far the colors deviate from the original values:
On the Tweak tool’s controls bar, to the right of the Mode buttons, there are four Channels toggles: H, S, L, and O. They allow you to turn on and off the tool’s action on the object’s hue, saturation, lightness, and opacity, correspondingly.
For example, if you want to raise the saturation of some part of your drawing without changing the hue, select some maximum-saturation color (such as pure red) and turn off all Channels buttons except S. Similarly, you can replace the hues without affecting saturation or lightness (with only H turned on), or lighten/darken all colors without changing their hues and saturations (only L turned on). Enabling O applies the master opacity from the tool’s style to the master opacity of objects (but not fill or stroke opacity).
Color painting is quite similar to a soft brush in a raster editor (such as the GIMP or Photoshop). However, even though the tool itself works as a brush, it still applies its color to vector objects, which behave as vector objects usually do. For example, if you want to change the tint of the face in your drawing, and if a hand in the drawing is part of the same path object as the face, that hand will change its tint too, even if it’s located far from the point you are painting. Still, even with this limitation, color painting allows you to quickly and intuitively make adjustments which would be awkward and slow with traditional vector tools.
Drawings containing patterns or scatterings of small independent objects are especially suitable for color painting with the Tweak tool. Examples include the following:
Freehand drawings with the Calligraphic pen, consisting of many separate strokes.
Gradient meshes imported from Adobe Illustrator’s AI files (B.6 AI (Import)), which Inkscape renders as lattices of small polygons. While there’s no direct support for gradient meshes in Inkscape yet, color painting on such lattices is nearly as good.
Text converted to paths, where each letter is a separate path (15.7 Converting Text to Path).
Patterns made with the clone tiler (16.6 Tiling Clones). Note that you need to unset the fill and/or stroke on the original object and use the Color tab of the Create Tiled Clones dialog to assign some initial color to the clones—this will make them paintable with the Tweak tool without unlinking.
Still, color tweaking can be useful for compositions with just a few objects or even for single objects. Unlike all other color selection methods, painting with the Tweak tool implements the color mixing metaphor, which is more natural for artists than RGB sliders or even the HSL color wheel. For example, start with a rectangle of pure blue color; then, pick different colors using Color Paint and apply light touches with minimum force and minimum pen pressure: Add a little green, a little brown, a little yellow, and so on until you have the exact mixed tint you need. Similarly, you can whiten or blacken any hue by adding white or black.
You can also use color tweaking to add a tint, darken, lighten, saturate, desaturate, or color-jitter your entire drawing. Just select all in all layers (5.11 Selecting with Keyboard Shortcuts), zoom out, choose a large brush width so it covers all of the drawing, and apply a little color tweaking (with minimum Force) that will therefore affect all visible objects.

