If you want to “fade out” or “feather” the edge of an object, you don’t have to (indeed, often you can’t) apply a color-to-transparent gradient to it. One way to address this need is by using a mask (18.4 Clipping and Masking); however, in many cases, if the background under the object is a solid color, an overlay object—a shader—of the same color as the background with opaque-to-transparent gradient would be easier to create and maintain. This method works equally well for multiple objects that need to be feathered as a group, for feathering more than one side, for objects that already have different gradient fills, or for bitmaps or pattern-filled objects.
In this example, four gradient shaders are put over the edges of a bitmap to feather it out on a white background:

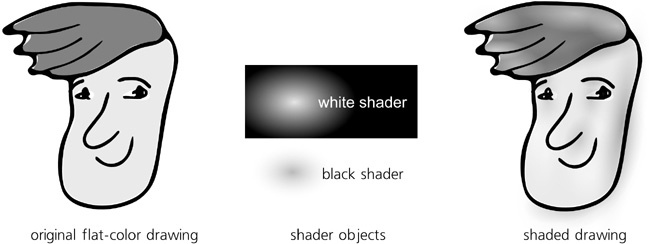
When using shaders, normally you don’t need to move the gradient handles to put the gradient where you need it. Instead, just transform the entire shader object with that gradient. In Figure 10-12, the Gradient tool was only used twice: to create opaque-to-transparent elliptic gradients on two ellipses, one white and one black. Then, a total of 29 clones (linked copies) of these shader ellipses, variously scaled and rotated, all with various reduced master opacity levels, were used to add depth to the cartoon face.
One problem with black (or any other dark-colored) shaders is that they often look too blunt at the edges, too definite, especially if you make them opaque enough. This is the result of the default gradient profile being linear, and therefore it can be fixed by adding mid stops and “profiling” them by  -dragging (10.5.2 Moving Middle Stops). Another useful approach is blurring the shader a bit so that its edges become less pronounced (17.1 Blur).
However, perhaps the simplest workaround for this problem is drawing a gradient not from opaque black to transparent black (which is the default), but from opaque black to transparent white (or, if you will be using the shader on some other light color, to the transparent version of that light color). This changes the perceived gradient profile drastically, making its edges a lot smoother and more natural. On the downside, this may make the center of the elliptic gradient a little too sharp, which can often be fixed simply by scaling the shader object up somewhat.
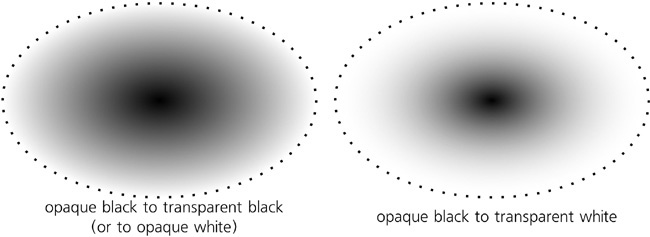
Figure 10-13. Changing the gradient profile in a dark shader by using a fully transparent light color at the edge
Using gradients in design often involves overlaying several objects with semitransparent gradients. Figure 8 on the color insert demonstrates a colored water drop or a glass button which is in fact a group of six objects with various elliptic gradients.
The color modes of the Tweak tool (8.7 Color Tweaking) can paint or randomize colors not only in flat color fill or stroke but in gradients, too. For gradients, the tool takes into account not only the position of the object with the gradient, but also the position of each gradient stop relative to the brush.
For example, you can recolor only the blue end of an object filled with bluered gradient simply by painting over that blue end with a brush small enough to not touch the red. Color tweaking does not create gradients on objects that used flat color before, nor does it add stops, but only paints the stops of the existing gradients in the drawing.
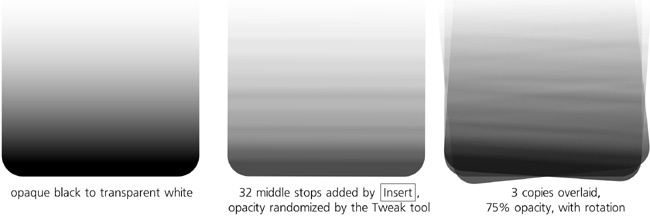
As an illustration, let’s take a simple opaque-black to transparent-black gradient, add a lot of middle stops by repeatedly pressing  , and randomize the lightness of the stop by stroking over the objects with a Tweak brush in Jitter Colors mode, with only the L channel enabled. Then, repeat the same for two more copies of the smooth original gradient, and overlay them all on top of each other with a little rotation. The resulting texture is a quite believable seascape in a mist: