A pattern is a paint type (8.1.1 Paint) where an object’s fill or stroke consists of repeated copies of a tile. The tile can be anything: a single object (e.g., a bitmap) or a group of objects, using any style properties or Inkscape techniques. In this regard, patterns are a very rich and flexible feature. In another respect, however, patterns in SVG are quite limited: They can only use a simple rectangular grid of tiles with no rotations or reflections (compare, e.g., with the clone tiler which implements 17 different symmetry types, 16.6 Tiling Clones).
You cannot have both a gradient and a pattern on an object; they are two alternative paint types. If you want a transparency gradient on an object with pattern, read 10.7 Gradient Tips and Examples on shaders or 18.4 Clipping and Masking on masks.
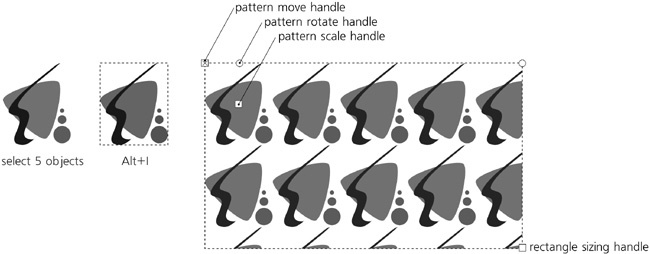
Unlike gradients, patterns don’t have a dedicated creation tool in Inkscape. Instead, just select the objects that you want to turn into a tile and choose Pattern ▸ Objects to Pattern ( ) from the Object menu.
The selected objects do not disappear and apparently don’t change; however, it’s easy to see that instead of the original object you now have a single rectangle selected. This rectangle is filled with the pattern made out of your objects, and it has exactly the size and position of their bounding box, which means that exactly one copy of the pattern fits into the rectangle. If you now drag the rectangle sizing handle (using the Rectangle or Node tool), you will see the other tiles as well:
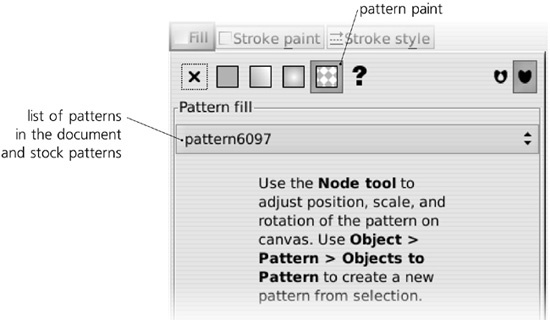
Now you can easily assign the new pattern to any object by choosing Copy and Paste Style from this rectangle (which you can then delete if no longer needed), or by choosing it from the pattern list in the Fill and Stroke dialog, as shown in Figure 10-16.
SVG allows you to set margins around tiles in a pattern to space them apart. Unfortunately, Inkscape does not yet support doing this via the UI. While you can do this in the XML Editor if you know how, a simpler approach is to add to the objects from which you create your pattern a transparent rectangle extending beyond the edges of the other objects and thus adding separation between the pattern’s tiles.
If you want to extract the tile objects back from a pattern in order to edit them, select an object with that pattern and use the Object ▸ Pattern ▸ Pattern to Objects command.
When you are in the Node tool or a shape tool, each object with a pattern fill displays three editing handles that allow you to move, scale, and rotate the pattern within the object. As with gradients, these handles can be anywhere on the canvas, not necessarily on the object itself. Unlike gradients, however, these handles are not connected by lines and cannot be selected nor moved by keys, but only dragged by the mouse.
Also, unlike the Gradient tool, currently only a single selected object can display its pattern handles. Patterns on stroke, while correctly rendered, are not yet editable by handles at all.
X-shaped handle
Positioned in the top-left corner of one of the tiles (the “origin” tile). Dragging this handle moves the pattern in any direction.
Square handle

Round handle
From an aesthetic viewpoint, the major problem with patterns is the same as their main advantage: repetitiveness. While necessary or at least acceptable in technical illustrations, artistic drawings are rarely improved by an overly repetitive rectangular pattern (even though they can sometimes use to a great effect some more complex pattern types). Two simple things that often help are to scale the pattern up as much as possible (so that fewer copies of it fit into the object) and rotate it so it’s no longer horizontal/vertical and therefore does not look as regular.
The Objects to Pattern command is not the only way to add patterns to your document. Inkscape comes with a selection of simple stock patterns which you can reuse in your documents.
Select some object and switch it to pattern paint by clicking the Pattern button in the corresponding tab of the Fill and Stroke dialog. You will see a dropdown list (Figure 10-16) which contains your document’s patterns, if any, at the top, and a set of stock patterns at bottom, after a separator. To use one of the patterns, simply select it from the list.
There is a selection of plain Stripes with different ratios of stripe width to gap width, in the range from 4:1 to 1:64. For example, the Stripes 1:2 pattern has gaps twice as wide as stripes. All stripes patterns exist in two versions: with black stripes and with white stripes (gaps are always transparent).
There are two Checkerboard patterns with black and white odd squares (even squares are transparent).
The Packed Circles option is a dense hexagonal pattern of black circles with transparent gaps.
Polka Dots is a scattering of dots, designed to appear randomly but evenly distributed to mask the regularity of the repeating pattern. There are three size variants of this pattern (small, medium, and large dots) and two color variants (black and white dots).
Wavy is a pattern of wavy lines with transparent gaps between them.
Camouflage is a green-toned protective pattern such as that used by the military.
Ermine is the traditional heraldic pattern, originating from a stylized representation of stoat furs with black tails.
The three bitmap patterns, Sand, Cloth, and Old Paint, are based on seamless photographic tiles and allow you to add some natural texture to your drawing. All of them are grayscale, so you can make objects with these textures semi-transparent and overlay them over other colored objects to “texturize” them.
Stock patterns are stored in the file patterns/patterns.svg in Inkscape’s share directory (typically /usr/share/inkscape on Linux, <inkscape-dir>\share on Windows). You can add your own patterns to this file or replace it with any other SVG file containing the stock patterns you need.