The Gradient tool ( or
or  ) is where you create new gradients on objects. It is also the best environment for editing existing gradients—even though, once created, a gradient on a selected object can be edited (by dragging handles and assigning colors to them) not only in the Gradient tool but also in the Node tool (12.5 The Node Tool), all shape tools (Chapter 11), and in the Dropper tool (8.6 The Dropper Tool). Still, the Gradient tool has a number of gradient-specific editing conveniences.
Creating a new gradient is very simple: Make sure you have the necessary object or objects selected and drag on the canvas. You will see an actual gradient appearing and following your mouse as you drag, and you will also see a system of handles (small on-canvas controls) connected by lines.
You don’t need to drag on the selected objects—gradient handles can very well lie completely outside the object they apply to. You can have any number of objects selected and get them all painted by the same gradient (more precisely, by multiple but coinciding gradients) with a single drag. Another method to quickly create a gradient that spans the entire object is to double-click that object with the Gradient tool.
To use the most common object selection shortcuts, you don’t need to switch to the Selector tool; click to select,  -click to select under, and
  -click to add to selection all work in the Gradient tool as well.
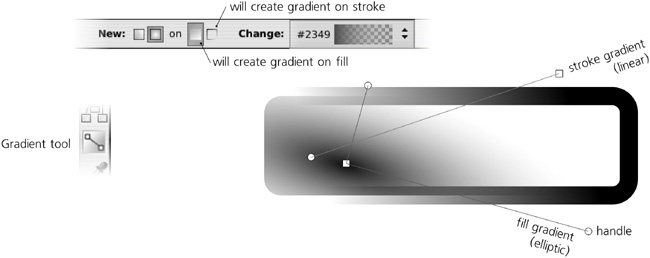
Gradients can be applied to the fill of objects, their stroke, or both (8.1.1 Paint). In Inkscape, stroke gradients use greenish connecting lines between the handles, while fill gradients use blue lines:
If you are creating a gradient for an object that had flat color paint before, the gradient will go from the fully opaque to the fully transparent version of the color of the object on which you started the drag. For example, if you have a yellow rectangle selected and drag starting from that rectangle, you will fill the object with a gradient going from opaque yellow to transparent yellow. You can, however, fill it with an opaque-blue-to-transparent-blue gradient if you have a blue-filled object somewhere and start dragging from it. To put it another way, the gradient you create applies to selected objects, but the color it uses may come from any object, selected or not, from which you start your drag. (If that’s not what you wanted, don’t worry—it’s very easy to change gradient colors once it’s created.)
Similarly, if the object where you started your drag already had some gradient, the tool will just redraw it for the selected object, preserving the colors of that gradient (i.e., preserving the gradient definition, 10.2 Gradient Definition). If you start dragging from an empty space and not from any object, the color or gradient of the topmost selected object will be used for the new gradient.
Of the many ways to remove gradients from an object, perhaps the easiest is to make sure none of the gradient handles are selected (all are white, not blue) and click any color on the palette. The object will be filled by the flat color, replacing any gradient it had before.
Note
Neither gradients nor any other paint (8.1.1 Paint) can be applied to bitmap objects (Chapter 18); if you want a transparency gradient applied to a bitmap, use a mask (18.4 Clipping and Masking). The same is true for clones (Chapter 16), except where the paint of a clone’s original is unset.
Let’s now look in more detail at the two types of gradients Inkscape can create: linear and elliptic.
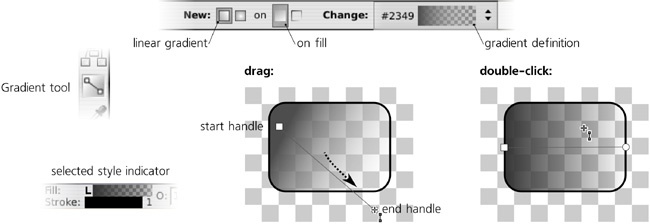
A linear gradient goes along a straight line, where both ends (as well as, possibly, some points in the middle) have certain colors and opacities assigned to them. The transitions between color areas on the object are always perpendicular to the gradient line. This is the default kind of gradient that the Gradient tool creates; the linear gradient mode of the tool is set by the first toggle button in the tool’s controls bar, as shown here:
Note
In the selected style indicator, linear gradients are marked with the letter L followed by the gradient swatch.
A linear gradient has two freely draggable handles: a square one at the start and a circular one at the end of the gradient line. By dragging them around, you can change the direction and length of the gradient (note how the gradient repaints itself in real time as you drag a handle).
With  pressed, drawing a new gradient or dragging a handle of an existing one makes the gradient line snap to angle increments, by default every 15 degrees (this value is changeable in the Steps tab of the Inkscape Preferences dialog, compare 6.3 The Selector: Rotating and Skewing). Double-clicking an object in linear gradient mode creates a horizontal linear gradient that goes through the center of the object’s bounding box.
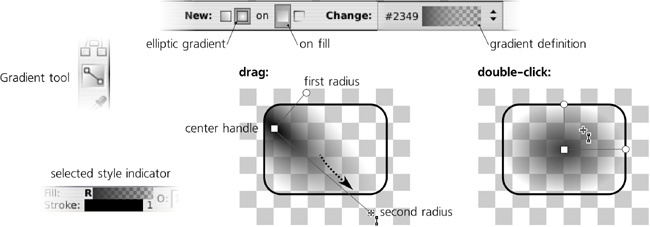
To switch the Gradient tool to creating elliptic gradients instead of linear, press the second toggle button in the tool’s controls bar (above the canvas). Now, if you drag on canvas with some objects selected, an elliptic gradient for them will be created:
Note
In the selected style indicator, elliptic gradients are marked with the letter R (for Radial) followed by the gradient swatch.
An elliptic gradient has at least three draggable handles—the center (square handle) and the two perpendicular radii (round handles). This makes it possible to move, stretch, squeeze, or rotate such a gradient; you can make it into anything from a circle to a narrow ellipse, rotated at any angle. Moving the center handle moves the entire gradient (i.e., all handles); moving the radii stretches and rotates the gradient without moving the center. The two radii always remain perpendicular. As in the linear gradient mode, dragging a radius with  pressed snaps it to 15-degree angle increments.
When you start a drag creating a new gradient, you are dragging one of the radii; the other one gets created to be equal to half of the selected object’s height. This means that if you start dragging from the center of the object and drag horizontally to the right edge of its bounding box, the ellipse will be neatly inscribed into the bounding box. The same effect can be achieved simply by double-clicking an object.
Note
If you need a symmetric “bilinear” gradient with a mountain-like profile, the easiest way to do this is via an elliptic gradient with one radius made very long, dragged far beyond the boundaries of the object. Then, the central part of the stretched ellipse will look almost indistinguishable from a couple of counter-directed linear gradients.
An elliptic gradient also has a fourth, normally hidden, handle—the focus. This is the point with the color and opacity of the gradient’s central stop. Normally, it is merged together with the central handle and moves with it, producing a perfectly symmetric gradient. You can, however, separate the focus—visualized by an X-shaped handle—from the center by dragging away from the central handle with  . This creates an asymmetric, eccentric gradient, shown in Figure 10-4. To merge the focus back, just drag it close enough to the central handle and it will snap.


