In a bitmap-dominated world, a vector editor without a good rasterization and bitmap export capability is useless. Inkscape’s bitmap export facilities are convenient and can be automated in numerous ways. On the downside, Inkscape lacks an export preview and supports only one bitmap format: PNG. Also, you can only create images with 8 bits per channel (no indexed color, no 16 bits per channel), and it is impossible to suppress antialiasing.
The lack of support for bitmap formats other than PNG is not as bad as it may sound. The PNG format faithfully preserves the maximum rendering quality Inkscape is capable of, including alpha transparency, antialiasing, filters, and so on. From a PNG file, you can easily create any other format (such as JPG or TIFF) using a bitmap editor or any image conversion utility such as ImageMagick (you can download it from http://imagemagick.org). During this conversion, you can optimize your image in various ways (e.g., to minimize the file size or palette).
Note
If you think your PNG export has lost the transparency of the original SVG, the most likely source of the problem is not Inkscape but the image file viewer you’re using to examine the PNG. Not all image viewers can handle alpha transparency in PNG; one program that is guaranteed to show your PNG correctly is the Firefox browser.
With the Export Bitmap dialog ( ), you can export your drawing or any part of it into a PNG file at any resolution. The dialog consists of three main areas, in which you configure the following:
The canvas area you want to export
The pixel size of the bitmap
The filename of the export file

For the Export area, you can choose either the page of your SVG document (anything beyond the edges of the page is not exported), the bounding box of the drawing (which can be smaller or larger than the page; the page rectangle is not in any way visible in the exported bitmap), or the bounding box of the selection (again, it can be inside or outside the page rectangle—this does not matter). These options correspond to the first three toggle buttons at the top of the dialog.
Alternatively, you can click the Custom toggle button and type your own values of the coordinates for the top-left corner (x0, y0), bottom-right corner (x1, y1), or width and height of the export area. You can also choose the measurement unit for these values (the default is px, A.6 Coordinates and Units).
The Export Bitmap dialog is not modal—that is, you can keep working on the canvas as you normally do while it is open. Unless you choose Custom, the dialog responds to changing a selection on the canvas by switching to the Selection mode and updating the coordinates to match the bounding box of the new selection. If nothing is selected and you are not in Custom, the dialog defaults to the Drawing mode.
For the Bitmap size, you can type the width and height, in pixels, or you can adjust the resolution value (dpi, which stands for dots—that is, pixels—per inch). The default resolution of 90 dpi results in one SVG px unit corresponding exactly to one pixel of the rendered bitmap. The horizontal and vertical dpi values cannot differ; changing any one of the three editable values (Width, Height, dpi) changes the other two to match.
Note
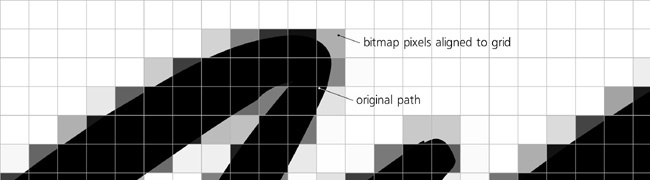
If your drawing contains some px-sized objects (such as strokes a whole number of px wide) and you want them to export precisely into the pixels of the bitmap, it may not be sufficient to choose the 90 dpi resolution. For example, a 1×1 px square in SVG may fall on a boundary between pixels in an exported bitmap and this would end up “smeared” into four adjacent pixels instead of one. The easiest way to prevent such misalignment and ensure your export is as crisp as possible is to use the grid (7.2 Grids). Snap your objects to the default 1 px-sized grid, and make sure that your export area has integer x0 and y0 coordinates when measured in px—that is, is itself aligned to the px grid. After that, exporting at 90 dpi will give you a perfectly crisp image.
For the Filename, you can type a complete path to the file (the .png extension will be added automatically) or click the Browse button to access your filesystem and choose a folder and a file.
When exporting a single selected object, the export filename and resolution of the export are remembered and stored in SVG document (so you may need to save it after performing the export) and restored into the Export Bitmap dialog when you select this object to export again. These export hints are one of the greatest time savers when using Inkscape to export multiple objects to multiple bitmap files—for example, slices of a web page graphic. Just as you select various objects with the Export Bitmap dialog open, you can see their saved export filenames popping up in the Filename field. For the same reason—to make it easier to export multiple objects one by one—the dialog stays open even after you click the Export button.
You can speed up the process even more if you select all objects that you want to export, each to its own file, and check the Batch export all selected objects checkbox. Now, clicking Export will create one bitmap file per each selected object. If an object has already been exported before—that is, has the filename and resolution hints saved—these values will be used for it; otherwise, a name for the bitmap file will be constructed from the ID of the object (for example, text2402.png, see A.9 Linking), and the file will be placed in the directory where your SVG document was last saved.
By default, even if you are exporting a selection, you are actually exporting an area—the bounding box of the selection—which may contain lots of other objects, all of which will be visible. Checking the Hide all except selected checkbox makes sure the exported bitmap will contain only the exported objects, while all others, even if they overlap the export area, will not be rendered.
All of the capabilities of the Export Bitmap dialog are also available when you run Inkscape from the command line by using various switches and parameters. This way, Inkscape can be used as a GUI-less utility from scripts or programs to automate various SVG rendering jobs. For example, this is how you export an object with id="text2402" at 600 dpi:
$ inkscape document.svg --export-png=img/text.png --export-id=text2402 \
    --export-dpi=600
For a complete list of Inkscape’s command-line switches, refer to Appendix C.
While there’s currently no preview pane in the Export Bitmap dialog, if you use Inkscape to create icons, one way to preview your work rendered to different icon sizes is via the Icon Preview dialog, which you can call from the View menu:
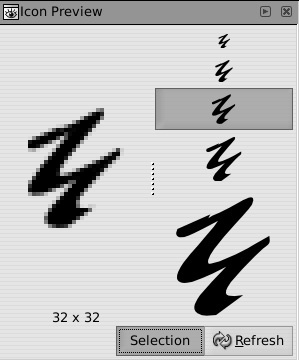
This dialog contains previews of your document rasterized in a few typical icon sizes, from 16-by-16 to 128-by-128 pixels; on the left of the dialog, one of these renderings is additionally displayed scaled up so you can see how your vector objects translate to actual pixels. Click the Selection toggle button to switch the preview from the entire document to the current selection. The Refresh button updates the preview (there’s no automatic update of the preview yet).
You can immediately import (18.1 Import) the bitmap file you have exported back into the document to review how rasterization worked. If, however, you only need that bitmap in your document and not as a separate file, you can use Inkscape’s shortcut: the Edit ▸ Make a Bitmap Copy command.
This command exports the selected objects and at once imports the resulting bitmap back to the document, overlaying it on top of the selection. The new bitmap object is not embedded (it is placed in the document’s last save directory); use the embedding effect (18.2 Linking vs. Embedding) to embed it. The resolution of the export can be set on the Bitmaps page of Inkscape Preferences; the default is 90 dpi, and for that value, the command will additionally snap the export area to the 1 px grid, making sure the pixels of the created bitmap align exactly with the boundaries of px squares.
This command can be used for a quick preview of how your art will rasterize (after which, the bitmap object can be deleted). It is also useful when you have some very slow-rendering filters (17.5 Filter Rendering Options) but do not want to work in the No Filters or Outline modes; in this case, just make a bitmap copy of the filtered object and delete or hide the slow-rendering original. Also, you can create a low-resolution bitmap copy of an object in order to trace it to achieve a characteristic distortion of its shape, which may have artistic value.