CRAZY RICE | PAGE 432
Rice and beans may not be the glamour dishes of a barbecue, but no self-respecting cookout is complete without them. This chapter focuses on those stalwart dishes that add heft to your plate and help to round out what could otherwise be a relentlessly carnivorian meal.
Rice is the traditional accompaniment to much of the world’s grilled fare, from the sticky short-grain rices popular in Asia to the fluffy long-grain rices featured in the West.
Beans are also universal. North American–style baked beans are familiar, but did you know that Indians serve dal (gingery stewed beans) with their tandoori or that Brazilians enjoy tutu mineira (cowboy-style black beans) with their churrasco (grilled meats)? In this chapter, you’ll find recipes for these delectable dishes and more.
This brings me to the less expected accompaniments to barbecue, such as polenta and grits, which are delicious grilled, and Yorkshire pudding, which can be cooked on the grill while the rib roast is resting. You’ll even find a recipe for toasted manioc flour, which Brazilians like to sprinkle over grilled meats.
Armed with these recipes, no one will go hungry. Which is the ultimate goal of any barbecue.
The traditional Indian method for cooking basmati rice involves an elaborate but easy sequence of rinsing, soaking, and steaming the rice. This produces the most delicate basmati rice I know.
SPECIAL EQUIPMENT
Wok ring or flame tamer
INGREDIENTS
2 cups basmati rice
1 teaspoon salt
1. Place the rice in a large bowl and add cold water to cover by 3 inches. Swirl the rice around with your fingers until the water becomes cloudy, then put the rice in a strainer to drain. Repeat the process until the water remains clear. This will take 4 to 6 rinsings. Drain the rice, return it to the bowl, and add 2 cups of water. Let the rice soak for 30 minutes.
2. Drain the rice through a strainer set over a large, heavy pot. Bring the soaking water to a boil over high heat. Add the salt, stir in the rice, and let the water return to a boil. Reduce the heat to medium-low and let simmer gently, partially covered, until the surface of the rice is riddled with steamy holes, 10 to 12 minutes.
3. Reduce the heat to low and use a wok ring or a flame tamer to raise the pot 1 inch above the burner. Wrap a clean kitchen towel around the pot lid, piling any excess cloth on top of the lid. (You want to keep the cloth away from the heat.) Place the cloth-covered lid over the rice and let steam, over very low heat, for 10 minutes.
4. Gently fluff the rice with a fork and serve at once.
Here’s a quick-cook method that produces quite tasty basmati rice for a hurried weeknight. You can also use an American-grown basmati-style rice like Texmati.
2 tablespoons unsalted butter
1 teaspoon salt
½ teaspoon freshly ground white pepper (optional)
2 cups basmati rice
1. Place the butter, salt, white pepper (if using), and 6 cups of water in a large, heavy pot and bring to a boil. Stir in the rice and let the water return to a boil over high heat.
2. Reduce the heat to low, cover the pot tightly, and cook the rice until the grains are tender and all the water is absorbed, about 18 minutes. Remove the pot from the heat and let stand, covered, for 5 minutes.
3. Gently fluff the rice with a fork and serve at once.
No Persian meal would be complete without rice. Here’s a simple steamed rice recipe that’s great with any of the Persian or Afghan kebabs in this book. Use this rice or the following one to prepare Iran’s most famous grilled meal: chelow kebab (see box, page 426).
3 cups basmati rice
1½ teaspoons salt
4 tablespoons (½ stick) unsalted butter, cut into small pieces
1. Place the rice in a large bowl and add cold water to cover by 3 inches. Swirl the rice around with your fingers until the water becomes cloudy, then put the rice in a strainer to drain. Repeat the process until the water remains clear. This will take 4 to 6 rinsings.
2. Place the rice, salt, and 6 cups of water in a deep, nonstick saucepan. Bring to a boil over high heat. Reduce the heat to medium and let the rice simmer gently, uncovered, for about 18 minutes. When the rice has absorbed all the water, reduce the heat to the lowest possible setting and sprinkle the pieces of butter over the top.
3. Wrap a clean kitchen towel around the pot lid, piling any excess cloth on top of the lid. (You want to keep the cloth away from the heat.) Place the cloth-covered lid over the rice and steam for 20 minutes. Remove the pot from the heat and let stand, covered, for 5 minutes.
4. Gently fluff the rice with a fork and serve at once.
One of the glories of Persian (Iranian) gastronomy, chelow is tender, sweet, saffroned rice served with an audibly crisp, yogurt-flavored crust. The theory is simple enough (you brown the rice in a single layer on the bottom), but it takes years of practice to achieve a perfect dark-golden crust that comes away from the bottom of the pan in one piece. Here’s how my Persian cooking guru, Najmieh Batmanglij, prepares this classic accompaniment to an Iranian barbecue.
3 cups basmati rice
1½ teaspoons salt
¼ teaspoon saffron threads
⅔ cup clarified melted unsalted butter (see Note), or olive oil
3 tablespoons plain whole-milk yogurt
1. Place the rice in a large bowl and add cold water to cover by 3 inches. Swirl the rice around with your fingers until the water becomes cloudy, then put the rice in a strainer to drain. Repeat the process until the water remains clear. This will take 4 to 6 rinsings.
2. Place 8 cups of water and the salt in a large shallow pot (preferably nonstick; the pot should be 10 to 12 inches across and about 6 inches deep) and bring to a boil over high heat. Reduce the heat to medium-high, add the rice, and cook, uncovered, at a brisk simmer for 6 minutes. Pour the rice into a strainer, rinse it under cool running water, and drain well. Wipe out and dry the rice pot with paper towels.
3. Place the saffron threads in a small bowl and grind to a fine powder with a pestle or the end of a wooden spoon. Add 1 tablespoon of warm water, stir, and let stand for 5 minutes.
4. In a separate bowl, combine the clarified butter, yogurt, and ½ cup of water and whisk to mix. Pour the butter mixture evenly over the bottom of the rice pot. Spoon a ½-inch layer of rice evenly over the butter mixture. Without disturbing this layer, add the remaining rice, mounding it toward the center. Sprinkle the top of the mound with the saffron mixture. Cover the pan and place it over medium heat for 8 minutes.
5. Remove the lid and sprinkle the rice with an additional ½ cup of water. Reduce the heat to low. Wrap a clean kitchen towel around the pot lid, piling any excess cloth on top of the lid. (You want to keep the cloth away from the heat.) Place the cloth-covered lid over the rice and cook until the rice on top is tender and the rice on the bottom of the pot has formed a dark golden crust, about 40 minutes. Check the rice after 30 minutes; if you don’t see a crust, increase the heat slightly.
6. To serve, spoon the loose rice from the top into a serving bowl, leaving the crusty rice at the bottom. Place a round platter over the pot. Invert the pot and give it a little shake. The crusty rice should slide out in a golden brown disk. Cut the crust into wedges and serve these next to the loose rice.
NOTE: To clarify butter, melt 1 cup (2 sticks) butter in a small saucepan over medium heat. Remove it from the heat and skim off any white foam on top. Pour off the golden liquid (the clarified butter) into a glass measure or heatproof jar, discarding the white liquid and milk solids that have settled in the bottom of the pan. Any unused clarified butter can be refrigerated, covered, for up to a month.
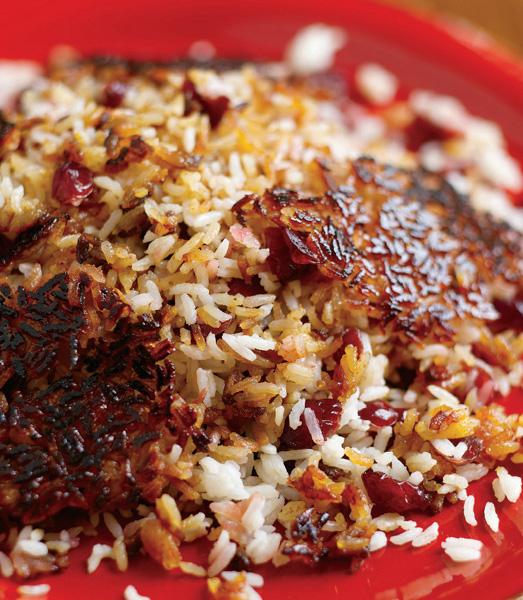
Rice with sour cherries or bilberries is a popular accompaniment to Persian kebabs. One evening, lacking both, I made the rice with dried cranberries: Their sweet-sour flavor was right on the money. Dried cranberries and cherries are sold at specialty food shops, natural foods stores, many supermarkets, and by mail from American Spoon Foods.
1½ teaspoons salt
1½ cups dried cranberries or dried sour cherries
¼ cup sugar
2 tablespoons unsalted butter, plus 2 tablespoons butter, melted
2 tablespoons plain whole-milk yogurt
1. Place the rice in a large bowl and add cold water to cover by 3 inches. Swirl the rice around with your fingers until the water becomes cloudy, then put the rice in a strainer to drain. Repeat the process until the water remains clear. This will take 4 to 6 rinsings.
2. Place 8 cups of water and the salt in a large shallow pot (preferably nonstick; the pot should be 10 to 12 inches across and about 6 inches deep) and bring to a boil over high heat. Reduce the heat to medium-high, add the rice, and cook, uncovered, at a brisk simmer for 6 minutes. Pour the rice into a strainer, rinse it under cool running water, and drain well. Wipe out and dry the rice pot with paper towels.
3. Meanwhile, place the cranberries, sugar, and 1½ cups of water in a medium-size saucepan. Bring to a simmer over medium heat and cook until the cranberries are soft and most of the cooking liquid has evaporated, 5 to 8 minutes; the juice of the cranberries should be thick and syrupy. Using a slotted spoon, transfer the cranberries to a bowl. Add the 2 tablespoons of butter to the cranberry juice and bring to a boil, stirring until the butter melts. Remove the cranberry juice from the heat and set it aside, covered, at room temperature.
4. Combine the yogurt, melted butter, and 2 tablespoons of water in a bowl and whisk to mix. Pour the yogurt mixture evenly over the bottom of the rice pot. Spoon a ½-inch layer of rice evenly over the yogurt mixture. Stir the cranberries into the remaining rice, and without disturbing the rice layer in the pot, add the cranberry rice, mounding it toward the center. Place the pot, uncovered, over medium heat and cook until the rice begins to brown on the bottom, 6 to 8 minutes.
5. Reduce the heat to low. Wrap a clean kitchen towel around the pot lid, piling any excess cloth on top of the lid. (You want to keep the cloth away from the heat.) Place the cloth-covered lid over the rice and cook until the rice on top is tender and the rice on the bottom of the pot has formed a dark golden crust, about 40 minutes. Check after 30 minutes; if you don’t see a crust, increase the heat slightly.
6. Remove the pot from the heat and pour the reserved cranberry juice over the rice. Let the rice stand, covered, for 5 minutes.
7. To serve, spoon the loose rice from the top into a bowl, leaving the crusty rice at the bottom. Place a round platter over the pot. Invert the pot and give it a little shake. The crusty rice should slide out in a golden brown disk. Cut the crust into wedges and serve these with the loose rice.
Jasmine rice is a relative newcomer to the North American table, but it’s taken the country by storm. With its sweet, delicate, almost floral flavor, it’s easy to see why. Jasmine rice can be found at Asian markets and specialty food shops. Serve this rice with any of the Thai grilled dishes in this book.
2 cups jasmine rice
1. Place the rice in a large bowl and add cold water to cover by 3 inches. Swirl the rice around with your fingers until the water becomes cloudy, then put the rice in a strainer to drain. Repeat this process until the water remains clear. This will take 4 to 6 rinsings.
2. Place 3½ cups of water in a large, heavy saucepan and bring to a boil over high heat. Stir in the rice and let the water return to a boil. Reduce the heat to low and cover the pot tightly. Cook the rice until just tender, 15 to 18 minutes.
3. Remove the pan from the heat. Remove the lid and wrap a clean kitchen towel around the pot lid, piling any excess cloth on top of the lid. Place the cloth-covered lid over the rice and let the rice stand for 5 minutes.
4. Gently fluff the rice with a fork and serve at once.
PERSIAN RICE WITH CRANBERRIES | PAGE 427
This towering cone of rice—gilded with turmeric and perfumed with lemongrass and galangal or ginger—symbolizes Bali’s sacred Mount Agung. As such, it’s a fitting centerpiece for a megibung, the Balinese rice table. A megibung is a sort of smorgasbord of Balinese delicacies, which would invariably include babi guling (Balinese Roast Pork, page 177) and a variety of satés.
The traditional rice for this dish is Balinese long-grain rice. The closest approximation available in this country is Thai jasmine rice. Coconut water is the liquid inside the coconut.
3 cups jasmine rice
1½ cups coconut water (see box, page 114) or plain water
1½ cups homemade chicken stock or canned low-sodium chicken broth
¾ cup coconut milk, canned or homemade (page 522) 1 stalk fresh lemongrass, trimmed and flattened with the side of a cleaver, or 1 teaspoon grated lemon zest
4 slices (each ¼ inch thick) peeled fresh galangal or peeled fresh ginger, lightly crushed with the side of a cleaver
½ teaspoon ground turmeric
1 tablespoon salt
1. Place the rice in a large bowl and add cold water to cover by 3 inches. Swirl the rice around with your fingers until the water becomes cloudy, then put the rice in a strainer to drain. Repeat the process until the water remains clear. This will take 4 to 6 rinsings.
2. Place the coconut water, chicken stock, coconut milk, lemongrass, galangal, turmeric, and salt in a large, heavy pot and bring to a boil over high heat. Add the rice and let the water return to a boil. Reduce the heat to low and cover the pot tightly. Cook the rice until just tender, 15 to 18 minutes.
Remove the pot from the heat and let the rice stand, covered, for 5 minutes.
3. Gently fluff the rice with a fork. Remove and discard the lemongrass and galangal slices. To serve nasi kuning in the traditional Balinese manner, pack it into a lightly oiled large funnel or other cone-shaped mold. Place the mold, with the wide opening facing up, in a deep bowl or pot covered with aluminum foil and let stand for 3 minutes. Place a platter over the base of the mold and invert and unmold the rice onto the platter.
Rice is more than just a food in Japan. It’s the very soul of Japanese culture. Japanese culinary authority Shizuo Tsuji devoted eight pages to the preparation of simple boiled rice in his seminal book Japanese Cooking: A Simple Art. It’s the inspiration for the recipe here.
You’ll need to use a short-grain (aka oval) Asian-style rice for this recipe. Most of the short-grain rice sold in North America is grown in California. Good brands include Calrose and Kokuho Rose. The choicest rice in Japan is shinmai, freshly harvested “new rice,” which comes to market in the fall. You may be able to find shinmai at a Japanese market.
3 cups short-grain rice
2 teaspoons black sesame seeds (optional)
1. Place the rice in a large bowl and add cold water to cover by 3 inches. Swirl the rice around with your fingers until the water becomes cloudy, then put the rice in a strainer to drain. Repeat the process until the water remains clear. This will take 4 to 6 rinsings. Once well rinsed, let the rice remain in the strainer for 30 minutes, so it is well drained.
2. Combine the rice and enough water to cover the rice by 1 inch (about 4 cups) in a large heavy pot with a tight-fitting lid. Cook the rice, covered, over medium-high heat until you can hear the water begin to boil. Increase the heat to high and bring the rice to a vigorous boil (the lid might move from the pressure of the steam). Boil the rice for 2 minutes. Reduce the heat to low and cook the rice until all the water is absorbed, 15 to 20 minutes. Do not uncover the rice until it has cooked for a minimum of 15 minutes.
3. Remove the pot from the heat. Remove the lid and wrap a clean kitchen towel around the pot lid, piling any excess cloth on top of the lid. Place the cloth-covered lid over the rice and let the rice stand for 15 minutes.
4. Gently fluff the rice with a fork before serving. Sprinkle black sesame seeds (if using) on top and serve at once.
Grilled rice cakes are a popular dish in Japan, turning up at street vendors’ stalls, at yakitori parlors, and even at highfalutin restaurants. The following recipe was inspired by the vendors outside the Sensoji Temple in Tokyo. You could probably use brown rice, although the Japanese barbecue buffs I met in Japan have an almost universal preference for white. Japanese grill jockeys don’t oil the rice cakes. Their grills don’t have grates, so the cakes are grilled on chopsticklike skewers held over the fire. The oil enables you to grill the cakes on a Western-style grill.
ADVANCE PREPARATION
2 to 8 hours for chilling the rice cakes
INGREDIENTS
Japanese Steamed Rice (page 430), cooled
1 tablespoon canola oil, plus more for oiling the plate
Classic Teriyaki Sauce (page 473), White Miso Barbecue Sauce (page 475), or both
1. Place the rice in a bowl and have a bowl of cold water handy. Lightly oil a large plate. Lightly wet your hands and pinch off 2-inch balls of rice. Mold them into circles, ovals, or heart shapes, rewetting your hands as necessary. Each shape should be about 1 inch thick. As they are made, place the rice cakes on the prepared plate. When all of the rice has been used up, refrigerate the rice cakes, loosely covered with plastic wrap, for at least 2 and as long as 8 hours.
2. Set up the grill for direct grilling and preheat to high.
3. When ready to cook, brush and oil the grill grate. Lightly brush the rice cakes on both sides with the canola oil. Brush one side with one or both of the sauces, then arrange the rice cakes, sauce side down, on the hot grate. Cook the rice cakes until nicely browned on both sides, 4 to 5 minutes per side, brushing the cakes with the sauces again before turning. Serve at once.
Peas and rice are a staple on every island in the Caribbean. The “peas” in this case are pigeon peas, a greenish-brown, earthy-flavored bean native to Africa. The African origins are evident in some of the bean’s local names. Jamaicans call it Gunga pea (Congo pea). In the French West Indies, it’s known as pois d’angole (pea from Angola), a name echoed in the Spanish term gandule. If you live in the American South, you probably know it as “crowder.”
Whatever you call it, pigeon peas come in ridged pods and are widely available canned and frozen at Hispanic markets and most supermarkets. If you can’t find them, you can certainly substitute black-eyed peas or small red kidney beans.
4 slices of bacon, cut into ¼-inch slivers
1 medium-size onion, finely chopped
1 medium-size red bell pepper, cored, seeded, and finely chopped
3 cloves garlic, minced
6 fresh basil leaves, thinly slivered, or 1 teaspoon dried basil
1 teaspoon fresh thyme, or ½ teaspoon dried thyme
2 teaspoons salt, or more to taste
½ teaspoon freshly ground black pepper, or more to taste
2 tablespoons tomato paste
½ teaspoon sugar
3 cups long-grain white rice
1 tablespoon fresh lime juice
2 cups cooked pigeon peas, black-eyed peas, or kidney beans
1. Heat the oil in a large, heavy pot over medium heat. Add the bacon and cook until lightly browned, about 4 minutes. Pour off all but 2 tablespoons of the fat. Add the onion, bell pepper, garlic, basil, thyme, salt, and black pepper and cook until the onion is golden brown, about 5 minutes. Stir in the tomato paste and sugar and cook about 2 minutes longer.
2. Add 5½ cups of water and bring to a boil. Stir in the rice and lime juice and let return to a boil. Reduce the heat to low and cover the pot tightly. Cook the rice until it is tender, about 18 minutes, but check it after 15 minutes: If the rice is too wet, set the pot lid ajar to allow some of the liquid to evaporate; if the rice is too dry, add 2 to 3 more tablespoons of water. Stir in the pigeon peas during the last 3 minutes of cooking.
3. Remove the pot from the heat and let the peas and rice stand for 5 minutes. Just before serving, fluff the peas and rice with a fork and taste for seasoning, adding more salt and/or black pepper as necessary.
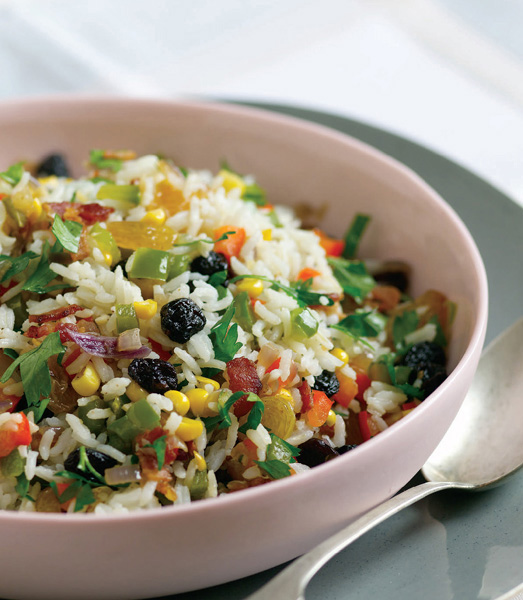
This colorful side dish is the Brazilian version of fried rice. It turns up at churrascarias and restaurants in Rio de Janeiro and São Paolo, with each chef trying to outdo his peers with the elaborateness of the flavorings. The version here comes from a wonderful restaurant called Candidos, located in the port town of Pedra de Guaratiba, an hour south of Rio.
FOR THE RICE
1½ cups long-grain rice
½ teaspoon salt
1 tablespoon unsalted butter
FOR THE FLAVORINGS
1 tablespoon extra-virgin olive oil
3 slices of bacon, cut into ¼-inch slivers (see Note)
½ medium-size red onion, diced
1 clove garlic, minced
½ medium-size green bell pepper, cored, seeded, and cut into ¼-inch dice
½ medium-size red bell pepper, cored, seeded, and cut into ¼-inch dice
½ cup cooked corn kernels
¼ cup dark raisins
¼ cup golden raisins
3 tablespoons chopped fresh flat-leaf parsley
Salt and freshly ground black pepper
1. Prepare the rice: Place the rice in a large bowl and add cold water to cover by 3 inches. Swirl the rice around with your fingers until the water becomes cloudy, then put the rice in a strainer to drain. Repeat the process until the water remains clear. This will take 4 to 6 rinsings.
2. Place the rice in a large, heavy pot. Add enough water to cover by ¾ inch (about 2½ cups). Stir in the salt and butter and bring to a boil over high heat. Tightly cover the pan, reduce the heat to low, and cook the rice until it is tender, about 18 minutes, but check after 15 minutes: If the rice is too wet, set the lid ajar to allow some of the liquid to evaporate; if the rice is too dry, add 2 to 3 more tablespoons of water. Remove the pot from the heat and let the rice stand, covered, for 5 minutes. Fluff it with a fork and set aside.
3. Prepare the flavorings: Heat the olive oil in a large skillet over medium heat. Add the bacon and cook until lightly browned, about 4 minutes. Pour off all but 2 tablespoons of the fat. Add the onion, garlic, green and red bell peppers, corn, dark and golden raisins, and the parsley. Cook until the onion is golden, about 5 minutes. Stir the rice into the flavorings and cook until thoroughly heated through, about 2 minutes. Taste for seasoning, adding salt and black pepper to taste, then serve.
NOTE: To make a vegetarian version of Crazy Rice, simply leave out the bacon and increase the olive oil to 2 tablespoons.
Polenta is Italian cornmeal mush—but, oh, what mush: cornmeal simmered to a savory paste and, here, enriched with butter and cream, then smokily browned on the grill. You can serve grilled polenta by itself as a side dish or you can top it with your favorite tomato sauce. For an artistic touch, use a cookie cutter to cut out the polenta in stars, triangles, circles, or other fanciful shapes.
If you’re in a hurry, you can buy precooked polenta, sold in bologna-shaped tubes. Cut it crosswise a half inch thick, brush it with melted butter, and grill as described in Step 6.
ADVANCE PREPARATION
4 hours to 2 days for chilling the polenta
INGREDIENTS
2 cups coarse yellow cornmeal
1 teaspoon salt, or more to taste
½ teaspoon freshly ground black pepper, or more to taste
½ cup heavy (whipping) cream
2 to 4 tablespoons unsalted butter, melted, or extra-virgin olive oil
1. Combine the cornmeal, salt, pepper, and 6 cups of water in a large, heavy saucepan and whisk until smooth. Bring the mixture to a boil over high heat and let boil for 2 minutes, whisking steadily.
2. Reduce the heat to a gentle simmer and stir in the cream and, if desired, 2 tablespoons of melted butter or olive oil. Let the polenta simmer gently, uncovered, until it thickens enough to pull away from the side of the pan, 30 to 40 minutes. The polenta should be the consistency of soft ice cream. You don’t need to whisk the polenta continuously, but you should keep a careful eye on it, giving it a stir every 5 minutes. As it thickens, you’ll need to switch from a whisk to a wooden spoon. Taste for seasoning, adding more salt and/or pepper as necessary; the polenta should be highly seasoned.
3. Pour the polenta into a nonstick jelly-roll pan or cake pan and even out the top with a spatula. The polenta should be about ½ inch thick. Let cool to room temperature, then cover the polenta loosely with plastic wrap and refrigerate until firm, at least 4 hours or as long as 2 days.
4. Cut the cold polenta with a knife or cookie cutter into squares, rectangles, or other shapes; the pieces should be no more than 3 to 4 inches across. Use a spatula to transfer the pieces of polenta from the pan to a large plate.
5. Set up the grill for direct grilling and preheat to high.
6. When ready to cook, brush and oil the grill grate. Brush both sides of the polenta pieces with 2 tablespoons of melted butter or with olive oil. Arrange the polenta on the hot grate and cook, turning with a spatula, until sizzling hot and nicely browned on both sides, 3 to 4 minutes per side. Serve the grilled polenta at once.
Grilling polenta is a long-standing Italian tradition. This gave me the idea to grill the American equivalent, grits. Grilled grits go really well with southern or Texas-style barbecue.
ADVANCE PREPARATION
4 hours to 2 days for chilling the grits
INGREDIENTS
3 cups homemade chicken stock, canned low-sodium chicken broth, or water
1 clove garlic, minced
1 teaspoon of your favorite hot sauce
1 teaspoon salt, or more to taste
½ teaspoon freshly ground black pepper, or more to taste
3 cups quick-cook grits
4 tablespoons (½ stick) unsalted butter, melted, or olive oil
1. Combine the chicken stock, garlic, hot sauce, salt, and pepper in a large, deep pot and bring to a boil over high heat. Stir in the grits and 2 tablespoons of melted butter and let return to a boil. Reduce the heat to a gentle simmer and cook the grits, uncovered, until thick, 5 to 8 minutes, or for the time given on the package, stirring often. The heat should be high enough to cause bubbles to break the surface but low enough so that the grits don’t spatter. Taste for seasoning, adding more salt and/or pepper as necessary.
2. Pour the cooked grits onto a nonstick baking sheet or pie pan and even out the top with a spatula. The grits should be about ½ inch thick. Let cool to room temperature, then cover the grits loosely with plastic wrap and refrigerate until firm, for at least 4 hours or as long as 2 days.
3. Cut the grits into rectangles or wedges. Use a spatula to transfer these from the baking sheet to a large plate.
4. Set up the grill for direct grilling and preheat to high.
5. When ready to cook, brush and oil the grill grate. Brush both sides of the pieces of grits with some of the remaining melted butter. Arrange the grits on the hot grate and cook, turning with a spatula, until sizzling hot and nicely browned on both sides, 3 to 4 minutes per side. Brush the grits with any remaining butter as they grill. Serve the grits at once.
Although it is little known outside its native Brazil, farofa is one of the world’s most unusual accompaniments to barbecue. In its simplest form, it looks somewhat like sautéed bread crumbs, but the flavor is nutty, earthy, and buttery—much more complex. The texture is delectably gritty.
Farofa (accent on the second syllable) is made from ground dried manioc (also known as cassava), the starchy tuber that gives us tapioca. There’s a basic version (see the following box), but a more elaborate farofa, like this one, is garnished with a rainbow-colored array of dried fruits, vegetables, and scrambled eggs.
2 tablespoons unsalted butter
4 tablespoons extra-virgin olive oil
1 large onion, finely chopped
2 cloves garlic, minced
1 medium-size red bell pepper, cored, seeded, and cut into ½-inch diamonds
1 medium-size green bell pepper, cored, seeded, and cut into ½-inch diamonds
1 medium-size yellow bell pepper, cored, seeded, and cut into ½-inch diamonds
⅓ cup raisins or dried currants
⅓ cup diced pitted prunes
2 cups manioc flour (see Note)
2 large eggs, beaten
Salt and freshly ground black pepper
1. Heat the butter and 2 tablespoons of the olive oil in a large nonstick skillet over medium heat. Add the onion and garlic and cook until soft but not brown, about 4 minutes. Add the bell peppers, raisins, and prunes and cook until the onion is golden brown, about 4 minutes longer.
2. Add the manioc flour and cook, stirring frequently, until golden brown, about 6 minutes. Push the manioc mixture to the edge of the pan.
3. Add the remaining 2 tablespoons of olive oil to the center of the skillet and heat well. Pour the eggs into the skillet and cook, stirring vigorously with a wooden spoon, until scrambled. Stir the scrambled eggs into the manioc mixture and cook until thoroughly heated, 2 to 4 minutes more. Season the farofa with salt and black pepper to taste, transfer it to a serving platter, and serve at once.
NOTE: Manioc flour can be found at Brazilian and Portuguese grocery stores and at specialty food shops. Matzo meal could be used as a substitute, although the flavor won’t be quite the same.
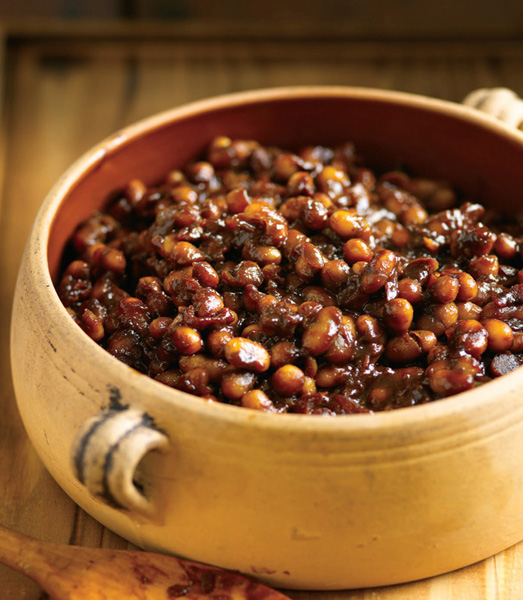
It’s hard to conceive of a North American barbecue without baked beans. Halfway around the world, New Delhi’s famous tandoori palace, Bukhara, attracts a cultlike following for an exquisitely rich, creamy bean dish called dal bukhara. In other words, baked beans. Like traditional Yankee beans, dal bukhara is cooked overnight in a giant pot over charcoal.
The bean of choice for dal bukhara is the urad dal (also called kali dal), a small black bean that looks like a mung bean. (The English name is “whole black gram bean.”) The cream and butter give the beans a silky consistency and concentrated richness unequaled by other Indian bean dishes. Urad dal is available at Indian markets and natural foods stores. In a pinch, you can use mung beans.
Traditional dal bukara takes twelve hours to make. I’ve streamlined the recipe by making it in a pressure cooker.
1 cup (8 ounces) dried whole black gram beans, or mung beans
1 large ripe tomato
1 tablespoon grated peeled fresh ginger
3 cloves garlic, minced
½ medium-size onion, minced
1 tablespoon tomato paste
2 teaspoons ground coriander
1 teaspoon salt, or more to taste
½ teaspoon ground black pepper, or more to taste
¼ teaspoon cayenne pepper, or more to taste
6 tablespoons unsalted butter
½ cup heavy (whipping) cream
QUICK AND SMOKY BAKED BEANS | FOLLOWING
1. Spread out the beans on a baking sheet and pick out and discard any twigs or stones. Place the beans in a large bowl and add cold water to cover by 3 inches. Swirl the beans with your fingers, then place them in a strainer to drain. Repeat the process another 3 or so times.
2. Place the beans in a pressure cooker and add 4 cups of water. Pressure cook the beans over medium heat until you hear an even hiss and the valve in the lid dances in a lively fashion, about 10 minutes.
3. Meanwhile, core the tomato and cut it into chunks. Place the tomato in a food processor and process until pureed.
4. Run cold water over the pressure cooker for 5 minutes to cool it completely (both top and sides), then remove the lid.
5. Stir the ginger, garlic, onion, pureed tomato, tomato paste, coriander, salt, black pepper, cayenne, and 4 tablespoons of the butter into the beans. Pressure cook the beans again until they are reduced to a thick, creamy puree, about 5 minutes (see Note). Once again, cool the cooker completely under cold running water before removing the lid.
6. Shortly before serving, stir the cream into the beans and let them simmer gently in the pressure cooker (with its lid off) or in a saucepan until rich and creamy, 2 minutes. Taste for seasoning, adding more salt, black pepper, and/or cayenne as necessary. Transfer the beans to a serving bowl and dot the top with the remaining 2 tablespoons of butter. Serve the beans at once.
NOTE: The beans can be prepared several hours or even a day ahead to this point and stored, covered, in the refrigerator. Reheat them over medium heat, stirring well.
Not everyone has the time to make baked beans from scratch. This recipe starts with canned beans, but a quick smoke on the grill produces such rich flavor, you’d swear the beans had been cooked for hours. For the best results, add a couple of cups of diced barbecued pork, ham, or brisket and/or meat drippings left over from a previous cookout.
SPECIAL EQUIPMENT
2 cups wood chips or chunks, soaked for 1 hour in cold water to cover and drained
INGREDIENTS
4 thick-cut slices of bacon (about 4 ounces), cut into ¼-inch slivers
1 large onion, finely chopped
3 cloves garlic, minced
1 tablespoon grated peeled fresh ginger
2 cans (each 15 ounces) Great Northern or kidney beans, rinsed and drained
¼ cup firmly packed dark brown sugar
¼ cup molasses
¼ cup barbecue sauce
¼ cup ketchup
2 tablespoons Worcestershire sauce
1 tablespoon dry mustard
1 tablespoon prepared mustard
1 tablespoon cider vinegar
1 to 2 cups diced smoked or barbecued pork, ham, or brisket (optional)
1 tablespoon barbecued meat drippings (optional)
Salt and freshly ground black pepper
1. Place the bacon in a large, heavy pot and cook over medium heat until lightly browned, about 5 minutes. Discard all but 2 tablespoons of the bacon fat.
2. Add the onion, garlic, and ginger and cook until the onion is golden brown, about 5 minutes. Remove the pot from the heat and stir in the beans, brown sugar, molasses, barbecue sauce, ketchup, Worcestershire sauce, dry mustard, prepared mustard, cider vinegar, pork (if using), and drippings (if using). Transfer the beans to a baking dish (an aluminum-foil turkey pan works well).
3. Set up the grill for indirect grilling. No drip pan is necessary for this recipe.
If using a gas grill, place all of the wood chips in the smoker box and preheat to high; when smoke appears, reduce the heat to medium.
If using a charcoal grill, preheat it to medium.
4. When ready to cook, if using a charcoal grill, toss all of the wood chips on the coals. Place the baking pan with the beans in the center of the hot grate, away from the heat, and cover the grill. Smoke roast the beans until thick and richly flavored, about 30 minutes. Season with salt and pepper to taste and serve at once.
NOTE: These beans can also be prepared in the oven; bake them for 30 minutes at 350°F.
Here’s the Brazilian version of baked beans. Actually, it’s only one of the versions. Brazilians love beans so much they have dozens of dishes to choose from. Tutu comes from Minas Gerais (a mining state in northwest Brazil), where it’s made with black beans and bacon. I’ve lightened up the recipe a little—the original is the sort of fare you want to eat before engaging in strenuous physical labor. Serve tutu mineira with any of the Brazilian barbecue main dishes in this book.
4 slices of bacon (about 4 ounces)
1 medium-size onion, finely chopped
4 cloves garlic, minced
¼ cup chopped fresh flat-leaf parsley
1 bay leaf
4 cups cooked black beans (if using canned beans, you’ll need two 15-ounce cans)
½ to 1 cup homemade chicken stock, canned low-sodium chicken broth, or liquid reserved from cooking the beans
¼ teaspoon Portuguese Hot Sauce (page 480) or your favorite hot sauce, or more to taste
3 to 4 tablespoons manioc flour (see Note)
Salt and freshly ground black pepper
2 hard-cooked eggs, coarsely chopped
1. Place the bacon in a large skillet and cook over medium heat until lightly browned, about 5 minutes. Pour off all but 2 tablespoons of the bacon fat. Add the onion, garlic, 2 tablespoons of the parsley, and the bay leaf to the skillet and cook until the onion is golden brown, about 4 minutes.
2. Add the beans, ½ cup of the chicken stock, and the hot sauce to the skillet and let simmer for 5 minutes. Discard the bay leaf. Using a pestle, potato masher, or the back of a wooden spoon, mash half the beans in the skillet. Stir in 3 tablespoons of manioc flour. Let the beans simmer, uncovered, until nice and thick, about 3 minutes. If the beans are too thick, add a little more bean cooking liquid; if they are too thin, add the remaining 1 tablespoon of manioc flour.
3. Taste for seasoning, adding salt and pepper to taste and more hot sauce as necessary. Sprinkle the tutu with the chopped eggs and the remaining 2 tablespoons of parsley and serve at once.
NOTE: If manioc flour is not available (see the Note on page 435), you can substitute toasted bread crumbs (see box, page 113).
Grilled Prime Ribs of Beef with Garlic and Rosemary (page 137) just isn’t complete without Yorkshire pudding. And you can cook the pudding on the grill while the meat rests before you carve it. The trick to achieving a dramatic puff is to start with ice-cold batter and add it to a smoking hot pan. For the most authentic flavor, use melted meat drippings—however nutritionally incorrect they may be. You can collect drippings from a roast while it cooks, using a turkey baster to extract them from the drip pan, or save drippings from a previous grill session.
ADVANCE PREPARATION
30 minutes for chilling the batter
INGREDIENTS
6 large eggs
2¼ cups milk
1 teaspoon salt
½ teaspoon freshly ground black pepper
2 cups all-purpose unbleached flour
¼ cup prime rib drippings, melted unsalted butter, or extra-virgin olive oil
1. Place the eggs, milk, salt, and pepper in a large bowl and whisk to mix. Whisk in the flour and 2 tablespoons of the drippings. Cover and chill the batter in the freezer for 30 minutes.
2. Set up the grill for indirect grilling and preheat it to high (see Note). No drip pan is necessary for this recipe.
3. When ready to cook, add the remaining 2 tablespoons of drippings to a clean 13 by 9–inch roasting pan, place it in the center of the hot grill grate, and heat to smoking, about 3 minutes. Pour the chilled batter into the roasting pan and cover the grill tightly. Cook the Yorkshire pudding until it is puffed and nicely browned, 20 to 30 minutes (don’t peek). Cut the pudding into squares and serve at once.
NOTE: If you have just prepared a roast, your grill will already be set up for the indirect method. If you are using a charcoal grill, just add 10 to 12 fresh coals to each side.