In the fall of 2016, Apple introduced new MacBook Pro models with an eye-popping feature, a first on computers: Above the keyboard, where the function keys (F1, F2, F3…) once sat, there’s a colorful strip of touchscreen. Apple calls it the Touch Bar (Figure 7-2).
It’s a half-inch–tall, high-resolution (“Retina”), 2170×60 pixel, multitouch, OLED screen. It can display whatever programmers want: buttons for functions you might need right now, or a rainbow of color selections, or a timeline of the video you’re editing. The Touch Bar is designed to give you quick access to commands and features that are usually hidden in menus—but now you don’t have to memorize keystrokes to trigger them.
The controls here change according to what you’re doing at this moment—what program you’re using, and what function within that program.
When you’re typing, you might see QuickType (autocomplete buttons for the three words the Mac thinks you’re most likely to want to type next). When you’re in Safari, you see little buttons for your open page tabs. When you’ve selected text, you get formatting controls. When you’re editing video or reading an iBook, you see a horizontal “map” of your movie or book, for quick navigation with a finger touch.
Note
The Touch Bar fades to black if you haven’t used it in a while. Just tap to make the buttons light up again.
All the major programs that come with the Mac have been outfitted with Touch Bar controls: the Finder, Automator, Calculator, Contacts, GarageBand, iBooks, iMovie, iTunes, Keynote, Mail, Maps, Messages, Notes, Numbers, Pages, Photos, Preview, QuickTime Player, Reminders, Safari, Stickies, System Preferences, and TextEdit. (Apple has even blessed some of the utility programs with Touch Bar buttons, like Activity Monitor, Script Editor, Terminal, and Xcode.)
Other software companies, including Adobe and Microsoft, have added Touch Bar buttons to their programs, too.
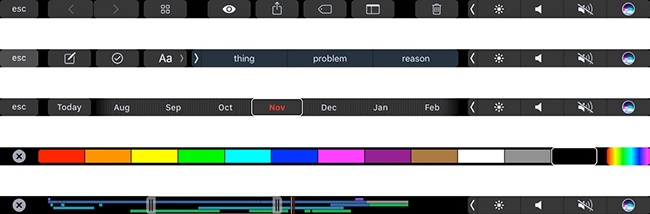
Figure 7-2. Meet the Touch Bar, shown in just a few of its incarnations. Apple decided that touch might be a useful feature—as part of the keyboard, not the screen.
In many programs, you can customize what’s on the Touch Bar, so that the functions you use most often are always glowing there.
The Touch Bar is especially useful when you’re in Full Screen mode (Tip), where the whole point is to maximize your document’s area on the screen. Now the editing controls you might need are on the Touch Bar, out of the way of the big screen.
There’s no feedback when you tap the Touch Bar—no little beep or vibration—so you do have to glance at it to see what you’re doing. Fortunately, the Touch Bar image is actually angled, not flat, so it’s looking right at you.
The Touch Bar may not revolutionize your work in every program. But you’ll probably find some situations where it’s a truly helpful work accelerator: navigating a video you’re editing without having to fuss with the onscreen scroll bar, for example, or tapping out emoji symbols in Messages.
Oh—and being able to log in without entering a password 65 times a day (thanks to your fingerprint) is a joy; read on.
Tip
If you miss the old function keys (F1, F2, F3…), you can have them back on command. Just hold down the physical fn key on your keyboard; the Touch Bar buttons change to the old F-keys, as shown in Figure 7-2 at bottom.
The power button—the rightmost Touch Bar button—is also a Touch ID fingerprint reader. It’s the same sensor that’s on the iPhone and iPad. Once you’ve taught the Mac to recognize your fingerprint in System Preferences→Touch ID, then just resting your finger on this button is enough to unlock the Mac, bypassing the password screen.
In fact, if you’ve set up your Mac with different accounts, the next person can insta-switch to his account just by clicking the Touch ID sensor himself—no logging out, no menu commands, no other steps.
Finally, you can use your fingerprint to approve App Store purchases with a single touch, or to buy stuff on the web without having to enter your name, address, and credit card info over and over again. That part’s called Apple Pay on the web, and it’s described in Tip.
Some Touch Bar buttons are always present. At the left end, for example, what Apple calls a System button is always available. Usually, it’s the Esc key, so that you’re always one tap away from being able to close a menu or dialog box from the keyboard (Keyboard Control). Sometimes the System button says Done or  , but you get the idea.
At the right end, Apple offers something called the Control Strip. You’re probably too young to remember the Control Strip (in System 7, which ran Macs from 1991 to 1998). But this is the same idea: a collapsible row of buttons that give you direct access to settings you’re likely to want to change without burrowing into System Preferences.
Out of the box, the Control Strip seeks to restore the most essential functions of the F-keys that the Touch Bar replaces: screen brightness and speaker volume (plus a button for Siri), as shown at top in Figure 7-3.
When the Control Strip is collapsed, you have two ways to adjust the brightness and volume:
Tap the
 or
or  button. A slider springs out to the left of the button. Touch or drag your finger inside the slider to adjust the brightness or volume.
Slide from the
or button. In other words, you can adjust the brightness or volume with one continuous finger move instead of two—just keep your finger down after the initial tap, and drag within the slider (Figure 7-3, bottom).
Now, not everybody likes change. And some people don’t like the way Apple makes changes. Fortunately, the Control Strip is a change you can change.
Bring back the function keys temporarily. If you need the standard full-row set of Mac function keys as described in Tip and The Complicated Story of the Function Keys, you can bring them back. Tap the thin
 button to the left of the button. The collapsed Control Strip now expands to stretch the full length of the keyboard, precisely replicating the function keys that used to be painted on the top row of physical keys (Figure 7-3, second from top).
Tip
You can also set things up so that tapping the physical fn key expands the Control Strip temporarily. Open System Preferences→Keyboard and from the “Press Fn key to” pop-up menu, choose Expand Control Strip.
Bring back the function keys permanently. If you prefer to have the standard function keys at all times, open System Preferences→Keyboard. From the “Touch Bar shows” pop-up menu, choose Expanded Control Strip. At this point, the Touch Bar never changes, never shows you app-specific buttons; it always shows the traditional function keys, pictured second from top in Figure 7-3.
Get rid of the Control Strip. On the other hand, maybe you don’t adjust your brightness or volume much, or you have another way to do it. And you’d rather have the entire width of the Touch Bar dedicated to app-specific buttons.
In that case, open System Preferences→Keyboard. From the “Touch Bar shows” pop-up menu, choose App Controls. Now the Control Strip is always hidden; you’ve got a lot more space available for function buttons within each program.
Change the buttons on the Control Strip. Apple’s probably correct that the functions most people want most of the time are Brightness, Volume, and Mute. (Siri? Well, maybe in time.) But that doesn’t mean you can’t add or delete buttons from the collapsed Control Strip if there are other functions you use more often. In fact, you can even customize the expanded Control Strip (Figure 7-3, second from top).
The key to making these changes: Open System Preferences→Keyboard; click Customize Control Strip. Now you’ve opened the weird, wonderful world of Touch Bar customizing, as described in the next section. Note that, in this case, you can expand or collapse the Control Strip during this process, thereby editing either version. For example, you could get rid of the Siri button (there are, after all, other ways to trigger Siri), which makes more room for app-specific buttons. Or maybe you never use the Launcher button in the expanded Control Strip; this is your chance to replace it with, for example, the Screenshot button (Screen-Capture Keystrokes) or the Show Desktop button.

The key to choosing which buttons you want on your Touch Bar is the View→Customize Touch Bar command. You’ll find that command in the Finder, Mail, Photos, and a few other major programs. (If the program you’re using doesn’t let you customize its Touch Bar, then that command doesn’t appear.)
The dialog box shown in Figure 7-4 shows what you’d see in the Finder.
Editing your Touch Bar is a strange, delightful procedure. It goes like this:
Install a new button. Inspect the palette of available Touch Bar buttons on your Mac’s main screen. You can drag one of those buttons downward with your mouse, down off the screen, “through” the laptop’s hinge, and onto the Touch Bar.
Figure 7-4. When the Customize dialog box is on the screen, you can move, delete, or add buttons on the Touch Bar. All the existing buttons begin gently wiggling to indicate that they’re movable or deletable.
If you drag onto a blank spot (anywhere marked by ---- dashes), you can drop it there to install it. If you drag it onto an existing button, then a dotted outline appears; that means that you’ll replace the existing button when you let go.
Rearrange existing buttons. Once the Customize dialog box is open, you can use your finger to drag the existing Touch Bar buttons into a new order.
Delete a button. Once the Customize dialog box is open, use your finger to drag the unwanted button all the way to the left; release it on top of the Trash icon that appears there.

Tip
Here again, you can use your mouse to drag a button to the Touch Bar Trash, too. The buttons light up to show the invisible cursor’s position.
In each case, hit Done (either at the far left of the Touch Bar, or on your main screen) to wrap it up.
On a phone, what Apple calls its QuickType keyboard can save you a lot of time, tapping, and errors. As you type a sentence, the software predicts which word you might type next—the three most likely words—and displays them as three buttons above the keyboard. (See Figure 7-5.)
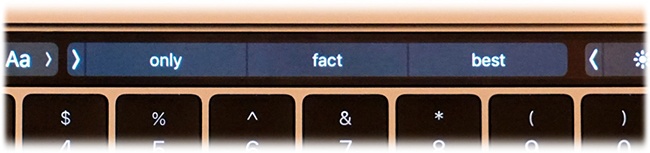
Figure 7-5. QuickType is autocomplete on steroids. Frankly, it’s a rush when it finishes a long word for you.
If you begin the sentence by typing, “I really,” then the three suggestions might be want, don’t, and like.
But what if you intended to say, “I really hope…”? In that case, type the first letter of “hope.” Instantly, the three suggestions change to “h,” hope, and hate. (The first button always shows, in quotes, whatever non-word you’ve typed so far, just in case that’s what you really intend. To place it into your text, you can tap that button or tap the space bar or some punctuation.)
When someone texts you a question that ends with a choice (“Coffee, tea, or me?”), the QuickType buttons cleverly offer those same choices. Before you’ve even typed a single letter, the choices say “coffee,” “tea,” and “you.”
QuickType automatically adds a space after each word you select, so you don’t have to mess with the space bar. And, sometimes, QuickType offers you several words on a single button, to save you even more time (for example, “up to” or “in the”).
Thanks to the Touch Bar, the QuickType suggestions are now on your Mac, too. They’re available in any Touch Bar–enabled program where you can type, like Mail, Notes, and TextEdit. (If you don’t see the suggestions, they may currently be collapsed. Tap the  button to bring them up.)
Of course, on the Mac, you have a real keyboard; you’re not trying to hit keys the size of Tic Tacs on a glass screen. And QuickType means that you have to split your focus; you have to pay attention to both the words you’re tapping and the text on the main screen.
You could argue, therefore, that QuickType is less important on the Mac than on the iPhone. It might be useful if you’re unsure of a word’s spelling, or if you’re a very slow typist—but if you can type fairly quickly, it’s usually faster to just use the keyboard.
In that case, you may want to turn off the QuickType feature entirely, or maybe only for one program.
The key is the “Show typing suggestions” checkbox on the Customize Touch Bar screen (Figure 7-4). If you turn it off (for the program whose Touch Bar you’re editing), then the QuickType suggestions no longer appear. There’s that much more space for your app-specific function buttons.