Apple loves introducing or standardizing some new technology, persuading us to use it—and then abandoning it the minute a better tech comes along. (The floppy drive, CD burner, 30-pin iPhone connector, the headphone jack…)
Apple has done it again. It has replaced the beloved but aging iPhoto with a completely new Mac app called Photos (included with macOS Sierra).
The first question is: Why?
Because, Apple says, times have changed in the 14 years since iPhoto first came along. We capture a lot more with our phones now, and that involves much more than plain old stills: square photos, panoramas, slow-motion videos, time-lapse videos, burst-mode sets, and so on.
And here’s the biggest, baddest, best part of Photos: iCloud Photo Library. That’s free, automatic, real-time syncing of your entire photo library, including edits and organization, across all your Apple gadgets.
Photos is meant to look, feel, and work exactly like Photos on the iPhone/iPad. For example, when you click Photos in the source list at left, Photos automatically groups your photos into sets that are easy to navigate (Figure 12-29).
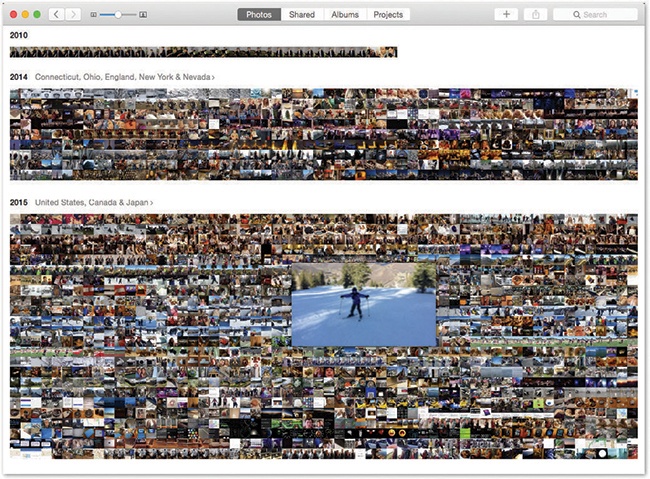
Figure 12-29. Whenever you’re looking at a grid of tiny thumbnail images (in a Year, Collection, or Moment), hold your mouse down within the batch. A larger thumbnail sprouts from your cursor, and you can slide your mouse around within the mosaic to find a particular photo, or batch of them. Release to open that photo at full-screen size for inspection.
Here they are, from smallest to largest (you’ll see each view identified in the title bar):
Moments. A moment is a group of photos you took in one place at one time—for example, all the shots at the picnic by the lake. If you take most of your pictures with an iPhone, you’ll see that it uses its own GPS to give each moment a name: “San Francisco, California (Union Square),” for example. Otherwise, or if you have location sharing turned off, moments are simply grouped by date.
Collections. Put a bunch of moments together, and what do you get? A collection. Here again, the phone tries to study the times and places of your photo taking—but this time, it puts them into groups that might span a few days and several locations. You might discover that your entire spring vacation is a single collection, for example.
Years. If you “zoom out” of your photos far enough, you wind up viewing them by year: 2015, 2016, and so on.
You backtrack from a moment or collection by “pinching” on your trackpad, or by clicking the < button at top left.
Apple usually hides the Sidebar list, which lists your albums’ other groupings, in hopes of making Photos look cleaner, but making it appear is easy enough: Choose View→Show Sidebar, or just press  -Option-S. (When the Sidebar is on the screen, the buttons at the top—Photos, Shared, Albums, Projects—disappear, since the Sidebar now takes over their functions.)
When the Sidebar is not visible, at the top of the photos layout, you get the same tabs you’d see on the phone:
The Photos tab is where you’ll do most of your hunting. This is Moments, Collections, and Years.
The Shared tab is like a tiny Facebook for photos you share with other people (and that other Apple people share with you). People can comment on photos, rate them, and, at your option, upload photos of their own to your batches.
You can even share sets of pix with non-Apple people: Photos automatically creates a private web page full of pictures that you’ve chosen and provides you a link. Very slick.
The Albums tab shows all your photo “folders,” just as iPhoto used to. A single photo can appear in as many albums as you like, without using any more disk space. If you delete a photo from an album, you’re not removing it from Photos—only from this virtual grouping. You can drag thumbnails around in an album to rearrange them.
Tip
If you drag a photo into several albums, then editing it changes that photo everywhere. But if you copy and paste a photo into a different album, you can edit the two independently. And yet, amazingly enough, you’re still not using any more disk space.
Here, too, you get specialized buttons for the kinds of photos the iPhone and iPad can take, like Panoramas, Slo-mo videos, Time-lapse videos, Burst-mode sets, Live Photos (3-second videos captured by the iPhone 6s), and so on. Super handy when you’re trying to show someone your latest time-lapse masterpiece, for example; now you know where to look for it.
There’s also a “folder” here for Favorites. Photos doesn’t offer star ratings or flags. But it does offer Favorites, which work the same as flags (and sync to your iPhone): It’s a way to designate or set aside certain photos.
If your photo collection came from iPhoto or Aperture, you’ll also see an album (in the Events folder) for each iPhoto Event or Aperture Project you had in the older program. (Yes, you can also create folders to hold your albums.)
The Projects tab houses the photo books, cards, calendars, prints, and slideshows you’ve created. (To create one, select the photos you want to include, and then click the + button at top right; from the shortcut menu, choose the kind of project you want to make.)
Tip
Handily enough, the keystrokes -1, -2, -3, -4, and -5 correspond to the Photos, Memories, Shared, Albums, and Projects tabs.
As you’d guess, you can drill down from any of these groupings to a screen full of thumbnails, and from there to an individual photo.
Photos can auto-group the people in your photos, using facial recognition—for example, all pictures of your mom appear in a clump.
To see it at work, click People in the left-side list. Here are thumbnails representing the faces Photos has found and grouped. Click beneath a thumbnail to edit that person’s name. Double-click the thumbnail to see all the photos of this person.
Note
This feature doesn’t work until the Mac has analyzed your photos, which can take at least a day. Apple proudly points out that all of this analysis is done on your Mac. (That’s in contrast to services like Google Photos, which offers similar features but requires that Google accesses your photo library.)
You can even drag your favorites into the top of the screen for quick access later.
Every photo you take with a smartphone (and a few very fancy cameras) gets geotagged—stamped, behind the scenes, with its geographical coordinates. When you click Places in the left-side list, you see a map, dotted with clusters of photos that you took in each place. Double-click one to see the photos you took there.
The updated Photos app introduces Memories: Automatically selected groups of pix and videos from a certain trip or weekend. Most people are pleasantly surprised at how coherent and well-created these are, even though they’re totally automatic.
To see them, click Memories in the list at the left side of Photos; you’ll see a few of Photos’ suggestions, represented as clearly labeled billboards (“Cape Cod Summer”).
The truth is, though, that any bunch of photos—an album, a Moment, a Collection, a Year, even an arbitrarily selected batch—can become a Memory. Make your selection, and then click Show as Memory at top right.
You can scroll down to see more about what’s in this Memory. You’ll see the photos that will be in it, as well as who’s in it (People), and where the photos came from (Places).
One huge, juicy payoff of the Memories feature is the instant-slideshow feature.
Any selected group of photos at all can get the animated, musical, instant-slideshow treatment—but these slideshows are a match made in heaven for Memories.
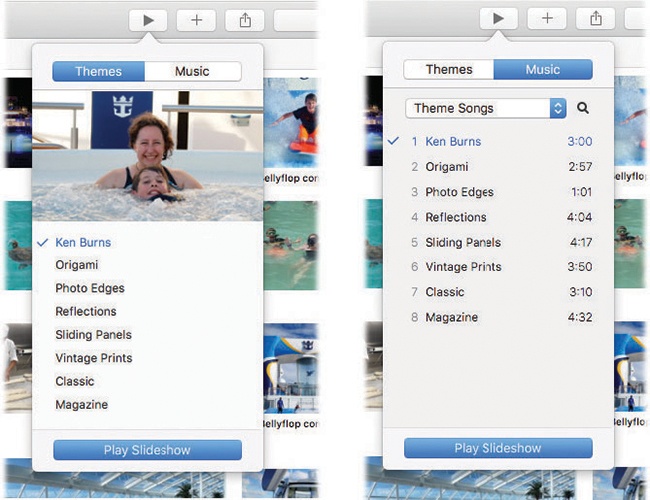
Having opened the Memory, album, or other batch of photos, click the  button at top right to produce the slideshow controls. The resulting pop-up palette offers three useful controls:
Themes. These are animation styles—transitions and movement for blending one photo or video into the next (Figure 12-30, left).
Music. From a pop-up menu, you can choose iTunes Music (your own music collection) or Theme Songs (eight evocative instrumental pieces that come built into Photos). Choose the background music you want for your slideshow (Figure 12-30, right).
Play Slideshow. Click this button to begin the actual slideshow, full-screen. While it plays, you can press the arrow keys on your keyboard to skip ahead or back—or wiggle your mouse to see a playback-controls palette. To stop the show before it’s over, press the Esc key, or wiggle the mouse and click the
 .
.
To open any selected thumbnail so you can see it at full size, tap the space bar. (Tap the space bar again to close the photo.)
While the photo is open, you can zoom in or out—either drag the top-left slider, or use two fingers on your trackpad (pinch or spread them). If your Mac has a Touch Bar (The Complicated Story of the Function Keys), you can tap or drag your finger through it to scroll through the photos in this set.
You can open a video this way, too. Playing and trimming videos works exactly as it does on the iPhone or in Photos. For slo-mo videos from the iPhone, you can even adjust the start and stop points for the slow effect.
To open a selected photo for editing, just press the Return key. Or, if your Mac has a Touch Bar, touch the  button. (At that point, some of the most useful editing buttons on the screen also appear on the Touch Bar for easy access.)
On the right side, you find exactly the same control layout as on the iPhone and iPad (Figure 12-31). The tools Apple gives you aren’t exactly Photoshop, but they’re coming dangerously close. And they’re much more complete on the Mac than they are on the phone/tablet.
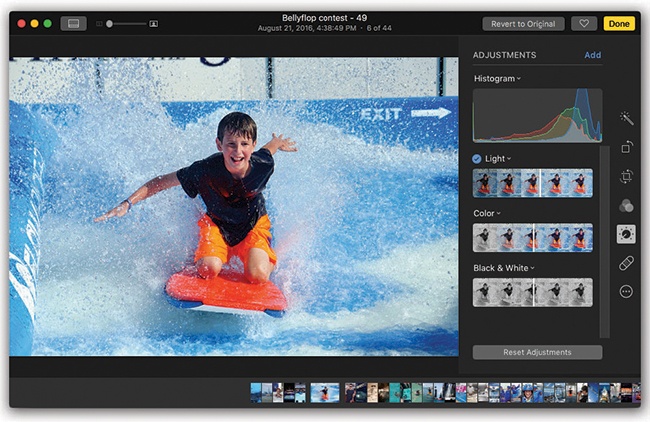
Figure 12-31. Any changes you make are nondestructive. At any time, hours or years later, on your Mac, iPhone, or iPad, you can return to this Edit screen and undo the changes. You can recrop the photo back to its original size, for example, turn off the Enhance button, or whatever. Your changes are never really permanent.
At the outset, you get buttons for Enhance, Rotate, Crop, Filters, Adjust, Retouch, and Extensions. (Crop includes an auto-crop/straighten function, which uses the Rule of Thirds to smartly adjust your shot.)
The heavy hitter here is the Adjust button. When you click it, you’re offered three adjustment categories: Light, Color, and Black & White.
When you choose one of these categories, you see a “filmstrip” of your photo. You can drag your mouse across it, watching the effect on your photo. As it turns out, each of these sliders controls a handful of variables, all of which it’s changing simultaneously. For example, adjusting the Light slider affects the exposure, contrast, brights, and darks all at once.
Intriguingly, you can expand a slider to see how it has affected these qualities—or adjust these sub-sliders yourself, or even double-click a number and type in a new value.
For example, Light is composed of Exposure (adjusts the brightness of all pixels), Highlights (pulls lost details out of very bright areas), Shadows (pulls lost details out of very dark areas), Brightness (like Exposure, but doesn’t brighten parts that are already bright), Contrast (heightens the difference between the brightest and darkest areas), Black Point (determines what is “black”; shifts the entire dark/light range upward or downward). Once again, you drag your mouse along the “film strip” to watch the effect on your photo.
At any point, you can compare your edited photo with the original by holding down the M key.
There’s more editing power in Photos than just the three Adjust sliders you see on Day One. You can also adjust sliders for white balance, sharpness, definition, noise reduction, levels, and so on. And you can summon a histogram (a graph of the brights and darks in this photo).
It’s all hiding in the Add pop-up menu. Add as many sliders as you like.
(And don’t forget to click Save as Default if you want these sliders to be here every time you enter Adjust mode.)
Tip
The Extensions button, in Edit mode, gives you access to plug-ins from Apple and other companies that let you do even more with your photo retouching. The one called Markup comes with macOS Sierra; it lets you draw or type right onto your photos, exactly as described in Tip.
Photos also offers keywords, searching, sharing via iCloud (see Photos), slideshows, simple video trimming, photo books and calendars, and more.
For a more in-depth guide to Photos, you can also download a free PDF appendix about it on this book’s “Missing CD” page at www.missingmanuals.com.
Honestly, though, Photos is a huge program with a lot going on; you could write a whole book about it. In fact, someone has; check out Photos for Mac and iOS: The Missing Manual.