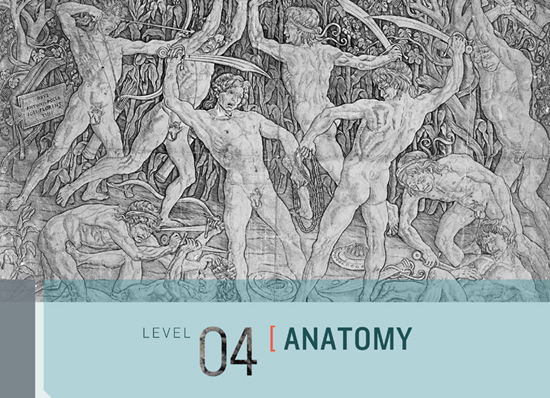

Battle of the Naked Men by Antonio del Pollaiuolo (ca. 1429–1498)
WE’LL LOOK EVEN MORE CLOSELY at skeletal landmarks in this anatomy chapter, which is the most complex chapter in the entire book as it combines all the elements studied so far. This may sound like a daunting challenge, but you’ll shortly see that the Old Masters had some simple solutions for drawing the complex human figure.
In medical science, anatomy is a very technical and detailed understanding of the human figure. Artists are more interested in the body’s broader volumes and functions. By conceptualizing the human figure in terms of basic volumes you’ll have greater freedom in drawing it from any angle and in communicating its solidity and weight.
Every artist has their own concept of anatomical forms based on observation, study, and personal preference. The Old Masters treated the human figure as malleable and plastic, shaping it to suit their ideal taste or artistic requirements.
The lessons in this chapter are structured to draw your attention to the volume and rhythm concepts employed by the Old Masters, which they used to create a powerful sense of solidity and movement.

The figure has been broken down into nine elements: feet, legs, pelvis, spine and ribcage, shoulder girdle, arms, hands, head and neck, and facial expressions/emotions. Each of these elements is executed in six stages: massing, bones, skeletal landmarks, opposing curves, master quick studies, and anatomy in games.
01 MASSING is the process of conceptualizing an element of anatomy using a simple volume or combination of volumes to create a coherent whole. Massing should always follow the same order: establish the largest forms before moving to the details. The massing processes here are only suggestions. You’ll develop your own concepts and shortcuts, as each drawing you do will present you with new challenges and insights.
02 BONES constitute the fundamental structure of the figure and dictate much of its outward appearance. It’s more important that you develop an overall concept for general forms, rather than try to memorize the 200-plus bones of the skeleton. For instance, it’s more important to understand the ribcage as an egg-like volume than it is to remember the number of ribs it has.
03 SKELETAL LANDMARKS are our spatial guides to map out a figure because they reveal the orientation and direction of the skeleton. It’s important that you emphasize these landmarks because they convincingly communicate that your figures have an internal skeletal frame holding them together.
04 OPPOSING CURVES are used to create an illusion of movement by offering viewers a visual path to follow through an image. An element of interpretation is necessary when studying opposing curves because they don’t reference literal lines on the figure. Which lines on the figure to emphasize is the choice of each artist: the contour of a form or muscle, a shadow edge, or an imaginary line that references the general shape of a body part. Concepts for opposing curves for the feet and hands have been combined with the larger forms of the legs and arms. There is no section on opposing curves for the pelvis and shoulder girdle because of their compact form, which makes them more useful as transitional points for a broader system of curves. The opposing curves of the leg are covered along with the foot, and those for the hand are covered with the arm.
05 MASTER QUICK STUDIES bring all our accumulated copying knowledge from Levels 1, 2, and 3 together. The practice of copying allows us to study the processes of different artists and gain an intimate insight into how they conceptualized the human figure.
06 ANATOMY IN GAMES will demonstrate how classic figure drawing concepts can be applied to video game characters. These lessons will help you combine concepts from both disciplines to design convincing characters, whether they’re based on a realistic human form or something animal or imagined.

Let’s begin our detailed analysis of the figure with the feet, as this is where all the force and weight of a person is directed. We’ll study the elastic properties of the feet and anatomical features that will help you better re-create the illusion of their weight-bearing energy.
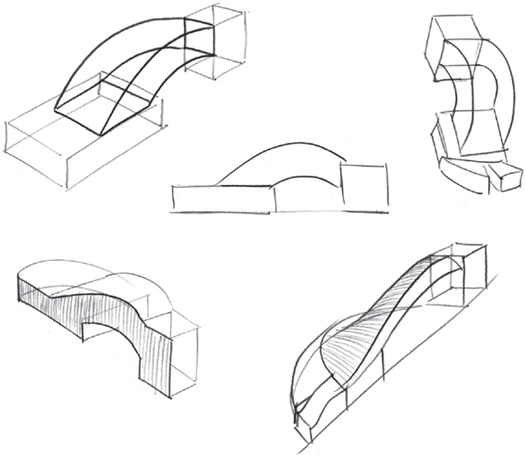
Whenever you draw, consider the big forms before details, as details increase the complexity of the elements you have to consider. In drawing the foot the first thing to note is that the form has an arched shape, most prominently visible in the front and side view. The inside plane, where the two feet come together, is relatively flat.
The arch connects two box-like forms at the front and back of the foot. The bases of these box forms relate to the pads of the foot that make contact with the ground. The shape of the front pad, in particular, is susceptible to change because of the flexible bone structure beneath the surface of the skin.
Avoid drawing out each toe individually, and instead conceptualize the toes as one curved mass attached to the larger form of the foot. The exception is the big toe, which has the most maneuverability and so is often split from the larger mass of the toes while adhering to the overall structure.
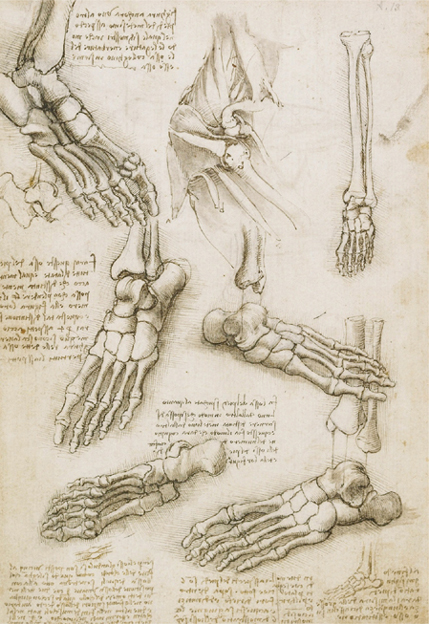
Six Studies of the Left Foot and One of the Shoulder by Leonardo da Vinci (1452–1519)
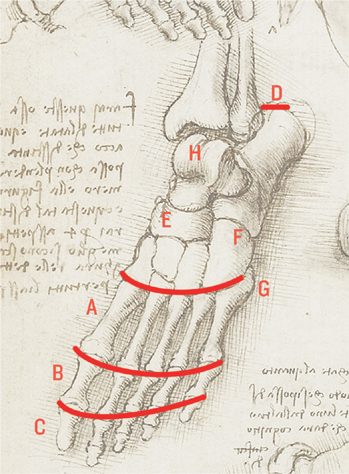
The visible portion of the toes is only a third of their full length, as the articulated bones start halfway along the foot at the metatarsals (A). The connections between the remaining two groups of bones at (B and C) can be traced by the bulky thickness of the joints.
The foot has several useful skeletal landmarks that you can use as navigation points, such as the heel (D), the navicular bone (E), the cuboid bone (F), and the hook at the base of the fifth metatarsal bone (G).
The bones of metatarsal section (A) are held together with elastic ligaments that allow them to spread outward, together with the toes, when weight is placed on the foot.
Note that the point at which the leg connects to the foot (H) is located further forward than the heel (D). This is because the muscles and tendons controlling movement of the foot require leverage. Therefore, (H) acts as the pivot and tendons attached to either side of this point control the pulling action.

Anatomical studies of the leg by Peter Paul Rubens
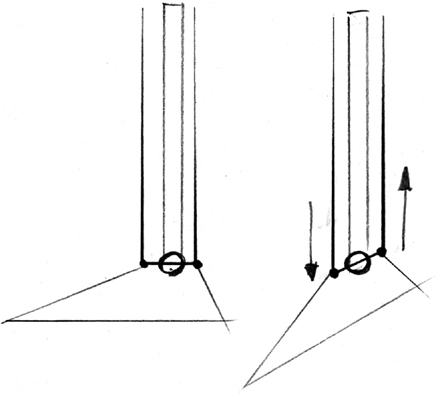
For the rapid process of blocking in a figure, particularly in the case of action poses or people in movement, artists often indicate the foot using a triangle shape because it matches the general form of the foot in the side view. Rubens’s side-view drawing also illustrates the levering mechanism of the ankle joint. The Achilles tendon (I) of the calf muscles runs down the back of the leg to cup the heel (D) like a slingshot. The accompanying sketch illustrates the mechanism in action. To lift the heel the muscles of the leg (I) pull against the pivot (H). To lift the toes, the muscles around the front leg (J) pull against the pivot (H).
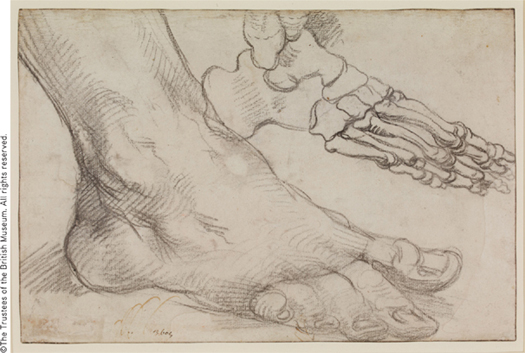
Study of a man’s right foot and its skeleton by Albrecht Dürer, British Museum
Notice how the internal skeleton dictates much of the external shape of the foot. If you want to draw realistic feet (or any other part of the human body), you’ll have to invest time in studying the skeleton.
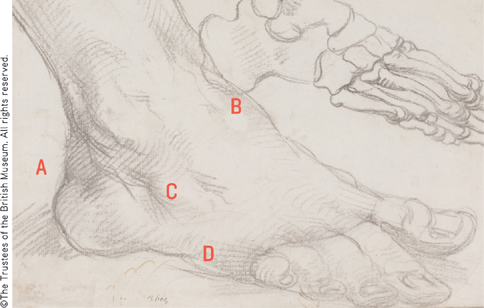
Detail with overlay of Study of a man’s right foot and its skeleton by Albrecht Dürer, British Museum
Dürer dedicated a lot of time to studying anatomy, so he understood the basis of surface forms and could confidently indicate important underlying skeletal landmarks when drawing the foot: the heel (A), the navicular bone (B), the cuboid bone (C), and the hook at the base of the fifth metatarsal bone (D). Suggesting skeletal landmarks is an important element of figure drawing because they indicate the solid internal structure holding the body together.
To align the toes correctly, Dürer drew a curved line across the bulky joints between the metatarsals and toes. He has aligned the big toe at a different angle to the remaining toes, demonstrating its increased maneuverability.
The fatty pads at the base of the foot are useful tools for communicating pressure and weight. The fatty pad that is visible on the side of the foot at (D) squashes outward when downward pressure is applied and is usually more pronounced on figures with more fat.
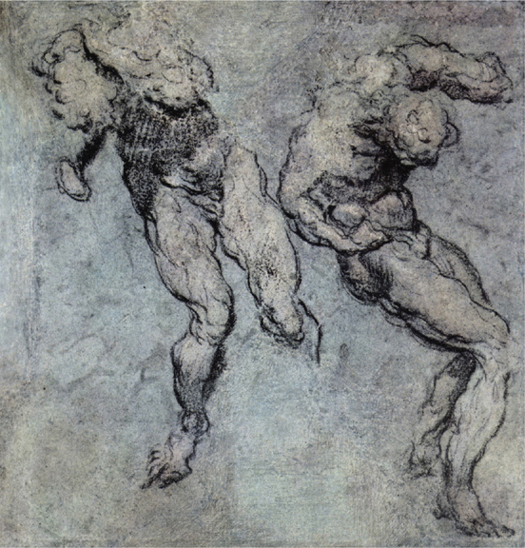
Studies for a Statue by Tintoretto (1518–1594)
Artists like Tintoretto who had expert knowledge of anatomy were masters at combining flowing systems of opposing curves to create the illusion of movement.
The opposing curves in Tintoretto’s sketch switch between referencing contours, shadow edges, and internal forms (such as skeletal landmarks and muscle). Each gesture line represents a choice by the artist in response to the energy and movement that he perceived in the moment of drawing.
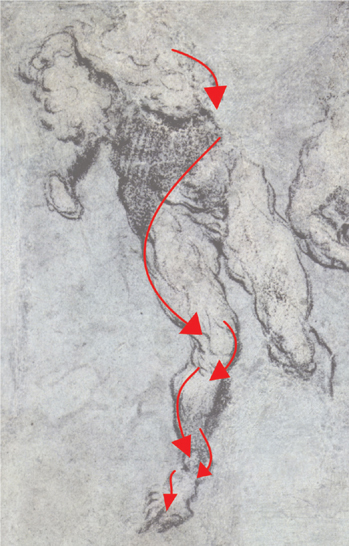
You can deduce Tintoretto’s concept of opposing curves by the way he has accented certain lines to give a stronger sense of rhythm and movement. The red arrows show how Tintoretto’s lines flow across the curved shadow of the abdomen, then on down the leg to bear down on the foot where the weight of the figure is concentrated. These lines create the illusion of movement by offering a path for the viewer’s eye to follow through the image.
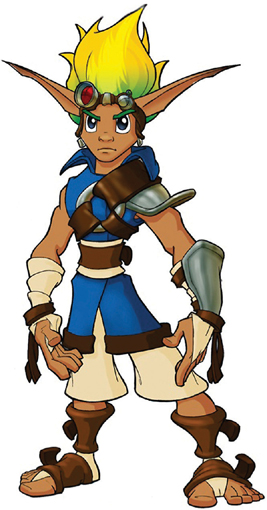
Jak & Daxter: Jak
The earliest design of Jak’s feet was inspired by Greco-Roman sandals, which separate the big toe from the rest with fabric. Because we know that digital space has no gravity and no weight, such details have the effect of making Jak look more grounded as his imagined body weight pushes down and out through his feet and toes, much like the way bristles of a paint brush spread out when pressed against a canvas.
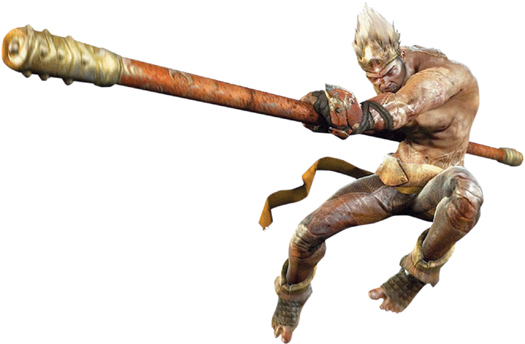
Enslaved: Odyssey to the West: Monkey
The articulation of the big toe on Monkey from Enslaved: Odyssey to the West adds a great deal of plasticity and life to the feet. Without that articulation, they’d look like inanimate blocks.
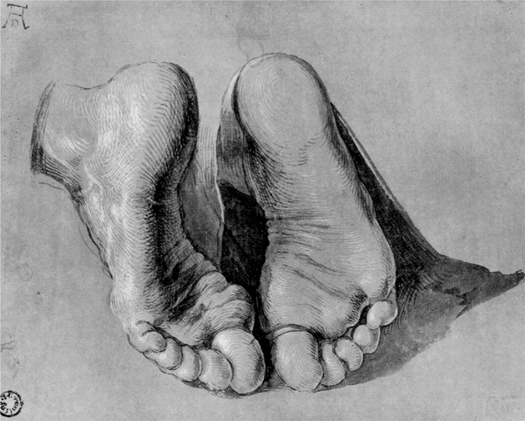
Feet of an Apostle by Albrecht Dürer
Dürer made many preparatory studies for his engravings that feature meticulous details capable of telling a story in themselves.
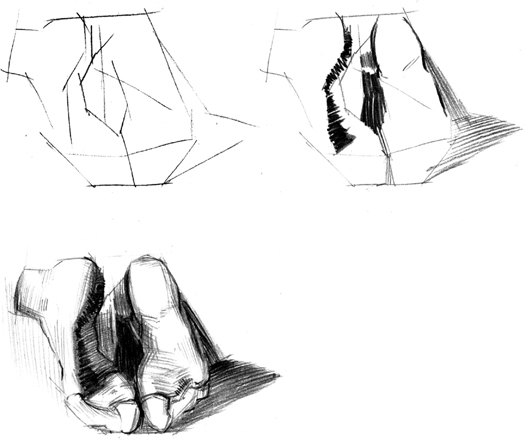
When doing your study of Dürer’s feet, ignore the wrinkles and bumps throughout the early stages and mass in the largest shapes first. Initially use straight lines to outline each shape, which will help you with measuring and triangulation (this page).
A good place to start is with the pads of the feet, making sure the proportions and placement of your shapes are correct because all subsequent elements will be constructed on top of this base. Even with these simple indications the feet are already recognizable.
The next step is to refine your initial contours and add more detail for the mass of the toes. Begin your shading with the strong core shadow that separates the dominant planes of the figure’s left foot, delineating the planes facing toward the light and those facing away. This will automatically give a strong sense of light and form. Continue adding descriptive hatch lines for the shading, making sure that curved forms are correctly described with curving lines. Also note any overlapping forms, correctly describing which form is in the foreground and which sits behind using T-intersections.
From this point on, add as much detail as you wish. It’s a simple task now that the largest shapes have been established.

The legs are a pleasure to draw because they feature a prominent series of opposing curves created by a combination of bone shapes and muscular forms.
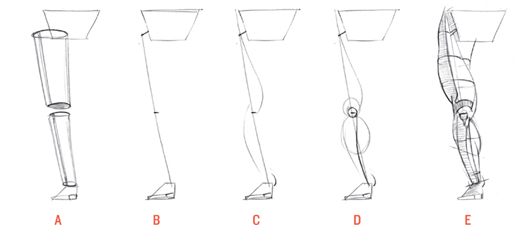
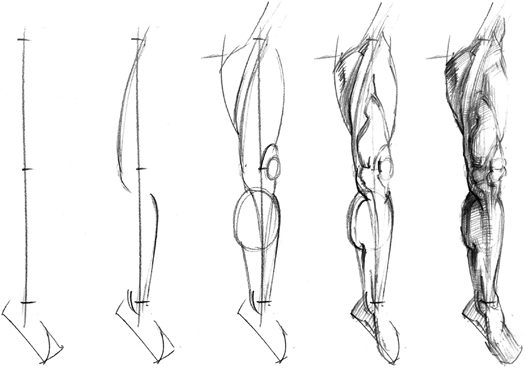
The basic volumes of the leg can be conceptualized as two stacked cylinders (A). When drawing the leg, your first lines establish its proportions, noting the top of the upper leg, the knee joint, and the ankle, and represent the bones of the upper and lower leg connecting to the pelvis and foot at either end (B). You can then connect these points with a spiral that wraps around the imagined cylinders behind the knee and passes on down to the inside of the ankle (C) in a system of opposing curves.
The section of the spiral connecting the pelvis and the knee defines a strong plane break between the front or forward-facing plane of the leg, and the inside plane of leg. The section of the spiral connecting the knee with the ankle defines the outside contour of the lower leg.
The next step is to suggest the calf muscle and kneecap (D), noting that the base of the calf is angled, as are the bones of the ankle joint. Draw a larger circle around the kneecap to locate the muscles on the front plane of the upper leg, which create an overhanging arch above the kneecap. You can also run a curved line downward from the base of the kneecap to suggest the strong plane break of the shin.
The remaining contours of the leg can then be added and the entire length of the leg described with modified oval cross-sections (E) that take into account the dominant planes already described.
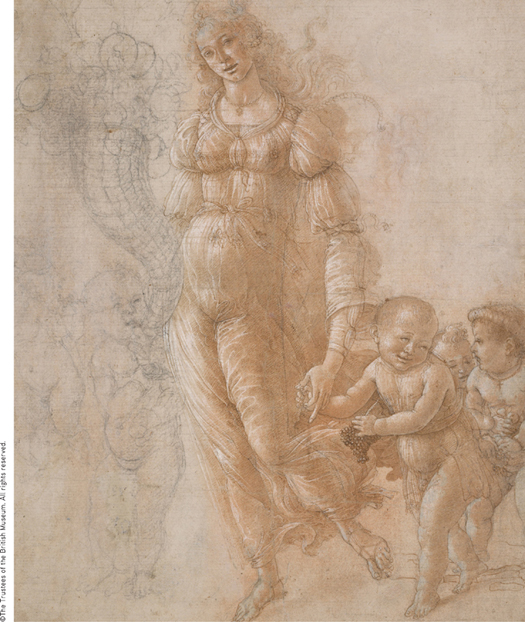
Allegory of Abundance or Autumn by Sandro Botticelli (1445–1510), British Museum
The basic volumes suggested for each element of the body can be changed to suit the personal preference of the artist and the emotions being communicated. Botticelli was known for his graceful female figures in paintings like The Birth of Venus. His preferred volume concepts were the softer cylinder and sphere.
In the drawing above we can see how the upper arm, forearm, and legs have been shaded according to a cylindrical mass concept. Solid box forms would have given the figures a heavier appearance.
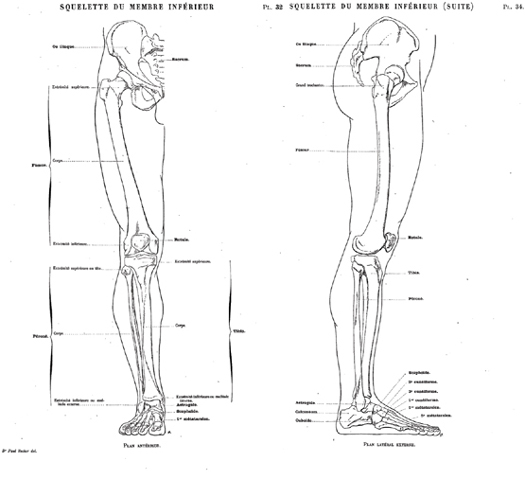
Bones of the lower limb by Dr. Paul Richer (1849–1933)
A common mistake for beginners is to draw the legs protruding straight down from the pelvis. In reality, the bone of the upper leg inserts into its socket at an angle of around 45 degrees. If the legs were attached to the base of the pelvis it’d be extremely awkward to walk, as our legs would rub against each other and we’d be restricted in raising our knees forward or out to the side.
Note the slight curvature of the bone of the upper leg in the side view, which echoes the curving contour of the thigh.
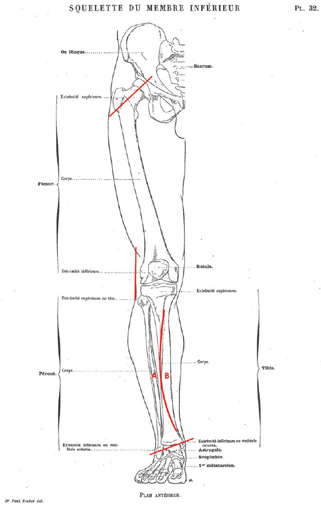
The ankle joint is composed of the topmost part of the foot (the talus) and the bones of the lower leg, the fibula (A) and tibia (B). The bumps that we commonly associate with the ankle are the ends of the fibula and tibia protruding out on either side of the leg. Note that the rounded bump of the tibia sits higher up than the bump of the fibula on the opposite side.
The tibia (B) appears to be fairly straight but the knife-like edge that is visible as a skeletal landmark on the surface of the shin is actually curved.
From a side view, the protruding kneecap creates an upward-facing plane across its top while the front plane points slightly downward.
In the front view, notice how the outside plane of the knee joint is flat, which is mirrored in the surface contours. The inside contour is more rounded because of muscle forms that wrap around the knee.
The midpoint of the figure is at the top of the great trochanter, which is the outermost part of the femur and is shaped like a bulb. This bulb is visible as a dimple on the side plane of the figure.
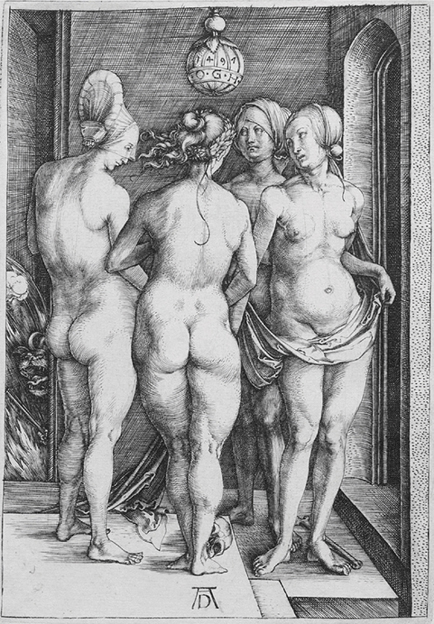
The Four Witches by Albrecht Dürer
Dürer has beautifully rendered the flesh of these females with a wonderful sense of their soft and supple forms while ensuring that important skeletal landmarks, particularly in the legs, are also indicated to communicate a sense of solidity.
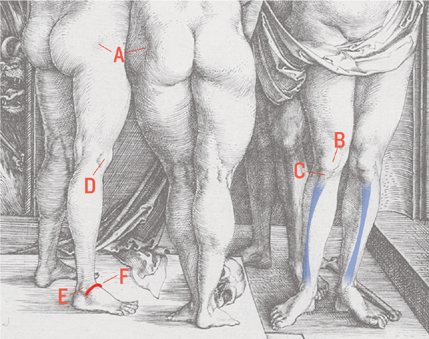
The topmost skeletal landmark of the leg is the great trochanter, which is the bulb shape at the top of the femur. The bony protrusion creates a dimple (A) on the surface of the skin because of muscles that radiate around it.
Farther down you’ll find the skeletal prominence of the kneecap (B), which sits above the knee joint. The bump located just below the kneecap is the combined mass of the head of the tibia and a fatty pad (C) that protects the knee.
A barely perceptible bump (D) below the knee’s mid-line represents the head of the fibula, visible on the side plane of the knee. This skeletal landmark becomes more pronounced when the knee is bent. The outside ankle (E) marks the lower end of the fibula, connecting the two points much like a splint. From here on down toward the ankle you can see the curved edge of the tibia—the larger of the two bones of the lower leg—highlighted in blue.
Dürer has expertly suggested the head of the tibia (F), feeling its arched form across the top of the foot. The vertical plane of the leg has been modeled in shadow, and the upward-facing plane of the foot is in light.
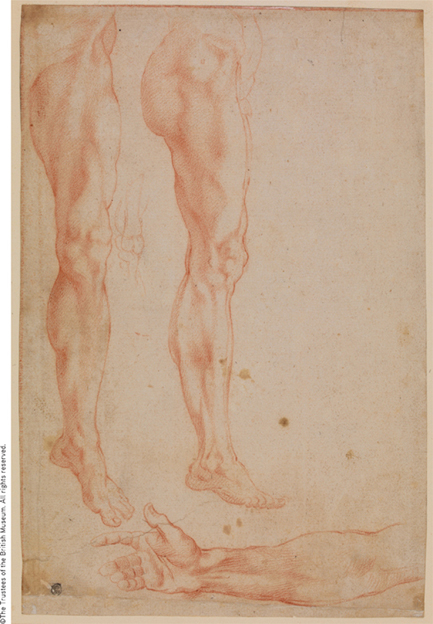
Studies of two legs and a right arm by Michelangelo (1475–1564), British Museum
Michelangelo had knowledge of the human form like few other artists in history, which he gained from performing his own dissections. Luckily you won’t need to perform any dissections to draw figures with the same sense of solidity as Michelangelo’s figures because it is largely his expressive use of light to model forms that gives his figures the illusion of strength.
Despite the complexity of Michelangelo’s study, you can use the massing concept (this page) to temporarily ignore details and block in the leg on the left in no time at all.
The core shadow is the boundary between the light- and shadow-facing planes. Squinting at the subject helps reduce the complexity of light and shadow masses so that you can see the core shadow more clearly, drawing its tangled path as it describes the forms of the leg. With only the core shadow indicated, you’ve already created a sense of light.
What remains is to refine the contours, ensuring that lines overlap correctly, depending on which form is in the foreground.
The final layer of shading should be descriptive of the form: curved lines for rounded forms and straight lines for flat planes.
Michelangelo’s leg study offers the opportunity to study the different shapes of the calf muscle when it’s resting or flexed. The human body isn’t an entirely efficient machine. With the masses of the body stacked up one on top of the other, the feet and ankle joints do an inordinate amount of work to keep the figure upright. The flexed calf on the left has a more defined shape than the relaxed calf muscle on the right.
Try the massing process on the other leg featured in the study, noting how the mass of the leg inserts into the downward-facing plane of the pelvis.
Team Fortress 2: Pyro (Artwork courtesy of Valve Corporation)
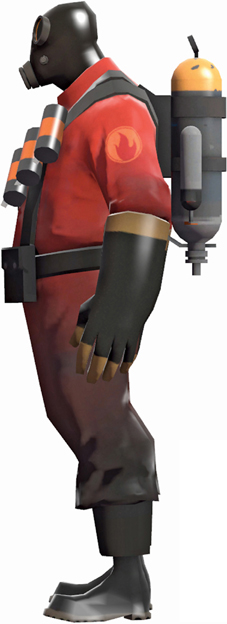
The Pyro character from Team Fortress 2 illustrates the strong opposing curves of the leg that are created by the flow of the antigravity muscles that you studied in Gravity and Movement (this page). Also note the forward tilt of the pelvis indicated by the character’s beltline and the plane change that occurs at the knee, which has been incorporated in an exaggerated manner. Consider featuring such exaggerations in your designs, because the resolution at which players may eventually view your characters may mean that nuances will be too subtle to notice.

The pelvis is the body’s second largest form—the ribcage is the largest—and should therefore be indicated at the beginning of a drawing, along with the ribcage and head, before details are added. The pelvis features prominent skeletal landmarks that wrap around the body in a 360-degree sweep and that give a strong visual indication for the orientation and direction of the pelvis.
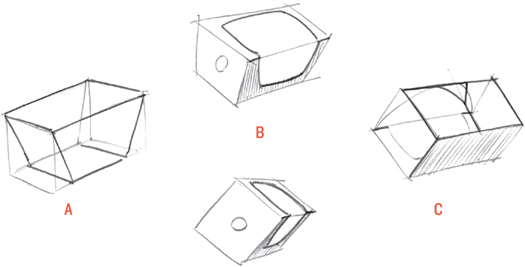
The pelvis can be conceptualized as a tapered box form (A). The bones of the upper leg insert in the middle of the side planes of this box. Note that the volume of the pelvis is angled forward at around 45 degrees. Refine the box form with the contour of the iliac crest, the curved ridge that defines the top of the pelvis, and the downward sweep of the pubis on the front plane (B). The upward-facing plane on the rear side of the box form features a triangle along its center line that represents the sacrum (C), which marks the base of the spine.
Without this simple mass concept, it would be extremely difficult to re-create the form from imagination. But because you’ve been practicing drawing boxes freehand you can turn the form around any way you wish.
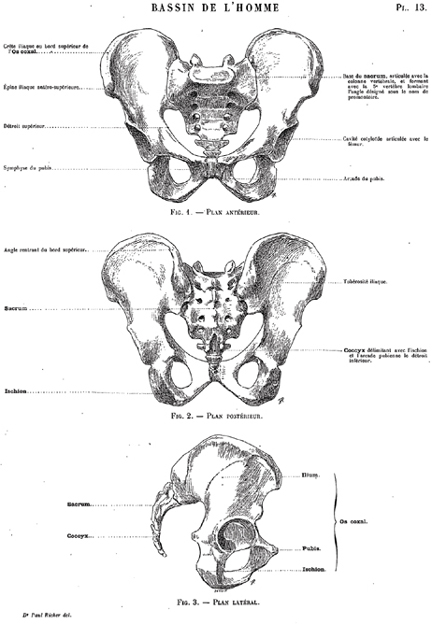
Pelvic bone illustrations from Artistic Anatomy by Dr. Paul Richer (1849–1933)
When you look at these anatomical illustrations by Dr. Paul Richer, it’s easy to see why the pelvis is generally conceptualized as a tapered box form. The front view illustrates how the sides of the pelvis taper inward between the curved ridge that defines the top of the pelvis and its base. The anterior superior iliac crests are the two prominent skeletal landmarks that you can feel if you trace your fingers across your hips, roughly above the front pockets of your trousers.
The socket into which the upper leg fits is visible in its central position in the side view. It faces out to the sides of the figure, not down.
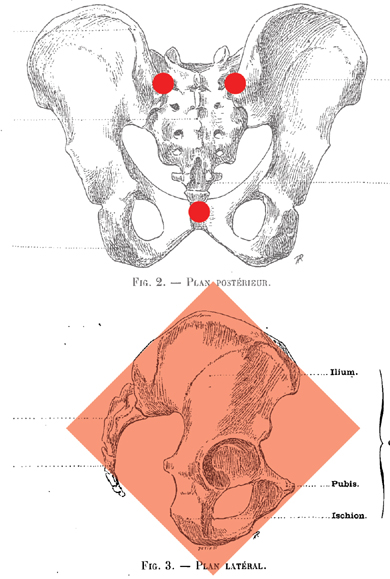
The thin ridges along the top of the pelvis are prominent skeletal landmarks that will help you position the pelvis. You can see in the side view how they define the forward tilt of the pelvis, turning at an angle of 90 degrees to form the back plane of the pelvis.
The sacrum triangle is the curved tail shape at the base of the spine. The three highlighted points are visible as landmarks on the surface of the body and likewise give us a strong indication of the pelvis’s orientation in space.
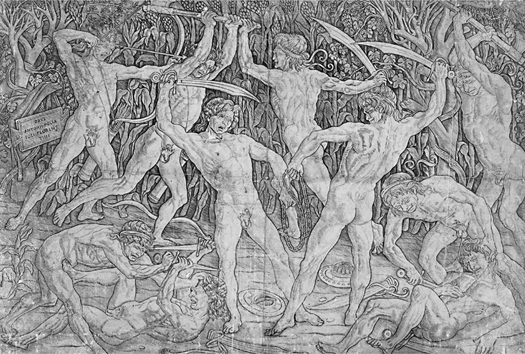
Battle of the Naked Men (1465–1475) by Antonio del Pollaiuolo
The iliac crest wraps around the side planes of the pelvis from the back, marking the top of the form where many muscles from the ribcage and leg converge. These landmarks are easy to see in the annotated detail of the artwork (this page).

Detail and overlay of Battle of the Naked Men by Antonio del Pollaiuolo
The anterior superior iliac spine (A) is a skeletal landmark located on the front plane of the pelvis at the end of the iliac crest. You can feel the anterior superior iliac spine on either side of your hips as hard points below the surface of the skin. The skeletal landmark of the pubis (B) sweeps down and across the front plane of the pelvis between the two points of the anterior superior iliac spine (A). The sartorius muscle (C) is attached to the bony ridge of the anterior superior iliac spine (A), from where it continues down across the front plane of the leg to attach on the inside of the leg below the knee.
The great thing about these skeletal landmarks is that they are not covered by muscle or significant layers of fat, and so are identifiable points of navigation on all body types.
Following the iliac crest around the waste to the back of the figure we find the sacral triangle, which is also known as the “devil’s tail.” It has a curved shape when viewed from the side. You can triangulate its position using its base and the top two points, which indicate the attachment of the strong muscles of the back. The sacrum is an important skeletal landmark because it clearly indicates the orientation of the pelvis.
The bulging form of the external oblique muscle (D) attaches along much of the length of the iliac crest and is responsible for the upward-facing plane at the waist in opposition to the downward-facing place of the ribcage.
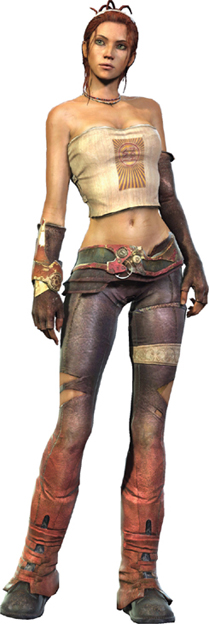
Enslaved: Odyssey to the West: Trip
The relatively hard-edged iliac crest and the downward sweep of the pubis can be seen in contrast to the softer muscular form around Trip’s abdomen.
The female pelvis is comparatively larger and wider than the male pelvis. The female body also tends to store more fat across the pelvis around the gluteus and sides of the upper leg, which softens the form of the pelvis and accounts for Trip’s rounded silhouette. The male body stores more fat above the pelvis, around the external oblique and abdomen, thus exposing more of its angular form.
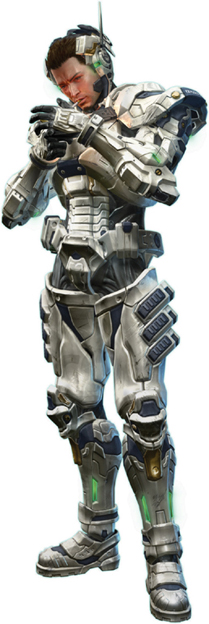
Vanquish: Sam Gideon wearing the Augmented Reaction Suit
Function creates form. Human anatomy has evolved to its current state due to functional requirements, such as the system of opposing curves of the antigravity muscles. Considering function will likewise dictate the forms you design for your own characters or creatures.
This is true of Sam Gideon’s Augmented Reaction Suit (ARS). The forward tilt of the pelvis is visible here in relation to the backward tilt of the shoulder girdle, showing the balancing relationship between the pelvis and ribcage that we explored in Gravity and Movement (this page).
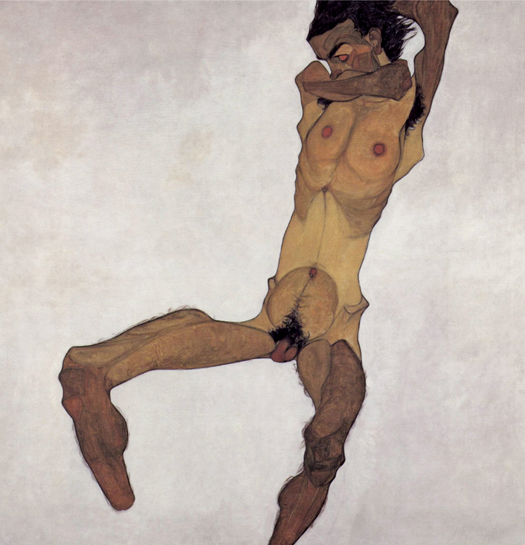
Seated Male Nude by Egon Schiele (1890–1918)
Although this is a very stylized interpretation of the figure, Egon Schiele’s classical training and strong anatomical knowledge are evident in the solidity of the skeletal forms. Schiele has almost entirely ignored the muscles of the abdomen to emphasize the hard-edged pelvis. The artistic effect creates a strong sense of vulnerability and discomfort. Our center of interest here is the pelvis, the box shape of which has been clearly defined by the prominent upward-facing planes of the iliac crest that wrap around the figure’s waist.
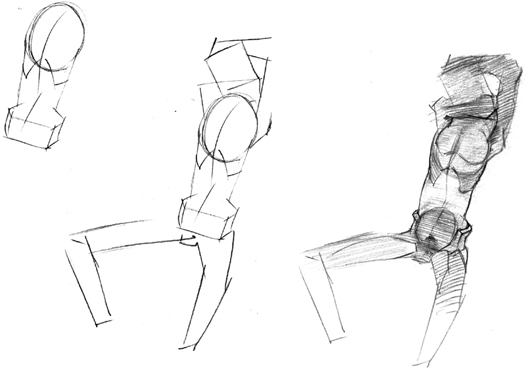
When drawing the human figure, the starting point is always the biggest forms. Because the head is obscured by the figure’s arm, start with the biggest form in the body: the ribcage. Indicate the ribcage’s spatial orientation with axis lines. The vertical line travels down the length of the abdomen to meet the pelvis. As you draw this line, closely observe the relative height of the ribcage in relation to the abdomen to establish good proportions.
Follow along by drawing the pelvis, head, and legs, using simple lines. Your eye should be on the extremities, making sure the alignment of the ribcage and pelvis is correct. You can add the guidelines to the drawing for accuracy.
Schiele has explicitly conceptualized several other forms of the body as simple shapes, which make the figure easier to draw. These include the circular shapes of the chest and lower abdomen, the latter defining the downward sweeping curve of the pubis. The remaining forms are easy to fill in once the dominant volumes are established. You can add simple layers of shading to match Schiele’s strongly silhouetted figure.

The ribcage is the largest mass of the body and therefore the most important. Artistic anatomy is more concerned with the volume that best describes the overall form of the ribcage than it is with anatomical accuracy and the exact number of ribs on the ribcage. When drawing the ribcage you have to also think about the spine, which supports the weight of the ribcage and connects it to the pelvis and head.
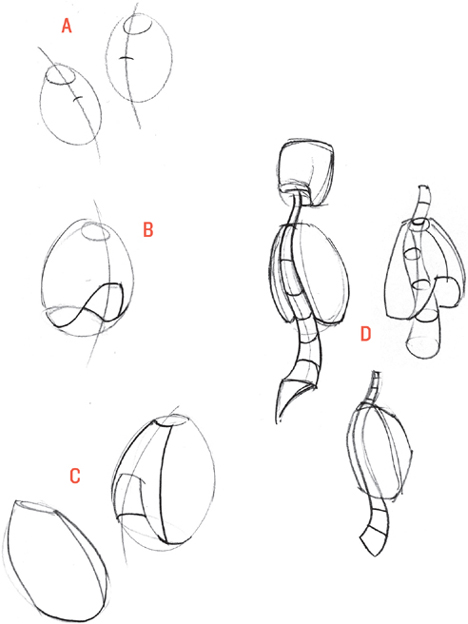
The basic shape of the ribcage is egg-like. It helps to draw a central axis onto this basic egg-form to indicate its orientation (A). You can also add an oval to the top of this volume to position the base of the neck.
Refine the volume of the ribcage by drawing the soft inverted V-shape (B) that describes the base of the ribs and that continues around the form to the spine at the back.
As you make further refinements, note that the volume of the ribcage is flatter in back and rounder in front, where it accommodates the lungs (C). The two lines traveling downward and outward from the base of the neck define the front plane of the ribcage.
The cylindrical column of the spine attaches to the ribcage along an S-curve, ending with a tail at its base to form the sacrum triangle (D).
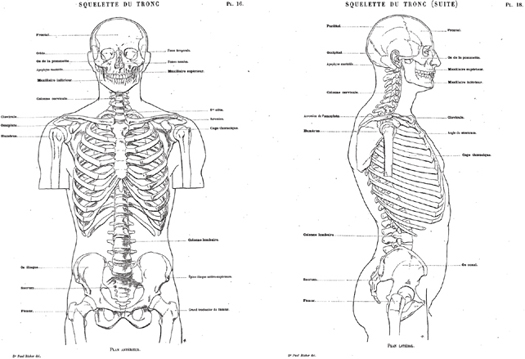
Skeleton of the trunk from Artistic Anatomy by Dr. Paul Richer (1849–1933)
Proportionally the ribcage is two heads high, two heads wide, and one head deep. The sternum, located between the ribs on the front plane, is one head in height.

The relative angle between the apex at the back and front of the ribcage is indicated by line (A). The dominant plane break is indicated along (B). Notice the overall orientation of the ribcage, which is tipped backward in opposition to the forward tilt of the pelvis.
The sternum (C) is a useful skeletal landmark that defines the central line of the ribcage. Another useful skeletal landmark is the inverted V-shaped opening at the front of the ribcage.
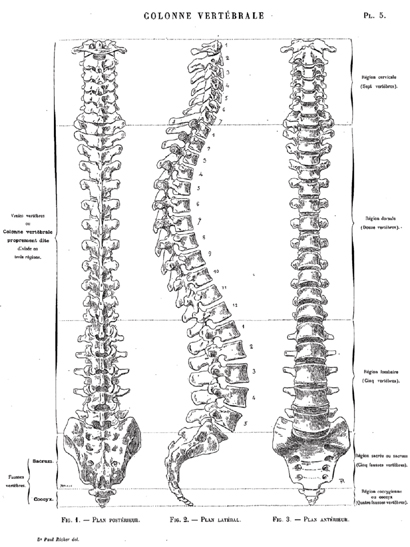
Vertebral column from Artistic Anatomy by Dr. Paul Richer (1849–1933)
You can see here how the spine becomes steadily wider from top to bottom, where it has more weight from the upper body to support. Artists tend to exaggerate this widening at the base to communicate a stronger sense of weight. Notice how the shape of the spine dips in and under the ribcage and head at sections (B) and (D), which are the two dominant forms it supports. The spine attaches to the sacrum triangle at its base.
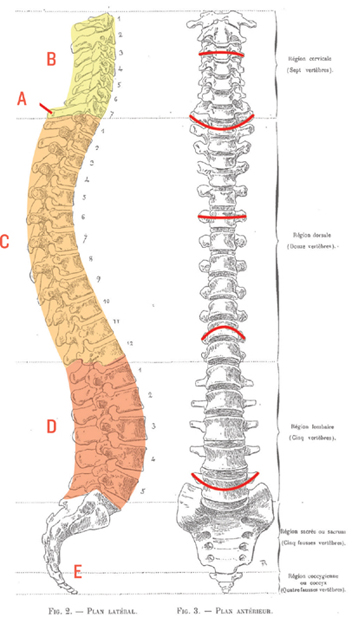
The spine has different levels of flexibility. Its seventh cervical vertebrae (A) is an important skeletal landmark that marks the border between the flexible neck (B) and the part of the spine that attaches to the ribcage (C), which has the least amount of flexibility.
You can feel the difference in flexibility between (B) and (C) by placing your hand on the back of the lower neck and rotating your head and then on the middle part of your spine at the ribcage. A similar increase in flexibility occurs between the ribcage and pelvis (D).
The tail-shaped sacral triangle (E) inserts into the pelvis. Its curvature and three skeletal landmarks make it a useful place to indicate the orientation of the pelvis.
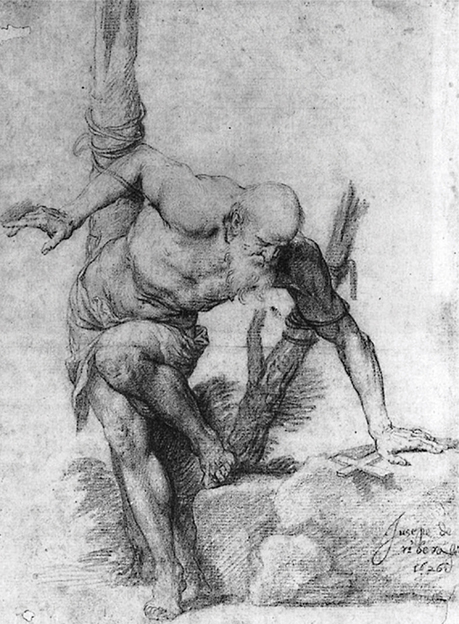
St. Albert by José de Ribera (1591–1652)
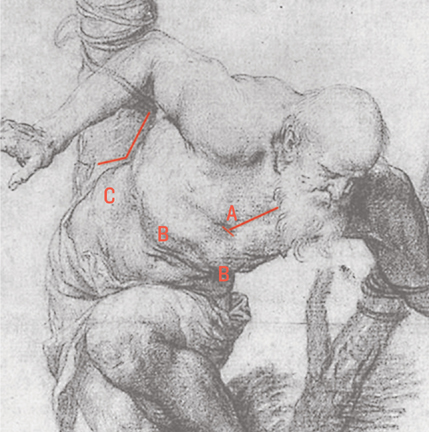
In this depiction of St. Albert, José de Ribera drew the ribcage from a top-down view. He simplified the task of drawing the difficult view of the ribcage by conceptualizing it as a spherical form. It’s suggested by the curved contour of the back, which is continued behind the arm and up and down the side of the figure.
To orient this spherical form and give it a direction, Ribera indicated the vertical and horizontal axis of the sternum (A) that runs down the middle of the ribcage. He also made sure to include the skeletal landmarks at (B), which mark a direction change between the front and side planes of the ribcage. The solidity of the ribcage means that the triangle connecting points (A) and (B) is fixed, no matter what action the figure is performing.
On the figure’s side, the downward-facing planes of the lower ribcage meet the upward-facing plane of the external oblique muscle at point (C).
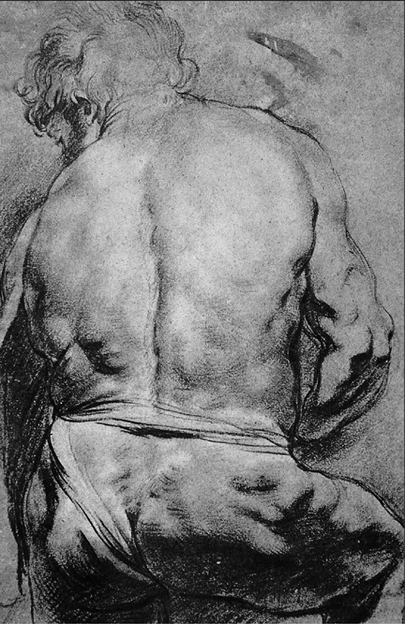
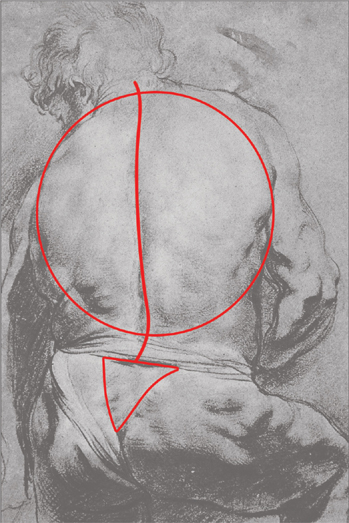
Study of a Male Figure Seen from Behind by Peter Paul Rubens
Rubens teaches us that maintaining the solidity of the ribcage is much more important than drawing its details, which should always support the bigger forms.
He created the illusion of a solid ribcage by drawing a nearly continuous line around its spherical form. The soft transition of light across the back reinforces its curved shape. He used the spine and the skeletal landmark of the sacral triangle to give the ribcage and pelvis a direction.
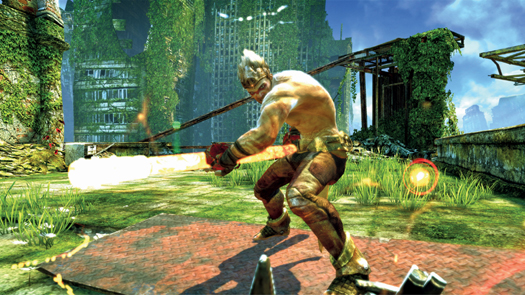
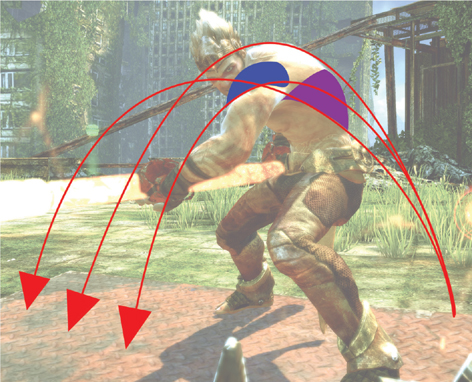
Enslaved: Odyssey to the West: Monkey
Taking time to establish a flow of opposing curves through the forms is essential to create a realistic sense of life and movement. Although the basic volume of the ribcage is fairly simple, the myriads of muscles that overlay and attach to it make the task of drawing it somewhat of a technical challenge.
The illusion of energy in Monkey’s pose has a lot to do with the parallel curves of the spine and the latissimus dorsi (purple) and deltoid (blue) muscles. The latissimus dorsi is a particularly useful surface feature that can link elements of the figure together because of its large size and the way it wraps around the length of the back up to the arm.
You should take the time to study these muscles in detail once you’re confident drawing the mass of the ribcage from every angle.
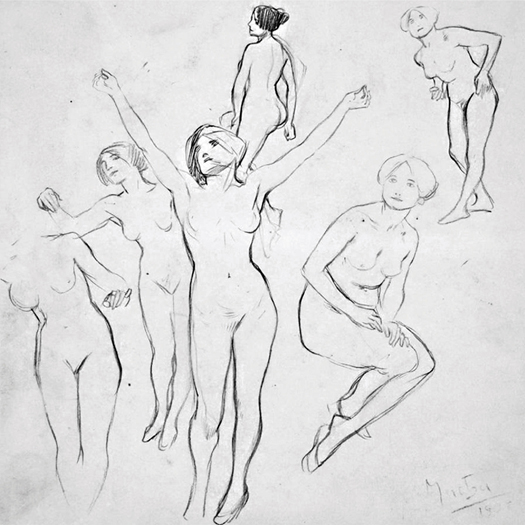
Study of the Female Nude by Alphonse Mucha (1860–1939)
This study by Alphonse Mucha is a great example of how much you can say with just a few simple lines. Master Japanese painter and printmaker Katsushika Hokusai (1760–1849) summarized the artistic pursuit of simplicity beautifully: “At seventy-three, I learned a little about the real structure of animals, plants, birds, fishes, and insects. Consequently when I am eighty I’ll have made more progress. At ninety I’ll have penetrated the mystery of things. At a hundred I shall have reached something marvelous, but when I am a hundred and ten everything I do, the smallest dot, will be alive.”
Mucha missed Hokusai’s life goal by twenty-one years, but nonetheless achieved a level of subtlety that few artists can match.
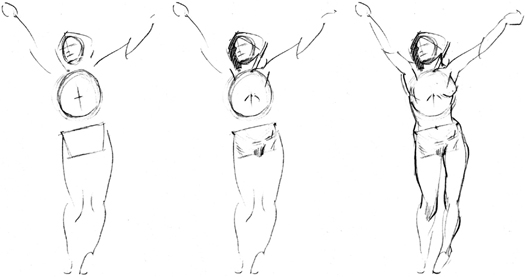
In your study of the central figure in Mucha’s composition, first block in the head, then use it to measure out and mark the relative proportions and placement of the ribcage and pelvis, using the neck and spine as attachment points. Indicate the central axis lines of each form to establish their relative orientation to one another.
Mucha used very subtle marks to communicate skeletal and muscular landmarks: the sternomastoid muscle, which runs across the neck from below the ear to the clavicle, was suggested with two lines; the short line at the armpit represents the pectoralis muscle and travels vertically to attach to the figure’s upraised arms.
Working down the figure, add the central line of the abdominal muscle and base of the ribcage followed by the contours of the pelvis between the skeletal landmarks of the anterior superior iliac spine.
Once these large skeletal forms are established you can consider the softer fleshy forms that overlay them. Most relevant to this study are the figure’s breasts and external oblique muscles, which are drawn with lines that overlap our initial volumes.
The initial shapes that you put down to indicate the head, ribcage, and pelvis can be lightened or removed entirely with the eraser at any moment, but it’s important that the contour lines that you put in their place echo their shapes.
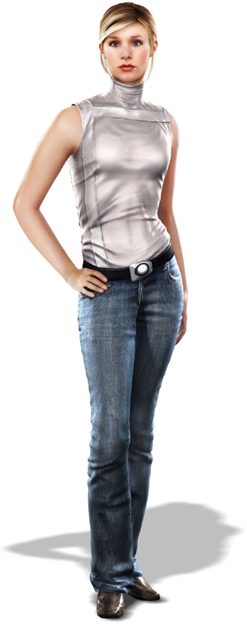
Assassin’s Creed II: Kristen Bell
In the character model of Kristen Bell from Assassin’s Creed II you can see the inverted V-shape at the base of the ribcage and the central groove separating the abdominal muscles. Two other skeletal landmarks are visible: the iliac crest of the pelvis suggested by the folds and stitching of Kristen’s top and the skeletal landmark of the clavicles, which you’ll investigate on this page.
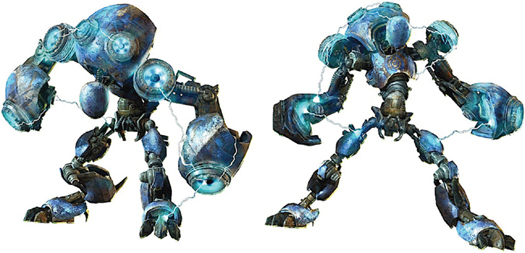
Enslaved: Odyssey to the West: Enemy Robot
The function of the inverted V at the base of the ribcage allows us to bring our chest down toward our toes. Without this V-shaped opening you would be restricted in this action because the skeletal forms of the ribcage would pinch the abdomen.
Because this robot from Enslaved: Odyssey to the West is meant to move in a human-like manner it has the V-shaped opening as well as a flexible midriff that references the flexible abdomen and lower section of the spine.
Notice the similarity of the robot’s pelvis to the human pelvis in its tapered box-shape, and the opposing curves throughout the forms of the legs. It’s easy to see from this example how knowledge of human anatomy can be used to create convincing characters from imagination.

The shoulder girdle is the convoluted skeletal link connecting the bones of the upper arm to the torso. It is composed of the shoulder blades, acromion process (the flat skeletal form that is located directly above the arm), and clavicles. The shoulder blades are an extension of the upper arm and follow the arm around wherever it goes. The shoulders are very expressive of emotions because of the free movement the shoulder girdle affords—pulled back to express confidence, dropped forward for protection and to express vulnerability.

In the front view a straight horizontal line establishes the plane break between the front plane of the chest and the top plane of the shoulder girdle. This line can be continued around to the back and the shoulder blades to complete the upward-facing plane of the upper body (A). This top plane should be tilted backward to echo the backward tilt of the ribcage, in opposition to the forward tilt of the pelvis. The shoulder blades have a thin, curved form when viewed from the side as they fit snuggly over the rounded ribcage. Their basic shape is a triangle (B).
A downward-pointing triangle at the pit of the neck indicates the inside edge of the clavicles and the top of the sternum (C), which is drawn with a vertical line. The T-shape that these lines create communicates the orientation and direction of the ribcage. The shoulder girdle’s primary function is to allow for free movement of the upper arm, to which the clavicles and shoulder blades are fastened. The pivot point for the shoulder is located at the inside edge of the clavicles. The clavicles move in relation to the arms, so the T-shape may turn into a Y if both arms are raised.
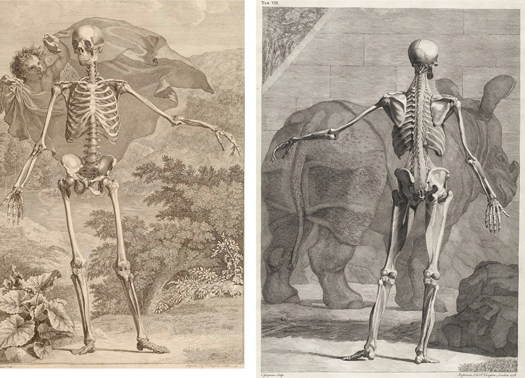
Skelatal studies by Bernhard Siegfried Albinus
Knowledge of the skeleton is extremely important because it dictates much of the outward forms of the body. Knowing the location of skeletal landmarks lets us communicate direction and structural solidity of the figure.
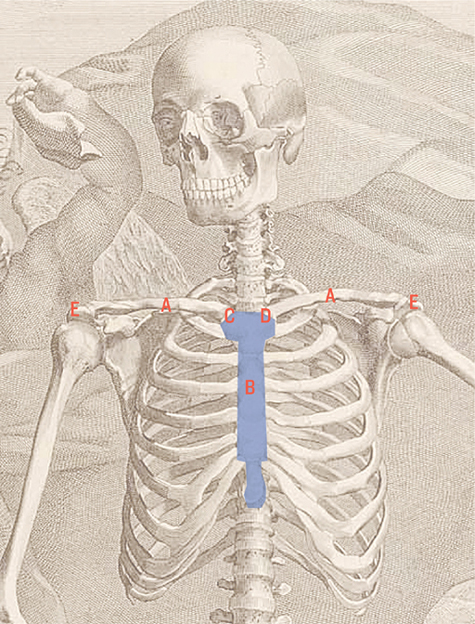
The construction of the shoulder girdle allows the shoulder blades to float above the ribcage, giving our arms a wide range of maneuverability. The pivot point of the shoulder girdle is located at the inside edge of the clavicles (C) and (D), where they attach to the sternum (B). The acromion process (E) is oriented at a right angle to the clavicles (A) in its position above the bone of the upper arm.
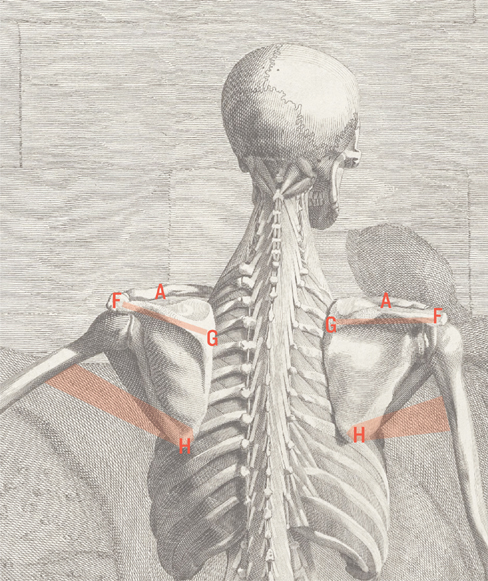
Our shoulder blades have a spine (line F to G), which is a useful skeletal landmark because it’s a good indication of what the shoulders are doing beneath the surface of the skin as they follow the movements of the upper arm to which they are connected.
The base of the shoulder blades is particularly visible when the arm is pulled back, causing the shoulder blade to literally lift off the surface of the ribcage. Indicating the points (F), (G), and (H) allows you to triangulate the position of the shoulder blades.
(H) is where the teres major muscle attaches, linking the shoulder blade and the bone of the upper arm. This is just one of several connecting muscles between the two forms. To pull our arms back, we must push our shoulder blades inward. To pull our arm forward the shoulder blade must follow, moving away from the spine.
The shoulder blades are larger than most people think: approximately half the height of the ribcage. In the front view they can be seen extending out beyond the mass of the ribcage, seen as a triangular shape below points (A) and (E), to connect with the upper arm.
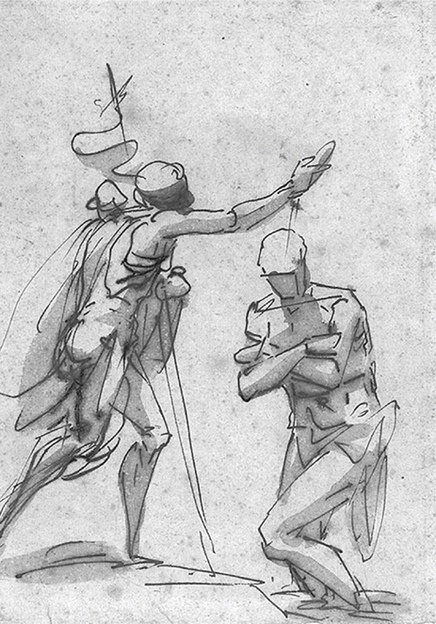
The Baptism of Christ by Luca Cambiaso
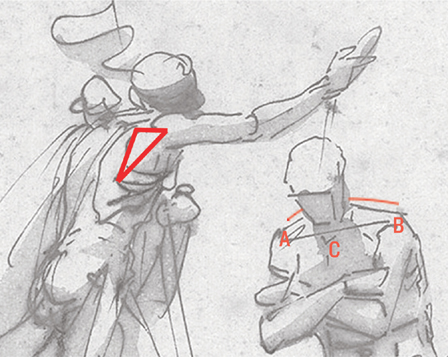
The shoulder girdle has many useful landmarks that will help you communicate the action of the arm and orientation of the ribcage. With a simple straight line between points (A) and (B) Luca Cambiaso defined the clavicles and established the upward plane of the shoulders. At (C) he drew a V and a small vertical line to indicate the inside edge of the clavicles and sternum, giving direction to the ribcage to which these forms are attached. The line that goes behind the head is the contour created by the trapezius muscle.
The figure on the left has his arm pulled forward, which correspondingly causes the shoulder blade to slide over the form of the ribcage, away from the spine in pursuit of the arm. Cambiaso has triangulated its position with a contour line and the shadow edge that continues into the arm.
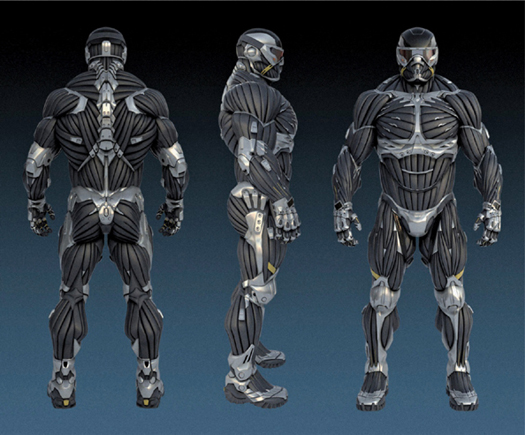
Crysis 2: Nanosuit 2
The spine of the shoulder blades (A), the acromion process (B), clavicles (C), and the sternum (D), have all been clearly incorporated here into the Nanosuit 2. Note how the plane created between these points is tilted backward in the side view, echoing the backward tilt of the ribcage.

The skeletal landmarks are instrumental in giving the suit its visual strength. Without them the character would look unstable and lack a solid structure to keep it upright.
In the front view the silhouette of the trapezius muscle travels behind the neck in an arc between points (B). The majority of aggressive characters have an overly developed trapezius because this muscle stabilizes the neck when the head is punched and adds a sense of belligerence to their appearance.
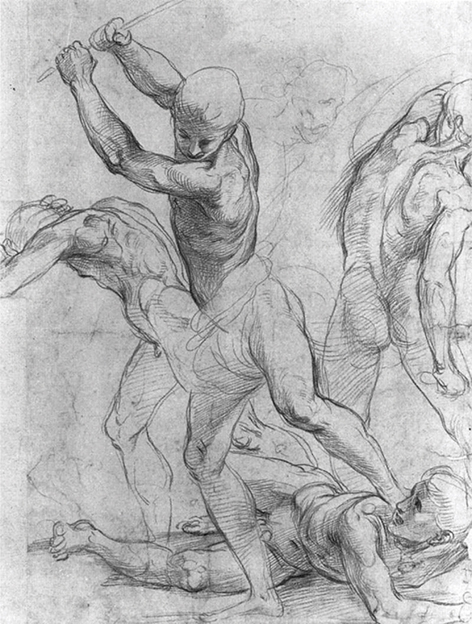
Examples of the shoulder girdle in action are in abundance in this study by Raphael. Make a quick study of the prostrate figure in Raphael’s composition, whose right arm is pulled forward and up in self-defense. Raphael would have been perfectly capable of creating this drawing from imagination, as would all the Masters featured here. You too can draw such convincing figures from imagination if you take the time to learn the proportion systems and massing concepts in this book.
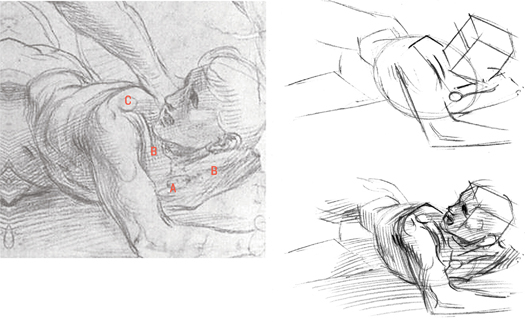
The most prominent skeletal landmarks of the prostrate figure are the sternum (A), clavicles (B), and acromion process (C).
After establishing the head and ribcage, note that the contour line of the acromion process and spine of the figure’s right shoulder blade intersect with his face just below the nose. Raphael has used the concept of atmospheric perspective (see this page) to fade the contour line before it disappears behind the head to emphasize that the form sits further back in space in relation to the face.
The figure’s right clavicle is at a steeper angle than his left, emphasizing the angle of his right shoulder’s defensive position.

The process of drawing arms is similar to that used for legs. Both the legs and arms have interesting spiraling rhythms linking their forms. This spiraling placement of forms is essential to create movement.
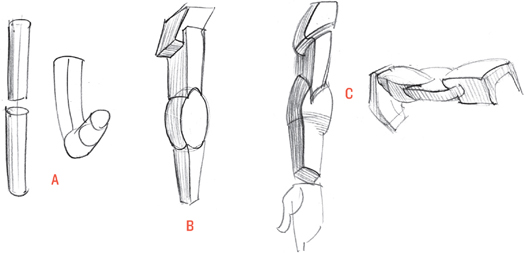
The quickest way to mass the arm is to conceptualize it as two cylinders (A). Begin with simple gestural lines to indicate the direction of the lower and upper arm using various curves and cross-sections depending on the action of the arm.
A more advanced mass concept for the arm is to reduce its volumes to a series of interconnecting box and spherical forms intersecting one another at roughly 90 degrees (B). For the final stage, refine these basic volumes, noting the way they attach to one another (C). The top box represents the deltoid muscle. The base of this form tapers to insert between the muscles below. A similar tapering and insertion happens across the pit of the elbow between the box form directly above the elbow joint and the spherical form below.
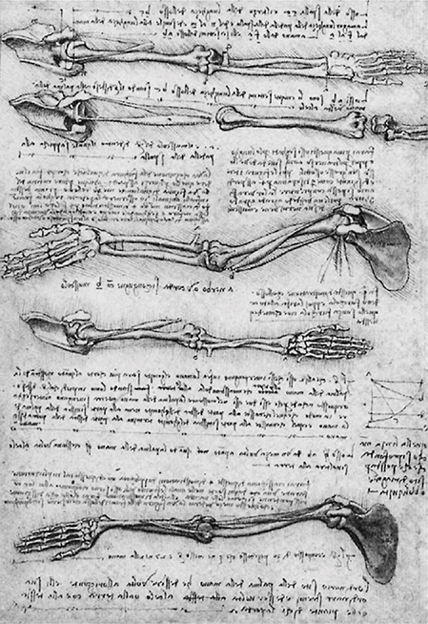
Arm study by Leonardo da Vinci (1452–1519)
In Gravity and Movement you saw how the opposing placement of antigravity muscles up and down the body is fundamental to the action of walking. This system of opposing curves penetrates down to the bones, since this is where the muscles attach. You can see this in the drawing above in the way Leonardo drew the spiraling shape of the humerus, which is the bone of the upper arm; see (A) in the next illustration.
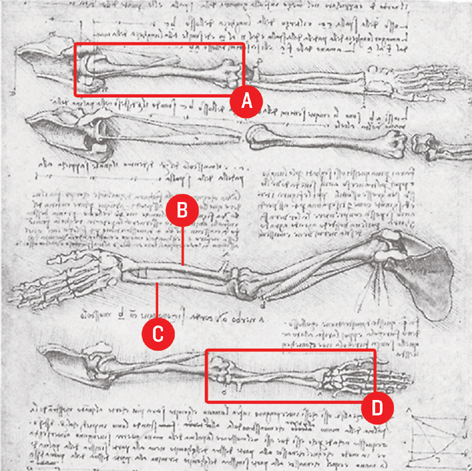
Here you can see the action of the two bones of the forearm. When the palm of your hand is turned so that it faces up or forward, the radius (B) and ulna (C) sit parallel to each other.
When the wrist is twisted so that the palm faces down or backward, the two bones twist over each other to create an X-shape (D). This action is visible on the surface of the skin because of several skeletal landmarks that we’ll study in the following drawings.
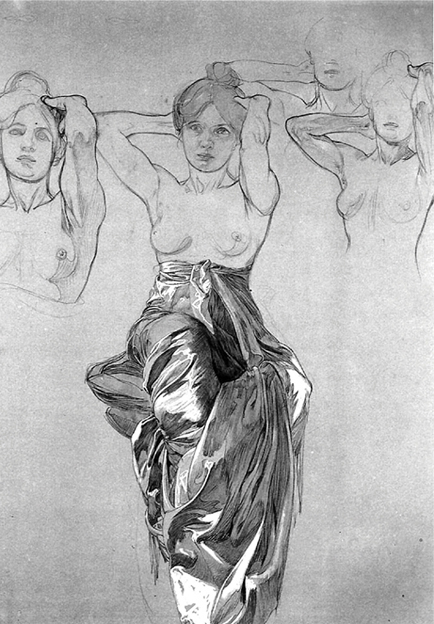
Study of Drapery by Alphonse Mucha
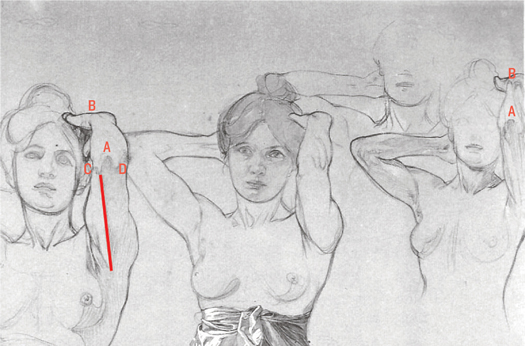
The skeletal landmarks of the arm concentrate around the area between the elbow and wrist. The hard skeletal form that we think of as the elbow is the large end of the ulna (A). The ulna has a second landmark, which is the skeletal bump on the top outside edge of the wrist (B). The line that links these two points together traces the path of the ulna below the surface of the skin.
Two smaller skeletal landmarks (C) and (D) indicate the extremities of the humerus bone, which hold the end of the ulna (A) in place. The edge of the ulna and the tendons of the triceps create a strong plane break along the line indicated down the back of the upper arm.
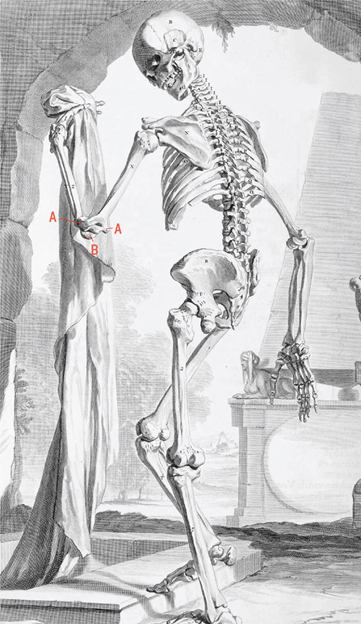
Human Skeleton by Govert Bidloo
This detail from an engraving by Govert Bidloo is included here because it shows the connection between the ulna and humerus bone. You can clearly see the ulna and its skeletal landmark where it slots into the wrench-like shape of the humerus bone. Look for these bones as skeletal landmarks at the elbows of the female figures in Mucha’s drawing, below and opposite.
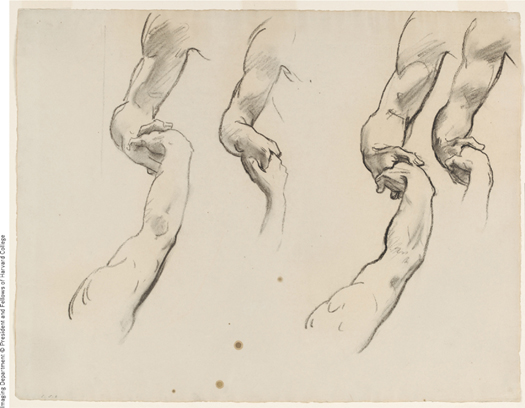
Study of Clasped Hands, for Heaven (1895–1916) by John Singer Sargent, Boston Public Library
This drawing of arms and clasped hands by John Singer Sargent is beautifully simple and yet it still has a powerful sense of strength and form. The three-step study opposite will show you how Sargent achieved this.
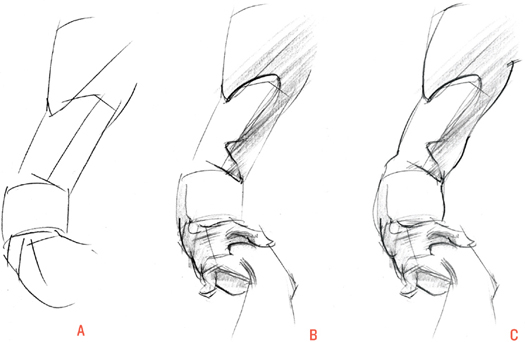
Illustration (A) demonstrates the first step of the study. Working from top to bottom, start with a tapered box for the deltoid muscle. Below this tapered box form place another box, intersecting it with the one above at an angle of approximately 90 degrees. The last set of volumes mass the lower arm, featuring cylinder and box forms, which overlap to communicate depth.
Because the muscle groups are conceptualized as separate volumes it’s easier to understand why the contour of the deltoid overlaps the contour of the triceps, as the triceps sit further back in space. Further down you see additional overlap where the contour of the forearm overlaps the outside edge of the triceps to indicate that the upper arm is further back in space than the forearm. Run a line indicating the core shadow along the dominant plane breaks of the upper arm (B), as Sargent has done. This gesture alone already increases the sense of light and form, but the addition of quick, diagonal shading for the shadow planes completes the illusion. Finish by refining the contour lines and adding overlapping T-intersections that communicate a stronger sense of depth (C).
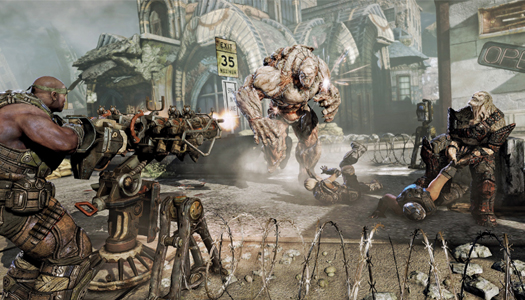
Gears of War 2: Berserker
You can clearly see the twisting action of the Berserker’s forearm, caused by the orientation of the downward-facing palm. Starting at the skeletal landmarks of the elbow, these surface forms twist around the lower arm toward the wrist, suggesting the same underlying skeletal mechanism that Leonardo drew in his study of the bones of the arm on this page.
The Berserker’s design also references the anatomy of the upper arm with the 90-degree intersection between the deltoid muscle and the combined mass of the biceps and triceps below. The majority of the muscle fibers have been clearly defined, making them look like they’re bursting at the seams. (photo credit 4.1)
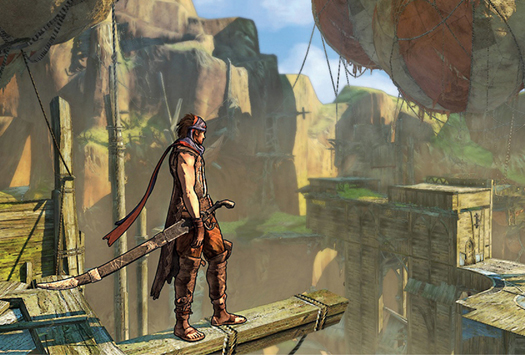
Prince of Persia
Prince of Persia features excellent lighting that models the planes of the figures, much like the lighting used by the Masters. The arm in this screenshot resembles the study by Sargent on this page.
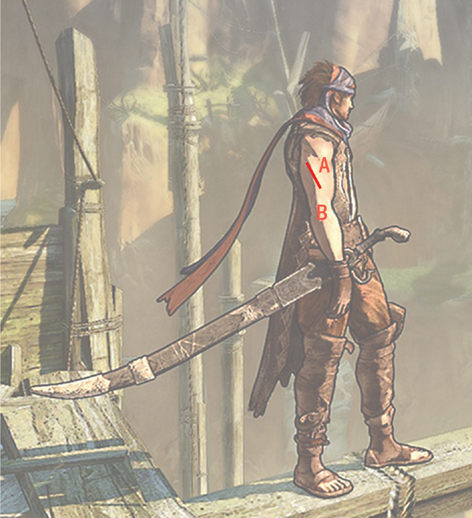
A core shadow runs down the length of the arm, defining the insertion of the deltoid in between the triceps and biceps. It then turns to wrap across the triceps before continuing down to the wrist. On its way down, it breaks at two important landmarks: the base of the lateral head of the triceps (A) and the skeletal landmarks of the humerus and ulna at the elbow (B).
The upper arm was modeled asymmetrically with the apex of the contour for the triceps on the back of the arm located higher than the apex of the biceps on the front of the arm. When the upper arm is flexed, the relative positions are reversed.

In comparison to the other anatomical forms we’ve investigated so far, the hands are a collection of very small forms, the intricacy and flexibility of which make them a very expressive feature of the human body.
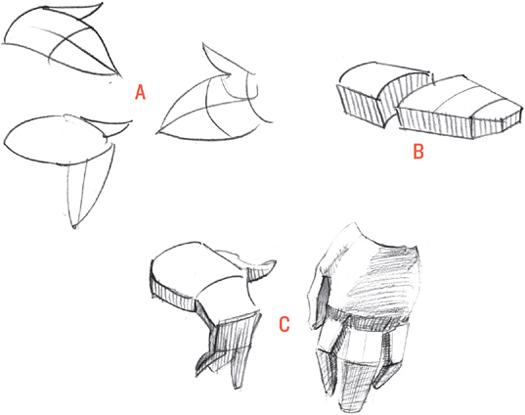
The quickest way to suggest the hand is with a petal shape (A), the tip of which is located off center to indicate the position of the long middle finger. Cut this petal shape in half with a curved line to indicate the placement of the knuckles. The form of the thumb overlaps the base of the palm at roughly a 45-degree angle.
To add volume, turn the bulk of the hand into a series of arched box forms that taper toward the fingers (B).
Keep in mind that the hands are much simpler to draw if you treat the fingers as one mass, rather than drawing each finger individually. We took the same approach in combining the toes to enhance the feeling of a coherent, solid mass. Common exceptions are the index and little fingers, which are the most maneuverable of the fingers and help communicate the expressive actions of the hand (C). Notice that fingernails have not been considered, as they are a detail that is secondary to the overall mass conception.
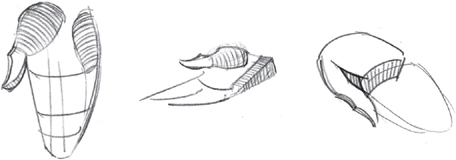
The thumb can also be conceptualized using box forms, but its base (where it attaches to the palm) is closer in shape to an elongated sphere. Another prominent form is located on the opposite side of the palm across from the thumb. When tensed, this mass of muscle and fat, together with the thumb, allows you to cup your hand.
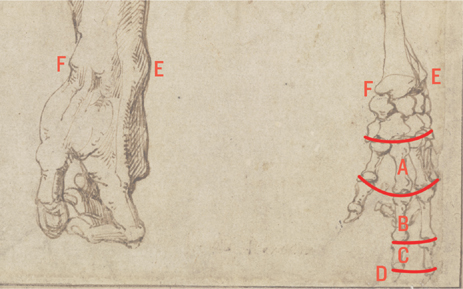
The segments of the fingers, known as the metacarpals (A) and phalanges (B), (C), and (D), are responsible for the skeletal landmarks on the surface of the hand. You can see how the bulky joints of the bones create the concertina-like shape of the fingers. Notice how the alignment of the joints describes the curved form of the hand.
Michelangelo’s study also features the styloid process of the ulna (E) and the smaller skeletal landmark of the radius (F), which are useful landmarks for describing the orientation of the wrist.
We often think of classical artworks as “realistic,” but in fact they were very stylized and unique to each artist. It’s interesting to note that Michelangelo used a simpler mass concept for the upper arm than did Sargent (see this page). Sargent’s core shadow snakes its way down across the deltoid and biceps; Michelangelo’s drops down almost uninterrupted. Also compare this mass concept for the arm to the Botticelli artwork on this page. These are great examples of just how open representing anatomy is to artistic expression.
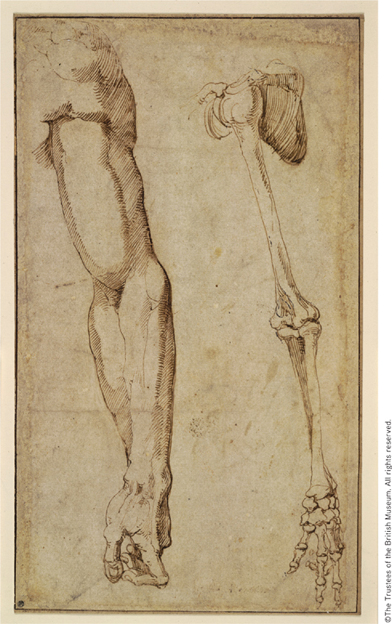
Study of a left arm and the bones of a left arm by Michelangelo, British Museum
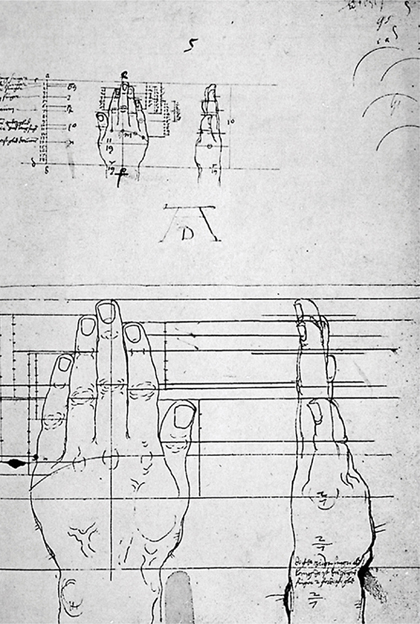
Right and left hand: outside view in profile by Albrecht Dürer, Saxon State Library, Dresden
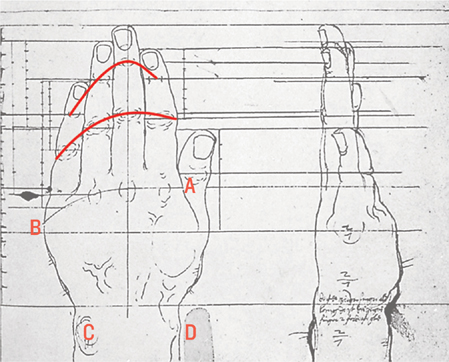
The joints of the fingers serve us perfectly in simplifying the mass of the hand if we link them together to create a larger shape, as opposed to drawing each finger individually. Here Dürer linked the skeletal landmarks of the knuckles with a curved line starting just below the joint of the thumb (A) and ending at (B). The tip of the thumb is roughly aligned to the first joint of the little finger after the knuckle.
Another landmark that you looked at already is the styloid process at the end of the ulna (C). On the opposite side of the wrist is the smaller skeletal landmark at the outside edge of the radius bone (D).
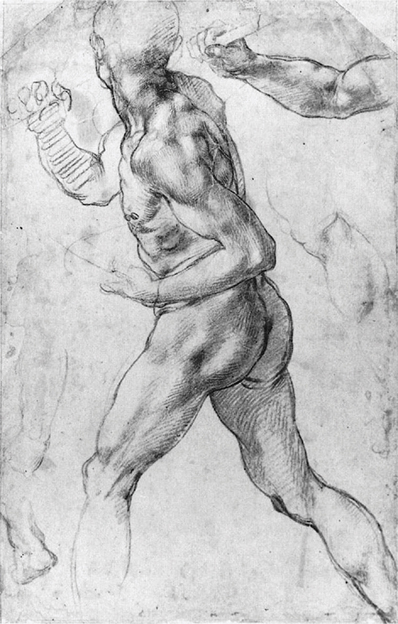
Study for the Battle of Cascina by Michelangelo
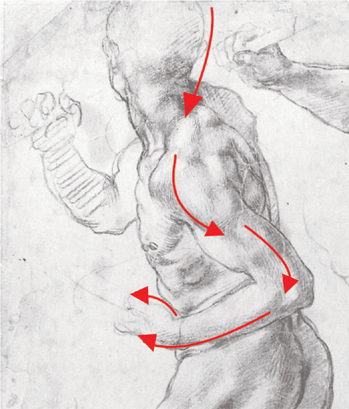
Artists sometimes use the spherical form at the base of the thumb in opposition to the curved contour of the fingers to create a flow of opposing curves, as Michelangelo has done here.
Make a quick study to find the opposing curves flowing throughout the figure, wrapping around the head, over the shoulders, and down to the legs. Note the opposing curves between the triceps and biceps.
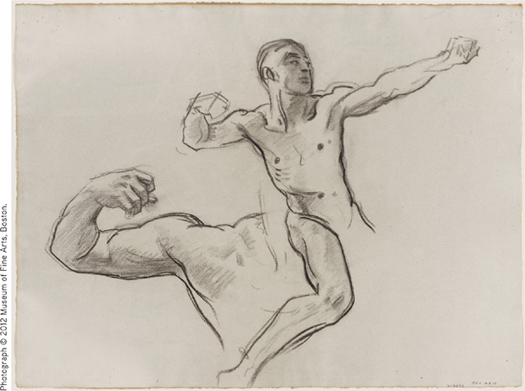
Sketch for Achilles and Chiron (MFA Rotunda), 1917–1921 by John Singer Sargent, Museum of Fine Arts, Boston
Preparatory drawings are fascinating to study because they reveal the thought process of the artist. In this study, Sargent drew two versions of the same hand. The upper drawing is less developed and reveals how he conceptualized the clenched hand as a modified box form with a top and front plane.

If you follow Sargent’s lead and begin with a block in combining all the fingers into one mass, you’ll see how useful this approach is in simplifying the otherwise complex elements of the hand.
Since you’re not considering individual fingers but the segments between the knuckles as a whole, measuring is made easier using triangulation and positive shapes.
Lighting such a simple mass is straightforward since the planes that face toward and away from the light are clearly defined. Once you have the general mass of the fingers blocked in and shaded appropriately, the fingers should fall nicely into place. Beginners often forget to draw a side plane for the fingers, which makes the fingers look two-dimensional.

Team Fortress 2: Medic (Artwork courtesy of Valve Corporation)
Team Fortress 2 features some of the best lighting in the business when it comes to modeling form. Individual planes that face in the same general direction, such as the fingers, are shaded with the same value, which subdues individual contours and groups them into one unified plane.
The proportions of the hands, like the feet, can be enlarged to add a greater sense of weight, as here with the Medic.
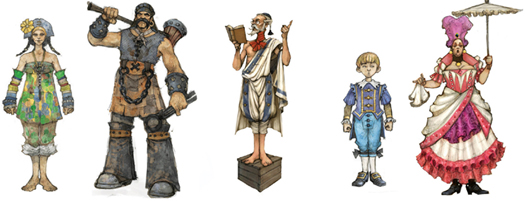
Fable 3, ©Microsoft Game Studios, 2010
In these concept sketches for Fable 3 you can see just how expressive the hands are in communicating much of the personality of the character to which they belong. From left to right, the characters’ hands communicate determination, strength, authority, stubbornness, and snobbish refinement.

The head is the third largest form of the body, after the ribcage and pelvis. Its overall shape should be your primary concern in establishing the solid skeletal form of the skull that it represents. The facial features are of secondary interest and allow you to fine-tune the emotions that have already been established in the broader concepts of the pose and larger volumes of your characters.
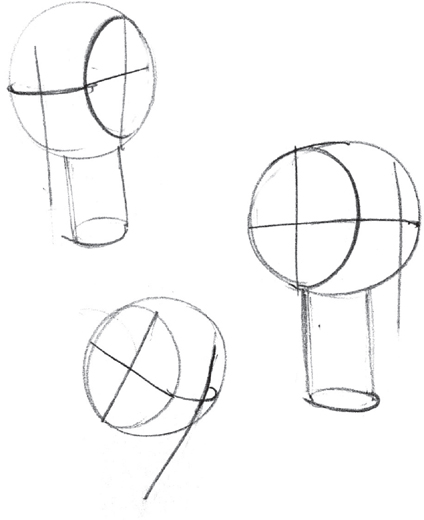
The best approximation of the head’s form is a sphere that represents the back of the head. Further refine this mass concept by slicing off the sides of the sphere to define the side planes of the head. Draw a crosshair across the front plane of the face to indicate the direction that the head is facing. The vertical line indicates the central axis of the face, and the horizontal line indicates the brow. Deciding whether the brow line curves up or down is very important, as this communicates whether you’re looking at the head from above or below. This combined mass can be placed atop the cylindrical volume of the neck.
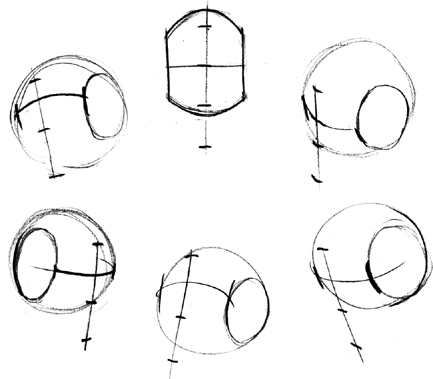
From here you can divide the vertical axis of the front plane into thirds, indicating the hairline (or top of the forehead), brow, and underside of the nose and chin. Note that the scalp extends beyond the top of the hairline. A common perspective mistake is to forget that all parallel lines of an object should converge to an imaginary vanishing point, so be sure these indications converge in a believable way.
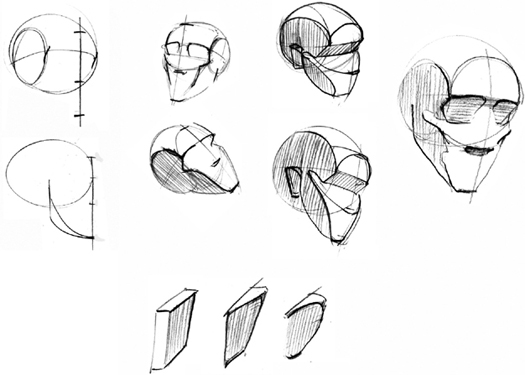
The downward plane of the eye sockets is chiseled out of the mass, much as a sculptor would do working with stone. Draw a curved line from the quarter mark on the side of the head and down to the chin to suggest the forms of the cheekbones.
Notice how the round form of the teeth and jaw is suggested simply by connecting the cheekbones with a curved line. A curved line likewise defines the forehead, linking the temples on either side of the front plane.
This volume is the first thing to consider when drawing the head because all facial features overlay this dominant mass. Practice the above process repeatedly, drawing the head in every possible orientation, and you’ll soon find yourself drawing heads from imagination.
Complete this massing stage by attaching the ears, which can be conceptualized as tapered box forms attached behind the vertical center line of the head on the side planes.
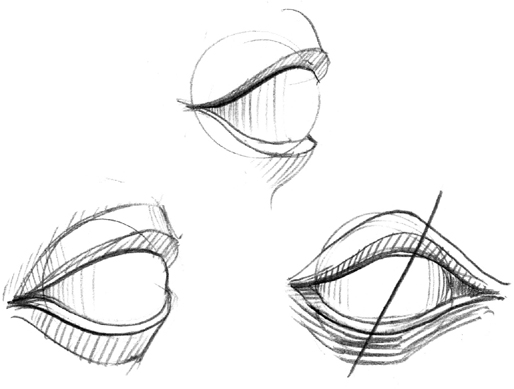
You should always be conscious of the spherical form of the eyeball when drawing the eyelids. Eyelids have a thickness to them that causes the upper eyelid to cast a shadow onto the sphere of the eyeball as it wraps around the form. Beginners often have the idea that the whites of the eyes are indeed white and automatically ignore any visible shadows cast by the eyelids. It’s better to think of the eyeball as a colorless sphere and shade it just like the spherical form that we studied in Advanced Lighting and Values on this page.
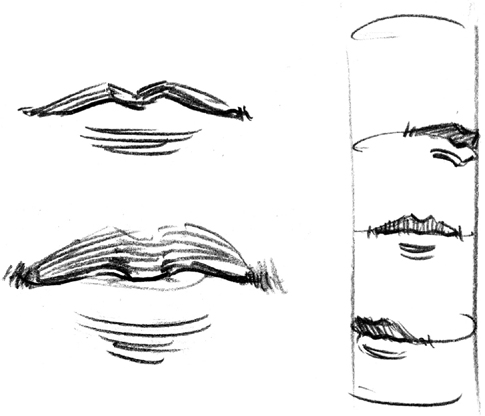
Keep in mind that the lips overlay the cylindrical mass of the teeth. As Andrew Loomis wrote in Drawing the Head and Hands, “To impress upon yourself what the roundness of this area is like, take a bite out of a piece of bread and study it. You will probably never draw lips flatly again.”
Note that the outside corners of the mouth are drawn softly to reflect the curved forms on either side of the lips. The bottom lip can be described as an upward, light-facing plane. Rather than draw an ugly and unrealistic contour line around the bottom lip, suggest the shadow below it. The lower lip magically appears without being explicitly defined.
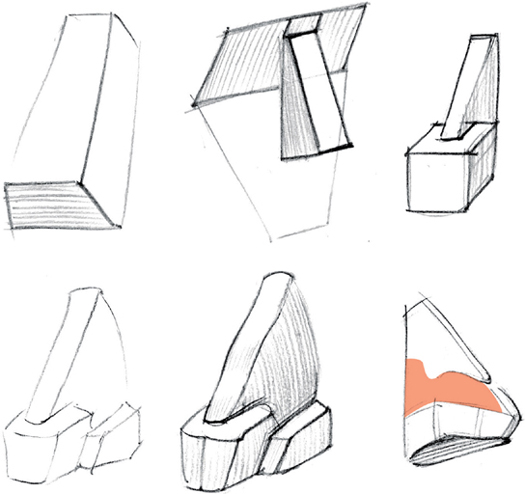
The box form of the nose should be placed along the central vertical axis of the face. The top plane of the nose changes from hard skeletal forms to softer masses at the base. These changes can be described by varying the weight of the line that describes the contour.
A feature of the nose that is greatly overlooked is that of the nasalis muscle (highlighted in red), which sits just above the outward forms of the nostrils. This muscle is emphasized when a person is snarling. The nasalis muscle and the intersections between forms break the otherwise straight contour of the nose.
Key to making the nose appear as if it is protruding is the core shadow that travels around the edges at the base of the nose, creating the effect of reflected light for the downward-facing plane.
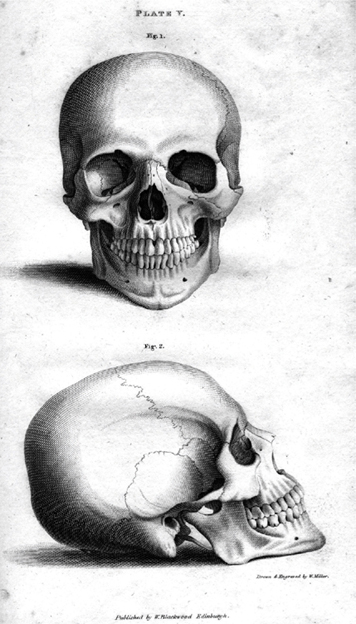
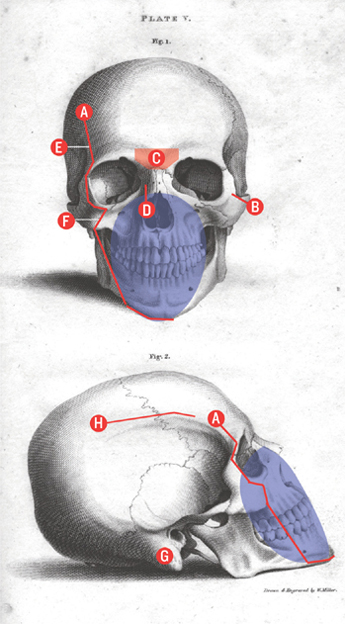
Engraving of the human skull by William Miller (1818–1871)
The hardness or softness of the line (A) that defines the front and side planes of the head varies along its length depending on whether it is describing bone or softer fleshy forms.
The most abrupt transitions between light and shadow are always where the bone is nearest the surface at skeletal landmarks. On the skull these are found along the edge of the nose (D), the temples (E), the cheekbone (F), the mastoid process behind the ear canal (G), and the temporal line (H).
The nasal bridge, or glabella (C), is loosely defined by the top of the nasal bone and the inside corners of the eyebrows on the surface of the skin. You can see in the side view that this plane is downward-facing and therefore often in shadow.
The angle of the cheekbone (B), which wraps around the eye sockets, varies wildly between people and ethnicities.
The cylindrical volume of the teeth and overlaying muscles define the shape of the muzzle (indicated as a blue oval). It’s difficult to fully appreciate the exact volumes of the head based on these two-dimensional etchings, which is why it’s important to find yourself a model of a skull to study firsthand (a very popular source of anatomy models for artists is www.anatomytools.com).
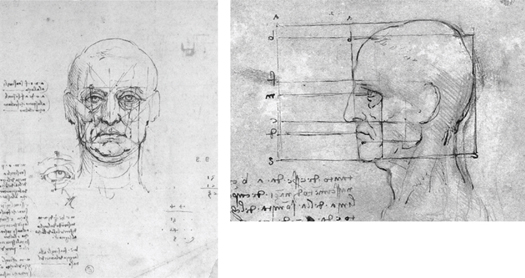
Proportion Studies by Leonardo da Vinci
Every classical artist had their own system of proportions, which gave them the ability to create figures from imagination. The sketchbooks of the Old Masters are filled with studies like the one above, where Leonardo noted the general alignment of various landmarks to make memorizing them easier.
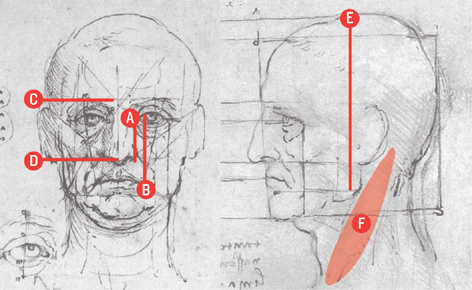
As you learned in the massing exercises on this page, the face, or front plane of the head, can be divided vertically into thirds using the hairline, brow, nose, and chin as landmarks. You can also see here that Leonardo drew a line from the inside corner of the eye (A) to the outermost edge of the nose as a way to remember the relative alignment between these two features. Another vertical line links the left edge of the iris with the outside corners of the mouth (B). The ears align with the brow line (C) and the tip of the nose (D).
On the side of the head, Leonardo aligned the ear behind the centerline of the head (E).
The sternomastoid muscle (F) emerges from behind the ear, wraps around the cylinder of the neck, and attaches to the inside edge of the clavicles. The sternomastoid muscles can be thought of as rubber bands that connect the head to the torso so that we can move our head from side to side and tilt it forward.
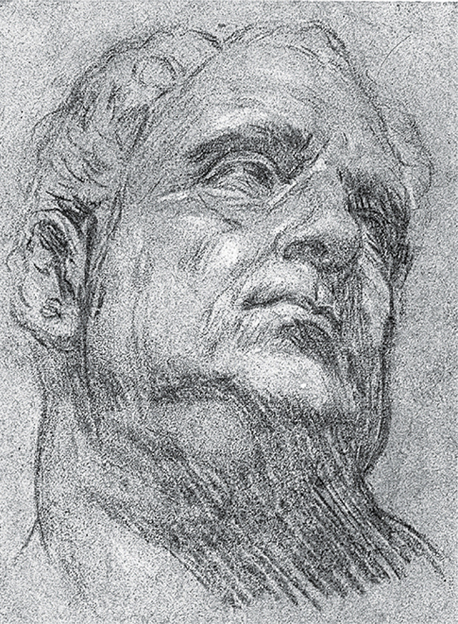
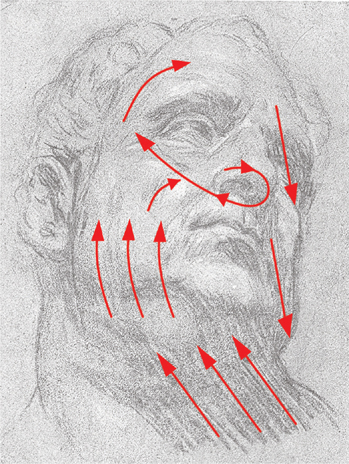
Study of a Bust of Vitellius by Tintoretto (1518–1594)
One of the great exercises to build confidence in drawing the head and its rhythms is to make copies of ancient Greek and Roman sculptures. Tintoretto did many such drawings of the Roman Emperor Vitellius (AD 15–69) because he had a copy of a classical sculpture depicting the emperor’s head in his studio.
Because the general mass of the head is such a compact form, you’d think that there is little room for creating a flow of opposing curves. But you can see here how Tintoretto expertly selected and emphasized lines that would help guide a viewer’s eye around the form.
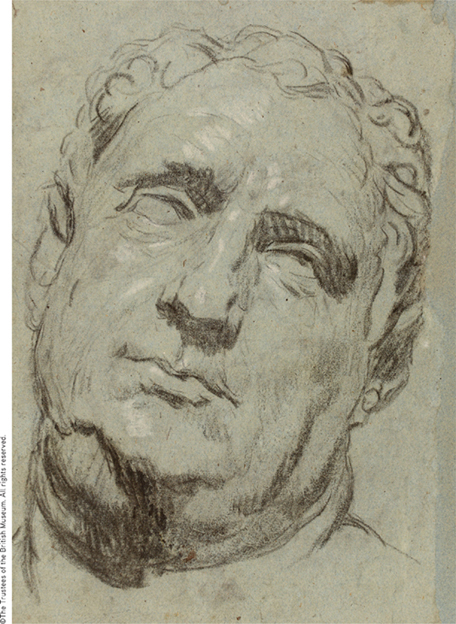
Study of a Bust of Vitellius by Tintoretto (1518–1594), British Museum
Practice your massing concept for the head by studying this second drawing of Emperor Vitellius by Tintoretto.
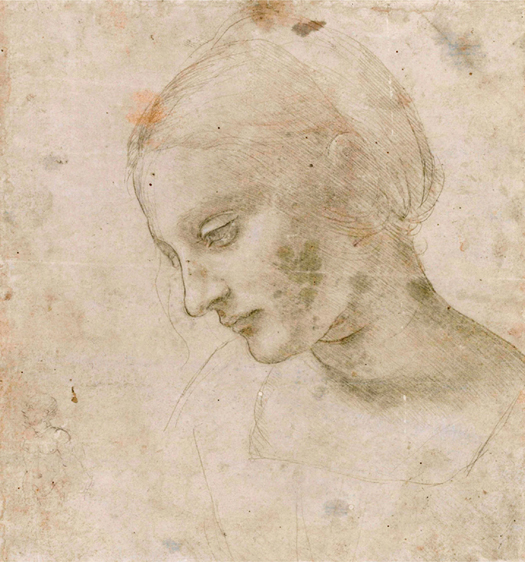
Study of a Woman’s Head by Leonardo da Vinci
Have a go at copying this beautifully subtle drawing by Leonardo da Vinci. Use the same process you did for the male head, although it’s worth noting the way in which Leonardo has rendered the female head with softer and more rounded features in contrast to Tintoretto’s relatively angular male head.
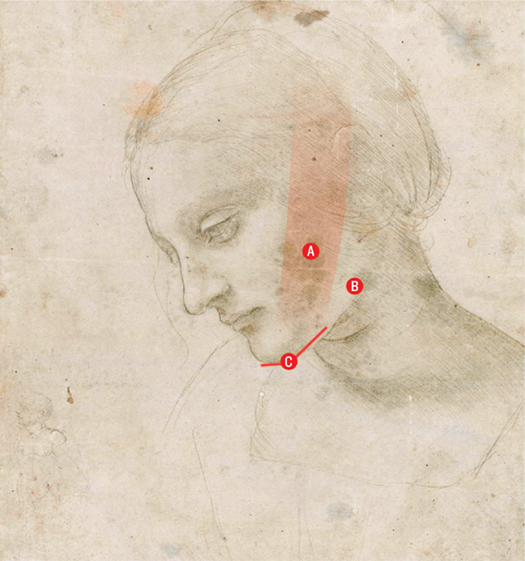
The head in Leonardo’s drawing is more spherical than the boxy male head by Tintoretto. Leonardo described the head’s volume with a core shadow that runs almost vertically across the cheek (A) and the reflected light on the underside of the chin (B).
The ear was shaded to conform to the head’s overall shape, with only the light-facing top plane indicated. This has an added effect of maintaining focus on the facial features, which are the center of interest.
Rounder features are a general characteristic of female heads. The chin, for instance, tends to be more curved in females, although it’s still important to define the front and side planes of the head with a change in direction at (C). The female figure also tends to have a longer neck, which is a feature that can be exaggerated for a swanlike effect. Leonardo did not draw the sternomastoid muscles on either side of the neck, which gives it a more delicate appearance. In the eyes, Leonardo offset the placement of the pupil within the iris to indicate perspective.
What makes this drawing so delicate is that the value contrasts are subdued. The model would likely have had at least a few wrinkles on her face, especially the lines that run down on either side of the nostrils to the corners of the mouth. Emphasizing wrinkles often makes figures look much older than they are, so ignore labial folds and eye crinkles altogether when drawing children.
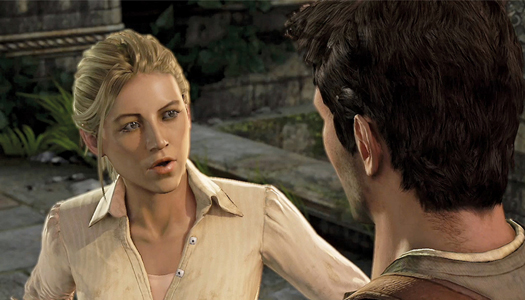
Uncharted 2: Elena Fisher (Artwork courtesy of SCE)
Although the shape of Elena’s head is rounded, the front and side planes are defined with light and shadow to give the face a strong sense of three dimensions. You can see the plane break between front and side plane by following the shadow line that runs along the edge of the forehead, along the cheek, and down toward the chin. This line is mirrored on either side of the face.
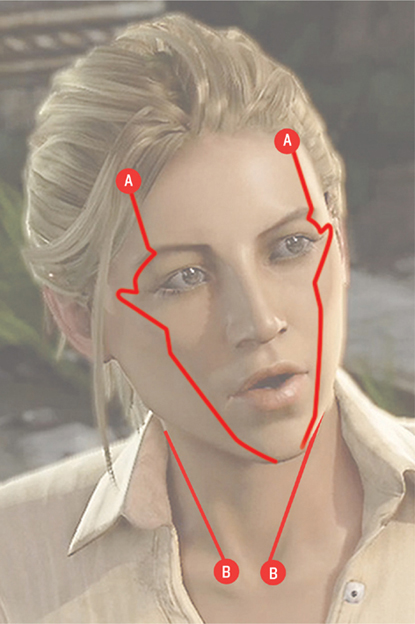
The front plane of the face starts at the hairline (A), down each side of forehead, running around the eye sockets, over the cheekbones, and down to the chin. The sternomastoid muscles on either side of Elena’s neck are indicated by the lines starting at the inside edge of the clavicles (B) to which they connect. Even though you can’t see the ribcage in this close-up view, the orientation of the head in relation to the torso is made clear due to the alignment of the head and chin in relation to the clavicles (B).
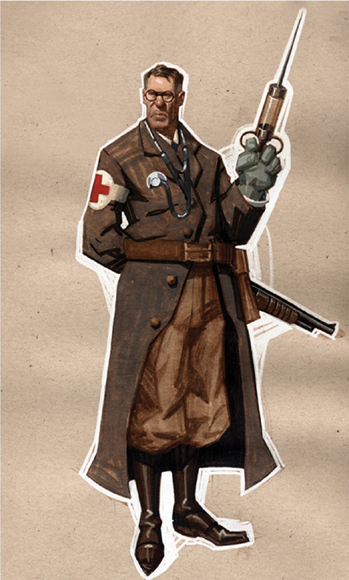
Team Fortress 2: Concept art for Medic
In contrast to Elena’s head, the Medic from Team Fortress 2 is much more angular, particularly at the chin. The excellent “classical” lighting of the game was evidently considered in the concept art stage and defines the front and side planes of the head much like the study by Tintoretto (this page).

The human face has the highest concentration of muscles of any animal, which allows us to articulate a wide and subtle range of emotions. But a character’s ability to express the whole range of basic emotions relies on a minimum of four specific areas of the face: the forehead, the eyebrows, the eyes, and mouth.
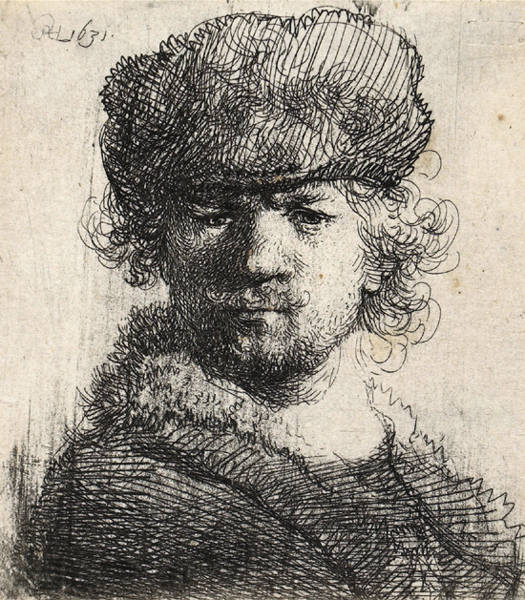

Self Portrait, Frowning by Rembrandt van Rijn (1606–1669)
Rembrandt was a master in creating subtle facial expressions thanks to his many self-portraits. Note that several important lines are key to communicating the emotion of anger in this expression: vertical frown folds (A), a flat brow (B), the downward slope of the upper eyelid, wrinkling and widening of the nose, and flat, pursed lips (C).
Rembrandt would have created this study by observing himself in a mirror. Modern-day artists and animators always have a mirror on hand and continually use it for reference.
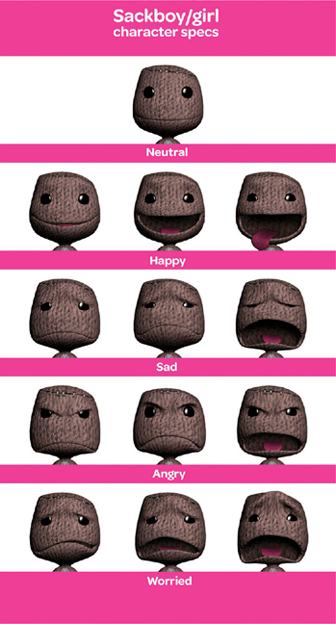
Little Big Planet: Sackboy/Sackgirl
Sackboy/Sackgirl in Little Big Planet doesn’t even have a nose or eyelids but is still capable of expressing a wide range of emotions because the character has variable frown and brow lines. Different mouth shapes also express emotion, as does the shape of each eye.
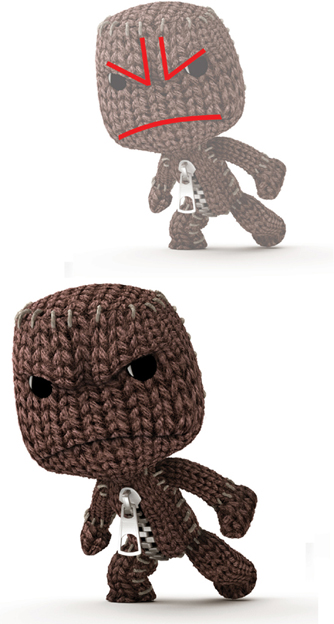
Make some sketches of Sackboy, using as few lines as possible to create the various emotions. (See Goldfinger’s facial expressions). Learning to tweak facial expressions to express emotions will enhance your ability to draw characters from imagination. Note that Sackboy has a proportionally big head and face, making his expressions more visible. Consider exaggerating anatomical features to emphasize important aspects of your character even if you’re designing realistic humans.
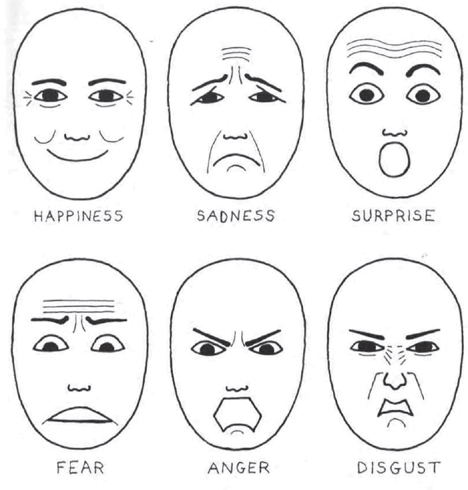
Facial expressions from Human Anatomy for Artists by Eliot Goldfinger
On this page, you practiced four facial features that express emotion: brow and frown lines, the mouth, and eyes. Goldfinger adds two more facial features: the crease of the nasolabial folds (also known as “laugh lines”) and the horizontal wrinkles of the forehead. The elements used to control expressions are fairly simple if you think of them as abstract lines and shapes as in Goldfinger’s illustration.