
World of Warcraft (Artwork courtesy of Blizzard Entertainment)
IT IS OFTEN ASSUMED THAT CREATIVITY IS SOMETHING that you’re born with: either you have it or you don’t. Although some people may be more naturally gifted than others, creativity and exercising your imagination can also be learned and developed. This level will give you a reliable process for creativity so that you need never be lost for ideas when designing characters (this same process can be applied to environment design, game design, and, for that matter, to creation in any artistic discipline). The structured process of defining your design goals before researching and character development will also ensure that you can visually engineer your designs to express specific ideas and emotions.

Some triple-A development teams consist of more than a hundred developers, including programmers, marketing teams, producers, and artists, each with their own unique take on the game being developed. That’s a lot of ideas and egos to balance! So before we begin looking at the creative process, here are a few suggestions for good studio practice to consider:
01 Develop cross-sections of the game rather than focusing on one aspect. This means developing the whole range of characters and environments in unison, rather than finishing one character or environment at a time. The quicker you can block in one entire cross-section of the game, such as a playable demo level, the easier it’ll be to judge the full scope of your game and make comparative decisions.
02 Present your work daily to members of your team. Artists often find daily presentations an uncomfortable chore because few want to show work they deem unfinished. But daily presentations are good because the key concepts can be refined through quick iterations and team feedback before precious time is spent on details and polish.
03 Make your inspiration and artwork visible. Never assume at the end of a discussion that everybody is thinking along the same lines. Draw it! Hang your latest work on the wall, so that everyone can visualize the product they’re working on as soon as it’s realized.

Media Molecule, the studio behind Little Big Planet, goes one step further and dedicates a corner of the studio to artwork created by its fans and quirky furniture that echoes the franchise’s handmade concept. (Image courtesy of Media Molecule)

This section will provide you with tools to be creative on demand. Make these tools an instinctive part of your design process and you’ll likely never be lost for ideas.
The first question you or your team should ask is not What game should we build or How do we build a game? The lead question of any creative endeavor is What is the emotional experience we want our audience to feel? The high concept serves this purpose.
The high concept is a simple paragraph that defines your design goals clearly and concisely. You can think of it as the game summary that you’d find written on the back of a video game box. Who defines the high concept varies:
A game publisher may submit a high concept outline to a development team
The development team may create its own high concept
A high concept may be derived from an existing story, such as a book, a film franchise, or a real-life event or experience
Whatever the scale and premise of your project, make a habit of developing a high concept before commencing work so that you can design with intent. Once a high concept is established for the entire game, take the time to develop similar concepts for each character, group or race, and environment to be featured in the game.
A high concept is assembled from keywords generated during a brainstorming session. Keywords are a small selection of adjectives that together summarize an entire concept.
To help structure the brainstorming session, write out the following checklist of key design concepts for you or your team to consider and come up with keywords for each:
Emotion
Color
Shape
Texture
Line
Speed
Size
Opposing concept

Let’s say that your task is to create a character for a hypothetical game about exploring a fantasy landscape populated with fantastic creatures and vegetation. The types of questions you should ask are: What emotion should the character communicate? What colors do we associate with such a character or environment? What shapes are invoked in our imagination when we think of fantastic creatures and vegetation? And so on, through all the concepts. Any association that comes to mind gets written down, whether it’s a memory from an exotic holiday in the tropics or a plant from the backyard.
Keywords should be adjectives, not nouns, because adjectives, like friendly, strange, or dangerous, describe emotions. Using keywords like these as search terms for visual research will return a broader and unexpected set of results than searching for specific objects.
Include keywords that are conceptually in opposition to your main theme. As we saw in Subverting Conventions you’ll add a greater element of depth and interest to your design if you include visual contrast.
Once you and your team have exhausted the idea process, formulate your keywords into a concise high concept that summarizes the character(s) and environment(s) you want to produce. Highlight the selected keywords, as in the following example, which we’ll use as a launch pad for gathering visual research.
Developing up from a high concept and a series of character and environment concepts provides the entire team with common reference points against which to judge the suitability of design decisions. Only once you’ve defined your goal are you ready to begin the character development process. But before we begin the first stage of development, which is research, we need to understand what the process of transforming words from our high concept into images actually involves. And this is done through visual metaphors.


We are all aware of metaphors in literature. Metaphors like “icy stare” and “beaming smile” are used to imbue objects or actions with greater emotional significance. Visual artists can use metaphors in much the same way, sometimes taking inspiration from the most unlikely places. All the images you find in the research stage can be turned into visual metaphors.

Every day you encounter many attention-grabbing visuals, and every one of them has the potential to be developed into a video game character or environment, whether it’s the gravity-defying height, solidity, and scale of a skyscraper or a creepy, shriveled dead spider.
When you see anything that piques your interest, make a habit of drawing quick black-and-white thumbnail sketches of it in your sketchbook, spending just enough time to capture the primary element of interest, as in the sketches to the left.

Reducing objects to black and white silhouettes masks their original identity. Once you have a shape that captures the abstract qualities of the original source it becomes easier to imagine it as something else entirely.
The abstract shape of the dead spider above can be turned into a creepy, arachnid-shaped hairstyle and the skyscraper into a sturdy and imposing character. Viewers may not recognize the underlying visual references but they will likely get a sense of their associated emotions.
Though the spider and skyscraper can both be used as abstract shapes for a character, they don’t fit our character concept that features keywords natural beauty and light, which the spider and skyscraper do not embody. So put these drawings aside for a more appropriate future project.

Thorough research is one of the key factors that distinguish professional artwork. Your aim is to become an expert on a given subject so you can create believable characters and environments with a sense of authenticity. If you have the time to do firsthand research—sketching on location, life drawing sessions, etc.—then be sure to take full advantage of the opportunity.
Once you know what emotions you want players to feel, begin researching images that abstractly embody these feelings in the form of visual metaphors. Creating a mind-map will help you research diverse concepts and images, so you can avoid drawing the first, most obvious thing that comes to mind.
While the character concept is based on adjectives that describe desired emotions and feelings, the mind-map looks for nouns that reflect the character concept’s emotions. Let’s go through the research and development process for our character together.

Structure the mind-map like this illustration, placing your high concept in the middle with key categories radiating out. These categories will help get your ideas flowing. Combining word associations from your mind-map categories with keywords from your character concept can uncover an array of seemingly disparate reference images that you can use to create an interesting character.

The character keywords delicate and natural beauty produced the visual research results of flora, leaves, and trees. When you make a study of each research image, draw it as a simple silhouette without details. You’re looking for a design that abstractly communicates the keywords in the character concept.
By drawing every photographic image that interests you, you’ll begin to get a feeling for the lines and shapes that will eventually be incorporated into the character design. Usually the character begins to evolve naturally through this repeated process of researching and sketching.

Research into the character keyword silence yielded images with sparse and simple composition elements composed of vertical and horizontal lines. Therefore, the goal for this particular character design is to avoid using too many diagonal or curved lines and noisy details. Feel free to annotate your drawings to highlight the key design features that you’ll want to incorporate into your final character design.

When it comes to your characters’ clothing, think about the resources and textiles available in their environment. In this example, the nature references in the character concept led to research of African tribal groups, although you might choose different ethnic or geographic avenues of research.
Often you just stumble upon interesting and suitable reference images by chance. In this case it was the garments of the Ndebele tribe of South Africa. They have simple design patterns and silhouettes that will be helpful in designing a simple character shape, which is the goal here.
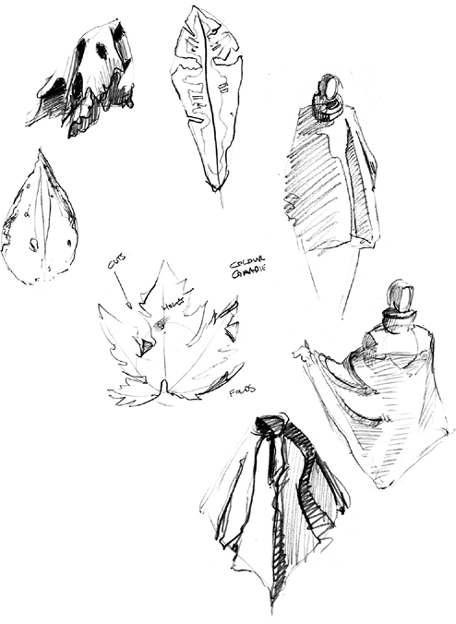
Visual metaphors for the keyword delicate were found in “dry, dying leaves,” some of which resembled a poncho, which was then likewise researched. Keep in mind that the quality of these research sketches doesn’t have to be great, as they’re primarily to be used as your own personal library of reference images. Draw only as long as it takes to visually note the main element of interest and ignore or suggest the rest.

Keywords light and gentle also influenced research for the character’s feet, starting with the search term “tiptoe.” This didn’t seem light enough, so further research was made into “ballet feet” and there was even a brief investigation of “grasshopper leg.” You can never predict when and where you’ll discover suitable visual metaphors, so it’s worth exploring everything that comes to mind for the chance that it’ll take the design in an unexpected and exciting direction.

Research for the character’s eyes began with sketches of images from a great book called Decorated Skin: A World Survey of Body Art, by Karl Gröning (Thames & Hudson). But the eyes appeared too alive and visually noisy for the keywords in the character concept, so the search term “quiet face” was researched, which uncovered images of “ancient Chinese sculpture” that featured more suitable eyes. Notice how even the eyes echo the leaf concept of the character.

Because researching images on the Internet and thumbnail sketching is so quick, it’s easy to explore several visual ideas in the space of just a few minutes. When you combine these tools with your innate ability to recognize meaningful shapes in random objects (apophenia), you’ll arrive at a process that is fast-paced and excitingly unpredictable. There’s a great wealth of fascinating visual information to be discovered, and your task is to select the appropriate inspirations and then marry diverse visual concepts together to create a coherent character design, a process called thumbnail development.

To determine a body shape for your character, review and assess your sketches from the visual research produced by your keywords and mind-map. Select shapes that most closely match the character concept.
A first step to developing an abstract shape into a character is to decide where to place the head, body, and legs. This process of personification need not be complex. Primary shapes—the circle, square, and triangle—play a key role in communicating emotions, so even at this early stage it’s worth considering which shapes best fit your high concept. Try to echo the overall shape from your thumbnail sketch in the body parts.

Combine the basic body shape with the thumbnail sketches of leaves from this page. Play around with the body’s placement within the shape of each leaf, as illustrated here. From left to right: the leaf becomes headgear for our character; scaling it up it turns into a full-length costume; rotating, flipping, and mirroring our abstract shape creates even more possibilities.

Steadily begin combining the personified abstract shape with elements of your research, starting with very simple lines and shapes. By keeping your drawing simple for as long as possible, you’ll be less reluctant to make bold changes and more inclined to experiment with proportions than if you were to start out with detailed drawings.
Here you can see how the base shape of a simple leaf is combined with various research sketches (this page) including Ndebele tribal clothing, dead leaves, faces from ancient Chinese sculpture, and a poncho.
Think of the composite sketch as a mannequin over which you can loosely try out different visual ideas.
Talk yourself through the design, challenging each decision in reference to the character concept. How can you communicate keywords like lofty and strange featured in the character concept? Here an impressive proportion of 10 heads goes some way to convey both keywords.
What is the character’s anatomy and underlying structure over which its flesh and clothing is draped? How would the character move? Aim to incorporate a system of opposing curves throughout your character designs for a believable sense of energy and life. As noted in Gravity and Movement, without opposing curves movement would not be possible. Return to research as often as necessary. Gestures for the hands were investigated using the search term “delicate hands.”

It’s time to assess how well the character silhouette is working as an abstract shape. Trace or copy it onto a new sheet of paper and block it in with a single value of shading. Do the elements of the character remain distinguishable when you stand back from the drawing? Does the silhouette sufficiently communicate the keywords in the character concept?
Angle changes that are too subtle tend to disappear entirely when viewed at a small resolution. Therefore, it’s important to exaggerate elements of the silhouette for the purposes of visual interest and clarity. For instance, where you have two overlapping elements it is often a good idea to exaggerate the angles between the two elements so as to define them as separate (highlighted in red).

Team Fortress 2 (Artwork courtesy of Valve Corporation)
The art team at Valve that developed the cast of Team Fortress 2 did a great job creating characters with silhouettes that are easily distinguishable and have a strong suggestion of personality without the need for supporting details. Notice how angles between elements of each figure are often acute—such as the transitions from boots to trouser cuffs—adding visual clarity, even when characters are viewed at a small scale.

With the thumbnail stage complete, we’ve tackled the hardest part of character design—communicating a character’s concept through its silhouette. At this point, you might want to switch to developing other characters and environment silhouettes so you and your team can begin to get a good visual overview of the game, and make visual comparisons, which may influence your character’s final design.
In Elements of Design we saw several examples of games that successfully echo the high concept at every level of detail. The character being developed in this chapter has now evolved to visually communicate its concept keywords, including nature, silence, delicate, and light, through its silhouette. Details like body parts, decorations, and textures should also echo the character’s overarching concepts or enhance them through contrast.
It’s important to keep in mind that any details you add in subsequent stages should not disrupt the form that has been designed so far. Details should assimilate into the design and not change it altogether.

Lightly trace or copy your rough sketch from this page onto a clean sheet of paper, making sure that you place the new drawing on the page so that the head, hands, and feet fit comfortably. Review the character concept on this page and this page as you check that your design addresses all the keywords—quiet face; delicate hands; dominant straight, vertical line for silence—and mute any textures to limit visual noise.
For the same reasons that the Old Masters like Rubens and Vermeer sought to conceal the compositional framework of their paintings (see this page and this page), refrain from making your original sources of inspiration for your character design too explicit. If players are conscious of the references to leaves, for instance, they will find it more difficult to appreciate the pure emotional qualities of the abstract shape.
For the face, check that the dominant facial expression lines are all present so you can manipulate the character’s features to communicate different moods, gender, and age.
In finalizing your character design, consider how light or dark it should be in general appearance. This character references the high-key concept of light, so its value design should reflect this accordingly.
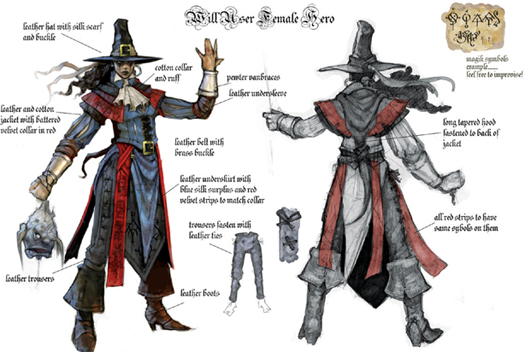
Model sheet from Fable 3, ©Microsoft Game Studios, 2010
The approved final drawing should be combined in a model sheet that will be used as the key reference document by other members of the team. Here is an example of a model sheet for the game Fable 3. The model sheet gives you an opportunity to annotate your designs with information that may be useful to other members of the team, including references to fabrics and textures. Cut-away drawings have been included for elements that are obscured by overlapping details.