
Floor Projects

The project portion of this book begins with a basic floor project, which is probably the most common tile project undertaken by homeowners. This chapter walks you through a basic installation, and then branches out to illustrate how to set a running bond tile pattern, a diagonal pattern within a border, and how to set hexagonal tile.
With these basic tile-setting techniques in hand, you’ll be ready to lay mosaic floor tile and even install a decorative round medallion in the middle of a tile floor. We also lead you through installing a custom shower stall base, waterproofing a shower or wet room, and more.
A floor typically is one of the largest surfaces in a room and so plays a major role in establishing the style of the space. Neutral or dramatic, plain or elaborate, these projects present the techniques necessary for just about any design you can find or dream up.
In this chapter:
• Evaluating & Preparing Floors

Gallery of Floor Tile Projects
Explore contrasting inlays. With a little planning, they are inevitably easier to install than the look would lead you to believe, and the visual fascination is well worth effort. The versatile nature of tiling ensures that you can use inlay tiles in a different color, texture, material, or all three.
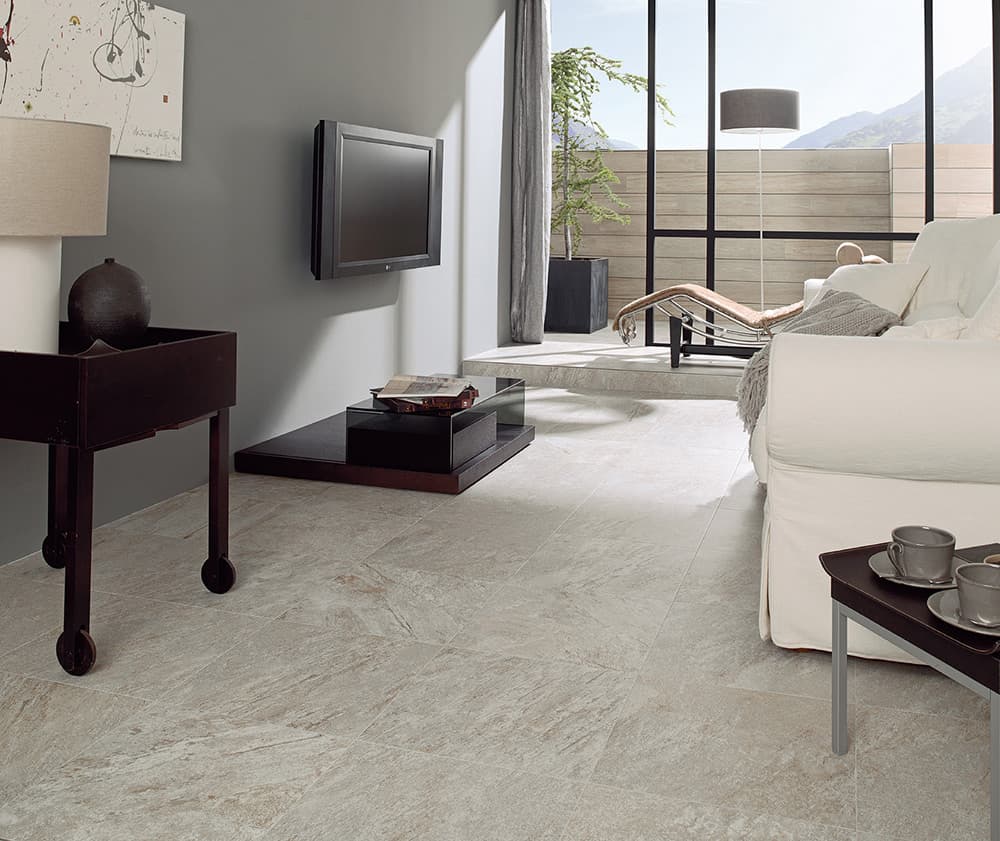
Fit the format to the space. Large format tiles are great for making a relatively modest space seem much larger, as the big faux-stone porcelain tiles do in this modern living room. Larger tiles also translate to finer and fewer grout lines—making the look less busy and more in keeping with a clean, modern aesthetic.

Dare to lay a floor with flair. It may seem like a big risk, but a floor like this can always be moderated with an area rug if it turns out to overwhelm the space. In most cases, though, the color is a welcome break to the usually neutral color schemes that mark most kitchens.
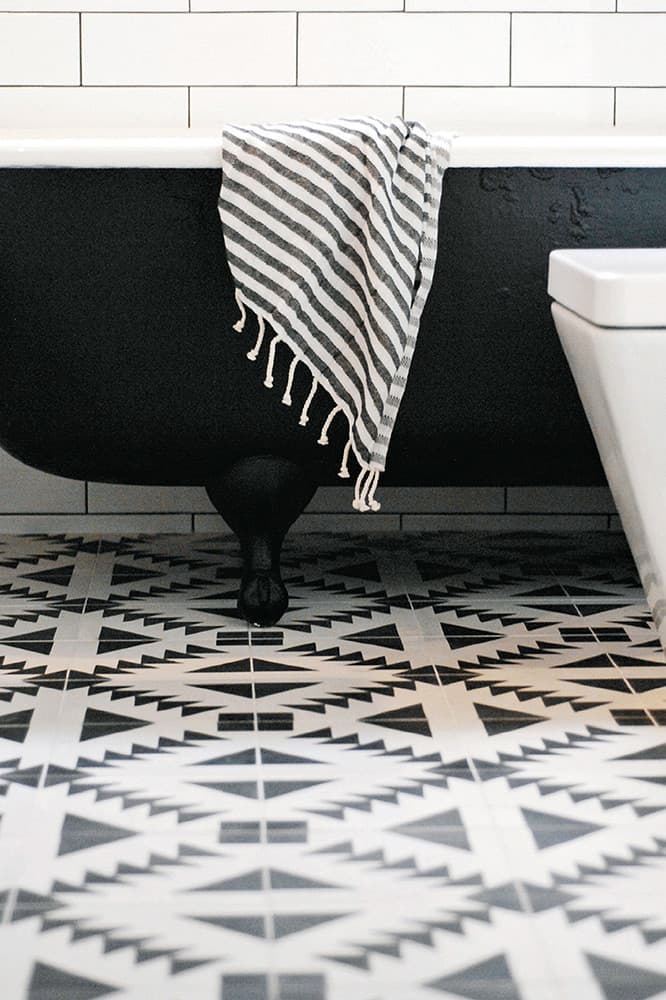
Inject sizzle into a simple bathroom design with decorative floor tile. Because visitors only spend a limited time in the room, you can go a bit wild with the surface underfoot. Use dynamic painted cement tile such as the ones laid for this floor and the excitement is built in.
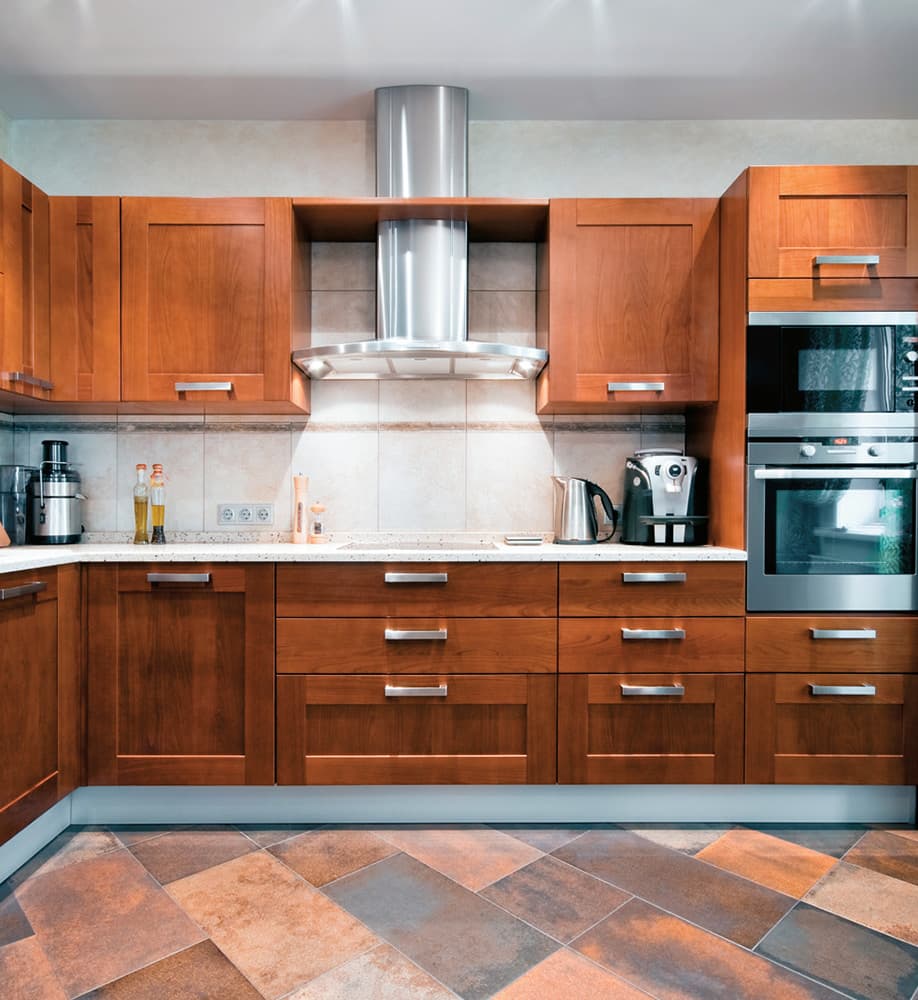
Pull together colors from other parts of the kitchen by using a floor of contrasting stone tiles. The tiles mimic the natural wood tones in this kitchen while adding a visual interest all their own.
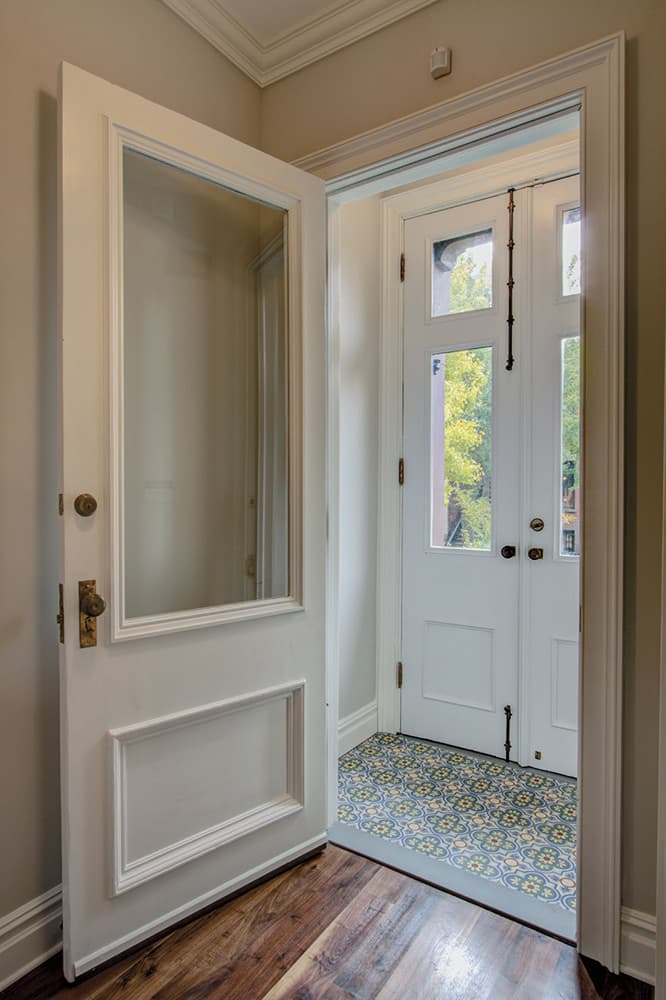
Integrate unique tile where it will have the most impact. A foyer or mudroom provides the opportunity to show off beautiful tile. The small square footage ensures that you can buy a high-end tile without breaking the bank. Choose a rugged tile in any case—such as the cement tile used here—so that it will look good over the long run.
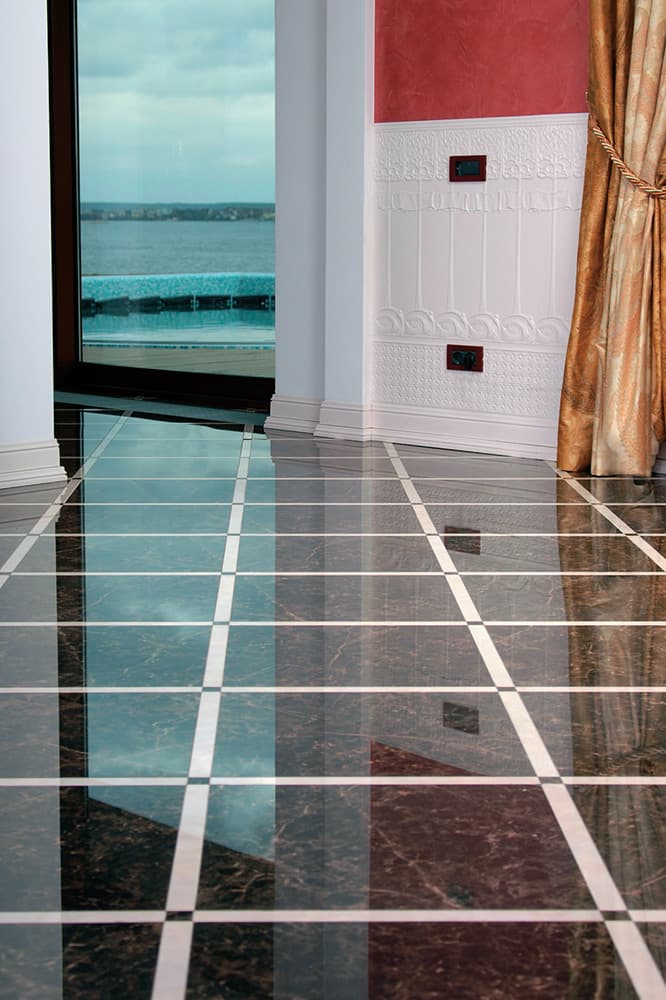
Go glam with granite. The high sheen and beautiful deep tones in this luxury stone make for an unforgettable floor that can singlehandedly elevate an entire room or home design.

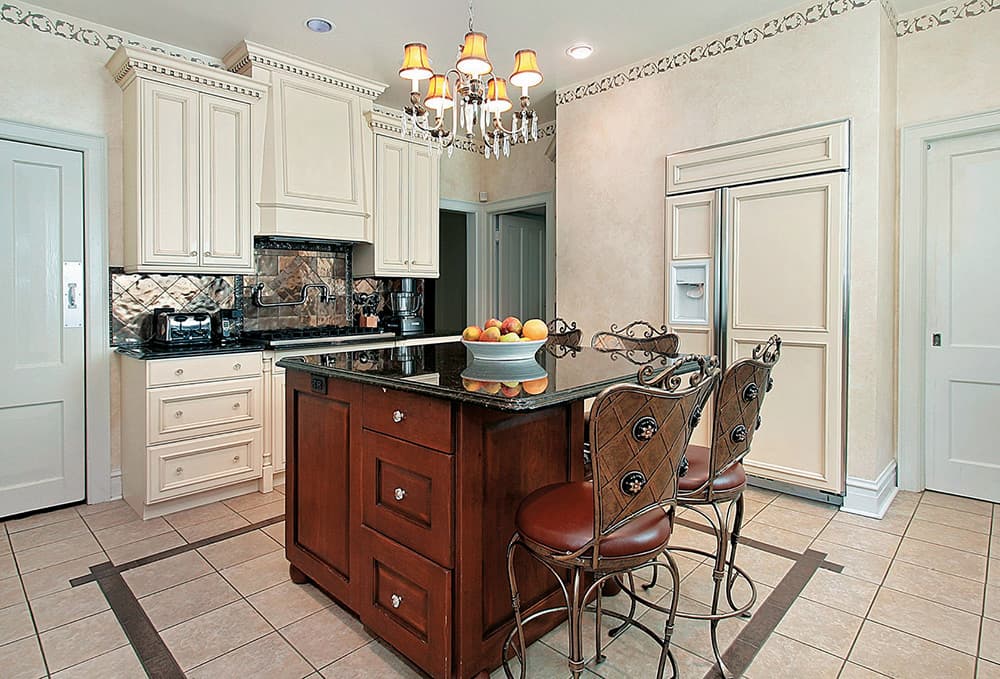
Soothe with simple. Mono-color tile laid in a simple grid creates a calming effect that is pleasing to the eye and provides a platform for other design elements. The light, neutral color of this tile floor not only blends perfectly with the other natural tones in the kitchen, it offers a clean, spare stage for the kitchen at large.
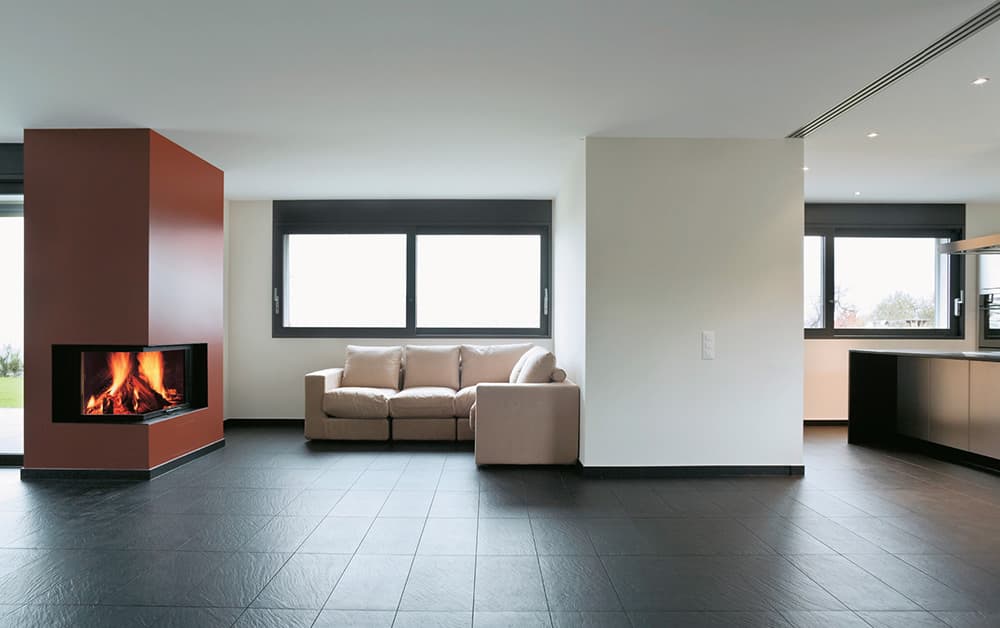
Warm up a large, cool room with low-luster textured tiles. The dark tiles here contrast with the white and bright contemporary interior. The rich, deep brown creates a sumptuous surface underfoot and makes the large space seem cozy and welcoming.

Choose a special look where it will have maximum impact. Large format tiles such as these are the chance to stun, by choosing from among the many exceptional finishes available at retail. This tile almost looks like rusted metal, but is a reasonably priced alternative to plain, mono-color ceramic versions.
Evaluating & Preparing Floors
The most important step in the success of your tile flooring project is evaluating and preparing the area. A well-done tile installation can last a lifetime, whereas poor preparation can lead to a lifetime of cracked grout and broken tile headaches.
Because of the weight of most tile, it is important to assess the condition of the joists, subfloor, and underlayment. Most tile installation cannot be done over existing flooring without the addition of underlayment. Check with your tile dealer for the specific requirements of the tile you have chosen.
Though it may initially seem like more work, it is important to remove bathroom fixtures, vanities, and non-plumbed kitchen islands for your floor tile project. Not only will this eliminate a great deal of cutting and fitting, it will allow you more flexibility in future remodeling choices.
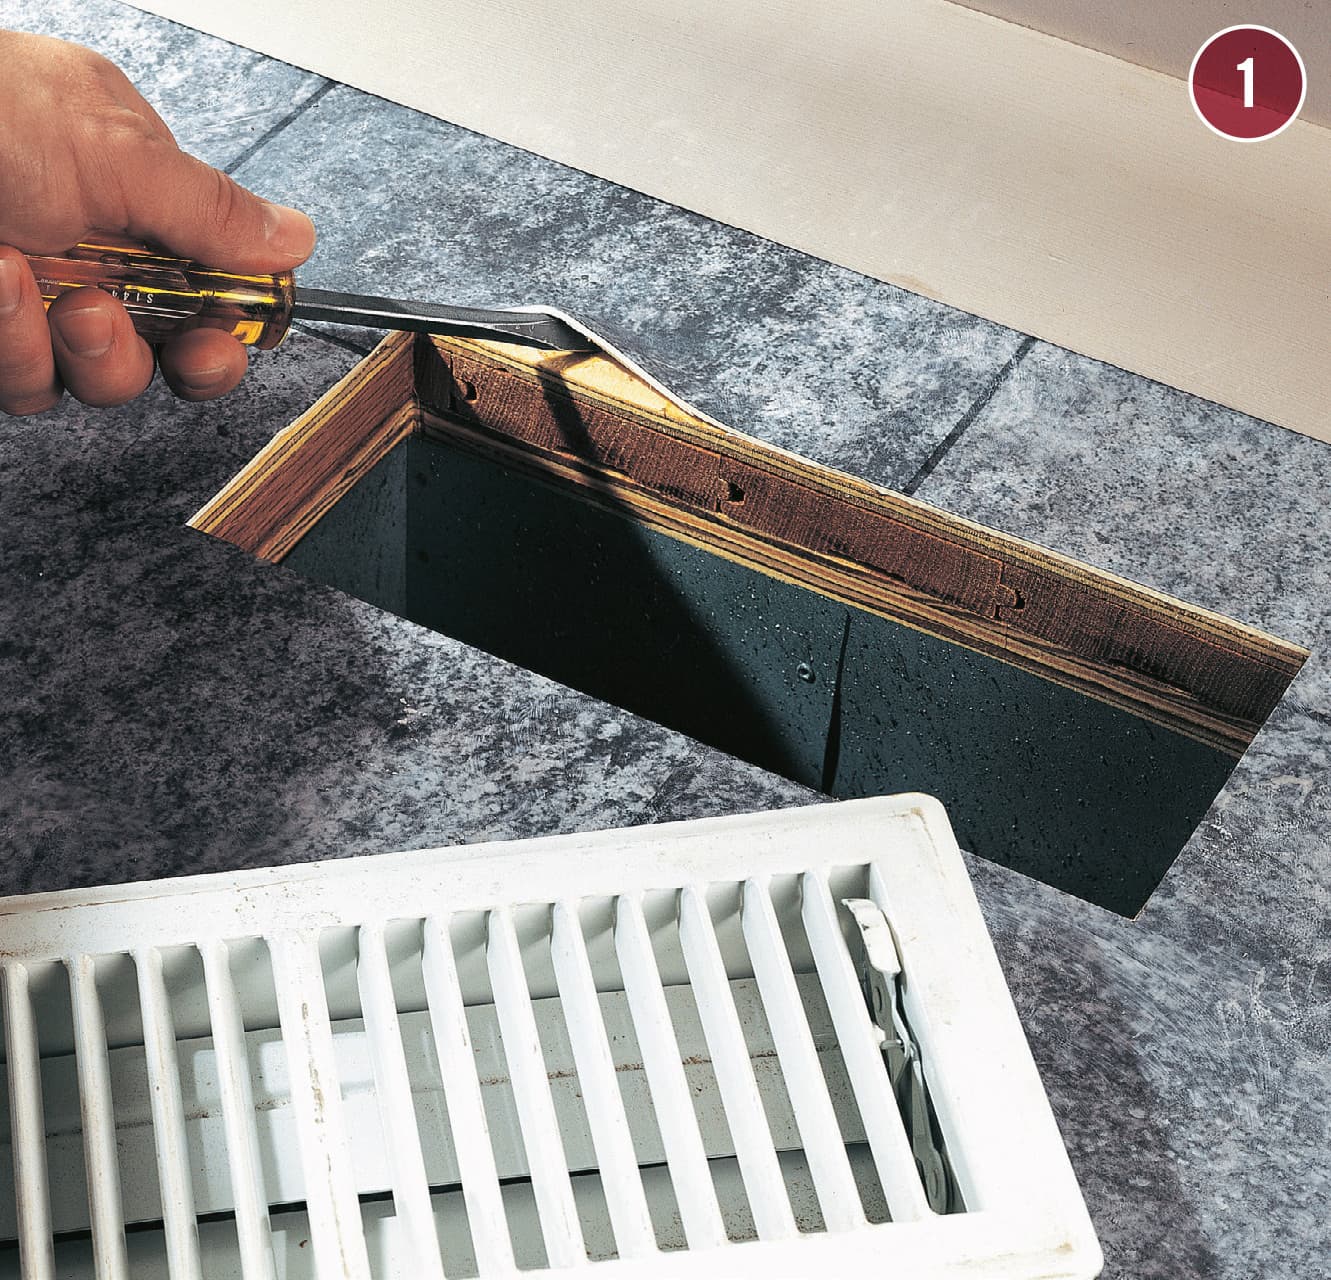
Start by removing any fixtures or appliances in the work area, then baseboards, then the old flooring. Shovel old flooring debris through a window and into a wheelbarrow to speed up removal work. Cover doorways with sheet plastic to contain debris and dust during the removal process. Keep the dust and dirt from blowing through your home’s ductwork by covering air and heat vents with sheet plastic and masking tape.
 ANATOMY OF AN OLD FLOOR
A typical wood-frame floor consists of several layers that work together to provide the required structural support and desired appearance. At the bottom of the floor are joists, the 2 × 10 or larger framing members that support the weight of the floor. Joists are typically spaced 16" apart on center. The subfloor is nailed to the joists. Most subfloors installed in the 1970s or later are made of 3/4" tongue-and-groove plywood, but in older homes, the subfloor often consists of 1"-thick wood planks nailed diagonally across the floor joists. On top of the subfloor, most builders place a 1/2" plywood underlayment. For many types of floor coverings, adhesive or mortar is spread on the underlayment prior to installing the floor cover.

 How to Evaluate & Prepare Floors
Determining the number and type of coverings already on your floor is an important first step in evaluating its condition. Ceramic and stone tile floors have specific requirements that must be met to prevent surface cracks. Check flooring layers at seams and exposed edges.

Measure vertical spaces in kitchens and bathrooms to ensure the proper fit of appliances and fixtures after the installation of tile. Use a sample of the tile and any additional underlayment as spacers while measuring.
To remove baseboards, place a scrap board against the wall to avoid damaging the drywall. Remove the baseboard using a pry bar placed against the scrap board. Pry the baseboard at all nail locations. Number the baseboards as they are removed.
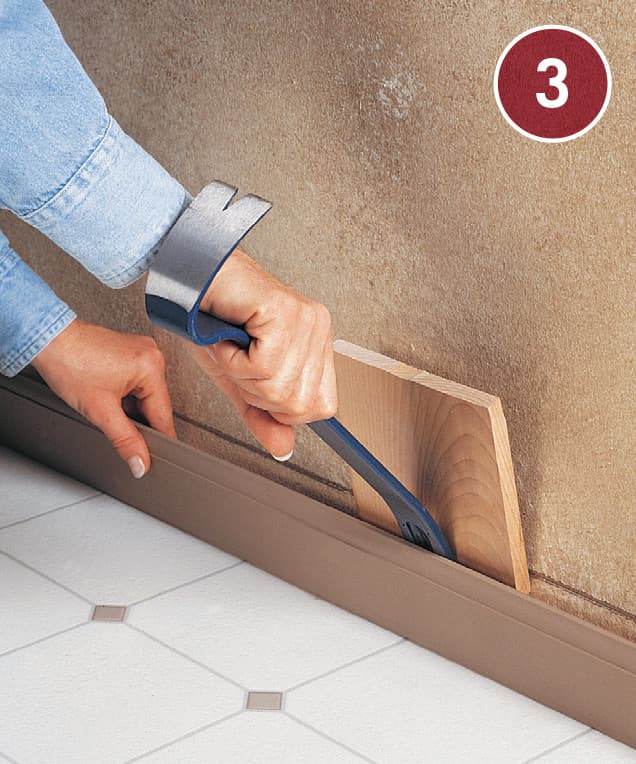
To prepare door jambs, measure the height of your underlayment and tile and mark the casing. Using a jamb saw, cut the casing at the mark.

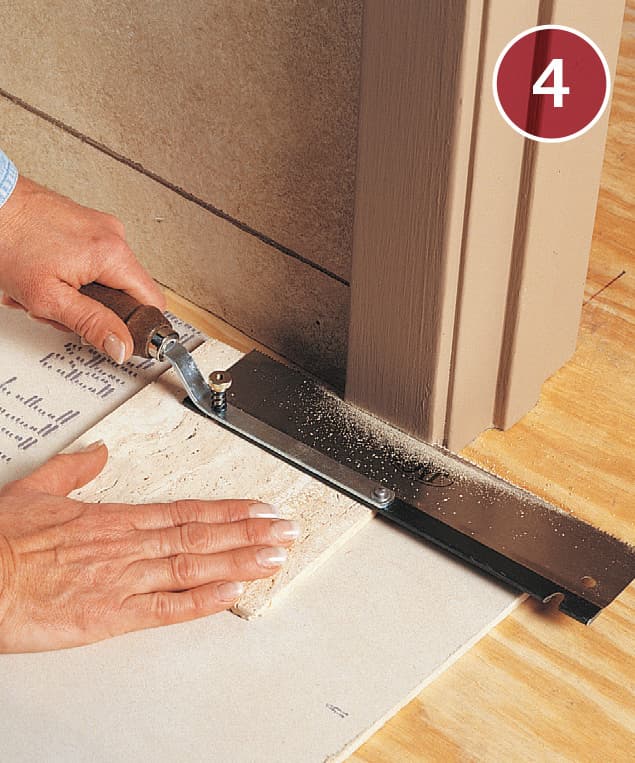
To test the height of the door jamb, slide a tile under the door jamb to make sure it fits easily.
How to Remove a Toilet
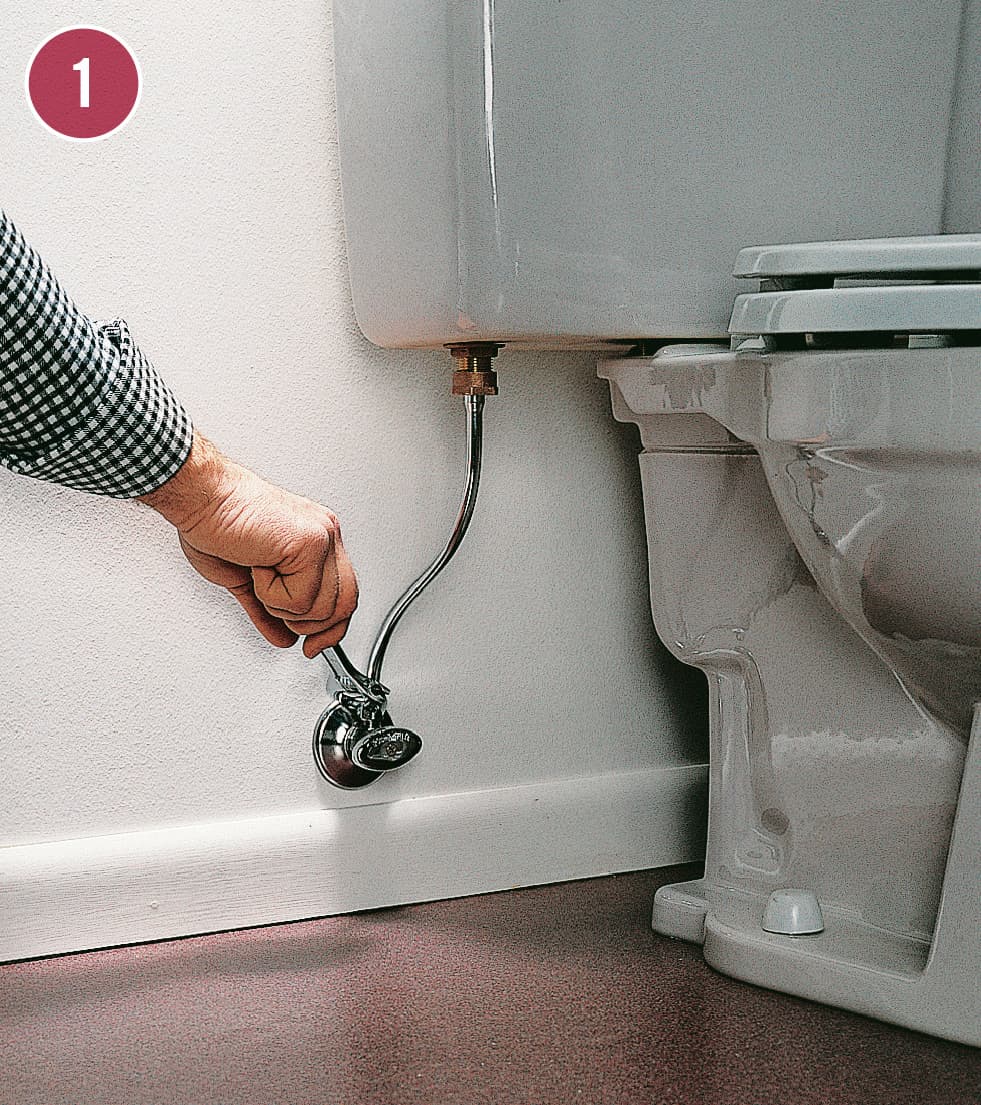
Empty the tank and disconnect. Turn off the water at the shutoff valve and flush the toilet to empty the tank. Use a sponge to soak up remaining water in the tank and bowl. Disconnect the supply tube using an adjustable wrench.

Remove the nuts from the tank bolts using a ratchet wrench. Carefully remove the tank and set it aside.
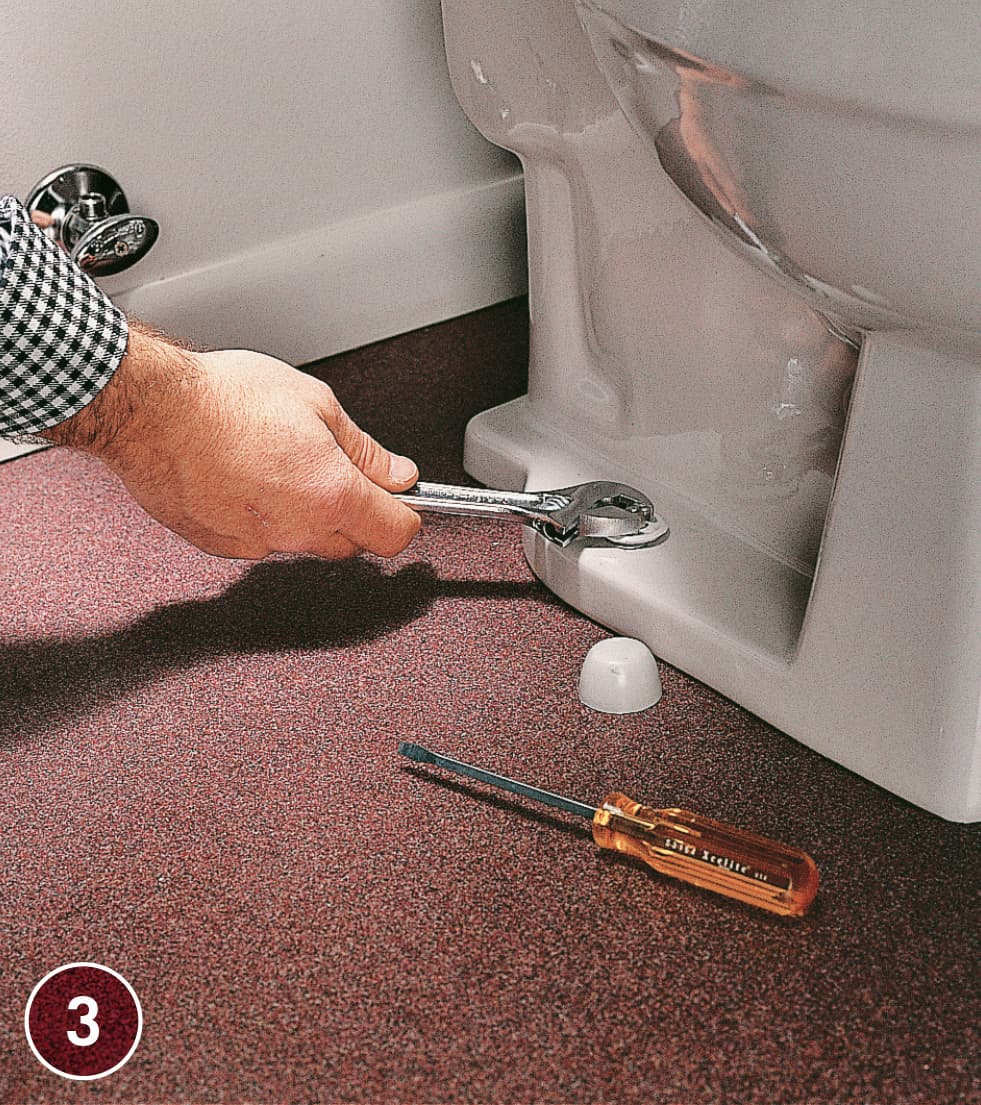
Pry off the floor bolt trim caps, then remove the nuts from the floor bolts. Rock the bowl from side to side to break the seal, then lift the toilet from the bolts and set it aside. Wear rubber gloves while cleaning up any water that spills from the toilet trap.
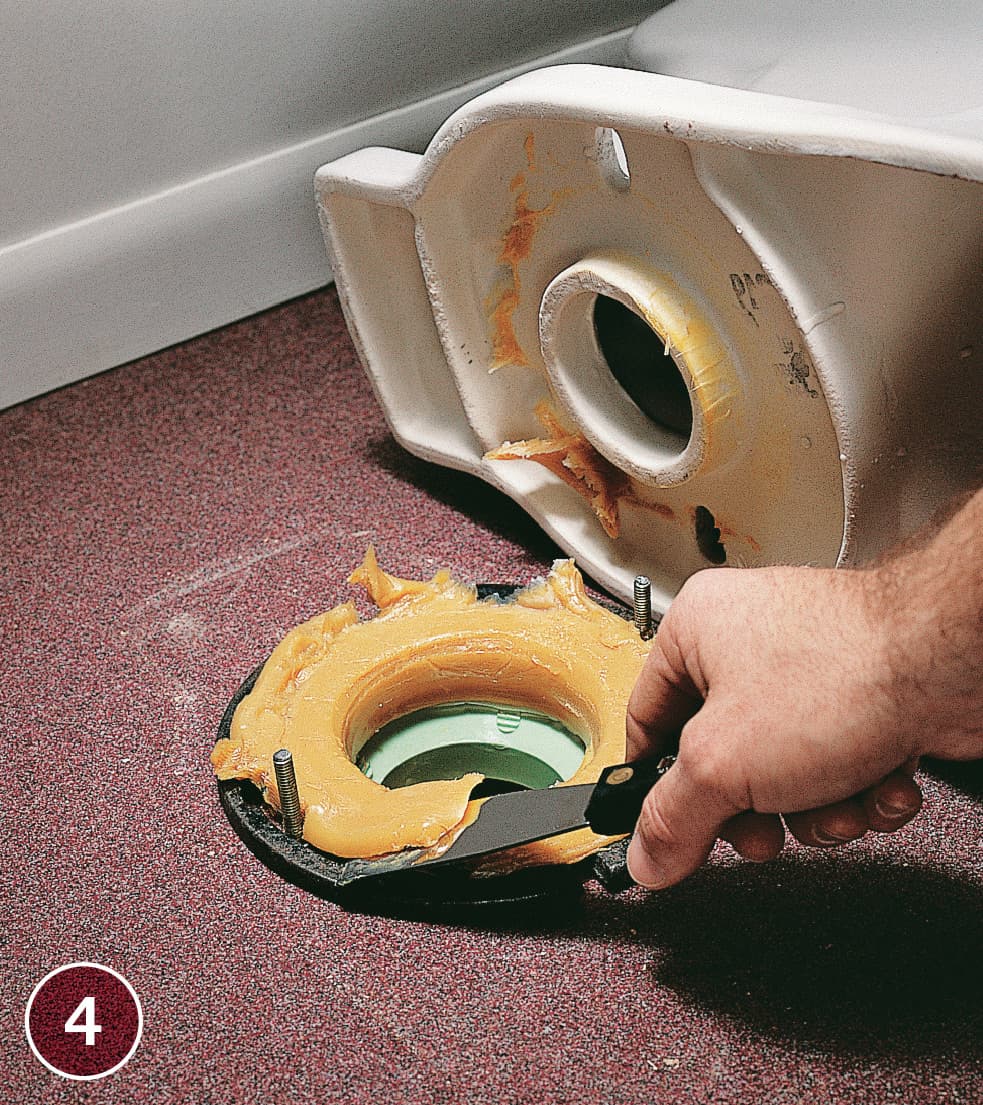
Scrape the old wax from the toilet flange, and plug the drain opening with a damp rag so sewer gas doesn’t escape into the house. If you’re going to reinstall the old toilet, clean the old wax and plumber’s putty from around the horn and base of the toilet.
How to Remove Sinks
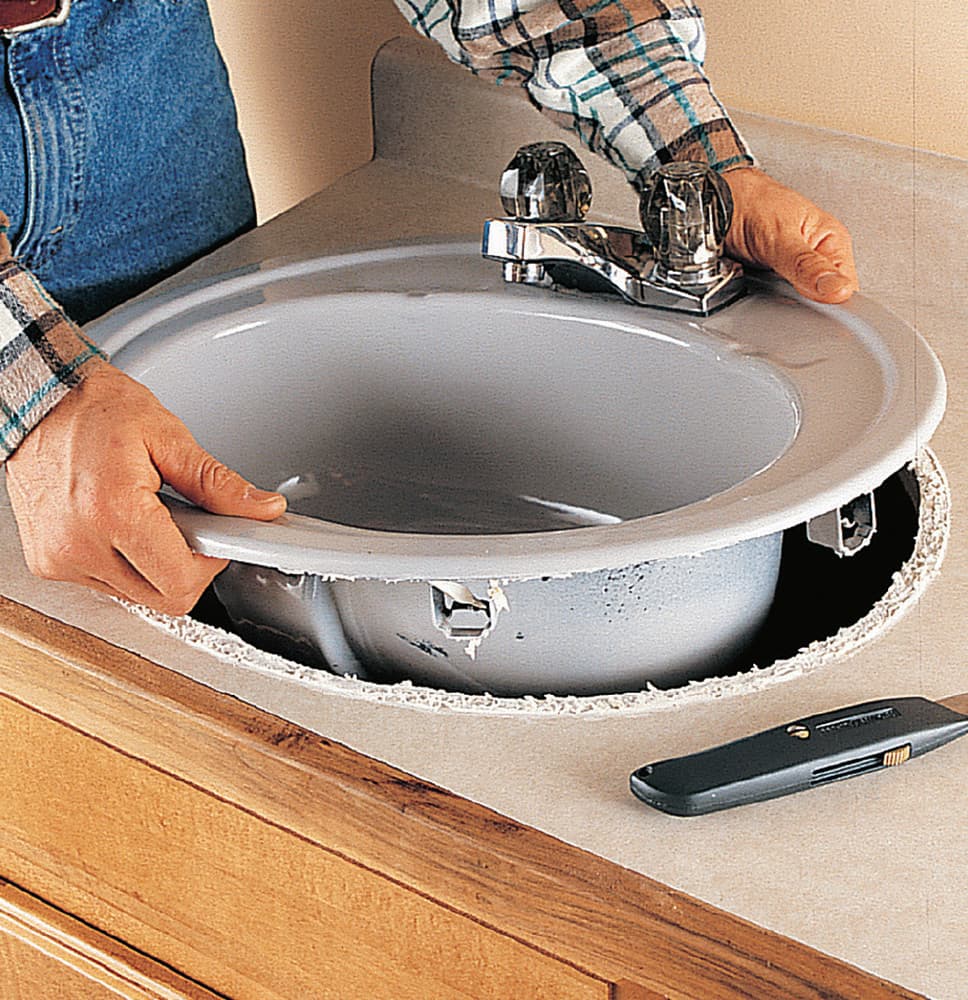
Self-rimming sink: Disconnect the plumbing, then slice through any caulk or sealant between the sink rim and the countertop using a utility knife. Lift the sink off the countertop.
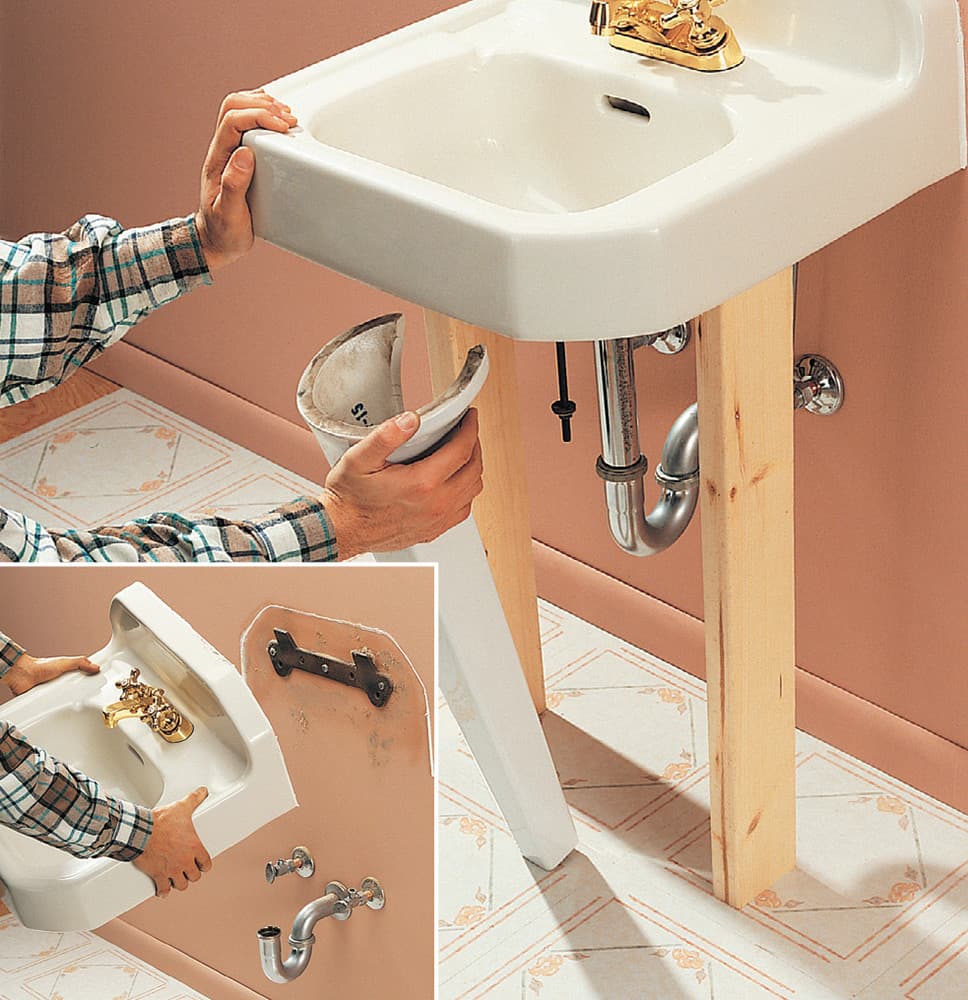
Pedestal sink: Disconnect the plumbing. If the sink and pedestal are bolted together, disconnect them. Remove the pedestal first, supporting the sink from below with 2 × 4s. Slice through any caulk or sealant. Lift the sink off the wall brackets (inset).
How to Remove Vanities

Detach any mounting hardware, located underneath the countertop inside the vanity.
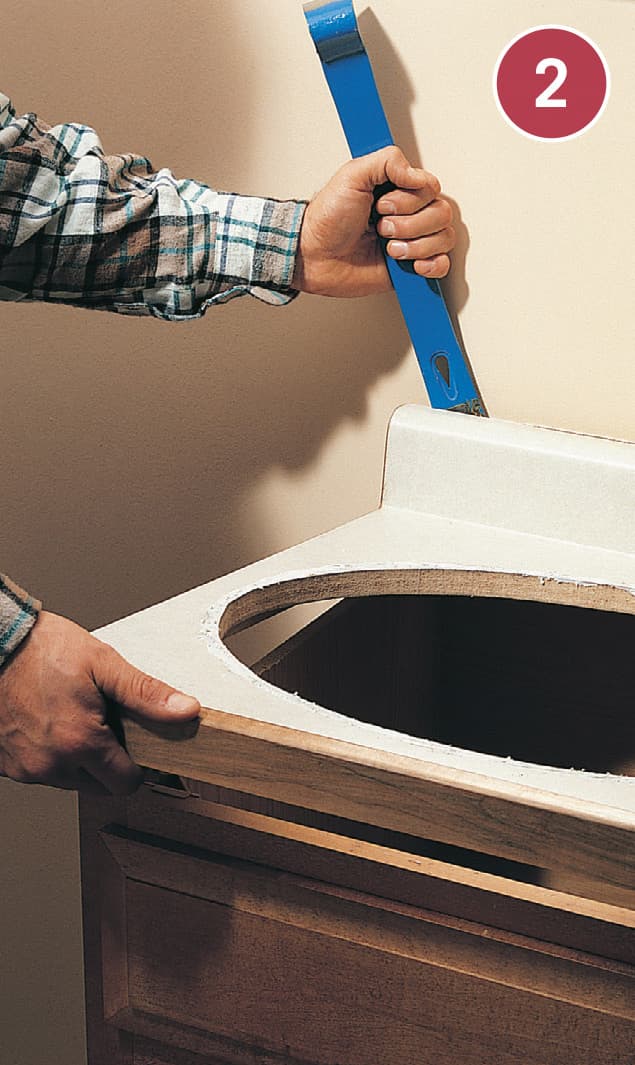
Slice through any caulk or sealant between the wall and the countertop. Remove the countertop from the vanity, using a pry bar if necessary.

Remove the screws or nails (usually driven through the back rail of the cabinet) that anchor the vanity to the wall and remove cabinet.
Removing Floor Coverings
Thorough and careful removal work is essential to the quality of a new floor tile or stone installation. The difficulty of flooring removal depends on the type of floor covering and the method that was used to install it. Carpet and perimeter-bond vinyl are generally quite easy to remove, and vinyl tiles are relatively simple. Full-spread sheet vinyl can be difficult to remove, however, and removing ceramic tile is a lot of work.
With any removal project, be sure to keep your tool blades sharp and avoid damaging the underlayment if you plan to reuse it. If you’ll be replacing the underlayment, it may be easier to remove the old underlayment along with the floor covering (see pages 68 to 69).
Resilient flooring installed before 1986 might contain asbestos, so consult an asbestos containment expert or have a sample tested before beginning removal. Even if asbestos is not present, wear a high-quality dust mask.
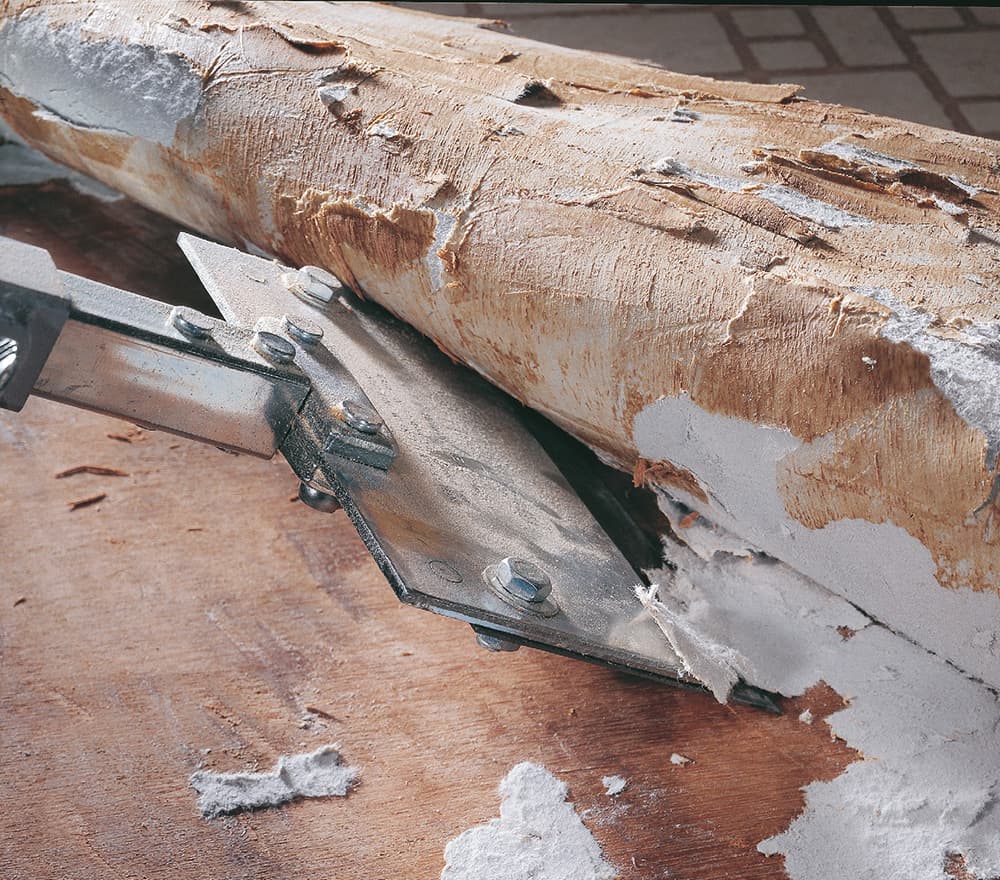
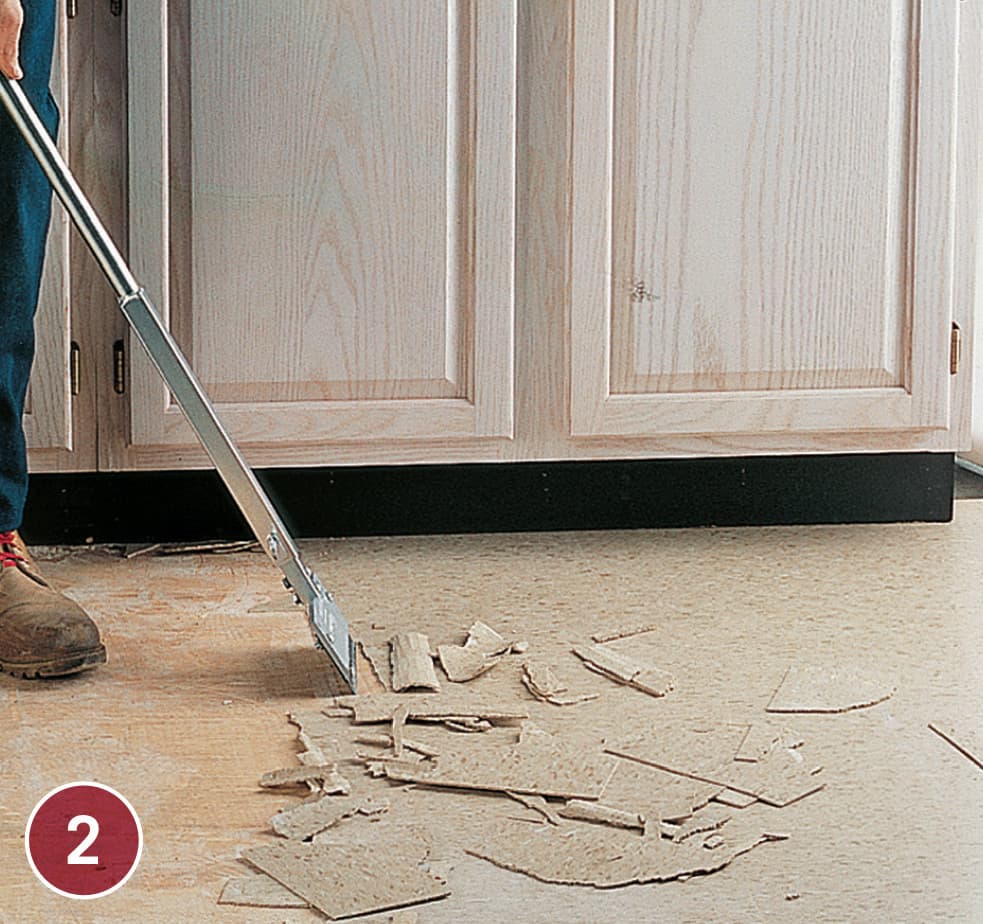
Use a floor scraper to remove resilient flooring products and to scrape off leftover adhesives or backings. The long handle provides leverage and force, and it allows you to work in a comfortable standing position. A scraper will remove most flooring, but you may need to use other tools to finish the job.
 TOOLS & MATERIALS
Gloves
Floor scraper
Utility knife
Spray bottle
Wallboard knife
Wet/dry vacuum
Heat gun
Dust mask
Hand maul
Masonry chisel
Flat pry bar
Broom
Tape measure
End-cutting nippers
Liquid dishwashing detergent
Belt sander with coarse sanding belt
Eye and ear protection
How to Remove Sheet Vinyl

Cut strips. Remove base moldings, if necessary. Use a utility knife to cut old flooring into strips about a foot wide.

Pull up as much flooring as possible by hand, gripping the strips close to the floor to minimize tearing.
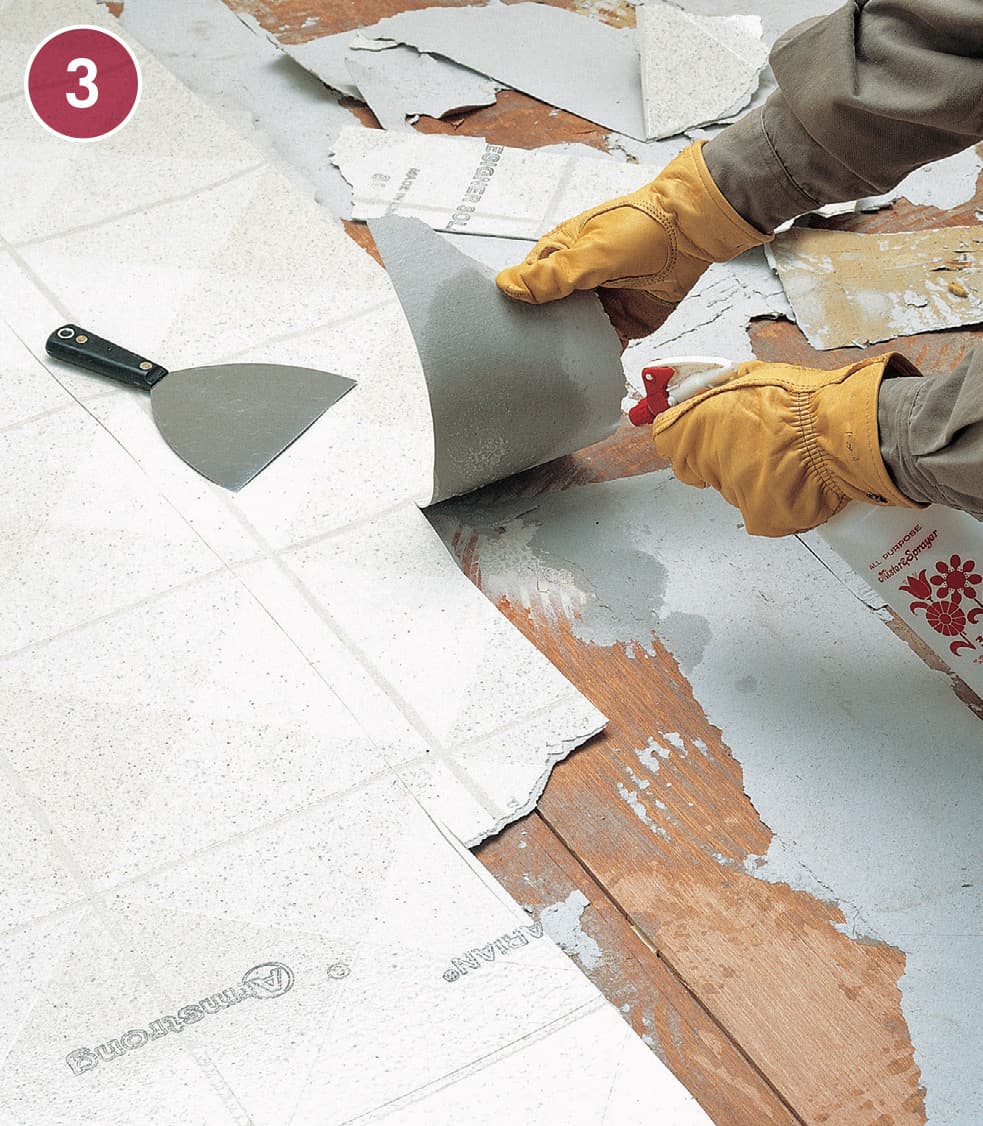
Cut stubborn sheet vinyl into strips about 5" wide. Starting at a wall, peel up as much of the floor covering as possible. If the felt backing remains, spray a solution of water and liquid dishwashing detergent under the surface layer to help separate the backing. Use a wallboard knife to scrape up particularly stubborn patches.
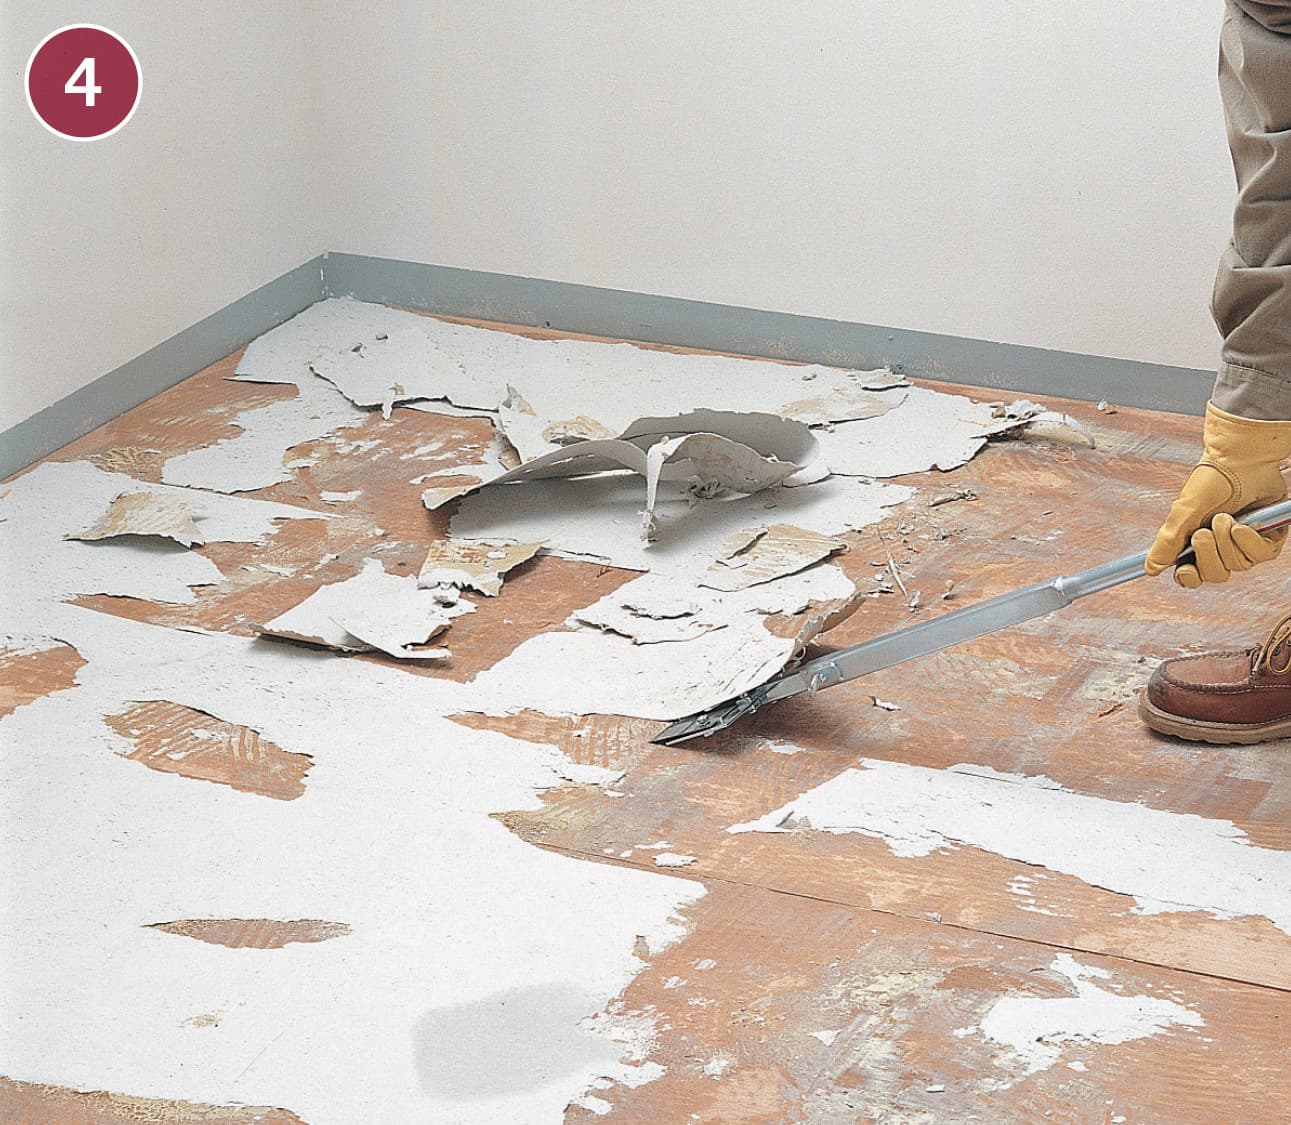
Scrape up the remaining sheet vinyl and backing using a floor scraper. If necessary, spray the backing again with the soap solution to loosen it. Sweep up the debris, then finish the cleanup with a wet/dry vacuum. Fill the vacuum with about an inch of water to help contain dust.
How to Remove Vinyl Tile
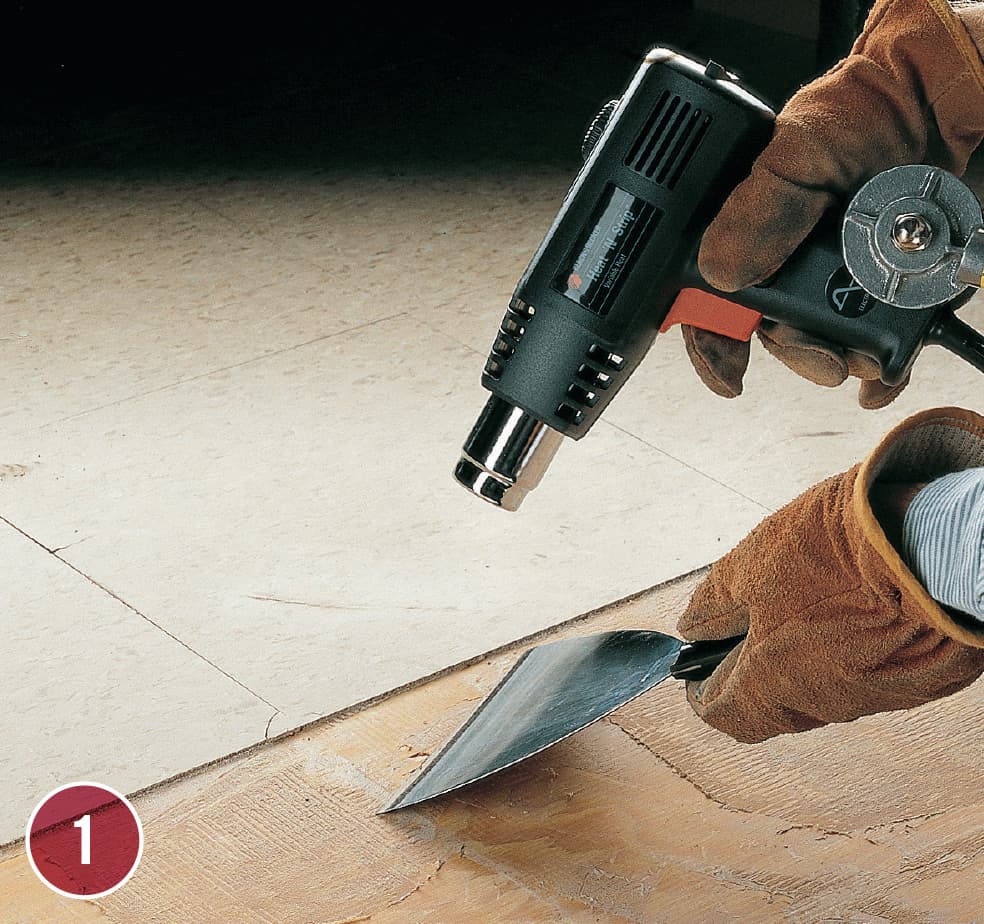
Carefully pry tiles loose. Remove base moldings, if necessary. Starting at a loose seam, use a long-handled floor scraper to remove tiles. To remove stubborn tiles, soften the adhesive with a heat gun, then use a wallboard knife to pry up the tile and scrape off the underlying adhesive.
Remove stubborn adhesive or backing by wetting the floor with a water/detergent mixture, then scraping with a floor scraper.
How to Remove Ceramic Tile
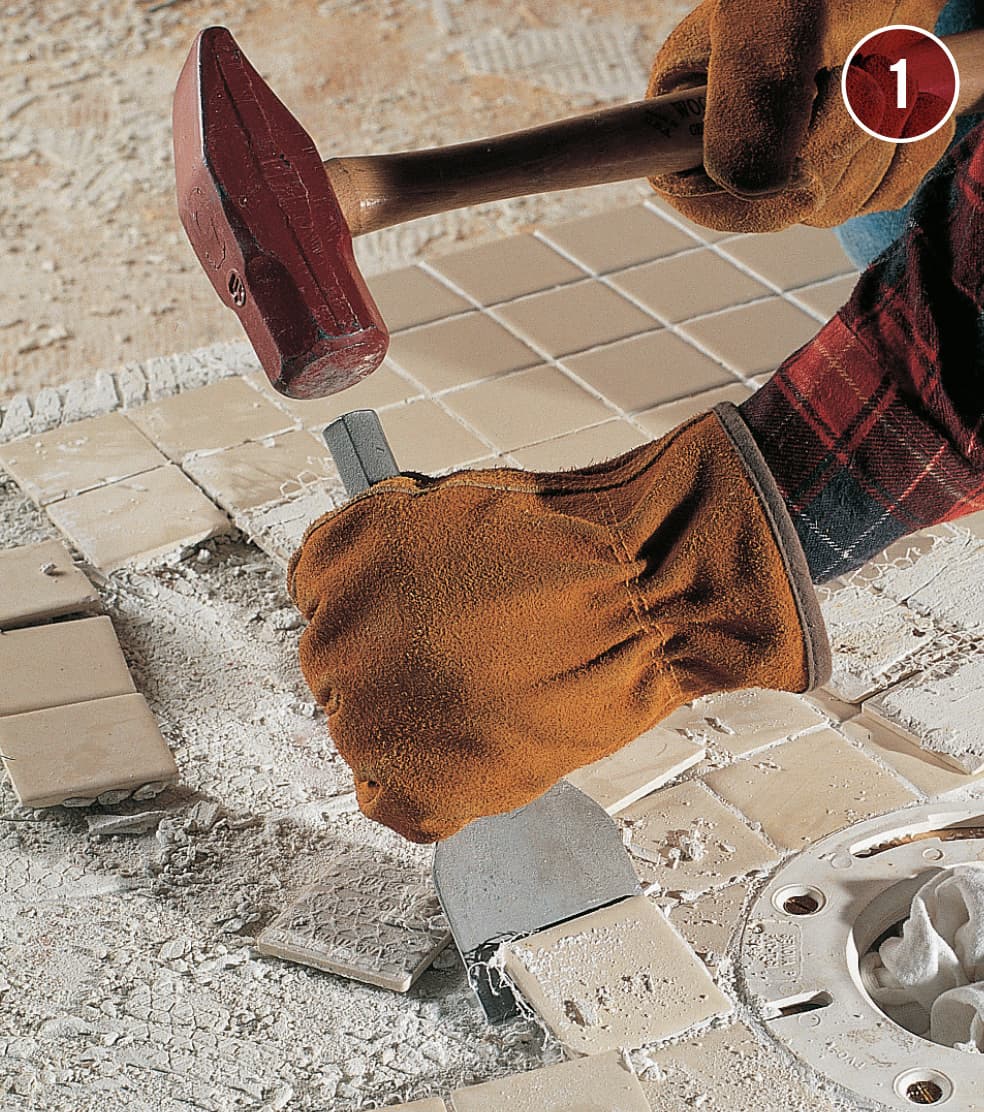
Knock tiles loose. Remove base moldings, if necessary. Knock out tile using a hand maul and masonry chisel. If possible, start in a space between tiles where the grout has loosened. Be careful when working around fragile fixtures, such as drain flanges.
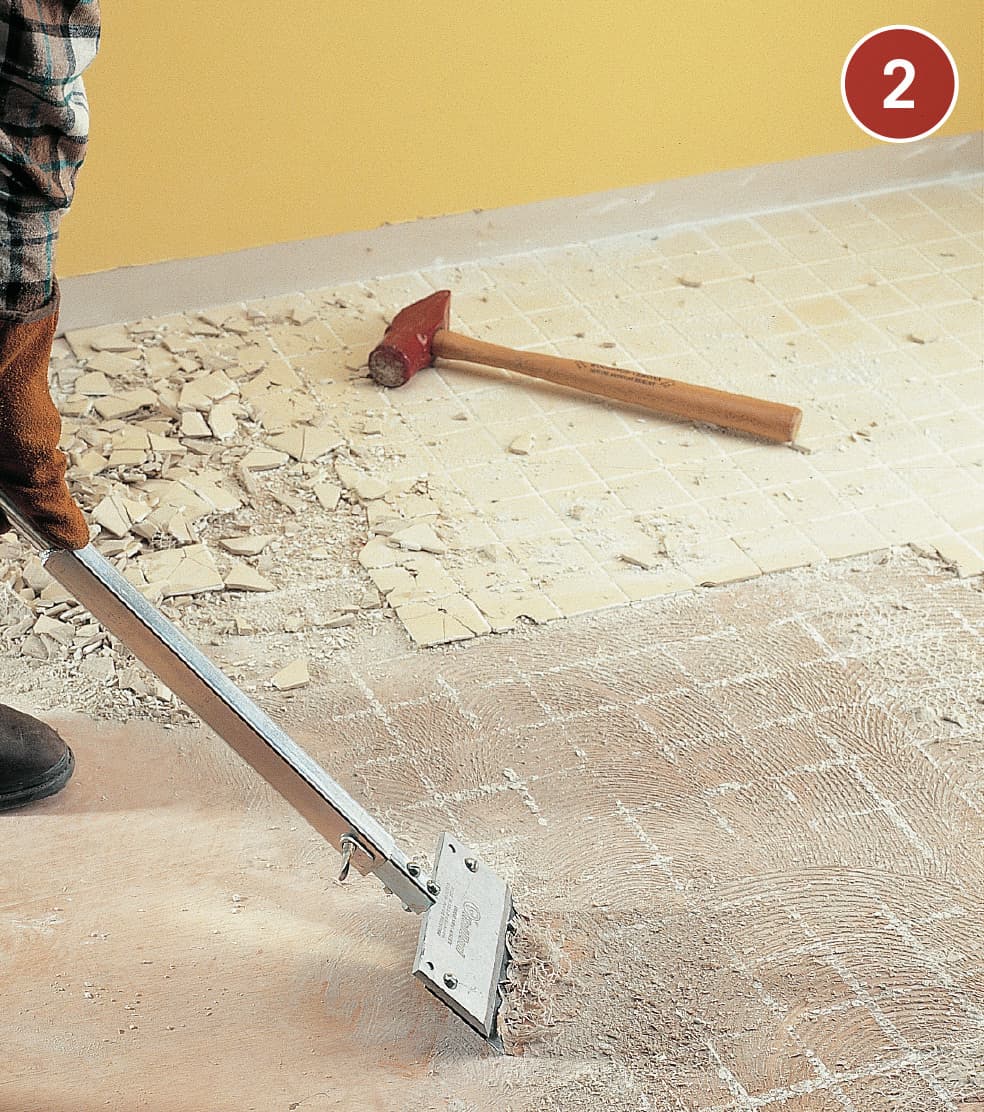
If you plan to reuse the underlayment, use a floor scraper to remove any remaining adhesive. You may have to use a belt sander with a coarse sanding belt to grind off stubborn adhesive.
How to Remove Carpet
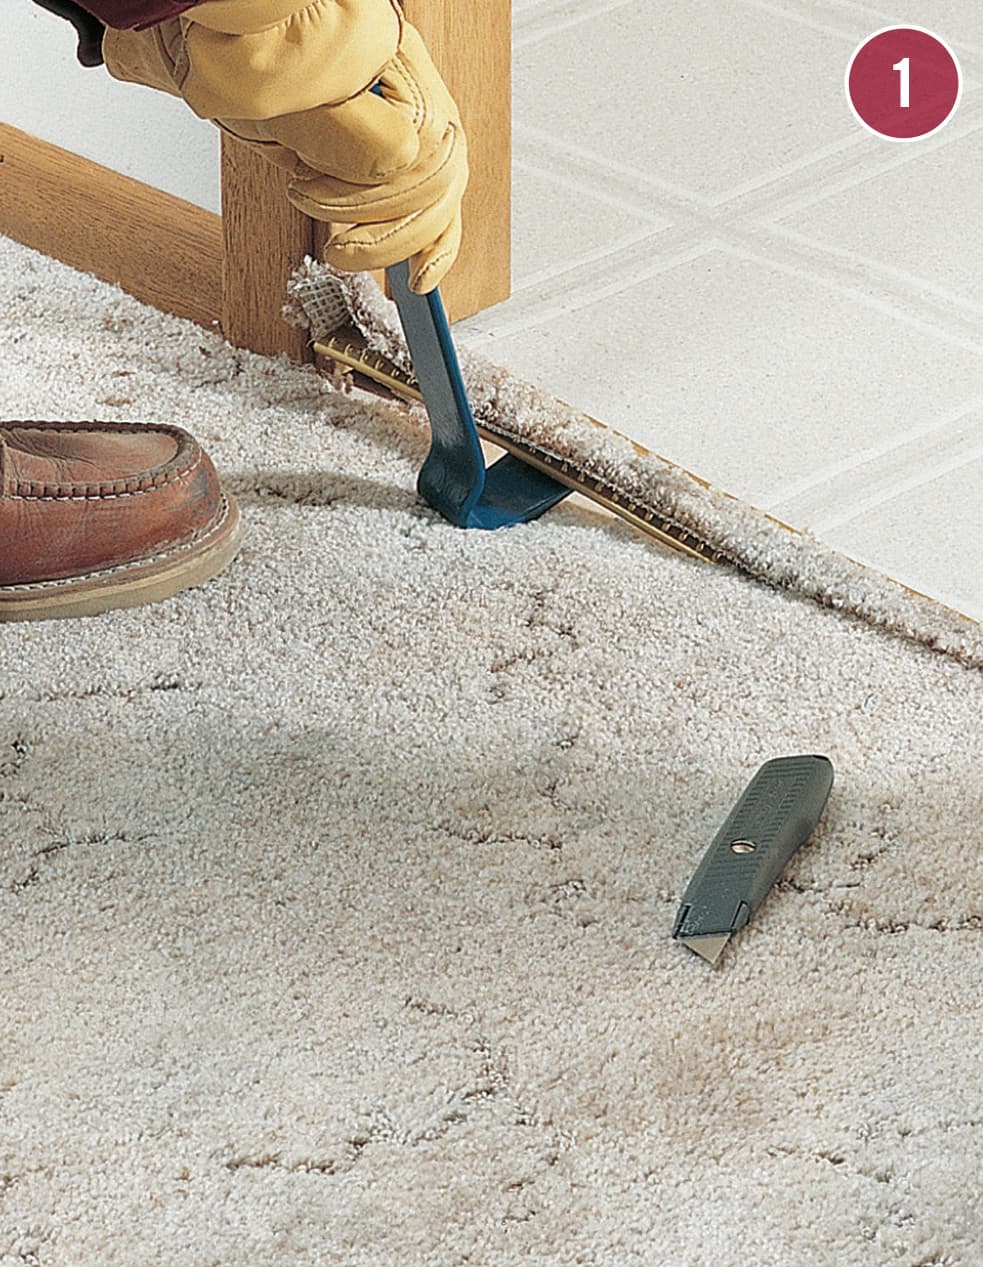
Using a utility knife, cut around metal threshold strips to free the carpet. Remove the threshold strips with a flat pry bar.
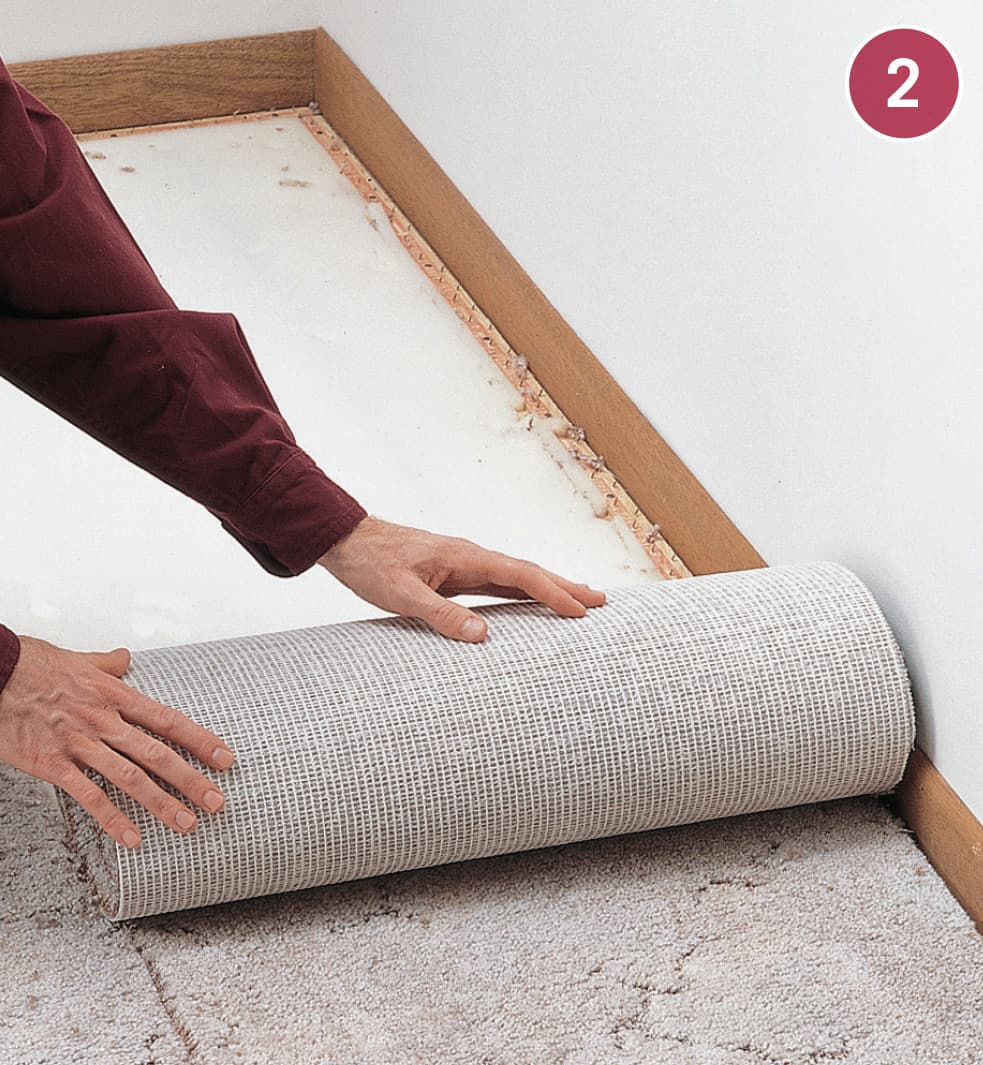
Cut the carpet into pieces small enough to be easily removed. Roll up the carpet and remove it from the room, then remove the padding. Padding is often stapled to the floor, and usually will come up in pieces as you roll it up.

Using end-cutting nippers or pliers, remove all staples from the floor. Pry tackless strips loose with a pry bar and remove them.

VARIATION: To remove glued-down carpet, first cut it into strips with a utility knife, then pull up as much material as you can. Scrape up the remaining cushion material and adhesive with a floor scraper.
Removing Underlayment
Flooring contractors routinely remove the underlayment along with the floor covering before installing new flooring. This saves time and makes it possible to install new underlayment that is ideally suited to ceramic and stone tile. Do-it-yourselfers using this technique should make sure they cut flooring into pieces that can be easily handled.
Remove underlayment and floor covering as though they were a single layer. This is an effective removal strategy with any floor covering that is bonded to the underlayment.
TOOLS & MATERIALS
Eye and ear protection
Gloves
Circular saw with carbide-tipped blade
Flat pry bar
Reciprocating saw
Wood chisel
Screwdriver
Hammer
Hand maul
Masonry chisel
BEWARE OF SCREWHEADS
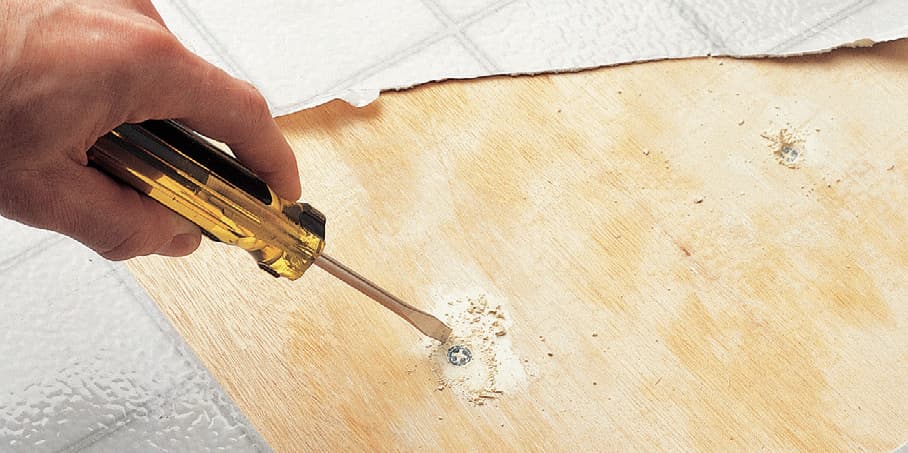
Examine fasteners to see how the underlayment is attached. Use a screwdriver to expose the heads of the fasteners. If the underlayment has been screwed down, you will need to remove the floor covering and then unscrew the underlayment.
WARNING
This floor removal method releases flooring particles into the air. Be sure the flooring you are removing does not contain asbestos.
How to Remove Underlayment
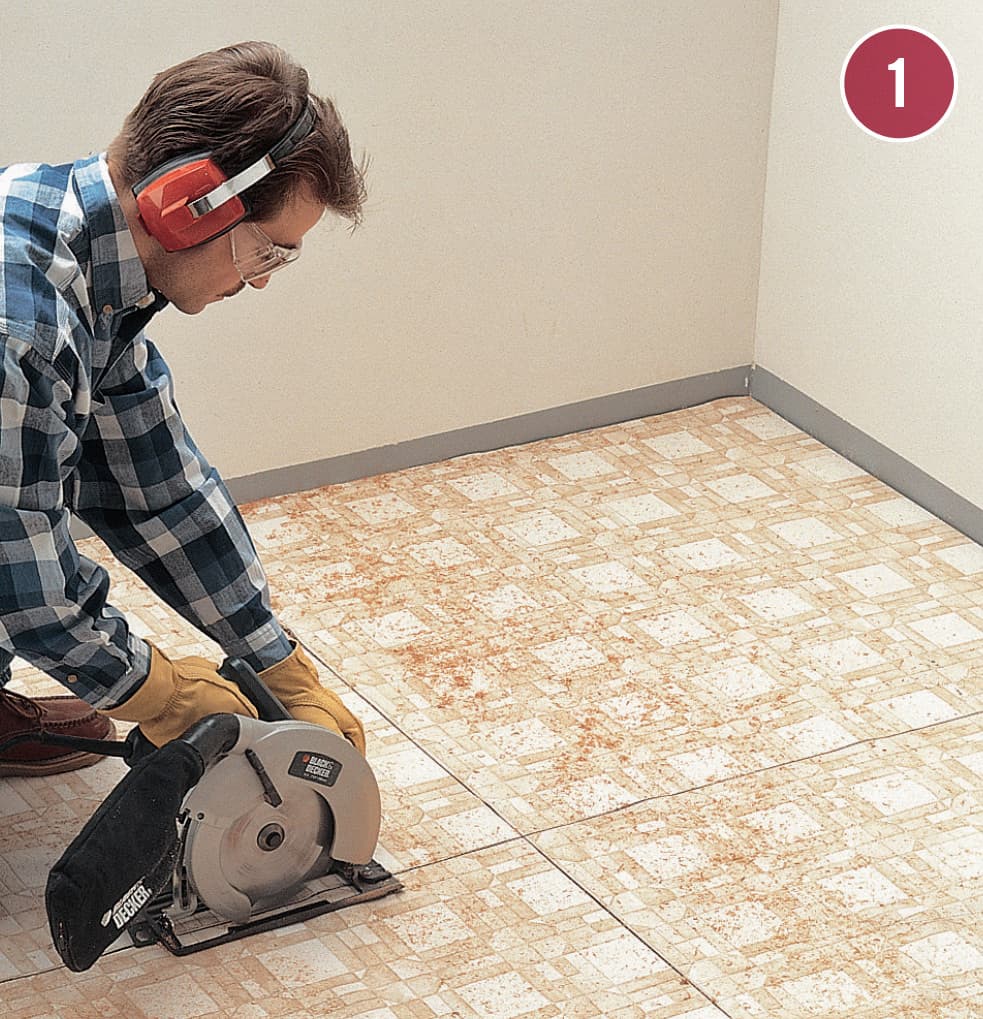
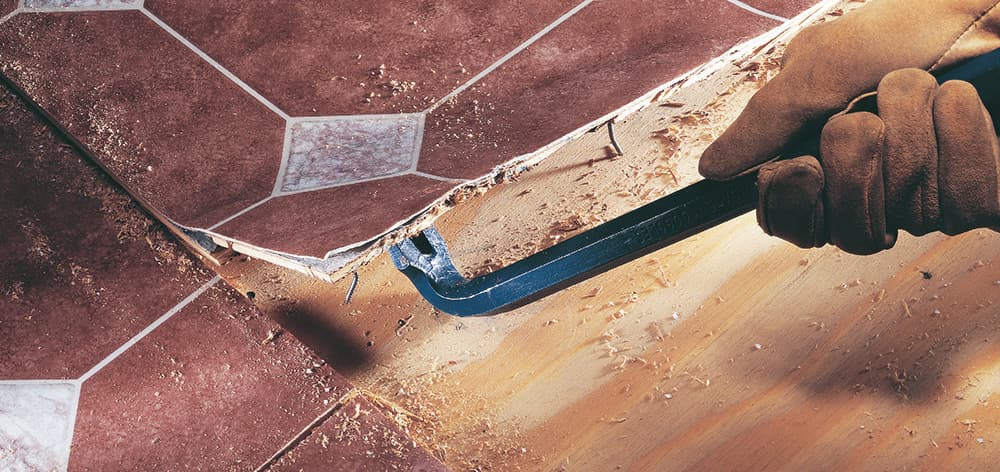
Cut the flooring and underlayment. Remove base moldings, if necessary. Adjust the cutting depth of a circular saw to equal the combined thickness of your floor covering and underlayment. Using a carbide-tipped blade, cut the floor covering and underlayment into squares measuring about 3 ft. square. Be sure to wear eye protection and gloves.
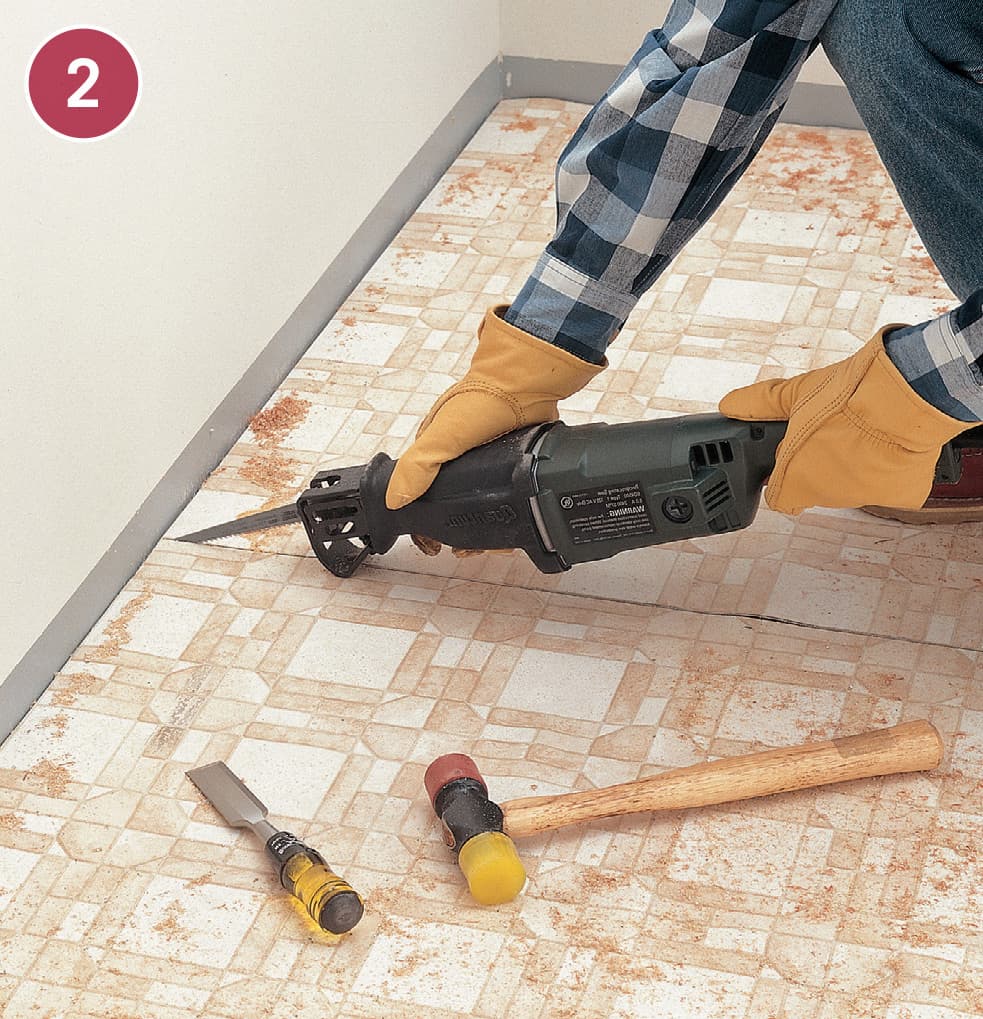
Use a reciprocating saw to extend cuts close to the edges of walls. Hold the blade at a slight angle to the floor, and try not to damage walls or cabinets. Do not cut deeper than the underlayment. Use a wood chisel to complete cuts near cabinets.
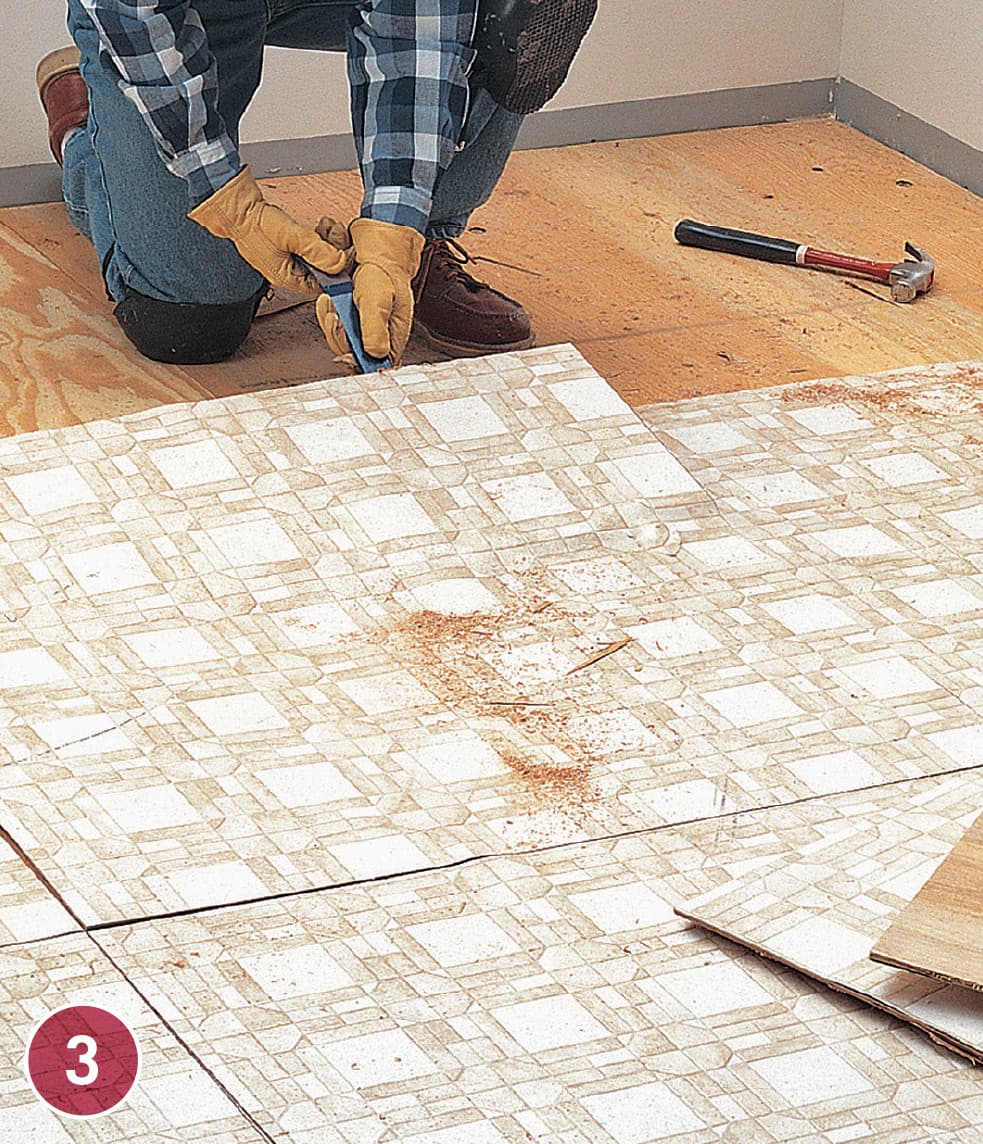
Separate the underlayment from the subfloor using a flat pry bar and hammer. Remove and discard the sections of underlayment and floor covering immediately, watching for exposed nails.
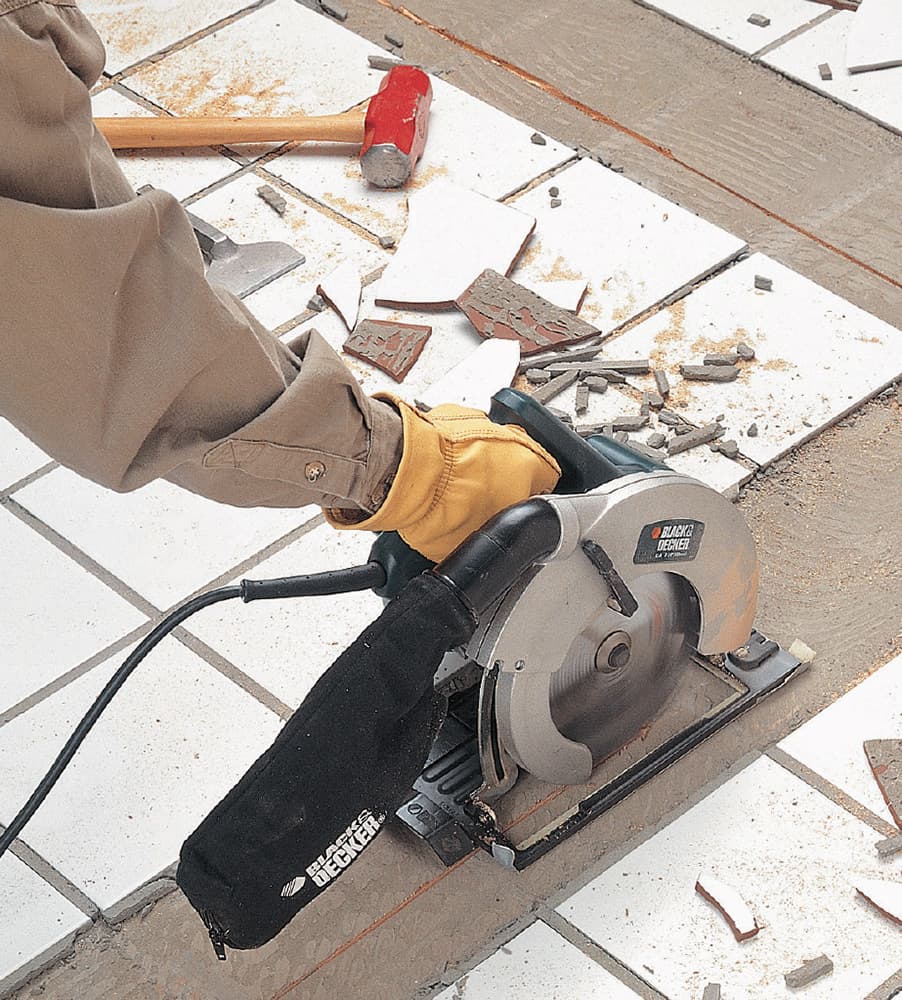
VARIATION: If your existing floor is ceramic tile over plywood underlayment, use a hand maul and masonry chisel to chip away the tile along the cutting lines before making the cuts.
Underlayment
Before you begin installing cementboard on a horizontal surface, the substructure will need to be examined to make sure it meets the requirements for a tile backer board installation. Wood subfloors installed over 16-inch on-center floor joists must be made of wood stock that is at least 5/8-inch thick and rated for floor sheathing. Acceptable sheathing includes exterior grade, tongue and groove, C-C plugged or better plywood, or oriented strand board (OSB) made with exterior glues. Floors that have large dips or bulges, or any areas with deflection problems, will require structural repairs or reinforcement. It is always recommended that you contact a structural engineer if you are unsure about the condition of your floor and support system.
Cabinet countertops require a minimum overlay of 3/4-inch-thick sheathing. The application of 1/4-inch-thick cementboard is optional for installation over countertops, as well as for floor joists spaced 16 inches on center (if the substructure is overlaid with 3/4-inch-thick sheathing). Unless otherwise allowed by the manufacturer, use 1/2-inch-thick cementboard for all other applications.
Cementboard is the preferred underlayment material for a ceramic tile floor. When installed correctly it forms a highly stable subbase that resists cracking of the tiles or grout lines.
TOOLS & MATERIALS
6" joint knife
Eye and ear protection
2" fiberglass mesh tape
1 1/4" cementboard screws
1/4" square notched trowel
Floor-patching compound
Latex or acrylic additive
Work gloves
Drill
Straightedge
Tape measure
Utility knife
Thinset mortar
Cementboard
1" deck screws
Circular saw
Power sander
Dust mask
How to Install Cementboard Underlayment
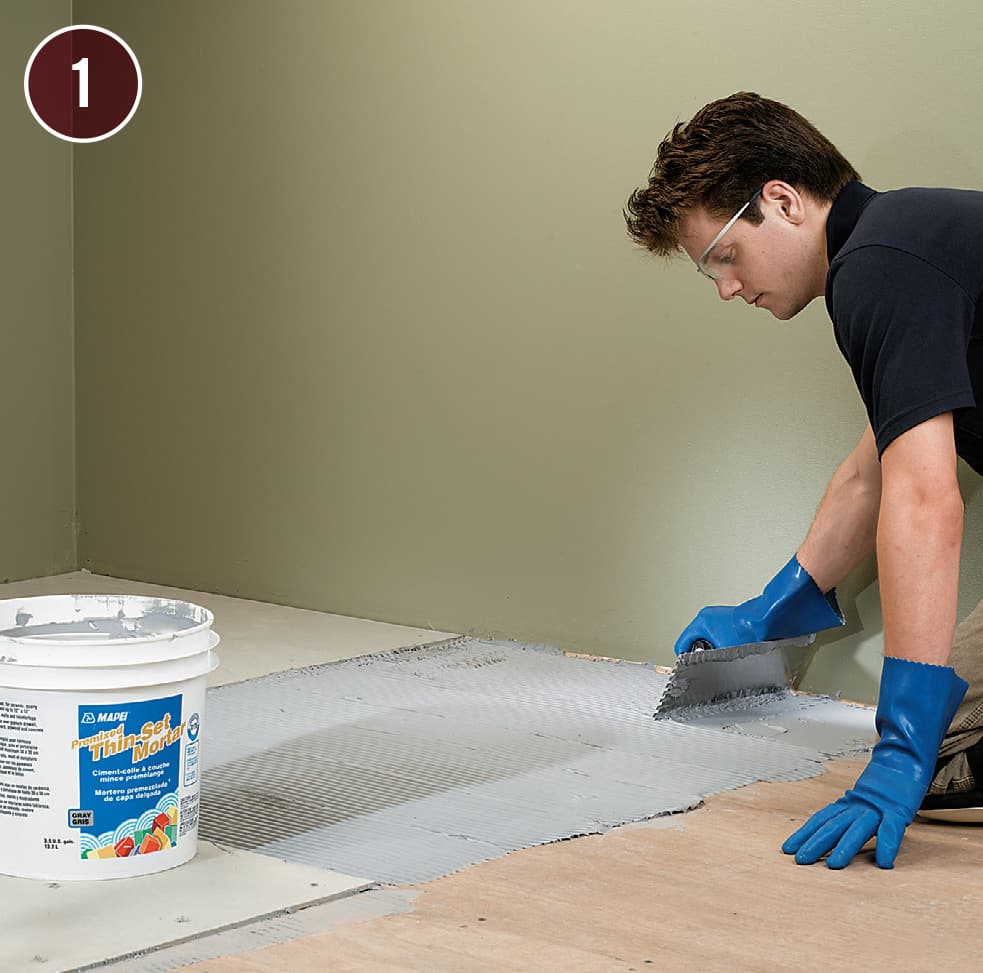
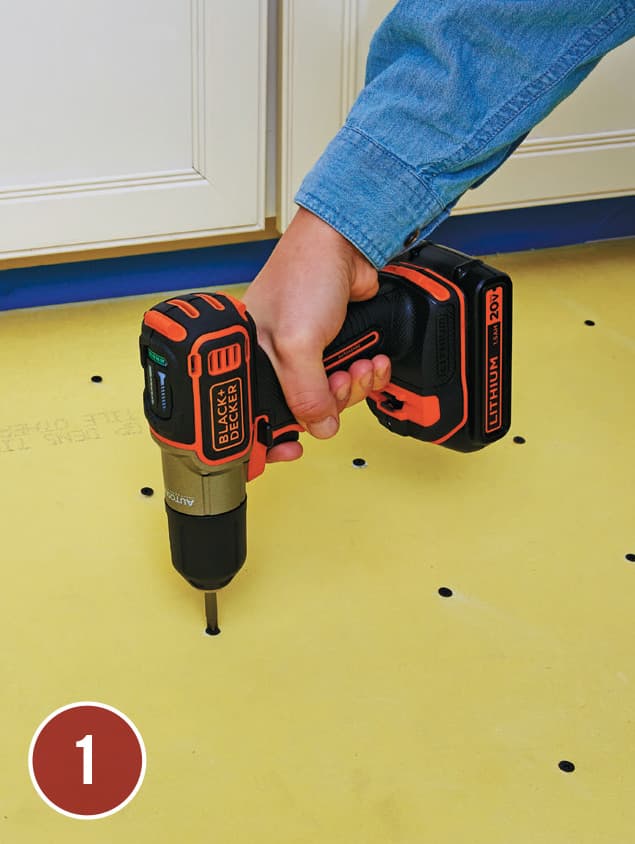
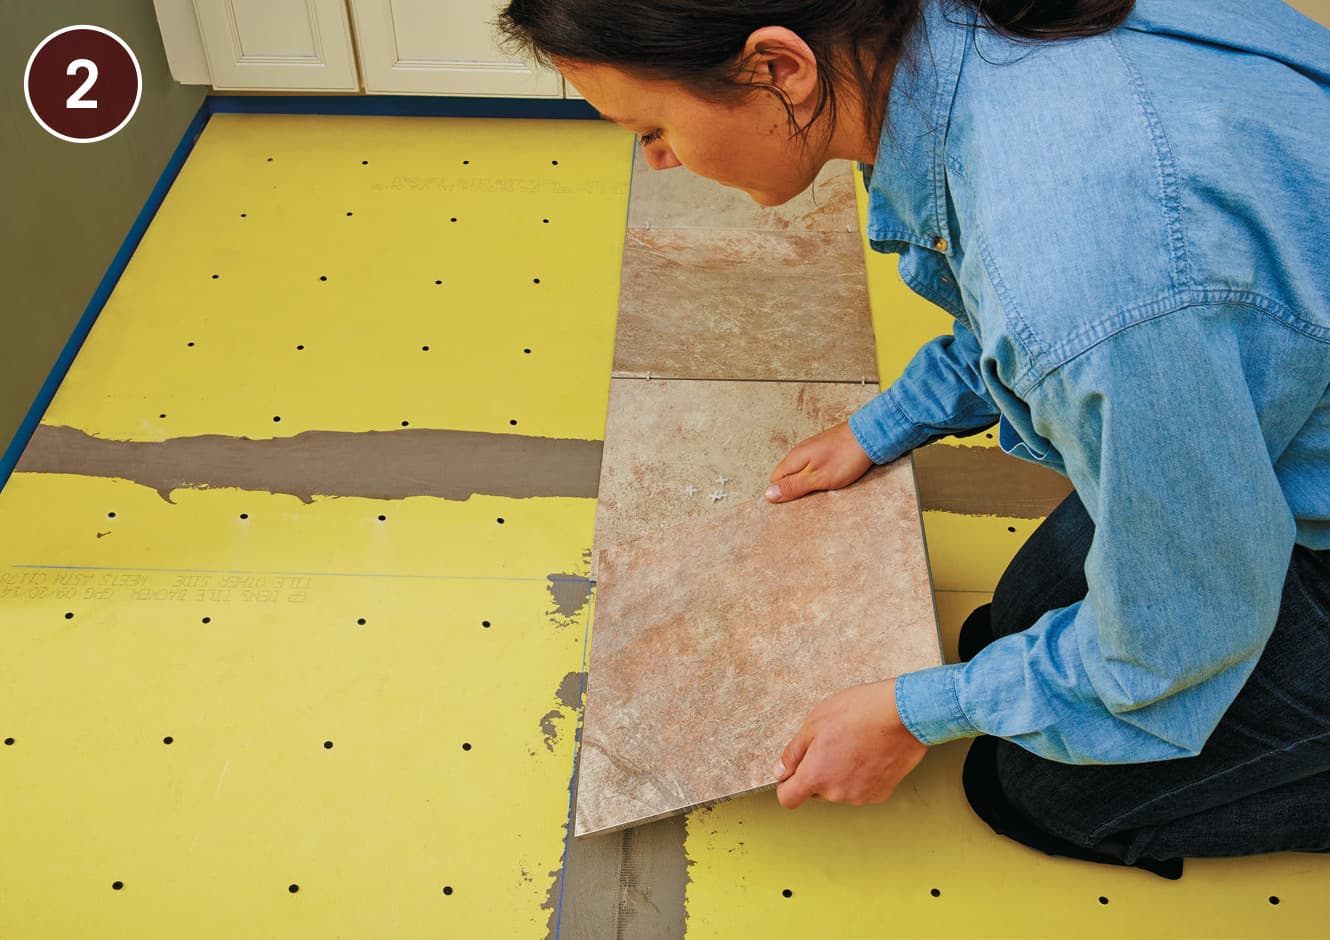
In most cases, cementboard should be set into a bed or layer of thinset mortar. Use a 1/4"-square-notched trowel to spread the setting bed of dry-set or modified thinset mortar. Apply only enough thinset for each panel and then set the panel into position according to your layout lines. Set the panels with the rougher-textured side facing up.
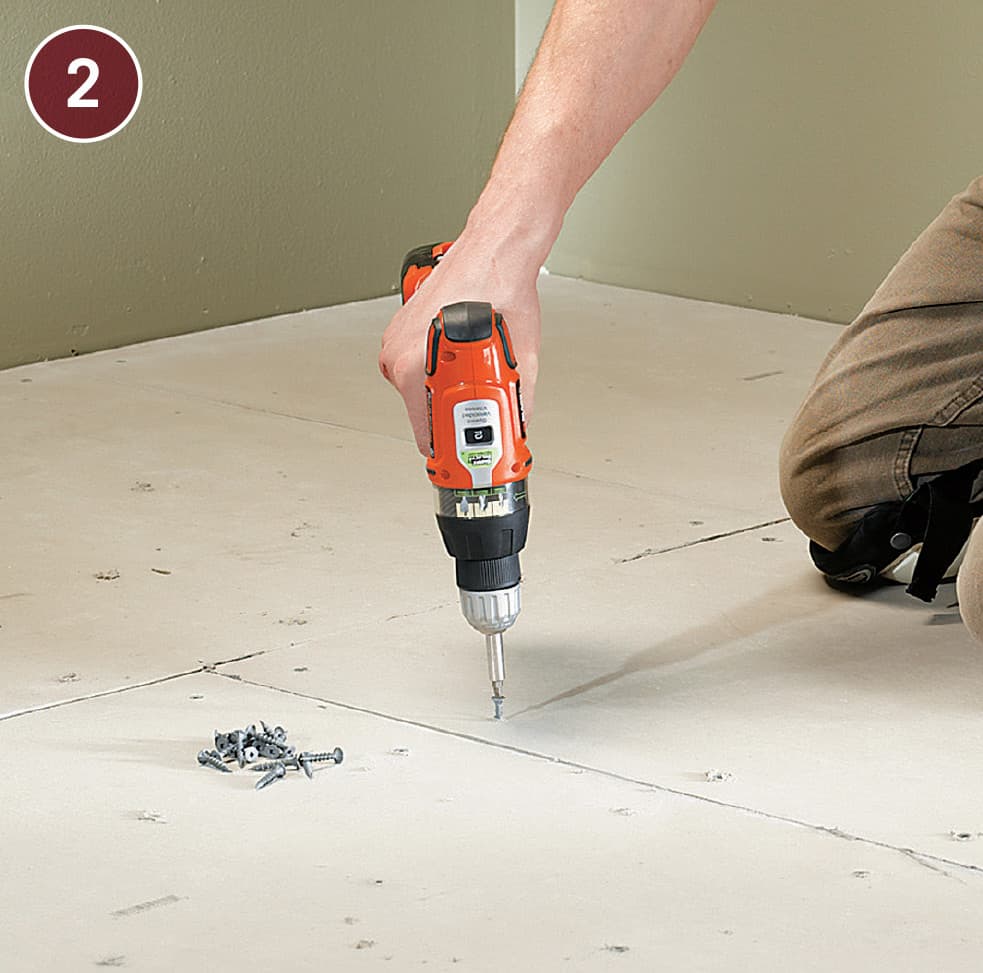
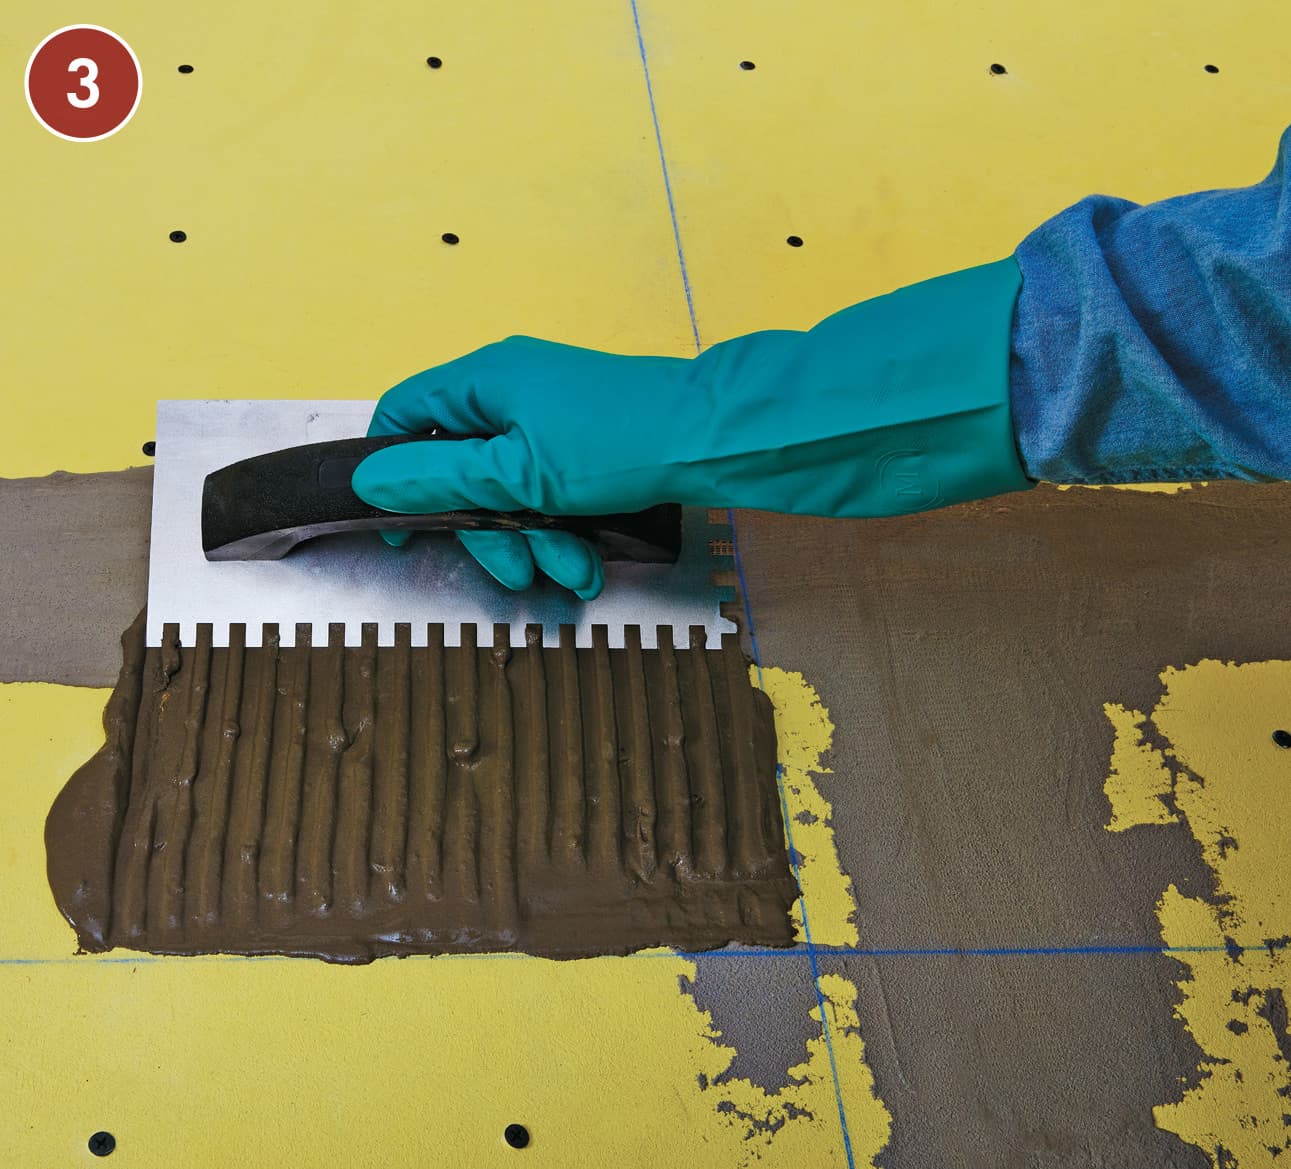
Fasten panels to the subfloor with 1 1/4" self-piloting cementboard screws. Fasten screws every 6 to 8" in the field, keeping fasteners 2" away from each corner but no less than 3/8" from the panel edges. Properly fastened, the head of each screw will sit flush with or just slightly below the surface of the panel.
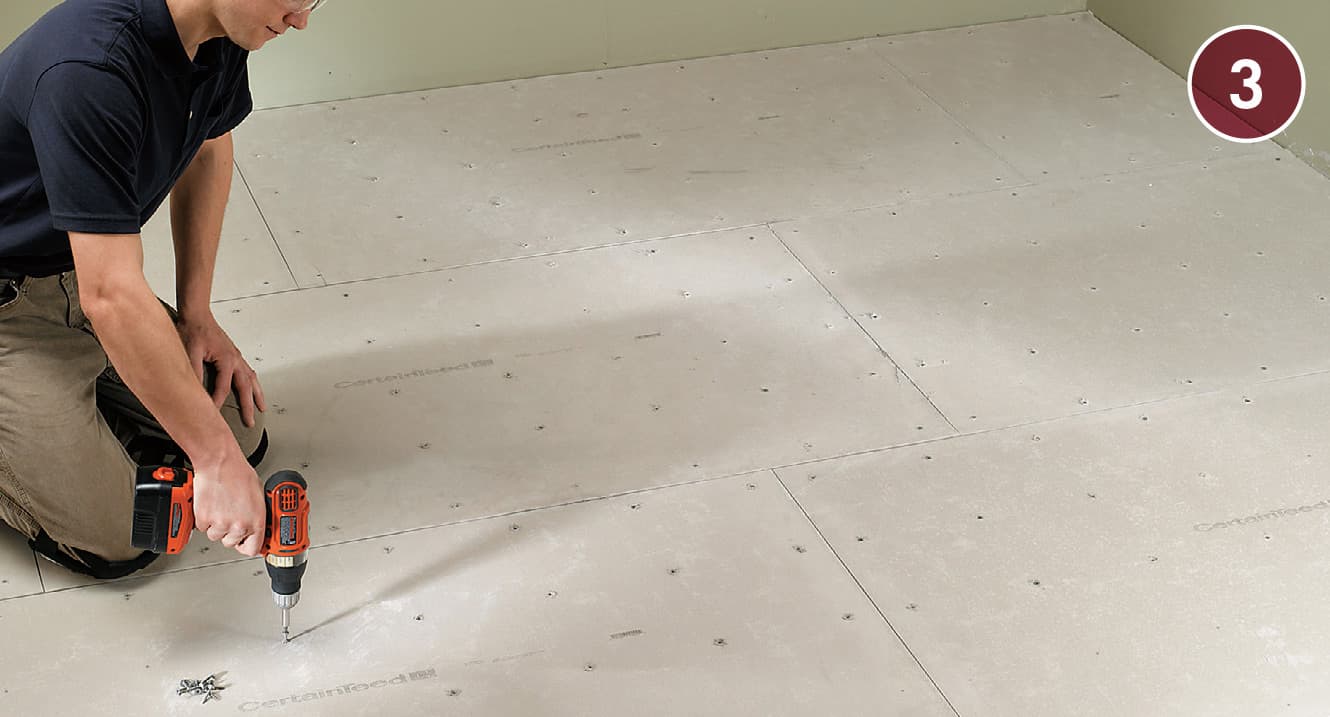
Add new panels, staggering the seams at adjoining panels to prevent any four corners from converging at one point. Install the cementboard perpendicular to floor joists, but avoid aligning them with existing plywood joints on the sub-floor.
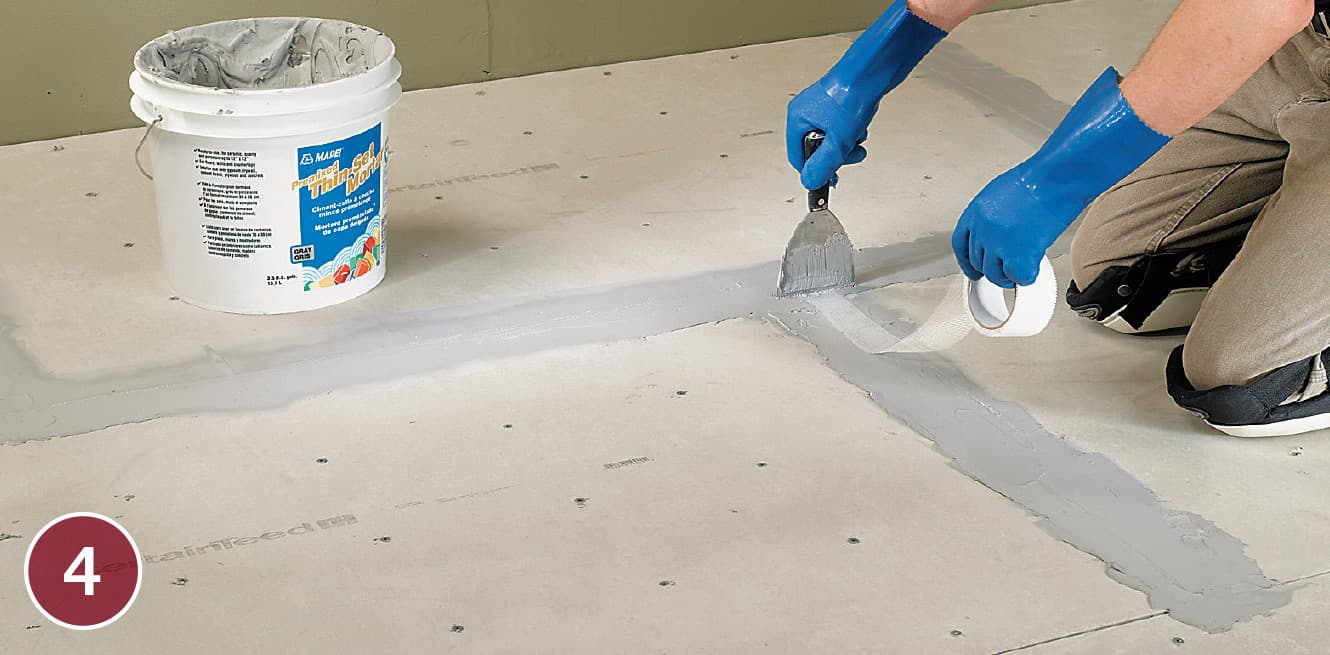
Maintain 1/8"-wide gaps between panels. Fill these gaps with a modified thinset mortar, overlapping at least 2 to 3" on each side of the juncture. Center and embed 2"-wide alkaline-resistant fiberglass tape over the joint and tightly skim thinset over the length of the abutment using a joint knife. Scrape off excess mortar to ensure an even transition between panel edges.
How to Install Plywood Underlayment
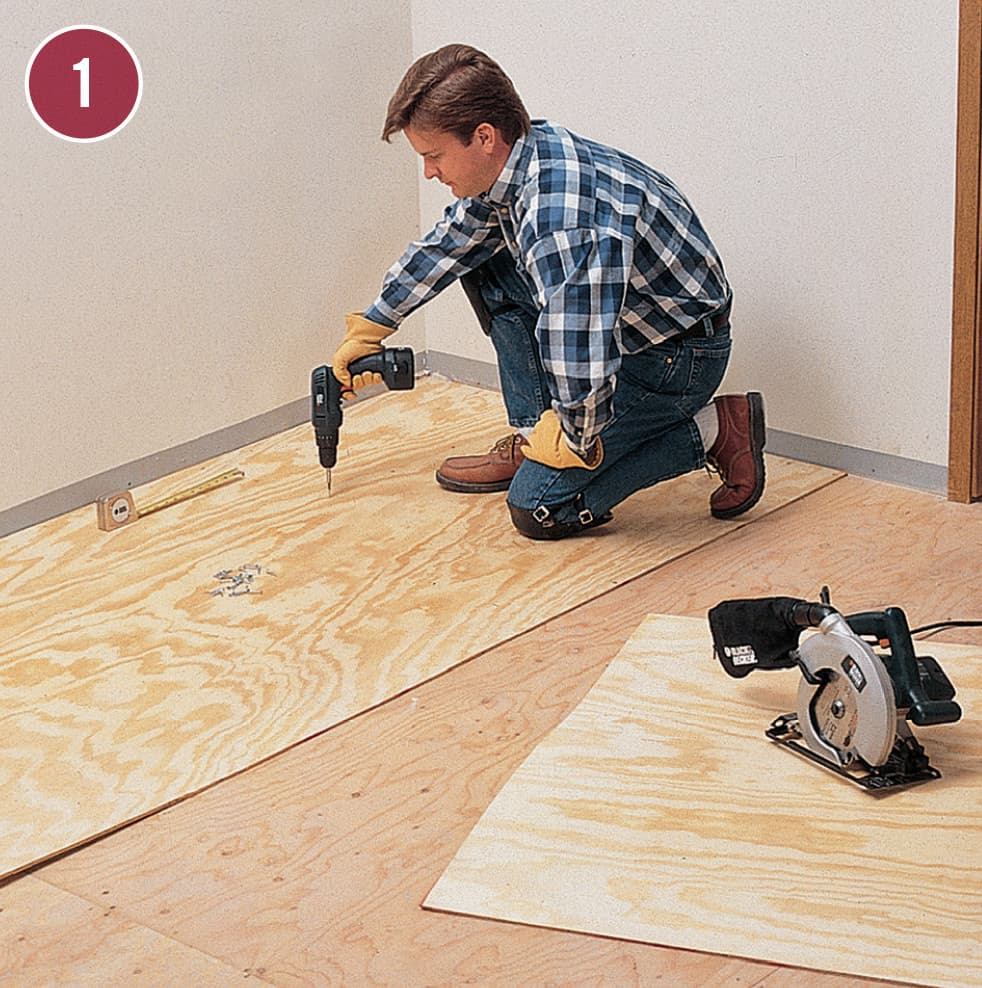
Begin by installing a full sheet of plywood along the longest wall, making sure the underlayment seams will not be aligned with the subfloor seams. Fasten the plywood to the subfloor, using 1" deck screws driven every 6" along the edges and at 8" intervals in the field of the sheet.
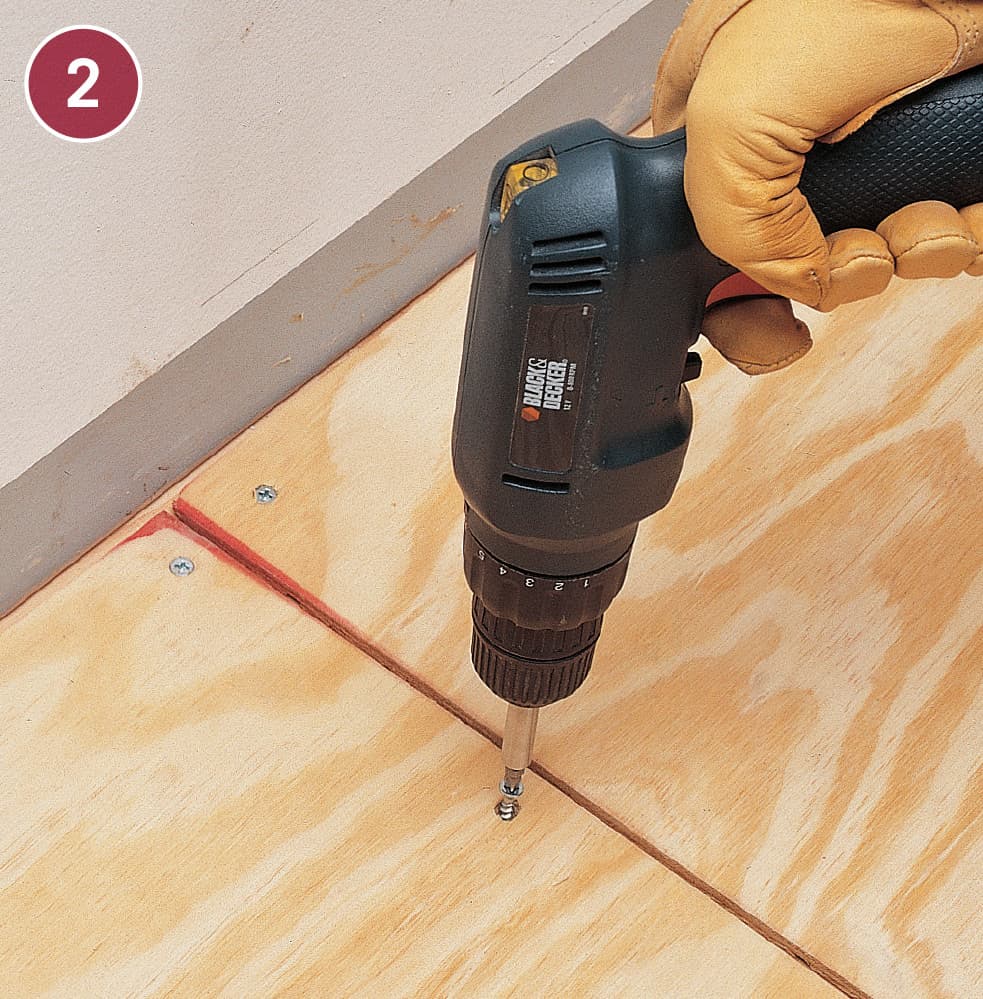
Continue fastening sheets of plywood to the subfloor, driving the screw heads slightly below the underlayment surface. Leave 1/4" expansion gaps at the walls and between sheets. Offset seams in subsequent rows.
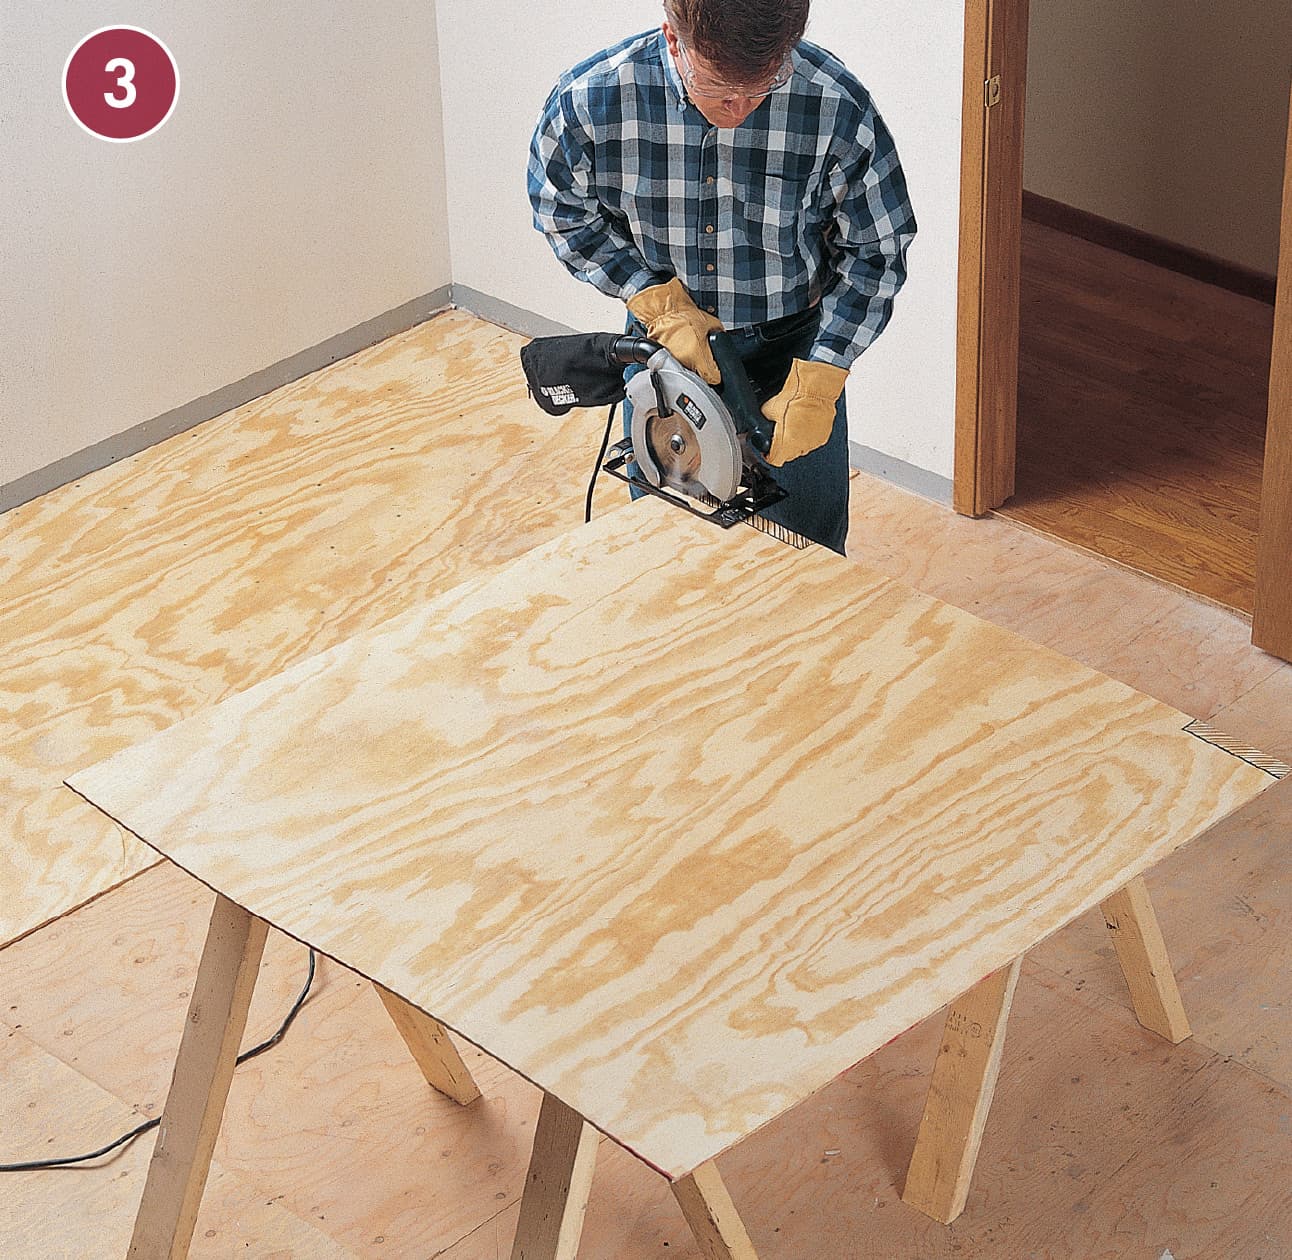
Using a circular saw or jigsaw, notch plywood to meet existing flooring in doorways, then fasten the notched sheets to the subfloor.

Mix floor-patching compound and latex or acrylic additive according to the manufacturer’s directions. Spread it over seams and screw heads with a joint knife.
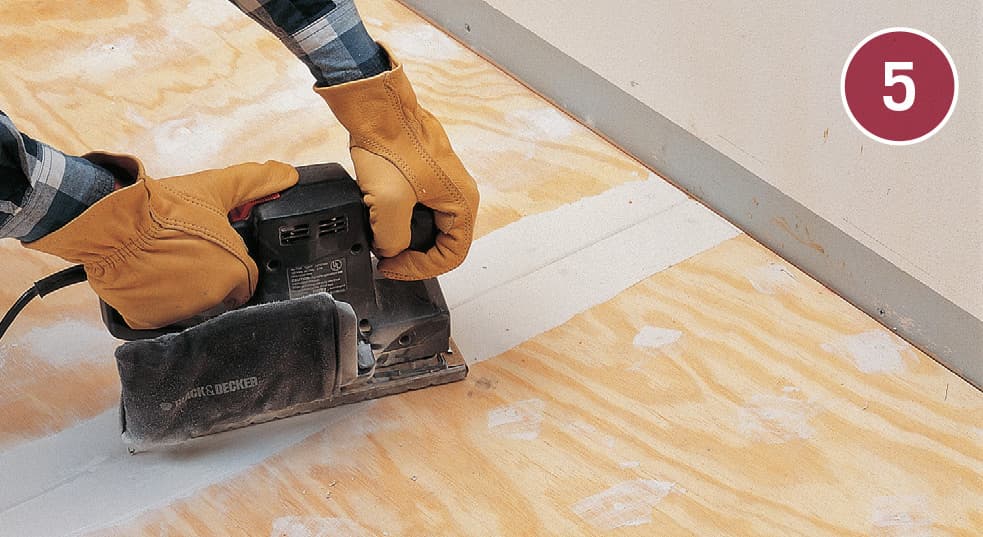
Let the patching compound dry, then sand the patched areas using a power sander.
Membrane
Several different types of membrane are used to provide a secure surface under tile flooring. All are used in conjunction with other underlayment such as cement backer board. Although each type is meant for a specific application, all membranes can serve additional roles to one degree or another.
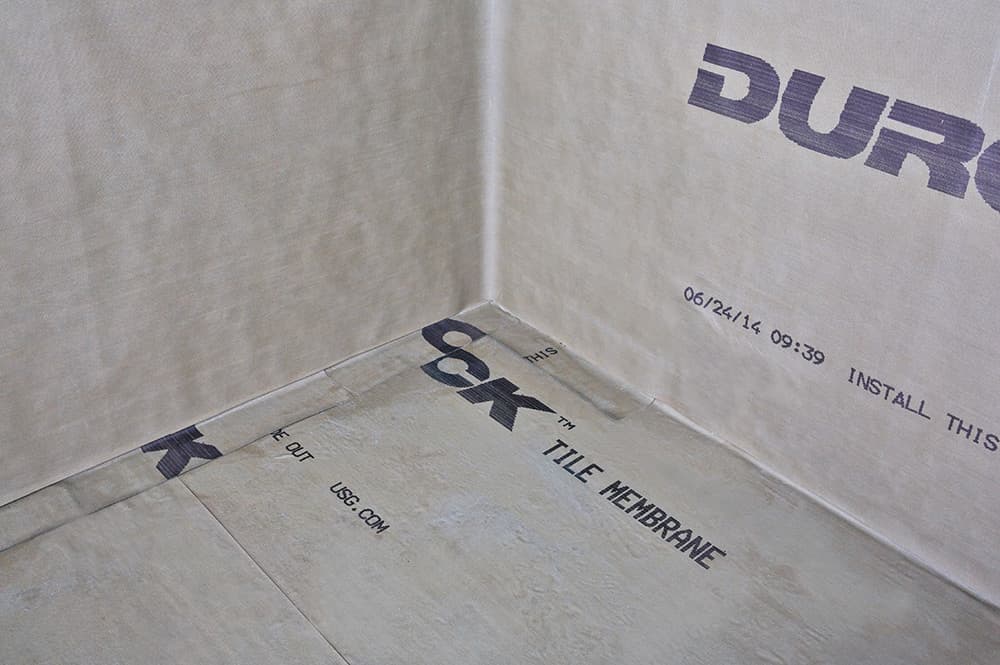
• Crack isolation. Basic crack isolation membrane ensures that any instability due to cracks in an underlying surface such as concrete does not migrate up to cause separation in the tile grout lines. The membranes can be either liquid (applied in much the same way as floor leveler) or sheet. Sheet crack isolation membrane is comprised of several layers that work together in stopping any subsurface movement from affecting tile placement and grout integrity. Sheet membrane is applied in the same manner as described in the project that follows.
• Uncoupling membrane is a newer product, basically a sheet with a rubberized waffle surface. It allows for movement of the substrate surface and expansion and contraction of both the subfloor surface and the tile floor—all while maintaining grout lines. This membrane has a reputation for ease of use and low-cost and is best used in high-traffic areas such as foyers or busy kitchens. Some uncoupling membranes are self-adhesive, but most widely used are laid on top of a layer of modified thinset mortar.
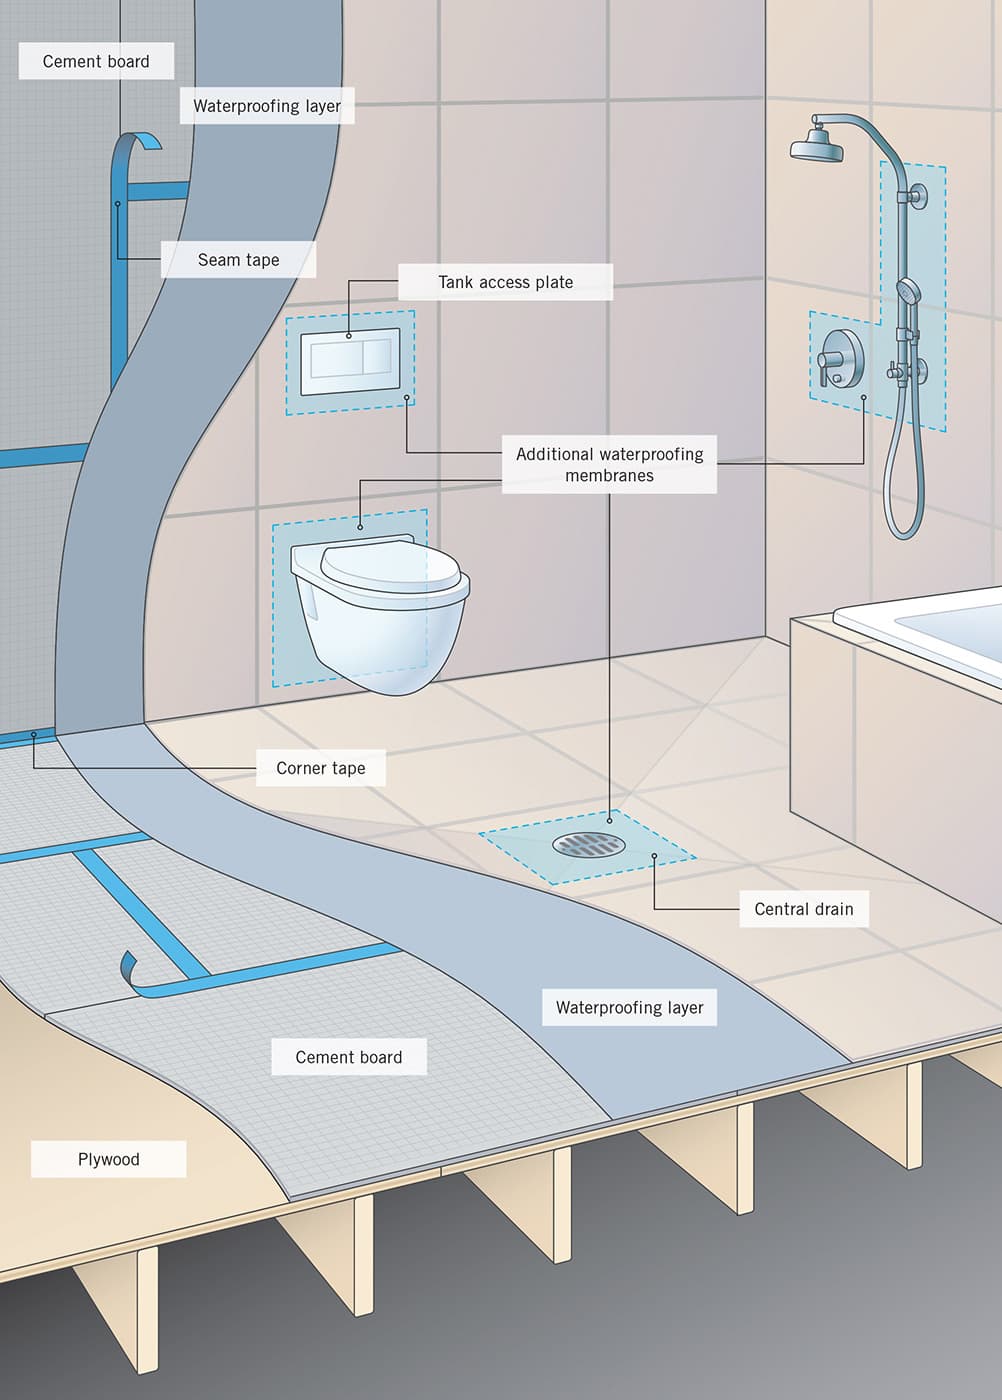
• Waterproofing membranes are still the professional’s choice for high-traffic, wet environments such as step-in shower stalls and wet room floors and walls. These are thick, tough, rubberized membranes that establish an extremely waterproof subsurface, one that maintains its integrity under years of frequent use.
The steps here outline installing a high-quality waterproofing membrane in a walk-in shower and wet room location. Given the need and code requirements for total waterproofing, the steps include applying membrane to walls, as well as floors.
TOOLS & MATERIALS
Modified thinset mortar
Paint roller and roller sleeve (optional)
Seam roller
Trowel
Utility knife
Waterproof sealant
Waterproofing membrane
Waterproof membrane such as this ensures that the framing and the wall and floor subsurfaces never get wet, protecting against mold, mildew, structural failure, and other related moisture problems.
NOTE: Local codes vary greatly when it comes to what types of membranes are allowed for shower enclosures. Always ask your retailer (or your building inspector) if the membrane you are considering purchasing is approved for the use you have in mind.
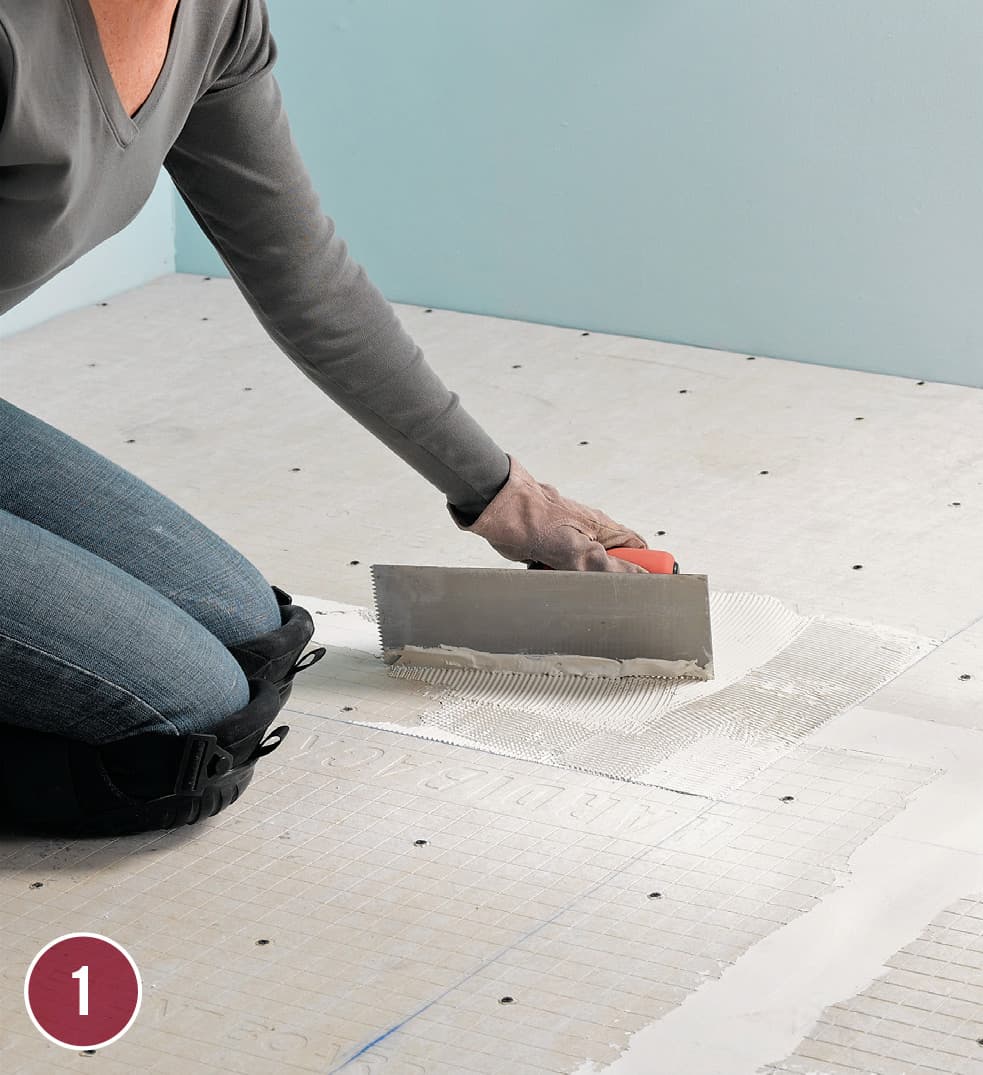
How to Install Membrane

Clean the floor thoroughly. Remove any wax, debris, grease, or dirt. Make sure the floor has no screw heads or other sharp edges sticking up that could pierce the membrane. Check the membrane to be sure you’ve ordered enough and that you have the right adhesive and additional accessories such as preformed corners or wall inserts. Seal seams as recommended by the membrane manufacturer.
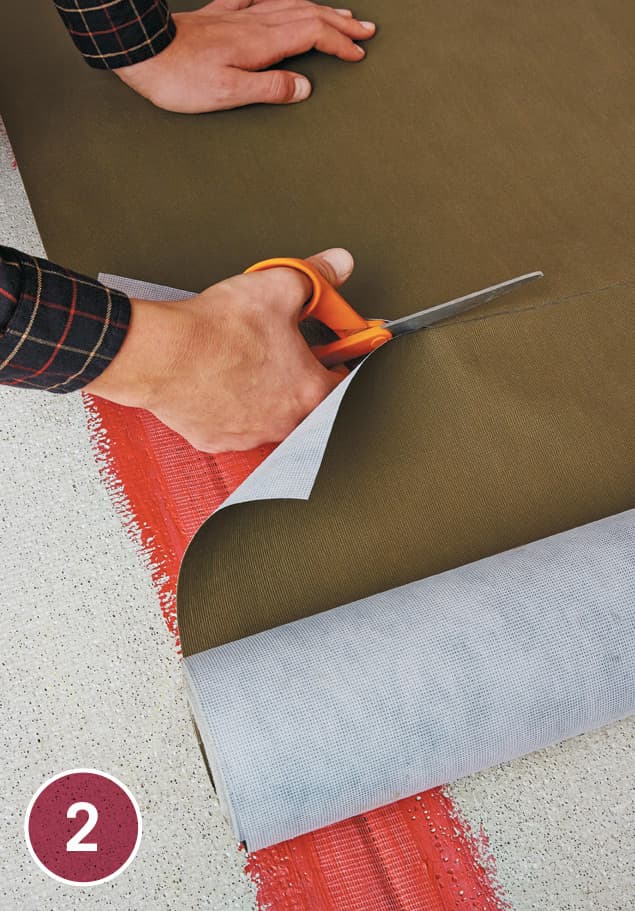
Measure and cut the membrane sections for different areas of the installation space. Be sure to account for sheet overlaps. These range from 1 1/2" to 3" depending on the membrane manufacturer. Follow the overlap recommendations for the membrane you’re using. In almost all cases you should start with the floor and work your way up from the bottoms of walls, always overlapping the lower section with the higher section.
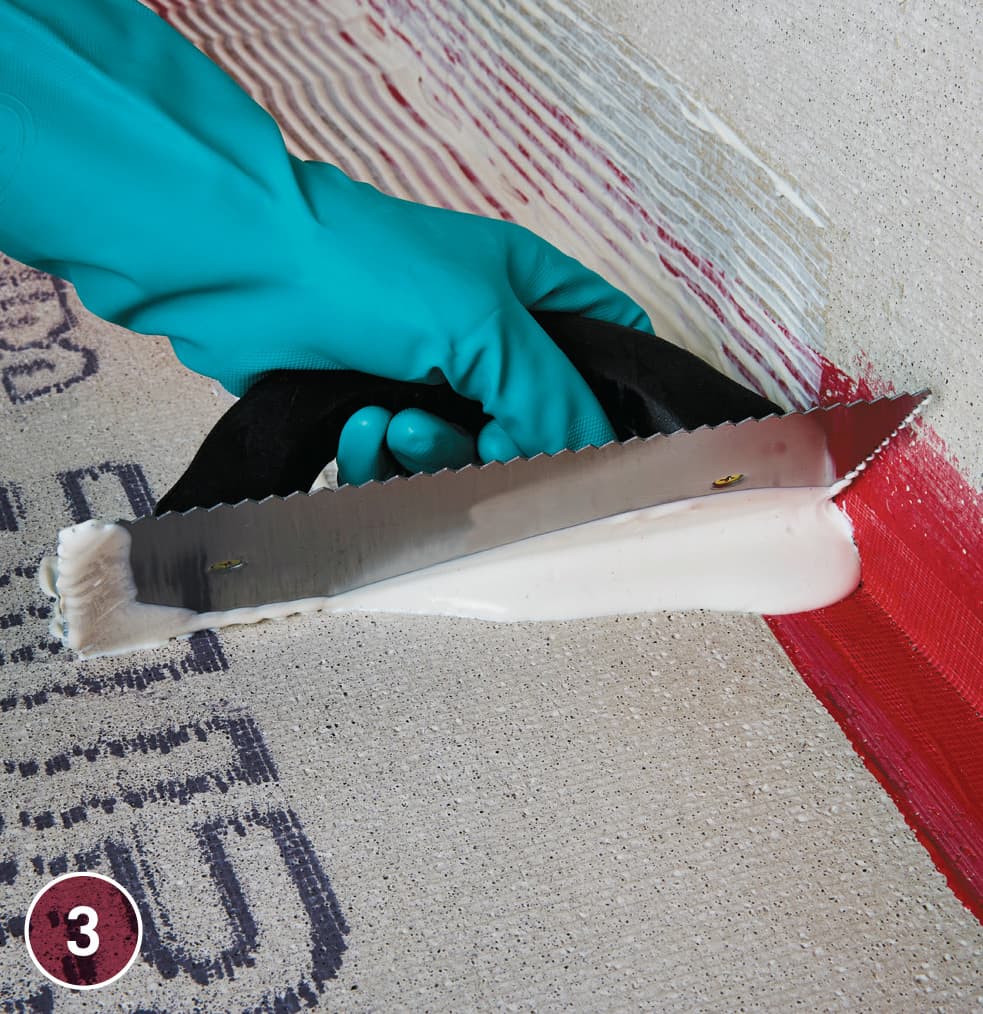
Roll or trowel the adhesive over the area for one sheet (follow the manufacturer’s recommendation for adhesive application).

Smooth the sheet in place with the flat side of a trowel or—on larger areas—use a roller. Typically, a sheet is smoothed out from the center outward.
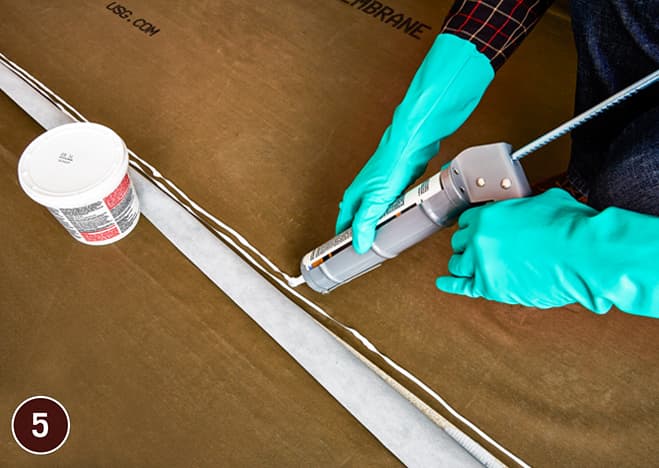
Apply double beads of waterproof sealant (the type recommended by the manufacturer—many supply their own) along the edge of overlaps.

Roll overlapping sections with a seam roller, flattening them as much as possible.
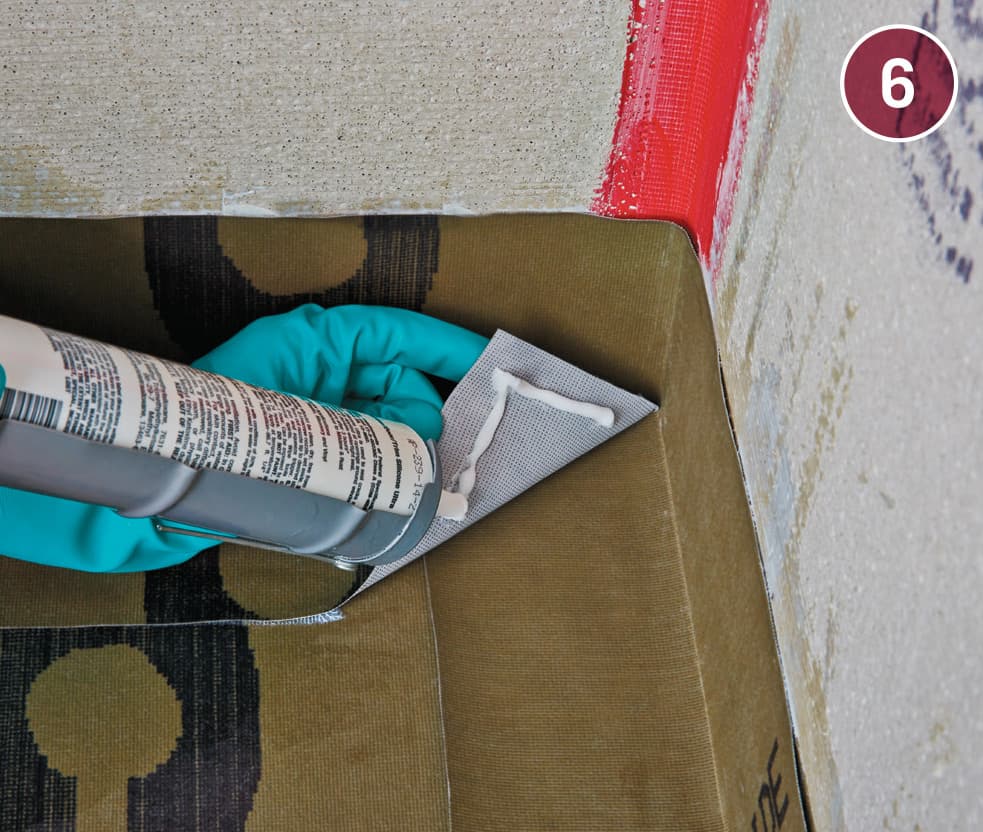
For inside corners, make vertical and horizontal cuts in the membrane at the corner, and then overlap the cut flaps using beads of adhesive or the same process you used for sheet overlaps.
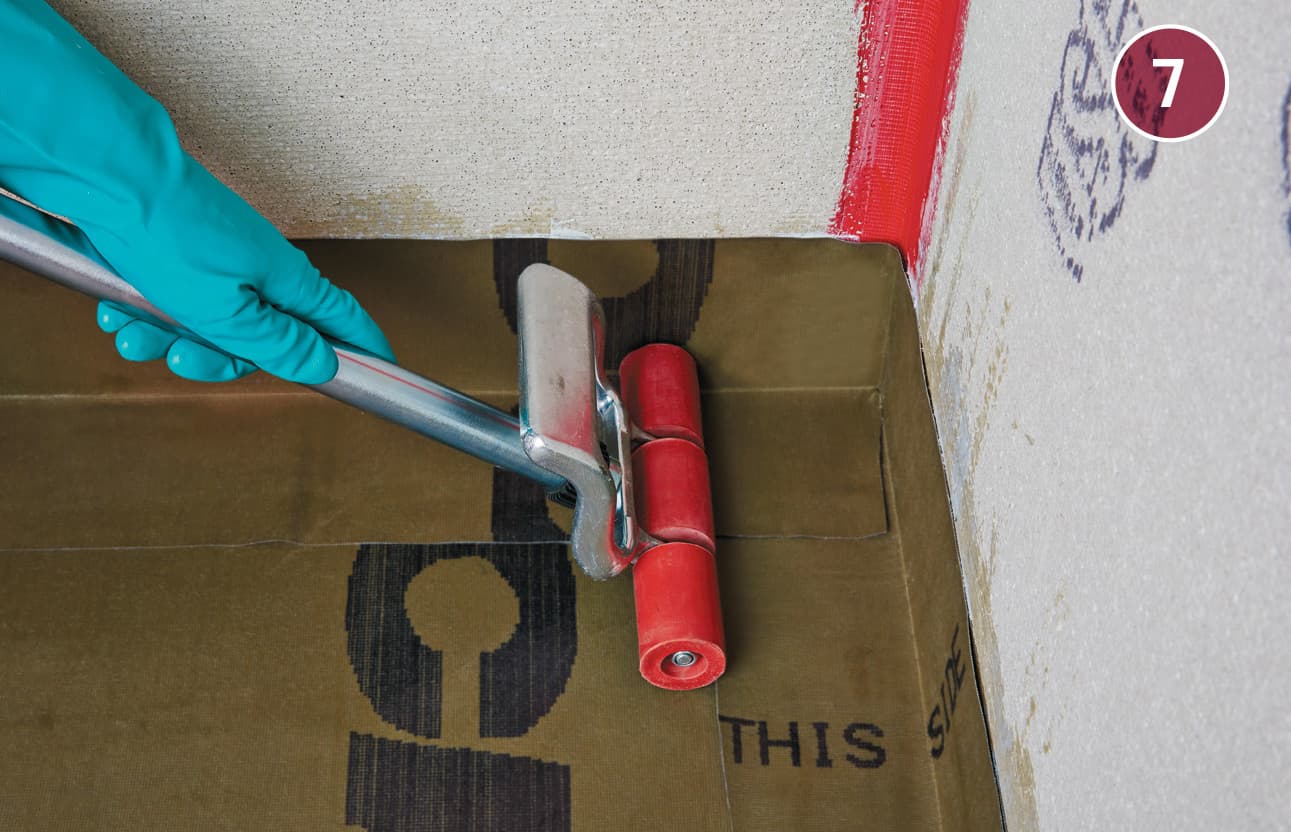
Roll the membrane strips in corner locations to help seal the joints.
NOTE: For outside corners, cut the sheet at the corner and overlap with a strip of membrane. The strip will need to be cut halfway through its width, in the middle of the strip.

Hang membrane on walls vertically, overlapping corners. Overlap sheets as you would on the floor. It’s essential that you secure the membrane to the wall by firmly smoothing it with a trowel or large roller.
Radiant Floor
Floor-warming systems require very little energy to run and are designed to heat tile floors only; they are not generally used as sole heat sources for rooms.
A typical floor-warming system consists of one or more thin mats containing electric resistance wires that heat up when energized, like an electric blanket. The mats are installed beneath the tile and are hardwired to a 120-volt GFCI circuit. A thermostat controls the temperature, and a timer turns the system off automatically.
The system shown in this project includes two plastic mesh mats, each with its own power lead that is wired directly to the thermostat. Radiant mats may be installed over a plywood subfloor, but if you plan to install floor tile you should put down a base of cementboard first, and then install the mats on top of the cementboard.
A crucial part of installing this system is to use a multimeter to perform several resistance checks to make sure the heating wires have not been damaged during shipping or installation.
Electrical service required for a floor-warming system is based on size. A smaller system may connect to an existing GFCI circuit, but a larger one will need a dedicated circuit; follow the manufacturer’s requirements.
To order a floor-warming system, contact the manufacturer or dealer. In most cases, you can send plans to the manufacturer and they’ll custom-fit a system for your project area.
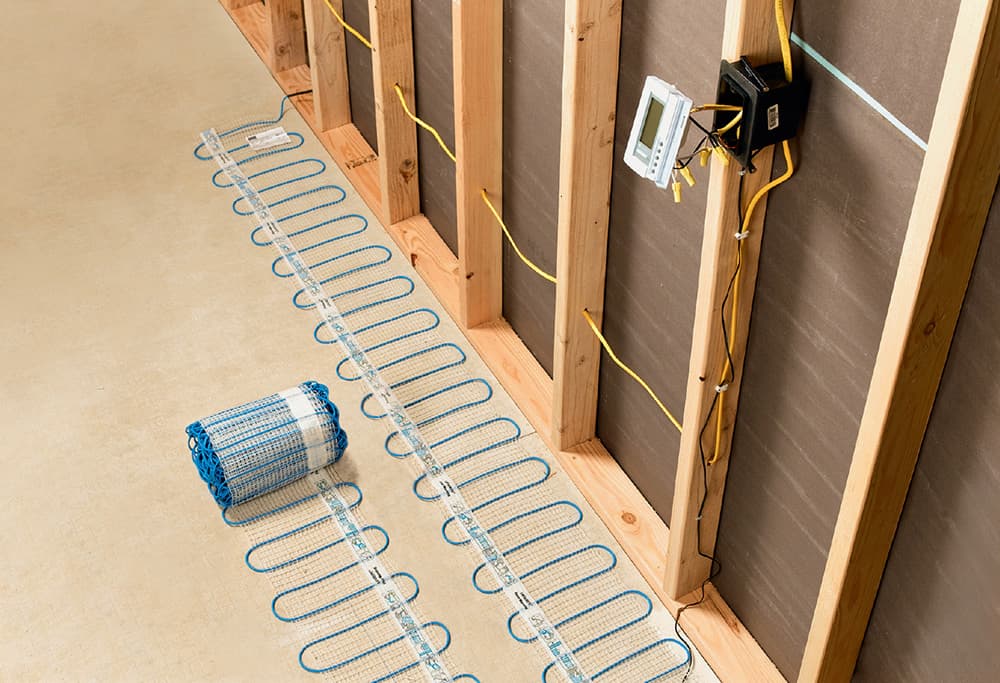
A radiant floor-warming system employs electric heating mats that are covered with floor tile to create a floor that’s cozy underfoot.
TOOLS & MATERIALS
Vacuum cleaner
Multimeter
Tape measure
Scissors
Router/rotary tool
Marker
Electric wire fault indicator (optional)
Hot glue gun
Radiant floor mats
1 2/2 NM cable
Trowel or rubber float
Conduit
Thinset mortar
Thermostat with sensor
Junction box(es)
Tile or stone floorcovering
Drill
Double-sided carpet tape
Cable clamps
INSTALLATION TIPS

A floor-warming system requires a dedicated circuit to power and control its heating mats, thermostat, and timer.
• Each radiant mat must have a direct connection to the power lead from the thermostat, with the connection made in a junction box in the wall cavity. Do not install mats in series.
• Do not install radiant floor mats under shower areas.
• Do not overlap mats or let them touch.
• Do not cut heating wire or damage heating wire insulation.
• The distance between wires in adjoining mats should equal the distance between wire loops measured center to center.
Installing a Radiant Floor-Warming System
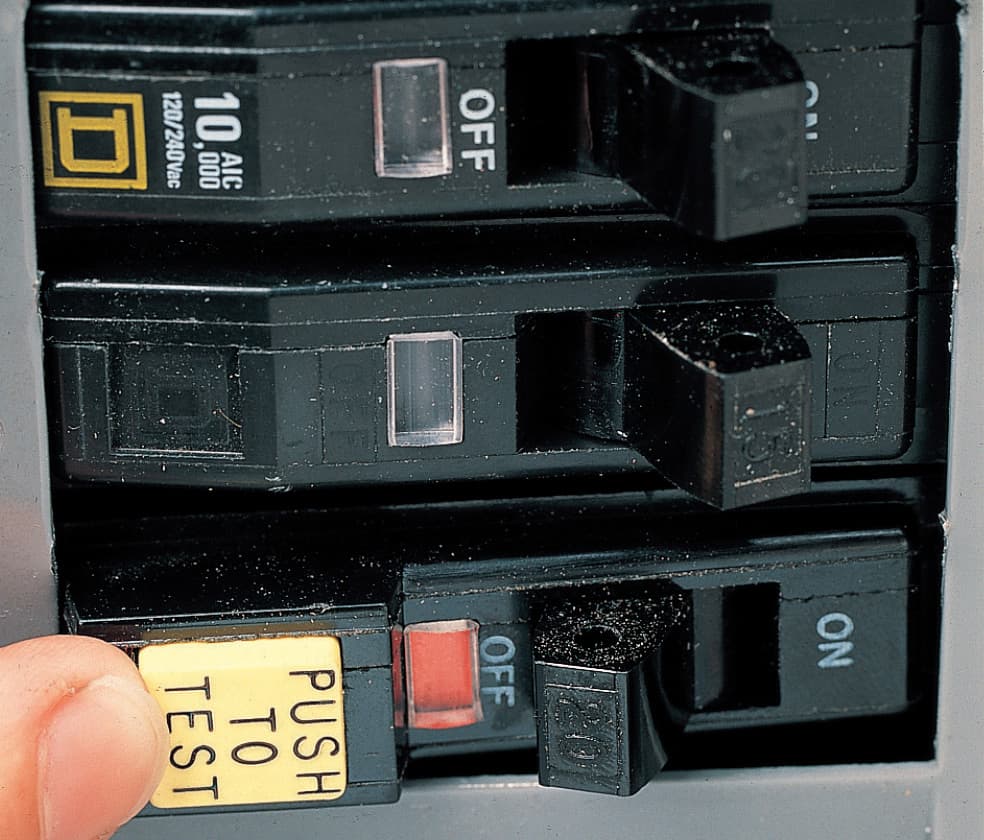
Floor-warming systems must be installed on a circuit with adequate amperage and a GFCI breaker. Smaller systems may tie into an existing circuit, but larger ones need a dedicated circuit. Follow local building and electrical codes that apply to your project.

An electric wire fault indicator monitors each floor mat for continuity during the installation process. If there is a break in continuity (for example, if a wire is cut), an alarm sounds. If you choose not to use an installation tool to monitor the mat, test for continuity frequently using a multimeter.
How To Install a Radiant Floor-Warming System

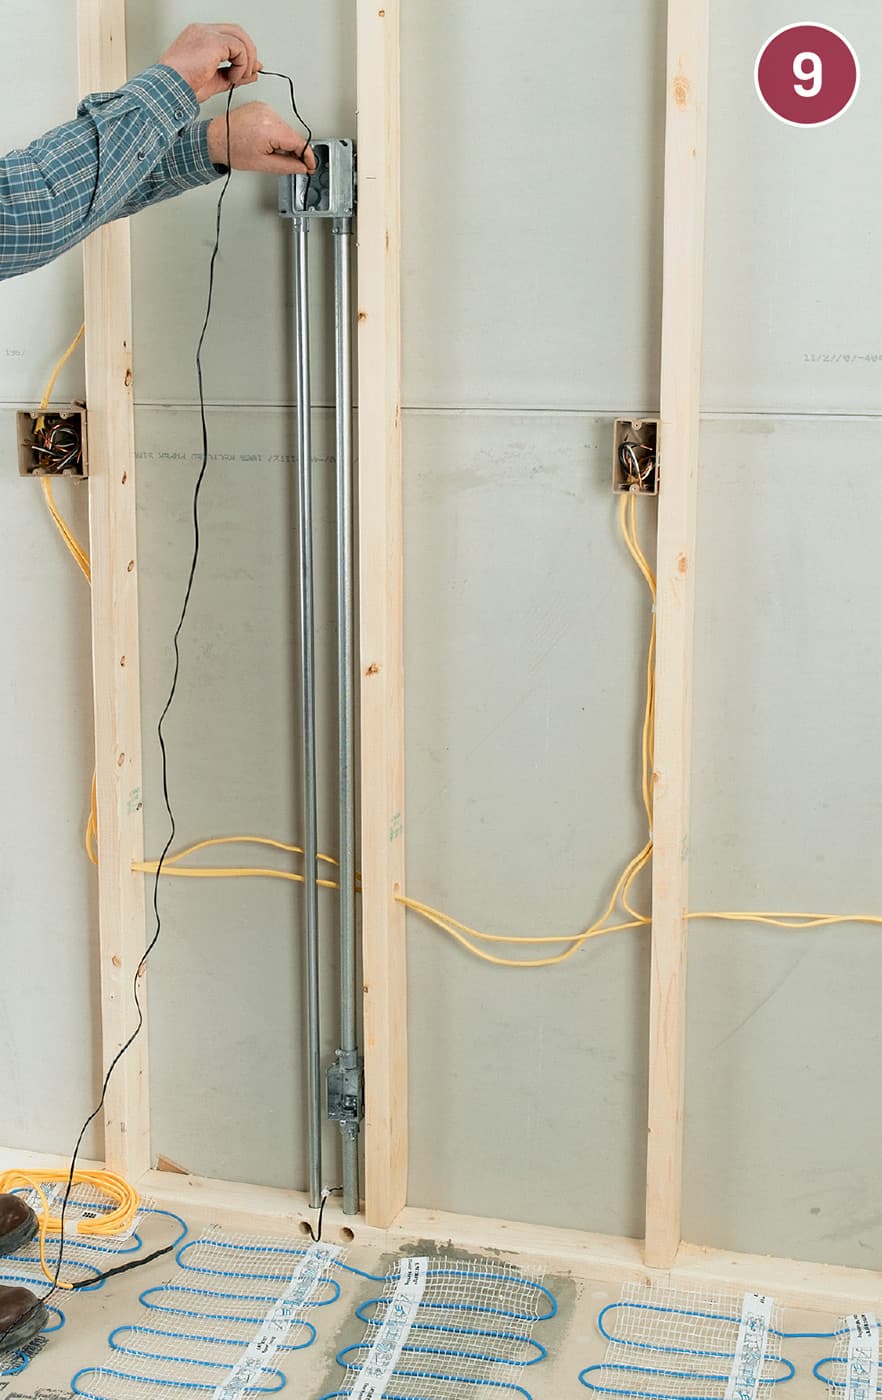
Install electrical boxes to house the thermostat and timer. In most cases, the box should be located 60" above floor level. Use a 4"-deep × 4"-wide double-gang box for the thermostat/timer control if your kit has an integral model. If your timer and thermostat are separate, install a separate single box for the timer.
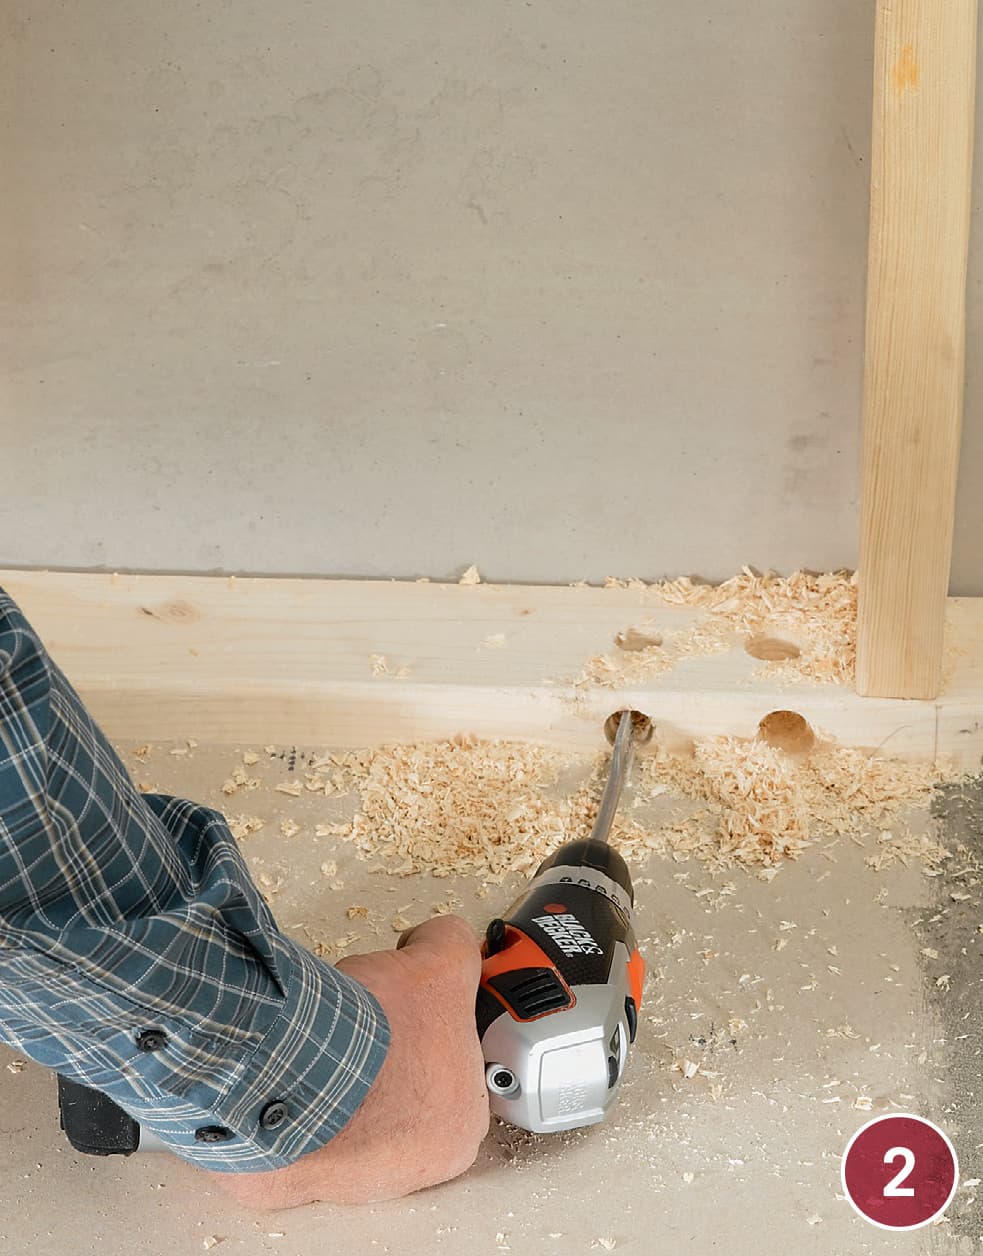
Drill access holes in the sole plate for the power leads that are preattached to the mats (they should be over 10 ft. long). The leads should be connected to a supply wire from the thermostat in a junction box located in a wall near the floor and below the thermostat box. The access hole for each mat should be located directly beneath the knockout for that cable in the thermostat box. Drill through the sill plate vertically and horizontally so the holes meet in an L-shape.

Run conduit from the electrical boxes to the sill plate. The line for the supply cable should be 3/4" conduit. If you are installing multiple mats, the supply conduit should feed into a junction box about 6" above the sill plate and then continue into the 3/4" hole you drilled for the supply leads. The sensor wire needs only 1/2" conduit that runs straight from the thermostat box via the thermostat. The mats should be powered by a dedicated 20-amp GFCI circuit of 1 2/2 NM cable run from your main service panel to the electrical box (this is for 120-volt mats—check your instruction manual for specific circuit recommendations).
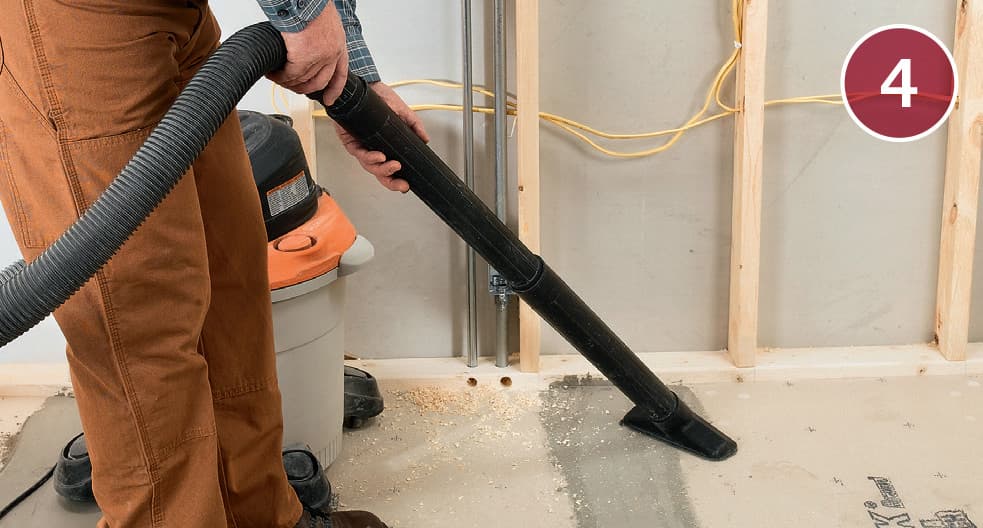
Clean the floor surface thoroughly to get rid of any debris that could potentially damage the wire mats. A vacuum cleaner generally does a more effective job than a broom.

Test for resistance using a multimeter set to measure ohms. This is a test you should make frequently during the installation, along with checking for continuity. If the resistance is off by more than 10% from the theoretical resistance listing (see manufacturer’s chart in installation instructions), contact technical support for the kit manufacturer. For example, the theoretical resistance for the 1 × 50 ft. mat seen here is 19, so the ohms reading should be between 17 and 21.
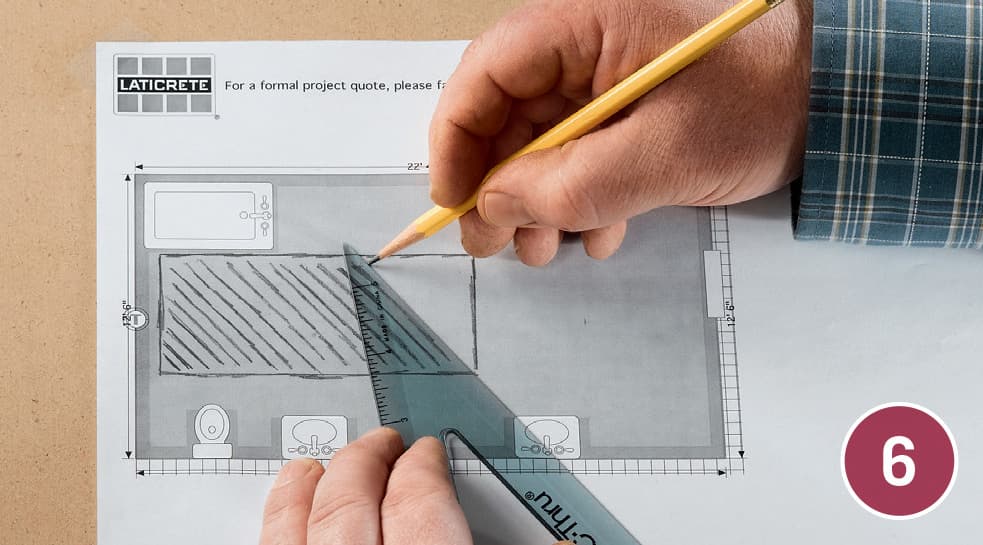
Finalize your mat layout plan. Most radiant floor-warming mat manufacturers will provide a layout plan for you at the time of purchase, or they will give you access to an online design tool so you can come up with your own plan. This is an important step to the success of your project, and the assistance is free.

Unroll the radiant mat or mats and allow them to settle. Arrange the mat or mats according to the plan you created. It’s okay to cut the plastic mesh so you can make curves or switchbacks, but do not cut the heating wire under any circumstances, even to shorten it.
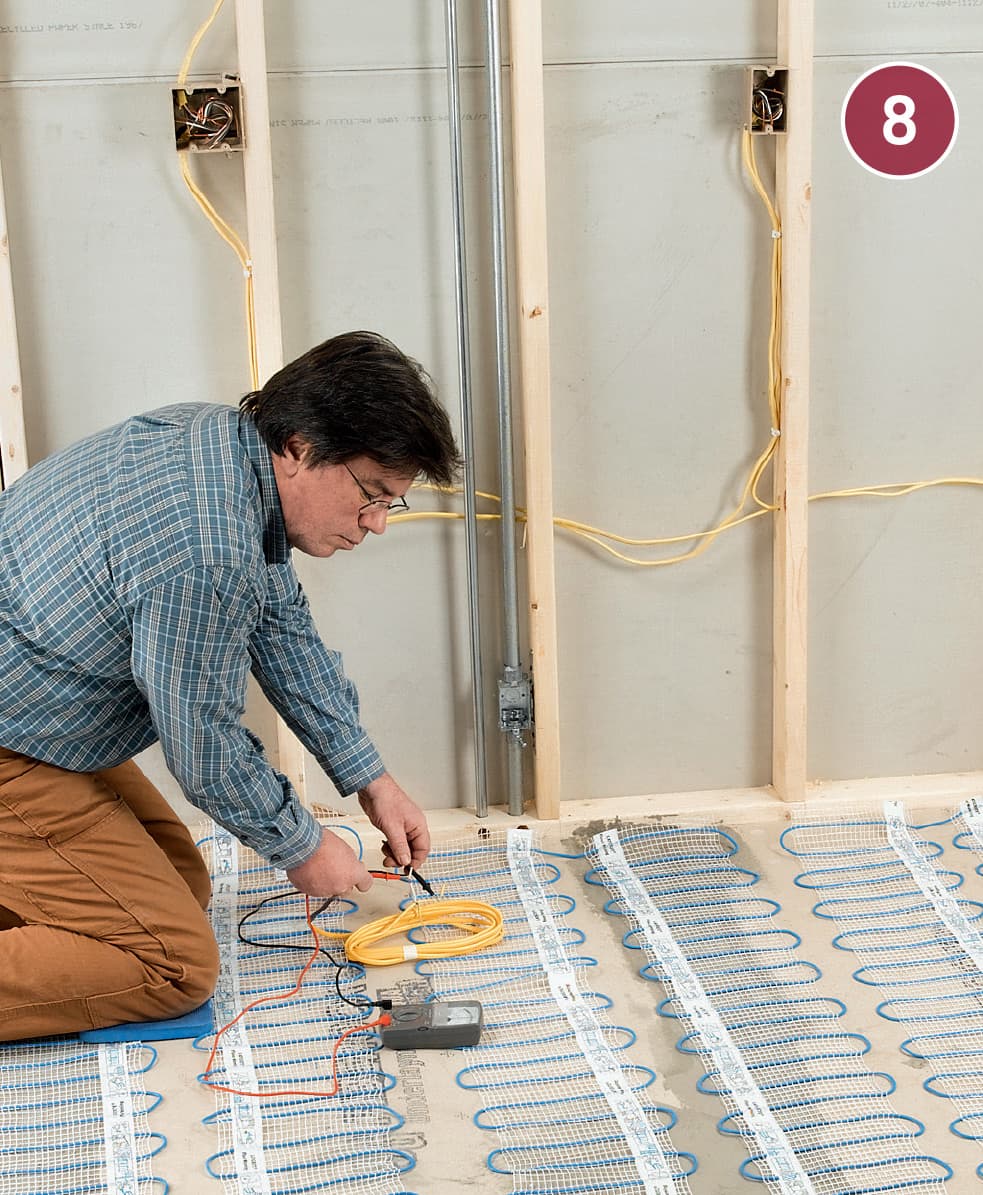
Finalize the mat layout and then test the resistance again using a multimeter. Also check for continuity in several different spots. If there is a problem with any of the mats, you should identify it and correct it before proceeding with the mortar installation.
Run the thermostat sensor wire from the electrical box down the 1/2" conduit raceway and out the access hole in the sill plate. Select the best location for the thermostat sensor and mark the location onto the flooring. Also mark the locations of the wires that connect to and lead from the sensor.
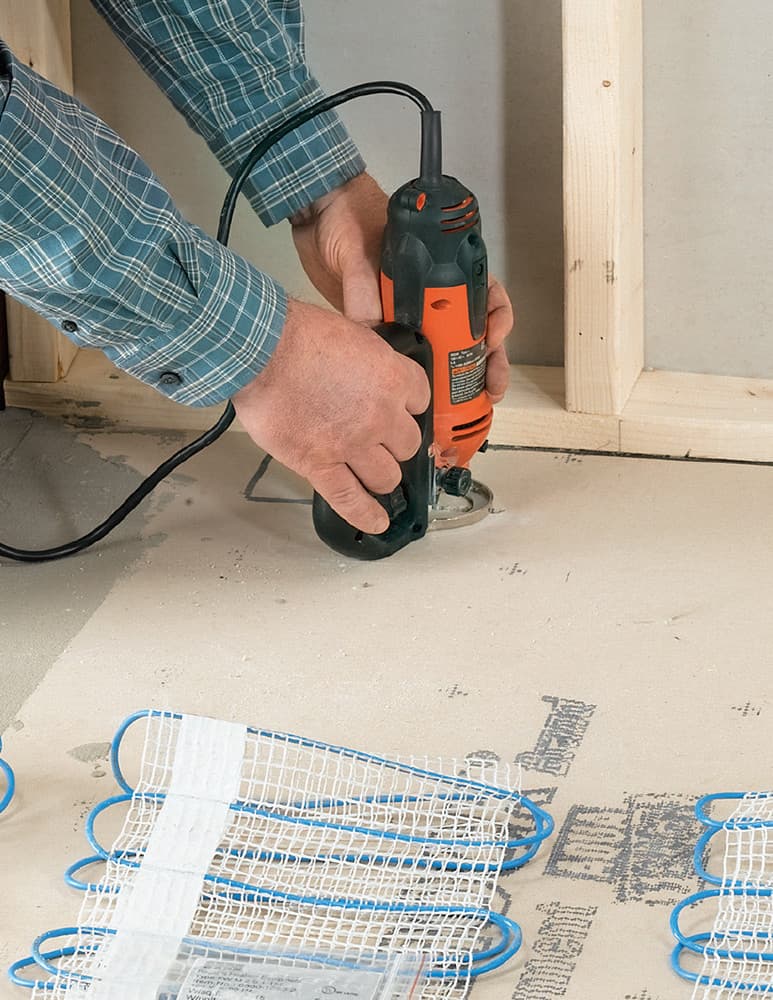
VARIATION: If your local codes require it, roll the mats out of the way and cut a channel for the sensor and the sensor wires into the floor or floor underlayment. For most floor materials, a spiral cutting tool does a quick and neat job of this task. Remove any debris.

Bond the mats to the floor. If the mats in your system have adhesive strips, peel off the adhesive backing and roll out the mats in the correct position, pressing them against the floor to set the adhesive. If your mats have no adhesive, bind them with strips of double-sided carpet tape. The thermostat sensor and the power supply leads should be attached with hot glue (inset photo) and run up into their respective holes in the sill plate if you have not done this already. Test all mats for resistance and continuity.

Cover the floor installation areas with a layer of thinset mortar that is thick enough to fully cover all the wires and mats (usually around 1/4" in thickness). Check the wires for continuity and resistance regularly and stop working immediately if there is a drop in resistance or a failure of continuity. Allow the mortar to dry overnight.
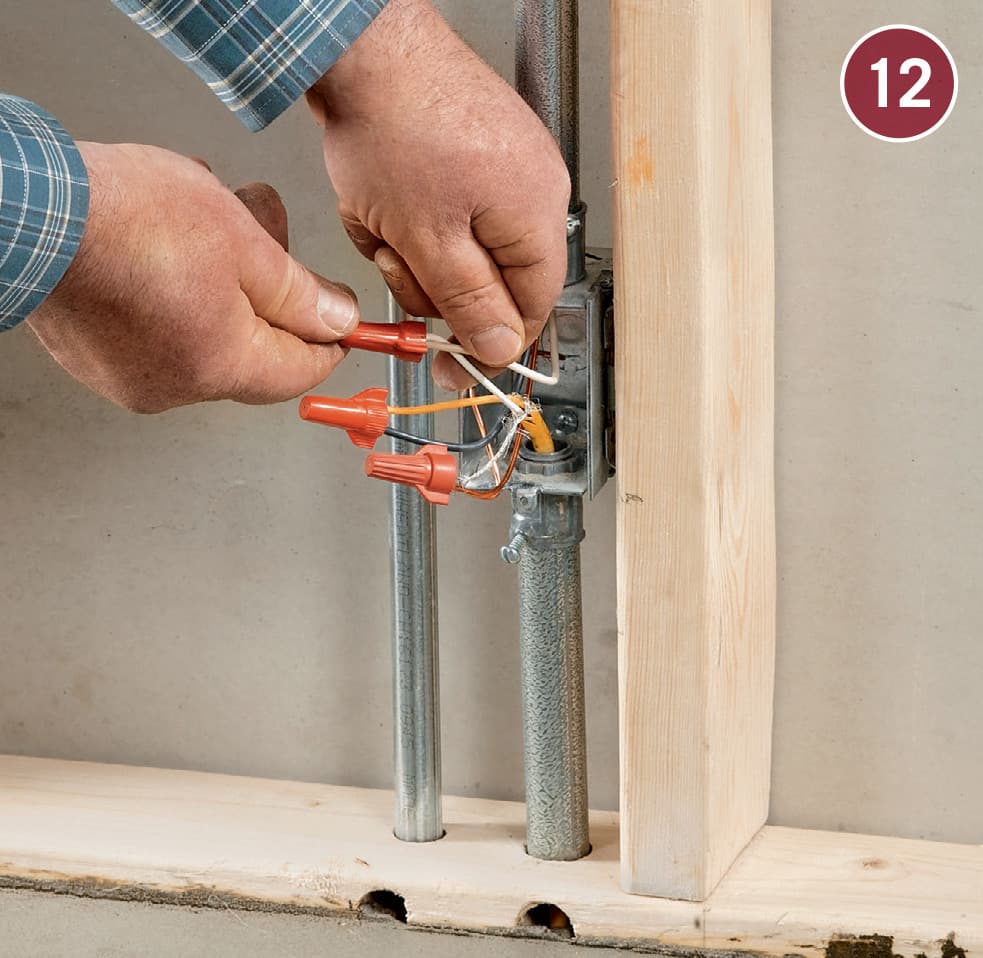
Connect the power supply leads from the mat or mats to the NM cable coming from the thermostat inside the junction box near the sill. Power must be turned off. The power leads should be cut so about 8" of wire feeds into the box. Be sure to use cable clamps to protect the wires.
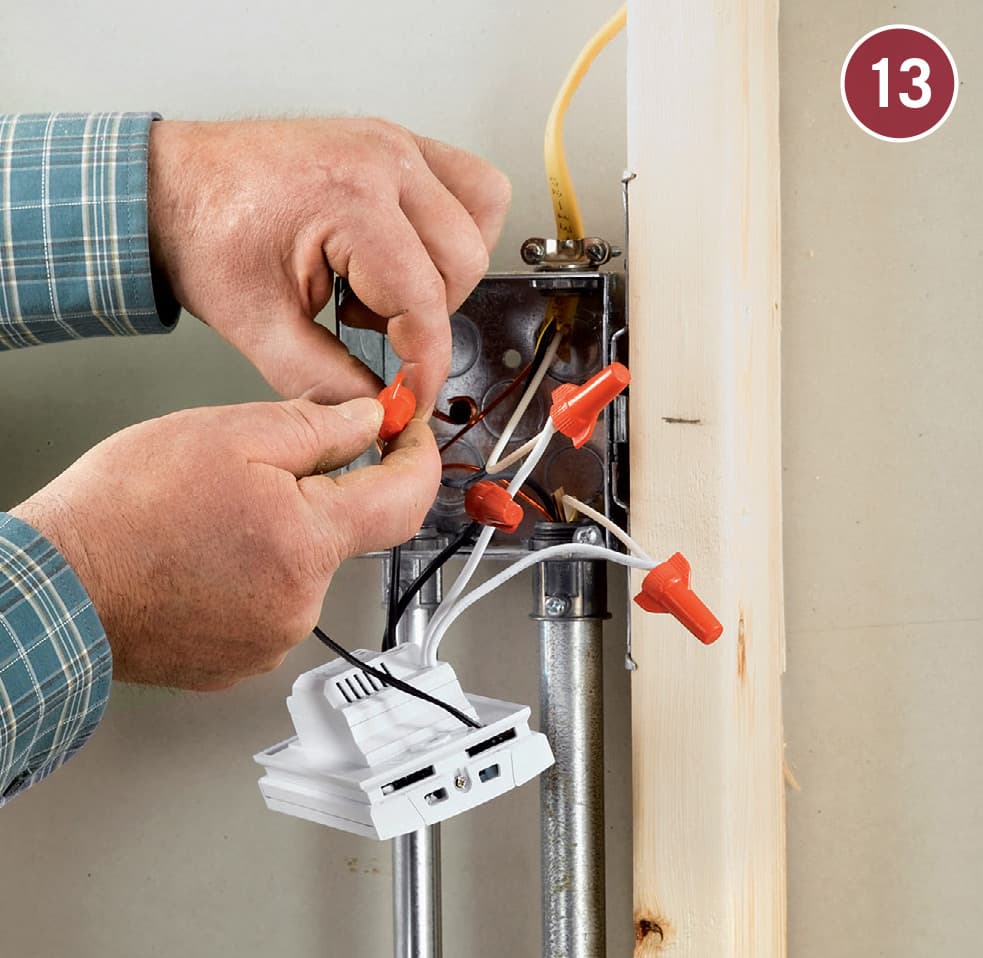
Connect the sensor wire and the power supply lead (from the junction box) to the thermostat/timer according to the manufacturer’s directions. Attach the device to the electrical box, restore power, and test the system to make sure it works. Once you are convinced that it is operating properly, install floor tiles and repair the wall surfaces.
Floor Tile
Although the floor tiles shown in the steps that follow are porcelain, this process would be the same if you were installing ceramic or stone tiles. In all cases, a successfully tiled floor relies on proper preparation. That starts with laying down a stable, secure surface for the tile (see pages 70 to 75). But the most important step for the look of the finished floor is snapping the chalklines and dry-fitting to determine the most visually pleasing tile placement. Beyond that, work carefully and steadily, using spacers throughout to maintain proper spacing, and be careful never to walk on a newly tiled floor. This means planning so that you never tile yourself into a corner. Plan carefully, pay attention when laying the tiles, and work within your own abilities and capacity, and you’ll wind up with a long-lasting, beautiful tile floor.
Floor tile can be laid in many different patterns, but for your first effort, it’s wise to stick to a basic grid. Generally, you’ll combine the floor tile with a profiled base tile or cove molding, installed after the flooring is completely dry and set.
TOOLS & MATERIALS
1/4" square-notched trowel
Rubber mallet
Tile cutter
Tile nippers
Hand-held tile cutter
Needlenose pliers
Grout float
Grout sponge
Soft cloth
Thinset mortar
Tile
Tile spacers
Grout
Latex grout additive
Wall adhesive
2 × 4 lumber
Grout sealer
Tile caulk
Sponge brush
Cementboard
Chalkline
Tape measure
Drill
Caulk gun
1 1/4" cementboard screws
Fiberglass-mesh wallboard tape
Utility knife or grout knife
Threshold material
Jigsaw or circular saw with a tungsten-carbide blade
Rounded bullnose tile
Eye protection and gloves
How to Install Floor Tile
Screw the tile backer board down to the subfloor with 1 1/4" self-piloting screws driven every 2" around the edge. Tape the seams with fiberglass mesh tape and finish the backer board surface as described on page 71.
Draw reference lines and establish the tile layout. Check that the lines are square to each other using the 3-4-5 method. Dry-lay two half rows of tiles in place, running from the center in two directions out to the wall. Determine if the layout leaves less than one-third of a tile at either wall, and adjust your reference lines if it does.
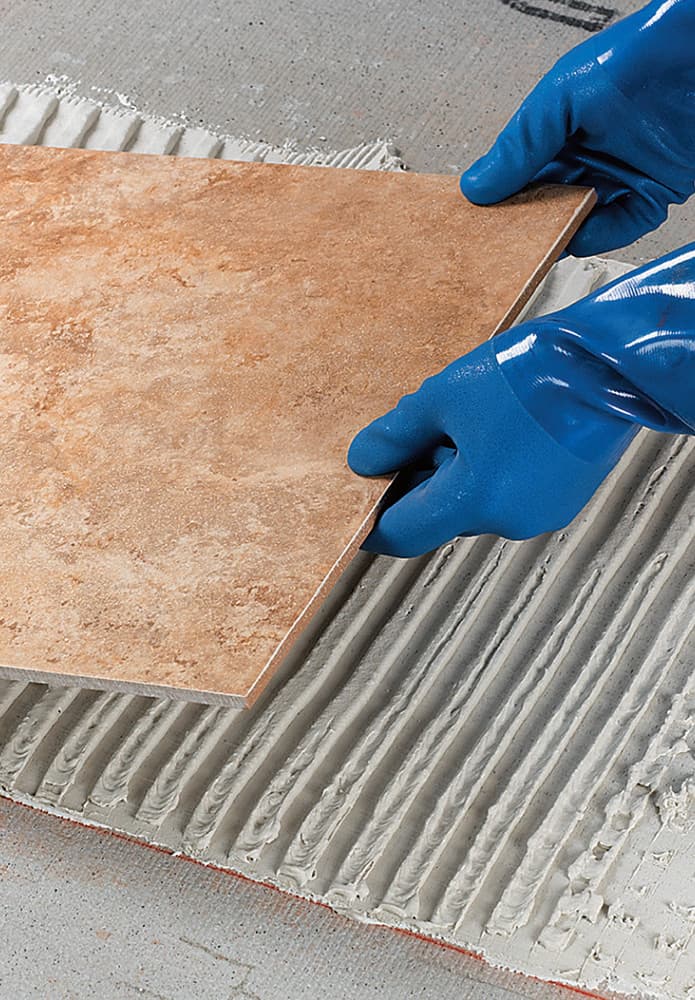
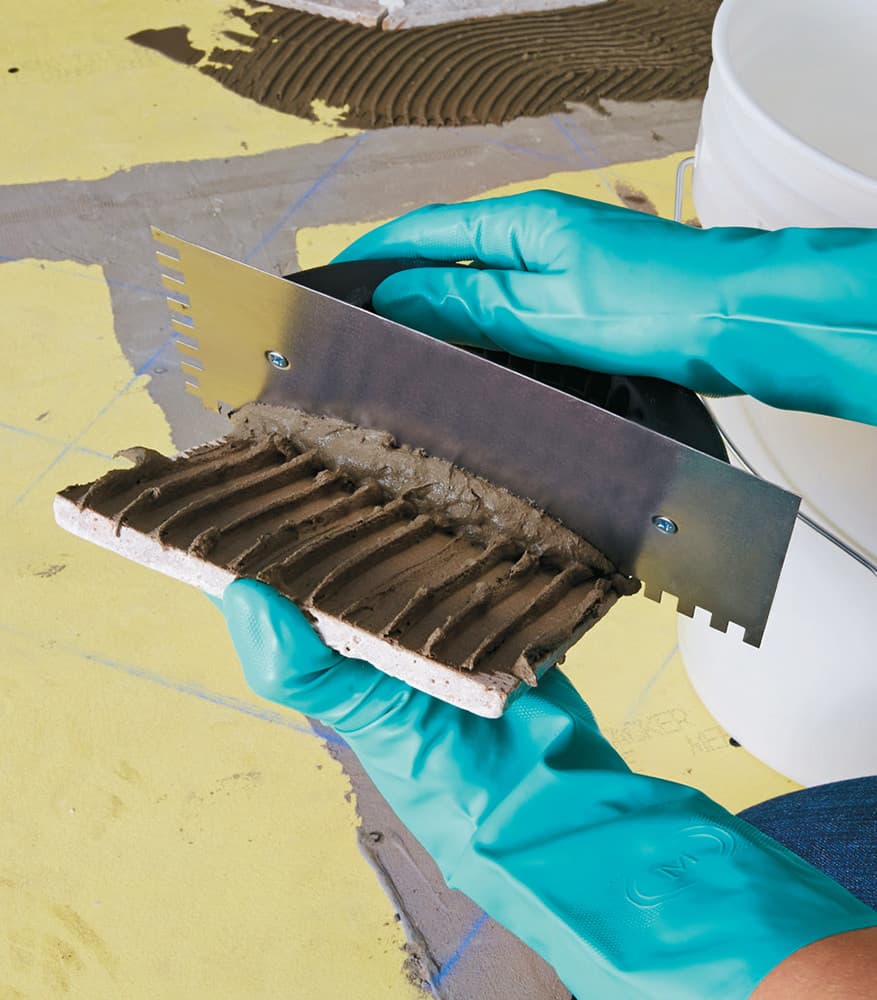
Mix a batch of thinset mortar and spread it evenly across a square along both reference lines of the quadrant, using the trowel recommended for your tile (see page 45). Use the notched edge to create furrows, being careful not to press down all the way to the backer board.
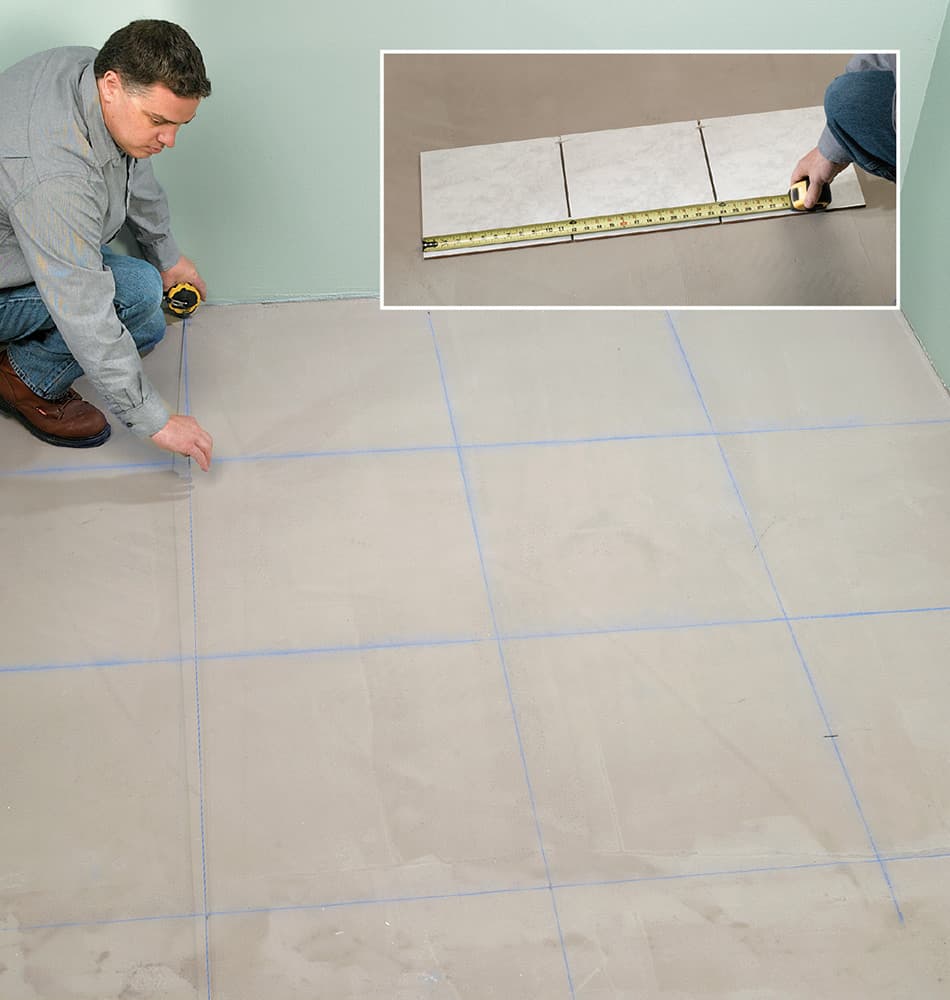
OPTION: Build a grid system of chalklines based on the actual dimensions of your tiles, including the grout lines. A grid system ensures that you will stay on track and it helps you divide the project into small sections so you can apply the correct amount of thinset without guessing.

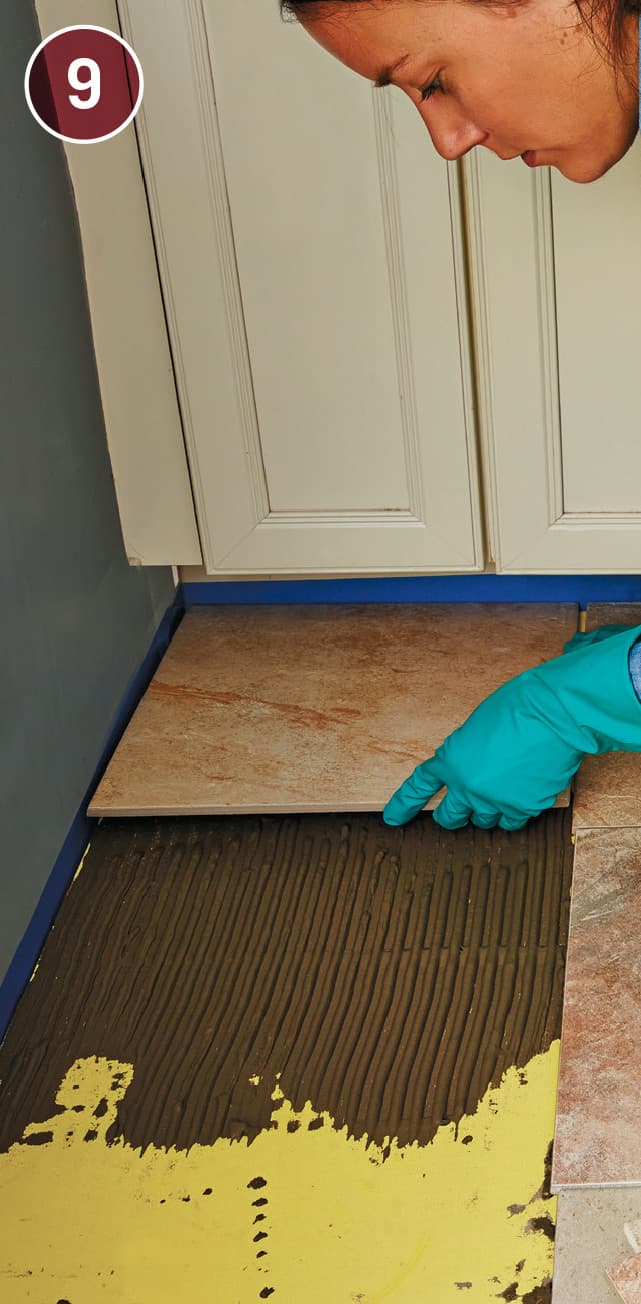
Press the first tile down into the mortar at the corner of the quadrant where the reference lines intersect. Twist it slightly and press down. Use a putty knife to pull the tile up to check that the mortar consistency is correct and coating all areas on the bottom of the tile. Press the tile back into position. Use a rubber mallet to gently tap the center area of the tile to set it properly.
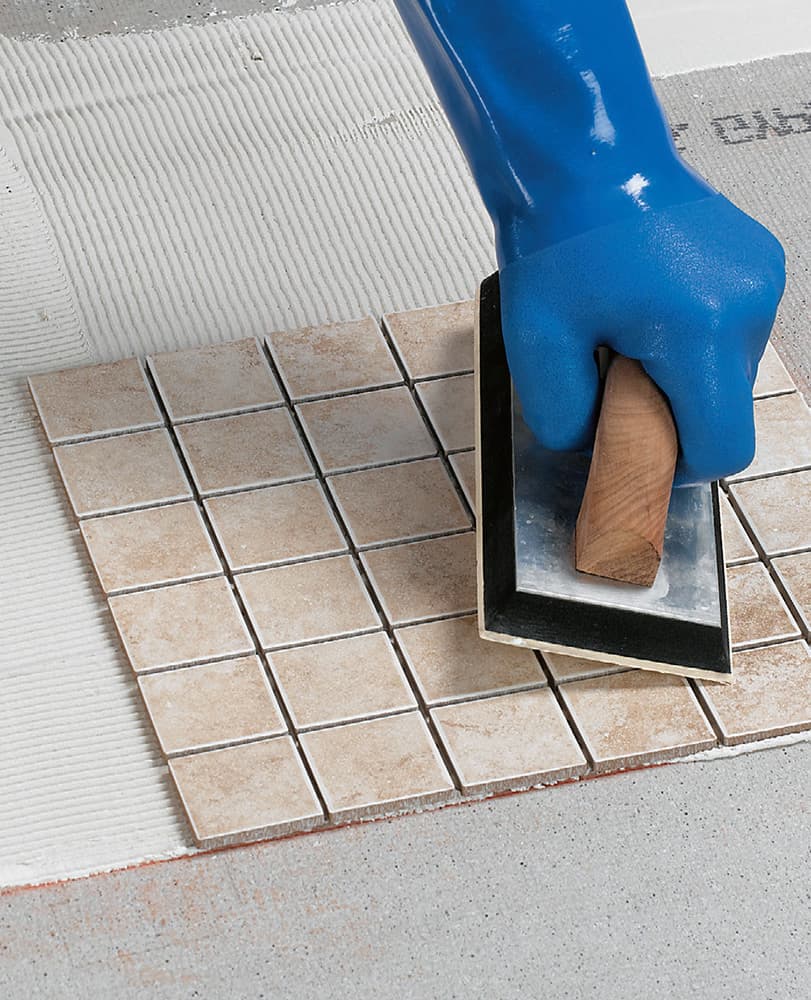
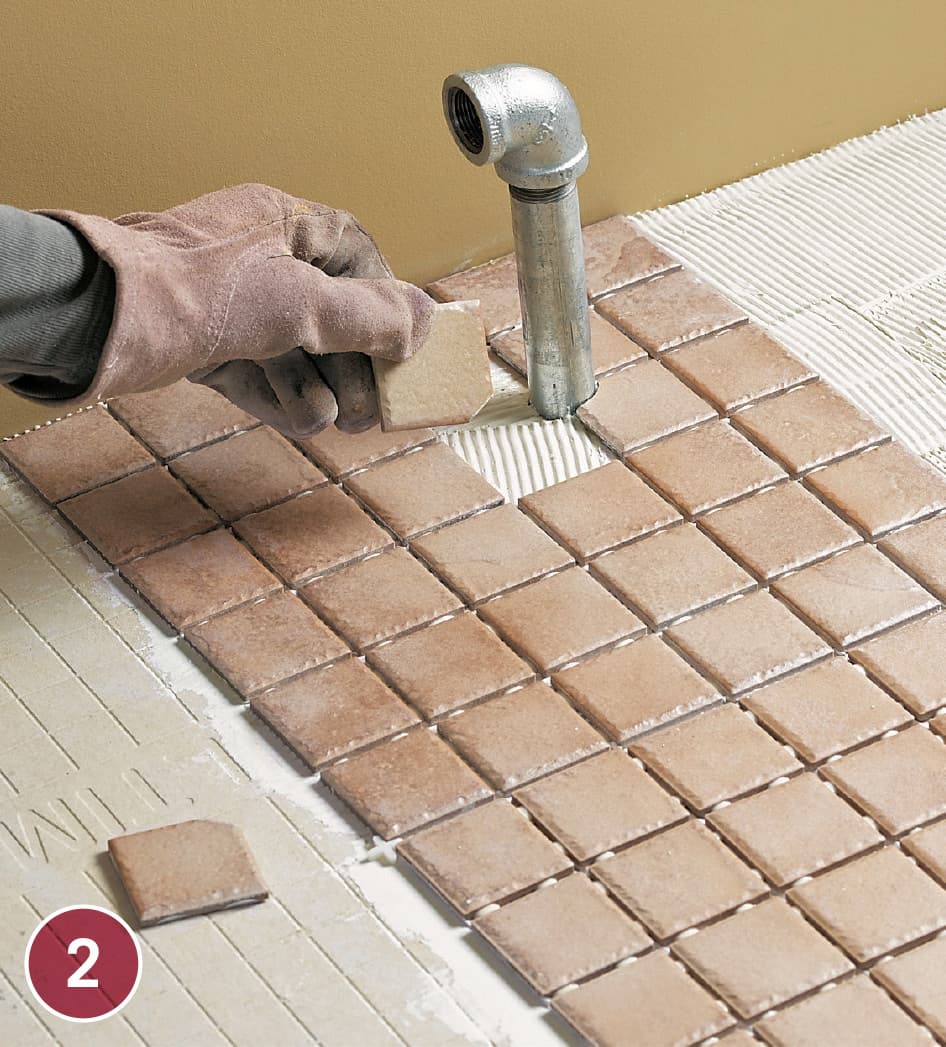
VARIATION: For mosaic sheets, use a 3/16" V-notched trowel to spread the mortar and a grout float to press the sheets into the mortar. Apply pressure gently to avoid creating an uneven surface.
VARIATION: For 16 × 16" or larger tiles or uneven stone, use a larger trowel with notches that are at least 1/2" deep.
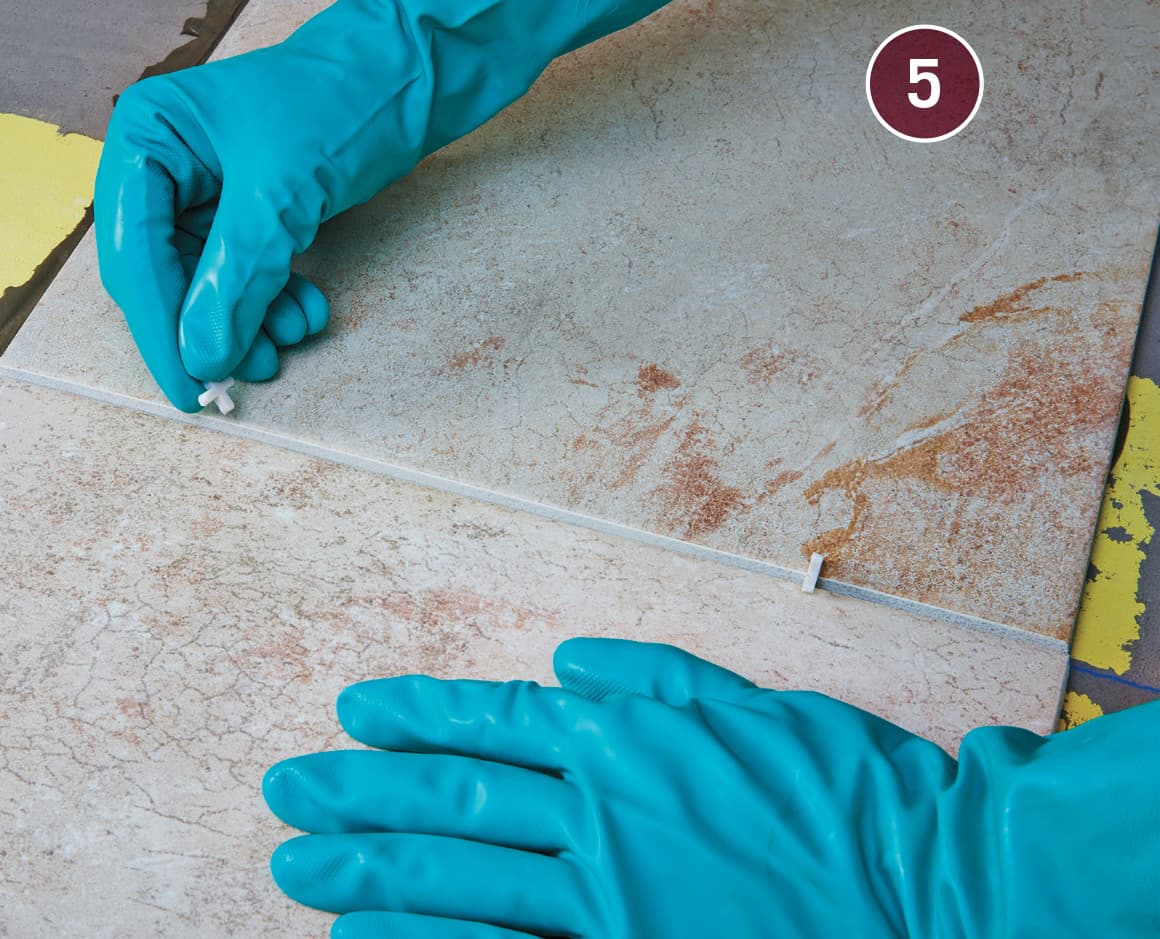
Continue laying tiles along one row, using spacers to maintain spacing between tiles. Use the appropriate spacers for the size tile you are laying, and stand them upright; do not lay spacers flat at tile intersections because they will be impossible to remove from the mortar and can compromise the integrity of the grout lines.

To make sure tiles are level with one another, place a straight 2 × 4 across several tiles in a row and tap the top of the board with a rubber mallet.
As you work, clean up any mortar on the top of the tiles as soon as you detect it. Use a damp sponge to wipe up the mortar completely, to ensure it doesn’t dry on the surface of the tile.

Lay the rest of the tile in the remaining area of the quadrant, repeating steps 2 through 7. Be careful to plan tile placement so that you don’t tile yourself into a corner. Avoid stepping or kneeling on the laid tiles.
 TIP
TIP
Use a small, flat plastering trowel to scrape up any mortar squeeze-out from the surface of the backer board around a set tile, so that you don’t wind up with too much under the adjacent tiles. When you’re ready to take a break or the mortar is starting to harden, clean up around the margins of the last tile you’ve laid with the same trowel.
In corners and against walls leave a gap of at least 1/4" between the tiles and the walls or cabinets. Make sure the gap is still narrow enough that your base shoe molding or trim will cover it.

To mark tile for cutting so it will fit between the end or edge of a row and the wall, lay the tile to be cut directly on top of the full tile it will sit next to. Stand one or two tiles up flat against the wall as spacers (this will account for an expansion and the grout space between tiles) and lay another tile on top of the tile to be marked, with the edge butted against the tiles on the wall. Mark the second tile for cutting. Check the dry fit and then apply mortar for two partial tiles at a time and set them in place, leaving an expansion gap between the tile edge and the wall or obstruction.

Measure, cut, and install tiles that require notches or curves to fit around obstacles, such as exposed pipes or toilet drains. See pages 26 to 29 for instructions on using nippers or a saw to make the cuts.

Continue laying tiles until the floor is complete. Allow 24 hours for the mortar to dry and then remove the spacers. To prepare for grouting, use painters’ tape to protect any trim that abuts the tiled surface.
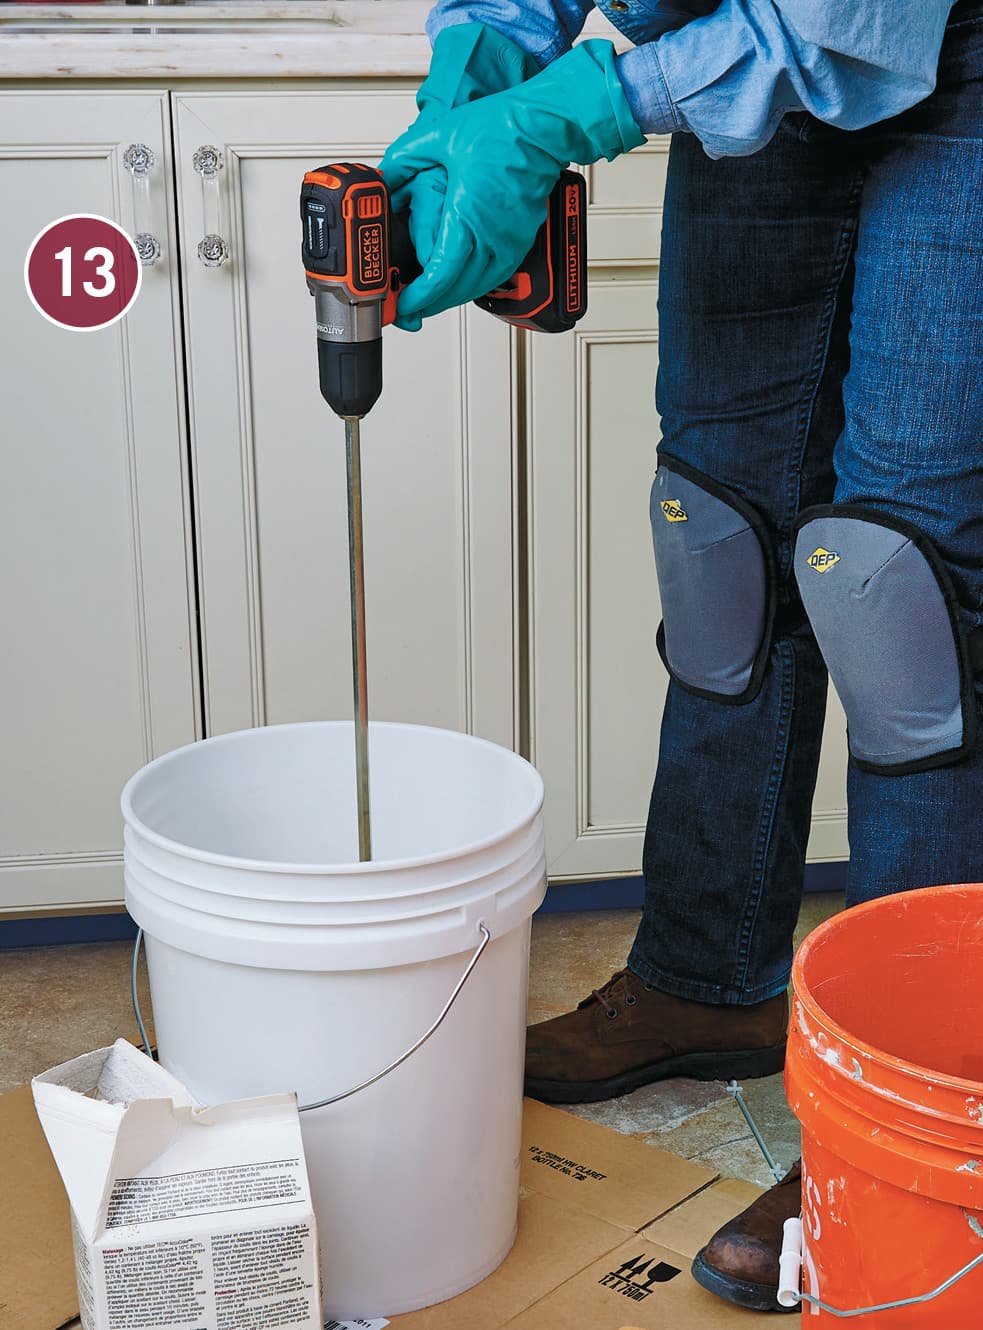
Mix the grout as you did the mortar, using the drill and paddle bit. Follow the instructions for the grout you’re using.
NOTE: When mixing grout for porous tile, such as unsealed quarry or natural stone, include an additive with a release agent to prevent the grout from bonding to the tile surfaces.

Start in a corner and pour a small amount of grout onto the tiles. Use the float to spread the grout out from the corner, working in smooth arcs and pressing the grout into the spaces between tiles. Hold the float at about a 60° angle and work in a figure-eight motion. Work on four-tile sections.

As you finish one small quadrant of tile, use the float and a small trowel to clean the excess grout off the surface of the tiles. Continue applying the grout at a 45°angle to the joints until you’ve finished about 25 sq. ft. of the floor.

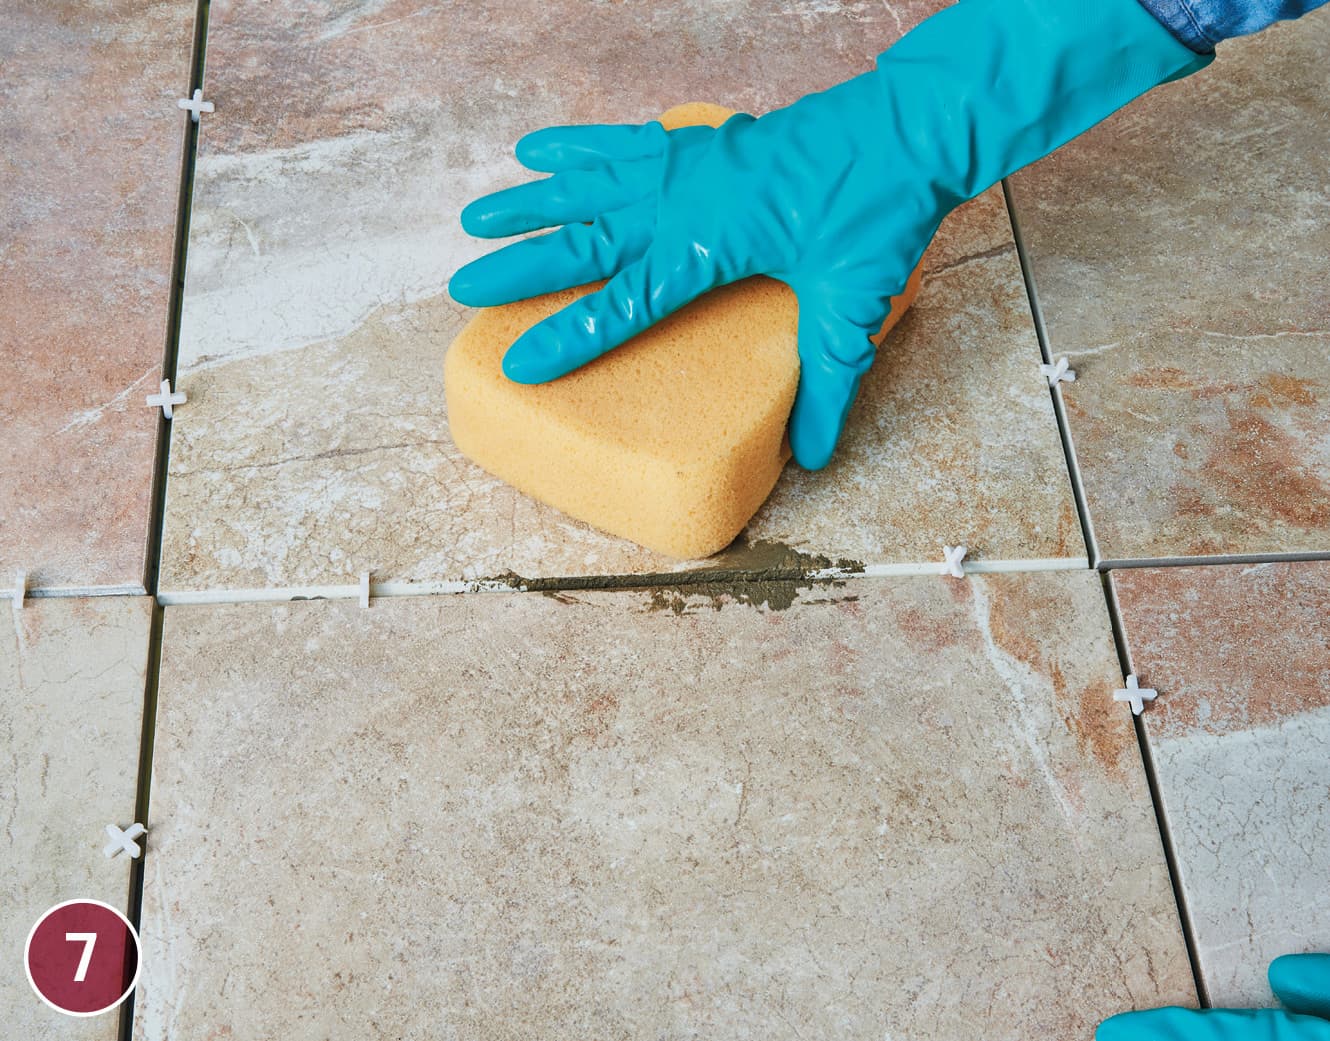
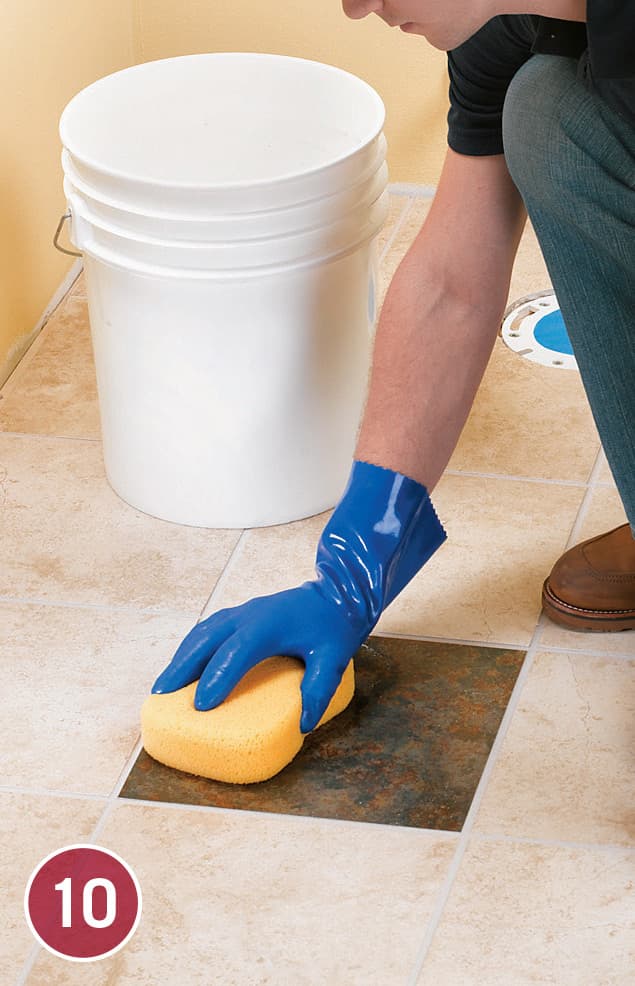
Wipe a damp grout sponge diagonally over about 2 sq. ft. of the floor to remove grout residue. Rinse the sponge in cool water between passes. Be careful not to press so hard you pull grout out of the joints, but use as many passes as necessary to clean the surface of the tiles. Change the rinse water frequently.
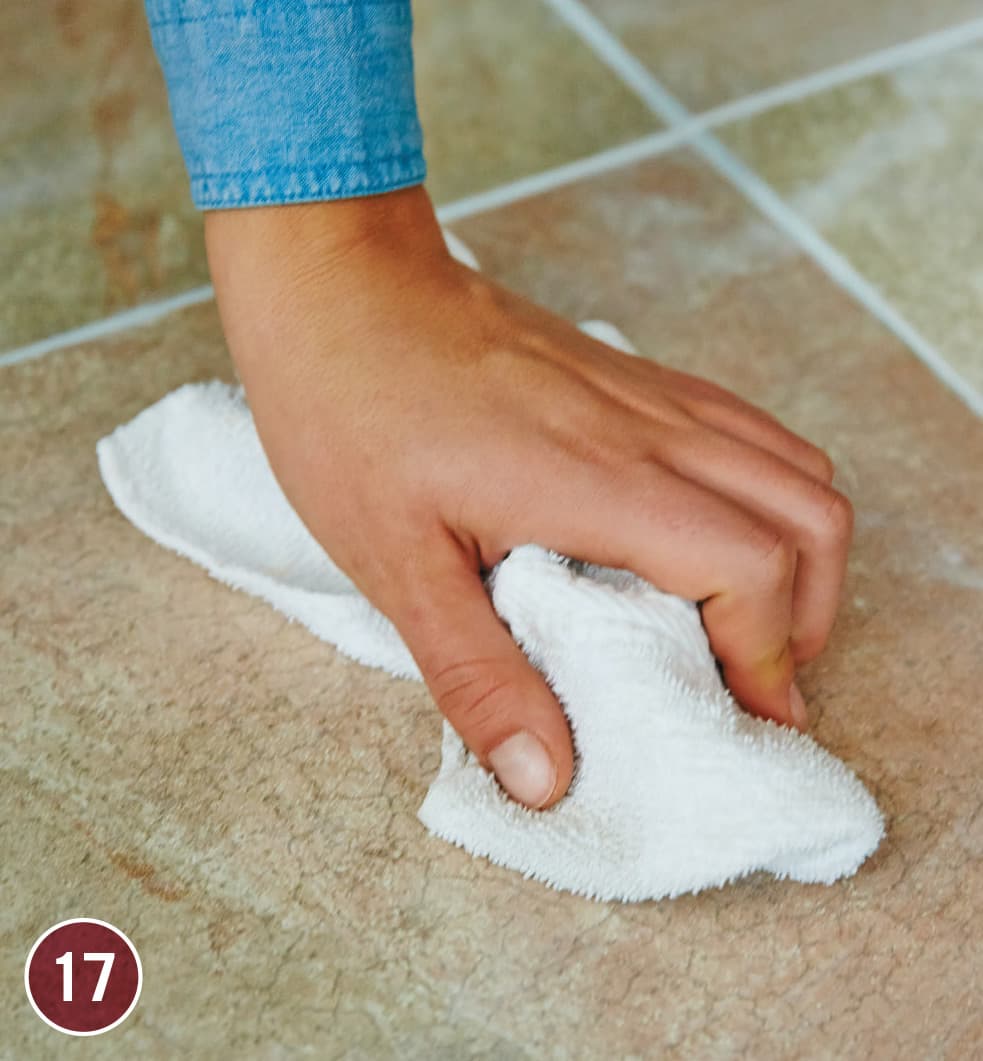
Allow the grout to dry for the recommended period (4 hours is a common drying time). Use a soft cloth such as folded cheesecloth to buff the tile surface and remove any remaining grout film. If any grout film remains, use a grout remover solution.
Ensure the integrity of the grout by misting it with water two to three times per day, for the first two or three days. This will help the grout cure evenly and completely and make it less likely to crack.
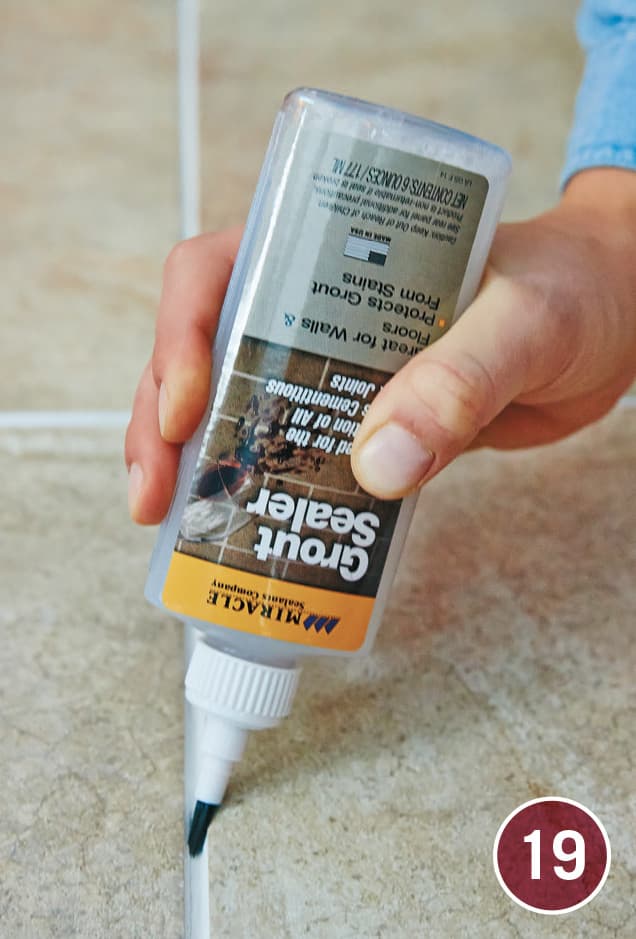
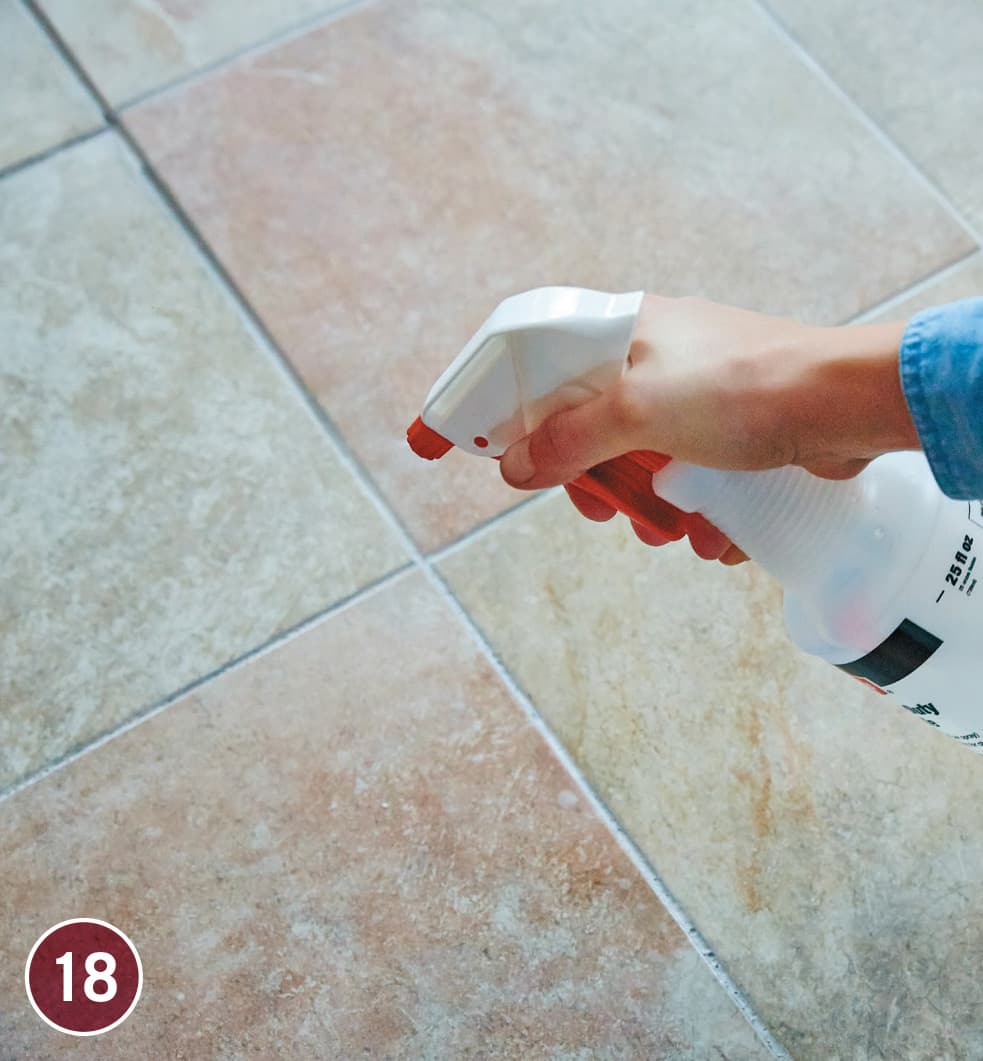
Apply grout sealer to all the grout lines. You can use an applicator bottle such as the one shown here, or you can use a formula meant to be applied with a small sponge or foam brush. Be careful to apply the sealer on the grout lines only.
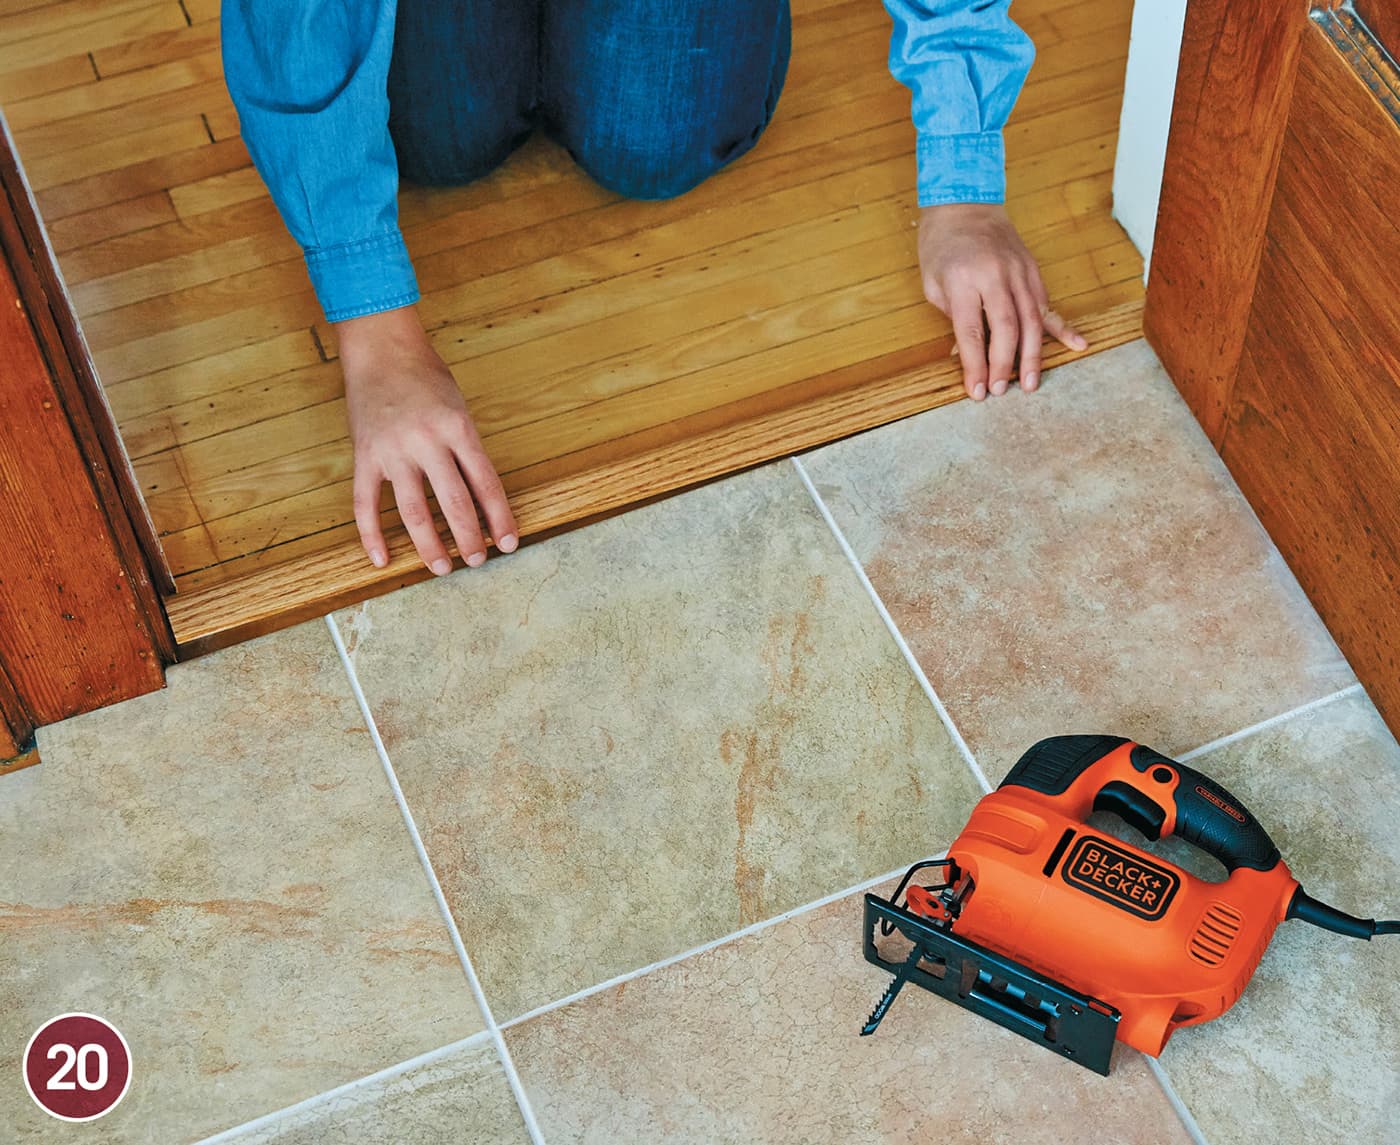
Install threshold transitions in doorways and between transitions to different flooring materials. If the threshold is too long for the doorway, cut it to fit with a jigsaw or circular saw equipped with a tungsten-carbide blade (if you are using a threshold made of tile). Depending on the type of threshold strip, either screw it down or set it in a bed of thinset mortar and allow 24 hours for the mortar to dry.
How to Install Bullnose Base Trim

Dry-fit the tiles to determine the best spacing. Grout lines in base tile do not always align with grout lines in the floor tile. Use rounded bullnose tiles at outside corners, and mark tiles for cutting as needed.
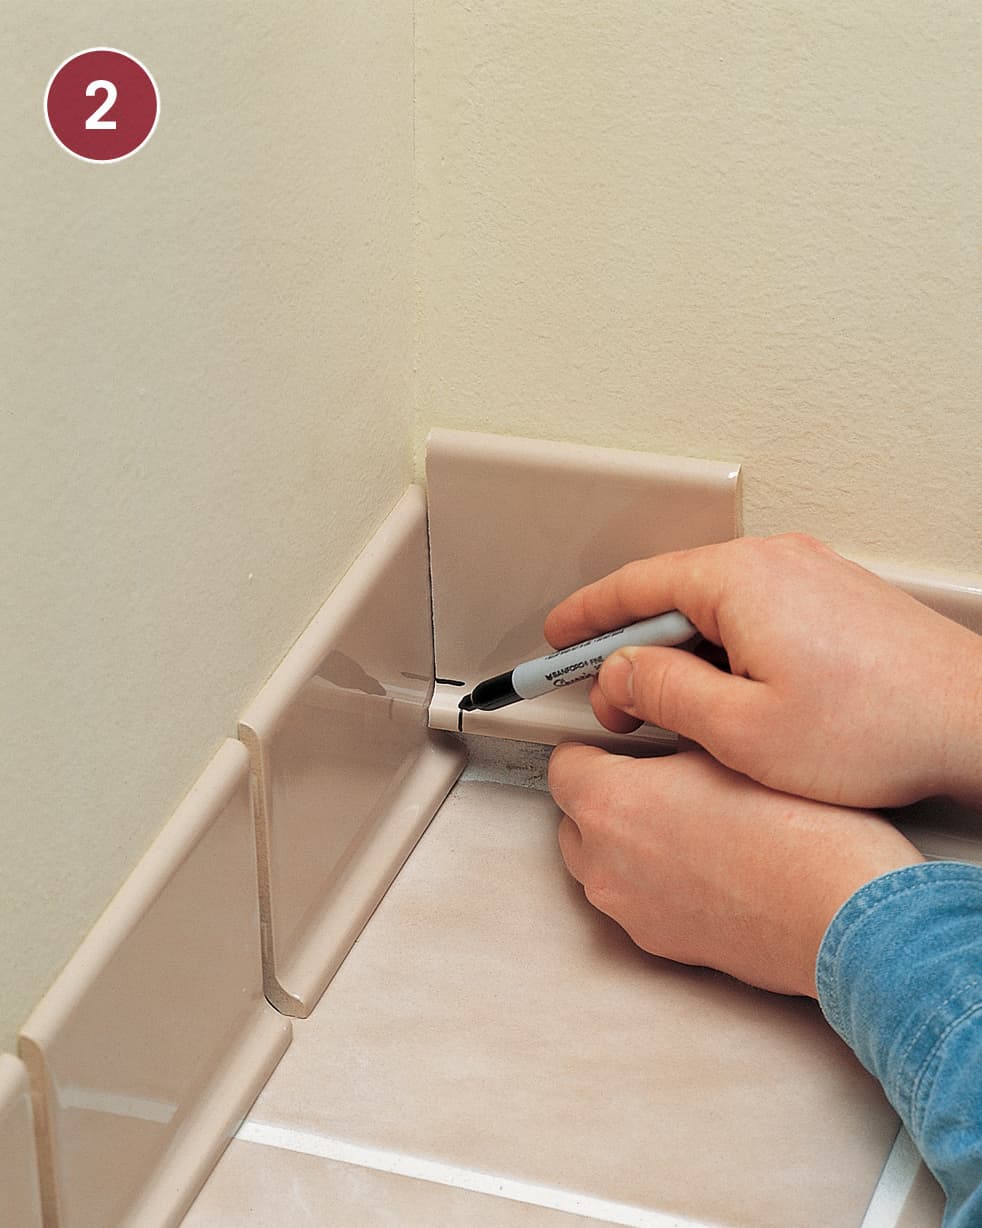
Leaving a 1/8" expansion gap between tiles at corners, mark any contour cuts necessary to allow the coved edges to fit together. Use a jigsaw with a tungsten-carbide blade to make curved cuts.
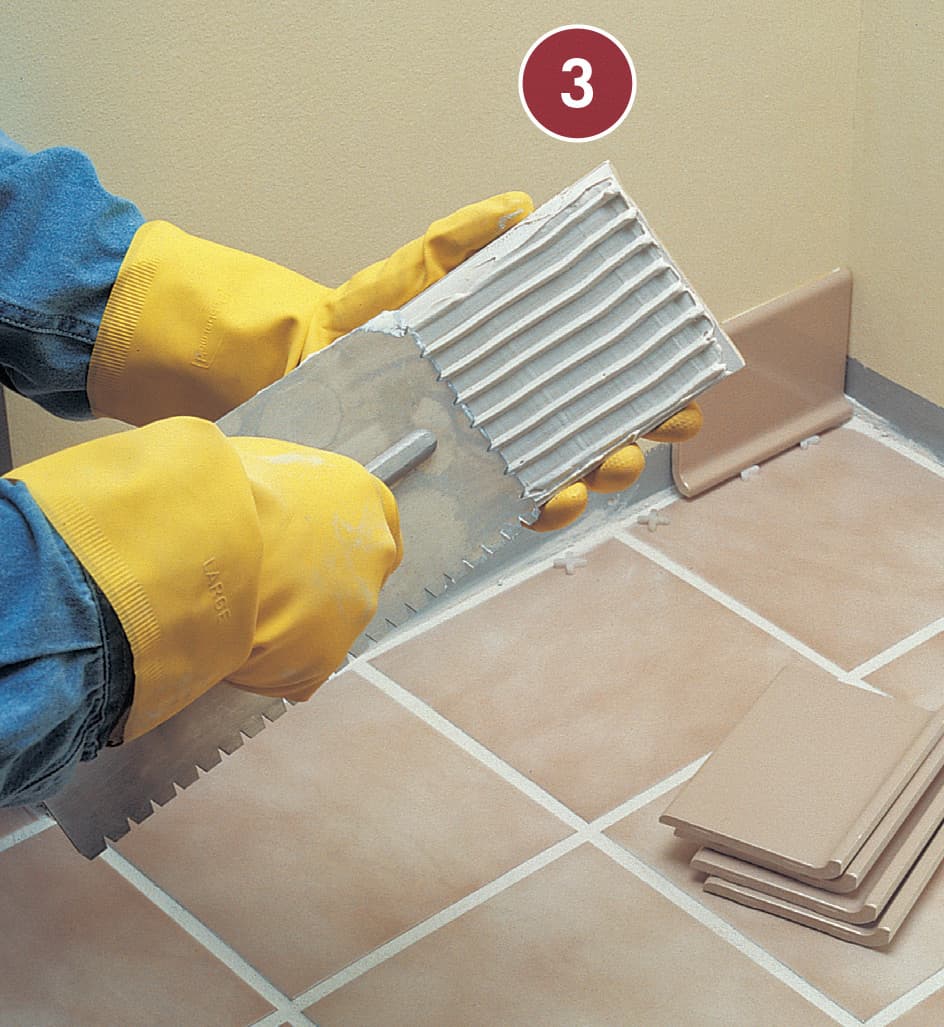
Begin installing base-trim tiles at an inside corner. Use a notched trowel to apply wall adhesive to the back of the tile. Place 1/8" spacers on the floor under each tile to create an expansion joint.
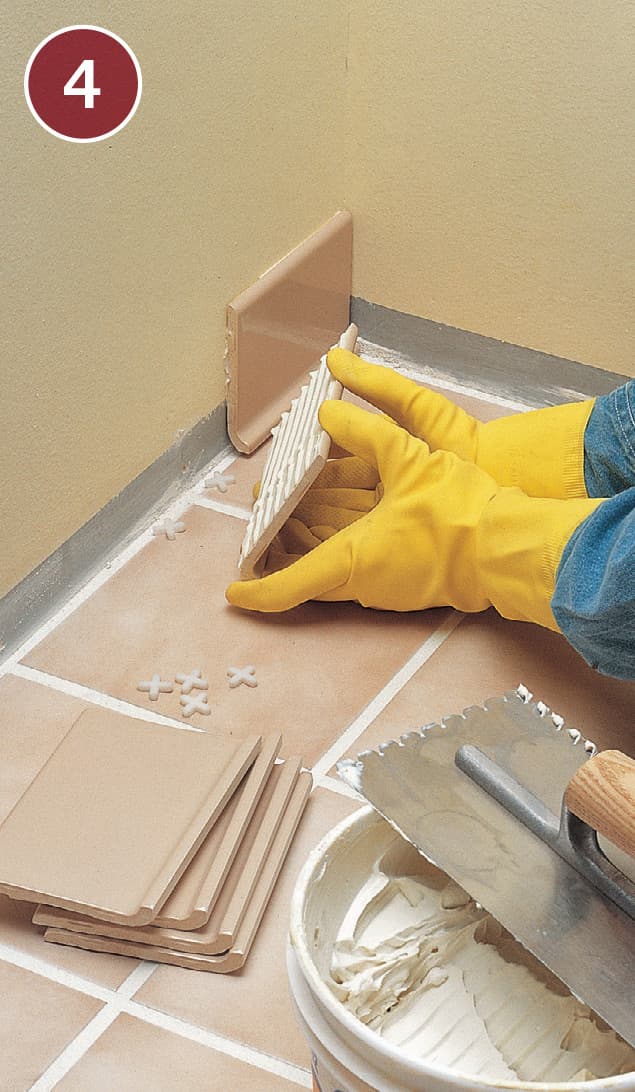
Press the tile onto the wall. Continue setting tiles, using spacers to maintain 1/8" gaps between the tiles and 1/8" expansion joints between the tiles and floor.
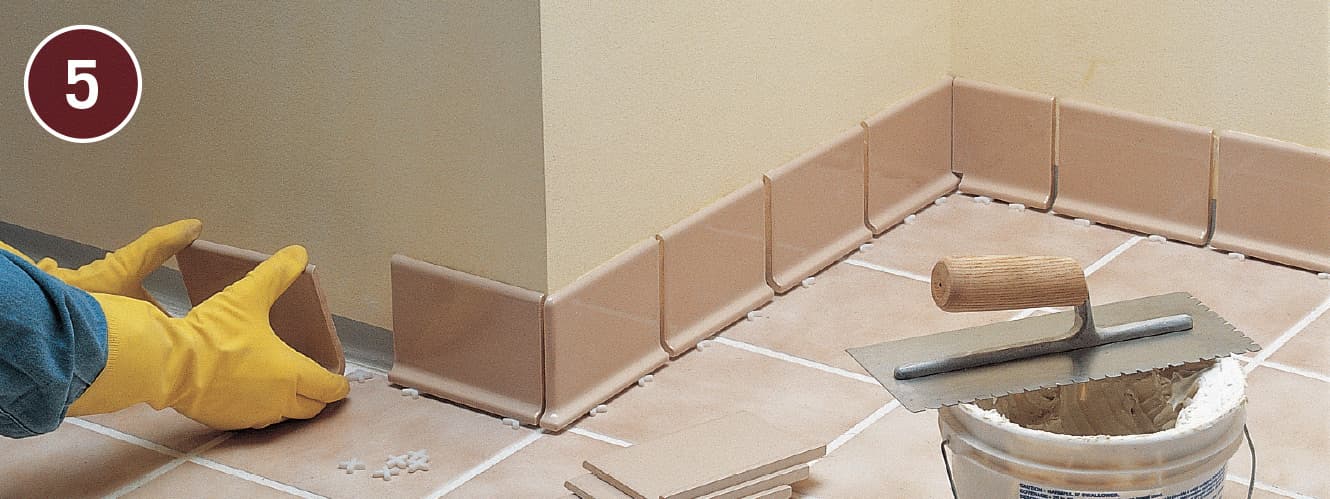
Use a double-bullnose tile on one side of outside corners to cover the edge of the adjoining tile.

After the adhesive dries, grout the vertical joints between tiles and apply grout along the tops of the tiles to make a continuous grout line. Once the grout hardens, fill the expansion joint between the tiles and floor with caulk.
Stone Floor with Medallion
A centerpiece stone medallion is simply one of the most impressive tile floor features you can install. This looks like hand-crafted, old world artistry but, using today’s prefab products, is not much more difficult to install than a simple grid stone floor. The secret is to take your time and plan carefully so that the medallion is placed exactly where it should be, in the middle of the field tile.
The medallion shown in this project is sold at retail as a single unit, with all the tiles attached to a mesh backing much like sheets of mosaic tiles. These medallions come in many shapes and sizes, but the majority are either square (diamond) or round. Keep in mind that the round ones take more work to install because of all the curved cuts you’ll have to make to the field tiles to fit the medallion’s shape.
Some round medallion designs are surrounded with a stone border so they install much like a square one. In the project seen here, a border of 6 × 6" Travertine floor tiles surrounds the medallion to enhance its impact and put it into better scale with the entry door.
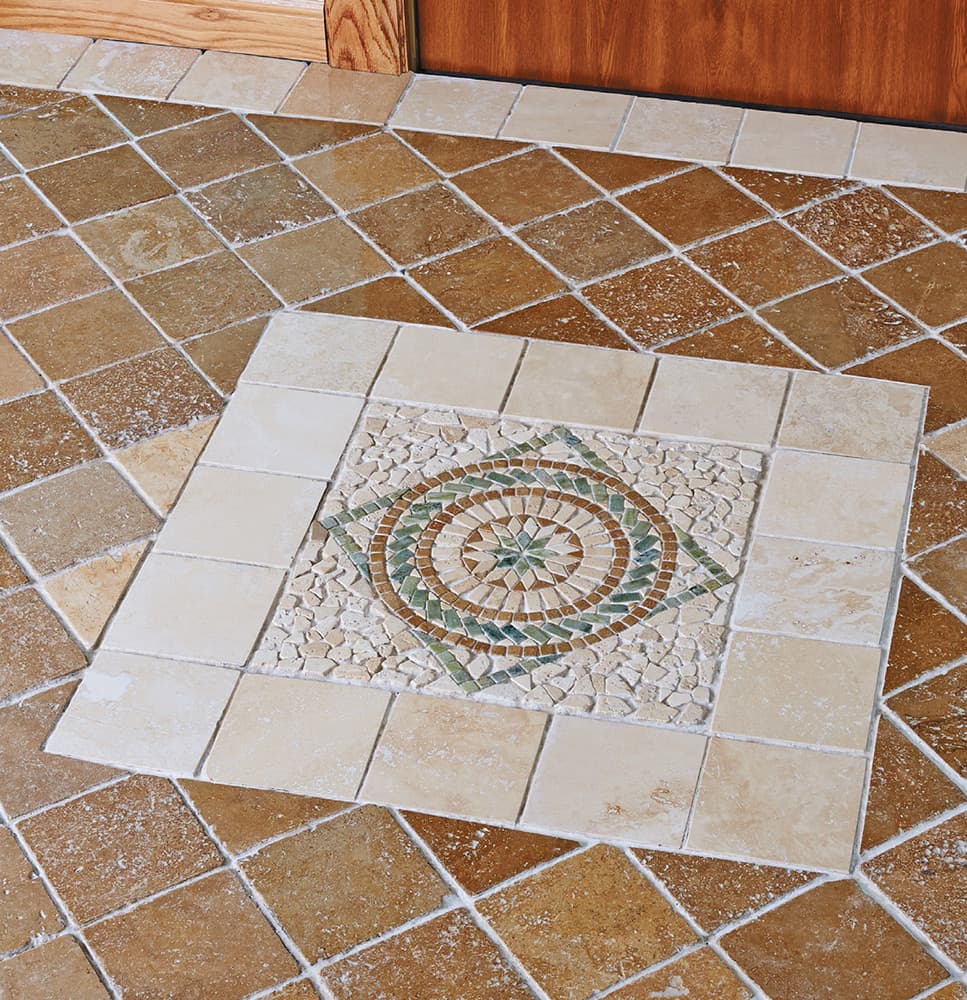
A properly laid medallion in the middle of a stone floor not only transforms the look of the floor, it can elevate the design of the entire room. If you work carefully, installing the medallion is not much more challenging than laying a basic tile floor.
TOOLS & MATERIALS
Grid paper
Pencil
Tile backer board
Thinset mortar
Trowel
Chalkline
Large scrap cardboard (or wide butcher’s paper)
Bucket
Power drill with paddle attachment
Prefab tumbled stone medallion
Stone tiles
Measuring tape
Scrap 2 × 4
Mallet
Grout
Grout float
Grout sponge
Clean rag
Tile nippers or wet saw
How to Install a Stone Tile Floor and Medallion
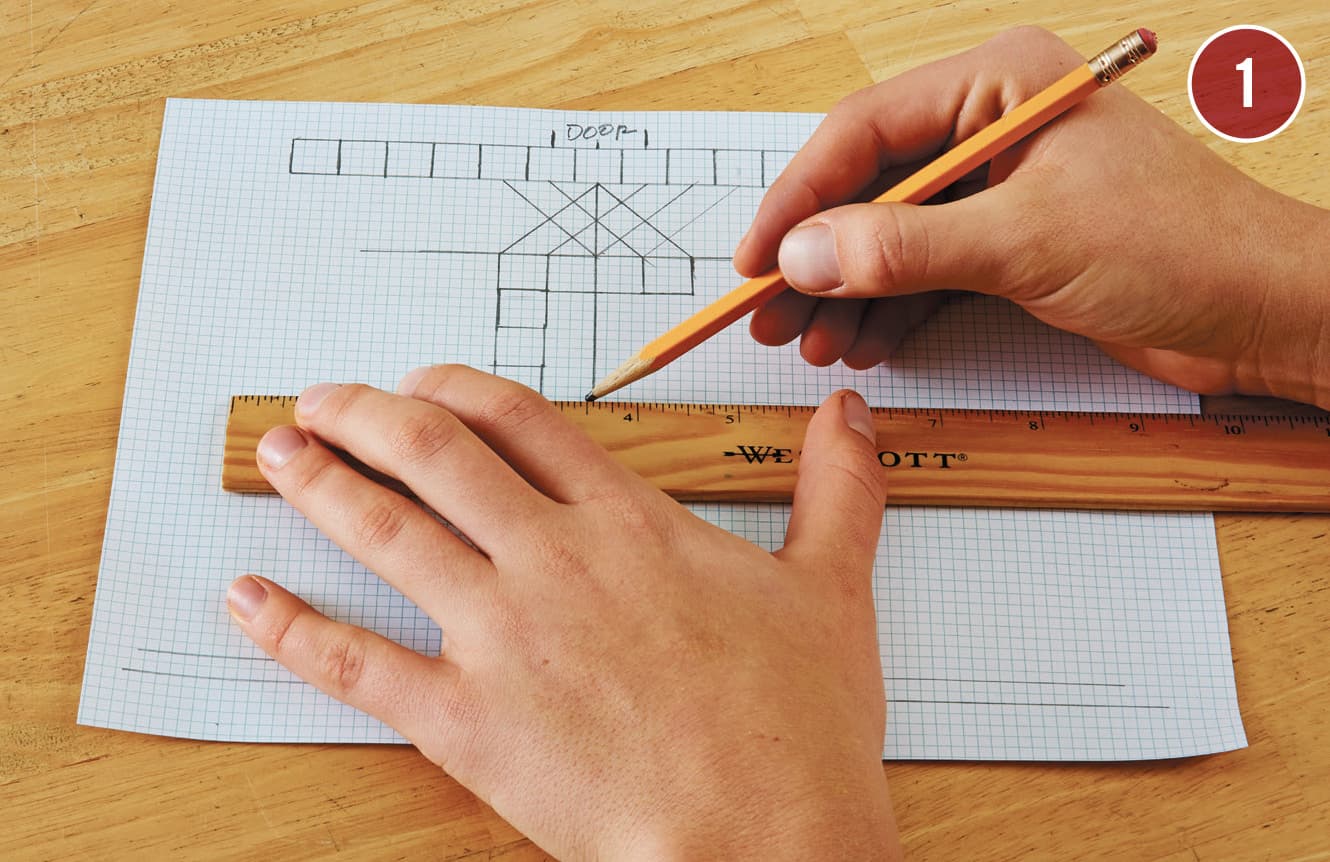
Plan out the tile pattern on paper, with the expectation of adjusting the layout as necessary when the tiles are dry laid. You can use any of a number of computer programs available, or layout the design on grid paper.
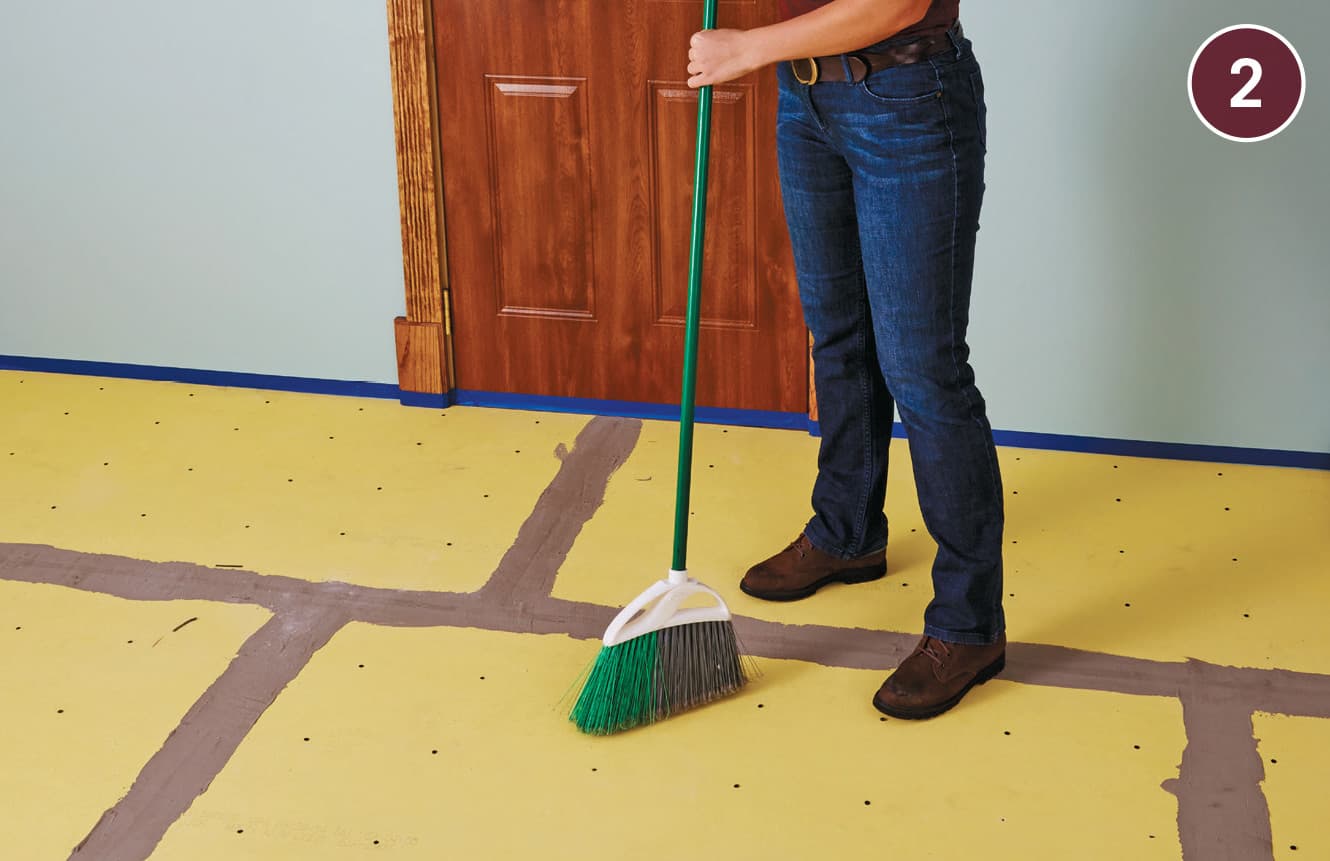
Prepare the floor (see pages 64 to 75). Remove old, unstable, or damaged flooring. Repair or replace the subflooring and level as necessary to create a solid, stable surface for the new tile. Install backer board over the subfloor. Remove any thresholds and cut door and trim as necessary to fit the final height of the flooring. Sweep the floor thoroughly before you start your project.

Establish the layout grid. In this case, the field tiles are laid in a diamond pattern relative to the entry door wall. Measure, mark, and snap chalklines for the center lines. Snap a chalkline diagonally from opposite corners, using a speed square to ensure a 90° angle to the center point. Continue measuring and snapping chalklines for smaller diamond shapes (including 1/8" for each grout line) to break the work area into smaller spaces.
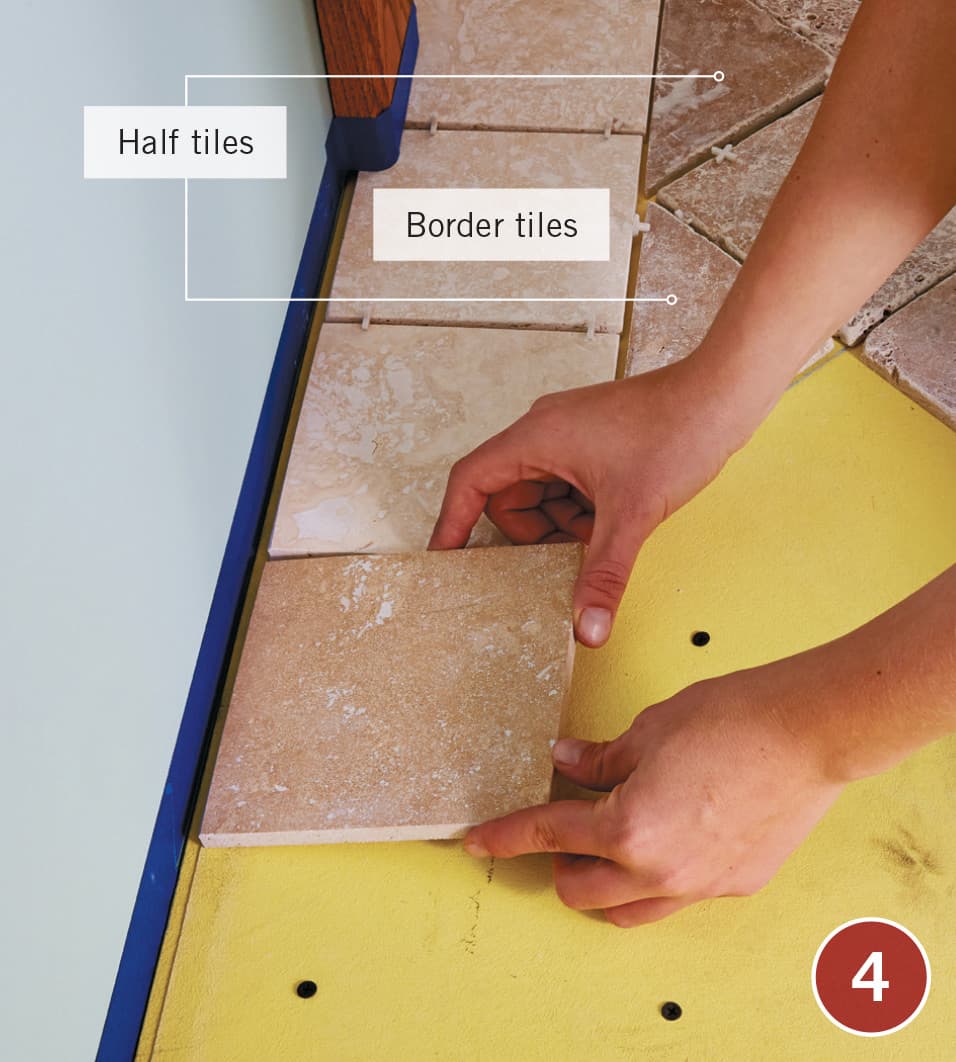
Dry-lay the border and field tiles. Because the diamond pattern requires that the first course be fashioned with half-tile cut on the diagonal, you can either leave spaces for these cut tiles or, if you’re laying a plain square border as shown here, cut them all at once. Use spacers to check that the tiles are positioned correctly. Adjust as necessary to ensure that no unusually small pieces are used in conspicuous locations. Tile up to and beyond the rough area where you wish to locate the medallion.
Lay the medallion on a large sheet of cardboard or paper. Trace a thick outline around the outside of the medallion, to represent the width of the grout line. Cut out the template, cutting outside the marked line.
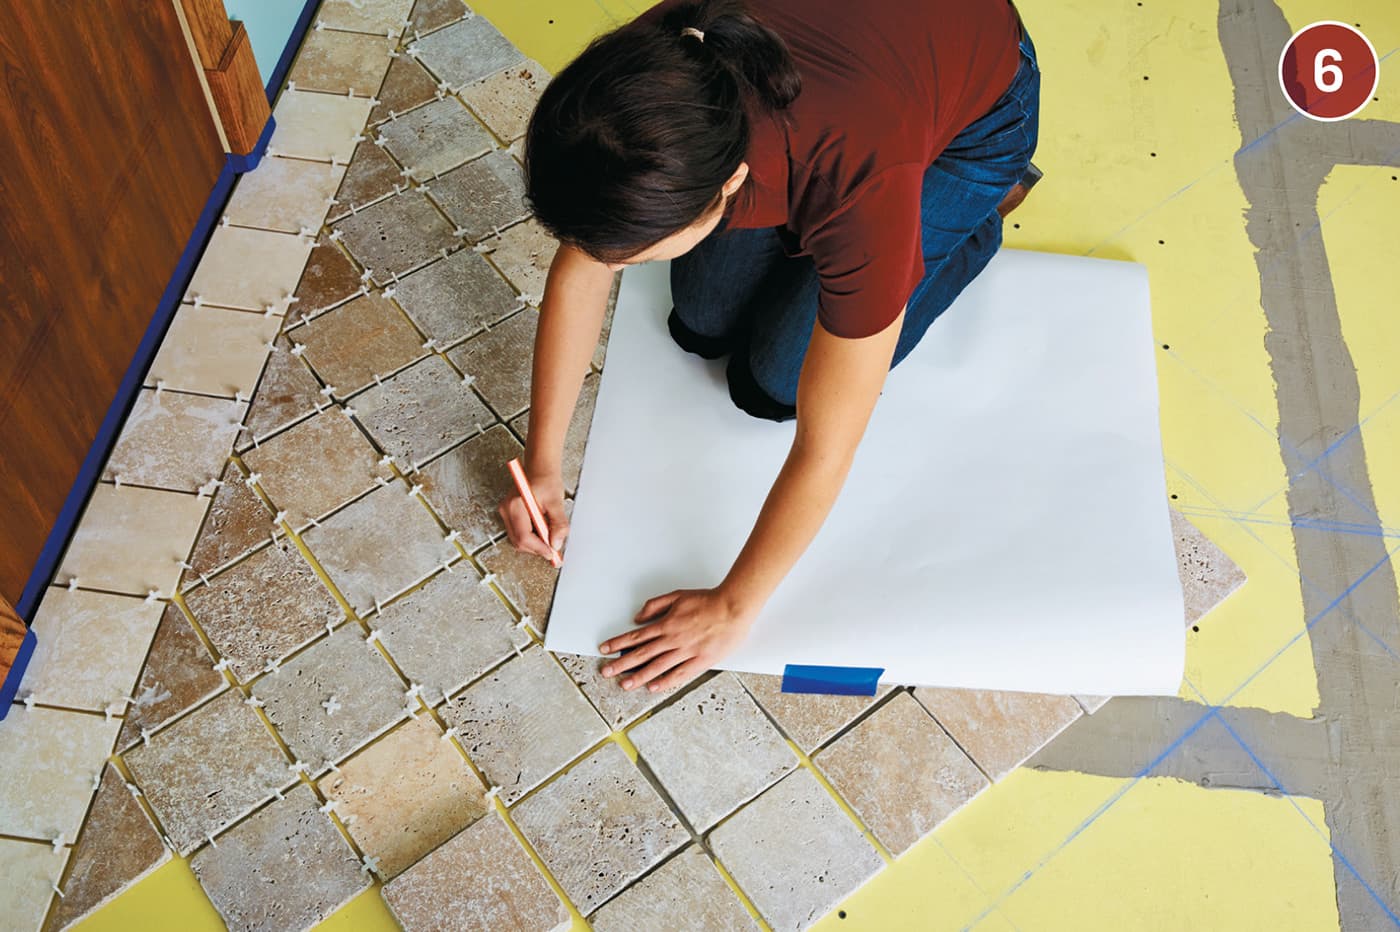
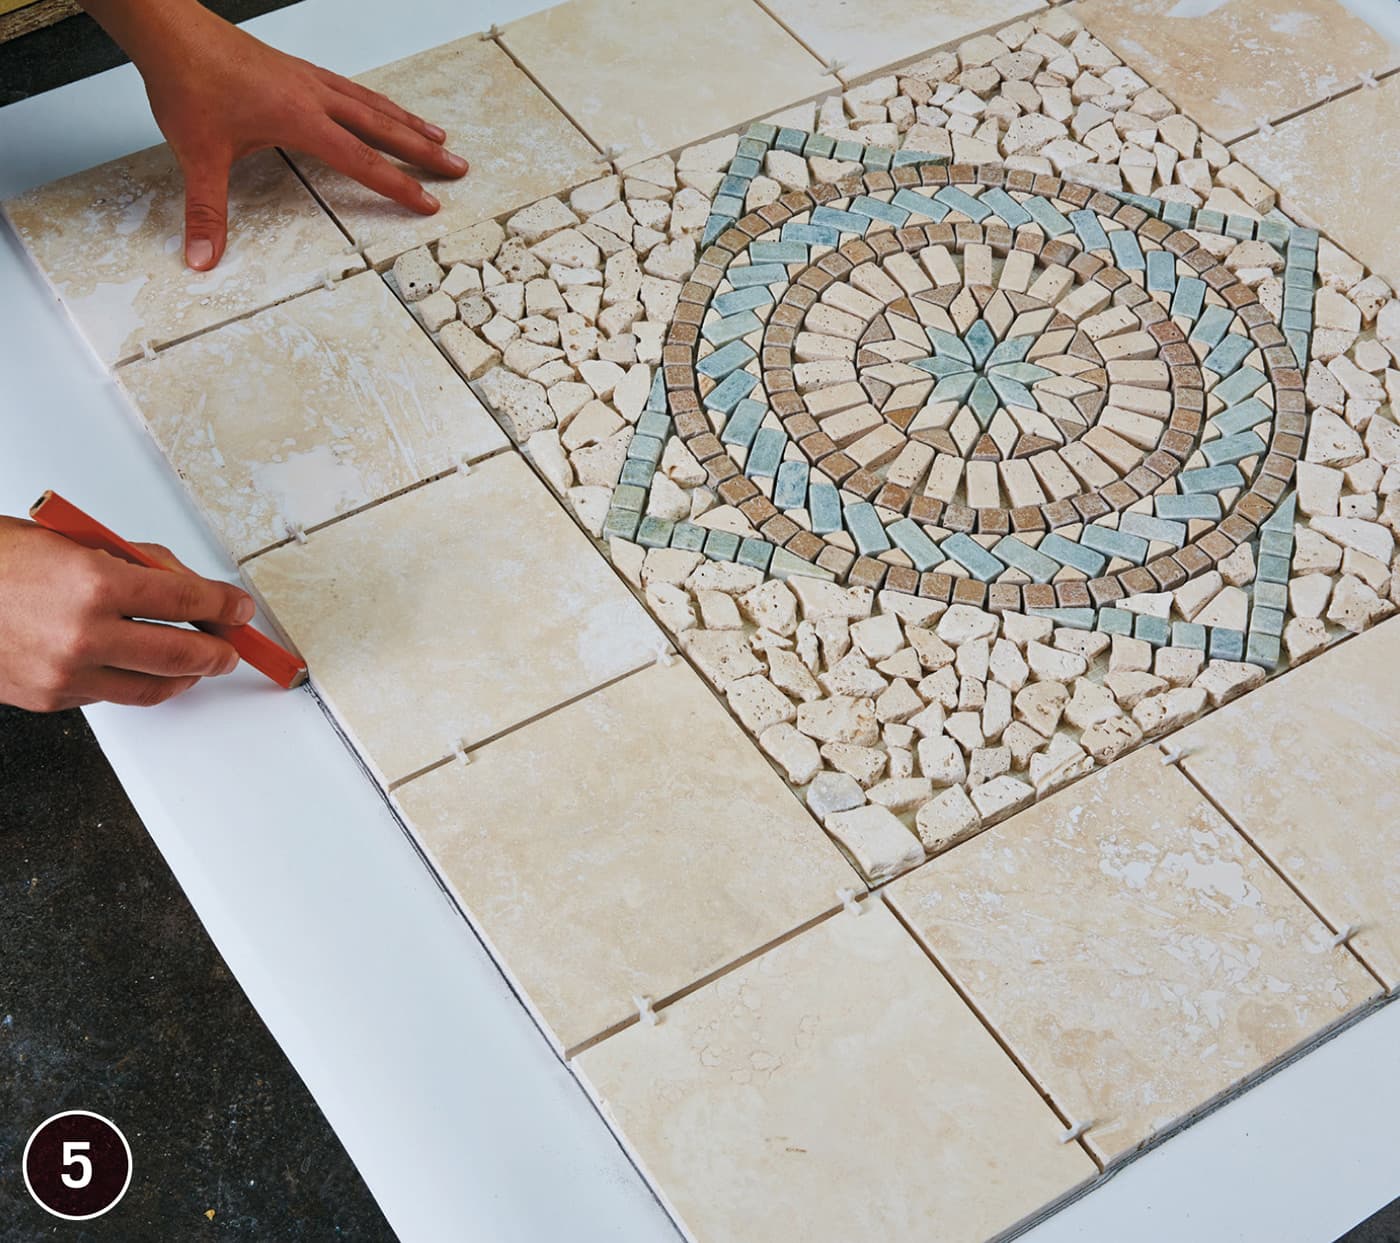
Set the medallion template on top of the tiles where you want to place the medallion. Avoid positioning it so you will have to make a lot of delicate or unnecessary cuts. Once you’re sure of the position, tape the template in place. Trace around the template with a carpenters pencil, marking the tiles underneath for cutting.
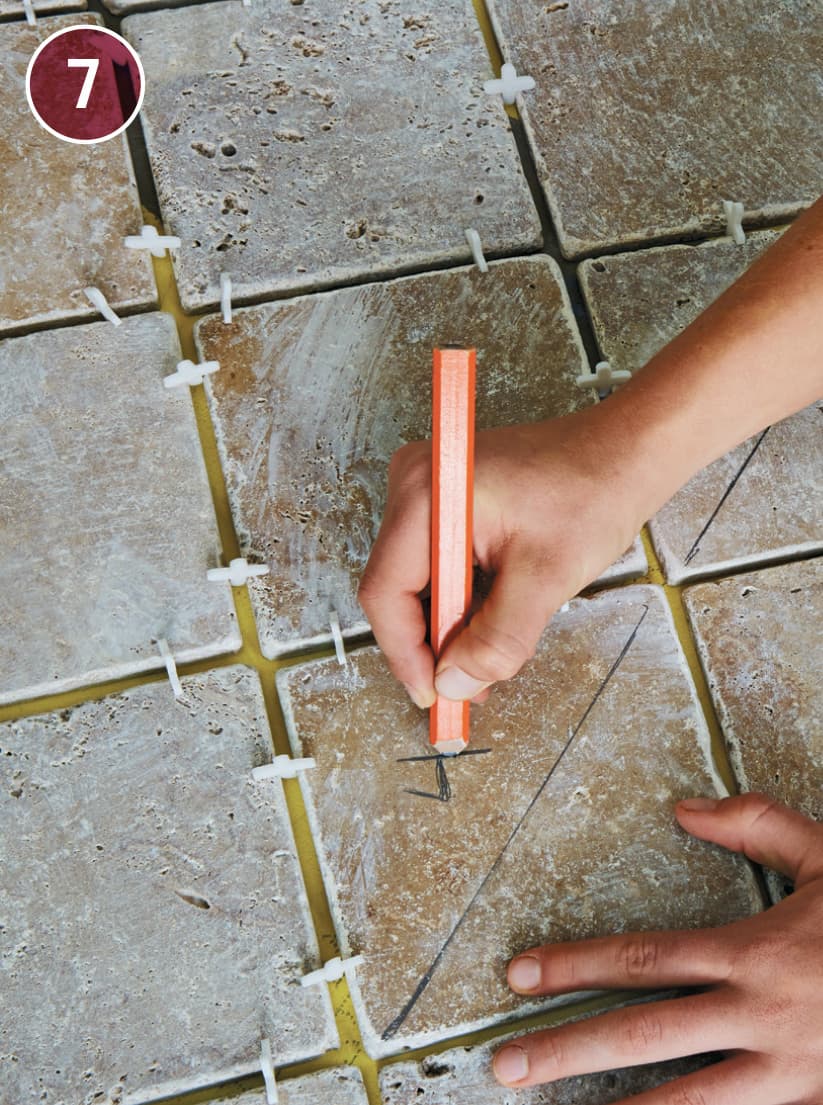
Before disassembling your dry lay, number all tiles that will need to be cut so you can lay them in the correct order.

Cut the field tiles to fit around the medallion according to your layout and cutting lines. For thick floor tiles, such as the Travertine tiles seen here, a wet saw works much better than a snap cutter for making straight cuts.
TIP: If you’re cutting dark stone tile, cover the cut area with masking tape and mark the cut on the tape so that it is easier to see and follow the cut line.
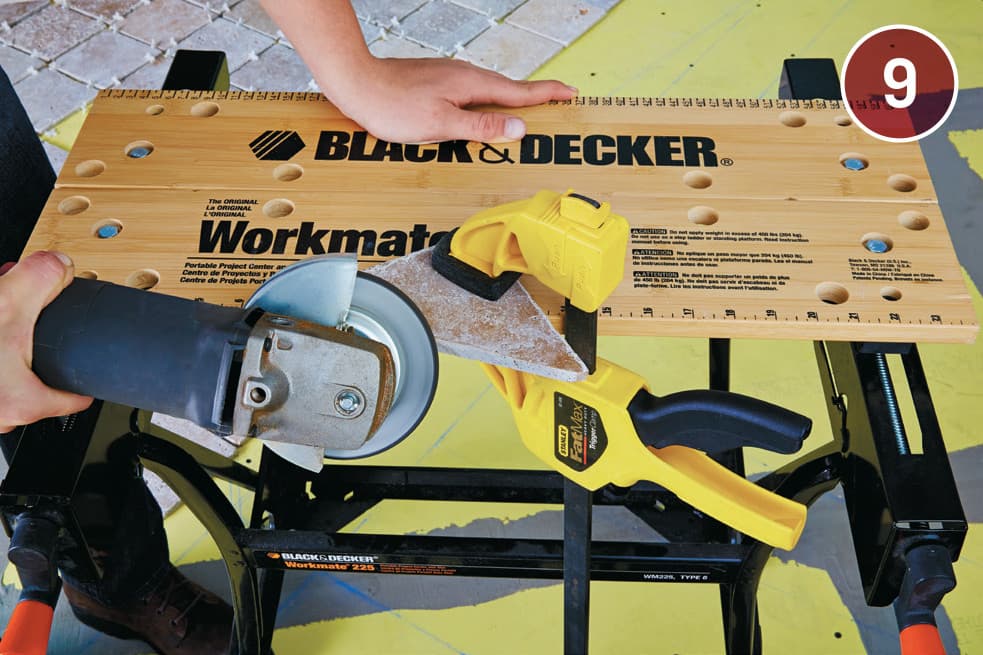
Use an angle grinder with a diamond blade to clean up any rough edges or to trim a tile if it is cut slightly too large. Make sure the tile is secured to your worksurface.
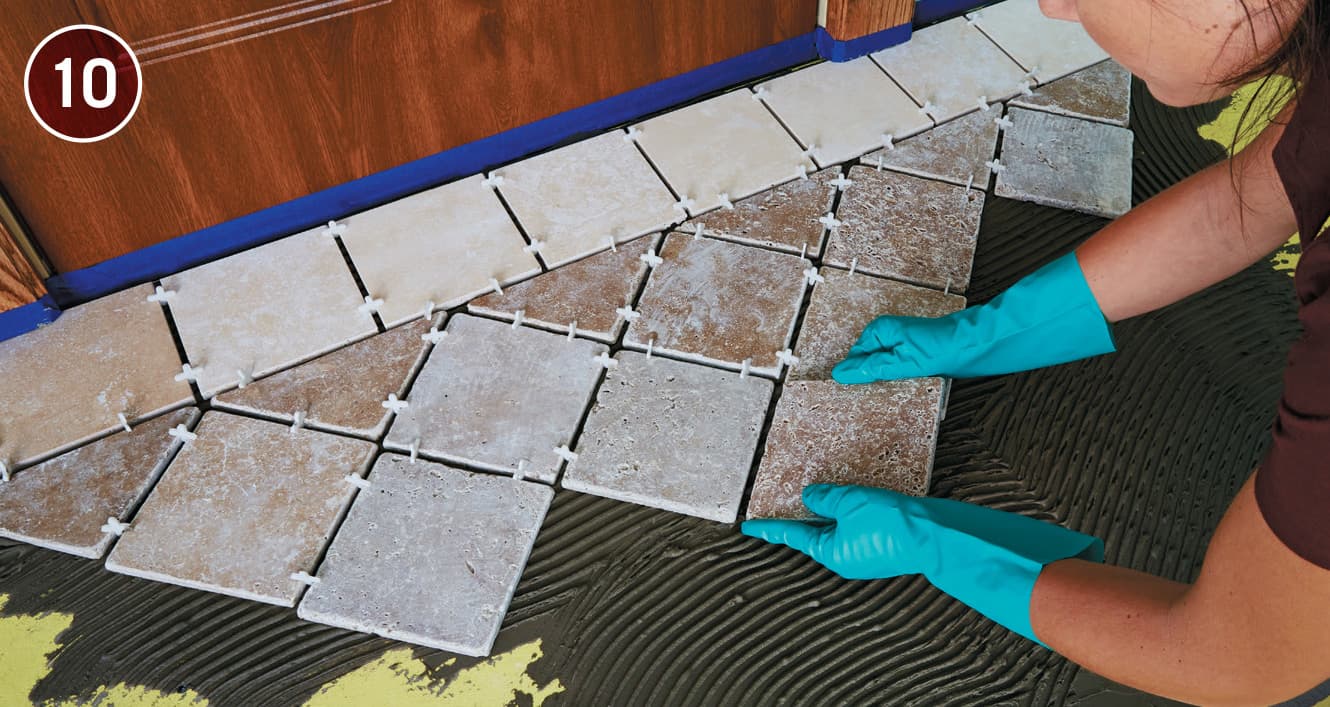
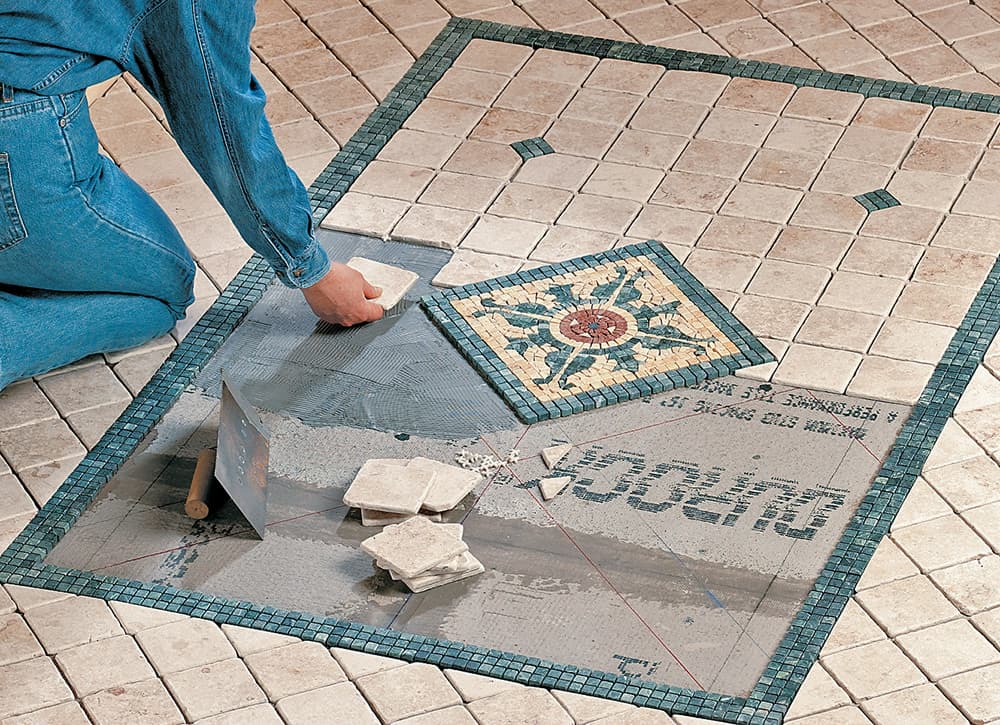
Apply a setting bed of thinset mortar according to the recommendations for your tile (here, a 1/4 × 1/4" square-notch trowel is used). Begin laying the tiles along one outside edge, working in toward the center. Here, a border of tiles matching the medallion border is laid first, followed by a course of triangular half-tiles. Follow the chalklines so that the medallion will fit exactly in the space you’ve allotted. Set the center tiles in place around the medallion opening, replacing the cut tiles in the correct order.

TIP: If you need to make any inside curve cuts, use the wet saw to cut “spokes” perpendicular to the edge of the curve, as if they were being cut from a central hub. Score along the curve with an awl and then break off the “fingers.” Clean up the curve with the edge of the saw blade, working slowly and carefully to avoid damaging the blade.
TIP: If you need to make any inside curve cuts, use the wet saw to cut “spokes” perpendicular to the edge of the curve, as if they were being cut from a central hub. Score along the curve with an awl and then break off the “fingers.” Clean up the curve with the edge of the saw blade, working slowly and carefully to avoid damaging the blade.
BUTTERING TILES
When working with heavy stone tiles, an individual tile may sit lower than those next to it when set it place. There’s an easy fix. Pry up the tile and “butter” the back with a layer of thinset mortar, using the trowel. Set the tile in place and set a straight, clean 2 × 4 spanning across the tile and its neighbors. Tap the wood with a rubber mallet to set the tile, until it is perfectly level with the surrounding tiles.
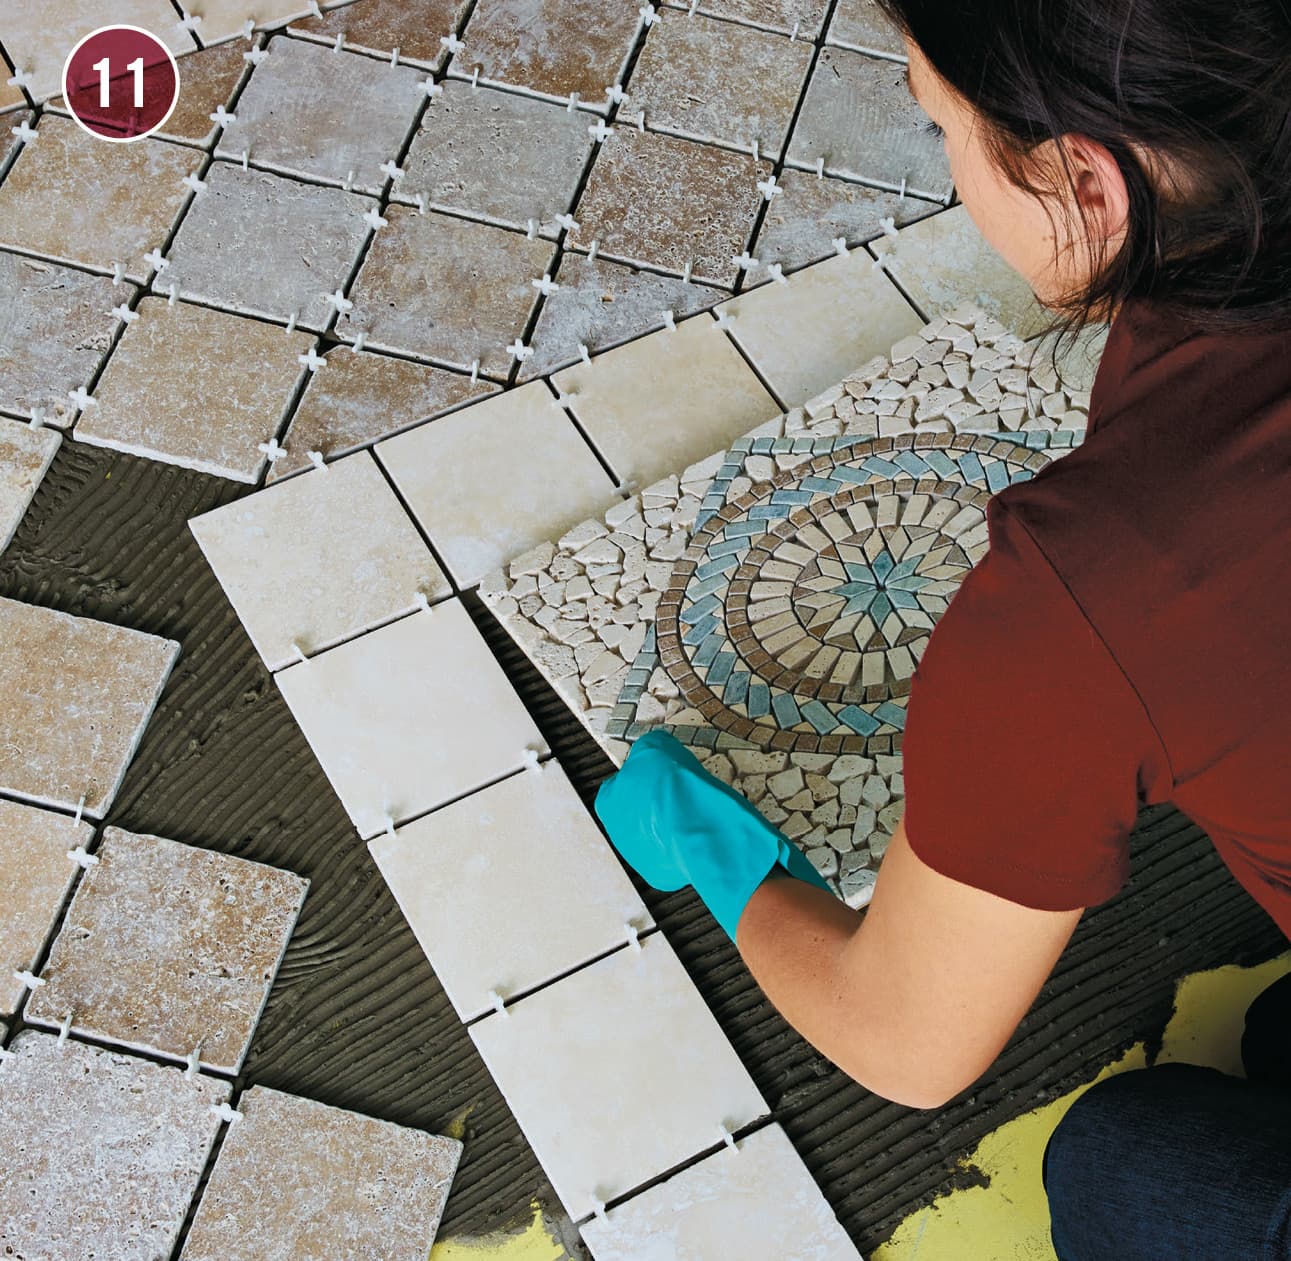
Lay a bed of thinset mortar in the medallion opening, and then carefully place the medallion into the opening. If you are setting border tiles, install them first. Twist the medallion slightly so that it is centered in the space. Fill in any unlaid tiles around the medallion opening.
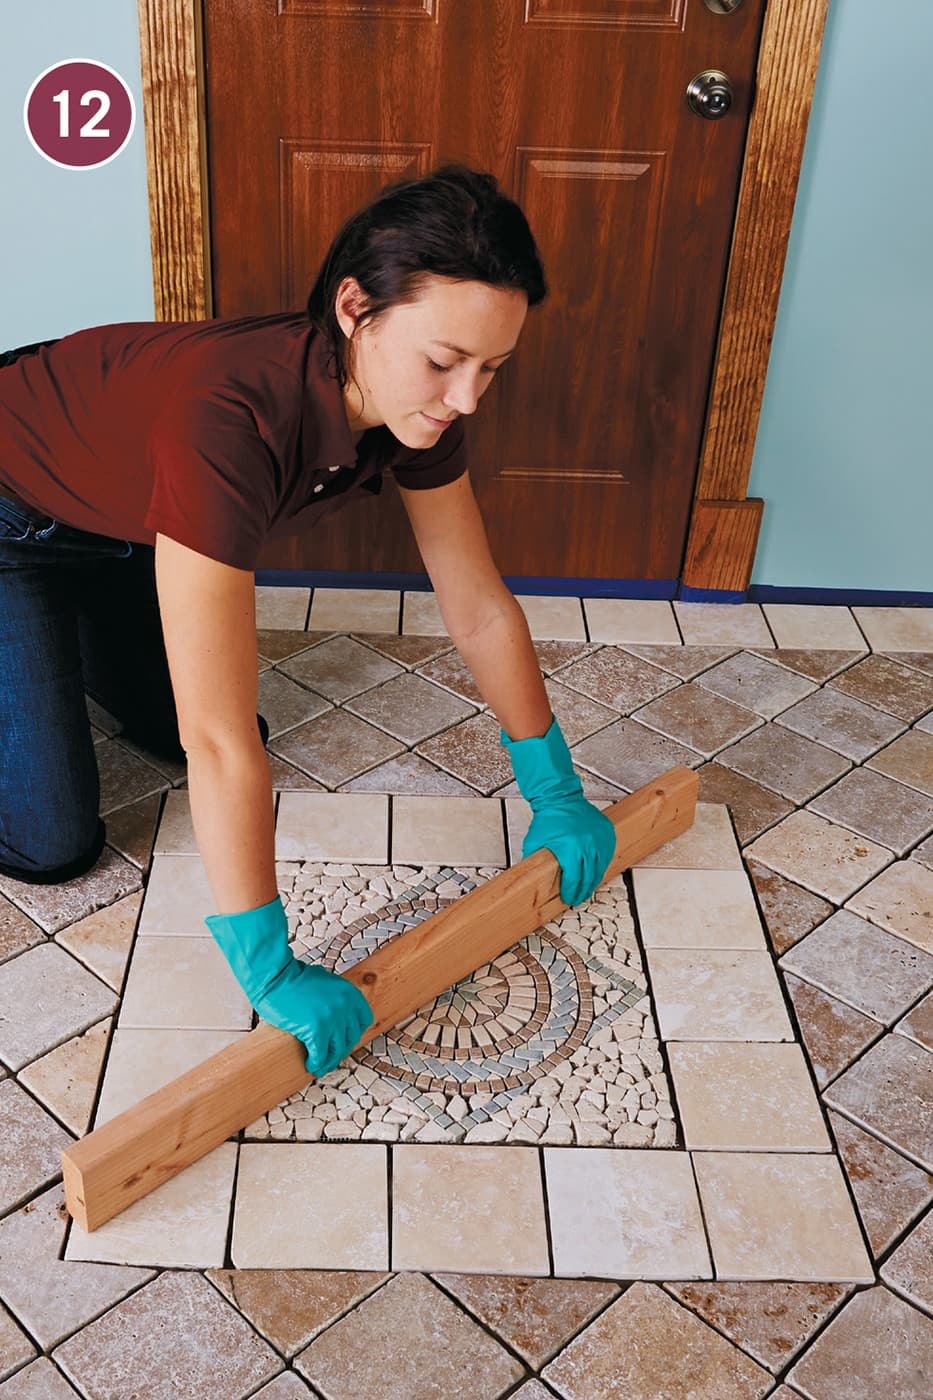
Use a straight 2 × 4 to press the medallion down into the mortar bed, while keeping it level with the surrounding tiles. Level it in all directions. If any section is lower than the rest, cut it out of the backing, lift it, and butter the back of the section.
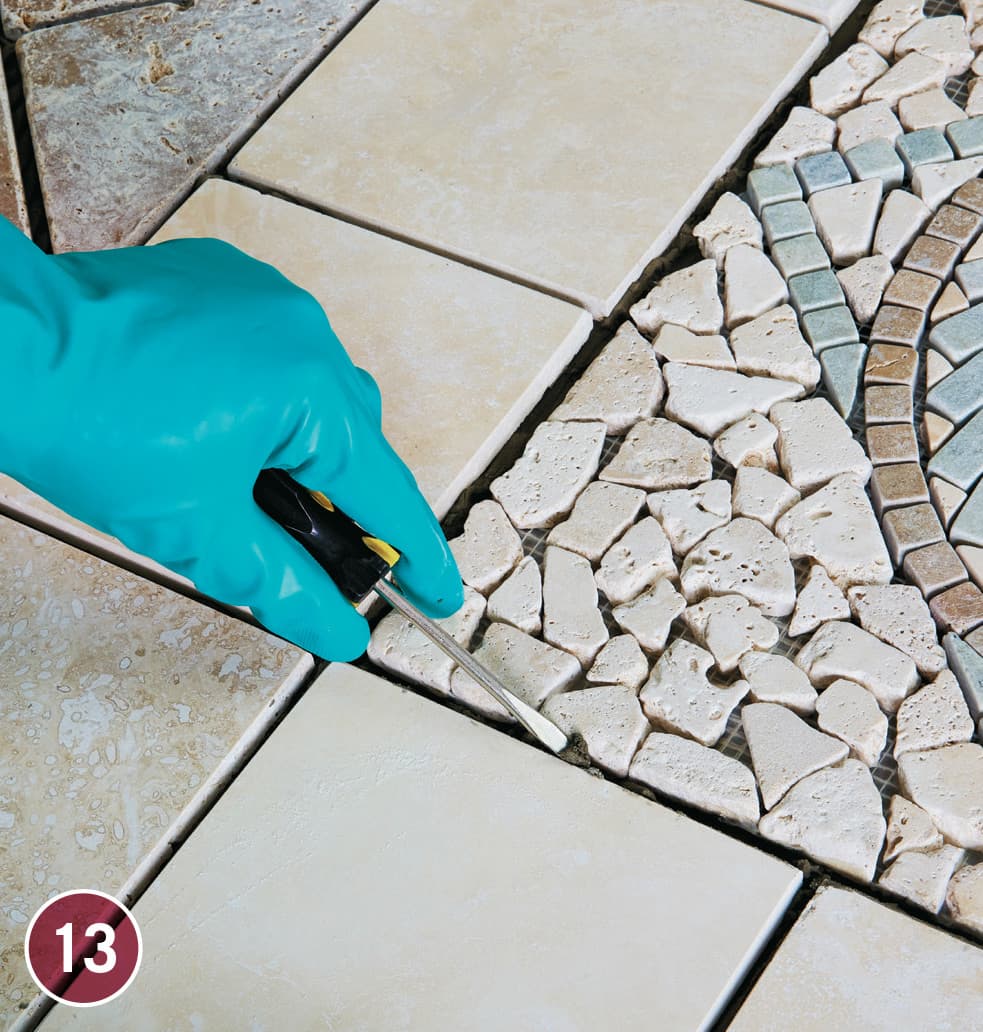
Mortar may squeeze up between smaller pieces of the medallion, although more often the mosaic backing prevents this. You are likely to get some squeezeout around the edges of the mosaic, however. If so, clean out the excess mortar while the mortar is still wet to make room for your grout.
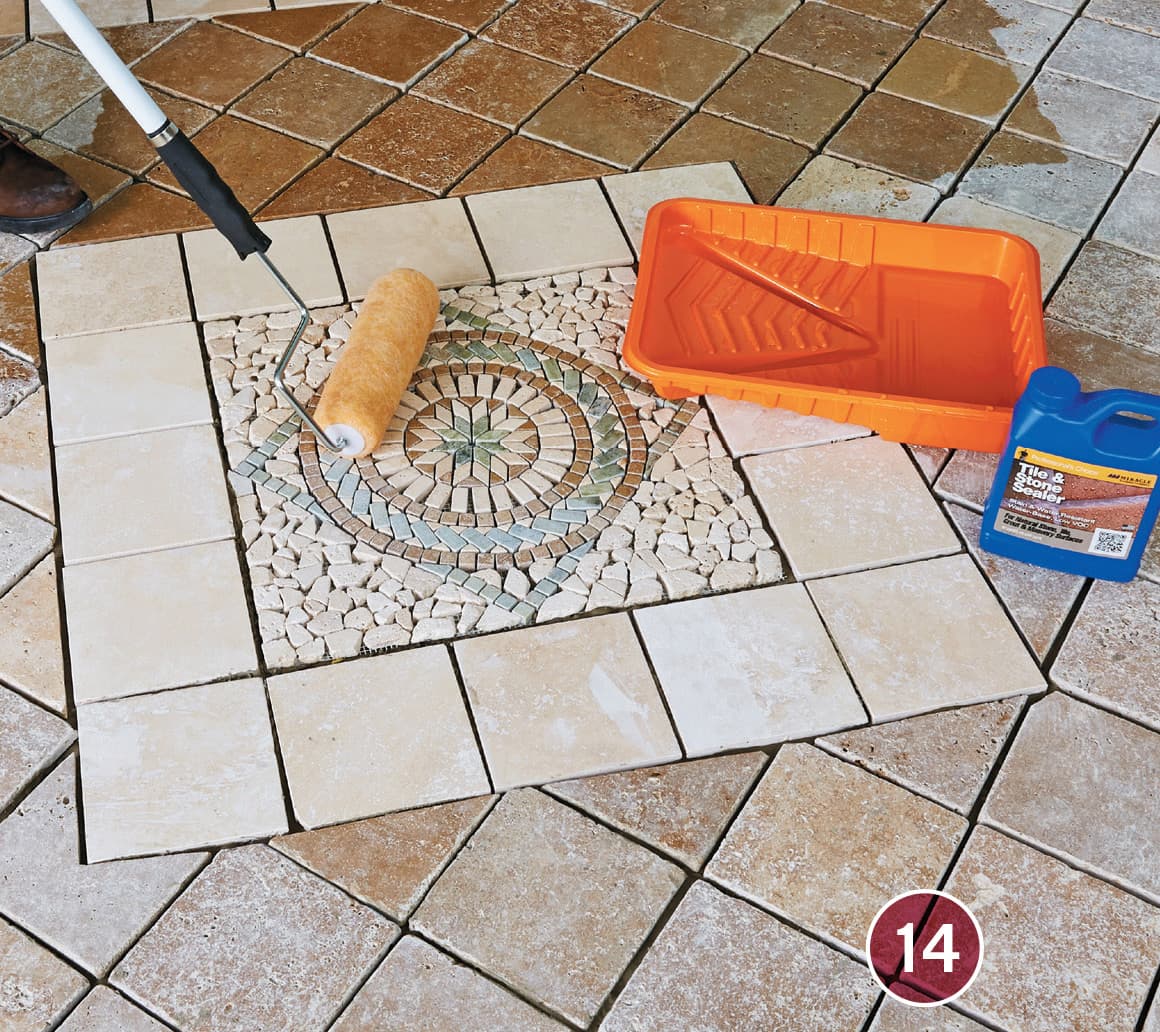
If the field tiles and/or medallion are made of unsealed stone (usually the case with tumbled tile), apply a coat of tile sealer prior to grouting. This will make cleaning the grout off the tiles easier.

Grout the medallion. This is the most complicated part of grouting the floor, so work only on the medallion, making sure all the thin grout lines are completely filled.
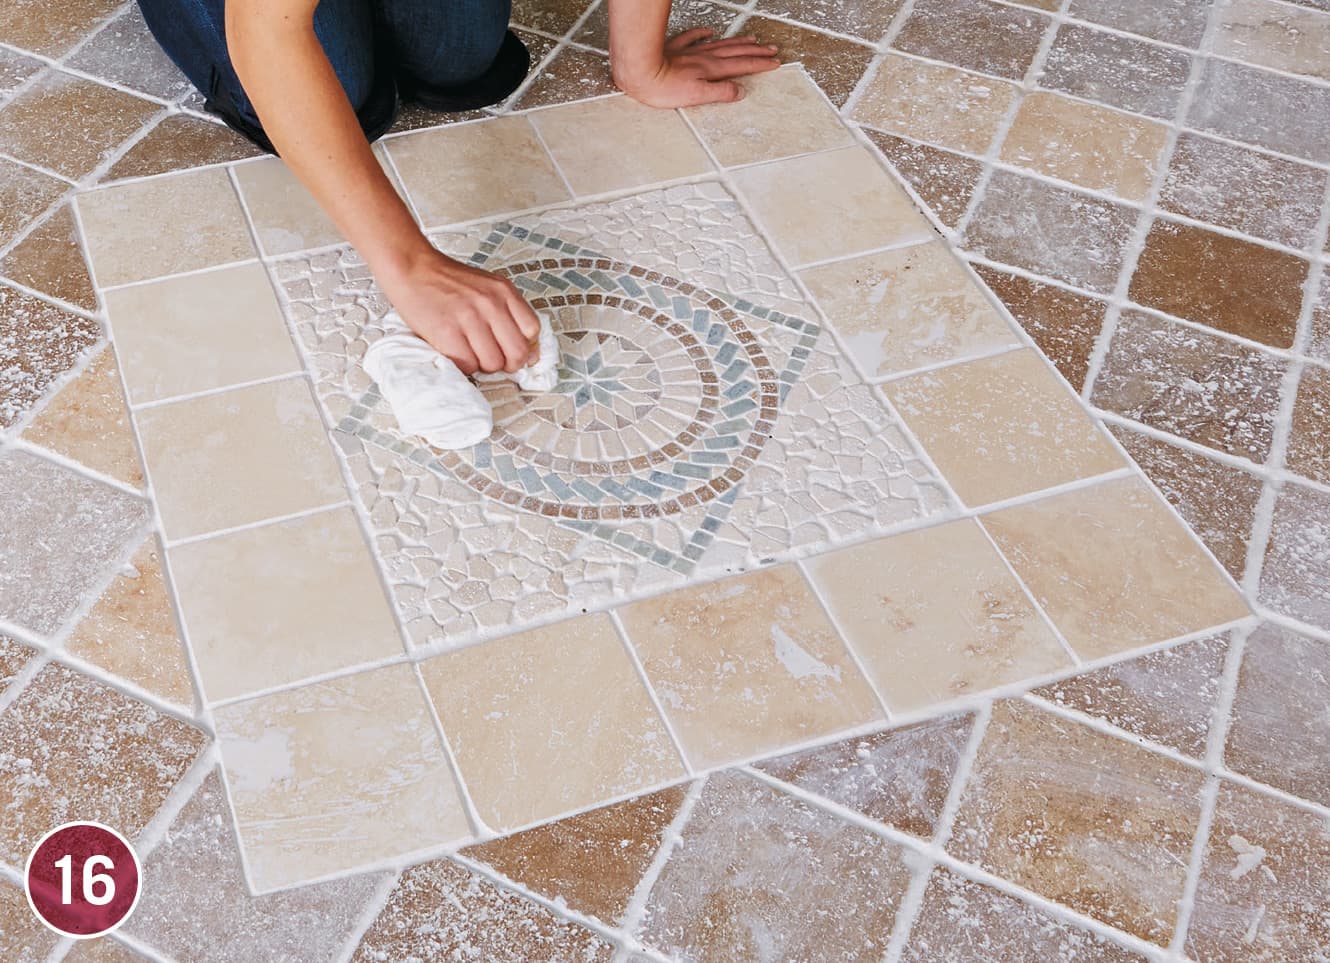
Let the grout in the medallion set up slightly, then clean off the face of the medallion with a grout sponge, rinsing after every swipe. Be careful not to pull grout from the grout lines. Grout the rest of the floor in small quadrants, cleaning the face of the tile after grouting. Polish the surface of the all tiles once you’re finished, using a soft cloth.
DESIGN TIP: If you enjoyed installing your medallion floor, next time consider getting even a little more creative. Tile, especially mosaic tiles and borders, lend themselves well to experimentation. Have fun, but always plan to minimize cutting—your results will look better and it will mean less work and less waste for you.
Glass Mosaic Tile Floor
Throughout history, mosaic tile has been more than a floor or wall covering—it’s an art form. In fact, the Latin origins of the word mosaic refer to art “worthy of the muses.” Mosaic tile is beautiful and durable, and working with it is easier than ever today. Modern mosaic floor tile is available in squares that are held together by a layer of fabric mesh. These squares are set in much the same way as larger tile, but their flexibility makes them slightly more difficult to hold, place, and move. The instructions given with this project simplify the handling of mosaic tile.
The colors of mosaic tile vary just as much as any other tile, so make sure all the boxes you buy are from the same lot and batch. Colors often vary from one box to another, too, so it’s a good idea to mix tile between boxes to make any variations less noticeable.
It’s also important to know that adhesive made for other tile may not work with glass or specialty mosaic tile. Consult your tile retailer for advice on the right mortar or mastic for your project. Before you start, clean and prepare the floor. Measure the room and draw reference lines. Lay out sheets of tile along both the vertical and horizontal reference lines. If these lines will produce small or difficult cuts at the edges, shift them until you’re satisfied with the layout.
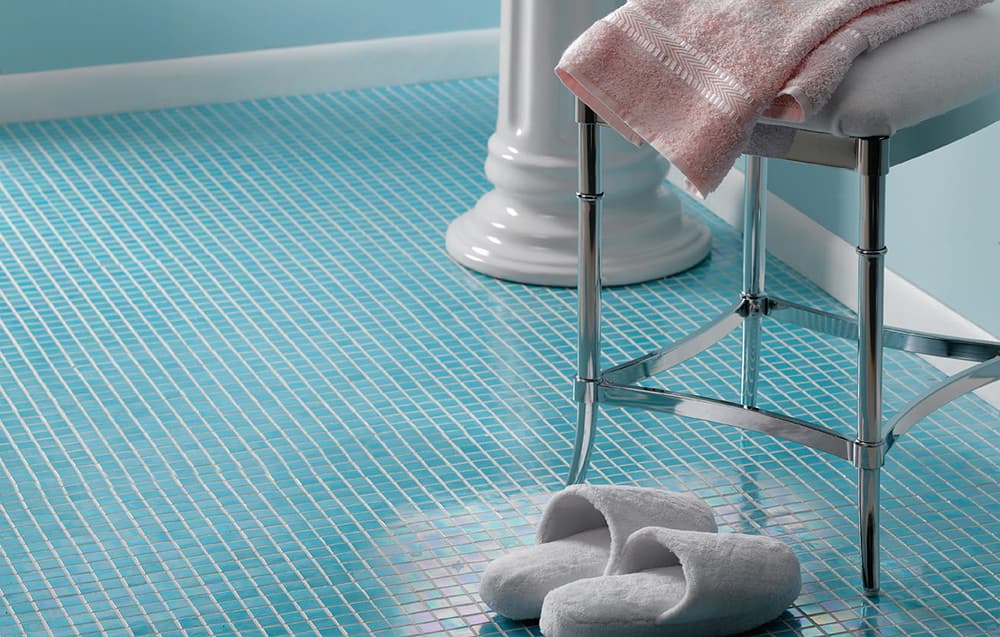
Glass tile, such as the kind used in the floor here, is some of the most striking mosaic tile and is available in both solid colors and an amazing selection of color blends.
TOOLS & MATERIALS
Tape measure
Chalkline
1/4" notched trowel
Grout float
Grout sponge
Buff rag
Sponge applicator
Needlenose pliers
2 × 4 wrapped in carpet
Mosaic tile
Tile adhesive
Tile spacers
Grout
Grout sealer
Tile nippers
Rubber mallet
Tile cutter
Straightedge
Eye protection
How to Install a Glass Mosaic Floor
Beginning at the intersection of the horizontal and vertical lines, apply the recommended adhesive in one quadrant. Spread it outward evenly with a notched trowel. Lay down only as much adhesive as you can cover in 10 to 15 minutes.
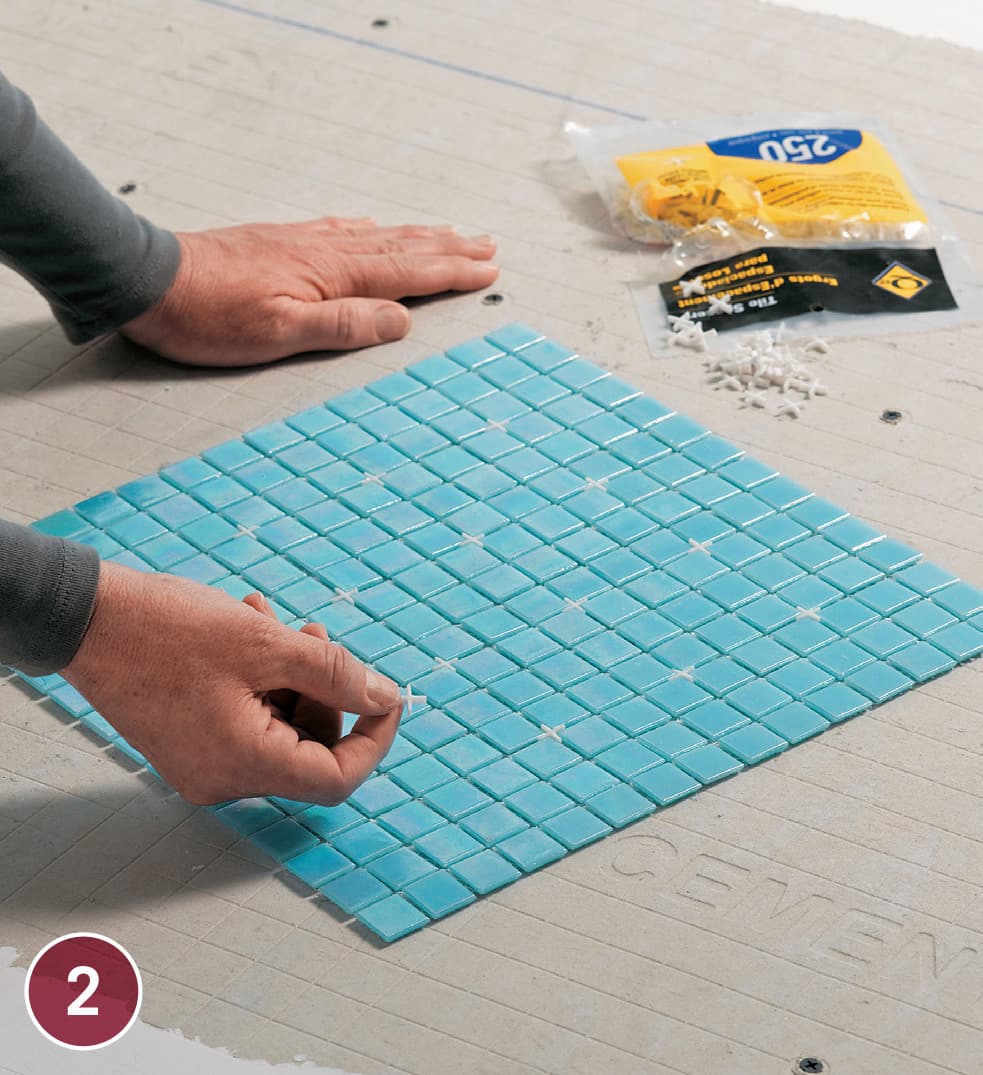
Stabilize a sheet of tile by randomly inserting three or four plastic spacers into the open joints.
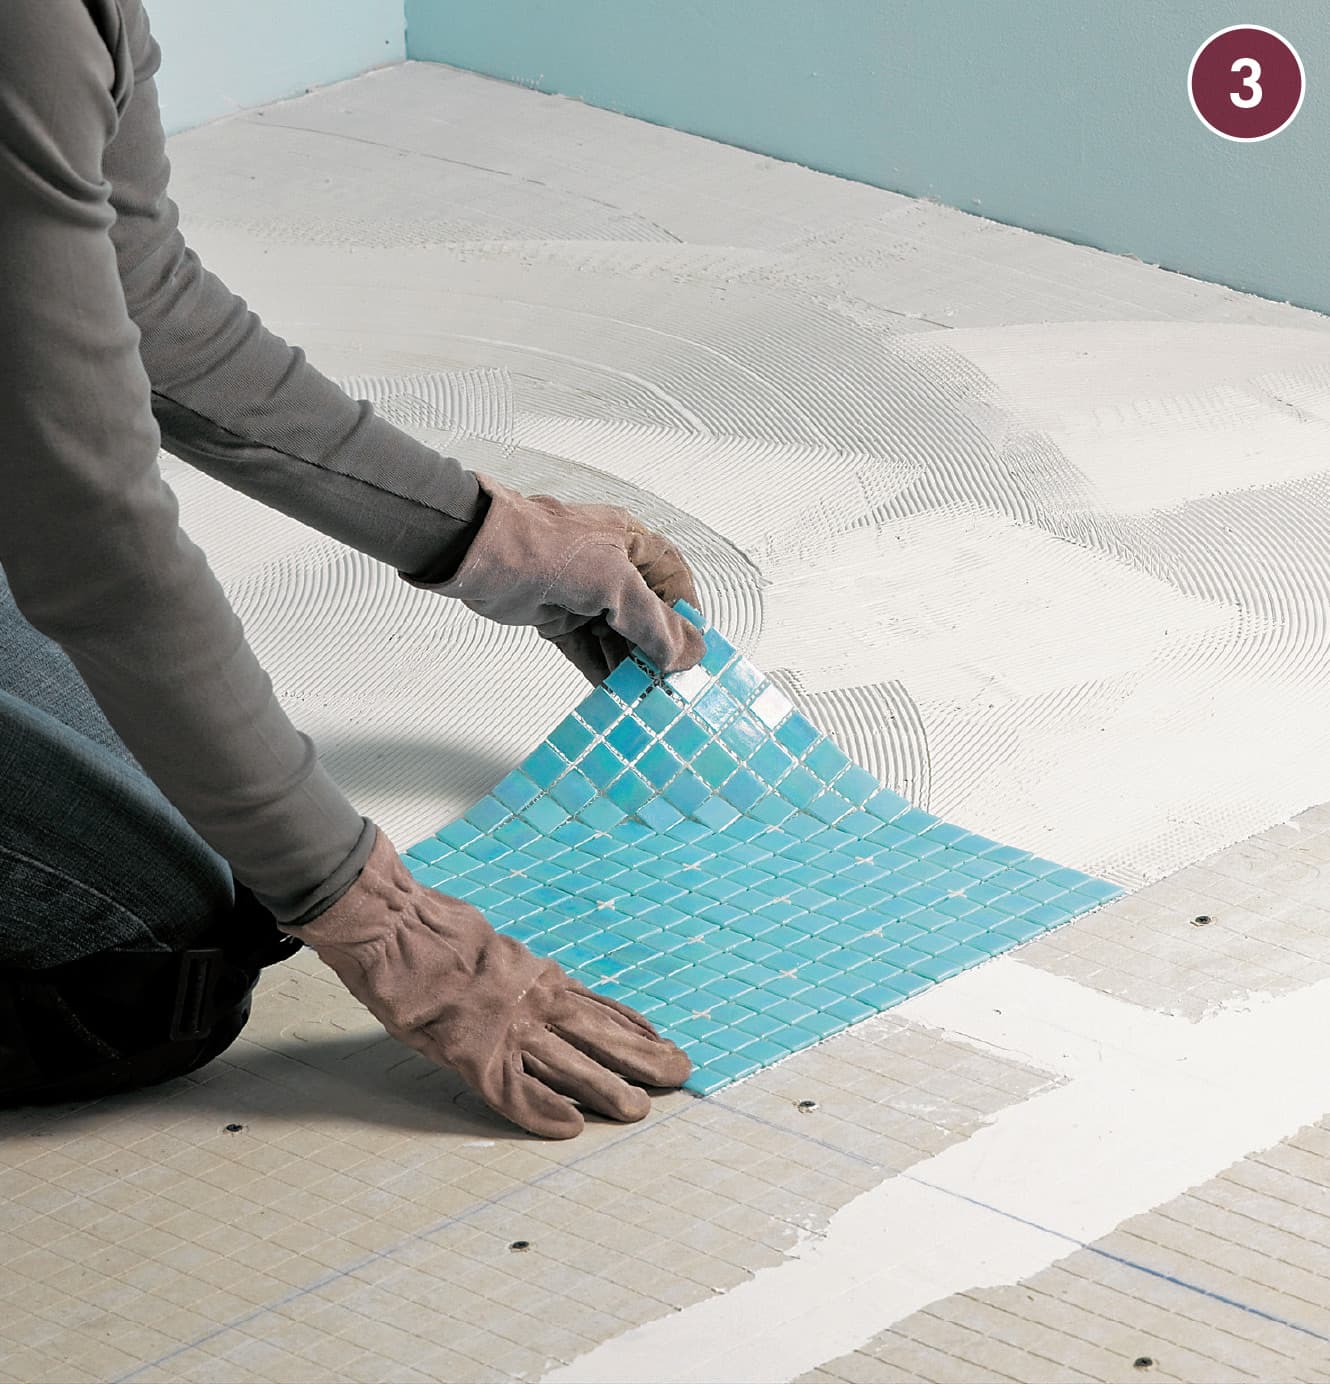
Pick up diagonally opposite corners of the square and move it to the intersection of the horizontal and vertical references lines. Align the sides with the reference lines and gently press one corner into place on the adhesive. Slowly lower the opposite corner, making sure the sides remain square with the reference lines. Massage the sheet into the adhesive, being careful not to press too hard or twist the sheet out of position. Continue setting tile, filling in one square area after another.
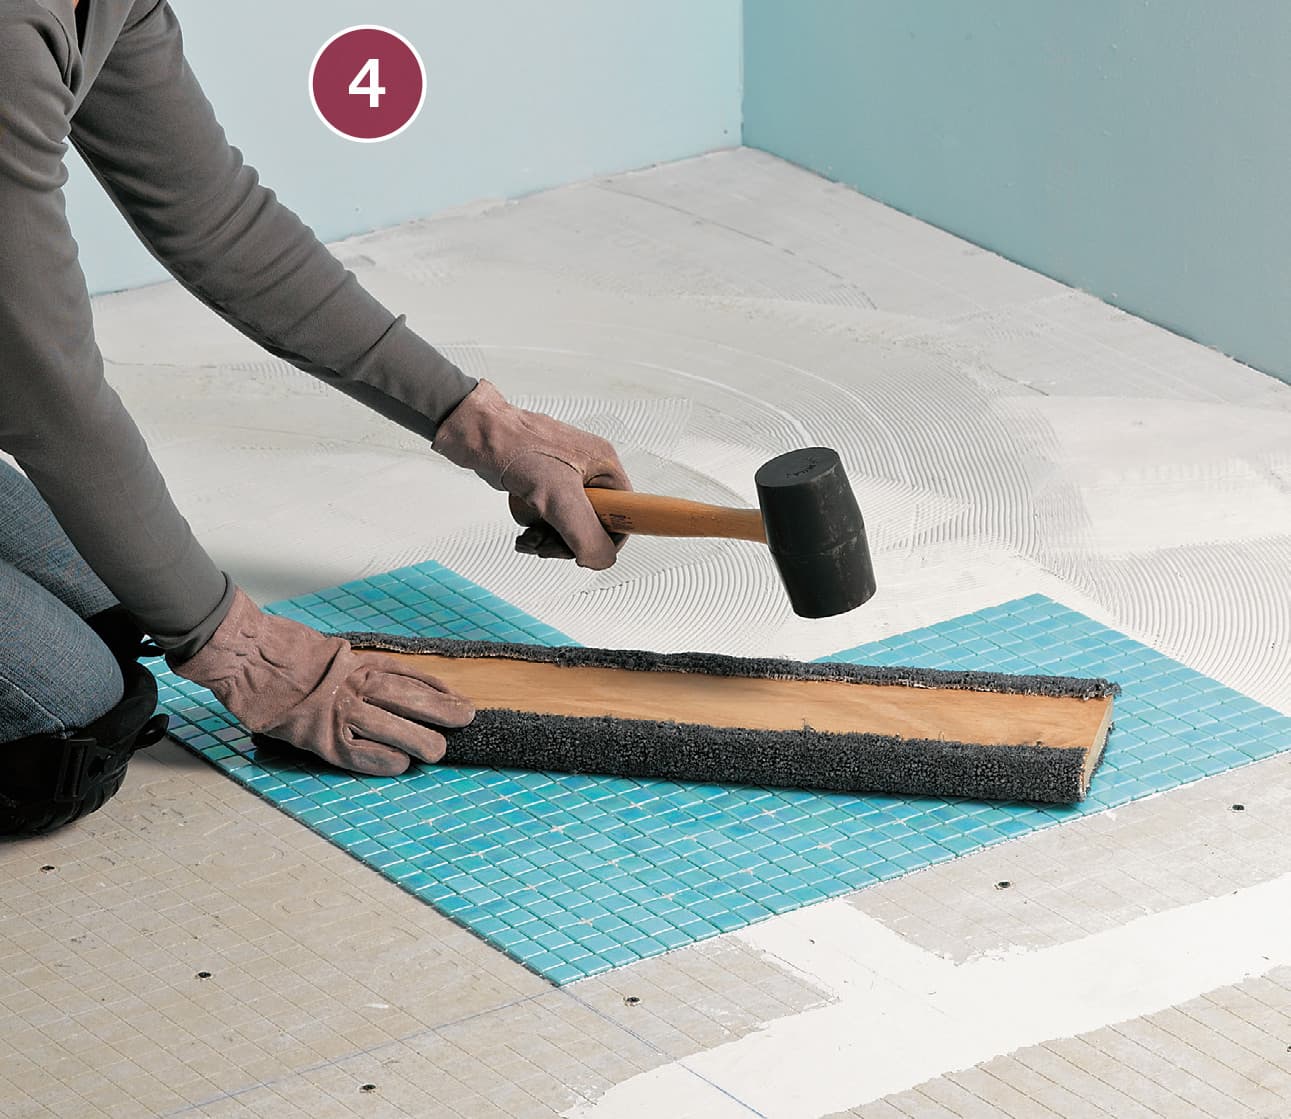
When two or three sheets are in place, lay a scrap of 2 × 4 wrapped in carpet across them and tap it with a rubber mallet to set the fabric mesh into the adhesive and force out any trapped air.
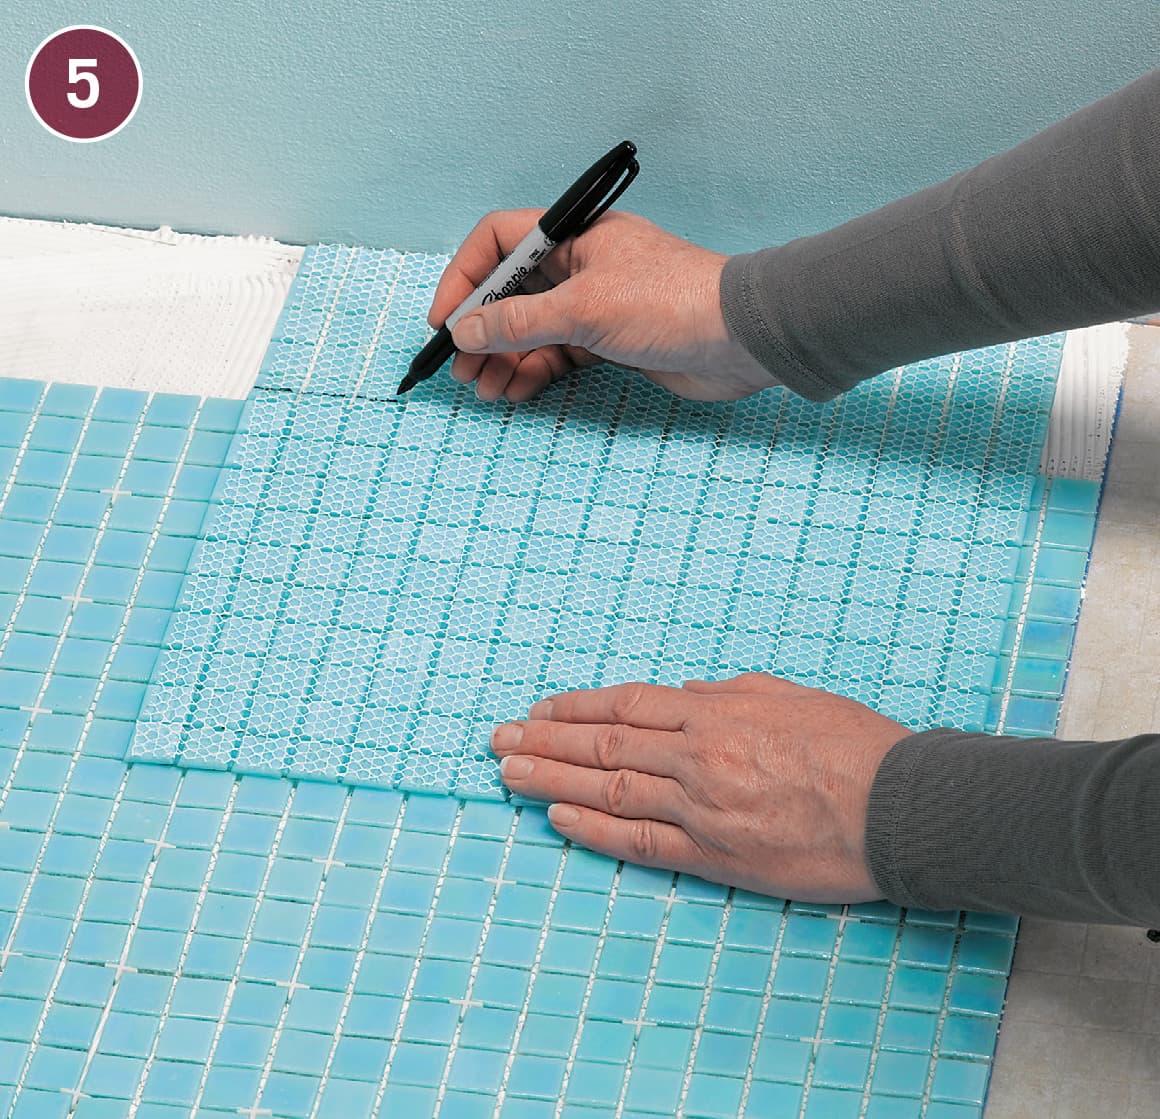
When you’ve tiled up close to the wall or another boundary, lay a full mosaic sheet into position and mark it for trimming. If you’ve planned well and are installing small-tile mosaics, you can often avoid cutting tiles.
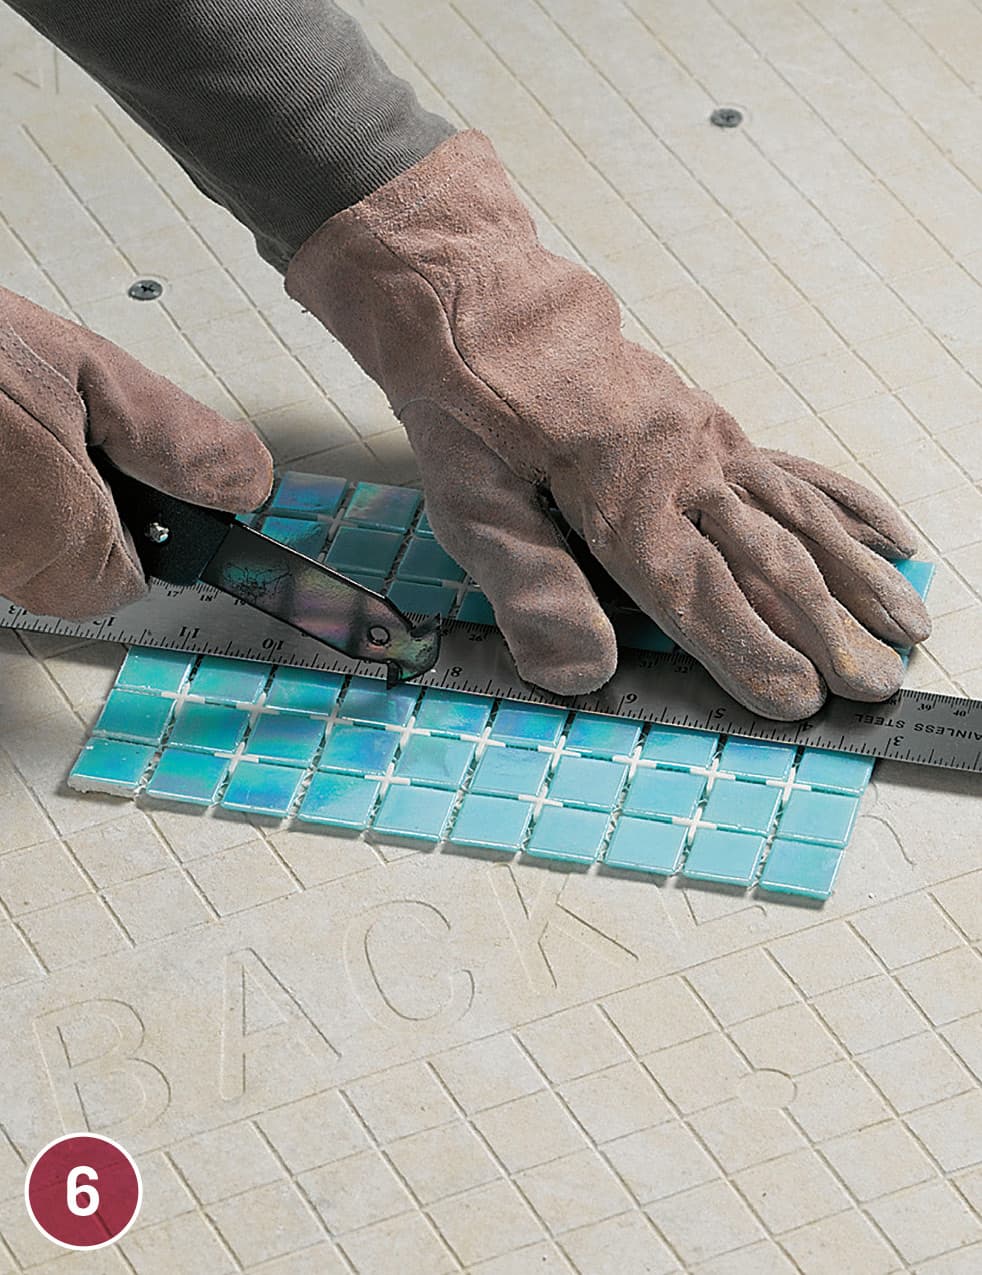
If you do need to cut tiles in the mosaic sheet, and not just the backing, score the tiles with a tile cutter. Be sure the tiles are still attached to the backing. Add spacers between the individual tiles to prevent them from shifting as you score.

After you’ve scored the tiles, cut them each individually with a pair of tile nippers.
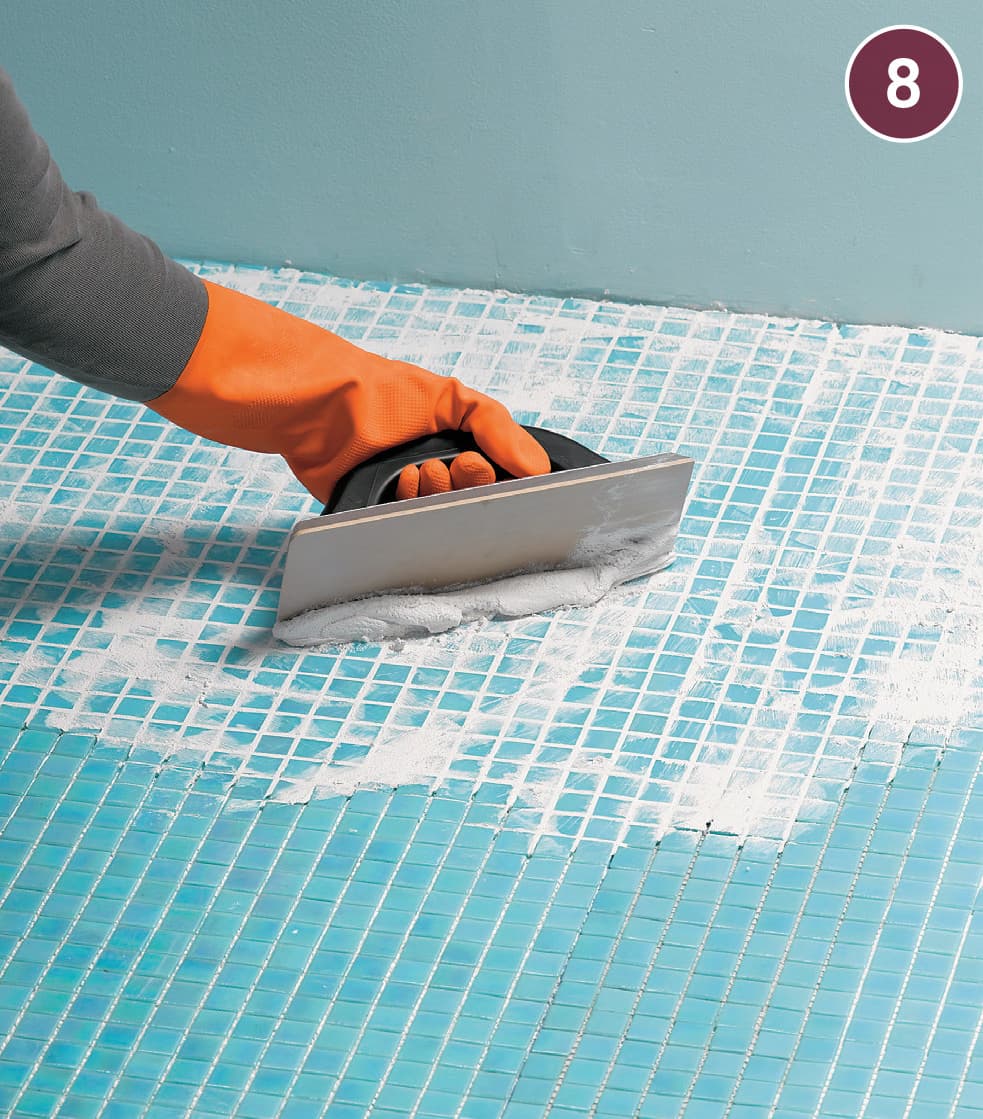
Set tile in the remaining quadrants. Let the adhesive cure according to the manufacturer’s instructions. Remove spacers with needlenose pliers. Mix a batch of grout and fill the joints. Allow the grout to dry according to manufacturer’s instructions.
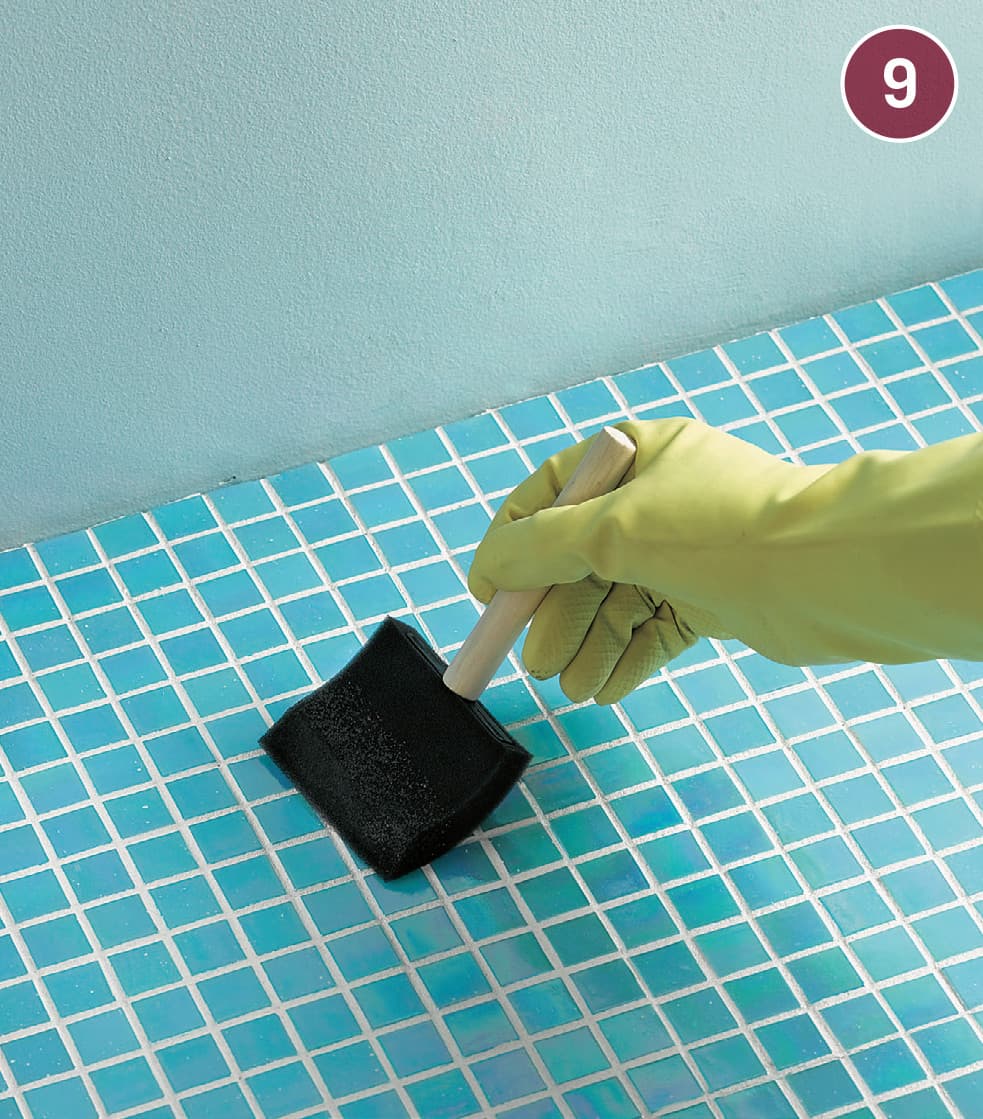
Mosaic tile has a much higher ratio of grout to tile than larger tiles do, so it is especially important to seal the grout with a quality sealer after it has cured.
WORKING AROUND OBSTACLES

To work around pipes and other obstructions, cut through the backing to create an access point for the sheet. Then, remove the tiles within the mosaic sheet to clear a space large enough for the pipe or other obstruction.
Set the cut sheet into an adhesive bed, and then cut small pieces of tile and fit them into the layout as necessary.
Porcelain Snap-Lock Tile
Porcelain snap-lock tile flooring is a relatively new innovation that combines the easy installation of laminate floors with the durability and feel of ceramic tile. Each square porcelain tile is placed on a plastic tray with interlocking tabs on top of a rubberized non-skid base. This construction allows the tiles to be assembled into a floating floor that requires no adhesive and creates a remarkably similar feel to a conventional tile floor.
These tiles also come in a range of surface appearances much like any other porcelain tile. The looks available include dark and light wood, stone, and simple mottled finishes such as the ones shown in this project. Keep the room’s use in mind; darker and mottled designs are less likely to show dirt between cleanings. Once installed, the floor is cleaned in the same way as any ceramic or porcelain tiled surface would be. Snap-lock porcelain tiles favor earth-tone beiges and browns that blend with a wide range of décor schemes. Brighter colors are sold too. The mottled satin finish is also easy to clean and doesn’t show dirt between cleanings. And, as the technology catches on, more and more colors will likely become available.
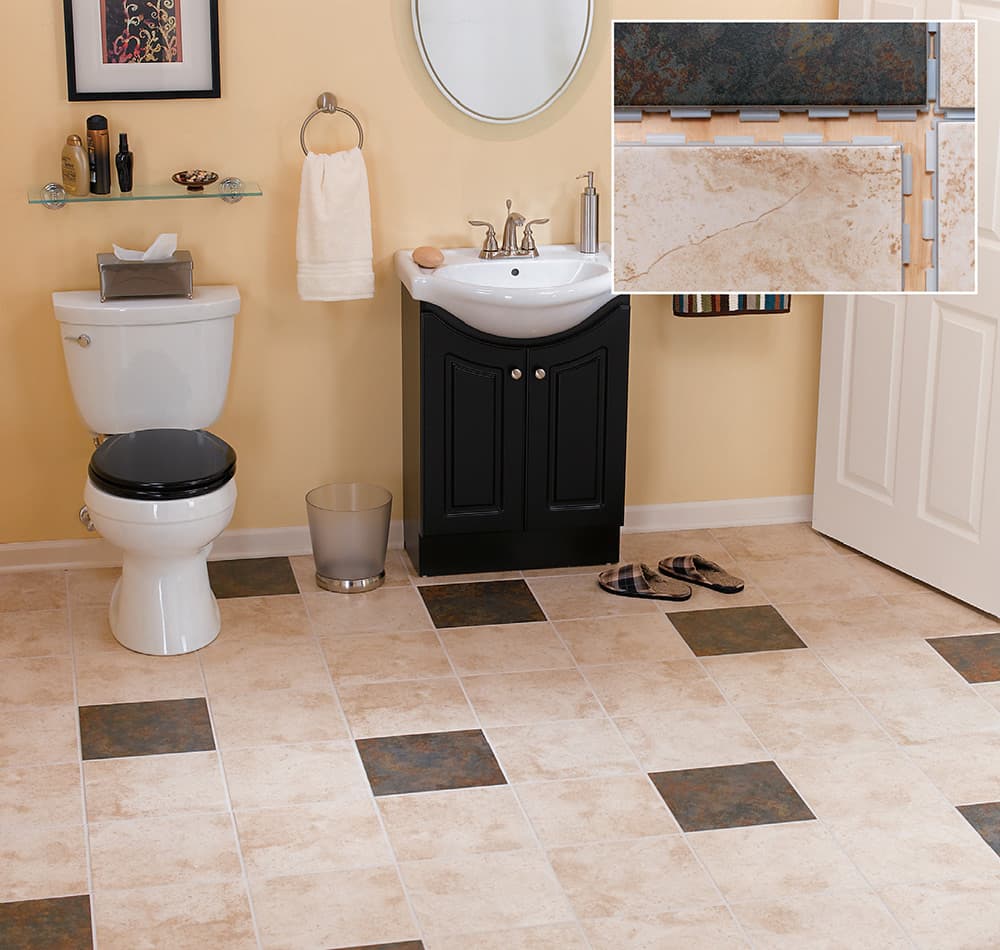
The look and feel of traditional ceramic tile is replicated with these snap-together tiles made up of a porcelain ceramic surface over a substrate that has interlocking tabs (inset). Flexible grout is the key to this system’s workability.
TOOLS & MATERIALS
Snap-lock tiles (See Resources, page 233)
Carpenter’s square
Rubber tapping block
Rubber-coated pull bar
Eye and ear protection
Trowel
Wet saw
Angle grinder
Utility knife
Mallet
Flexible grout
Grout float
Sponge
Tape measure
Gloves
How to Install a Snap-Lock Tile Floor
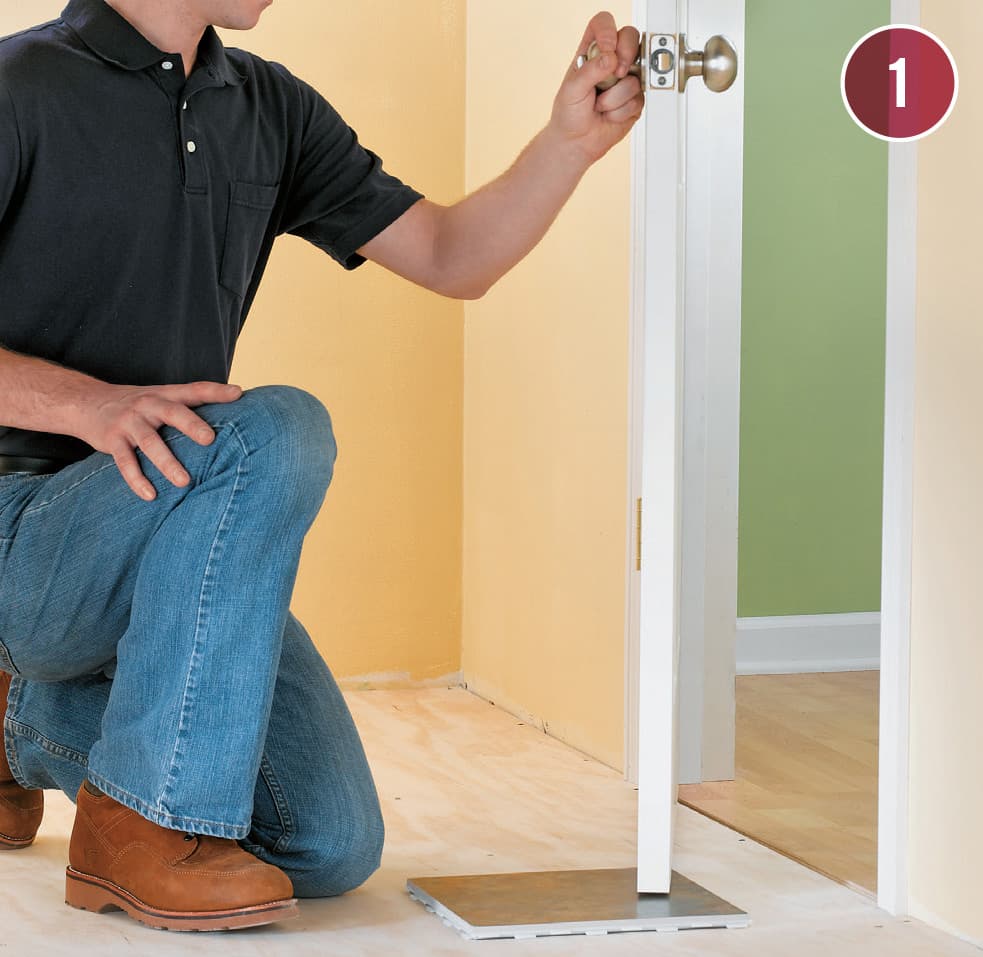
Check the door swing for all doors in the room to make sure they will clear the new tile floor. If the door won’t clear, or if the gap between the door and the floor is less than 1/4", remove and shorten the door. Flush-cut the door casings to allow for tile clearance, and remove shoe molding and all appliances and fixtures that block access to the floor.
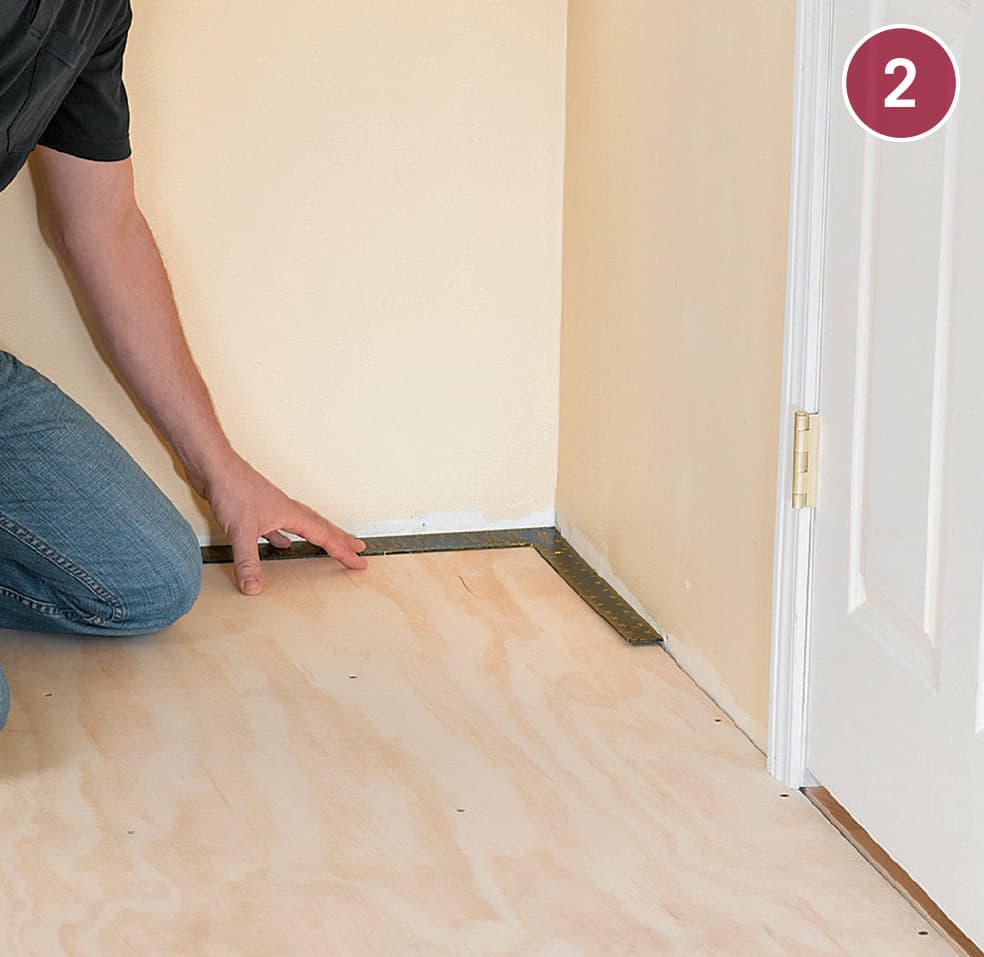
Check that walls are square using a carpenter’s square or the 3-4-5 measurement method. If walls are out of square, decide how you will adjust rows to compensate. Also measure floor width and decide if you want to place the first row in the center of the floor or begin at a wall.
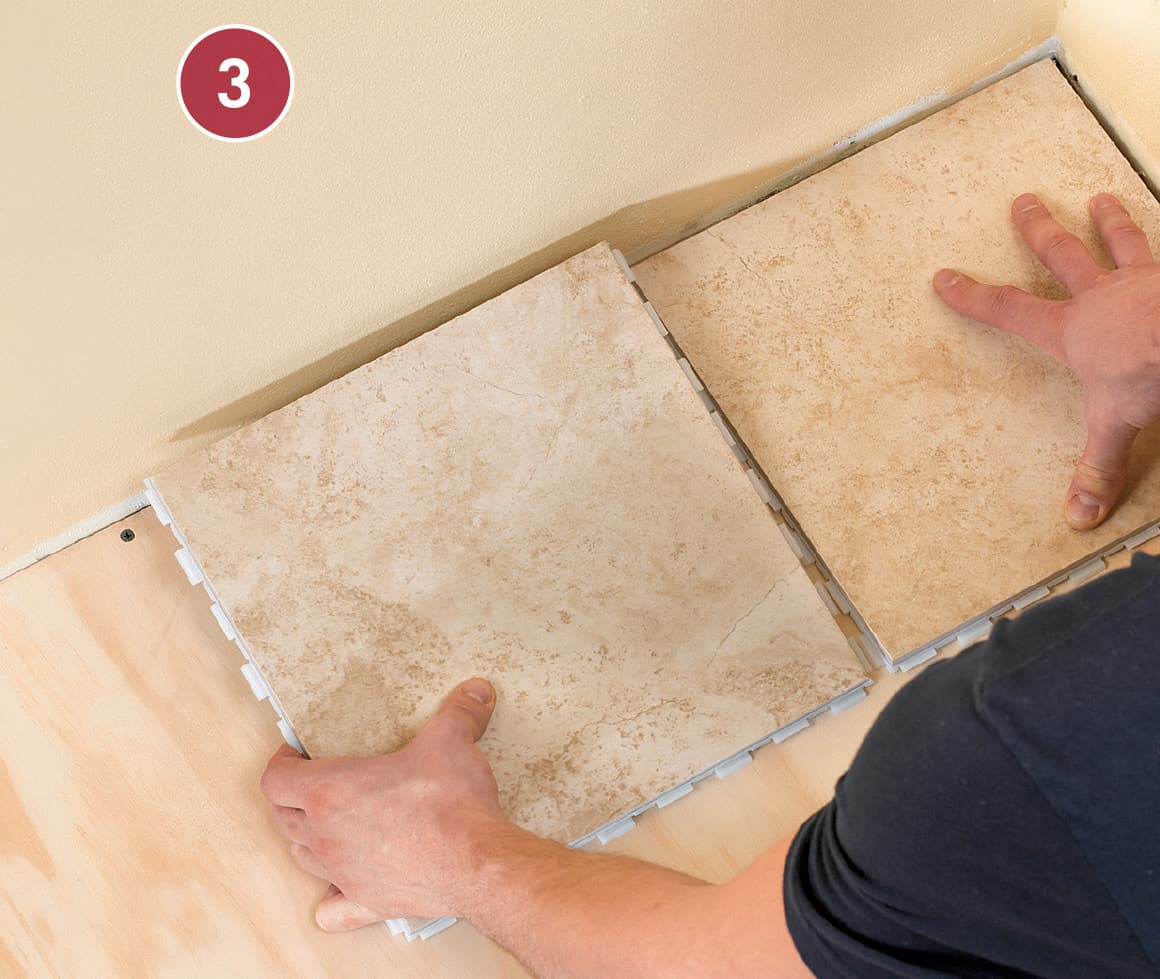
Lay the first two tiles after removing the lock tabs on the wall-facing side or sides using a sharp utility knife. Start placing tiles in the corner, and leave a 1/4" expansion gap between the tiles and the walls. Although the locking tabs project out 1/4" from the tiles and thus would function as 1/4" spacers, the fact that they are integral parts of the tiles makes this gap ineffective as an expansion gap. Use traditional removable spacers. Attach each new tile by aligning the tiles, connecting at the corner, and then pressing together until the tiles lock.
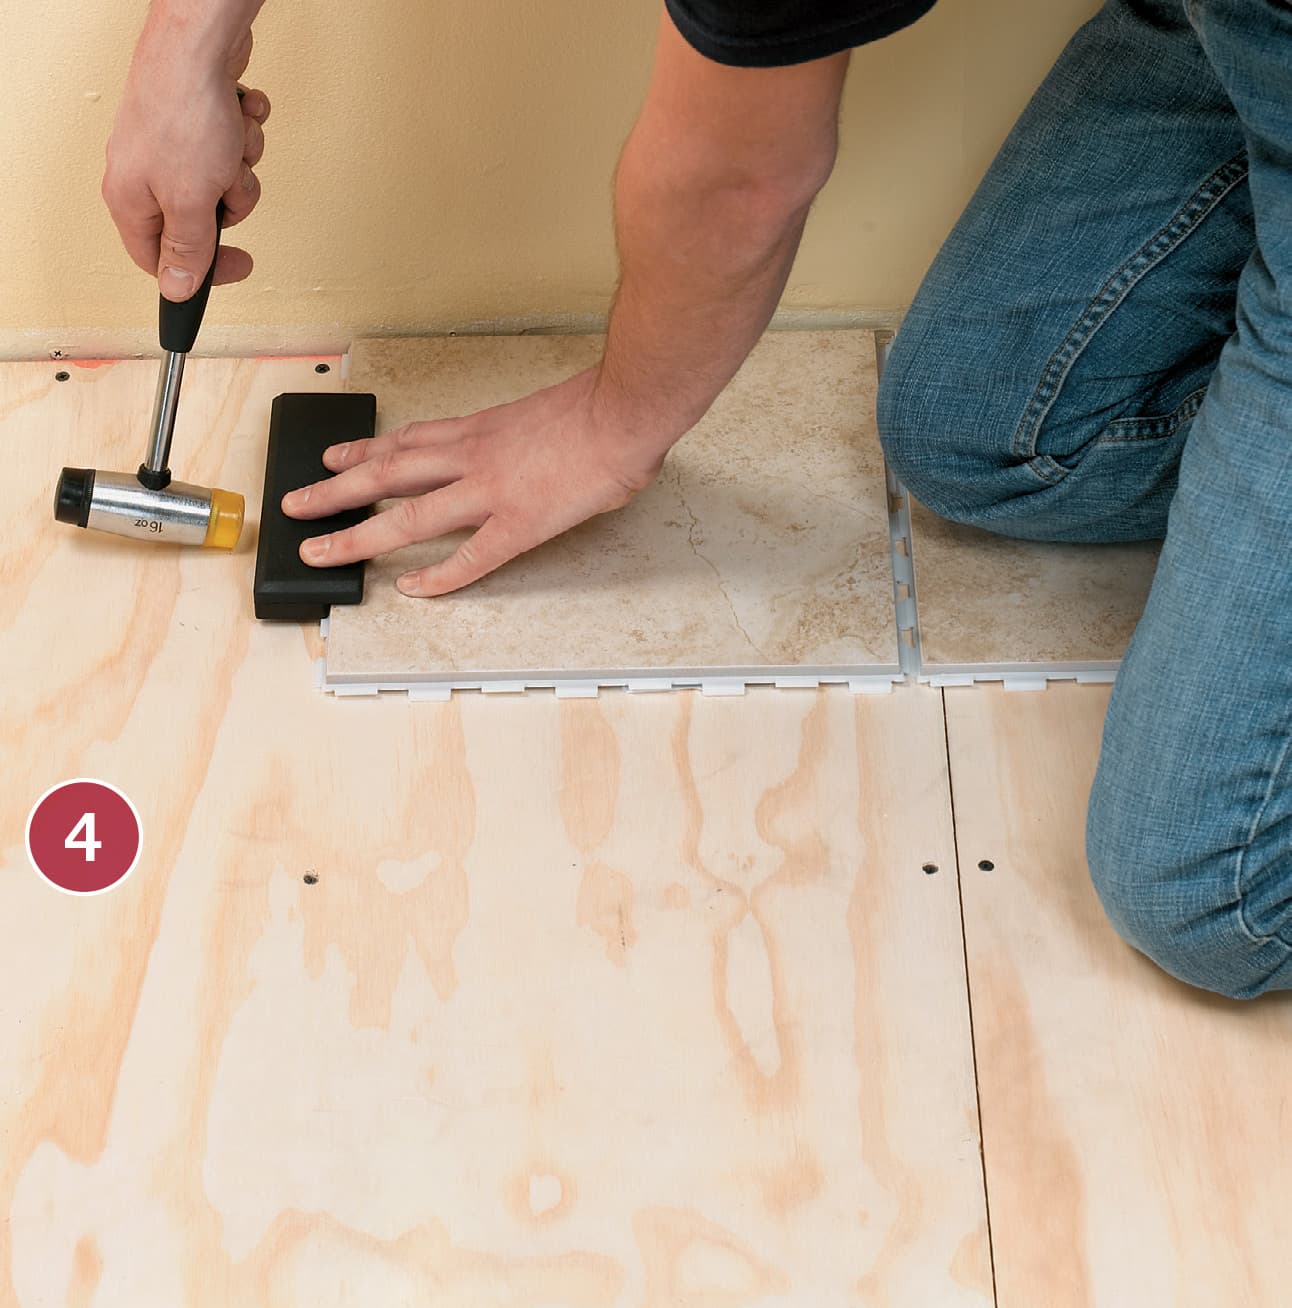
Use a rubber tapping block if you have difficulty engaging the locking tabs by simply pressing them together. Align the tiles, then hold the block against the side of the tile—not the plastic tray or grid. Gently tap the block until the tiles lock together.
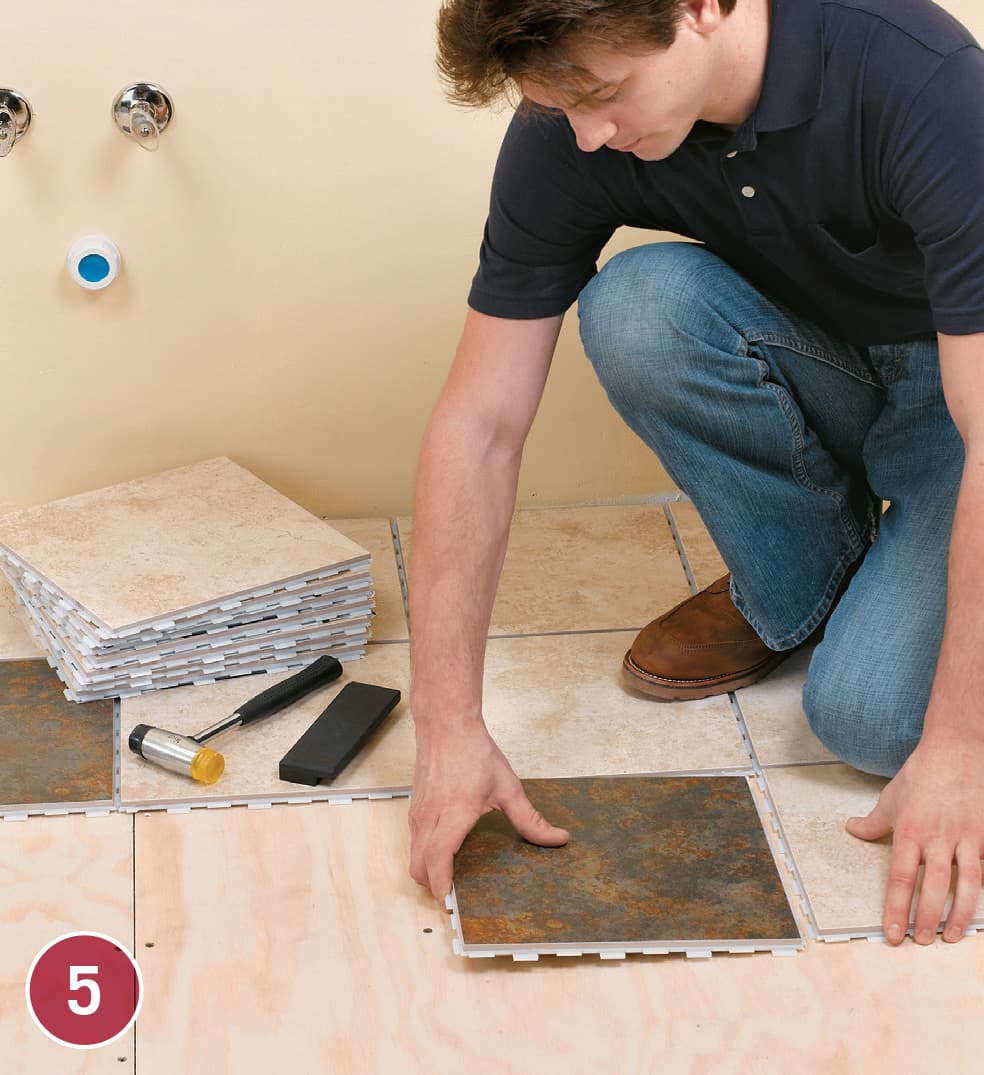
Continue to lay tiles, paying careful attention to layout patterns and directional veining in the tile surfaces. If you make a mistake and need to remove and adjust a tile, you can disconnect the joints with a rubber-coated pull bar or any other prying tool with a protective surface coating. Place the tool edge between the two tiles and gently pry them apart.
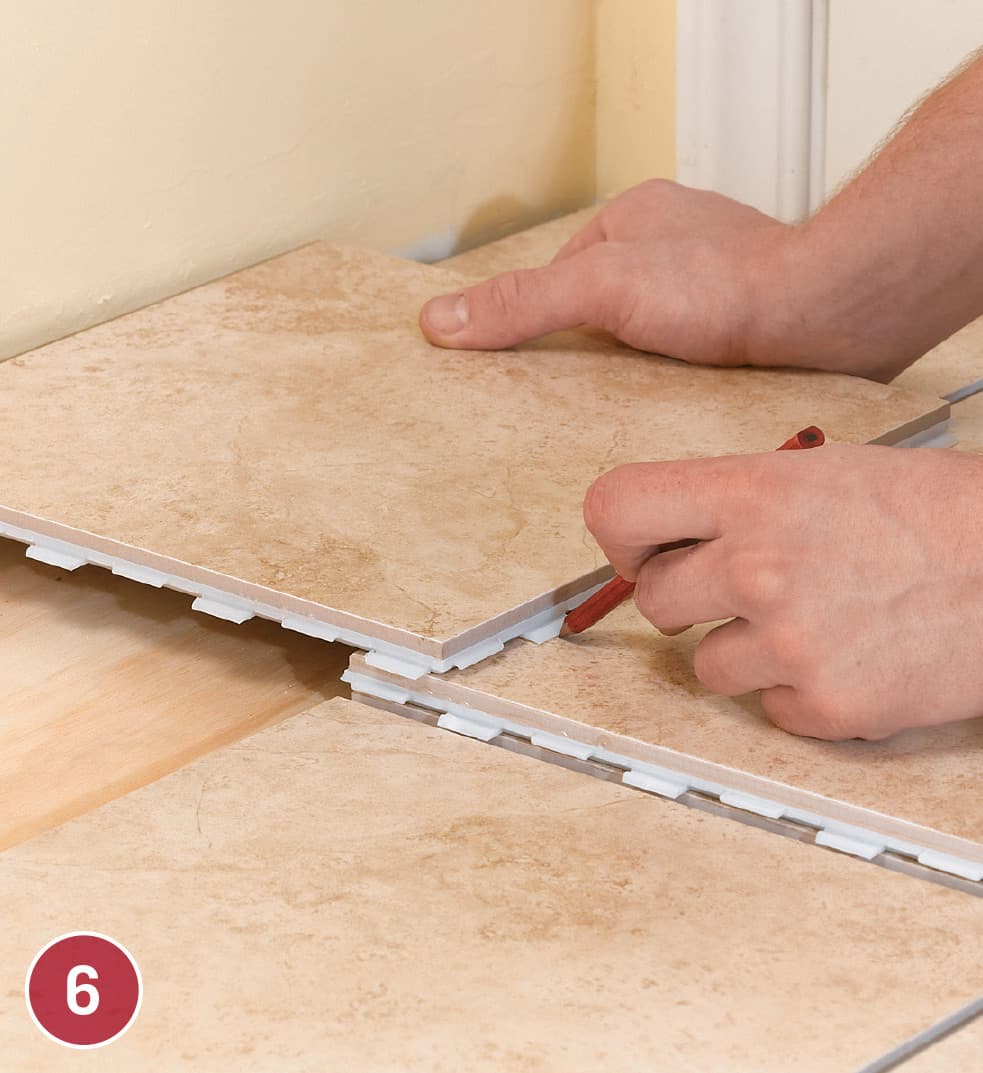
Mark tiles to fit around obstacles or for the final row by laying one tile on top and aligning with the previous row. Then lay a tile on top of that one, and align within 1/4" of the wall or obstacle. Mark a cutline on the middle tile using the space between the tabs of the top tile as guidance.
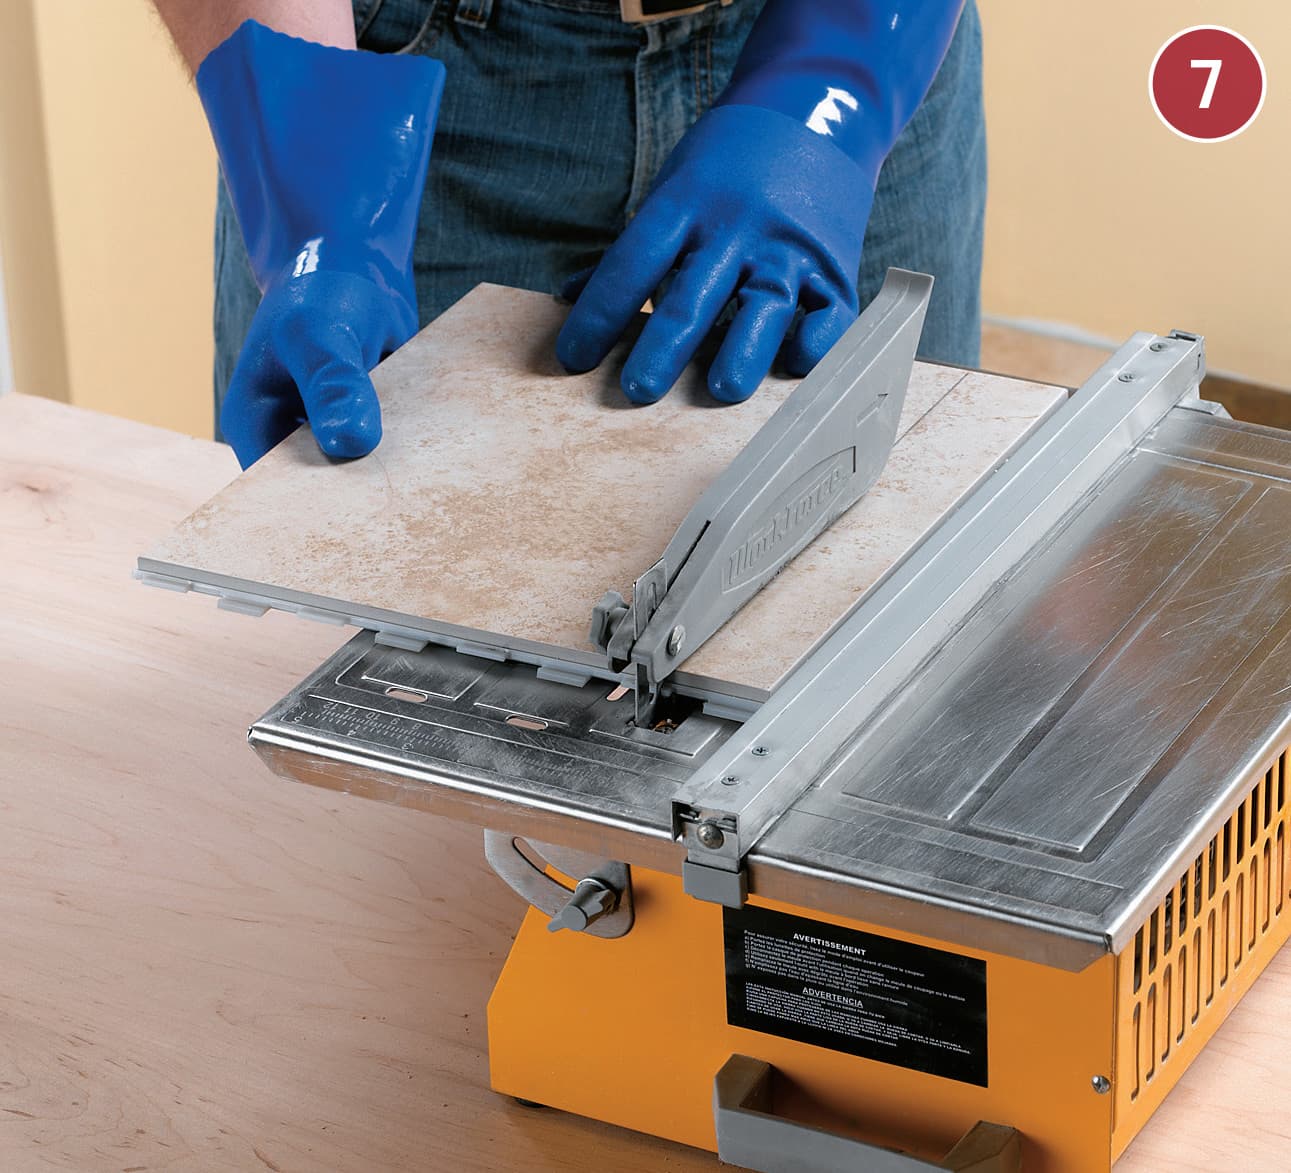
Cut tiles using a wet saw with a blade meant for cutting ceramic and porcelain tiles. Cut on the waste side of the marked line, and change water in the basin frequently to ensure clean cuts. Porcelain takes a long time to cut. Be patient and do not force the tile into the saw blade.
CUTTING CURVES
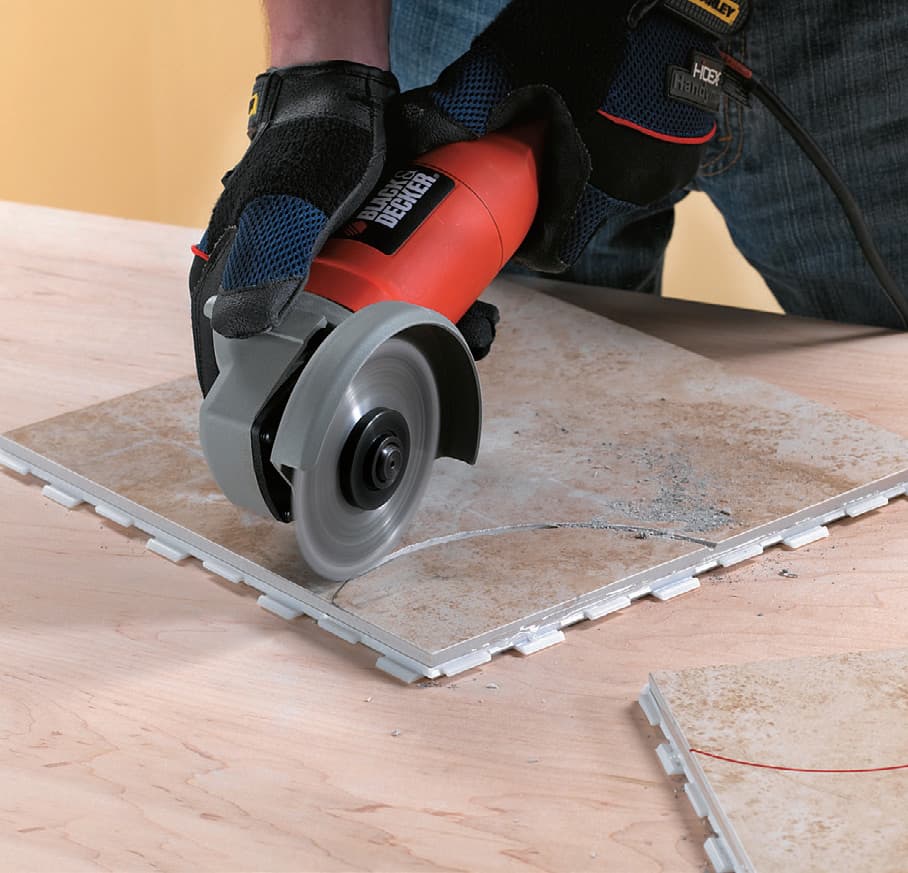
To cut curves and other irregular shapes, use an angle grinder that’s fitted with a diamond-tipped cutting wheel. Cut all the way through the tile, including the plastic base layer. This will take several passes.
NOTE: The tiles seen here have very aggressive anti-skid ribs on the bottom and do not require securing to the worksurface as a typical workpiece would.
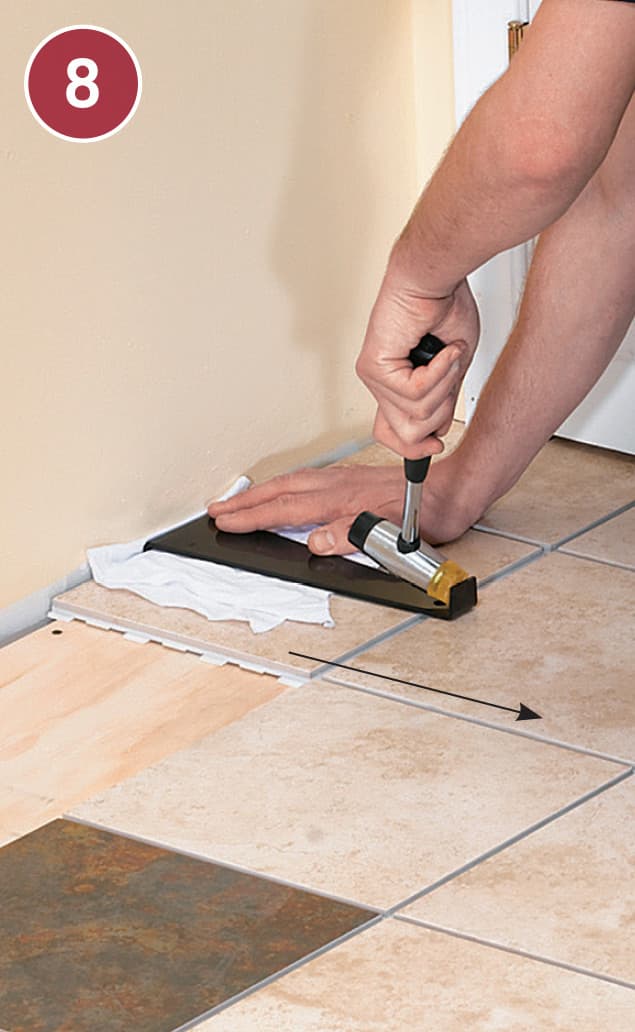
Set final tiles into position and then pull them back into the preceding rows using a rubberized pull bar. When the floor is completed, open the pail of flexible grout and mix thoroughly with a trowel according to the manufacturer’s instructions.
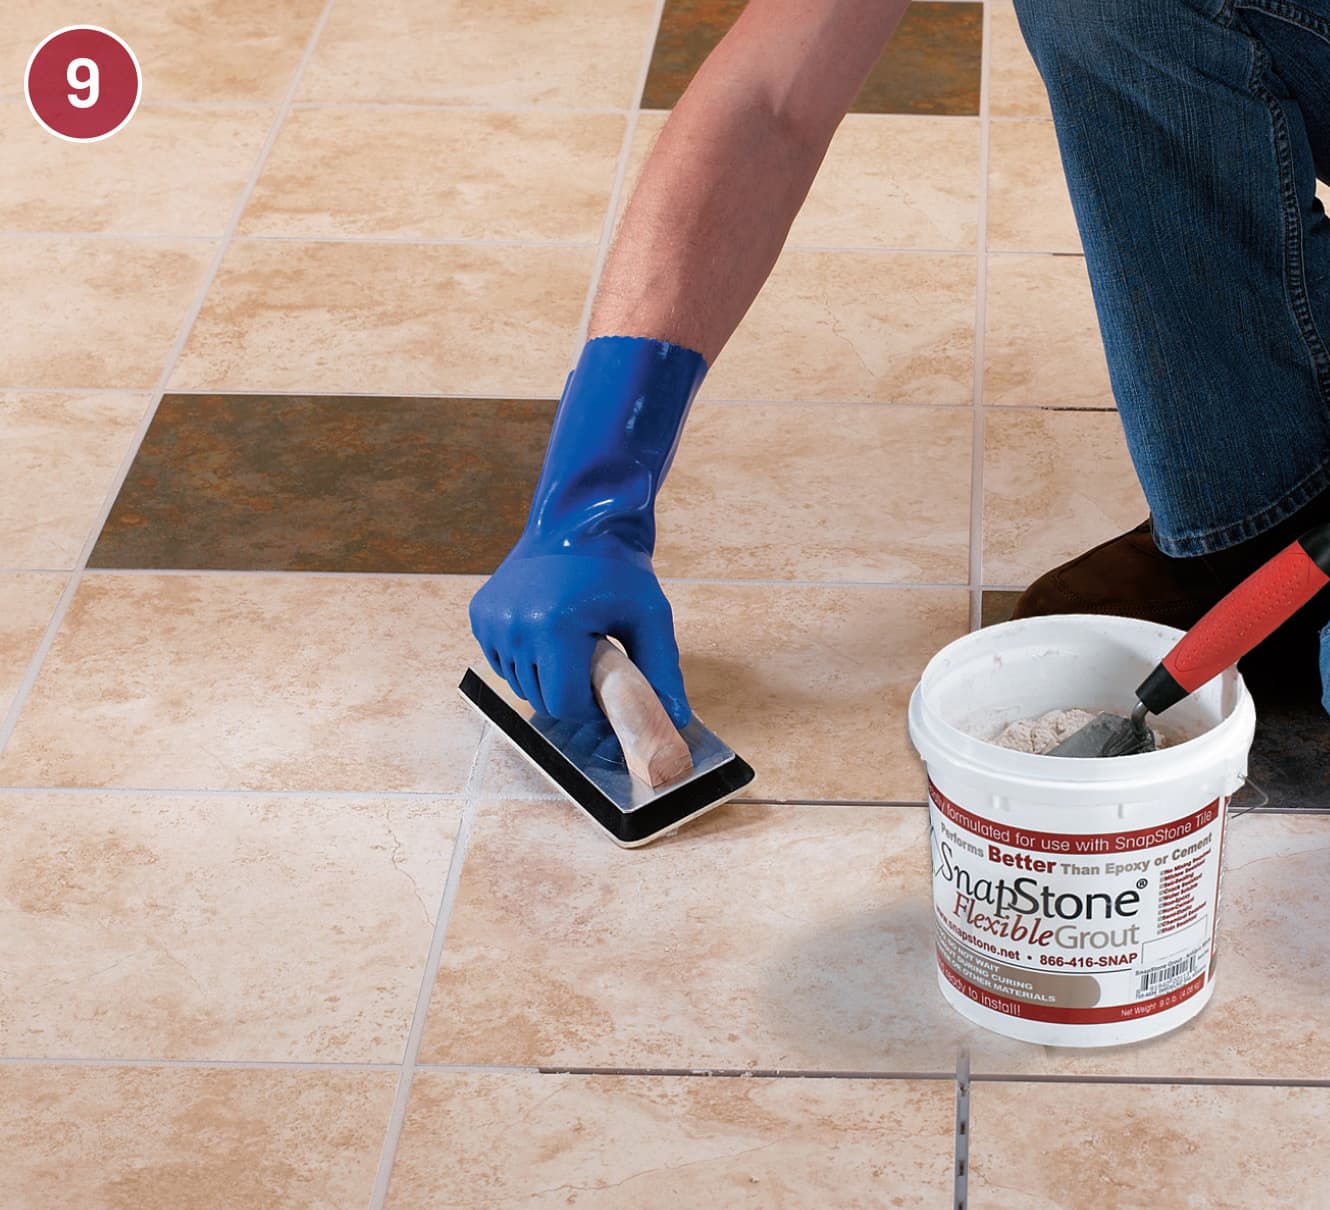
Apply grout in the tile gaps with a firm rubber grout float. Spread grout diagonally to the tile joints, working the grout firmly into the joints. Remove excess grout from the tiles with the edge of the float and touch up voids or low areas in the grout joints.
Clean off excess grout. Fill a 5 gal. bucket with clean water and use a sponge to clean the surfaces of the tiles. Wipe off grout residue, and use the sponge to smooth grout lines.
IMPORTANT: Rinse the sponge thoroughly with clean water after each pass.
REPLACING A DAMAGED TILE

To replace a porcelain snap-lock tile that has been cracked or damaged, remove the grout all around the tile. Use a grout cutter or simply chip out the grout with an awl or fine chisel. In either case, be careful not to chip the surrounding tiles. Then cut the downward-facing tabs on three sides of the tile with a utility knife. Pry up the broken tile and pull away from the uncut side. Remove downward tabs on three sides of the new tile and lay a bed of general construction adhesive under the new tile. Slide the new tile into place and lock the uncut side to the adjacent tile. Let adhesive dry and grout with flexible grout.
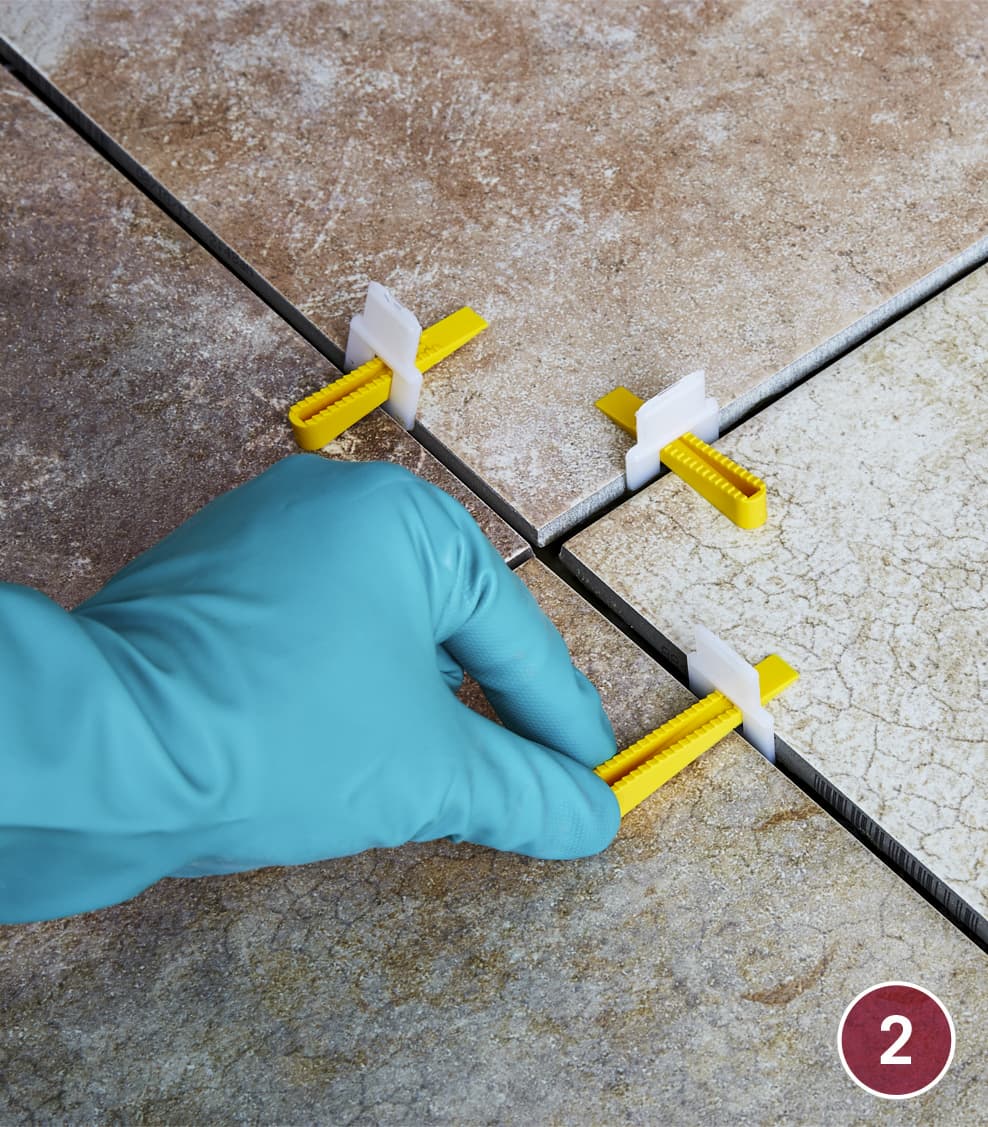
Self-Leveling Systems
Tile self-leveling systems were first developed for contractors working on large tile projects that required exacting placement and speed. The systems were a way to space and level the tiles at the same time, ensuring that the entire floor was level and that there was no “lippage”—raised surfaces that could trip someone walking over the floor.
The systems worked so well that they eventually became available at retail, for the home DIY tiler. They work on a basic wedge principle. You may have to seek them out, but you’ll find them at many home centers and larger hardware stores, and they are relatively inexpensive. Using them could not be easier, and requires very little additional expertise beyond knowing the basics of tiling. The wedges in these systems are even reusable.
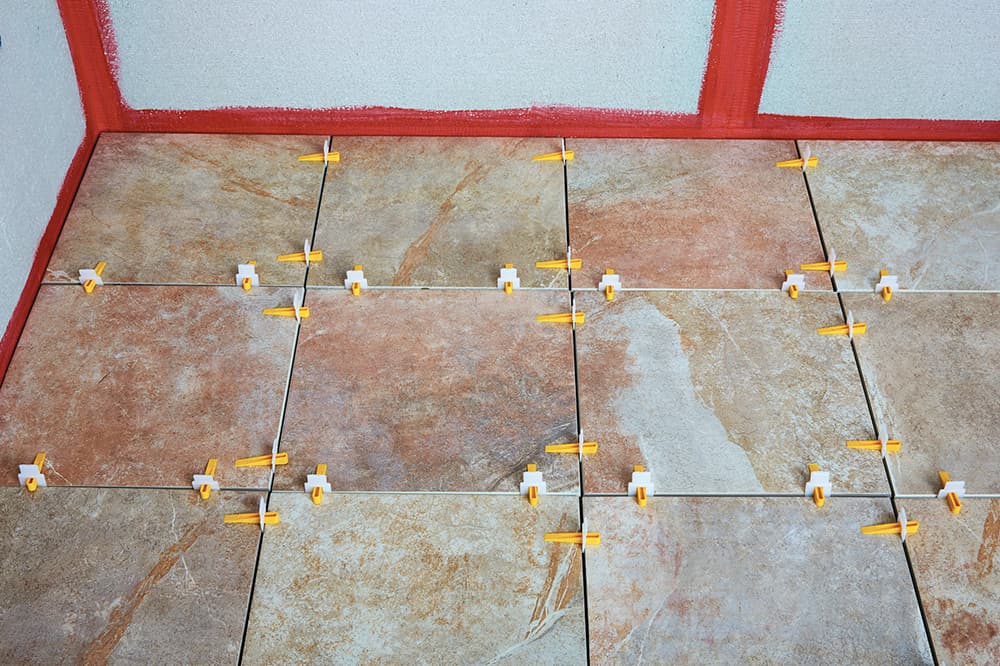
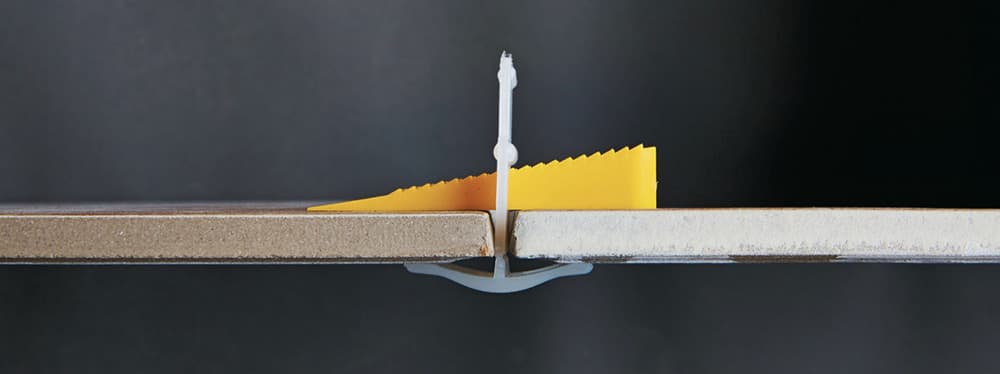
A self-leveling system is easy to use and almost completely foolproof during installation. The spacers actually fit underneath the tiles so you can draw them up to level by inserting the wedges into the spacer tops (right).
TOOLS & MATERIALS
Spacers and wedges
Tiles
4-ft. level
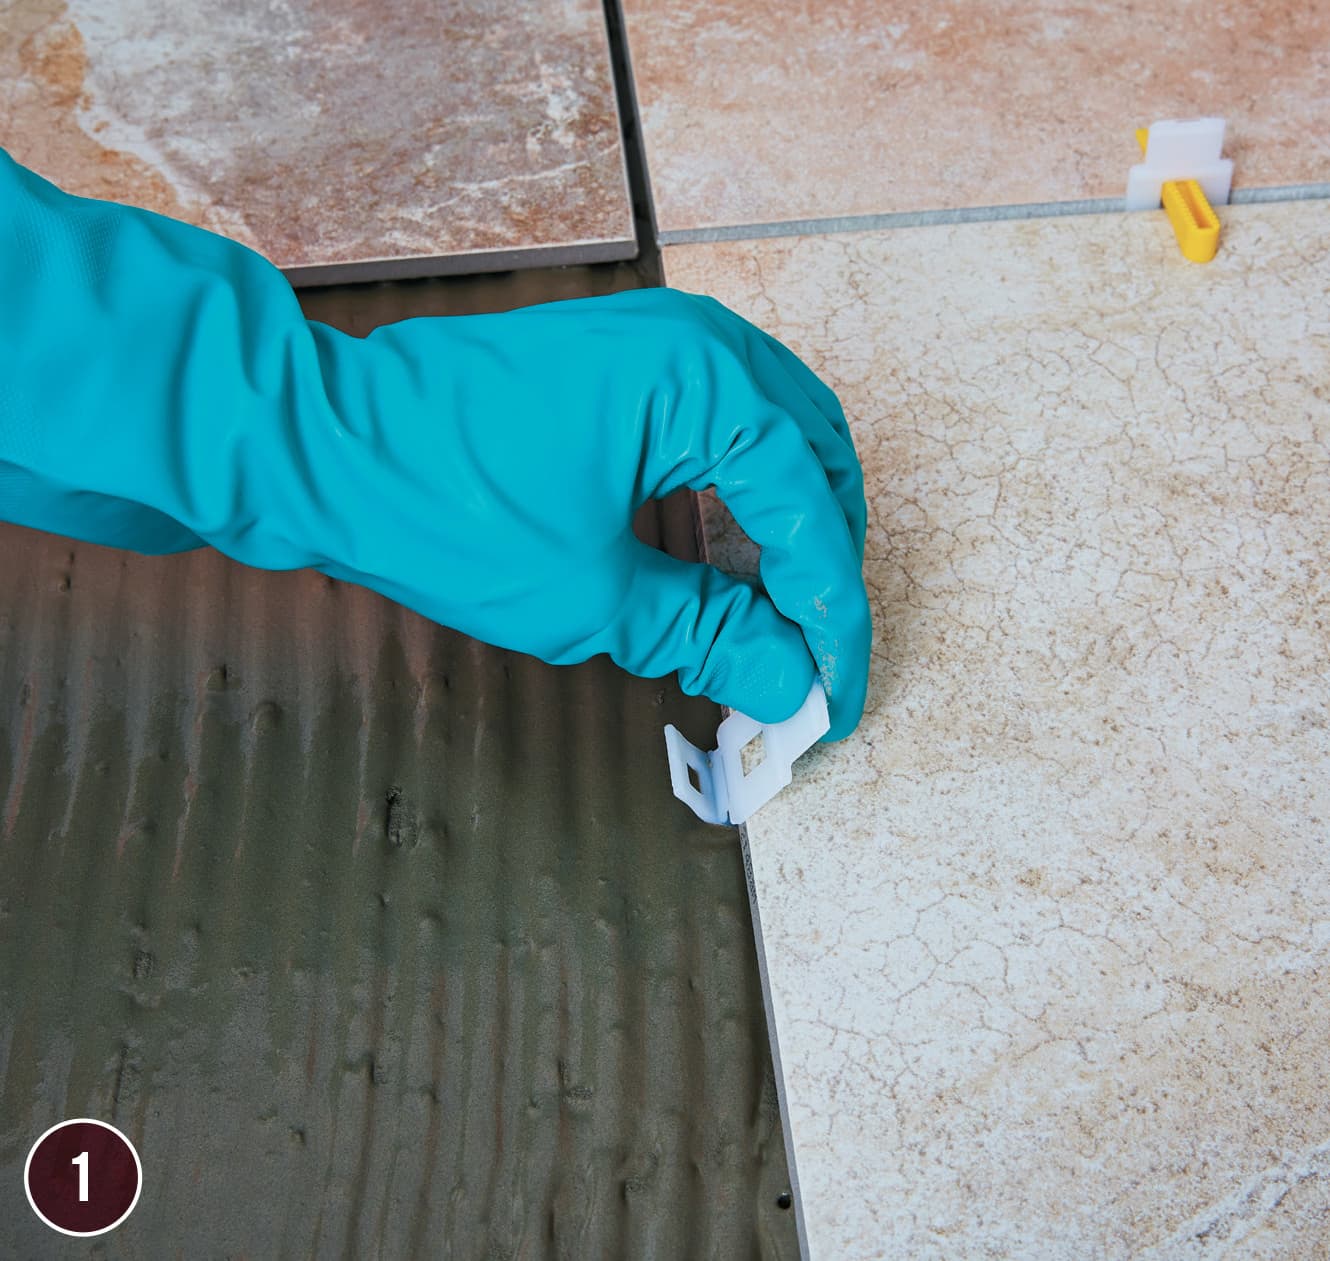
Prepare the floor (pages 63 through 75) and lay a bed of thinset mortar. Lay the first tile in place and insert the spacers along each edge that will butt another tile. Slide the tabs under the bottom of the tile, using two spacers on each side, positioned 2 to 3" in from each end.
Position the next tile over the tabs of the spacers. Press down to bed the tile. Slide the wedge through the spacer window until it is tight. All subsequent wedges should be pushed in so the same number of teeth pass through the spacer window.
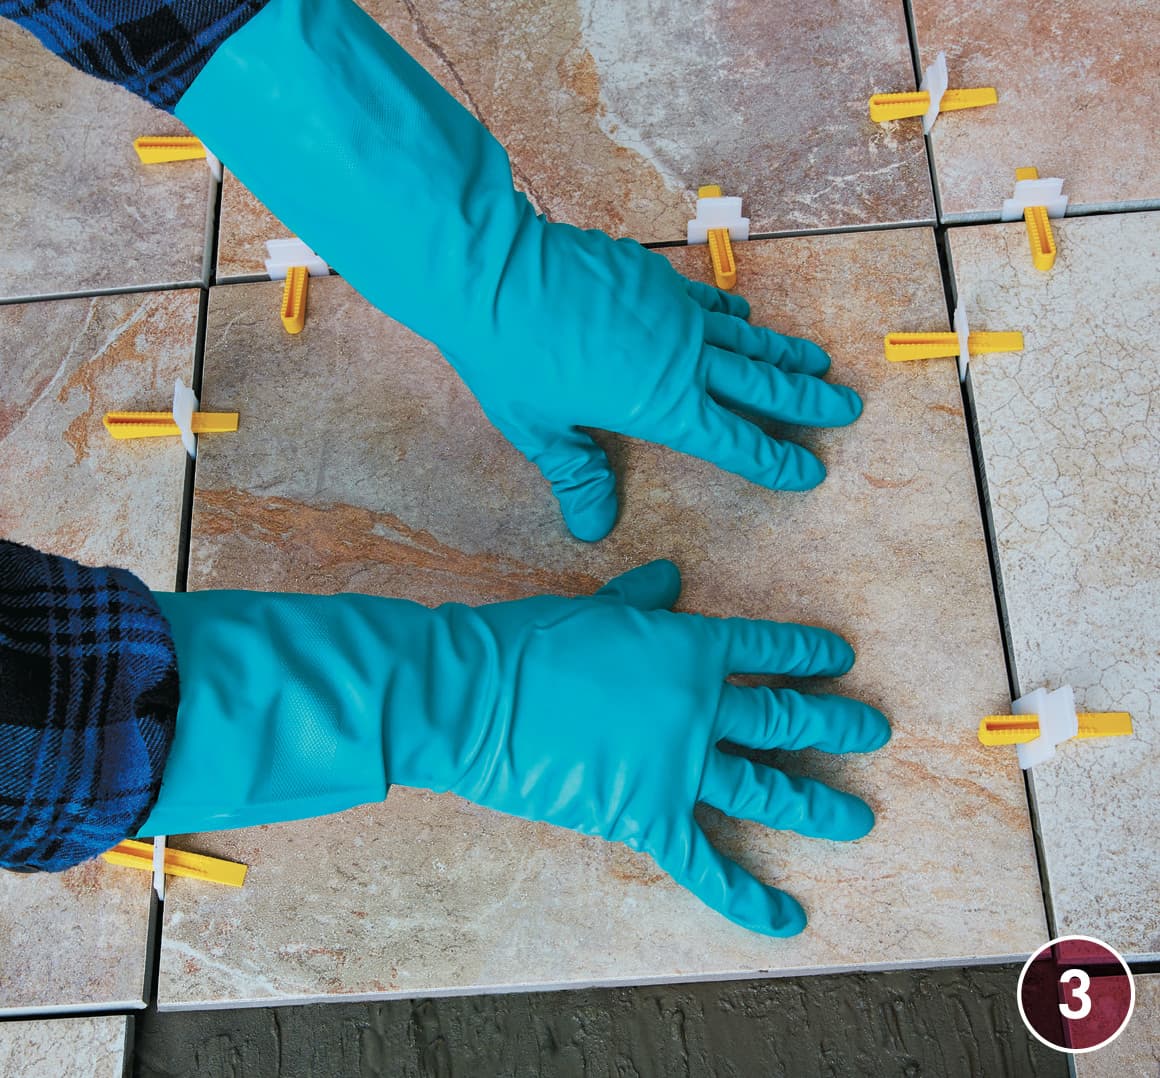
Pull the tile in toward the first tile to ensure it is snug against the spacer. Check for lippage and continue laying tile, wedging each adjoining tile as you lay it. Check with a level after laying a few tiles. Adjust as necessary by inserting the individual wedges further in or withdrawing them slightly.
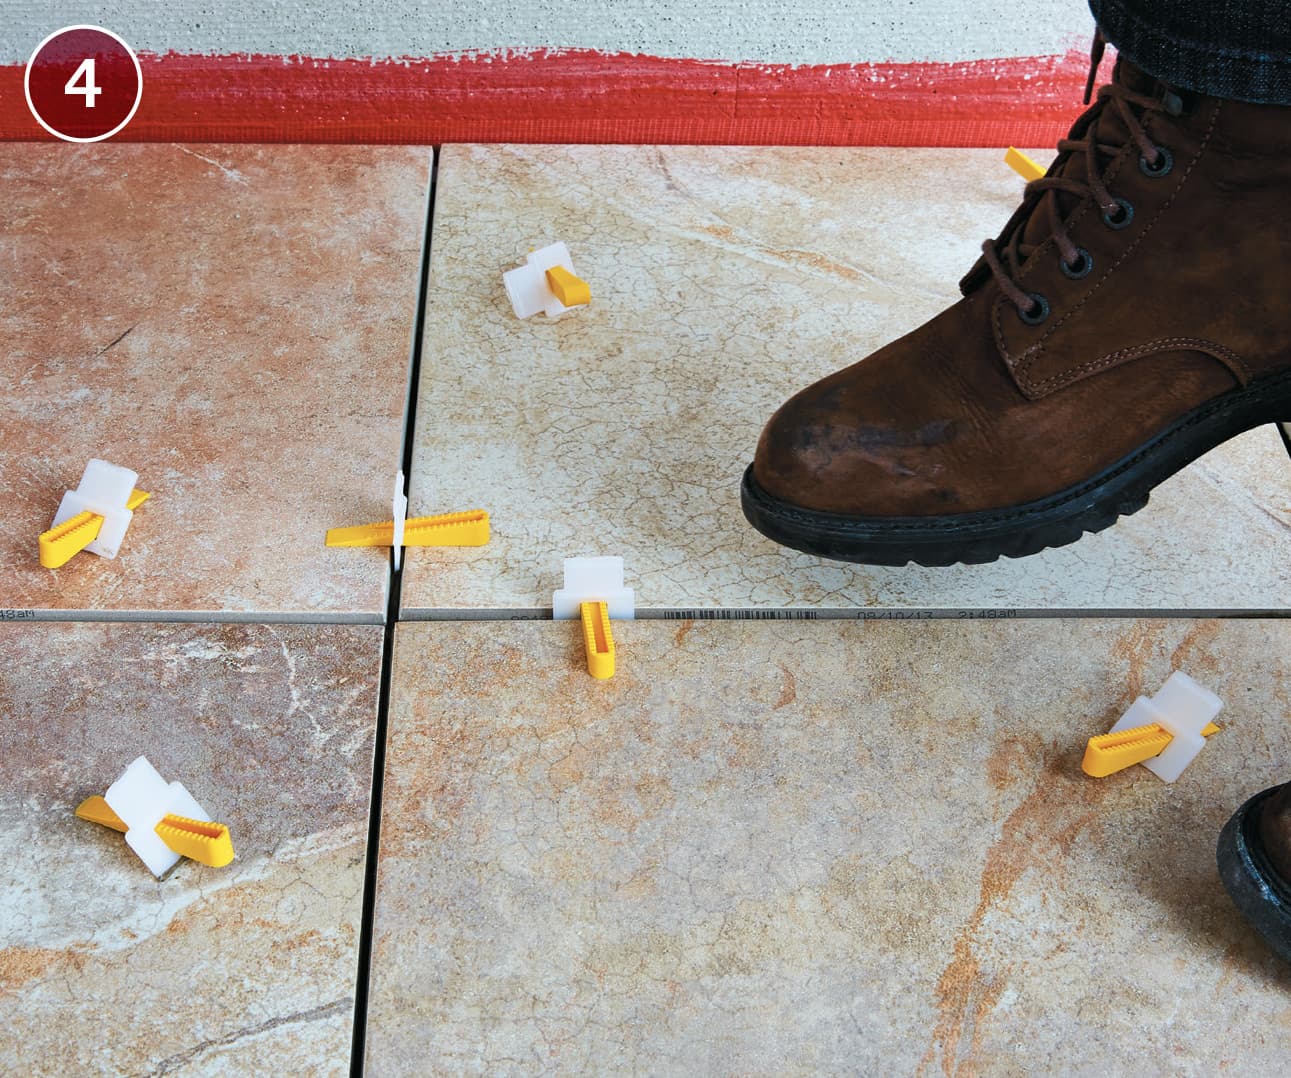
Allow the tiled floor to dry completely—24 hours or more. Once the tile can be walked on, kick the wedge/spacer assemblies on the side to break the spacers off. Collect the wedges for reuse, and discard the top tabs of the spacers. Grout the floor.
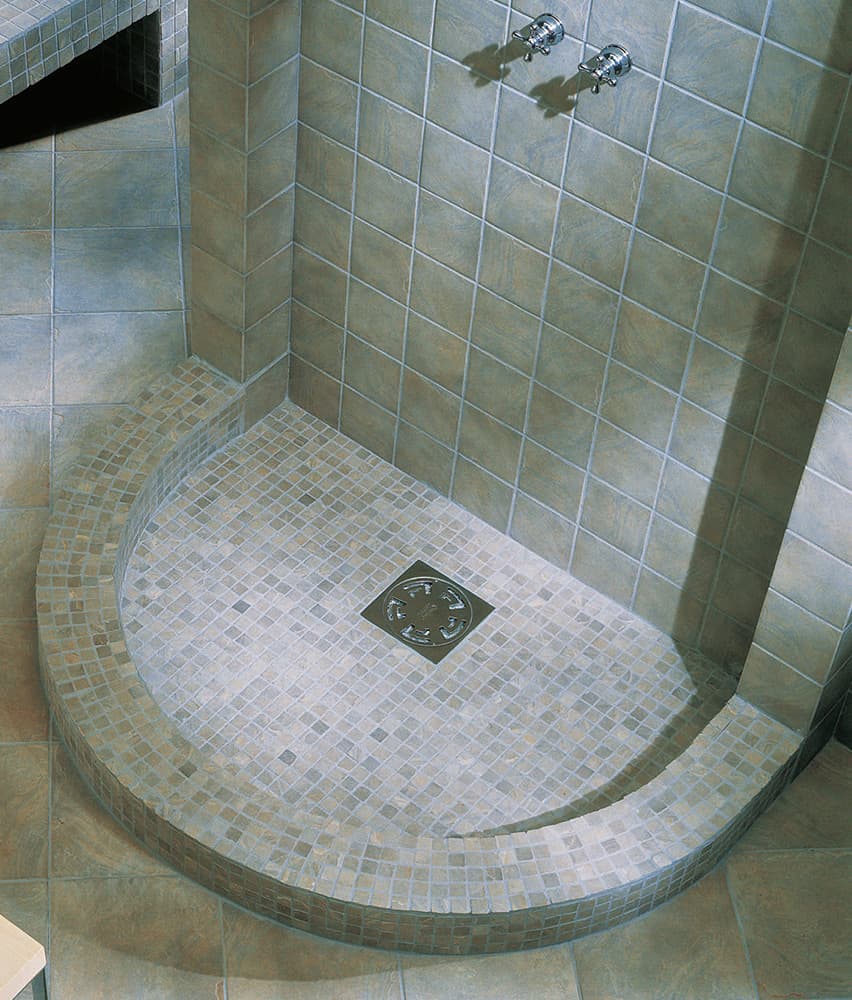
Shower Base
Building a custom-tiled shower base lets you choose the shape and size of your shower rather than having its dimensions dictated by available products. Building the base is quite simple, though it does require time and some knowledge of basic masonry techniques because the base is formed primarily using mortar. What you get for your time and trouble can be spectacular.
Before designing a shower base, contact your local building department regarding code restrictions and to secure the necessary permits. Most codes require water controls to be accessible from outside the shower and describe acceptable door positions and operation. Requirements such as these influence the size and position of the base.
Choosing the tile before finalizing the design lets you size the base to require mostly full tile. Showers are among the most frequently used amenities in the average home, so it really makes sense to build one that is comfortable and pleasing to your senses. Consider using small tile and gradate the color from top to bottom or in a sweep across the walls. Or, use trim tile and listellos on the walls to create an interesting focal point.
Whatever tile you choose, remember to seal the grout in your new shower and to maintain it carefully over the years. Water-resistant grout protects the structure of the shower and prolongs its useful life.
TOOLS & MATERIALS
Tape measure
Circular saw
Hammer
Utility knife
Stapler
2-ft. level
Mortar mixing box
Trowel
Wood float
Felt-tip marker
Ratchet wrench
Tin snips
Torpedo level
Tools for installing tile
Framing lumber (1×, 2 × 4, 2 × 10)
16d galvanized common nails
15# building paper
Staples
3-piece shower drain
PVC cement
Galvanized metal lath
Thick-bed floor mortar (“deck mud”)
Latex mortar additive
Thinset mortar
CPE waterproof membrane & preformed dam corners
CPE membrane solvent glue
CPE membrane sealant
Cementboard and materials for installing cementboard
Materials for installing tile
Builder’s sand
Portland cement
Masonry hoe
Gloves
Dust mask or respirator
Straightedge
1/4" wood shims
Mortar
Tile spacers
Balloon tester
Silicon caulk
Caulk gun
TIPS FOR BUILDING A CUSTOM SHOWER BASE
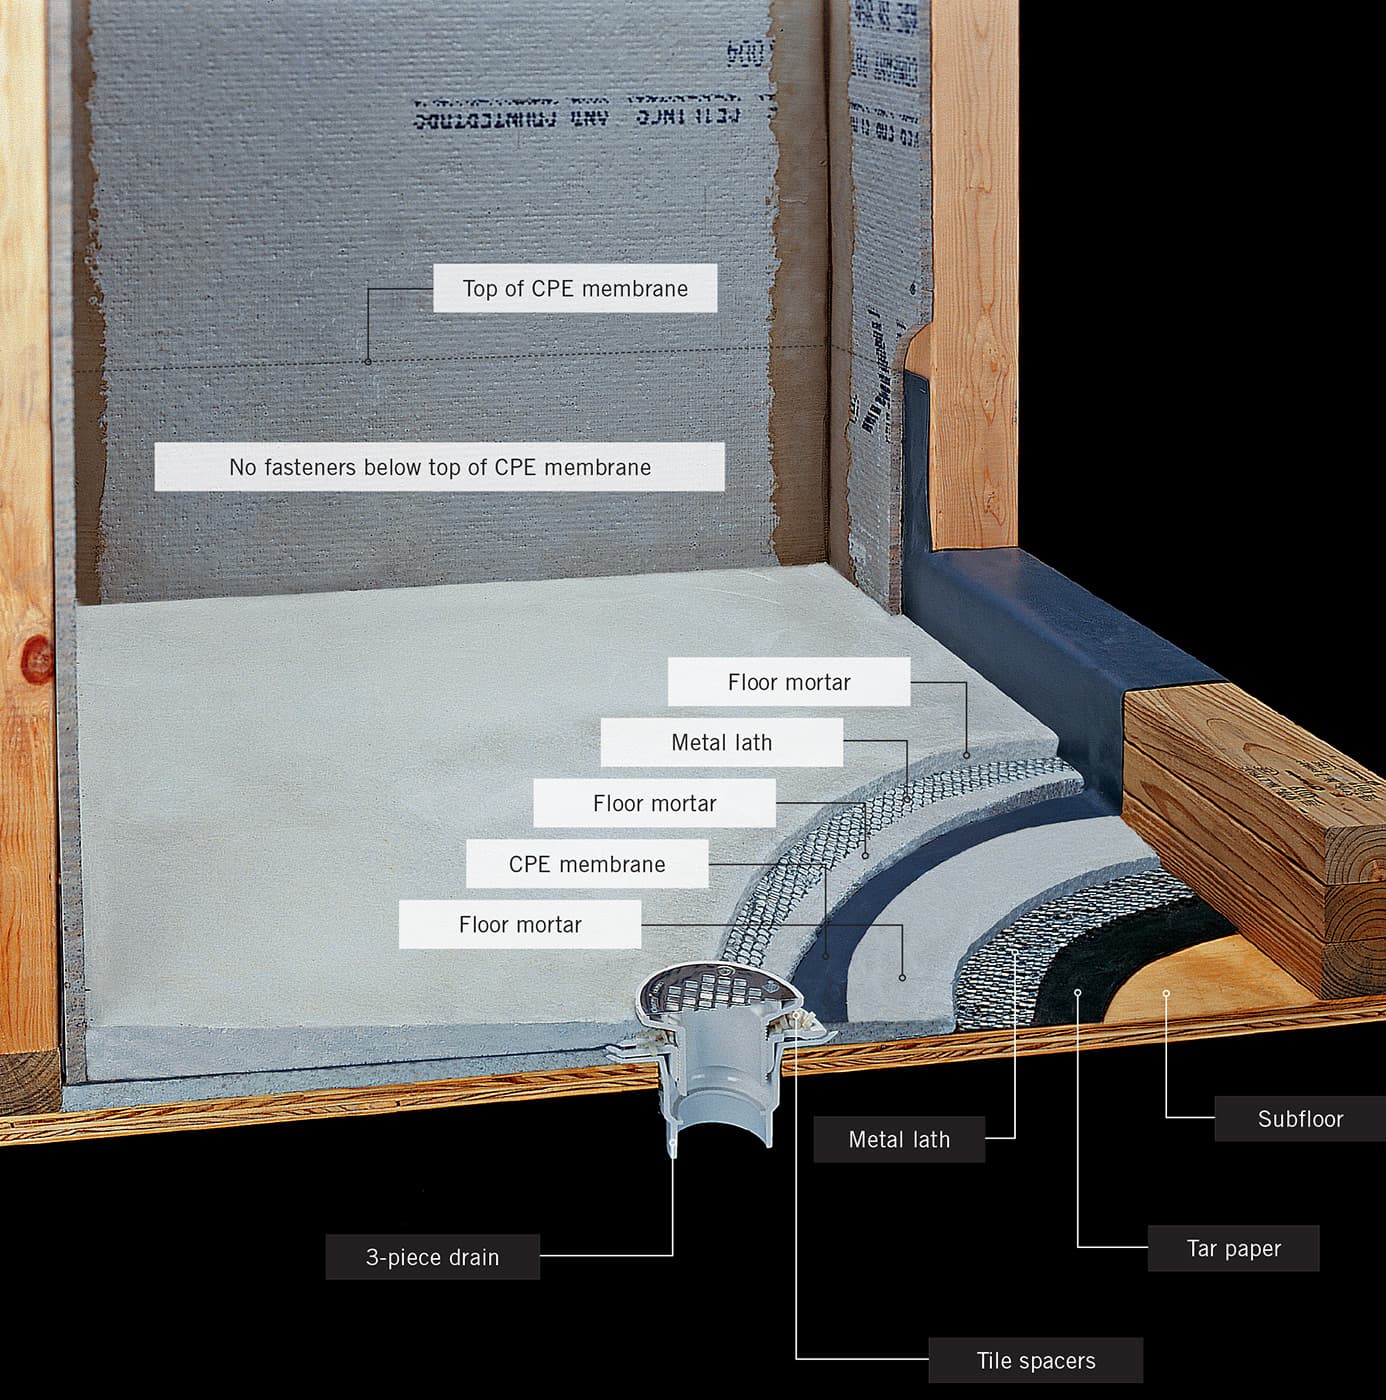
A custom-tiled shower base is built in three layers to ensure proper water drainage: the pre-pan, the shower pan, and the shower floor. A mortar pre-pan is first built on top of the subfloor, establishing a slope toward the drain of 1/4" for every 12" of shower floor. Next, a waterproof chlorinated polyethylene (CPE) membrane forms the shower pan, providing a watertight seal for the shower base. Finally, a second mortar bed reinforced with wire mesh is installed for the shower floor, providing a surface for tile installation. If water penetrates the tiled shower floor, the shower pan and sloped pre-pan will direct it to the weep holes of the 3-piece drain. One of the most important steps in building a custom-tiled shower base is testing the shower pan after installation (step 13). This allows you to locate and fix any leaks to prevent costly damage.
MIXING DECK MUD
Mortar beds for laying tile are made from deck mud, a simple mortar consisting of a proportioned mixture of builders sand and Portland cement, with a little water added to bind the particles together. Sometimes referred to as dry pack mortar or floor mud, it can be purchased in prepackaged blends or you can easily make it yourself. It can be set in thicker layers than ordinary thinset mortar.
Deck mud is made with a ratio of four to six parts of builders sand to one part of Portland cement. The higher the proportion of Portland cement in the mixture, the richer it is considered to be. Leaner mortars contain a lower proportion of Portland cement. A mortar bed 1 1/4" thick (a common thickness for a shower receptor base) requires approximately 12 pounds of dry sand per square foot of application. Add an additional three pounds of sand per square foot for each additional 1/4" of mortar thickness desired. The amount of Portland cement required will depend on the mixing ratio and the total volume of sand required to complete the job. A richer blend that uses a four-to-one ratio is suitable for small areas such as shower pan mortar beds.
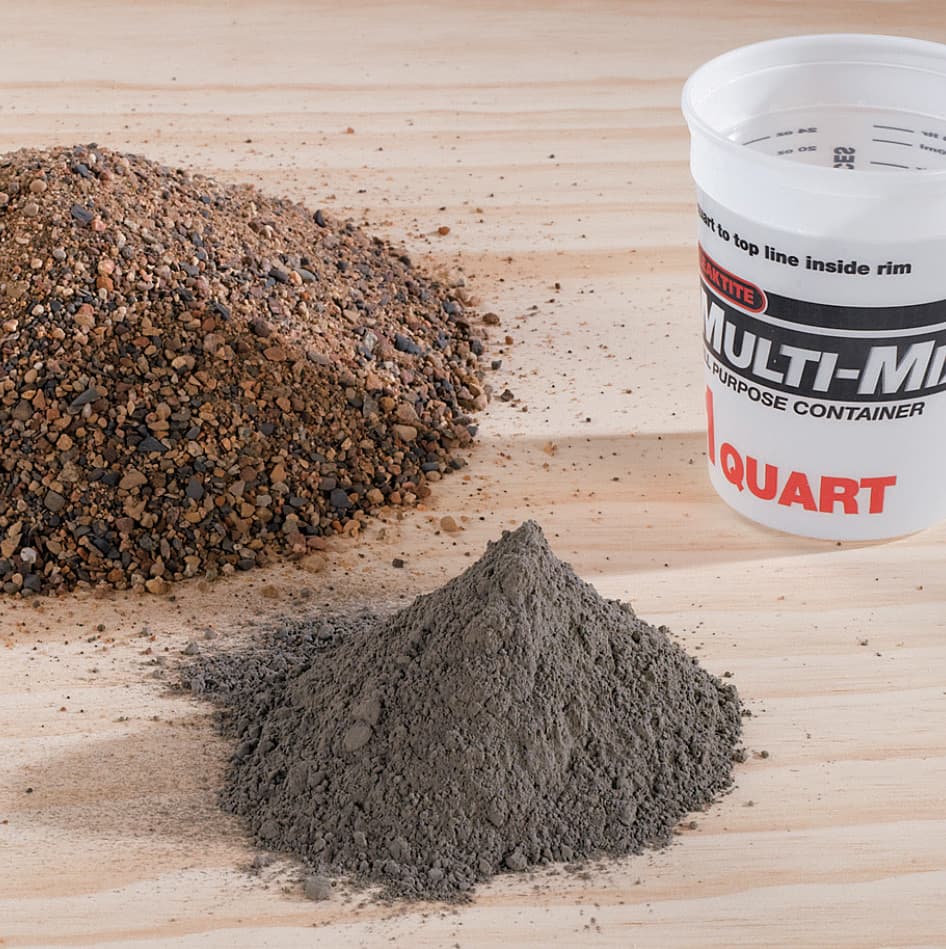
The ingredients for making your own mortar bed “mud” are minimal. You’ll need sharp sand (also called builders sand), Portland cement, and water. The proportions vary by application.
How to Mix Deck Mud

Add the dry ingredients (builders sand and Portland cement) to a mortar box in the correct ratios. For general purposes, four parts sand to one part mortar mix (by volume) works. Don’t mix more mud than you can use in a half hour or so.
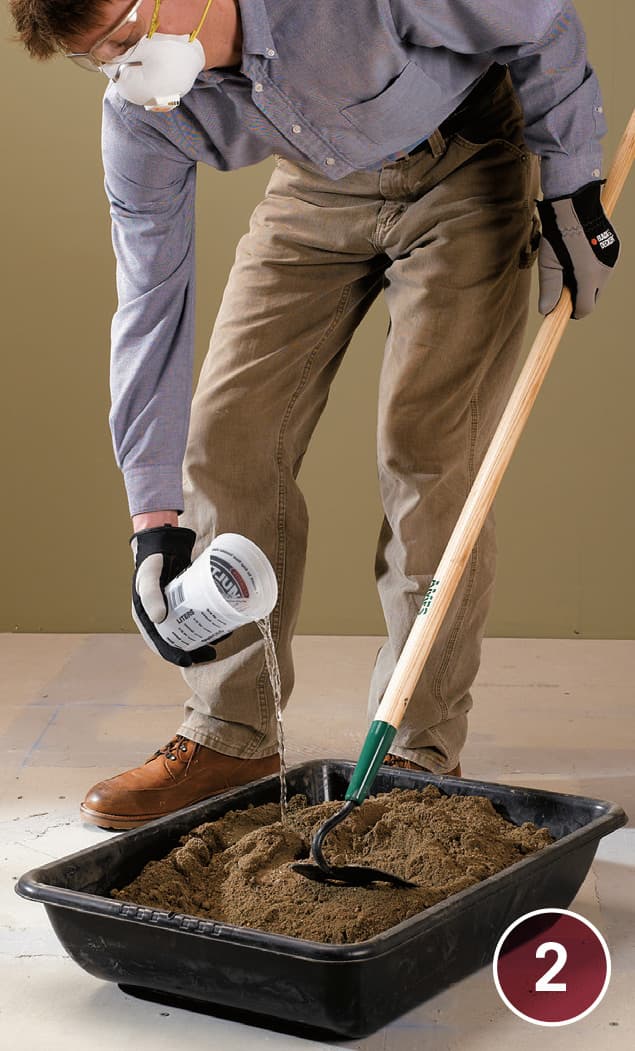
Add small amounts of clean, potable water to the dry mixture and blend to an evenly moist consistency using a masonry hoe. Be sure to wear gloves and a dust mask or respirator.
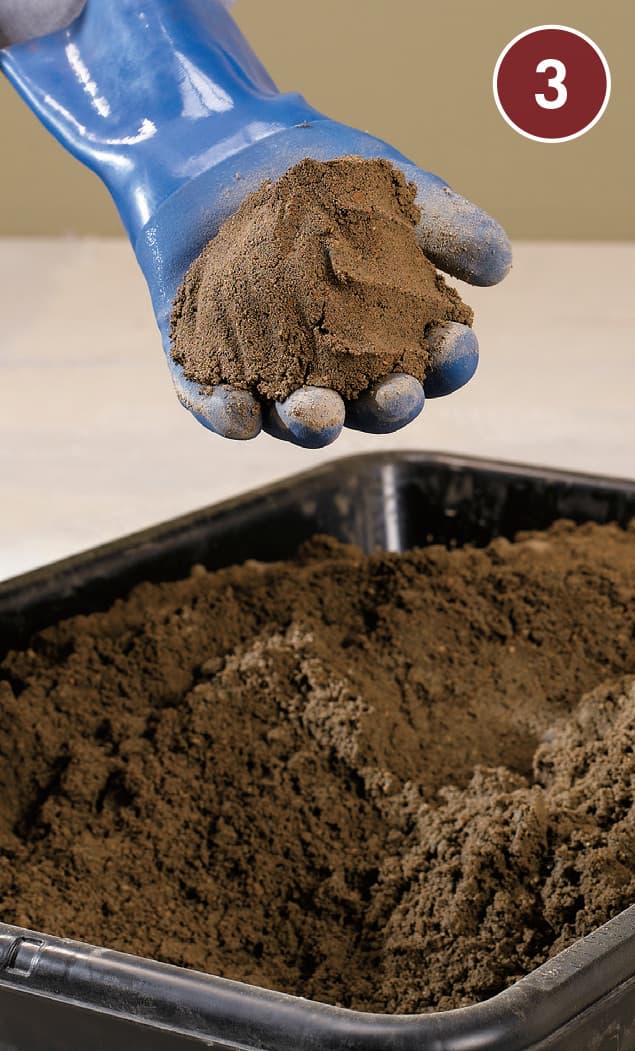
A squeezed clump of deck mud should hold its shape without sagging or falling apart.
How to Build a Custom-Tiled Shower Base
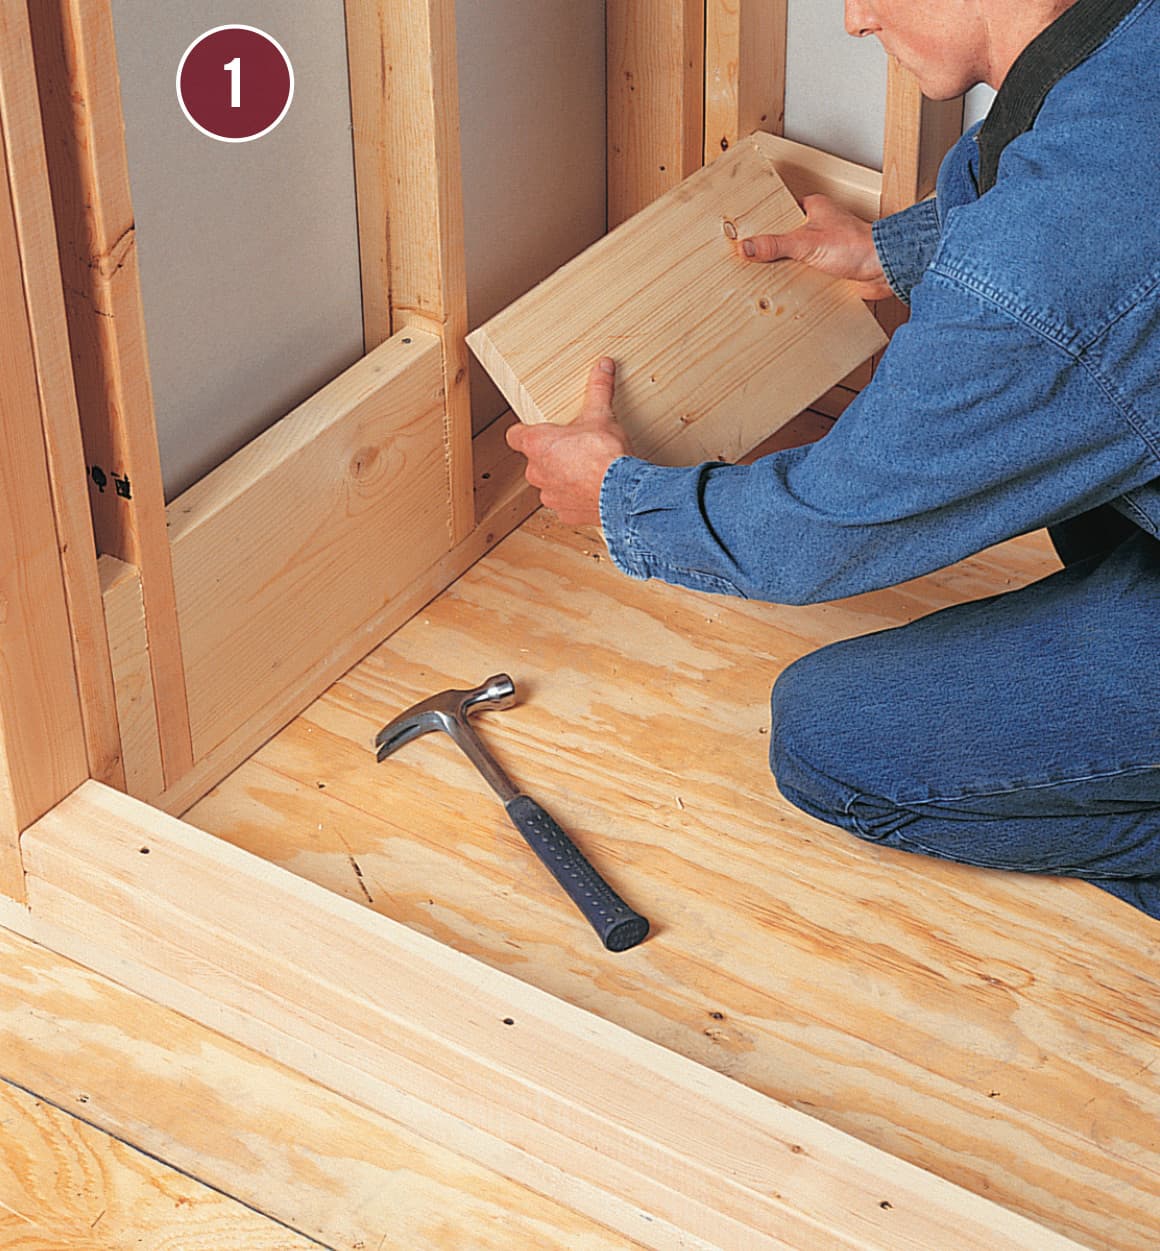
Remove building materials to expose subfloor and stud walls. Cut three 2 × 4s for the curb and fasten them to the floor joists and the studs at the shower threshold with 16d galvanized common nails. Also cut 2 × 10 lumber to size and install in the stud bays around the perimeter of the shower base.
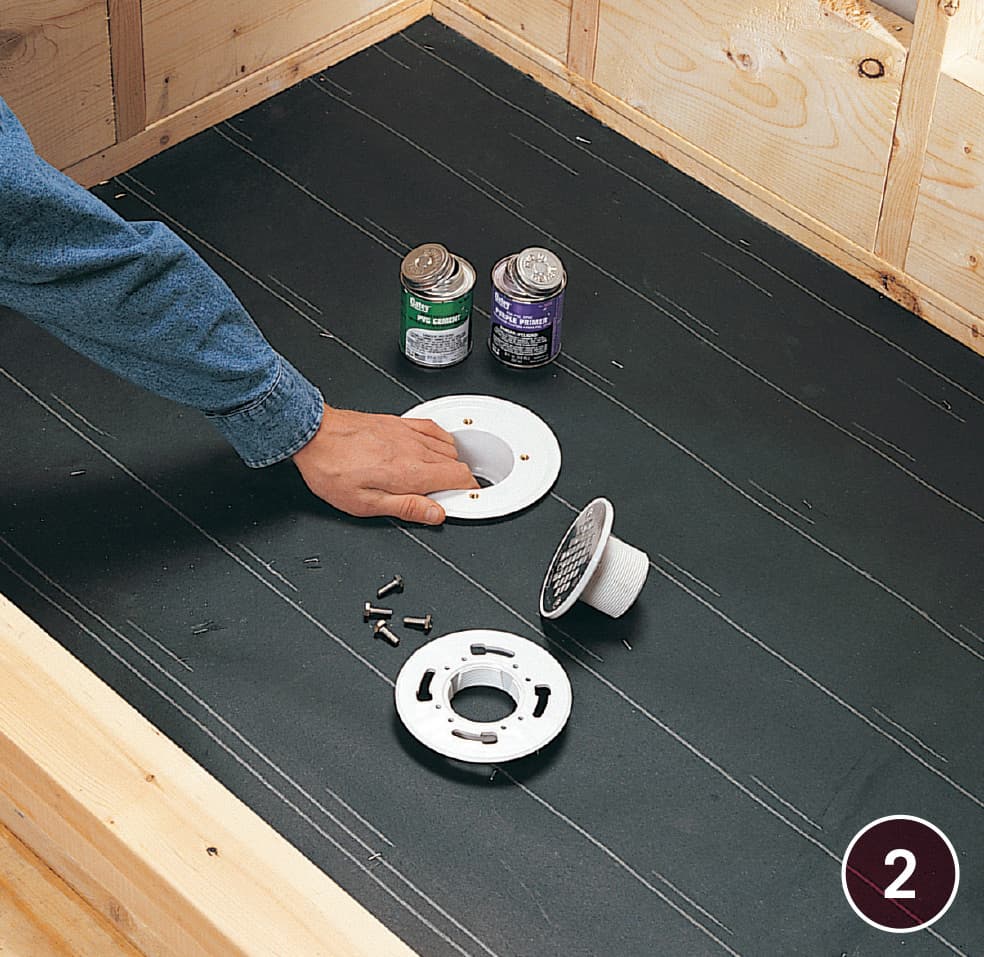
Staple 15# building paper to the subfloor of the shower base. Disassemble the three-piece shower drain and glue the bottom piece to the drain pipe with PVC cement. Partially screw the drain bolts into the drain piece, and stuff a rag into the drain pipe to prevent mortar from falling into the drain.
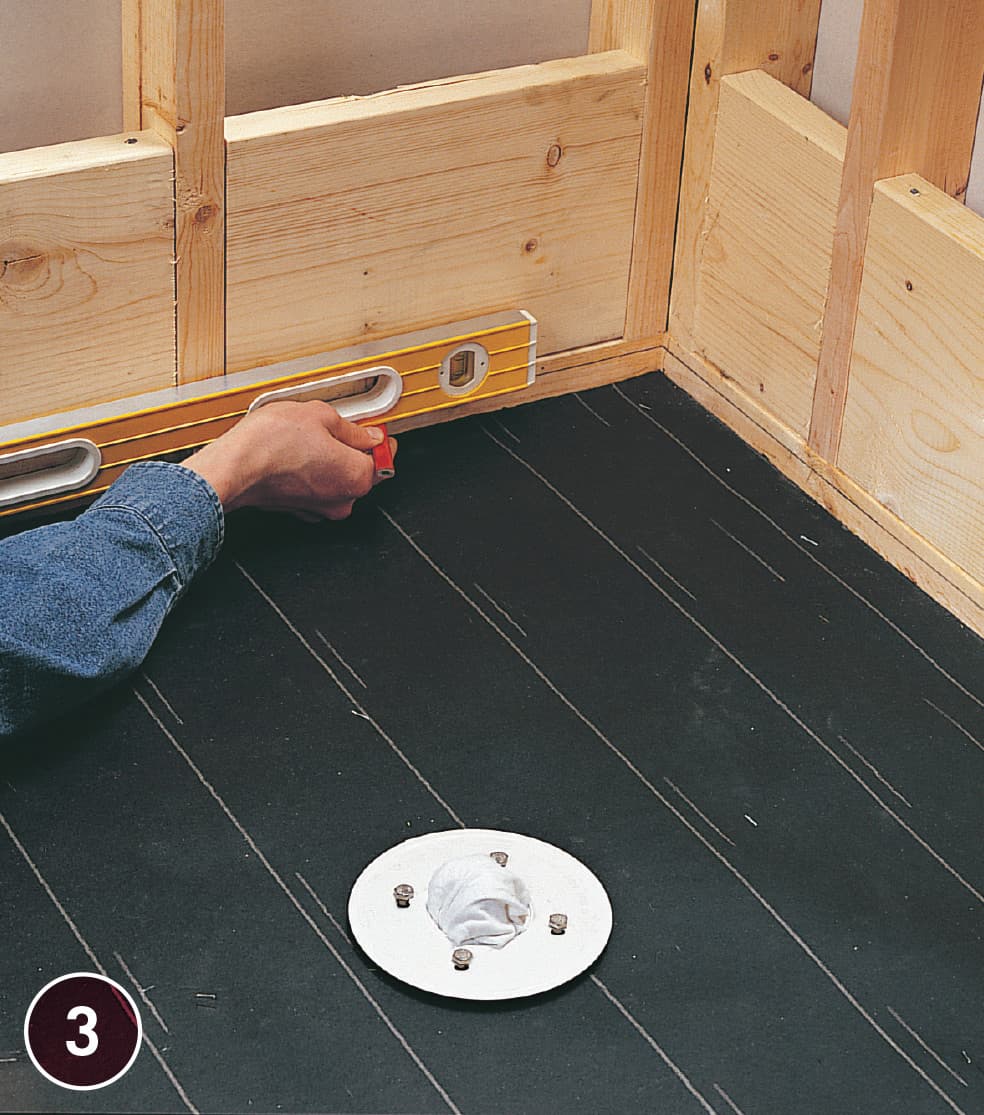
Mark the height of the bottom drain piece on the wall farthest from the center of the drain. Measure from the center of the drain straight across to that wall, then raise the height mark 1/4" for every 12" of shower floor to slope the pre-pan toward the drain. Trace a reference line at the height mark around the perimeter of the entire alcove using a level.
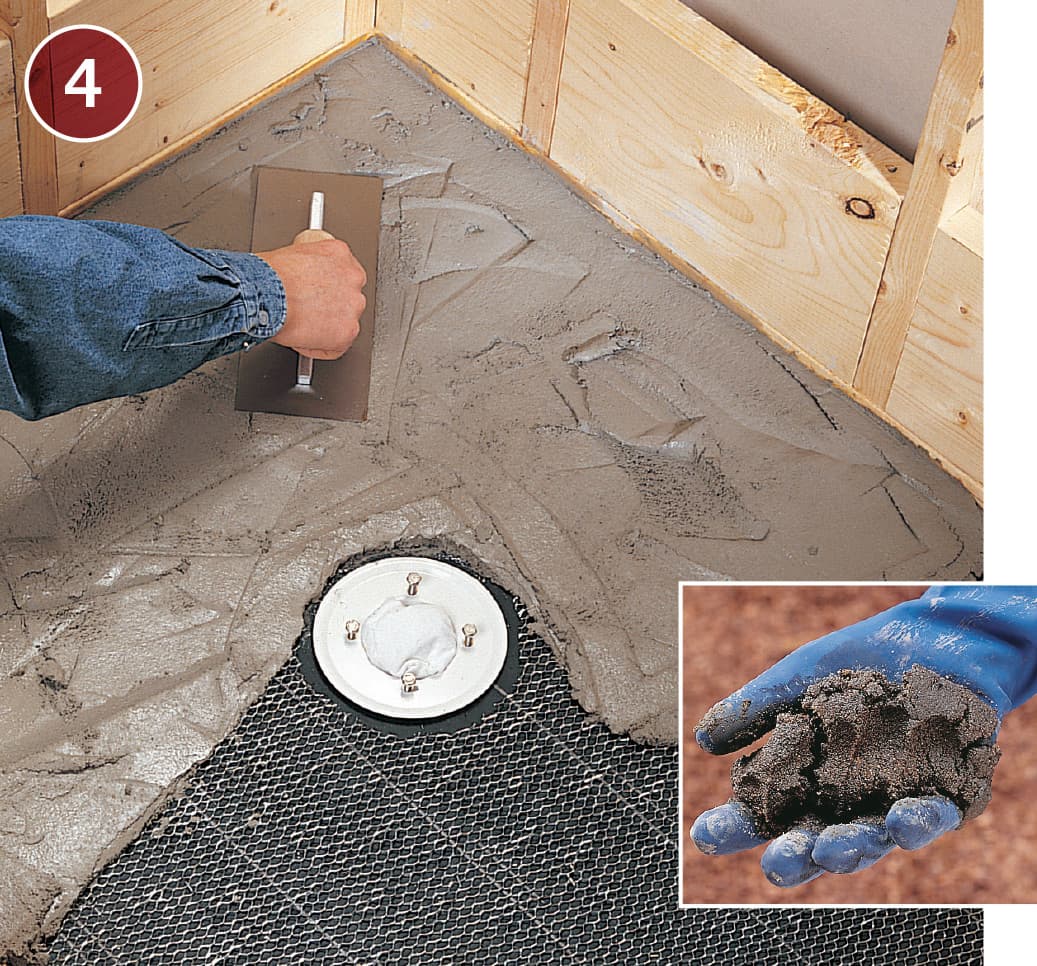
Staple galvanized metal lath over the building paper; cut a hole in the lath 1/2" from the drain. Mix floor mortar (or “deck mud”) to a fairly dry consistency using a latex additive for strength; mortar should hold its shape when squeezed (inset). Trowel the mortar onto the subfloor, building the pre-pan from the flange of the drain piece to the height line on the perimeter of the walls.
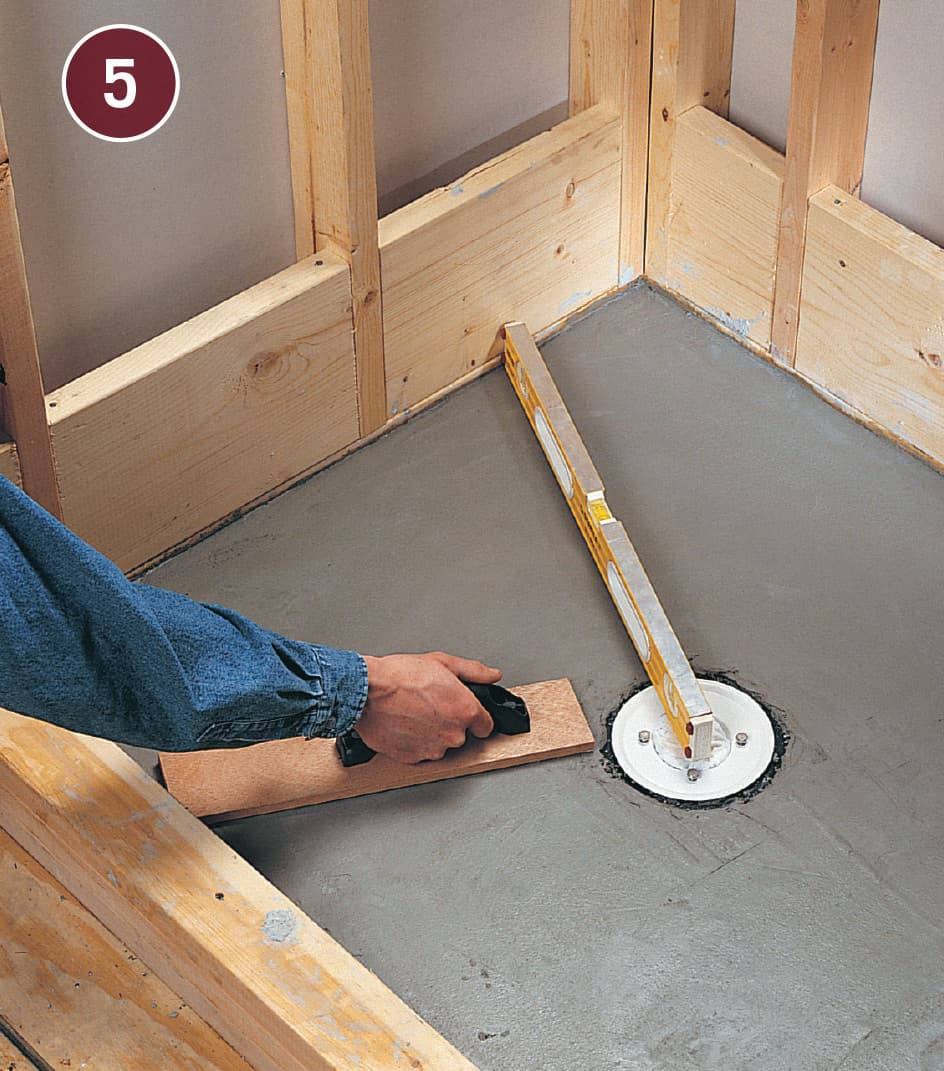
Continue using the trowel to form the pre-pan, checking the slope using a level and filling any low spots with mortar. Finish the surface of the pre-pan with a wood float until it is even and smooth. Allow the mortar to cure overnight.
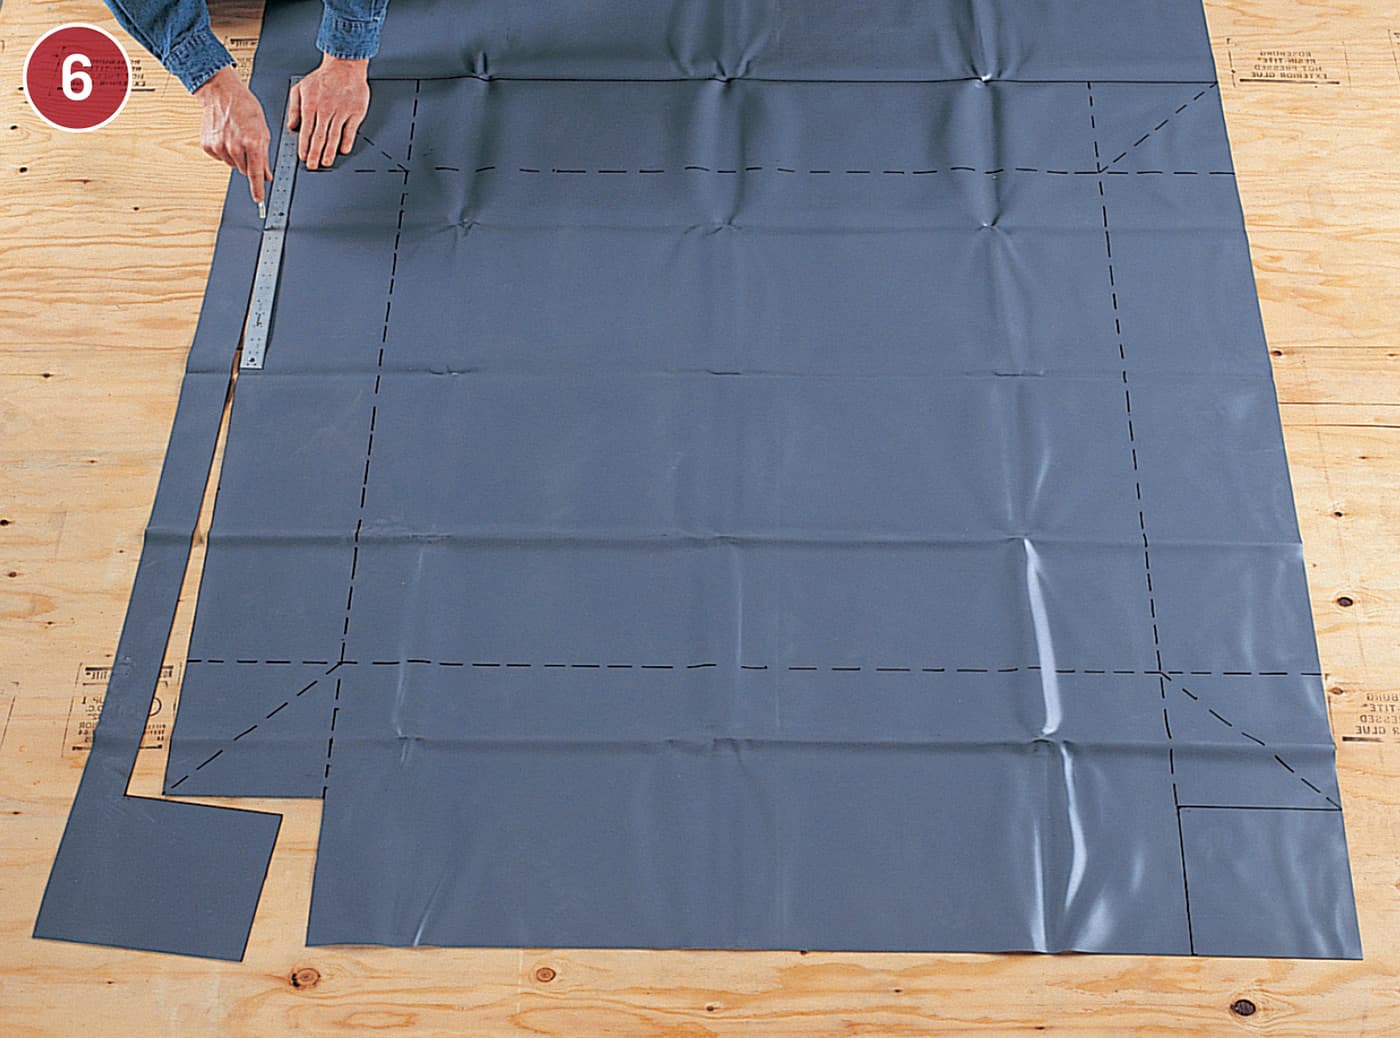
Measure the dimensions of the shower floor, and mark it out on a sheet of CPE waterproof membrane using a felt-tipped marker. From the floor outline, measure out and mark an additional 8" for each wall and 16" for the curb end. Cut the membrane to size using a utility knife and straightedge. Be careful to cut on a clean, smooth surface to prevent puncturing the membrane. Lay the membrane onto the shower pan.
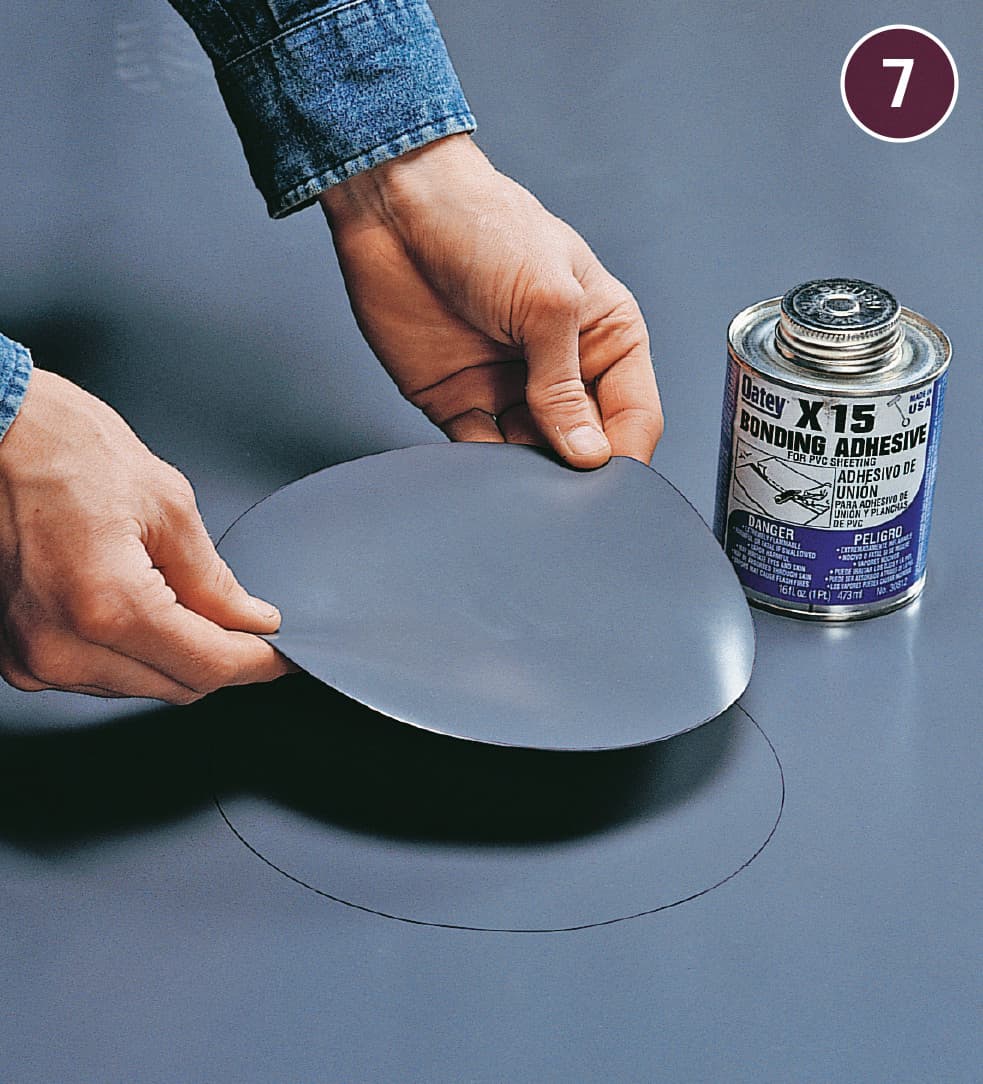
Measure to find the exact location of the drain and mark it on the membrane, outlining the outer diameter of the drain flange. Cut a circular piece of CPE membrane roughly 2" larger than the drain flange, then use CPE membrane solvent glue to weld it into place and reinforce the seal at the drain.

Apply CPE sealant around the drain. Fold the membrane along the floor outline. Set the membrane over the pre-pan so the reinforced drain seal is centered over the drain bolts. Working from the drain to the walls, carefully tuck the membrane tightly into each corner, folding the extra material into triangular flaps.
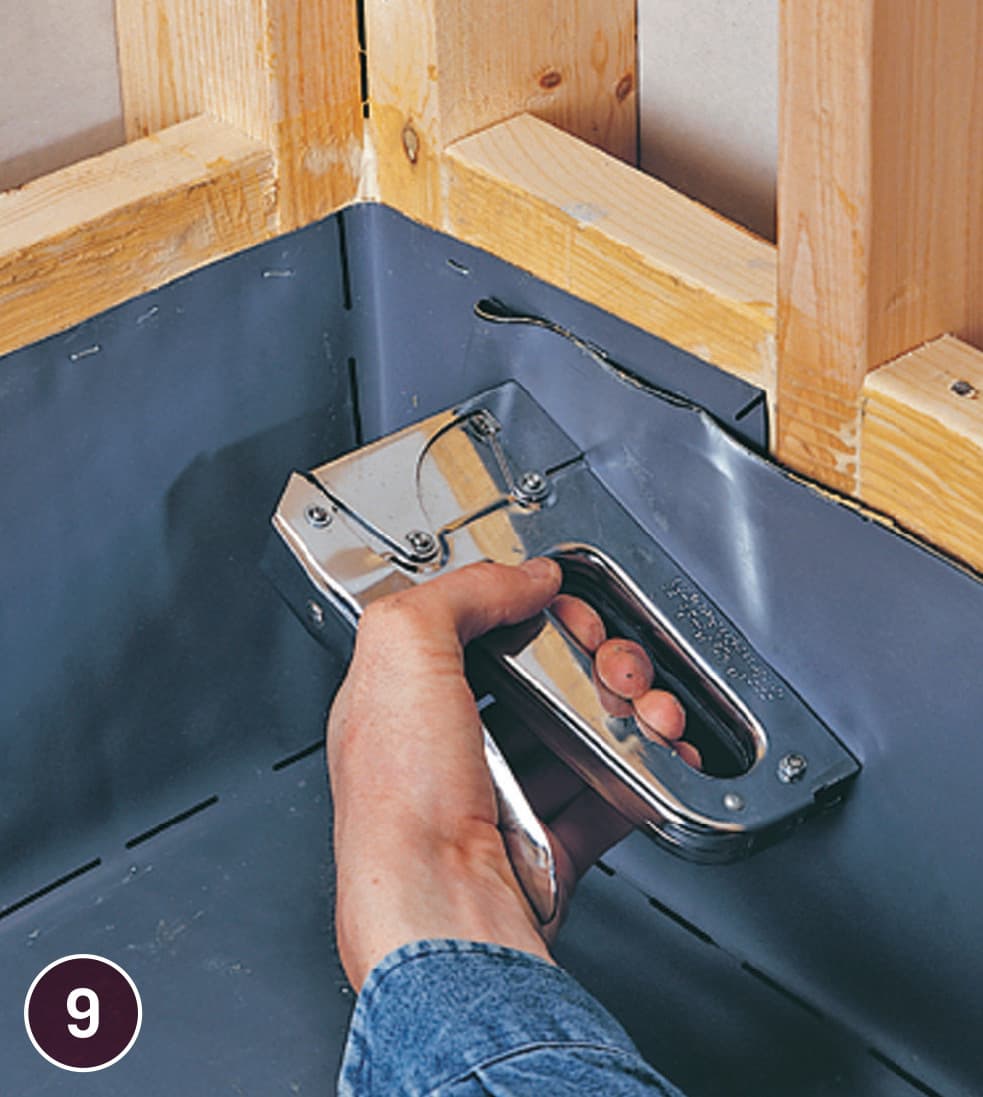
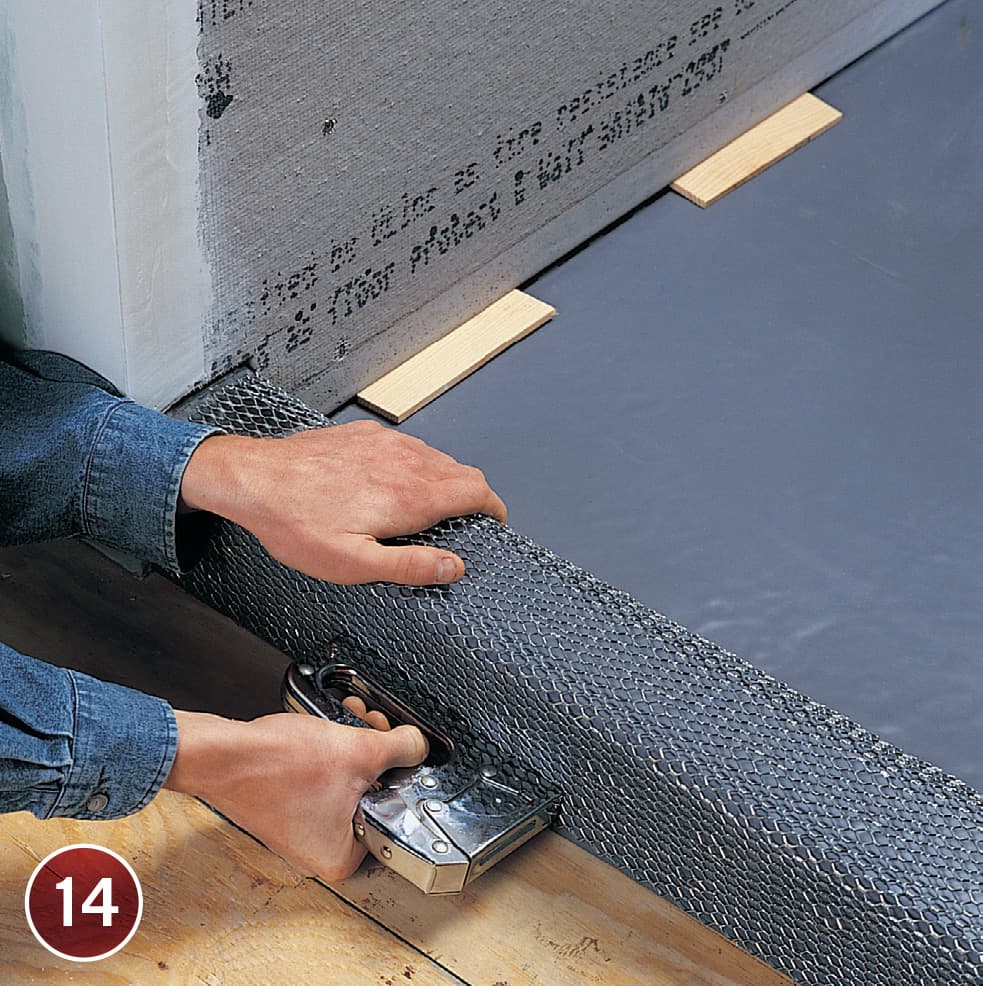
Apply CPE solvent glue to one side, press the flap flat, then staple it in place. Staple only the top edge of the membrane to the blocking; do not staple below the top of the curb or on the curb itself.
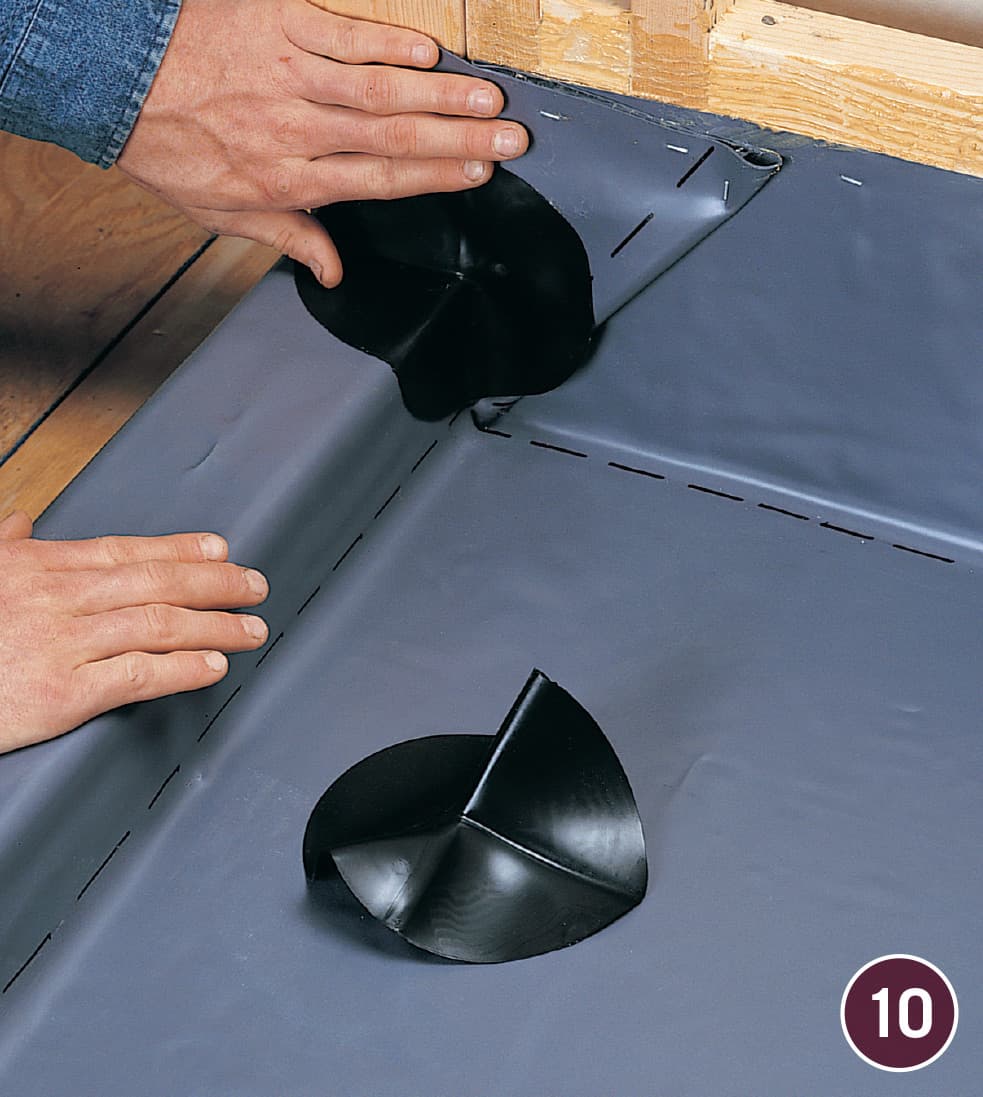
At the shower curb, cut the membrane along the studs so it can be folded over the curb. Solvent-glue a dam corner at each inside corner of the curb. Do not fasten the dam corners with staples.
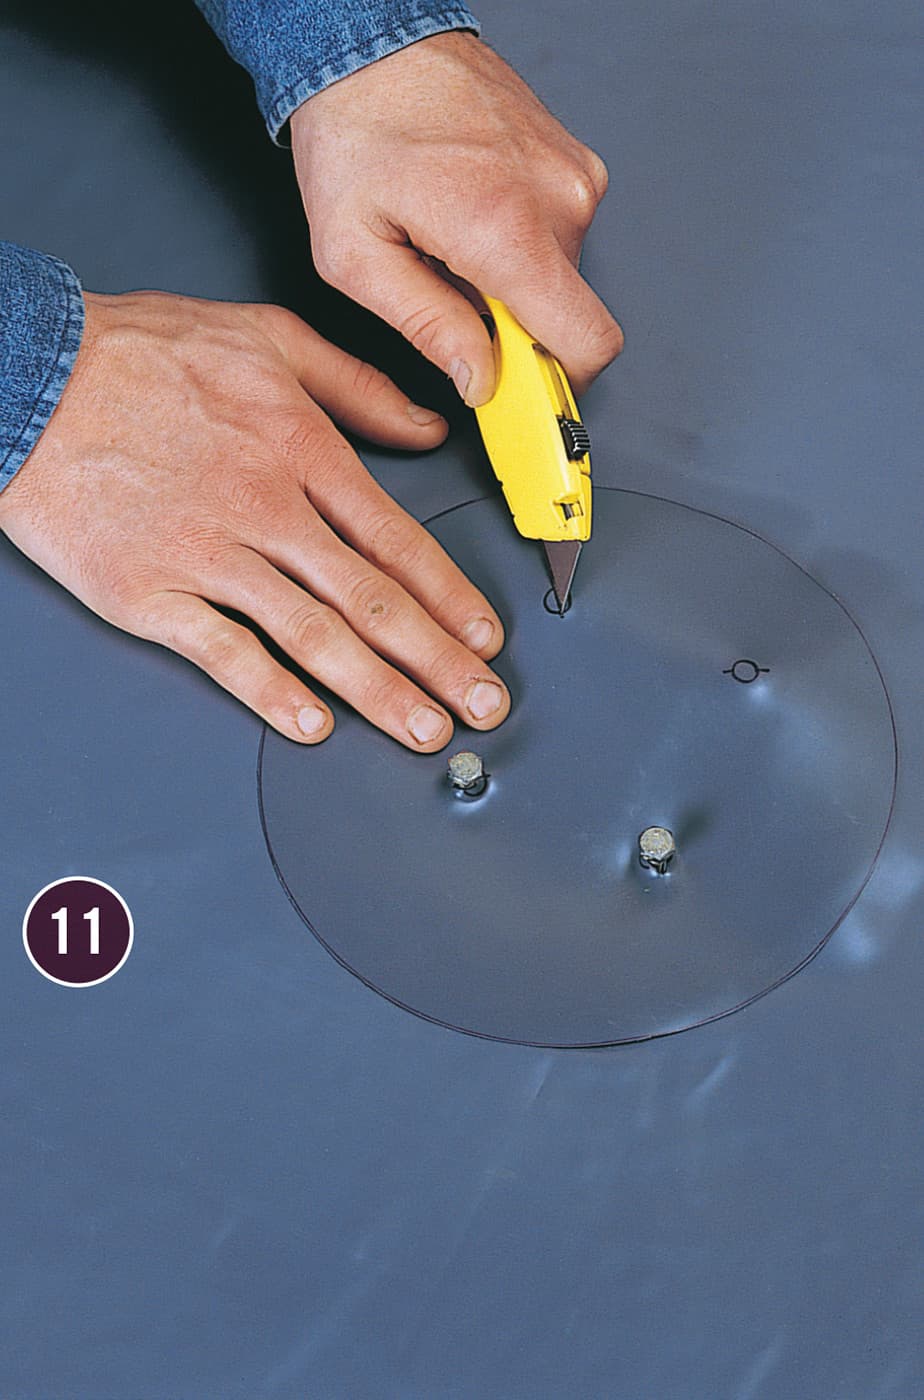
At the reinforced drain seal on the membrane, locate and mark the drain bolts. Press the membrane down around the bolts, then use a utility knife to carefully cut a slit just large enough for the bolts to poke through. Push the membrane down over the bolts.
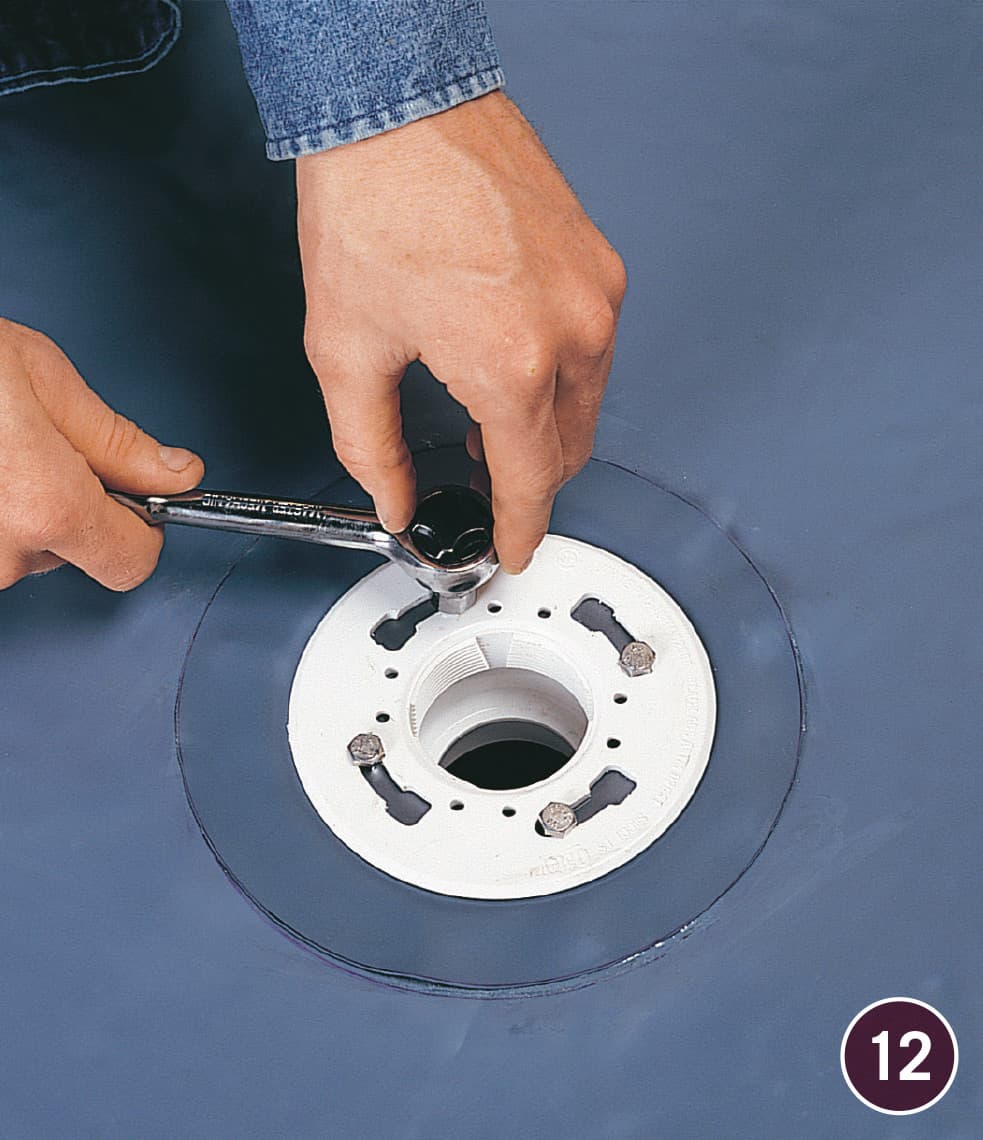
Use a utility knife to carefully cut away only enough of the membrane to expose the drain and allow the middle drain piece to fit in place. Remove the drain bolts, then position the middle drain piece over the bolt holes. Reinstall the bolts, tightening them evenly and firmly to create a watertight seal.
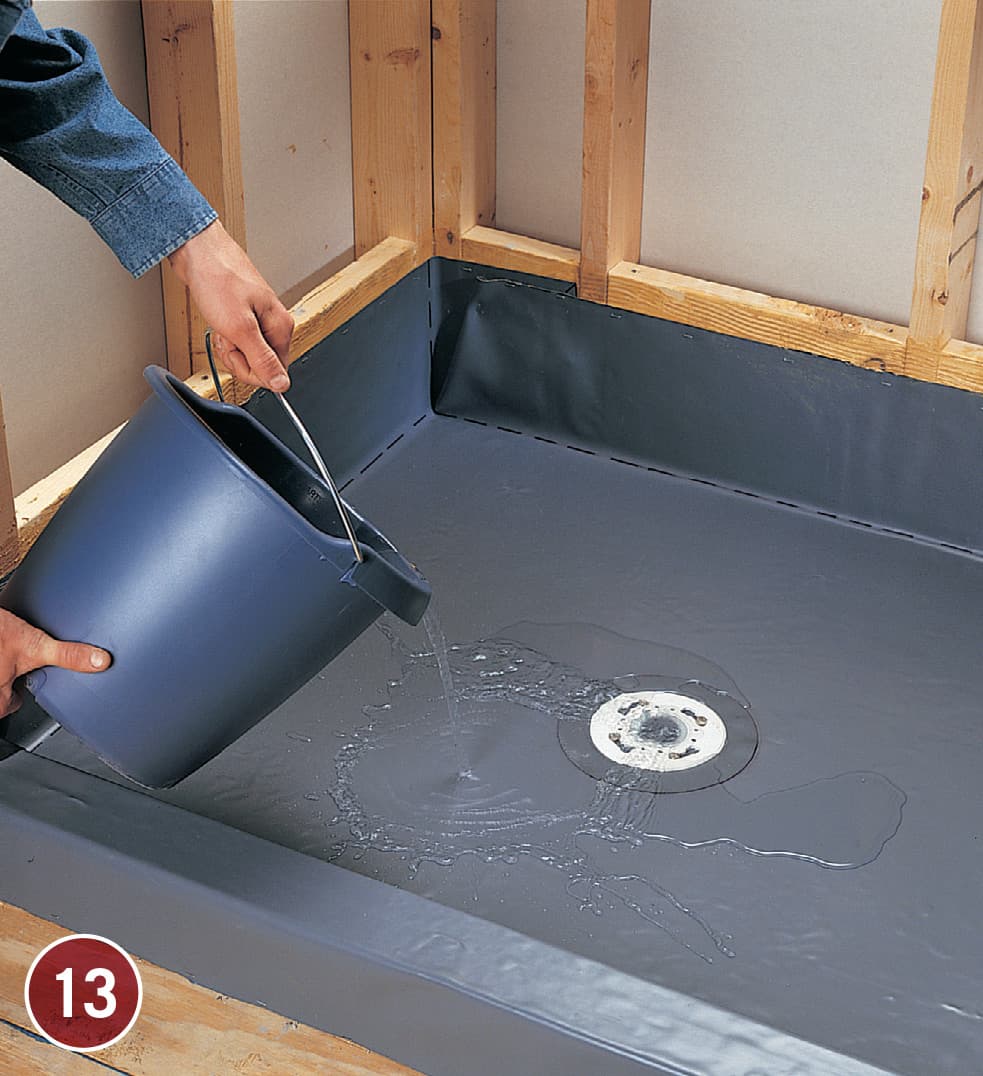
Test the shower pan for leaks overnight. Place a balloon tester in the drain below the weep holes, and fill the pan with water, to 1" below the top of the curb. Mark the water level and let the water sit overnight. If the water level remains the same, the pan holds water. If the level is lower, locate and fix leaks in the pan using patches of membrane and CPE solvent.
Install cementboard on the alcove walls, using 1/4" wood shims to lift the bottom edge off the CPE membrane. To prevent puncturing the membrane, do not use fasteners in the lower 8" of the cementboard. Cut a piece of metal lath to fit around the three sides of the curb. Bend the lath so it tightly conforms to the curb. Pressing the lath against the top of the curb, staple it to the outside face of the curb. Mix enough mortar for the two sides of the curb.
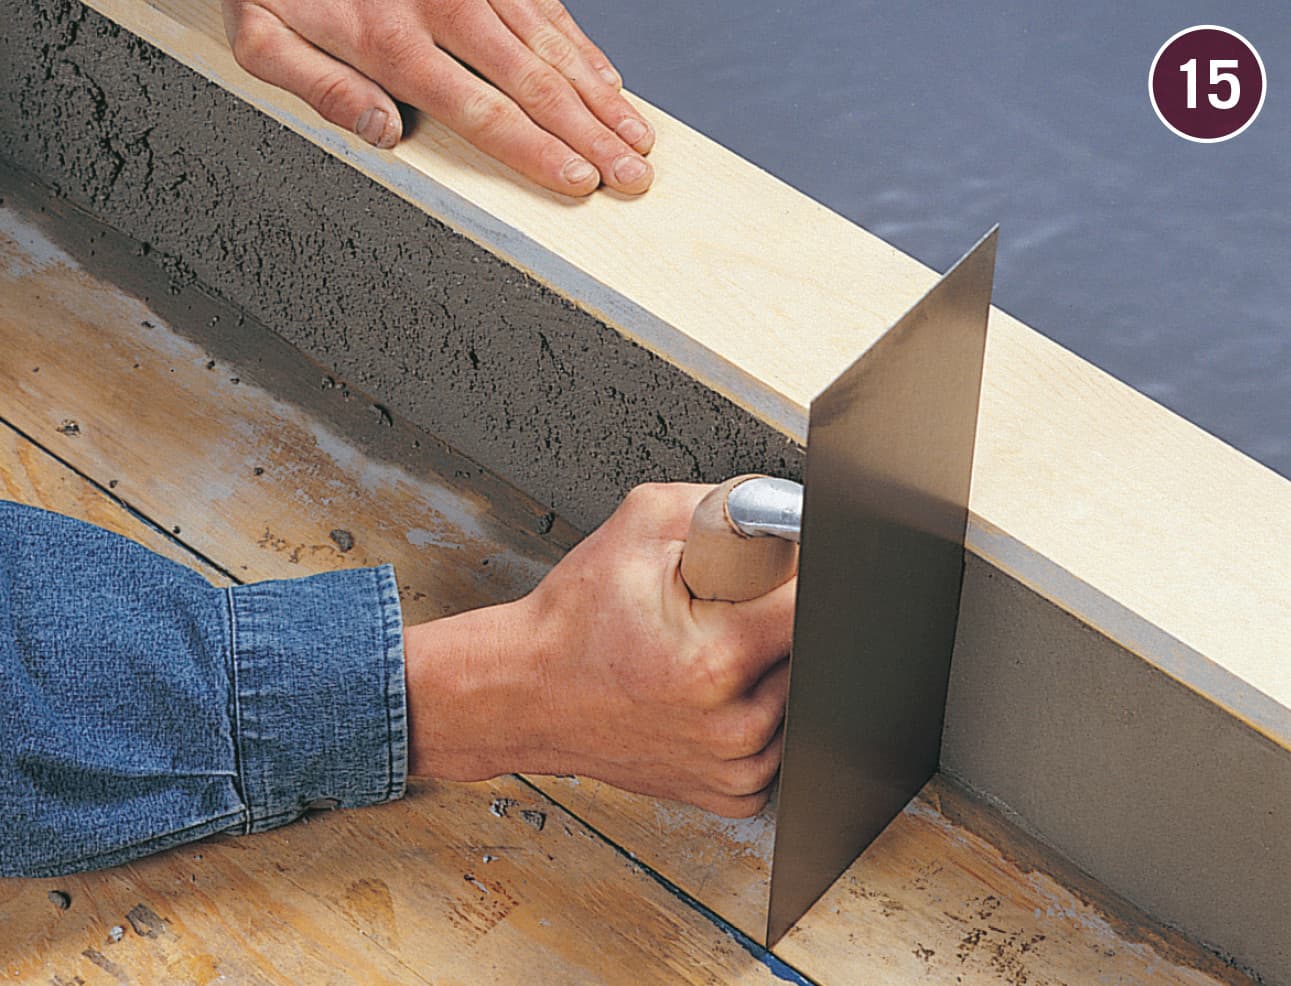
Overhang the front edge of the curb with a straight 1× board, so it is flush with the outer wall material. Apply mortar to the mesh with a trowel, building to the edge of the board. Clear away excess mortar, then use a torpedo level to check for plumb, making adjustments as needed. Repeat for the inside face of the curb. Allow the mortar to cure overnight.
NOTE: The top of the curb will be finished after tile is installed (step 19).
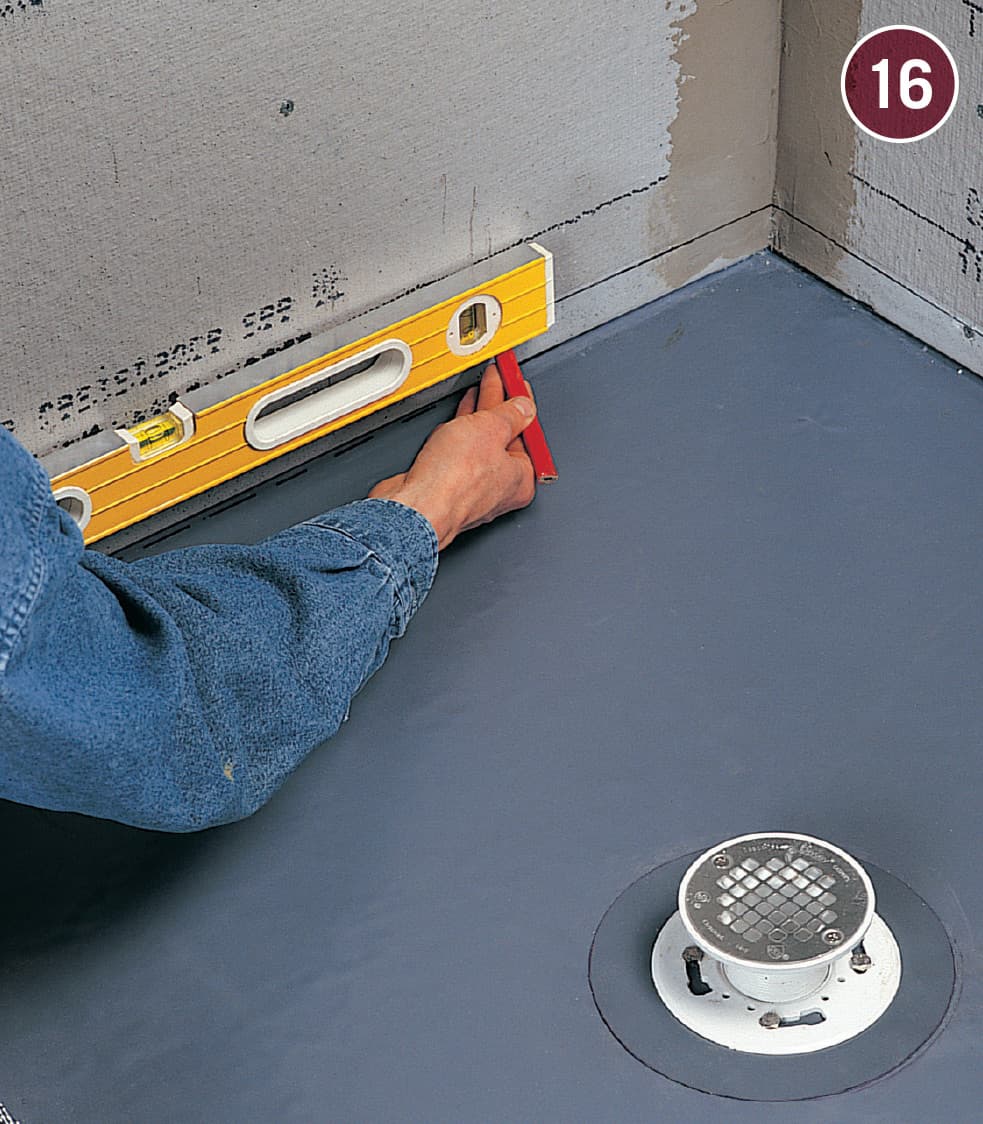
Attach the drain strainer piece to the drain, adjusting it to a minimum of 1 1/2" above the shower pan. On one wall, mark 1 1/2" up from the shower pan, then use a level to draw a reference line around the perimeter of the shower base. Because the pre-pan establishes the 1/4" per foot slope, this measurement will maintain that slope.

Spread tile spacers over the weep holes of the drain to prevent mortar from plugging the holes. Mix the floor mortar, then build up the shower floor to roughly half the thickness of the base. Cut metal lath to cover the mortar bed, keeping it 1/2" from the drain (see photo in step 18).

Continue to add mortar, building the floor to the reference line on the walls. Use a level to check the slope, and pack mortar into low spots with a trowel. Leave space at the drain for the thickness of the tile. Float the surface using a wood float until it is smooth and slopes evenly to the drain. When finished, allow the mortar to cure overnight before installing the tiles.
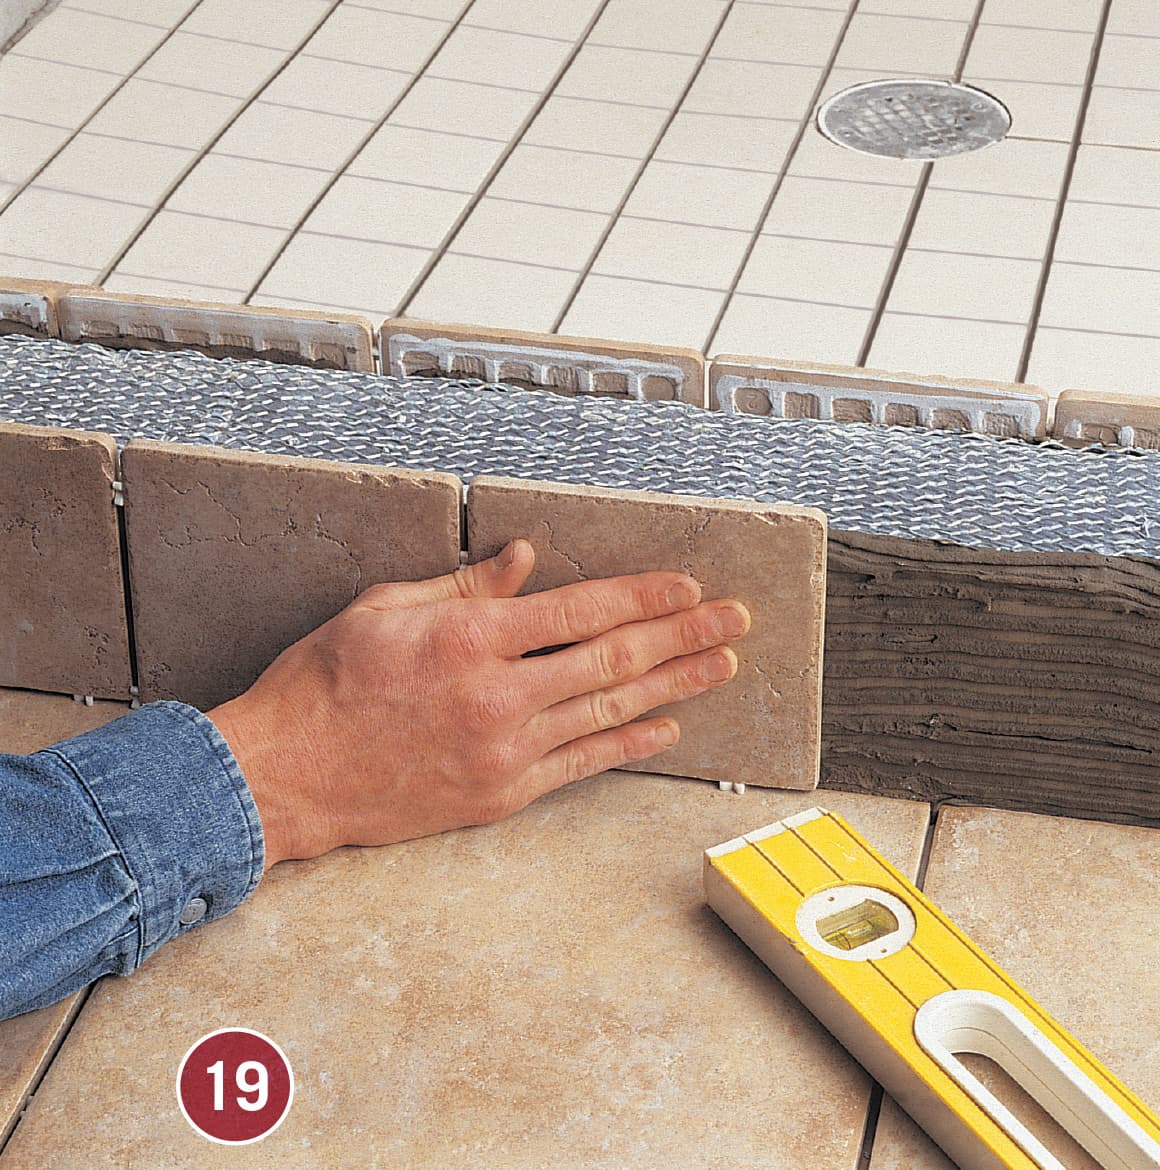
After the floor has cured, draw reference lines and establish the tile layout, then mix a batch of thinset mortar and install the floor tile. At the curb, cut the tiles for the inside to protrude 1/2" above the unfinished top of the curb, and the tiles for the outside to protrude 5/8" above the top, establishing a 1/8" slope so water drains back into the shower. Use a level to check the tops of the tiles for level as you work.

Mix enough floor mortar to cover the unfinished top of the curb, then pack it in place between the tiles using a trowel. Screed off the excess mortar flush with the tops of the side tiles. Allow the mortar to cure, then install bullnose cap tile. Install the wall tile, then grout, clean, and seal all the tile. After the grout has cured fully, run a bead of silicone caulk around all inside corners to create control joints.
Tiling Curbless Showers & Wet Rooms
Curbless showers and entire bathroom “wet rooms” are becoming increasingly common as more and more homeowners discover the luxury of a barrier-free shower and open bathroom floor plan. In both cases, the entire space is waterproofed and can be tiled without concern for capturing water overspray or runoff. This creates a sleek, upscale, and sophisticated look. It also makes it easier to navigate the space—especially in the case of a curbless shower. The shower is truly “walk-in” and can even be used by those in a wheelchair or using a walker. (One reason why textured-surface tile is usually used in these applications.)
The main idea behind a wet room or a curbless shower is that moisture doesn’t need to be contained because the entire area is waterproof, up to the ceiling. Without the need for divider walls or enclosures, the layout of a wet room can be opened up, allowing the homeowner to exploit more of the floor space.
Installing a wet room involves laying down layers that work together to provide an impermeable barrier to water, in a process called “tanking.” The process centers on the use of a thick, durable waterproofing membrane (see pages 73 to 75 for installation instructions), specialized waterproofing tape, and waterproofing compound that can be rolled or brushed onto walls and floors. Some companies even supply complete kits, with everything you’ll need to prepare the surfaces for tile. You can find these kits for entire wet rooms, but more commonly, they are offered for curbless showers. The kit includes everything you’ll need to install, waterproof, and tile the space, right down to the shower pan and drain fittings.
In practice, the preliminary work is a lot like taping and skim coating a newly drywalled room. All openings—from drains to water-supply inlets—are sealed with additional membranes, and the floor is sloped to a central drain. A curbless shower (and a complete wet room) floor is most commonly sloped from all four corners to the drain. But you can opt for a sleeker look with the use of a concealed linear “trench” drain along one edge of the room. This type of drain requires the floor be sloped in one direction only.
The actual tiling work, shown in the project that follows, is feasible for even a modestly skilled DIYer, thanks to well thought-out kits that include all the materials you’ll need. You must, however, be careful when tiling floor sloops and around drains and other fixtures.
Any curbless shower is a great place to show off a custom tile design, such as the one outlined in this project. Modify it to suit your own tastes.

A curbless shower can be an impressive, space-efficient addition to any bathroom, especially when tiled in a unique design as shown here. It’s essential that the substructure underneath the tile is completely stable and waterproof.
TYPICAL WET ROOM CONSTRUCTION
How to Install Tile for a Curbless Shower
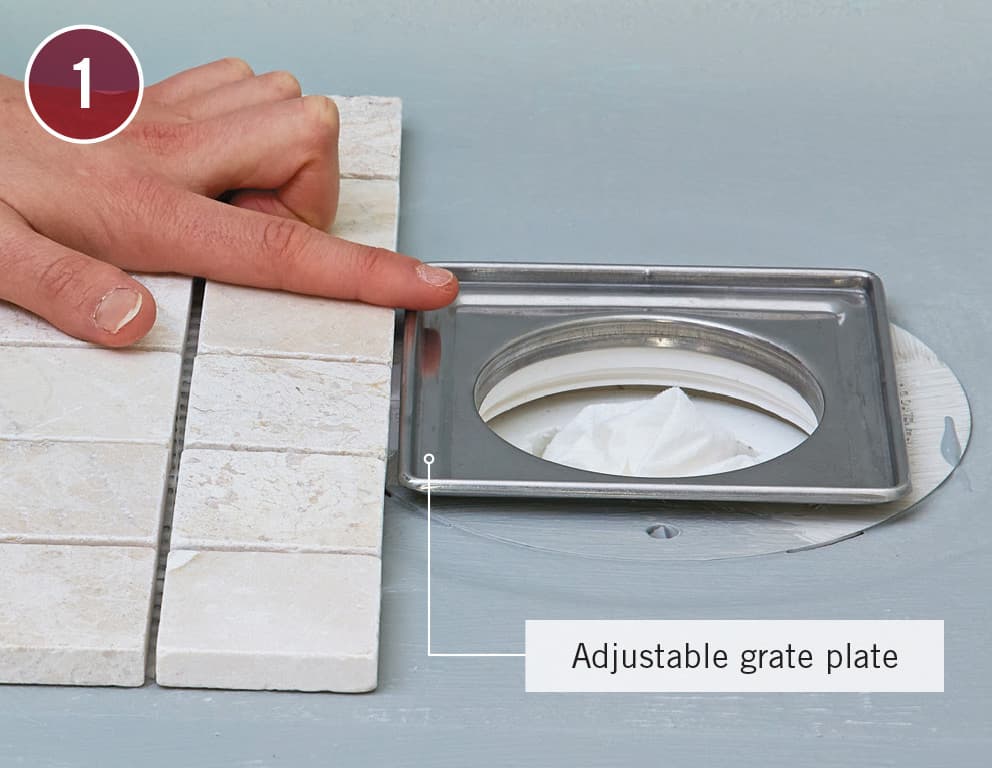
BEFORE YOU START: Curbless showers and wet rooms must meet strict local codes for providing a waterproof membrane beneath the tile. See pages 73 to 75 and 106 to 113 for two examples. The walls and floor in the bathroom seen here are treated with a roll-on waterproofing system. (See Resources, page 233). Check with your local building inspector to learn which waterproofing systems may be used in your area. Set the floor tile first. Begin by placing a sample of the floor tile directly next to the drain so you can set the drain grate height to match. The adjustable mounting plate for the grate should be flush with the tops of the tile.
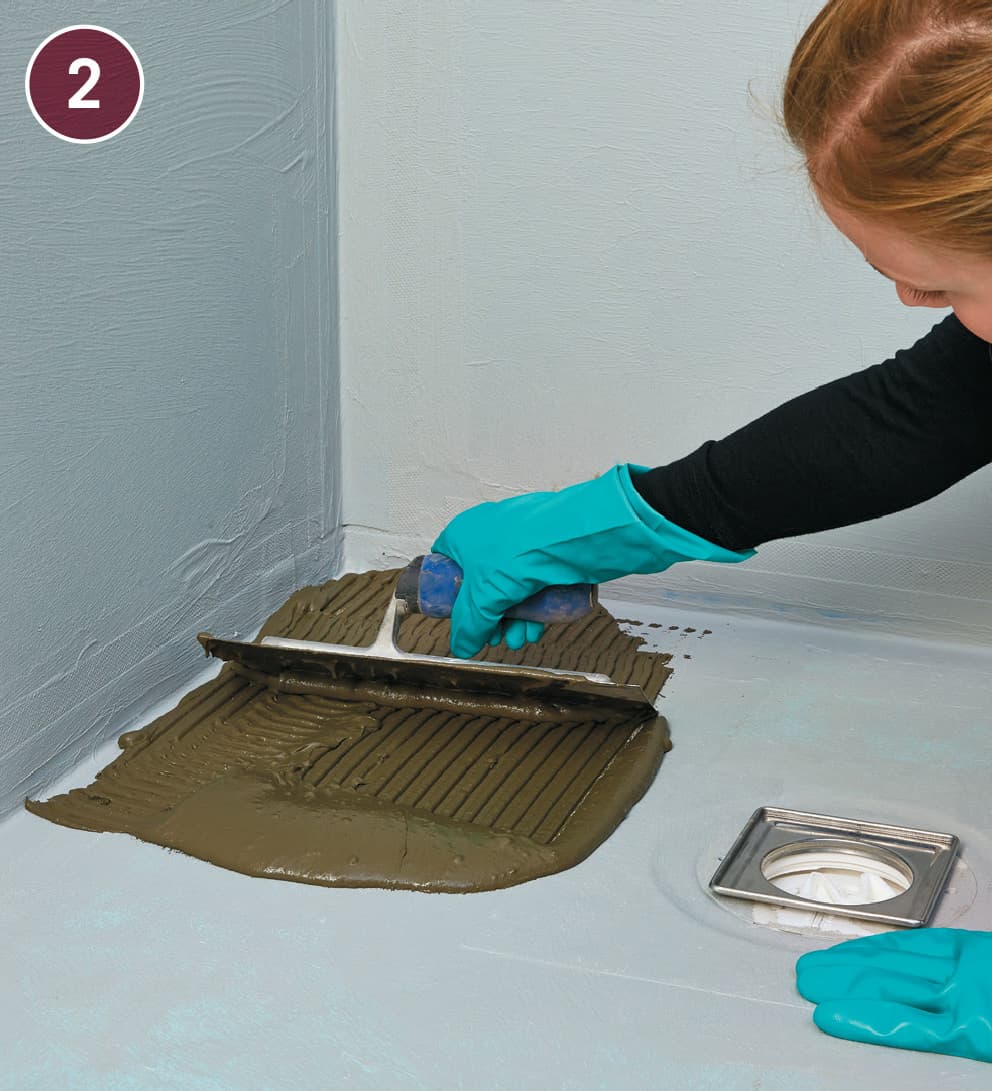
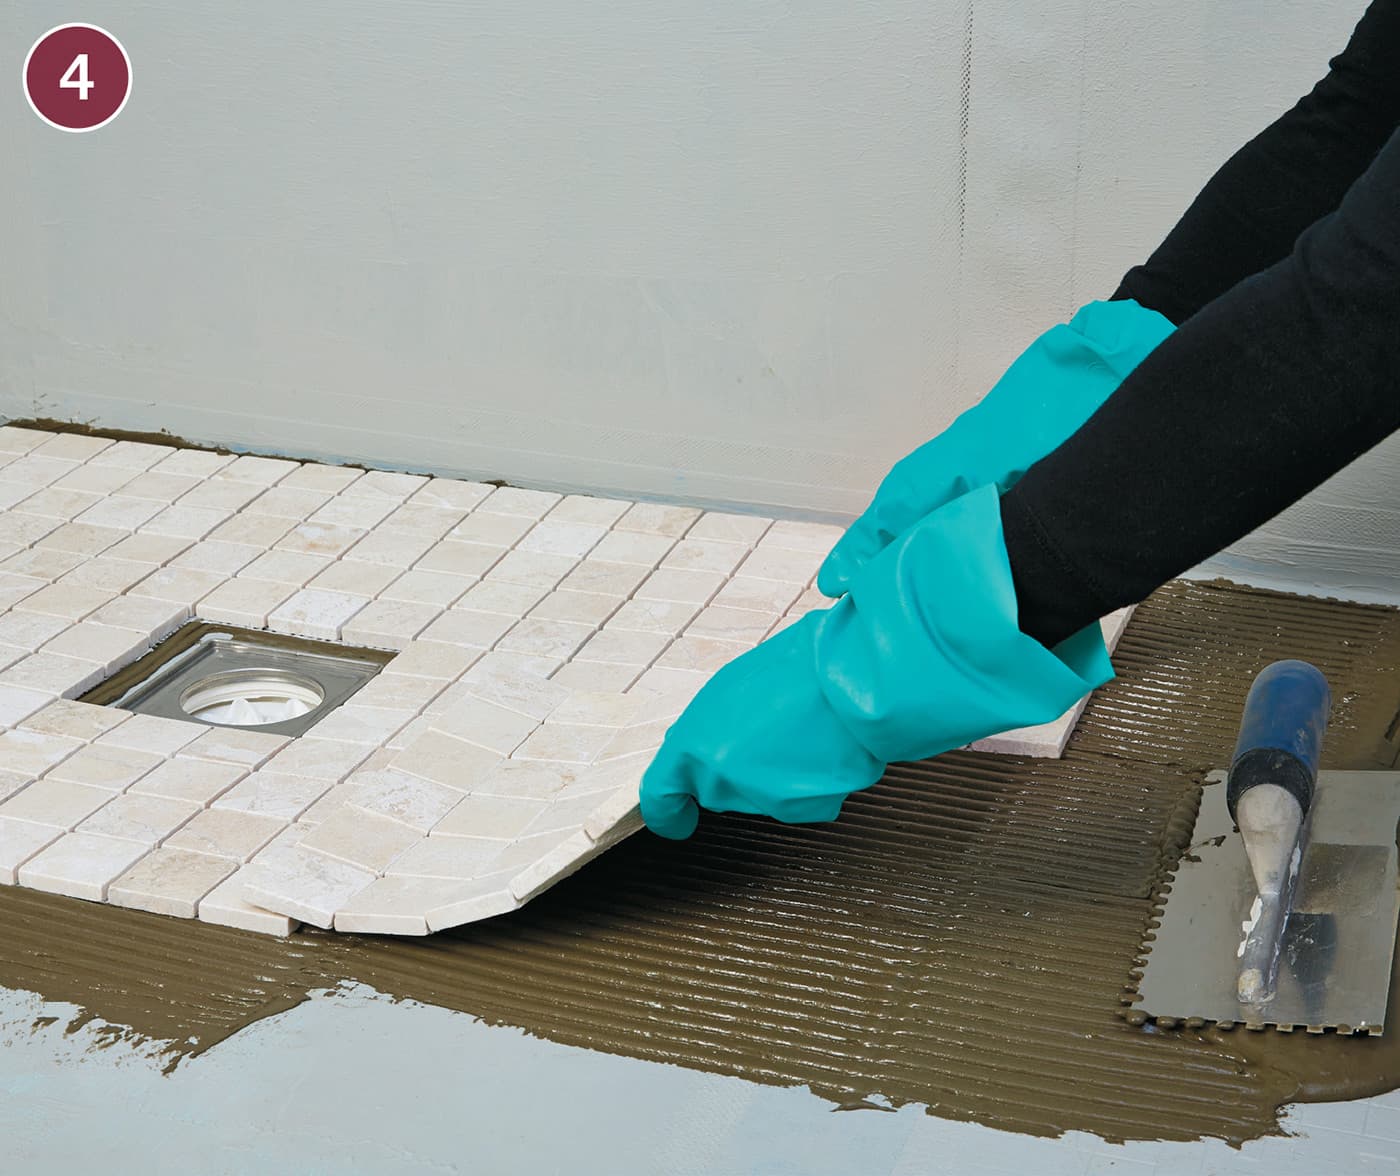
Begin laying floor tile in the corner of the shower. Lay a bed of thinset tile adhesive, using a notched trowel. The thinset container should specify the notch size (3/8" square notch is seen here).
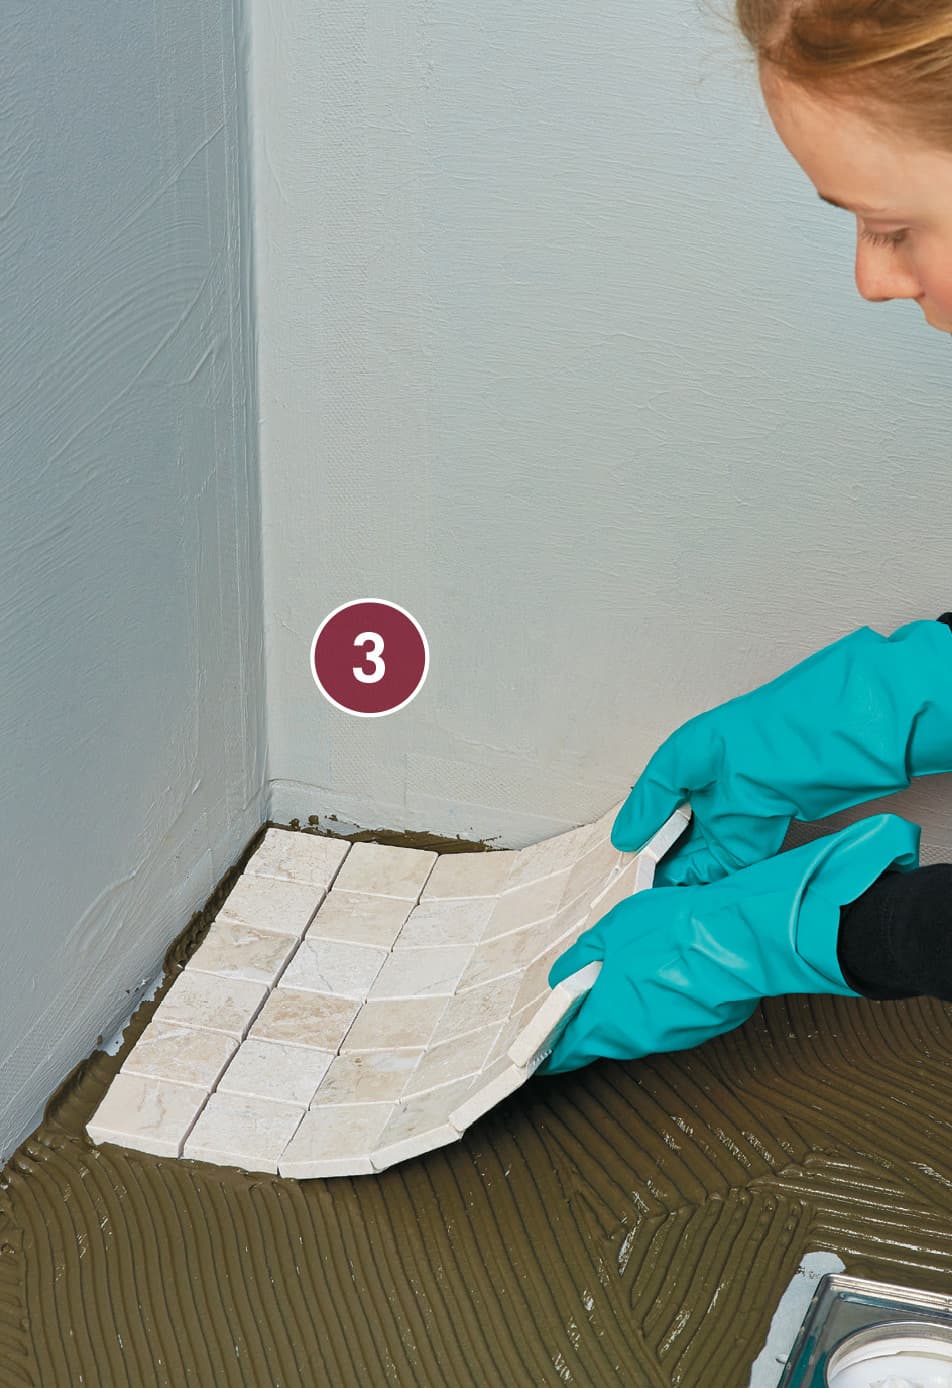
Place the corner tile into the bed of thinset and press it to set it. Don’t press down too hard or you will displace too much of the material. Continue laying tile, fanning out from the corner toward the drain opening. Leave space around the drain opening as it is likely you’ll need to cut tiles to fit.
Install tile so a small square of untiled area is left around the drain opening (which, in the system seen here, is square, making for an easier cutting job).

Mark the tiles that surround the drain opening for cutting. Leave a small gap between the tiles next to the drain grate mounting plate. Cut the tiles along the trim lines using a tile saw. If you are not comfortable using a tile saw, score the tiles and cut them with tile nippers.
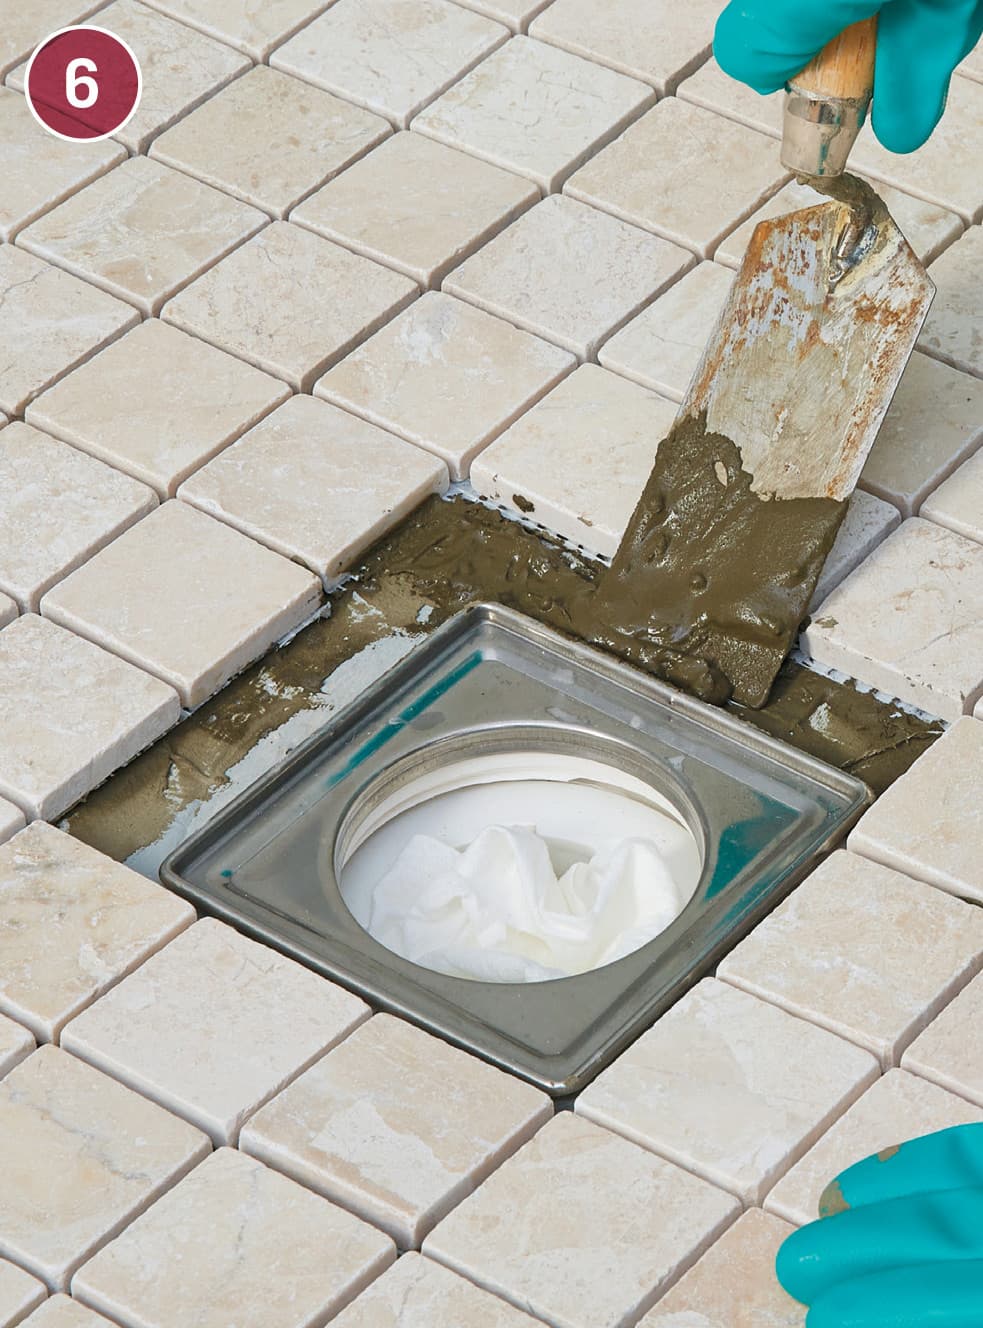
Apply thinset onto the shower pan, taking care not to get any on the drain grate mounting plate. You may need to use a small trowel or a putty knife to get into small gaps.
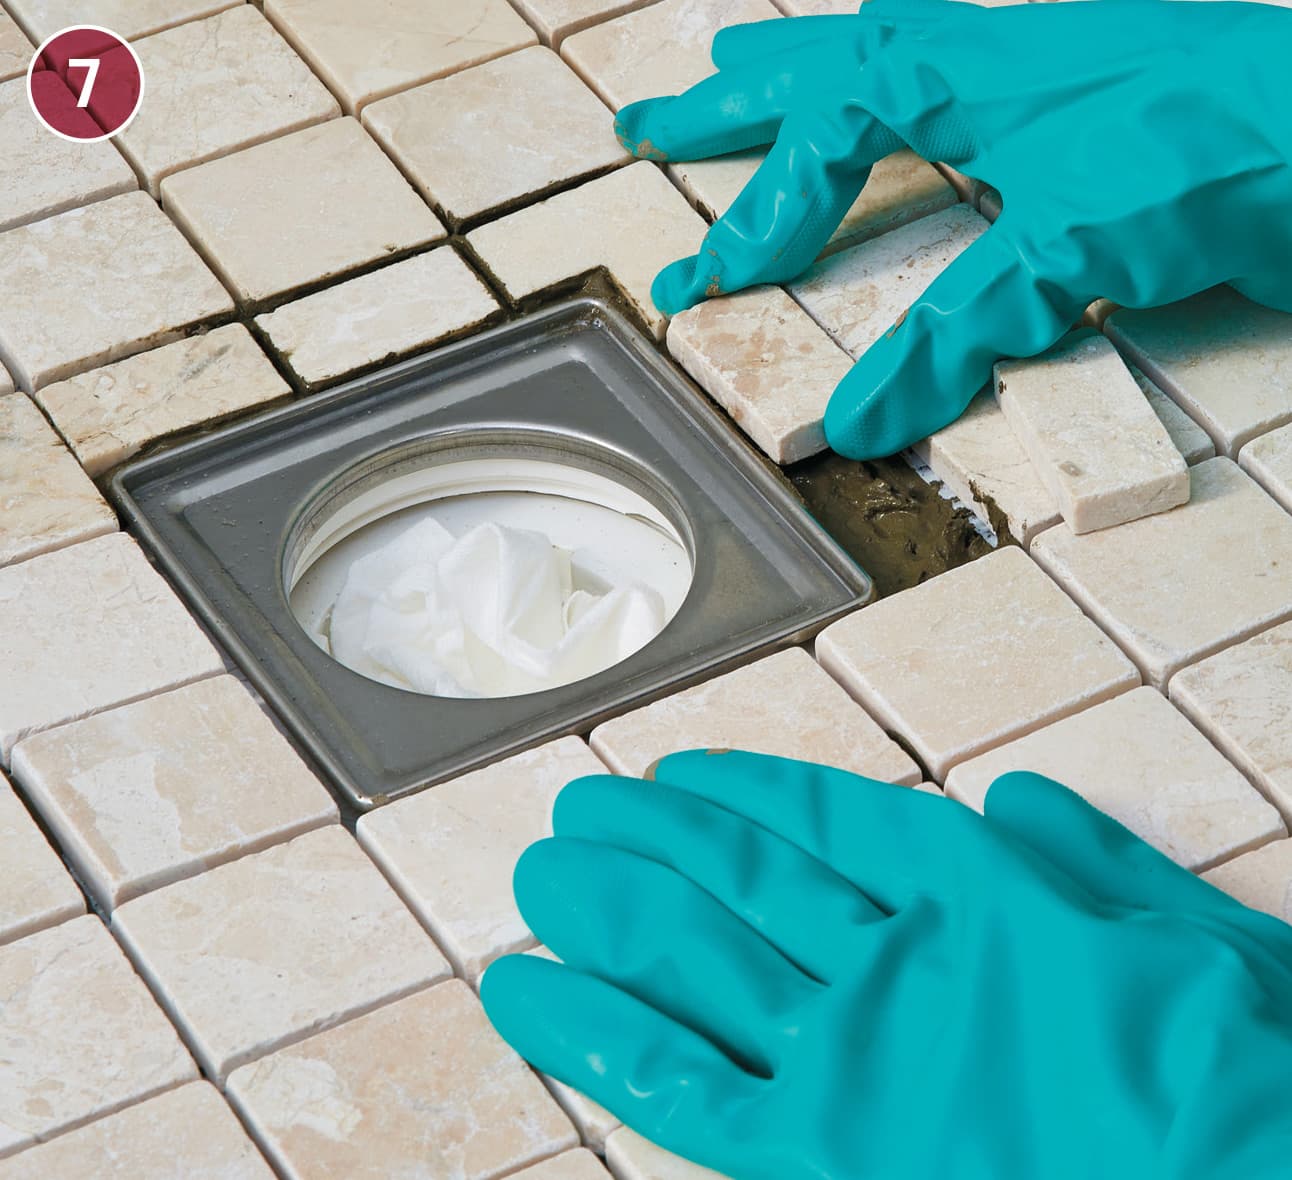
Set the cut tiles around the drain opening, doing your best to maintain even gaps that match the gaps in the rest of the floor. Once you’ve finished tiling around the drain, complete setting floor tile in the rest of the project area.

Let the floor tile set overnight, and then apply grout. Using a grout sponge, wipe the grout over the gaps so all gaps are filled evenly. After the grout dries, buff the floor with a towel to wipe up excess residue.
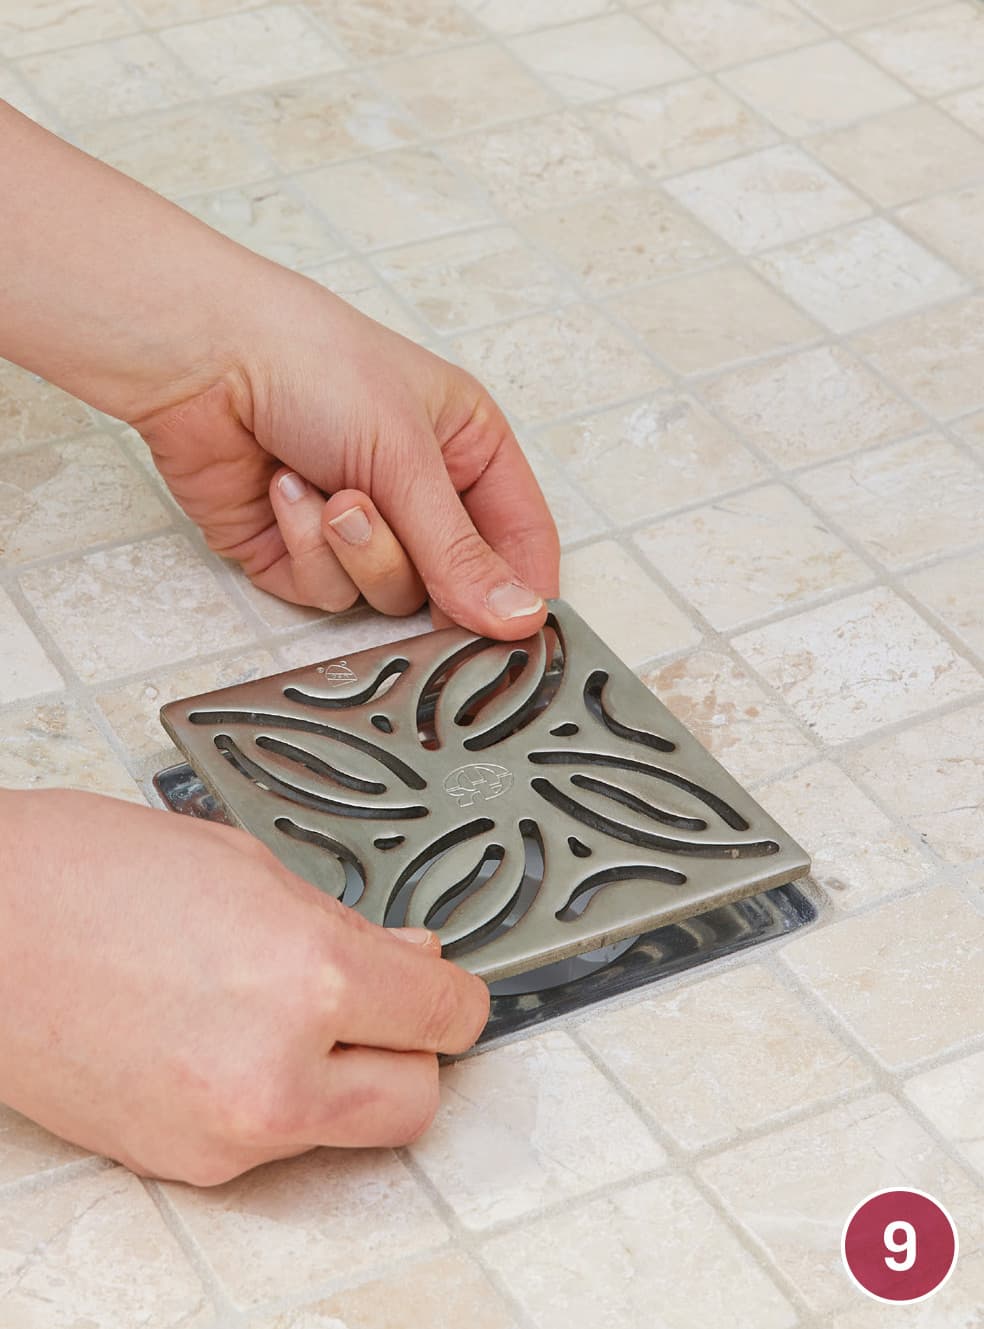
Snap the grate cover into the cover mounting plate (if you’ve stuffed a rag into the drain opening to keep debris out, be sure to remove it first). The grate cover seen here locks in with a small key that should be saved in case you need to remove the grate cover.
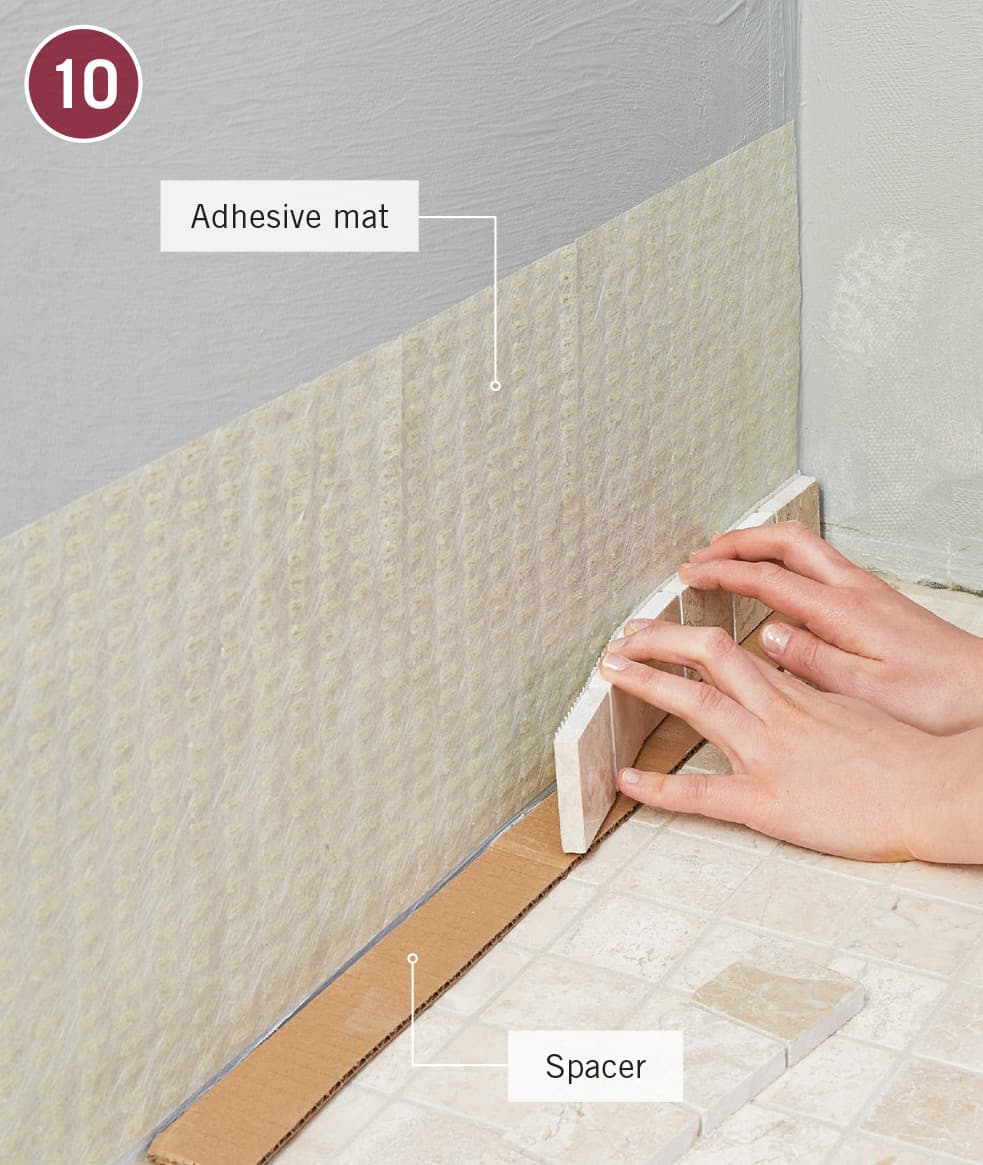
Begin setting the wall tile. Generally, it’s easiest if you start at the bottom and work upward. Instead of thinset adhesive, an adhesive mat is being used here. This relatively new product is designed for walls and is rated for waterproof applications. It is a good idea to use a spacer (1/4" thick or so) to get an even border at the bottoms of the first tiles.
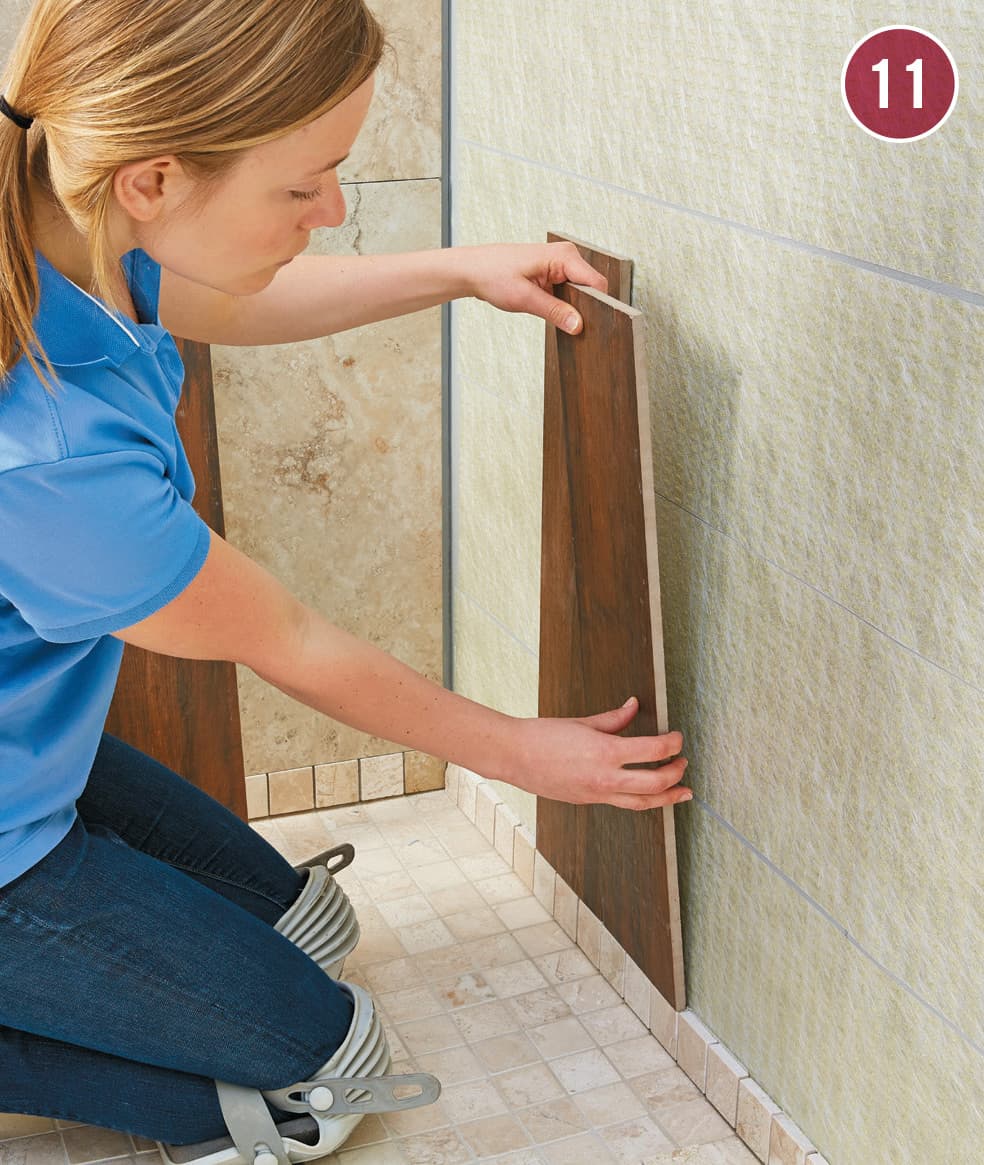
In the design used here, a border of the same mosaic tile used in the floor is installed all around the shower area to make the first course. Dark brown accent tiles are installed in a single vertical column running upward, centered on the line formed by the shower faucet and showerhead. This vertical column is installed after the bottom border.
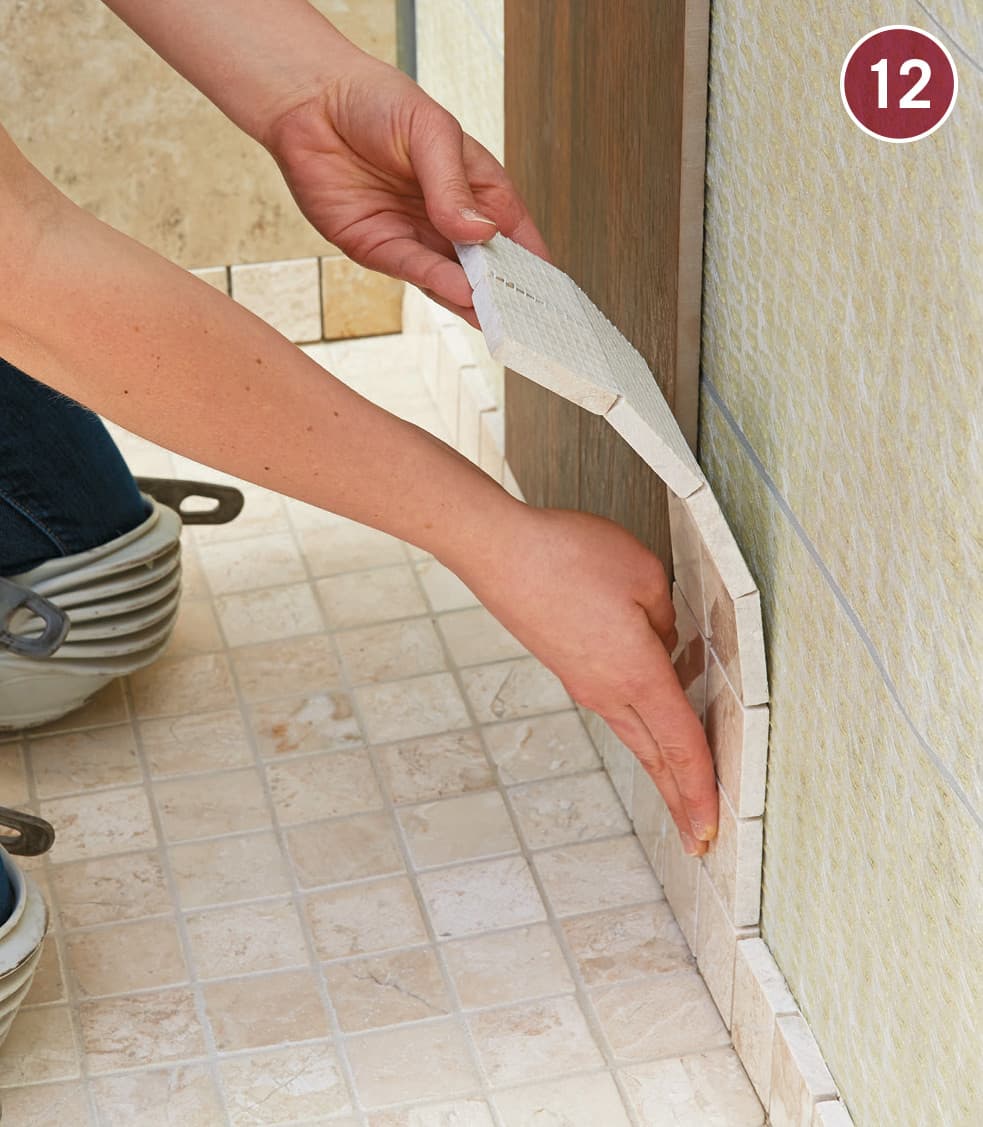
Next, another vertical column of accent tiles is installed on each side of the large, dark tiles. These columns are also laid using the floor tile, which connects the walls and floor visually in an effective way.
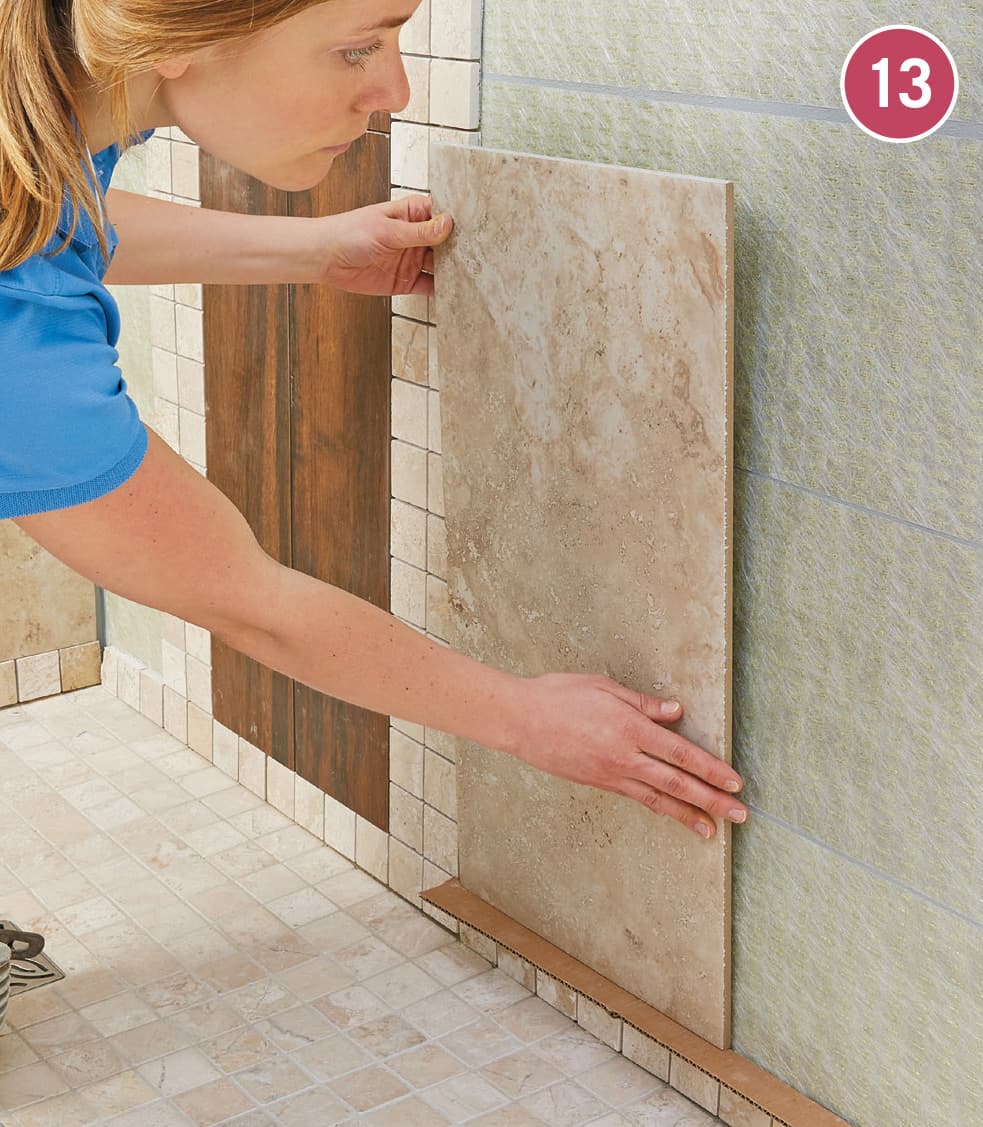
Finally, larger field tiles that match the floor tile used outside the shower area are installed up to the corner and outward from the shower area. Starting at the bottom, set a thin spacer on top of the border tiles to ensure even gaps.
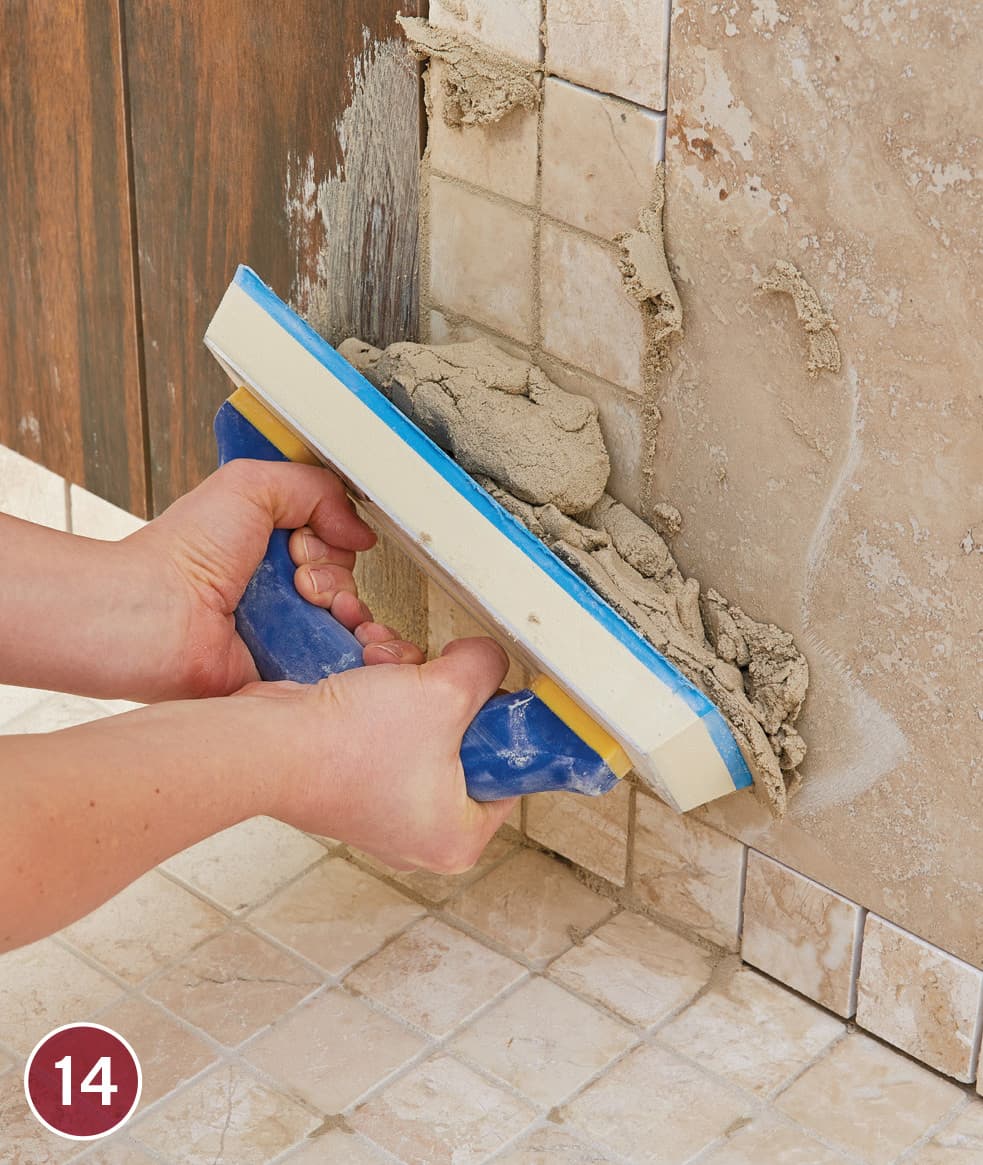
Grout the gaps in the wall tiles. It’s usually a good idea to protect any fittings with painter’s tape prior to grouting. If you wish, a clear surround may be installed to visually define the shower area, as in the photo to the right, but because the shower pan is pitched toward the drain it really is not necessary.
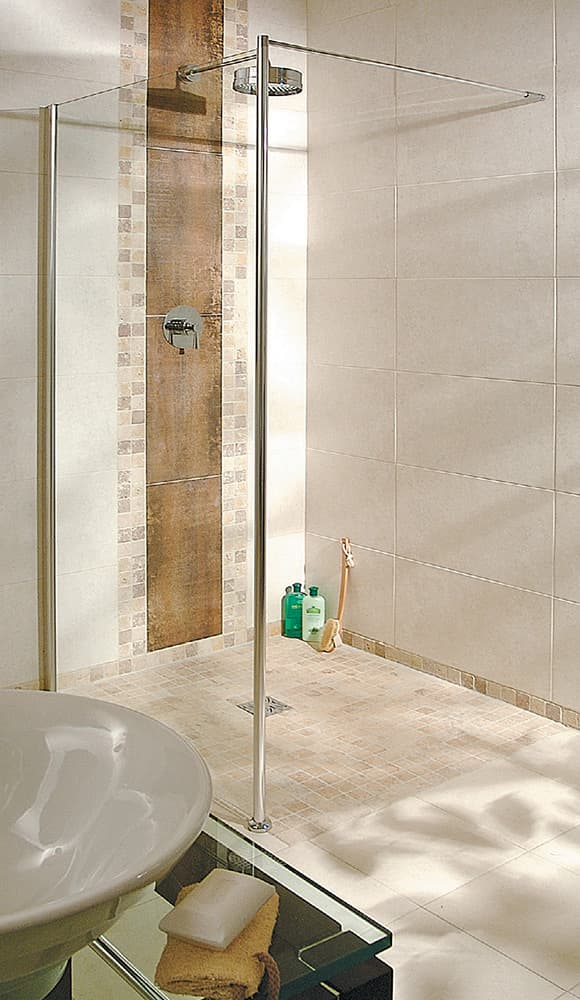
Resilient Tile
As with any tile installation, resilient tile requires carefully positioned layout lines. Before committing to any layout and applying tile, conduct a dry run to identify potential problems.
Keep in mind the difference between reference lines (see opposite page) and layout lines. Reference lines mark the center of the room and divide it into quadrants. If the tiles don’t lay out symmetrically along these lines, you’ll need to adjust them slightly, creating layout lines. Once layout lines are established, installing the tile is a fairly quick process. Be sure to keep joints between the tiles tight and lay the tiles square.
Tiles with an obvious grain pattern can be laid so the grain of each tile is oriented identically throughout the installation. You can also use the quarter-turn method, in which each tile has its pattern grain running perpendicular to that of adjacent tiles. Whichever method you choose, be sure to be consistent throughout the project.

Resilient tiles have a pattern layer that is bonded to a vinyl base and coated with a transparent wear layer. Some come with adhesive pre-applied and covered by a paper backing, others have dry backs and are designed to be set into flooring adhesive.
TOOLS & MATERIALS
Tape measure
Chalkline
Framing square
Utility knife
1/16" notched trowel
Heat gun
Resilient tile
Flooring adhesive (for dry-back tile)
1/8" spacer
Threshold material (if necessary)
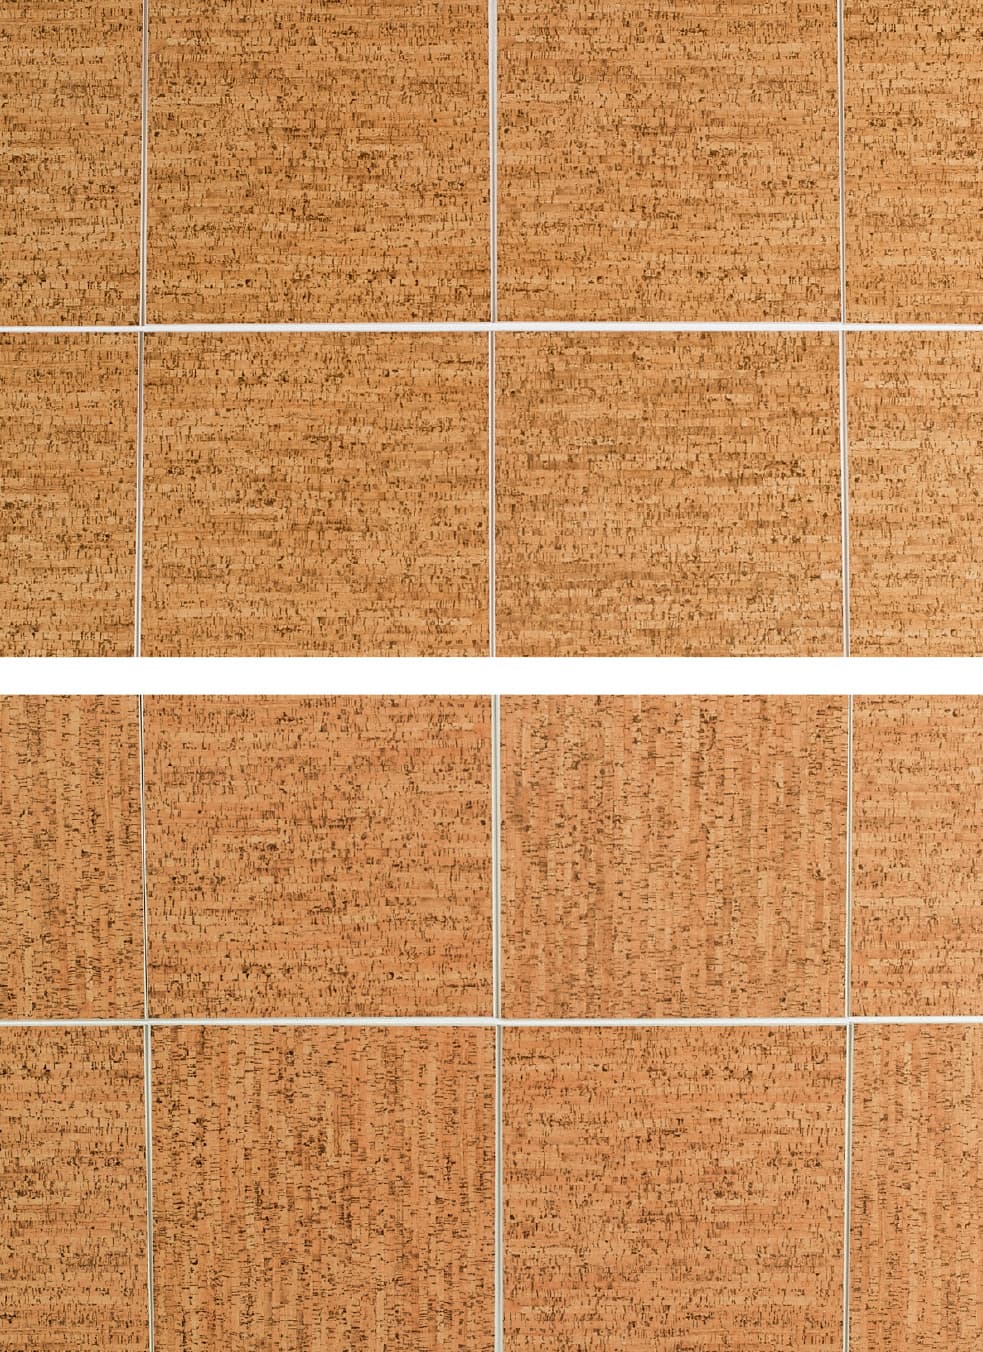
Check for noticeable directional features, such as the grain of the vinyl particles. You can set the tiles in a running pattern so the directional feature runs in the same direction (top), or in a checkerboard pattern using the quarter-turn method (bottom).
How to Make Reference Lines for Tile Installation
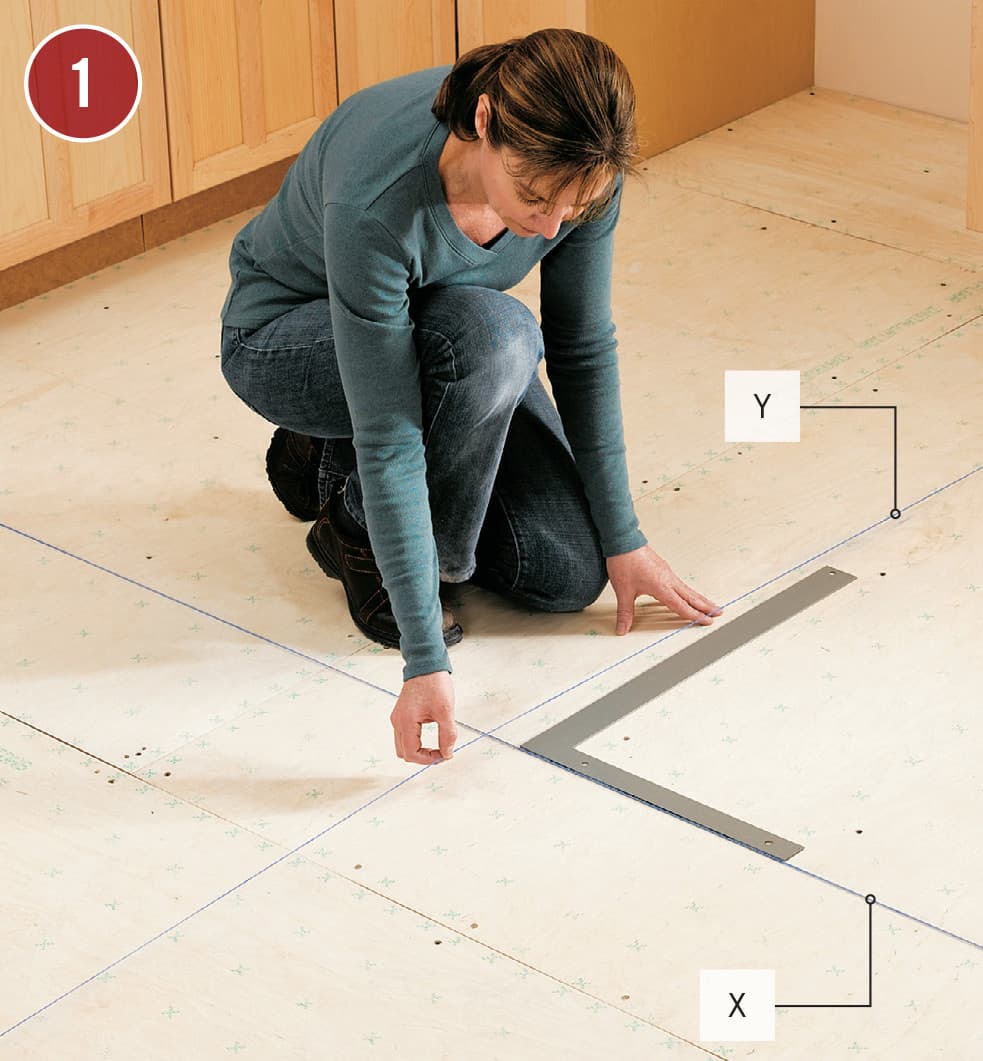
Mark reference line X by measuring along opposite sides of the room and marking the center of each side. Snap a chalkline between the marks. Measure and mark the center point of the line. Use a framing square to establish a perpendicular reference line. Snap chalkline for the second line, Y.

Measure along line X and mark 3 ft. from the center point. Measure from the center point along line Y and mark at 4 ft. Measure between the marks. If the lines are perpendicular, the distance will be 5 ft. If not, adjust the lines until they’re exactly perpendicular.
How to Install Dry-Backed Resilient Tile
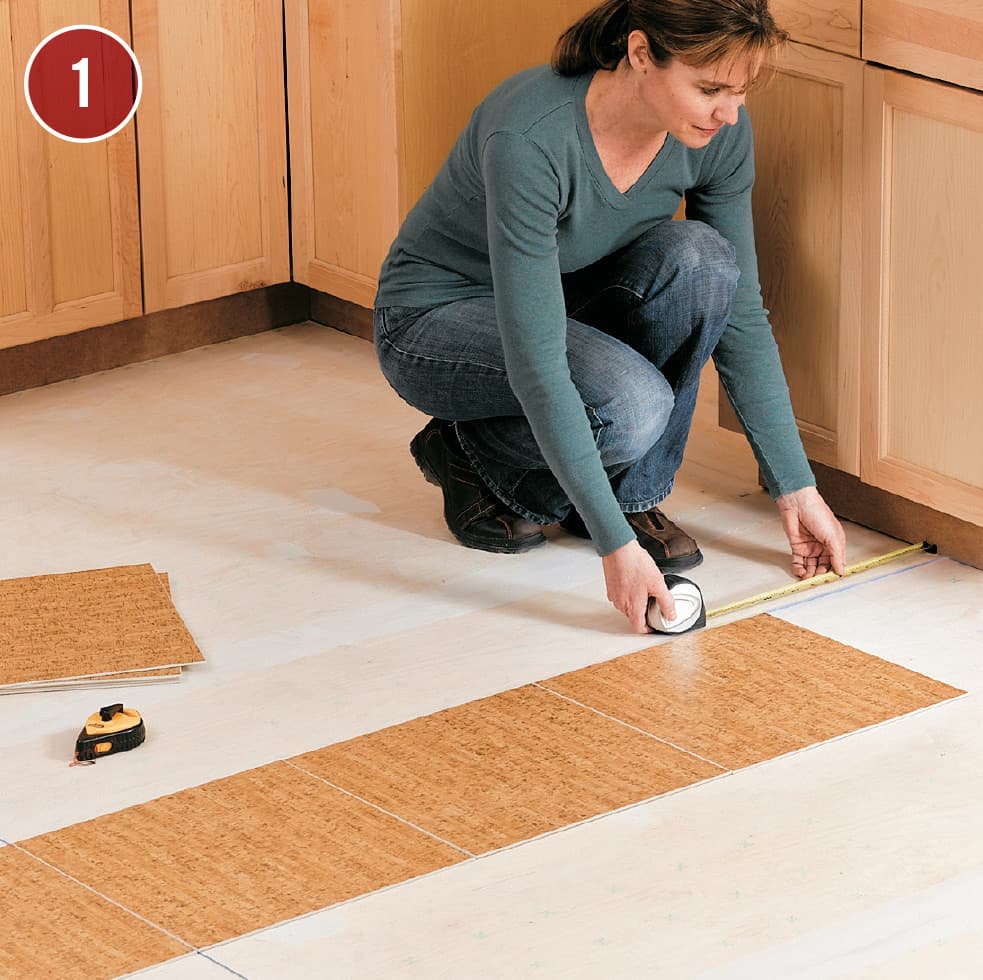
Snap perpendicular reference lines with a chalkline (above). Dry-fit tiles along layout line Y so a joint falls along reference line X. If necessary, shift the layout to make the layout symmetrical or to reduce the number of tiles that need to be cut.
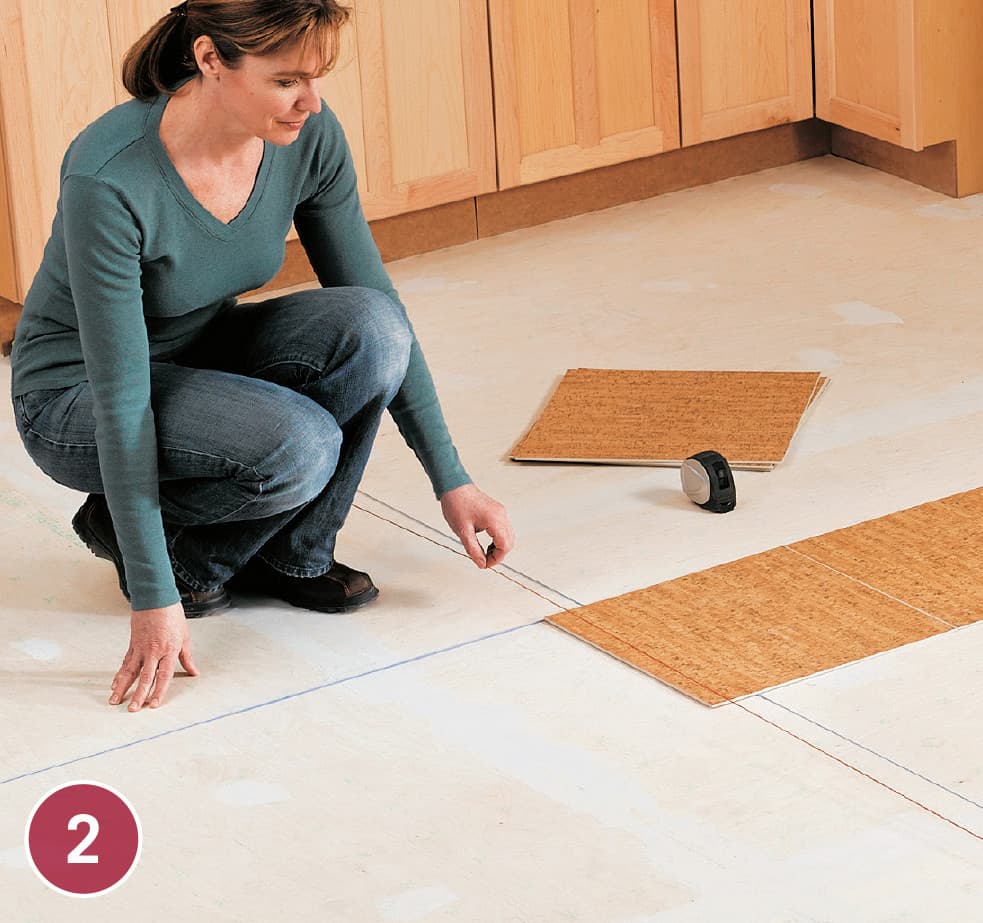
If you shift the tile layout, create a new line that is parallel to reference line X and runs through a tile joint near line X. The new line, X1, is the line you’ll use when installing the tile. Use a different colored chalk to distinguish between lines.

Dry-fit tiles along the new line, X1. If necessary, adjust the layout line as in steps 1 and 2.
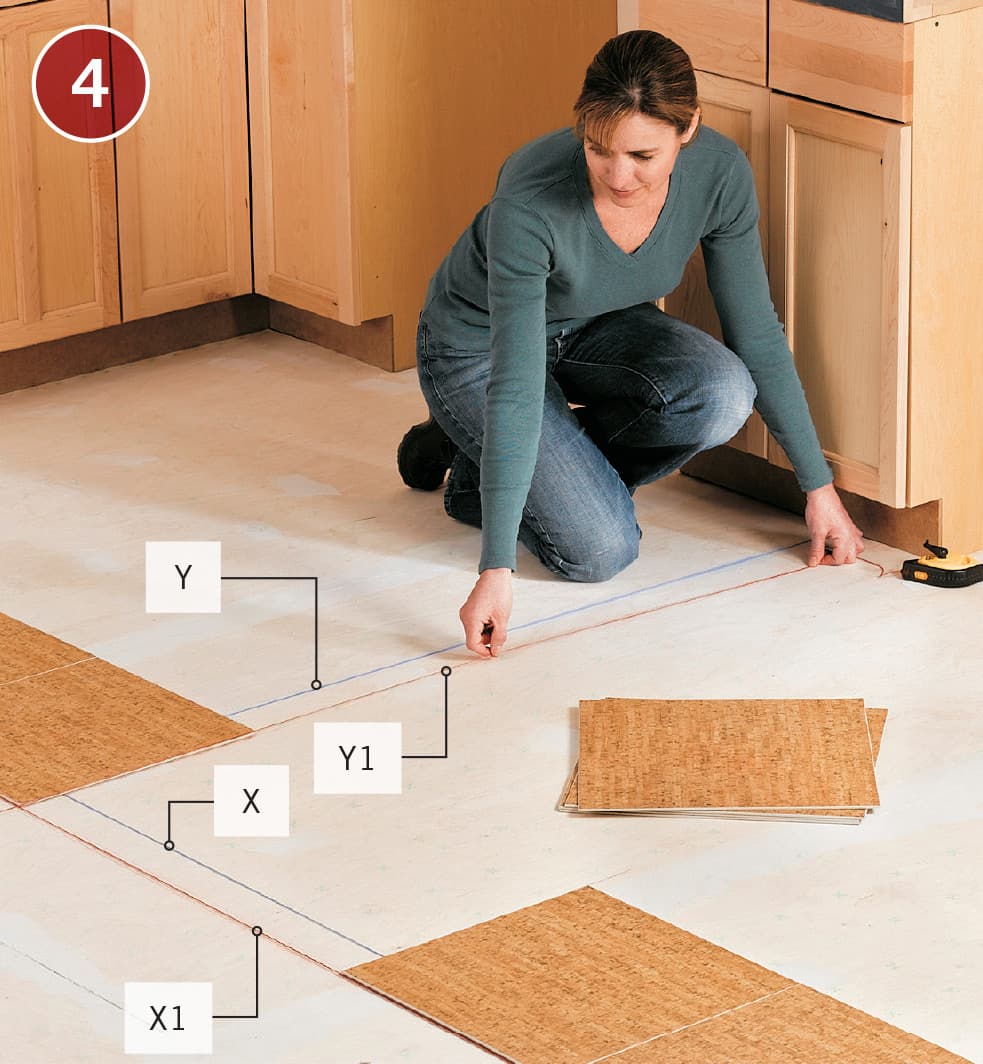
If you adjusted the layout along X1, measure and make a new layout line, Y1, that’s parallel to reference line Y and runs through a tile joint. Y1 will form the second layout line you’ll use during installation.
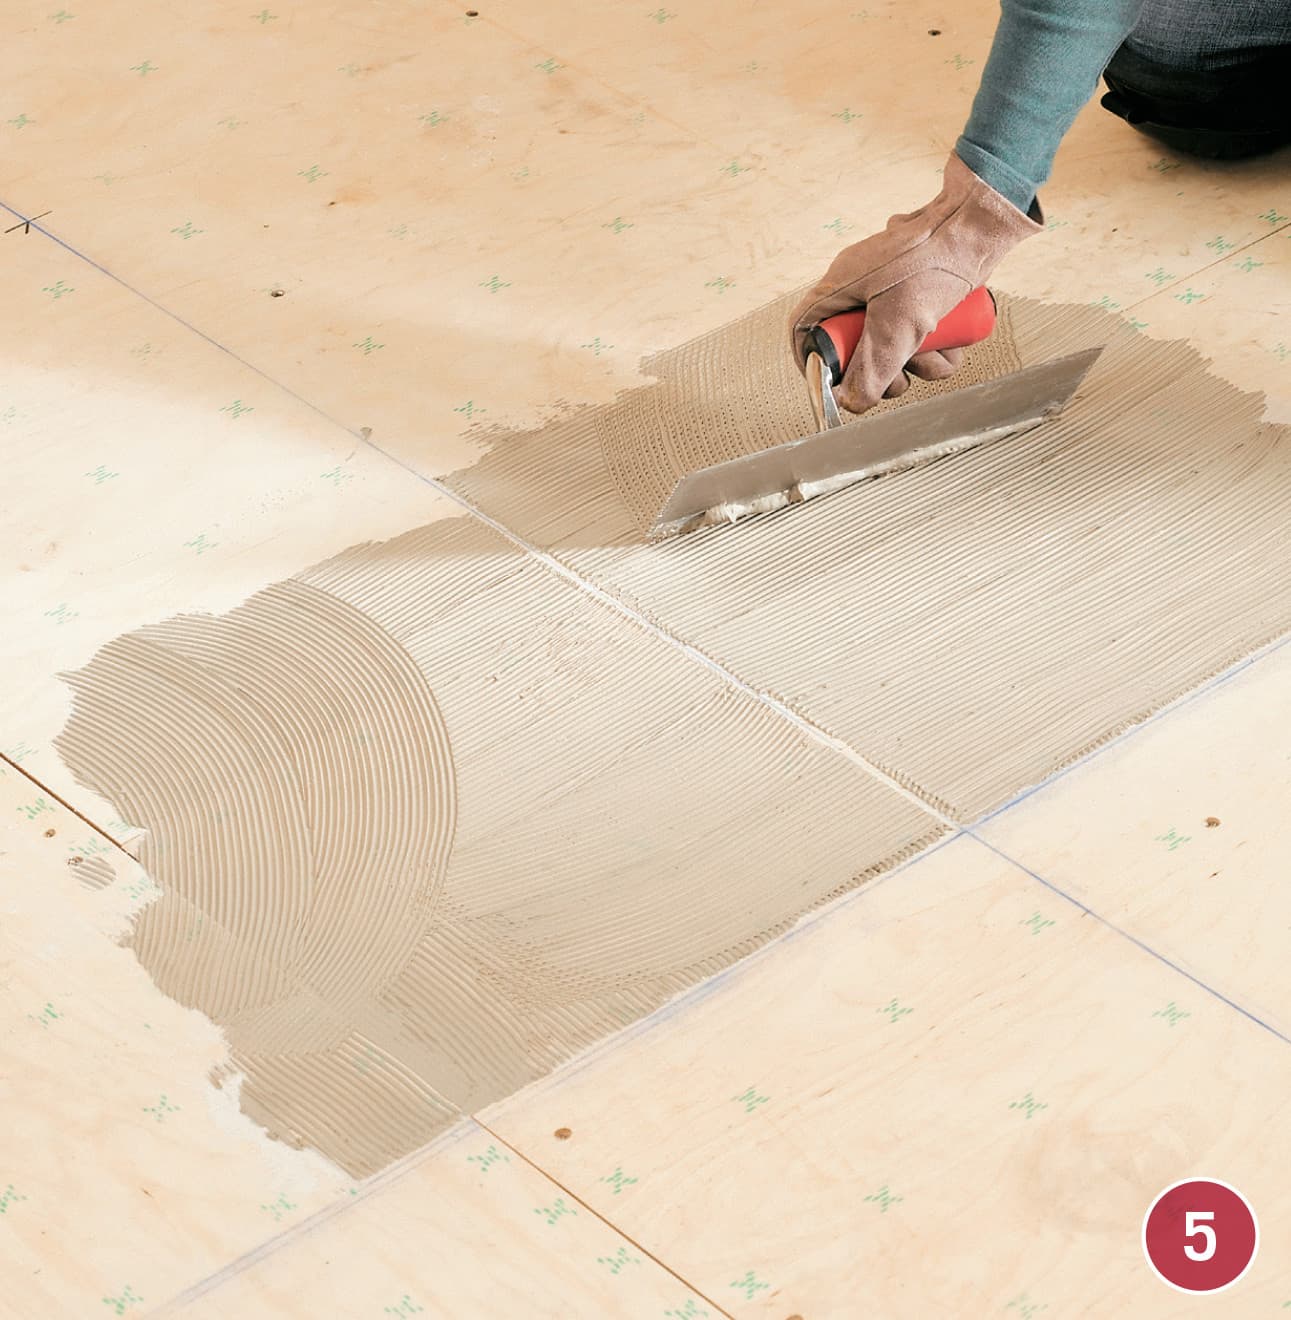
Apply adhesive around the intersection of the layout lines using a trowel with 1/16" V-shaped notches. Hold the trowel at a 60° angle and spread adhesive evenly over the surface.
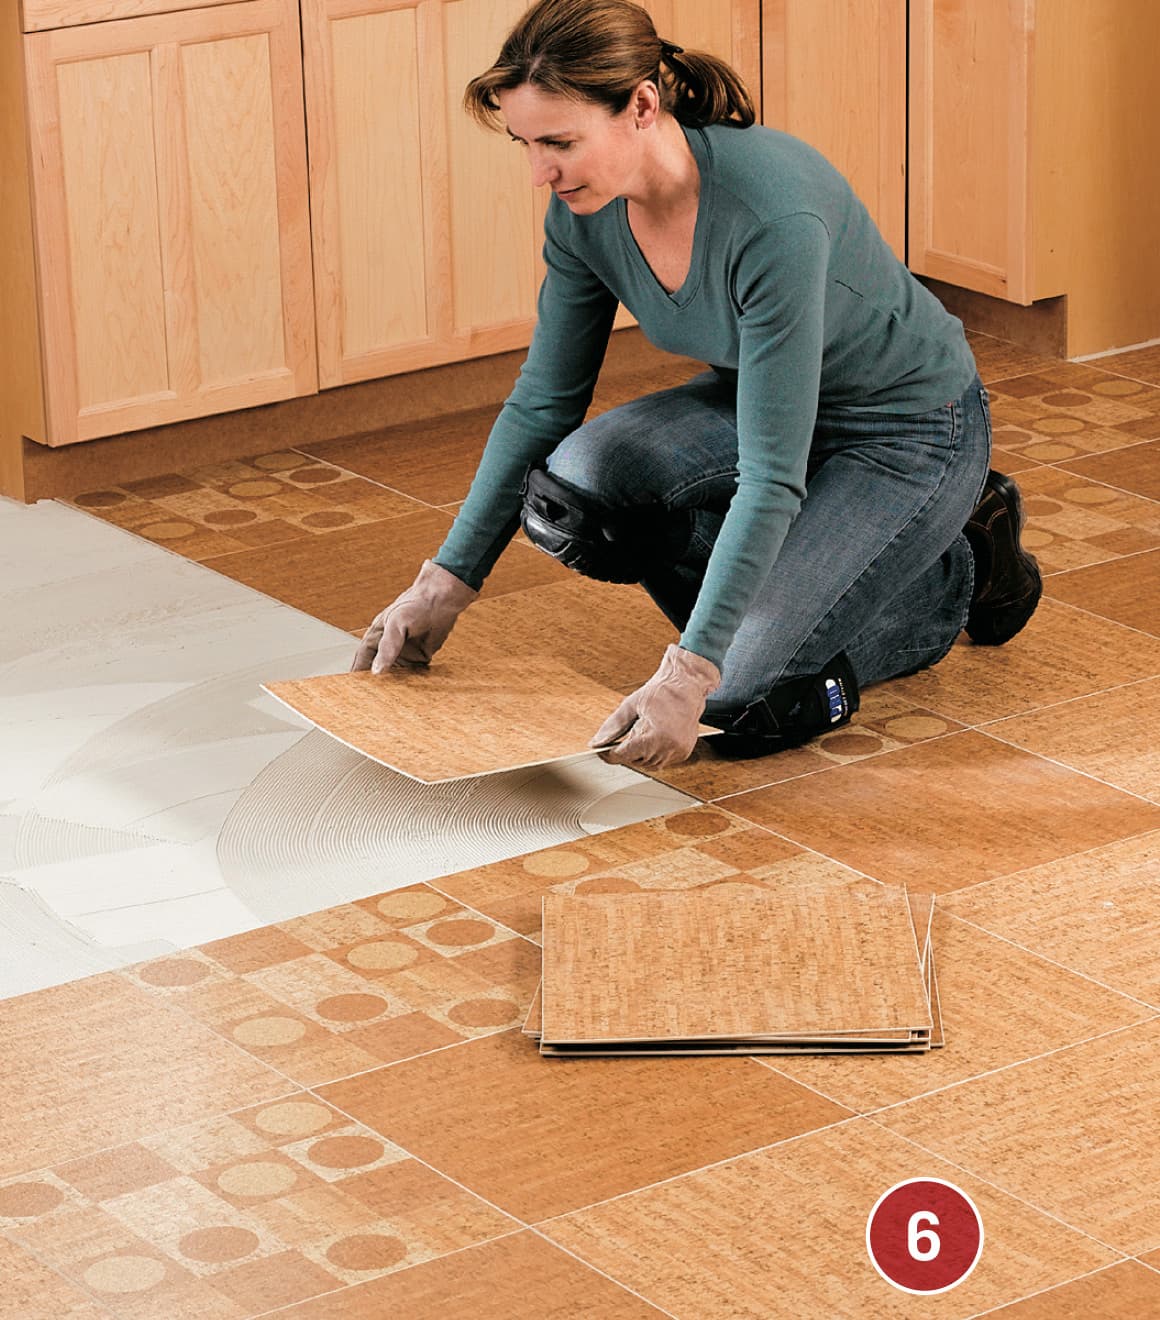
Spread adhesive over three quadrants. Allow it to set according to manufacturer’s instructions, then begin laying tile at the center intersection. When the first three quadrants are tiled, spread adhesive and tile the last quadrant.
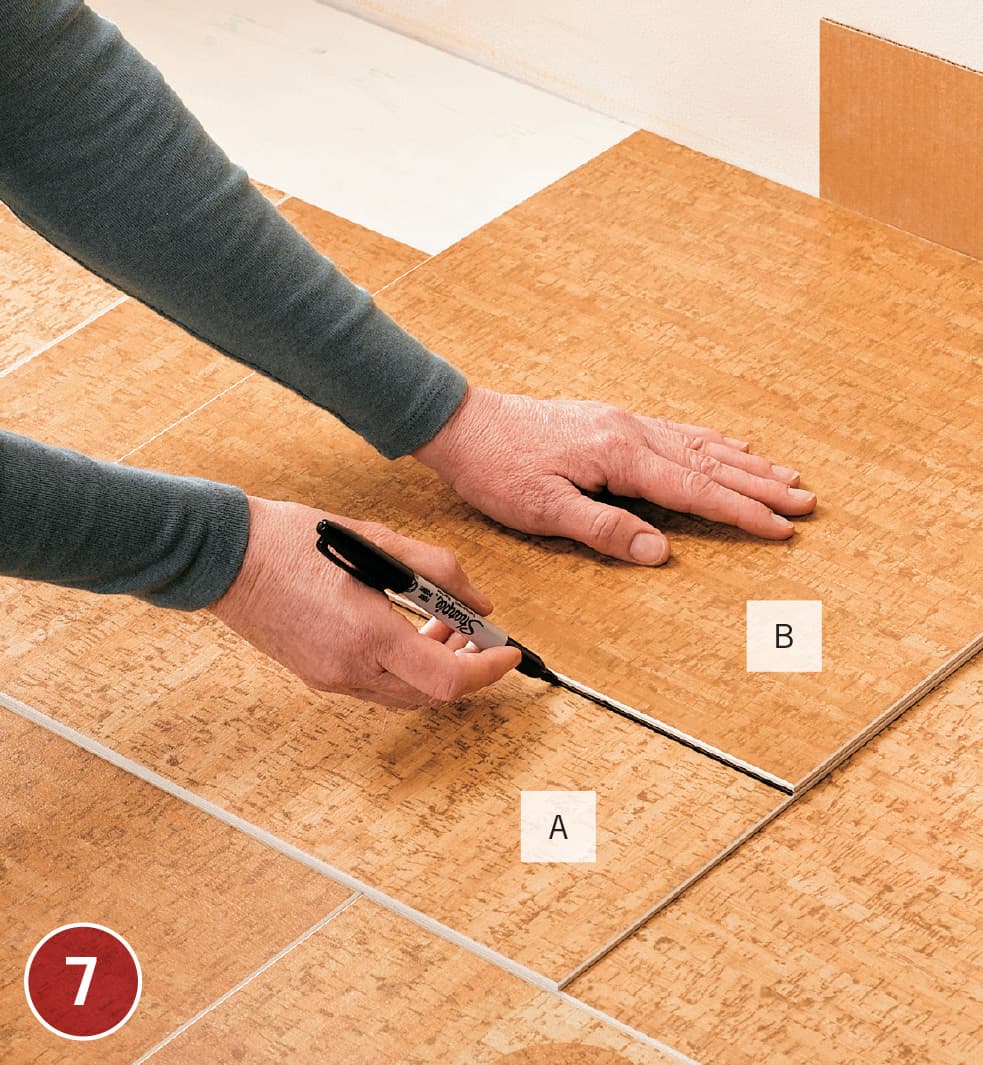
To cut tiles to fit along the walls, place the tile to be cut (A) face up on top of the last full tile you installed. Position a 1/8"-thick spacer against the wall, then set a marker tile (B) on top of the tile to be cut. Trace along the edge of the marker tile to draw a cutting line.

Cut the tile to fit using a snap cutter to make straight cuts. You may use a straightedge guide and utility knife instead.
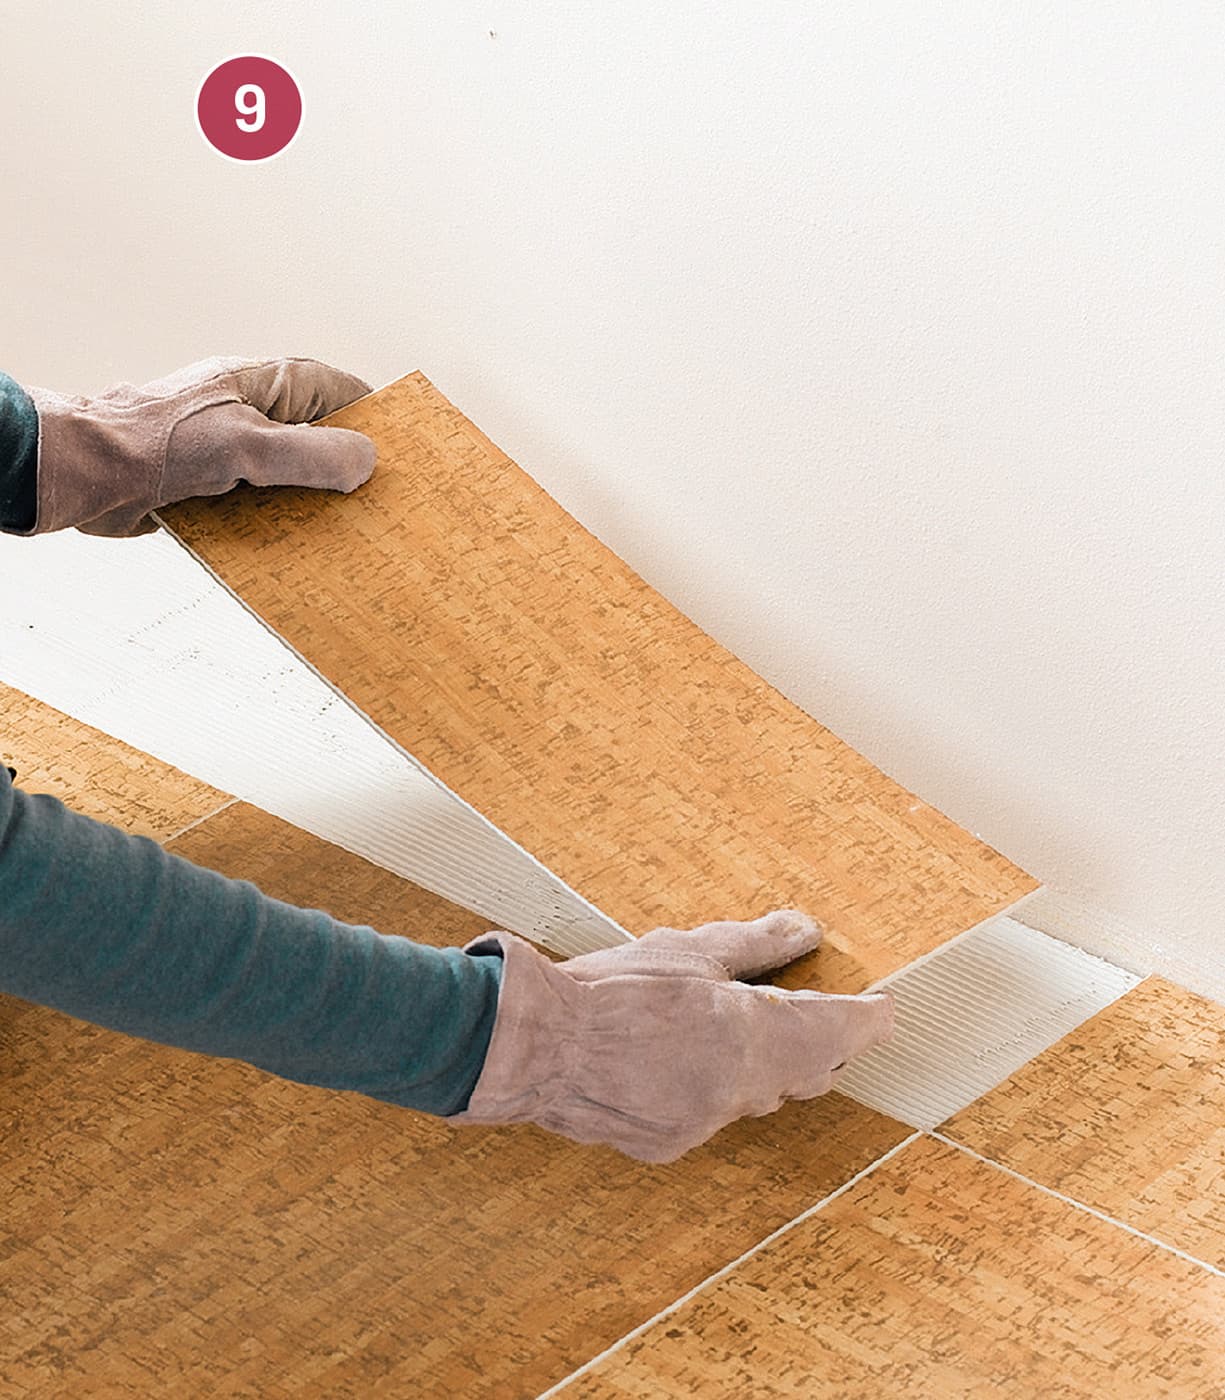
Install cut tiles. If you’re precutting all tiles before installing them, measure the distance and install tiles at various points in case the measurement changes. Install thresholds at room borders where the new floor joins another floor covering.
OUTSIDE CORNERS

To mark tiles for cutting around outside corners, make a cardboard template to match the space, keeping a 1/8" gap along the walls. After cutting the template, check to make sure it fits. Place the template on a tile and trace its outline.