
Wall Projects

This chapter starts with a very basic wall project that can be adapted for many different applications. Then, we go over how to tile a tub alcove, another tile project that’s frequently undertaken by do-it-yourselfers.
From these beginnings, it’s a small step to learn how to embellish an existing tile wall with a medallion or decorative tile, or tile a fireplace surround or kitchen backsplash. With the confidence developed in those projects, you’ll be ready to tile a tub deck or build a wall niche, if the opportunity arises.
The projects in this chapter introduce you to several new and interesting techniques. The tub deck project shows you how to set several types of trim tile, and the wall niche project illustrates how to set irregularly shaped, groutless tile.
Use these projects as jumping off points, as places from which to let your imagination soar. Study the techniques and information presented here, then throw in some accent tiles or get creative and add splashes of color—make a project your own.
In this chapter:
• Evaluating & Preparing Walls
• Installing & Finishing Wallboard
• Installing Cementboard on Walls
• Installing a Tub Tile Surround

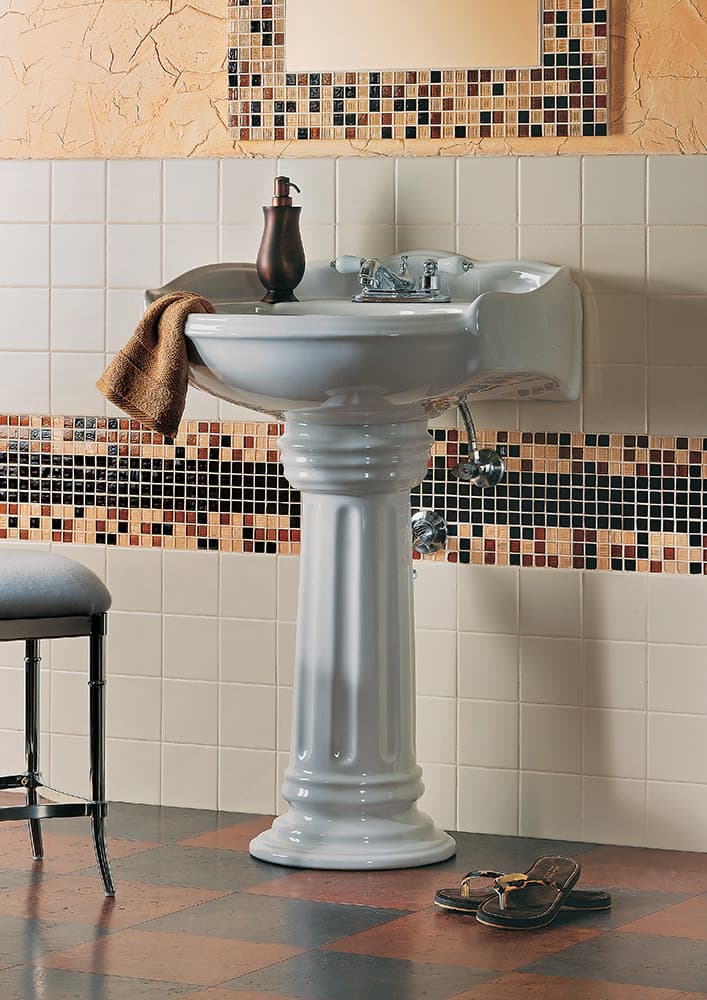
Gallery of Wall Tile Projects
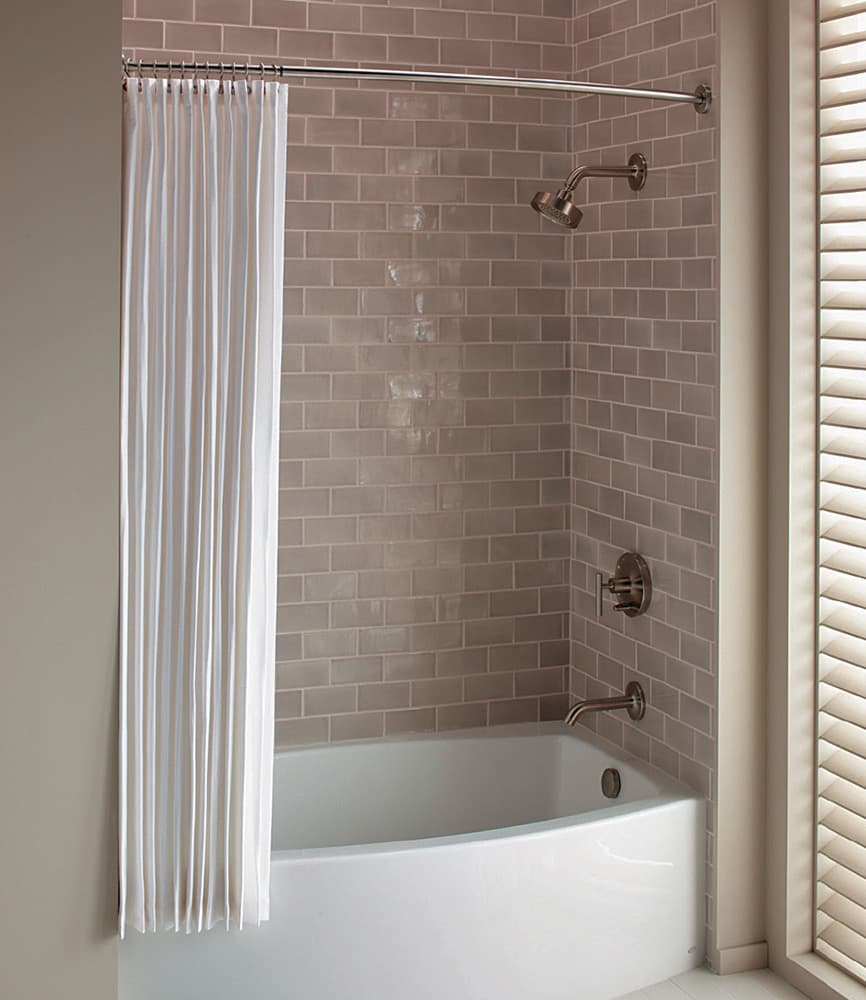
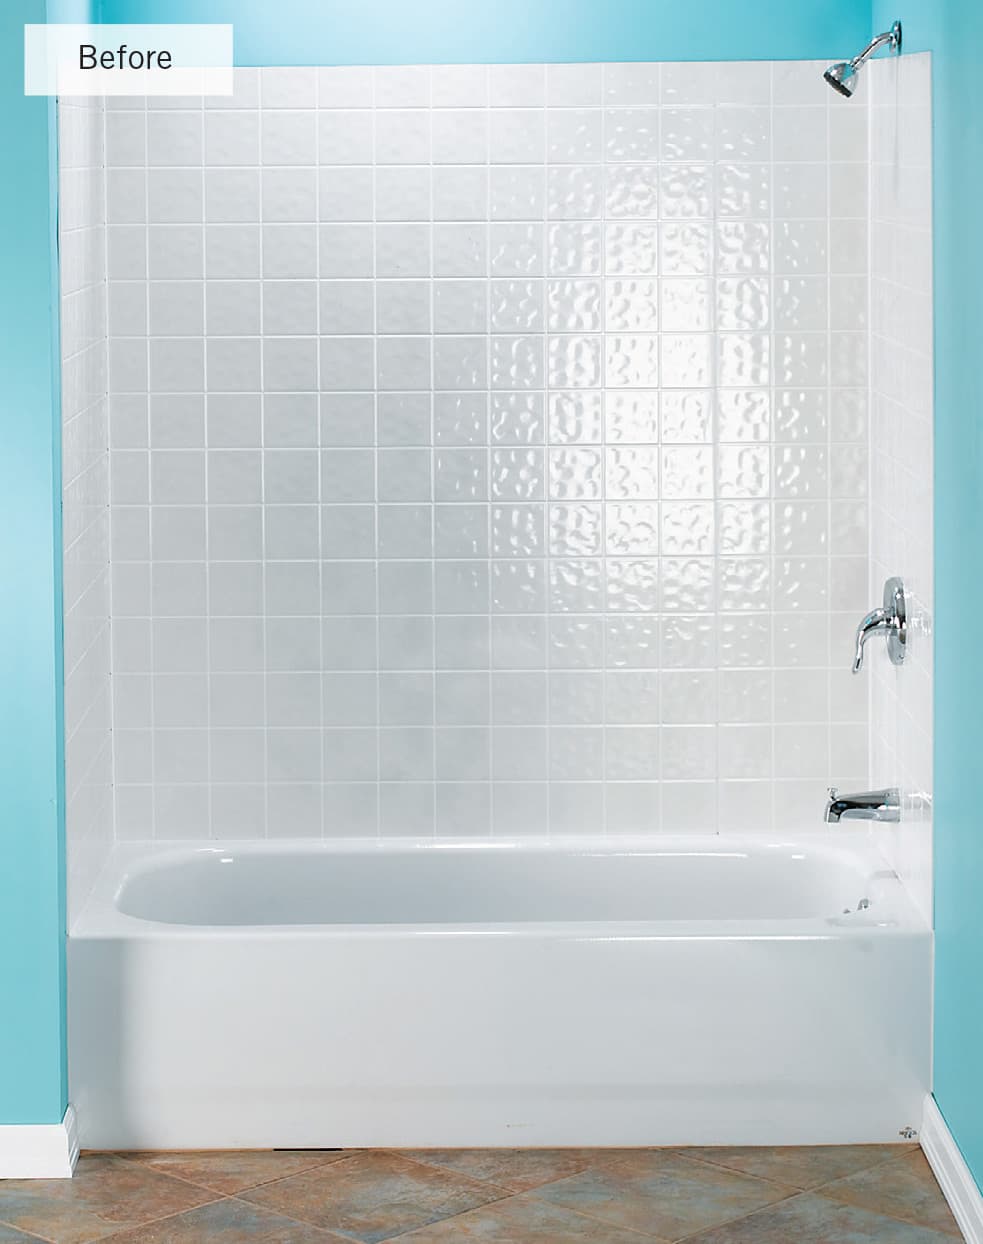
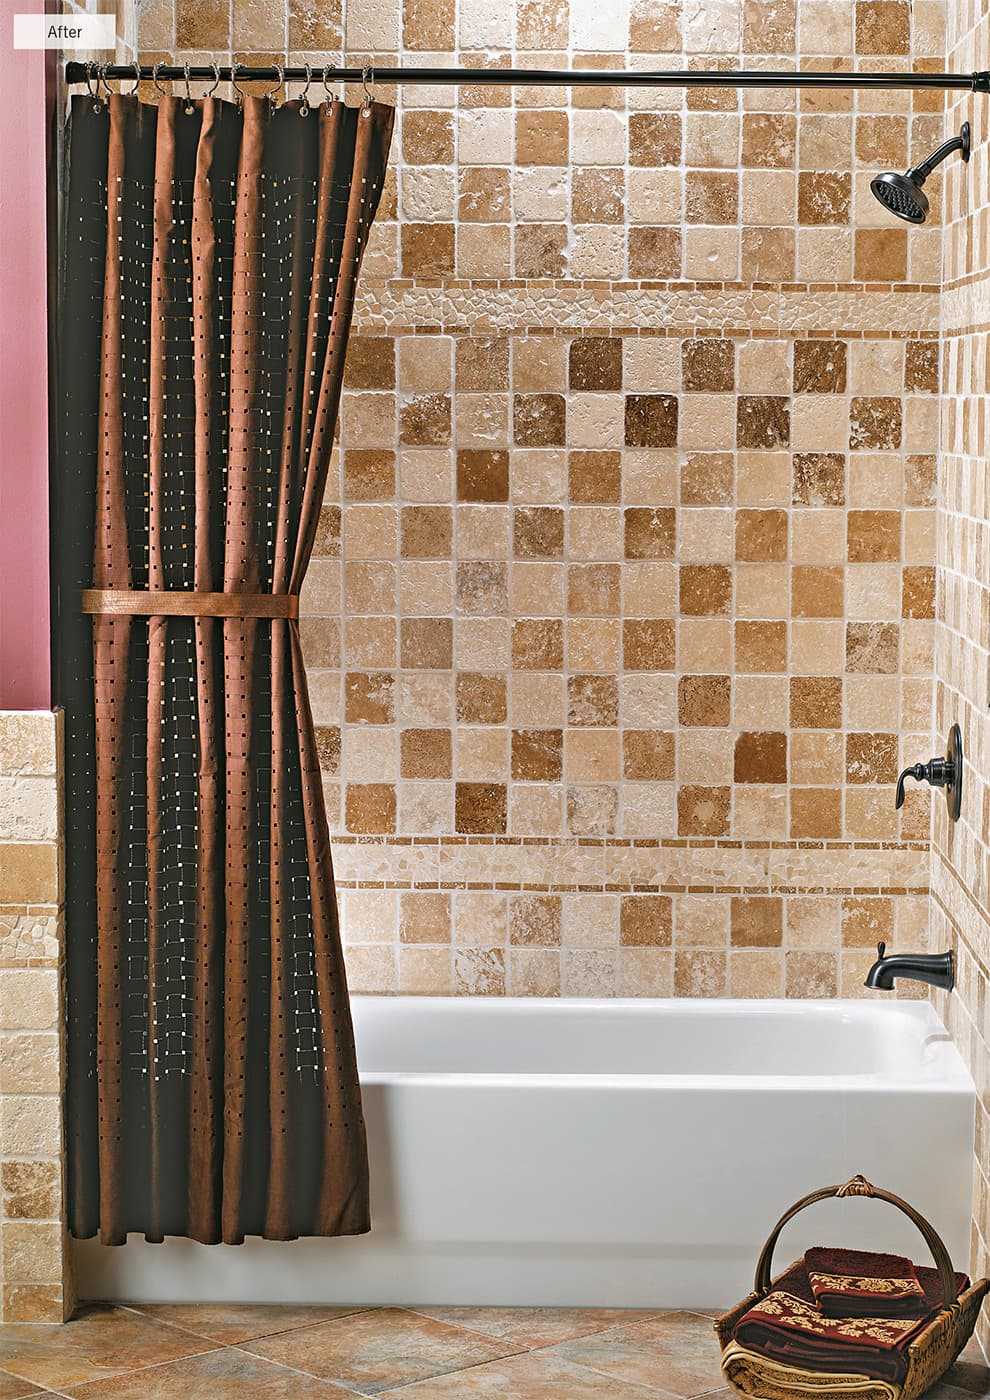
Make a confined tub alcove seem larger by using subway tiles. With their horizontal orientation, they visually stretch the niche. Subway tiles are most often white, but you can use colors or neutrals such as the tan shown here for a surprising look.
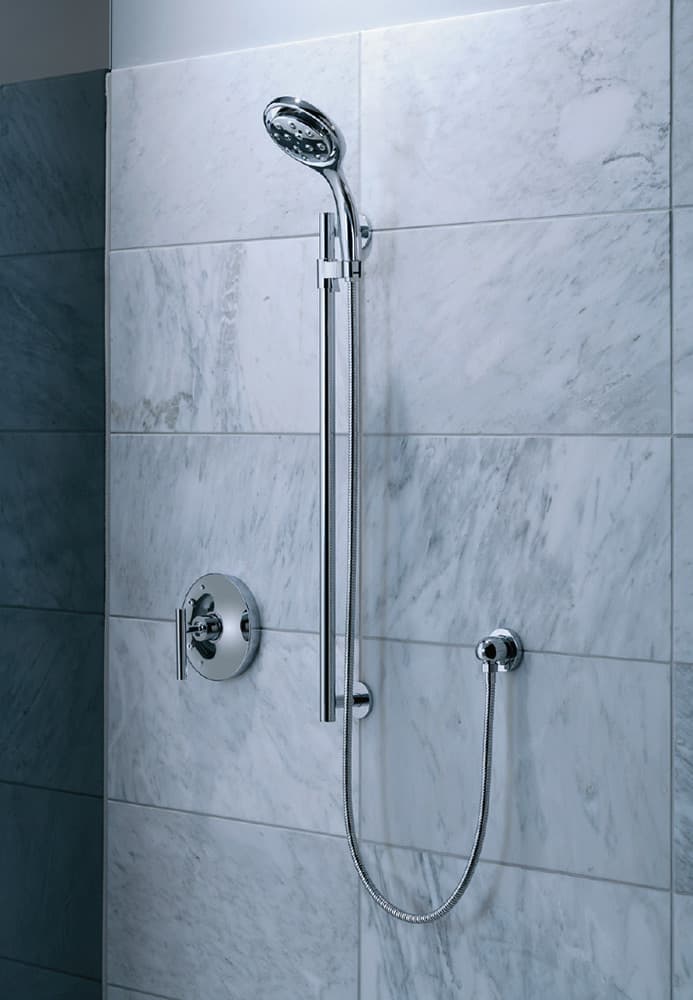
Protect against potential shower leaks by cladding walls in large-format tiles. Fewer grout lines mean fewer avenues for water to infiltrate behind tiles.

Bring life to a small powder room with unique painted tile, such as the cement tile used on the wall of this room.
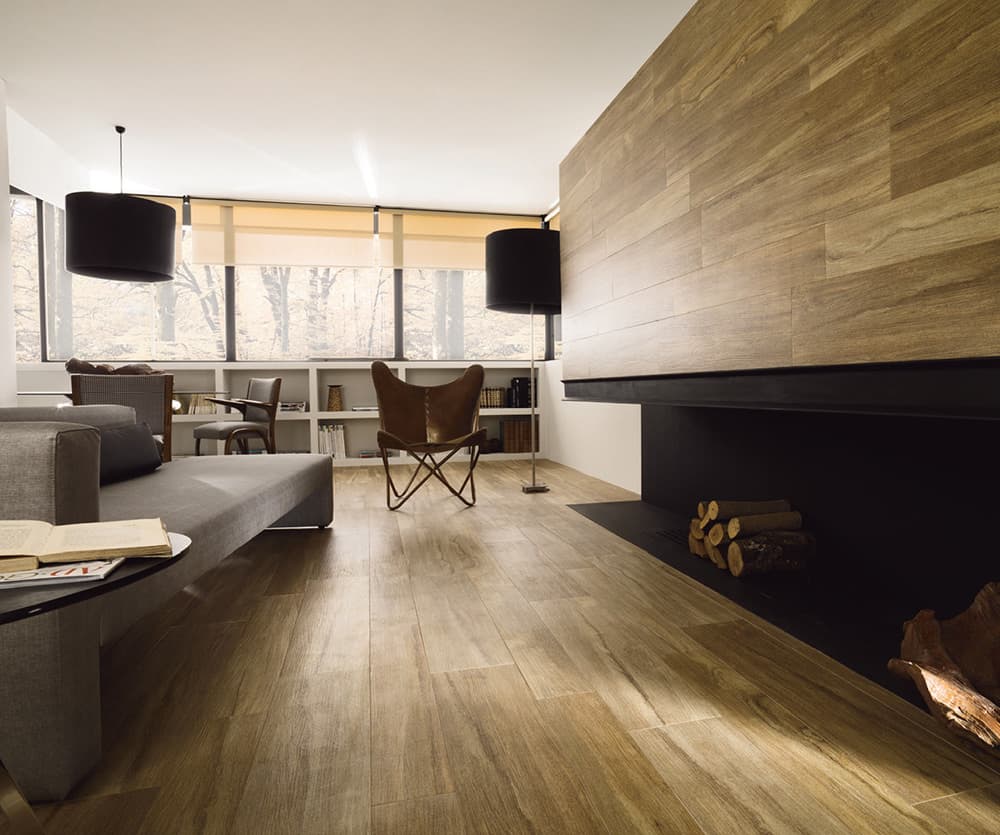
Make a bold statement by using the same tile on the wall as you used on the floor. Although this won’t work in every situation, a modern space and faux-wood porcelain tile is ideal for the treatment.
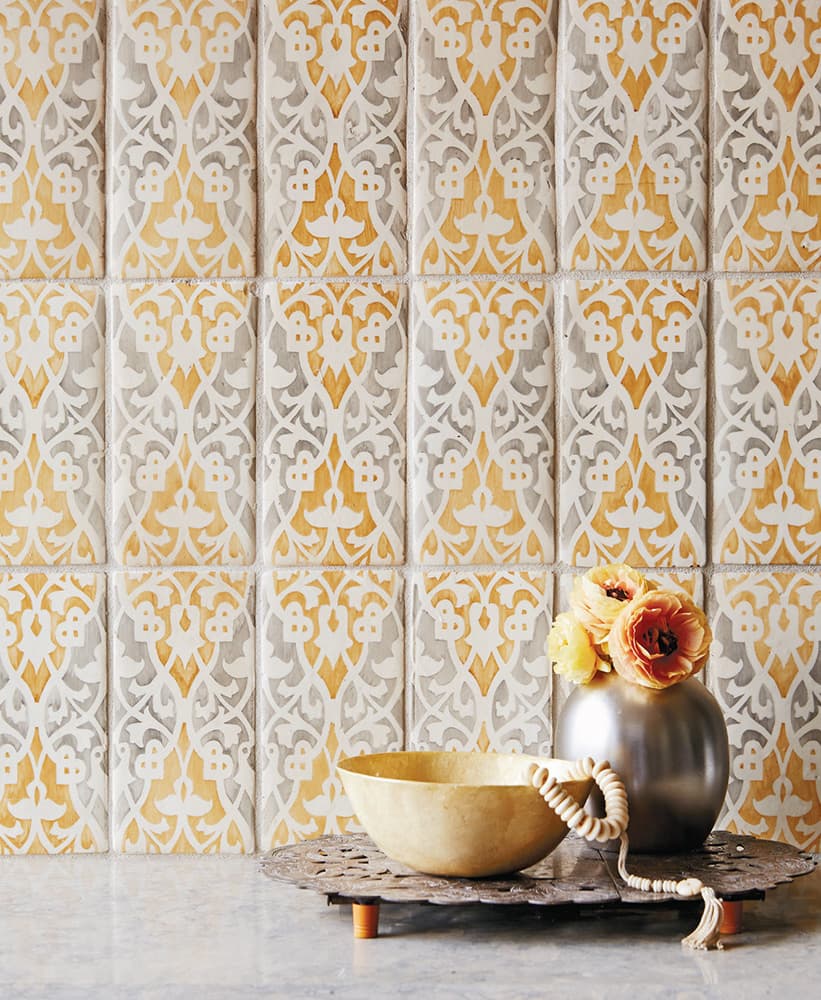
Create a very special focal point by using handpainted ceramic tiles such as these on a high-profile wall, where they will get the attention they deserve (and deliver visual fireworks that justify the cost).
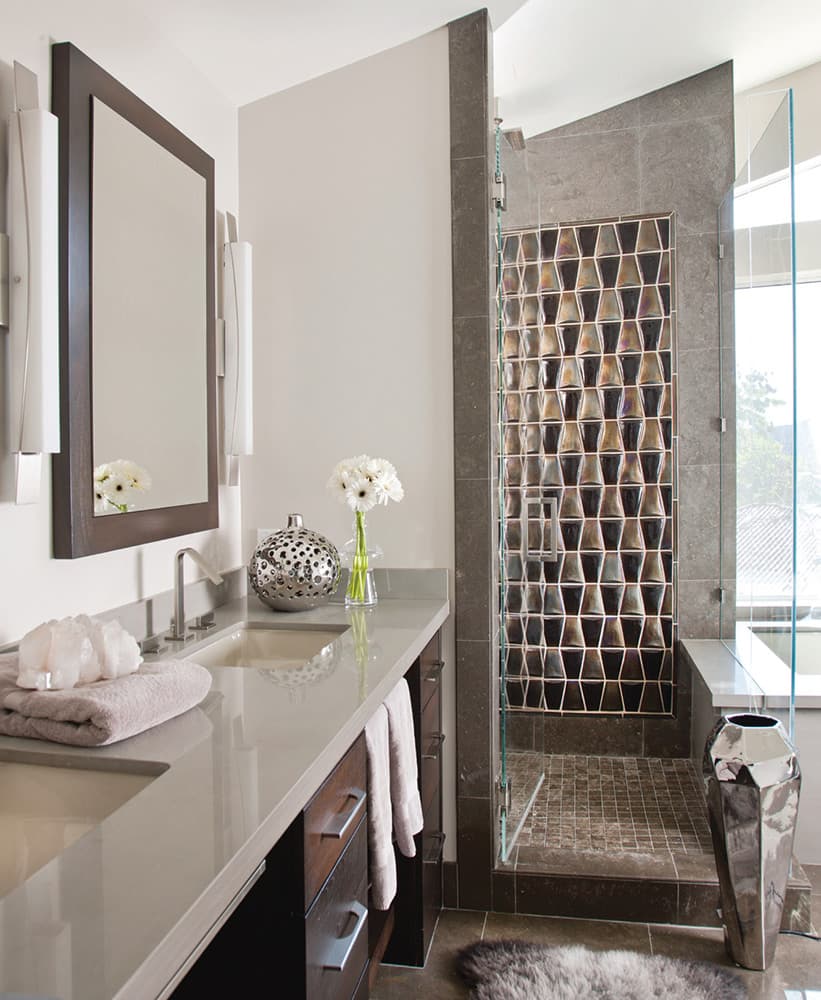
Frame a field of distinctive tiles to make a wall really stand out. The relief tiles in this shower create an almost hypnotic pattern that garners even more attention against monochrome, neutral, square wall tiles. This effect can work in any room of the house.

Match the surface pattern of wall tile to that of floor tile to seamlessly blend the look of the room. This space is unified by the faux-wood tones of the porcelain floor and wall tiles, but by using different sizes and formats, visual interest is still maintained.
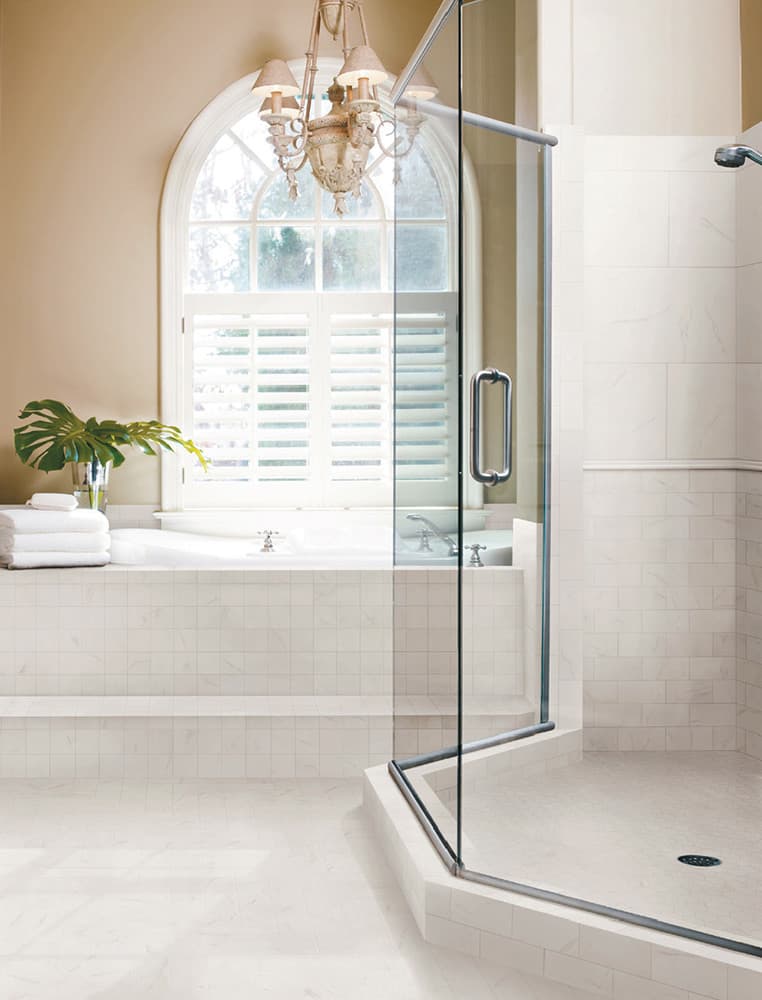
Coordinate tile choice with overall design. A subtle bathroom style calls for an understated classic tile such as the marble in this bathroom. It’s a clean, demure, and very handsome look in which all the design elements work together.
Blend a variety of wall tile shapes, patterns, and sizes by keeping all the tiles in the same color family. The rust red used in this bathroom ties everything together and fits perfectly with the antique fixtures throughout the room.
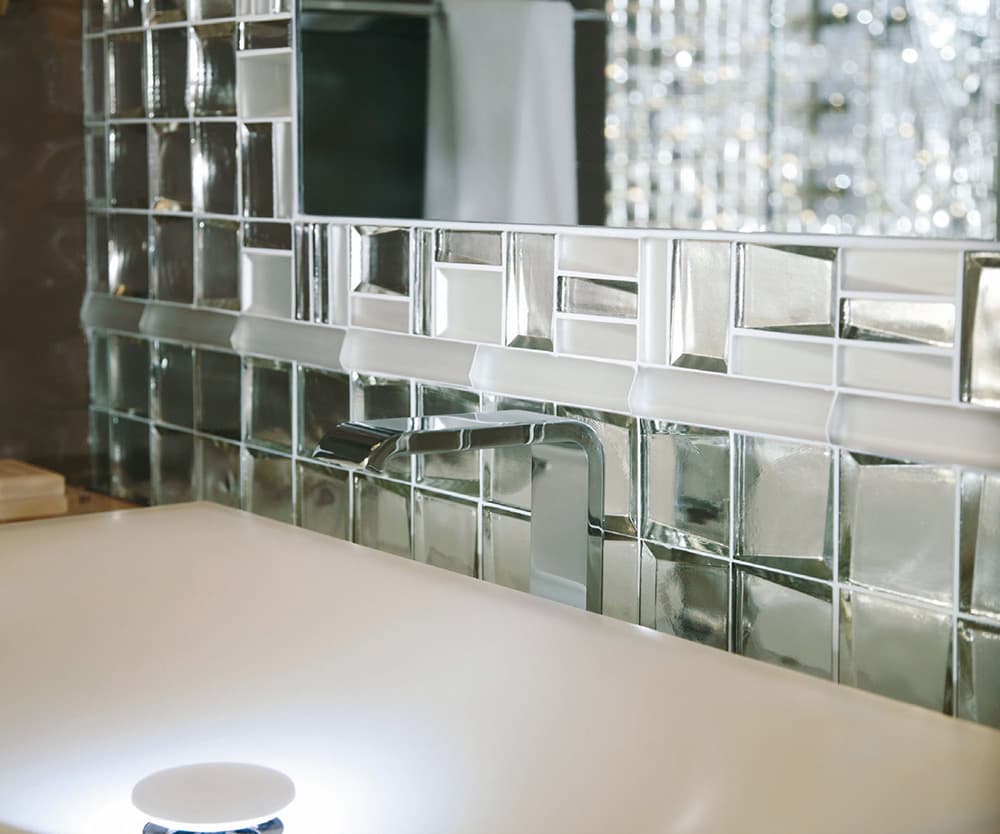
Glam it up by using unusual tiles that bring fun and flair to the room. If you’re willing to take a little risk, you can make the most of exciting tile options such as these metal tiles that look like mirrored glass. Asymmetrical edge bevels give the tiles a funky appeal, and the overall look makes them a real conversation piece.
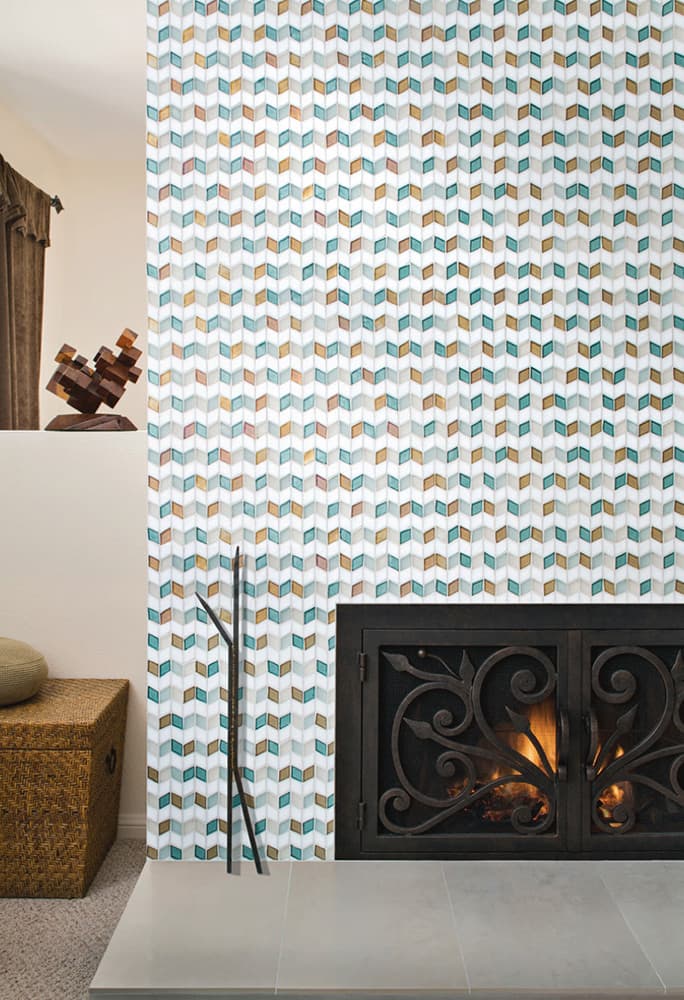
Take advantage of the canvas that is a fireplace surround, as a chance to show off hallmark tile in a stunning design. The glass tile here is easy to clean and the pattern is endlessly fascinating—ensuring that the area is still a focal point even when no fire is roaring in the fireplace.

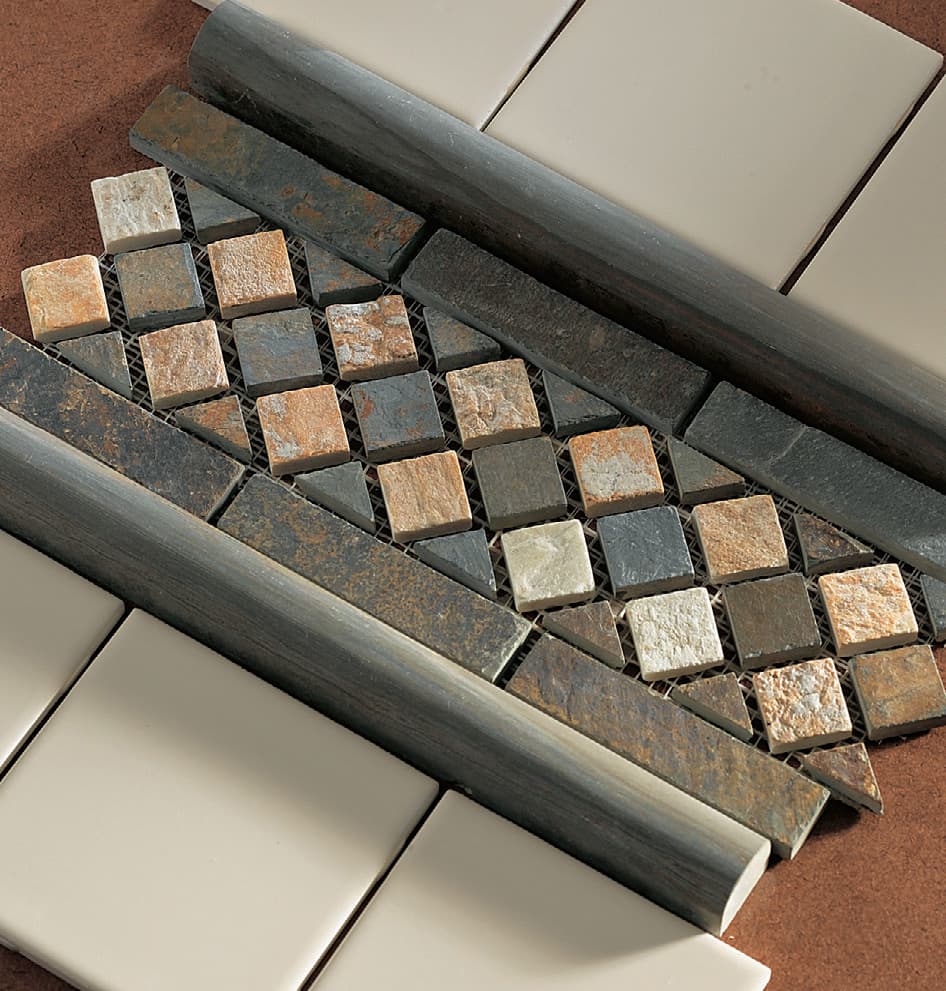
Choose mosaics that reflect your style. Manufacturers offer a growing selection of mosaics, including the irregularly sized pieces in this wall—giving the kitchen a rustic feel in an eye-catching backsplash.
Evaluating & Preparing Walls
The substrate for wall tiles must be stable; that is, it must not expand and contract in response to changes in temperature or humidity. For this reason, it will be necessary to strip all wallpaper before tiling, even if the paper has been painted. Similarly, remove any type of wood paneling before tiling a wall. Even painted walls need some preparation. For example, paint that’s likely to peel needs to be sanded thoroughly before the project starts.
Smooth concrete walls can be tiled, but the concrete has to be prepared. Scrub it with a concrete cleaner, then apply a concrete bonding agent. Use a grinder to smooth any unevenness. Install an isolation membrane (see pages 73 to 75) to keep the tile from cracking if the walls crack, which is a common problem.
Brick or block walls are a good substrate for tiling, but the surface is not smooth enough to be tiled without additional preparation. Mix extra Portland cement into brick mortar, apply a smooth, even skim coat to the walls, and let it dry thoroughly before beginning the tile project.
Existing tile can be tiled over as long as the glaze has been roughened enough for the adhesive to adhere properly. Remember, though, that the new tile will protrude quite a way from the wall. You’ll need to accommodate for this on the edges and around receptacles, switches, windows or doors, and other obstacles.
In some cases, you’ll find that it’s easiest to remove the old substrate and install new (see pages 68 to 72). Even if you’re working with an appropriate substrate in good condition, you will need to evaluate the wall to make sure it is plumb and flat, and fix surface flaws before you begin your wall tiling project.

Run a straightedge up and down and side-to-side along wall surfaces and outline the valleys. Any difference of 1/4" or more must be filled with joint compound using a 12" taping knife. You may need to apply a number of thin layers for best results. Some plaster surfaces are softer than others. High lime content plaster (inset) is too soft to serve as a backing surface for tile.
 How to Patch Holes

Patching small holes: Fill smooth holes with spackle, then sand smooth. Cover ragged holes with a repair patch, then apply two coats of spackle or wallboard compound. Use a damp sponge or wet sander to smooth the repair area, then sand when dry, if necessary.
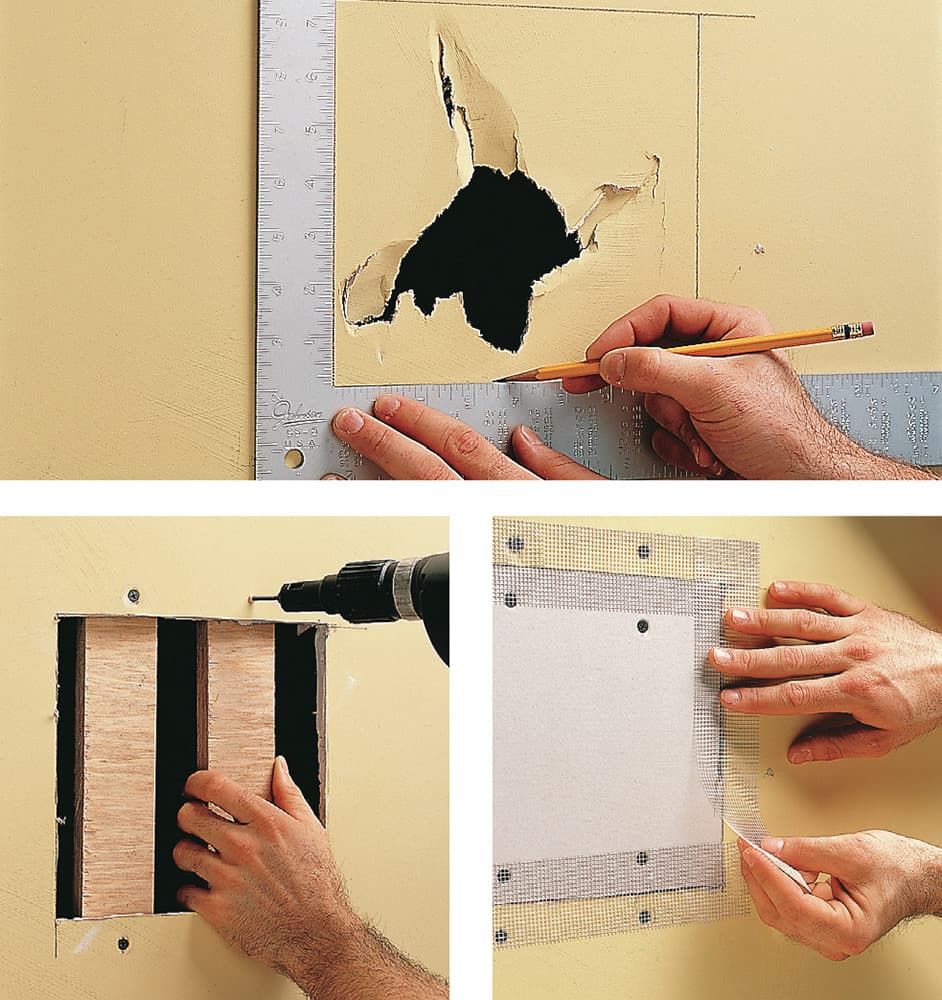
Patching large holes: Draw cutting lines around the hole, then cut away the damaged area using a wallboard saw. Place plywood strips behind the opening and drive wallboard screws to hold them in place. Drive screws through the wallboard patch and into the backers. Cover the joints with wallboard tape and finish with compound.
How to Check & Correct Out-of-Plumb Walls
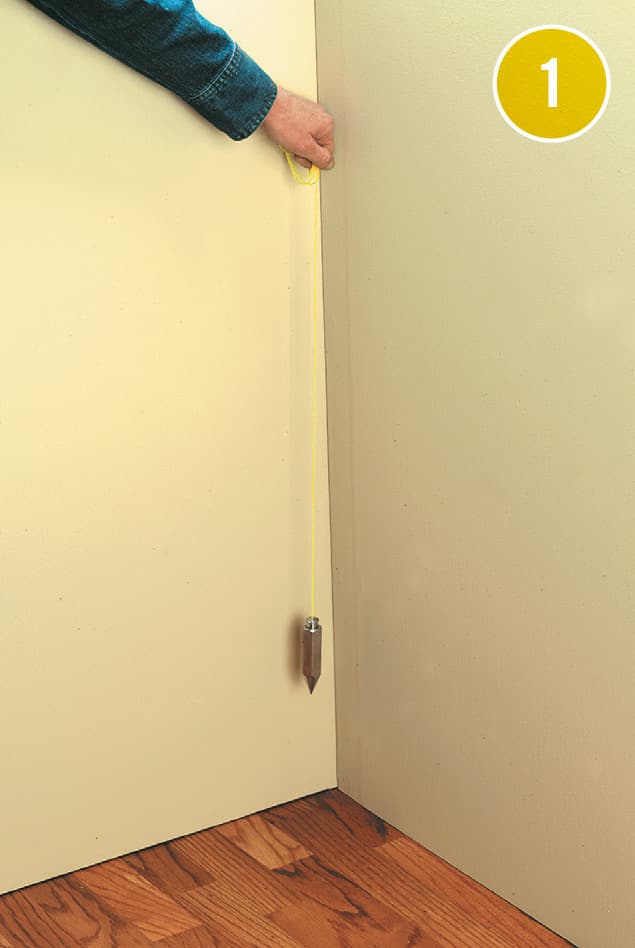
Use a plumb bob to determine if corners are plumb. A wall more than 1/2" out of plumb should be corrected before tiling.
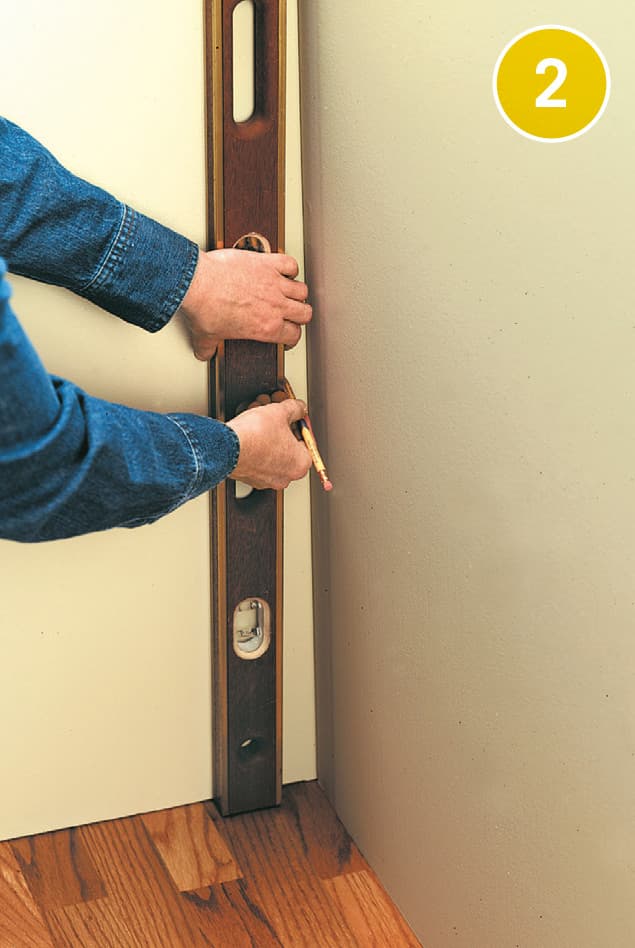
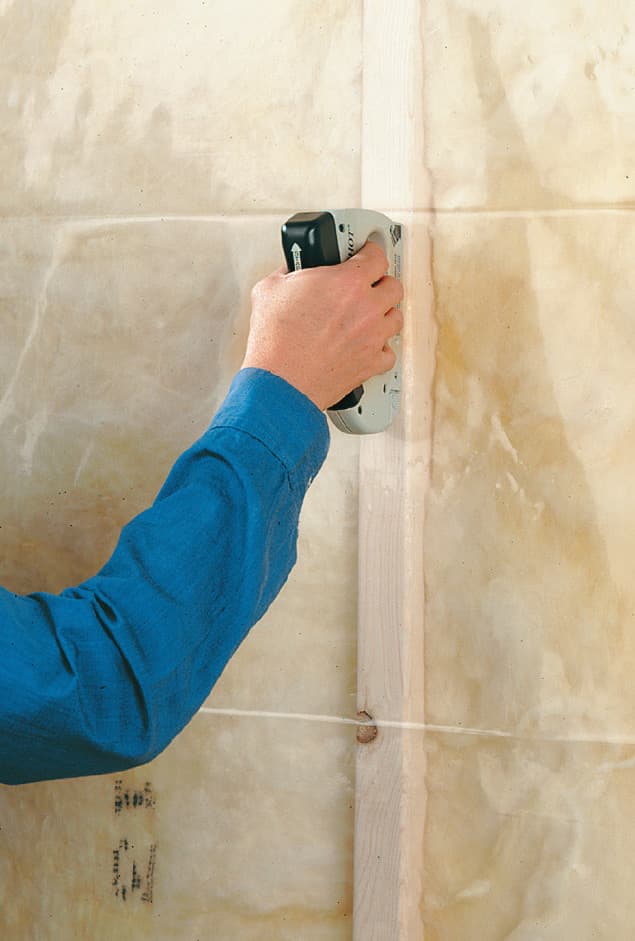
If the wall is out of plumb, use a long level to mark a plumb line the entire height of the wall. Remove the wall covering from the out-of-plumb wall.
Cut and install shims on all the studs to create a new, plumb surface for attaching backing materials. Draw arrows at the shim highpoints to mark for wallboard screw placement.
Removing Wall Surfaces
You may have to remove and replace interior wall surfaces before starting your tiling project. Most often, the material you’ll be removing is wallboard, but you may be removing plaster or ceramic tile. Removing wall surfaces is a messy job, but it is not difficult. Before you begin, shut off the power and inspect the wall for wiring and plumbing.
Make sure you wear appropriate safety gear—glasses and dust masks—since you will be generating dust and small pieces of debris. Use plastic sheeting to close off doorways and air vents to prevent dust from spreading throughout the house. Protect floor surfaces and the bathtub with rosin paper securely taped down. Dust and debris will find their way under drop cloths and will quickly scratch your floor or tub surfaces.
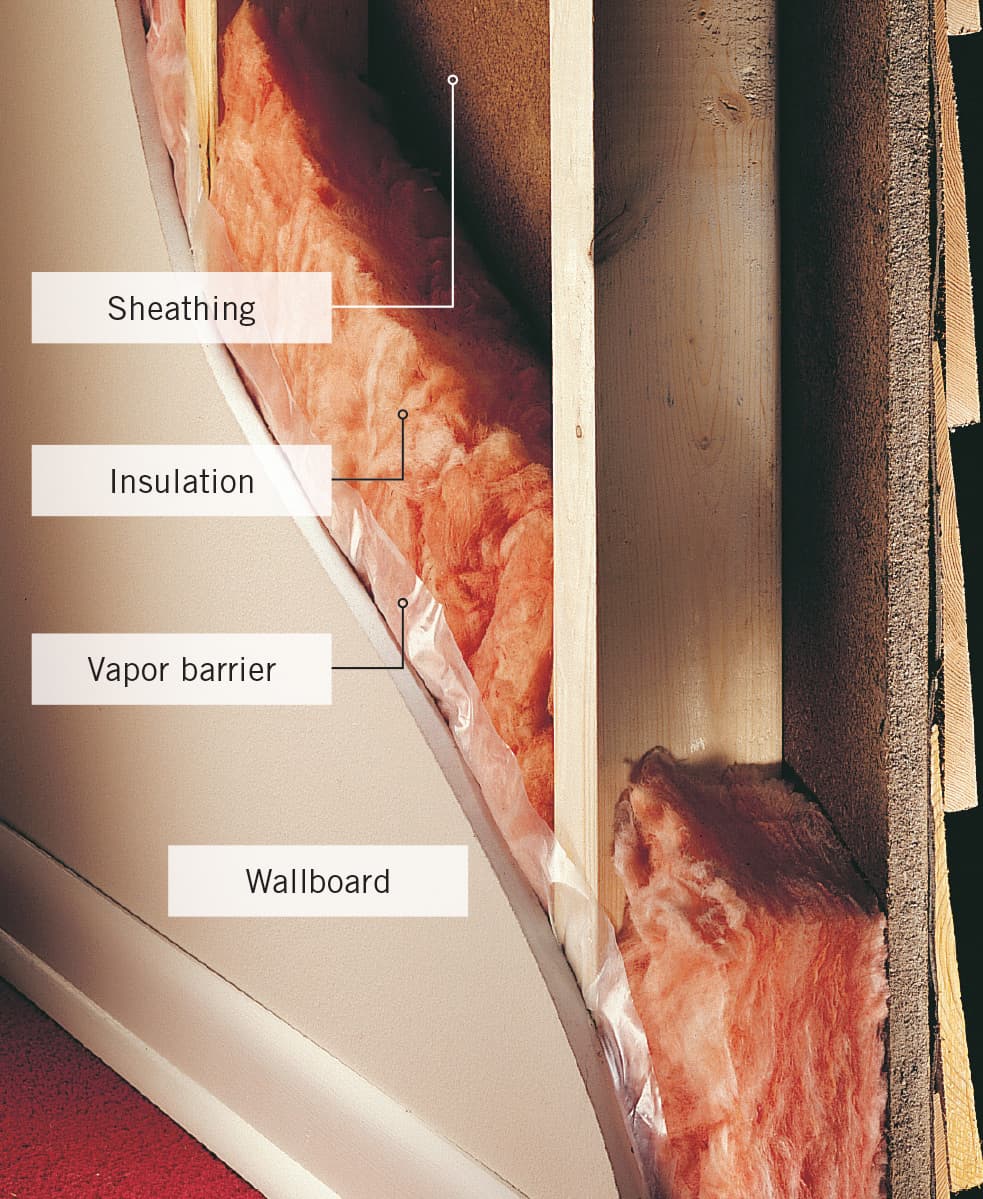
Be aware of how your wall is built before you start tearing off surfaces. If it is an exterior wall take extra care not to disturb insulation. You should plan on replacing the vapor barrier before installing new wallcoverings.
 TOOLS & MATERIALS
Utility knife
Pry bar
Circular saw with demolition blade
Straightedge
Maul
Masonry chisel
Heavy tarp
Reciprocating saw with bimetal blade
Hammer
Protective eyewear
Dust mask
2 × 4 lumber
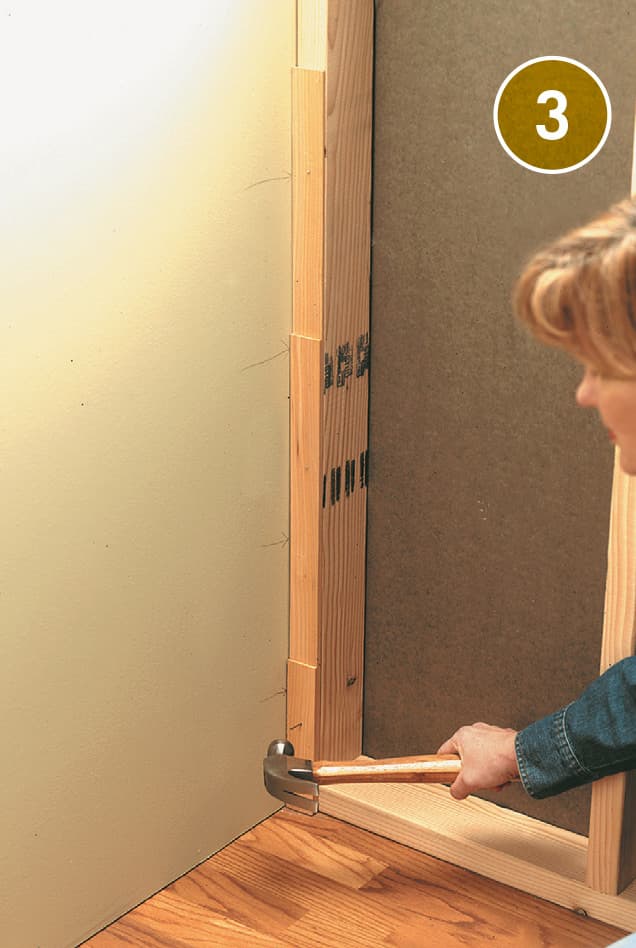
How to Remove Wallboard
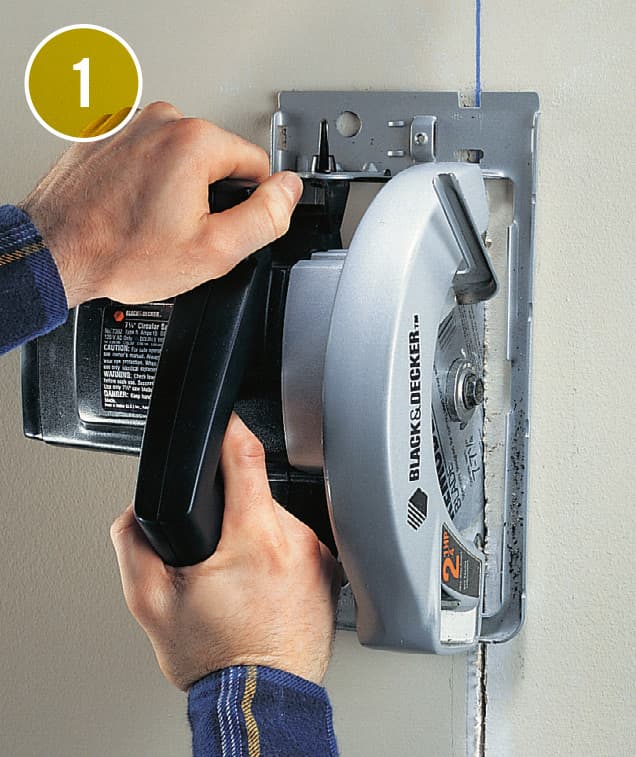
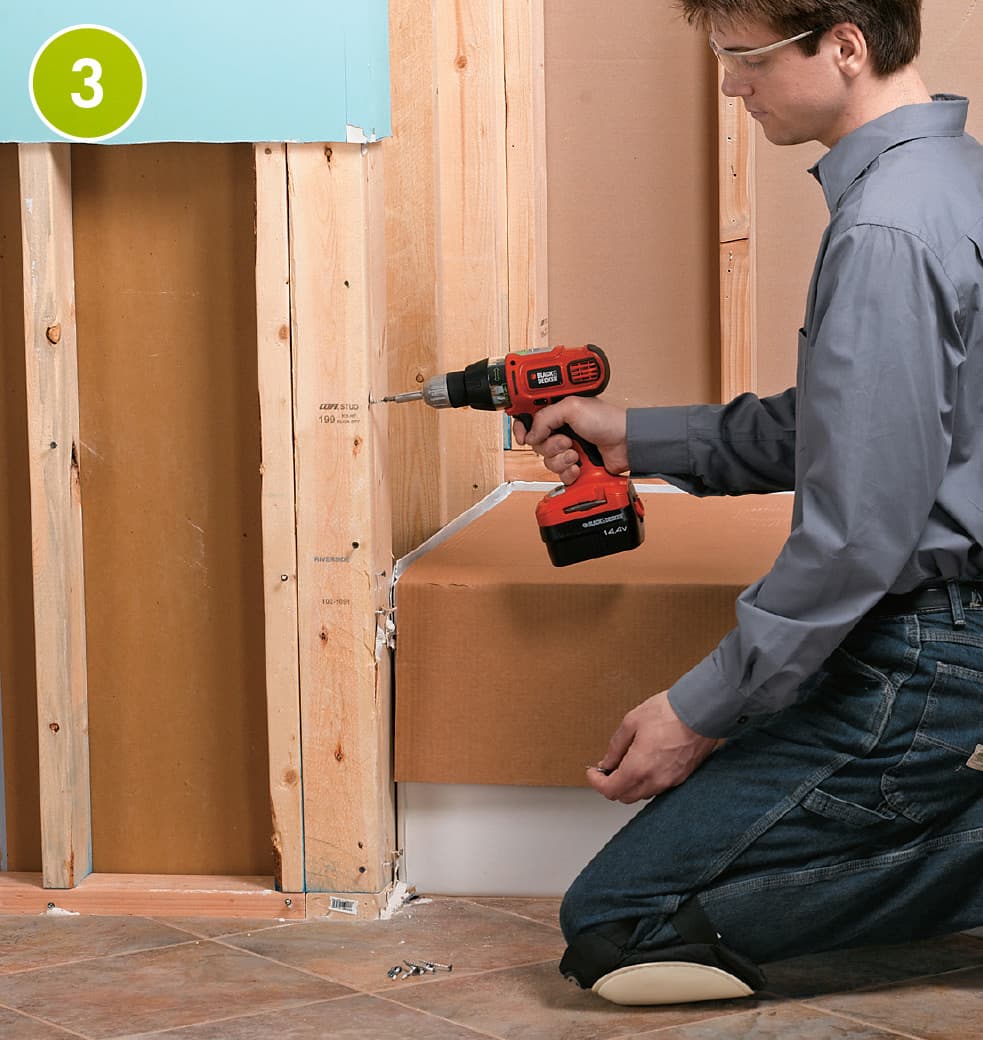
Remove baseboards and other trim and prepare the work area. Make a 1/2"-deep cut from floor to ceiling using a circular saw. Use a utility knife to finish the cuts at the top and bottom and to cut through the taped horizontal seam where the wall meets the ceiling surface.
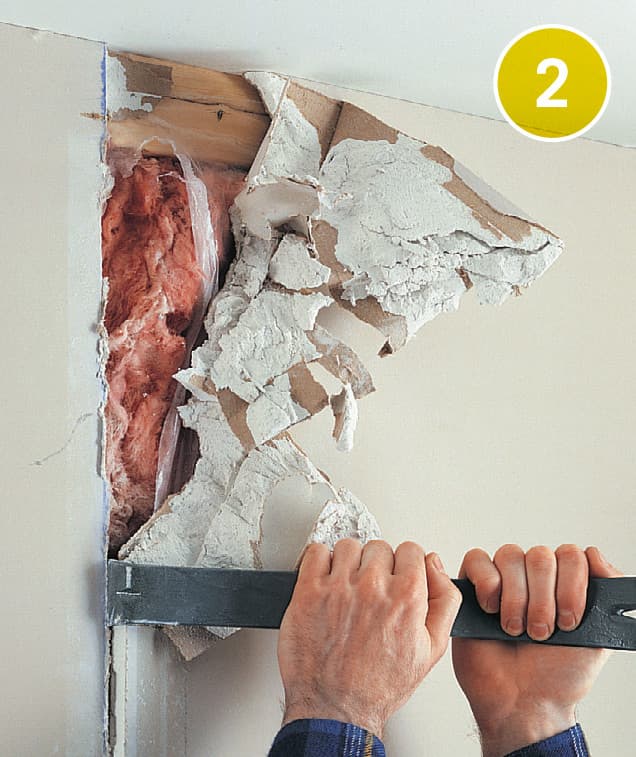
Insert the end of a pry bar into the cut near one corner of the opening. Pull the pry bar until the wallboard breaks, then tear away the broken pieces. Take care to avoid damaging the wallboard outside the project area.
How to Remove Plaster
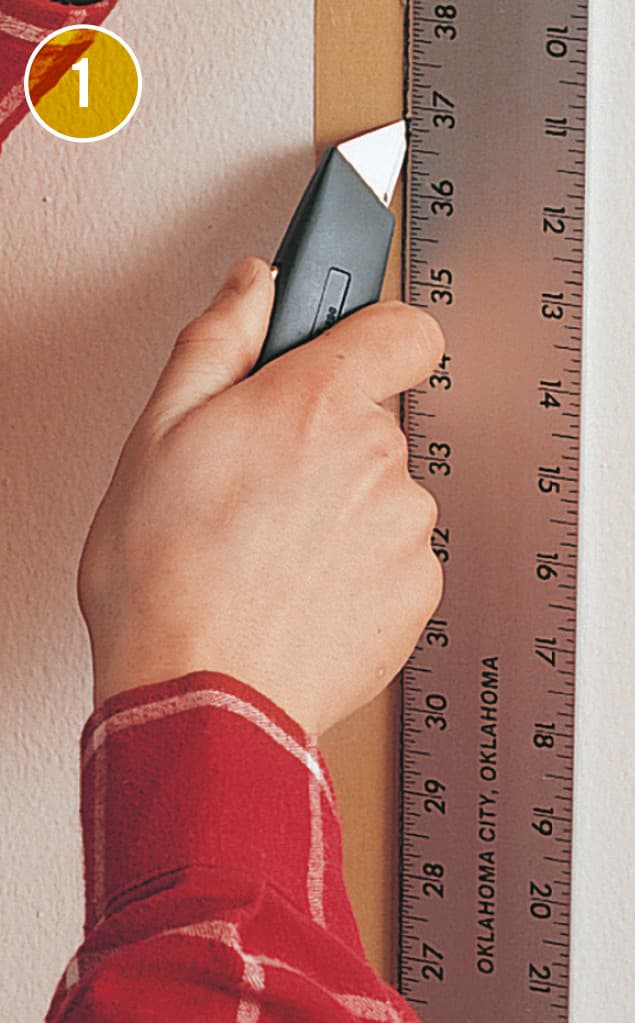
Remove baseboards and other trim and prepare the work area. Score the cutting line several times with a utility knife using a straightedge as a guide. The line should be at least 1/8" deep.
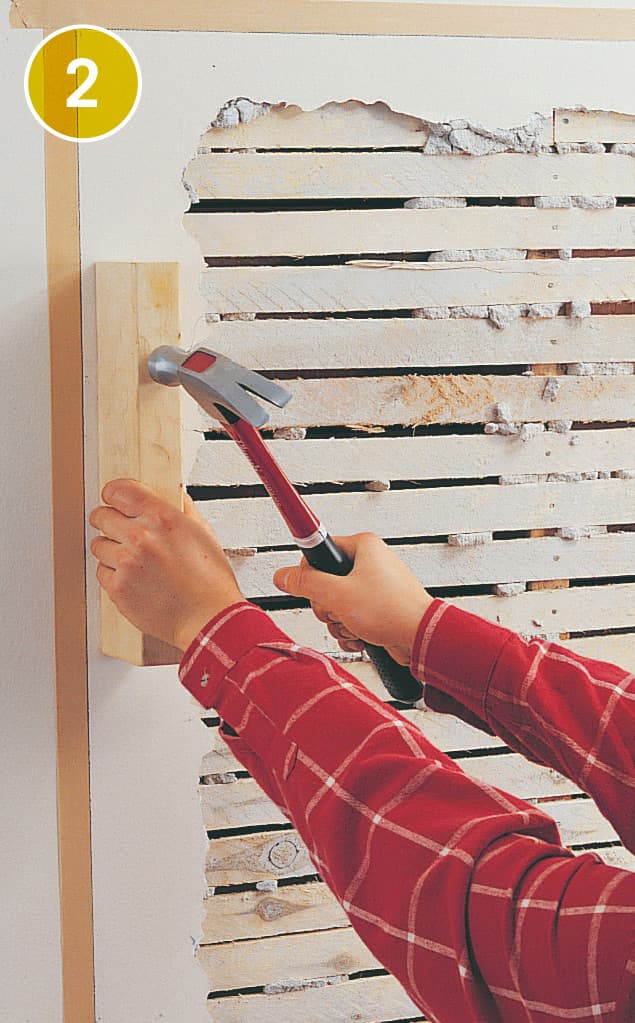
Break the plaster along the edge by holding a scrap piece of 2 × 4 on edge just inside the scored line, and rapping it with a hammer. Use a pry bar to remove the remaining plaster.
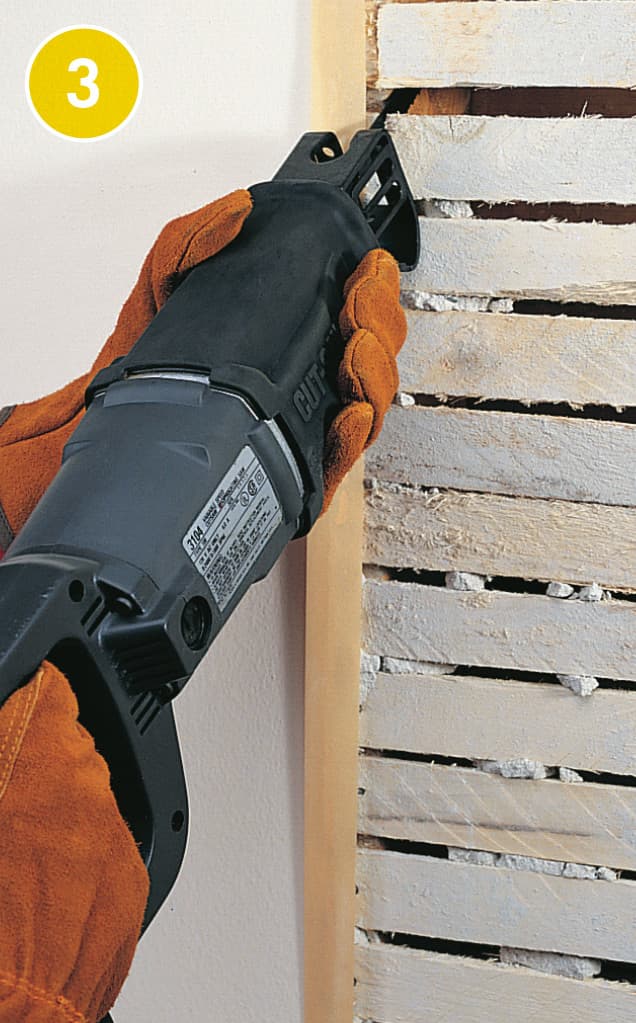
Cut through the lath along the edges of the plaster using a reciprocating saw or jigsaw. Remove the lath from the studs using a pry bar.
How to Remove Ceramic Wall Tile

Cover the floor with a heavy tarp, and shut off the electricity and water. Knock a small starter hole into the bottom of the wall using a maul and masonry chisel.
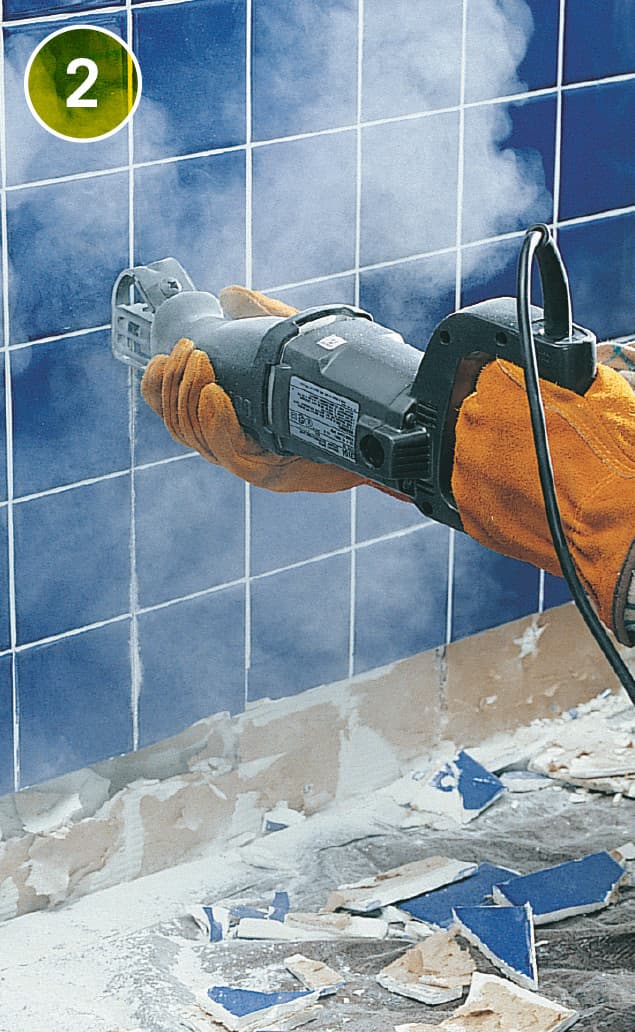
Begin cutting out small sections of the wall by inserting a reciprocating saw with a bimetal blade into the hole and cutting along grout lines. Be careful when sawing near pipes and wiring.
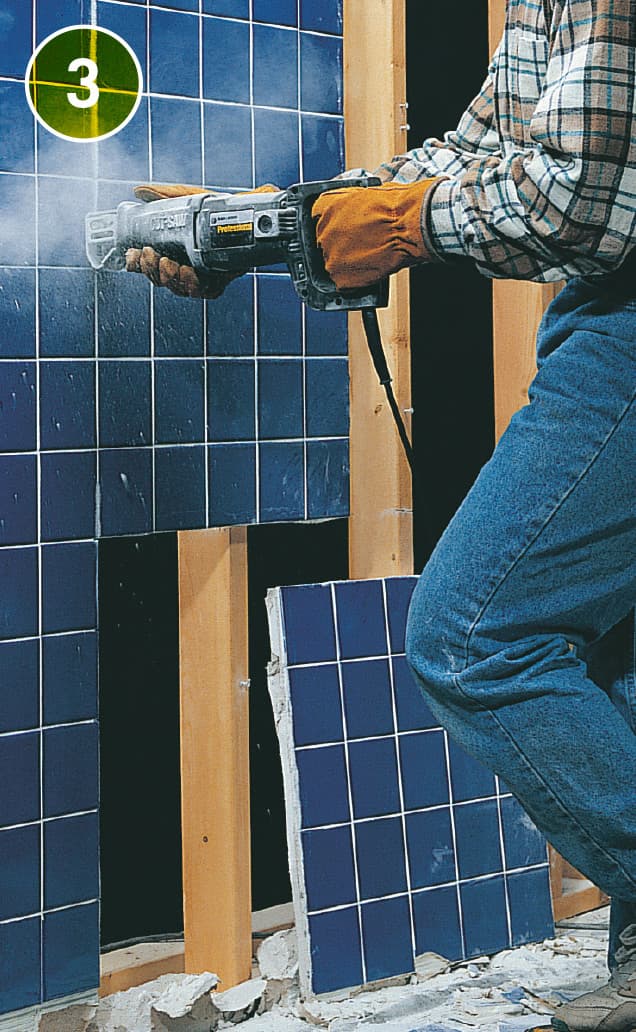
Cut the entire wall surface into small sections, removing each section as it is cut. Be careful not to cut through studs.
Installing & Finishing Wallboard
Regular wallboard is an appropriate backer for ceramic tile in dry locations. Greenboard, a moisture-resistent form of wallboard, is good for kitchens and the dry areas of bathrooms. Tub and shower surrounds and kitchen backsplashes should have a cementboard backer.
Wallboard panels are available in 4 × 8-foot or 4 × 10-foot sheets, and in 3/8-, 1/2-, and 5/8-inch thicknesses. For new walls, 1/2-inch thick is standard.
Install wallboard panels so that seams fall over the center of framing members, not at sides. Use all-purpose wallboard compound and paper joint tape to finish seams.
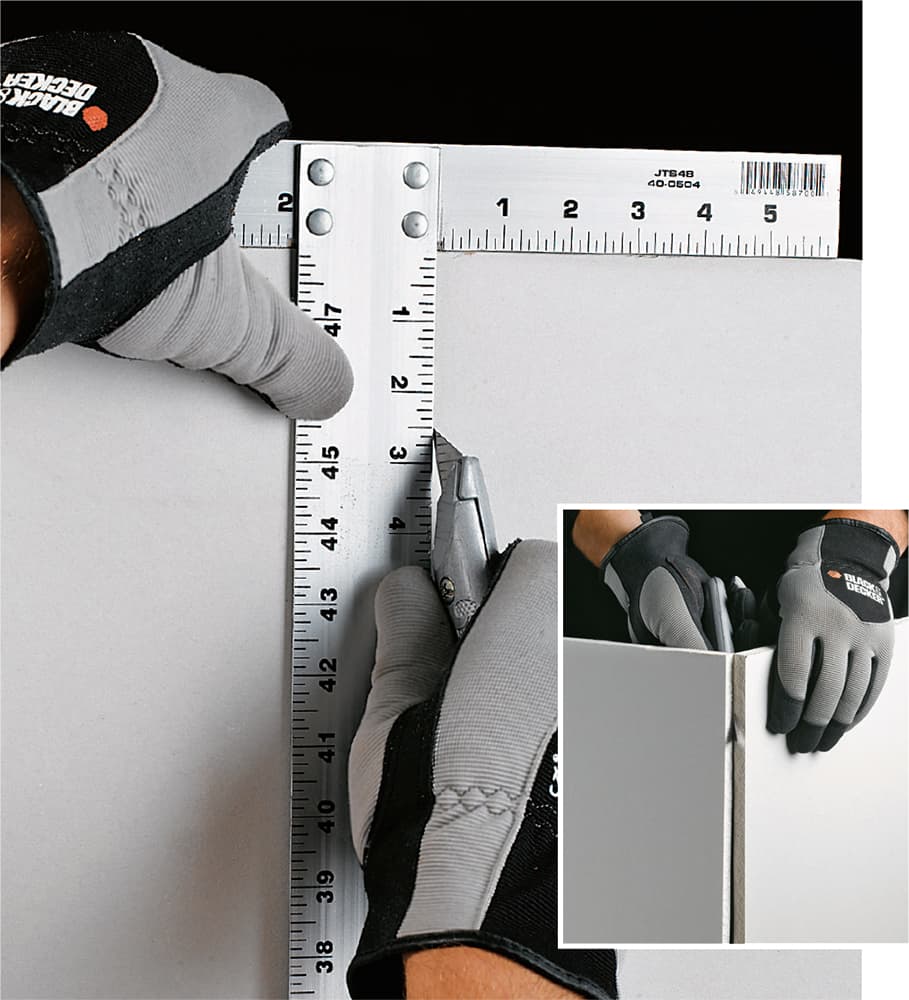
Score wallboard face paper with a utility knife using a drywall T-square as a guide. Bend the panel away from the scored line until the core breaks, then cut through the back paper (inset) with a utility knife, and separate the pieces.
TOOLS & MATERIALS
Tape measure
Utility knife
T-square
6" and 12" taping knives
150-grit sanding sponge
Screw gun
Wallboard
Wallboard tape
1 1/4" coarse-thread wallboard screws
Wallboard compound
Metal inside corner bead
How to Install & Finish Wallboard
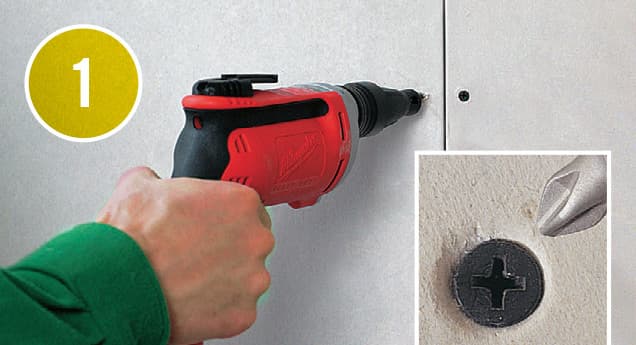
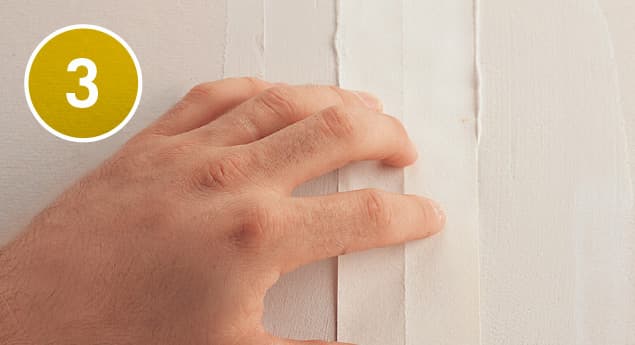
Install panels with their tapered edges butted together. Fasten with 1 1/4" wallboard screws, driven every 8" along the edges, and every 12" in the field. Drive screws deep enough to dimple surface without ripping face paper (inset).
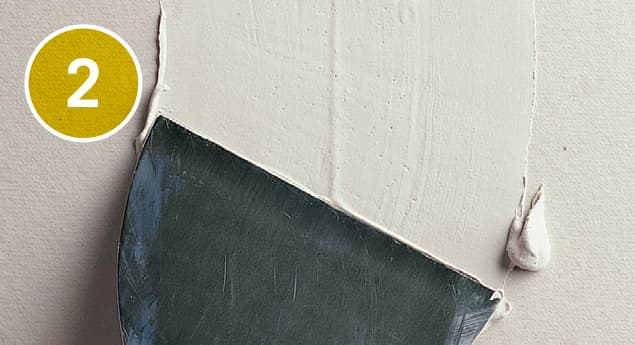
Finish the seams by applying an even bed layer of wallboard compound over the seam, about 1/8" thick using a 6" taping knife.
Center the wallboard tape over the seam and lightly embed it into the compound, making sure it’s smooth and straight.
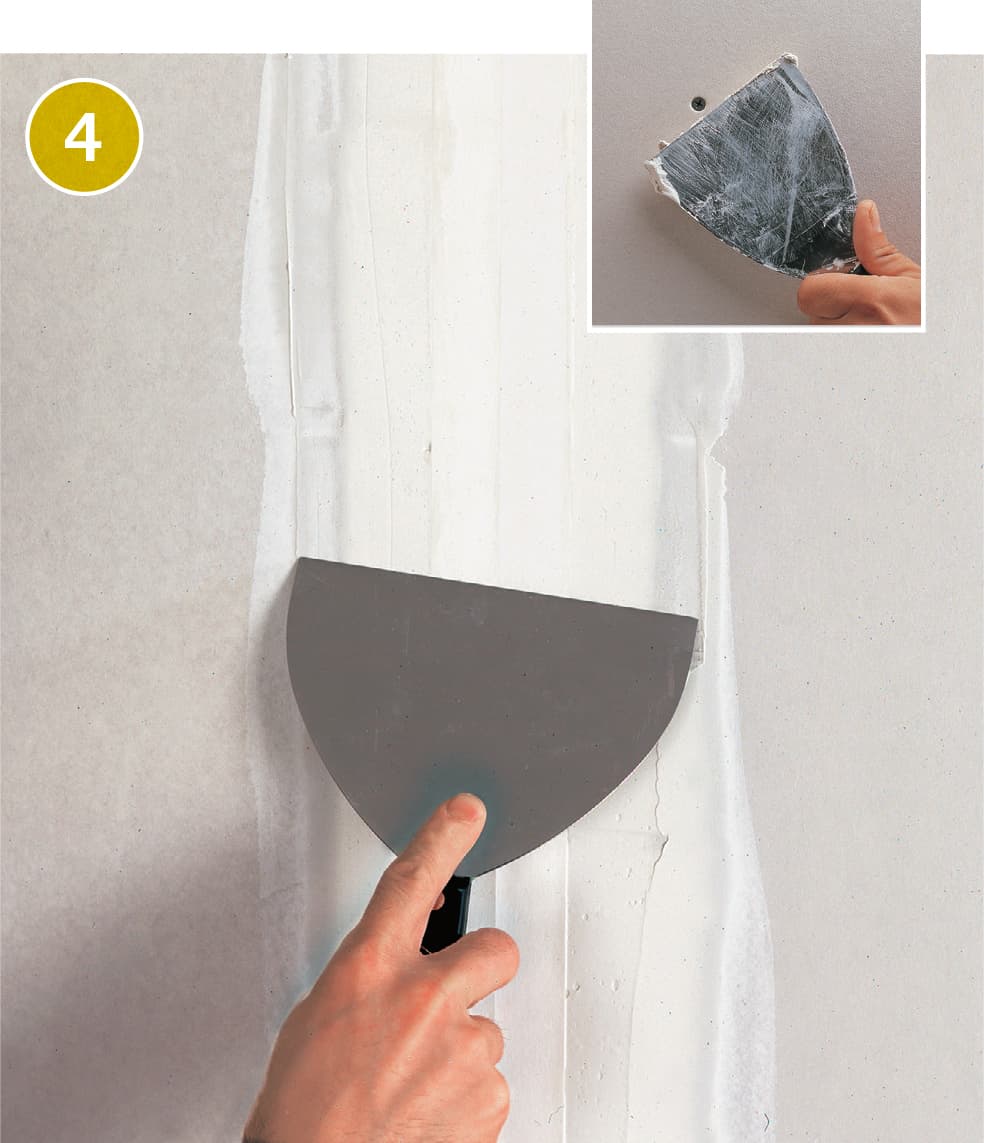
Smooth the tape with the taping knife. Apply enough pressure to force compound from underneath the tape, leaving the tape flat and with a thin layer underneath. Cover all exposed screw heads with the first of three coats of compound (inset). Let compound dry overnight.
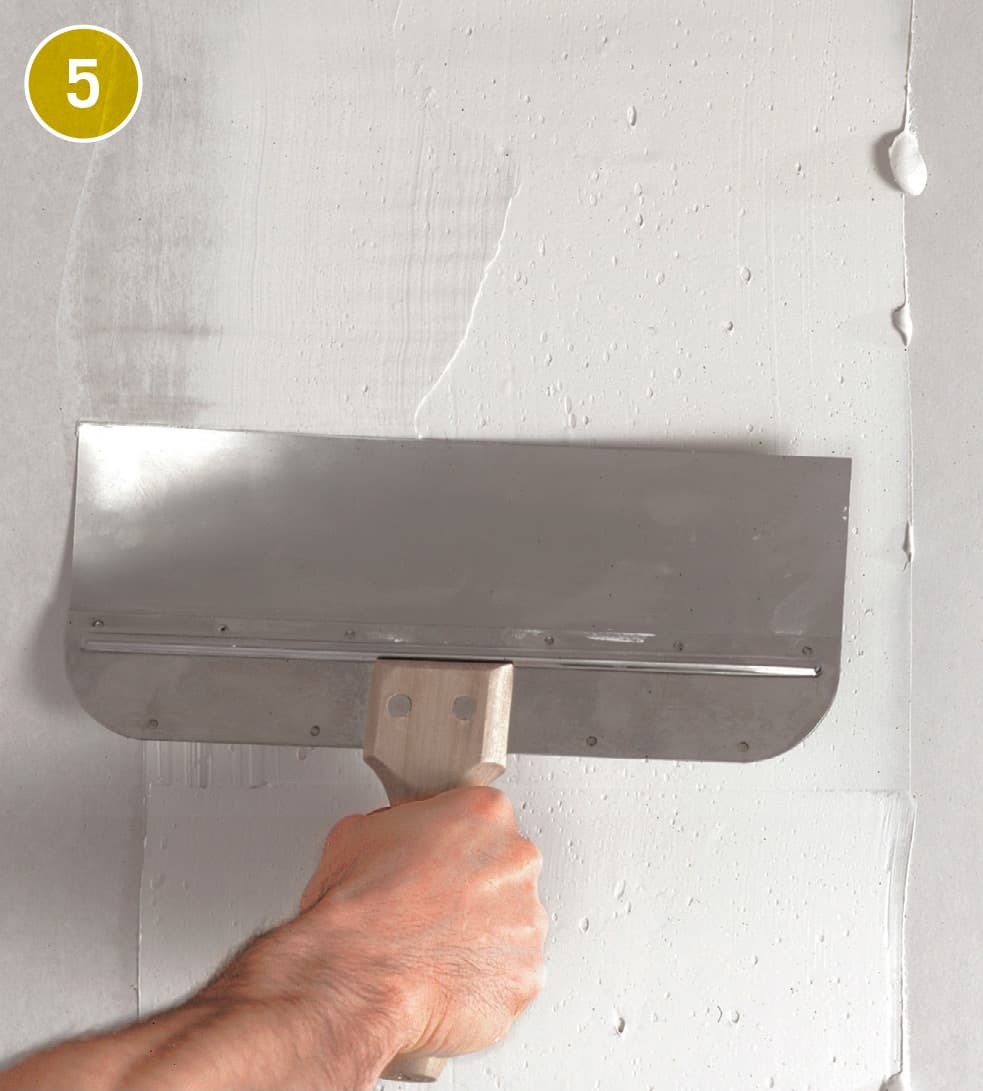
Second-coat the seams with a thin, even layer of compound using a 12" knife. Feather the sides of the compound first, holding the blade almost flat and applying pressure to the outside of the blade so the blade just skims over the center of the seam.
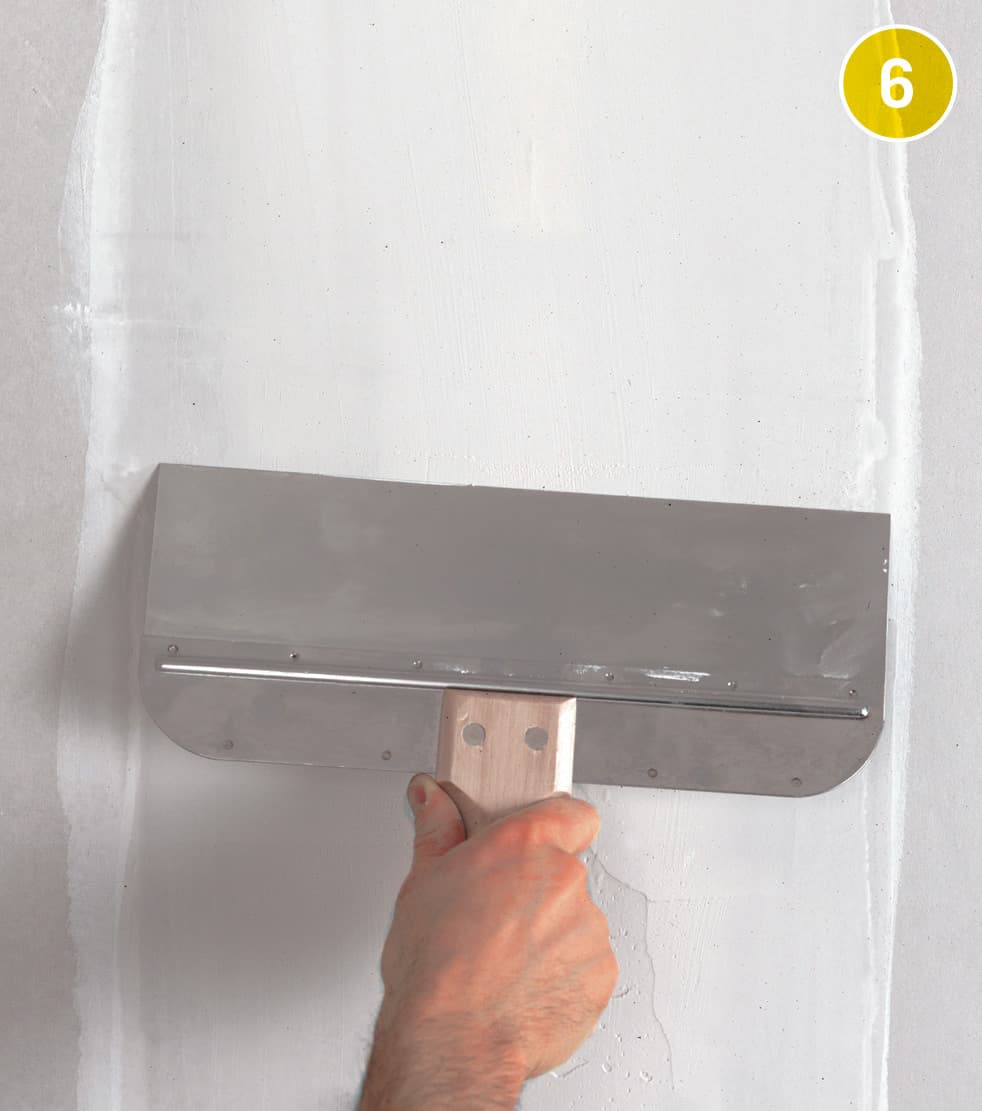
After feathering both sides, make a pass down the center of the seam, leaving the seam smooth and even, the edges feathered out even with the wallboard surface. Completely cover the joint tape. Let the second coat dry, then apply a third coat using the 12" knife. After the third coat dries completely, sand the compound lightly with a wallboard sander or a 150-grit sanding sponge.
 INSIDE CORNER BEAD

Finish any inside corners using paper-faced metal inside corner bead to produce straight, durable corners with little fuss. Embed the bead into a thin layer of compound, then smooth the paper with a taping knife. Apply two finish coats to the corner, then sand the compound smooth.
Installing Cementboard on Walls
Before you begin working, the wall and ceiling framing will need to be examined to make sure they meet the structural requirements for a backer board installation. Studs, joists, and rafters, often referred to as framing members, should be spaced a maximum of 16 inches on center for wall applications.
In wet areas, the application of a moisture barrier, 15# roofing felt or polyethylene film, is required to protect the wall cavity from moisture intrusion. This is fastened directly to the framing members using staples or roofing nails. Polyethylene sheeting is commonly found in rolls that are wide enough to cover an entire wall in one piece. Asphalt roofing felt (also called building paper) is installed in lapped rows, starting from the bottom of the wall assembly. Subsequent rows should overlap the prior row by a minimum of 2 inches for horizontal seams and 6 inches for vertical seams and corners.
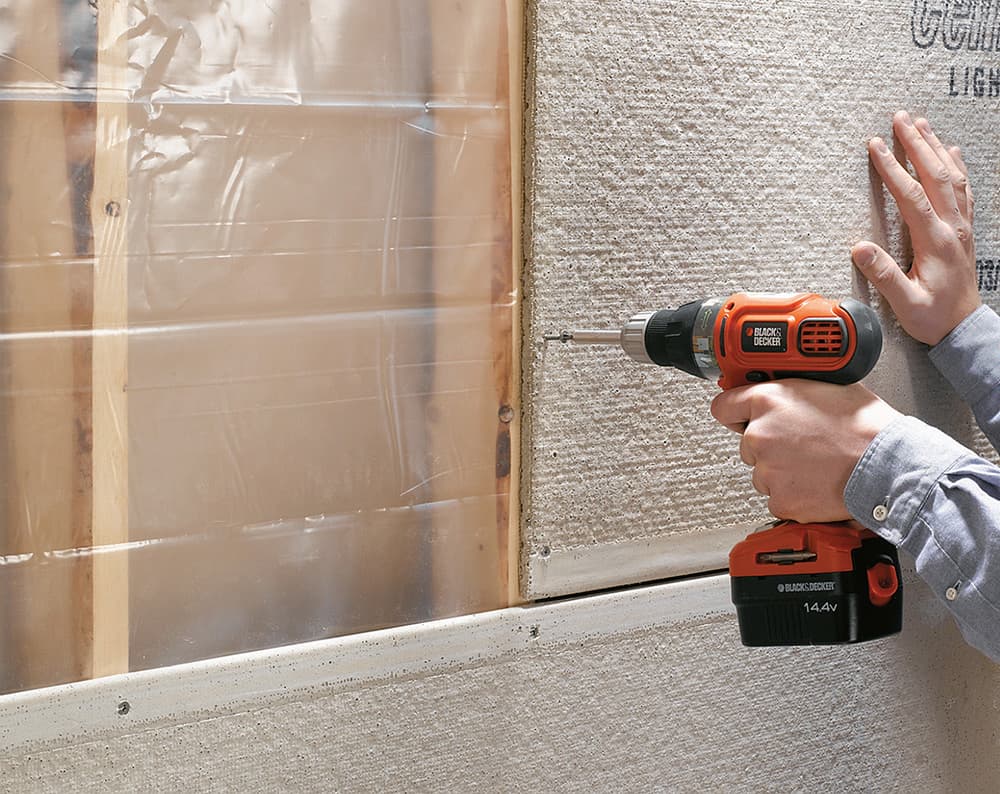
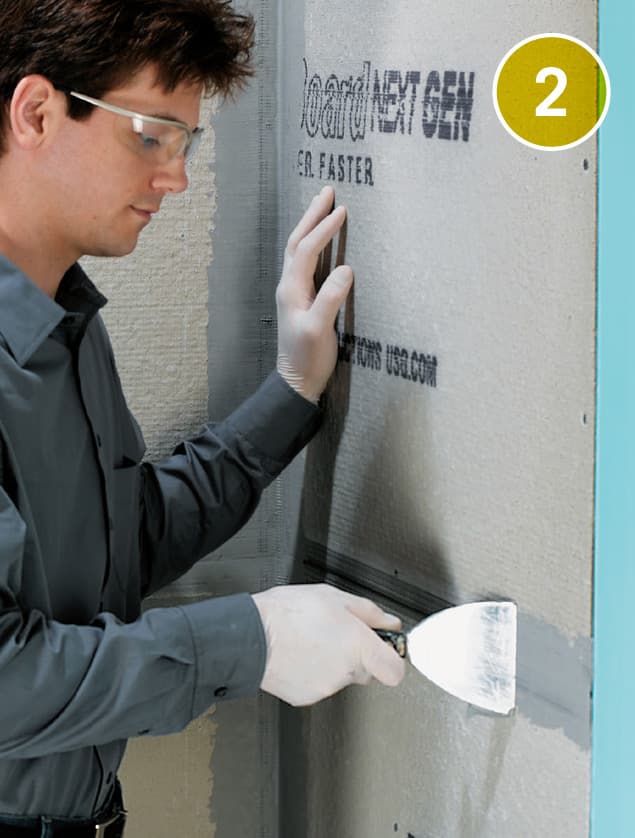
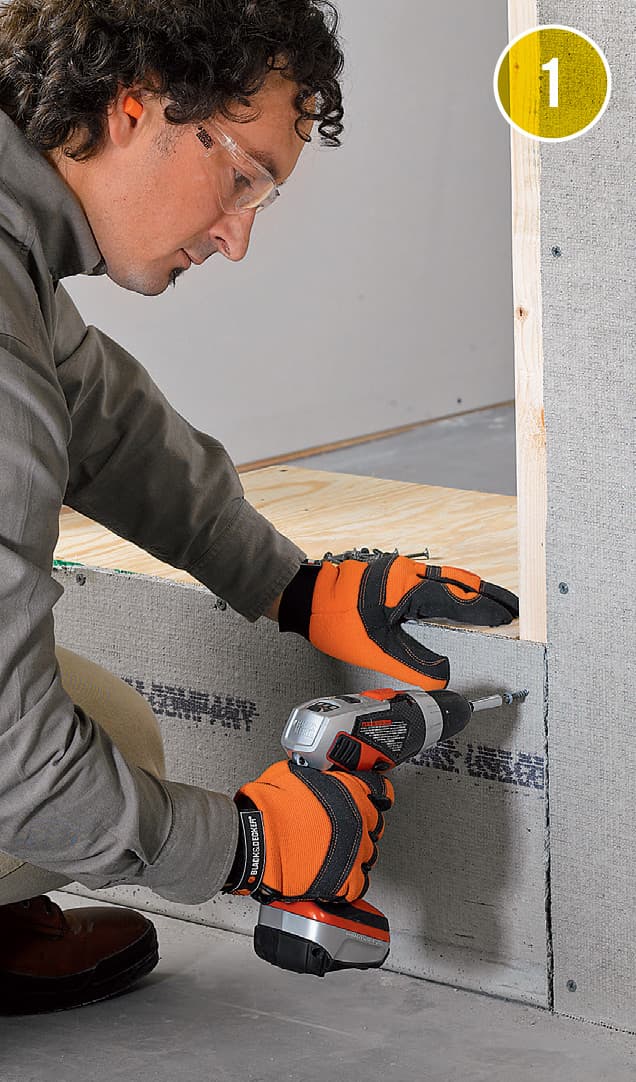
Attach 1/2"-thick cementboard to the framing members horizontally with the rough side facing out. Use 1 1/4" cementboard screws. Fasten screws every 6" on-center for ceiling applications and every 8" on-center for wall applications. Keep fasteners 2" away from each corner and no less than 3/8" from the panel edges.
TOOLS & MATERIALS
Eye and ear protection
Screw bit
Stapler and staples
Modified thinset mortar
4-mil clear poly sheeting
2" fiberglass mesh tape
1 1/4" cementboard screws
15# roofing felt
1/2" cementboard
Work gloves
Drill
Tape measure
6" joint knife
Preparing the Wall
A moisture barrier consisting of 4-mil clear polyethylene sheeting can be stapled to framing members in damp areas before installing the cementboard.
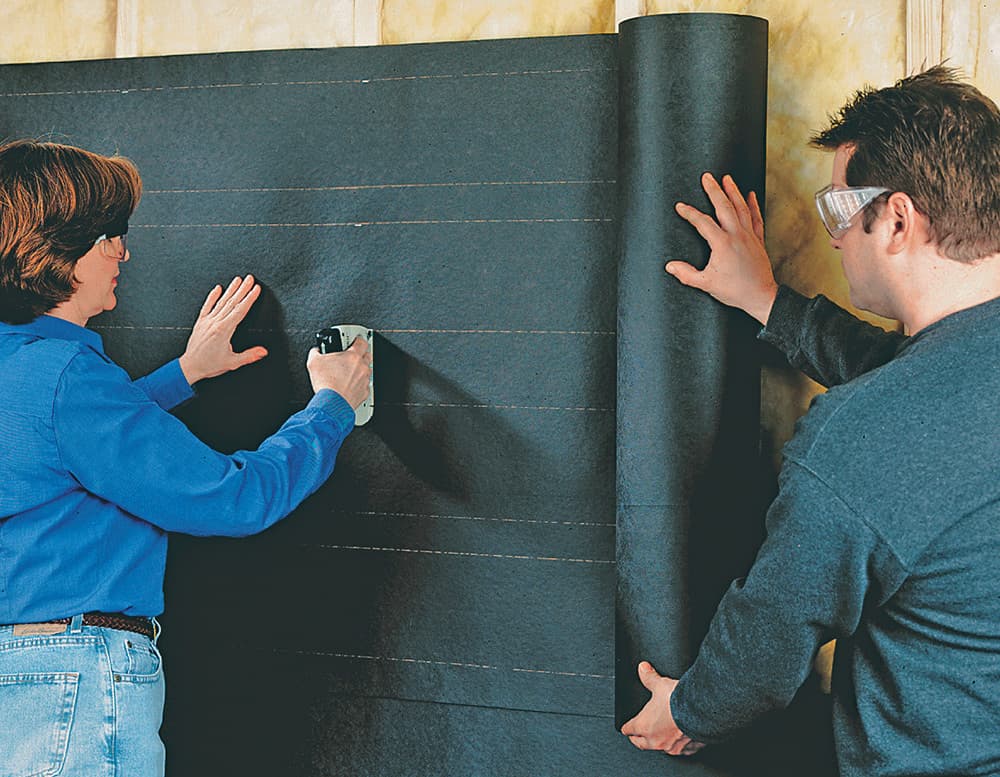
Asphalt roofing felt (15# building paper) can also be used as a moisture barrier behind cementboard panels in damp areas.
How to Hang Cementboard on Walls
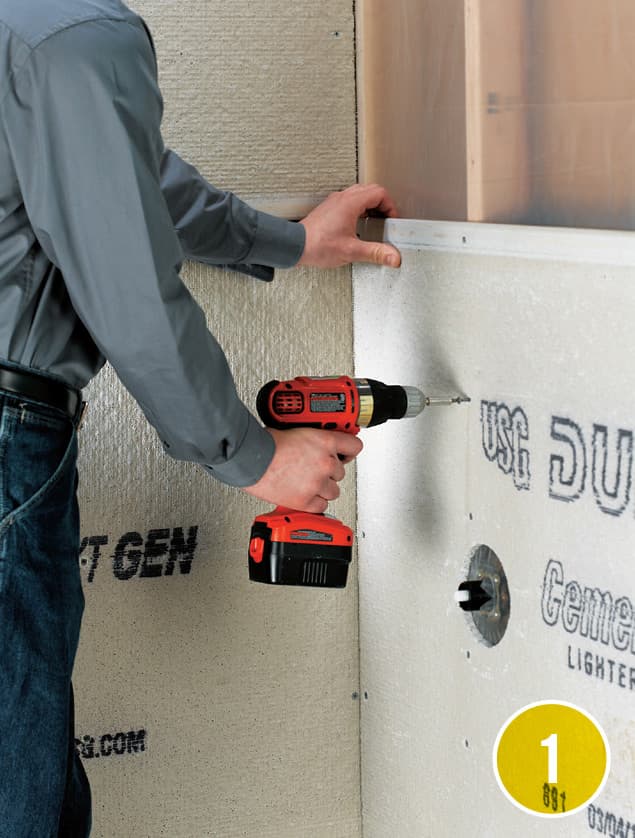
Fasten panels to the wall framing members using 1 1/4" cementboard screws. Properly fastened, the head of each screw will sit flush with the surface of the panel. Make sure all seams fall at stud locations, and install the bottom course so the panels are around 1/4" off the ground.
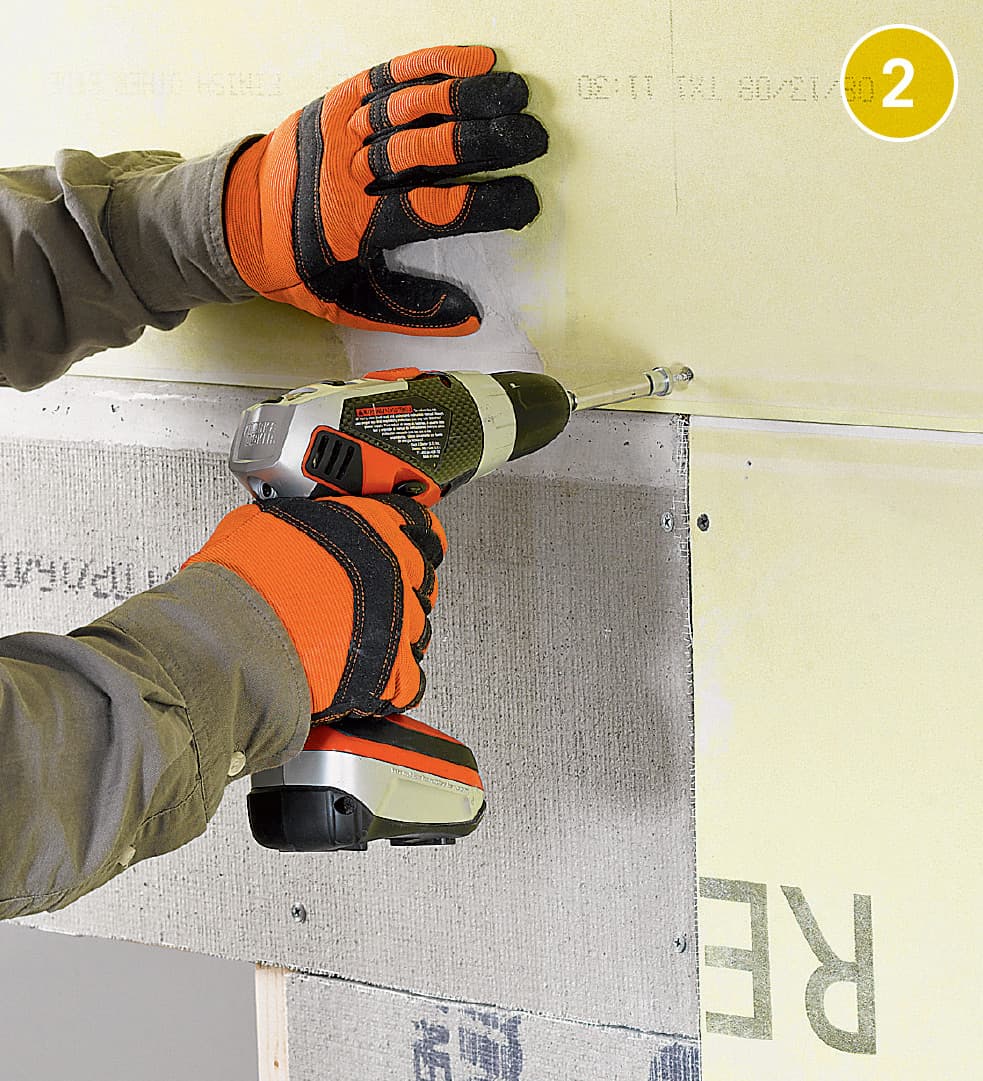
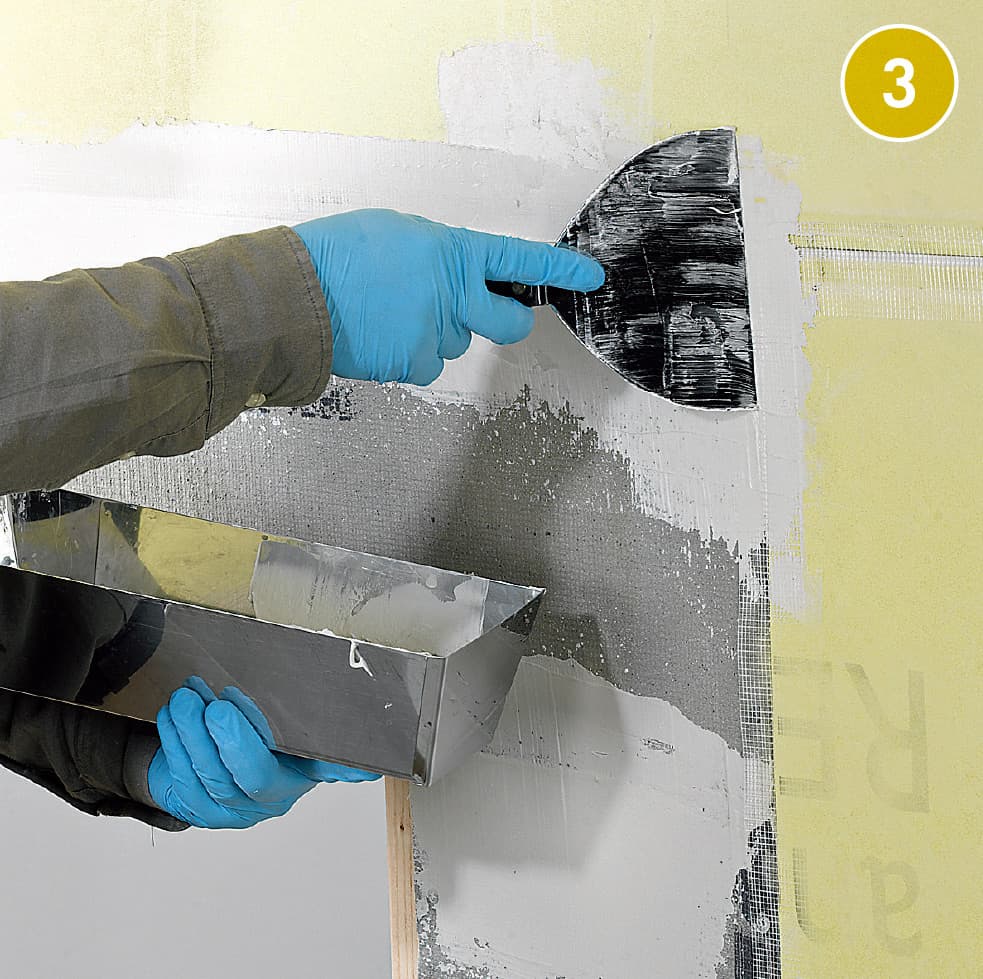
Fill the joints using a modified thinset mortar, and then embed fiberglass mesh tape into the mortar. Skim off excess mortar from the joint using a joint knife.
Complete the cementboard installation by applying thinset mortar over the tape and feathering out the edges. If you will be applying a waterproofing membrane over the cementboard surfaces, allow 24 hrs. for the thinset in the seams to dry.
Wall Tile Layouts
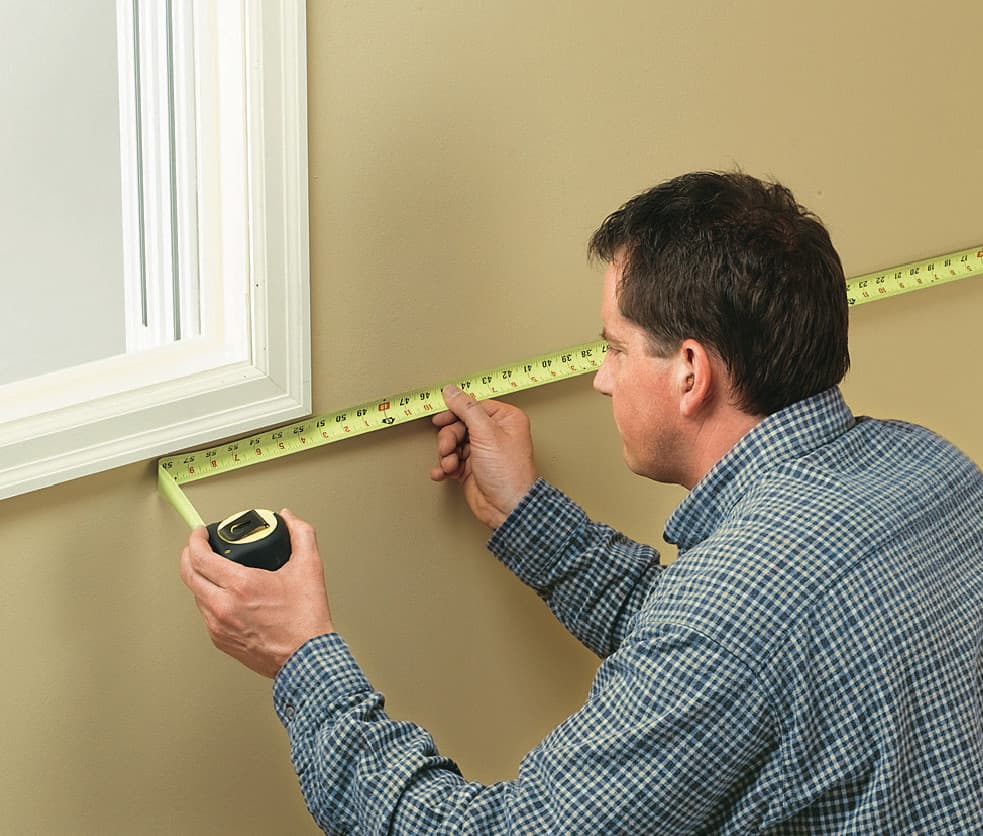
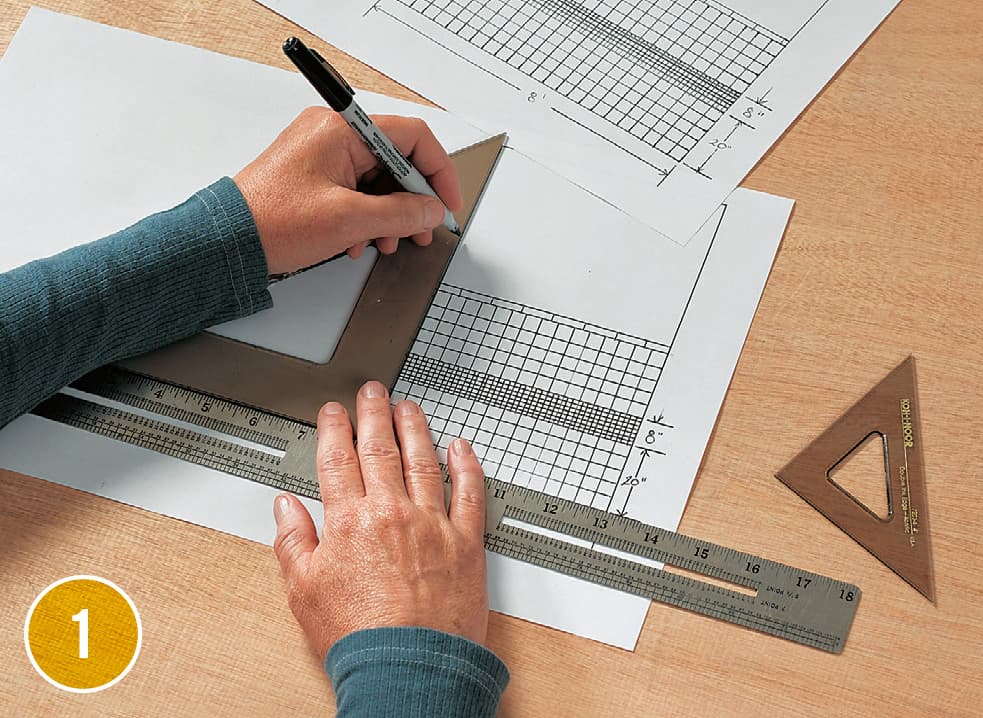
Establishing perpendicular reference lines is a critical part of every tile project, including wall projects. To create these lines, measure and mark the midpoint at the top and bottom of the wall, and then again along each side. Snap chalklines between opposite marks to create your vertical and horizontal centerlines. Use the 3-4-5 triangle method to make sure the lines are drawn correctly. Adjust the lines until they are exactly perpendicular.
Next, do a dry run of your proposed layout, starting at the center of the wall and working toward an adjoining wall. If the gap between the last full tile and the wall is too narrow, adjust your starting point. Continue to dry-fit tile along the walls, paying special attention to any windows, doors, or permanent fixtures in the wall. If you end up with very narrow tiles anywhere, adjust the reference lines (and your layout) to avoid them. It’s best not to cut tiles by more than half.
If your wall has an outside corner, start your dry run there. Place bullnose tiles over the edges of the adjoining field tiles. If this results in a narrow gap at the opposite wall, install trimmed tile next to the bullnose edge to even out or avoid the gap.
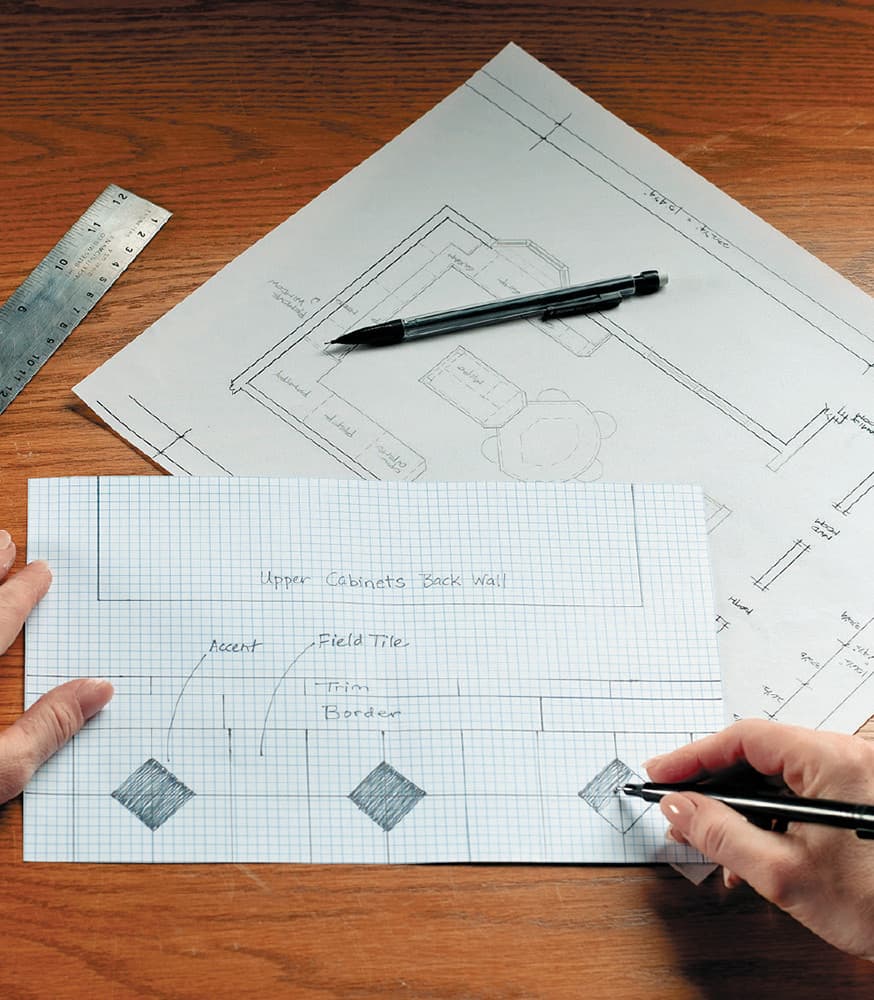
Draw your tile layout to scale on the wall drawing to establish your reference lines.
Check the Walls
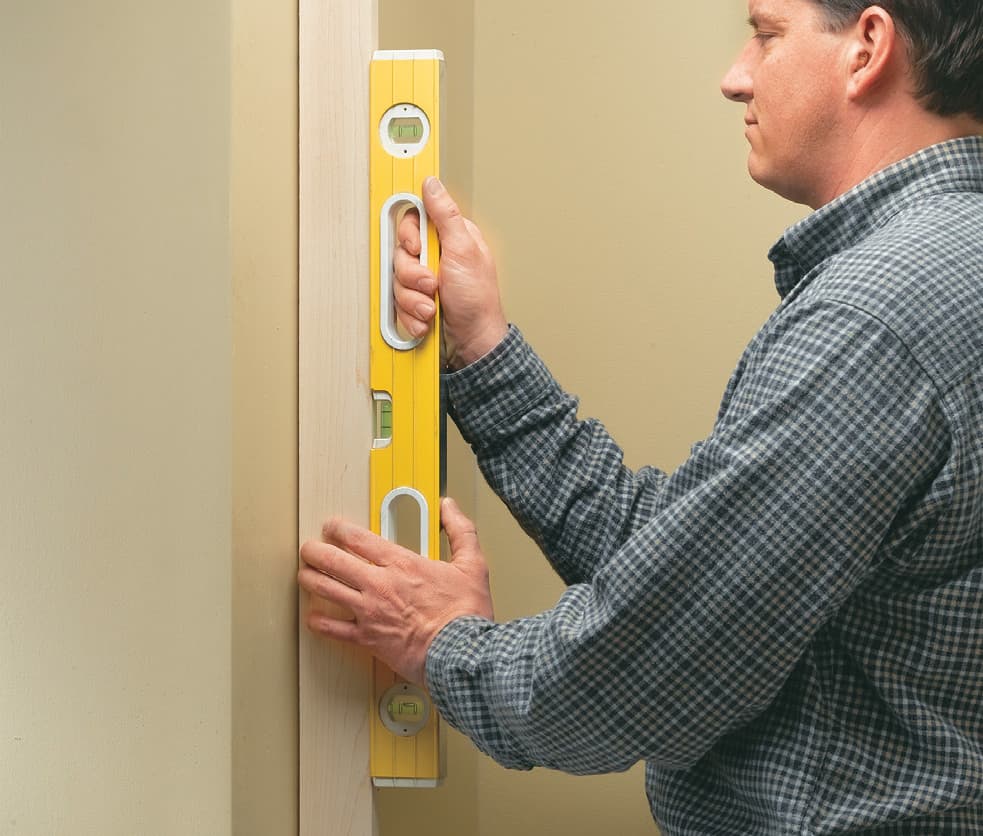
Check the walls and corners to see if they’re plumb. Make any necessary adjustments before beginning your tile project.
Measure the walls, paying particular attention to the placement of windows, doors, and permanent fixtures. Use these measurements to create a scale drawing of each wall to be tiled.
How to Test a Wall Layout
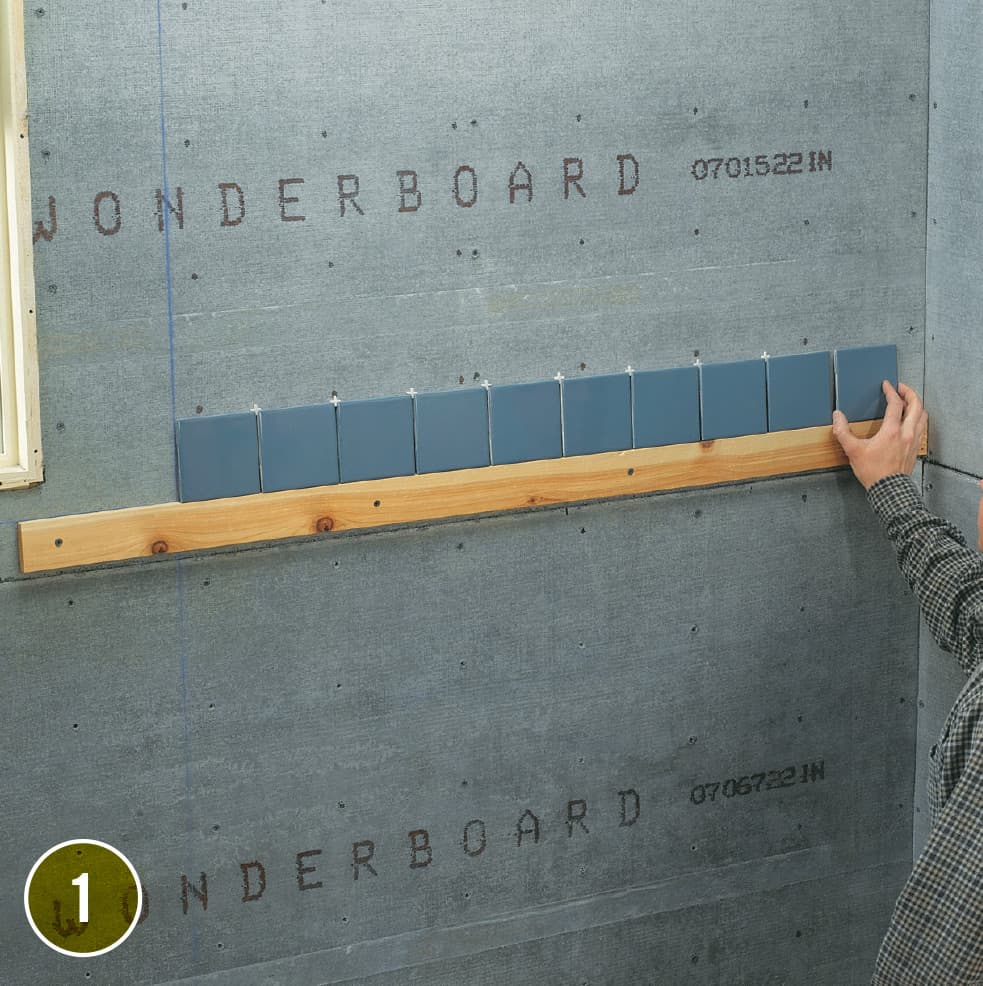
Attach a batten to the wall along your horizontal reference line using screws. Dry-fit tiles on the batten, aligning the middle tile with the vertical centerline.

If you end up with too narrow a gap along the wall in step 1, move over half the width of a tile by centering the middle tile over the vertical centerline.

Use a story stick to determine whether your planned layout works vertically. If necessary, adjust the size of the first row of tile.
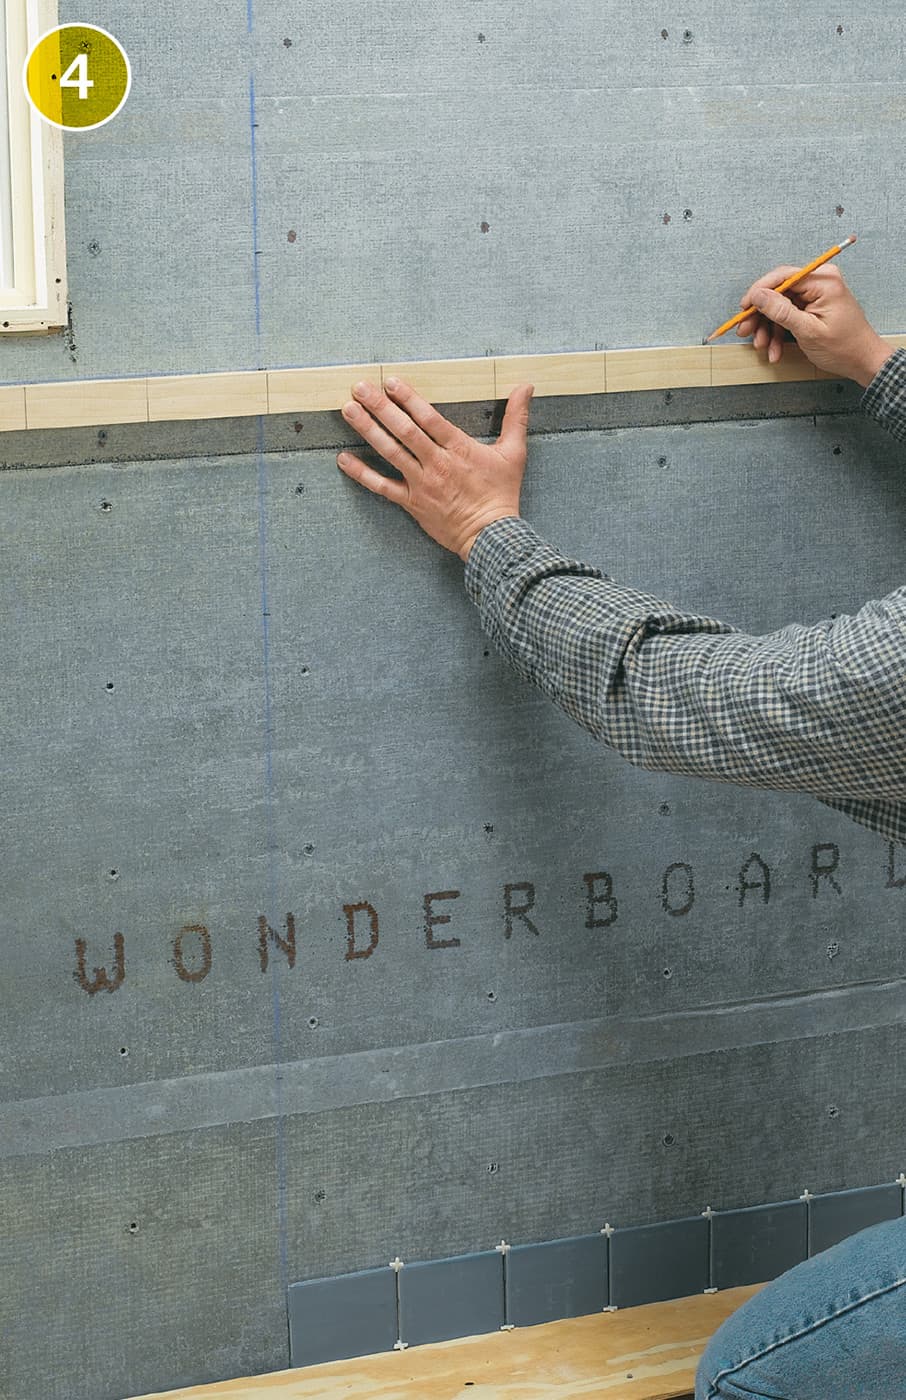
Dry-fit the first row of tile, then hold a story stick along the horizontal guideline with one grout line matched to the vertical reference line. Mark the grout lines, which will correspond with the grout lines of the first row and can be used as reference points.
Installing Wall Tile
Beautiful, practical, and easy to clean and maintain, tile walls are well suited to bathrooms, kitchens, mudrooms, and other hard-working spaces in your home.
When shopping for tile, keep in mind that tiles that are at least 6 × 6 inches are easier to install than small tiles, because they require less cutting and cover more surface area. Larger tiles also have fewer grout lines that must be cleaned and maintained. Check out the selection of trim and specialty tiles and accessories that are available to help you customize your project.
Most wall tile is designed to have narrow grout lines (less than 1/8-inch wide) filled with unsanded grout. Grout lines wider than 1/8-inch should be filled with sanded floor-tile grout. Either type will last longer if it contains, or is mixed with, a latex additive. To prevent staining, it’s a good idea to seal your grout after it fully cures, then once a year thereafter.
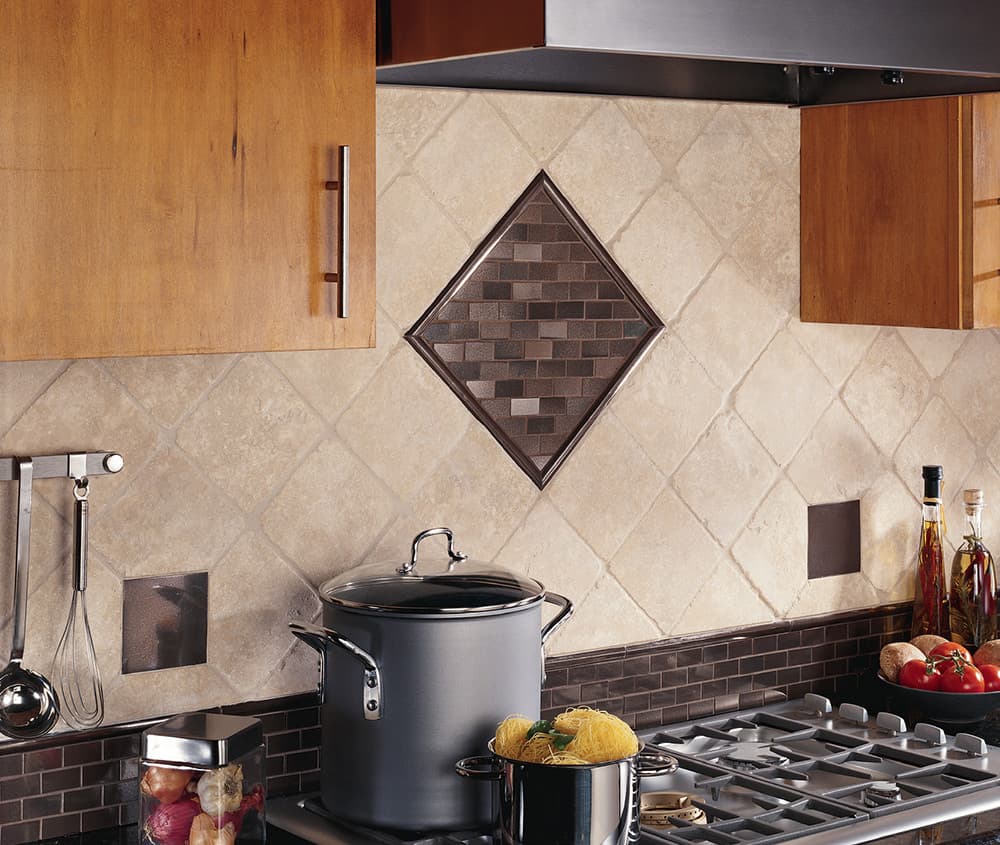
The range of available wall tile is even more dynamic than floor tile. If you’re willing to do a bit of in-depth planning and extra installation work, you can have a stunning wall such as this, incorporating different sizes and shapes of tile—including the metal versions used for this backsplash.
TOOLS & MATERIALS
Wet saw
Nippers
Carpenters pencil
Notched trowel
Rubber mallet
Grout float
Grout sponge
Soft cloth
Small paintbrush or foam brush
Tub and Tile caulk, as necessary
Caulk gun
Carpet-wrapped scrap 2 × 4
Chalkline
Thinset mortar with latex additive
Wall tile
Trim tile (as needed)
Tile grout with latex additive
Grout sealer
Tile spacers
1/8" shims
Eye protection
Rubber gloves
How to Set Wall Tile

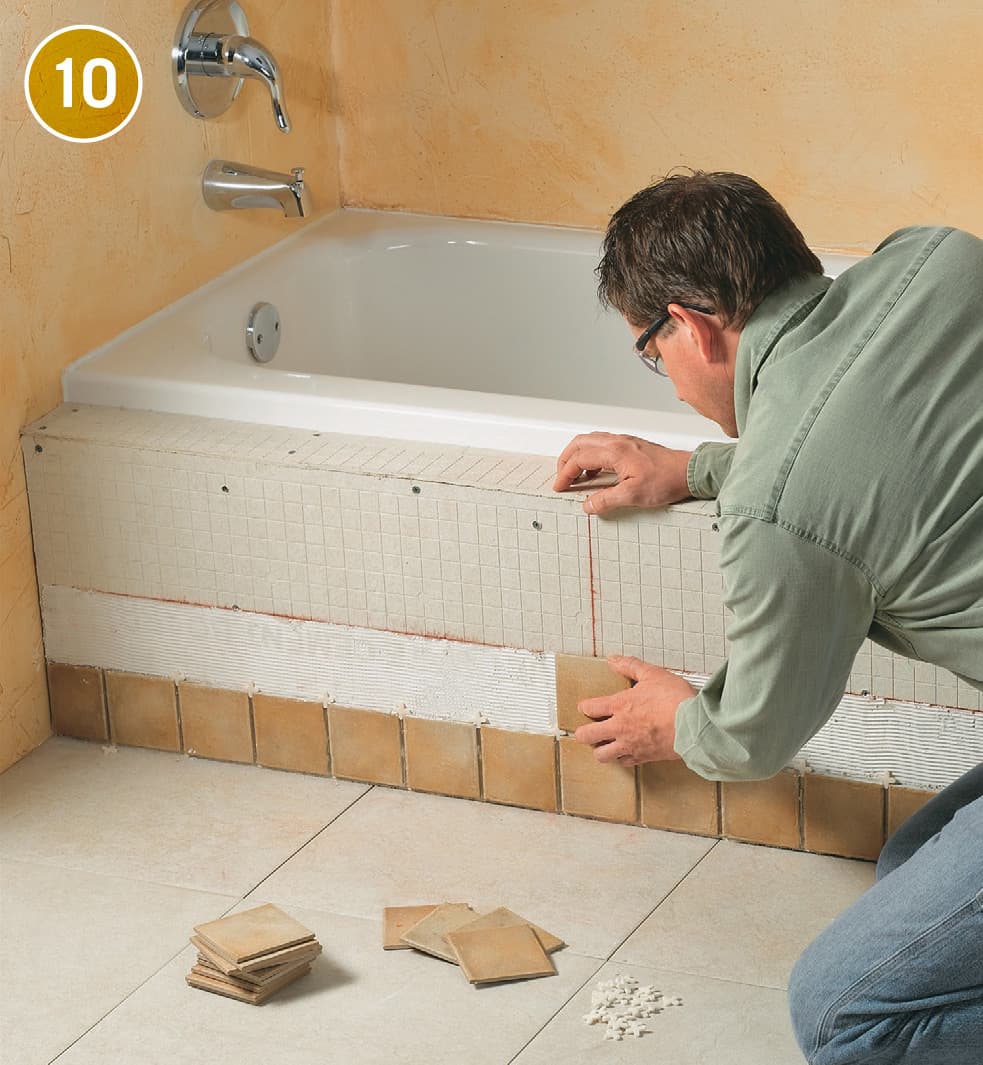
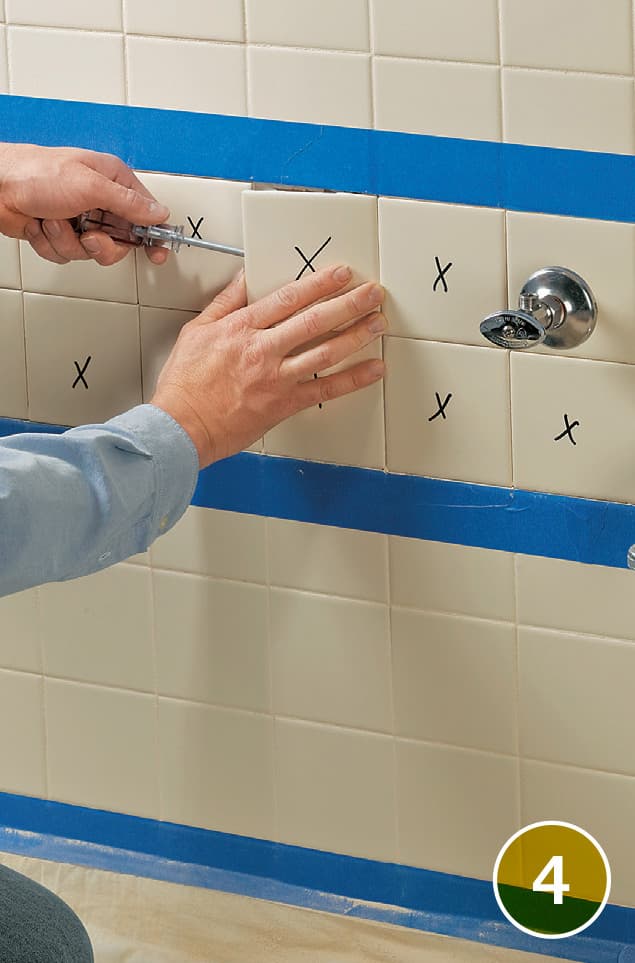
Design the layout and mark the reference lines. Begin installation with the second row of tiles above the floor. If the layout requires cut tiles for this row, mark and cut the tiles for the entire row at one time.
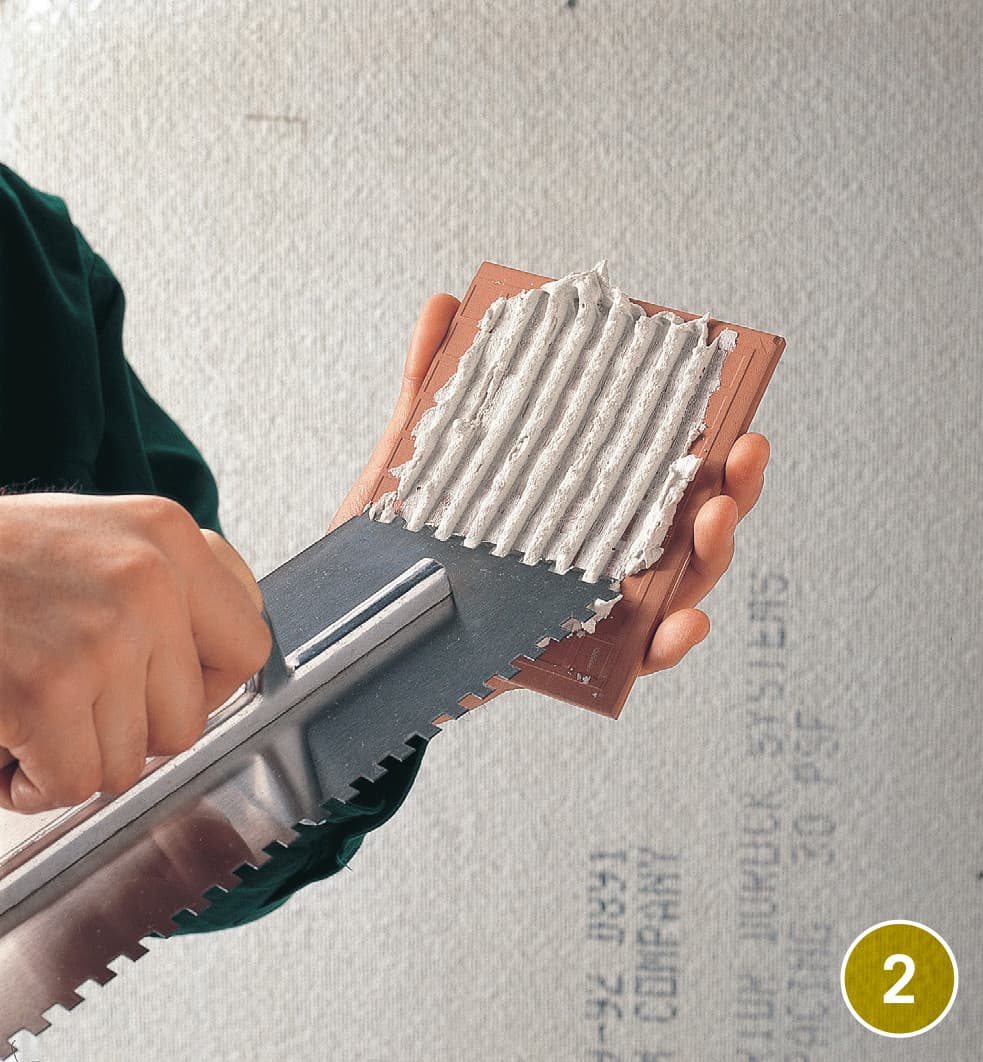
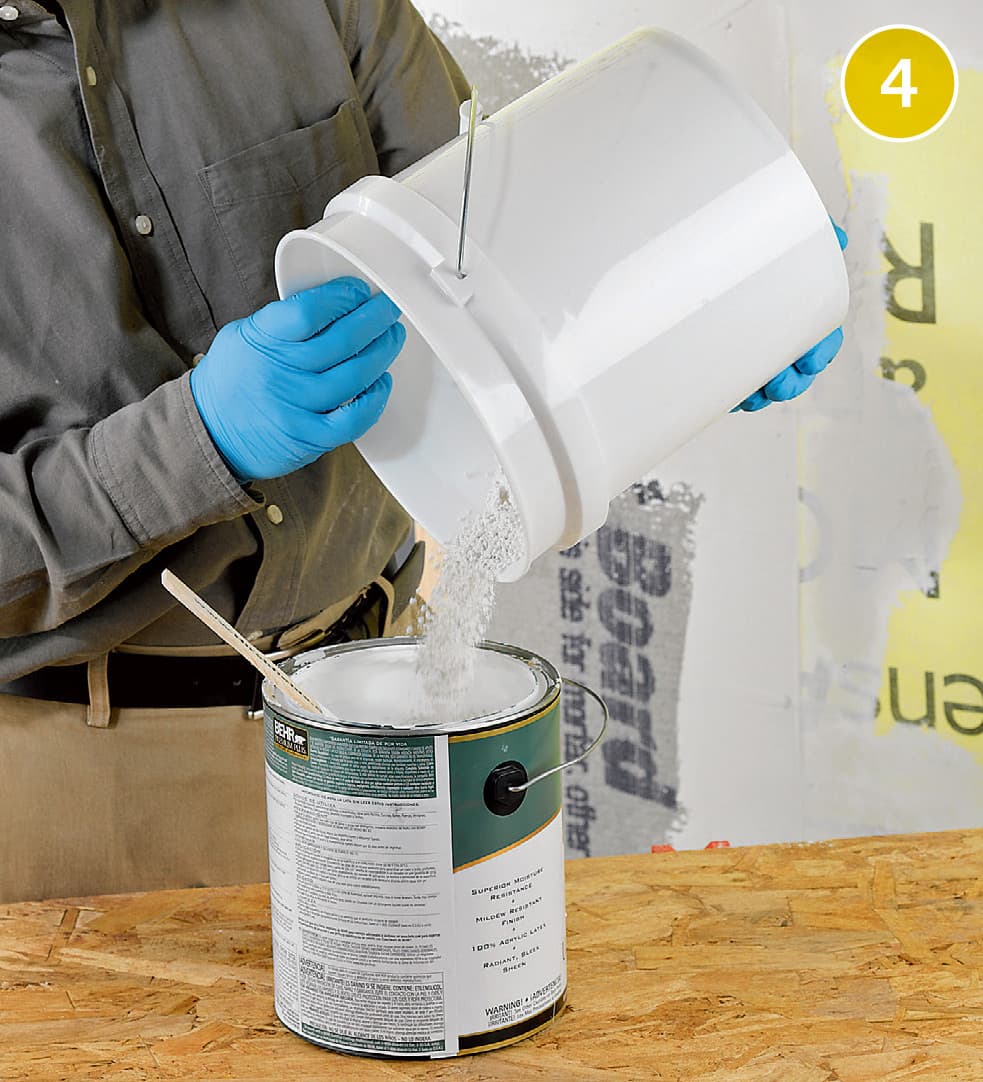
Mix a small batch of thinset mortar containing a latex additive. (Some mortar has additive mixed in by the manufacturer and some must have additive mixed in separately.) Cover the back of the first tile with adhesive, using a 1/4" notched trowel.
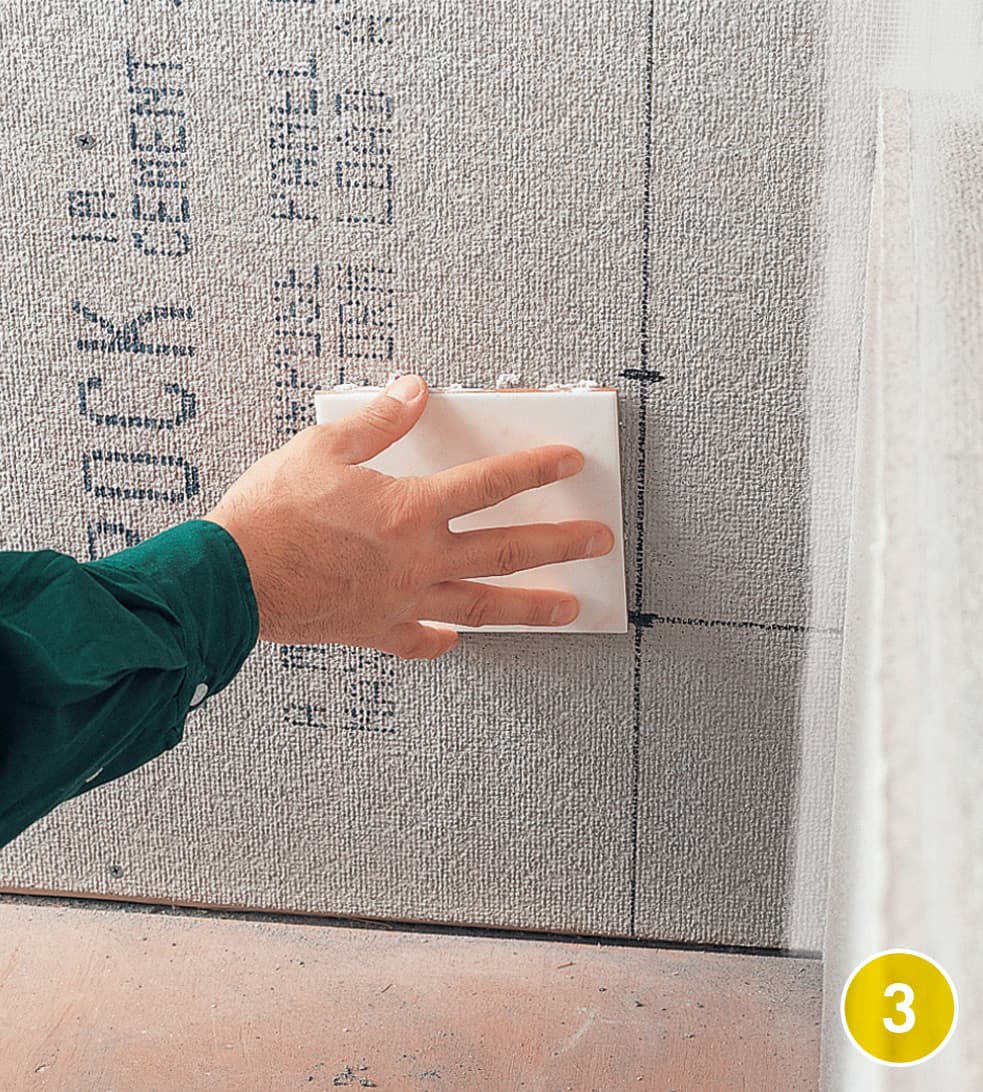
Beginning near the center of the wall, apply the tile to the wall with a slight twisting motion, aligning it exactly with the horizontal and vertical reference lines. When placing cut tiles, position the cut edges where they will be least visible.

VARIATION: Spread adhesive on a small section of the wall, then set the tiles into the adhesive. Thinset adhesive sets fast, so work quickly if you choose this installation method.
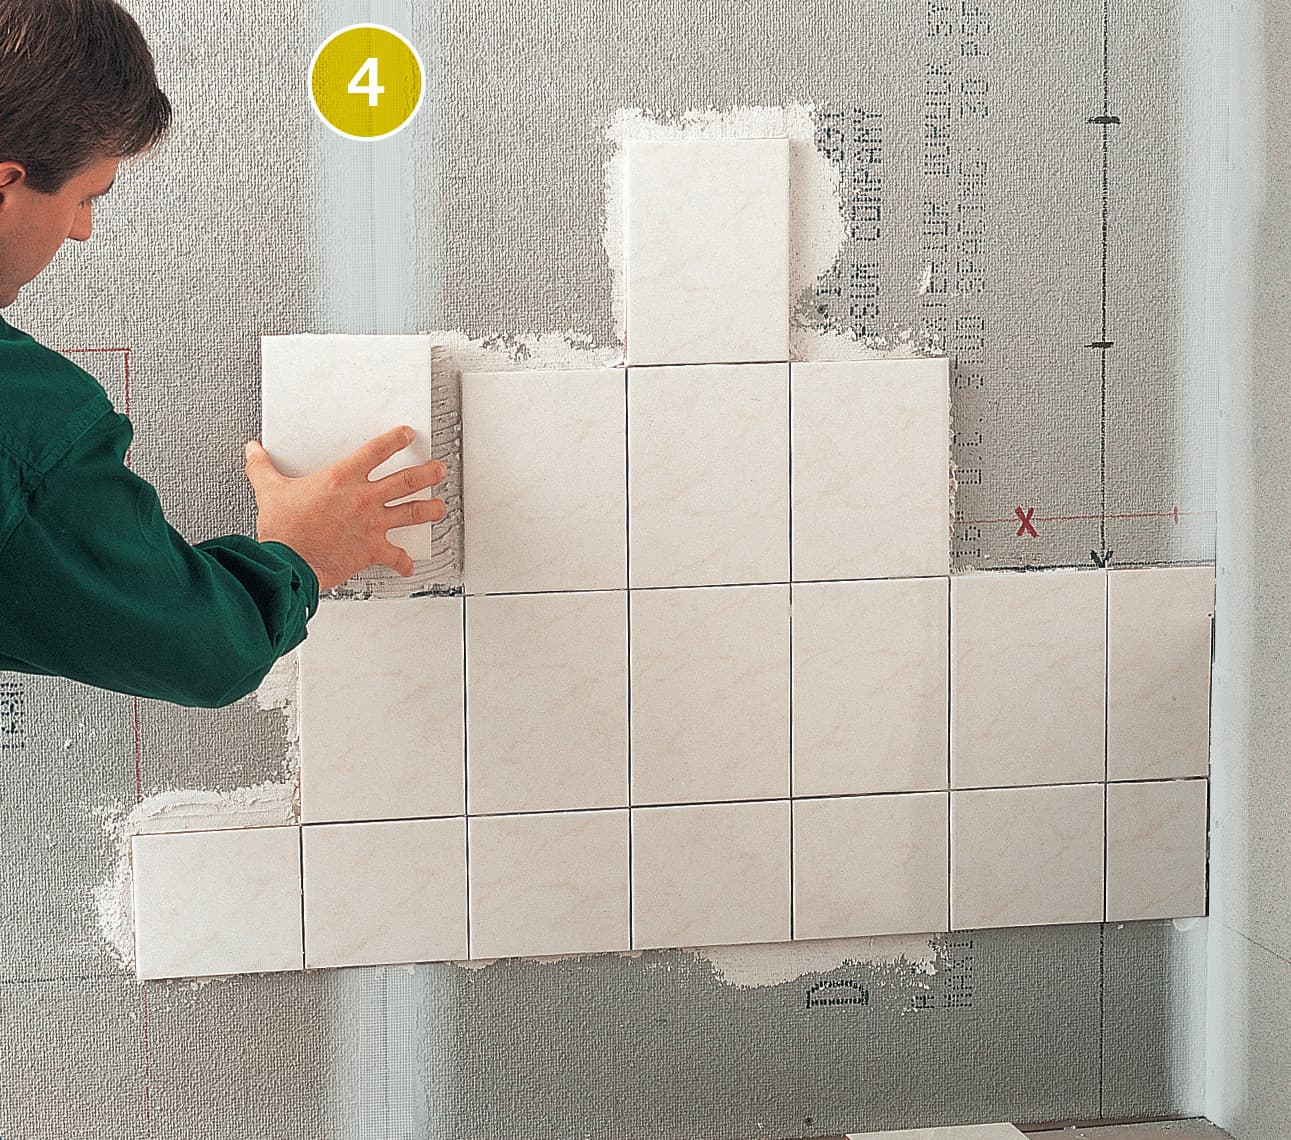
Continue installing tiles, working from the center to the sides in a pyramid pattern. Keep the tiles aligned with the reference lines. If the tiles are not self-spacing, use plastic spacers inserted between tiles to maintain even grout lines. The base row should be the last row of full tiles installed. Cut tile as necessary.
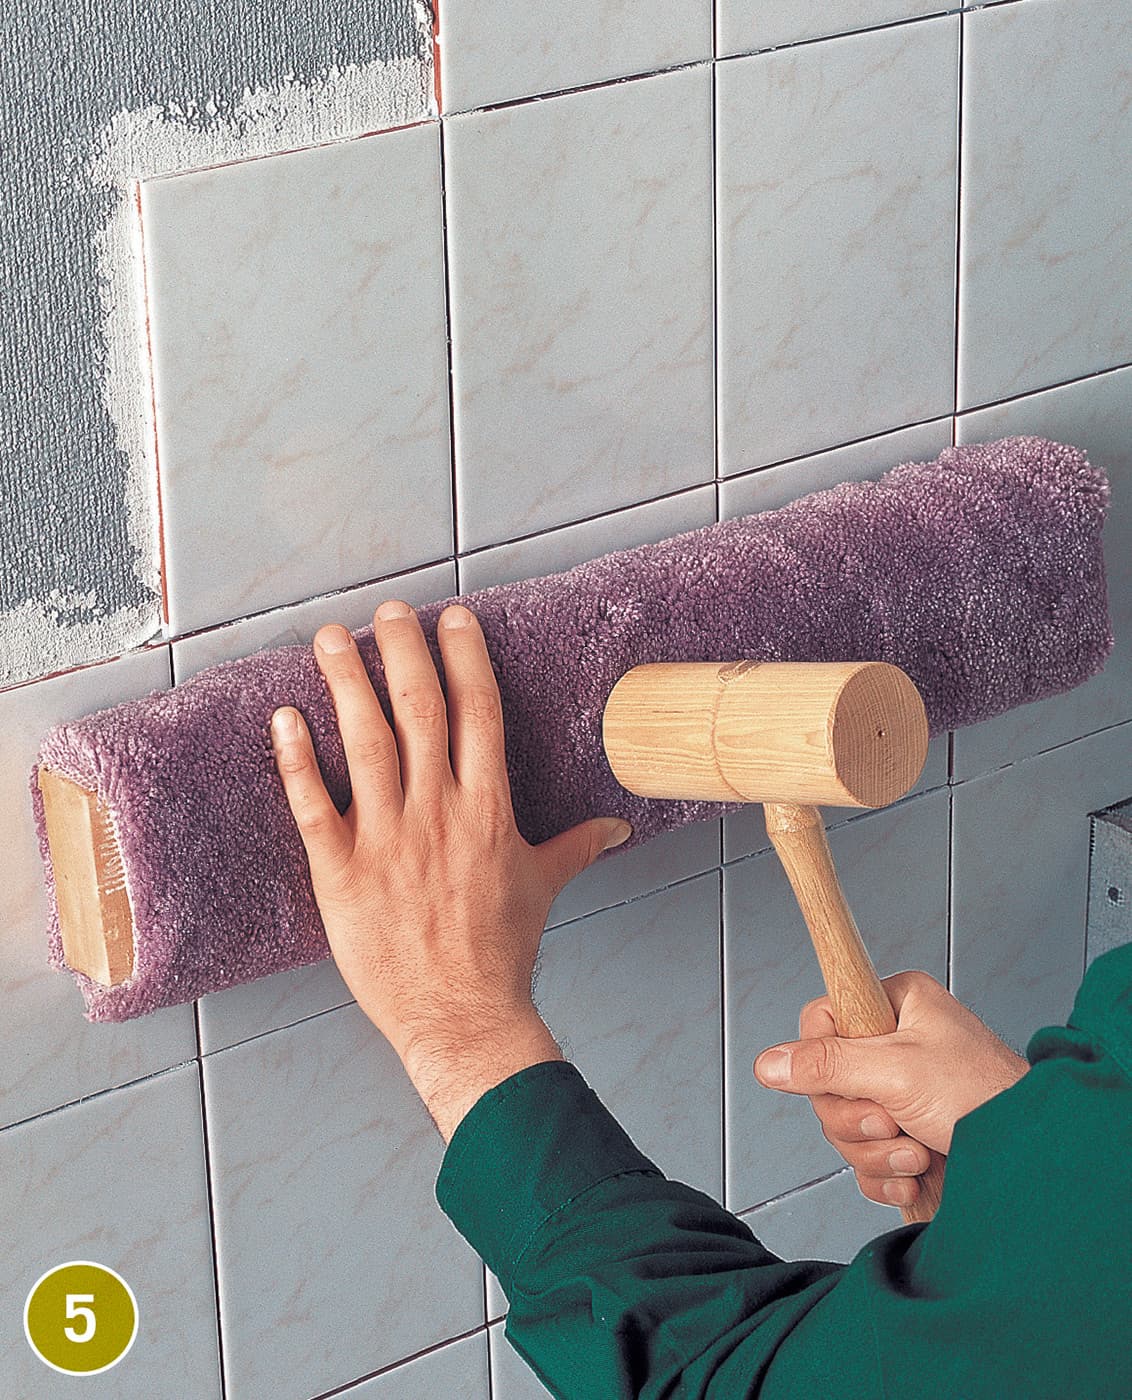
As small sections of tile are completed, set the tile by laying a scrap of 2 × 4 wrapped with carpet onto the tile and rapping it lightly with a mallet. This embeds the tile solidly in the adhesive and creates a flat, even surface.
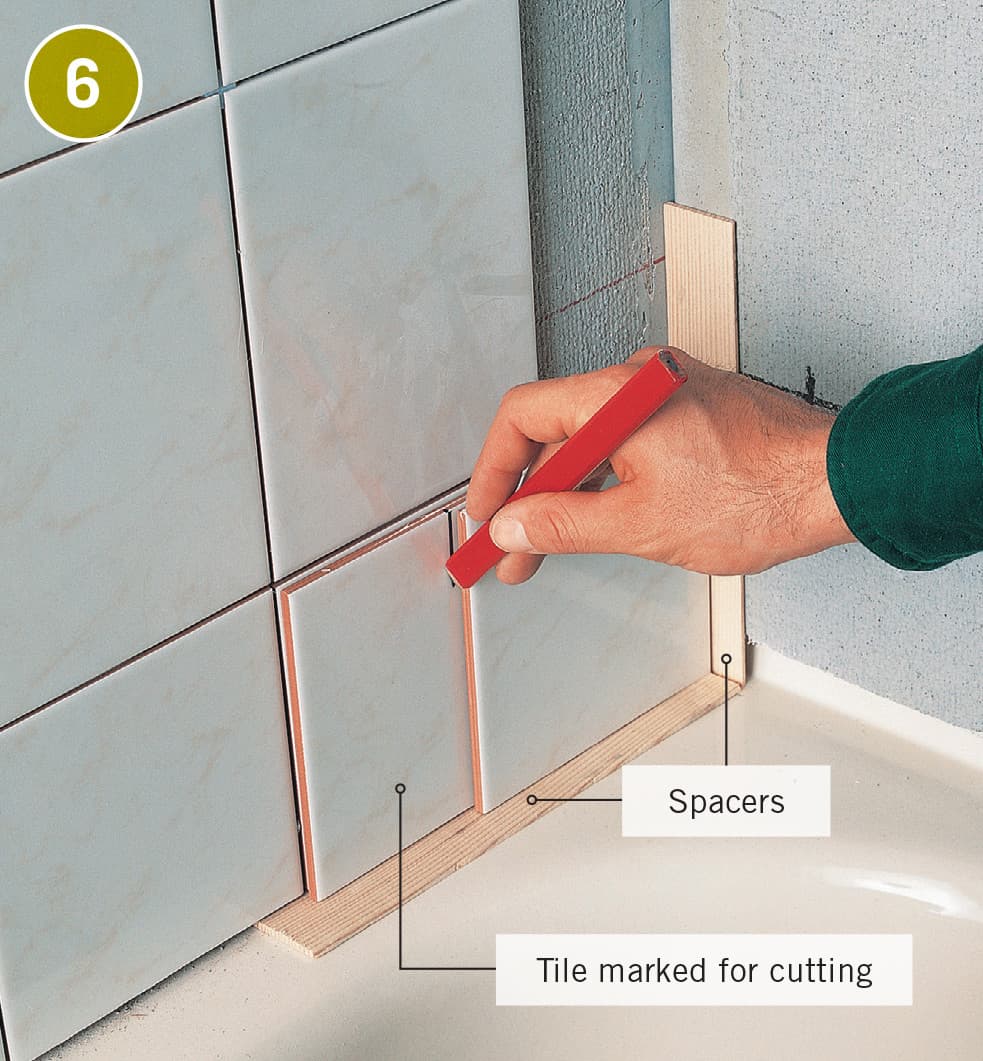
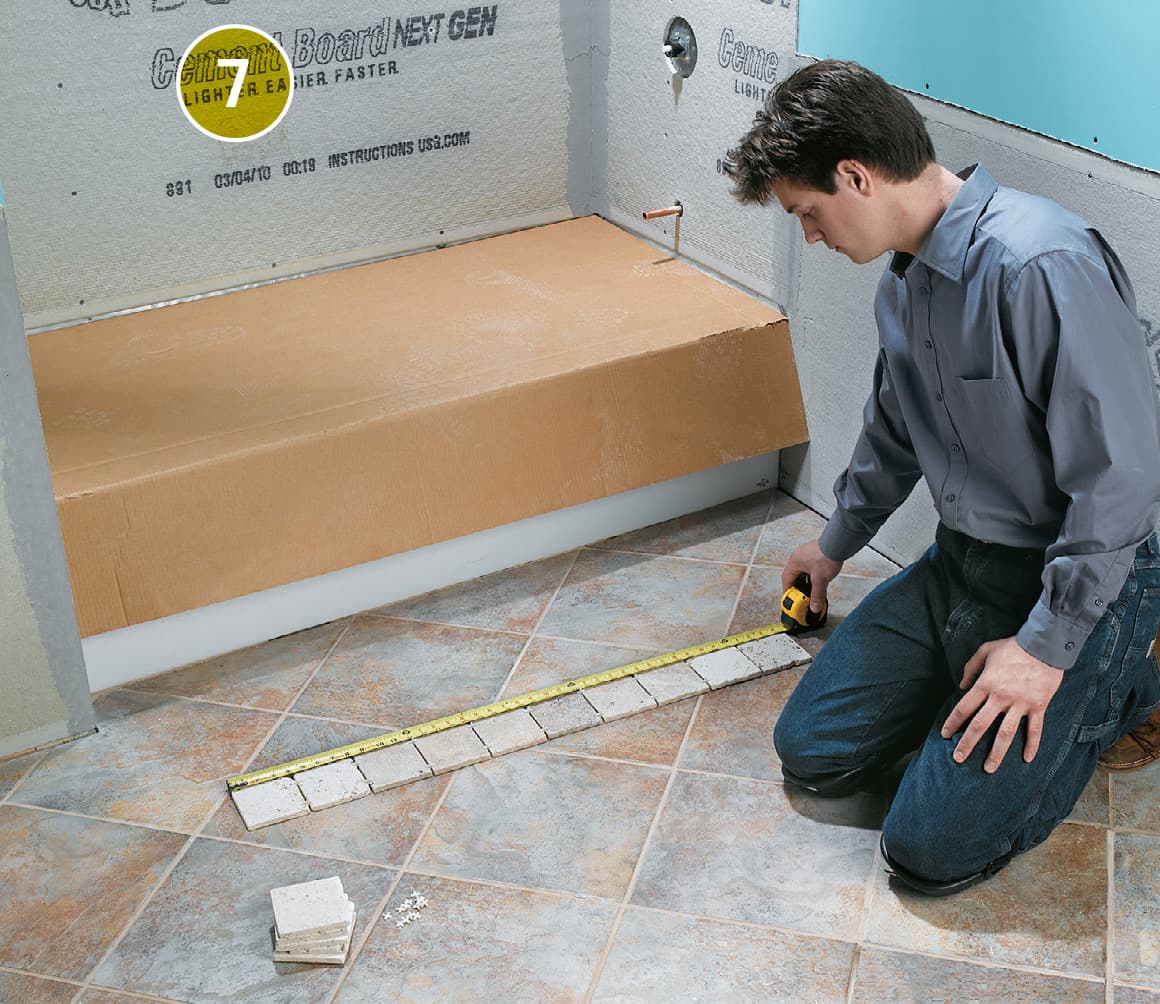
To mark bottom and edge row tiles for straight cuts, begin by taping 1/8" spacers against the surfaces below and to the side of the tile. Position a tile directly over the last full tile installed, then place a third tile so the edge butts against the spacers. Trace the edge of the top tile onto the middle tile to mark it for cutting.

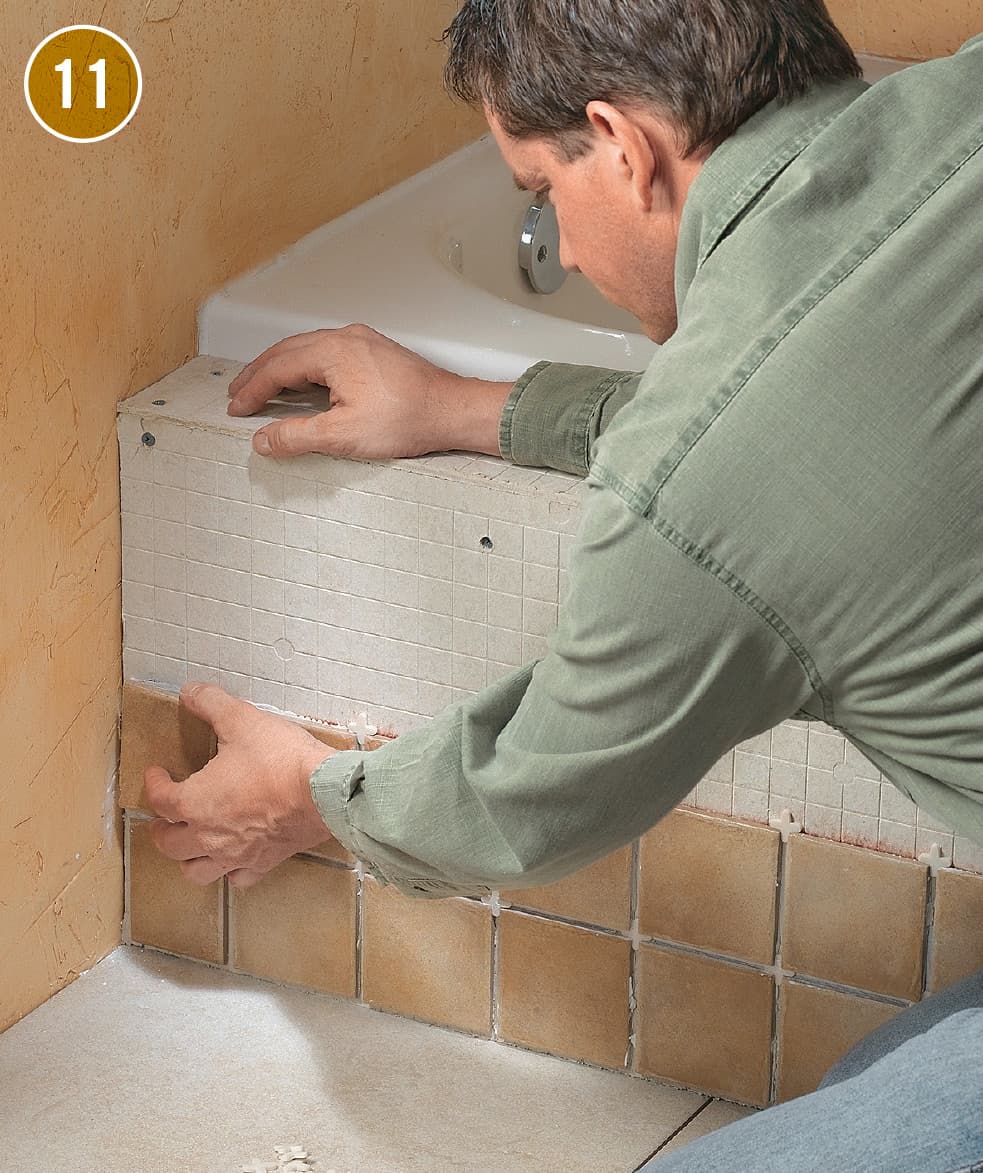
Install any trim tiles, such as the bullnose edge tiles shown above, at border areas. Wipe away excess mortar along the top edges of the edge tiles. Use bullnose and corner bullnose (with two adjacent bullnose edges) tiles at outside corners to cover the rough edges of the adjoining tiles.

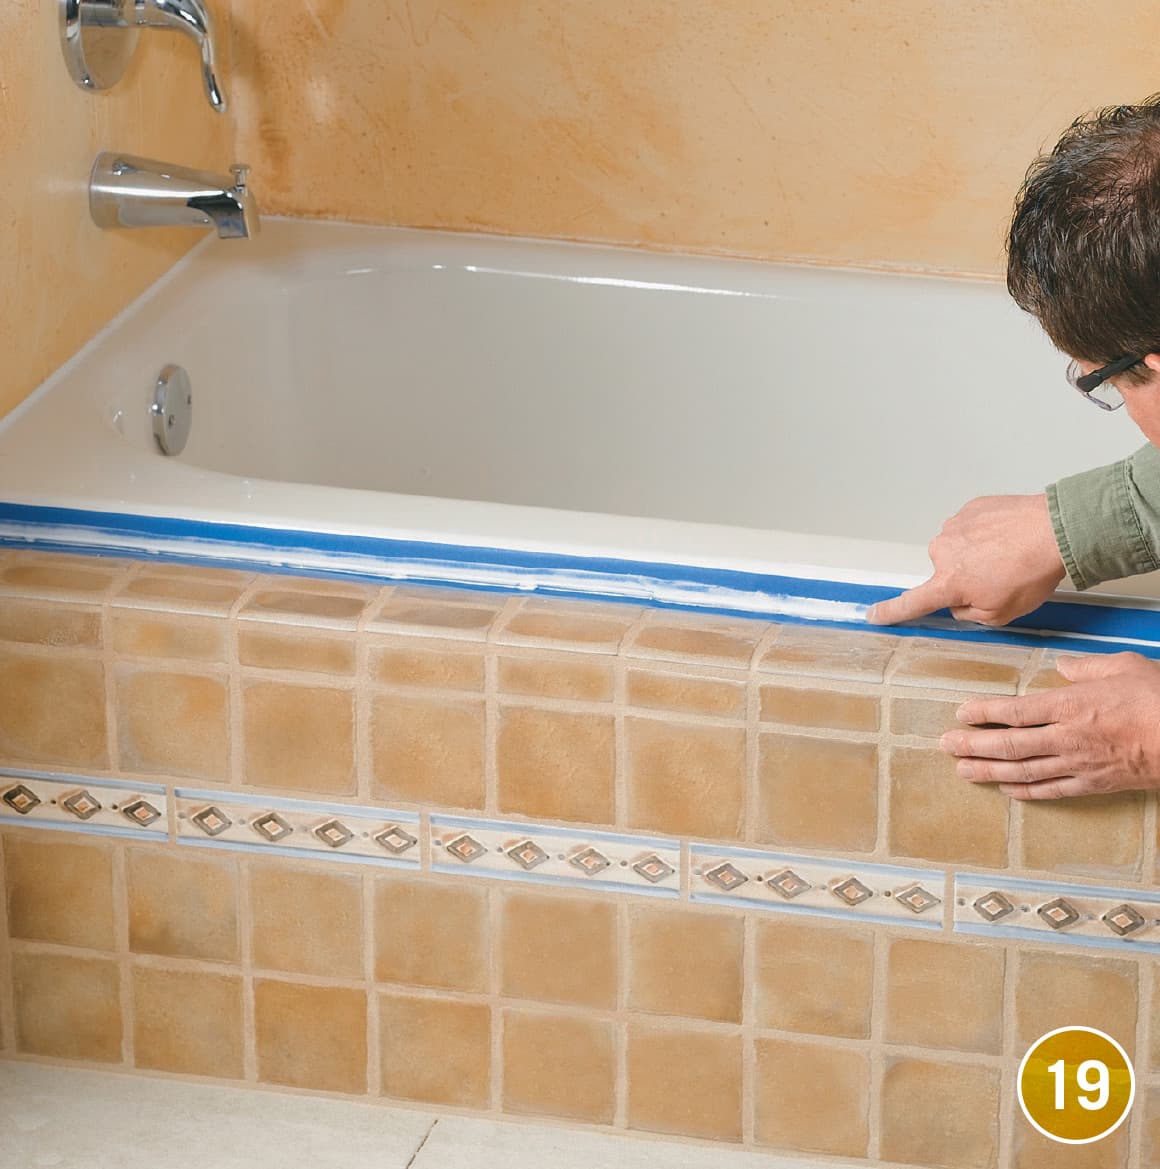
Let mortar dry completely (12 to 24 hrs.), then mix a batch of grout containing latex additive. Apply the grout with a rubber grout float, using a sweeping motion to force it deep into the joints. Do not grout joints adjoining bathtubs, floors, or room corners. These will serve as expansion joints and will be caulked later.
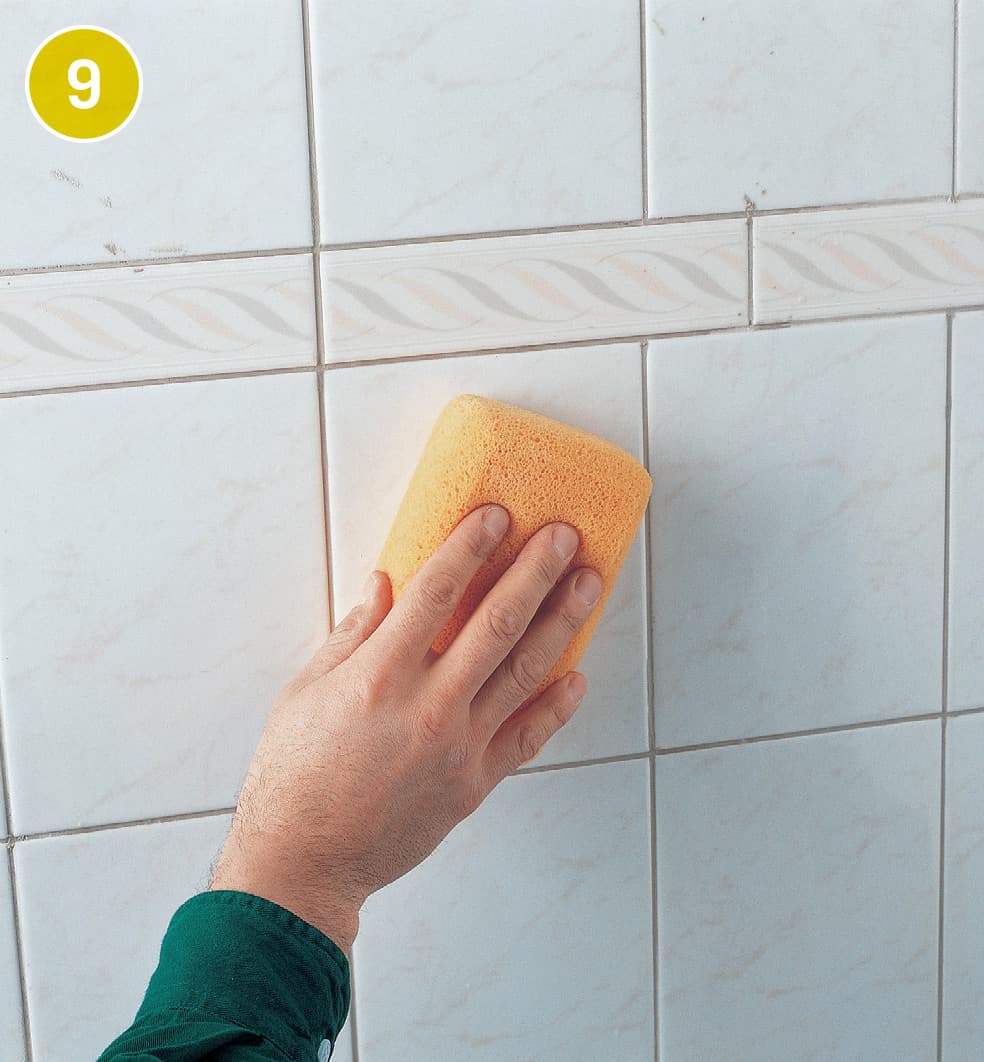
Wipe a damp grout sponge diagonally over the tile, rinsing the sponge in cool water between wipes. Wipe each area only once; repeated wiping can pull grout from the joints. Allow the grout to dry for about 4 hrs., then use a soft cloth to buff the tile surface and remove any remaining grout film.
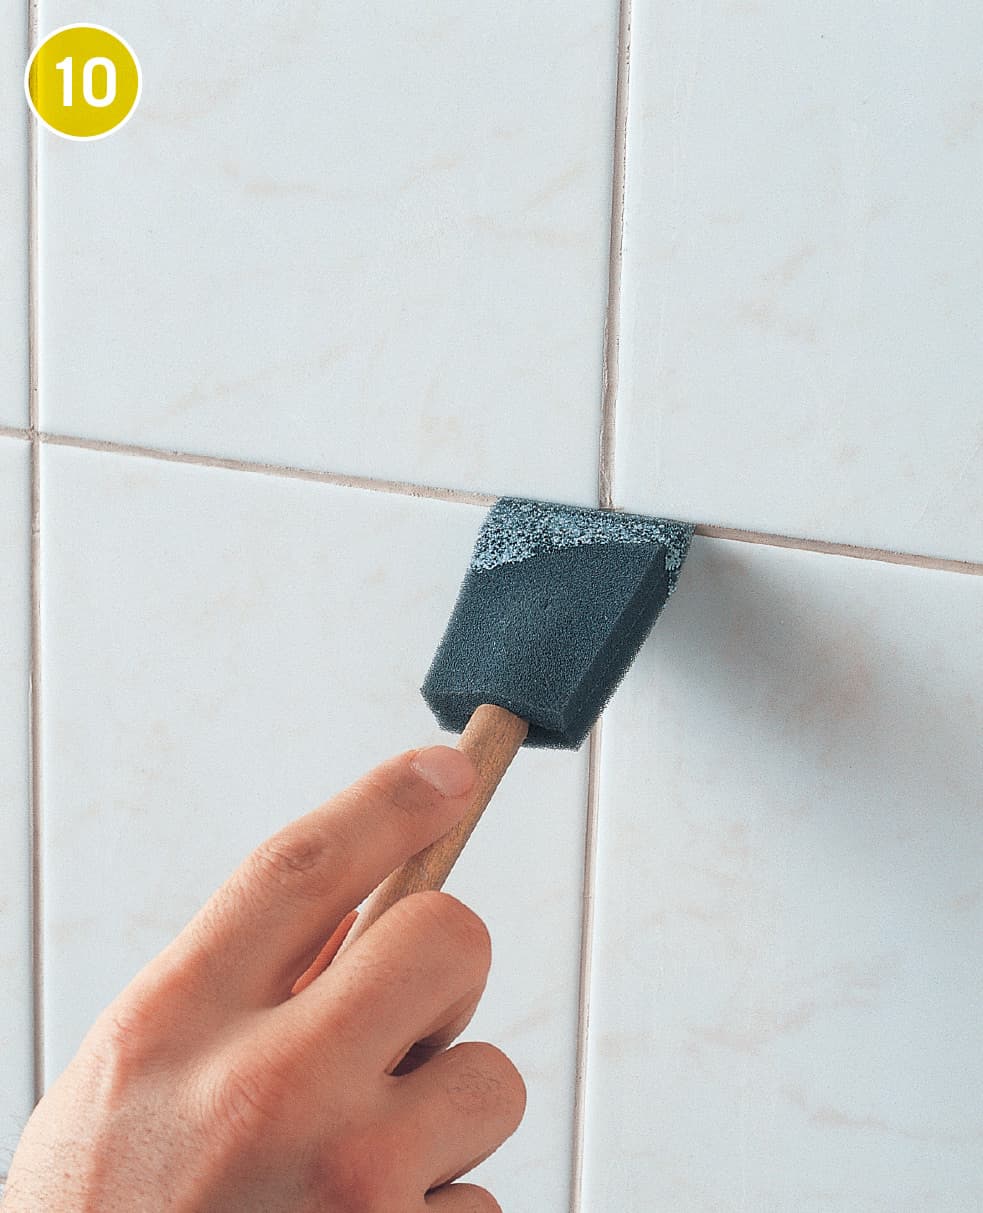
When the grout has cured completely, use a small foam brush to apply grout sealer to the joints, following the manufacturer’s directions. Avoid brushing sealer on the tile surfaces, and wipe up excess sealer immediately.
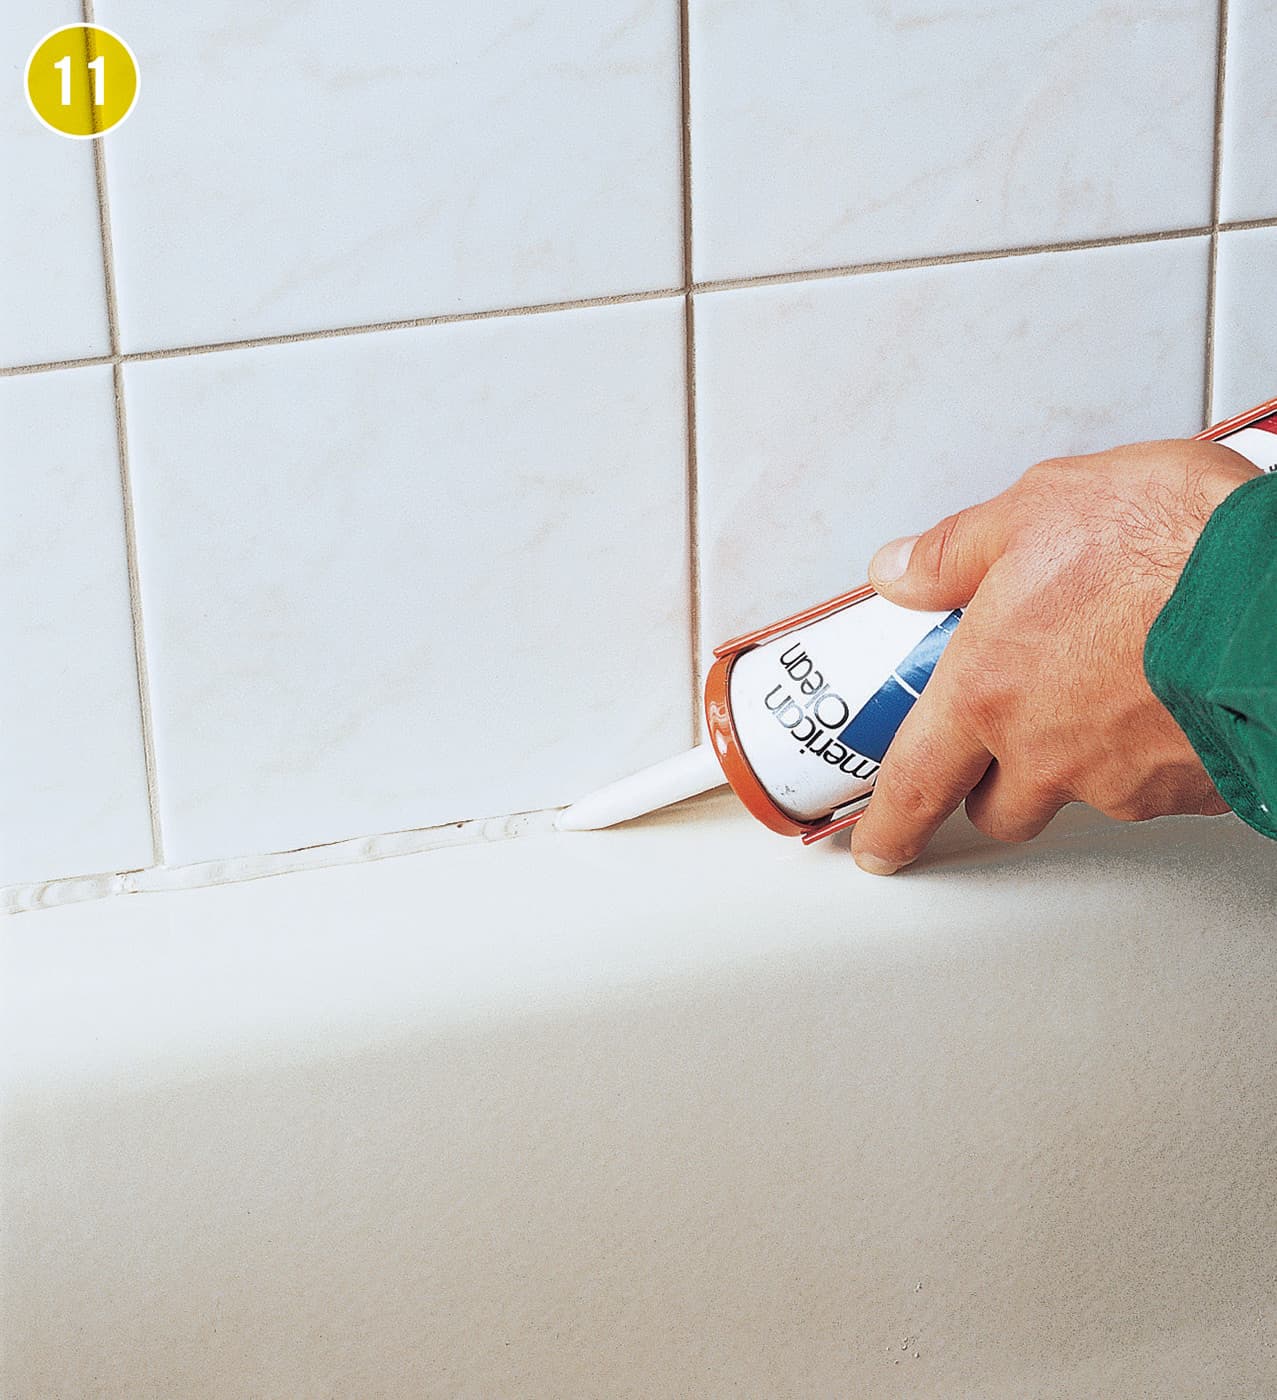
Seal expansion joints at the floor and corners with silicone caulk. After the caulk dries, buff the tile with a soft, dry cloth.
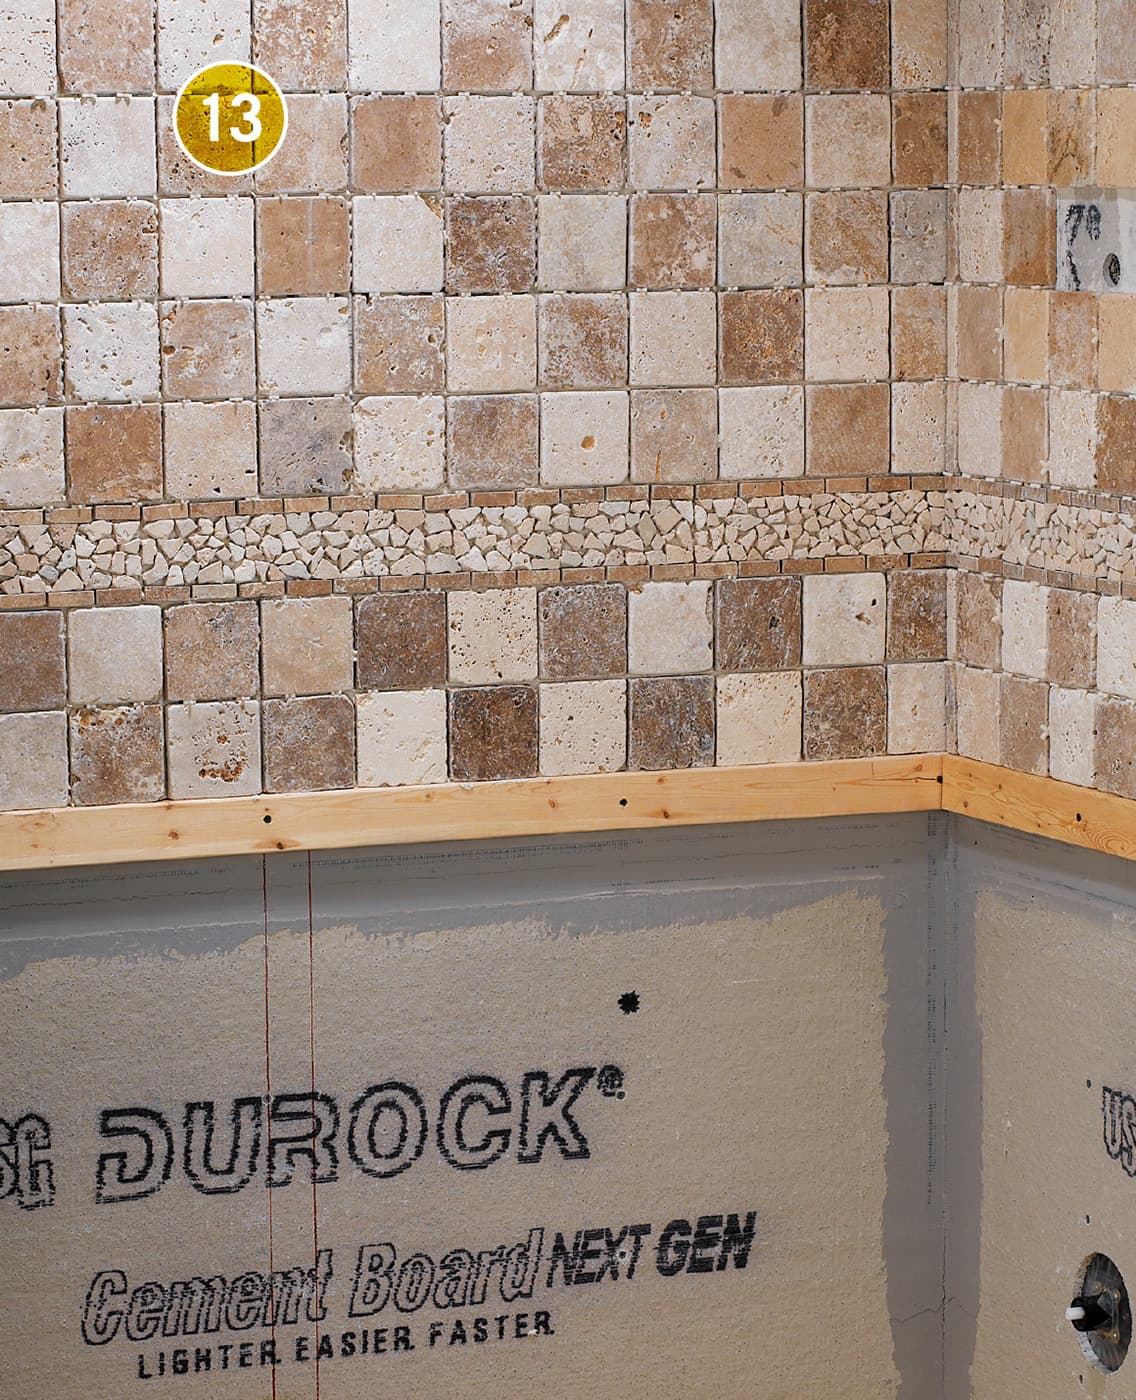
Installing a Tub Tile Surround
With a nearly limitless selection of styles, colors, and sizes of tile to choose from, a tub tile surround replacement is an ideal home improvement project. It can transform your bathroom into a luxurious retreat, while increasing the value of your home.
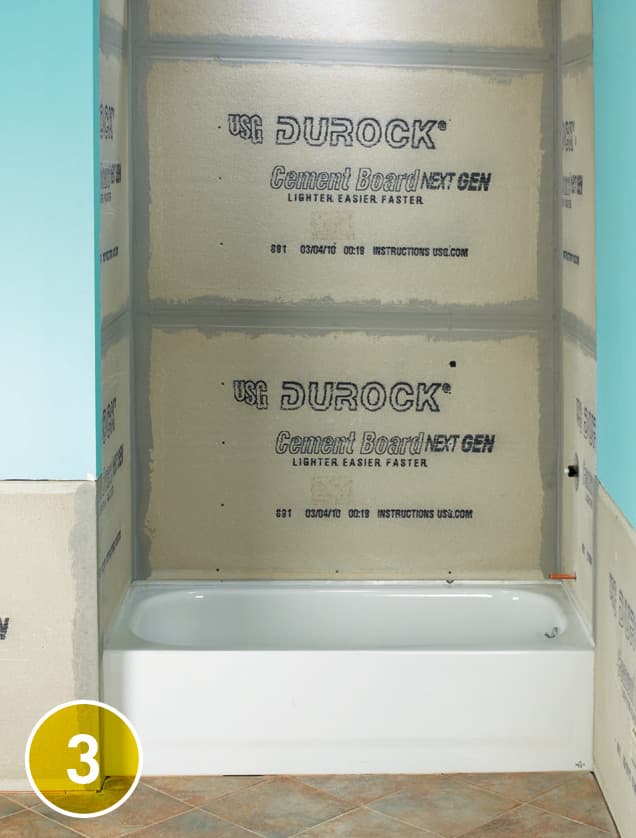
Tub tile surrounds can be broken down to three basic components. The back wall is always tiled first. The towel bar wall contains the optional posts and rod used for hanging bath towels. Lastly, the manifold wall contains the valve stems, shower head, and tub spout. Some tub surrounds are topped off with a low hanging ceiling. If this is the case for your project, install the cementboard on the ceiling first and tile the ceiling after the walls have been tiled. Ceiling tile is often installed on a diagonal pattern to avoid alignment issues with the wall tile joints.
With proper care and maintenance, nearly any type of wall or floor tile can be used for a surround. Tiles that are rated vitrified or impervious, however, absorb less moisture and are better suited for wet areas. Unglazed tiles such as the tile installed in this project may be used, but be sure to seal them well with at least two coats of tile sealant.
While field tile is estimated and purchased by the total number of square feet, trim tile such as bullnose or cap tile is quantified in linear feet. If the tile you select isn’t available with matching trim tile, consider making your own using a wet tile saw fitted with a bevel profile wheel. Through-body porcelain tile is an excellent choice for making custom trim because the surface color is uniform throughout the body of the tile. Most tiled surrounds include bath accessories such as a soap dish and towel bar fixtures. Some tile families offer these accessories in the same patterns and colors. In other cases, you’ll have to choose a similar—or perhaps contrasting—style or color. Make sure the thickness of the base for these accessories matches the tile thickness.
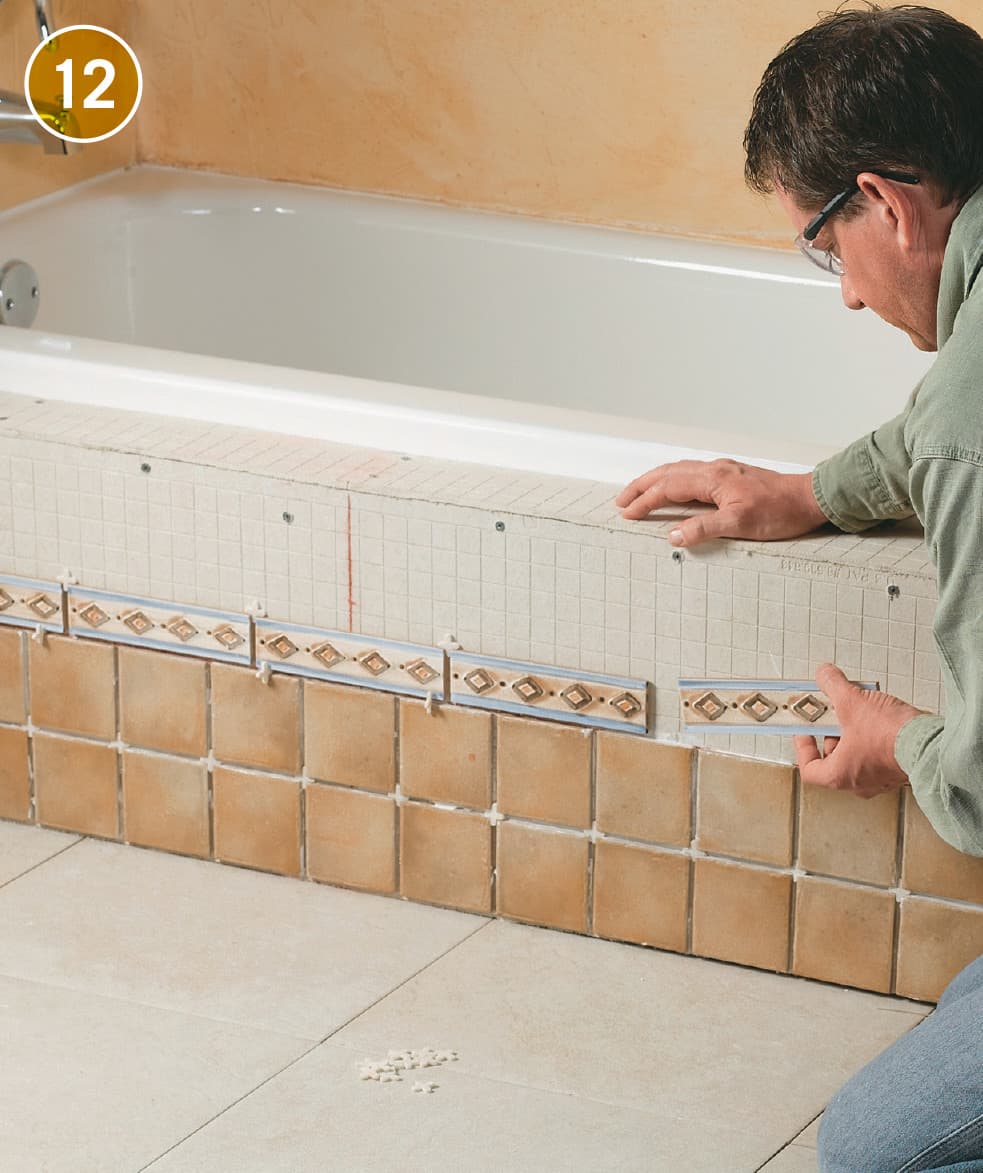
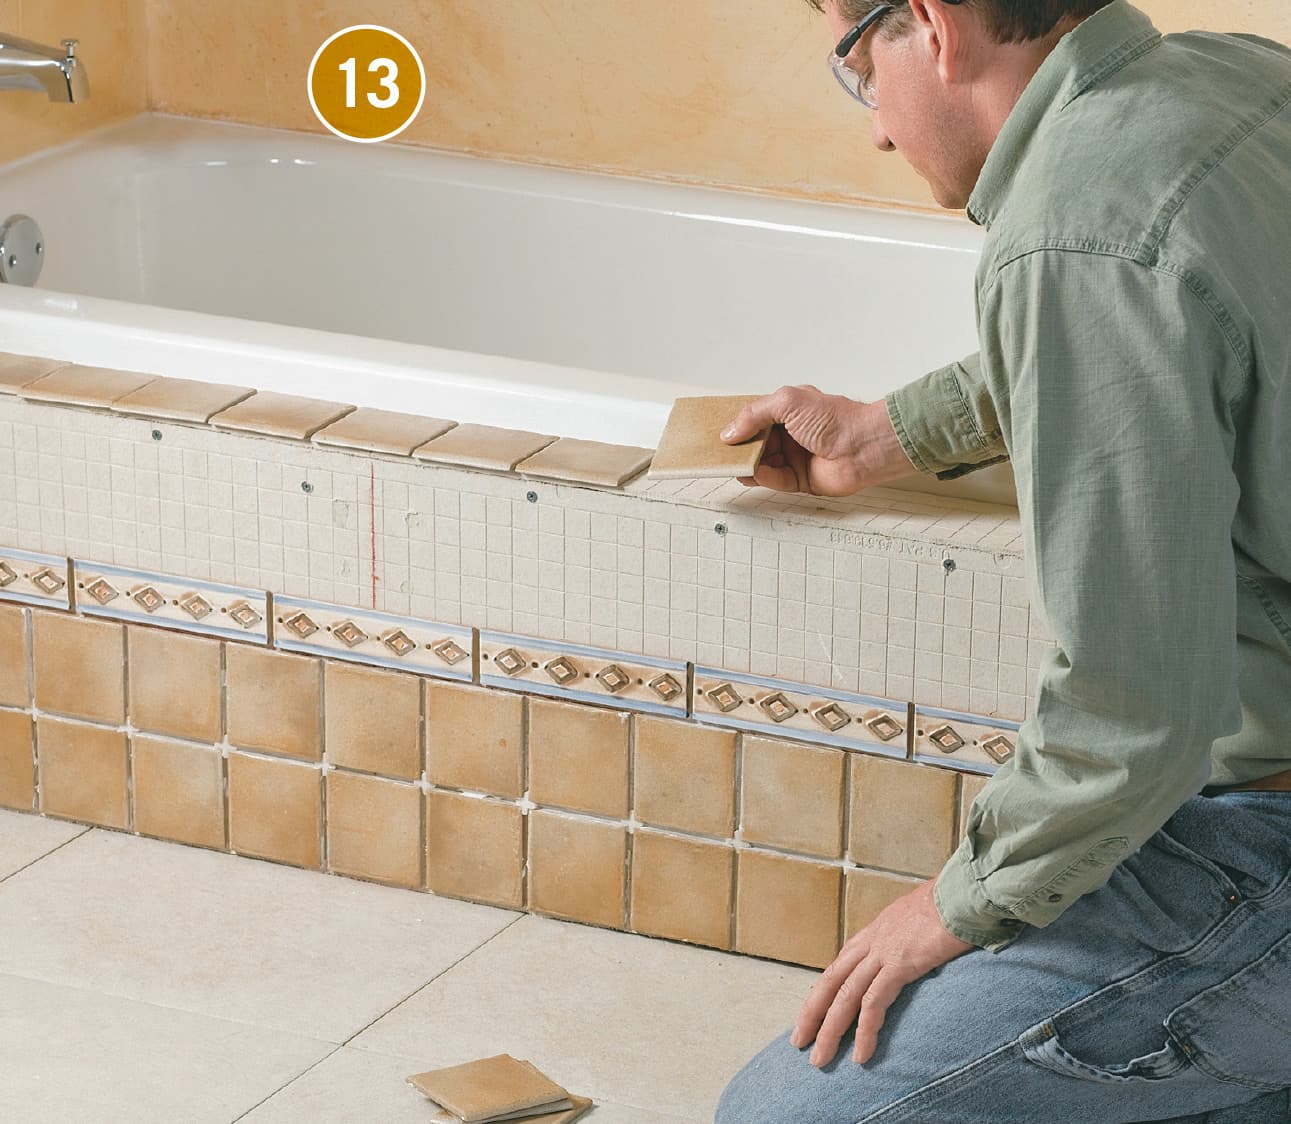
To introduce a splash of color to an otherwise plain tile surround, consider adding one or more bands of contrasting tile into the installation. Some tile product lines are available in a variety of solid colors, allowing the installer to incorporate colored rows of similarly sized tiles into the installation without having to make special adjustments to the layout. For added effect, you can even match the trim color to the colored bands of tile or sprinkle some decorative accent tiles throughout the tile installation.
A perfectly functional alcove bathtub surround (above) can be utterly transformed with tile (below).
TOOLS & MATERIALS
1 × 2 furring strips
1 1/4" cementboard screws
1/2" cementboard
2" fiberglass mesh tape
4-ft. level
4-mil polyethylene sheeting
6" joint knife
Cardboard
Caulk gun
Drill
Eye and ear protection
Square notched trowel
Modified thinset mortar
Stapler and staples
Carbide scoring tool
Carbide hole saw bit
Grout release agent
Grout float
Grout
Grout sponge
Keyhole saw
Latex tile caulk
Tape measure
Tarps
Tile
Tile-cutting tools
Trim tile
Work gloves
Utility knife
Screwdriver
Hammer
Wood blocking
Tile spacers
Small roller
How to Install a Tiled Tub Surround
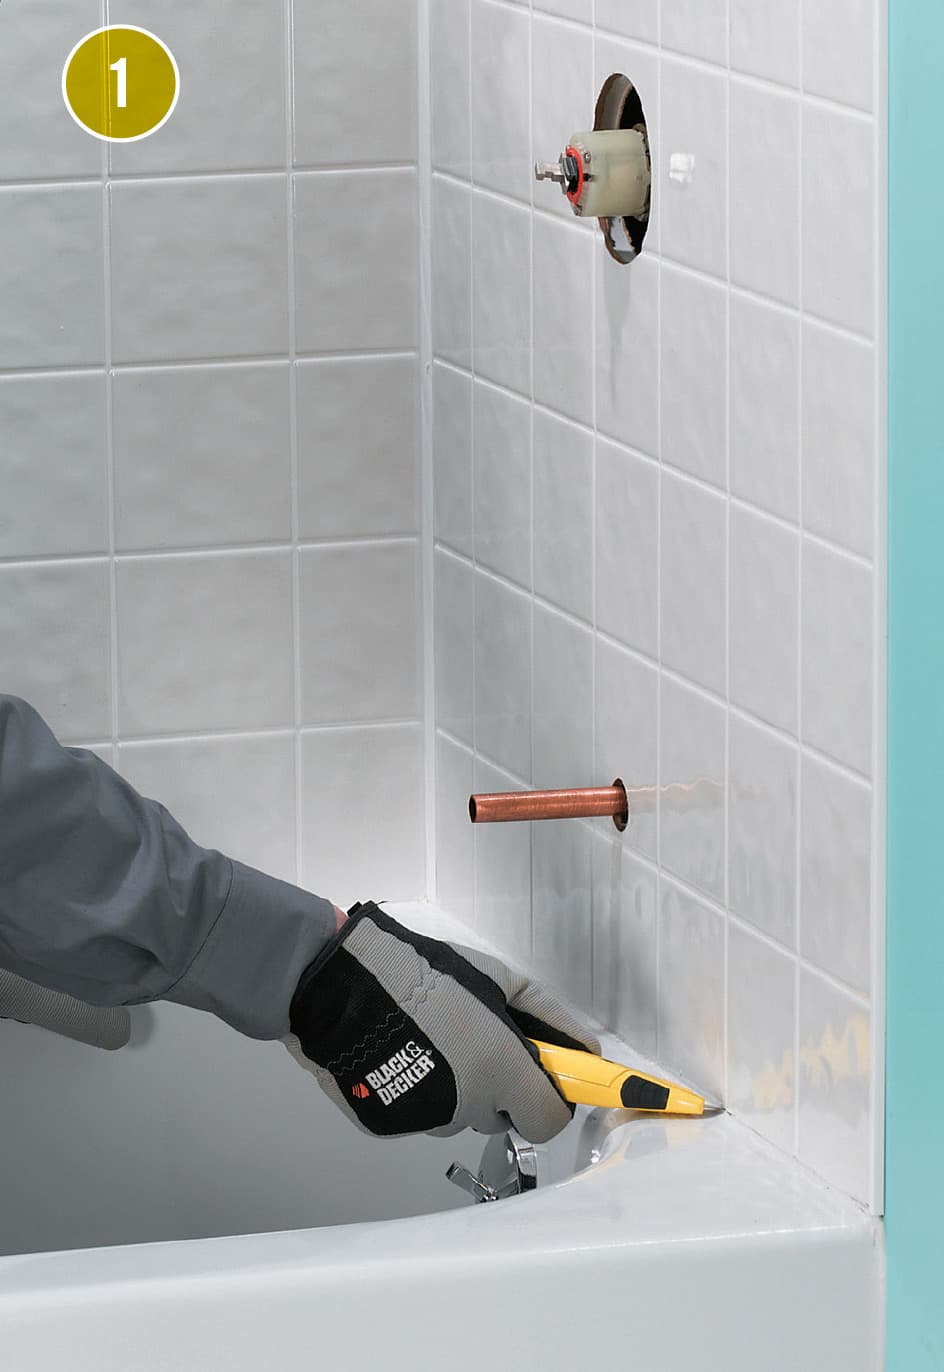
Remove the old fittings. To begin, remove the tub spout, faucet handles, and shower head. Then, slice and remove the caulk from the corner joints. Existing ceramic fittings such as soap dishes should also be removed to prevent them from falling later and damaging the tub. Use a utility knife to remove old caulk, grout, and adhesive from around the lip of the tub. Finally, lay protective cardboard over the exposed surfaces of the tub and drape tarps over cabinets and toilets.
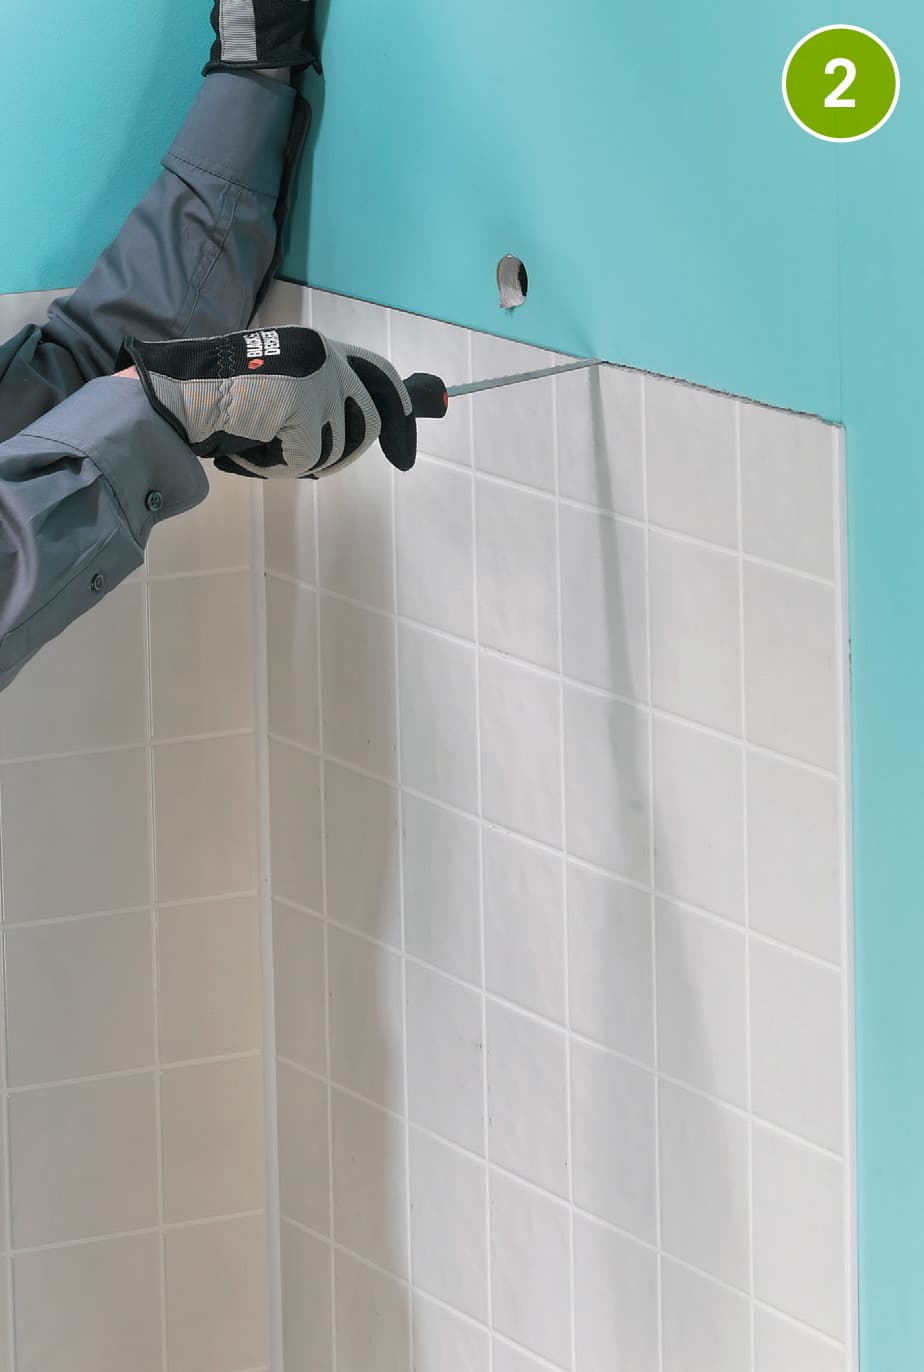
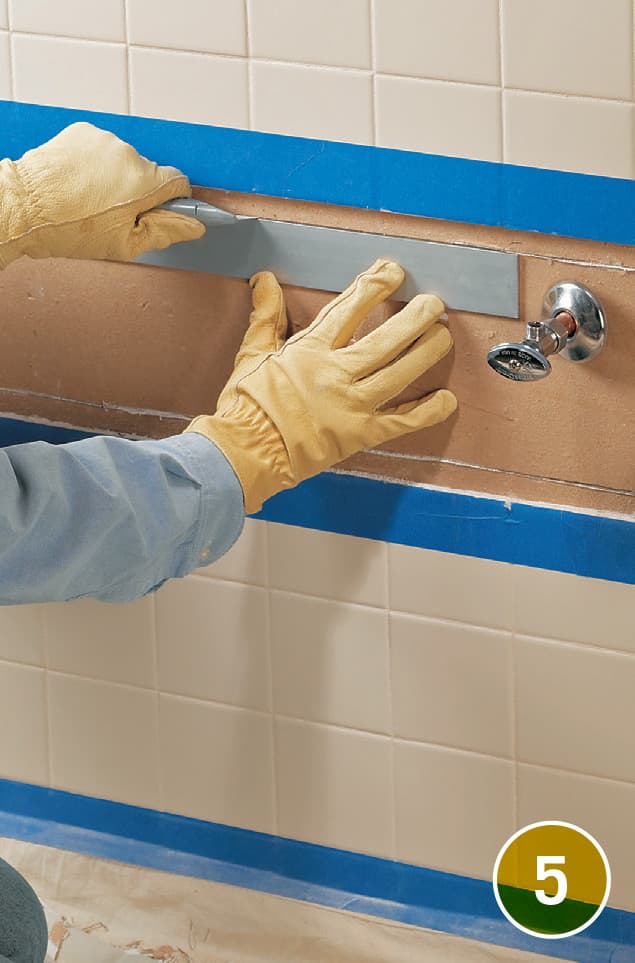
Cut out old surround panels or tiles. A keyhole or drywall saw can be used to safely cut through the drywall at the junction where it meets the surround. Use the edge of the tile or panel as a guide, taking care to feel for and avoid plumbing or other unseen obstacles hidden within the wall cavity.
Remove any drywall in the new tile installation area. This will need to be replaced with cementboard. Remove all nails and debris from the framing members. If necessary, install additional wood blocking to accommodate the cementboard installation.
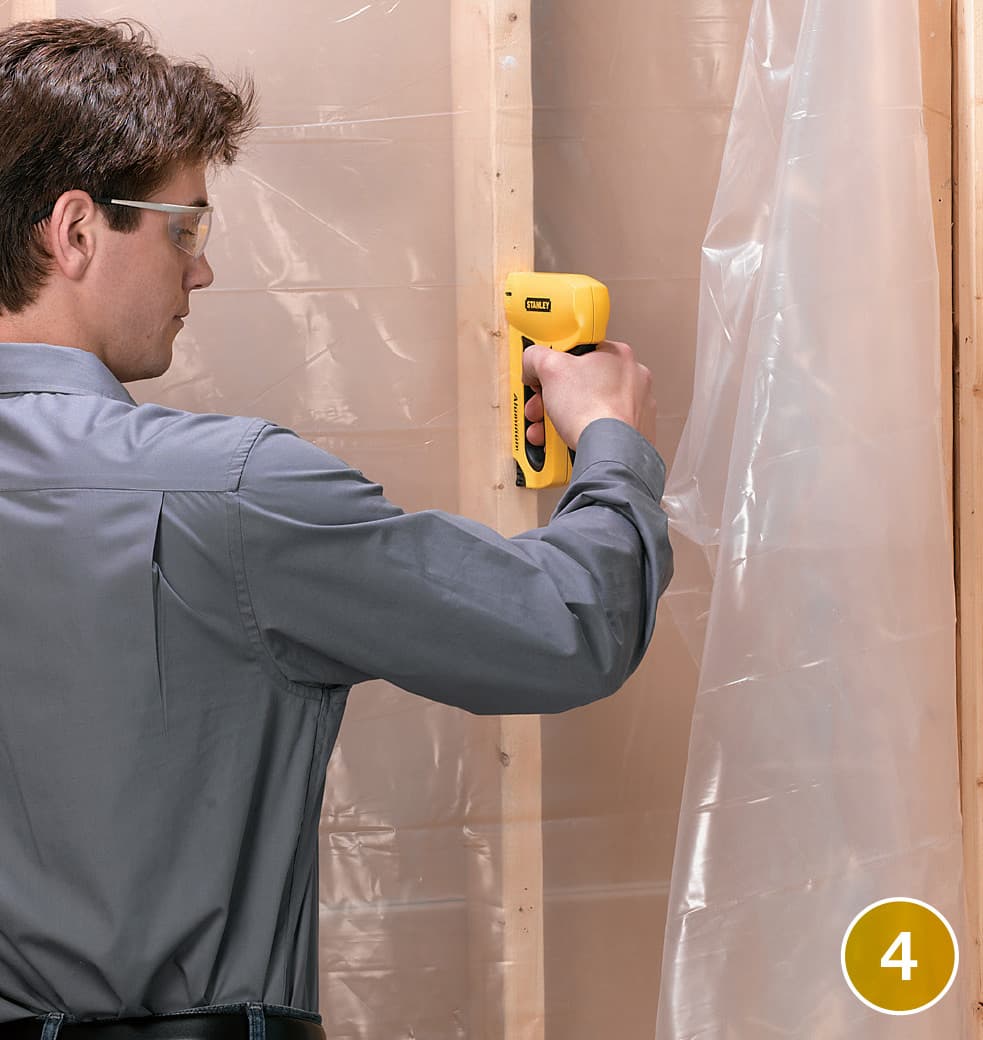
Install a moisture barrier. Fasten 4-mil clear polyethylene sheeting to the studs using staples. This step may be omitted if a waterproofing membrane will be applied over the surface of the cementboard later.
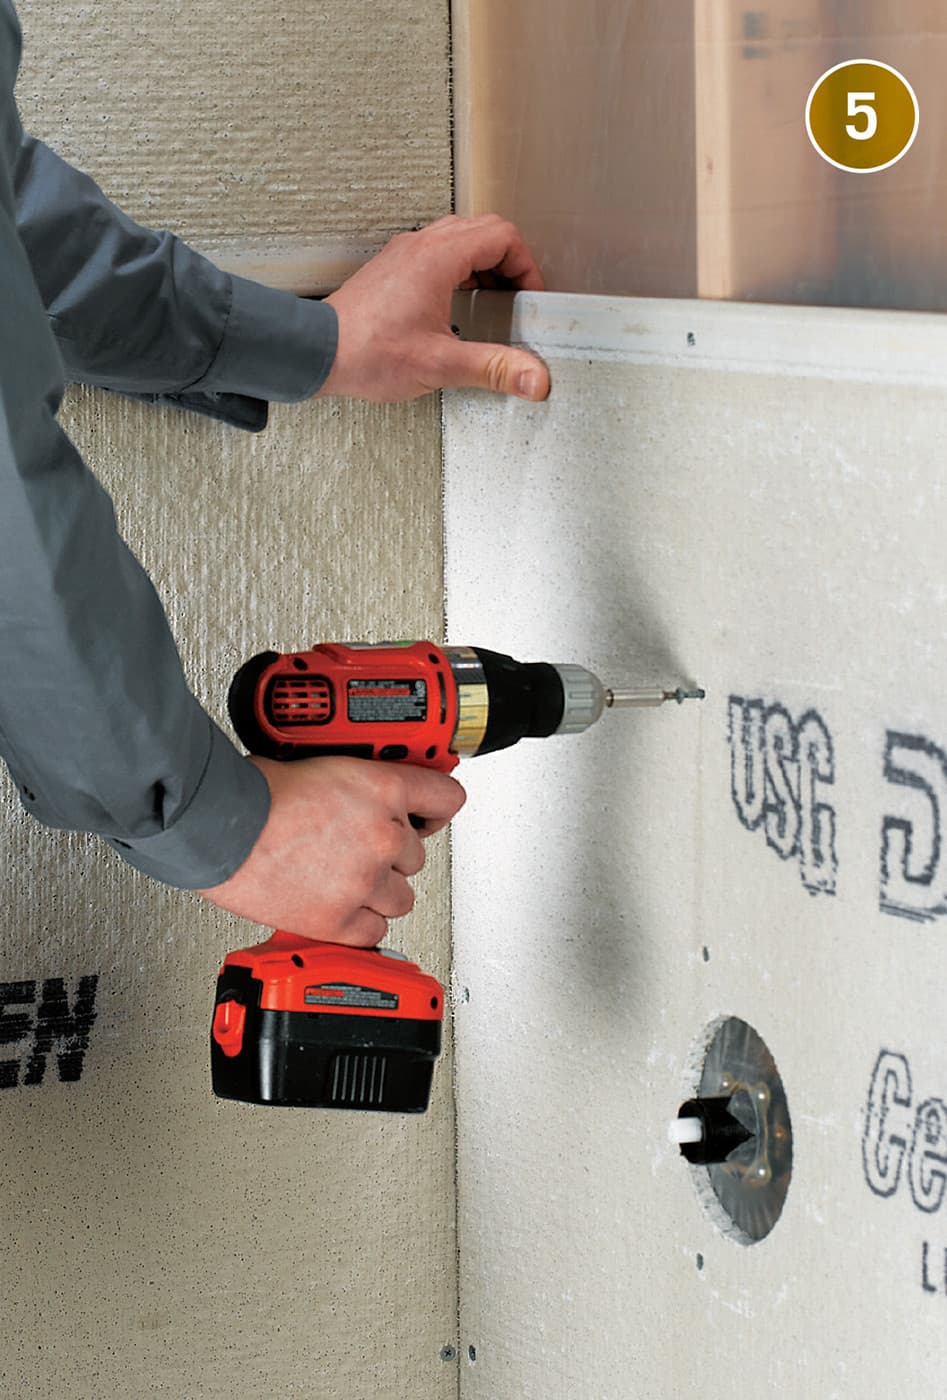
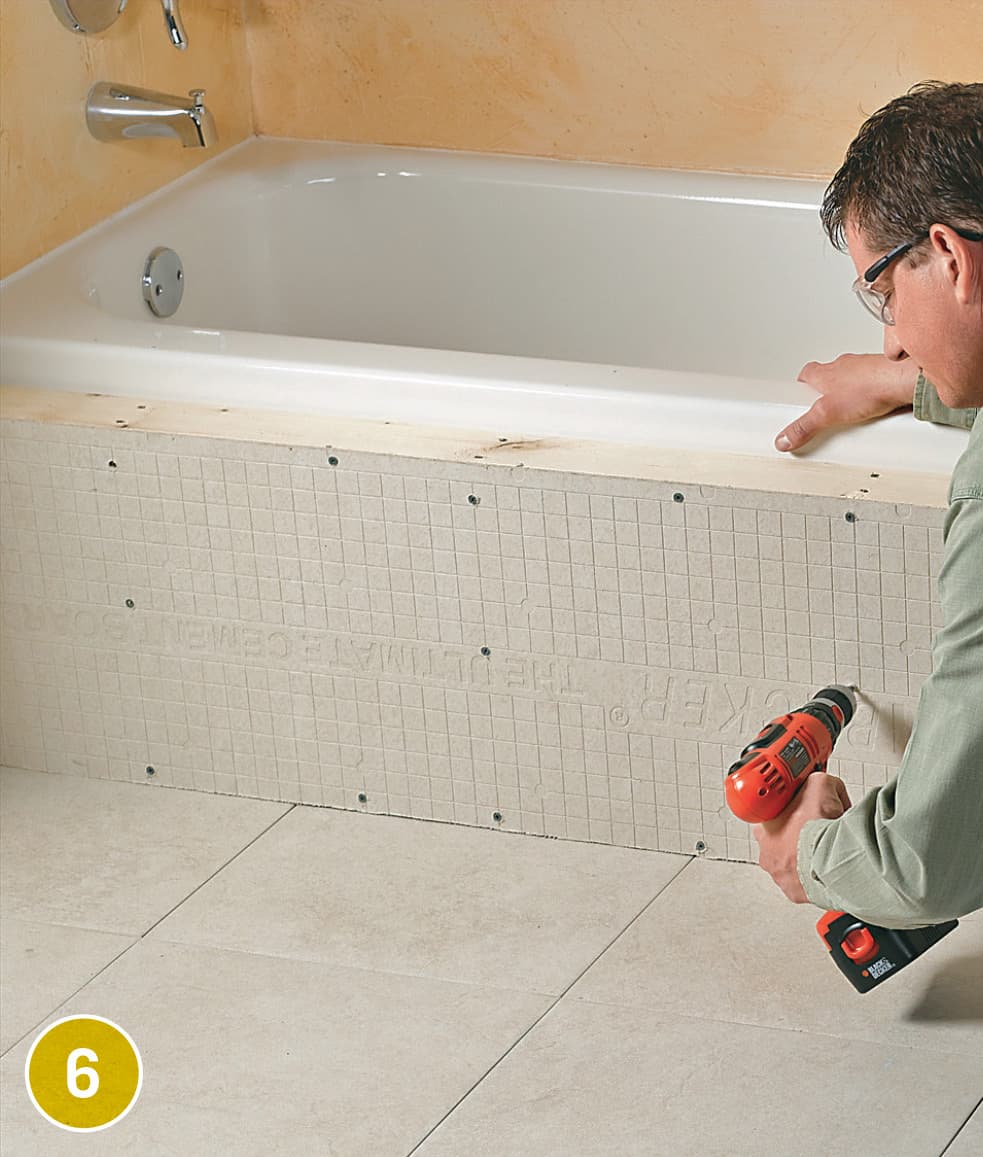
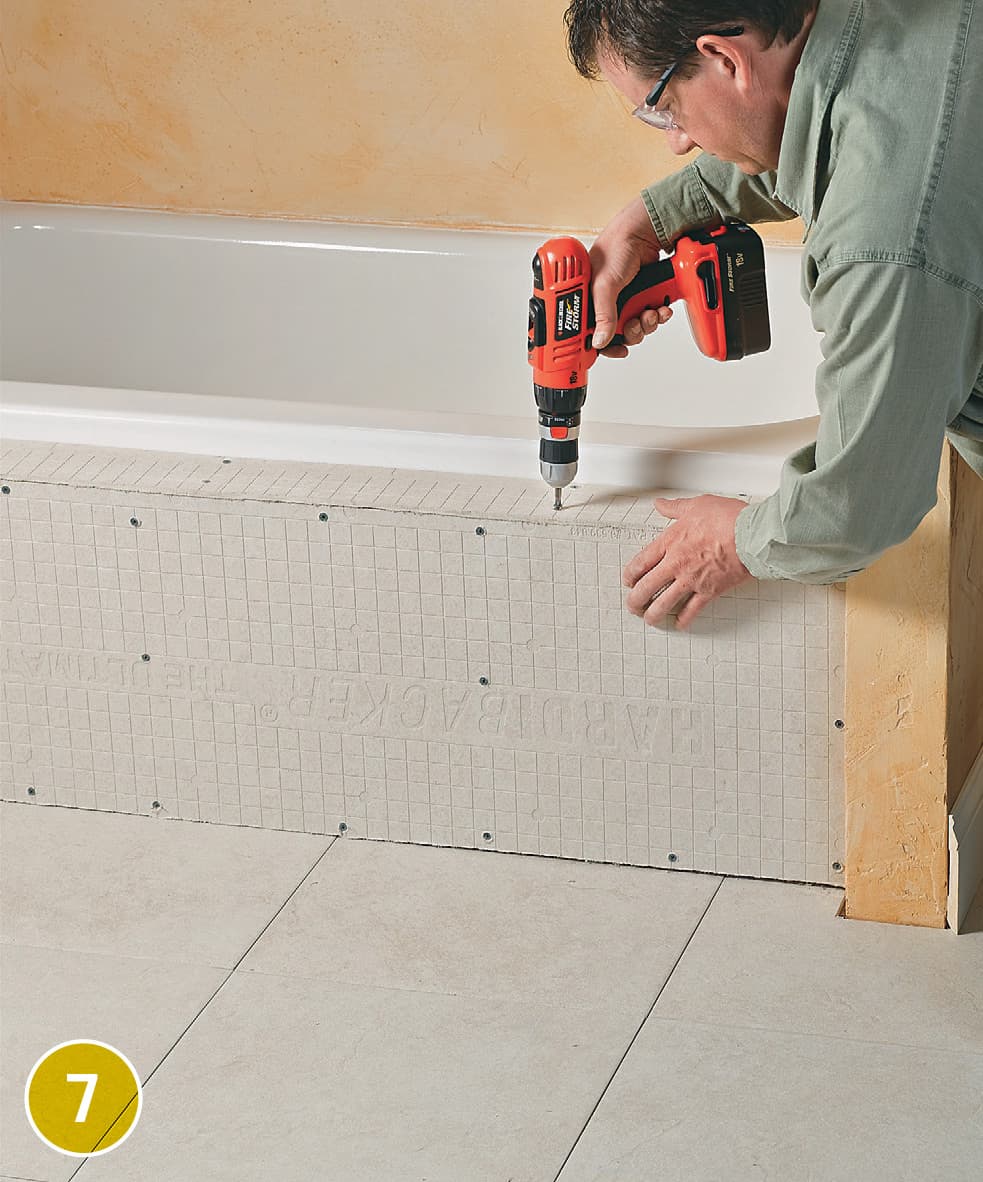
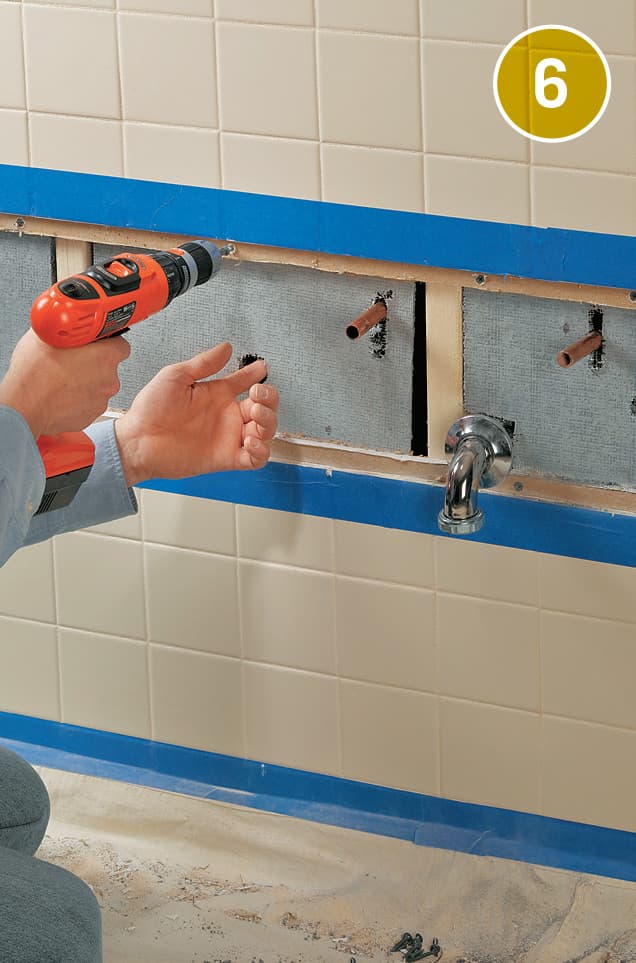
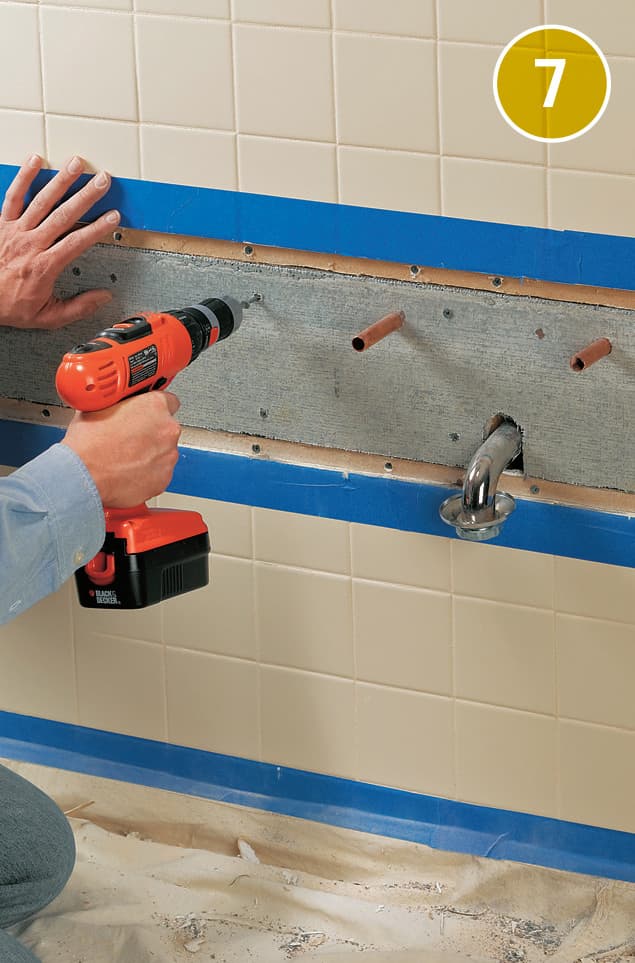
Install 1/2"-thick cementboard horizontally on the back wall first, and then on the side walls. Fasten the panels to the studs using 1 1/4" cementboard screws. To make straight cuts, score the panel using a carbide scoring tool, then snap the panel along the scored line. To make hole cuts for plumbing protrusions, use a drill fitted with a carbide hole saw bit.
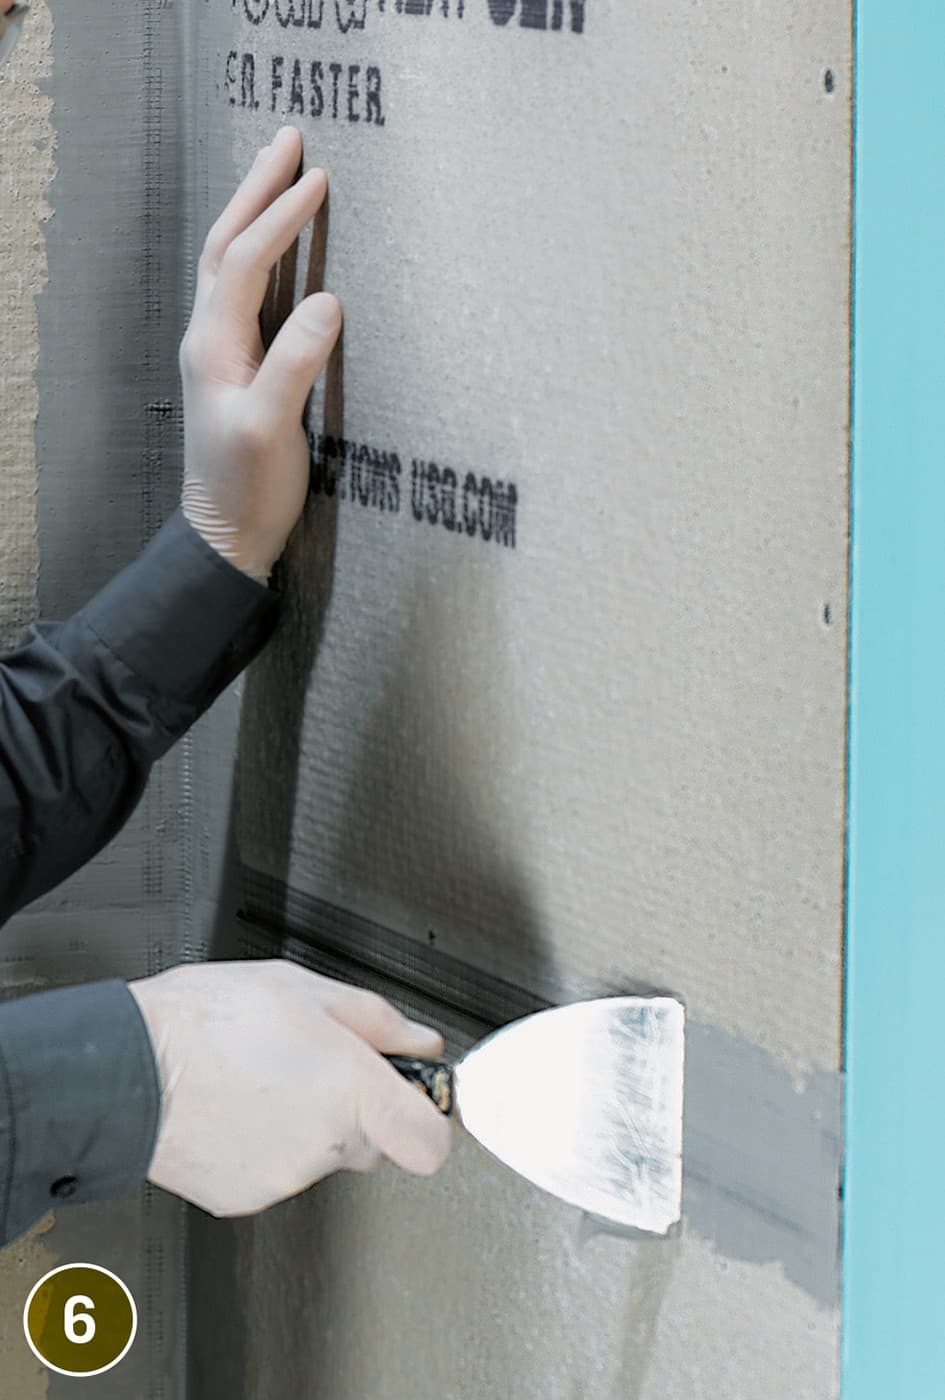
Fill the gaps between cementboard panels with thinset mortar, overlapping at least 2 to 3" on each side of the joint. Center and embed 2"-wide alkaline-resistant fiberglass tape over the joint and lightly skim thinset over the joint. If your local codes require it, apply a roll-on waterproofing membrane to the cementboard (see page 63).
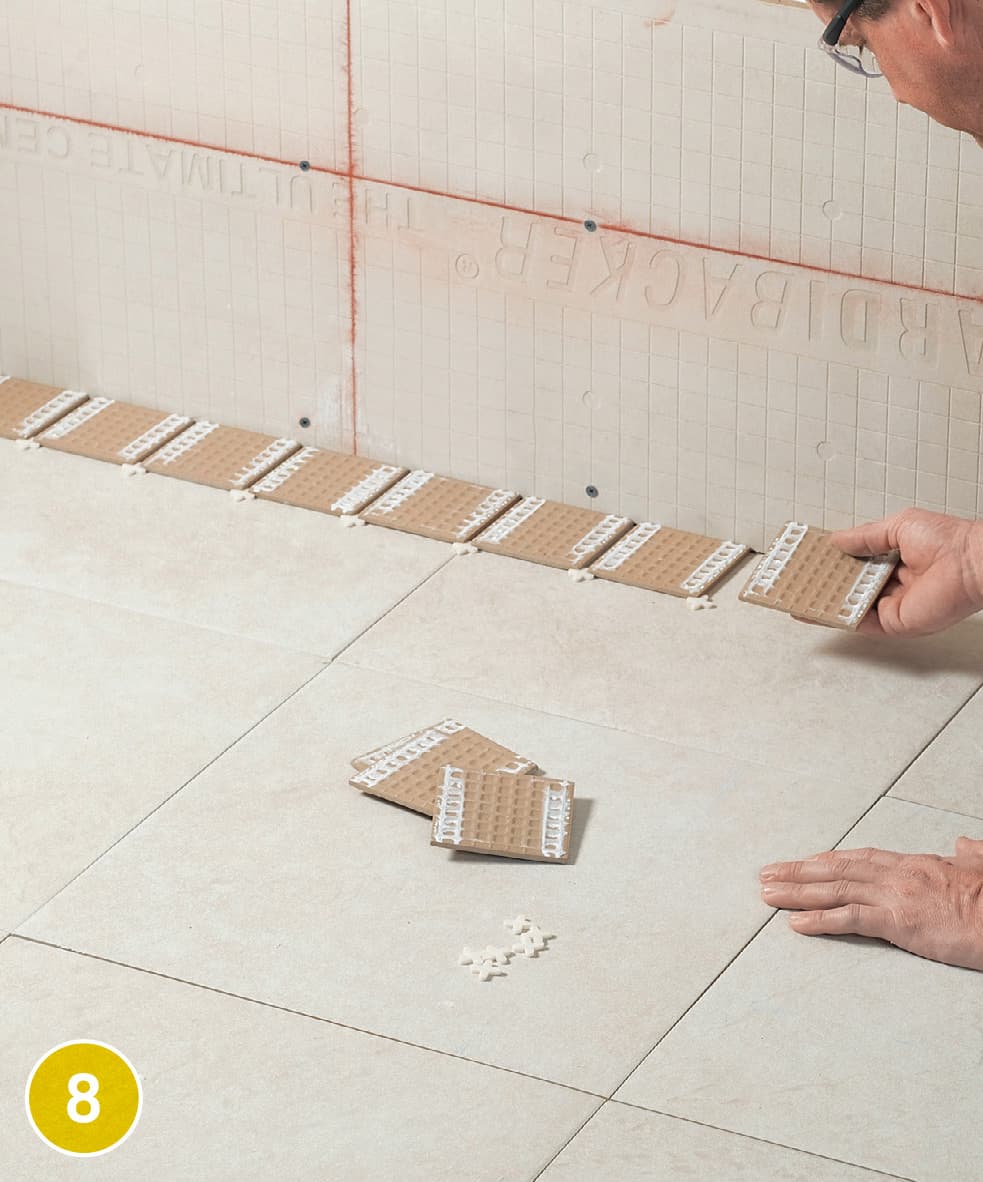
Dry-lay tile for your surround on a flat surface, inserting 1/8" spacers between the tiles to set the gap. Lay out enough for roughly half the surround height and then measure the length of the dry-laid row to find the actual height of the tiles on the wall.

Draw horizontal reference lines on the wall using a 4-ft. level to make sure the lines are level. Extend these reference lines to each side wall. Measure down from the horizontal lines to the tub at several points on all walls to make sure the tub deck and the lines are parallel. If they aren’t, re-measure from the point where the tub deck is highest and transfer level lines all around from that point.
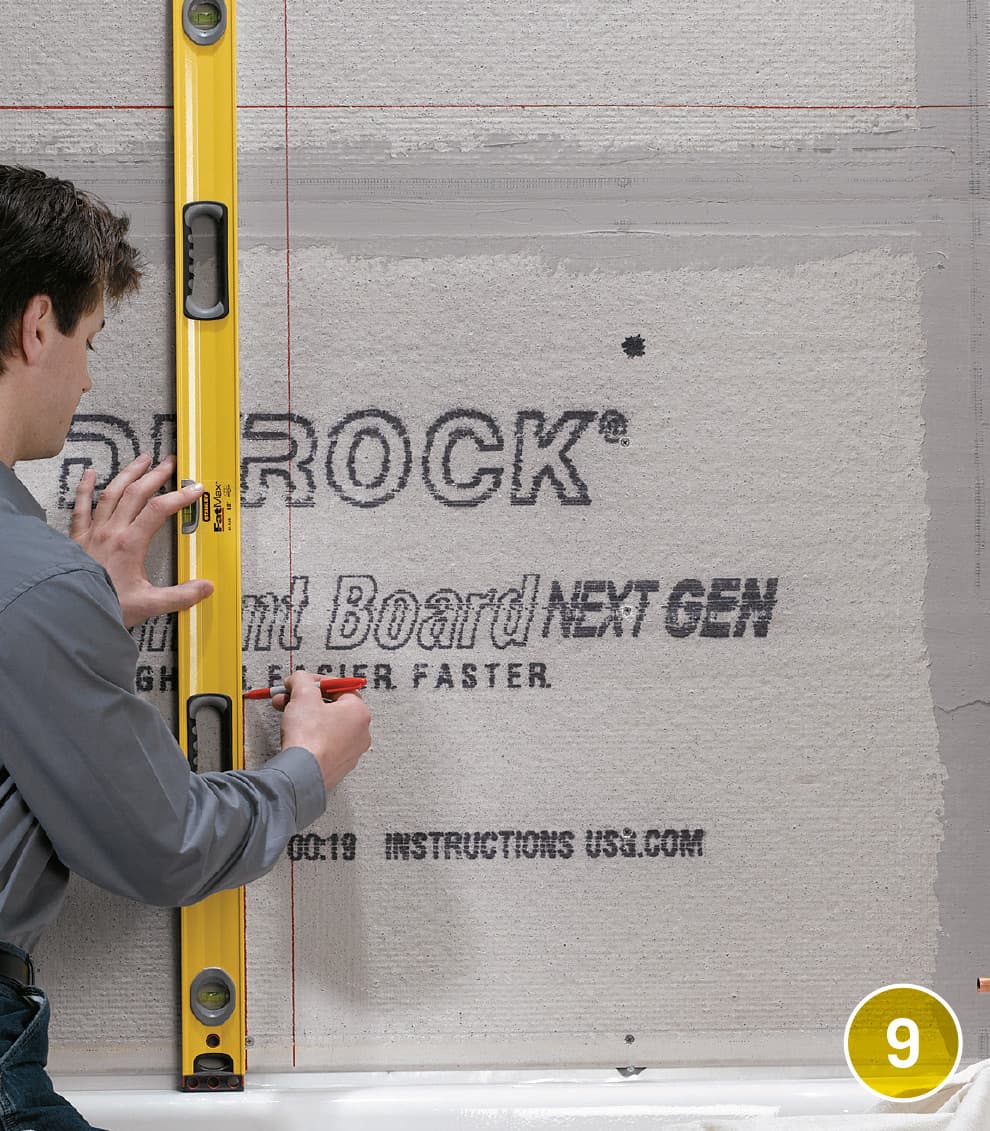
Draw a vertical reference line down the center of the back wall. To temporarily support the weight of the tile that will be installed above, align and fasten 1 × 2 furring strips just below the horizontal reference lines located in the midsection of the tub surround.

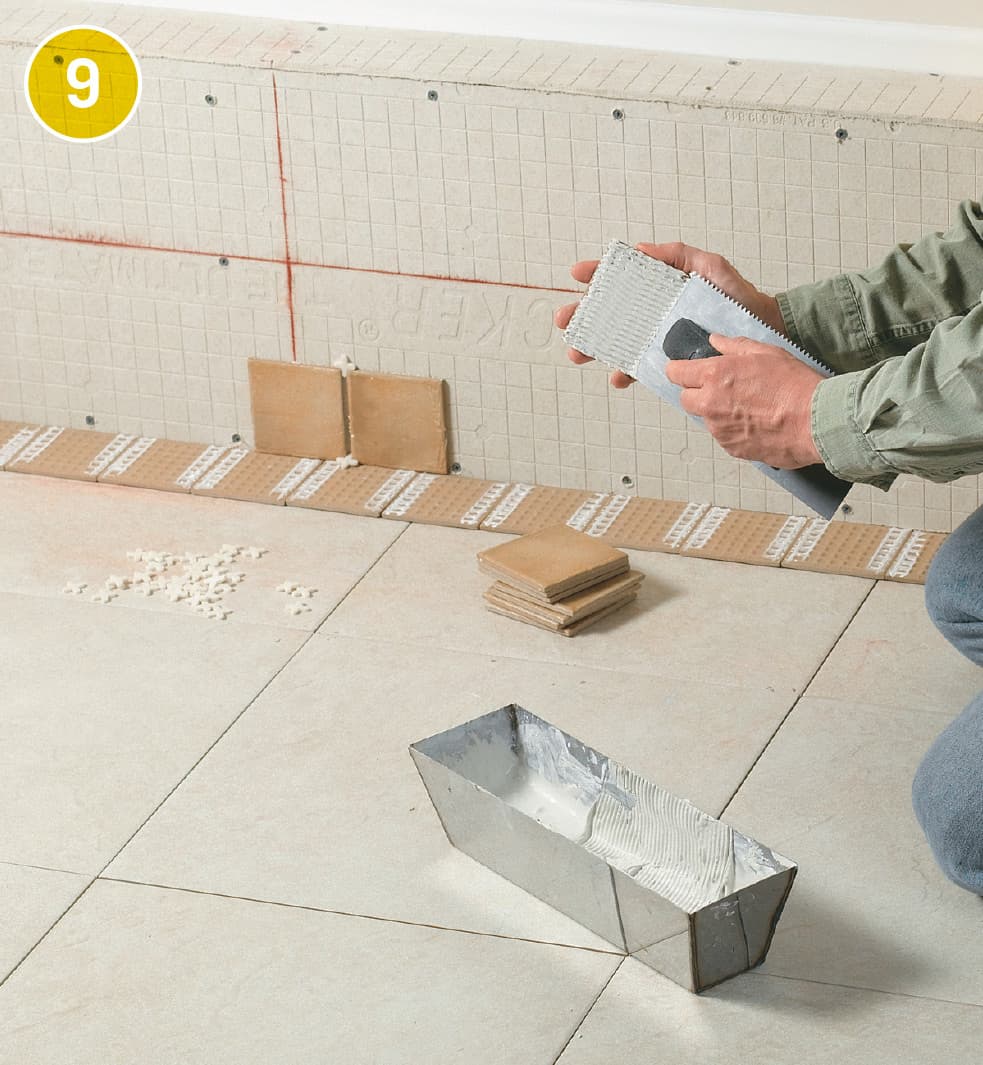
Set the first tiles. Mix a small batch of thinset mortar. Apply the thinset using a 1/4" square-notched trowel held at a 45° angle. Spread the adhesive within the guidelines on the wall, aligning the ridges of the setting bed in a horizontal direction. Install tile on the back wall first, keeping tile aligned to the centered guide line.
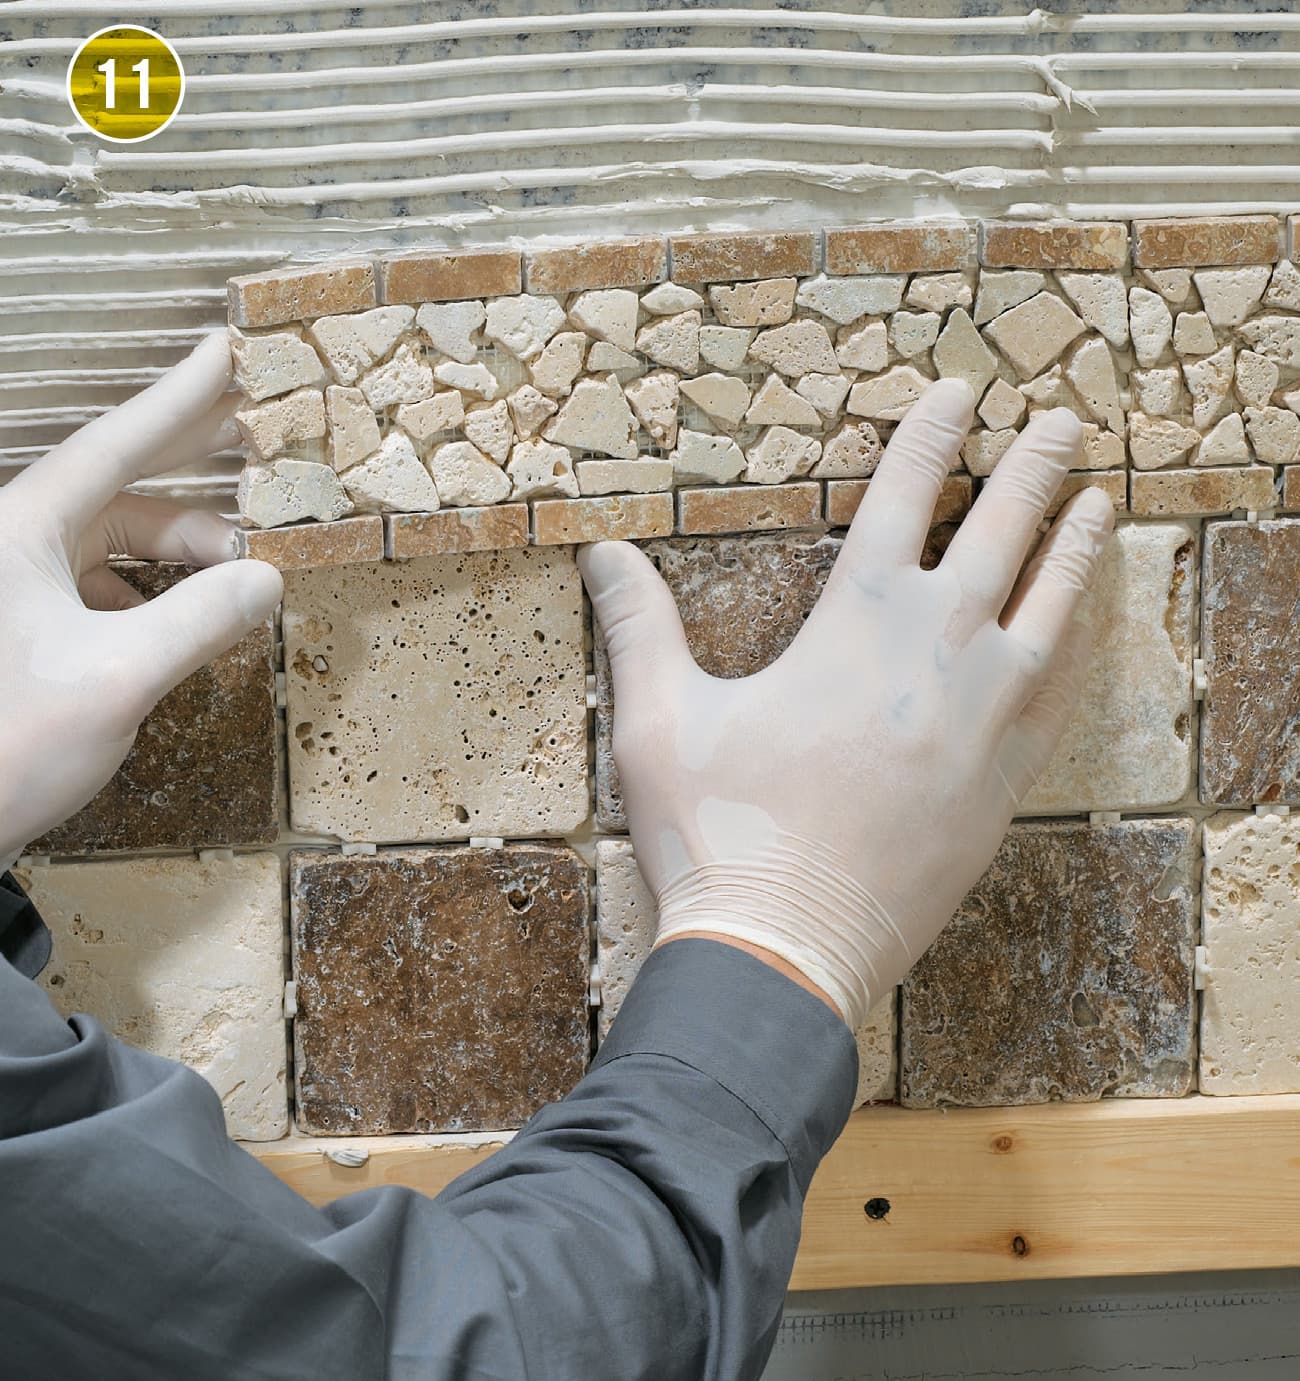
Install two or three rows of tiles—here, a row of decorative accent tiles is installed as well.
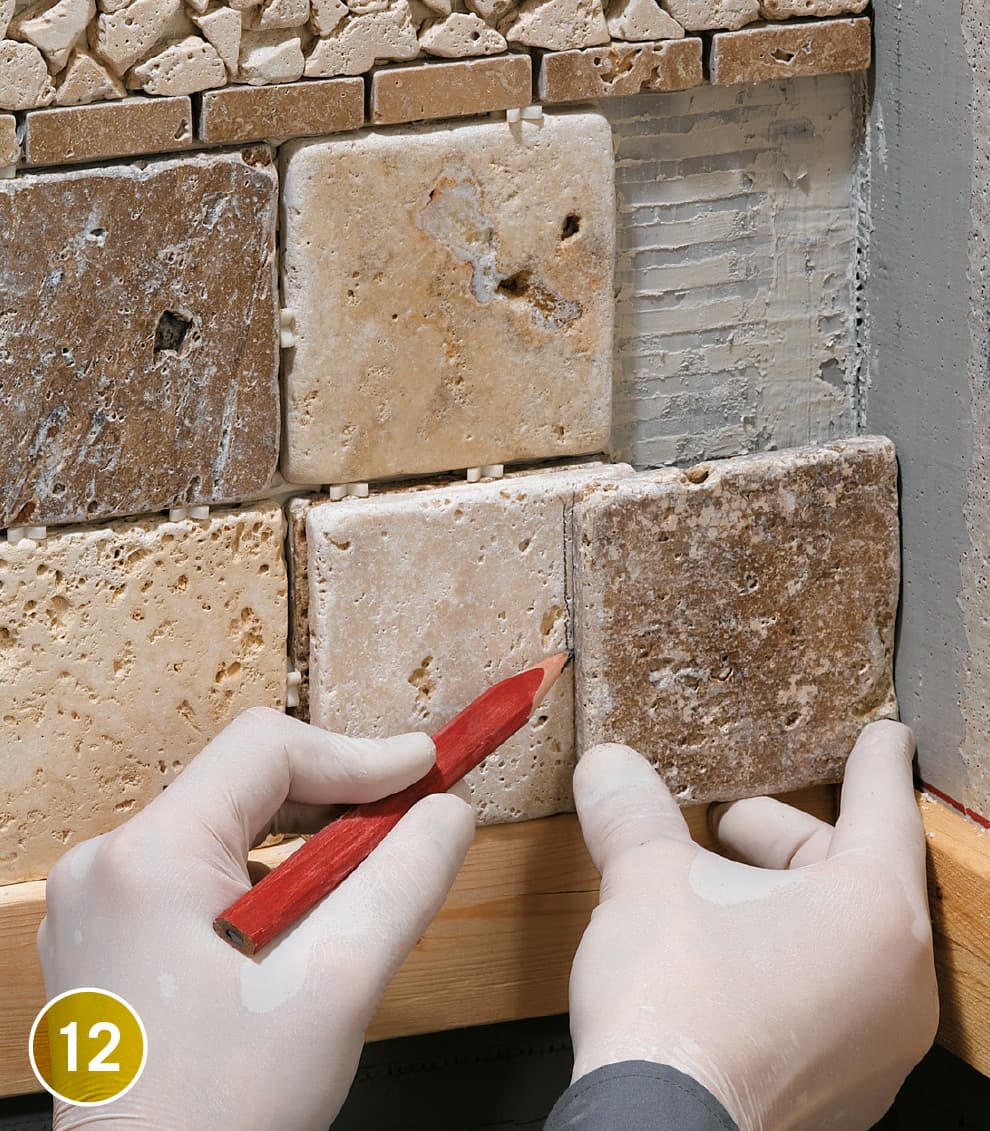
To mark tiles for straight cuts, place a full tile directly on top of the field tile that is installed adjacent to the void. Position another full tile over the void, abutting the overhanging edge of the tile against a 1/8" spacer. Trace the edge of this tile to mark the underlying tile for cutting.
Complete the upper sections. After the top portion of the back wall is tiled, fill in the upper portions of each side wall. Leave out tiles as needed to accommodate tiled-in accessories such as a soap dish or towel rod.

Mark and cut tiles to fit around the valve stems and water pipes as required to install your tub spout, diverter, and shower head (often, shower heads are installed above the tiles). Finish tiling the lower portions of the tile installation, then allow to dry for 24 hrs.
TIP: Tape tiles together to prevent slippage while they dry.
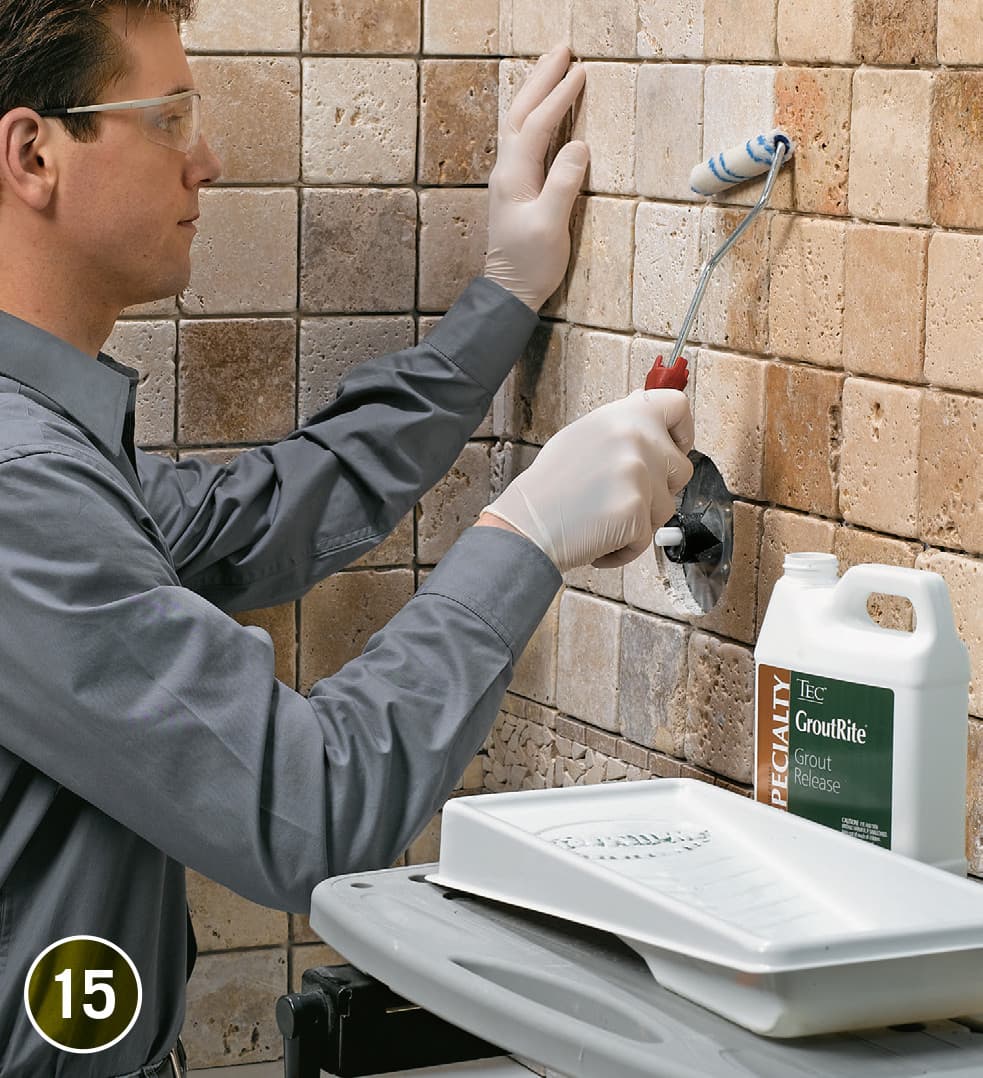
Coat the tile surfaces with a sealer or other grout-release agent if they are not glazed by the manufacturer. This treatment will prevent grout from getting into places where it should not go.
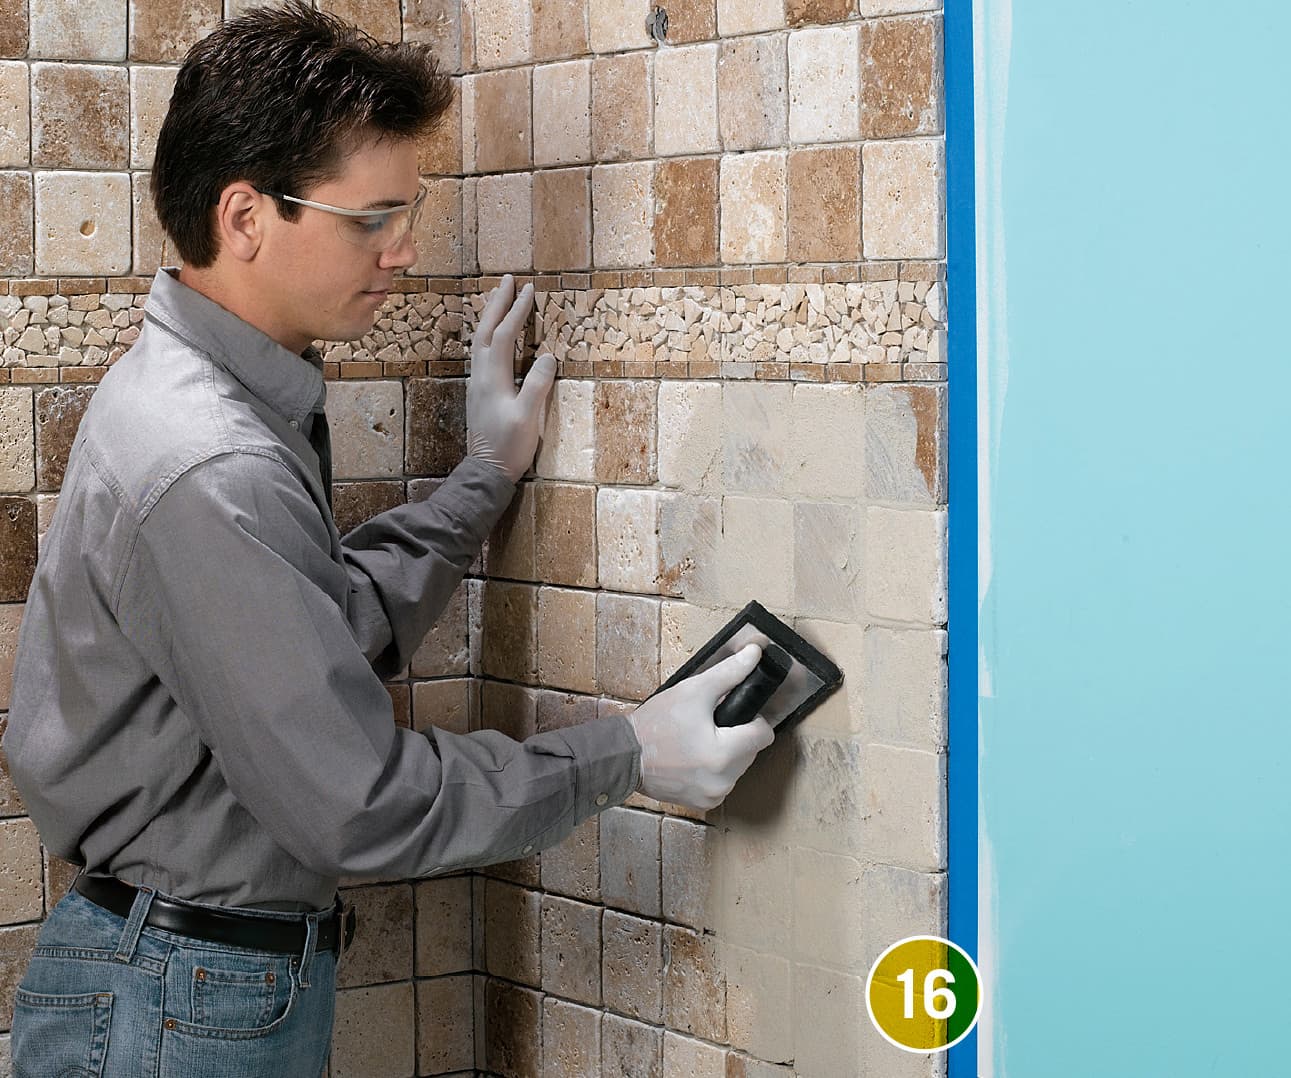
Grout the tiles (see page 143). To apply grout, hold the grout float at an angle and force the mortar into the joints, skimming excess grout from the tile surface with each pass. Wipe tile clean using a damp grout sponge. After grouting, buff tile surfaces with a soft cloth to remove haze. Install fittings and hardware, and caulk around the tub deck.
Tiled Tub Apron
The aprons that are cast into alcove bathtubs simplify the tub installation, but they often come up a bit short in the style department. One way to improve the appearance of a plain apron and create the look of a built-in tub is simply to build and tile a short wall in front of the tub. All it takes is a little simple framing and a few square feet of tile.
The basic strategy is to construct a 2 × 4 stub wall in front of the tub apron and then tile the top and front of the wall. One design option is to try and match existing tile, but it’s unlikely you’ll be able to find the exact tile unless it’s relatively new. Choosing complementary or contrasting tile is usually a better bet. Specialty tile, such as listellos, pencils, and accent tile, can have a big impact without breaking the bank because you’re covering such a small area. Ask your tile retailer to direct you to families of tile with multiple shapes and accessories.
Be sure to include a waterproof backer (cementboard is recommended) and get a good grout seal, since the stub wall will be in a wet area.
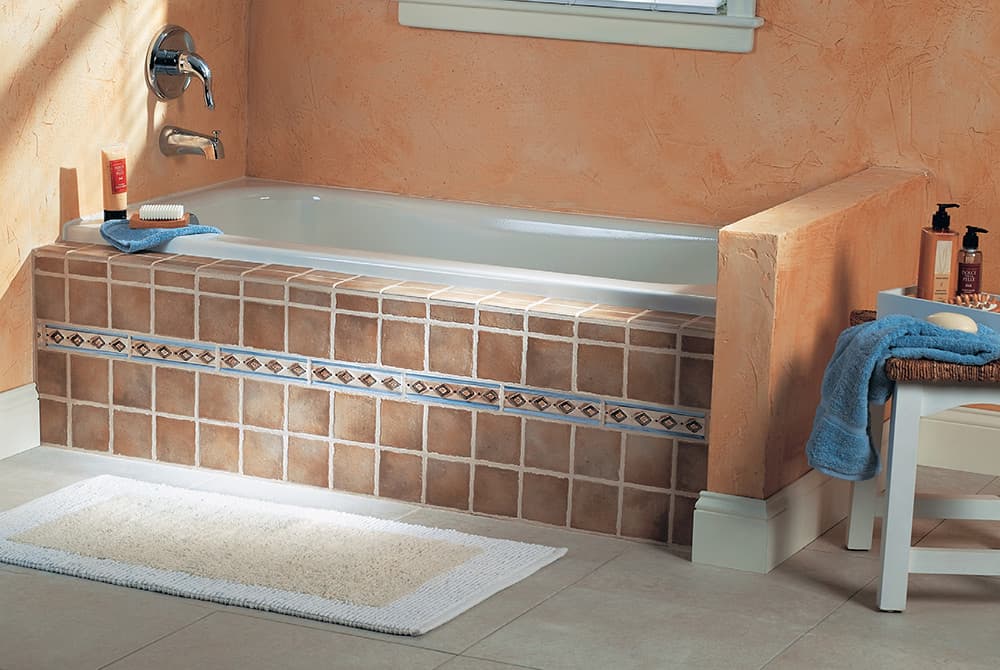
An ordinary tub apron does little to inspire in a bathroom, but a tiled apron wall is a fine way to add interest.
TOOLS & MATERIALS
Stud finder
Tape measure
Circular saw
Drill
Laser or carpenter’s level
Tile cutting tools
Utility knife
Grout float
Grout sponge
Buff rag
Foam brush
2 × 4 lumber
Construction adhesive
Screws (2 1/2", 3")
Cementboard
Tile
Thinset mortar
Carbide paper or wet stone
Wide painter’s tape
Grout
Silicone caulk
Grout sealer
Notched trowel
Rubbing alcohol
Caulk gun
Tile spacers
Eye protection
How to Build a Tiled Tub Deck

Measure the distance of the tub rim from the floor, as well as the distance from one wall to the other at the ends of the tub. Allowing for the thickness of the tiles, create a layout for the project and draw a detailed plan, spacing the studs 16" apart on center.
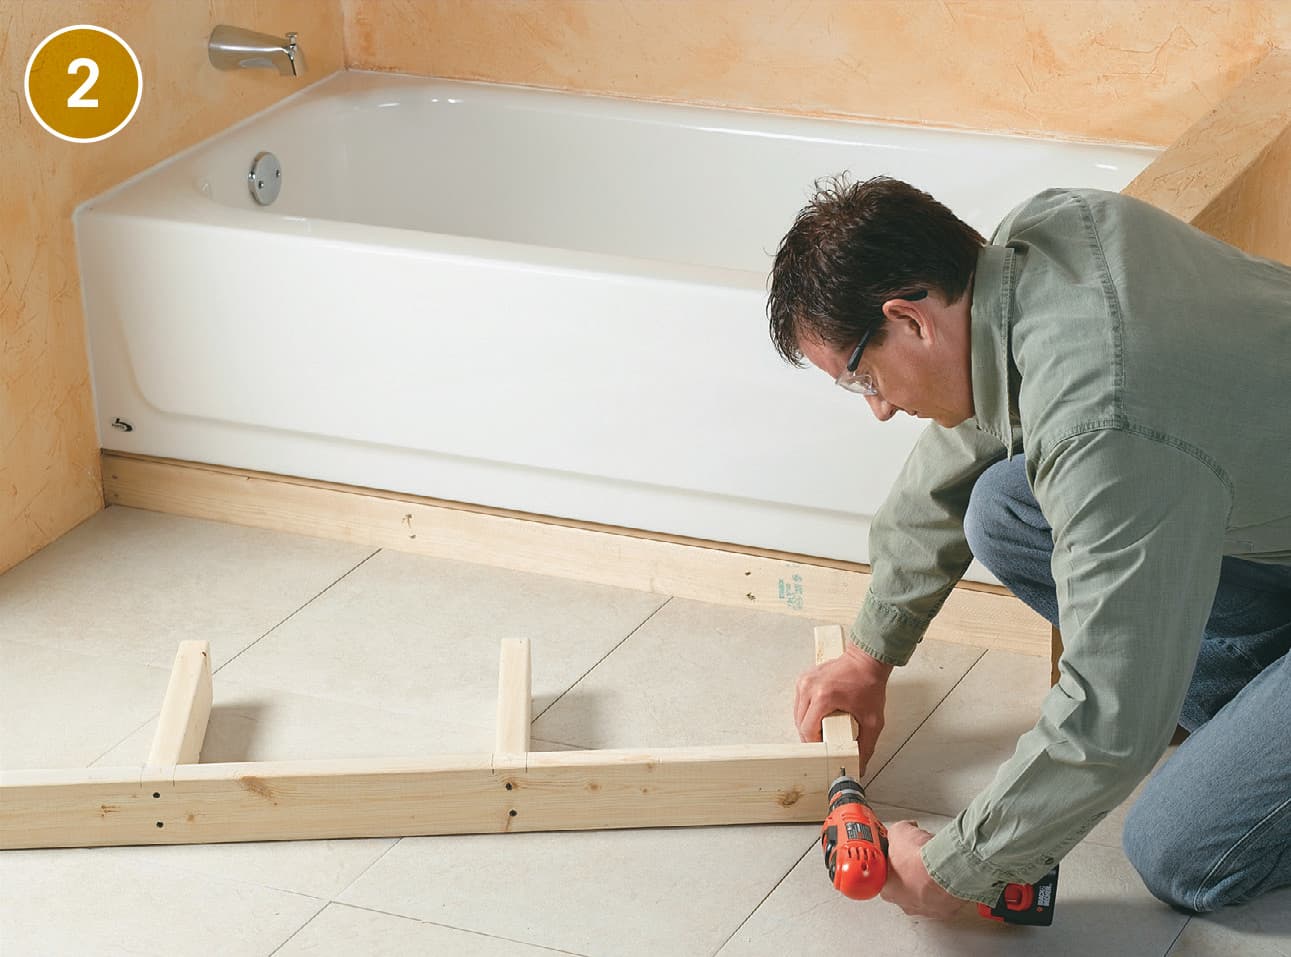
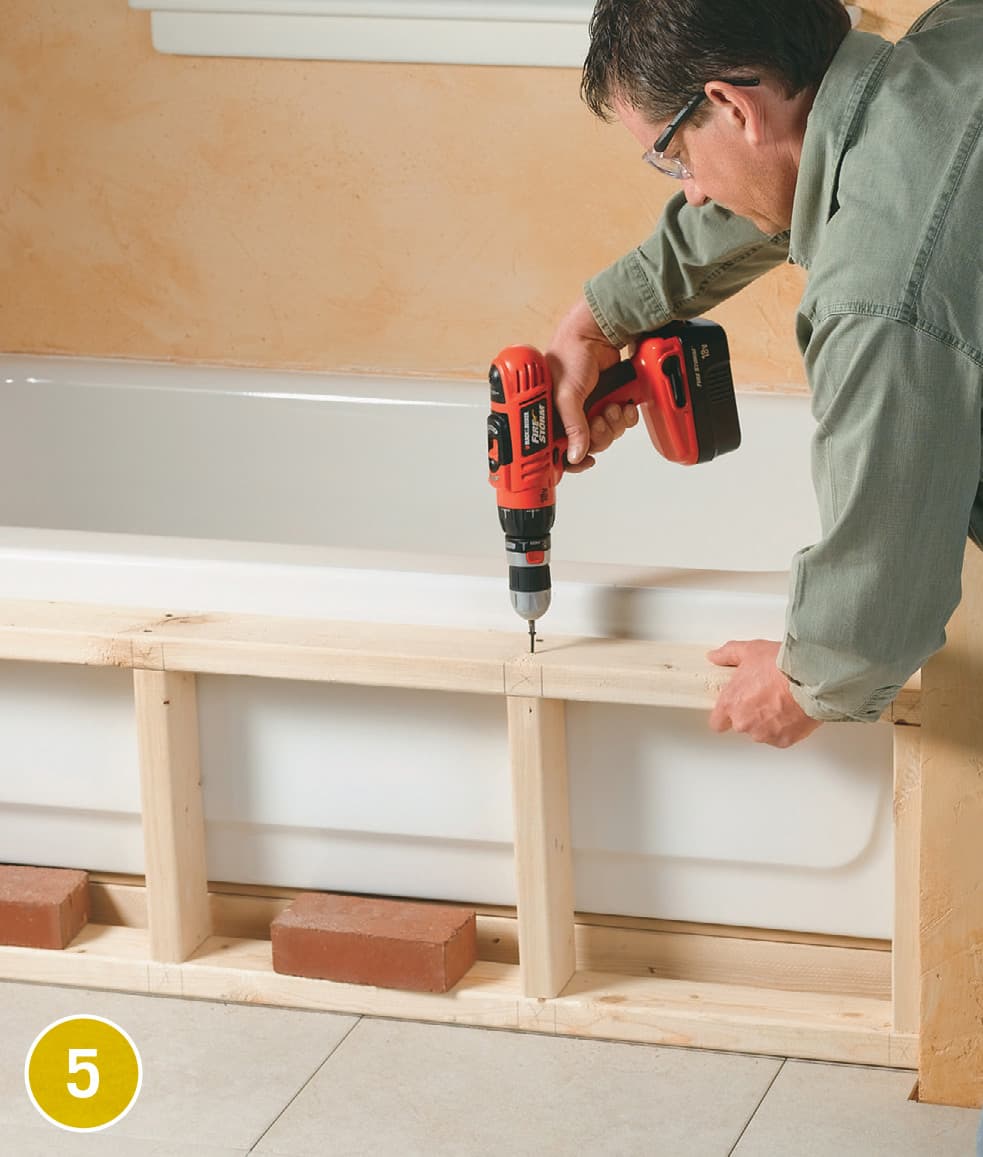
Cut the 2 × 4s to length for the base plate and top plate (58 1/2" long as shown). Cut the studs (five 11" pieces as shown). Set the base plate on edge and lay out the studs, spacing them 16" on-center. Make sure the first and last studs are perfectly parallel with the end of the base plate, then drive two 2 1/2" screws through the base plate and into each stud.
Draw a placement line on the floor using a permanent marker. Spread a generous bead of construction adhesive on the bottom of the base plate. Align the base plate with the placement line and set it into position. Put concrete blocks or other weights between the studs to anchor the base plate to the flooring and let the adhesive cure according to manufacturer’s instructions.
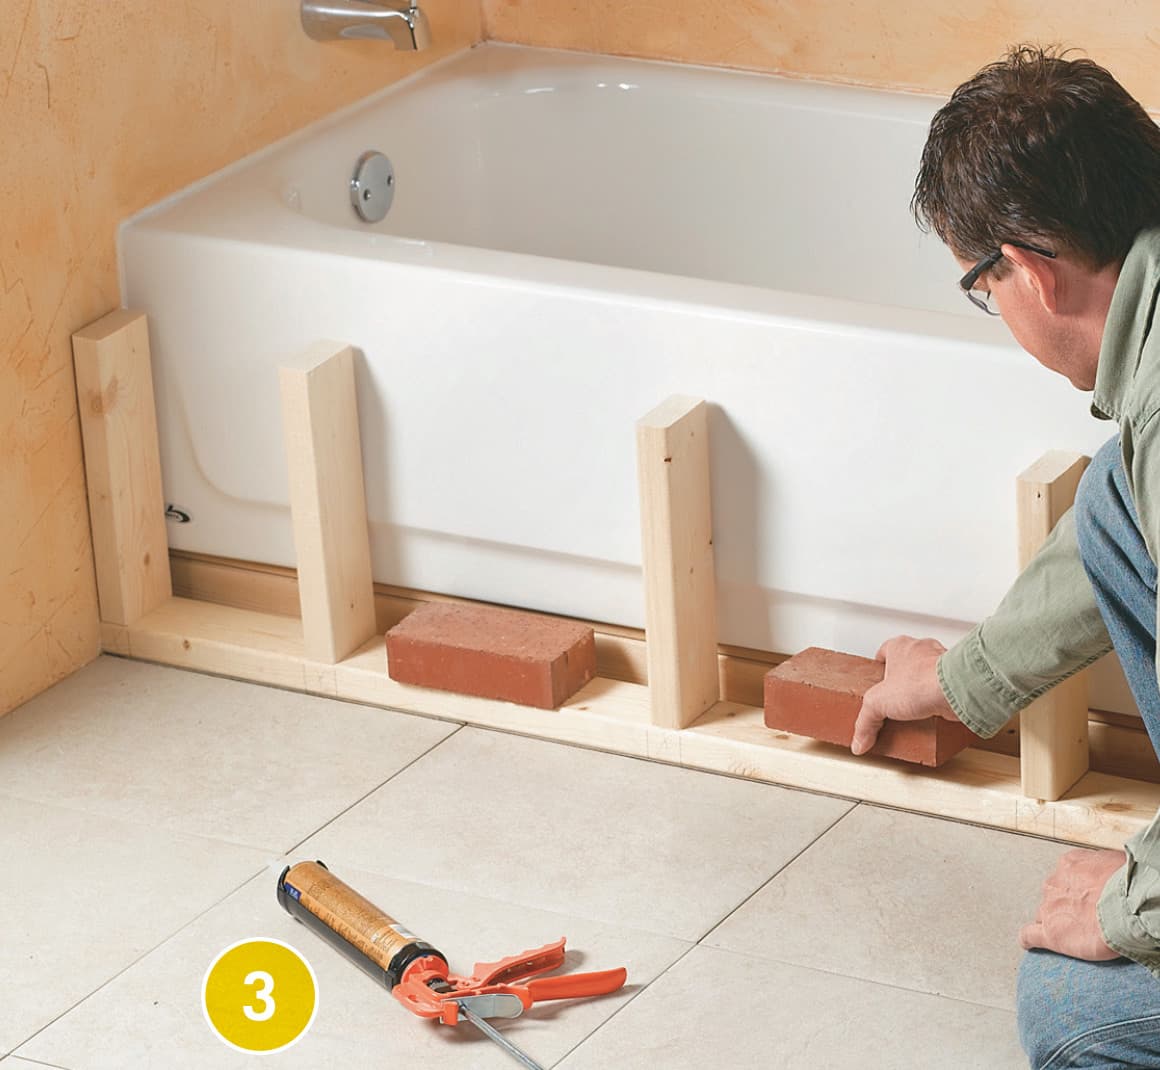
Drive two or three 2 1/2" screws through the studs and into the room walls at each end of the stub wall. If the stub wall does not happen to line up with any wall studs, at least drive two 3" deck screws toenail style through the stub wall and into the room wall sole plate.
Set the top plate on the stub wall and attach it using two 2 1/2" screws for each stud. Offset the screws slightly to increase the strength of the assembly. The top of the stub wall should be 2 1/2" below the top of the tub.
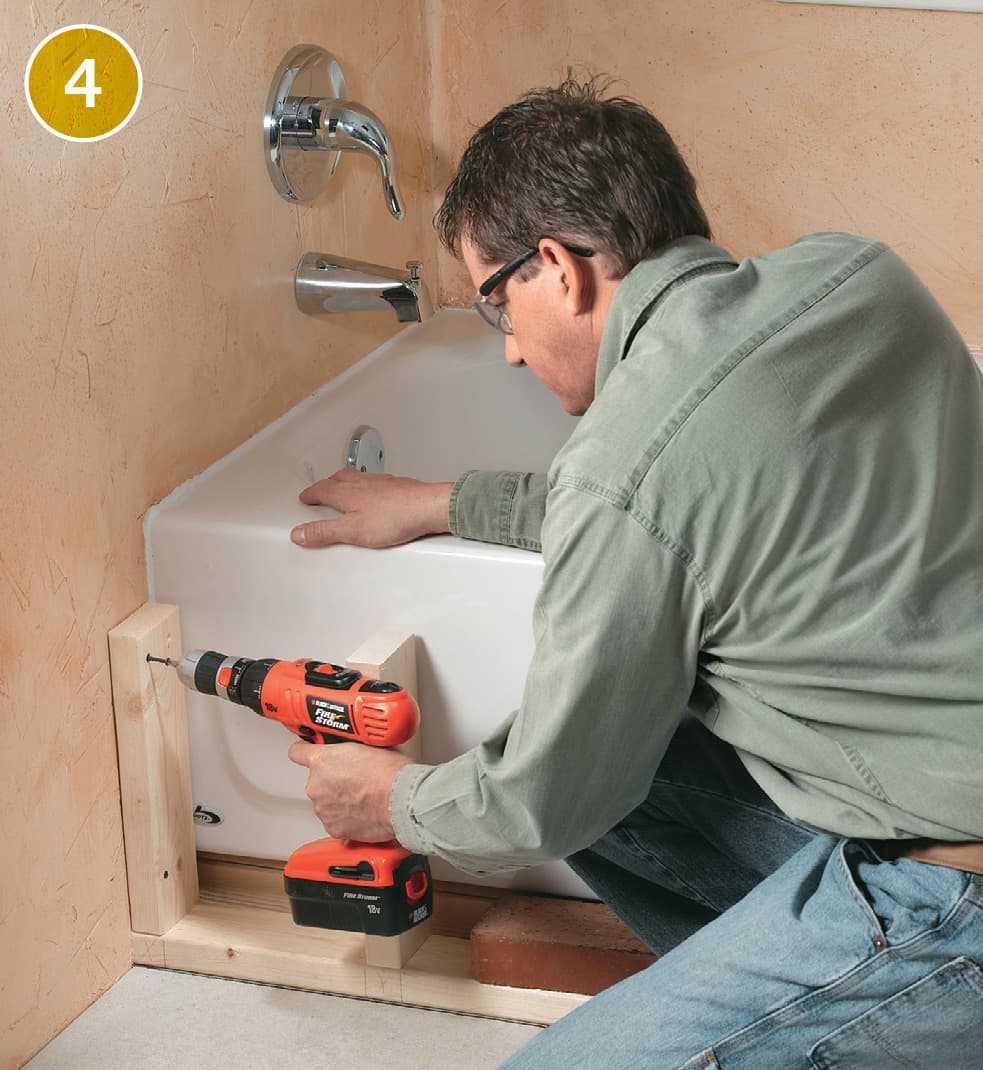
Cut cementboard to fit the front (14 1/2" as shown). With the factory-finished edge of the cementboard at the top of the wall, attach the cementboard to the studs using cementboard screws.
Cut cementboard to fit the top of the stub wall (31/2"). With the factory-finished edge facing the tub edge, attach the cementboard to the top plate using cementboard screws.
Design the layout and mark reference lines (see page 141) on the wall. Draw horizontal and vertical reference lines for the corner tile (used to transition from vertical to horizontal at the top stub wall edge) and the coved base tile (if your project includes them). Lay out tile along the floor, including spacers.
Start tiling at the bottom of the wall. Lay out the bottom row of tile on the floor, using spacers if necessary. Adjust the layout to make end tiles balanced in size. Mark and cut the tiles as necessary, and then smooth any sharp edges with carbide paper or a wet stone. Mix a small batch of thinset mortar and install the base tiles by buttering the backs with mortar.
Beginning at the center intersection of the vertical field area, apply mortar using a notched trowel to spread it evenly. Cover as much area as required for a few field tiles. Install the field tiles, keeping the grout lines in alignment.
Finish installing the field tiles up to the horizontal line marking the accent tile location.
Apply thinset mortar to the backs of the accent tiles and install them in a straight line. The grout lines will likely not align with the field tile grout lines.
Dry-lay corner tiles to create a rounded transition at the top edge of the wall. Install these before you install the field tiles in the top row of the wall face or on the top of the stub wall (corner tiles are virtually impossible to cut if your measurements are off). Dry-lay the top row of tiles. Mark and cut tile if necessary.

Fill in the top course of field tile on the wall face, between the accent tiles and the corner tiles. If you have planned well you won’t need to trim the field tiles to fit. If you need to cut tiles to create the correct wall height, choose the tiles in the first row of field tiles.
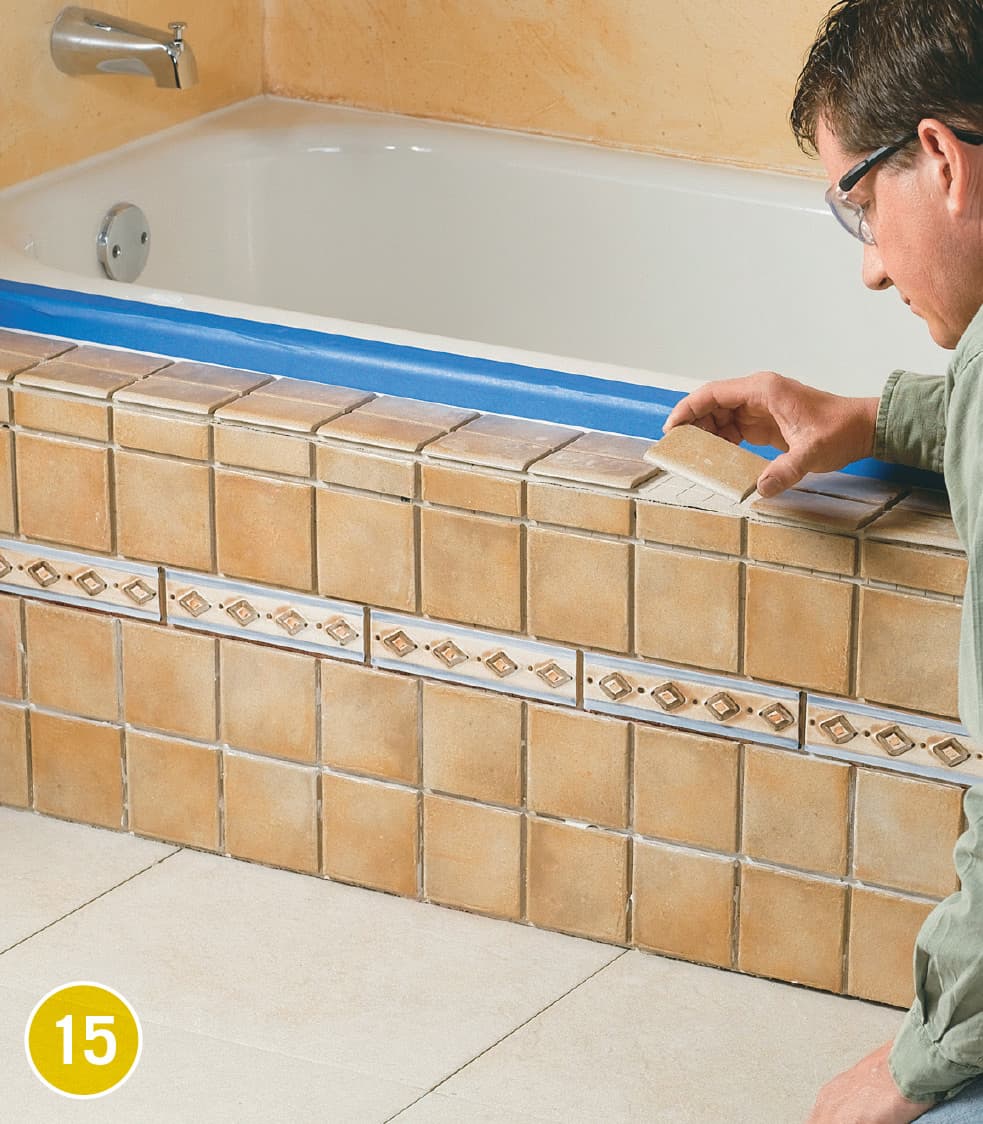
Remove the dry-laid row of tile along the top of the wall. Shield the edge of the tub with painter’s tape, then spread thinset adhesive on the wall and begin to lay tile. Keep the joints of the field tiles on the top aligned with the grout joints of the field tile on the face of the wall.
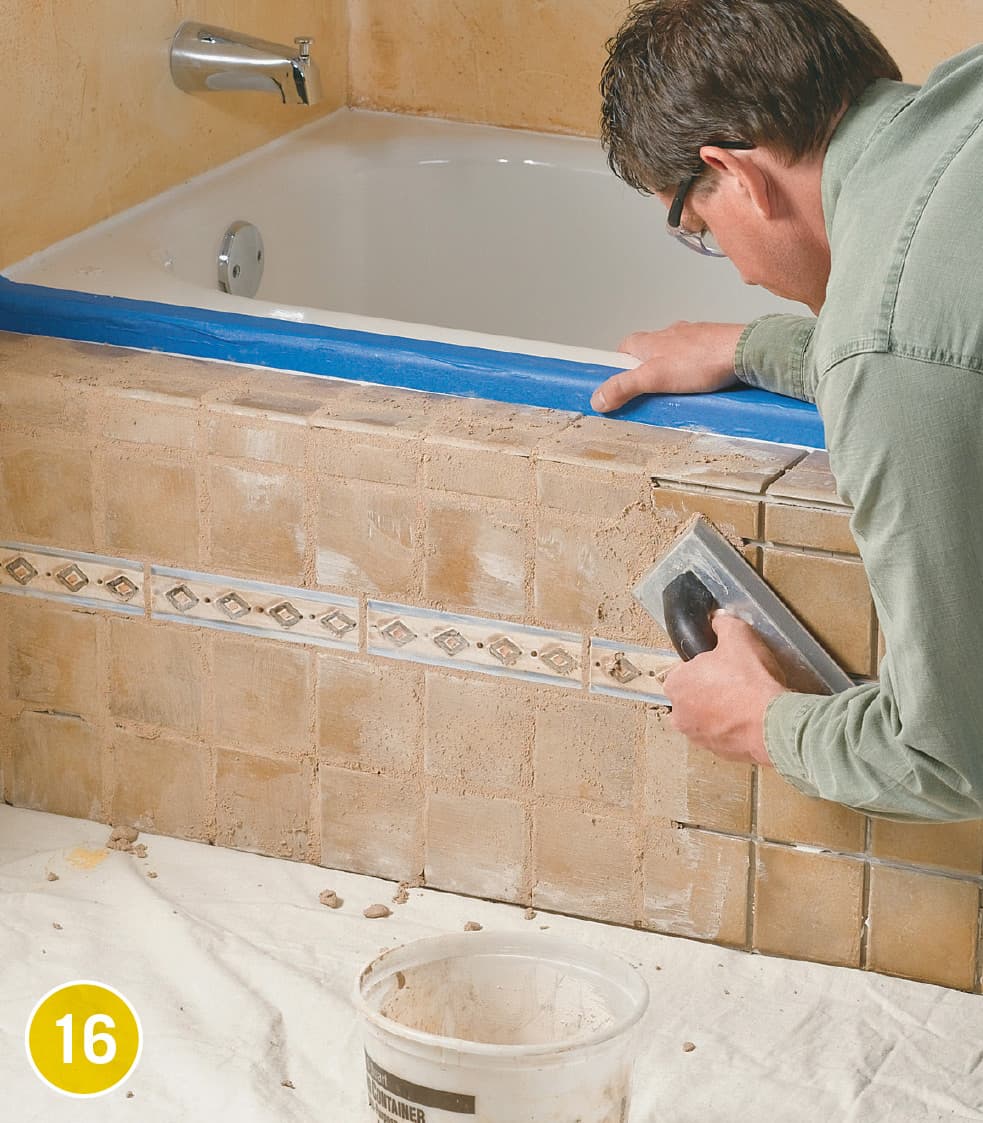
Mix a batch of grout and use a grout float to force it into the joints between the tiles. Keep the space between the top field tiles and the tub clear of grout to create space for a bead of silicone caulk between the tub and tile.
Remove excess grout and clean the tile using a damp sponge. Rinse the sponge often.
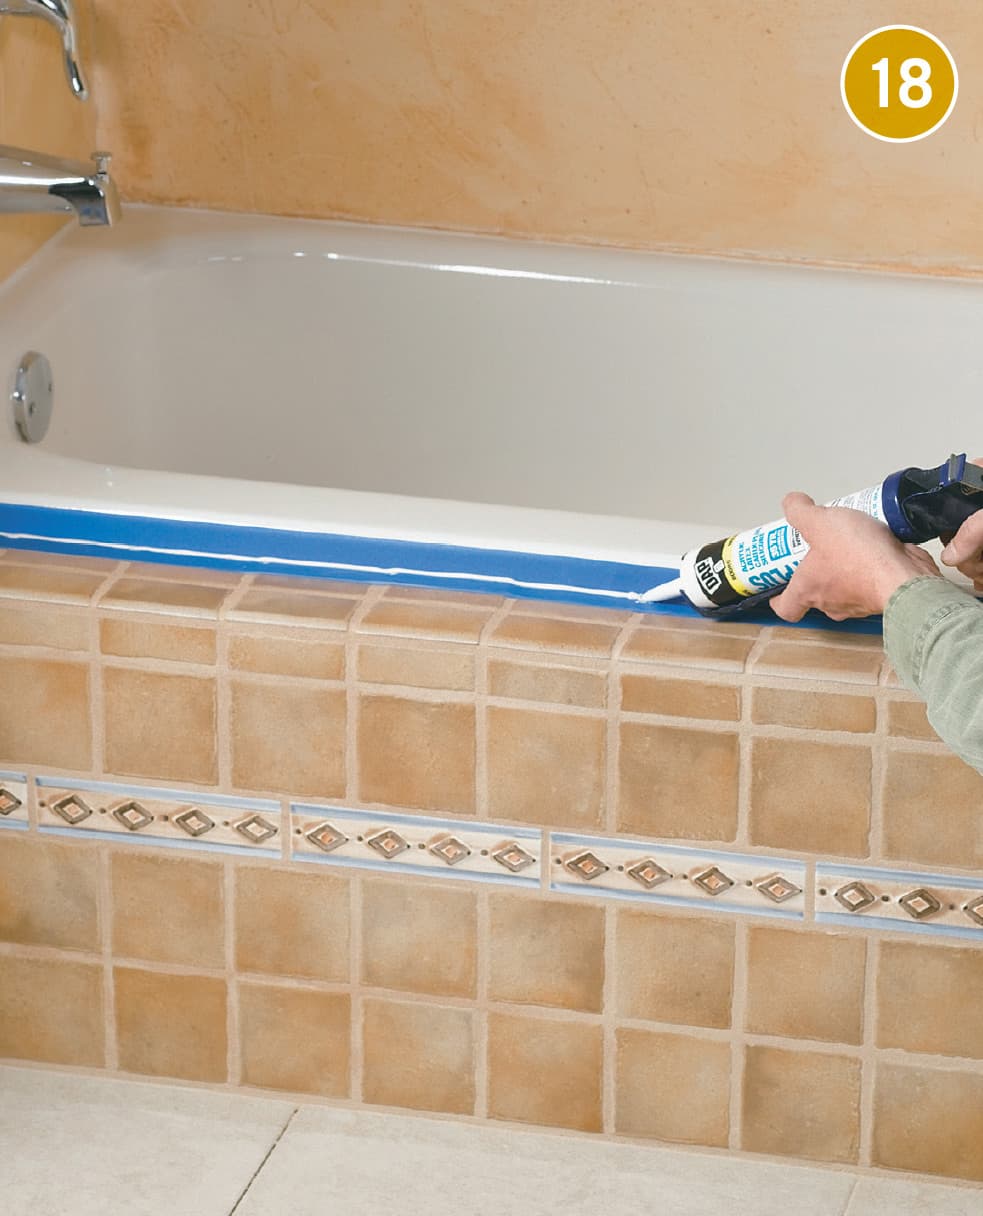
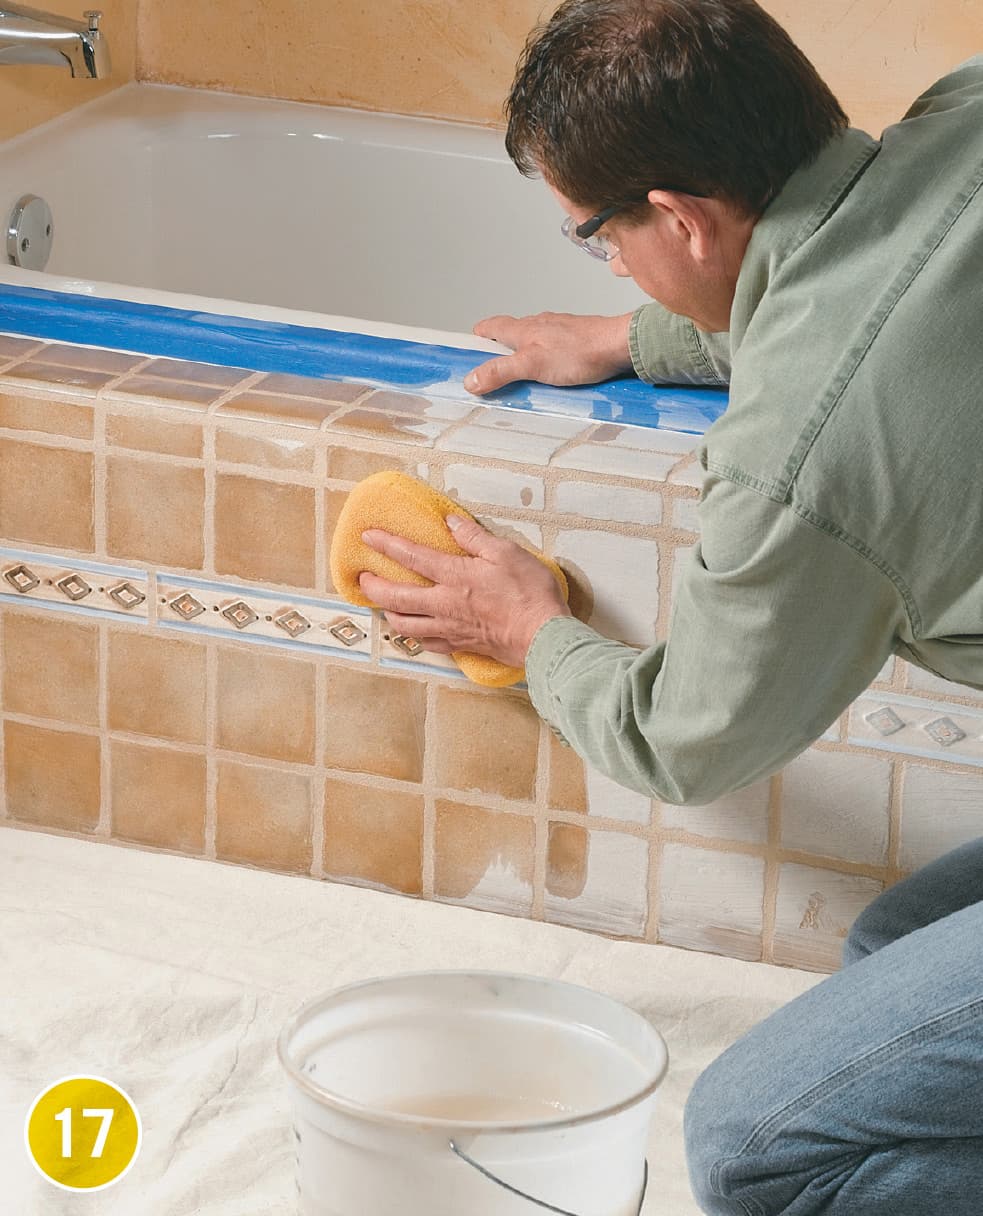
After 24 hours, clean the area where the tile and tub meet with rubbing alcohol, then put tape on the edge of the tub and the face of the tile. Apply clear silicone caulk into the gap, overfilling it slightly.
Smooth the caulk with a moistened plastic straw or a moistened fingertip to create an even finish. Make sure this spot is well-sealed, because it is a prime spot for water to penetrate into the tub wall.

When the grout has cured completely (consult manufacturer’s directions), apply grout sealer to the joints.
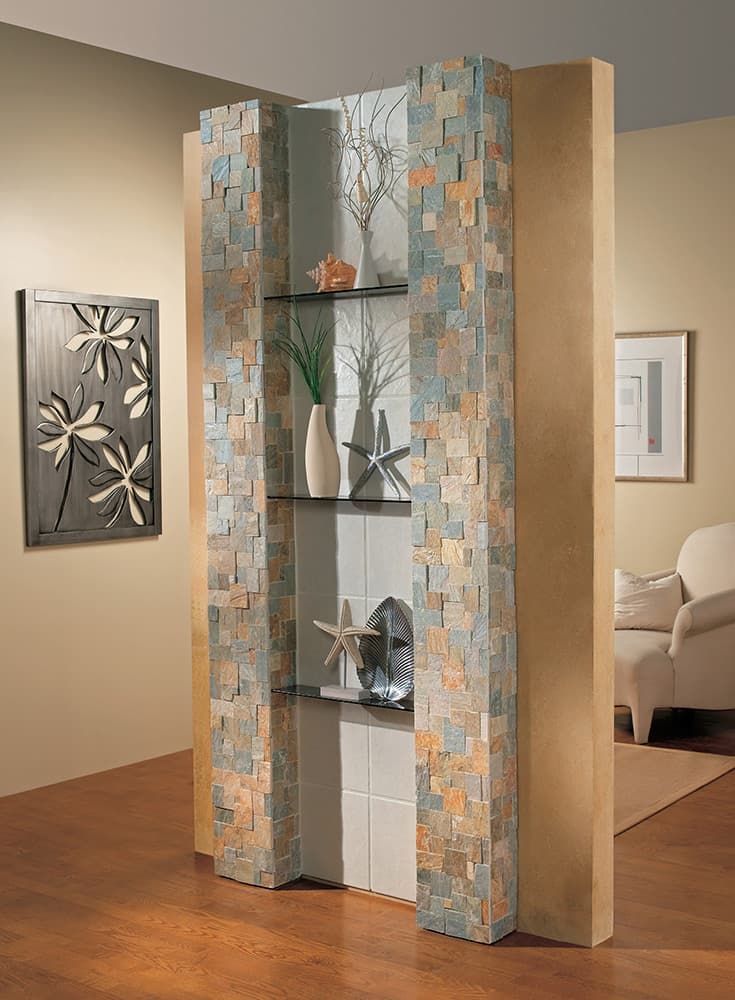
This unique room feature is a showcase for beautiful tile work. A niche can be added to just about any wall, including a room divider wall that is built specifically to support the niche.
Tiled Wall Niche
A wall niche—a small recessed area between studs—provides ideal display space and creates a focal point in a room. Typical recessed niches require that you cut into the wall, which can be a little intimidating. An easier answer is to build outward from the wall, as we do here.
The “columns” that form the sides of our niche are plain wood boxes that are built in a workshop and then installed. Quartz tile is attached to the columns after installation, and contrasting wall tiles are added to the wallspace between the columns. Finally, glass shelves are installed between the tiled columns to complete the project. The finished look is textural, natural, and sophisticated.
When designing your project, consider the size of the tile and grout lines to create a plan that requires the fewest possible cut tiles. If it’s not possible to complete an area (such as a column or the background) with full tile, plan to cut equal-size tiles for each side so the full tiles are centered. If it is not possible for you to attach both boxes to wall studs, use sturdy hollow wall anchors or toggle bolts to secure one of the boxes.
TOOLS & MATERIALS
Tape measure
Stud finder
Circular saw
Drill
Long driver bit or bit extender
Bar clamps
Pry bar
Hammer
Laser or carpenter’s level and chalkline
Awl
1/4" carbide-tip bit
1/4" notched trowel
Grout float
Grout sponge
Buff rag
Foam brush
Needlenose pliers
Rubber mallet
1 1/4" screws
Construction adhesive
Wide painter’s tape
Sheet plastic
Tile
Thinset mortar
Tile spacers
Grout
Latex additive
Shelf pins (4 per shelf)
Teflon tape
Glass shelves
Grout sealer
Lumber (1 × 2, 1 × 6, 1 × 8)
Caulk gun
Tile-cutting tools
Eye protection
How to Build a Tiled Wall Niche
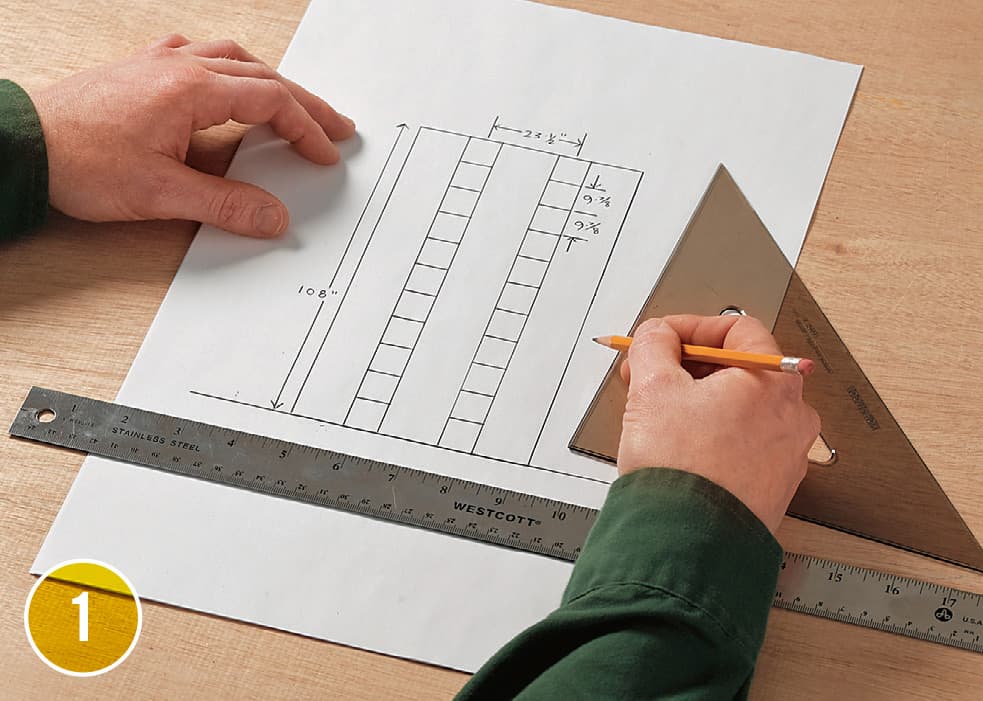
Use a stud finder to locate the studs in the area and mark them. Measure the area and draw a plan on graph paper.
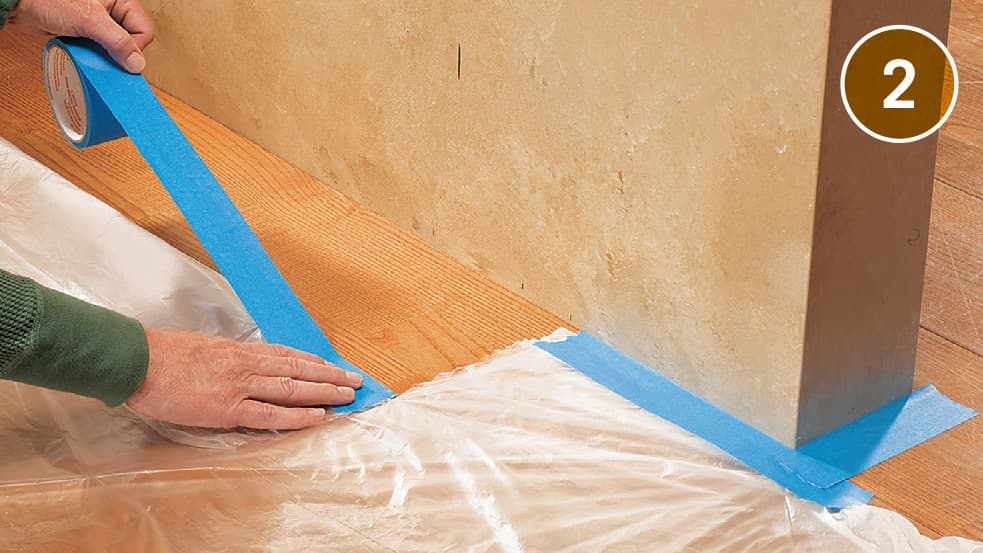
If there are baseboards in the construction area, remove them using a pry bar and hammer. Tape down sheet plastic in the construction area, as close to the wall as possible.
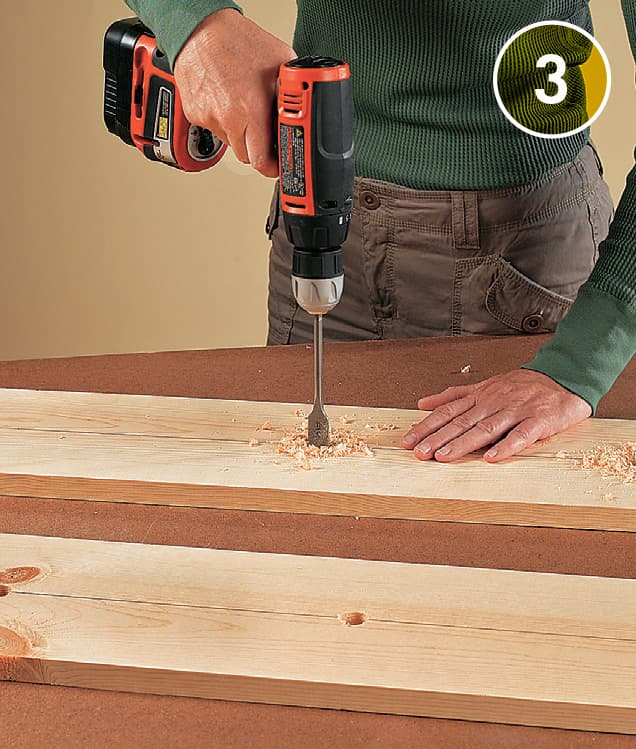
Cut four 1 × 6s and four 1 × 8s to length (108 inches for our project). On two of the 1 × 8s, drill 3/4-inch holes centered every 10" down the length of each board. On the remaining two 1 × 8s, drill pilot holes centered every 10".
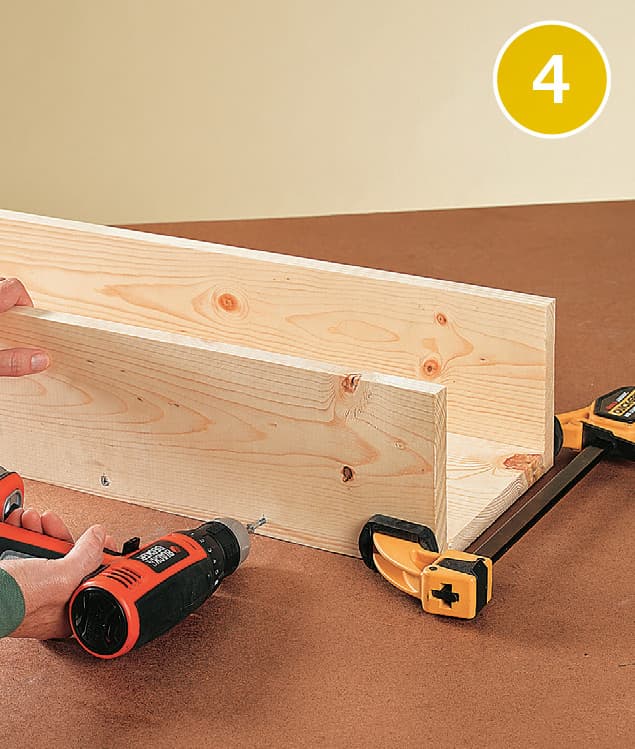
Place one 1 × 8 (one with pilot holes) on the work surface and position a 1 × 6 on edge beside it. Clamp the boards together and drive a 1 1/4" screw every 6" to join them. Put a second 1 × 6 on the work surface and clamp to assembly as shown. Drive screws every 6" to join the pieces.
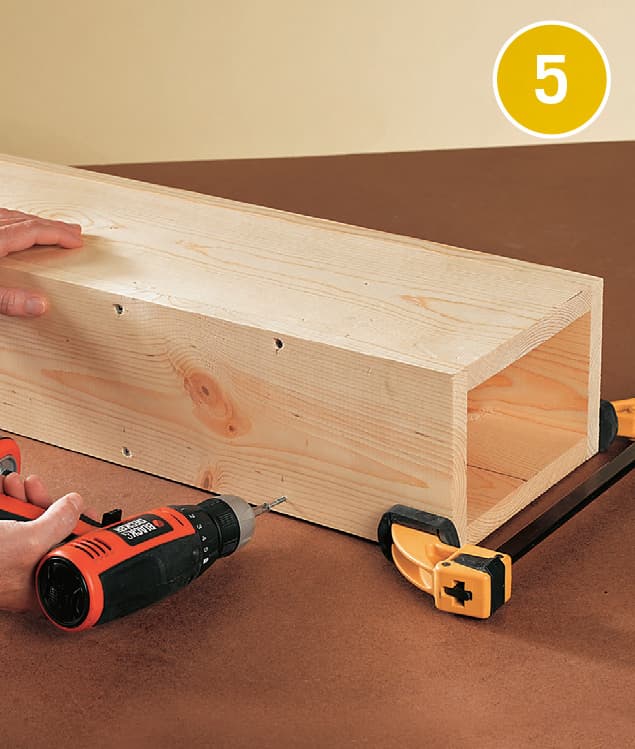
Complete the box by adding a 1 × 8 (with 3/4" holes in it) to the opposite side of the assembly and fasten it as described. Build a second, identical box.
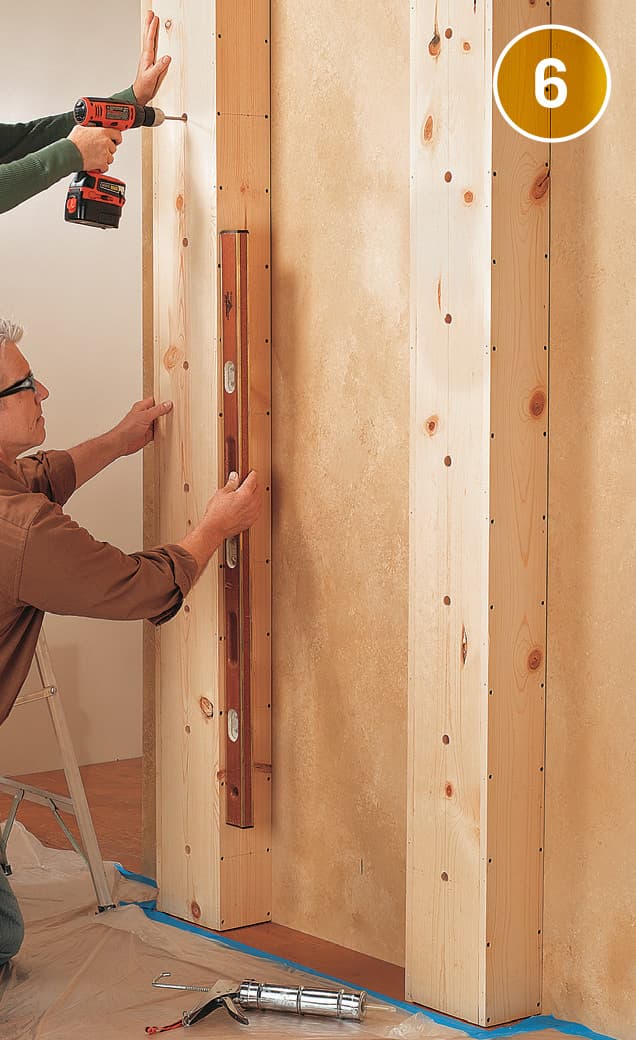
Shoot a vertical line on the wall with the laser level. Spread a bead of construction adhesive on the back (1 × 8 with pilot holes) of the first box. With a helper, align the outside edge of the box. Using a long magnetic driver bit or bit extender, drive an 1 1/4" screw through each pilot hole (and into stud). Install the second box on the other side of the niche.
NOTE: When you cannot hit a stud, use toggle bolts.
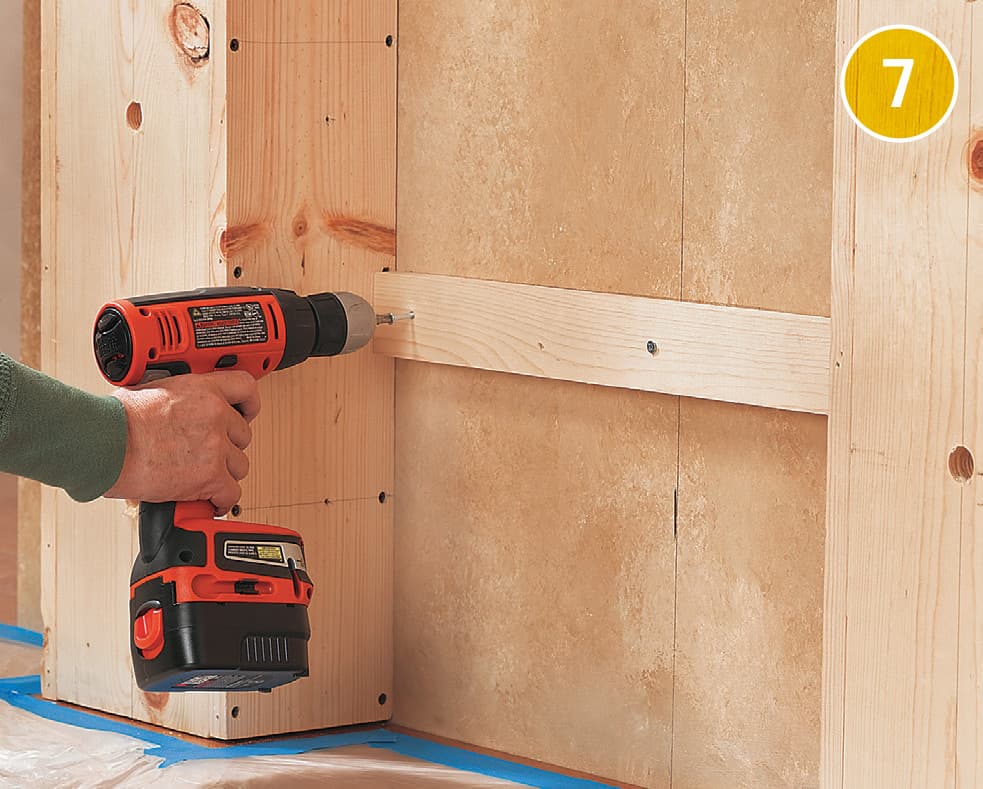
Mark the reference lines. If necessary, tack a 1 × 2 batten in position to support the second row of tile above the floor. If tiles have to be cut for this row, mark and cut all of them.

Mix a small batch of thinset mortar. Spread the mortar on a small section of wall, then set the tiles into it. If tile is not self-spacing, insert spacers as you work. When all other tile is set, remove the battens and set the bottom row.
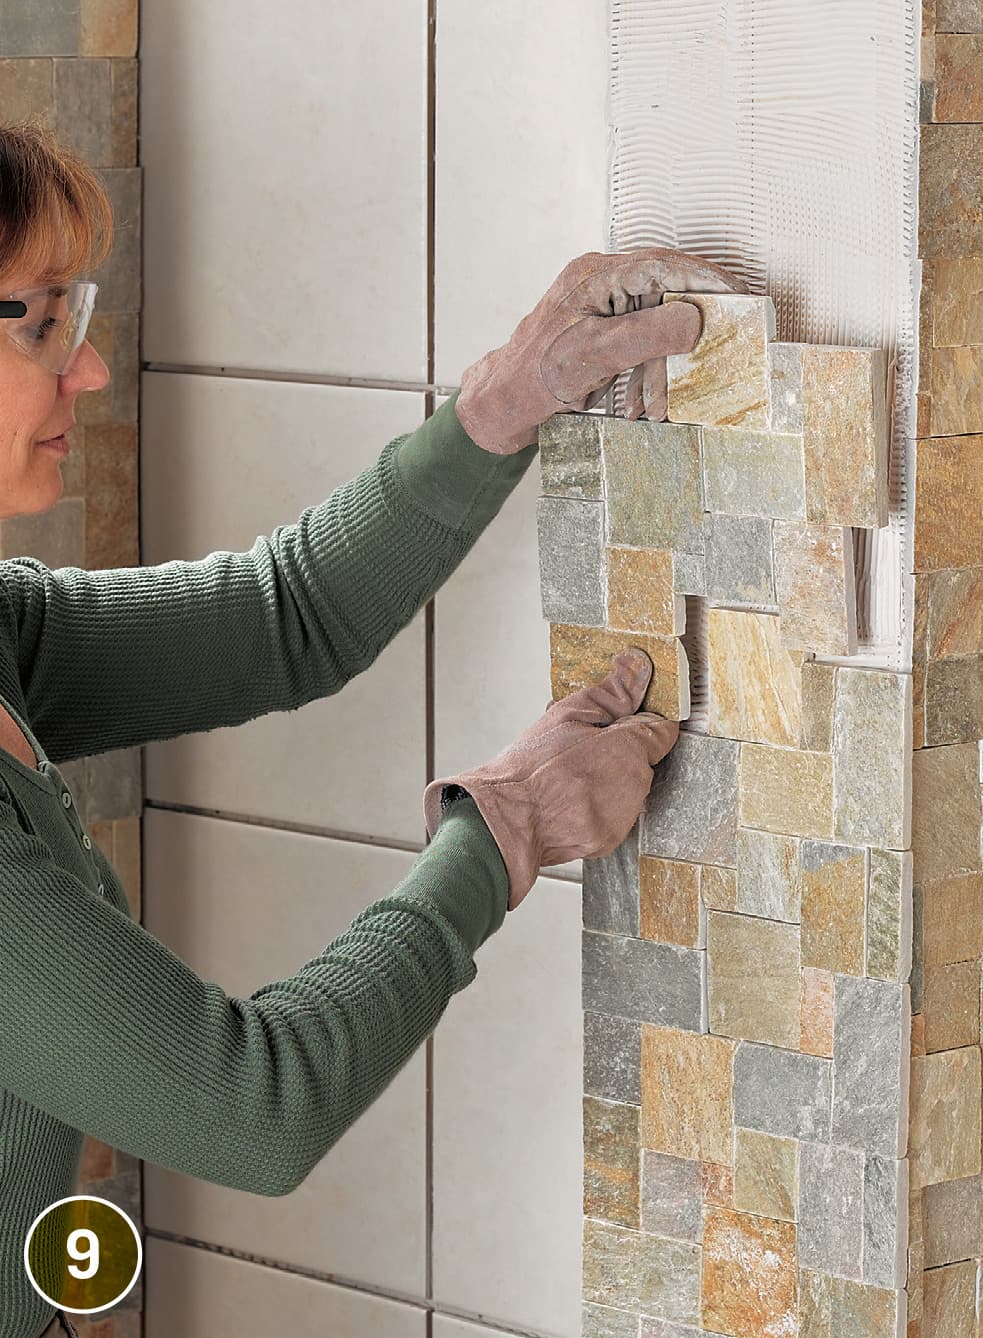
Repeat Step 8 to set tile on first one box and then the other. Let the mortar cure, according to manufacturer’s instructions.

If there are spacers between tiles, use needlenose pliers to remove them. Grout the tile in the center of the niche. If necessary, grout the tile on the columns. Let the grout set and then wipe away excess with a damp sponge.
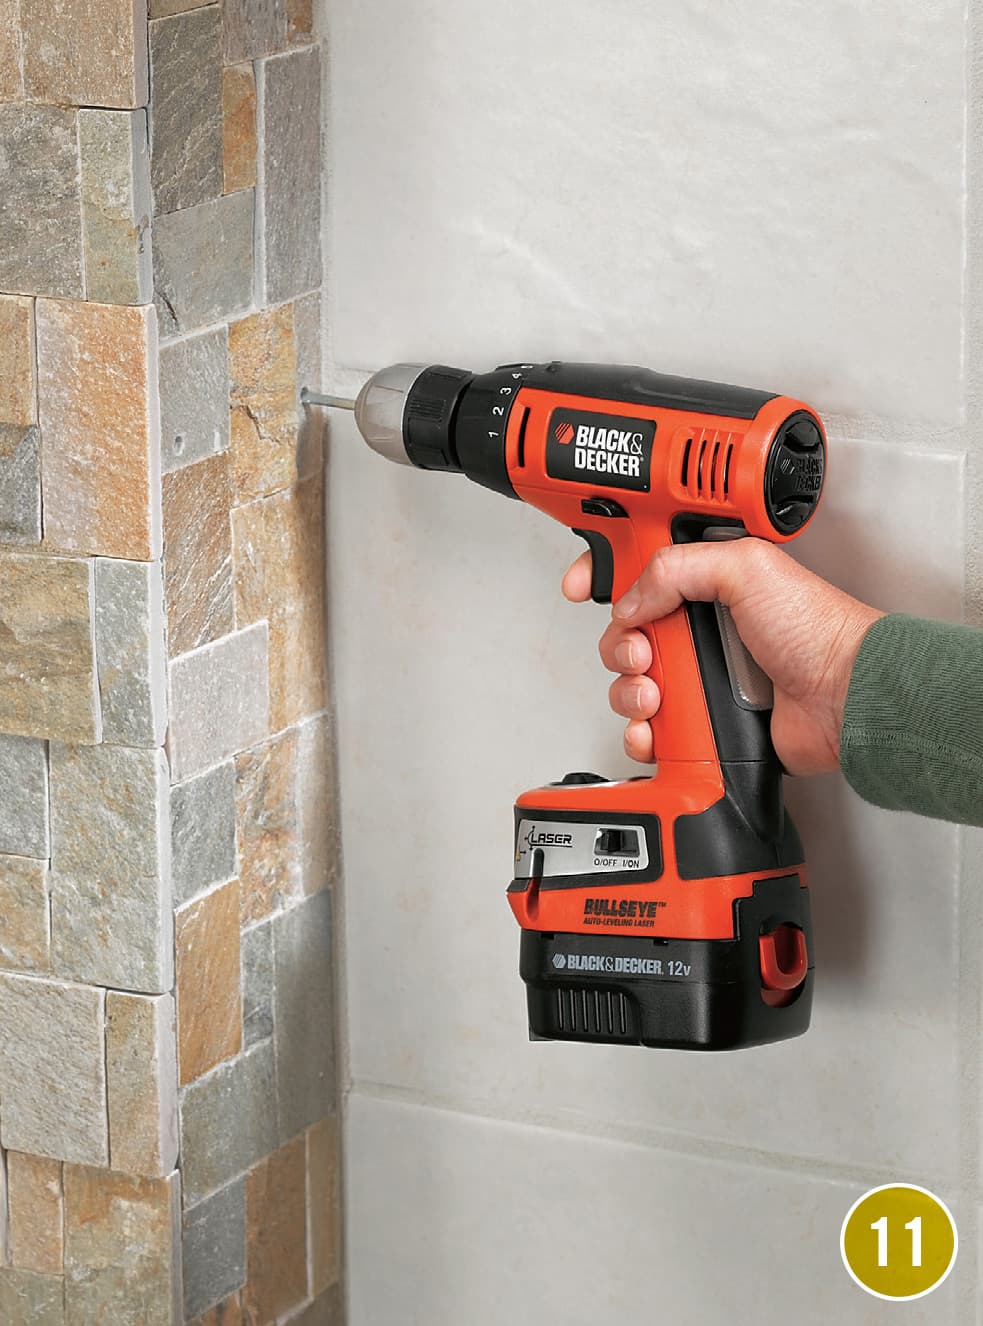
On the inside edges of each column, measure and mark the location for the shelf pins. Use a laser level to check and adjust the marks. Using an awl and hammer, create a dimple at each mark, then use a carbide-tipped 1/4" bit to drill the holes.
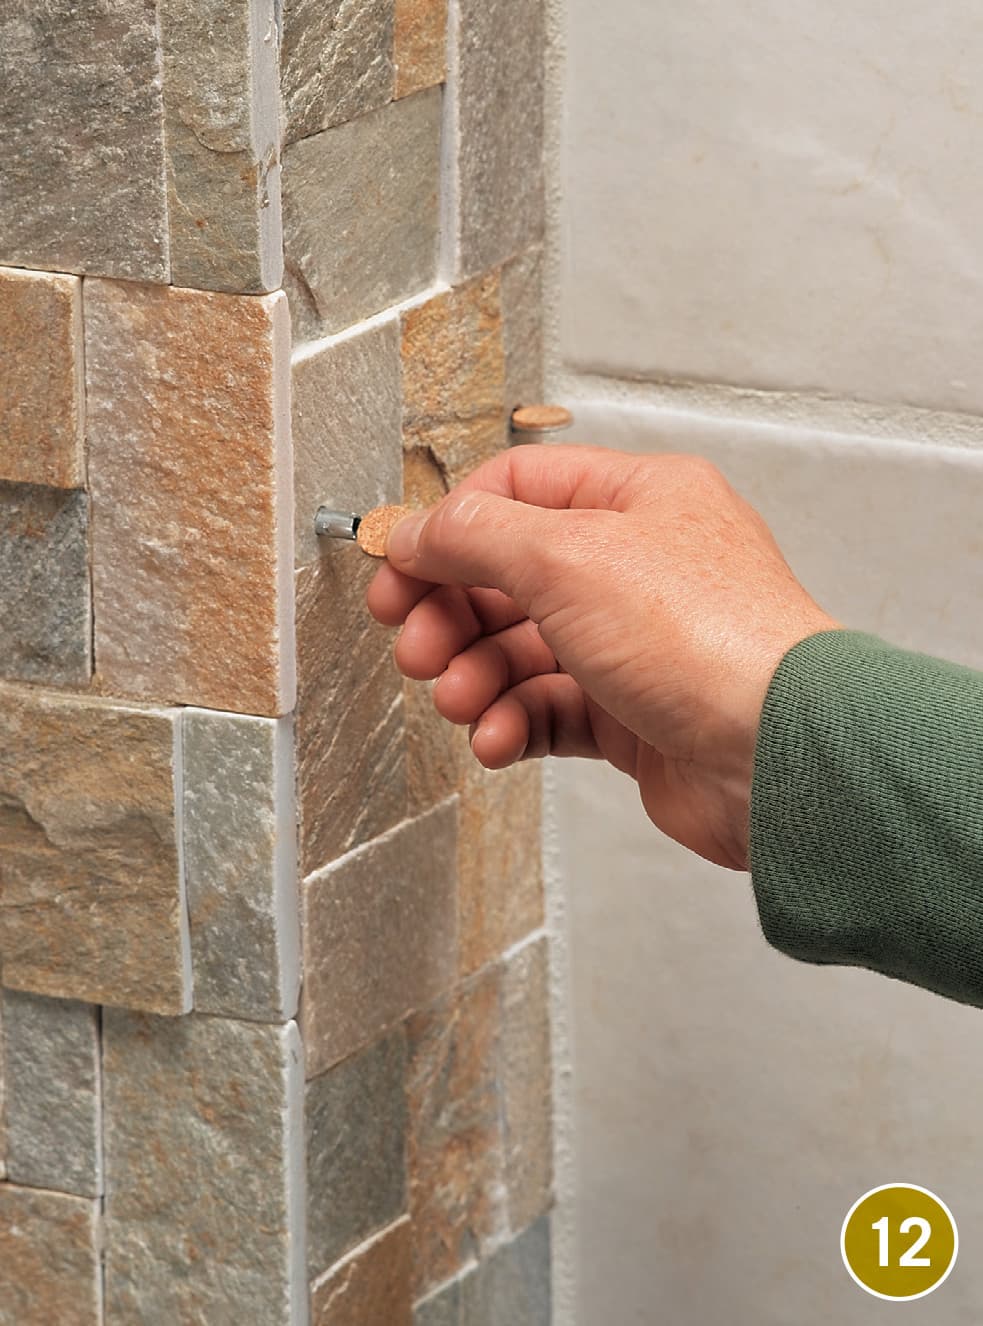
Wrap the peg of each shelf pin with Teflon tape. (The tape will seal the hole and keep moisture from getting behind the tile.) Tap a pin into each hole, using a rubber mallet if necessary. Position the glass shelves.
Retrofit Accent Strip
Many of us live with tile we don’t particularly like. It’s easy to see why: builders and remodelers often install simple, neutral tile in an effort not to put off future buyers. Older homes sometimes have tile that’s not quite vintage, but certainly no longer stylish. Or, a previous owner might just have had different taste. Because tile is so long-lasting, new styles and trends often overtake it and make it look dated. Here’s a bit of good news: there’s a choice beyond simply living with it or tearing out perfectly good tile to start over.
Removing a section of boring tile and replacing it with some decorative accent tile can transform a plain wall into one that makes a unique design statement. And while a project such as this requires a bit of demolition, it can be done with very little mess and fuss. Because it involves breaking the seal of the wall surface, it’s a better choice for a tiled wall that gets little exposure to water (as opposed to a shower wall or tub deck).
The new tile you install will need to be grouted, and the new grout will undoubtedly be a different color. The only way to blend the new tile into the old is to regrout the entire area. If the project involves only one wall and the same grout color is still available, it is necessary to remove the grout surrounding the tile on the project wall. If you are tiling two or more walls, regrout the whole room.
This project is easier if you don’t have to cut any existing tile. Cutting tile is not especially difficult if you do, but it’s always best to know what you’re getting into before committing to a project.
How to Embellish a Tiled Wall
Measure the decorative tiles and draw a detailed plan for your project. Indicate a removal area at least one tile larger than the space required. If it will be necessary to cut tile, create a plan that will result in symmetrical tiles.
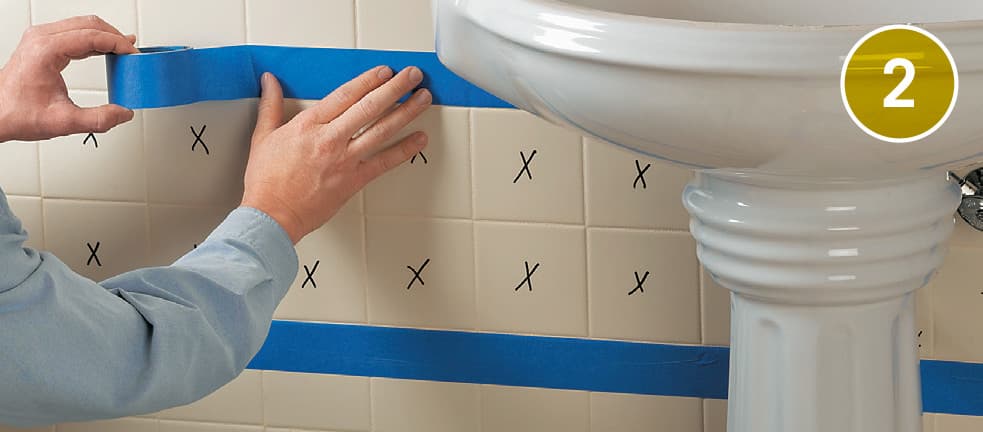
Protect the floor with a drop cloth. So you can patch the tile backer, you’ll need to remove a section of tile that’s a minimum of one tile all around the project installation area. Using a grease pencil, mark the tiles to be removed, according to the plan drawing. Put masking tape or painter’s tape on the edges of the bordering tiles that will remain to keep them from being scratched or otherwise damaged by the grout saw. If you will be reinstalling some of the old tiles, protect them as well.
TOOLS & MATERIALS
Tape measure
Grout saw
Grout scraper
Flathead screwdriver
Straightedge
Utility knife
Drill
1/4" notched trowel
Grout float
Grout sponge
Buff rag
Needlenose pliers
Drop cloth
Grease pencil
Masking tape
Safety glasses
Wallboard screws
Cementboard
Thinset mortar
Decorative tile
Tile spacers
Grout
Dust mask
Wallboard tape
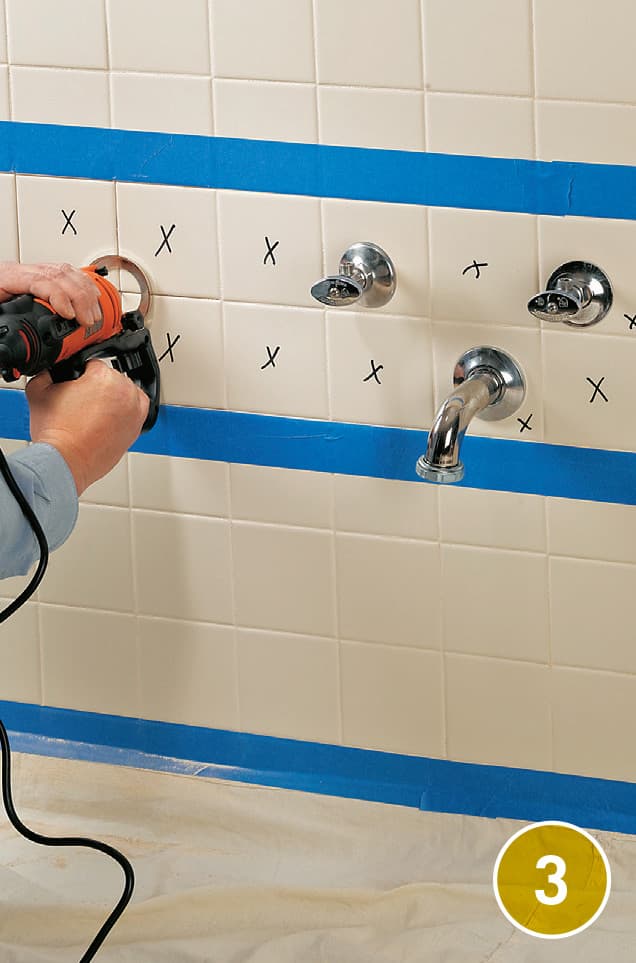
Wearing eye protection and a dust mask, use a grout saw to cut grooves in all of the grout lines in the removal area. If the grout lines are soft this will only take one or two passes. If the grout is hard, it may take several. Using a grout scraper, remove any remaining material in the joint. Angle the tools toward the open area to protect the tile.
With a flathead screwdriver, pry up the edges of the tile at the center of the removal area. Wiggle the blade toward the center of the tile and pry up to pop it off. (For large areas, see page 133 for another removal method.)
Draw cutting lines on the drywall that are at least 1/2" inside the borders of the area where you removed tiles. Using a straightedge and utility knife, carefully cut out the old drywall.
NOTE: If the tile comes off very easily and the tile backer is not damaged, you may be able to scrape it clean and reuse it.
Cut cementboard strips that are slightly longer than the width of the opening. Insert the strips into the opening and orient them so the ends are pressed against the back surface of the tile backer. Drive wallboard screws through the edges of the old tile backer and into the strips to hold them in place.
Cut a cementboard patch to fit the opening in the tile backer. Place the patch in the opening and drive wallboard screws through the cementboard and into the backer strips. Also drive screws at any stud locations.

Cover the edges with wallboard tape. Mix a small batch of thinset mortar. Apply the mortar using a notched trowel to spread it evenly.
Gently press the accent tiles into the adhesive, smoothing it from the center toward the edges. Let the mortar cure as directed.
Use a damp sponge to soak the protective sheet on the tile. Once wet, slide the sheet off and throw it away.
Mix a batch of grout and fill the joints between tiles on the entire wall, one section at a time. Clean the tile with a damp sponge (inset). Occasionally rinse the sponge in cool water.
 DESIGN SUGGESTIONS
Inserts add interest, texture, and color to tile designs. This piece combines tumbled stone with marble in a delicate floral motif.
This stone insert adds a contemporary flair to a simple tile design.
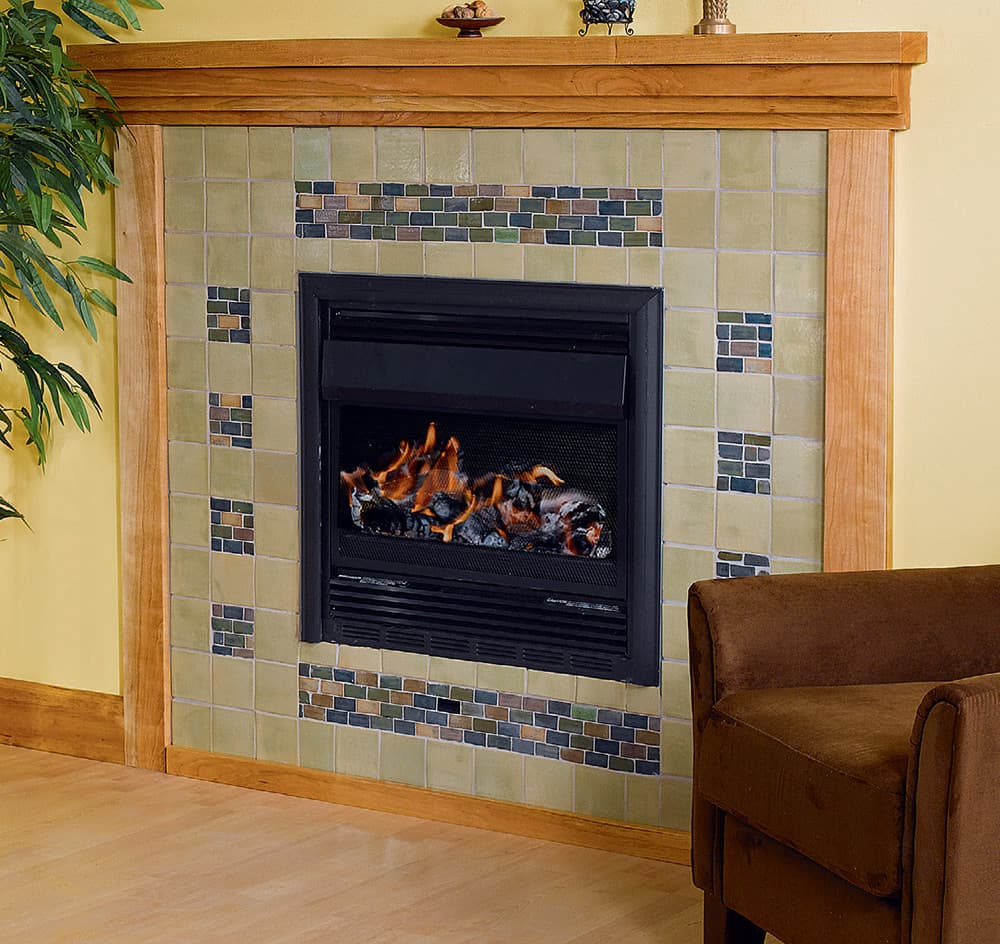
Fireplace Surround
Tile dresses a fireplace surround in style—any style you like. From simple ceramic to elegant cut stone to handmade art tile, anything goes. As long as it’s sturdy enough to withstand significant swings in temperature, almost any tile will work.
Although the project shown here starts with unfinished wallboard, you can tile over any level surface that isn’t glossy. If you’re tiling over old tile or brick, go over the surface with a grinder, then apply a thin coat of latex-reinforced thinset mortar to even out any irregularities. To rough up painted surfaces, sand them lightly before beginning the project.
The tile shown here is flush with the face of the firebox, which then supports it during installation. If necessary, tack level battens in place to support the weight of your tile during installation.
You can finish the edges of the surround with wood cap rail trim, as shown here, bullnose tile, or other trim tile.
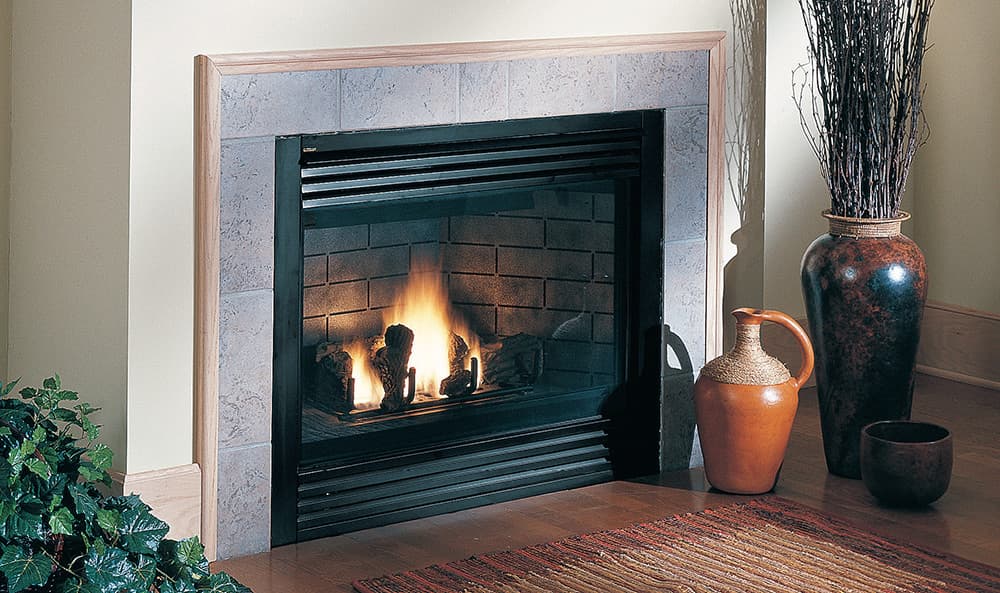
Because tile is not flammable it makes a beautiful first line of defense around a fireplace opening.
TOOLS & MATERIALS
Level
Drill
Hammer
Nail set
Notched trowel
Grout float
2 × 4 lumber
Mantel
Tile
Tile spacers
Masking tape
Grout
Cap rail trim
Wood putty
Sponge
Tape measure
Tile-cutting tools
Buff cloth
Buildup strips
Eye protection
Cementboard
Utility knife
Wallboard
Joint compound
Fiberglass seam tape
Wallboard knife
Scrap 2 × 4
Carpet scrap
Mallet
Trim (1 × 2, 1 × 3, 1 × 4)
6d and 4d finish nails
Pneumatic brad nailer
Sander
Wood-finishing materials
Latex-reinforced thinset mortar
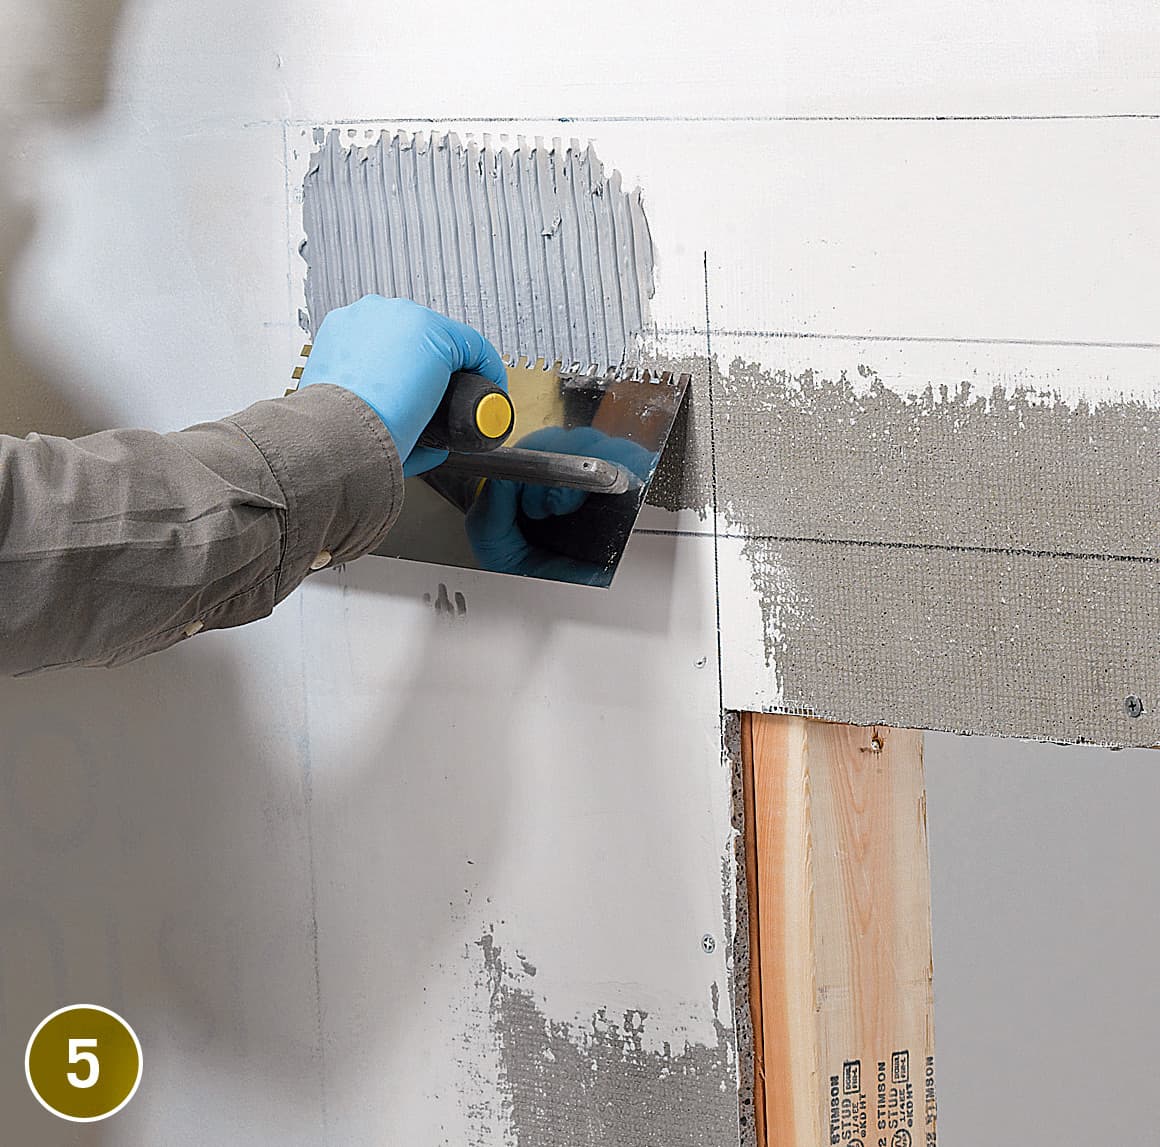
How to Tile a Fireplace Surround
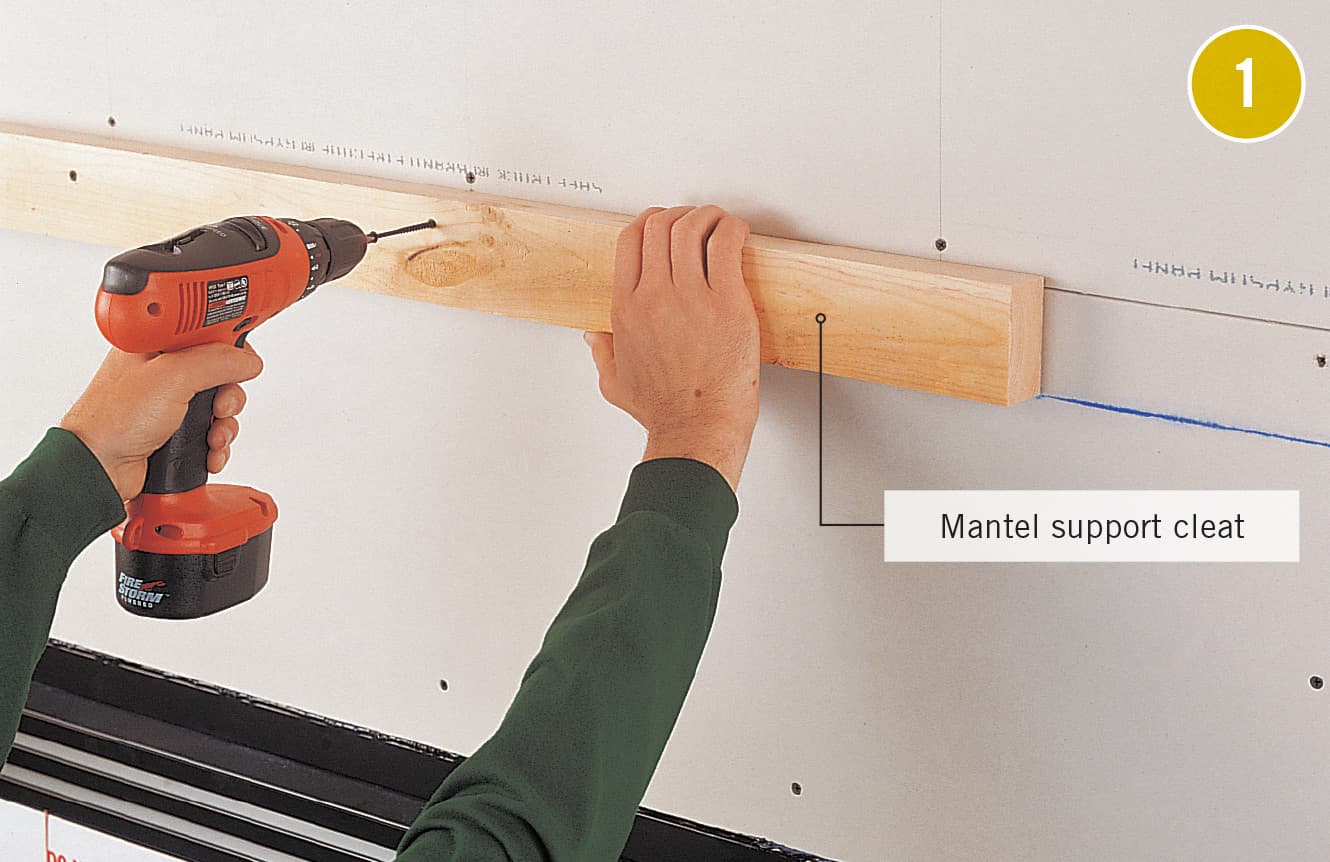
To install the mantel, measure up from the floor and mark the height of the support cleat. Use a level to draw a level line through the mark. Mark the stud locations just above the level line. Position the cleat on the line, centered between the frame sides, and drill a pilot hole at each stud location. Fasten the cleat to the studs with screws provided by the manufacturer.

Paint the areas of wallboard that won’t be tiled. Finish the mantel as desired, then fit it over the support cleat and center it. Drill pilot holes for 6d finish nails through the top of the mantel, about 3/4" from the back edge. Secure the mantel to the cleat with four nails. Set the nails with a nail set, fill the holes with wood putty, then touch up the finish.
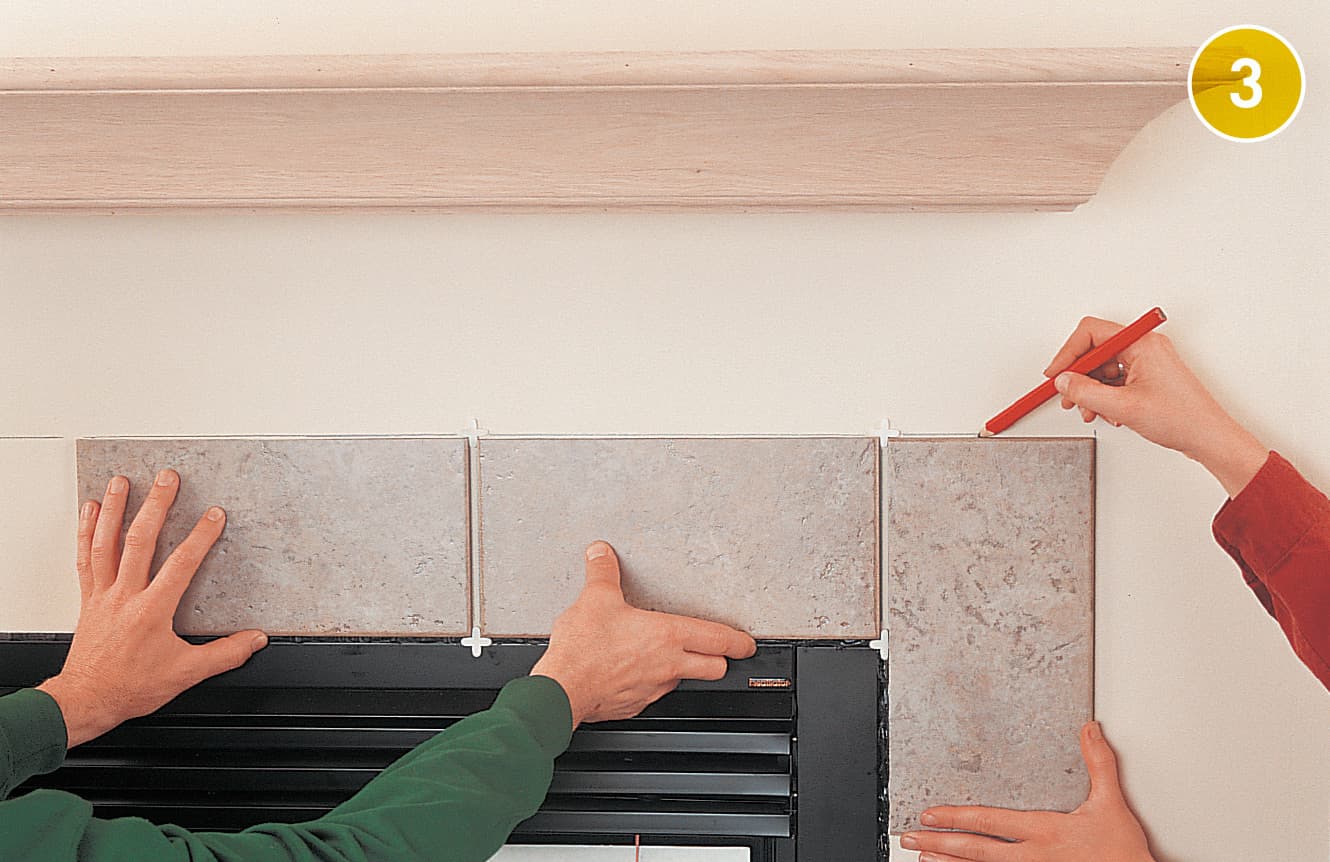
Dry-fit the tile around the front of the fireplace. You can lay tile over the black front face, but do not cover the glass or any portion of the grills. If you’re using tile without spacer lugs, use spacers to set the gaps (at least 1/8" for floor tile). Mark the perimeter of the tile area and make any other layout marks that will help with the installation. Pre-cut tiles.
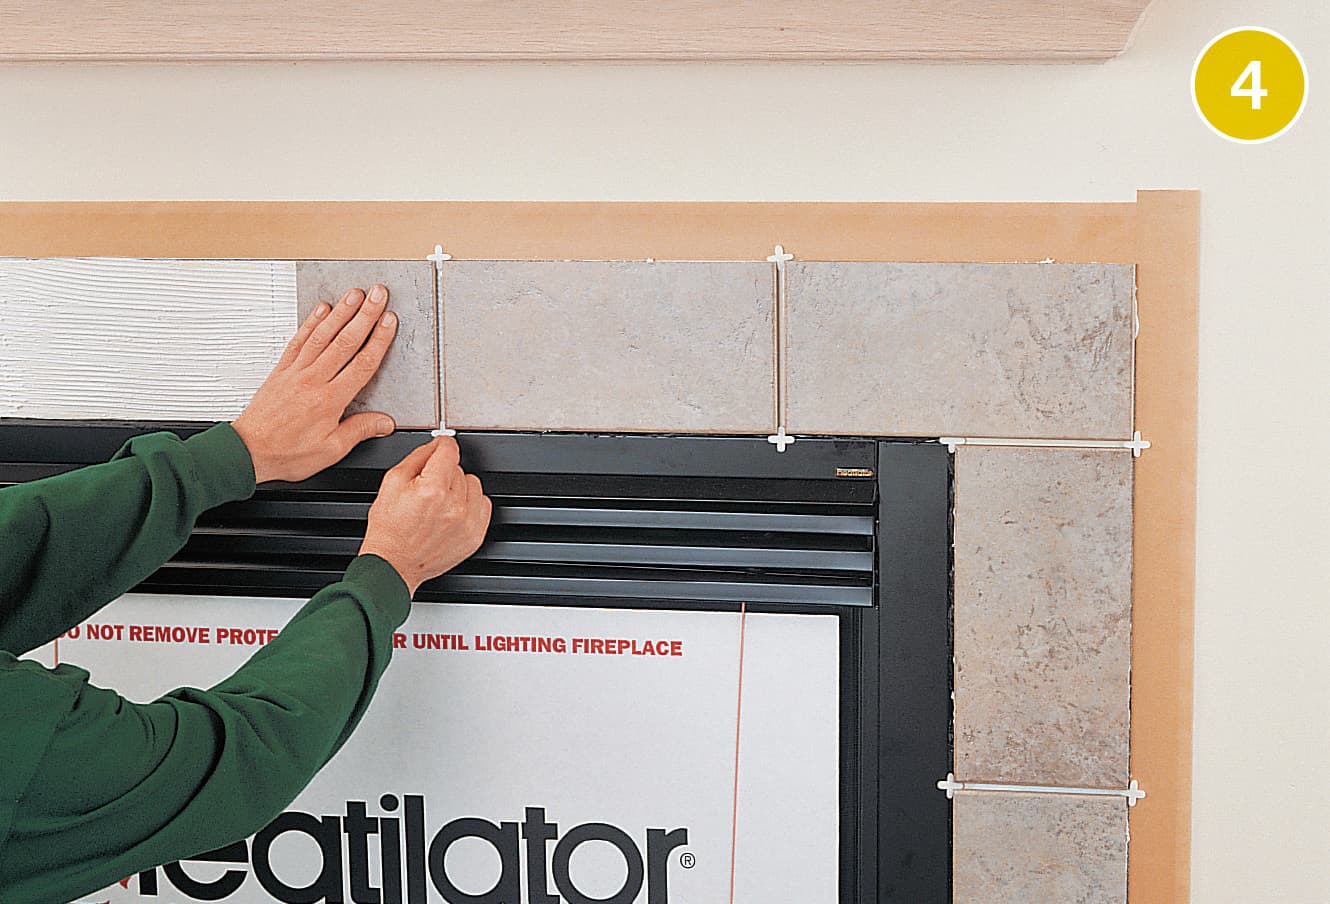
Mask off around the tile, then use a notched trowel to apply latex-reinforced thinset mortar to the wall, spreading it evenly just inside the perimeter lines. Set the tiles into the mortar, aligning them with the layout marks, and press firmly to create a good bond. Install spacers as you work. Install all of the tile, then let the mortar set completely.
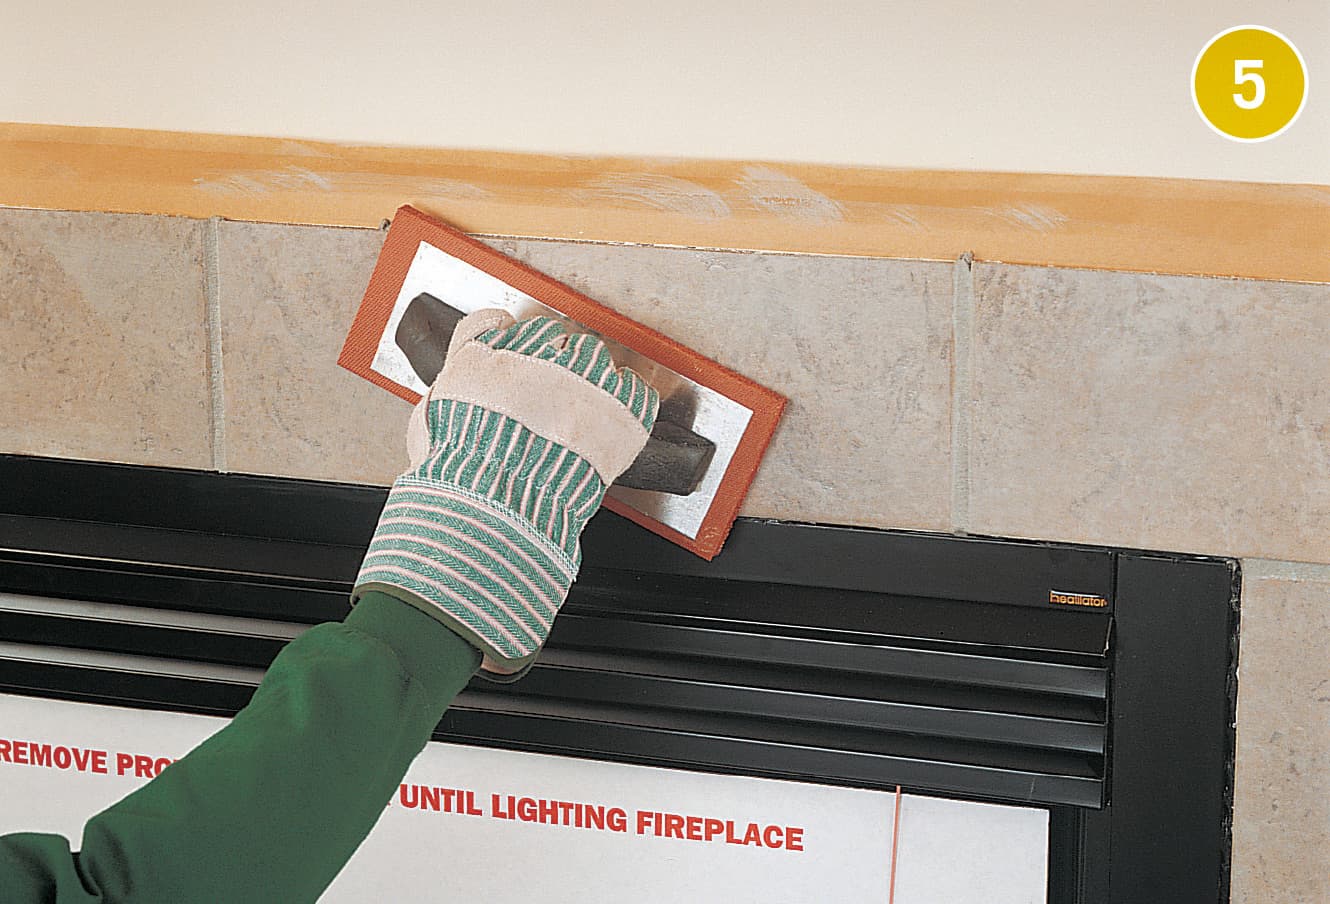
Mix a batch of grout and spread it over the tiles with a rubber grout float. Drag the float across the joints diagonally, tilting it at a 45° angle. Make another pass to remove excess grout. Wait 10 to 15 minutes, then wipe away excess grout with a damp sponge, rinsing frequently. Let the grout dry for one hour, then polish the tiles with a dry cloth. Let the grout dry completely.
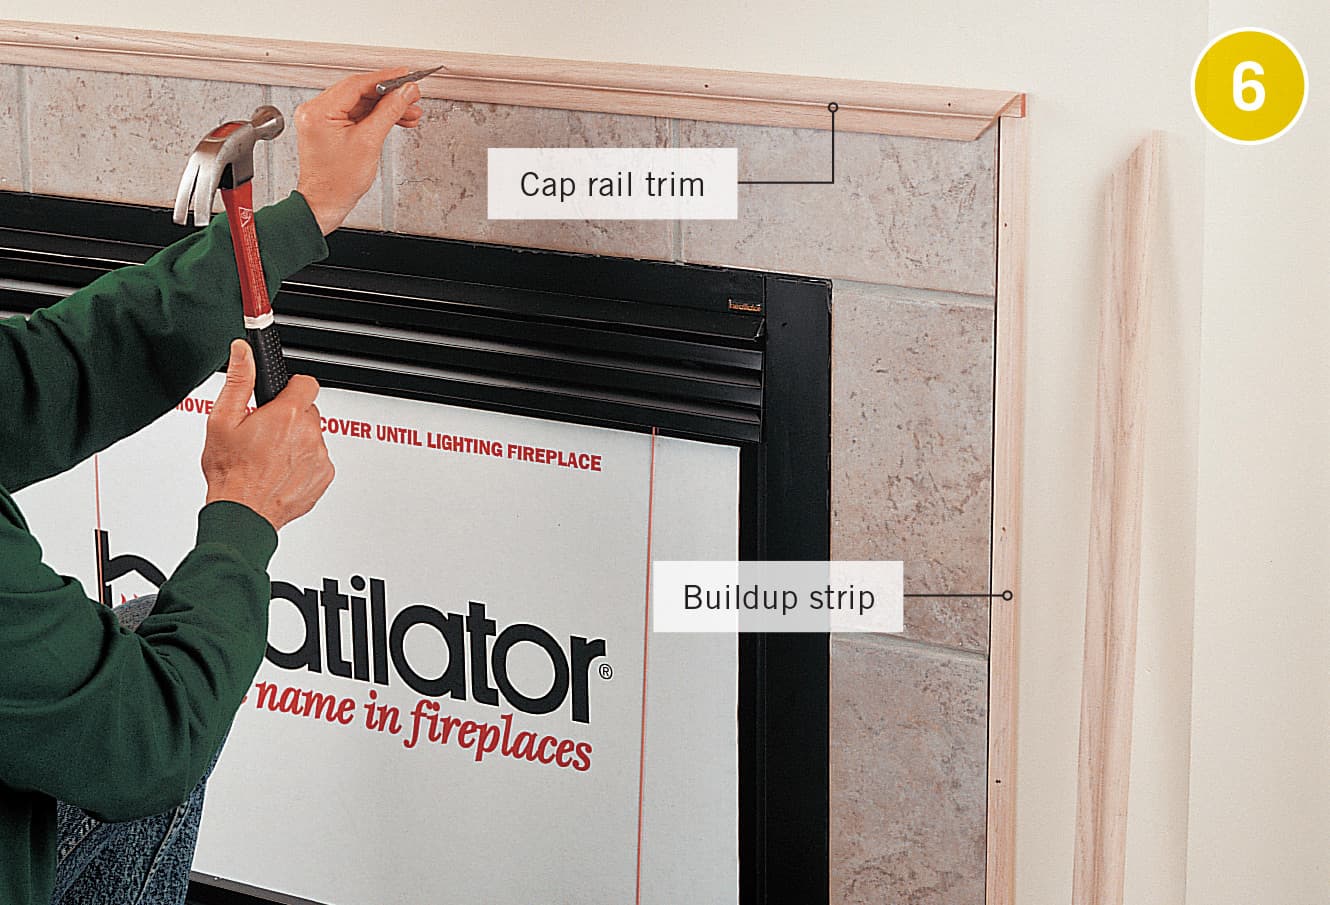
Cut pieces of cap rail trim to fit around the tile, mitering the ends. If the tile is thicker than the trim recesses, install buildup strips behind the trim using finish nails. Finish the trim to match the mantel. Drill pilot holes and nail the trim in place with 4d finish nails. Set the nails with a nail set. Fill the holes with wood putty and touch up the finish.
How to Install a Tile Surround with a Wood Border
A lovely ceramic tile and cherry fireplace surround frames a ventless gas fireplace in this basment rec room.
Cut cementboard into strips equal in width to the dimension of your tiled surround and attach them to the 2 × 4 nailers bordering the framed firebox opening. It is generally a good idea to predrill for cementboard screws, especially with narrower strips.
Patch around the cementboard, if necessary, with regular wallboard. If you are installing the surround in a damp area, such as a basement, use moisture-resistant wallboard.
Apply joint compound and fiberglass seam tape over seams and cover screwheads with compound (see pages 136 to 137). Sand the compound smooth.
Touch up paint around the tile installation area as needed.
Apply a mortar bed for the tile surround using a notched trowel (a 1/4" square-notch trowel is typical but check the recommendations on the thinset package label). Apply only as much mortar as you can tile in about 10 min. Treating each leg of the square surround separately is a good strategy.

Press the surround tiles into the mortar bed and set them by pressing with a short piece of 2 × 4 wrapped in a carpet scrap. Most tiles have spacing nubs cast into the edges so setting the gaps between tiles or tile sheets is automatic. If your tiles do not have spacing nubs, use plastic tile spacers available at your tile store. Let the thinset mortar dry overnight once you’ve finished setting the tiles. See page 26 if you need to cut tiles.

Apply dark-tinted grout to the tiles using a grout float. Let the grout harden slightly and then buff off the residue with a soft, clean cloth. For more information on grouting, see page 143.
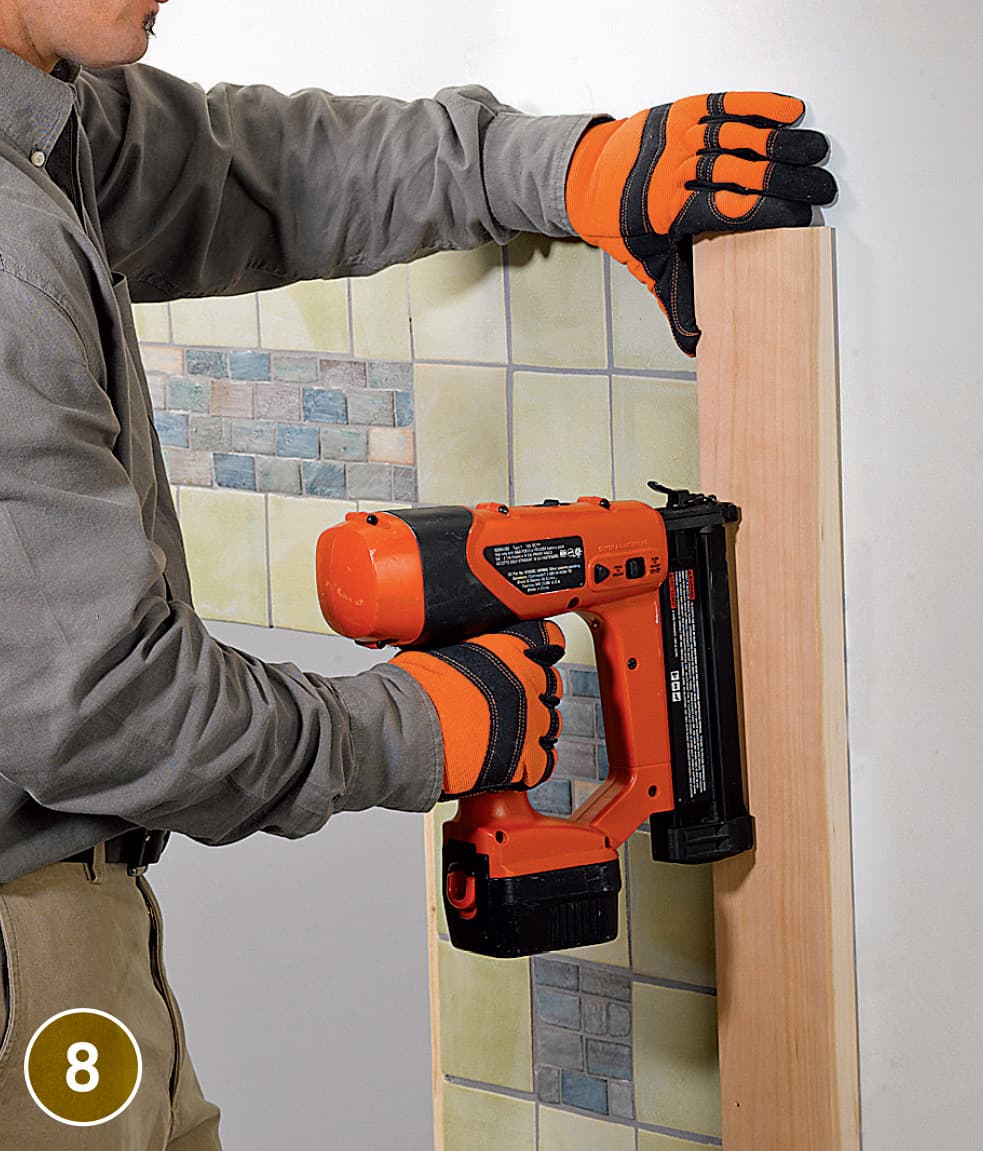
Begin adding surround trim. Here, 1 × 4 cherry casing is being attached to wall stud locations. The side casings should be slightly off the floor (if you have not installed flooring yet account for the floor covering thickness) and butted against the tile surround. If you have planned properly, there will be wall studs behind the casing.
NOTE: We chose 1 × 4 cherry because it is attractive, but also because you can usually buy it dimensioned, planed, and sanded on all sides at the lumber yard. If you have woodworking equipment, use any lumber you like.
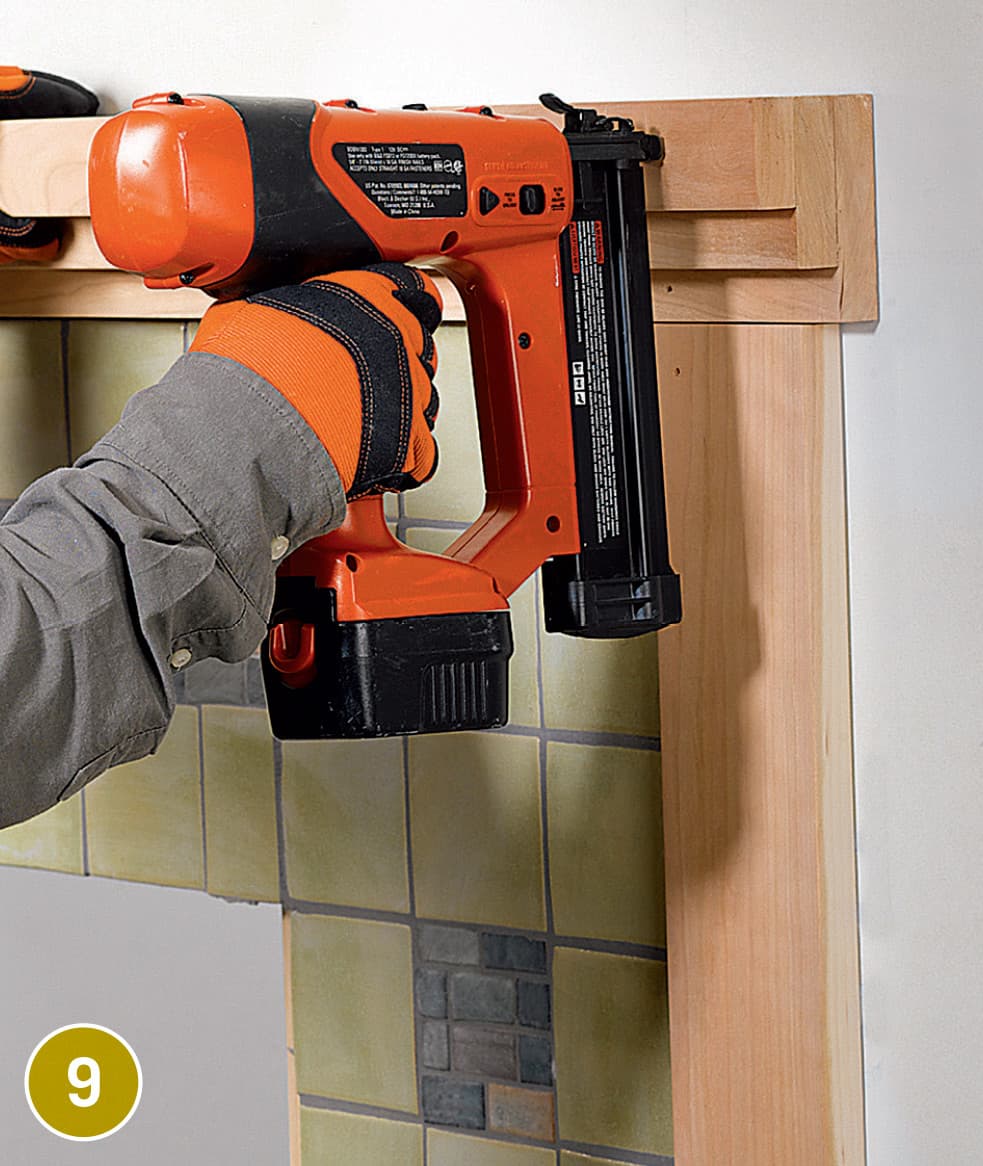
Add built-up head casing. The head casing should overhang the side casings by an inch or so. We used a built-up technique to add some depth and profile to the head casing. First, attach a full-width 1 × 4 to the wall. Then, install a 1 × 3 so the ends and top are flush with the ends and top of the 1 × 4. Finally, install a cherry 1 × 2 in the same manner.
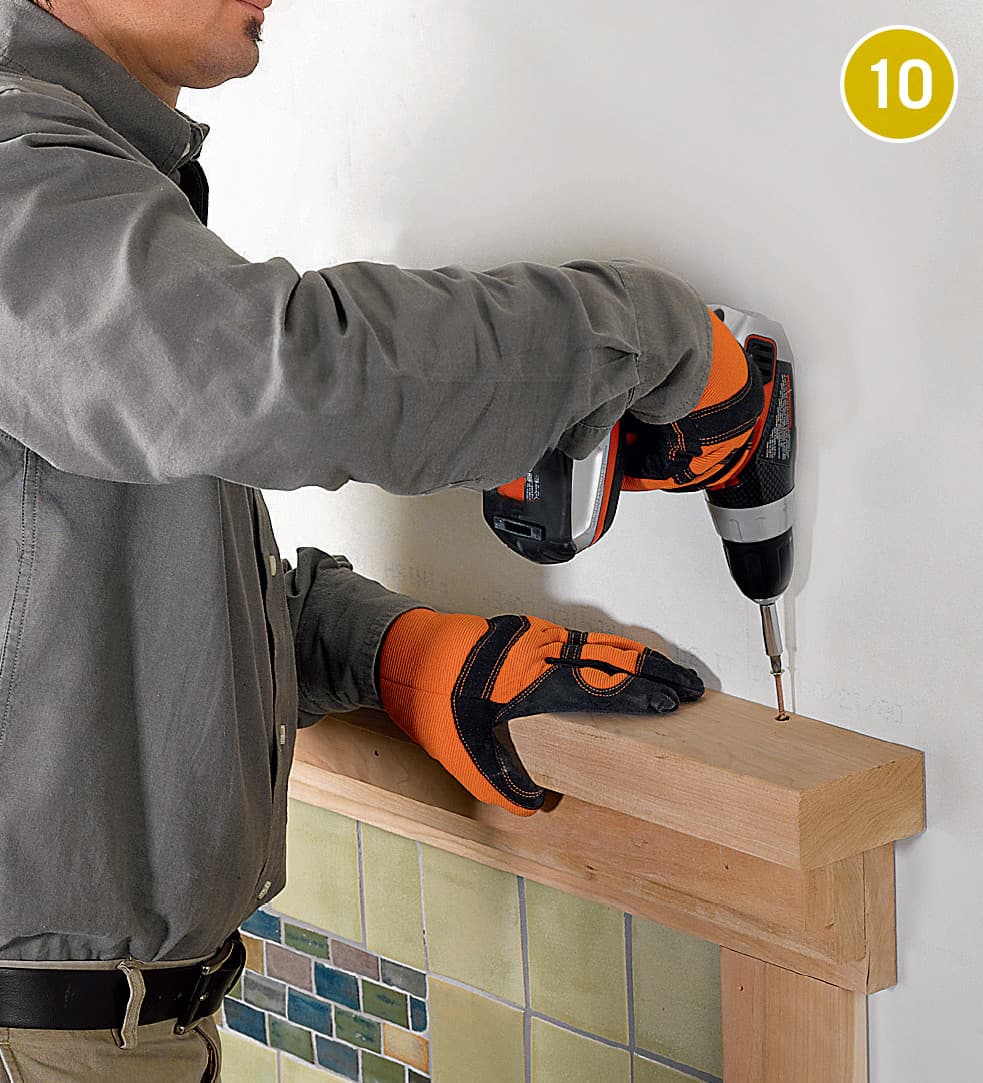
Cut and install the mantel board. We used another piece of 1 × 4 cherry the same length as the head casings, but if you have access to woodworking tools consider a thicker board for a little more presence. Or, face-glue two 1 × 4s together.

Finish-sand all the cherry and then apply a light wood stain. After the stain dries, topcoat with a cherry-tone or light mahogany wipe-on varnish that will even out the uneven coloration typical of cherry wood. Fill nail holes with cherry-tinted wood putty.